| Author |
Message |
 |
|
|
|
|
Advert
|
Forum adverts like this one are shown to any user who is not logged in. Join us by filling out a tiny 3 field form and you will get your own, free, dakka user account which gives a good range of benefits to you:
- No adverts like this in the forums anymore.
- Times and dates in your local timezone.
- Full tracking of what you have read so you can skip to your first unread post, easily see what has changed since you last logged in, and easily see what is new at a glance.
- Email notifications for threads you want to watch closely.
- Being a part of the oldest wargaming community on the net.
If you are already a member then feel free to login now. |
|
 |
2012/09/07 16:53:25
Subject: Tomb Kings in Space – Thokt Necron Army (Ready for NOVA! Last 3 models & Display) Update 8/28
|
|

Devestating Grey Knight Dreadknight
|
Awesome sauce. As someone already said, the Troncrons looking good 
|
|
|
|
 |
|
2013/02/16 23:05:25
Subject: Tomb Kings in Space – Thokt Necron Army (Ready for NOVA! Last 3 models & Display) Update 8/28
|
|

Wicked Ghast
|
havent seen this thread in a little while gld to see the necrons lcomming on good if your still working on them thought you might be intrested in this
http://www.waylandgames.co.uk/anarchy-models/anarchy-crystals/blue-anarchy-crystals/cat_1629.html
|
|
|
|
|
2013/07/15 11:37:51
Subject: Re:Tomb Kings in Space – Thokt Necron Army (Ready for NOVA! Last 3 models & Display) Update 8/28
|
|

Scuttling Genestealer
|
have you guys seen the red version
|
|
|
|
|
|
2014/06/09 01:59:24
Subject: Re:Tomb Kings in Space – Thokt Necron Army (Ready for NOVA! Last 3 models & Display) Update 8/28
|
|

Fresh-Faced New User
|
I've been following your blogs for the past several years, and wanted to say that your work's been very inspriational.
I have (cumulative) about 6,000 points of Tomb Kings and Necrons that have been dying for glue/paint for several years. I'm finally getting back into 40k/Fantasy, and eager to try out the techniques you've posted. Keep up the great work!
|
|
|
|
|
2015/02/22 23:29:31
Subject: Tomb Kings in Space – Thokt Necron Army Ghost Ark (2-22-15)
|
|
Regular Dakkanaut
|
Buried and long since forgotten, the Thoct Dynasty rises…
Damn, Been a while since I touched this tread…
Hello people, Soul’s back in his painting chair prepping for Adepticon ’15. I’m building/painting new force to participate in the Team Battles. I have some new units I’ve been working on so this thread is going to see some much needed action.
First new unit – The Ghost Ark
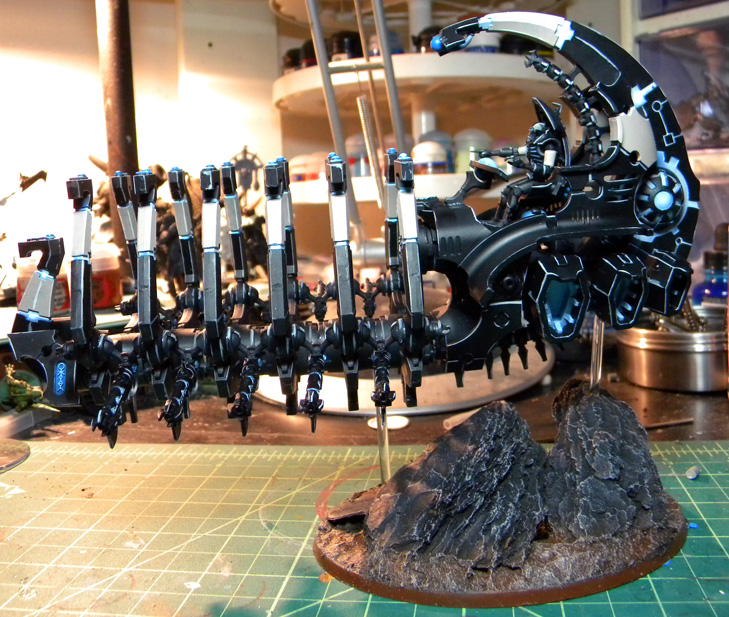
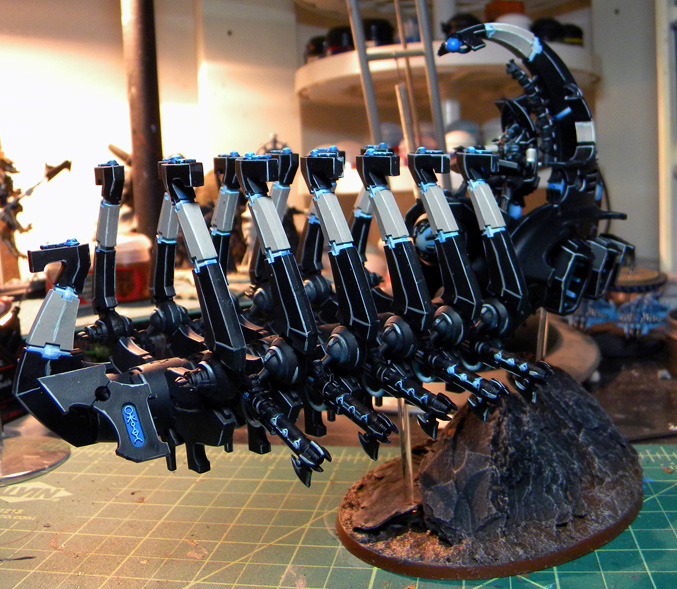

Back in 2012,I built and painted a Doomsday Ark. I’m unsure if you are aware, but hat kit is a NIGHTMARE to assemble. It has a mind-numbing amount of parts and I swore I would never build another, but they are so good now. Like scary good. And the Adepticon list we are building calls for 4.
This thing took hours to build and longer to paint, I’m rusty and I’ve been trying some new things to cut completion time. I opted do not include the ‘crew’for two reasons. Firstly, the 10 mounted warriors are 50+ parts to assemble. 50. Seriosuly. 50+. Second, I didn’t think the paint scheme I designed for my warriors would lend enough visual interest to warrant such suffering in assembly. I was worried I would not like it when it was complete, but I do. I like the ‘openness’ of it.
I built a cool base for it to float over. I used some pine bark for the rocks, but I suck at base design. I’ve never been happy in any base scheme I’ve created save for snow bases. A base redesign may be in order. I’ll try a few things and post my results to get your opinions.
Shawn G. (Soul)
|
|
|
|
|
|
2015/02/23 00:15:34
Subject: Tomb Kings in Space – Thokt Necron Army Ghost Ark (2-22-15)
|
|
Fixture of Dakka
|
Thats looking really nice, I think it looks fine open without the crew.
Good to have you back.
|
|
|
|
|
|
2015/02/23 05:09:47
Subject: Tomb Kings in Space – Thokt Necron Army Ghost Ark (2-22-15)
|
|
Liche Priest Hierophant
|
I feel like if you ever feel up to revisiting it, you could maybe look at some sort of bas-relief detailing, with panels set up between some of the ribs, with rest-pose warriors embedded in them. Think Han Solo in carbonite.
|
GENERATION 8: The first time you see this, copy and paste it into your sig and add 1 to the number after generation. Consider it a social experiment.
If yer an Ork, why dont ya WAAAGH!!
M.A.V.- if you liked ChromeHounds, drop by the site and give it a go. Or check out my M.A.V. Oneshots videos on YouTube! |
|
|
|
|
2015/02/23 05:28:47
Subject: Tomb Kings in Space – Thokt Necron Army Ghost Ark (2-22-15)
|
|
Ragin' Ork Dreadnought
Deep in the Outer Boroughs of NYC
|
I really like the two-toned color scheme of your Necrons. Looking great, keep it up!
|
|
|
|
|
|
2015/02/23 16:34:22
Subject: Re:Tomb Kings in Space – Thokt Necron Army Ghost Ark (2-22-15)
|
|
Regular Dakkanaut
|
GiraffeX - Thanks. Feels nice to be painting again.
Anvildude - What you suggest sounds cool, but I'm terrible at sculpting. That's a little beyond my talents.
Warboss - Thanks.
I'm in the process of modding this scheme some. I've gotten better with my airbrush and its cut my painting steps down by quite a bit. I'm going to try my new techniques in large scale and finally paint the monolith I've had primed for years.
Soul
|
|
This message was edited 1 time. Last update was at 2015/02/23 16:34:59
|
|
|
|
|
2015/02/23 21:41:29
Subject: Tomb Kings in Space – Thokt Necron Army Ghost Ark (2-22-15)
|
|
Liche Priest Hierophant
|
Who said you have to sculpt? Granted, it might take a bit of greenstuff, but you can buy it cheaper than GW gives it out, under the brand name Kneaditite- get a blob of it, roll it into a slab, press the upper torso of one of the passengers into it and let it dry. Tada!
|
GENERATION 8: The first time you see this, copy and paste it into your sig and add 1 to the number after generation. Consider it a social experiment.
If yer an Ork, why dont ya WAAAGH!!
M.A.V.- if you liked ChromeHounds, drop by the site and give it a go. Or check out my M.A.V. Oneshots videos on YouTube! |
|
|
|
|
2015/02/24 12:57:53
Subject: Tomb Kings in Space – Thokt Necron Army Ghost Ark (2-22-15)
|
|
Regular Dakkanaut
|
Ah, I understand you know. I don't think that would work for me.
I would love if the kit had some sort of layout where you could display a mounted battle ready crew. Kind of like how the dark Eldar hang of their raiders. As it stands I'll just likely leave it open.
Soul
|
|
|
|
|
|
2015/02/25 18:19:57
Subject: Re:Tomb Kings in Space – Thokt Necron Army Ghost Ark (2-22-15)
|
|
Regular Dakkanaut
|
I've bee kicking around the idea of changing my armies bases for a while now. since I'm so bad with base work, I've decid to go with what I know. Snow.
Here's a mockup using pine bark rocks and baking soda snow:
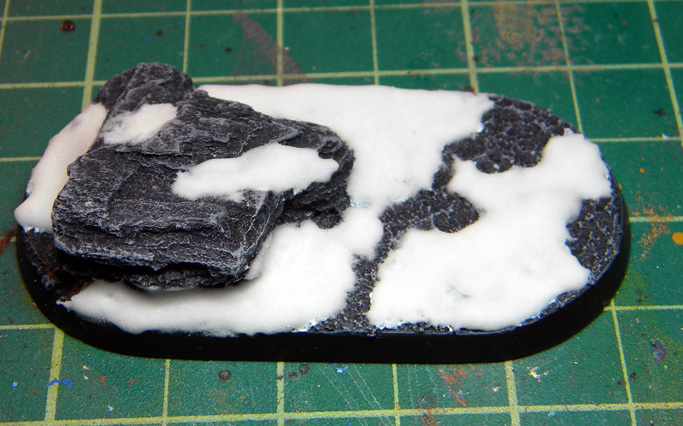
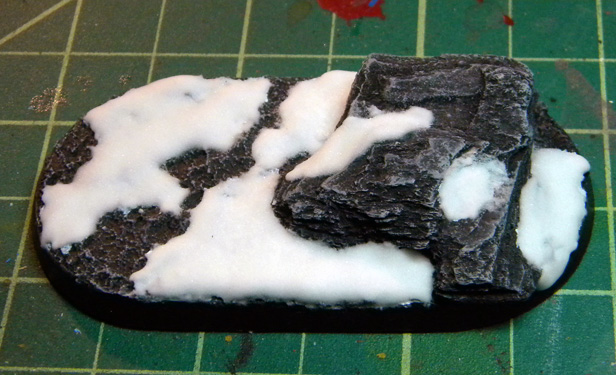
Here’s it next to one of my new destoyers. I’ll have the unit finished this week and I’ll post and go over the revision of my paint scheme.

Shawn G.
|
|
|
|
|
|
2015/04/27 17:44:50
Subject: Tomb Kings in Space – Thokt Necron Army Ghost Ark (2-22-15)
|
|
Tail-spinning Tomb Blade Pilot
|
Glad to see the Dynasty rise again!
|
DZC - Scourge
  |
|
|
|
|
2015/05/11 23:54:41
Subject: Re:Tomb Kings in Space – Thokt Necron Army Ghost Ark (2-22-15)
|
|

Fresh-Faced New User
|
Just wanted to say that its great to see this thread in action again. Looking forward to your new work.
|
|
|
|
|
2015/05/14 13:40:14
Subject: Tomb Kings in Space - Necron Dice Box (5-14-15)
|
|
Regular Dakkanaut
|
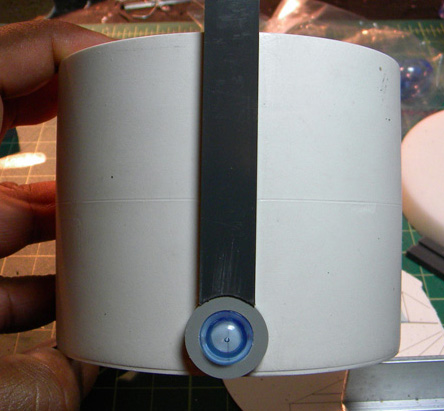
So anyone familiar with me is aware of my love for a good dice box. I’m always on the look out for one for my armies. I have two for my tomb kings; one I’ve shared and the other I’ve been sitting on for a few years. And I’ve one that is actually Imperial designed that I recast and painted to go with my Necron army. The second box while awesome, never settled well with me. The colors may match, but the theme is all wrong! And my neurosis would not grant me satisfaction until I found a suitable replacement. I searched and searched but never found one that was acceptable and years ago, 2012, I said to myself you’re going to have to build one. I never got around to it, and then I fell into my funk and everything went to the wayside. Till now.
Last month I started conceptualizing this dice box project. I sketched some ideas out on paper (badly) and ran it past some friends. After some re-working I started gathering parts.
First off it needed to be round. I went digging around the plumbing isle in Lowes and found a 3” repair coupling that fit the role perfectly. After a bit of sanding the piece was perfectly smooth. I did have to grind some ugly parts off and it will need some additional filling/sanding closer to the end but so far so good. I started hunting for the parts add onto the frame. Off to Plastruct!
After perusing Plastruct’s catalog for several days, I built myself a nice list of parts and made my order. Also need a lid and that took several days to find. I found this company, MSC Industrial Supply, which sold plastic disks perfect for my project. I piced up two 4” plastic disks. After they arrived, only took a day, I measured the coupling and it was just shy of 4 inches. Damn my luck. I’ll just have to fix that flaw in production.
It took another few days for the Plastruct order to arrive and by then the lid disk was nicely sanded and line divided into three parts. I also divided the coupling into three parts to make adding the plastic elements easier.
Time to begin production!
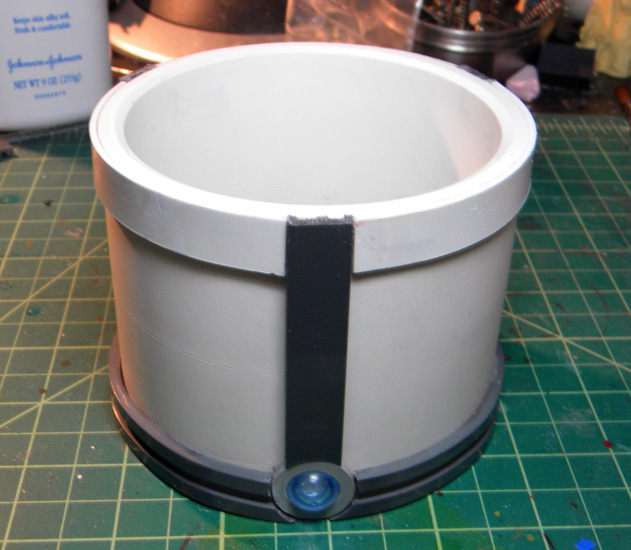
I knew a round design was going to be a pain, I had no idea. Bending that plastic was a chore that took hours. First I boiled some water and dumped the pre-cut pieces into to soften them up for bending. Little did I know that 100 degrees was not hot enough to work this plastic. I need to go HOTTER!
The oven was right out there was not way I’d be able to keep the parts from melting if it got to warm so I decided to give my wife’s hair dryer a run. The air that rushes out of the business end is really hot on the highest setting and I bet it would warm the plastic up perfectly if I was patient and careful. It took a little trial and error, but I managed to get 6 pieces bent around the coupling frame with some strong clamps. With that done, it was time to start to glue.
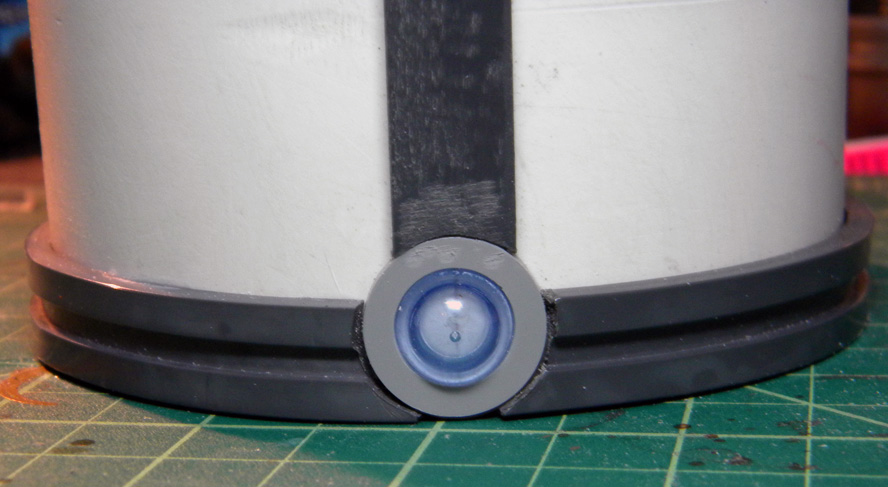
I got the first elements on with no problem. The hard part was getting the bent parts around the bottom of the box. I used my dremel and a round sanding bit to get the parts to fit around what I call the glowing elements. It was pretty damn difficult to get it right and I used of four of the six parts I made getting it right. I glued them down and clamped it tight for a few hours. I had to finish it one section at a time so this phase took a day or so. ~ I was so busy working on this part that I forgot to take pictures. This is a close-up the finished work. ~
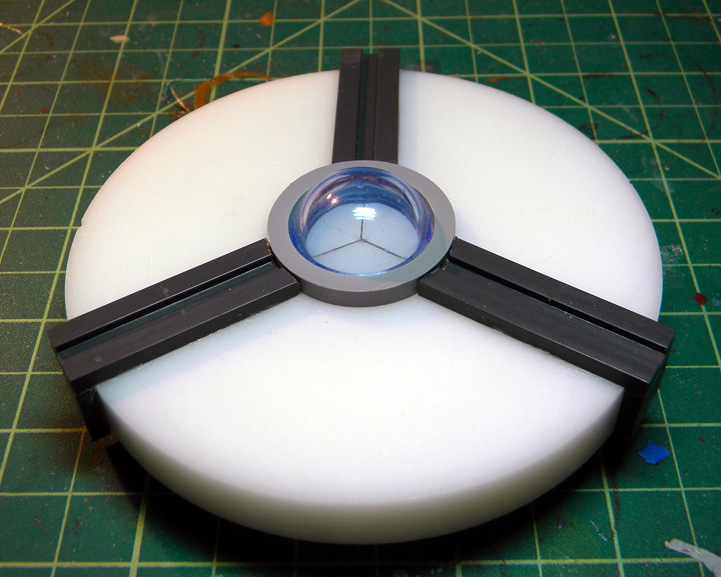
The lid was easy. The pre-measured lines made adding the parts a breeze though I did have some trouble getting the vertical bits to line up correctly. I had to tear a part off and re-glue it because it was crooked. You can actually see it in the pic above.
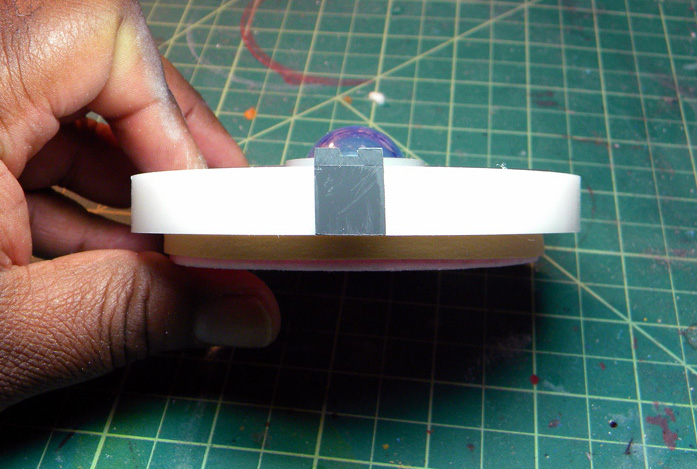
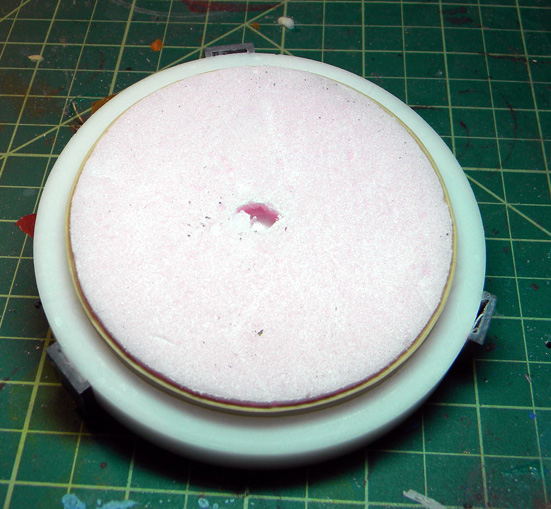
Getting the inside of the lid has been a real trial. I could not for the life of me find a part to fit in there correctly. I settled with using some foam and some rubber bands to fill the gap. I’ll be casting this whole thing when I’m done so those parts will blend seamlessly.
I added some ½ inch plastic strips to the top of the box. These were not too hard but I did discover that my measurements for trisecting the box were off by about ¼ of an inch. Never did this before so I think that and acceptable degree of error.
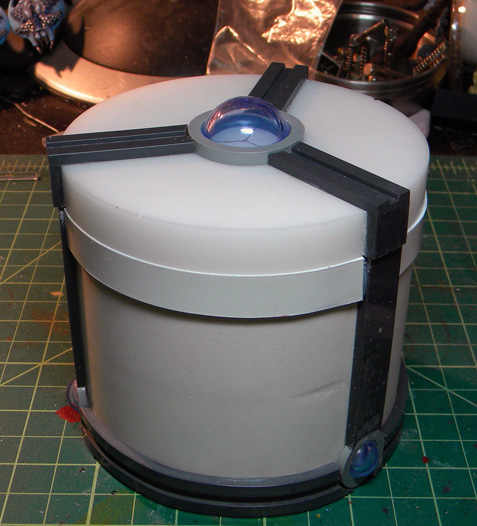
Here’s the whole thing so far. Not too bad. I’m no sure on the lid as it looks like a replication of the top of the box. I don’t know what I’ll do about that at the moment. I’ll just continue with production and fix that design bug later.
Please let me know what you think so far. Feedback is very helpful!
Shawn G. (SoI)
~ Posted this from my phone! \o/ ~
|
|
|
|
|
|
2015/05/15 00:26:40
Subject: Tomb Kings in Space – Necron Dice Box (5-14-15)
|
|
Liche Priest Hierophant
|
Very cool. Super, super happy that you fixed the crooked strut, though I'd suggest for future 'round' projects that you don't attempt perfect division without quadruple-checking your protractors or utilizing a compass and straightedge to lay out your lines- better to have one section be deliberately smaller, or all three be deliberately different sizes. It can also add to the 'artistic' merit of the piece if you do it right. Adds more visual interest. Perfect symmetry is only really interesting when you get into fine detail stuff like fractals.
On the seal- I'd actually suggest casting it without the rubber band- leaving a little groove where you can put a rubber band after- that way you can actually have a seal on it- and it's not like gummybands are that hard to come across.
|
GENERATION 8: The first time you see this, copy and paste it into your sig and add 1 to the number after generation. Consider it a social experiment.
If yer an Ork, why dont ya WAAAGH!!
M.A.V.- if you liked ChromeHounds, drop by the site and give it a go. Or check out my M.A.V. Oneshots videos on YouTube! |
|
|
|
|
2015/05/15 14:08:22
Subject: Re:Tomb Kings in Space – Necron Dice Box (5-14-15)
|
|
Regular Dakkanaut
|
Thanks so much for the feedback! I've never done anything like this before. I opted to go with a round shape just because I thought it would be cool. The reality was enlightening... 
I'm in the process of pinning down the interior detail. I'm unsure if I want to etch blocks like the monolith and add that strange coffin shape for dynasty detail, or this complex tech line pattern I have in my crappy sketch designs. I'll practice both on some spare plasticard to see how it turns out.
As for the seal, I intend on filling in that entire zone with apoxy sculpt prior to casting. Getting a perfect seal is improbable as the inside shape of this coupling is not perfectly round. What's your opinion on the top? I'm not quite sure about it while it's on the box. I think the two parts look better separate then together. It's kind of bothering me.
Shawn G. (SoI)
|
|
|
|
|
|
2015/05/15 23:28:43
Subject: Tomb Kings in Space – Necron Dice Box (5-14-15)
|
|
Liche Priest Hierophant
|
The 'oddness' you're seeing is probably because of a sort of 'uncanny valley' effect. The pillars are the same width as their continuations on the top, but the bits on the lid aren't the same depth- it's causing visual and tactile conflict. You'll want to either 'smallify' the parts on the side of the lid so that they're completely flush with the pillars on the sides of the main jar, or 'embiggen' the pillars on the jar to match up with the parts on the top. You don't have to make the whole things bigger (the side 'columns', I'll call them, while I'll call the ones on the top part 'caps') to make it work- you can make an angle, or a subtle or not-so-subtle curve as well, and it should look good. Just as long as it matches perfectly.
Or, you could go the other route and make them match each other by making an obvious socket for one or the other. This would have the added bonus of making it easier to line them up to each other. Your best bet there would be to just make the Caps a bit bigger and maybe give them a tiny lip to hug the outside of the tops of the columns.
It's a similar problem for the join between the white areas of the top and the container. Right now, there's just enough of a lip/gap that they don't flow as a single piece, but not enough of one that they're clearly meant to be viewed as separate. You need to either work on cleaning the join up significantly (I'm leaning towards this fix) or make the top clearly larger- maybe with a bit of decorative trim.
Easiest fix would be to sand the container walls until they match up (the whole thing, unless you want a visual curve/angle, which could be interesting potentially) and then put a deliberate bevel on the outer lips of both the lid and the container. There would be a line, but there's always going to be a line (you're not a precision machinist working with steel, after all), so it's best to make it non-obtrusive by making it obvious. A sort of "Yeah, I'm a gap, you wanna make something of it?" mentality.
|
GENERATION 8: The first time you see this, copy and paste it into your sig and add 1 to the number after generation. Consider it a social experiment.
If yer an Ork, why dont ya WAAAGH!!
M.A.V.- if you liked ChromeHounds, drop by the site and give it a go. Or check out my M.A.V. Oneshots videos on YouTube! |
|
|
|
|
2015/05/19 16:44:03
Subject: Tomb Kings in Space – Necron Dice Box (5-14-15)
|
|
Regular Dakkanaut
|
Thanks so much for he feedback!
I have additional body work that should change this oddness that's bothering me.
Life has been a tad busy. Hope to get some more work in this weekend.
|
|
|
|
|
|
|
|


