| Author |
Message |
 |
|
|
|
|
Advert
|
Forum adverts like this one are shown to any user who is not logged in. Join us by filling out a tiny 3 field form and you will get your own, free, dakka user account which gives a good range of benefits to you:
- No adverts like this in the forums anymore.
- Times and dates in your local timezone.
- Full tracking of what you have read so you can skip to your first unread post, easily see what has changed since you last logged in, and easily see what is new at a glance.
- Email notifications for threads you want to watch closely.
- Being a part of the oldest wargaming community on the net.
If you are already a member then feel free to login now. |
|
 |
2019/01/29 03:04:42
Subject: [Kill Team] Necron Kill Team Tactica
|
|

Freaky Flayed One
Sydney, Australia
|
There's no means of re-rolling break tests in Kill Team.
Oh, wow - wish I had known that before! That could have changed things a little 
How?
I can't remember 100%, but I think it was the rail rifle and the missile turret. They both took away a lot of Armour, and then the multiple damage helped get through their FNP. The fusion gun might have landed a hit, too (only one shot, and being very inaccurate, means it rarely hits!)
As to the CP: the "insane Bravery" tactic (page 65 of the core rulebook). So even with flesh wounds on marines (instead of them dying), he still ensured that they didn't have to risk a nerve check. Only the Pox Walkers did.
But yeah, it was definitely my intention to get as many of those walkers down to force morale checks - it just didn't go as well as planned. (partially because of the reroll shenanigans!)
|
|
This message was edited 1 time. Last update was at 2019/01/29 03:05:03
|
|
|
 |
|
2019/02/06 21:47:50
Subject: Re:[Kill Team] Necron Kill Team Tactica
|
|

Loyal Necron Lychguard
|
About to get in my first game of Arena tonight, bringing Necrons since that's all I have atm until I build my Blackstone Fortress 
I have a feeling Arena will be good for us. The corridors being much tighter than the average KT board is a nice boost to Flayed Ones and Gauss RF, which were already our bigger selling points.
Deathmarks feel like they'll still be good in the setting - while you might not get the most out of the 24" ignore distance modifier, they're still Rapid Fire and defensive, allowing them to either camp a hallway or move up it.
I think my opponent is playing Tyranids, so we'll see how it goes! For reference, here's my roster:
With the general TAC setup being Leader Immortal, Sniper Deathmark, Comms Deathmark, Combat Flayed One, 2x Gauss Immortal, Flayed One. The nice thing about Necron Rosters is that since we're low on options and model count, you can really bring lots of options for Specialist mixups depending on mission. I think my Roster allows for basically any mix or match I may come across in a given setting.
|
|
This message was edited 1 time. Last update was at 2019/02/06 22:00:47
|
|
|
|
|
2019/02/07 06:16:10
Subject: [Kill Team] Necron Kill Team Tactica
|
|
Fixture of Dakka
|
Deathmarks are incredibly bad.
There's nothing they are good at which Immortals aren't better.
|
"'players must agree how they are going to select their armies, and if any restrictions apply to the number and type of models they can use."
This is an actual rule in the actual rulebook. Quit whining about how you can imagine someone's army touching you in a bad place and play by the actual rules.
Freelance Ontologist
When people ask, "What's the point in understanding everything?" they've just disqualified themselves from using questions and should disappear in a puff of paradox. But they don't understand and just continue existing, which are also their only two strategies for life. |
|
|
|
|
2019/02/10 22:58:37
Subject: Re:[Kill Team] Necron Kill Team Tactica
|
|
Freaky Flayed One
Sydney, Australia
|
Had another two games last night, and happily (for me), they went a bit better than the last match.
The first one was defending against the Tau in "Disrupt Supply Lines".
The Tau brought two stealth suits (heavy and comms, with comms also being the shas'ui), pathfinder sniper with railrifle, fire warrior shas'la, and five drones.
His big mistake was not pushing forward enough - he sent in his stealth suits, with a gun drone and three shield drones, and tried to capture the first point. I charged in with my flayed ones, loosing the combat specialist to overwatch (my first action of the game was to let my guy die). But that zealot took down a suit - thanks to the tau player being overly confident in his 3+ save, and the rolling very poorly.
Most of my shooting targeted the drones directly, as the rest of his team was sitting way back. By round 2, he was retreating his heavy, and continued as I tried to chase him down later. By the time the game was ending, and he realised he now couldn't make it to the points, it was too late. He tried to take me down as best he could, but my immortals were made too sturdily, and the game was won 6-0 !
The second game was again defending, this time against a wall of green in "Feint".
The ork forces were a boss with a skorcha, a combat specialist, a rokkit (not sure of specialisation), and a heavy big shoota. Then, he had five boys with sluggas and choppas, and five with shootas. This was an experimental list - a new orks player still testing out his codex.
Well, the way the game is set up, I pretty much gave up on the back three objectives, residing myself to at least knowing he was going to have to leave someone back there to snag them, and spend three CP to take them out. I was going to protect mine, and hope that was enough.
Orks started their "charge" first (ie, they all advanced), meaning that both flayed ones were able to counter-charge into the oncoming horde, tying up a few orks, and leaving a number of other targets for the tesla weaponry. Their t-shirt saves did not help, and by the time any orks reached the necron gun-line, they were whittled down somewhat, and those that remained bleeding, too. The boss couldn't get past the strong immortal armour, and despite the lowly attack rate, tesla weapons served as good blunt instruments for smashing into orks!
As the rear objectives were picked off, the ork numbers whittled, until at the end of round 3, they were broken and set to do very little. A CP was spent to ensure the rear-guard remained alert to grab the third objective, but the rest of the team - that which remained - cowered in fear.
Mop up operations were had, to ensure no more locations were lost, and the game ended in another necron victory: 6-3.
Despite the two wins, I think both games could have easily gone the other way - a slight change in tactics (not to mention rolls being shifted a little) could have lead to a necron loss. And, I think the orks could have dropped some of the 'bigger' weapons for more guys - maybe. I'm not familiar enough with the orks to be sure!
|
|
|
|
|
2019/02/13 17:07:18
Subject: [Kill Team] Necron Kill Team Tactica
|
|

Numberless Necron Warrior
Scotland, UK
|
First game with my Necrons in ages and we played some Battle Brothers. And... wow, those Tactics from the team box are good! Superior Inheritance is just superb, I think I used it every round, and those Immortals were downing Genestealers all over the show. Tireless Advance also good!
|
|
|
|
|
2019/02/13 18:46:36
Subject: [Kill Team] Necron Kill Team Tactica
|
|
Pyro Pilot of a Triach Stalker
Somewhere over the rainbow, way up high
|
Huh....maybe I need to look into the new stratagems or something.
|
Bedouin Dynasty:  10000 pts 10000 pts
The Silver Lances:  4000 pts 4000 pts
The Custodes Winter Watch 4000 pts
MajorStoffer wrote:
...
Sternguard though, those guys are all about kicking ass. They'd chew bubble gum as well, but bubble gum is heretical. Only tau chew gum. |
|
|
|
|
2019/02/14 09:43:24
Subject: [Kill Team] Necron Kill Team Tactica
|
|
Numberless Necron Warrior
Scotland, UK
|
Superior Inheritance is 1CP to let you shoot an additional time with a Gauss weapon, it's like having an additional Immortal on the table. It keeps any other strats/abilities you've used to boost them too, naturally...
|
|
|
|
|
2019/02/14 18:31:49
Subject: [Kill Team] Necron Kill Team Tactica
|
|
Pyro Pilot of a Triach Stalker
Somewhere over the rainbow, way up high
|
I could see that being excellent for sure. Comms specialist on 2s to hit. Nasty.
|
Bedouin Dynasty: 10000 pts
The Silver Lances: 4000 pts
The Custodes Winter Watch 4000 pts
MajorStoffer wrote:
...
Sternguard though, those guys are all about kicking ass. They'd chew bubble gum as well, but bubble gum is heretical. Only tau chew gum. |
|
|
|
|
2019/02/14 21:35:42
Subject: [Kill Team] Necron Kill Team Tactica
|
|
Fresh-Faced New User
|
 unitled wrote: unitled wrote:Superior Inheritance is 1CP to let you shoot an additional time with a Gauss weapon, it's like having an additional Immortal on the table.
it's more like a command point reroll. I'd rather save points for mindshackle scarabs, resurrection protocol, or prime reanimation.
I was able to beat Death Watch & Grey Knights in Assassinate & Ambush respectively last weekend. First match I ran "the good list" with 5 immortal / 2 flayed ones & managed to keep my leader alive for 5 turns. my opponent got his frag cannon to a window with a view of my leader & thought he was about to make me eat 2D6 auto hits, but I was able to successfully charge his model with my gauss blaster bayonet through the terrain, locking him in combat to prevent the shot. my flayed ones did their job keeping his other units locked in combat, only 1 reanimation in 5 turns was a bit disappointing.
I played 4 flayed ones / 5 warriors as the defender in ambush, I would have preferred 10 flayed ones or even 5 with 4 warriors but I don't have the models. My opponent's multi wound weapons combined with a particularly high rolling set of dice set off reanimation protocol 6 times!
|
|
|
|
|
2019/02/14 22:14:14
Subject: [Kill Team] Necron Kill Team Tactica
|
|
Numberless Necron Warrior
Scotland, UK
|
nerf frag cannon wrote: unitled wrote:Superior Inheritance is 1CP to let you shoot an additional time with a Gauss weapon, it's like having an additional Immortal on the table.
it's more like a command point reroll. I'd rather save points for mindshackle scarabs, resurrection protocol, or prime reanimation.
Well... Not really, reroll can turn 1 miss into a hit, SI can turn 2 hits into 4 hits? Mindshackle is situational good but OCCASIONALLY is worth the two, in the meantime more guaranteed shots for fewer points is good to me.
|
|
|
|
|
2019/02/14 23:43:16
Subject: [Kill Team] Necron Kill Team Tactica
|
|
Freaky Flayed One
Sydney, Australia
|
nerf frag cannon wrote: unitled wrote:Superior Inheritance is 1CP to let you shoot an additional time with a Gauss weapon, it's like having an additional Immortal on the table.
it's more like a command point reroll. I'd rather save points for mindshackle scarabs, resurrection protocol, or prime reanimation.
Oh, it's much better than a command point reroll. Firstly, a reroll already assumes you missed, so at best a reroll is one kill. With SI, you can potentially (even if not likely) get four kills. But even if you don't have the target or luck, SI allows two more shots (because you're shooting at short range), whereas a reroll is only on one shot. It's great for getting lots of flesh wounds out, also!
Mindshackle scarabs has worked out something like once in four of five times. It's just not reliable enough, and costs a large chunk of CP. I keep wanting to use it, failing even a low roll, then realising I could have had two more tactics for that same cost.
Resurrection protocol is kind of similar - holding on to it on the off-chance that your leader goes down, and then it only goes off half the time. A poor take on the Space Marine's "Death Denied" (any model, guaranteed working, still only 2CP).
Prime Reanimation is great, but I have to put the points aside for it - and have them roll a 4 or 5 (or, more likely, a 5, as I'll be behind cover). So it doesn't come up, making the points more useful to be used earlier. Automatically Appended Next Post: Additionally - I was mistakenly playing "Superior Inheritance " as costing 2CP for a few games, and I still thought it was worthwhile. Clearly, it's much better now that I play it correctly 
|
|
This message was edited 1 time. Last update was at 2019/02/15 01:06:04
|
|
|
|
|
2019/02/17 06:59:37
Subject: [Kill Team] Necron Kill Team Tactica
|
|
Fresh-Faced New User
|
no really, it's a glorified command point reroll. being that it doesn't work with tesla carbine, you are re-rolling a single to hit die unless your warrior / immortal is in rapid fire range. you can bet your target is obscured, so it would make sense to only use on a unit with comms buff... that makes it pretty situational, at best.
|
|
|
|
|
2019/02/17 21:57:31
Subject: [Kill Team] Necron Kill Team Tactica
|
|
Freaky Flayed One
Sydney, Australia
|
nerf frag cannon wrote:
no really, it's a glorified command point reroll. being that it doesn't work with tesla carbine, you are re-rolling a single to hit die unless your warrior / immortal is in rapid fire range. you can bet your target is obscured, so it would make sense to only use on a unit with comms buff... that makes it pretty situational, at best.
Well, yeah - that's what we were saying. Choose your model / target carefully. Rapid fire range, with comms, and the extra two shots >> reroll of one shot. (plus, if you wanted, you could do both of them with your two rolls). Having *two* extra shots (with bonuses) is typically much better than rerolling *one* of those shots 
|
|
|
|
|
2019/02/18 17:37:56
Subject: Re:[Kill Team] Necron Kill Team Tactica
|
|

Fresh-Faced New User
|
Hello
We recently picked up this game with my friends and Im about to have my first match, I chose necrons and bought the necron box with 5 models and additional necron tactics.
However I have few questions about the tactics if anyone here happens to know the answers:
1) Prime reanimation protocols: if I use this tactic do I get to see the original injury roll beforehand or not?
2) Targeting routines: cover makes opponents harder to hit by 1 and this gives 1 bonus against covered opponents so effectively modifier is 0?
3) Superior inheritance: this tactic lets me shoot again. If the model is within short range do I get to make one or two shooting attacks(they have rapid fire 1)?
4) Tireless advance: the card description says I can ready one model, even if it moved in previous movement phase. Does it matter what kind of movement was done(normal movement, falling back or advancing)?
5) Mindshackle scarabs: if I use this to shoot with a model does that mean my opponent cant use this model to shoot on his turn?
thanks in advance
FinHatch
|
|
This message was edited 1 time. Last update was at 2019/02/18 17:38:47
|
|
|
|
|
2019/02/18 19:24:54
Subject: [Kill Team] Necron Kill Team Tactica
|
|
Lord of the Fleet
|
nerf frag cannon wrote:
no really, it's a glorified command point reroll. being that it doesn't work with tesla carbine, you are re-rolling a single to hit die unless your warrior / immortal is in rapid fire range. you can bet your target is obscured, so it would make sense to only use on a unit with comms buff... that makes it pretty situational, at best.
More shots is absolutely not the same as a reroll.
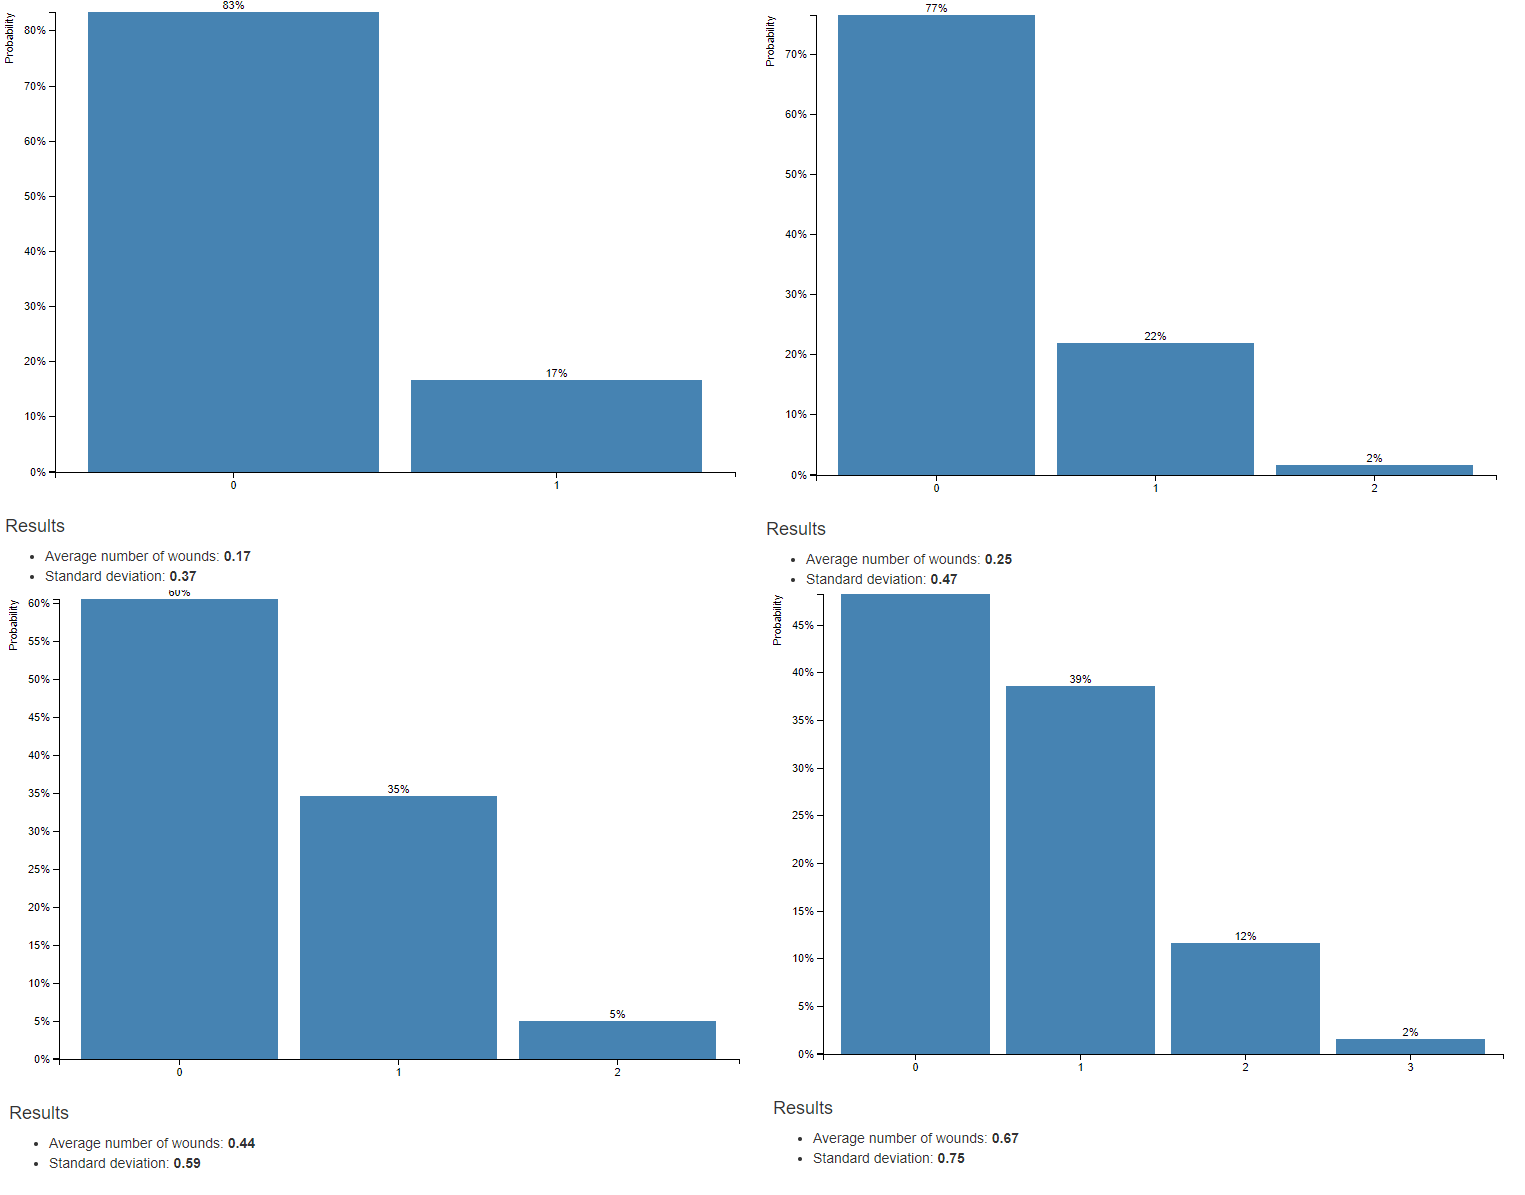
Above you have a warrior shooting at a marine with re-rolling misses on the left and double shots on the right. Top row is long range, bottom row is short range. I've even allowed re-rolls on both shots at close range to help you but you can see that re-rolls are still inferior to double shots which gives 50% more wounds on an average result in addition to the possibility of more wounds that is capable using rerolls.
|
|
This message was edited 1 time. Last update was at 2019/02/18 19:26:01
|
|
|
|
|
2019/02/18 21:38:16
Subject: Re:[Kill Team] Necron Kill Team Tactica
|
|
Freaky Flayed One
Sydney, Australia
|
FinHatch wrote:Hello
We recently picked up this game with my friends and Im about to have my first match, I chose necrons and bought the necron box with 5 models and additional necron tactics.
Welcome! First things first - you'll want to find a few more miniatures (even proxy them at first) so you can fill out a 100 point team (two "flayed one" stand-ins should do for starters).
However I have few questions about the tactics if anyone here happens to know the answers:
1) Prime reanimation protocols: if I use this tactic do I get to see the original injury roll beforehand or not?
The "when" leaves it as a little ambiguous, but as it doesn't say "before", and it is two points (so why would you be forced to spend two points to do absolutely nothing?), the general consensus is that yes, you see the results and then spend the points.
2) Targeting routines: cover makes opponents harder to hit by 1 and this gives 1 bonus against covered opponents so effectively modifier is 0?
That is correct - but any other effects that count for cover still apply (so they are still obscured, and still count as such for injury rolls etc, but the penalty is nullified...or, if they get an additional -1, then it goes down from -2 to -1).
3) Superior inheritance: this tactic lets me shoot again. If the model is within short range do I get to make one or two shooting attacks(they have rapid fire 1)?
You shoot with the again as normal - so if within short range, shoot twice. If you used Comms on them, they get the +1 bonus again. If you used Targeting routines on them, they get the +1 vs obscured targets again. This is a great power
4) Tireless advance: the card description says I can ready one model, even if it moved in previous movement phase. Does it matter what kind of movement was done(normal movement, falling back or advancing)?
I hadn't considered this for the "fall back" case, but yes, that's how it reads! I had thought of it for the "advance" and then fire case, but clearly, "as if they had not moved" means you ignore the fact that they fell back! I'll have to use this one some more
5) Mindshackle scarabs: if I use this to shoot with a model does that mean my opponent cant use this model to shoot on his turn?
"No model may be chosen to shoot more than once in a Shooting phase" (page 28, first paragraph). So once it shoots at the start of the phase, it cannot shoot again. (It's another 2CP tactic that only goes off 50% or less of the time).
Hope this all helped!
|
|
|
|
|
2019/02/18 22:36:23
Subject: Re:[Kill Team] Necron Kill Team Tactica
|
|
Fresh-Faced New User
|
hvg3akaek wrote:FinHatch wrote:Hello
We recently picked up this game with my friends and Im about to have my first match, I chose necrons and bought the necron box with 5 models and additional necron tactics.
Welcome! First things first - you'll want to find a few more miniatures (even proxy them at first) so you can fill out a 100 point team (two "flayed one" stand-ins should do for starters).
However I have few questions about the tactics if anyone here happens to know the answers:
1) Prime reanimation protocols: if I use this tactic do I get to see the original injury roll beforehand or not?
The "when" leaves it as a little ambiguous, but as it doesn't say "before", and it is two points (so why would you be forced to spend two points to do absolutely nothing?), the general consensus is that yes, you see the results and then spend the points.
2) Targeting routines: cover makes opponents harder to hit by 1 and this gives 1 bonus against covered opponents so effectively modifier is 0?
That is correct - but any other effects that count for cover still apply (so they are still obscured, and still count as such for injury rolls etc, but the penalty is nullified...or, if they get an additional -1, then it goes down from -2 to -1).
3) Superior inheritance: this tactic lets me shoot again. If the model is within short range do I get to make one or two shooting attacks(they have rapid fire 1)?
You shoot with the again as normal - so if within short range, shoot twice. If you used Comms on them, they get the +1 bonus again. If you used Targeting routines on them, they get the +1 vs obscured targets again. This is a great power
4) Tireless advance: the card description says I can ready one model, even if it moved in previous movement phase. Does it matter what kind of movement was done(normal movement, falling back or advancing)?
I hadn't considered this for the "fall back" case, but yes, that's how it reads! I had thought of it for the "advance" and then fire case, but clearly, "as if they had not moved" means you ignore the fact that they fell back! I'll have to use this one some more
5) Mindshackle scarabs: if I use this to shoot with a model does that mean my opponent cant use this model to shoot on his turn?
"No model may be chosen to shoot more than once in a Shooting phase" (page 28, first paragraph). So once it shoots at the start of the phase, it cannot shoot again. (It's another 2CP tactic that only goes off 50% or less of the time).
Hope this all helped!
Yes, all is pretty much cleared for me, ready for the first game!
Oh and I do have two flayed one conversions to back the other robos, the kill team is two flayed ones(combat and zealot), deathmark sniper, immortal with tesla carbine and 3 immortals with gauss blasters, one which is a leader
FinHatch
|
|
|
|
|
2019/02/18 23:33:39
Subject: [Kill Team] Necron Kill Team Tactica
|
|
Freaky Flayed One
Sydney, Australia
|
Sounds good
Depending on the mission / enemy, you might want to change up your immortals and deathmark (I tend to take 5x gauss immortals vs heavy armoured folk, and 5x tesla immortals vs light armoured or harlequins). Deathmark sadly haven't been as effective as I had hoped - Str 4 (vs 5) and no AP means they really only excel at long-distance shooting, and it's usually easy enough to get into short range to make the others far more painful to the enemy.
|
|
|
|
|
2019/03/03 22:19:44
Subject: [Kill Team] Necron Kill Team Tactica
|
|
Freaky Flayed One
Sydney, Australia
|
Managed to get two games in last night - the first against a swarm of orks, and the second (as we were down to two players) against the orks and tau (because we all know how friendly those two armies can be!).
The orks brought many, many boys, two boss nobs with power klaws (one a combat, one a commando vet), and a handful of gretchin (one being their leader). I brought my typical 5-2 (5 immortals with tesla, one a leader, one a comms; and two flayed ones, one a combat and one a zealot).
We played one of the new Arena missions (Claim the Catacombs), which, given that he outnumbered me more than 2:1, I assumed I would lose. That didn't happen.
The kommando moved very quickly to stand behind the door my leader was guarding, and had a couple of boys follow. Some other figures moved to flank and grab one of the outer objectives (there were five in total), another collection raced for the middle point, and the rest wrapped around through the no-door corridor towards another point and my zone.
Somehow, my leader managed to hold the door closed long enough to realise he didn't want to be there, and then ran. A trusting immortal remained on duty, as both Flayed Ones charged the oncoming green tide - with a boost to their strength (zealot charge + combat using necron stratagem), they took out the Boss Nob and two of his henchmen - a good first round! I held two points, he held one, and I triggered all three of my extra objectives. Not a single shot fired.
After a few attempts, the door finally opened, allowing his Kommando to charge and destroy the immortal; other orks charged, but were less effective. At the end of round two, I still held more points, and only lost the one body.
Combat was met around the central point, but the immortals proved to be stronger than the boys facing them. The kommando slipped on spilled lubrication oil (failing two charge rolls), and was let in the open, to be shot down by my remaining immortals, moments before they were charged by other boys. The flayed ones quickly swept up the bounty tokens before rejoining battle, and by the end of the game, the score was a 8-18 necron victory (max 9 on VP, max 9 on three secondary objectives).
Our second game was my same army vs the orks same army, with an overlord commander (melee) added for me, and a tau army (fusion stealthsuit, two rail rifles, an ion rifle, a fire warrior and turret, and some drones). We did the simple "kill the commander" mission. They didn't.
The orks ran across the field, whilst the tau shot the necrons up. First shot of the night, their sniper took down my comms. But that seemed to be the best shot - after that, things didn't hit, or didn't wound, or on the odd occasion that they did, they were saved. The kommando did his best to take down the overlord, hitting and wounding with everything he had, but when needed, the overlord's invulnerable save did its work. Not a single wound against the commander went unsaved over the game!
After killing the kommando, I foolishly didn't charge enough targets with my overlord, and thus left him in the open; there were two mortal wounds applied from the rail rifles, but as the actual damage was ignored, they were easily healed up the following rounds.
As the ork numbers were thinned enough to cause their team to break, the tau did a most interesting and surprising move: the stealthsuit and its accompanying gun drone charged my leader and his immortal buddy! Being out-of-sight meant no overwatch, so they just went straight into melee. The stealthsuit was not effective...but that drone headbutted my leader to machine death! (Fortunately, I had enough CP to allow my Overlord to bring him back...)
The game ended with only one Ork boy still moving, and maybe a third of the tau force removed. I had lost my comms and combat specialists (the latter because I foolishly forgot to use the tactic to attack with him before all the orks gathered around him had their turn). But my commander lived, and thus it was another Necron victory.
But, ouch! That overlord can be mighty strong. Of course, a few failed saves and it would have been a different story, but there's something about half my team surviving or not because of a single roll or two here or there that makes me less confident in the victory...
Also - since we're playing campaign, I levelled up my Immortals, and they gained the wonderfully useful ability to reroll failed nerve tests...so it looks like I'll be "disbanding" them and getting some new ones (read: taking them back to the shop and hitting that hard factory reset button!)
|
|
|
|
|
|
|
|