| Author |
Message |
 |
|
|
|
|
Advert
|
Forum adverts like this one are shown to any user who is not logged in. Join us by filling out a tiny 3 field form and you will get your own, free, dakka user account which gives a good range of benefits to you:
- No adverts like this in the forums anymore.
- Times and dates in your local timezone.
- Full tracking of what you have read so you can skip to your first unread post, easily see what has changed since you last logged in, and easily see what is new at a glance.
- Email notifications for threads you want to watch closely.
- Being a part of the oldest wargaming community on the net.
If you are already a member then feel free to login now. |
|
 |
2012/08/09 21:58:55
Subject: Scratch Built Stuff on the Cheap - Ard Boyz & Meganob
|
|

Gargantuan Gargant
|
I found templates for Mega Armor, but they were labor intensive, and required diffferent sized tubes.
If you have a link for any tutorials I would be interested in checking them out.
|
|
|
|
 |
|
2012/08/09 22:11:18
Subject: Scratch Built Stuff on the Cheap - Ard Boyz & Meganob
|
|

Shroomin Brain Boy
|
well it was rather speculative of me to say so... but... you know the old saying...
money =time and vice versa... if you want to save up on the fist you gotta invest in the latter...
|
|
|
|
|
|
2012/08/09 22:15:49
Subject: Scratch Built Stuff on the Cheap - Ard Boyz & Meganob
|
|
Decrepit Dakkanaut
|
I would just look at pics online of the GW and other Mega Armors you find, from all angles if possible, get out some ork heads, legs, arms,weapons, etc. Then I would start looking at basic shapes and thinking in layers. Start with a chunk of plastic for the torso and start cutting and gluing shape layers, you can paint them however later, but just think and work in basic shapes.
|
"dave you are the definition of old school..." -Viktor Von Domm    My P&M Blog : My P&M Blog :
It's great how just adding a little iconography, and rivets of course, can make something look distinctly 40K-adamsouza
"Ah yes, the sound of riveting.....Swear word after swear word and the clinking of thrown tools" "Nope. It sucks do it again..."- mxwllmdr
"It puts together more terrain, or else it gets the hose again...-dangledorf2.0
"This is the Imperium, there is no peace, there are only rivets" -Vitruvian XVII
"I think rivets are the perfect solution to almost every problem"- Rawson
More buildings for the Building God! -Shasolenzabi
  |
|
|
|
|
2012/08/09 22:18:55
Subject: Scratch Built Stuff on the Cheap - Ard Boyz & Meganob
|
|
Shroomin Brain Boy
|
actually if you think about using only ork heads already together with GK or other stuff the idea of scratchbuilding simple bodies and arms out of PC and styrene rods is rather simple...
maybe you could even use old dices for the main body and build up fromt here...
|
|
|
|
|
|
2012/08/09 23:38:05
Subject: Re:Scratch Built Stuff on the Cheap - Ard Boyz & Meganob
|
|
Posts with Authority
Boston-area [Watertown] Massachusetts
|
When the shark jumps, part 114.
"When it is cheaper to buy RT era, non-recast Ork Meganobz in power armour, than it is to buy new ones."
|
Falling down is the same as being hit by a planet — "I paint to the 20 foot rule, it saves a lot of time." -- Me
ddogwood wrote:People who feel the need to cheat at Warhammer deserve pity, not anger. I mean, how pathetic does your life have to be to make you feel like you need to cheat at your toy army soldiers game?
 |
|
|
|
|
2012/08/10 03:10:07
Subject: Scratch Built Stuff on the Cheap - Ard Boyz & Meganob
|
|
Gargantuan Gargant
|
Kicking myself now as I had a squad of 10 RT Era MegaNobs.
Had a huge Ork army for 2nd edition and sold it all when the 3rd edition plastics came out as I didn't care for mismatch in sculpting styles.
|
|
|
|
|
|
2012/08/11 05:35:31
Subject: Re:Scratch Built Stuff on the Cheap - Ard Boyz & Meganob
|
|
Gargantuan Gargant
|
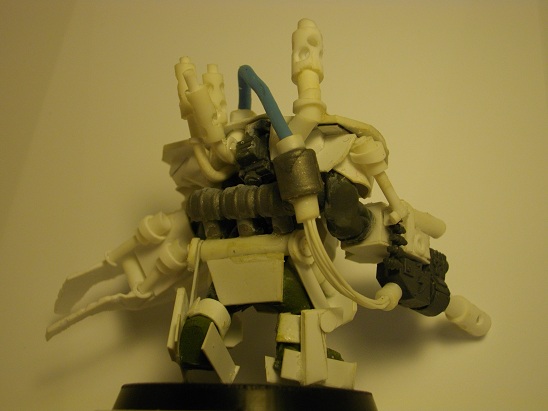
Progress shot on Ard Boyz
Defense Line with additional armor plating added
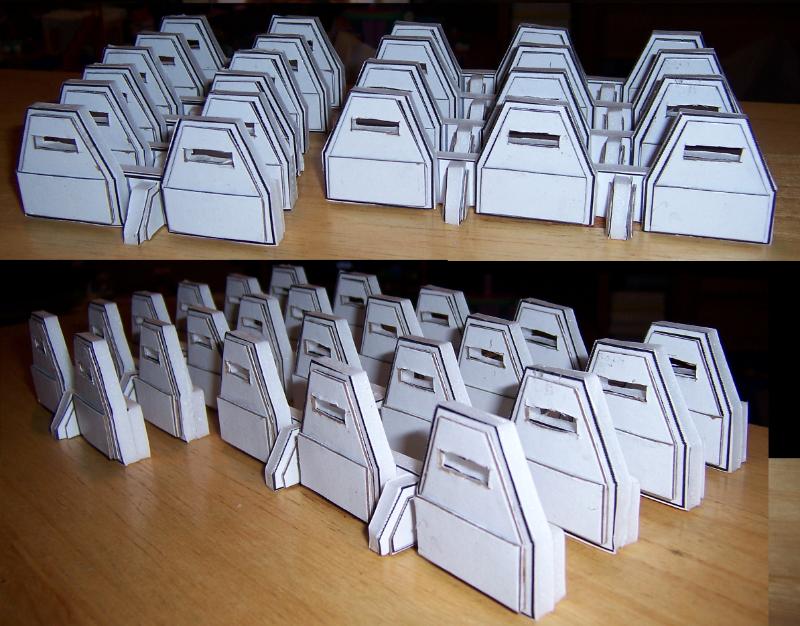
Two layers of metal plating bolted onto the front of the ferrocrete fortification for additional protection.
The most difficult part of this project is cutting out all the little rectangle openings
|
|
This message was edited 2 times. Last update was at 2012/08/11 16:39:17
|
|
|
|
|
2012/08/11 19:39:23
Subject: Scratch Built Stuff on the Cheap - Ard Boyz & Defense Line
|
|
Shroomin Brain Boy
|
The most difficult part of this project is cutting out all the little rectangle openings
that is always the most difficult... if i had a rectangular holepunch it would be way easier... but maybe using the classic round holepunch could ease the workprocess?
and all those neat looking ´ard boyz look very classic and have a strong 60´s vibe to them 
|
|
|
|
|
|
2012/08/11 19:55:38
Subject: Re:Scratch Built Stuff on the Cheap - Ard Boyz & Defense Line
|
|
Gargantuan Gargant
|
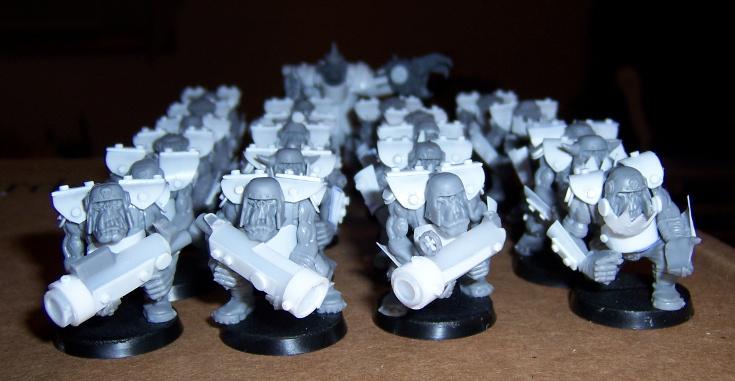
The round punch might be neat to make boxes with rounded corners. I'll have to keep that in mind when making Xenos defenses.
Me 'Ard Boyz are a bit more uniform than regular ladz, but dat's cuz dey ded ard !!
I have to take a pic of the completed mob. 30 Ard boyz, including a Nob and 3 Rokkit Launcha ladz. The Rokkit launchas look more like Potato cannons. I never did like the rockkit on a stick look. For the Nob I used an AOBR Nob. Cut off his Choppa and added a Shoota Barrel and clip to his slugga. It makes an extra long shoota for him, but it looks more appropriate for his size, and I find it fluffy that the nob would have a ded shooty kustom shoota.
Automatically Appended Next Post: Just had a brainstorm, and I'm going to document it here before I forget about it.
Instead of the support leg being basically a triangle, make it more of a U shape and have it fit snuggly over the horizontally runing piece. That way it would support the model from tipping either way, make the models profile a tad bit more interesting, and not impare models sitting adjacent, the way side mounted supports would.
|
|
This message was edited 1 time. Last update was at 2012/08/11 20:13:15
|
|
|
|
|
2012/08/11 20:29:23
Subject: Scratch Built Stuff on the Cheap - Ard Boyz & Defense Line
|
|
Shroomin Brain Boy
|
well i thought that the round holepunch could punch out the corners first of your rectangualr holes you want...then cut them to your wanted shape after that with a knife... i think in the end this would be a way to move on quicker...
and the U-shaped support "legs" sound like a good idea...
and as for more regular looking orks... i think orks don´t have to just look like green apes .... there is mmore to these than meets the eye at first glance... and beside... 40k has so much room for newer versions of old themes.... no telling how brighter orks would look...
|
|
|
|
|
|
2012/08/11 20:41:57
Subject: Scratch Built Stuff on the Cheap - Ard Boyz & Defense Line
|
|
Gargantuan Gargant
|
Viktor von Domm wrote:well i thought that the round holepunch could punch out the corners first of your rectangualr holes you want...then cut them to your wanted shape after that with a knife... i think in the end this would be a way to move on quicker...
I'm sorry, I knew what you were suggesting, I just kinda zoomed past it in my train of thought. If I was working with thisck plastic card that would be spot on advice. With card board and foam core, I think it may just add more work, having to go back in to round out the corners. Thank you for the suggestion though.
and the U-shaped support "legs" sound like a good idea...
It is defintely a better thought out idea. The way I did it is serviceable, but a U shaped support would be a better design.
and as for more regular looking orks... i think orks don´t have to just look like green apes .... there is mmore to these than meets the eye at first glance... and beside... 40k has so much room for newer versions of old themes.... no telling how brighter orks would look...
Everything is hand cut without measuring, so it defeintely has an Ork feel to it, just used to seeing people go out of their way to make each Ork extra unique, while I made my boyz look more like a cohesive unit of disciplined troops.
|
|
|
|
|
|
2012/08/11 20:45:12
Subject: Scratch Built Stuff on the Cheap - Ard Boyz & Defense Line
|
|
Shroomin Brain Boy
|
h card board and foam core, I think it may just add more work, having to go back in to round out the corners.
with this thought i am totally with you!!! absolutley right!
while I made my boyz look more like a cohesive unit of disciplined troops.
which is why i like them... i am not much of an ork fan... i like them but for now don´t intend to work on them atm... but your work i see as a logic that has a true appeal to me!!!
|
|
|
|
|
|
2012/08/11 22:54:21
Subject: Scratch Built Stuff on the Cheap - Ard Boyz & Defense Line
|
|
Gargantuan Gargant
|
You know what they say... Once you go Ork......nah, I got nothing. 
|
|
This message was edited 1 time. Last update was at 2012/08/11 22:54:39
|
|
|
|
|
2012/08/12 13:07:42
Subject: Scratch Built Stuff on the Cheap - Ard Boyz & Defense Line
|
|

Pious Palatine
|
Those 'Ard Boyz are looking sweet!
Also, I think I'm being a bit slow, I can't see where the U-shape you've mentioned is... (I do understand the logic though).
D
|
|
|
|
|
2012/08/12 13:10:17
Subject: Scratch Built Stuff on the Cheap - Ard Boyz & Defense Line
|
|
Shroomin Brain Boy
|
adamsouza wrote:You know what they say... Once you go Ork......nah, I got nothing.
hurhurhur...
|
|
|
|
|
|
2012/08/12 16:10:18
Subject: Scratch Built Stuff on the Cheap - Ard Boyz & Defense Line
|
|
Gargantuan Gargant
|
evildrcheese wrote:Those 'Ard Boyz are looking sweet!
Thanks !
Also, I think I'm being a bit slow, I can't see where the U-shape you've mentioned is... (I do understand the logic though).
No brain fart on your part, the U shape isn't there yet. I had the idea while at work and used the post to remind myself to do it.
|
|
|
|
|
|
2012/08/12 16:21:44
Subject: Scratch Built Stuff on the Cheap - Ard Boyz & Defense Line
|
|
Pious Palatine
|
^ Well that's a relief . Looking forward to seeing the results
D
|
|
|
|
|
2012/08/12 17:20:28
Subject: Re:Scratch Built Stuff on the Cheap - Ard Boyz & Defense Line
|
|
Gargantuan Gargant
|
Remember when we were talking about scratch building Mega Nobs ?
TRANSLATED from ORKS FORGE Website
Original Article found here: http://orksforge.blogspot.fr/2012/04/tuto-scratchbuild-meganobz.html
 Tutorial: Scratchbuilt meganobz
You also create your MegaNobZ! As expected following the tutorial to help you and guide you in achieving your MegaNobZ. To do this you will need a number of tools and raw materials. As always, my concern is to save, that's what I took to the base of my MegaNobZ Black Reach Nobz. It is good to know that if you are motivated, we can easily do without the body, leaving only the arms, head and legs. But here I can not help you. And tools for the plastic card, I return to my folder: to provide plastic card and equipment . I myself have not made a specific plan, the tutorial presents itself more as a guide to help you in achieving your MegaNobZ, this is why I multiplied the photos, is often observed best thing to do. In this regard, last tip before you start: you provide an official MegaNobZ, it will be very helpful to inspire you in your building.
Step 1: "Nob Préparationné the Boss!"
The first thing to do is to remove the ugly plastic bar under the feet. Wherever possible it is best to cut anything over and interfere too sodding plastic card: tip of the handles, objects hanging from their belts, etc. ...
Know that your MegaNobZ will differ with the installation of arms, they will determine the final shape of the figurine. You can cut them if you have rabiots of Nobz mass (because of arm boyz ca does not happen of course).
At this stage you should also shave his chest, underwear and knees to lay the plates of plastic card as desired

You must begin to prepare the structure that will comprise the mega-armor: - A plate chest (pic1 / 2) - A "slip" (pic1 / 2) - bands around the ankles (pic1 / 2) - Shoes: Warning! You must raise the sur-Nobz with these shoes, glue the plastic card so that the shoes become the top of the shoe. (Peak 2) - A tube in the back, above the slip (pic1) - 1 tube of each side of the slip, inclined to the front: they train future pistons hung on the knees. The fit is tight, I advise you to lock onto the tube in the back. Know that I recut some "slips" and later plates. It is better to cut fat and adjust later as needed.
We then glue the pieces of tube that will host the knee (peak 3). You will have the beveled so that the knee does not collide with the shoe. Indeed the Nobz have difficult poses in the legs, you have to do with and provide to avoid having small balls.
I realized the knee plastic card thicker (1mm I believe). Consider insert before the piston rods without fixing (peak 4/5). It's easier. Note that these pistons are a bastard horror to ask, do not hesitate to take it easy on the glue in the beginning because you will have to adjust them so that the whole is consistent. Sometimes I even "dig" in the figure to secure them in a credible manner (thank you mini-tools)


You see the peaks 4 and 5 of the base of the legs MegaNobZ. If we stopped there, it would be packed architecture (like the first one I made), we must raise her on-soles (peak 7). You can enjoy the waterfalls of plastic card to add some elements of the knee (clad plated 'in rab' / teeth / glyph: peak 6/7)
Step 2: "Met de plak of protéjassion boss!"
He then comes the agony of preparing boxes dorsal. Between planing figurines and a hassle to find a credible height (too high: MN giant, not high enough: the head and does not seem quite flat MN) is a real picnic. I began this stage by making "shoulder" (peak 8)
 (
This step will ask you tons of adjustments so that the shoulder pad to shoulder with the agreement of Nobz without leaving too many "empty". Ideally, the shoulder pads come lock on the chest plate, allowing the entire unit. Once this step is completed, we put a plaque above the shoulder (the larger plate, rework it later when the glue is dry). This often happens that elements come unstuck when reworking a plate, do not be discouraged!

At this level it is best to wedge a piece of plastic card behind the head of each figures. advantageously it hides the thickness of the plastic card and mask depth (peak 9).
It's time to stall the wings of our model aircraft! A number of Internet users exclaimed against these huge shoulder pads they are ugly or not credible. For me, this is what makes the beauty of my MegaNobZ, shoulder pads provide a solid side, almost chivalrous of clunky looking. You are free not to do or make smaller. See for yourself. At this stage (peak 9) MegaNobZ resemble the aircraft on legs, do not worry, the addition of arms and weapons rebalance all. A tip though: breaking up your form, fold in the tapping lightly of successive pliers to "round up", then file beveled so that the shoulder sticks easily on the shoulder pads. You will also notice on Peak 9 that I have at this stage, added the jaws of iron. They may seem prominent but again, it is better to cut off leaves behind to reshape.
Once done you have to start giving "body" and "volume" for our MegaNobZ is more like airplanes. Glue the arms into thinking that the weapons will be there geffer impressive. You have the right to cheat! Genre paste a piece of tube to remove the arm from the body, the important thing is that it just do not see the end. I even remember a severed arm above the elbow, glued to a tube glued himself directly under the shoulder! Moreover, apart from worries to hold the tube is a position more credible because it is easy to orient the arm as desired. It should however improve the technique to fit the arms (a rod? From wire? I do not know).
Paste plates protections under the shoulder pads, slanted (peak 10). This has two functions: firstly it gives volume to the model by hiding the thickness of relatively thin plastic card, on the other hand it allows to hide the arms hacks (hack if there was).
Finally attach the "hip" with their feet by creating these joints on the side of the figure. Keep in mind that the part of the thigh and gaut represents the lower tibia, this will help you visualize how to place each element. Watch the official MegaNobZ, it will also help you
Step 3: "Dakka Dakka DAKKA Boss!"
Now that a beautiful MegaNobZ well protected, it must be armed as a nag. Fortunately (or not ...) the codex is skinny at this level, and in melee you can choose between clip and clamp energy energy ... In terms of weapons, Fling 'twin, Kombi and Kombi LanceMissile Carbo. As we are a small band playing streak on the rules of distribution of damage in a unit with different equipment, so we made three of each. The basis for weapons, either forceps or fling ', are quite similar: the goal is to create a box of plastic card (peak 12) which will be grafted thumbs or rabiots to a weapon ( peak 13). I can not explain to you better than the picture (pic 14/15). Keep in mind that it is important to look at your official MegaNobZ and watch on the net to create things credible. Do not forget it takes longer seem that being in modeling. So even if in reality ca no chance of working, as ca appears credible when mounted, it's good.


Once done you have made the biggest! You should get something approaching the peaks 16 and 17. This does not mean complete! We'll have to dress your figure severely to finish building its final volume and give it a unique charm.
 Step 4: "Ce me pluss bo head arf arf arf!"
MegaNobZ a self-respecting, this is a MegaNobZ not care who dazzle and whose second goal (after killing a lot by doing a lot of noise) is to make jealous all the boyz to burst out of the corner. To do this we'll have to burn the box and rabiots in crafting. It is for everyone to do what he wants and that is where the advantage of playing Orks: you can let go and do almost anything. However there are some elements that I feel bound to add good: - The mechanical: the mega-armor are lots of dubious Taules technology but inevitably noisy and conspicuous. even on mega armor the "softer" I created (peak 18) I let emerge mechanical. In this case a second helping of epic Thud Gun. You can see something more elaborate on the peak 19: rabiots diverse collection of elements on an old circuit board, son and electric wire, overall, a bit messy, gives a mechanical unit to the figurine.

- Rivets: It is mandatory to put rivets. If I made the choice of large rivets / bolts to give an imposing appearance to my MegaNobZ, it is quite possible to use or make smaller rivets. In all cases, it takes! - Chimneys and exhaust pipe: as you can see from the peak 20, it is possible to easily with the rods and tubes, very credible exhaust pipe and / or chimneys. We can let go again, but if you want to stay sober, one well placed pipe (peak 17) will fit the bill.
Finally here is a picture of a MegaNobZ finished with Battles Damages:
You will notice the addition of a plaque on the upper arm and the piston starting from under the shoulder to the arm (really handy at any point of view these shoulder pads ...). These are additions that I made on each MegaNobZ, they are long and tedious but bring a real visual impact. I also add extra skid plates underneath shoulder pads to add volume and help hide the start of the pistons (which are actually glued directly on the arms ... always seem to appear ...). It only removes the figure is impressive and credible and it is the only lens you need to assign (with of course the fact you like it). I hope this tutorial will help you. I appreciate in advance your feedback to this article, feel free to ask me for more information or show me what you have done with this issue.
|
|
This message was edited 1 time. Last update was at 2012/08/12 17:23:20
|
|
|
|
|
2012/08/12 17:26:06
Subject: Re:Scratch Built Stuff on the Cheap - Ard Boyz & Defense Line
|
|
Screamin' Stormboy
Hattiesburg, MS
|
I've seen this guys stuff over on the Waaagh. He does great work.
|
|
|
|
|
2012/08/12 17:31:03
Subject: Scratch Built Stuff on the Cheap - Ard Boyz & Defense Line
|
|
Pious Palatine
|
Wow they are some seriously cool nobz in mega armour!
D
|
|
|
|
|
2012/08/12 17:41:49
Subject: Re:Scratch Built Stuff on the Cheap - Ard Boyz & Defense Line
|
|
Lead-Footed Trukkboy Driver
|
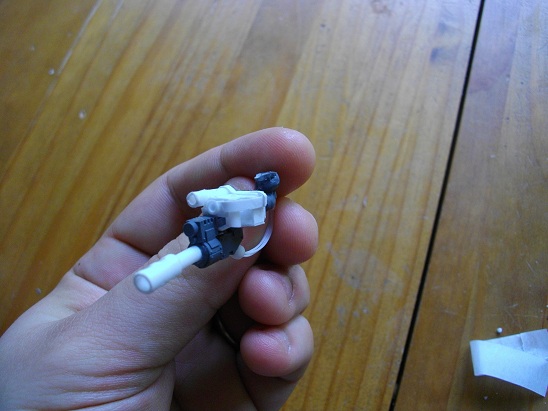
Great looking 'ard boyz. I like their cannon/shootaz.
I don't blame you for wanting to find a quicker way to build meganobz. To scratch build one, it can take roughly 6-7 hours per nob. I made about 4 before I got so lazy I demoted my Ghazkull model to simple meganob to make an even 5. Mostly because mine turned out about as big as Ghazzy, heh.
My tactic was to use a standard Ork torso + head, and then build a plasticard box around it. I bought the nobz kit to 'borrow' the heads and arms (still have enough to make a set of normal Nobz too!). Just build boxes around the hands and the upper part of you model is done after you glue crap everywhere.
Legs were more difficult in I decided to use greenstuff to sculpt the non-armored part of the leg to keep scale (and make them HUGE). Thats the tricky part. I used glued together sprue parts to form the basis to add the greenstuff over. Then add the plasticard armor.
I saw another guy's variant, he had taken normal nobz, armored them up a bit, and then gave them really big riot shields and power klaws. Those looked pretty good too.
|
|
|
|
|
|
2012/08/12 19:43:51
Subject: Scratch Built Stuff on the Cheap - Ard Boyz & Defense Line
|
|
Shroomin Brain Boy
|
good find adam!
|
|
|
|
|
|
2012/08/13 15:23:39
Subject: Re:Scratch Built Stuff on the Cheap - Ard Boyz & Defense Line
|
|
Gargantuan Gargant
|
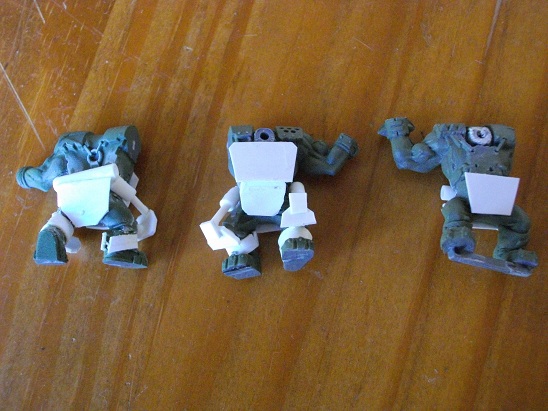
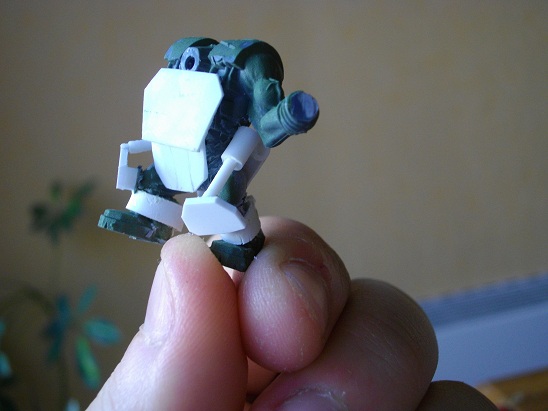
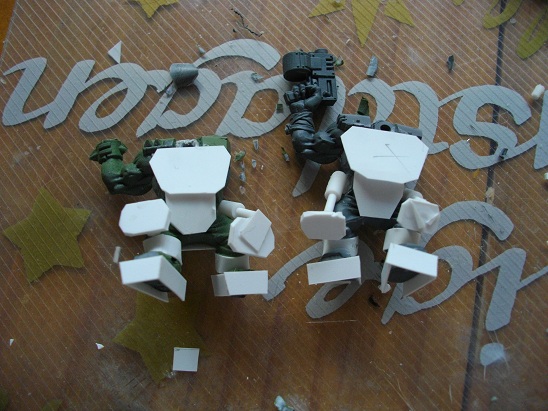
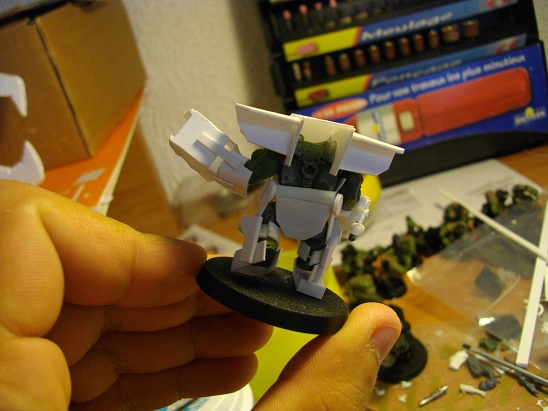
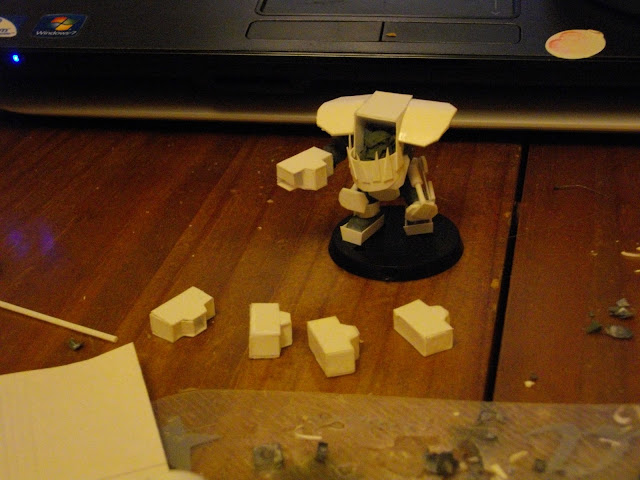
Started toying with a meganob, just to see how time consuming it would be
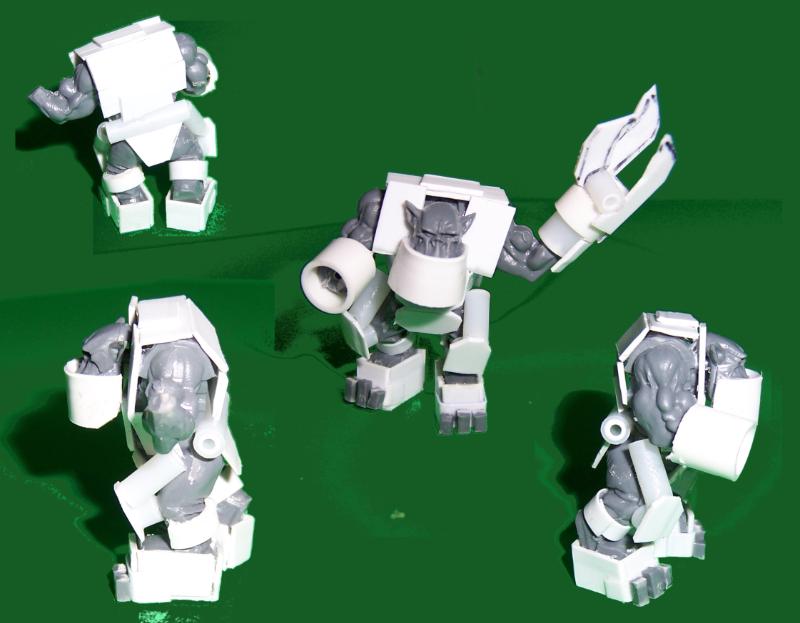
Used an AOBR Nob. I think I am going to get my money's worth out of that AOBR set.
|
|
|
|
|
|
2012/08/13 17:27:35
Subject: Scratch Built Stuff on the Cheap - New MegaNob
|
|
Pious Palatine
|
Looking good so far. I bet my bottom dollar they'll look super sweet once you've done the detailing.
D
|
|
|
|
|
2012/08/13 20:50:45
Subject: Scratch Built Stuff on the Cheap - New MegaNob
|
|
Shroomin Brain Boy
|
yup...gotta agree... a very good start!
|
|
|
|
|
|
2012/08/13 21:20:24
Subject: Scratch Built Stuff on the Cheap - New MegaNob
|
|
Hoary Long Fang with Lascannon
|
They look riveting.
|
Check out this comp!http://www.dakkadakka.com/dakkaforum/posts/list/0/498307.page
My P&M Blog:http://www.dakkadakka.com/dakkaforum/posts/list/497661.page
2500  Brothers of Sanguinor Brothers of Sanguinor
2500  Purifiers Purifiers 
750 :  Bad Wolves Bad Wolves
2 successful trades: TemplarCoyote, blood angel
P.M. for a reference! K.C.C.O.! |
|
|
|
|
2012/08/13 21:47:12
Subject: Scratch Built Stuff on the Cheap - New MegaNob
|
|
Shroomin Brain Boy
|
hurhurhur... i see what you did there eldartau
|
|
|
|
|
|
2012/08/16 07:16:48
Subject: Re:Scratch Built Stuff on the Cheap - New MegaNob
|
|
Gargantuan Gargant
|
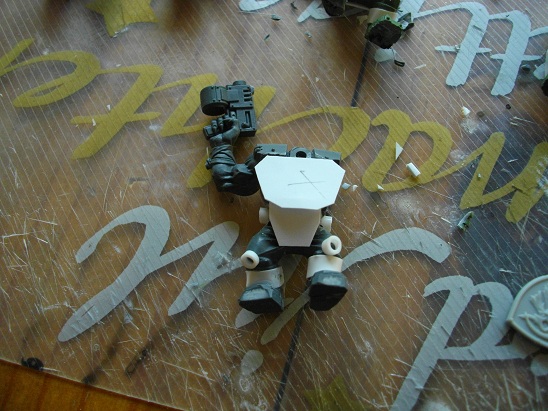
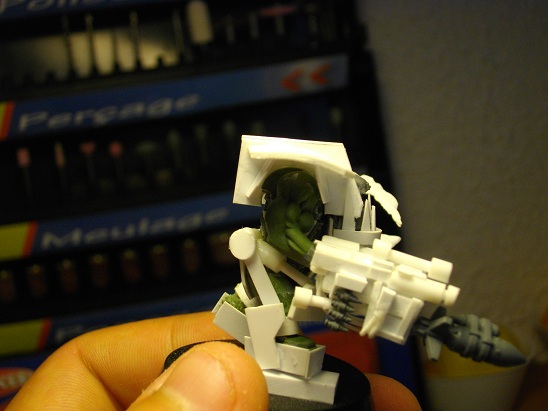
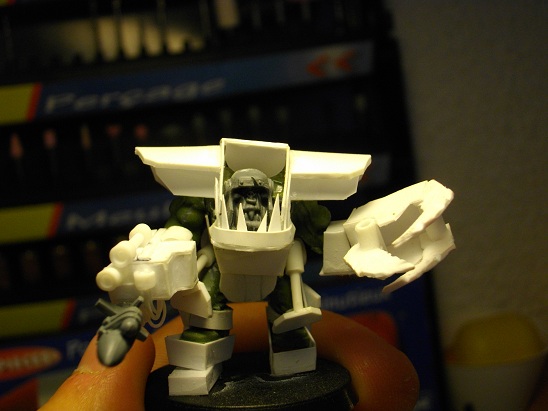
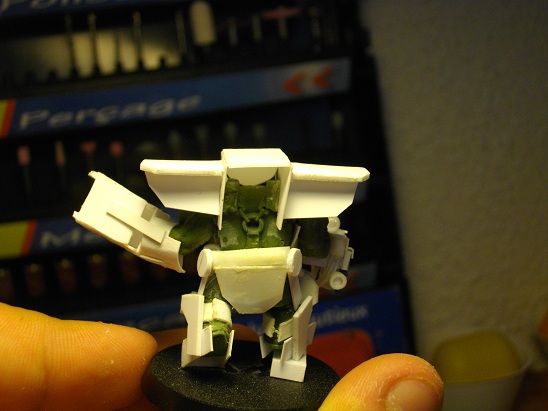
Ork Boyz, completely forgot to prime them and just spray painted them yellow. Biel Tan Green on the flesh and toying with different combinations of black and metals.
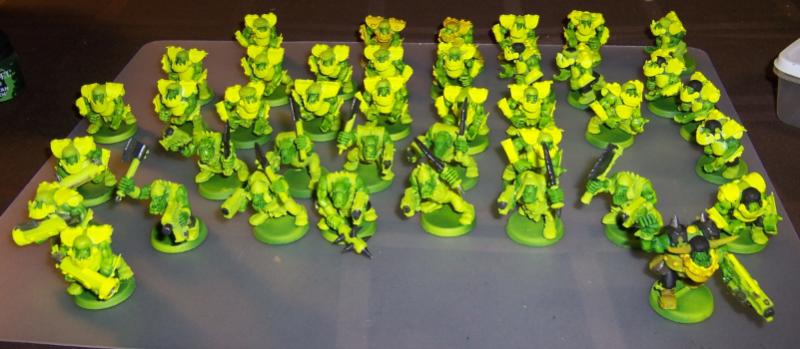
Close up of the Nob

|
|
|
|
|
|
2012/08/16 08:04:01
Subject: Re:Scratch Built Stuff on the Cheap - New MegaNob
|
|

Sadistic Inquisitorial Excruciator
|
When I saw Luciusletroll's work on the french Warhammer Forum, I knew that if he posted his work on Dakka it would find an echo within the -=]_,=-.
Great start Adam. So, how long have you been working on your nob to get to this stage?
|
|
|
|
|
|
2012/08/16 08:33:46
Subject: Re:Scratch Built Stuff on the Cheap - New MegaNob
|
|
Xenohunter with First Contact
Loserville - population: 1
|
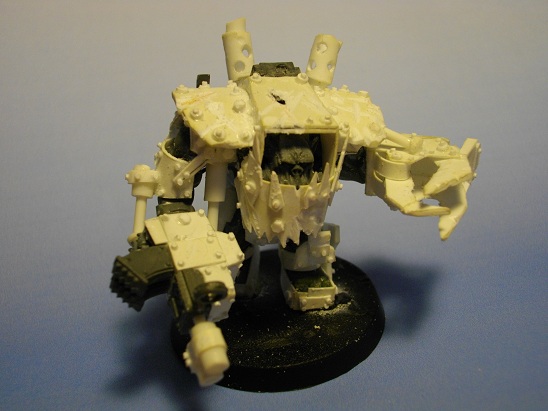
lookin good. I started a mega dread a few weeks ago after viewing your kans, hopefully i can finish it and post some pics. 
|
|
|
|
|
|
|

