So I’m going to try and explain my method of converting standard Marine helmets into the Rogue Trader style MK6 “Beaky” helmets. This is by no means a new idea but I’ve yet to see anything decent and the bits are still about 1 quid each on sites like bits and kits so people still apparently will spend that much for one of these. To put it simply, there’s no need.
K so the tools I use aren’t anything special and
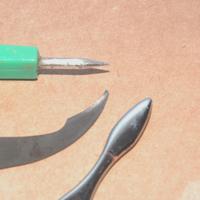
IMO they don’t need to be. You don’t have to spend anything to get a decent set of medelling tools. I use an old compass which is slightly blunt on the end for this job together with some other thing which used to be something to do with women’s nails but as long as you get something similar it shouldn’t matter. Just something pointy and something to smooth your putty will do. Besides that is like a scalpel tool which a friend got me from their work so again I don’t know the name of it, all I know is it cuts through plastic like butter and is perfect for shaving off unwanted detail. If you can’t get that a modelling knife will do. + a pin vice and some sort of lubricant (oil, Vaseline etc.) which I didn’t photograph.
Oh and some green stuff and a space marine helmet should come in handy aswell.
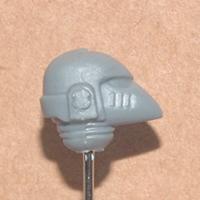
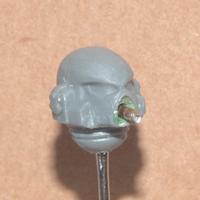
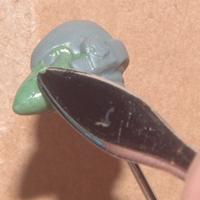
Now den, to start with your going to want to prep your helmet as you usually would, i.e. remove the mould lines etc. etc. Then you’re going to want to shave off the top vent and those things leading out to the mouth piece. I find the best way is to slice off the main part of it then run the knife against the plastic as you would if you were sharpening a kitchen knife for example. Keep doing that and you should eventually end up with something like this…
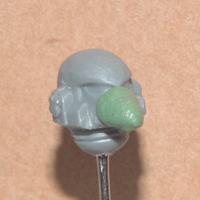
Once you have that you’re going to want to drill a hole in the mouthpiece with your pin vice and place a small pin (I used a bit of paperclip) into it.
My image shows a bit of green stuff, that’s just because my smaller drill bit is broken and so I had to fill the bigger hole I made. You can just glue it in. Make sure it isn’t too long and it is towards the bottom of the mouthpiece as centre as you can get it. This part is necessary so that we are able to work the putty later on without pulling it off.
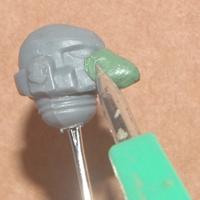
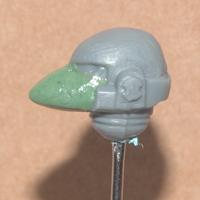
Right now we have done that part your going to want to mix your green stuff and put a rough amount you think is right on the helmet. Make a rough cone shape with your fingers.
After that you need to either add to or get rid of
GS around the beak until the rough shape starts to look better. If you need to add just get a tiny bit and build up the area that needs it. To take away run your tool across it and pull away the
GS you don’t need. Don’t worry about mucking up the shape, right now we are just making sure we have the right amount of putty in the right areas.
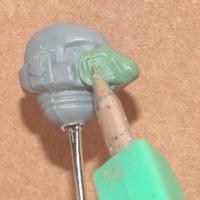
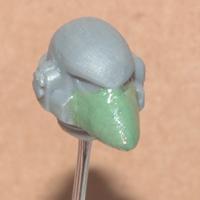
Ok so now is the bulk of the work, what we need to do is get the smoothing tool and work the putty gently into the shape we need. I find it is good to have one of
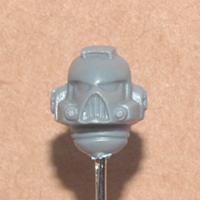
GW’s beaky beside you so you can keep back checking to see what how it’s comparing. You’ll also need some sort of lubricant I use some massage oil I nicked from a hotel but you can use Vaseline etc, etc. You could use water but the amount of times you will have to keep wetting your tools will be rather tiresome.
Run your smoothing tool along the putty without pushing too hard just in the direction you want the shape to move. For example if your nose is looking too long run it back from the tip towards the ears on either side repeatedly and it will gradually move into place. To work the conical shape you need to circle the entire nose. Keep looking at the helmet from different angles, don’t spend too much time from one angle or you’ll find you’ll get it looking perfect from one view then as soon as you turn it it won’t look right. I find working in one area for a short time then changing to the opposite side works best so that in the event you do push the putty in one direction the work you do on the opposite side will counteract it.
Here’s hoping that’s understandable. In general just take your time and work the putty gently. Never force it work with it, touch here, touch there sort of business. If you run in to trouble and find you have one side really bigger than the other check you haven’t got too much
GS, if so just pull it off same as the above step and start over, no worries. And add a bit if you think you need more. Greenstuff is always more forgiving than painting.
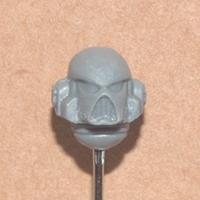
K so hopefully all going well you should end up with something like this and you’ve got yourself a MK6 beaky. Good times.
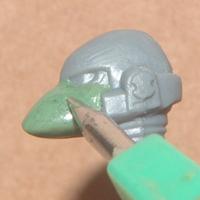
If you want you can add the little vents by gently pressing into the
GS once it’s hardened up a bit so you don’t mess up your shape.

Hope that’s not too complicated. Ty for reading.


 My blog


