| Author |
Message |
 |
|
|
|
|
Advert
|
Forum adverts like this one are shown to any user who is not logged in. Join us by filling out a tiny 3 field form and you will get your own, free, dakka user account which gives a good range of benefits to you:
- No adverts like this in the forums anymore.
- Times and dates in your local timezone.
- Full tracking of what you have read so you can skip to your first unread post, easily see what has changed since you last logged in, and easily see what is new at a glance.
- Email notifications for threads you want to watch closely.
- Being a part of the oldest wargaming community on the net.
If you are already a member then feel free to login now. |
|
 |
2010/02/02 05:57:05
Subject: blackhand's scratchbuild tervigon
|
|

Nurgle Chosen Marine on a Palanquin
|
Ok so I couldn't wait for replies to my question and I went ahead and got my friend to find me a termiguant weopon to graft onto the "faetal" gaunt (or faetagaunt as it will hence forth be called) so in an afternoon of frenzied slicing and greenstuffing the "faetagaunt" went from this....
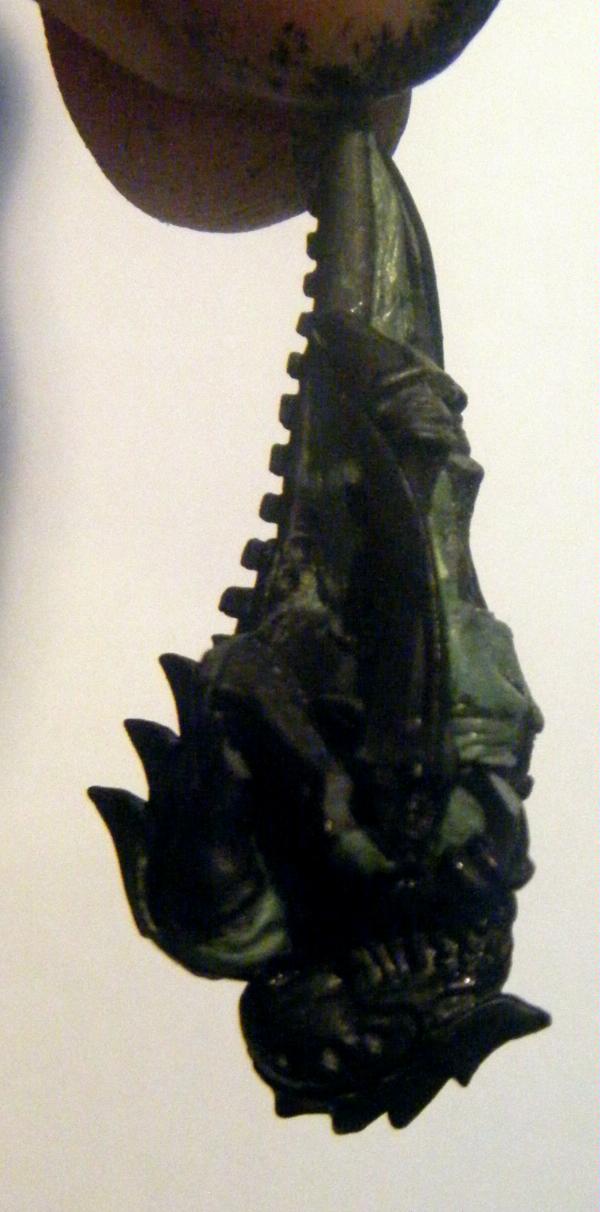
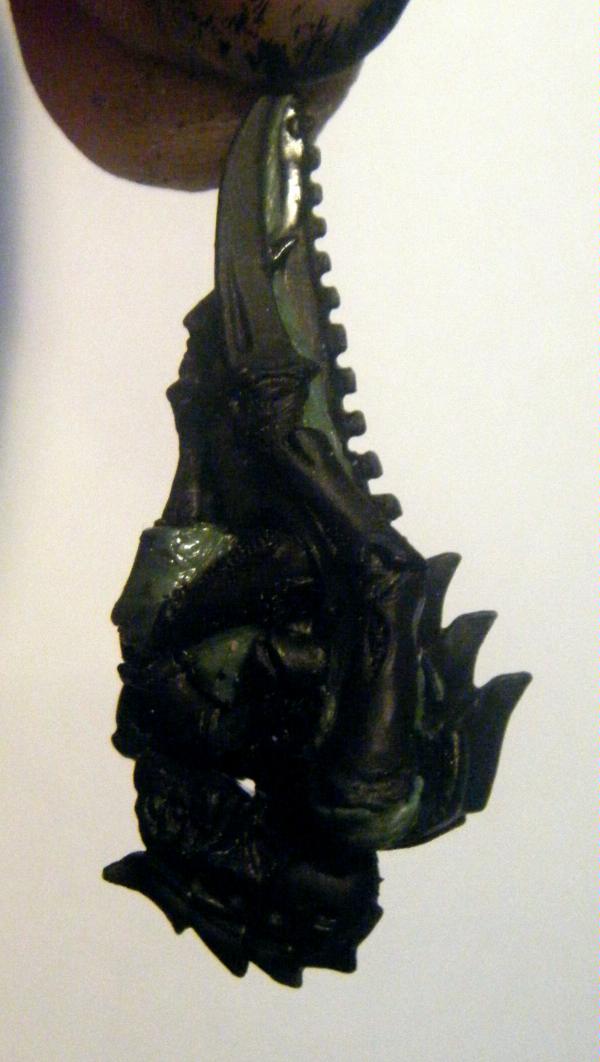
To this.
Basically the greenstuff will be painted a toxic green colour and represent the "yolk" of the eggsac that is feeding the Faetagaunt. The rest of the gaunt will be painted in my mate's army colours and then the whole thing will be encased in a teardrop shaped ball of resin so that you can see the faetagaunt inside and then six or seven of these will be hung in a cluster from the stomach of the Tervi"
Any thoughts?
Cheers
BLACKHAND
|
 BobtheInquisitor wrote: BobtheInquisitor wrote:I tend to glue metal models with a combination of BSI cyanoacrylate and my tears of frustration.
|
|
|
 |
|
2010/02/02 09:19:34
Subject: blackhand's scratchbuild tervigon
|
|

Liberated Grot Land Raida
|
Wow... That's some amazing skills there an a very nice execution of the original concept. looking forward to the finished model!
|
A Squeaky Waaagh!!
Camkhieri: "And another very cool thing, my phones predictive text actually gave me chicken as an option after typing robot, how cool is that."'
Meercat: "All eyes turned to the horizon and beheld, in lonely and menacing grandeur, the silhouette of a single Grot robot chicken; a portent of evil days to come."
From 'The Plucking of Gindoo Phlem' |
|
|
|
|
2010/02/02 09:47:34
Subject: blackhand's scratchbuild tervigon
|
|

Stabbin' Skarboy
|
Excellent stuff. Not like the Gonad at all.
|
MeanGreenStompa wrote:penek wrote:wtf is wrong with GW ???
It's being run by people with short term vision and enough greed to extinguish a sun.
Perhaps they're the C'tan.
|
|
|
|
|
2010/02/02 12:17:15
Subject: blackhand's scratchbuild tervigon
|
|

Dominating Dominatrix
|
Much better. 
Now fix the legs I didn't like! 
|
|
|
|
|
2010/02/02 18:07:25
Subject: Re:blackhand's scratchbuild tervigon
|
|

Yellin' Yoof on a Scooter
Chicago, IL
|
I will have to look at strengthing and/or bluntening the scytalons
I'd think that they would drive into the ground when it walked.
Maybe clip three of them off (like they're embedded in the earth) and raise the fourth up a little so it looks like it's taking a stride.
|
|
|
|
|
|
2010/02/02 18:21:23
Subject: blackhand's scratchbuild tervigon
|
|
Nurgle Chosen Marine on a Palanquin
|
My mate and I like the idea of the the Tervi seeing incoming fire and driving its talons into the ground to secure it then hunkering down with only it's carapace and the "knees" visible!
One thing I like about 40k is how a bit of fluff can gloss over any design flaw 
Cheers
BLACKHAND
|
BobtheInquisitor wrote:I tend to glue metal models with a combination of BSI cyanoacrylate and my tears of frustration.
|
|
|
|
|
2010/02/02 22:50:23
Subject: blackhand's scratchbuild tervigon
|
|
Lead-Footed Trukkboy Driver
|
*joygasm*
|
When someone smiles at me, all I see is a chimpanzee begging for its life. |
|
|
|
|
2010/02/02 23:04:09
Subject: Re:blackhand's scratchbuild tervigon
|
|
Focused Fire Warrior
|
Very cool, I look forward to seeing the next set of pics in the development.
|
Ikasarete Iru
Graffiti from Pompeii: VIII.2 (in the basilica); 1882: The one who buggers a fire burns his penis
Xenophanes: "If horses had Gods, they would look like horses!"
|
|
|
|
|
2010/02/03 00:24:50
Subject: blackhand's scratchbuild tervigon
|
|

Dour Wolf Priest with Iron Wolf Amulet
|
Excellent stuff, I'm thinking of making my own Tervigon out of a Carnifex sometime, so this is giving me some cool ideas.
|
|
|
|
|
|
2010/02/03 04:37:16
Subject: blackhand's scratchbuild tervigon
|
|
Mutated Chosen Chaos Marine
In a Toyota, plotting revenge.
|
Thanks for the idea! I love how you extended the head! What's the hive fleet colour?
|
metallifan said: I almost wonder is "Matt Ward" another pen name for C.S. Goto?
metallifan said: The Imperium would probably love Hitler...
Play KoL! Click my sig to go to the main website and sign up!
 |
|
|
|
|
2010/02/06 05:10:22
Subject: blackhand's scratchbuild tervigon
|
|
Nurgle Chosen Marine on a Palanquin
|
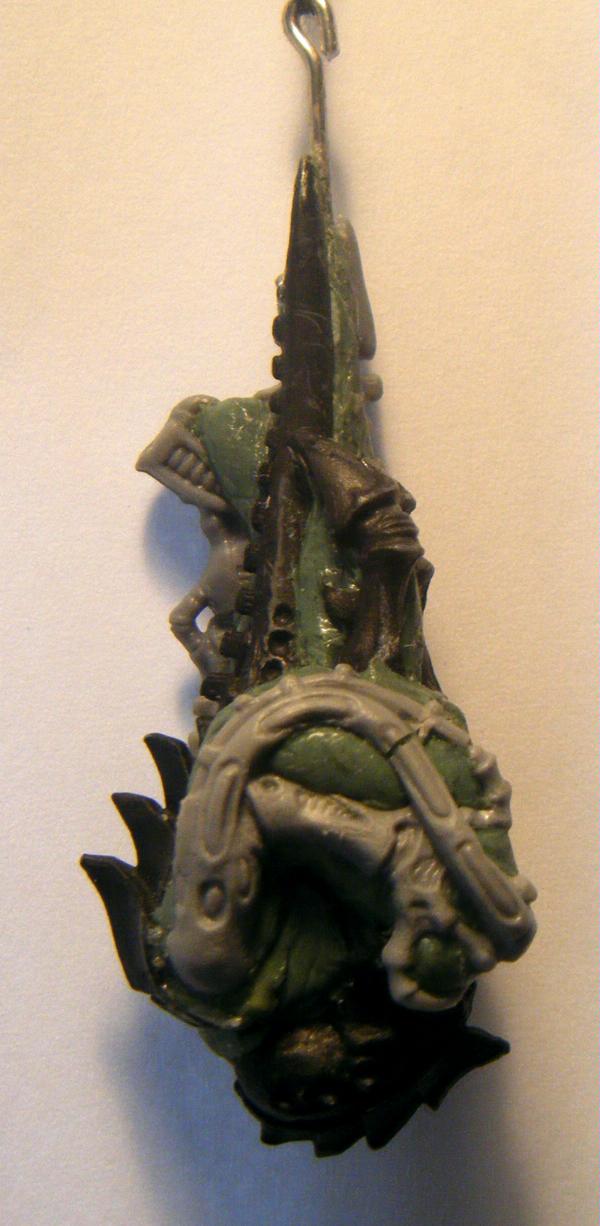
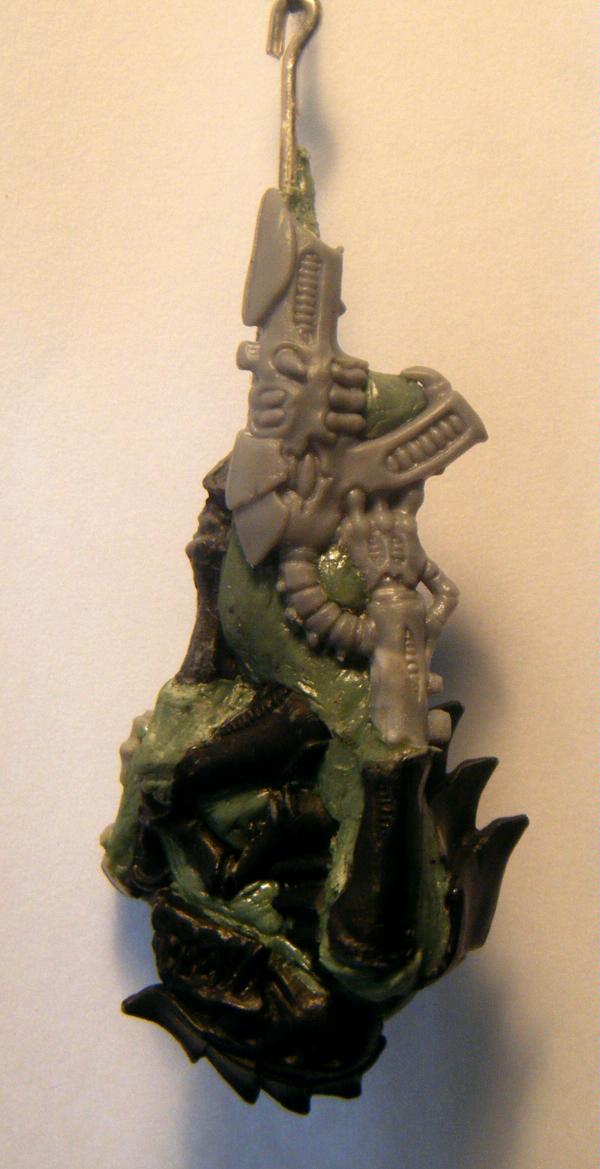
Hey folks, no pics at the moment I got sidetracked putting together a twin linked autocannon left arm for my club's space marine army. There isn't much to take pics of any way as I have been mostly doing detail work around the neck and tail of the Tervi and buiding the original eggsac that I'll cast a mould of tommorrow (family permitting!)
@catpeeler - I'm not sure if It's a good thing that I have the ability to bring you to "joygasm" through a blog but thanks anyway 
@j-roc77 - thanks!
@andilus - Thanks, I sometimes wish I had a fex kit to work from instead of just spare parts but I feel it will come out a lot more unique this way. The main problem I am facing in this build is the chimneys on it's back which having a fex kit would solve.
@munch - Cool man your welcome! I've got a bit more greenstuff work to do on the neck but it does look good so far if I do say so myself. The fleet colours are a khaki/bone colour on the carapace and gore red muscles and body.
Cheers
BLACKHAND
|
BobtheInquisitor wrote:I tend to glue metal models with a combination of BSI cyanoacrylate and my tears of frustration.
|
|
|
|
|
2010/02/06 07:50:58
Subject: blackhand's scratchbuild tervigon
|
|
Mindless Spore Mine
Sequim, WA
|
Have you thought about looking up Aliens* toys? i think
someone made a queen model sitting on her egg sac
thingy... that might work for critter dispensers?
awesome work by the way!
|
|
|
|
|
|
2010/02/06 07:53:53
Subject: blackhand's scratchbuild tervigon
|
|
Avatar of the Bloody-Handed God
|
Blasphemy of Nature wrote:Have you thought about looking up Aliens* toys? i think
someone made a queen model sitting on her egg sac
thingy... that might work for critter dispensers?
awesome work by the way!
Might be too big o_o
|
Paused
◙▬▬▬▬▬▬▬▬▬▬▬▬▬
◂◂ ► ▐ ▌ ◼ ▸▸
ʳʷ ᵖˡᵃʸ ᵖᵃᵘˢᵉ ˢᵗᵒᵖ ᶠᶠ |
|
|
|
|
2010/02/06 09:25:26
Subject: blackhand's scratchbuild tervigon
|
|

Preacher of the Emperor
|
This could turn out to be something special. I hope your friend has the painting skillz necessary to do justice to this once it's finished, especially if it turns out to be as cool as i think it's going to
|
 1500pts 1500pts
Gwar! wrote:Debate it all you want, I just report what the rules actually say. It's up to others to tie their panties in a Knot. I stopped caring long ago.
|
|
|
|
|
2010/02/08 18:56:35
Subject: blackhand's scratchbuild tervigon
|
|
Nurgle Chosen Marine on a Palanquin
|
Quick update.
I got some casting in last night and took a few pics which I will post tonight.
@blasphemy - I'm doing something a bit different for the eggsacs keep an eye on the blog!
@Lunahound - Yep.
@J.Black - Due to the fact that parts of the model are going be clear plastic I'm going to have to be painting as I assemble the model so you can't see any resin or greenstuff throught the clear bits. That may not make a lot of sense at the moment but it will.
Cheers again guys for all the comments,
BLACKHAND
|
BobtheInquisitor wrote:I tend to glue metal models with a combination of BSI cyanoacrylate and my tears of frustration.
|
|
|
|
|
2010/02/09 06:02:34
Subject: blackhand's scratchbuild tervigon
|
|
Nurgle Chosen Marine on a Palanquin
|
Ok heres the pics I promised along with a bit of a description of the casting process. First you need to build a box to pour the mould in and this is where the Lego comes in very handy. I glue it down with superglue onto plasticard to seal it and stop all the rubber pouring out the bottom Sorry forgot to rotate this pic before posting it. 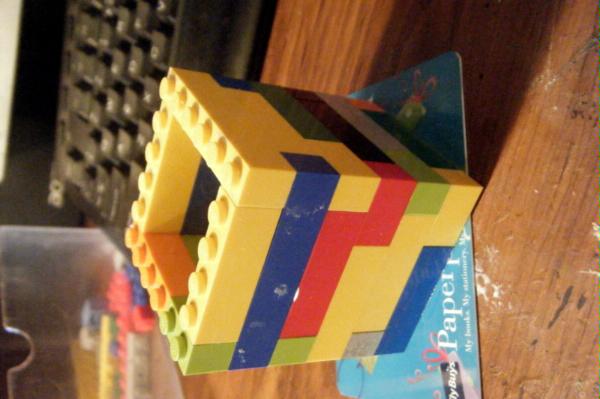 Then I superglue the Master copy of the model I want to copy in the center of the lego box. Remember that the part that you glue to the plasticard will be the hole you pour into so make it wide enough capture the resin comound as you pour it. I also glue a few short pieces of sprue to the model on any parts I think will trap bubbles of air in the hope that these areas will fill properly. This is a part of the process that can only be perfected by a lot of practice and experience and I am by no means perfect! 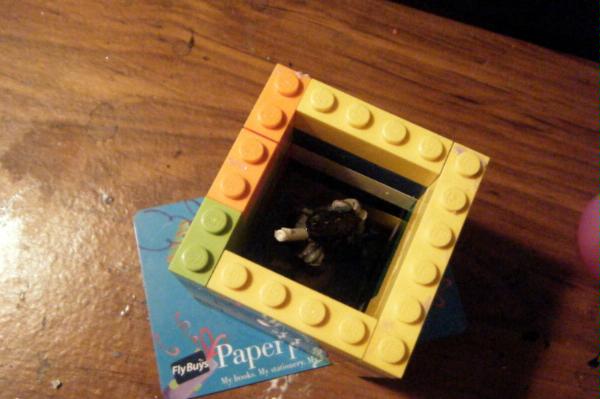 I then mix the rubber mould compound which is a 2 part silicone which is mixed 1:1 easy enough that even I can do it! It takes about 20 mins to set fully and I can't recommend it enough, I have used silicones that take 12 hours to cure and its really frustrating to wait to get casting. 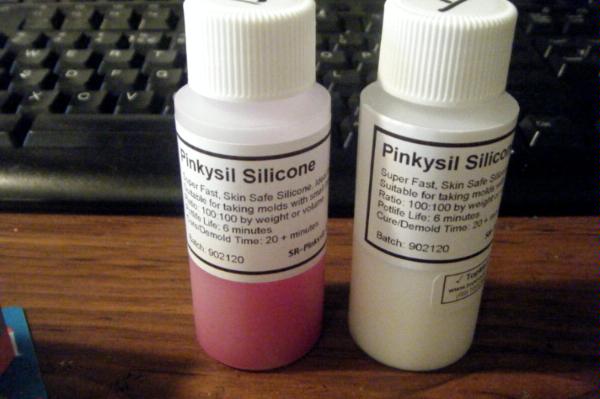 Next its a case of simply pouring the mixed silicone into the mould box covering the model by at least 1 cm to provide a decent base to the mould. Another tip is to have another model or piece of model such as a marine shoulder pad which you might like a copy of in a shallow casting box nearby so that if you have any extra silicone mix left over you can pour it into the second box so you don't waste it. 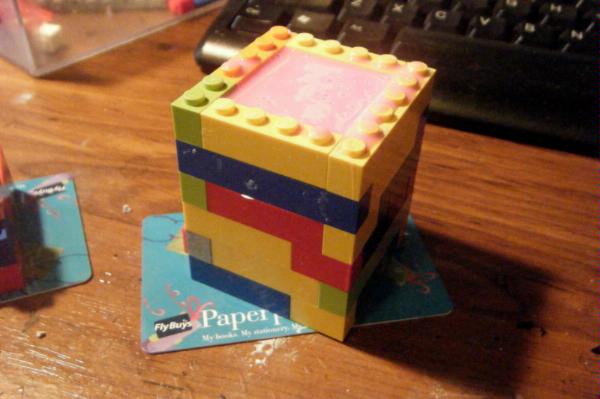 Once the rubber has set you can then break away the lego box and cut out your master. You can be fairly rough when you do this as the the rubber will key back together better with some underhangs in the cut, if you have a perfectly smooth cut dow3n both sides the rubber will split apart when you pour in the resin. Always use a new knife blade and don't cut all the way through, leave the base in one piece so that it keeps the sides of the mould in the right place when it comes to casting 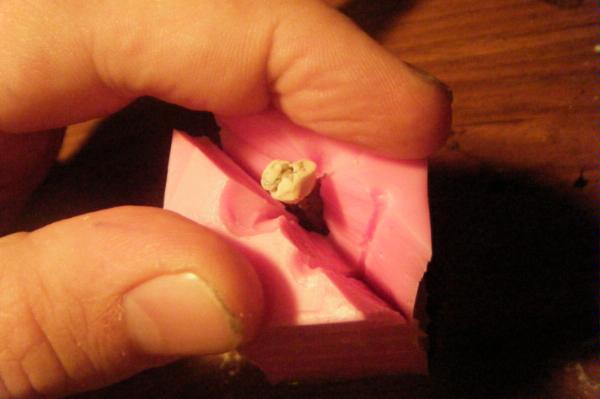 Once you have a usable mould that keys together well its time to cast! and it as easy as mixing the resin , gain the productI uses is 1:1 so is pretty simple and then pour it into the mould. Again this is where the secondary rubber mould handy as mixing is an imperfect art I often have resin left over after pouring my intended cast and I hate letting it go to waste. This next pic shows my first cast which I made far too much resin for and subsequently ended up with 4 extra shoulderpads and a partr for my roughrider mech bike, you may notice that the smaller pieces are clear still as the resin generates heat when it sets and the mor of it in a mould the faster it cures and goes white, you can also put it under a lamp to cure it faster but with a cure time of 20mins I don't really bother. 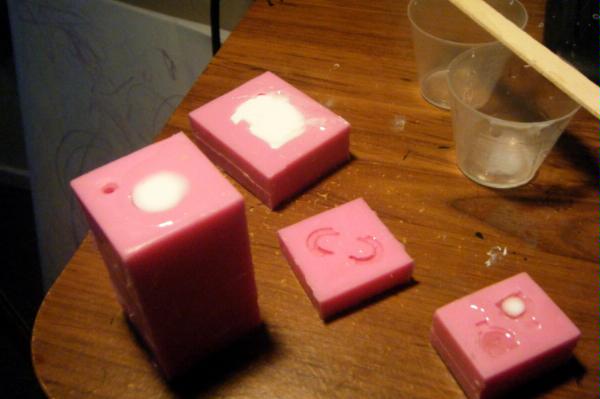 After the resin cures you just need to peel back both sides of the rubber and pull out your newly cast model. At this point you can easily tell where the bubbles are forming and can add channels in the rubber by carefully cutting with a knife to allow the resin to distribute better and let bubbles rise and not ruin your precious cast. You will notice on the faetagaunt I am casting that the tips of the carapace is not casting and Ive decided to fix them with greenstuff rather than try to carve out ne channels in this case as the mould is fiddly to get into and this wa I can add some differences ini the models to avoid a factory finish to them. 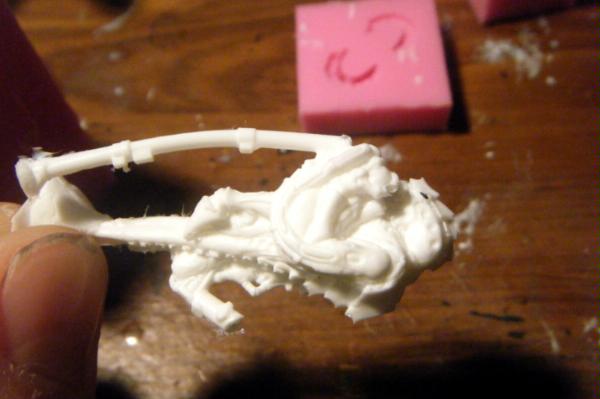 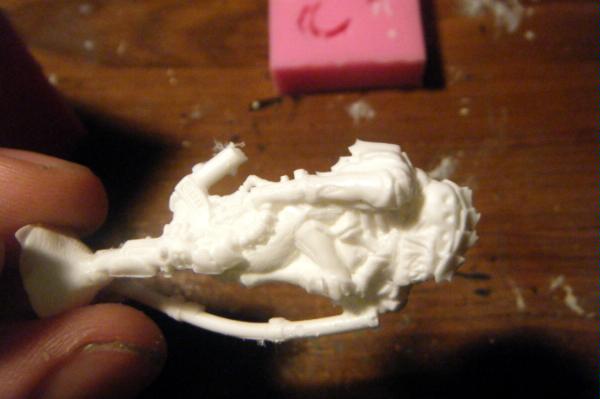 And after a nights work four of my faetagaunts ready to be cleaned up and painted! 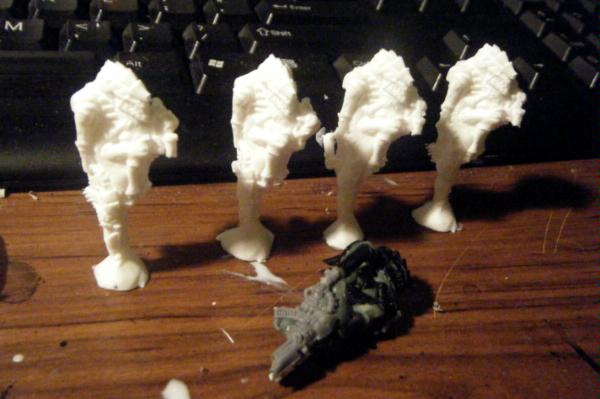 Well its back to the painting table for me as I need 7 of these little guys and my deadline for this project is looming! C&C welcome as always Cheers BLACKHAND
|
|
This message was edited 1 time. Last update was at 2010/02/09 06:04:14
BobtheInquisitor wrote:I tend to glue metal models with a combination of BSI cyanoacrylate and my tears of frustration.
|
|
|
|
|
2010/02/09 15:14:15
Subject: blackhand's scratchbuild tervigon
|
|
Dominating Dominatrix
|
Impressive. Most impressive.
|
|
|
|
|
2010/02/09 15:23:35
Subject: blackhand's scratchbuild tervigon
|
|
Avatar of the Bloody-Handed God
Inside your mind, corrupting the pathways
|
Seconded. An interesting idea on the clear egg sacks.
Edit: and I have never seen moulds being created in a single piece and hacked out like that - they are always two piece.
|
|
This message was edited 1 time. Last update was at 2010/02/09 15:24:33
|
|
|
|
|
2010/02/09 17:43:21
Subject: blackhand's scratchbuild tervigon
|
|
Enginseer with a Wrench
|
Delicious!
|
|
|
|
|
2010/02/09 18:18:03
Subject: Re:blackhand's scratchbuild tervigon
|
|
Deranged Necron Destroyer
|
I hate to burst your bubble but since you used GW parts, when you cast it, you broke their I.P. and right now you are considered stealing from GW.
|

malfred wrote:Buy what you like.
Paint what you love.
|
|
|
|
|
2010/02/09 18:23:48
Subject: blackhand's scratchbuild tervigon
|
|
Dakka Veteran
|
BLACKHAND wrote:Ok so I couldn't wait for replies to my question and I went ahead and got my friend to find me a termiguant weopon to graft onto the "faetal" gaunt (or faetagaunt as it will hence forth be called) so in an afternoon of frenzied slicing and greenstuffing the "faetagaunt" went from this....
To this.
Basically the greenstuff will be painted a toxic green colour and represent the "yolk" of the eggsac that is feeding the Faetagaunt. The rest of the gaunt will be painted in my mate's army colours and then the whole thing will be encased in a teardrop shaped ball of resin so that you can see the faetagaunt inside and then six or seven of these will be hung in a cluster from the stomach of the Tervi"
Any thoughts?
Cheers
BLACKHAND
Blackhand I have to give you props for awesome conversion work.
/Offtopic
But ...uhm...it maybe my slightly perverse mind but...with these first two pictures it really looks like the male anatomy...uhm...dropping a 3rd testy. >.<
/Ontopic
Anyways, other than that, the Tervigon model looks good, although what I noticed from the picture (in the codex) that all the new big nids look like they have the Carnifex back hind legs for there back legs and then Scything Talons for the front legs. But I do like the spider look, makes it look faster and a bit more freaky when it's "birthing" termigaunts.
Keep up the good work and I'm looking forward to seeing a painted/finished result.
A++
Cheers~
|
 : 1500pts - : 1500pts -  : 1000pts - : 1000pts -  : 1500pts : 1500pts
I want you to know that every time I fart under the covers... (Frrp!)
I'm doing it because I care about you and I want to keep you warm.
Don't fight my methane cuddels. Enjoy them!
 |
|
|
|
|
2010/02/09 18:34:09
Subject: Re:blackhand's scratchbuild tervigon
|
|
Dominating Dominatrix
|
Mewiththeface wrote:I hate to burst your bubble but since you used GW parts, when you cast it, you broke their I.P. and right now you are considered stealing from GW.
Yes, thank you for pointing out the obvious. He should be fine unless he starts selling them. Can we please now go back to discussing how awesome this is?
|
|
|
|
|
2010/02/09 19:17:49
Subject: blackhand's scratchbuild tervigon
|
|
Nurgle Chosen Marine on a Palanquin
|
Thanks guys, @anung um rama - Thanks a lot man, its really cool to know your watching the thread and liking it. @silvermk2 - I find that pouring the mould as one piece saves a lot of time and mucking around and makes such a close fit when finished that you can pour the resin in and squeeze the mould to get the bubbles out, very handy. @kaloran - thanks! @mewtheface - I knew when I was taking the pics and posting them that someone was going to mention this. As Anung said I am not selling these casts, this is a favour for a friend. If I do decide to build one of these for a commision for instance I would use seperate models to create several unique faetal gaunts as opposed to casting the same one again and again. I'm not doing this to cheat or steal from GW only to create something a bit different and hopefully cool. @fexor - Um yeah, I guess I just don't see male genitalia everywhere I look About the back legs, I know but I couldn't afford a whole new fex kit to use in building the Tervi so I had to use leftover bitz, I could have carved up some crushing claws to make big legs but when I showed my mate the scything claw only mock-up he loved it and we went with it. @anung un rama - Thanks again bro. Thanks as usual for the comments, they are always welcome. Cheers BLACKHAND
|
|
This message was edited 1 time. Last update was at 2010/02/09 19:18:40
BobtheInquisitor wrote:I tend to glue metal models with a combination of BSI cyanoacrylate and my tears of frustration.
|
|
|
|
|
2010/02/09 21:31:29
Subject: Re:blackhand's scratchbuild tervigon
|
|
Decrepit Dakkanaut
|
Mewiththeface wrote:I hate to burst your bubble but since you used GW parts, when you cast it, you broke their I.P. and right now you are considered stealing from GW.

Very cool man. Ive also never seen someone do a cast in one shot. Ive been gathering a bunch of info on the best ways to do this, for some ideas I have for my Ork army. Ill deffinetly give your method a shot when I get to that point. Very nice conversions
|
|
|
|
|
2010/02/09 21:52:32
Subject: blackhand's scratchbuild tervigon
|
|
Dominating Dominatrix
|
I suppose you will put him/her/it on a base. How about a Gaunt lying there beneath it like he was just ... ehm ... born 
|
|
|
|
|
2010/02/09 22:45:12
Subject: blackhand's scratchbuild tervigon
|
|
Mutated Chosen Chaos Marine
In a Toyota, plotting revenge.
|
that would be a cool thing to add.
|
metallifan said: I almost wonder is "Matt Ward" another pen name for C.S. Goto?
metallifan said: The Imperium would probably love Hitler...
Play KoL! Click my sig to go to the main website and sign up!
|
|
|
|
|
2010/02/10 04:56:24
Subject: blackhand's scratchbuild tervigon
|
|
Nurgle Chosen Marine on a Palanquin
|
@kingcracker - Succinct and to the point thank you!. And yeah pouring a mould in one piece is genuinely easier as long as you plan the master ahead of time.
@ Anung and munch - I have had vague ideas of an eggsac that has split/burst at the end with the gaunts head and gun barrel pushing out covered in slime and amniotic fluid, ok maybe more than vague ideas but I will have to if time and costs allow me to try something that complicated.
Cheers
BLACKHAND
|
BobtheInquisitor wrote:I tend to glue metal models with a combination of BSI cyanoacrylate and my tears of frustration.
|
|
|
|
|
2010/02/10 04:59:34
Subject: blackhand's scratchbuild tervigon
|
|
Longtime Dakkanaut
|
I suppose the possible downside to a one piece mould is that you may gouge the original with your scalpel when you cut it out? Other than that, it seems a sensible alternative to the usual two-stage two-piece mould process, depending on what you'll be casting.
|
|
|
|
|
2010/02/10 05:33:16
Subject: blackhand's scratchbuild tervigon
|
|
Nurgle Chosen Marine on a Palanquin
|
@clang - If you have a brand new sharp knife blade and put tension on the area you are slicing its not much of a problem. The good thing about pinkysil is that its really stretchy and when you put tension on it it will often pull away from the master. As usual though its the overhangs and extremeties that are the problem but I think that will be the case no matter what product or method you use
Cheers
BLACKHAND
|
BobtheInquisitor wrote:I tend to glue metal models with a combination of BSI cyanoacrylate and my tears of frustration.
|
|
|
|
|
2010/02/14 08:33:03
Subject: blackhand's scratchbuild tervigon
|
|
Nurgle Chosen Marine on a Palanquin
|
And we have an update!
I got around to painting up a couple of the gaunts and tried out the clear resin in a mould I made for the eggsac
Here is the progresion from resin cast to eggsac
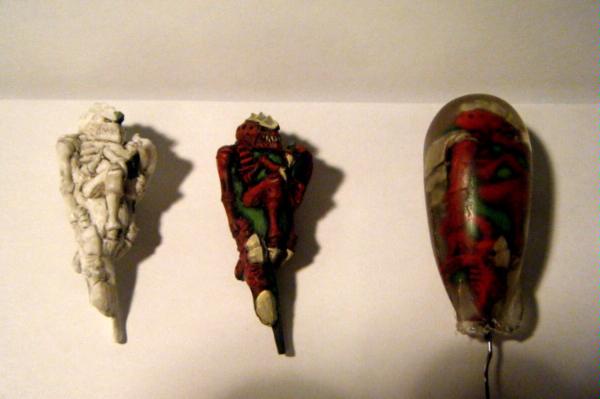
and a few shots of the eggsac
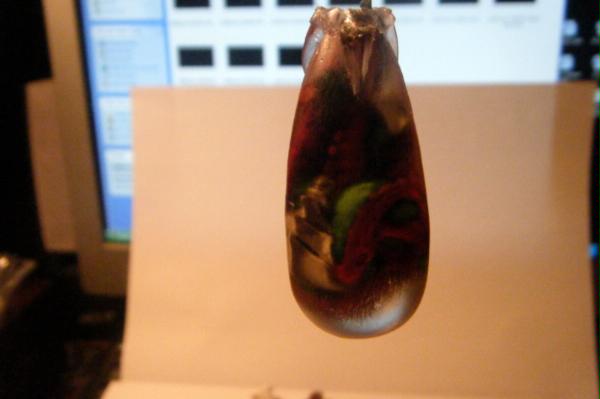
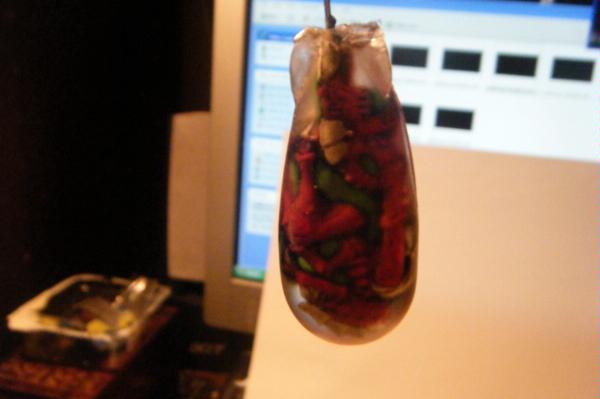
I cant believe I didn't realize that the curve of the sac would distort the gaunt inside but I guess it will take care of the worry I had that all the gauntsacs would look to similar. All you have to do is turn the sac slightly and the gaunt inside looks totally different. I think I will tone down the green of the "yolk" that I put in the gaps of the gaunt model (this was a solution to the problem of doing a single mould for such a complex model) it seems to drown out the reds of the guants body. Otherwise I'm pretty happy with how it came out, next I need to find a way of polishing the sacs up to a nice gooey shine and I can start assemble the underside of the Tervi'
As always C&C is welcome.
Cheers
BLACKHAND
|
BobtheInquisitor wrote:I tend to glue metal models with a combination of BSI cyanoacrylate and my tears of frustration.
|
|
|
|
|
|
|


