| Author |
Message |
 |
|
|
|
|
Advert
|
Forum adverts like this one are shown to any user who is not logged in. Join us by filling out a tiny 3 field form and you will get your own, free, dakka user account which gives a good range of benefits to you:
- No adverts like this in the forums anymore.
- Times and dates in your local timezone.
- Full tracking of what you have read so you can skip to your first unread post, easily see what has changed since you last logged in, and easily see what is new at a glance.
- Email notifications for threads you want to watch closely.
- Being a part of the oldest wargaming community on the net.
If you are already a member then feel free to login now. |
|
 |
2011/04/08 20:51:19
Subject: Bob's Projects
|
|

Sneaky Kommando
|
this is real incredible work here, i agree about the tank treads, they are a bit unproportional
|
|
|
 |
|
2011/04/08 21:22:49
Subject: Re:Bob's Projects
|
|
Death-Dealing Devastator
|
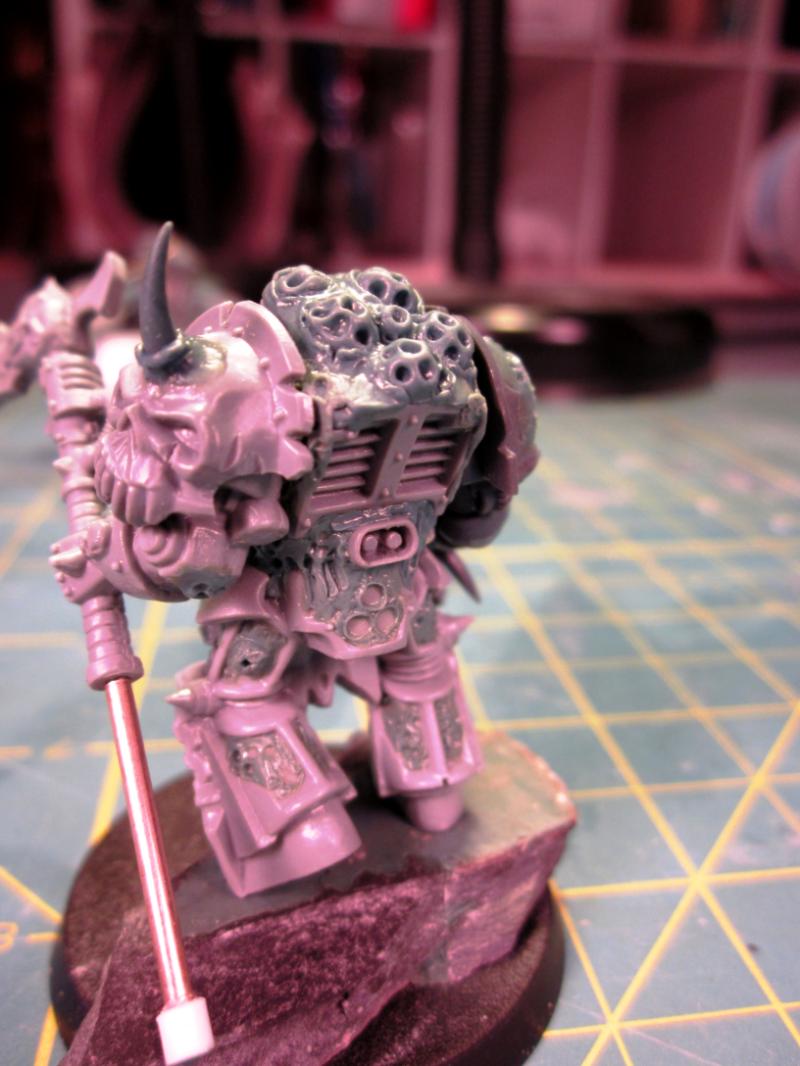
this thread has inspired me to make my own obliterators! sub'd!
|
 Capellanus Lemartes Speramus Capellanus Lemartes Speramus |
|
|
|
|
2011/04/11 04:42:58
Subject: Bob's Projects
|
|
Sinister Chaos Marine
|
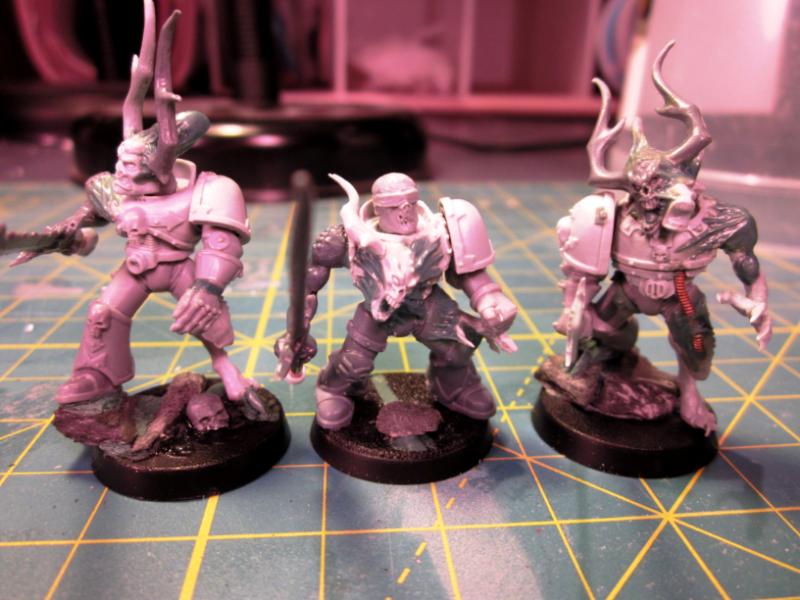
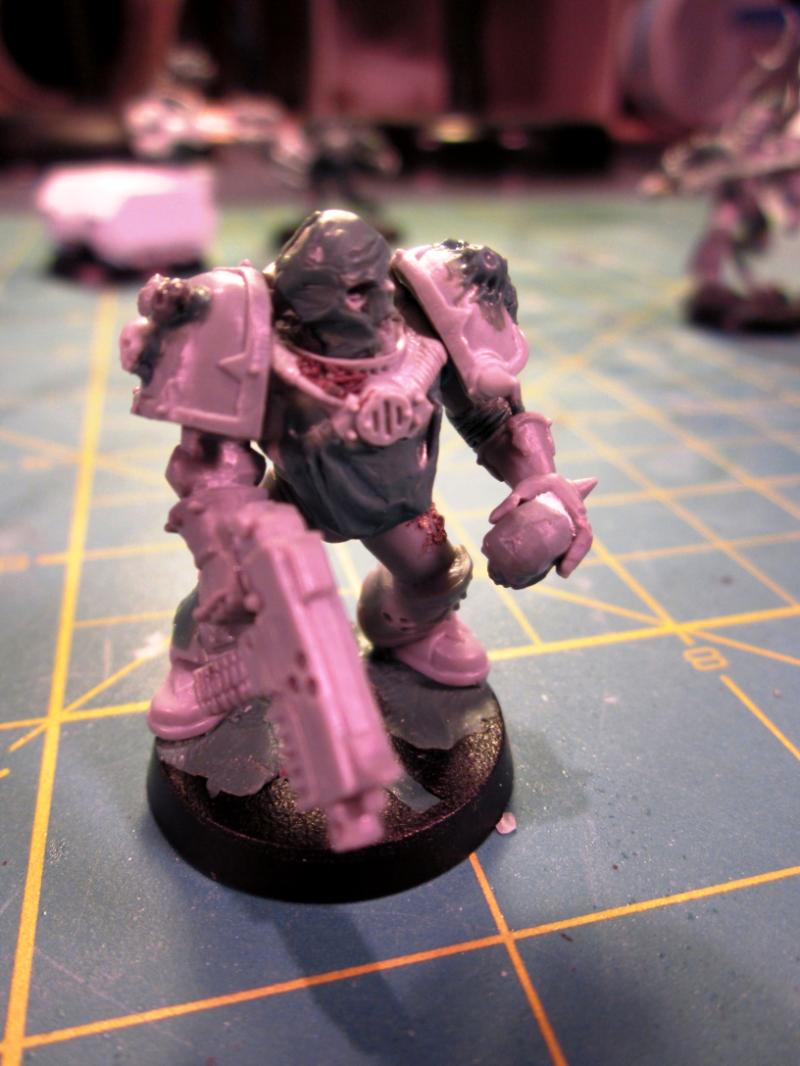
Thanks guys. I appreciate it, I'd love to see what you come up with for obliterators. I'm pondering my next conversion. I'm thinking of using demonettes and gargolye wings to make raptors, but I think they need more armor and haven't come up with a good way to do it yet. I could give them shoulder armor like the masque or add a few more bits to their arms and legs like they have on their torsos, but I'm not sold on either idea at this point. Suggestions welcome.
|
|
|
|
|
|
2011/04/12 03:07:13
Subject: Re:Bob's Projects
|
|
Sinister Chaos Marine
|
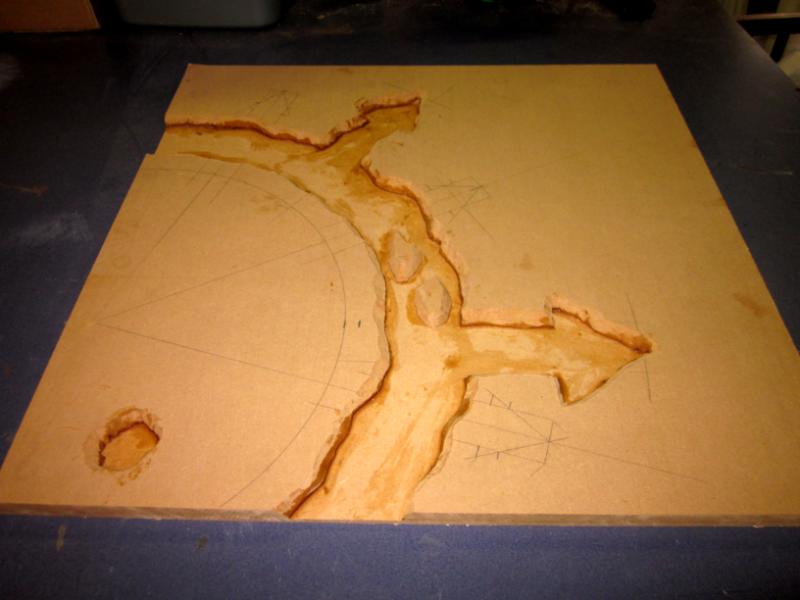
I started work on a display board yesterday. The glue was all set today. Not sure what I'm going to put in the "ditch" yet; probably blood, but could be lava.
|
|
|
|
|
|
2011/04/12 03:09:57
Subject: Bob's Projects
|
|
[SWAP SHOP MOD]
Decrepit Dakkanaut
OH-I Wanna get out of here
|
Is that going to be for the Nurge, or the beast deamons? Or both, some swappable spots maybe?
|
|
|
|
|
2011/04/12 03:21:43
Subject: Bob's Projects
|
|

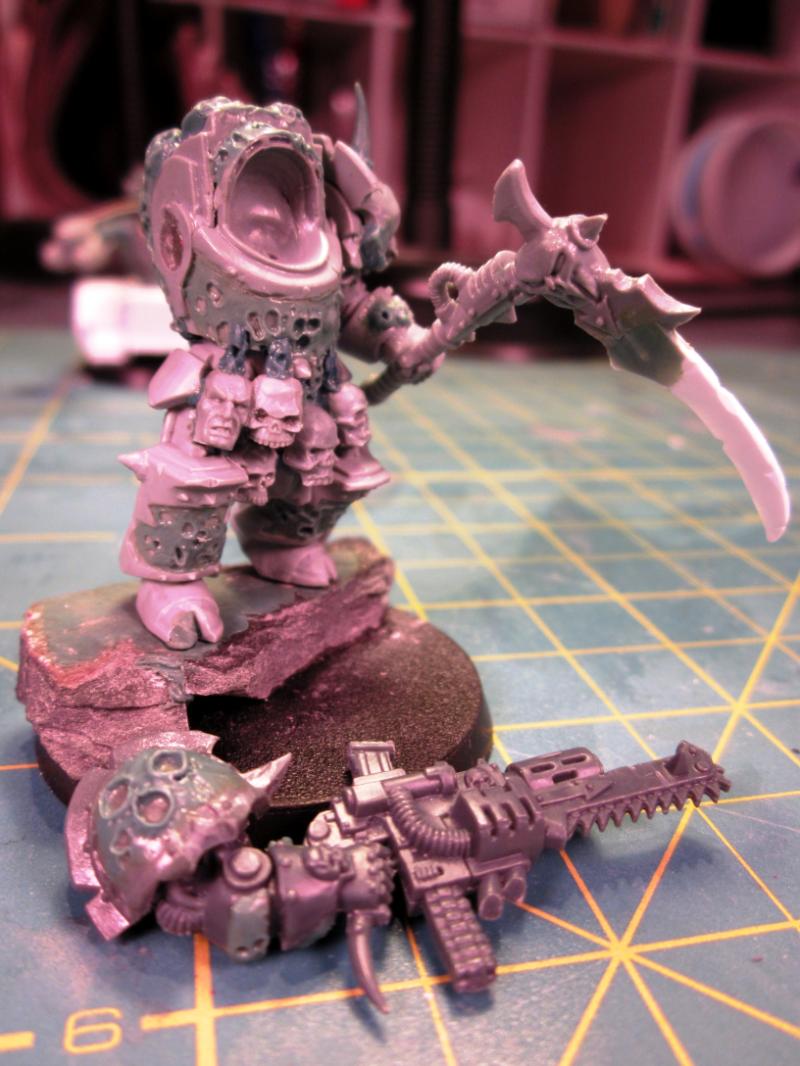
Morphing Obliterator
|
...I... I dont think i can subscribe to this quickly enough.
Seriously, awesome stuff.
|
|
This message was edited 1 time. Last update was at 2011/04/12 03:22:47
|
|
|
|
|
2011/04/12 03:39:48
Subject: Bob's Projects
|
|
Crazed Spirit of the Defiler
|
That board is awesome looking.
|
|
|
|
|
|
2011/04/12 21:27:20
Subject: Bob's Projects
|
|
Sinister Chaos Marine
|
whalemusic360 wrote:Is that going to be for the Nurge, or the beast deamons? Or both, some swappable spots maybe?
This is going to be a generic board for any chaos army. That's why I'm keeping the fluid in the giant icon generic like blood or lava. I may make some themed board later. This is my first attempt so I'm keeping it simple and generic.
No recessed spots for specific bases. I'm thinking I'm going to put sheet metal over the spots the army will stand on since I put magnets in the bases of most of my figures. I had planned on tracing the second layer onto the sheet metal befor gluing it down, but totally forgot the sheet metal till just now.
|
|
|
|
|
|
2011/04/12 23:34:24
Subject: Bob's Projects
|
|
Dakka Veteran
|
Well river of blood with chunks of victim/sacrifies/BBQ always makes for chaos.
The tracks, too big for that model yes but well done. Somehow i doubt you have the design plans you used, because that would be awesome info to share.
|
|
|
|
|
2011/04/13 04:25:41
Subject: Bob's Projects
|
|
Sinister Chaos Marine
|
1-i wrote:The tracks, too big for that model yes but well done. Somehow i doubt you have the design plans you used, because that would be awesome info to share.
I would share them if I had them, but the whole thing was free form, just making it up as I went. They are pretty easy to build, I copied Kanvass1's technique. http://www.youtube.com/watch?v=nu25qmf99Po
|
|
|
|
|
|
2011/04/15 01:28:09
Subject: Re:Bob's Projects
|
|
Sinister Chaos Marine
|
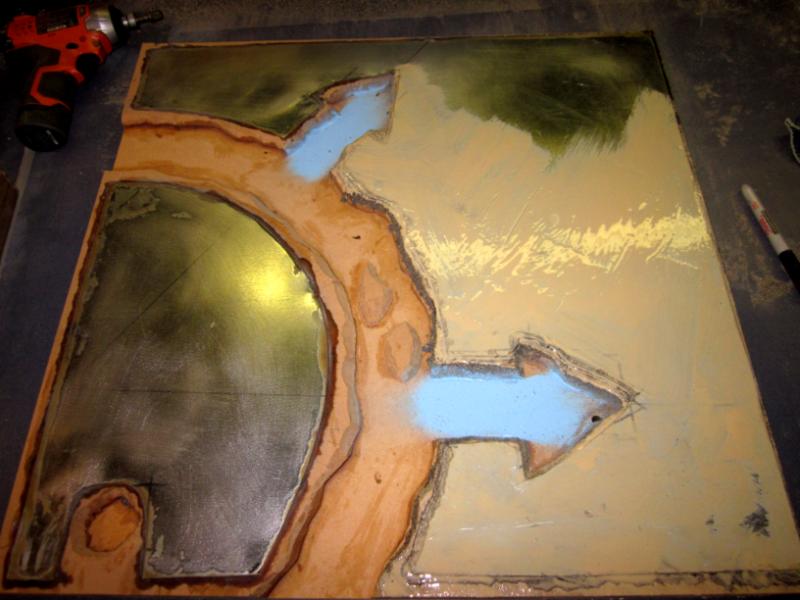
Display board moving along. The sheet metal is glued in place and half covered in glue (forgot to take a picture sooner). Ignore the blue; once I got the rough shape of the sheet metal cut out I put it in place and tried using spray paint in the gap to paint the shape of the arrows onto the under side of the metal. It worked okay.
|
|
|
|
|
|
2011/04/15 01:58:49
Subject: Bob's Projects
|
|
[SWAP SHOP MOD]
Decrepit Dakkanaut
OH-I Wanna get out of here
|
Looking really good. Consider the sheet metal idea stolen. I think I'll even do it on my next game board.
|
|
|
|
|
2011/04/15 03:13:30
Subject: Re:Bob's Projects
|
|
Sinister Chaos Marine
|
whalemusic360 wrote:Looking really good. Consider the sheet metal idea stolen. I think I'll even do it on my next game board.
Glad you like it. Here's a tip; I went to the hardware store and the sheet metal in the "sheet metal" area was for welding and such and was somewhat expensive (~$30 or so for a 2'x3'), but in the "duct work" section they had 2'x3' sections of sheet metal for ~$7. I'm sure its not as high a quality, but its still steel and more than adequate for our purposes.
You might like this stuff as well. This transport tray is pretty easy to make. I used a table saw to cut a groove in a long strip of wood. Then cut the wood into the proper lengths for the sides. Then nailed the wood in the rectangular shape with the sheet metal in the groove. I know that's not very clear. If anyone needs I can draw some sketches an post them.
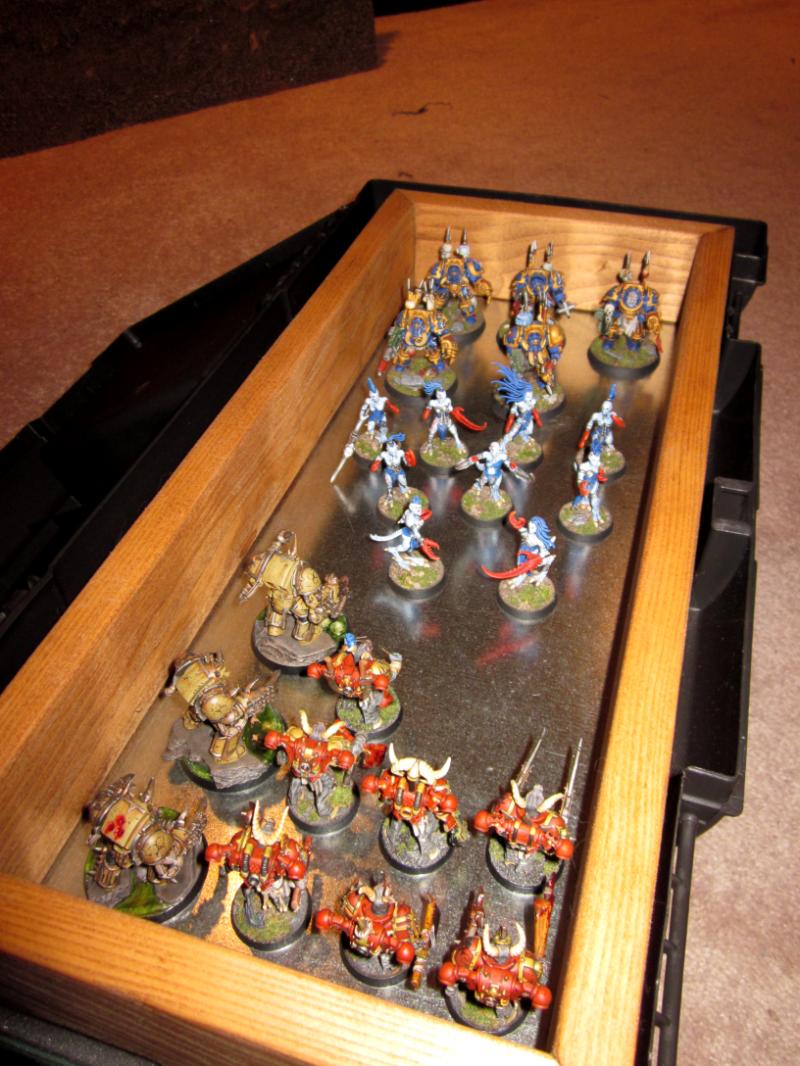
And Upside down. I glue 1/8th inch by 1/4 inch diameter rare earth magnets on the bottom of the bases. It keeps a good hold on plastic figures, but isn't strong enough to hold metal figs. I put two of the same magnets on the bottom of Queek Headtaker and he was not very stable. These guys are stable enough that if you accidentally drop your case a few feet you should be okay, but if you tossed it you'd have a mess.
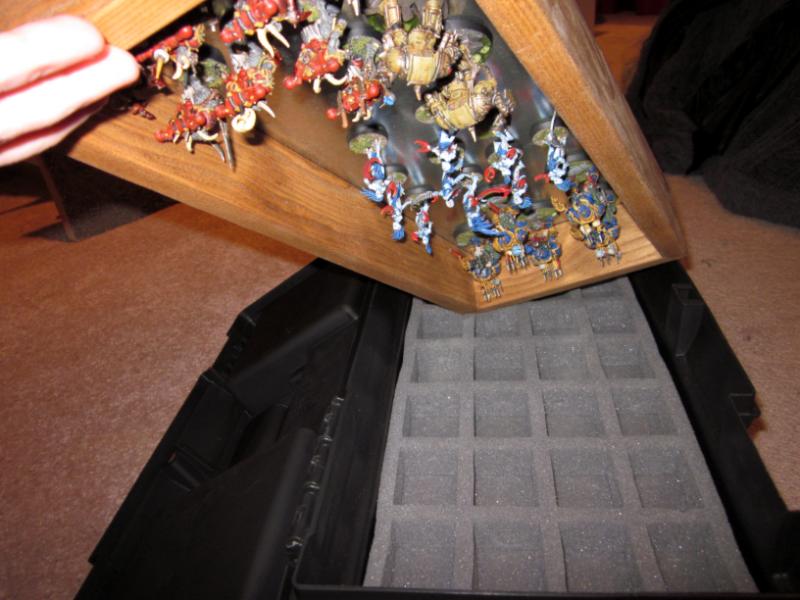
I glued a couple of pieces of scrap in a small cardboard box with a hinged top to carry my just a few around for like when going to the game store to paint. I use a few extra magnets in the lid to hold the extra arms and backpack up so they don't rub against the metal.
|
|
|
|
|
|
2011/04/15 03:18:20
Subject: Re:Bob's Projects
|
|
Speedy Swiftclaw Biker
|
That is awesome, i really like the termies, if you dont mind how did you do swamp, i get the skulls but the clear "water" material got me wondering how
|
|
|
|
|
|
2011/04/15 03:20:33
Subject: Bob's Projects
|
|
[SWAP SHOP MOD]
Decrepit Dakkanaut
OH-I Wanna get out of here
|
I've got a friend that owns a steel siding (for houses) business, Im betting I can get some scrap sheets for free.
|
|
|
|
|
2011/04/16 03:17:47
Subject: Re:Bob's Projects
|
|
Sinister Chaos Marine
|
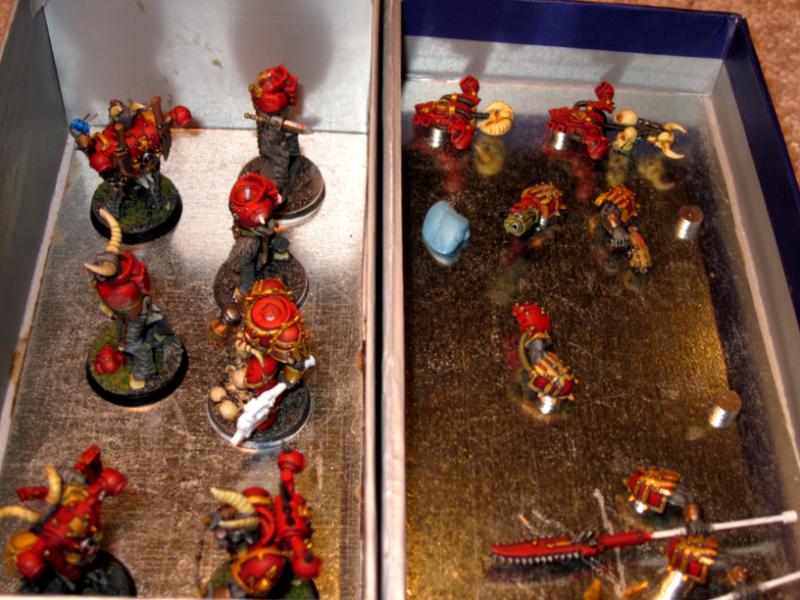
Njal the Weatherman wrote:That is awesome, i really like the termies, if you dont mind how did you do swamp, i get the skulls but the clear "water" material got me wondering how
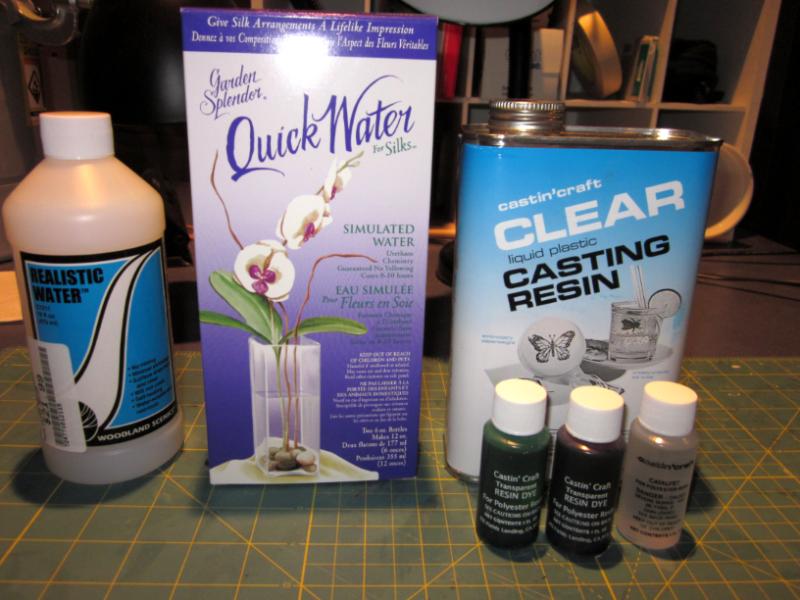
Short Answer: I used masking tape to create walls round the edge of the base and used castin'craft's Clear Liquid Plastic Resin with some of their Green dye.
Long Answer: I've tried three different product each cost between $20 and $30.
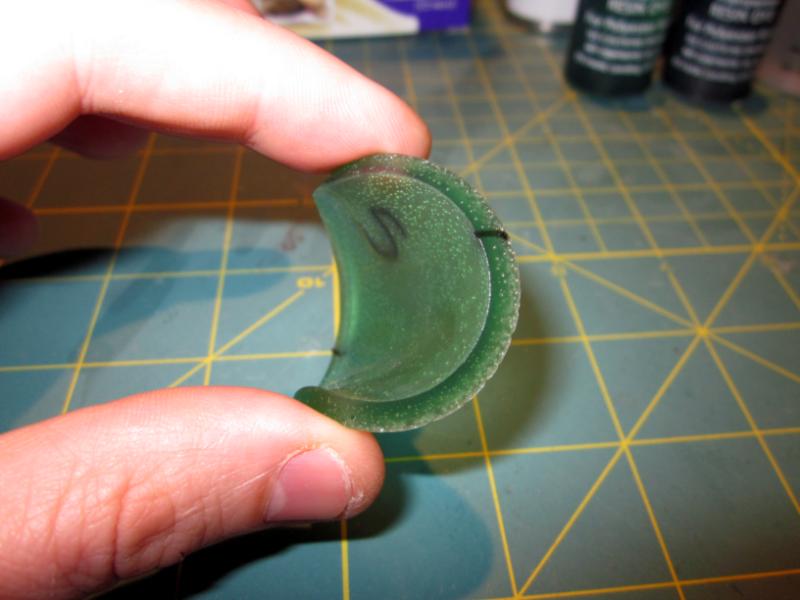
For my first attempt I created a wall of masking tape around the edges of the base where the liquid would pour out and used Woodland Scenics Realistic Water with a little green wash mixed in. The problem I had (and some google searches turned up lots of other folks with the same issue, but no solutions) was the surface tension was so great as it dried is climbed up the walls of tape and the rocks on the figure so I ended up with what looked like a glass bowl. I trimmed off the "bowl edges" along the front of the figure and tried again this time I painted a layer of silicon on the tape, but had pretty much the same result. The stuff is pretty thick next instead of pouring in a layer of the stuff I put globs on let them dry over night then added some more globs the next night and so on for several nights.
This is what I ended up with. Over all I'm happy with it, but it's not the edge of a pool I wanted like in the next two terminators. All-in-all if it wasn't for the crawling issue I'd be very happy with this product. I'll do some more experimenting with it and if any has any tips I'd love to hear them.
The next thing I tried was Garden Splendor's Quick Water. I picked it up at a craft store and don't recommend it. It took a LONG time to dry. I'd say somewhere between 1 and 2 weeks. I'm not sure because it never set up the way I expected so I'm guessing some of the time I was waiting it was already done and I didn't know it. As you can see in this pic it stays flexible, has lots of bubbles and if I press my finger into it it leaves finger prints. I three test pours in dixie cups and never tried it on a model.
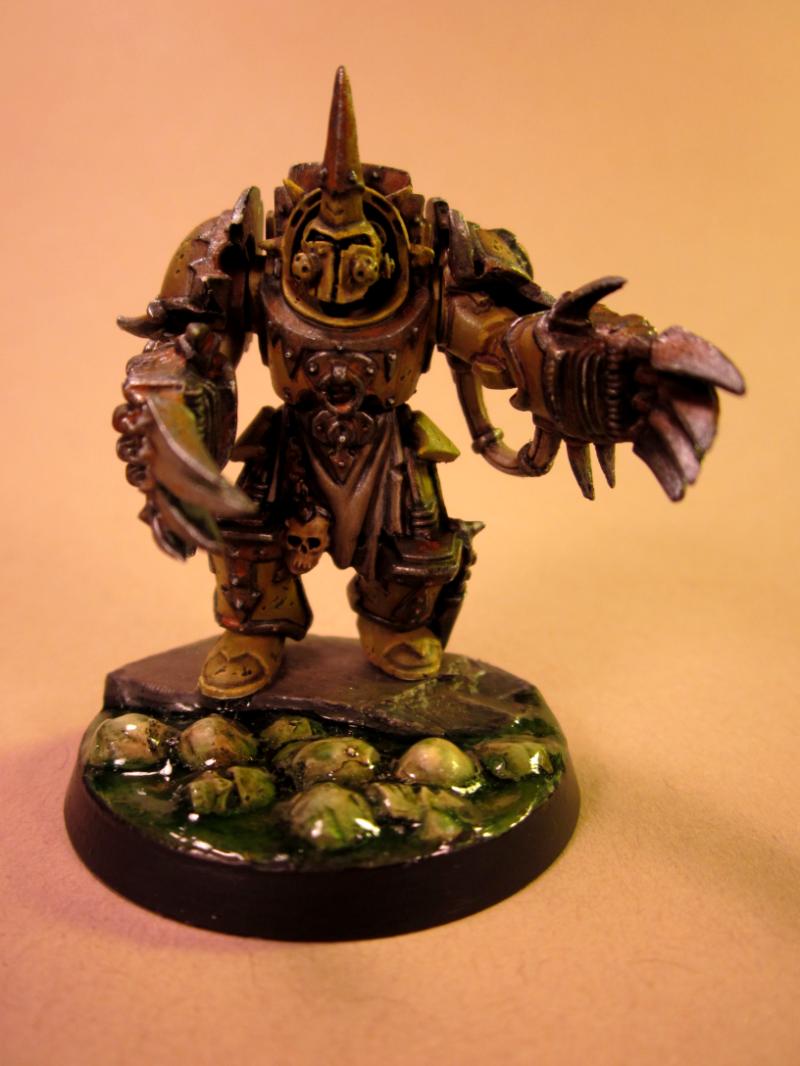
The last product I tried was castin'craft's Clear Liquid Plastic Resin. It's a two part epoxy so you need the big can of resin and the small bottle of catalyst (sold separately). I also bought their green and red dye's. I used the same process with the tape wall (no silicon) as with the Realistic Water. I added some of their green dye to the resin, then added some red to give it a murkier look. It worked beautifully, the liquid in the cup was a murky, swampy green, but as you can see from the pic below when cured it looked like green jello. Later I covered it with hard coat poorly mixed with Devlin Mud to murk it up a bit (pics earlier in the thread). Once I had the resin on the base I put a desk lamp about 8 inches over to provide extra heat and speed curing. I left it over night and it was done in the morning. There were also a couple of gaps next to the rocks where it didn't fill in as smooth as I'd like so I filled those with a few layers of 'Ard Coat.
It came out pretty good. Still not 100% happy with it. There was a little bit of a tension issue, but you will have that with any liquid. While measuring out the resin and catalyst aren't hard I'd rather just pore it out of a bottle like Realistic Water. The resin is pretty nasty stuff too. While researching products on the interweb I saw warning after warning about using it only outside or in a we ventilated area.
Something interesting about heat cure resins. The warmer it is the faster it cures and as it cures it generates its own heat. This means it "dries" counter intuitively; imaging spiked ball of resin. The big ball will generate the most heat, which will accelerate the curing process, which will generate more heat accelerating the curing process, and on and on. The spikes will generate less heat, and dissipate heat faster so will cure slower. So the center of the big ball will be the first part cured and the tips of the spikes the last. This also means a thin disk a few mm thick can take a long time to cure. Using a bit more catalyst will speed it up, but can cause it to crack if you use too much, so check the directions carefully.
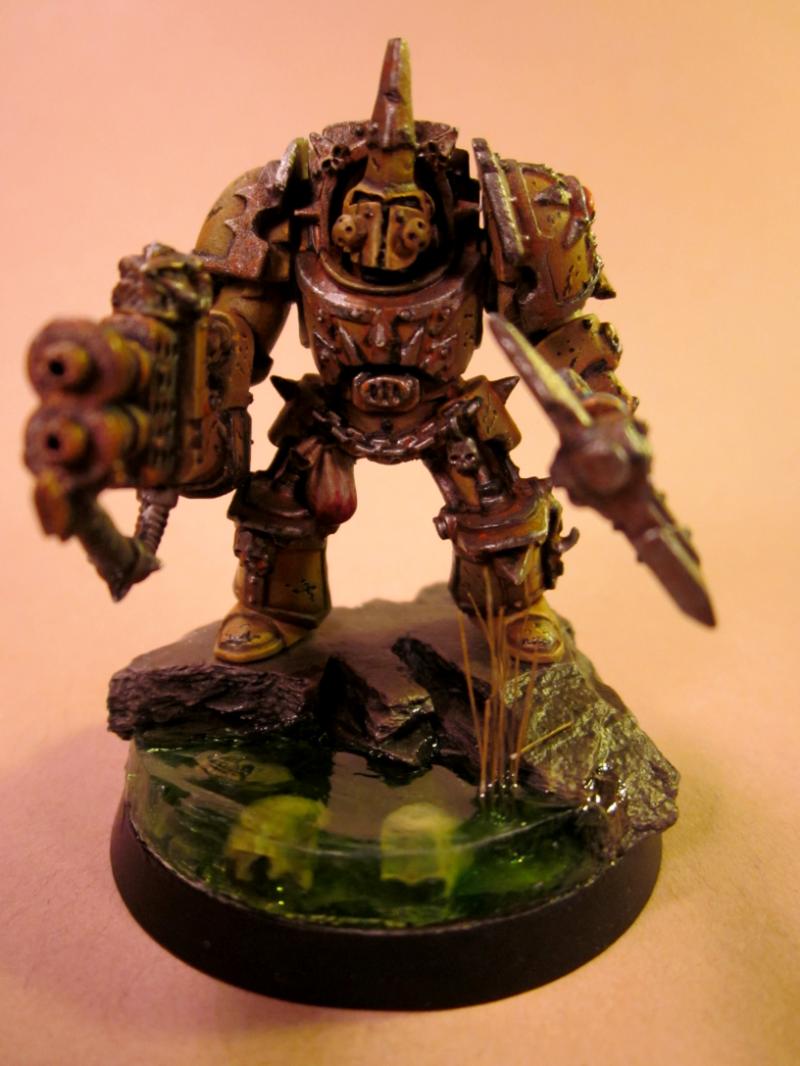
All in all I have two products that I think will give me pretty good results with some practice. If anyone out there has any advice or another product they recommend please share.
|
|
|
|
|
|
2011/04/22 18:33:07
Subject: Re:Bob's Projects
|
|
Sinister Chaos Marine
|
|
|
|
|
|
|
2011/05/22 16:47:13
Subject: Re:Bob's Projects
|
|
Sinister Chaos Marine
|
|
|
|
|
|
|
2011/05/22 23:22:28
Subject: Bob's Projects
|
|
Voracious Kroothound
SLC, UT
|
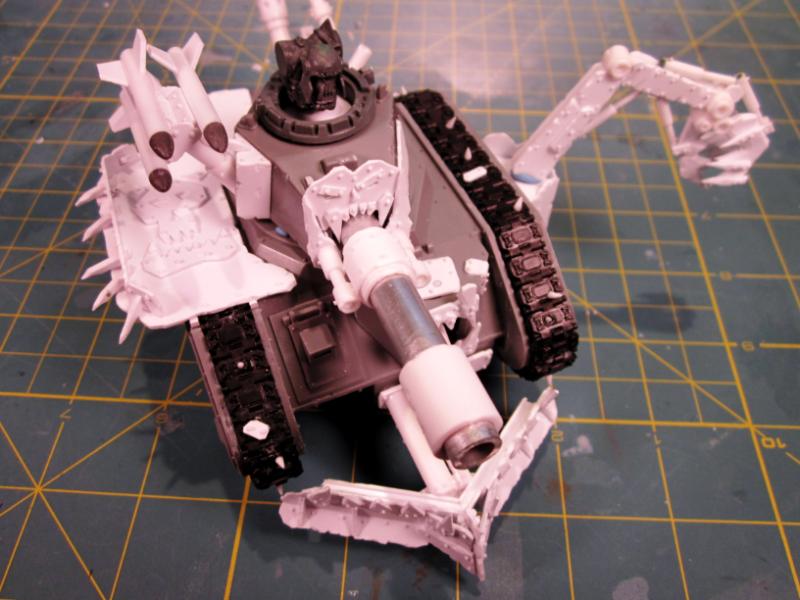
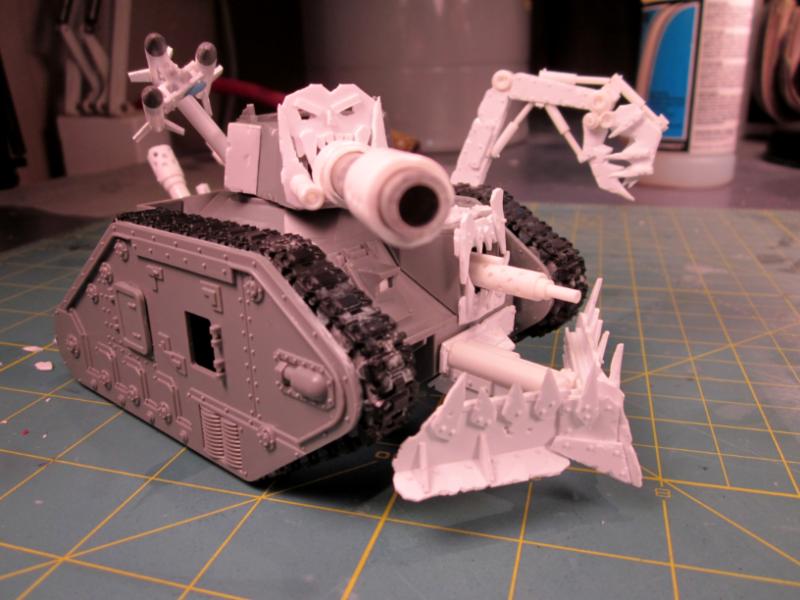
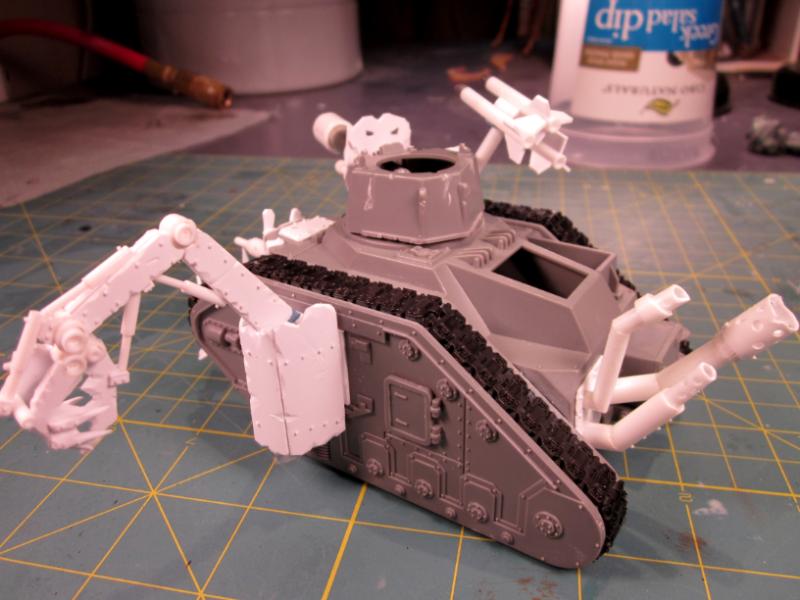
Looks very orky. the tracks could use some orkifying though.
|
|
This message was edited 1 time. Last update was at 2011/05/22 23:23:24
|
|
|
|
|
2011/05/23 00:00:27
Subject: Re:Bob's Projects
|
|

Regular Dakkanaut
|
Great stuff you got here, I've been wanting to do bases with high water for some time, and I think I'll have a go at it now 
I have some water effect from zitardes which is essentially just a to part epoxy (resin and hardener) gives great results for my other projects.
Now I have a question, I noticed on one picture of the beastmen bezerker that the torso didn't have a seam from where the two halves was glued, and then I noticed that two of these guys have Iron Warriors torso's and they're not in metal as usual. Sooo this leads me to my question, do you cast your own in resin from a mould of the original metal ones sold by GW??
I'm toying with the idea of doing that myself, for personal use of course.
rwzimmerman wrote:
|
The might of the omnissiah ! Adeptus Mechanicus force.
http://www.warseer.com/forums/showthread.php?t=198681 |
|
|
|
|
2011/05/23 02:12:54
Subject: Re:Bob's Projects
|
|
Sinister Chaos Marine
|
the damned artificer wrote:Great stuff you got here, I've been wanting to do bases with high water for some time, and I think I'll have a go at it now
I have some water effect from zitardes which is essentially just a to part epoxy (resin and hardener) gives great results for my other projects.
Now I have a question, I noticed on one picture of the beastmen bezerker that the torso didn't have a seam from where the two halves was glued, and then I noticed that two of these guys have Iron Warriors torso's and they're not in metal as usual. Sooo this leads me to my question, do you cast your own in resin from a mould of the original metal ones sold by GW??
I'm toying with the idea of doing that myself, for personal use of course.
I'll have to check out zitardes; see how it measures up.
Good eye. Yes, I do make my own molds and cast from them. I started trying so I could make more of the OOP stuff I have (like the old metal noise marines) and bits that I use extensively (skulls) or are very expensive (like Typhus's head). I started casting the SM torso as well since I hate filling the seem between the two halves. I made molds of a few after filling all the gaps and cast them as a single piece (no filling!).
Here's a few things I would tell anyone thinking about casting.
1) It is not cheep. To get good results you need to have an air compressor, a pressure pot, mold making material, casting resin or plastic, plus all the other misc stuff (air hoses, mold releases, stir sticks, digital scale, etc). I don't think I've spent less money by doing it. For example; I have no use for chaos knights, but they have wicked cool weapons and shoulder pads, so knowing I could cast them I bought them ($45 IIRC) and made molds of their shoulder pads and some of their weapons (this probably cost about $10 in materials to make the molds; casting the parts after that costs pennies apiece). I've used four of one of their halberds to make the power claw on the dreadnaught. So you can look at it as I've spent $55 (disregarding setup costs) than I would have or I've saved $135 (since that's what it would have cost to buy three more boxes of chaos knights. But I'd never spend that sort of cash for bits for single model). In the end I've spent way more money on casting materials and GW figures than I would have if I did not cast, but I've saved a bundle (that I never would have spent) if you go by the retail cost of the bits I've used. If you were building a hoard army and were going to make the same view figs over and over I'm sure you could save a bundle.
2) Getting good results is not easy (but not hard either). It will take some practice to make molds that are not prone to bubbles. You will need to use pressure or there will be lots of bubbles and any long slender parts like a horn will not "fill out" leaving you with a head with only half a horn. Getting usable results takes a bit of time and effort. I try to stick to "spherical" objects (skull, SM torso) or object with large "channels" (an melta gun). That gives plenty of space for the resin/plastic to get in and the air to get out. Long skinning things like the chaos knight halberds are much harder since the resin/plastic traps air in the slender parts.
For me it is worth it since I can do conversions that would have been too expensive to do otherwise.
Automatically Appended Next Post:
TheH2Oelement wrote:Looks very orky. the tracks could use some orkifying though.
Agreed. Are you talking about the black parts or the gray sections near the tracks (basically the sides)? I plan on adding some spikes an small tacked on plates to the black parts, the gray will get some plates, rivets and probably some glyphs as well. Any suggestions? I'd love to hear them.
|
|
This message was edited 3 times. Last update was at 2011/05/23 02:30:58
|
|
|
|
|
2011/05/23 11:06:34
Subject: Bob's Projects
|
|
Regular Dakkanaut
|
Thanks a lot, I've been researching on the matter in over a year and I think it's finally time now. As you said, it is expensive, but compared to buying all the stuff I need for my armies (Iron wariors and my admech force with a few titans) I think I'll come out with more money and cooler armies in the end
|
The might of the omnissiah ! Adeptus Mechanicus force.
http://www.warseer.com/forums/showthread.php?t=198681 |
|
|
|
|
2011/05/24 20:00:06
Subject: Re:Bob's Projects
|
|
Sinister Chaos Marine
|
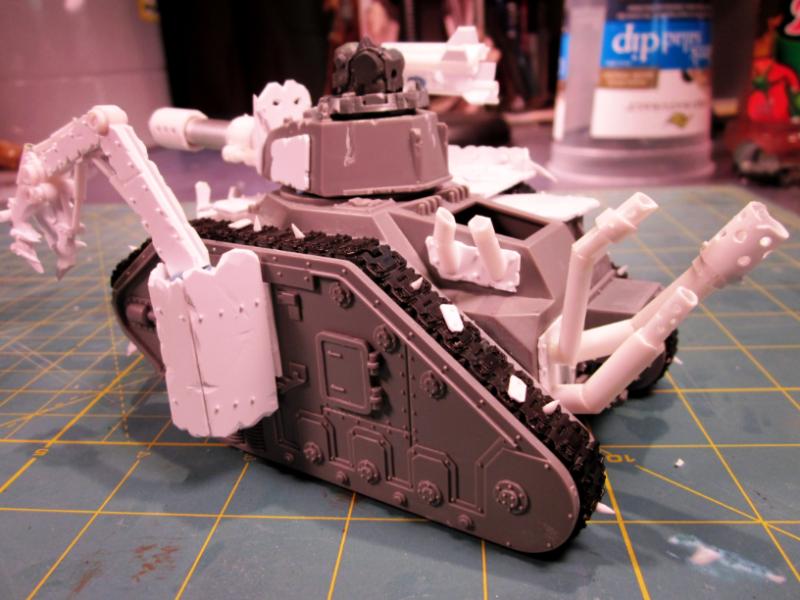
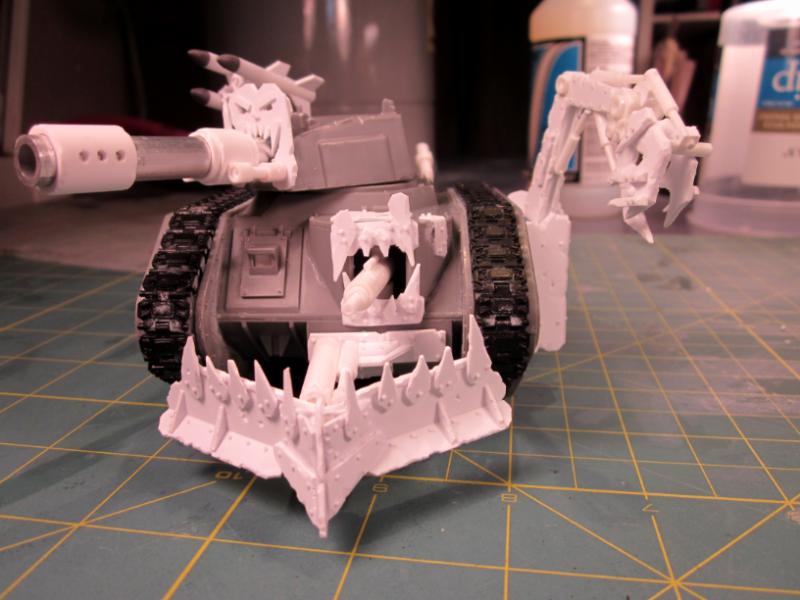
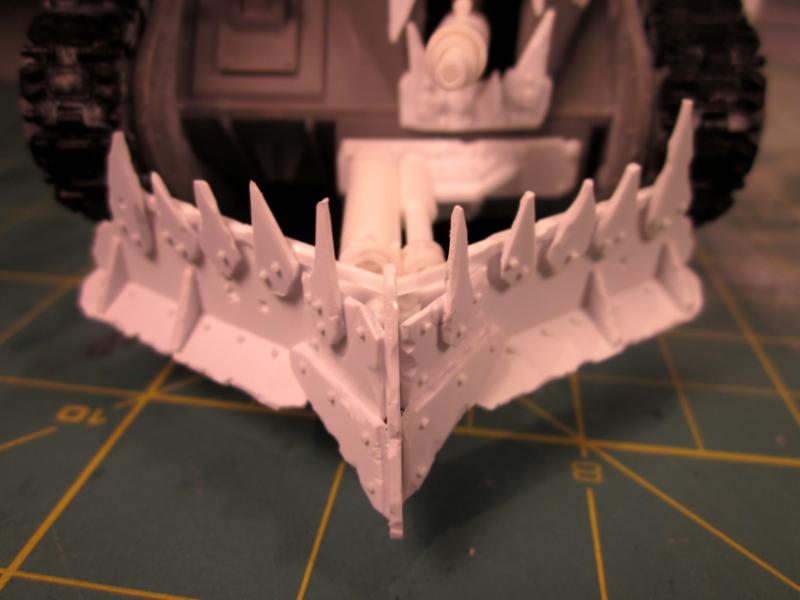
Progress.... Almost done with the build.
|
|
|
|
|
|
2011/05/24 20:22:24
Subject: Bob's Projects
|
|
Longtime Dakkanaut
|
That looks awesome, bob. I really like the added exhaust pipes.
|
|
|
|
|
|
2011/05/24 23:18:50
Subject: Re:Bob's Projects
|
|
Voracious Kroothound
SLC, UT
|
|
|
|
|
|
|
2011/05/24 23:33:48
Subject: Bob's Projects
|
|

Nasty Nob
|
DAM your looted wagon is good. i need to get my self some plasticard. EPIC sunscribed
|
|
|
|
|
|
2011/05/24 23:38:44
Subject: Bob's Projects
|
|
Stabbin' Skarboy
|
I think that is the coolest looted wagon I have ever seen. And the sheet metal idea for the display board, Genius. Cant wait to see more
|
|
|
|
|
|
2011/05/24 23:43:13
Subject: Bob's Projects
|
|
Morphing Obliterator
|
This is all epic. Love the display board - how much weight does the sheet metal add?
|
|
|
|
|
2011/05/24 23:43:25
Subject: Re:Bob's Projects
|
|
Stabbin' Skarboy
|
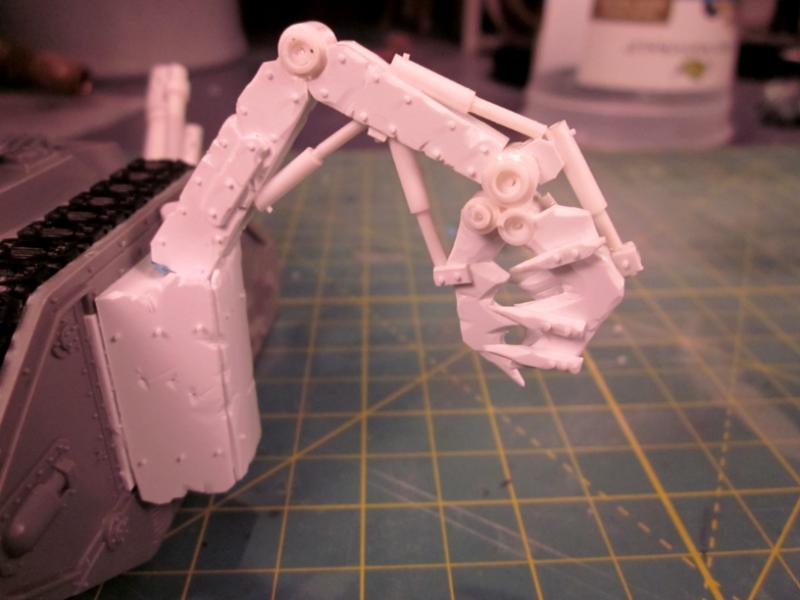
Good work on the Looted Wagon! The claw looks nice and orky!
|
PM me if you want me to draw anything related to Warhmmer 40k. I will put it in my gallery for all to see.
WAAAGH! Wazrokk 
Salamanders - 2000 pts 

|
|
|
|
|
2011/05/24 23:48:39
Subject: Re:Bob's Projects
|
|
Sure Space Wolves Land Raider Pilot
|
Fantastic jobs there! Really love the ork dread!!!! 
|
|
|
|
|
|
|
|

 1250 Kalvian 110th PDF (IG)


 bad moonz
 Kabal of Black heart
 I HATE finecast