| Author |
Message |
 |
|
|
|
|
Advert
|
Forum adverts like this one are shown to any user who is not logged in. Join us by filling out a tiny 3 field form and you will get your own, free, dakka user account which gives a good range of benefits to you:
- No adverts like this in the forums anymore.
- Times and dates in your local timezone.
- Full tracking of what you have read so you can skip to your first unread post, easily see what has changed since you last logged in, and easily see what is new at a glance.
- Email notifications for threads you want to watch closely.
- Being a part of the oldest wargaming community on the net.
If you are already a member then feel free to login now. |
|
 |
2013/02/25 11:08:35
Subject: A Detailed Quality build of the Forge World Storm Eagle
|
|

Thinking of Joining a Davinite Loge
|
Stunning!
I love it.
|
|
|
 |
|
2013/02/25 20:40:30
Subject: Re:A Detailed Quality build of the Forge World Storm Eagle
|
|
Nurgle Veteran Marine with the Flu
Norwich - England - usually in the pub
|
Great thread! FW models are lovely but fitting them together can be a real nightmare!
|
|
|
|
|
|
2013/02/25 21:19:27
Subject: A Detailed Quality build of the Forge World Storm Eagle
|
|

Nasty Nob
|
And I had really wanted one (three actually) of these models for a custom army project...but seeing the quality, or lack thereof in the model is making me very, very skeptical.
You've done an amazing job though, making it work.
|
Current Project: Random quaratine models!
Most Recently Completed: Stormcast Nightvault Warband
On the Desk: Looking into 3D Printing!
Instagram Updates: @joyous_oblivion |
|
|
|
|
2013/02/26 00:08:58
Subject: A Detailed Quality build of the Forge World Storm Eagle
|
|
Legendary Dogfighter
|
I have my storm eagle in a metal kr case with custom cut foam.......they are easily broken so be sure to give this great model you are working on a decent storage system lol
|
|
|
|
|
2013/02/26 02:33:12
Subject: A Detailed Quality build of the Forge World Storm Eagle
|
|

Fresh-Faced New User
Memphis TN
|
Lovepug13 wrote:I have my storm eagle in a metal kr case with custom cut foam.......they are easily broken so be sure to give this great model you are working on a decent storage system lol
I'm glad you brought that up! Actually this build is quite strong. If I dropped it, whatever actually hit a hard floor might break, but with the care taken with fitting parts and the particular adhesives I am using it is really quite rugged. I saw one build where the guy was using some kind of brush on "super glue". The CA glues I use would turn the brush into a lump in short order, so I am not sure how well that particular adhesive actually would work in this case. I have no problem picking the model up by either wing they are that solid. The canard wings might pop if they get some heavy stress, but then again they might not, the glues I use are quite strong and the way it is attached makes a lot of difference as well as the prep. Even attempting to get any of the main parts apart would probably end up with things totaled.
I actually did some tests, and while they don't quite do the same justice as a video would, this beast is quite solid. Even the rear landing gear are quite solid for what they are.
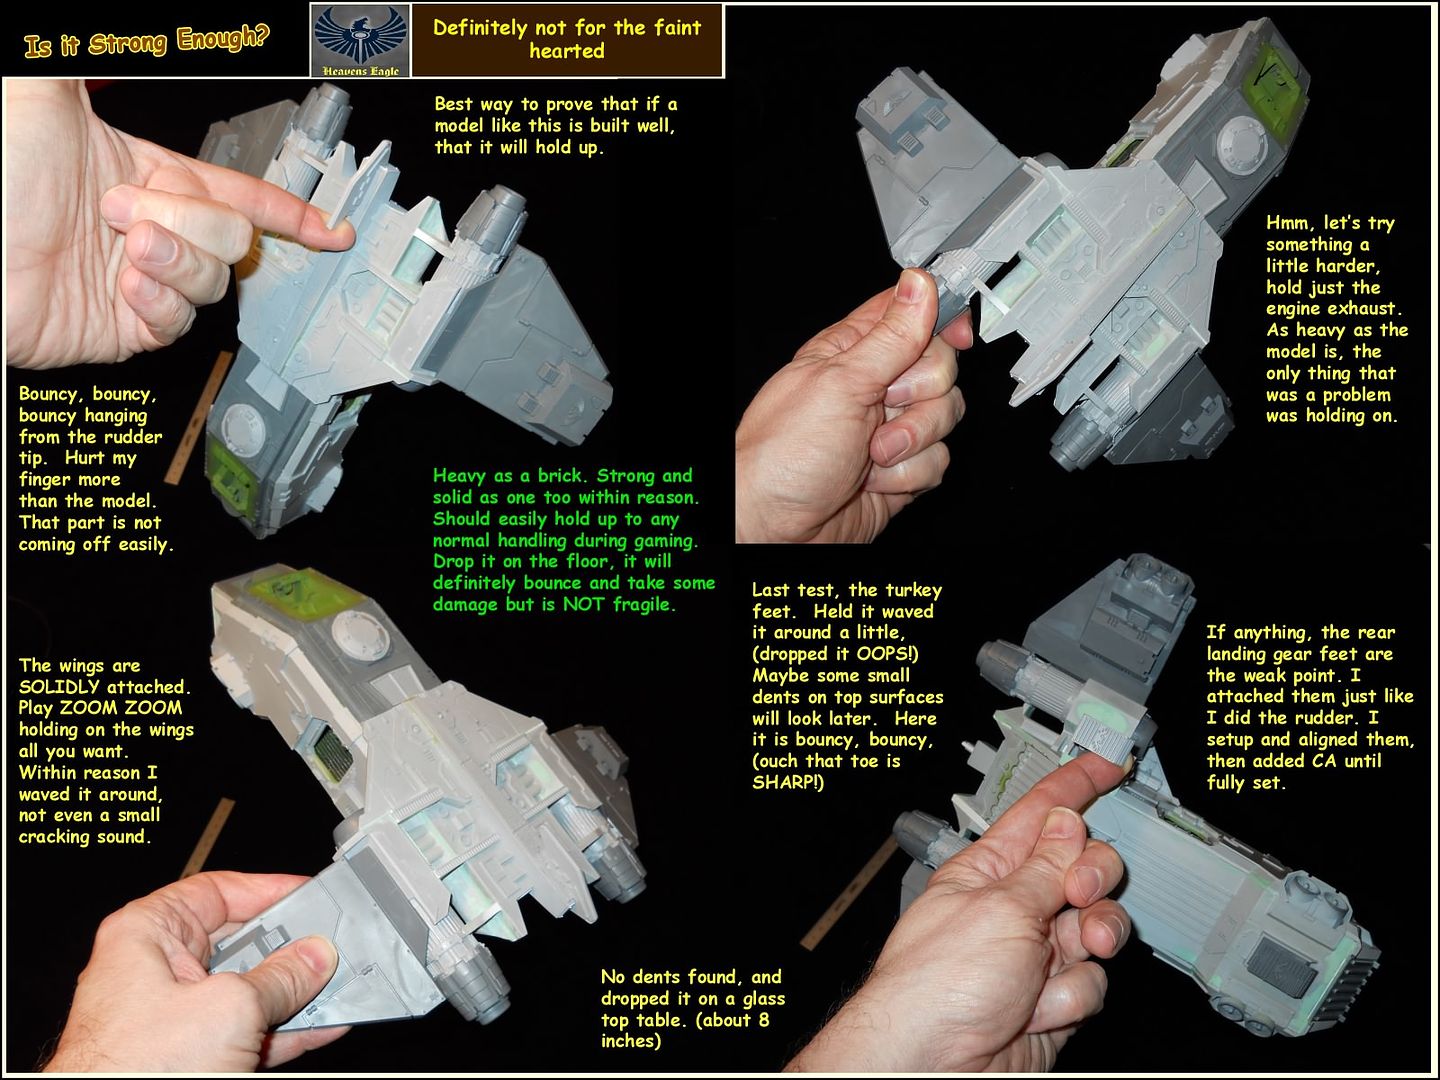 So everyone, enjoy the bonus post! I had been intending to do this and
 LovePug13 just provided the right setting. Thanks!
|
|
|
|
|
|
2013/02/27 23:55:29
Subject: A Detailed Quality build of the Forge World Storm Eagle
|
|
Legendary Dogfighter
|
My pleasure, I am paranoid handling mine......the model that is lol
|
|
|
|
|
2013/03/16 01:16:57
Subject: Re:A Detailed Quality build of the Forge World Storm Eagle
|
|
Fresh-Faced New User
Memphis TN
|
Hi folks!
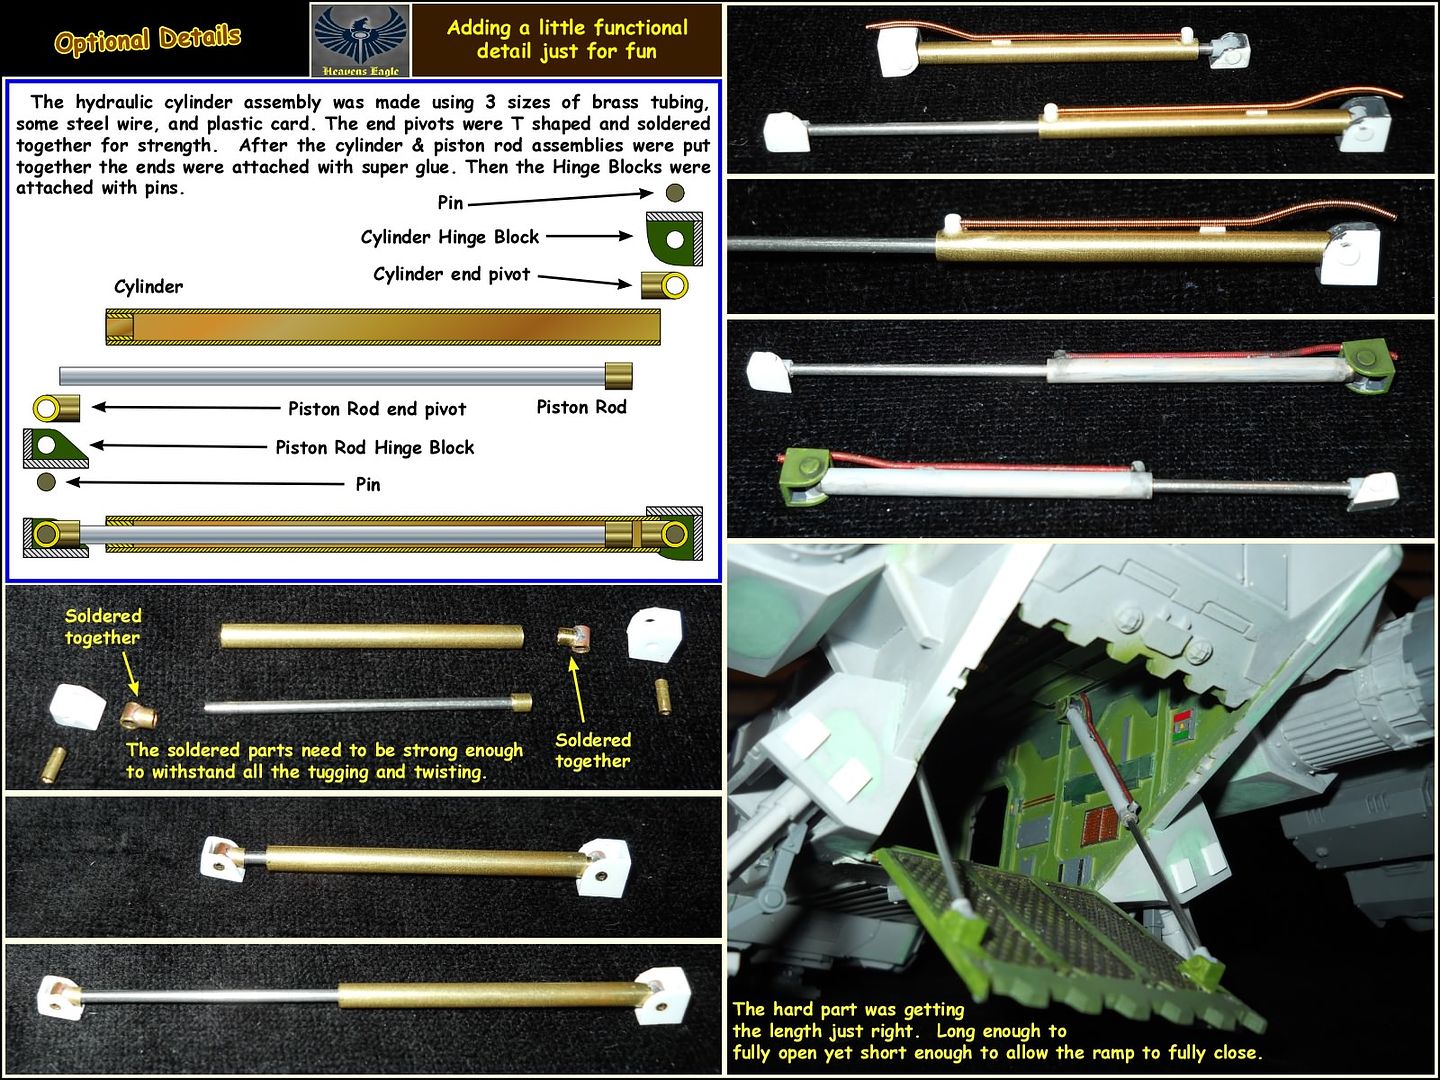
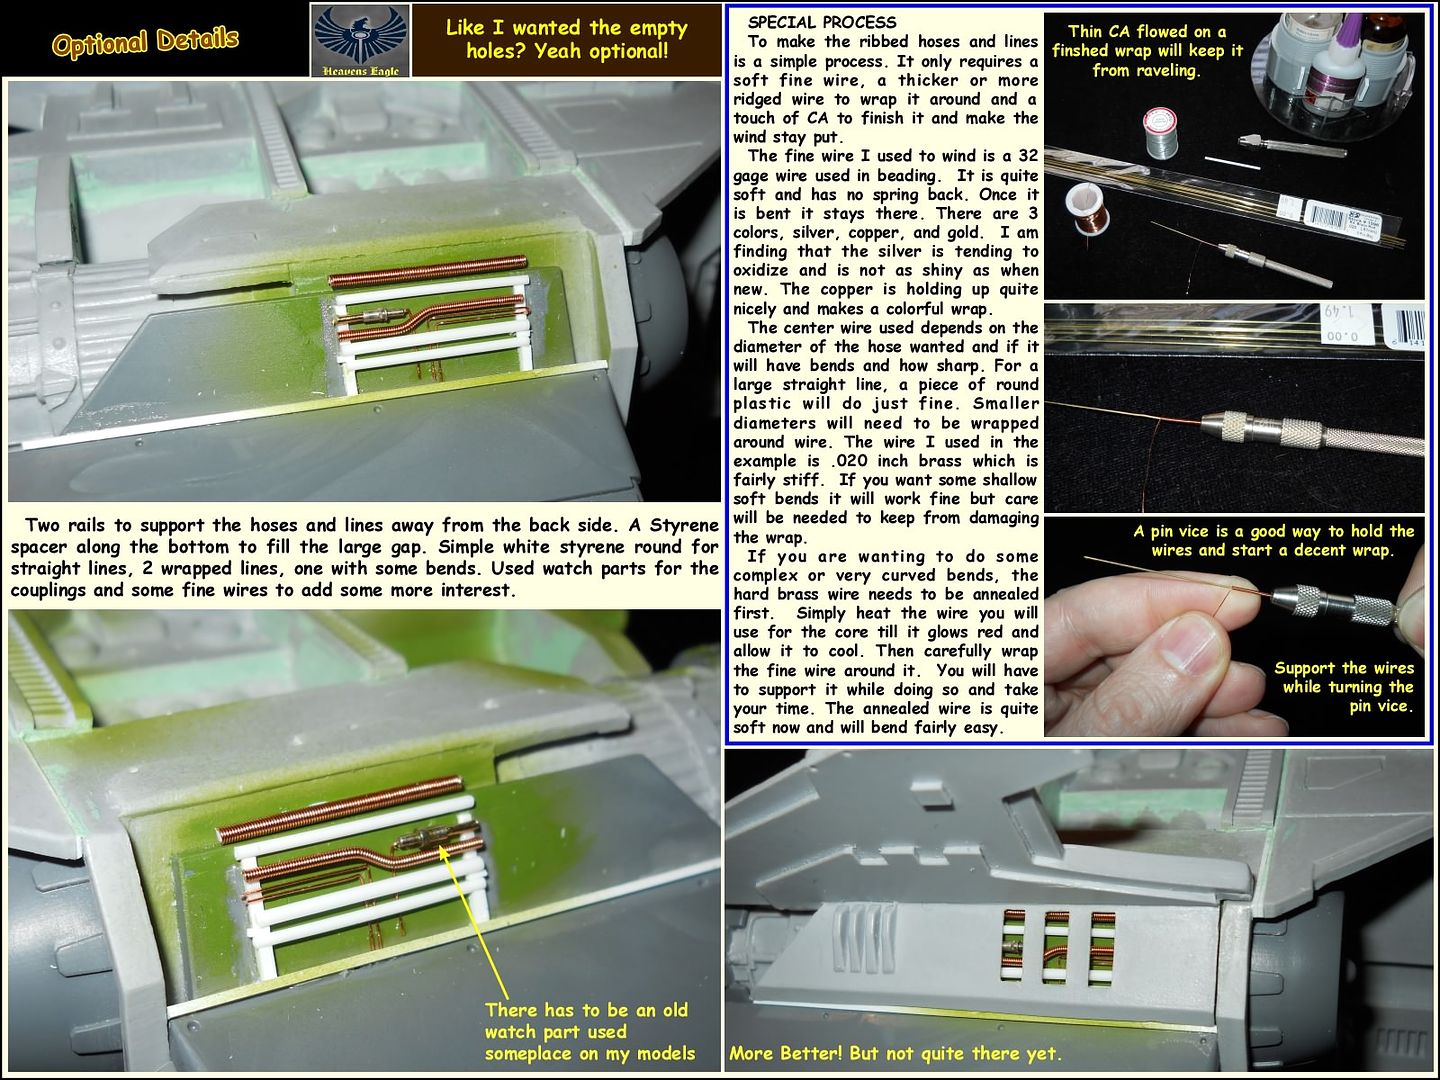
Still plugging away at the Storm Eagle, been working on some detail stuff and all of the detail stuff I have been working on is totally scratch. Added some plumbing behind the outer engine covers and added 2 hydraulic units to the rear ramp. I will show how I did all the parts, the seemingly hard stuff was actually quite easy if you have the base materials. I will probably have a new post later this weekend so keep your eyes open!
|
|
|
|
|
|
2013/03/16 09:22:45
Subject: A Detailed Quality build of the Forge World Storm Eagle
|
|
Esteemed Veteran Space Marine
Sheppey, England
|
Lovepug13 wrote:I have my storm eagle in a metal kr case with custom cut foam.......they are easily broken so be sure to give this great model you are working on a decent storage system lol
Mine's in a BF tray, using their template.
This is a superb tutorial - would have made assembling mine sooooo much easier. I wish I had half your patience and skill, as mine looks like it was put together by Orks by comparison 
|
|
|
|
|
|
2013/03/16 09:43:17
Subject: A Detailed Quality build of the Forge World Storm Eagle
|
|
Regular Dakkanaut
|
Awesome tutorial. I love it.
On another note, I would never consider purchasing this model. The amount of work and potential for a bad build is not worth it IMO. I prefer the GW plastics and smaller forge world stuff.
|
|
|
|
|
2013/03/16 16:26:20
Subject: A Detailed Quality build of the Forge World Storm Eagle
|
|
Fresh-Faced New User
Memphis TN
|
In looking around the internet, the reviews and builds on this particular model all show the same problems. It is not for the casual builder or someone new to the hobby. However if you want a unique model that few people will have and want to challenge yourself, it is that. I have not found another thread where someone went to the detail I have on building a kit.
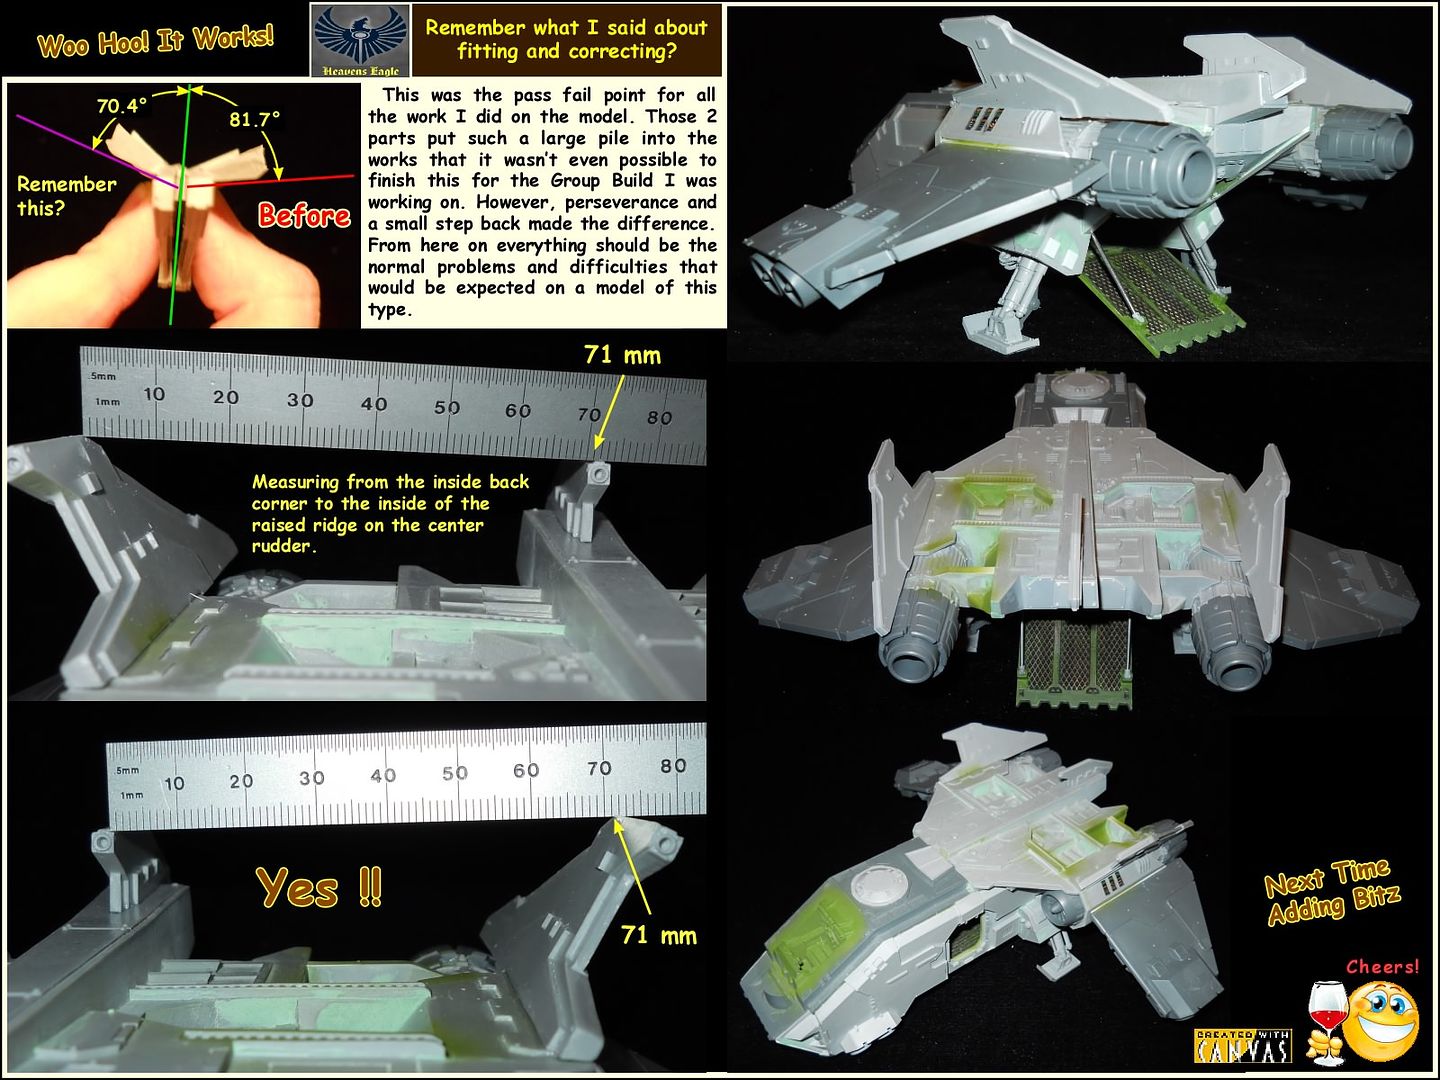
While the kit has some major faults, it is a RESIN kit and as such will always be quite a bit more of a challenge to build. To me it seems obvious that the person that made the original sculpt (?) was not as experienced with some of the problems found in larger resin parts. If that were the case some things would probably have been done a fair amount differently.
The reason I say that is the two rudder/engine cover pieces that I have been working on should have been 2 separate pieces each. One piece being the rudder and one being the engine cover. The parts would have been simpler to make AND would have been accurate to assemble.
As I bought this second hand, the warpage problems could very well have been from where it had been stored. A garage or attic on a hot Memphis day could easily soften the resin enough to allow things to reshape slightly.
As to resin model cost, while the material isn't all that expensive, the cost of the mold material, limited number of parts from a single mold, and the labor to make the parts, contribute a lot to the final cost. Personally if I were to make say a Thunder Hawk kit, a large part of the kit would be laser cut acrylic with resin detail to be added. This would solve many problems and the cost could be reduced. The kit would still be quite a challenge, but working with accurate parts solves many of the problems.
A better example would be the huge resin gate that FW has. That thing is mostly flat sides fitted together. The $1400 cost is quite prohibitive. If most of it were laser cut acrylic and then add resin details where needed, the parts would be lighter and easier to handle, and the labor, resin used, molds used would be greatly reduced.
Enough of that soapbox. Folks build and create as they have skills and desire. At the Memphis bunker one of the employees scratch built a version of the Storm Eagle using a Storm Raven kit and a Land Raider kit. To my eye not quite as pleasing lines as the FW kit, but still an impressive build and it took probably as much work as I have put into this kit. Don't get me wrong, it was a beautiful model and was painted exquisitely in a blue and light grey color scheme. Again the only limits are what do you want to attempt?
|
|
|
|
|
|
2013/03/18 03:20:58
Subject: Re:A Detailed Quality build of the Forge World Storm Eagle
|
|
Fresh-Faced New User
Memphis TN
|
Hey All!
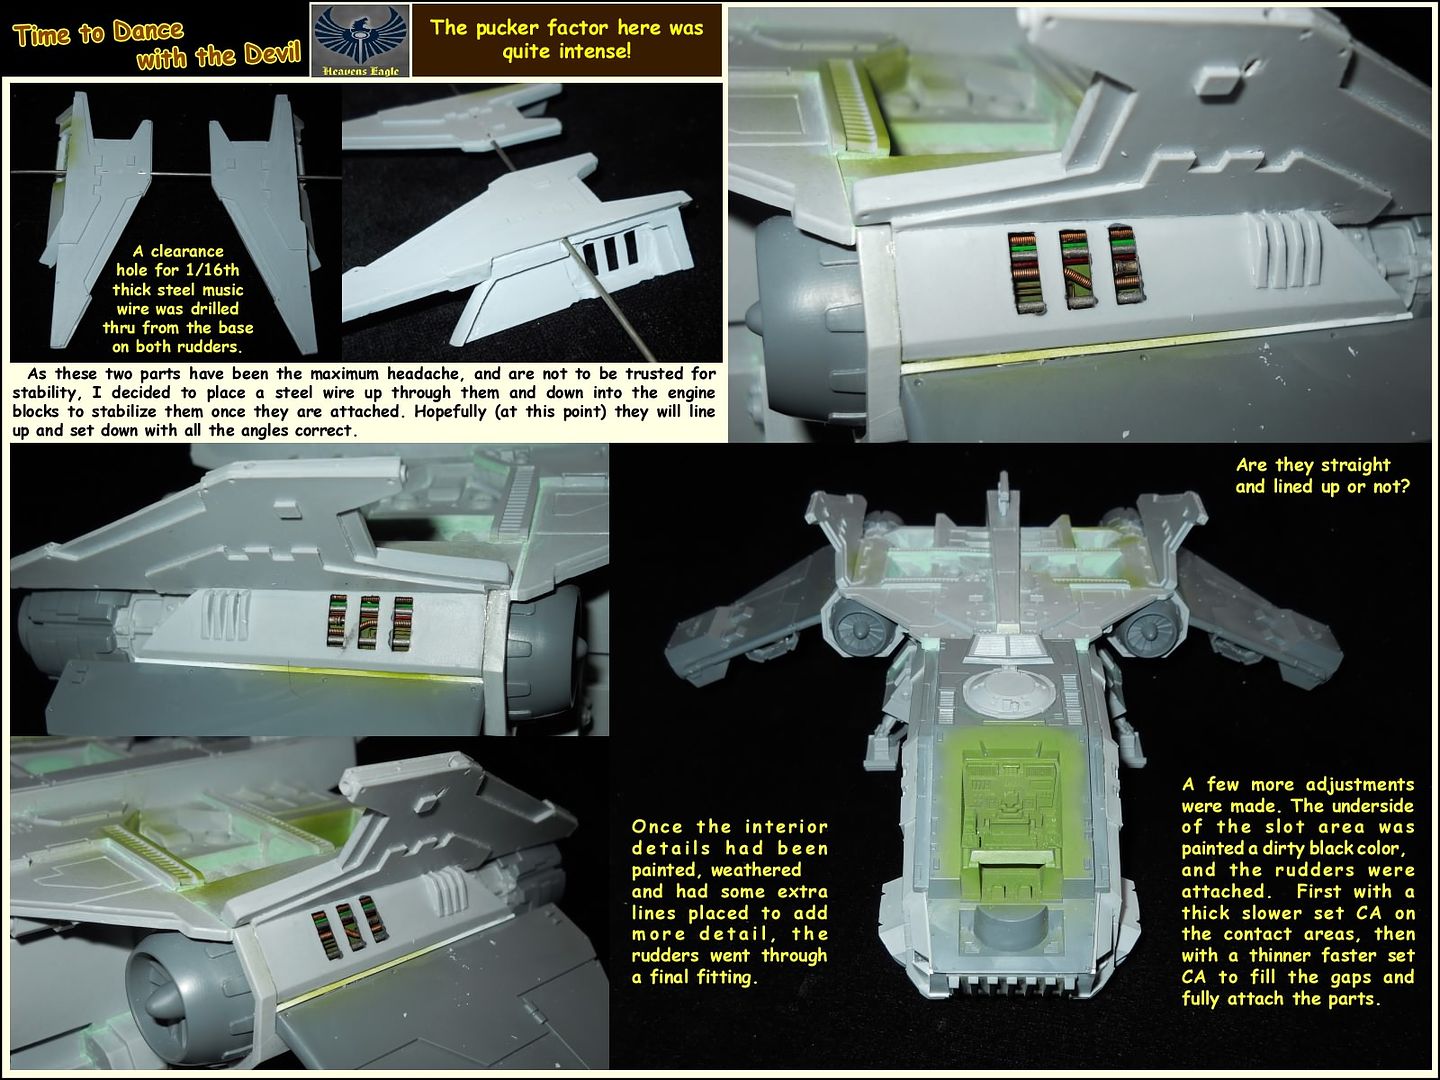
I have been busy the last couple of weeks. Have added some nice details and finally was able to attach the rudder pieces to my satisfaction. They were an absolute bear and were the straw that ka-bashed finishing this kit in time for a Group Build on another forum.
Anyway there is much goodness in this post so enjoy! As always questions and comments are welcome!

|
|
|
|
|
|
2013/03/20 15:47:39
Subject: A Detailed Quality build of the Forge World Storm Eagle
|
|

Dipping With Wood Stain
|
Just... wow - really stunning tutorial and a slew of great tips.
On another note, I've heard that FW casts can be bad, but this? Amazing how they justify to charge a premium price for a product which has to be corrected this much...
Cheers!
|
|
|
|
|
|
2013/03/20 15:56:32
Subject: A Detailed Quality build of the Forge World Storm Eagle
|
|
Inspiring Icon Bearer
|
I'm going to start an investigating you for possible use of Black Magic. The complexity and attention to detail is mind-boggling! Many kudos to you sir!
|
One of them filthy casuals... |
|
|
|
|
2013/03/20 20:32:04
Subject: Re:A Detailed Quality build of the Forge World Storm Eagle
|
|
Long-Range Ultramarine Land Speeder Pilot
|
Clearly, RESIN is a better quality material.... This is an impressive undertaking.
|
 4000pts 4000pts |
|
|
|
|
2013/03/20 21:02:28
Subject: Re:A Detailed Quality build of the Forge World Storm Eagle
|
|
Last Remaining Whole C'Tan
|
In an ideal world, all the awesome kits we like would be released in plastic. However, in this world, plastic is not an economical choice for small production runs that would never earn back the cost of the molds.
So, the alternatives are metal or resin. I daresay this tutorial would not exist if this model was metal, since there is no way to do as extensive cutting as the OP has done, at least not easily. In this case, resin clearly is the better choice.
Trying to put the blame on the resin material is.... misplaced. To put it differently, your statement is similar to me buying a Ferarri, immediately driving it into a hydrant, and then saying "Ferrari's suck". There is nothing wrong with resin and countless garage casters are putting out great kits with it every single day. Unfortunately, Forge World lacks the professionalism and skill of those random guys in their basements and garages.
|
 lord_blackfang wrote: lord_blackfang wrote:Respect to the guy who subscribed just to post a massive ASCII dong in the chat and immediately get banned.
 Flinty wrote: Flinty wrote:The benefit of slate is that its.actually a.rock with rock like properties. The downside is that it's a rock
|
|
|
|
|
2013/03/21 01:49:46
Subject: Re:A Detailed Quality build of the Forge World Storm Eagle
|
|
Fresh-Faced New User
Memphis TN
|
Actually the real problems with this particular model do not stem from the material it is made out of. This particular resin is fairly easy to work with. It is easy to cut, especially with a sharp new #11 X-acto blade or one of my razor sharp jewelers gravers. It actually cuts and carves easier than the plastic parts of the kit.
As far as hardness and strength, the resin is almost the same as the plastic parts. So there are no real problems that should come from the materials part of the kit.
The problems on this kit stem from a poor master. While I have not done a lot of sculpting, or molds, the point is that you make the master as close to perfect as possible. Any flaw will be replicated over and over. This kit has those in abundance. At the moment I am cleaning up and filling areas around the side door recesses that were not finished properly on the master. These are not mold imperfections, these are square blocky undercuts where the sculptor just didn't fill it in. There should be no excuse for those flaws. On a figure, some of that can be left as it is part of the character. On an Ork type vehicle, they are slapped and clapped together and it is the rule rather than the thumb. So there is the starting point for problems.
Next you have fit between the parts. Again if the masters are just thrown together and the fit is "good enough for Go'ment wurk" there will be problems. Again the quality has to start with the very first piece. Accuracy or lack of it just compounds over the next steps.
Secondly there are the molds and the mold making process. All rubber molds will change size over time. Shrink a small amount usually, though the composition and hardness of the rubber can reduce this to a negligible amount. The mold parting lines and how they are ported also can have an effect on quality. Usually for production casting situations, the master is supported and the mold is poured around it all at once. Once the mold has fully set an experienced person using a new sharp scalpel will carefully cut the mold away from the part in such a way that the 2 halves sawtooth to each other for alignment. This is done with jewelry and many other molds. If this isn't done right there can be serious mismatch between the 2 halves and you have to deal with serious mold lines. The side slabs had a little problem with this, the upper rear part and rear landing gear housings were horrible.
Lastly the casting process can have a positive or negative effect on the finished parts. There are a number of ways this can be done. One is that the mold is placed in a machine that spins it and the liquid resin is added at the center of rotation and centrifugal force makes it fill the mold and hopefully push the bubbles out of the way. The gating to allow air to escape is very important as well as large enough gates to allow resin to enter. The Fine Cast minis are done this way, it is no wonder that they have an abundance of air bubbles and warpage to the cast. The spinning can deform the mold and items with a lot of small intricate detail will collect air bubbles. Usually FW models don't have too much surface detail, but looking at the parts the molds do deflect a little and cause some deformities.
Another casting process uses vacuum and air pressure to make the resin fill the mold cavities. Resin is poured in a mold and it is set in a pressure canister. A vacuum is drawn and held long enough to make the air purge from the liquid resin, then air is allowed back in and slowly brought up to pressure and held for a period of time. This usually doesn't cause mold deformation and usually removes all the air bubbles. The drawback is that it takes more time and equipment, and in production situations that equals money.
So the process is:
1. Make the master pattern- needs to be as accurate and perfect as possible.
2. Determine casting process and make the molds. Mold composition and how it comes apart are quite important.
3. Casting the parts and attention to the process and how consistent it is and how many defective parts come through.
In the case of the FW Storm Eagle, the very first step has the most issues and flaws. The only way to correct those is to either remake the masters or at least re work them to address the flaws. In the case of mixed media (plastic and resin) models, if the allowances have not been worked into the parts that mate up with the other media so that the "FINISHED" resin parts mate properly with both the plastic and each other, you end up with the fit problems that this kit has.
In the case of a single media kit, say the Thunder Hawk, since all the parts are resin, all the parts are cast and the molds are made in similar ways, it the fit between the master parts is good then the fit between the resin castings should be acceptable. Warpage will always be a problem, but if the molding is done in a consistent way that keeps problems to a minimum, even a large kit can be easily built.
So sorry for the long post, but as I understand it those are the processes. Where this particular kit has the most trouble is right from the master sculpt pattern. The only way that can be fixed is to fix the pattern or start over and make a new one. Until then we have what we have. It is possible to build it quickly if you are not too picky about appearance. Many of the faults could be covered by a nice paint job or a lot of Green stuff or putty. If however you want a kit that will make folks stop and have to check it out and look some more, the work will have to be done to repair almost everything.
Since I am absolutely OCD about doing this kind of stuff, it is getting the royal treatment.  Again folks, I much appreciate the wonderful comments and how many of you are following the thread. It's folks doing the "How'd you DO that?!?!" that keeps me going.
|
|
|
|
|
|
2013/03/21 10:32:47
Subject: A Detailed Quality build of the Forge World Storm Eagle
|
|

Confessor Of Sins
|
It's quite shocking how this kit fits together. The only big FW kit I have (Avenger Strike Fighter) fit almost perfectly, with minimal gaps needing to be filled.
Then again that's a complete resin kit and likely a better master...
It's amazing how you managed to turn these warped pieces into something that fits.
|
 Cratfworld Alaitoc (Gallery) Cratfworld Alaitoc (Gallery)
 Order of the Red Mantle (Gallery) Order of the Red Mantle (Gallery)
 Grand (little) Army of Chaos, now painting! (Blog) Grand (little) Army of Chaos, now painting! (Blog) |
|
|
|
|
2013/03/21 15:14:27
Subject: A Detailed Quality build of the Forge World Storm Eagle
|
|
Tower of Power
|
Well done for building this, it looks a complete ball ache.
I would have to say I would be pretty pissed off if I got something like this from F.W. I keep seeing in your images how things do not fit right etc. Not something I would expect from an expensive model.
|
warhammer 40,000 tactica and hobby blog - www.imperiusdominatus.com
Want list feedback and advice? e-mail imperiusdominatus@live.co.uk
 Blood Angels - 2000 Iron Warriors - 2000 Blood Angels - 2000 Iron Warriors - 2000  Orks -2000 Orks -2000  Imperial Guard - 2000 Imperial Guard - 2000
 Eldar - 2000 Eldar - 2000  Hive Fleet Krakken - 2000 Hive Fleet Krakken - 2000  Dark Eldar - 2000 Dark Eldar - 2000  Necrons - 2000 Necrons - 2000  Grey Knights - 2000 Grey Knights - 2000  Daemons - 2000 Daemons - 2000  Ravenwing - 2000 Ravenwing - 2000 |
|
|
|
|
2013/04/06 20:57:11
Subject: A Detailed Quality build of the Forge World Storm Eagle
|
|
Aspirant Tech-Adept
|
I love your attention to detail, like all the pipe work behind the vents and those working ramp pistons, Excellent work.
|
|
|
|
|
2013/04/07 22:59:15
Subject: A Detailed Quality build of the Forge World Storm Eagle
|
|
Possessed Khorne Marine Covered in Spikes
The Royal Tunbridge Wells
|
You are absolutely mental! The things you are doing are amazing, gorgeous, mind-blowing, and pretty frustrating all at the same time. I think I would have just hauled in for a refund after the second or third major moulding issue, you just seem to keep rolling with the punches and finding new, stunning ways to make the kit look perfect.
I can't even think of anything appropriate to say about it in terms of how good it is, or what I would do, but please, for the love of everything that is holy, keep at it, and I would love to see more work like this from you in the future.
Exhalted!
|
|
|
|
|
|
2013/04/08 02:32:27
Subject: Re:A Detailed Quality build of the Forge World Storm Eagle
|
|
Perturbed Blood Angel Tactical Marine
Toronto
|
So... Do you do commission assembly? 
|
|
|
|
|
2013/04/09 04:48:57
Subject: Re:A Detailed Quality build of the Forge World Storm Eagle
|
|
Fresh-Faced New User
Memphis TN
|
Thanks for the encouraging comments! The build is progressing. Mostly it has just been smooth and fill, repeat, and repeat again. Worked on the beast a lot this weekend doing a lot of fix on the outer surfaces.
Also had to do some rebuild on the lower rear detail of the missile launchers. One of them wasn't too bad but had a fair amount of flash. The other one had a big error where the mold shifted and misaligned by about 1/16th of an inch right in the center of the detail. The only way to really fix it well was remove all that detail from both launchers and redo it from scratch. Came out looking better than it started on the original I think. Will probably noodle it up some more in some of the depressed and inset areas as these would be somewhat protected. Will see once I get all the basic clean up done.
Am also removing pretty much all of the rivets that are done in resin. Since they are not consistent and mostly just funny shaped bumps, and the fact they are in areas I need to clean up it is easier to remove and replace them. I have an old Waldron miniature punch set and have used it to make more out of .020 thick styrene. Much better and a lot sharper look.
I almost forgot, the front of the missile racks had some serious problems from where the molds had pieces torn out from previous pours. A little careful carving with the super polished sharp jewelry graving tools cleaned that all up and can't even tell that it was messed up now. The molds were still slightly distorted during the pour and thus some things just aren't quite as nice as a plastic molded part. Can't really do anything about that without a total scratch build redo of the launchers.
This would be a great model to make a plastic mold for. It would still use the Storm Raven parts and some small sprues could be made as accessories for either craft. However with GW's current trend on overpricing it's models the kit would cost more than the current FW model.
As of today, GW has announced about Games Day for 2013. I am going to seriously try and finish this build to enter into the Golden Daemon contest. It will just depend on a number of things though. Will know more in a couple of weeks.
As to commission work, sorry, I learned a long time ago that I need to pass on work for others. My hobby time I have found needs to be for my hobby, anything that makes it into a chore pretty much kills the hobby part for me. I am still getting myself up to speed after almost 20 years off of any hobby stuff and I am enjoying the building and new skills that I now have that were just dreaming when I built stuff 20 years ago. Wish now I had been able to do this all along, but that is the breaks.
All this that I have described should be coming up in a new post in the near future. All the positive "atta-boys" is what really gives the drive to continue.
|
|
|
|
|
|
2013/04/19 16:46:18
Subject: A Detailed Quality build of the Forge World Storm Eagle
|
|
Dour Wolf Priest with Iron Wolf Amulet
|
Hopefully you do get it done for Golden Daemon, I've like to see it and compare it to my Storm Eagle.  I didn't have nearly as much trouble with mine, but then again I said "eh, good enough" a few times.
|
|
|
|
|
|
2013/04/23 08:51:19
Subject: Re:A Detailed Quality build of the Forge World Storm Eagle
|
|
Splattered With Acrylic Paint
Uk, South
|
Those home made tools look like Torture devices made for your naughty models.
Its comforting to know that it isnt just me who finds kits dont fit correctly. Though i wouldnt say i torture my models in the way you do. You have a great deal of skill and knowledge. Almost like one of those a car is born programmes on discovery. Your talent speaks for itself, and its been great learning from a modelling master.
Kudos
|
|
|
|
|
2013/04/24 15:53:05
Subject: A Detailed Quality build of the Forge World Storm Eagle
|
|
Fresh-Faced New User
|
Wow..very impressive presentation and work.
Can you pleeeaaase go into more detail about your tool you made for clamping, leveling, etc.? The type of parts you use for spacers, etc. Thanks
|
|
|
|
|
|
2013/04/24 16:09:09
Subject: A Detailed Quality build of the Forge World Storm Eagle
|
|
Perfect Shot Black Templar Predator Pilot
|
This is such an amazing thread and has so much great tips and tricks in it. But if anything I think it pulled me away from getting one. I think this made me realize how hard the model is and the level of difficulty. I even consider myself a decent modeler, but this is beyond me haha. I have a lot of respect for you and I cannot thank you enough for making something like this. Information of this nature should never be passed up.
|
|
|
|
|
|
2013/04/24 22:13:09
Subject: Re:A Detailed Quality build of the Forge World Storm Eagle
|
|
Blood Angel Terminator with Lightning Claws
|
Amazing attention to detail. I think you have turned me off from buying anything large from Forge World though, I dont fancy having to straighten tons of resin parts.
|
|
|
|
|
|
2013/04/27 02:56:34
Subject: Re:A Detailed Quality build of the Forge World Storm Eagle
|
|
Fresh-Faced New User
Memphis TN
|
 Primarchz wrote: Primarchz wrote:Wow..very impressive presentation and work.
Can you pleeeaaase go into more detail about your tool you made for clamping, leveling, etc.? The type of parts you use for spacers, etc. Thanks
Don't fear Primarchz! I have heard your plea and will give everyone some info if they desire to build their own tool. Actually I am considering building a slightly larger plate. The one I have is perfect for the hot water dip for warped parts, but it could stand to be 2 inches longer and 2 inches wider when using it for a building jig. If you like how it works, it isn't really that hard to build, as long as you are willing to spend several hours drilling holes and then tapping the holes to your favorite screw size.
 TheLionOfTheForest wrote: TheLionOfTheForest wrote:Amazing attention to detail. I think you have turned me off from buying anything large from Forge World though, I dont fancy having to straighten tons of resin parts.
As I have stated before, don't let the level of trouble this model has hold you back from all large FW kits. I have seen the large titan type kits built up into gorgeous models! They are expensive, but are not like this kit in the least. Where the Storm Eagle has slab sides and mates up to plastic molded parts from the Storm Raven kit, many of the FW kits are a lot sturdier and do not have the problems this one has. If you really want to build a kit, do the research! Look all over the net for reviews and builds that other people have done. If you find the builds, but no information on how easy or difficult it was, simpley ask in a nice way. I don't know of many modelers that won't go into detail on their build if someone asks about it in a flattering way.
I have one other FW kit of the Thunderbolt. Out of the bag it seems to fit together much better than this one, (of course that won't stop me from doing every type of modification I can thik of to it). In the back of my mind I am picturing that one quite heavily damaged and having been somewhat crash landed on the tarmak with the valiant pilot just standing there looking at his pitiful ride. The crash crew already climbing over the craft and crew chief shaking his head wondering how he will fix it. That is for another time though.
Anyway, with ANY resin kit there will be more challenge to build it than you will find in a molded plastic model. Molded plastic is done in (hopefully) precision metal molds that don't shift and with care don't wear out. Resin is done in various types of rubber molds that by their design can flex and need to flex in order to remove the finishe parts. Large thick parts rarely will warp after they are made, though they might need a little tweak if the mold was overly flexed while the resin was curing.
OK now I have a question for everyone, I don't know how to set up a poll on here, so I will just have to ask you to post. I do not actually have an army for this model yet. I am leaning toward doing a very obscure chapter and having it done up in a blue grey over an off white/tan. Anyway here is a color chart I created using This site. http://colorschemedesigner.com/
The basics for the colors I am thinking of using are mostly in this pic captured on the site. If you have some ideas or suggestions, I am open to most. Just a note up front, I am not fond of the color schemes where the colors are different either in half or quarters. Two color schemes where the colors are done for example Dark Angels. I won't use DA even though I like the colors as GW has put gouge (or as they say) goblin pricing on their DA models. I refuse to pay for that kind of larceny. So If you have some ideas, or can provide a link to the color scheme on "Color Scheme Designer" (the URL will have the Scheme ID in it) I am looking for ideas.
 Thanks all! There is more done on the model at this point and it really is very close to getting the exterior paint it richly deserves!
|
|
|
|
|
|
2013/04/27 05:07:20
Subject: A Detailed Quality build of the Forge World Storm Eagle
|
|
Blood Angel Chapter Master with Wings
|
You are an effing crazy man! Awesome, such amazingly precise technical prowess... really floored... I'm not sure what is more work, fixing this storm eagle or building my pre-storm eagle storm eagle MT11 pattern stormraven from scratch... I have no idea how a kid is supposed to pull building this thing properly off...
|
|
|
|
|
|
2013/04/28 00:28:15
Subject: A Detailed Quality build of the Forge World Storm Eagle
|
|
Fresh-Faced New User
Memphis TN
|
 MajorTom11 wrote: MajorTom11 wrote:You are an effing crazy man! Awesome, such amazingly precise technical prowess... really floored... I'm not sure what is more work, fixing this storm eagle or building my pre-storm eagle storm eagle MT11 pattern stormraven from scratch... I have no idea how a kid is supposed to pull building this thing properly off...
Hey Tom! I found many of the GW "plastic" kits are fairly easy to assemble. By the time I was 10 these would all have been easy stuff. (of course that was a bit over 40 years ago) The actual Storm Raven kit isn't really much to look at. The wing locations are way too far back. I found a simple modification that requires 6 small cuts either with a knife (more difficult) or a razor saw (fairly easy) that transforms the whole look and balances out the model. Otherwise it seemed quite easy to build with just a little attention to fitting parts.
I did look in on your build, interesting conversion!
Well I had better get busy. I have a lot of new photos to put together The Beast is quite close to needing paint at this point. Automatically Appended Next Post: Oh! just a little bit of fun, I went to the World of Battle today, (the main corporate bunker here in Memphis) and took the Storm Eagle by so the staff could look at it. Freaked one of them out when I grabbed hold of one of the smaller parts of the model and shook it around. Then did it again when shaking it around only holding one landing gear. This model, even as heavy as the resin is, is quite sturdy. The trick is I DON'T use GW glues. I guess that most models that come in there are built a lot more delicately. That and many folks lack of experience with adhesives.
At another store one of the employees asked about the green filler (as the GW green stuff apparently doesn't stick to the resin for poo) It is interesting that with as much as GW makes it's workers tout the GW product line, in the end the glues and such are only so-so and even the loyalist Kool-Aid drinkers know this.
|
|
This message was edited 1 time. Last update was at 2013/04/28 00:43:29
|
|
|
|
|
|
|
 &
& 


 P&M Blog -