| Author |
Message |
 |
|
|
|
|
Advert
|
Forum adverts like this one are shown to any user who is not logged in. Join us by filling out a tiny 3 field form and you will get your own, free, dakka user account which gives a good range of benefits to you:
- No adverts like this in the forums anymore.
- Times and dates in your local timezone.
- Full tracking of what you have read so you can skip to your first unread post, easily see what has changed since you last logged in, and easily see what is new at a glance.
- Email notifications for threads you want to watch closely.
- Being a part of the oldest wargaming community on the net.
If you are already a member then feel free to login now. |
|
 |
2013/09/17 07:00:52
Subject: Re:Fellblade / Blade/Sword Variants
|
|

Regular Dakkanaut
|
Monthly update time:
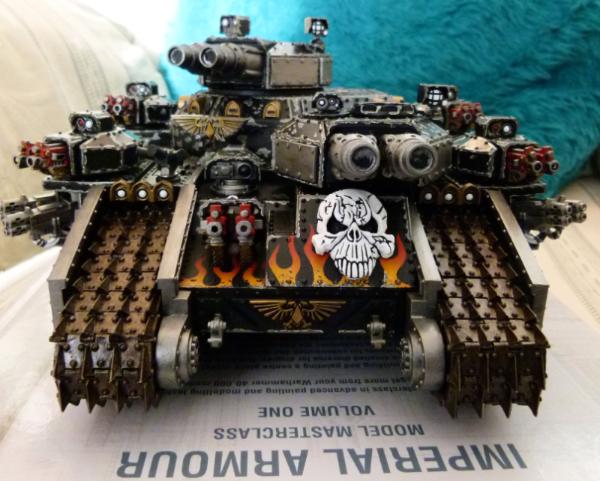
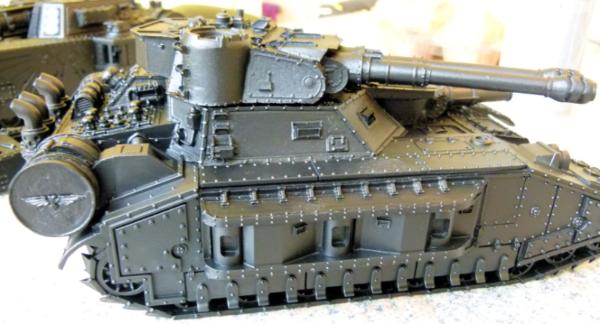
I've blocked in the main colours and "chipped" the hull and turrets. This beast is taking ages to paint!!
I need to lay down another coat of gloss varnish before I start adding a black oil wash over most of the tank. I'll use some white spirit to clean up and smooth out the wash.
I've got FW's Imperial Armour Masterclass Part 1 - A very good read with brilliant models. I hope my fellblade will turnout as good as one of theirs!
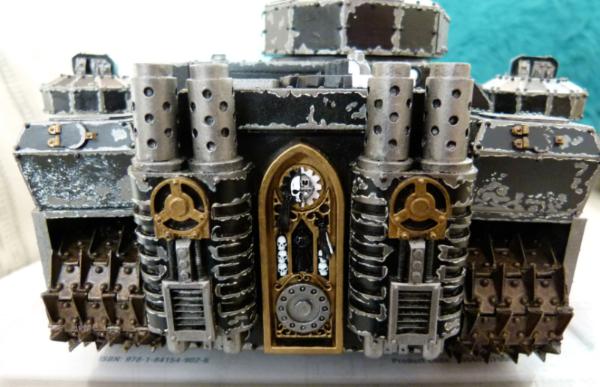
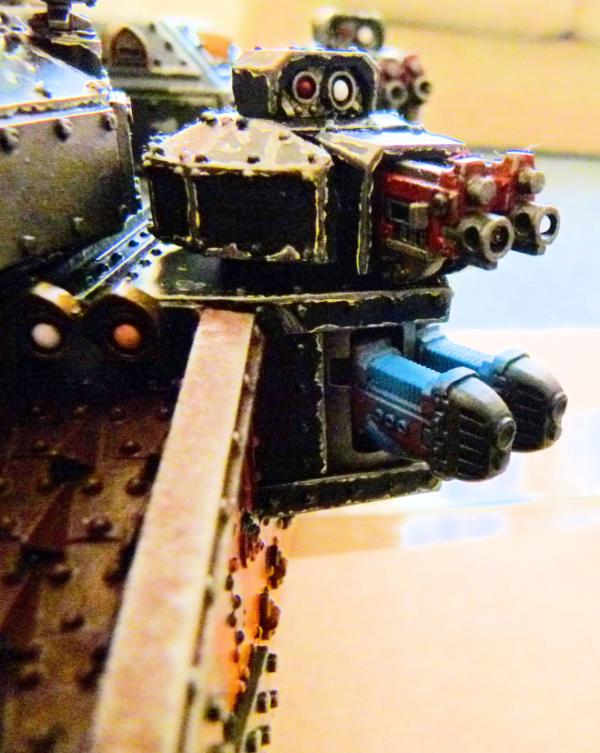
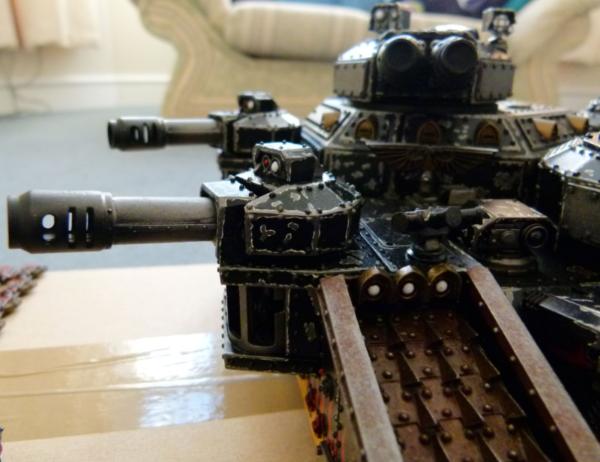
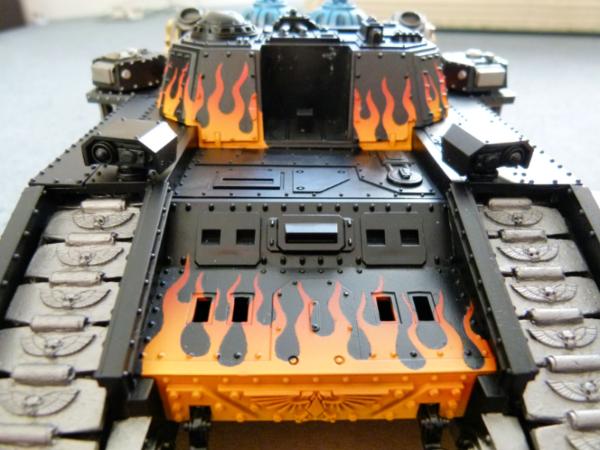
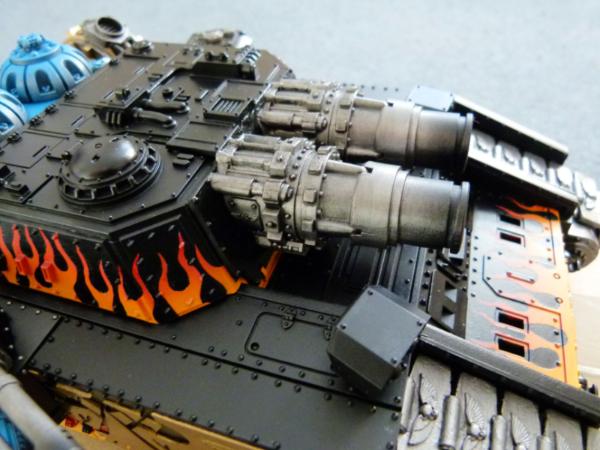
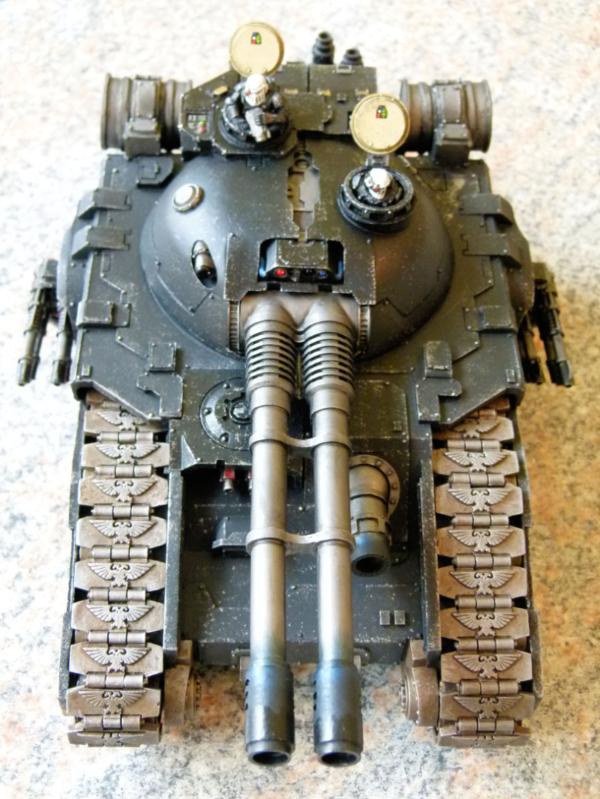
This shows the front from the top. The turret hatches are being painted separately and it can be either modelled open or closed. I've just got Chronus from ebay and think he will look cool looking out of the top turret!
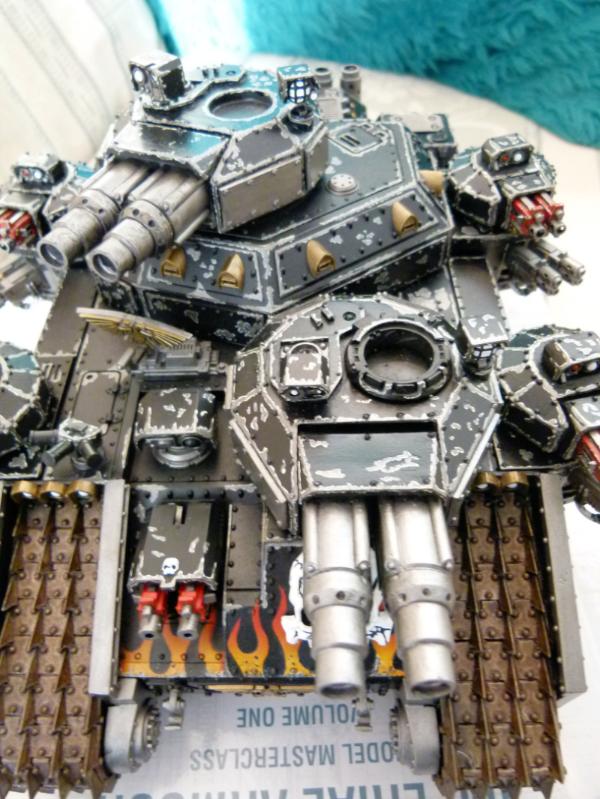
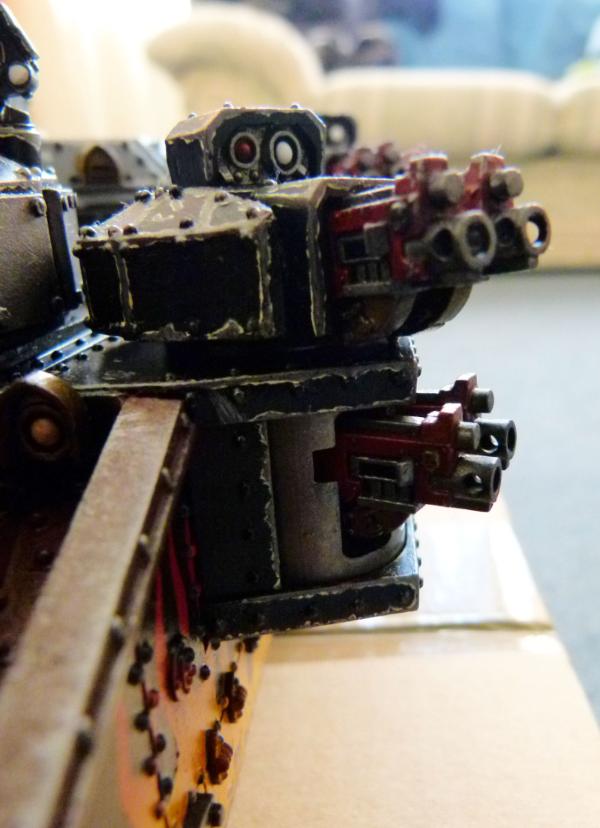
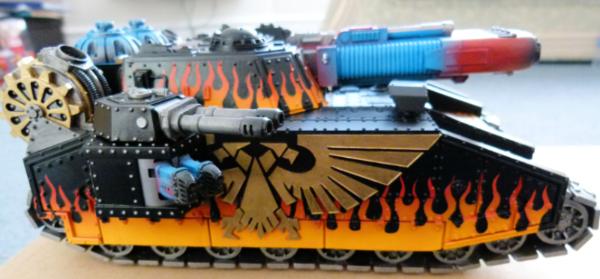
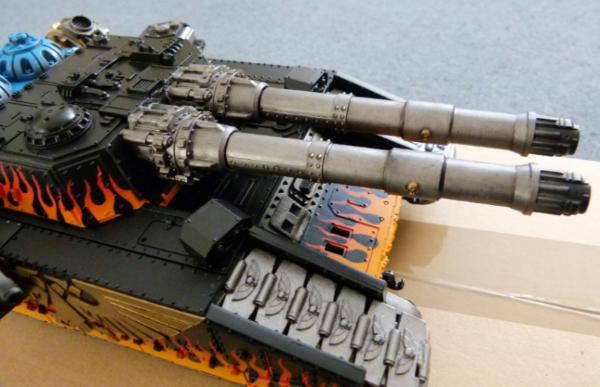
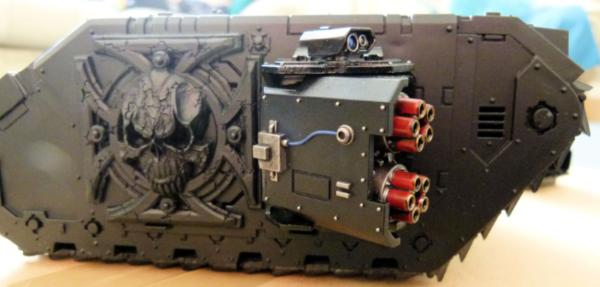
This side shot shows the progress on the sponsons and weapons. The heavy bolters have been "chipped" and with the mutli meltas, need a gloss varnish before I weather with a black oil wash.
This shot shows I still have to paint the power cables on the multi meltas (something I'll do after the oil wash has been finished).
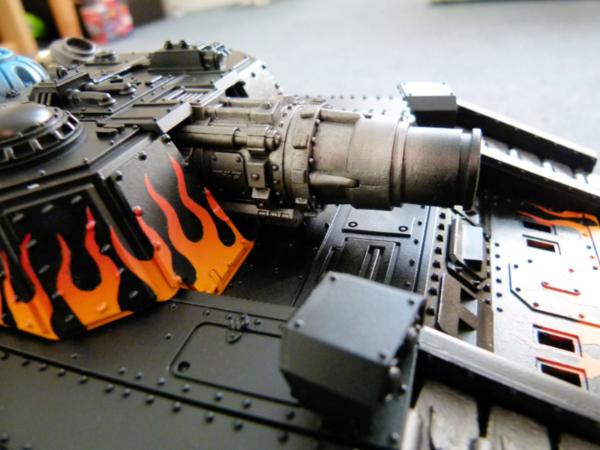
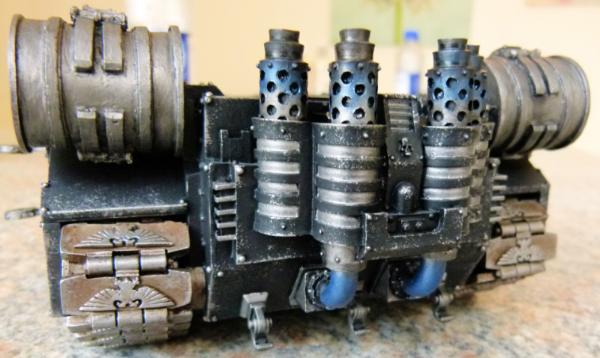
A shot of the engines and exhausts before I "rust" them up a bit!!!!!
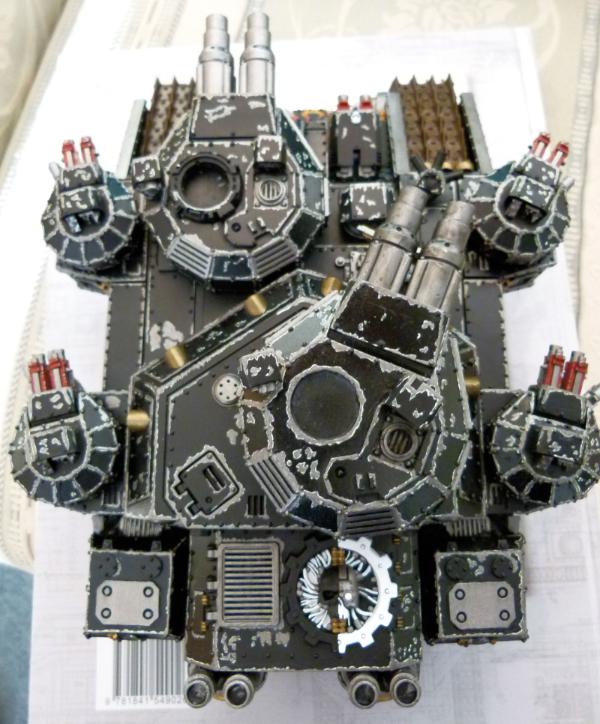
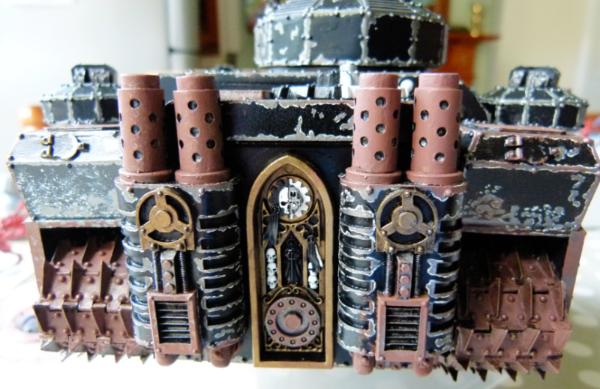
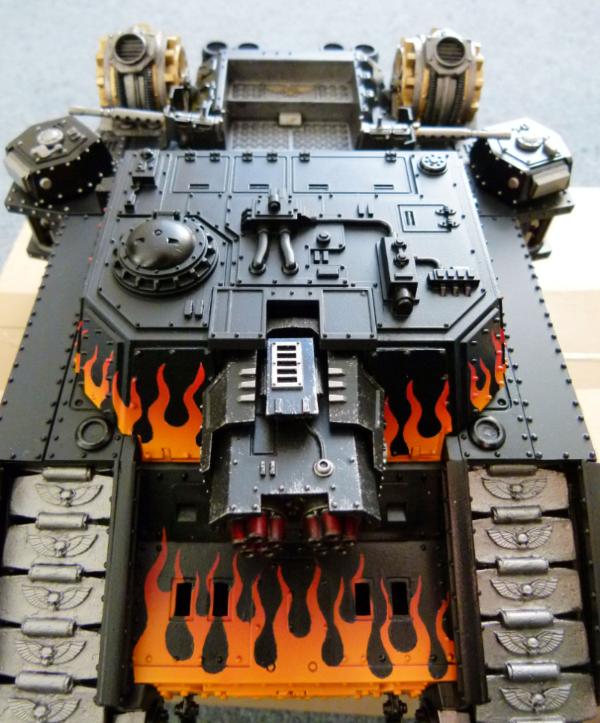
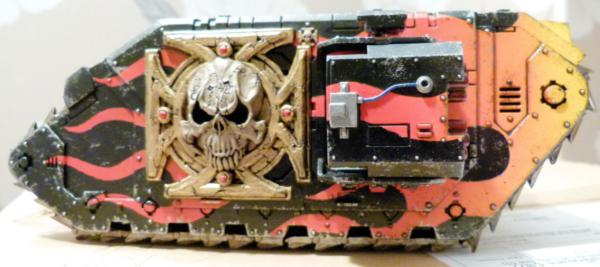
Finally, a shot from above. The Adeptus Mechanicus logo is still a WIP.
I hope to gloss varnish the beast this week and start the washes this weekend. More shots to follow (hopefully) soon.
Regards, Phil.
|
|
|
|
 |
|
2013/09/19 15:11:03
Subject: Re:Fellblade / Blade/Sword Variants
|
|

Longtime Dakkanaut
|
Weathering looks decent. Is it from chipping off, or painting on?
|
|
|
|
|
|
2013/09/19 17:02:40
Subject: Fellblade / Blade/Sword Variants
|
|
Fighter Ace
|
Hot damn man! I'm loving it! I want to see some of those land raiders painted too! Especially the one that's a moving pile of skulls!
|
|
|
|
|
|
2013/09/19 17:05:47
Subject: Fellblade / Blade/Sword Variants
|
|

Norn Queen
|
DELICIOUS work, kudos.
|
Dman137 wrote:
goobs is all you guys will ever be
By 1-irt: Still as long as Hissy keeps showing up this is one of the most entertaining threads ever.
"Feelin' goods, good enough". |
|
|
|
|
2013/09/19 18:41:49
Subject: Fellblade / Blade/Sword Variants
|
|

Frothing Warhound of Chaos
Spain
|
Awesome!!!! a really nice work!!
I keep in love of the blade-on tracks!! with the fire scheme are really awesome. Congratulations!
|
|
|
|
|
|
2013/09/19 21:04:55
Subject: Re:Fellblade / Blade/Sword Variants
|
|
Regular Dakkanaut
|
Thanks for your thoughts guys!
Skalk Bloodaxe wrote:Weathering looks decent. Is it from chipping off, or painting on?
I hand painted all the chips on the tank. I did buy some chipping off solution from AK Interactive, but didn't have the nerve to try it on this model. Maybe on the next one!
Bobaram wrote:Hot damn man! I'm loving it! I want to see some of those land raiders painted too! Especially the one that's a moving pile of skulls!
I have too many models and vehicles and not enough time to paint them all!!! I would love to do them all justice but at the speed I paint, I'll be to blind to see what I am doing!
Small update time:
I've sprayed everything with gloss varnish and started black oil washing the heavy bolters and multimeltas before cleaning them up with white spirit. Once fully dry, a quick spray of matt varnish and those parts will be finished.
Shots to follow.
Regards, Phil.
|
|
|
|
|
|
2013/09/20 15:56:09
Subject: Fellblade / Blade/Sword Variants
|
|
Fighter Ace
|
I feel you, I've got about 100 models on my plate that need painting, not including vehicles. >.<
|
|
|
|
|
|
2013/10/30 19:04:41
Subject: Fellblade / Blade/Sword Variants
|
|
Regular Dakkanaut
|
 Bobaram wrote: Bobaram wrote:I feel you, I've got about 100 models on my plate that need painting, not including vehicles. >.<
The problem is, I buy quicker than I can paint!!!
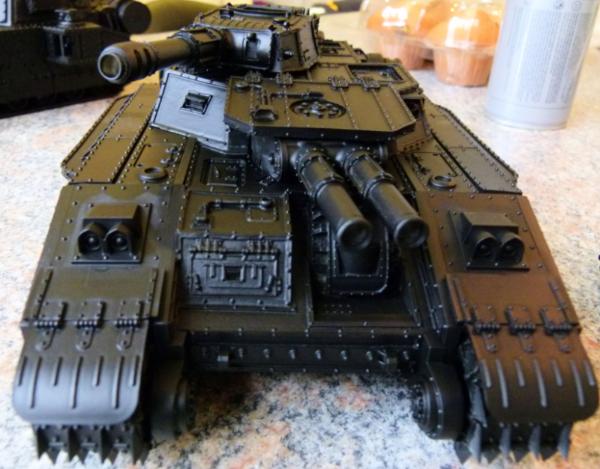
Another month has come and gone. Here's what I've been up to:
I've started to sponge some rust streaks from AK Interactive and rust pigment over the tracks, wheels and exposed metal. I'm not 100% sure I'm happy with the effect and may sponge some more gun metal back over the rust to make it less "brown"!!
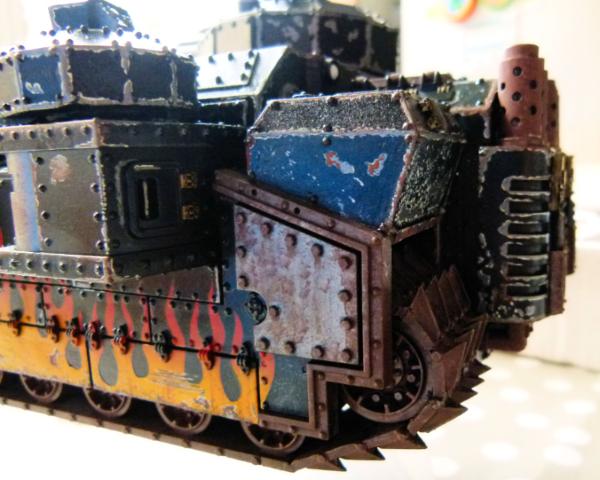
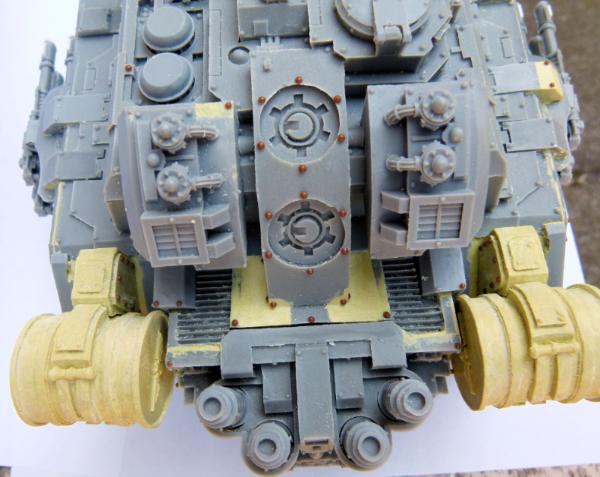
Here's the rear left quadrant. Again, I'll sponge some more gun metal onto the rusted areas and I still need to add dust and mud effects.
I need to spray some black soot to the top of the exhaust stacks to finish off those.
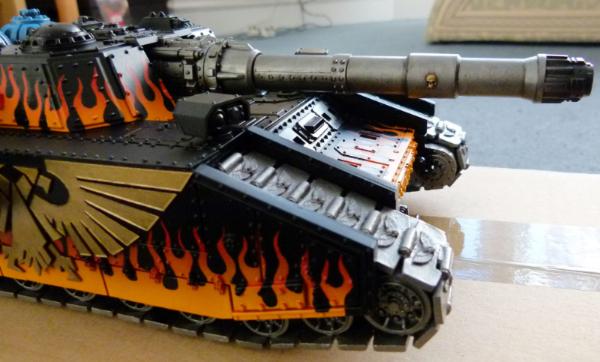
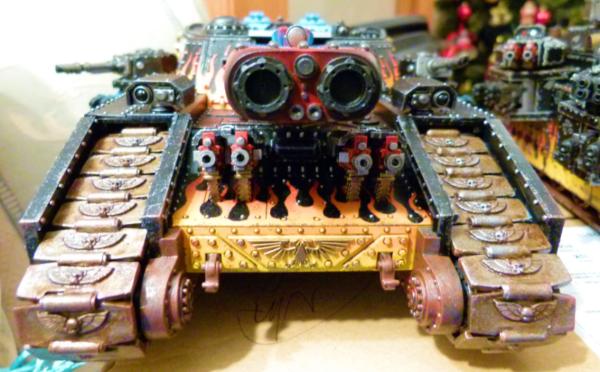
Compulsory front shot. Again, gun metal to be added. I need to remember to paint the inside of the gun barrels black.
I've lost my drive to finish off this project. My 7 year old and 5 year old sons have started to get interested into 40k now and we have played a couple of games of Space Hulk together. As a result, I started to paint a number of Genestealers and got slightly sidetracked! I hope to finish this model by Christmas (2013 hopefully!!)
Any comments or critiques welcome.
Regards, Phil.
|
|
|
|
|
|
2013/10/31 16:48:27
Subject: Re:Fellblade / Blade/Sword Variants
|
|
Longtime Dakkanaut
|
Weathering looks great, but I think a little too much in places (like the rear and left rear shots). Overall it is an excellent model, and I hope you have fun painting those Genestealers. I miss my Genestealer Cult.
|
|
|
|
|
|
2013/12/21 20:27:31
Subject: Re:Fellblade / Blade/Sword Variants
|
|
Regular Dakkanaut
|
Apologies for no recent update - I have been busy I promise!!
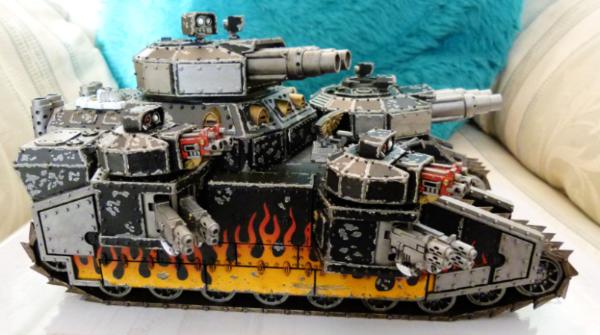
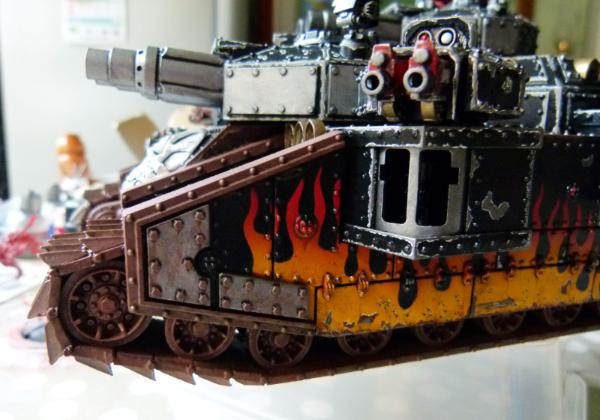
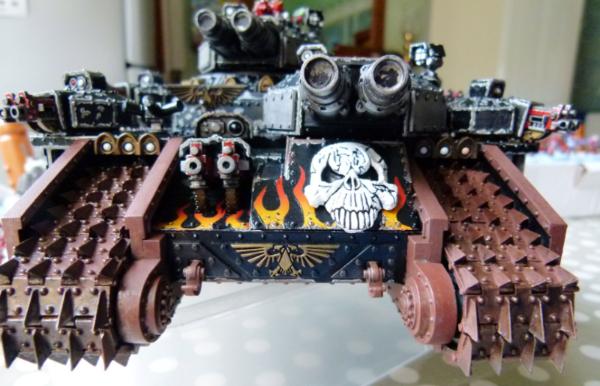
I decided enough was enough on this Glaive and put my paint brush down. This shot shows the "normal" weapon payload. But .......
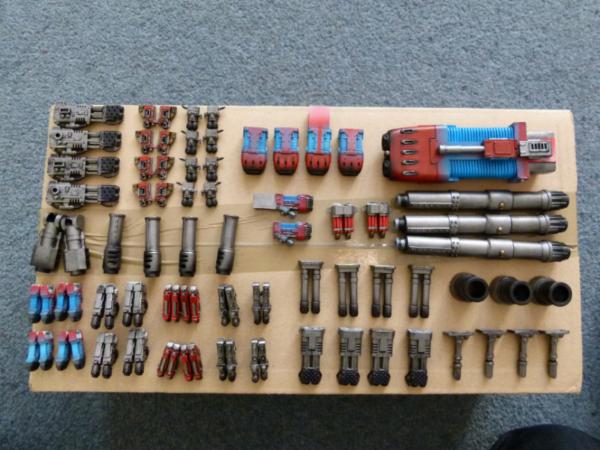
..... these are the alternatives I've painted for this and my second fellblade that I've recently started to base coat paint.
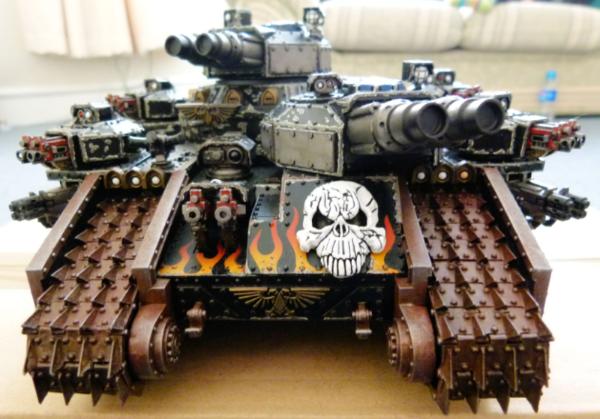
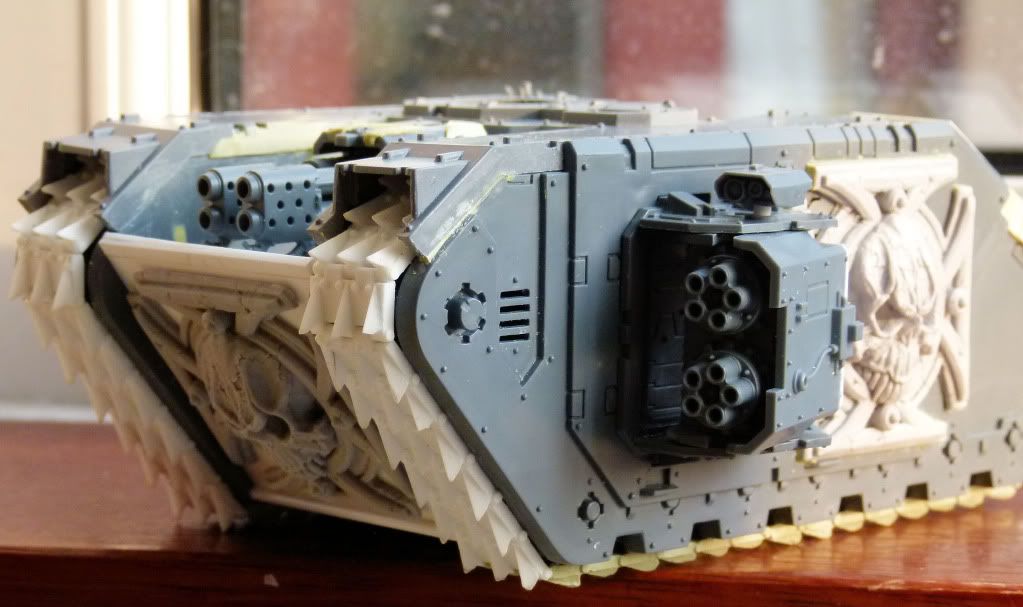
This shows the sponsons loaded with plasma cannons and the turret with heavy bolter.
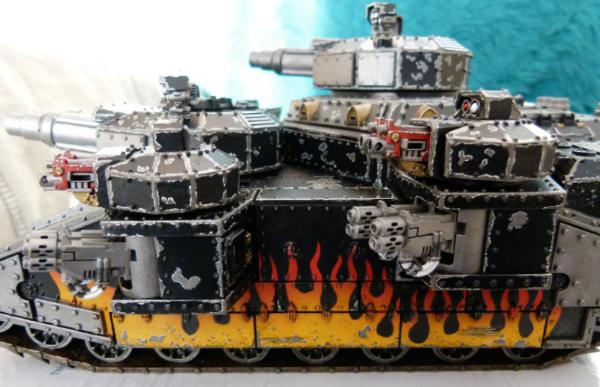
This shows the sponsons and turret loaded with heavy bolters.

This shows the sponsons and turrets loaded with heavy flamers.
Turrets loaded with battle cannon.
I've started my second fellblade/shadowsword/etc.....
There are still a lot of processes to be finished on this one. Since taking these photo's, I've black oil washed all the rivets and added a wash to the tracks. I am writing this blog as I await the matt varnish coat to dry before I can move onto the next process.
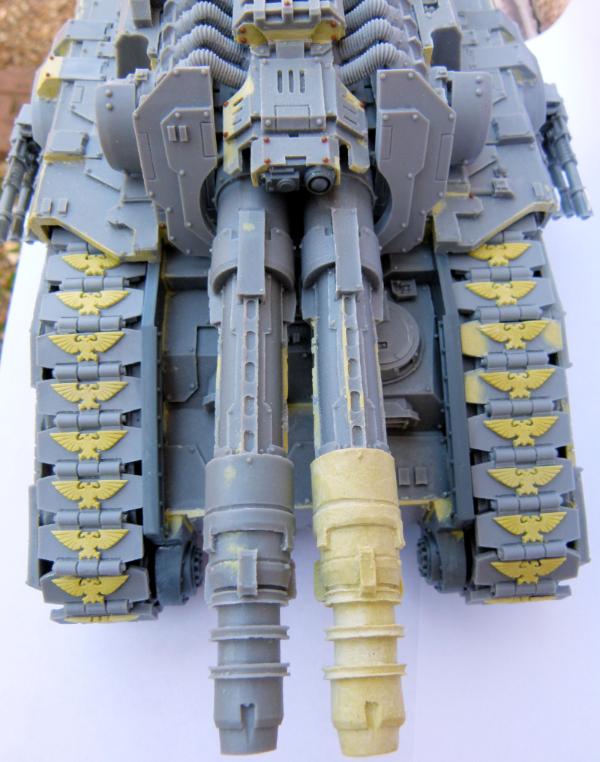
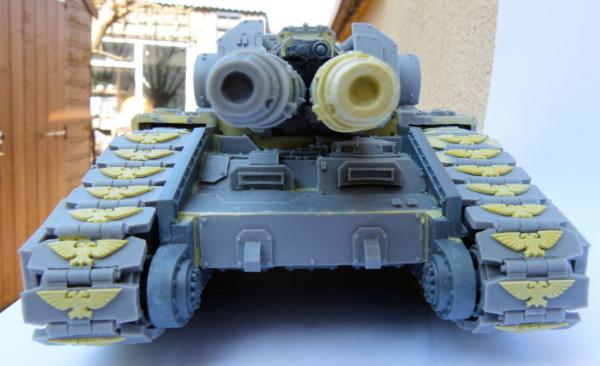
This shows the right hand side with just the base coats of paint (apart from the weapons that are finished). I loved painting the titan plasma cannon!
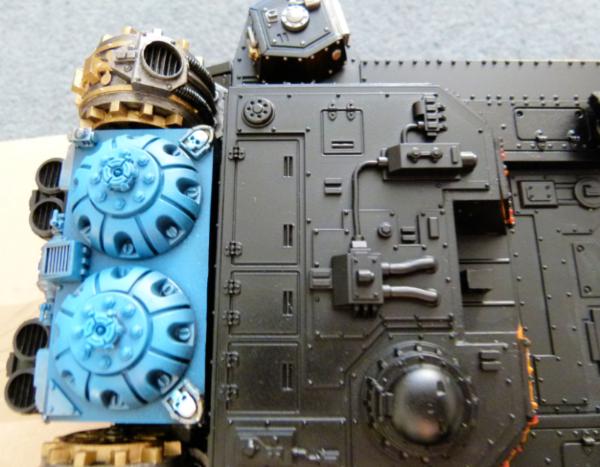
This shows the plasma reactors in a finished state. I used the airbrush to (hopefully) give a plasma glow.
As everything is magnetised, I can make the fellblade into a Shadowsword or ......
.....Twin Shadowsword .....
...Stormsword........
....Twin Stormsword.....
..... and Storm Lord.
I'm off for the next 9 days over the Christmas period, so I hope to get as many of my projects finished.
Here's a sneak peak of another project I've just started....
An Assault Land Raider!! The Vulcan Mega Bolter sponson's are finished - just the rest to finish now!!!
Comments/critiques welcome as always.
Regards, Phil.
|
|
|
|
|
|
2013/12/22 10:36:52
Subject: Fellblade / Blade/Sword Variants
|
|

Homicidal Veteran Blood Angel Assault Marine
|
Amazing conversion work! A suggestion for your painting is to not make your chipping so big and so many. less is more and you should try the sponge technique for making more realistic chips and scratches.
|
|
|
|
|
|
2013/12/23 14:31:52
Subject: Re:Fellblade / Blade/Sword Variants
|
|
Longtime Dakkanaut
|
The beauty of magnetization! Great job!
|
|
|
|
|
|
2013/12/24 00:40:56
Subject: Fellblade / Blade/Sword Variants
|
|
Perturbed Blood Angel Tactical Marine
|
Are those vulcan megabolter sponsons pointing backwards?
|
Purge the heretic. |
|
|
|
|
2013/12/25 20:49:13
Subject: Fellblade / Blade/Sword Variants
|
|
Regular Dakkanaut
|
No!
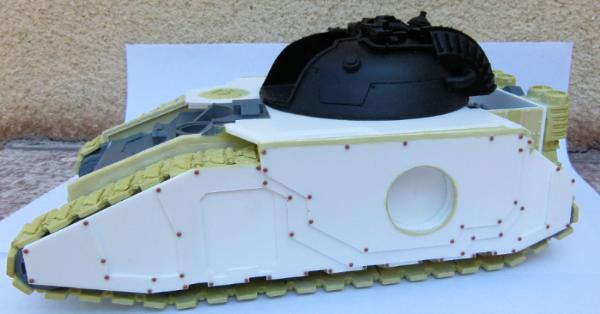
I've deliberately made this Assault Land Raider the "wrong" way around (to resemble First World War tanks).

This shows a better shot before I undercoated it. I have decided that my Heavy Assault Land Raider would look cool with Twin Vulcan Mega Bolter sponsons and Twin Inferno Cannon Turret. The tracks are from Blood and Skulls Industry and the large Crux Terminator logo comes from FW.
I just have the engine and the rear of the Fellblade to finish before I can start on this one (bar the VMB's that have already been finished). Compulsory flames will flow over most of the top and sides on this one. My airbrush is twitching at the prospect!!!!
Merry Christmas, Phil.
|
|
|
|
|
|
2013/12/26 20:20:07
Subject: Re:Fellblade / Blade/Sword Variants
|
|

Possessed Khorne Marine Covered in Spikes
|
That "backwards" landraider is great.
Awesome idea flipping it around.
|
|
|
|
|
2013/12/26 20:45:15
Subject: Fellblade / Blade/Sword Variants
|
|
Hellacious Havoc
|
Those are some pretty awesome and terrifyingly well armed creations you have there.
Awesome work!
|
|
|
|
|
|
2014/01/01 19:42:58
Subject: Re:Fellblade / Blade/Sword Variants
|
|
Regular Dakkanaut
|
99.99% Completed my Storm Blade/Sword etc.
I refrained from weathering this fellblade as much as my first. I only added a small amount of rust to the front and tracks and used the sponging technique to add the exposed metal areas around the edges. The only thing I need to do to complete this behemoth is to airbrush some VMA black over the front of the Twin Twin Heavy Bolters to give them some Carbon weathering.
This shows the right hand side, with Lascannon turret and Twin Heavy Plasma Gun Sponsons. Boy, did I have fun painting those rivets!!!!!!!
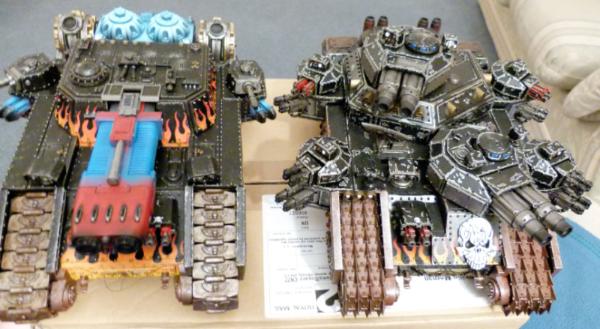
Here's a shot of my 2 fellblades together. I've had a lot of fun painting these. I've managed to practise a lot of painting and weathering techniques on these and will continue to learn with each model I work on.
I can now box these boys up and finally take them out of my living room (my wife will be happy LOL!!). I have enough Baneblade bits to make another fellblade in the future, but I need to slowly buy parts from Machinator over the next couple of months. In the meantime, I'm going to start painting some of my many Land Raider Variants.
PS: Here's a WIP shot of my back to front Assault Land Raider........
More shots can be seen in my blog in my signature below.
Regards, Phil.
|
|
|
|
|
|
2018/06/02 16:17:52
Subject: Re:Fellblade / Blade/Sword Variants
|
|
Regular Dakkanaut
|
Update time:
Legion Falchion
I've recently got my hands on a Legion Falchion and after a lot of repair, I finally finished the construction.
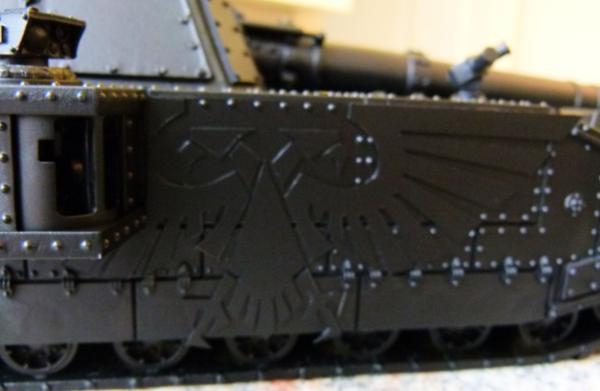
One of the barrels had a really bad mould slip and it was easier to take a mould and create a second one. I added Imperial Eagles onto every track to show my allegiance as well!
This shows the business end! I used milliput to fill any gaps and repair any resin damaged in transit.
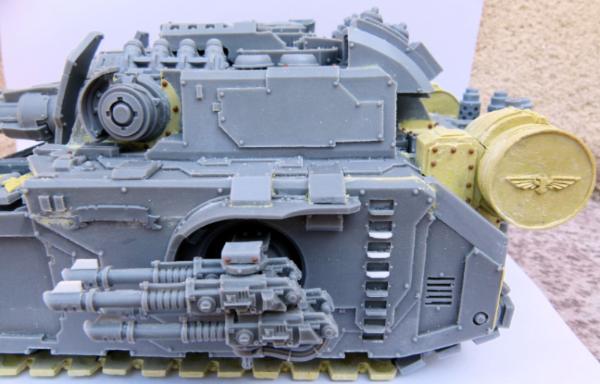
This shows the left side. I had to repair some of the rungs on the ladder at the rear and the lascannon barrel fins out of white plasticard and as I prefer the look of the single round fuel drums, I added these instead of the baneblade twin drums.
I used tichytraingroup rivets to add more realism. I have already undercoated it black and it will now add to the growing list of vehicles to paint!
Legion Glaive
As I wasn't prepared to pay for a full price Legion Glaive, I managed to pick up the turret and front glacis off of ebay a couple of years ago. As a modelling challenge, I then decided to make the rest out of plasticard and milliput. Without further ado, this is the progress I've made....
Using my existing fellblade as a template I made the side armour from different plasticard of varying thickness. I then again added tichytraingroup rivets to add more realism. The hardest part was cutting the circle in the very thick plasticard with a modelling compass. I'm really happy with how this turned out. Patience and the right equipment can give really good results!
This shows the construction out of plasticard. I then needed to box in the rear. I've got multiple projects on the go at the moment and haven't touched this for the past week. I'll add more shots as I'm making more progress.
Regards, Phil.
|
|
|
|
|
|
2018/06/03 05:45:58
Subject: Fellblade / Blade/Sword Variants
|
|
Dakka Veteran
|
Those are some sweet hot rod style flames. Keep up the good work.
I'll back up the comments on Machinator's products, good stuff all round, and that's not me doing some semi-self-promotion since I've designed parts for him. Excellent service, he's always been great to deal with.
I was thinking to cover up that demolisher gun mount you could have blanked over the back and filled/sanded the piece so it's flat and put on one of his Large mounting skulls to give it a little attitude.
EDIT - and apparently you already had that idea and put a skull there. Good work.
|
|
This message was edited 1 time. Last update was at 2018/06/03 05:47:06
|
|
|
|
|
2018/06/03 09:09:37
Subject: Re:Fellblade / Blade/Sword Variants
|
|
Regular Dakkanaut
|
Looking back over this thread, I realise that I didn’t update it with my FW Fellblade I finished last year .....
This shows the top plan. I refrained from a lot of the weathering techniques I did on my first fellblade and only used the “sponging” technique on this model.
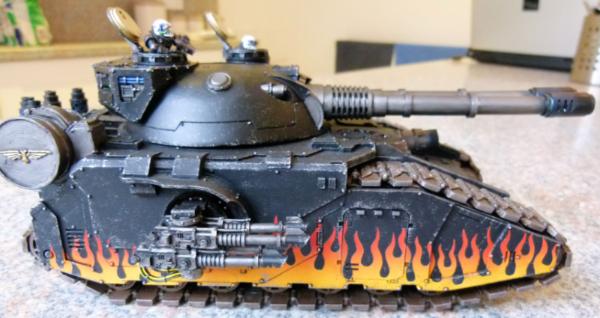
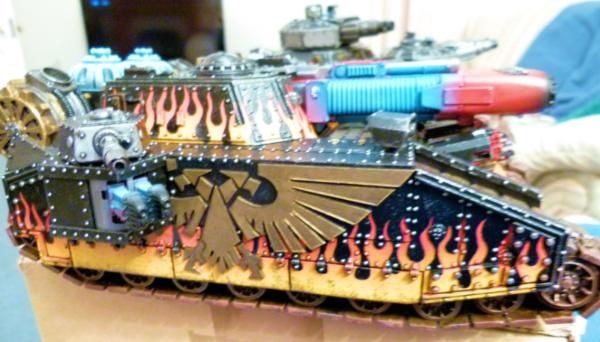
Obligatory flames up the side were airbrushed on. I opted to go with the single fuel tank you saw when FW released their original fellblade years ago. I think it looks cooler and makes the tank look “ancient”. All my future versions will have them as well.
 Future painting projects
Arkurian Shadowsword with imperial eagle from plasticard on its side.
Storm hammer with single fuel tanks.
Till next time. Phil.
|
|
|
|
|
|
|
|

 2000 Points IG
 2000 Points SM
 [Eggroll's Blood Angels WIP Log]