Switch Theme:

Lamb's World 117th Imperial Guard  [RSS] Share on facebook Share on Twitter Submit to Reddit
»
Author Message
Advert


Forum adverts like this one are shown to any user who is not logged in. Join us by filling out a tiny 3 field form and you will get your own, free, dakka user account which gives a good range of benefits to you:
  • No adverts like this in the forums anymore.
  • Times and dates in your local timezone.
  • Full tracking of what you have read so you can skip to your first unread post, easily see what has changed since you last logged in, and easily see what is new at a glance.
  • Email notifications for threads you want to watch closely.
  • Being a part of the oldest wargaming community on the net.
If you are already a member then feel free to login now.


Made in gb
Discriminating Deathmark Assassin


Starting my first Guard army now. Feeling a bit intimidated after looking at these. So good throughout... Every detail... Just swapping heads off Cadians doesn't seem like quite enough now...
   
Made in us
Regular Dakkanaut


The blog is awesome! You are soo lucky to have a gaming crew like that. All great painters, all dedicated gamers making the most out of 40k. Awesome.


Made in us
Multispectral Nisse


These are awesome keep up the work, sweet!

Hydra Dominatus

World Wide War Winner  
   
Made in gb
Enginseer with a Wrench


Thanks all

Anti tank Specialists


Anti-personnel specialists


Reconnaissance Specialists


Which way to victory? Onward!

This message was edited 1 time. Last update was at 2013/10/23 13:08:21


+Death of a Rubricist+
My miniature painting blog.
 
   
Made in gb
Enginseer with a Wrench


Painting step-by-step
I thought I'd do a little tutorial on how I paint my Lamb's World troopers, which I'll try and update it a bit every day. Here's the first few steps.

1) Clean and assemble your model/s and stick it/them to a base. I use a mix of plain bases and textured resin rocky ones. This keeps costs down and provides a nice visual mix while remaining cohesive.

2) Undercoat the models with a light undercoat of grey. I use Halford's car primer. An undercoat should cover every part and recess of the model evenly and lightly, obscuring no detail.


3) Once dry, give the models a basecoat. For these, I've used Humbrol's Desert Yellow 93 from their Model & Craft Hobby Spray Acrylic range. The important thing for a basecoat is that it covers everything fairly evenly, so feel free to apply yours with a brush. However, if there are a few small recesses that remain grey, that's not a problem. Since both the undercoat and basecoat are mid-toned, it'll blend in nicely and create a natural worn variance in the cloth (the armour, flesh, weapons etc. will be covered anyway). This won't work if you undercoat in a dark shade or bright tint (such as black or white) unless your basecoat is a matching dark or light tone*.

4) Once dry, check the models over. If you've missed large areas with the basecoat or the models don't look vaguely uniform, give them another basecoat until you're happy.


5) Identify the fatigues of the model. Using a small flat brush apply the darkest tone of your camouflage pattern in a broken pattern – I have used Scorched Brown for these. Keep only a little paint on your brush, and dilute it only very slightly: it should feel a little dry and stay exactly where you place it on the model. Try to keep the pattern evenly spaced, and aim to cover one third or so of the fatigues with blotches. Try to make these in thin, broken lines that curve back on themselves, rather than big near-circular patches.

It is important for the effect that the blotches cover the undulations of the surface evenly – they should go into recesses and touch high points equally, so poke the paint on with a slow stabbing motion, rather than with a light, surface-catching drybrush technique.

I tend to use a size 1 flat synthetic brush, as the bristles have more resistance which makes it easier to touch the tip to the model. If you don't have a flat brush, this is a great chance to use that poor split/damaged detail brush you have lying around, rather than retiring it! Since the bristles shoot off in different directions, you'll have slightly less control, and will get a more natural uncontrived effect to the camouflage splotches.


6) Once the dark-toned areas are dry, overlay a wash of Gryphonne Sepia (or equivalent) over the fatigues. This will help to bring out the colour of the fatigues and start to develop the shading.

It's worth pointing out that I also use the wash on non-camouflaged areas of cloth, such as any bedrolls or officers' headgear.


7) Using Dheneb stone, add camouflage patches as before. Use a slow semi-stippling motion with your split brush to get the blotchy curved lines and dots. Aim to cover roughly a third of the surface, and – importantly – overlay both the basecoat areas and dark-toned areas. This is a great opportunity to cover up any mistakes made with the darker-toned areas, and also to cut in and reshape any blotches that have got too large or unpleasantly-shaped.

At this point, the surface of the fatigues should be roughly split into thirds: basecoat (midtone), tints (light tone) and shades (dark tone). Next up – the armour!


8) With the camouflage pattern in place, paint in all the parts that you want to be metallic using black.


9) Once dry, paint over the same areas with Boltgun Metal.


10) Use a size 1 round brush to paint the shoes, gloves, armour straps (the bits behind the knees and in front of the elbows) and some of the pouches (the ones you want to stand out a little) with Charadon Granite. Once dry, use a size 2 round to give the fatigues of the model a wash with Gryphonne Sepia and allow to dry. Don't worry too much about neatness with this stage – as long as you keep the wash away from the metallics and the Granite areas.


11) Switch back to a size 1 round and carefully paint the hard armour areas with the Vallejo Russian Tank Crew II (Catachan Green or Straken Green are good equivalents), including the resirator and any technical widgets and doobries on the helmets.


12) Use a size 2 brush to add a second wash of Gryphonne Sepia to the fatigue areas, and while it is still wet, use a size 1 brush to drop in a little Agrax Earthshade to the darker areas around the elbows, knees, and groin. Allow the two washes to bleed together a little, then use a clean dry brush to lift away excess wash from surface areas.

Once dry, give the armour, weapon casings and Charadon Granite areas (boots, gloves, etc.) a wash of Agrax Earthshade (or Devlan Mud), allow to dry, and then apply basic highlighting to the plates using a size 1 brush lightly loaded with Camo Green (I think Elysian Green is the new equivalent).

To apply the highlighting to each section of the armour, pick a direction for the light source (top left or top right), and use the side of a lightly-loaded size 1 brush with a scumbling technique. Start from the direction of the light source (e.g. top left) and scumble the paint towards the opposite side (bottom right). This technique should result in better paint coverage towards the light source, blending away to the base colour about a third of the way across. Note that this is just on average – you'll have to evaluate each plate separately. If the flat of one is pointed directly at the light source (e.g. the top parts of the left shoulder plate), then this will be almost entirely covered with the highlight. Equally, if something is shaded almost entirely from the light (such as the bottom of the codpiece), then this will be almost entirely covered with the base coat.

Once this is completed (the paint should dry almost immediately on application owing to the light loading of the paint and the scumbling technique), add Rotting Flesh to the Camo Green and add some gentle edge highlighting to the sharp corners. Again, apply the paint lightly using the side of the brush, and apply more paint on the edges that face the light source and less paint on the edges that face away – this ensures that you don't get a 'neon glow' to the armour plates.


13) Use the jewel painting technique (blending from a dark colour towards the light source to a light colour away from the light source, then adding a dot of white in the centre of the dark area) to paint the eye lenses. I used Dark Flesh blended away to Solar Macharius Orange.

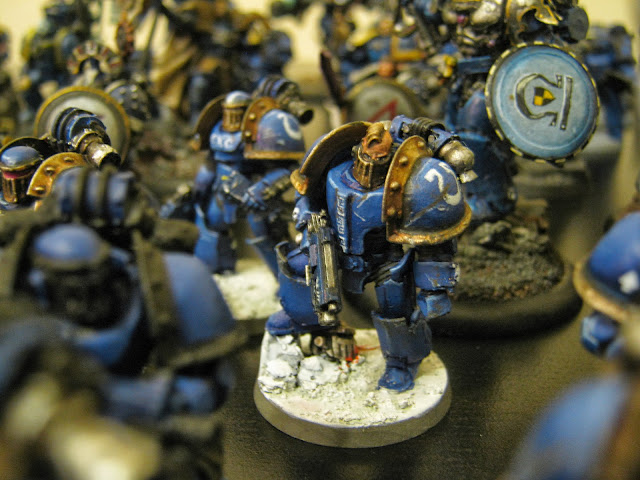
Lightly load a size 1 brush with Solar Macharius Orange and draw a vertical line down the shoulder pad as a Company sigil.


14) Paint the model's skin in the manner of your choosing. My skin painting technique is fairly involved, but on models with this little flesh showing, a good result can be achieved by painting the neck, fingers and any exposed skin with the base colour (such as Tanned Flesh), then adding a highlight (such as Tanned Flesh and Bleached Bone), then washing with Agrax Earthshade and lifting out excess wash from raised areas. Paint the eyes by drawing a short fine line of black and allowing it to dry, then adding dots of white, one on either side of each eye. Make sure each dot has a border of black remaining around it. Once dry, draw lines of the skin base (e.g. Tanned Flesh) under and over the eye.

I like to add diversity to my skintones – they're hugely variable even in an individual: quite aside from big differences such as ethnicity, conditions such as sunburn, sickness or even being out of breath can change people's skin colour quite dramatically. Adding touches of blue to the skin mix for stubble and bags under the eyes, touches of scab red to the mix for lips, cheeks and fresh scars, or a dilute wash of Olive Green for feeling poorly can make the difference between a cool-looking model and a believable individual.

The model itself is basically finished at this point, but I think a good base – even if very simple – really lifts a figure. Apologies that the picture doesn't really show the skin and eyes; it was a very quick shot! There are some closeup example of skintones elsewhere.


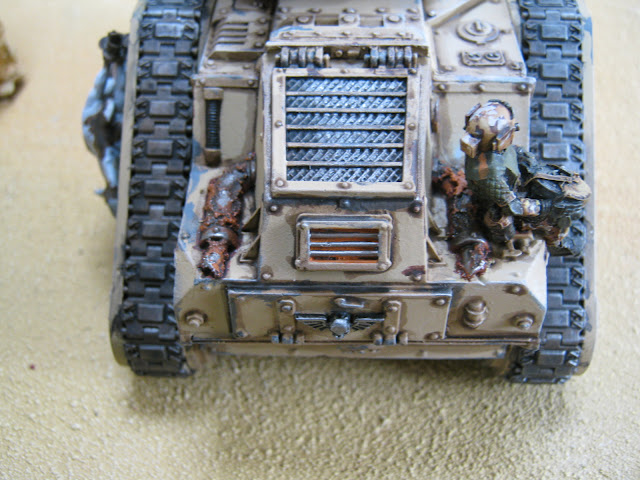
15) Use an old brush to apply Armageddon Dust to the base (pictured). Once dry, paint the whole base Khemri Brown. Allow to dry, then drybrush the surface fairly heavily using Dheneb Stone. Finish the base by painting the rim Calthan Brown.

+++

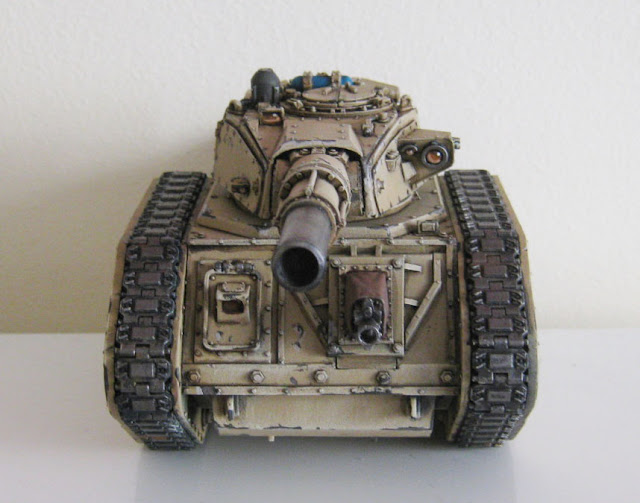
Rinse and repeat! The following are finished aside from their bases and final details. Touches of personalisation can add a lot to the final effect, but these are the most fun to think up – knock yourself out!


+++
*Though it's worth noting that using differently-toned sprays can give lovely effects, such as zenithal highlighting. Spray black (or a dark tone), then spray a lighter-toned colour from a fixed point at the top. Bang – instant dramatic shadows!

+Death of a Rubricist+
My miniature painting blog.
 
   
Made in gb
Avatar of the Bloody-Handed God


Inside your mind, corrupting the pathways

Excellent tutorial!

   
Made in gb
Enginseer with a Wrench


 Medium of Death wrote:
Having looked through the blog I'm really taken with the whole thing. It's all very cool. All your mates armies are fantastic too. Particularly like the Tau colour scheme.

Ta very much – and if you'd like more info on Shas'ka Nan and the Starblade Cadre, you can find grahamgilchrist's blog here.

I notice that Shale is described as being devoured by a Hive Fleet, who's building that up? Could we be seeing some Apologist style 'nids?

Unlikely you'll see any from me (at least in the immediate future). The tyranids were the antagonists in an earlier campaign, which ended with the Bad Day at Bothusion Prime – a big mega game that led to the events on Shale.

General Q: Did you find removing the respirator parts from the Elysian torsos to be overly troublesome?

No, not at all. The cabling that runs rounds the back requires a little more care, but the front respirator and cup is very easy to remove.


+Death of a Rubricist+
My miniature painting blog.
 
   
Made in it
Fresh-Faced New User


Awesome miniatures Man!
What other army do you have?
   
Made in gb
Enginseer with a Wrench


I have some Ultramarines:


...and some Eldar and orks in the works too:


...but my heart will always be with the Guard!

+Death of a Rubricist+
My miniature painting blog.
 
   
Made in us
Calculating Commissar


 Apologist wrote:
I have some Ultramarines:


He looks so disappointed in whoever is taking the picture.

40k: IG "The Poli-Aima 1st" ~3500pts (and various allies)
KHADOR
X-Wing (Empire Strong)
 Ouze wrote:
I can't wait to buy one of these, open the box, peek at the sprues, and then put it back in the box and store it unpainted for years.
 
   
Made in gb
Wolf Guard Bodyguard in Terminator Armor


Sweet looking models chap!

Out of interest where did you source those horses from? I have a load of original rough riders ready for some paint but the old GW horses look terrible.


Made in gb
Enginseer with a Wrench


Sweet! I love the old Rough Riders – sadly parted with mine after an offer I couldn't refuse.
The horses I used here are from the Wood Elf range. I think they're Glade Riders(?) or something similar.


Automatically Appended Next Post:
Taaank!
Leman Russ Battle Tank


Leman Russ Eradicator variant


+++


This message was edited 2 times. Last update was at 2013/10/24 13:31:33


+Death of a Rubricist+
My miniature painting blog.
 
   
Made in us
Longtime Dakkanaut


Charleston, SC

This guard army is hands-down one of the best looking. I love all the character each mini and machine has. Tanks look great!

   
Made in gb
Insect-Infested Nurgle Chaos Lord


Amazing detail, love all the character building touches like the guy sitting on the back or the "No Hitchers" writing.

What does the white text say on the left side of your LRBT?

   
Made in us
Boom! Leman Russ Commander


Ohio

Very nice work, love the color scheme for the army.

The weathering on the tank is really nice as well, Could you explain some of the basics of what you did? Also how did you get the nice weathered look around the rivets? Ive been trying to get that with the tan on my tanks but have not been able to accomplish it.


Made in fi
Utilizing Careful Highlighting


Finland... the country next to Sweden? No! That's Norway! Finland is to the east! No! That's Russia!

Amazing work on every aspect of your miniatures!
Makes me want to continue my cadian army.

Sweet Jesus, Nurgle and Slaanesh in the same box!?
No, just Nurgle and Slaanesh, Jesus will be sold seperately in a blister.


Made in gb
Enginseer with a Wrench


Medium of Death wrote:Amazing detail, love all the character building touches like the guy sitting on the back or the "No Hitchers" writing.
What does the white text say on the left side of your LRBT?


Do you know, I'd quite forgotten about that? I had to dig the tank out of storage and have a look. It says 'Grumbler', for some reason in copperplate hand. Can't quite remember why – I think it may have been under the influence of a synthale or two

tankboy145 wrote:The weathering on the tank is really nice as well, Could you explain some of the basics of what you did? Also how did you get the nice weathered look around the rivets? Ive been trying to get that with the tan on my tanks but have not been able to accomplish it.

I'm not sure I could do much more than basic – you'll be pleased to hear it's a very simple process. Because I don't find vehicles terribly exciting to paint, and I think they need to look more consistent than infantry (fabrics fade, after all), I try to keep vehicle schemes as simple as possible.

Step 1: Prime with grey (I use Halford's grey primer for preference).
Step 2: Spray with Humbrol's Desert Yellow 93 (Model & Craft Hobby Spray Acrylic range) – same as the infantry.
Step 3: Using a size 1 brush, line the deeper recesses with Devlan Mud.
Step 4: Drybrush the whole tank using a large brush and Dheneb Stone. I use the same 37mm (1½in) filbert brush as I use for my canvasses, but any big brush will work. When drybrushing, be careful to wipe away almost all of the paint. The biggest mistake I see with drybrushing is to try and do it with too much paint, which results in streaks and marks on the flat surfaces. Much better to do two or three very faint layers.
Step 5: Using a size 1 brush, line the deeper recesses with Devlan Mud again.
Step 6: Still using the size 1 brush with Devlan Mud, touch on a little bit to each rivet. While wet, carefully wipe off the paint on top using your thumb, a piece of tissue or a cotton bud, leaving just a little of the colour around it.
Step 7: Use the edge of the size 1 brush to add starker highlights of Dheneb Stone to the light-facing edges of flat surfaces.

That finishes the basic paintjob. The rest of it is weathering, which I add with patches, stripes and scrapes of grey (any grey, really). A little black mixed with brown is painted inside the larger one of these, and then overpainted with boltgun metal. I add a fine highlighting line at the bottom of each shape to give the area some shape.

Metal areas and tracks are tackled with black mixed with brown. Tracks are then drybrushed very lightly with Boltgun Metal added to the same black/brown mix, while metal areas get pure Boltgun Metal, and then a mix of Boltgun and Mithril Silver. You could use Tin Bitz for the tracks.

+Death of a Rubricist+
My miniature painting blog.
 
   
Made in us
Boom! Leman Russ Commander


Ohio

Thats much easier than I had thought. Just a simple bit of devlan mud and then wiping the top off. Thanks for the help!


Made in us
Unhealthy Competition With Other Legions


Wow, your faces are stellar! I love the cow on the side of the russ lol.

"You are like a son and together we have all but conquered the galaxy. Now the time has come for me to retire to Terra. My work as a soldier is done and now passes to you for I have great tasks to perform in my earthly sanctum. I name you Warmaster and from this day forth all of my armies and generals shall take orders from you as if the words came from mine own mouth. But words of caution I have for you for your brother Primarchs are strong of will, of thought and of action.

My Sons of Horus P&M. LUPERCAL! http://www.dakkadakka.com/dakkaforum/posts/list/494329.page

Sons of Horus : 12000pts
Pre-Heresy Ultramarines - 5000pts
Vior'la Tau - 2000pts  
   
Made in gb
Enginseer with a Wrench


tankboy145 wrote:Thats much easier than I had thought. Just a simple bit of devlan mud and then wiping the top off. Thanks for the help!

My pleasure – hope it helps!

Brokksamson wrote:Wow, your faces are stellar! I love the cow on the side of the russ lol.

Thanks very much; faces are one of my favourite parts of painting. If you don't mind me posting a load of 'em...


+Death of a Rubricist+
My miniature painting blog.
 
   
Made in gb
Steady Space Marine Vet Sergeant


United Kingdom

You, sir, can paint faces... well

   
Made in gb
Longtime Dakkanaut


Gork's balls, I love your IG!
   
Made in gb
Wrathful Warlord Titan Commander


Ramsden Heath, Essex

This is a sweet plog Apologist, thanks for sharing.

One question though, although I note some weathering on your tanks they are nonetheless quite clean compared to the grubbier infantry; was this a conscious decision or are you going back to dirty them up or a result of your preference for infantry models?

How do you promote your Hobby? - Legoburner "I run some crappy wargaming website " 
   
Made in gb
Lit By the Flames of Prospero


Bearing Words in Rugby

Stop.. Just stop being good :c My guard feel inadequate

Muh Black Templars
Blacksails wrote:Maybe you should read your own posts before calling someone else's juvenile.
 
   
Made in us
Fresh-Faced New User


Afghanistan

With as much character each model has, I feel every Guardsman has their own name and back story. This is hands down one of the best painted armies I've ever seen.
   
Made in us
Flashy Flashgitz


MD

Epic work man! As most have said the camo detail is very well done.

3k Points 
   
Made in gb
Enginseer with a Wrench


Thanks for all the lovely feedback, everyone

One question though, although I note some weathering on your tanks they are nonetheless quite clean compared to the grubbier infantry; was this a conscious decision or are you going back to dirty them up or a result of your preference for infantry models?

The tanks were left cleaner than the infantry for a couple of reasons.

Firstly, nice clean lines make things look bigger – so I chose not to use camouflage or weather them too much to keep nice clean panels.

Secondly, I like the idea that Imperial tanks can be hundreds of years old; kept running both through their simple mechanical structure and the fact that unthinking soldiers following strict rote orders would keep it spick and span.

This tank 's operating manual has obviously lost the pages with the rituals for cleaning the exhaust pipes, so we have massive encrustations of rust

Finally, the theatre of war to which this regiment was deployed was dry, so I restricted the weathering to dust, oil and occasional paint scraped back to primer.

+++
I added a Valkyrie to the army for the big Apocalypse game that finished the campaign.


I had fun with the personalised helms of Flight Lieutenants 'Walky' Walt and Iax.

Like the tanks, I've kept this relatively clean, with weathering only really affecting the steps up to the cockpit.

The Valkyrie carried a payload of Stormtroopers:


These elite men (and women) needed something to denote them as elite, so I used threatening black armour and mixed in some intimidating full-face visors.

+Death of a Rubricist+
My miniature painting blog.
 
   
Made in gb
Enginseer with a Wrench


If you've enjoyed this blog and would like to help see what happened earlier in sector history to lead to the events on Shale, my gaming group is looking for some colour text for Imperial Guard regiments and small ork warbands for an upcoming campaign. If you'd like to help, please read more on my blog here:
http://apologentsia.blogspot.co.uk/2013/11/project-inload-pcrc-scallop-stars-build.html

+Death of a Rubricist+
My miniature painting blog.
 
   
Made in gb
Enginseer with a Wrench


Senior Officer (Caef) Terentius Dresden
Here's the leader of the whole force:


...and with his command squad:

+Death of a Rubricist+
My miniature painting blog.
 
   
Made in gb
Steady Space Marine Vet Sergeant


United Kingdom

Holy smoke, batman!

I really love your work. When i've got my White Scars out the way, I'm diving into IG. This is my first stop for inspiration.

Dont stop painting.

Zambro


Forum Index » Painting & Modeling Showcase
Go to: