| Author |
Message |
 |
|
|
|
|
Advert
|
Forum adverts like this one are shown to any user who is not logged in. Join us by filling out a tiny 3 field form and you will get your own, free, dakka user account which gives a good range of benefits to you:
- No adverts like this in the forums anymore.
- Times and dates in your local timezone.
- Full tracking of what you have read so you can skip to your first unread post, easily see what has changed since you last logged in, and easily see what is new at a glance.
- Email notifications for threads you want to watch closely.
- Being a part of the oldest wargaming community on the net.
If you are already a member then feel free to login now. |
|
 |
2022/03/26 15:59:19
Subject: Re:LoER Hobby Challenge #37 (March/April): Biomes
|
|

Fireknife Shas'el
|
|
|
|
|
 |
|
2022/03/26 17:18:46
Subject: Re:LoER Hobby Challenge #37 (March/April): Biomes
|
|

Speed Drybrushing
|
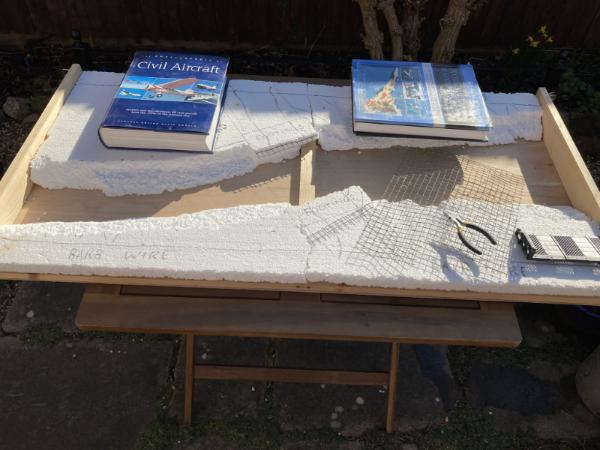
Jadenim, that looks epic so far. I really like the feel of the crumbling bridge. Welcome to the competition. If we're looking at just one section, this is going to be a fantastic layout. There is going to be an awful lot of barbed wire. Scale barb wire is something that really draws me. It's just one of those things that gets me every time.
I have some progress to share as well. I have made some progress on the terrain I started for the last round of competition. Looking to see if I can get it over the line for this round.
I have a good assortment of structures and causeways.
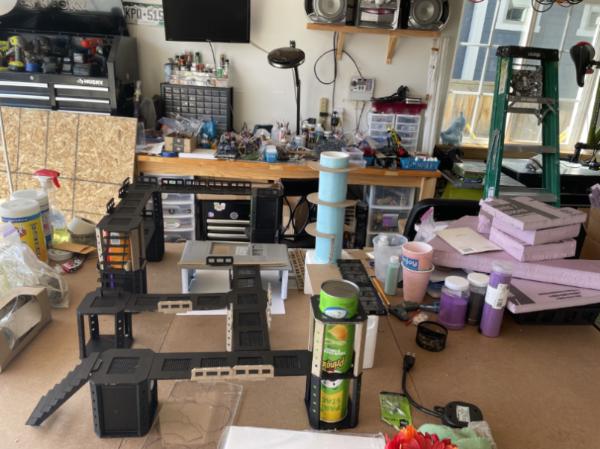
The weather took a turn for the warmer this week, so I got out some rattle cans and began the rust work on my modular towers.
The next from here is to finish up some of the heavier rust with a big brush.
|
|
|
|
|
|
2022/03/29 06:50:20
Subject: LoER Hobby Challenge #37 (March/April): Biomes
|
|
Liberated Grot Land Raida
|
Some really great looking pieces being produced this time round. Pretty large scale projects too. And that rust is looking excellent.
My own “tunnels” are coming on well. Some actual dirt going down, and experimenting with a few different styles and designs. I’ll take some snaps soon.
|
|
|
|
|
|
2022/03/29 23:01:56
Subject: LoER Hobby Challenge #37 (March/April): Biomes
|
|
Liberated Grot Land Raida
|
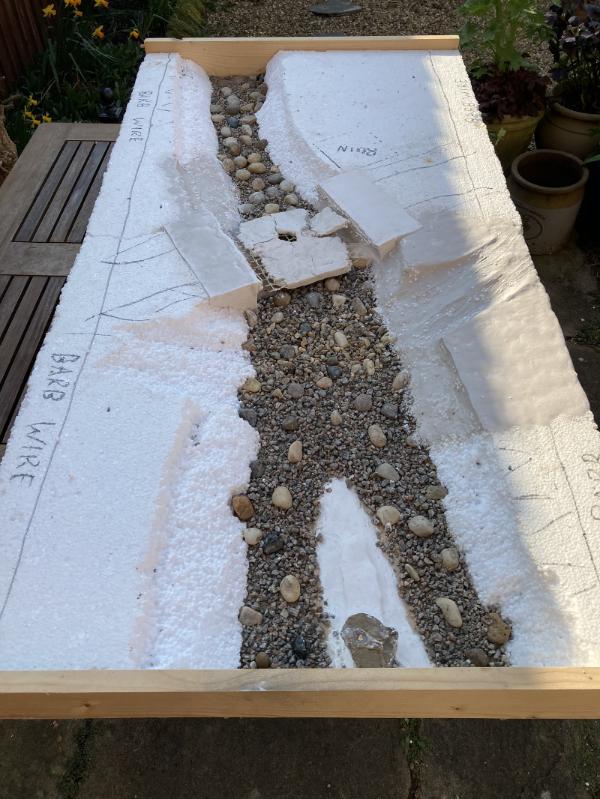
Some of the tunnel pieces I’ve made so far. Still some surfaces to flock and lots still to paint.
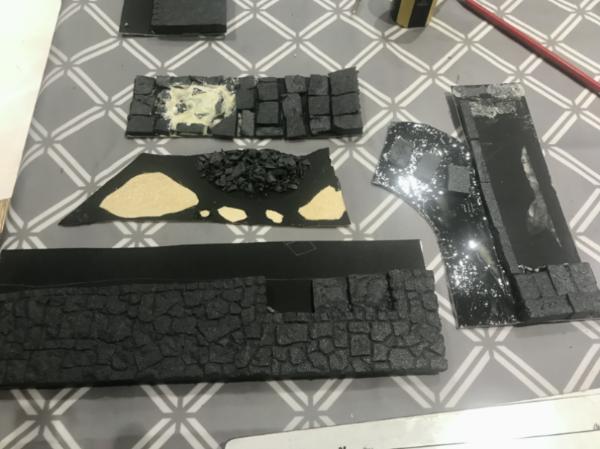
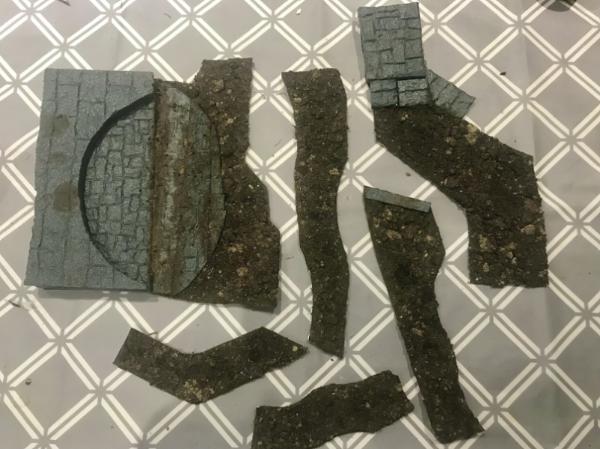
Apart from these there are some more river/sewer pieces. The whole lot should form a collection of passageways of various sizes and surfaces either paved, dirt floor or river to allow for advantages to various types of creatures such as swimmers, more nimble or smaller types.
There’s a few ways to make larger underground spaces with it too so hopefully It’ll lend itself to a good variety of options for scenarios.
|
|
|
|
|
|
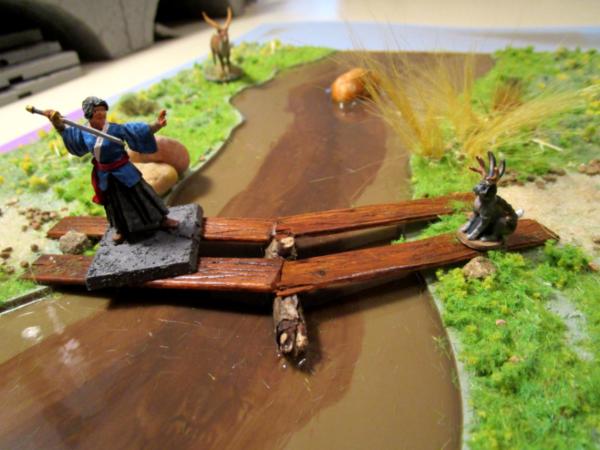
2022/03/29 23:10:58
Subject: Re:LoER Hobby Challenge #37 (March/April): Biomes
|
|
[DCM]
Boom! Leman Russ Commander
|
I'm impressed by the diversity, detail and SCALE of all y'alls projects- very neat! 
Progress tonight:
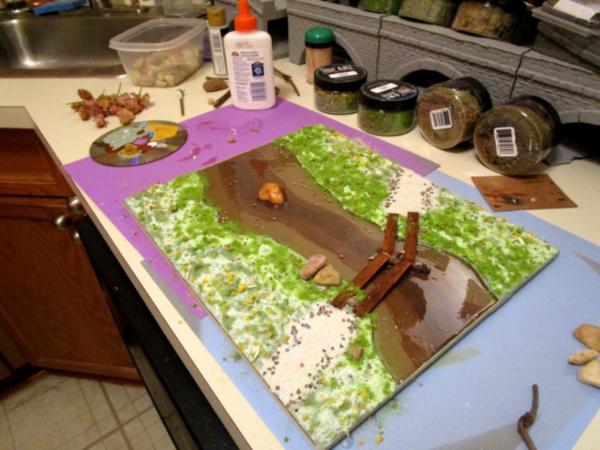
This pic is definitely WIP- what you're seeing is the boards for the footbridge glued down, the couple of stones on the riverbank also, and the pathway sand and flock laid down. I used a three stage technique for this, based on the directions on the MicroMark Ballast Cement bottle and my own experience messing about with track ballast in model railroading many years ago:
- I painted the ballast cement (very thin white/PVA glue) on relatively small sections at a time to drop the flock onto so it wouldn't blow all over the place
- Dropped the flock and hit it with a light mist of 70% isopropyl alcohol
- Used an eye dropper to 'flood' more ballast cement amongst the flock
That's what you're seeing here: the flock liberally saturated with drying white glue. Past experience suggests that when dry, the cement will be invisible and the flocking will still look vibrant and 'springy'.
I used two mixes of flock from Huge Miniatures (I really like their product): Marsh and Meadow. I wanted to show a transition from the wetter riverbank itself into a drier meadow ecology. It's hard to see here, with the wet glue, but the meadow areas at the very edges of the board have more yellow in them (darn dandelions!).
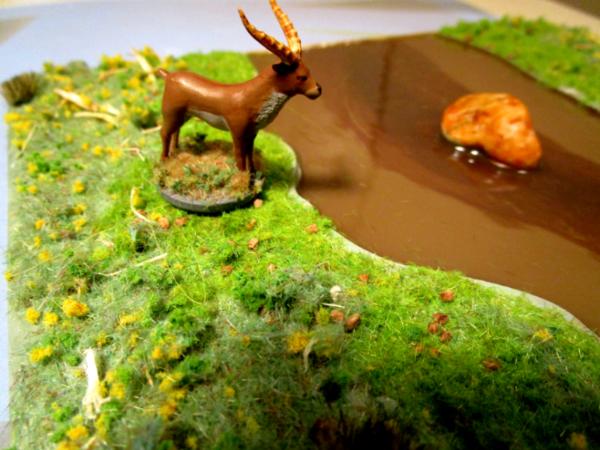
And a 'biome' is defined as an "area of diverse and interconnected lifeforms contributing to a whole and unique ecology", or something close to that, so I needed critters. These are from the Monsters of Solan Heroes and Animals set and I give you Roger's Antelope and the fully armored Battle Jackalope:
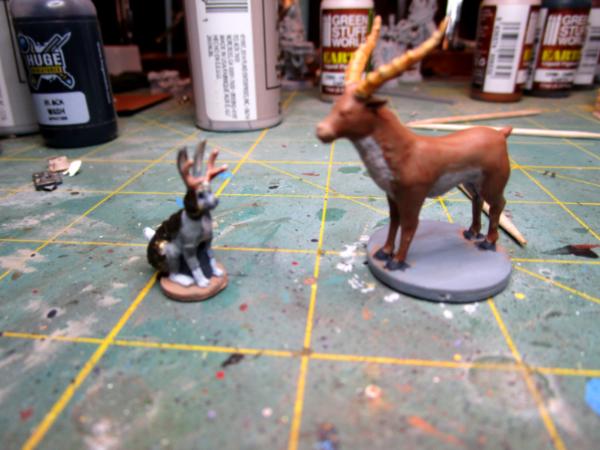
They're nearly finished and need a much better picture.
Like I mentioned to Viterbi, I'm liking this terrain board better as it gets some color, texture and character, but it was lacking something. I like height differentials in the pieces I try to build; if I were to try to model a section of the Bonneville Salt Flats I'd have to try to give it some elevation relief. So even though I'm modeling a (flat) river based on a (very flat) arts and crafts board intended to be actually gamed on (not a diorama where I could cut loose with some sculpted pink foam board) I didn't like how (flat) it all was, even with flock, rocks, bridge and logs.
So we're building a tree:
I've always wanted to try to fashion a tree from intertwined wires but never had success covering/texturing the trunk with masking tape or other materials until I saw all of the work here using hot glue (thanks for the inspiration, Syro!) and greenstuff. My plan is to build the tree and use the 'root' wires sticking out at the bottom to form it against the rock in midstream and look all old and kung-fu-ey.
We'll see how that works out.
More follows soonest.
|
"He fears his fate too much, or his desserts are small, who will not put it to a single touch; to win- or lose- it all."
Montrose Toast

|
|
|
|
|
2022/03/31 07:44:01
Subject: Re:LoER Hobby Challenge #37 (March/April): Biomes
|
|

Regular Dakkanaut
|
So much great stuff being accomplished already. I have started working on making some I beams. They pale in comparison to the rest of the stuff shown so far, but I hope to get more done this month.
|
|
|
|
|
2022/03/31 22:12:24
Subject: Re:LoER Hobby Challenge #37 (March/April): Biomes
|
|
[DCM]
Boom! Leman Russ Commander
|
It's a great start and your cuts are extremely precise, Peterhausenn- rock on!
So, the river tile Part One is finished- the part that counts towards my self-imposed "Make Something March". Here's a couple of shots:
The whole thing in Panavision!:

Yoshi versus the Fully Armored (and very dangerous) Battle Jackalope:
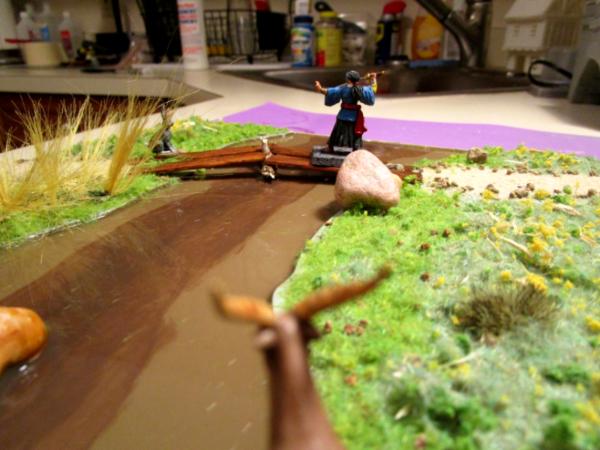
Robert's Antelope watches with disinterest:
Really, the only things different from the last WIP shot are the addition of the rushes at the one point on the bank and a second round of adding flock to spots here and there where it was thin. I swept the water surface with a soft brush but see I'll need to do that again. To add the rushes, I had to drill a hole into the spackle and the board, fold the 'rushes' fibers in half and push them in with a small screwdriver. I tried to hide the residue from drilling the holes with green wash, but it's too dark and shows too much (I was hoping that capillary action would draw it off and thin it out, but no) so I'll thin some acrylic paint and cover it up once it dries, or maybe tuck some more flock in there.
And per JoshinJapan's observation: yes if you rest things on the water material, it will gradually sink in and leave marks. It isn't sticky, but it will press down on the softer plastic-y stuff. I'm going to do some research and see if there is a hardener or additive that can rectify that (probably too late for an accomplished pour, but for next time).
The part of the river tile that isn't complete for the League of Extraordinary Riveters is the addition of The Tree, as described earlier. Here's most of the rest of the greenstuff applied:
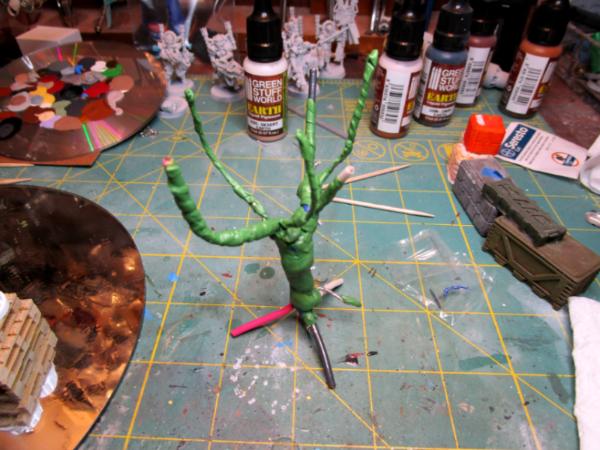
Since this pic, I've covered the rest of the trunk and branches, smoothed out my fingerprints and shaped and cut the 'roots' to length to fit exactly over the rock in the middle of the stream. Once it dries, I'll primer, paint and add the foliage flocking. The suspense for submissions for the Biome competition are the end of April, I believe.
More follows soonest.
|
"He fears his fate too much, or his desserts are small, who will not put it to a single touch; to win- or lose- it all."
Montrose Toast
|
|
|
|
|
2022/04/02 07:44:43
Subject: Re:LoER Hobby Challenge #37 (March/April): Biomes
|
|
Preacher of the Emperor
|
Meer_Cat, that creek is fabulous. The depth effect is really well done, the glossy finish is great, and it's nice and organic. I feel like I could get after some crawdads in there, or cast for brookies in the shadow of that footbridge. I am totally slacking on the water effects in a pond I built way too long ago... Maybe this will get me off my feet.
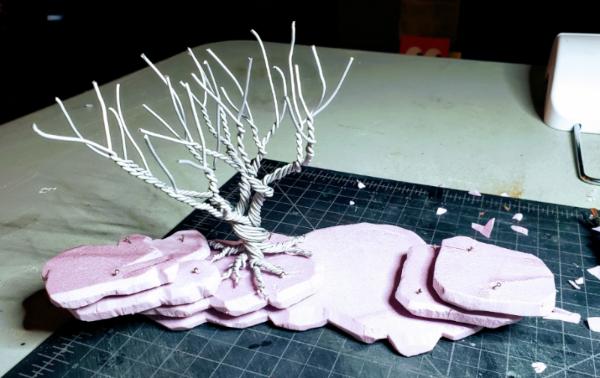
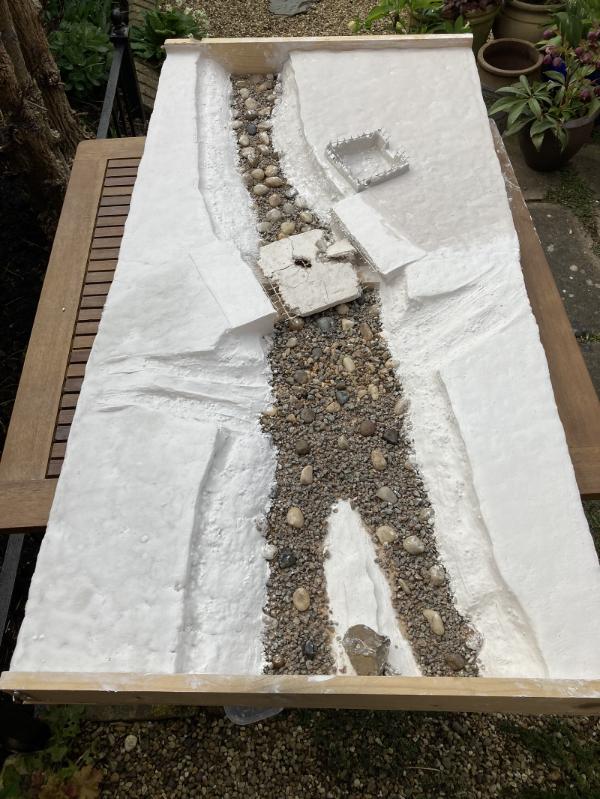
Speaking of moving, I got after the current LoER theme at last. In an effort to find a more organic feel than last round, I'm going for some very rough cut XPS foam (to be tumbled). The slabs are pinned together for a dry fit right now. The twist tree came out really well, although I don't quite know what material to use for the next step. I'm going to try for two bases of 'forest' area terrain per 9th Ed. from GW. More pics on my blog.
|
|
|
|
|
|
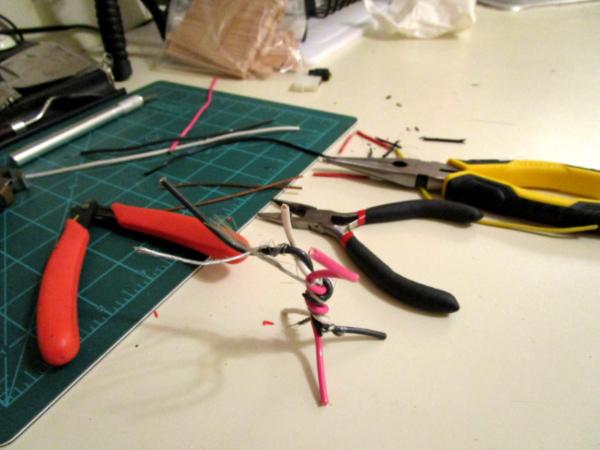
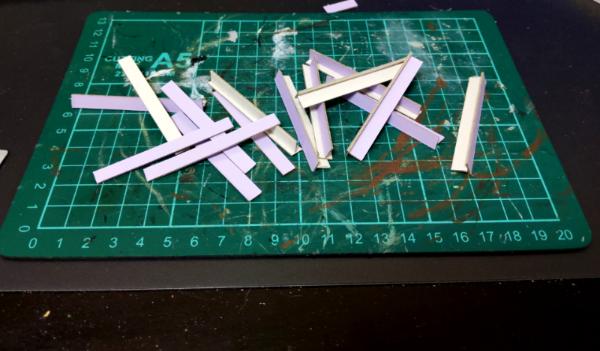
2022/04/03 04:35:22
Subject: Re:LoER Hobby Challenge #37 (March/April): Biomes
|
|
Regular Dakkanaut
|
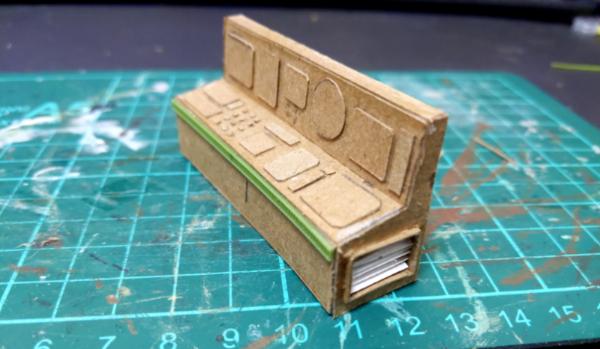
@Meer_Cat, MacPhail: What do you guys plan on doing for the foliage on the trees?
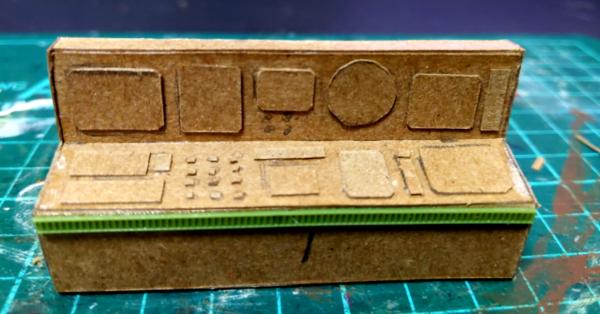
A console I built for the pumping station.
Any suggestion on how to make little flood or security lights? Any material or objects that would work?
|
|
|
|
|
2022/04/03 06:03:07
Subject: LoER Hobby Challenge #37 (March/April): Biomes
|
|
Liberated Grot Land Raida
|
Loving all these twisty wire trees and water features. I’m watching to see how the leave go on as that’s the part I never got.
Here an update on my progress.
This is the whole lot pre-paint. It’s got enough going on that I think I’ll be able to accommodate whatever underground shenanigans present themselves for a game. I might even be able to throw in my stone circle for a secret underground summoning chamber. Automatically Appended Next Post: @Peterhausenn that console looks great! Really great precision card skills.
I’ve no doubt you could probably make some flood lights from plasticard but I’m aware that there are such things available to buy from hobby stores that stock train things. I’ll see if I can find some links.
|
|
This message was edited 1 time. Last update was at 2022/04/03 08:59:56
|
|
|
|
|
2022/04/03 20:49:49
Subject: Re:LoER Hobby Challenge #37 (March/April): Biomes
|
|
Preacher of the Emperor
|
Wow, I'm so behind on comments, and so much to say about all the coolness.
For now, a quick post: photos from last night's session and a couple of Q&A tidbits.
I'm planning on using clumps of lichen for the clumps of twigs at the end of each branch. I have some natural leaf litter than I use on my bases, so I've been committed to an autumnal theme to a degree, and I may see about sprinkling some of that on as well. I'm also not sure about paint, adhesives, or a finishing coat, so there are a lot of variables to pin down. But it should be something like this:
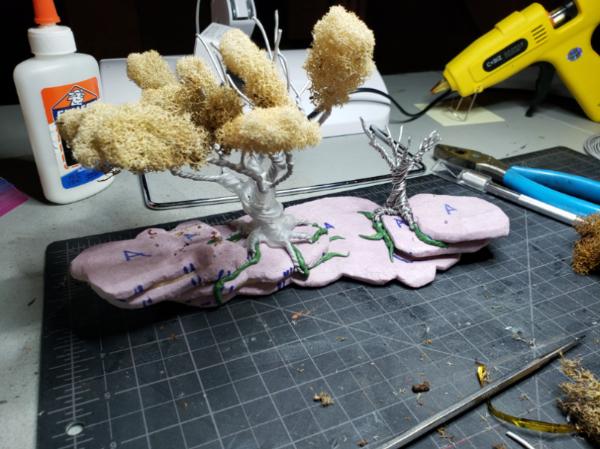
Some other variables I'm messing with: the big one on the left has a main trunk sheathed in hot glue, but I think I lost more detail than I'd like. The upper branches of that one are just slathered with PVA, and I may opt for two coats of PVA instead of any more hot glue (but it is great for filling in big gaps and making a flat base). The little one on the right is bare, but will get some PVA at some point. I also took my first shot at making roots out of Green Stuff and I'm not dissatisfied. I should be headed for more texture later tonight, and then paint this week.
To Peterhausenn's question above, I've had good luck lighting up thin styrene card from behind with LEDs. I keep recommending the same Colorado-based supplier, Evan Designs. They make pre-wired LEDs and battery cases for hobby use and give great customer service.
Here's the last project I did with that technique, with white LEDS behind styrene on the left and a bare amber LED in a scratch built housing on the right.
|
|
|
|
|
|
2022/04/05 11:11:03
Subject: Re:LoER Hobby Challenge #37 (March/April): Biomes
|
|
Regular Dakkanaut
|
Thanks for the suggestions guys. I'm actually not planning on them lighting up, I just want the appearance. I have thought about trying to make them out of card, but at the size I am thinking it seems like it would be more challenge than I want, and I am not even sure they would look good. I have seen a few things online that would be perfect, but my budget is pretty much zero so if I do something it will have to be with found items. As a rough idea these are along the lines of what I would want to accomplish:
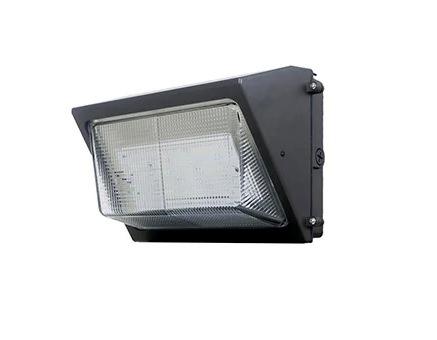 
I am not trying to replicate the pole, just the light fixture. The size I would like them to be is roughly a space marines head thus why I think it would be challenging to get a good shape with card at that size. If I can't come up with anything I'll just skip it as I was just looking to add them to put some extra details on.
|
|
|
|
|
2022/04/05 12:03:55
Subject: LoER Hobby Challenge #37 (March/April): Biomes
|
|
Preacher of the Emperor
|
How about a Lego brick? You could base it white and dab a bright color inside, add a drop of PVA or hot glue for the lens, and paint the outside dark for the housing. Those light fixture look like Legos from the underside to my eye (but then I have small children, and these are the things I find all over the house).
|
|
|
|
|
|
2022/04/06 01:48:09
Subject: Re:LoER Hobby Challenge #37 (March/April): Biomes
|
|
[DCM]
Boom! Leman Russ Commander
|
If you have some sprue that is angle sided rather than rounded, you could use that to cut the light fixtures to the length you wanted (not poles, just the light head itself).
Or, sometimes you can find cheap costume jewelry lying about or from the dollar store with the plastic 'gems' having good facets to look like lights when painted.
Or! Possibly Chiclets Gum, or equivalent. The pieces are rectangular with rounded corners and the hard outer shell should take primer and paint well. If I recall, they measure about 12mm by 20mm.
Good luck!
|
"He fears his fate too much, or his desserts are small, who will not put it to a single touch; to win- or lose- it all."
Montrose Toast
|
|
|
|
|
2022/04/06 12:02:36
Subject: LoER Hobby Challenge #37 (March/April): Biomes
|
|
Regular Dakkanaut
|
 MacPhail wrote: MacPhail wrote:How about a Lego brick? You could base it white and dab a bright color inside, add a drop of PVA or hot glue for the lens, and paint the outside dark for the housing. Those light fixture look like Legos from the underside to my eye (but then I have small children, and these are the things I find all over the house).
 Meer_Cat wrote: Meer_Cat wrote:If you have some sprue that is angle sided rather than rounded, you could use that to cut the light fixtures to the length you wanted (not poles, just the light head itself).
Or, sometimes you can find cheap costume jewelry lying about or from the dollar store with the plastic 'gems' having good facets to look like lights when painted.
Or! Possibly Chiclets Gum, or equivalent. The pieces are rectangular with rounded corners and the hard outer shell should take primer and paint well. If I recall, they measure about 12mm by 20mm.
Good luck!
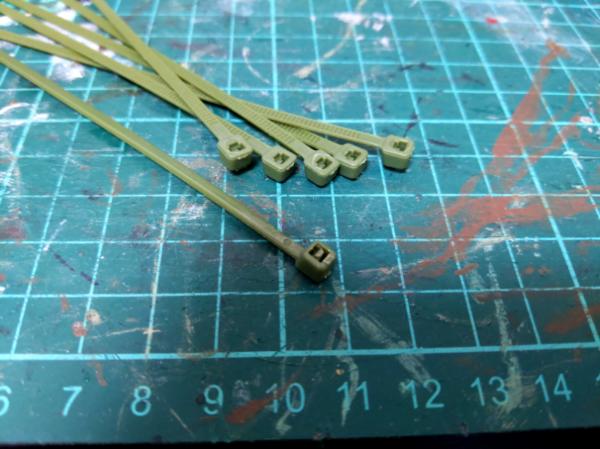
More good suggestions, but I think I found something to try to work with. I was scrounging around and came across some cable ties. I think this might work.
|
|
|
|
|
2022/04/06 13:24:22
Subject: LoER Hobby Challenge #37 (March/April): Biomes
|
|
Calculating Commissar
|
Oh those work nicely! a bit of clear paint or varnish in there might work to give it a lens effect?
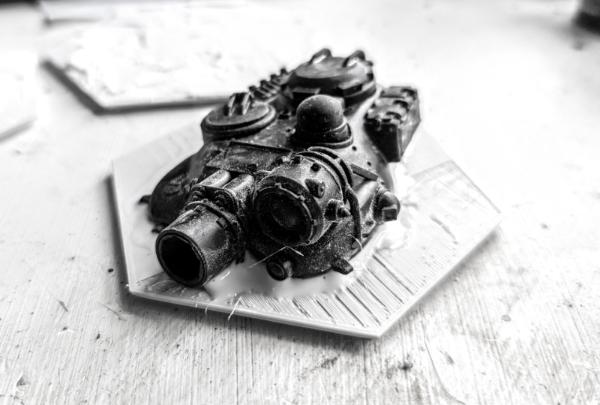
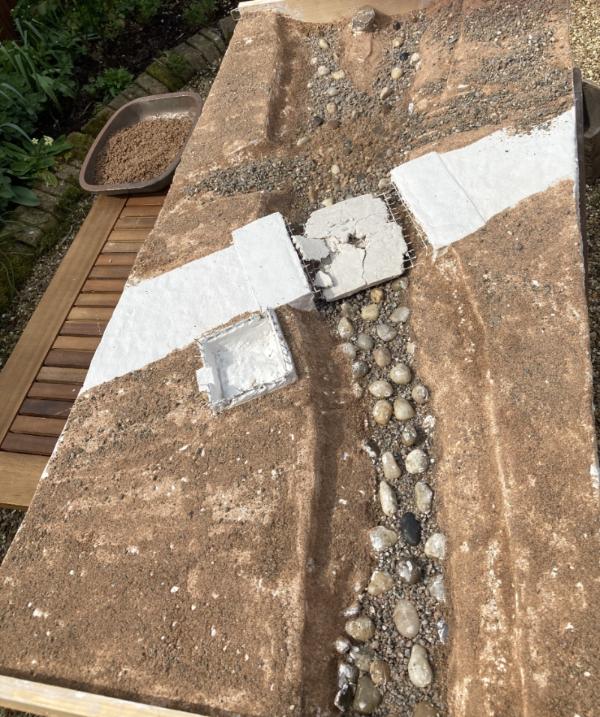
Speaking of projects... I've *finally* decided what I wanted to do and made a start!! I have been holding off on the intention of doing some swamps, but with the printers not playing ball at the moment I didn't want to start those as I need some of foliage and swampy buildings. At some point in the future want to create an ash wastes board for necromunda and 40k... so why not start that now?
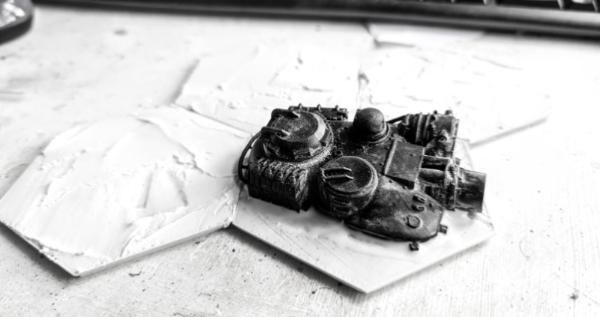
I wanted something small to start with so I can play around with the colours a bit and see if we go greys or sand (I suspect sand with oranges and rusts due to all the decaying hive cities and junk that will be piling up out there). It was at that point that I remembered the horrific pictures on the news recently... and that I had a spare tank turret in the bitz box left over from when I gave up on the Tallarn force last year.
One hacksaw job later and we've got the base for one interesting focal point (plus a couple of currently blank sand tiles for context and experimentation with colours). I still need to bank up some filler and sand around the turret so that it is partially buried... and batter the hell out of the turret... but a start is a start!
|
|
|
|
|
|
2022/04/07 01:51:02
Subject: Re:LoER Hobby Challenge #37 (March/April): Biomes
|
|
[DCM]
Boom! Leman Russ Commander
|
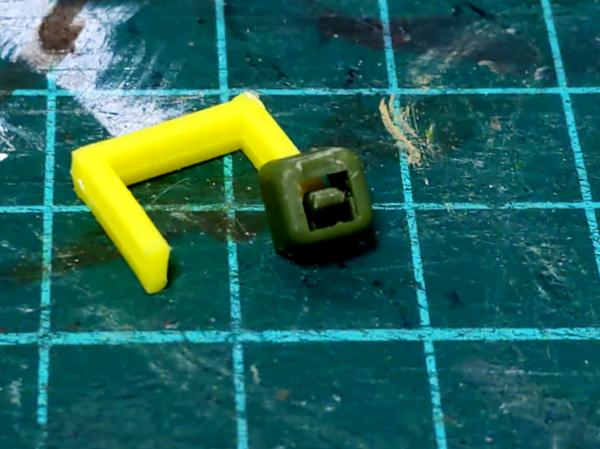
Peterhausenn: The cable ties are perfect! It's as if they were made to be light units. I'm writing that idea down in the notebook of modeling hacks I keep for when I need lights like that.
endtransmission: Very good to start your swamp boards with a targeted, focused project and build outward. Without meaning to, I've accidently built the components for a fair sized 'astro-colony/mining world/moon base' board- one piece at a time. The destroyed turret sinking into the muck is classic. The movie Monsters has an American trying to get back to the US border through Central America and Mexico after the crash of an 'alien thing' that lets a bunch of weird lifeforms loose. Like the film Evolution, but not funny. There is a scene where the hero is hiking along and he sees a downed F16 half-sunk into a river and _something_ drags it under. Possibly another aspect of your swamp terrain. Glad you found your groove!
|
"He fears his fate too much, or his desserts are small, who will not put it to a single touch; to win- or lose- it all."
Montrose Toast
|
|
|
|
|
2022/04/10 07:03:19
Subject: Re:LoER Hobby Challenge #37 (March/April): Biomes
|
|
Regular Dakkanaut
|
|
|
|
|
|
2022/04/11 07:23:56
Subject: LoER Hobby Challenge #37 (March/April): Biomes
|
|
Liberated Grot Land Raida
|
Some really excellent scratch-building going on. Always fun to see stats and card and cable tie ends transform into miniature wonders.
My own entry has been painted and stuck in a box for a week. I’ll maybe have another look at it and add some tree roots or other little details if I have some time before photos. It’s a bit plain.
|
|
|
|
|
|
2022/04/11 13:28:12
Subject: LoER Hobby Challenge #37 (March/April): Biomes
|
|
Hurr! Ogryn Bone 'Ead!
|
These are some really cool builds and they've got me feeling inspired to try my hand at it, albeit in a digital format as I use table top simulator to play long distance with an old college buddy. The 3D model bases feel a bit bland and I've been looking for ways to add more customization to the models (spicing them up a bit by painting them to look like rocky soil helps a lot, but doing some digital sculpting work to give the terrain more depth and features would really seal the deal).
|
|
|
|
|
2022/04/12 23:33:46
Subject: LoER Hobby Challenge #37 (March/April): Biomes
|
|
Liberated Grot Land Raida
|
Just set dressing now. I’ve added some roots and made these little mushrooms and some wooden boxes for scatter in the cellar/crypt/store type section.
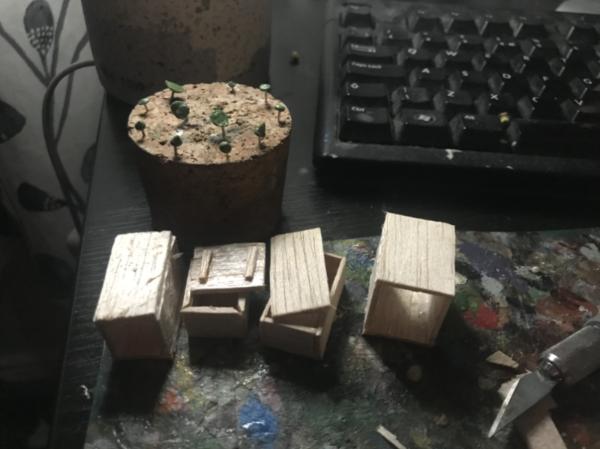
I’ll maybe throw some pale lichen about too for a bit more anaemic lookin flora but that’ll be it.
|
|
|
|
|
|
2022/04/14 21:30:23
Subject: LoER Hobby Challenge #37 (March/April): Biomes
|
|
Liberated Grot Land Raida
|
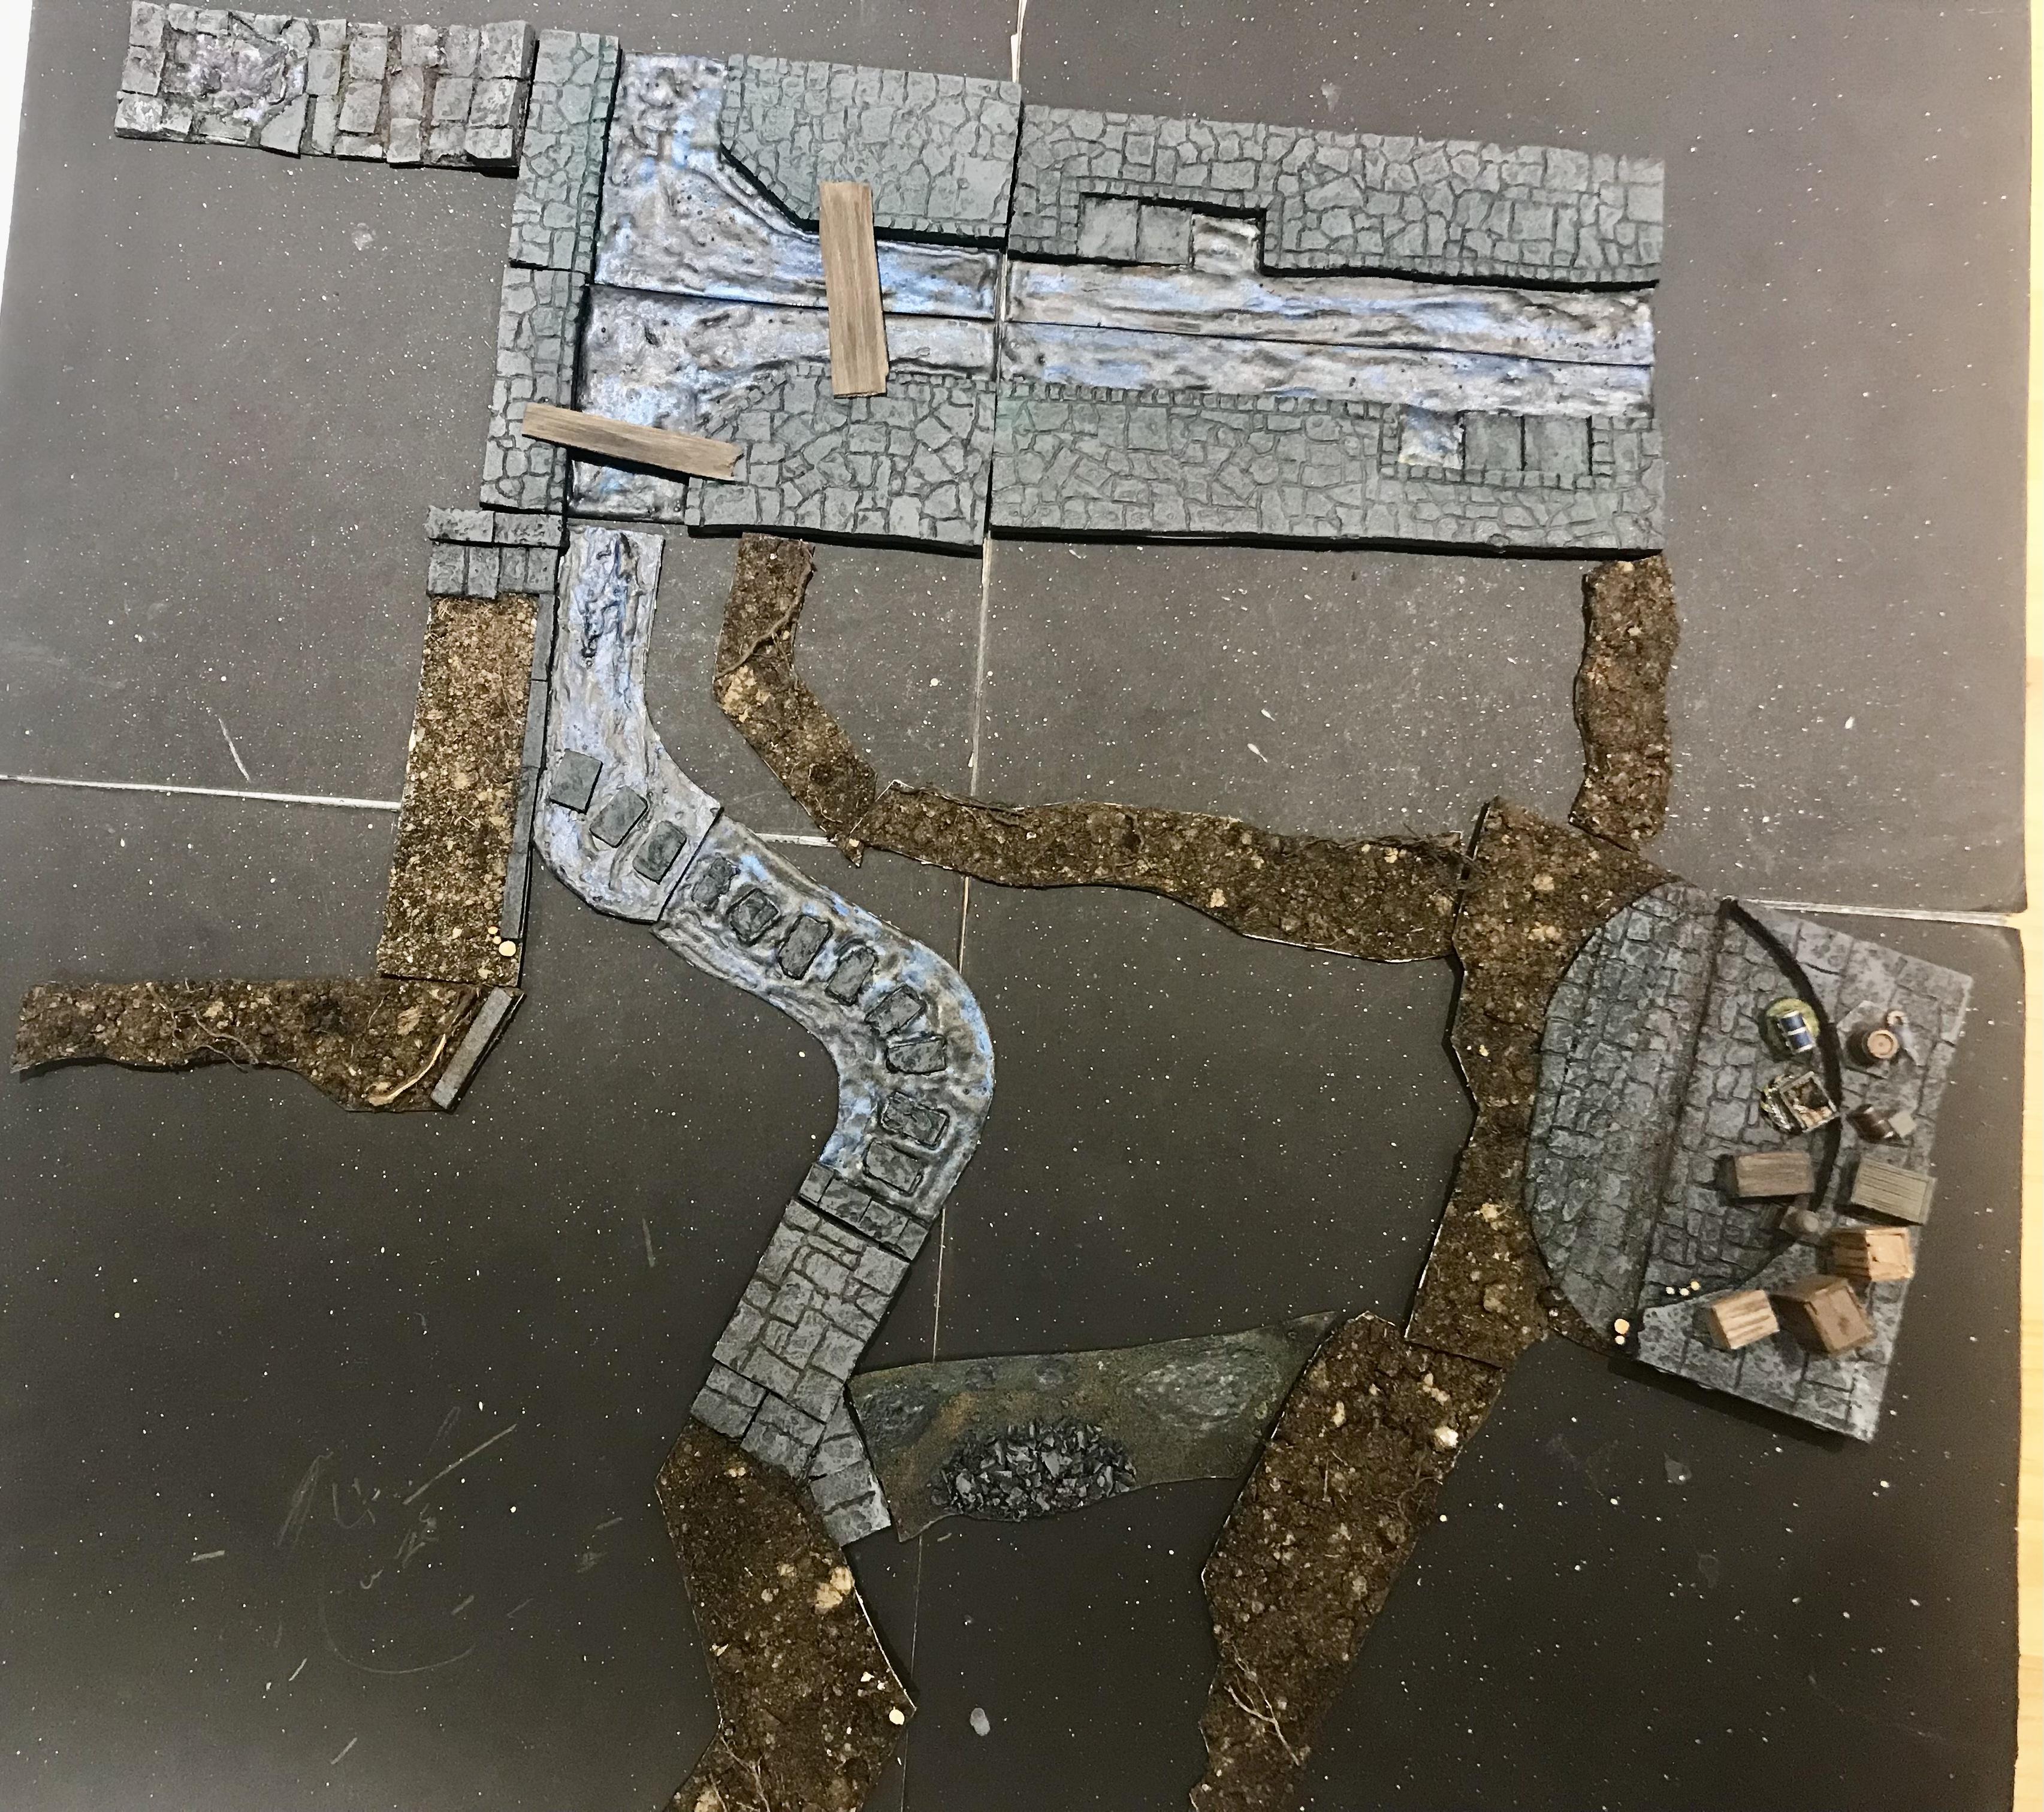
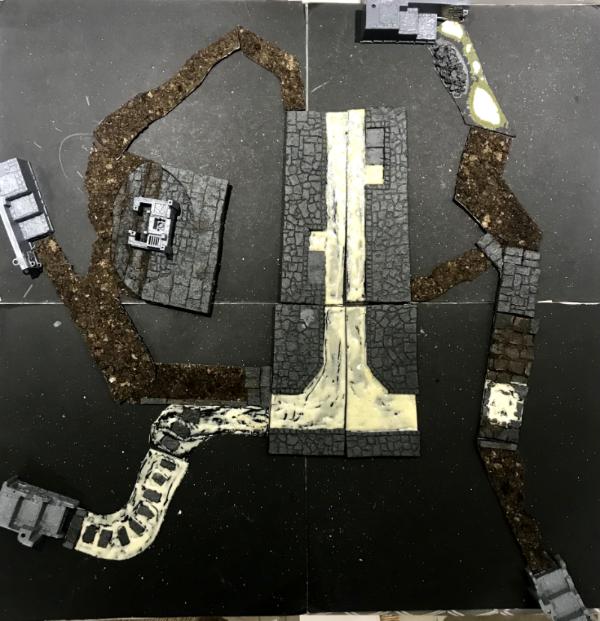
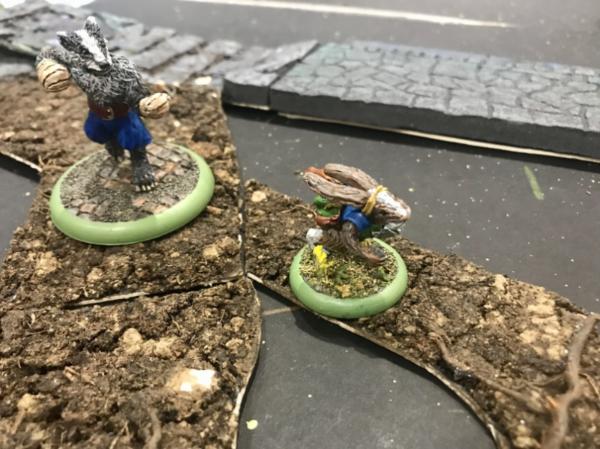
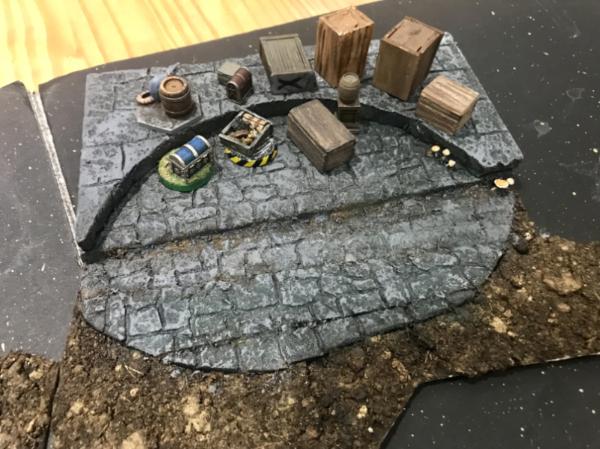
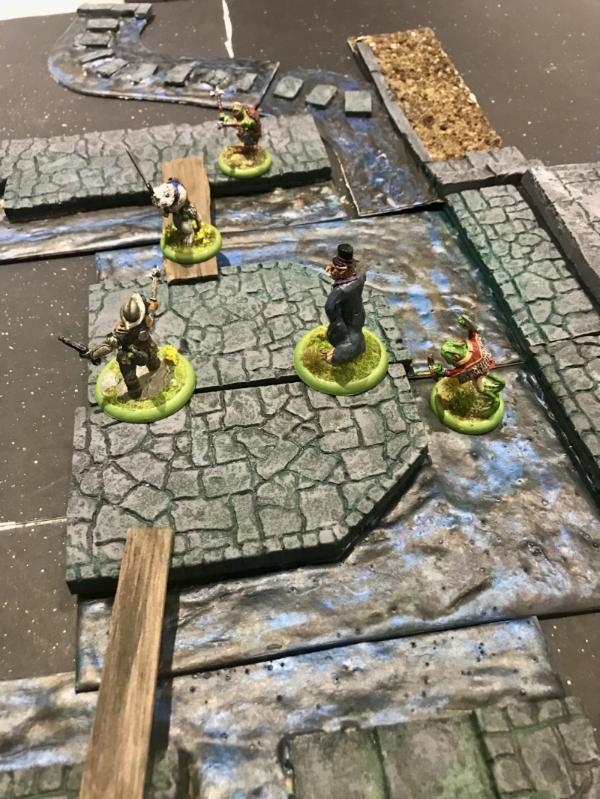
Here’s my entry complete- Underground Tunnels
I’ve Spoilered this first pic just so the big pic doesn’t wreck the page. It’s the whole lot in a full table set up.
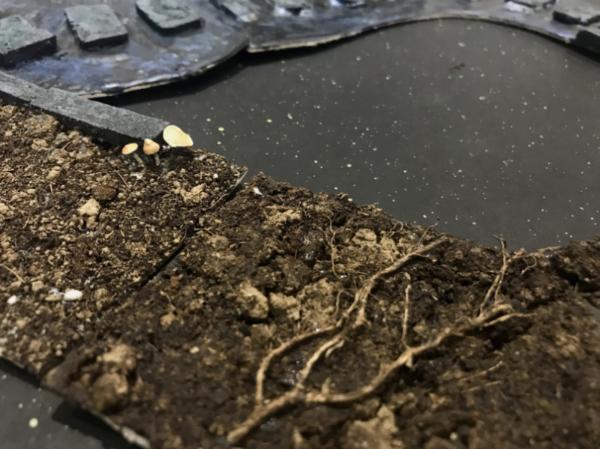
And putting the bio in biome I’ve added some roots and mushrooms.
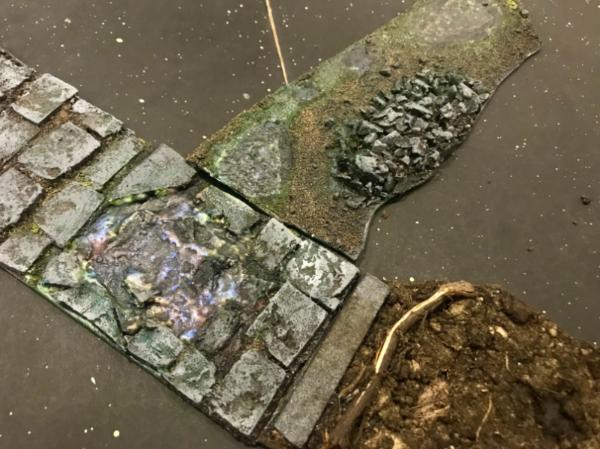
Then there are some more slimy areas.
Some tunnels are narrower than others so only smaller bases can fit.
Some areas are wider like this underground storage vault.
And hopefully the whole thing is modular enough to allow for plenty of variety and options.
That’s it from me. Looking forward to seeing the rest of the entries coming together. Cheers.
|
|
|
|
|
|
2022/04/14 21:39:10
Subject: Re:LoER Hobby Challenge #37 (March/April): Biomes
|
|
[DCM]
Boom! Leman Russ Commander
|
Man that layout is neat TC! This has everything: it meets the theme of the competition, is modular, is scratchbuilt, has excruciatingly minute detail- it's a Riveter's dream- well done!
I can only wish my mob back in the day had had the imagination to things along these lines when we gamed, but we were back in the 'graph paper and pencil' era and never really had the opportunity (I gamed in high school- 1970's, a little in college and then not really anything game-wise until Warhammer 40k in 1989).
My LOER River gameboard piece is nearly done, I'm waiting on just one more item to arrive in the post; if it isn't in by Monday I'll get my final pics and submit towards this month's "Biomes" competition:

That little footbridge is just made for confrontations, first the epic Yoshi versus Battle Jackalope, now the okka and inugami yokai. I'm pretty sure in my final pics there are going to be a lot more (in the six shots we provide) confrontations. I'm overall pleased with how the tree came out- I just started gluing tufts to the ends of the branches and then to each other to build up the 'loft' and left the little bits of twig in the lichen to represent more, smaller branches where it looked good. I had two colors of deer moss on hand, this orangy color and a nice green- which looked almost exactly the same shade as the grass on the river bank and was just too much of one color. So, wen with the orange.
|
"He fears his fate too much, or his desserts are small, who will not put it to a single touch; to win- or lose- it all."
Montrose Toast
|
|
|
|
|
2022/04/15 19:04:16
Subject: Re:LoER Hobby Challenge #37 (March/April): Biomes
|
|
Fireknife Shas'el
|
So I’ve got the base sculpts pretty much finished; once it’s dry, time for some paint!
|
|
|
|
|
|
2022/04/17 06:56:36
Subject: Re:LoER Hobby Challenge #37 (March/April): Biomes
|
|
Regular Dakkanaut
|
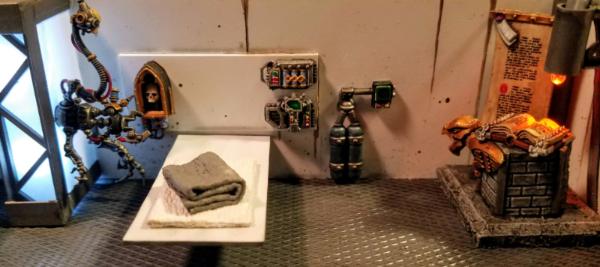
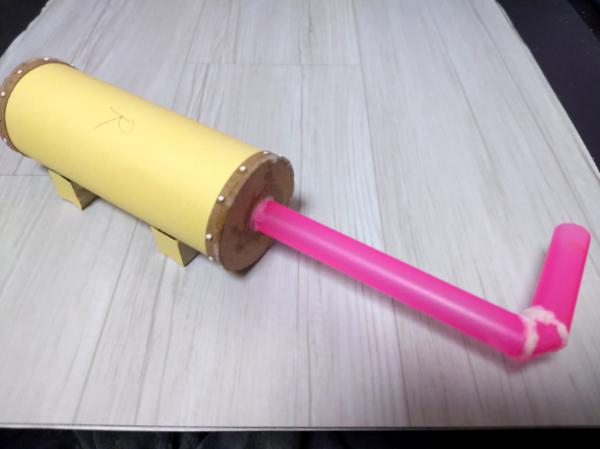
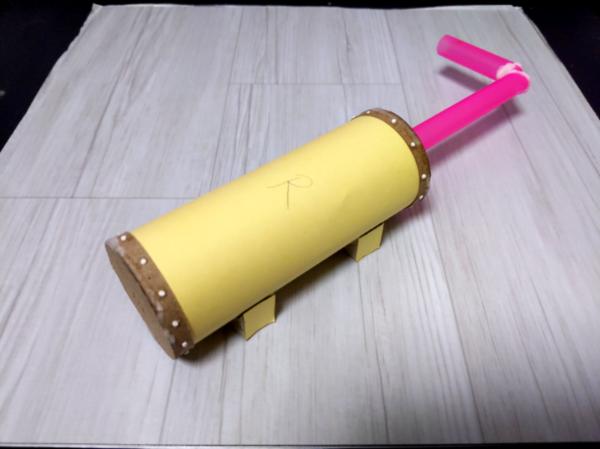
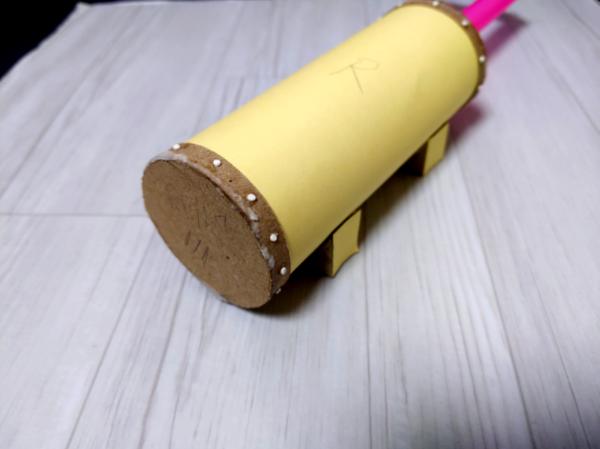
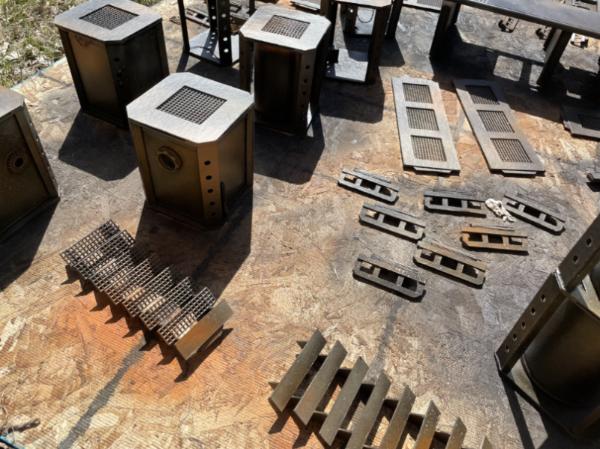
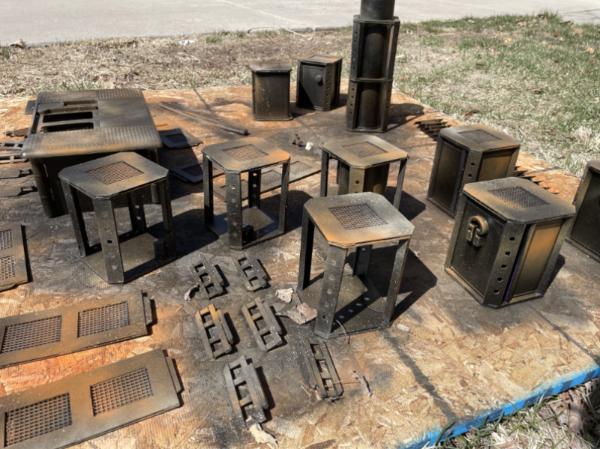
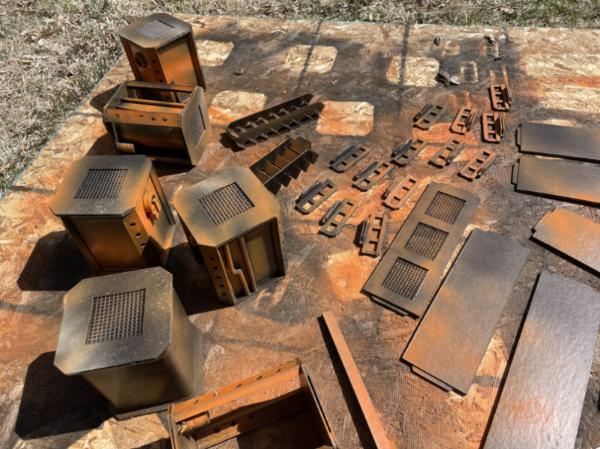
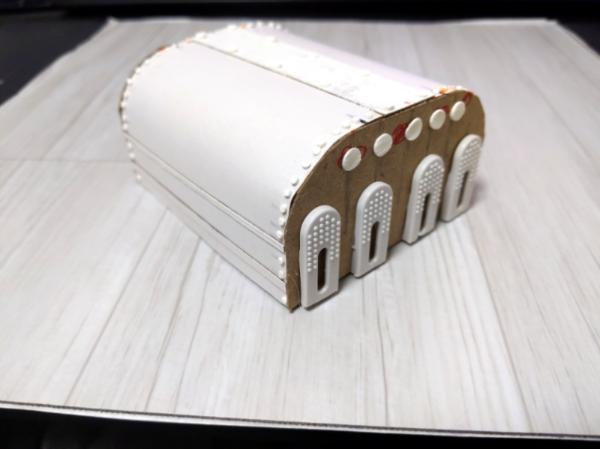
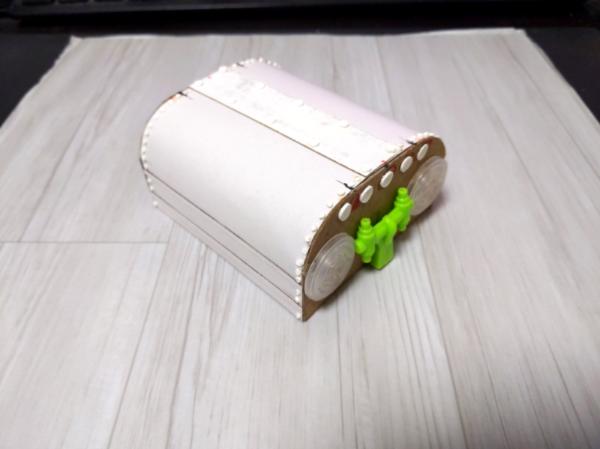
Short on time, but I like what you guys are doing. Here is a little progress by me, a power generator perhaps?
|
|
|
|
|
2022/04/17 11:37:30
Subject: Re:LoER Hobby Challenge #37 (March/April): Biomes
|
|
Fireknife Shas'el
|
Forgot, before I paint I need to texture:
|
|
|
|
|
|
2022/04/23 05:51:13
Subject: Re:LoER Hobby Challenge #37 (March/April): Biomes
|
|
Preacher of the Emperor
|
Both of the rivers look gorgeous! Each of the bridges is exactly what the scene needs.
I think I'm going to call my entry done. I wanted to mess around a bit with the moss canopy to see if some color blending or sprinkled leaves might be cool, but I'm on a tight schedule. Next week I'm taking 50 seventh-graders on a trip down the Colorado River, and the month will close out before I'm back. I need to get a subject poll up for next cycle, and I have some ideas around record keeping to float.
Keep pushing onwards to the finish line! I'll drop a preview here and get some more photos into my P&M blog when I can.

|
|
|
|
|
|
2022/04/23 09:17:05
Subject: LoER Hobby Challenge #37 (March/April): Biomes
|
|
Liberated Grot Land Raida
|
@Meer_Cat- Thanks. I’m glad it’s ticking so many boxes for something so rough and ready. I’m seeing these big tables grow and bloom while mine is jumbled away in a shoebox somewhere. Feels like i should be doing more. Your little foot bridge is perfectly suited to the mini’s your displaying it with. I imagine they’d not like to get their fur wet. Great work all round.
@Macphail- really gorgeous work. I love the colours pallet and all the variety of textures in this.
@peterhausen- those little thumb-tab doors are great. Where did you find them?
@jadenim- it’s great to see the layers building up on this big piece. I’d enjoy seeing a battle report on it too when it’s ready for use.
|
|
|
|
|
|
2022/04/24 17:10:43
Subject: LoER Hobby Challenge #37 (March/April): Biomes
|
|
Fireknife Shas'el
|
Ok, I need some advice from the league; I have the base paint colour down, and I’m going to be building up dry brush / stippling layers, but I could do with a wash. Any suggestions, other than about half a dozen pots of Agrax!
|
|
|
|
|
|
2022/04/24 17:52:59
Subject: LoER Hobby Challenge #37 (March/April): Biomes
|
|

Shroomin Brain Boy
|
ever heard of Black magic craft on youtube? he has a vid on a cheap diy wash recipe...
|
|
|
|
|
|
|
|