Switch Theme:

BLACKHAND'S Leman Russ Armoured Skirts  [RSS] Share on facebook Share on Twitter Submit to Reddit
»
Author Message
Advert


Forum adverts like this one are shown to any user who is not logged in. Join us by filling out a tiny 3 field form and you will get your own, free, dakka user account which gives a good range of benefits to you:
  • No adverts like this in the forums anymore.
  • Times and dates in your local timezone.
  • Full tracking of what you have read so you can skip to your first unread post, easily see what has changed since you last logged in, and easily see what is new at a glance.
  • Email notifications for threads you want to watch closely.
  • Being a part of the oldest wargaming community on the net.
If you are already a member then feel free to login now.


Made in nz
Nurgle Chosen Marine on a Palanquin


Whangarei , New Zealand

After seeing the excellent work Xanthos has done on his Kreig tanks I decided I had to do something to a couple of tanks I won in an online auction that were not only missing their sponsons but also a couple of side hatches and were the proud owners of the worst paint jobs in history....no wait SEVERAL of the worst paintjobs in history.

Check out Xanthos's blog on page 4, his Zimmuret and armour skirt work is pretty damn cool

http://www.dakkadakka.com/dakkaforum/posts/list/277551.page

I decided to post up a tutorial of my LRBT armour skirt project as in the past I've been asked how I did some of the conversions I've done and I figured if I took pics from the start I would be all set to do a tutorial ( plus I don't plan on doing many of these )

Taking pics and thinking of the structure of a tutorial actually helped a lot in my process so give it a go, I dare you!


Step 1

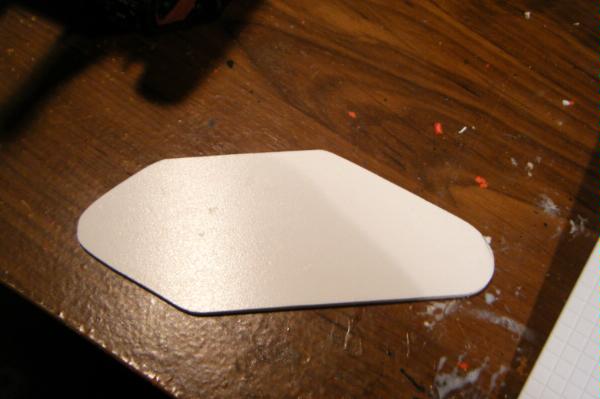
I took a piece of 2mm plasticard and cut it fit the side of the LR, seems straightforward but getting it right took a while and even then it wasn't perfect but hey, laziness won... again.
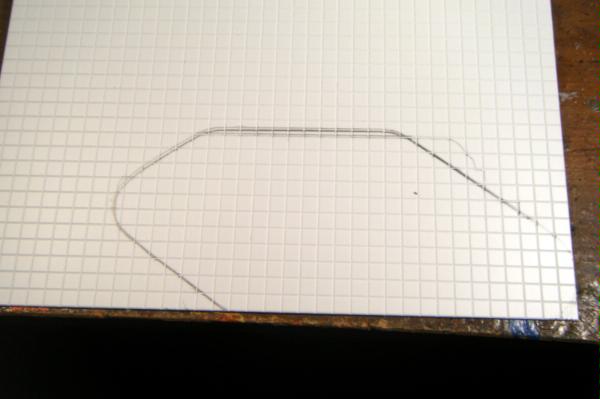


Step 2

I laid the plate on a sheet of plasticard etched with 4mm squares. These are a little bigger than the ones on the FW skirts but it's a LR not a puny Chimera so I went with it. I traced the plate and then starting at one end I counted out how wide I wanted the armour plates, I kept the two middle plates the same width and the two end ones were a little smaller.
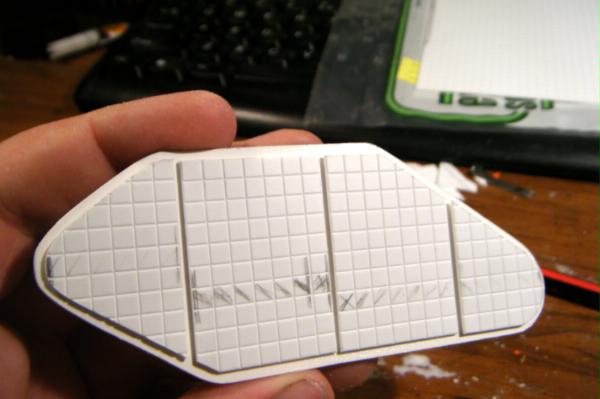

Step 3

Cut the plates so that they are around 8-10mm short of one end and you will end up with a 2mm gap between all 4 plates and around the edge.
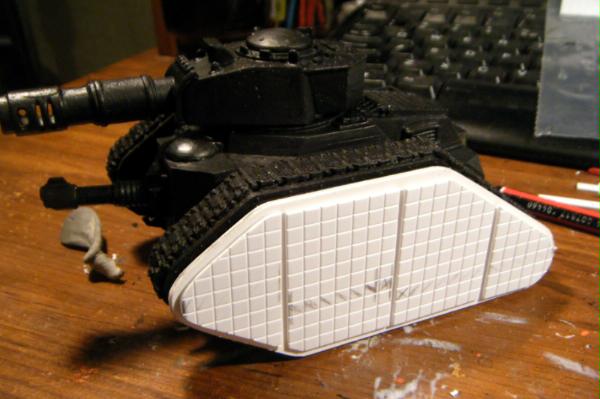
Here is a shot of the main plate with the armour plates tacked on for sizing, take your time to get it right as you will be using these as the templates for the skirt on the opposite side of the LR.


Step 4

This part is easy, trace the main plate on another sheet of 3mm plasticard. Cut out a copy of the first main plate and cut and sand it to the same shape
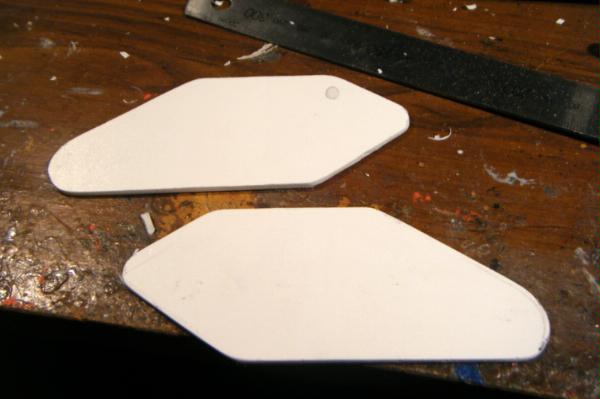


Step 5

Repeat step 4 with the armour plates this is relatively simple due to the etched squares as they make it easy to line them up. One important thing to remember...MAKE SURE TO REVERSE THE ARMOUR PLATES WHEN YOU TRACE AND CUT THEM or you will end up with shaped plates that don't face the right way!
In this case I made enough plates for 2 LRs but the main thing is to make sure you have enough for your needs before gluing together the skirts.


Step 6

And here is a finished skirt! I am thinking of adding countersunk bolts in the corners of the armour plates like the FW skirts but my chronic laziness will probably flare up and end up with me spraying it black and moving on to the next project.


Thanks for reading I hope I have inspired some of you to try armouring up your Russes!

Cheers,

BLACKHAND


This message was edited 1 time. Last update was at 2010/07/04 20:48:29


 BobtheInquisitor wrote:
I tend to glue metal models with a combination of BSI cyanoacrylate and my tears of frustration.
 
   
Made in dk
Battle-tested Knight Castellan Pilot


Copenhagen

Excellent work, really like how those came out! Those countersunk bolts could give them that last bit of awesome, but this is really inspiring.

I´ll be scuttling off to the plasticard pusher methinks....

(Oh, and thanks for the kind words also)

Back on the path of the Imperial Citizen

Still rolling ones...

Krieg: More wins than Losses. 
   
Made in gb
Irked Blood Angel Scout with Combat Knife


Hinckley, Leicestershire.

That looks spot on mate, I'd like to see the painted version.

3000
3000
In Progress  
   
Made in gb
Monstrous Master Moulder


I dunno...

These would look great with some battle-damage modelled on.

Bewhiskered Gasmasks: For the Post-Apocalyptic Gentleman

And to this day, on darkest nyte
It can be seen, they tell
A Prynce of Rattes, in finery
Upon a horned bell.
 
   
Made in nz
Nurgle Chosen Marine on a Palanquin


Whangarei , New Zealand

Thanks guys,

@Xanthos - After looking at them again this morning I am definitely planning on doing countersunk bolts, they need more detail to make em pop. I will post up the bolts tutorial as well I figure.

@Mrmummbles - Thanks, once I've finished them I will post up a painted pic.

@P4c4k3 - I will be adding a sparing amount of battle damage, laser burn and the like but as my tanks are fairly pristine I won't go overboard. The good thing about making my own skirts is that they won't all have the same bullet holes like the FW ones.

Cheers

BLACKHAND

 BobtheInquisitor wrote:
I tend to glue metal models with a combination of BSI cyanoacrylate and my tears of frustration.
 
   
Made in us
Decrepit Dakkanaut


Madison, WI

Those are the nuts Blackhand! I've got an auction Baneblade that is similarly challenged... might have to 'speriment myself.

Anvildude: "Honestly, it's kinda refreshing to see an Ork vehicle that doesn't look like a rainbow threw up on it."

Gitsplitta's Unified Painting Theory
 
   
Made in gb
Monstrous Master Moulder


I dunno...

BLACKHAND wrote:
@P4c4k3 - I will be adding a sparing amount of battle damage, laser burn and the like but as my tanks are fairly pristine I won't go overboard. The good thing about making my own skirts is that they won't all have the same bullet holes like the FW ones.


Quite so! It also seems to be GW fashion to randomly position bullet holes around a tank, whereas it looks much better (and more realistic) to have them in lines as if the tank has been strasfed by heavy weapons fire, and it would really have to be heavy weapons as I believe small arms fire actually barely dents tank armour.

Bewhiskered Gasmasks: For the Post-Apocalyptic Gentleman

And to this day, on darkest nyte
It can be seen, they tell
A Prynce of Rattes, in finery
Upon a horned bell.
 
   
Made in nz
Nurgle Chosen Marine on a Palanquin


Whangarei , New Zealand

@gitsplitta - Dude if you end up doing skirts for a bane blade you have to post pics they would be madness!

@p4nc4k3 - I'm planning on borrowing a soldering iron to do the battle damage, I figure that will simulate lascannon and meltagun hits the best

 BobtheInquisitor wrote:
I tend to glue metal models with a combination of BSI cyanoacrylate and my tears of frustration.
 
   
Made in nl
Hellacious Havoc


The Netherlands

Thanks for sharing this i'm going to start up a guard army after i finnish (most) of my chaos army and will defently use this when i do


Made in gb
Avatar of the Bloody-Handed God


Inside your mind, corrupting the pathways

Nicely done.


Forum Index » Painting & Modeling Tutorials
Go to: