| Author |
Message |
 |
|
|
|
|
Advert
|
Forum adverts like this one are shown to any user who is not logged in. Join us by filling out a tiny 3 field form and you will get your own, free, dakka user account which gives a good range of benefits to you:
- No adverts like this in the forums anymore.
- Times and dates in your local timezone.
- Full tracking of what you have read so you can skip to your first unread post, easily see what has changed since you last logged in, and easily see what is new at a glance.
- Email notifications for threads you want to watch closely.
- Being a part of the oldest wargaming community on the net.
If you are already a member then feel free to login now. |
|
 |
2010/08/10 16:36:10
Subject: Converted plastic SM Librarian
|
|

Screaming Banshee
|
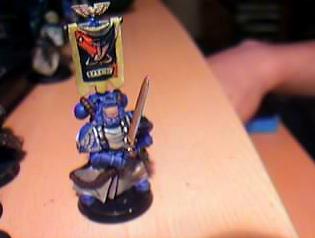
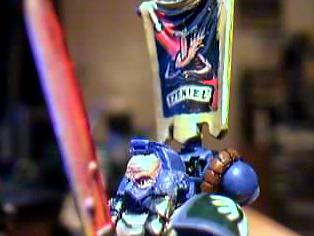
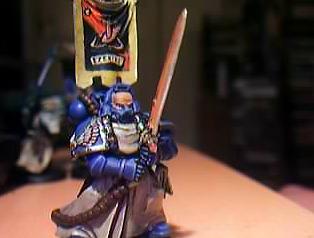
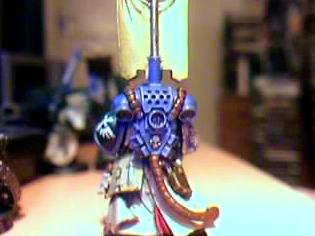
EDIT: The original premise of this post was resolved and I decided to post pics of the finished result... I took these on my webcam so they are not as high-res as my normal images, I may get my sister to take some decent pics later 

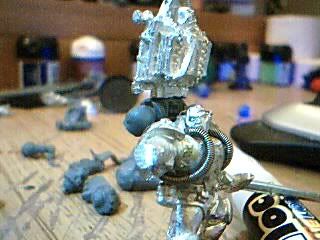
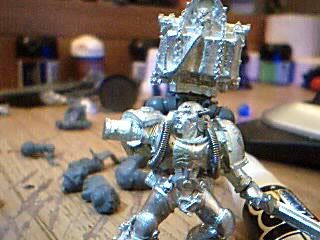
Hi y'all, I'm currently converting a Librarian (pics soon)... I wanted him to be interchangeable with Ezekiel... I've used the two-handed sword from the vanguard veteran boxset ( http://www.games-workshop.com/MEDIA_CustomProductCatalog/m1870255_99110101391_SMVanguard_873x627.jpg), a Dark Angel robed body and some appropriate accessories... I was originally going to just use a hooded head and stick some wires out of it (like the Ezekiel model)... but last night at 3am I ended up thinking, in a sleep-deprived state of mind "NAH! I'm going to show some converting talent!" and set about doing the good ol' fashionable shoulderpad cut-up... Some fiddling, glue damage and blurry eyed attempts at concentration (I actually couldn't focus most of the time), I'm not best pleased with the results but it's all glued down (along with that SM sergeant head you can't get anymore :-/)... It's all pretty much a ripoff of this model BitzBox have on their site:

Anyway, I cut the shoulderpad up into three pieces, a long curved piece to go around the back of the head (the head had to be filed down significantly) and a shorter one to go over his head... I then green-stuffed up the sides to make it a fully enclosed hood (in contrast to the pic, I think that having it like that leaves it a bit bare due to the fact a hood should be filled with wires... And I don't have the skill to model that ). Really the finished product was mostly inspired by Jonah Orion's hood, though that still has wires showing (but creative painting can solve that...):
http://hippiefreak12.files.wordpress.com/2010/06/jonah_orion.jpg
And now the problem:
I tried using wire and green stuff to make the "tubes", but argh, the greenstuff just won't stick to the body whilst I try to shape the wire and when I press it down it gets all misshapen... So I was hoping for someone to write a "mini-guide" to making the tubes, I figured I would have to drill holes in the chest and fill them with green stuff and place the wires in there... but I'd rather find out from others before I butcher a model (or a test-chest, rhyming... geddit?).
Secondly I was wondering whether to paint the green stuff on the hood as a fabric hood (in homage to the Ezekiel model) or blue as though it's armour... it could pass off as either. But I guess I'll need to post pics before that judgement can be made
Thanks for any help, I'll get a pic up asap... just need my sister to get home with her camera  Automatically Appended Next Post:
http://fromthewarp.blogspot.com/2009/12/space-marine-psychic-hood.html
Automatically Appended Next Post:
http://fromthewarp.blogspot.com/2009/12/space-marine-psychic-hood.html
If someone could guess how the guy that made this did the cables that'd be pretty sweet... It seems this blog suffers from the typical converter's vice of preferring to show off rather than give away their secrets ;P
|
|
This message was edited 7 times. Last update was at 2010/08/15 03:27:05
|
|
|
 |
|
2010/08/11 05:27:25
Subject: Advice needed about modelling psychic hoods...
|
|

Perfect Shot Dark Angels Predator Pilot
|
You know man it looks really good! i wouldnt have thought of using a shoulder pad for that hood... great!
|
Follow me if i advance
kill me if i retreat
Avenge me if i die |
|
|
|
|
2010/08/11 06:10:21
Subject: Advice needed about modelling psychic hoods...
|
|

[MOD]
Making Stuff
|
I would forget about the wire. Just roll a sausage of green stuff, press it into place, and then add the ribbing with the a hobby knife, or the end of a chisel-tip sculpting tool.
It will deform slightly as you press the ribbing into it, but you can round it off again at the end with some careful manipulation from the sides with the tool.
|
|
|
|
|
|
2010/08/11 13:36:51
Subject: Advice needed about modelling psychic hoods...
|
|
Screaming Banshee
|
Thanks Insaniak, I'll try later today... the lower part of the hood will need to try first. Probably what I hate most about Green Stuff is having the massive urge to work on a model but knowing that the last stage you did needs another 12 hours or so to dry
|
|
|
|
|
|
2010/08/11 18:57:16
Subject: Advice needed about modelling psychic hoods...
|
|
Preacher of the Emperor
|
I'd use guitar string myself, you can get it in around that size and certainly smaller, but it can be a bit ornery sometimes when you're trying to get specific curves into it. It looks really good as far as tubing goes though and is...pre-ribbed, as it were.
Pretty handy for those of us with a tendency to break guitar strings, but as for the rest of you...
|
|
|
|
|
|
2010/08/11 19:07:11
Subject: Advice needed about modelling psychic hoods...
|
|
Regular Dakkanaut
|
|
|
|
|
|
2010/08/11 21:22:08
Subject: Advice needed about modelling psychic hoods...
|
|
[MOD]
Making Stuff
|
That was the link he already posted...
|
|
|
|
|
|
2010/08/12 00:35:55
Subject: Advice needed about modelling psychic hoods...
|
|
Regular Dakkanaut
|
im really not on the ball today.... lol
|
|
|
|
|
2010/08/12 02:30:15
Subject: Advice needed about modelling psychic hoods...
|
|
Screaming Banshee
|
I tried using green stuff today and just raged... I don't have any tool lubricants bar water so the model is quickly reduced to a soaking mess and the putty refuses to stick... the "tube" was either sticking to my tool, refusing to stick to the marine, or folding back up when I'd managed to stick one side down and went for the other... Guitar string might be worth looking into after all :-/
|
|
|
|
|
|
2010/08/12 02:43:49
Subject: Advice needed about modelling psychic hoods...
|
|
Regular Dakkanaut
|
made this just for you, simple bass guitar strings, pinned at either end of . no green stuff yet but you can see how it looks
|
|
This message was edited 1 time. Last update was at 2010/08/12 02:44:21
|
|
|
|
|
2010/08/12 02:46:04
Subject: Advice needed about modelling psychic hoods...
|
|
Mekboy Hammerin' Somethin'
|
Hur hur hur your tool,,,, sorry what?
i would give the guitar strings a go or failing that if you can get you hands on a set of micro drillbits and a bit of loose electrical wire, run a scalpul blade down the wire cutting on side of insulatioin away then seperate the copper strands if you twist four or five stands together yppu should get something you can use as very fine wires, you'll need a very fine drill bit to drill holes for them to 0.5mm or less
|
|
|
|
|
|
2010/08/12 20:38:39
Subject: Advice needed about modelling psychic hoods...
|
|
Screaming Banshee
|
Khargrim wrote:
made this just for you, simple bass guitar strings, pinned at either end of . no green stuff yet but you can see how it looks
Wow thanks for the thought 
I tried begging about to all my friends for guitar strings and none had any... so I tried again with the greenstuff, things went OK, not as good as the strings would've been but I did manage to get what I want.
Only when I show the finished product to my dad does he finally understand what I had been asking for earlier and tell me he could've made some guitar strings on his lathe ¬_¬
B'oh eh? Automatically Appended Next Post: I'll get the painted product up here soonish, but he still has work to be done on him before a brush can touch him... I'm planning to add some tubing to his backpack... could use guitar wire for those.
|
|
This message was edited 1 time. Last update was at 2010/08/12 20:39:34
|
|
|
|
|
2010/08/15 03:24:00
Subject: Converted plastic SM Librarian
|
|
Screaming Banshee
|
Submitted for your approval, some pictures of the finished product edited into my first post
|
|
|
|
|
|
|
|


 Order of the Sable Heart
 Grave Knights
 House Rouen