| Author |
Message |
 |
|
|
|
|
Advert
|
Forum adverts like this one are shown to any user who is not logged in. Join us by filling out a tiny 3 field form and you will get your own, free, dakka user account which gives a good range of benefits to you:
- No adverts like this in the forums anymore.
- Times and dates in your local timezone.
- Full tracking of what you have read so you can skip to your first unread post, easily see what has changed since you last logged in, and easily see what is new at a glance.
- Email notifications for threads you want to watch closely.
- Being a part of the oldest wargaming community on the net.
If you are already a member then feel free to login now. |
|
 |
2010/09/11 01:37:45
Subject: Massive Terrain and Table Build WIP
|
|

Cultist of Nurgle with Open Sores
|
Hello everyone, I have been a Dakka lurker for about 4 years now and I just wanted to start a post with what I am currently working on. Feel free to add any constructive comments to the thread at any point.
First up is a set of pictures of one of my recent terrain builds. This is part one of a 8x12 gaming table all done in 2x2 squares.
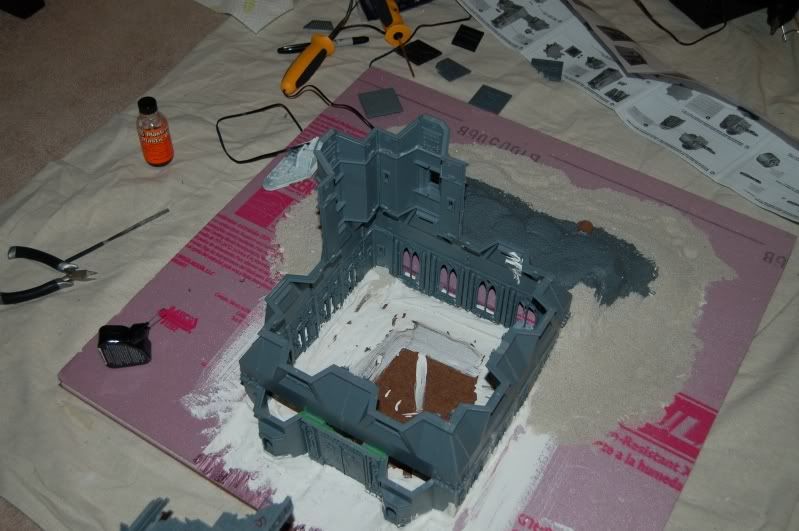
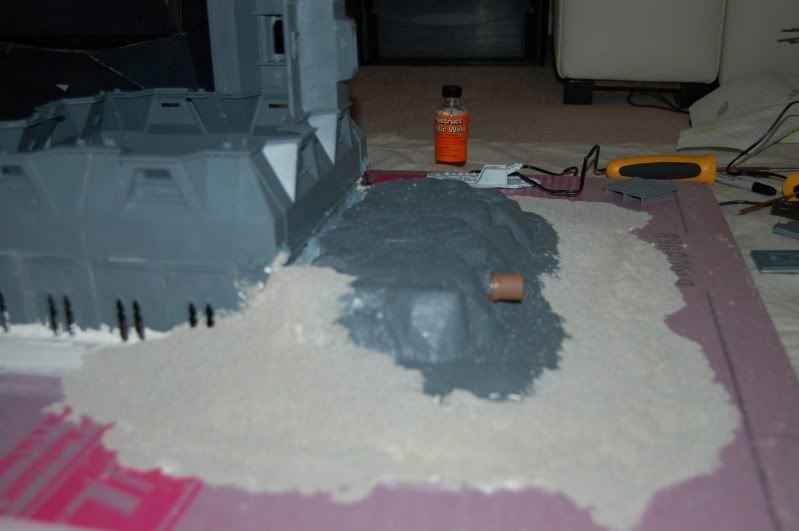

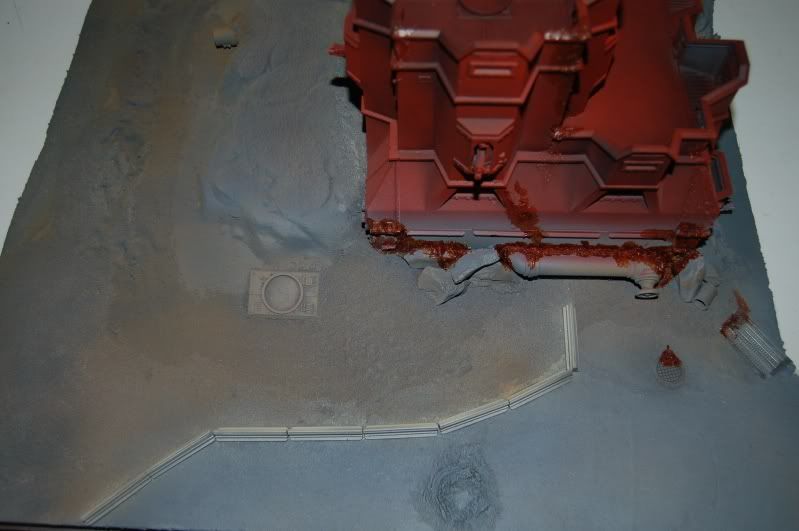
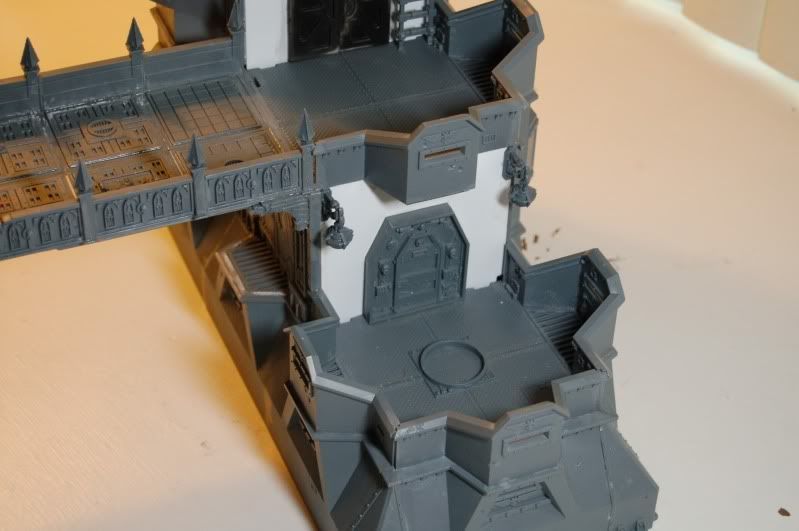
Here you can see parts of the process. Notice the gaming hill in rear with a Hirst Art's pipe coming out of it. You will see where this is going in the finished photos. So far, the plan calls for 3 bastions and some cities of death bits for the foundation. Additionally, you will notice some Hirst Arts pieces added along the way. I have been doing a lot of plaster casting lately (more pics to follow) A lot of plaster was used to blend the building into the cutout of the foam insulation which is then glued onto a piece of Masonite. The tools of the trade here are your typical hobby tools plus a foam cutter and a putty knife for the plaster. Follow me for more on the build.
Automatically Appended Next Post:
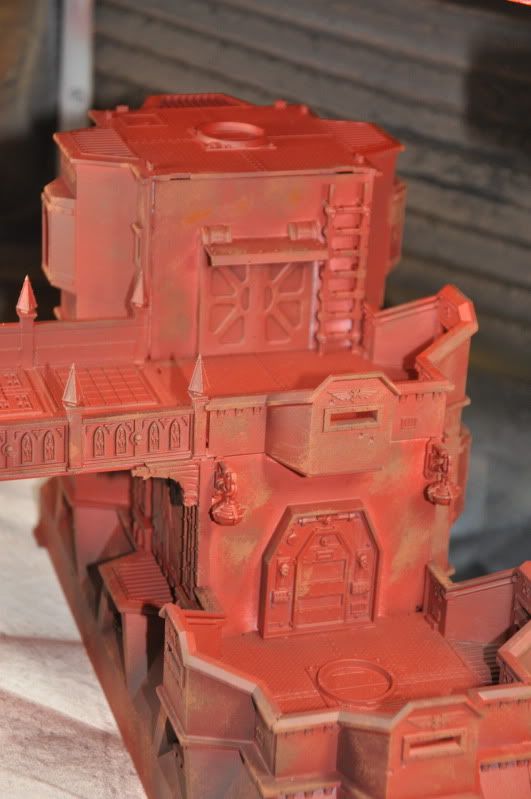
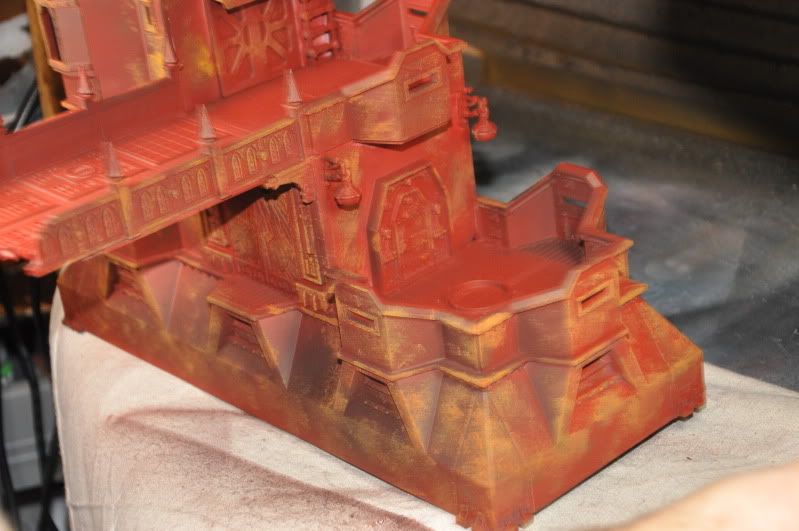
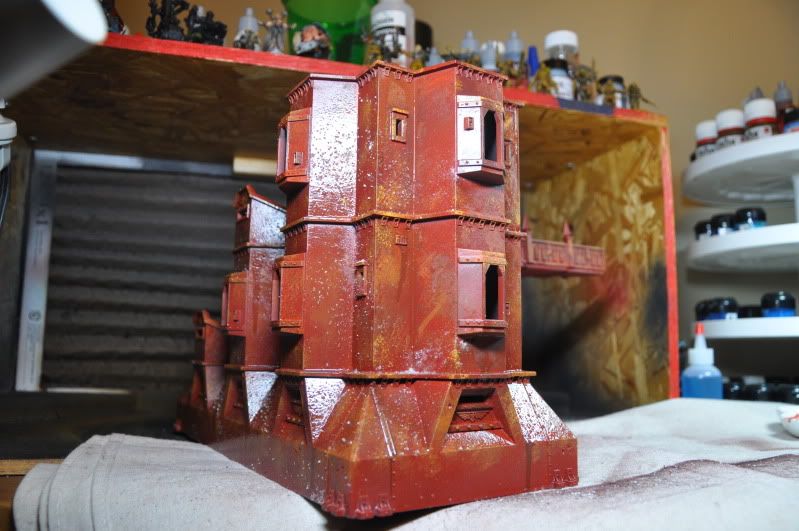
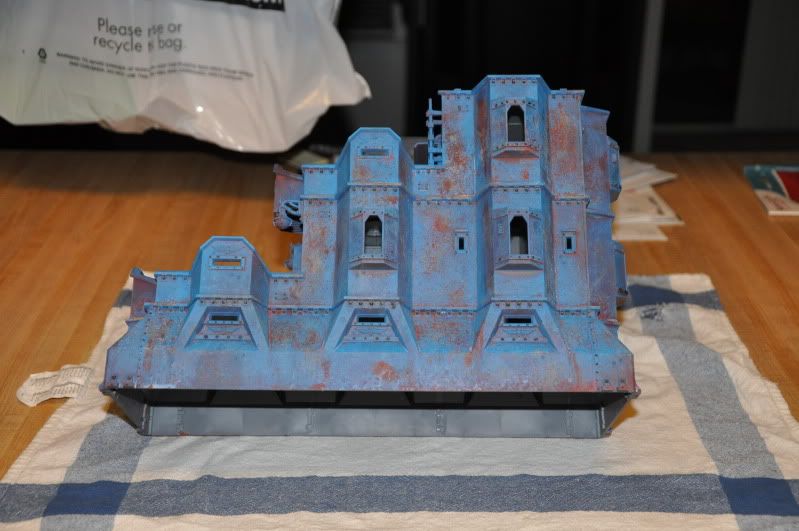
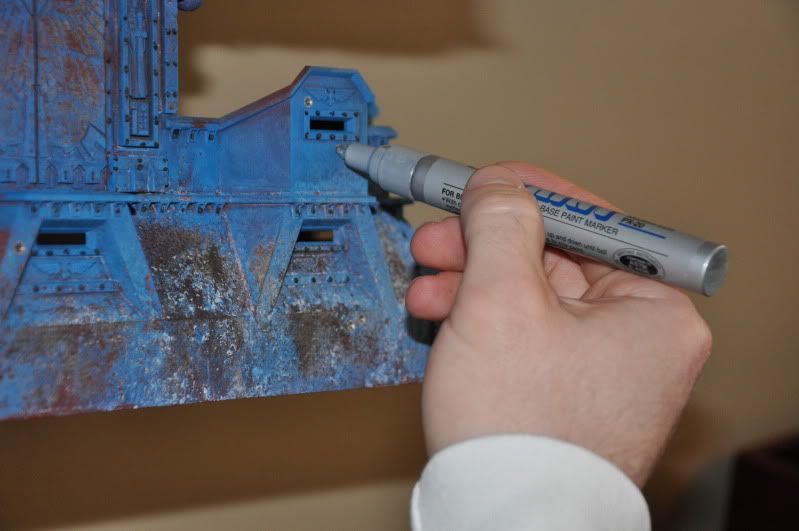
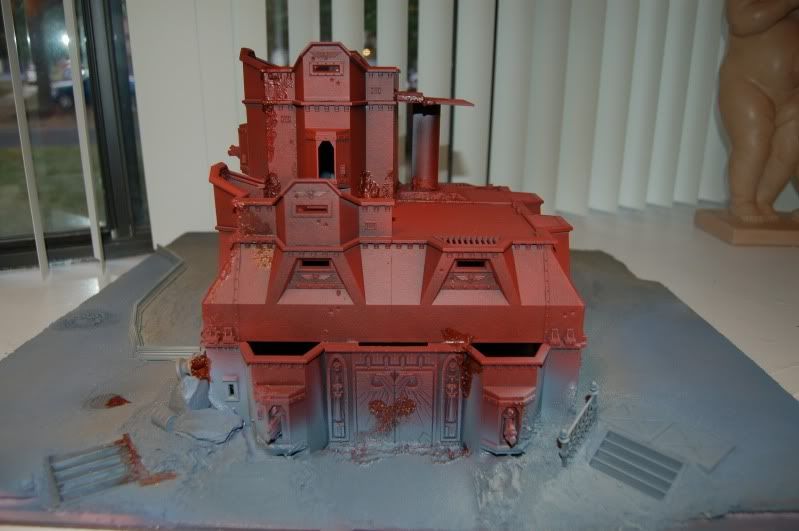
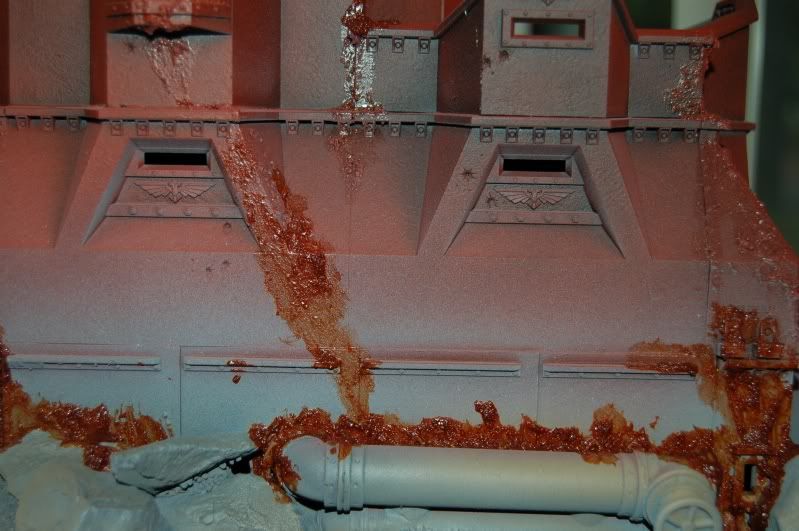
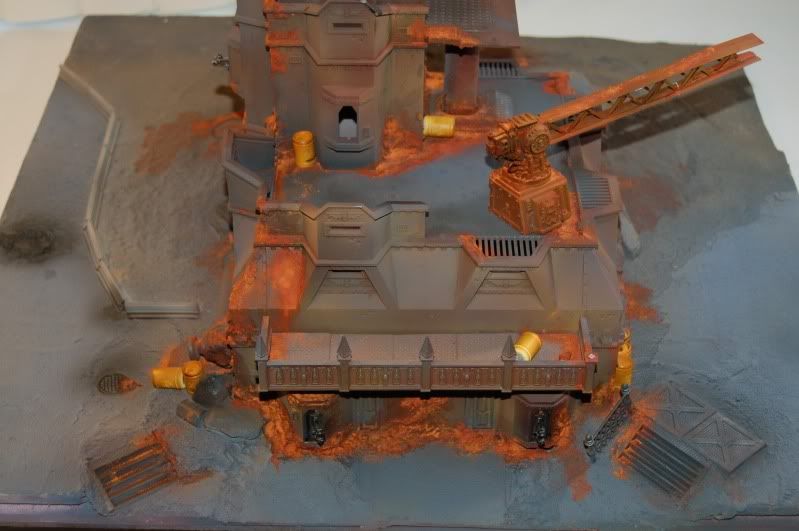
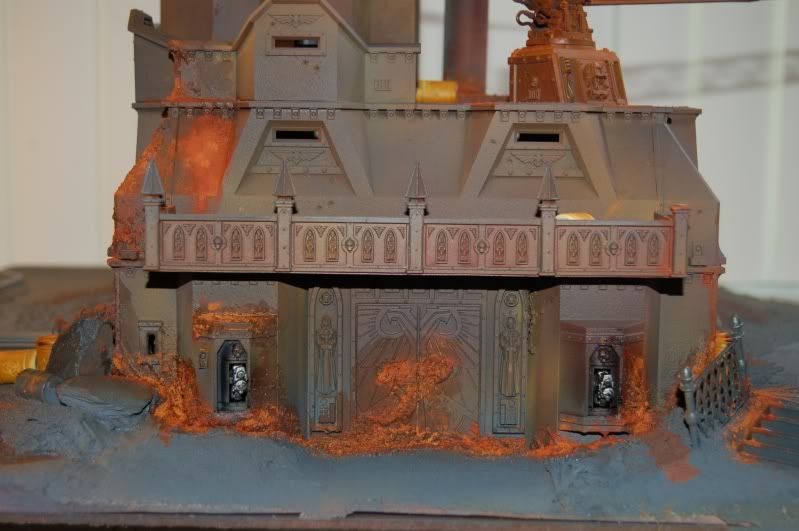
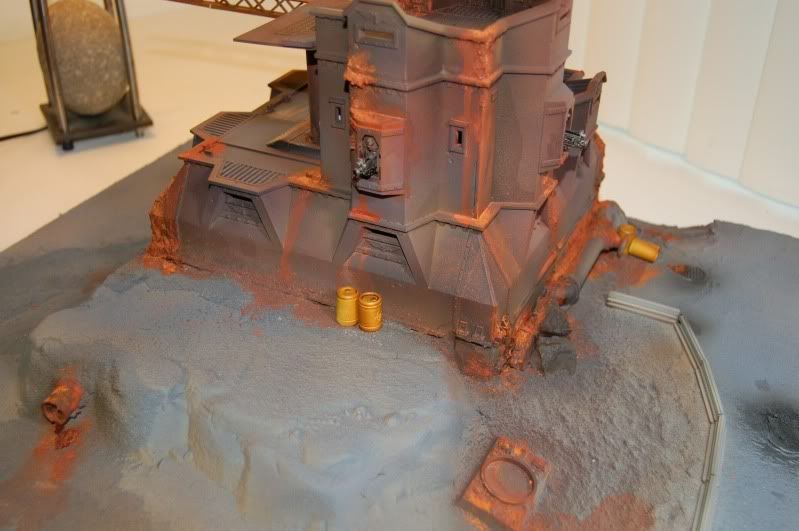
Ok, so the build is finished and the paint has just begun. First pic you will see the bastion all built up and taking some color. I am going for a completely rusted out chemical plant feel, so there will be some serious rust effects and grime/dirt. The effect that I used for the areas most affected by corrosion was resin sand medium mixed with chestnut ink. This was after an initial basecoat of a dark rust color on top of black primer. I left some of the black primer to show through for a quick shade effect. Also prior to priming the piece, I sprayed a rough coat on the plastic. I carved some more foam and added the stairs from the Fortress kit. Atop the stairs are some more of Hirst's flooring with a layer of concrete patch filler spread out to make some concrete sections of road. This board will later be joined by more just like it for the full effect. I threw in some resin barrels and Hirst Arts pipes and then gave the terrain a triad of gray paints with the airbrush. I also airbrushed some custom washes on different areas of the ground. I am not worried about overspray at this point because I still have many layers of paint to lay on the building. By the way, if you were wondering, the bit on the right going from level 1 to level 2 is an old rusty hydraulic elevator complete with control panel.
In this next picture, you can see some of the detail on the ground come into reality. The overall scope of the board is industrial factory type setting with a few of the sections devoted to a toxic waste dump that is heavily corroded. This would be a likely candidate of some acid rain, hence the large amounts of rust. I will be adding much more battle damage as days go by; some basic craters and rubble, but for now, I just have a couple of blast marks rubbed into the plaster.
The last picture is just a closeup so you can see the resin sand mix. It doesn't look like much at this point, but I tinted it with chestnut ink to give it an immediate contrast whilst I begin to paint the other color layers. I think its really starting to come along.
Also, I have some more ideas for this piece that I'd like some opinions on. I'm thinking of building a crane out of the autocannon bits that come with the defense line. This will probably be made from evergreen beams and trusses. From that crane, I'd like to suspend a cage with a guardsman turning nurgle. Also perhaps a big gun or two! Let me know what you think!
|
|
This message was edited 3 times. Last update was at 2010/09/11 17:38:55
|
|
|
 |
|
2010/09/11 05:09:25
Subject: TTG Bunker's WIP
|
|

Nimble Pistolier
|
REALLY liking the look of this so far.
Only thing I'm not sold on is the gaps above the door in the second last picture. Just have the feeling that they should be enclosed to make it a complete structure.
Loving the rest of it and looking forward to seeing more of your work.
Keep it up =)
|
You Can't Have Manslaughter Without Laughter 
 3000pt 3000pt
 1000pt 1000pt
 Empire - W4-D1-L1 Empire - W4-D1-L1
DQ:90S++G+++MB--I+Pwhfb05#+D+A--/sWD294R+T(D)DM+
|
|
|
|
|
2010/09/11 05:20:26
Subject: Re:TTG Bunker's WIP
|
|
Cultist of Nurgle with Open Sores
|
Oo! I do have something to go over it. I forgot to put it on for the pics. I wanted to paint the floor of it separate from the rest of the building. It is basically an overhang where men can stand and fire from. Kind of like a guard post for the front door. I made it from Hirst floor tiles and COD railings. I'll try and post another pic so you can see what I'm talking about.
|
|
|
|
|
|
2010/09/11 05:29:16
Subject: TTG Bunker's WIP
|
|
Fresh-Faced New User
|
That is very nice. i could see a last stand action taking place here.
Ixajin
|
|
|
|
|
2010/09/11 16:41:14
Subject: Re:TTG Bunker's WIP
|
|
Cultist of Nurgle with Open Sores
|
|
|
|
|
|
|
2010/09/11 18:20:58
Subject: Massive Terrain and Table Build WIP
|
|
Sureshot Kroot Hunter
|
Your sludge has a very cool glowy toxic look to it. Do you plan to do much dry brushing or detailing?
|
|
|
|
|
2010/09/11 18:45:30
Subject: Massive Terrain and Table Build WIP
|
|
Cultist of Nurgle with Open Sores
|
crimsonmicc wrote:Your sludge has a very cool glowy toxic look to it. Do you plan to do much dry brushing or detailing?
Yes, there is still much detail to paint. I just finished the weathering and rust effects for now and I think I'm going to move on with the next tile. The detail will come when the table is complete and I can see it all together. All in all I'm very happy with how this is coming along.
|
|
|
|
|
|
2010/09/11 18:52:27
Subject: Massive Terrain and Table Build WIP
|
|

Furious Fire Dragon
|
This is great I wanna see more.
|
|
|
|
|
|
2010/09/11 19:02:24
Subject: Massive Terrain and Table Build WIP
|
|

Rampaging Reaver Titan Princeps
|
Awesome!! If every board in your store is like this you'll have a sweet setup!
|
|
|
|
|
2010/09/11 19:40:22
Subject: Re:Massive Terrain and Table Build WIP
|
|
Long-Range Ultramarine Land Speeder Pilot
|
very,very nice. 
|
|
|
|
|
|
2010/09/12 00:42:19
Subject: Massive Terrain and Table Build WIP
|
|
Cultist of Nurgle with Open Sores
|
Vitruvian XVII wrote:Awesome!! If every board in your store is like this you'll have a sweet setup!
Many thanks. The idea is to create an environment where people WANT to come out of their comfortable homes and play. I know it's always been tough for me to drag my butt to the store just to get a game on.
jetjetex wrote:very,very nice.
Thank you very much. I have always been a little nervous to post here because the forum is always jam packed full of AWESOME quality work. I do my best!
|
|
This message was edited 1 time. Last update was at 2010/09/12 00:46:49
|
|
|
|
|
2010/09/12 01:23:45
Subject: Massive Terrain and Table Build WIP
|
|
Stealthy Warhound Titan Princeps
|
I like the overall structure alot, especially the way it is merged into the ground. However, the rusty crane appears out of place, perhaps because of its color.
|
|
|
|
|
2010/09/12 15:10:46
Subject: Re:Massive Terrain and Table Build WIP
|
|
Cultist of Nurgle with Open Sores
|
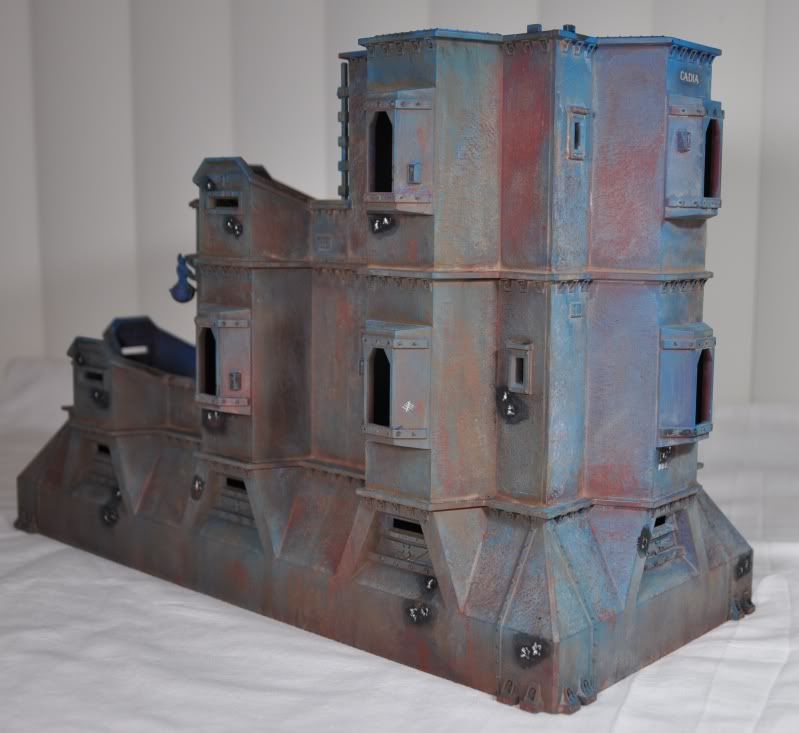
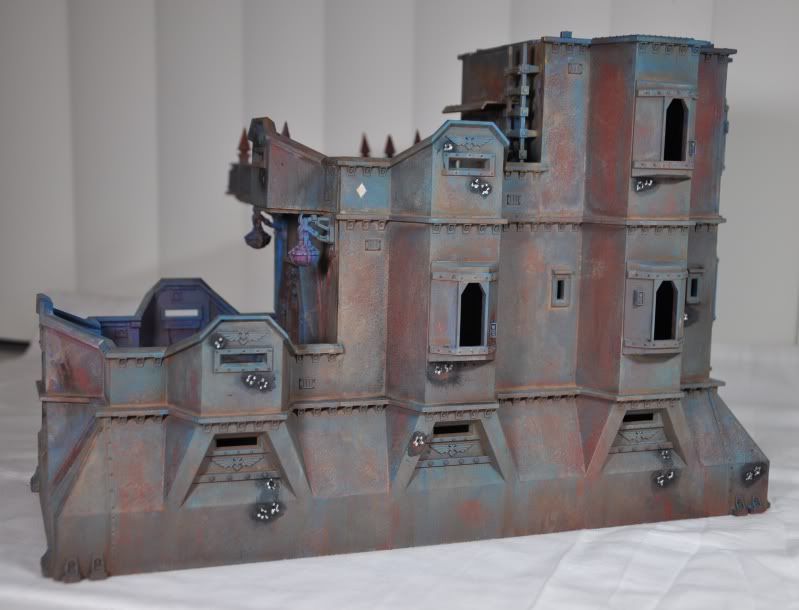
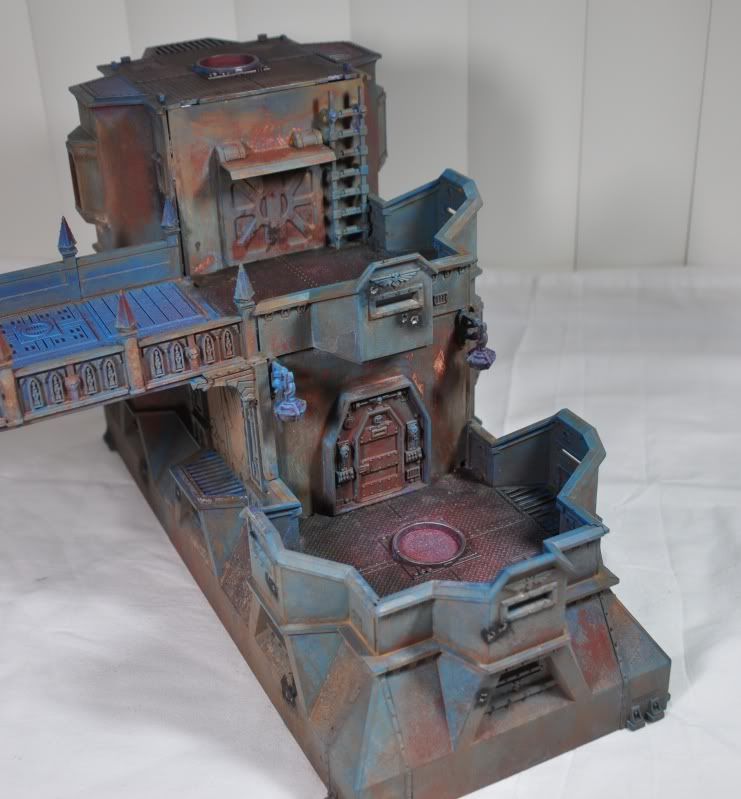
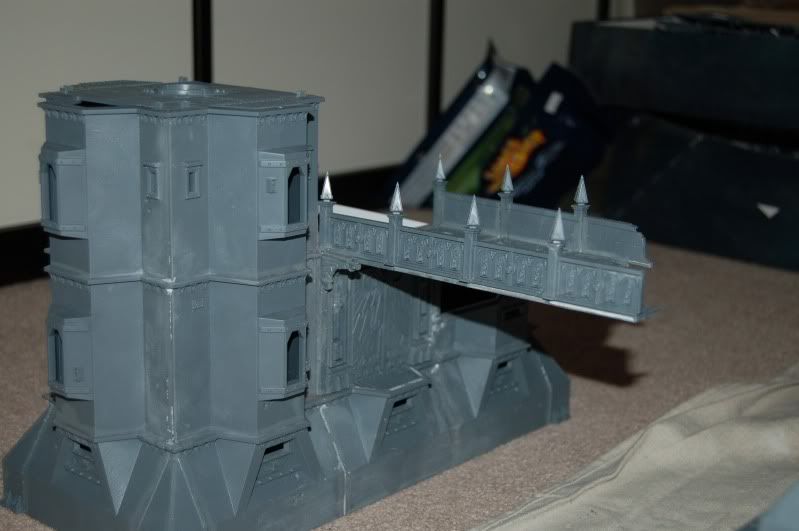
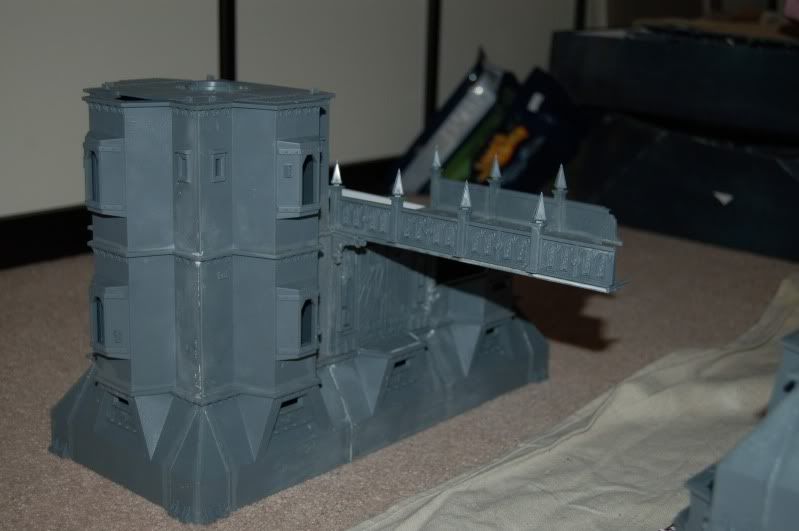
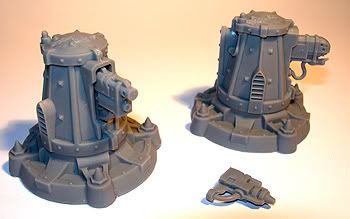
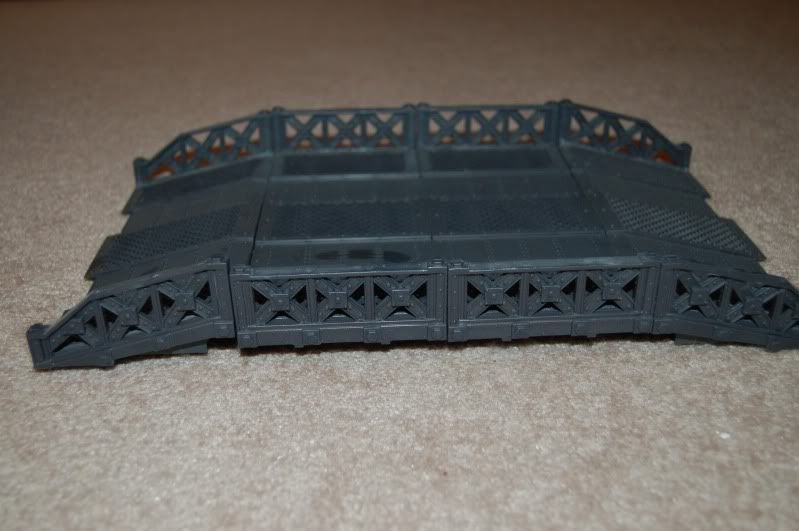
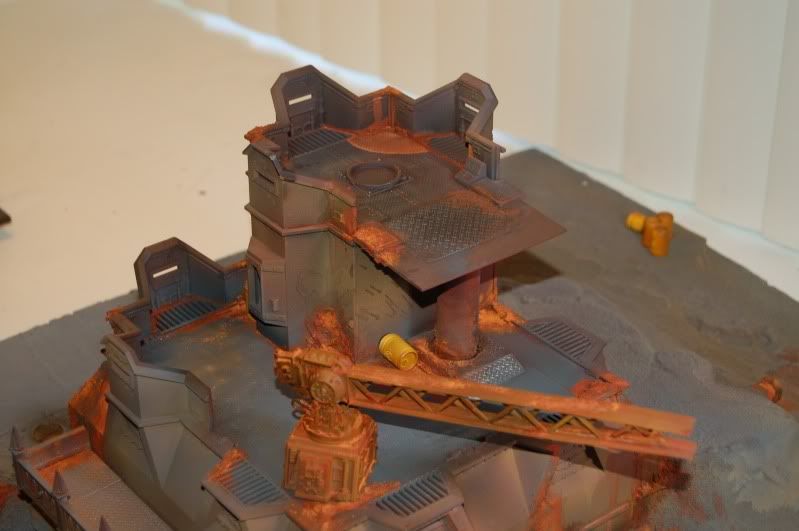
Here are a few shots of the next piece of terrain, which will be modular and not fit into the board. This will be able to match up to four other towers which I will build, and able to be configured on any one of four board tiles. The bridges will cross the river sections of the board, and where the broken bridge ends are, I will be piling rubble underneath to create an effect that looks as if the bridge were shot down from above. As soon as the bastions are complete, there will be more COD buildings and look for some Pegasus Pieces along the way. Let me know what you think, or if you have any ideas about how I should progress. Also, you will notice the guns are not in place yet, and for good reason. I have some custom flamers and plasma guns that will be going in place of the bolters. I am waiting until I have more of the terrain built and setup so I can make the defensible positions more realistic. I do not want one side or another to be left open for relentless assault, so my weapons loadout will be dependent entirely on position. For this reason, I think I will magnetize.
 Automatically Appended Next Post: Automatically Appended Next Post: kestral wrote:I like the overall structure alot, especially the way it is merged into the ground. However, the rusty crane appears out of place, perhaps because of its color.
I don't think that the crane will be staying there. It is currently just sitting in place. I haven't found a good place for it yet. 
|
|
This message was edited 3 times. Last update was at 2010/09/12 15:28:34
|
|
|
|
|
2010/09/12 15:48:09
Subject: Massive Terrain and Table Build WIP
|
|
Stalwart Space Marine
|
Fantastic! That is awesome, I'm very interested to see where you go with this!
|
|
|
|
|
|
2010/09/12 16:25:39
Subject: Massive Terrain and Table Build WIP
|
|
Rampaging Reaver Titan Princeps
|
That is really awesome! I love bridges in 40k.
If i were you i'd be wary about magnetising, its cool and all but open to exploitation by some ass-hat 
|
|
|
|
|
2010/09/12 16:32:50
Subject: Massive Terrain and Table Build WIP
|
|
Cultist of Nurgle with Open Sores
|
redscorps wrote:Fantastic! That is awesome, I'm very interested to see where you go with this!
Thank you so much. I'm very happy to get nice comments.
Vitruvian XVII wrote:That is really awesome! I love bridges in 40k.
If i were you i'd be wary about magnetising, its cool and all but open to exploitation by some ass-hat
I have always been a fan of bridges myself. As far as magnetizing, I am not so sure what you mean. I like the idea simply for maneuverability of terrain pieces. If I set the board up, I think about choke points and tank traps etc... where it would be logical to have different weapon emplacements. There are also these things in lieu of magnets:
|
|
|
|
|
|
2010/09/12 16:46:23
Subject: Re:Massive Terrain and Table Build WIP
|
|
Battleship Captain
|
Face=Melted.
|
|
|
|
|
2010/09/12 17:09:18
Subject: Massive Terrain and Table Build WIP
|
|
Rampaging Reaver Titan Princeps
|
If you were talking about magnetising the weapons in the buildings i was just saying be wary of sticky-fingered customers, theres always one person that will have the urge to take something.
If you werent talking about this then, carry on!
Ps. Those towers are pretty cool, where are they from?
|
|
|
|
|
2010/09/12 18:33:23
Subject: Massive Terrain and Table Build WIP
|
|
Cultist of Nurgle with Open Sores
|
Vitruvian XVII wrote:If you were talking about magnetising the weapons in the buildings i was just saying be wary of sticky-fingered customers, theres always one person that will have the urge to take something.
If you werent talking about this then, carry on!
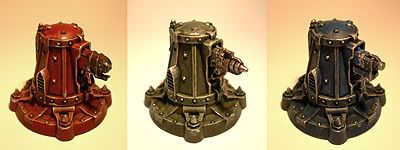
Ps. Those towers are pretty cool, where are they from?
I understand now. Thanks.
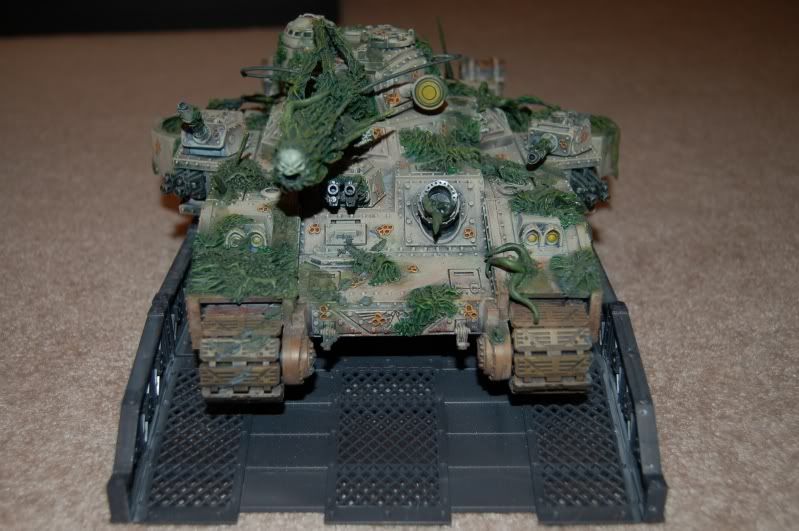
Also, the turrets are from http://www.quantumgothic.co.uk/component/option,com_frontpage/Itemid,1/ You should definitely check them out if you haven't seen this before. Some very awesome stuff here. Automatically Appended Next Post: So, I was busy with building a couple of Pegasus bridges when it dawned on me that in order to play Apocalypse on this gameboard, I would need to fit the largest possible tank across the bridges. Thankfully, I happen to own a couple of Baneblades and a Plaguereaper (which happens to be the widest due to its plague vats) and fortunately IT FITS!
Here are the pics!
|
|
This message was edited 1 time. Last update was at 2010/09/12 19:43:19
|
|
|
|
|
2010/09/13 01:25:09
Subject: Massive Terrain and Table Build WIP
|
|
Thunderhawk Pilot Dropping From Orbit
|
http://www.youtube.com/watch?v=kb5jgnaI8SU MAC uses the Pegasus to good effect on his board, the vid may give you some good ideas for your own table including an elevated railway and an Arbites precinct.
|
|
This message was edited 1 time. Last update was at 2010/09/13 01:25:47

No trees were hurt in the making of this sig, however many electrons were disturbed.
|
|
|
|
|
2010/09/13 03:23:55
Subject: Massive Terrain and Table Build WIP
|
|
Cultist of Nurgle with Open Sores
|
Lennysmash wrote:http://www.youtube.com/watch?v=kb5jgnaI8SU
MAC uses the Pegasus to good effect on his board, the vid may give you some good ideas for your own table including an elevated railway and an Arbites precinct.
Wow that is impressive! I am tuning in!
|
|
|
|
|
|
2010/09/13 03:59:36
Subject: Massive Terrain and Table Build WIP
|
|
Dakka Veteran
Brisbane, OZ
|
That first building legit looks like it's on fire. If that's not what you were going for then it should be! Do a whole city on fire... with glow effects everywhere!
|
Son can you play me a memory? I'm not really sure how it goes... |
|
|
|
|
2010/09/17 03:29:32
Subject: Re:Massive Terrain and Table Build WIP
|
|
Cultist of Nurgle with Open Sores
|
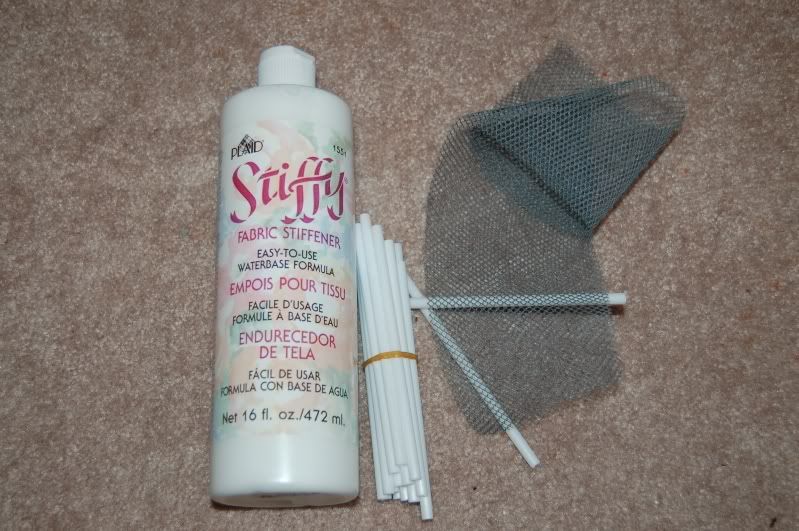
Quick and dirty fences:
Things you'll need:
1) A bolt of mesh fabric
2) A handfull of hollow plastic sucker sticks
3) A bottle of "Stiffy" Fabric Stiffener
4) Primer and two shades of gray paint and boltgun metal.
5) Wire pliers
6) Thin gauge wire
7) Gray paint/primer for fence posts
8) A heat source to bend the posts (optional) ***Use caution melting plastic!
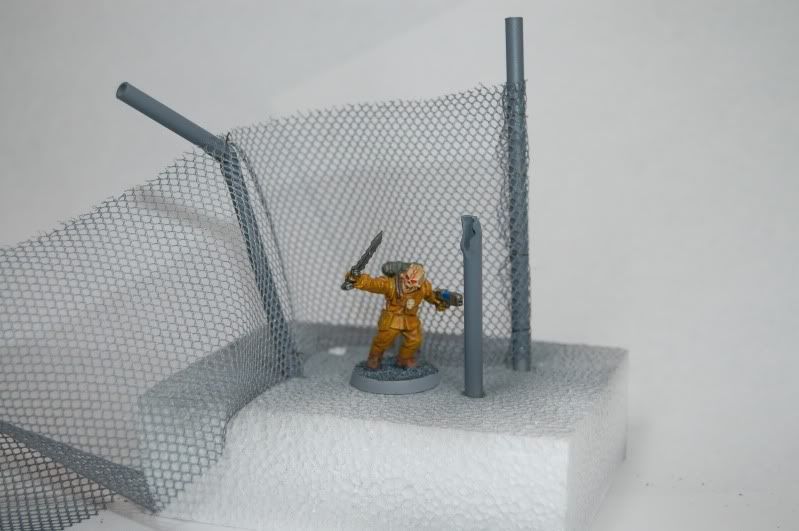
And now, the process:
Cut a length of fabric that is suitable for the scope of your project. Next, cut the height according to the scale of your model. For this you may wish to Google pics of people standing next to chain link fences to get an idea of the scale. Next, brush "Stiffy" on the fabric fairly thick, and later remove all excess with a paper towel by blotting or dabbing and be careful not to wrinkle the fabric. After the "Stiffy" has dried, prime the material. Follow the primer up with a dark shade of gray basecoat. Then drybrush a second, lighter shade of gray atop the first coat. Finally, lightly drybrush boltgun metal on top of the grays.
Use a lighter or other heat source to bent the posts where desired. Place the posts in the terrain piece you are working with and then prime them. Take the thin gauge wire and wrap the fabric around the post at the desired location. Bring the two ends of the wire together and twist them tight with the pliers. Cut off the excess and repeat. That's it! Simple, quick and dirty fences to spruce up your wargaming terrain.
Pics below. Enjoy!

|
|
|
|
|
|
2010/09/17 11:25:25
Subject: Re:Massive Terrain and Table Build WIP
|
|
Battleship Captain
|
Great mini, and the fences look awesome. Definately gonna try and make some for my board.
|
|
|
|
|
2010/09/17 17:00:44
Subject: Re:Massive Terrain and Table Build WIP
|
|
Cultist of Nurgle with Open Sores
|
Thanks for the comments all. They are very much appreciated. I have some more to do this weekend with the next board piece but I haven't moved very far ahead due to a very busy schedule. Updates incoming.
|
|
|
|
|
|
2011/03/15 14:03:40
Subject: Re:Massive Terrain and Table Build WIP Updated 3/15
|
|
Cultist of Nurgle with Open Sores
|
|
|
This message was edited 1 time. Last update was at 2011/03/15 14:05:15
|
|
|
|
|
2011/03/15 16:22:47
Subject: Massive Terrain and Table Build WIP
|
|
Rampaging Reaver Titan Princeps
|
 Awesome!
Seriously, wish my FLGS had terrain this awesome!!
|
|
|
|
|
2011/03/15 18:43:38
Subject: Massive Terrain and Table Build WIP
|
|
Avatar of the Bloody-Handed God
Inside your mind, corrupting the pathways
|
Looking good.
|
|
|
|
|
|
2011/03/15 18:55:11
Subject: Massive Terrain and Table Build WIP
|
|
Chaplain with Hate to Spare
|
Fantastically great work with heaps of character! good step by step shots and inspirational terrain for us to keep wanting more!
|
 Flesh Eaters 4,500 points Flesh Eaters 4,500 points

" I will constantly have those in my head telling me how lazy and ugly and whorish I am. You sir, are a true friend " - KingCracker
"Nah, I'm just way too lazy to stand up so I keep sitting and paint" - Sigur
"I think the NMM technique with metals is just MNMM. Same sound I make while eating a good pizza" - Whalemusic360 |
|
|
|
|
2011/03/15 19:06:50
Subject: Re:Massive Terrain and Table Build WIP
|
|
Cultist of Nurgle with Open Sores
|
Please check out my blog in the signature if you want updates as I go along. I only post here as I get the time. Thanks for the interest!
|
|
|
|
|
|
|
|
 5000
5000
 2000
2000
 2000
2000
 1500
1500
 1200
1200