| Author |
Message |
 |
|
|
|
|
Advert
|
Forum adverts like this one are shown to any user who is not logged in. Join us by filling out a tiny 3 field form and you will get your own, free, dakka user account which gives a good range of benefits to you:
- No adverts like this in the forums anymore.
- Times and dates in your local timezone.
- Full tracking of what you have read so you can skip to your first unread post, easily see what has changed since you last logged in, and easily see what is new at a glance.
- Email notifications for threads you want to watch closely.
- Being a part of the oldest wargaming community on the net.
If you are already a member then feel free to login now. |
|
 |
2010/09/19 17:48:26
Subject: Dracos wins best general @ Mechani-kon 2 (All rounds posted, some pics)
|
|

Angered Reaver Arena Champion
|
This years edition of Mechani-kon was contested by about 20 people at 1500 points. In winnipeg we don't have a huge 40k community, and this was about the 2nd largest event in the city of the year (the first being astronomi-con, where I finished 4th out of 35 for battle points).
Tournaments in Winnipeg are generally run on non-standard missions created by the organizers, which is what everyone around here likes. 4 Games were contested over the course of one day where each round all the participants play the same scenario. Wins are worth 12, draw 8 and loss 4. Most missions have some bonus and penalty points too, with 3 of each being normal.
No pics here, sorry. I might be able to get some from the organizer though. Not enough for a blow by blow, but he came around at some points and got shots of my guys in action.
Here is what I brought, my standard 1500 point list:
Sangfroid Marines:
HQ Librarian storm shield, terminator armor, psychic hood, force weapon (nullzone + avenger) 140
Elite Assault Terminators x5 1x LC 4x TH/ SS 200
Dedicated Transport Landraider Crusader multi melta, extra armor 275
Troops Tactical Marine x10 missile launcher, flamer 170
Dedicated Transport Rhino 35
Troops Tactical Marine x5 90
Dedicated Transport Razorback TL assault cannons 75
Troops Tactical Marine x5 90
Dedicated Transport Razorback TL assault cannons 75
Fast Attack Landspeeder Tornado Squadron (2x(heavy flamer+ multimelta)) 140
Fast Attack Landspeeder Typhoon 90
Heavy Predator AC/las 120
1500
Game 1:
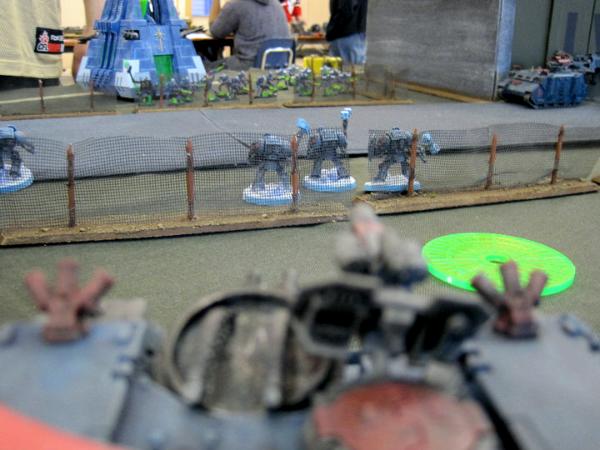
Hot Landing Zone vs Necrons.
The Mission: Modified Table Quarters.
Table is divided into 6 segements, each 24” by 24” (Table 1/6ths instead of 1/4ths). Any unit can claim or contest, except those with rules specifically disallowing them from doing so or vehicles with no weapons left.
Opponent: Necrons – this guy did not have an army list to give me, so this is from memory
Necron lord – rez orb
Immortals x8
warriors x10
warriors x10
warriors x10
destroyers x3
destroyers x3
Monolith
Table:
Mostly open table, with a large road going diagonally across from one corner to the other. The road was completely fenced off from one side to the other making it DT to get on/off the road and giving a 6+ cover to shooting across the field from essentially anywhere. In one of the corner segments (across from the road) there was a large building that completely blocked LOS and was impassible. In the opposite corner there were some fuel tankers, which were relatively big, but not nearly as big as the building
Deployment:
Both players can deploy up to 2 troop choices and either 1 elite or fast attack choice. I won the roll off, and took first turn. Everything else is in reserves and comes on from your long table edge. You can pick any segment in a corner of the table for deployment zone, and your opponent deploys in the opposite corner segment. I deployed on the table corner with the road close to the segment with the big building. Both razorback squads and the typhoon go on the road basically as far forward as I can. There is no seizing the initiative in this mission, so I knew I had first turn for sure. He puts down two warrior squads and reserves everything else. One squad in the back of his segment ready to run into the adjacent one and one at the front ready to run into the one adjacent on my side of the table.
Turn 1 SM
I move forward a little and try some shooting, being out of range of the razorbacks, and the typhoon kills a couple. Thats it, have to wait until next turn for reserves.
Turn 1 Necrons.
His warriors make their WBB. He moves his warriors up a little bit from the back, maintaining control of his deployment segment. The other warriors run into the segment on my table edge. He is out of range of shooting anything.
Turn 2 SM
LRC comes in from reserves. LRC moves up in the table segment the warriors just ran into, and the terminators disembark. Razorbacks move up a bit more and they unload on the other warriors with the typhoon. He makes some saves and ends up losing 2 to krak missiles denying wbb. The warriors are just inside assault range, and are completely destroyed in assault with the terminators. The terminators consolidate back to the LRC ready to reembark on my next turn.
Turn 2 Necrons
His monolith and a unit of warriors with lord come in. Monolith takes his center segment and warriors teleport in through the mono. I'm not in range of any of his guns, so he just sits in his segments waiting for me to come to him.
Turn 3 SM
Rhino, predator and speeders come in. Rhino drives up the side with the building on it, speeder move flat out to get in front of the building and block LOS to them. The razorbacks also back up a bit to hide from the particle whip via the BLOS building. I'm going to wait to advance until he wants to shoot the whip at the LRC. The predator comes in the middle segment to claim it and have a wide target selection. The fence will give anything (save the mono, which I won't be shooting) a 6+, but that is fine. The typhoon moves back to get out of range and starts moving towards the segment with the LRC in it, getting ready to take it when it leaves. Terminators reembark and drive towards the center. I figure I'm out of particle whip range, so I'll save my smoke for the next turn when I'm in range of the whip. Shooting sees a few warriors go down.
Turn 3 Necrons
About half the WBB rolls are made, and one unit of destroyers and the immortals come in. Immortals come in close to the big building, and the destroyers come in close the the monolith and lord with the rez orb. Destroyers shoot at the LRC, scoring an immobilize and destroying the assault cannon. I really didn't think they'd get so lucky, but there you go. The rest of the shooting was out of range still, so he just advanced the immortals as much as he could towards my razorbacks in hiding.
Turn 4 SM
Terminators get out and start walking. I spread out but get a low DTT to get over the fence. The also score low on the run roll leaving me 2 turns away from making any assaults with them. But I figure I've given the monolith a good whip target in the terminators I advance my razorbacks, using the lead as cover for the 2nd. The landspeeders hide behind them just out of los, ready to cruise over the building next turn and line up a good double shot of heavy flamer action. The razorbacks kill of a couple immortals. Between the typhoon and the predator the unit of destroyers disappears. The rhino moves up along the outside of the big building, claiming the segment and completely out of LOS.
As the terminators start moving down the road to an uncontested segment
Turn 4 Necrons
He only controlled 2 segments at this point, and was trying to use everything he could to stop me from contesting those he had. He makes 1 out of 2 wbb on immortals. The other destroyers come in and wreck the lead razorback. The Monolith fires its particle whip but it scatters and only hits one since they are spread out. I make the 3++ save easily. 2 squads of warriors open up on the terminators, getting some double tap but not much. The librarian takes a wound but otherwise the unit escapes intact. Immortals run up to the fence, ready to shoot down the passengers of the wreck if they try to move out of hiding to contest.
Turn 5 SM
Rhino squad gets out of their ride, and allow it to drive back into my deployment segment. The remaining razorback drives into his middle segment and the tacticals who lost their ride move in as well. The tornado speeders cruise over the building lining up either some multimeltas on the destroyers or heavy flamers on the immortals. Since the LRC is immobilized, it is still claiming a segment against my table edge, the predator has the middle and my rhino + typhoon have my deployment segment. The rhino's squad is in one of his segments, completely out of LOS. So I run my terminators into his deployment segment to contest and move the tornadoes and razorback and 5 man squad contest his middle segment. Shooting sees the predator, typhoon and tornadoes pour enough fire to finish off the destroyers. He doesn't have anything with speed left so the game is basically over.
Turn 5 Necrons
He shoots at the terminators, doing nothing. Shoots at the Tornadoes, wrecking both. Shoots at the foot marines, killing a couple. At the end of his turn I'm still controlling 4 segments, and contesting the other 2. He rolls a 2 and the game ends.
I get a single of the bonus point for controlling 3 segments or more at game's end, and he gets a negative point for controlling none.
Score: 13-2 for the SM
Postgame: His initial mistake was moving those necrons up a bit too far, barely allowing the terminators to assault them. Of course, he may have been banking on them not making it in on turn 2. Not deepstriking his Mono meant that he really had no mobility, and all I had to do to win was take out the destroyers. My superior mobility was the deciding factor here. I didn't play incredibly aggressively, as once I had more segments I just focused on limiting what he could contest or claim. Probably deepstriking his monolith would have given him the best chance to contest the most segments.
This guy admitted that he hadn't really tested his list much, whereas I have been playing this exact list for months, and that was after months of tuning. He was a great guy but had a bad day overall, finishing last in battlepoints. There was an “award” given to him: a new set of dice.
3 more games coming! Stay tuned...
|
|
This message was edited 4 times. Last update was at 2010/11/29 04:54:56
Sangfroid Marines  5000 pts 5000 pts
Wych Cult  2000 2000
Tau  2000 2000 |
|
|
 |
|
2010/09/19 19:48:45
Subject: Dracos wins best general @ Mechani-kon 2 (1500 points)
|
|

Fixture of Dakka
|
Necrons need a revamp badly. They can't win tournies without the Deceiver.
|
|
|
|
|
|
2010/09/20 14:52:42
Subject: Dracos wins best general @ Mechani-kon 2 (1500 points)
|
|
Painlord Titan Princeps of Slaanesh
|
Well written bat rep even without pictures, look forward to the rest of the tournament. Don't wait too long or youll forget!
|
|
|
|
|
|
2010/09/20 19:49:35
Subject: Re:Dracos wins best general @ Mechani-kon 2 (1500 points)
|
|
Angered Reaver Arena Champion
|
Now with pics taken by one of the TO's!
Game 2: Supply run vs Imperial Guard
The Mission: Modified Seize Ground. 6 objective tokens. Objectives are not stationary, can be picked up by any model with a hand or other suitable appendage by that model ending its movement phase in base contact with it. They can also be passed from one model to another by ending movement in base contact. At the start of the game, roll a dice. The number that comes up will be the number of the “fake” token. All tokens have a number from 1-6 on the bottom, when a token is picked up reveal the number (shuffle and do not look at the numbers when placing tokens) to see if it is the fake.
Opponent: Imperial Guard Again no army list given to me, and I'm really not familiar with the construction of an IG army, so forgive me if this is not entirely accurate.
CCS in multilaser chimera with astropth? (the guy that allows +1 to reserves and rerolling outflanking stuff)
al'rahim (outflanking dude) with meltaguns in autocannon chimera
2x autocannon ( IA) chimera with infantry and plasmagun
PCS with power sword and missile launcher? In multilaser chimera
2x infantry squads with plasma gun and missile launcher in multilaser chimera
LRBT with lascannon and heavy bolter sponsons
LR punisher with pask.
Hydra
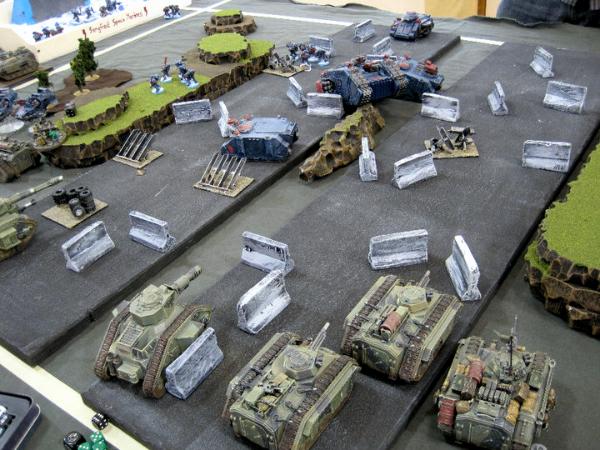
Table: The table was symmetrical featuring two central roads, with a small space between. The roads were littered with tank traps that we agreed were impassible to vehicles but just difficult to infantry. On either side were a hill, with some area terrain woods along the sides of the boards. Not vehicle friendly at all. If the first table was a dream with the huge, central, unobstructed road, this was the opposite. Luckily my opponent was mech IG, so it affected us mostly the same, except I had some skimmers. The objectives were placed symmetrically across the board. One each on the middle of the hills, and 1 each on either road close to our respective deployment zones.
Deployment: Essentially pitched battle deployment. This mission gave infiltrating to fast attack choices that had not been destroyed in the previous game, so my typhoon was able to take advantage of that. I deployed with a ML combat squad on foot ready to pick up an objective early. I decided I needed to find out early if the ones close to me were the fake. The rhino deployed on my right road with a razorback and the foot marines. LRC deployed on the other road, with another razorback. Predator was hanging on my back table edge on the right road trying to get a central firing position while the 2 tornado speeders hid behind the hill as far forward as they could go, in case he seized. He deployed the LR punisher on the right road, and the LRBT on the left. The CCS and 2 infantry squads went behind the hill on the left, while PCS was on the right behind the hill. The hydra was backed up pretty close to his table edge on the right, mostly in the open to get a wide firing zone. The typhoon infiltrated on the left near the trio of chimeras.
Turn 1 SM
I basically moved everything forward, and popped smoke. Except the predator, who shot its lascannons at the punisher hoping to shake it, no luck there. The ML combat squad grabbed the objective on my right road, which a razorback's tacticals got the one on the left. Neither were the fake, so I knew I was already in a good position. If I could hold on to them and grab one more, victory would be mine. The typhoon immobilizes the CCS chimera on the left. The tornadoes hide behind some trees on the right, managing to get sufficient cover from the hydra.
Turn 1 IG
He opens fire with everything, moving only the left PCS's chimera to get a good shot at the tornadoes. However, hiding behind the trees payed off as the cover saved 2 pens and the 1 glance, allowing them to escape unharmed! He stuns and destroyers the typhoon missile launcher on the typhoon speeder, shakes a razorback and kills 2 marines in the razorback squad picking up my left side objective. A chimera multilaser rips the assault cannons off the razorback whose squad just got out. The smoke really prevented his alpha strike from doing much harm, allowing those terminators to get to an imposing central position. PCS had gotten out to start running up the hill on the right.
Objectives: SM 2, IG 0
Turn 2 SM
Landraider tries to go up the middle as much as possible, on a DT rock formation between the roads. It was completely exposed, but it was able to get a side shot at a chimera, exploding the CCS chimera. The guys inside take a wound, fail morale and proceed to run off the board. The left objective holding razorback squad got back in their ride and it moved around the side of the hill, mostly hidden. I was preparing them to get the objective on the left hill. The tornadoes moved up and destroyed the hydra with multimelta fire. The rhino's combat squad got out and rand up on the hill with a decent DTT, but were just shy of being able to pick up the objective. They shot at the PCS who went to ground, and suffered no wounds. The rhino moved up to get near the my opponents objective to simply try and move block him if he wanted to take it. That should end up forcing him to shoot the rhino or just not get the objective. Either way was fine to me. Predator fire stunned the LR punisher. ML tries to glance the LRBT (really all it had LOS to) and fails.
Here is a shot of the status of the table after my 2nd movement phase:
Tornadoes in position after destroying hydra
Turn 2 IG
Outflanking platoon didn't show up. Punisher moved off to the side to get away from the LRC and predator. LRBT moved over to take shots at the squad on the hill on the right. Battle cannon scattered and killed one guy. Chimeras shot at the same exposed squad, but didn't do anything. The PCS's chimera wrecked one of the tornadoes.
Objectives: SM 2, IG 0
Turn 3 SM
Razorback squad on the left who already have an objective, and have smoke left zoom around the other side of the hill and pop smoke, going after another objective. The other razorback moves forward to a more central firing position. LRC moves up as much as it can, but is mostly boxed in by impassible terrain. Terminators get out and run toward the objective on the left road near my opponents deployment zone. Some shooting sees a couple weapons destroyed on chimeras. The combat squad on the right hill grab the objective, and it is not the fake either. They shoot at the PCS, who take 2 wounds, fail morale and run off the board thanks to the tornado preventing them from regrouping on their turn. Incidentally, the tornado moved over to the side of the punisher, takes a point blank MM shot and misses. Typhoon with heavy bolter remaining manages to rip a multilazer off a chimera, and the LRC rips both weapons off the other chimera on the left.
Turn 3 IG
No outflankers again, he really needed them to try and make me drop some objectives. Punisher destroys the remaining tornado. PC's chimera rolls around the hill to go up it. Both infantry chimeras on the left start going around the hill to try and shoot me down after I pick up the objective. The LRBT again shoots at the guys on the hill, and get a bad scatter on the battle cannon and again manage to kill only one. It helped that I spread them out a bunch.
Objectives: SM 3 IG 0
* In the middle of his 3rd turn, the 30 minute warning was called. All the maneuvering and firing had taken a long time. Setting up the mission and discussing terrain had also cut into our time a bit. We agreed that the next turn would likely be the last.*
Turn 4 SM
The razorback on the left goes up the hill and positions itself to give cover from the battlecannon and some of the incoming infantry. Grab the objective, and it is not a fake either! The squad on the right hill run off it and behind some cover. Terminators close in on the objective on the left road near my opponent's deployment zone, but can't end their movement in base contact as is needed to pick it up because they had to make a DTT to get over some tank traps. My shooting this turn was completely ineffectual, as I don't even manage to stun a single vehicle. He needs to make me drop all the objectives to draw it. My turn didn't take long, so if he does it quickly we might even get in another turn.
Turn 4 IG
Outflankers finally arrive, perhaps too little too late. The platoon's 3 chimeras come in on the right, 2 of the infantry squads have plasma and the PCS has melta. Everything pours fire into the 5 man ML squad. Between 2 squads FRFSRF and the special weapons, the squad evaporates and drops and objective. The two chimeras come around on the left, and unload the two infantry squads, each with a plasma gun. I have cover from one squad but not the other. After a torrent of fire, only the marine not carrying an objective dies. The LRBT fires at the squad that come down off the hill on the right, as does the punisher. Between both of them they kill 2 guys, and the objective holder survives!
Infantry surround left side hill
 ML
ML Squad hit by outflankers
We had 5 minutes left at this point, as all the unloading of troops and shooting on his turn took a long while. Therefore we called the game over there.
Objectives: SM 3 IG 0
Score: 13-4
Postgame:
After the game we revealed the fake objective was the one my terminators were close to. We agreed that after turn 4 I had the ability to hop in rides and drive away, making him stopping me from winning all but impossible if the game had continued. He really needed better shooting or me to fail more saves on turn 4 to have a hope.
I'm not sure exactly what he could have done better, maybe going for the objectives close to him off the start. Not getting the platoon of reserves until the last turn certainly affected the outcome, which was probably made possible because the CCS ran off the board.
Another great opponent, and fun game.
2 more games coming!
|
|
This message was edited 1 time. Last update was at 2010/09/20 19:51:57
Sangfroid Marines 5000 pts
Wych Cult 2000
Tau 2000 |
|
|
|
|
2010/09/22 05:24:07
Subject: Re:Dracos wins best general @ Mechani-kon 2 (1500 points)(now with some pics)
|
|
Angered Reaver Arena Champion
|
Game 3: Fighting Withdrawal vs Chaos Space Marines
The Mission: Pretty unique scenario. The player with the most battle points from the previous round is the attacker, and the other players is the defender. By my opponent and I had scored 13 battle points in the previous round, so we rolled off. The winner HAD to be the attacker. My opponent won and was thus the attacker. Essentially there would be 3 objective locations, and the point was for the defender to hold the objectives for as long as possible, while losing as little of his army as possible. The attacker got VPs for destroying enemy units, and holding objectives. The defender got victory points for holding the objectives, and moving his units off the board turn 4 or later. Note the defender gets zero Vps for actually destroying any of the attackers units. Attacker always goes first (no need to roll), but defender can seize the initiative. Objectives are worth points depending on how many you control. 50 pts for 1, 100 pts for 2 and 200 pts for all 3.
Opponent: Nurgle themed CSM army
This individual was kind enough to provide me with his list
Demon Prince – MoN, Wings, Warptime
Demon Prince – MoN, Wings, Warptime
Plague marines x8 in extra armor rhino with p.fist champ, melta
Plague marines x8 in extra armor rhino with p.fist champ, melta
Plague marines x8 in rhino with p.fist champ, melta
Oblit x2
Oblit x2
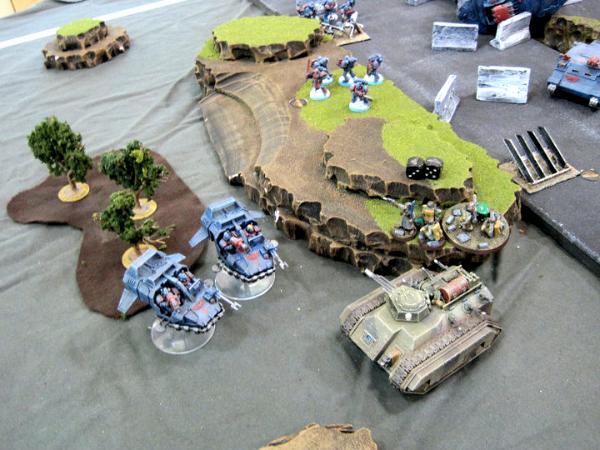
Table: The table was a symmetrical arrangement of small impassible rock formations. You'll get a good idea of what I'm referring to if you look at the picture from after my first turn.
Deployment: The defender draws the edge of his deployment zone from one corner of the table to the corner diagonally opposite. The table half is therefore a triangle, with hypotenuse being the line through the middle of the board. In the very center of the board, one objective location marker was placed. Then, 18” back towards my corner is the 2nd objective, and another 18” back is the 3rd. The 3rd is about 6” or so away from my back corner. The attacker can only deploy troop choices, everything else is in reserve. The attacker also must deploy 18” away from any of the defenders units. Defender deploys first then the attacker. I put down my LRC right next to the central objective, then the razorbacks out along the edge of my deployment zone half-way to the corners. Each speeder squadron goes half way from a razorback to the corner, thereby severely limiting the areas he can deploy into. The predator goes centrally along my back table edge and the rhino with a combat squad stays on my 2nd objective while the ML combat squad stays on the objective in my corner. I basically pushed his deployment zone back into a corner of the table with my deployment along the central line. He lines 2 rhinos up exactly 18” away from the LRC and one goes along a flank near the typhoon. Oblitz are deepstriking and DPs are just in reserve.
Then comes seize the initiative, and I get a 6!
Turn 1 SM
I move the LRC a bit to try and get cover from the incoming melta shot. The typhoon destroys a rhino while the predator does the same. Now 2 of his units are footslogging, and can't hope to stop me from walking off on turn 4. A brutal strike resulting from him not deploying in cover. I move the razorbacks backwards and the Tornadoes back as well, moving towards my long edge already. On of the razorbacks move behind a central rock formation where the first objective is, next the the LRC. I was hoping to give both cover and have both in range of the objective.
Here is a shot of the board after my first turn
Turn 1 CSM
The foot plague marines start walking, and the one remaining rhino moves up 12”and disembarks. His melta gunner can see though a hole in the rocks, and gets a good enough shot to deny cover the the LRC. He ends up wrecking it, and I put the razorback to close to allow the terminators to get out close the the plague marines and objective. The have to get out on the other side, closer to my long table edge. That was a mistake, and measuring at the end of the turn reveals my Razorback to be just outside the 3” needing to contest it, while his plague marine is just inside. D'oh.
VP: SM:100 CSM: 325 ( LRC + 50 for objective)
Turn 2 SM
I start backing up, abandoning the central objective. As long as I don't lose anything else I'll be fine for VPs since I get them for units that make it off the board instead of units I kill. It was hard to restrain myself from having the terminators go around and kill the plague marines, but I would get no points for it and simply bring myself closer to his footslogging units. So in the end I just run the terminators back towards the 2nd objective. A razorback takes over guarding the 2nd objective to allow the rhino squad to move back. This got more units close to my back table edge. Other units all fall back towards my corner, trying to spread out a bit to deny area to deepstrike those oblits. Typhoon shots the remaining rhino but only stuns it. The predator backs up and misses both autocannon shots.
Turn 2 CSM
One unit of oblitz and deamon princes come in. The oblitz deepstrike in an area that is a bit open away from my terminators. The backfield is pretty clogged up with units spread out to cover a wide area while close enough together to make deepstriking risky. He lands a hit on the scatter anyways. He opens up on the razorback sitting on the 2nd objective, and strips the weapon off and stuns it. Both Demon princes move up 12” from his back edge then run forward. One unit of plague marines keeps the central objective and the other 2 continue to run over towards me. I'm backing up faster than he can move though, so its a losing proposition for him. He has no better option though.
VP: SM:200 CSM: 375
Turn 3 SM
I move the unit inside the razorback out of it. I congo line them so that one model is next the objective, but they are moving towards the back edge. There is a rock formation between the oblitz and them, so they should be safe from shooting. The tornadoes line up some Multimelta shots on the oblitz, close enough to fly flat out off the board next turn. I get one hit and he gets his invuln save, despite nullzone. Everything else lines up along the back edge ready to leave at the start of my next turn. I should be far enough away from the deamon princes to avoid any assaults.
Here is a shot of my guys getting ready to move off next turn.
Turn 3 CSM
The 2nd oblitz do not come in. The plague marines all move up, holding 1 objective. The DPs move up as far as they can but are not in assault range still. The oblitz wreck the razorback on the 2nd objective and contest it.
VP: SM:250 CSM:500 (425 +75 for razorback)
Turn 4 SM
All my remaining unit leave the battlefield by moving in contact with the edge. He has largely failed to prevent me from retreating, and I score 1050 VPs for the units that moved off the table.
At this point, I offer that he can claim all the objectives for the next 3 turns, until the game ends on turn 6 as dictated by the mission.
Final VPs: SM 1300 (250 +1050 for withdrawn units) CSM: 1100 (500 + 600 Objective VPs for remaining turns)
You need 150 more than the opponent to win, so I get the win. With bonus points this round is:
Score: 14-6 victory for SM!
Postgame: My opponent said "you played that perfectly". He was somewhat upset that at the beginning of my 4th turn I could just walk off like that. He was thinking the scenario was unbalanced, but there were also many tables where there were close games or the attacker was slaughtering the defender. I think seizing the initiative, along with smart deployment, really sealed the deal early on. As long as I didn't engage unnecessarily, I don't see how his army could have stopped me from retreating as the mission described.
I spoke with the TOs about this one, saying that allowing the defender to seize might actually be a bit too strong. They replied that they wanted to attacker to have to deploy in cover to account for the possibility of not going first, since they could just throw units away trying to kill the defender at no cost. Its up for debate a bit, and they will likely tweek this scenario a little. All in all the response from the players seemed about equally mixed as to who had the advantage. Maybe that is an indication that its actually pretty even.
Last game coming shortly...
|
|
This message was edited 2 times. Last update was at 2011/02/23 18:03:31
Sangfroid Marines 5000 pts
Wych Cult 2000
Tau 2000 |
|
|
|
|
2010/09/22 07:12:21
Subject: Re:Dracos wins best general @ Mechani-kon 2 (1500 points)(now with some pics)
|
|
Angered Reaver Arena Champion
|
Game 4: Annihilation vs Black Templar
Its kind of funny to note that this guy told me at the start of the game that all his opponents had terrible luck against him the whole tournament. He was a decent player, but not generally one of the players you would expect to see at the top table on the last game. I believe that he and I were the only ones with 3 wins at that point, so I knew we were likely playing for Best General if one of us could win, or if we drew we might give the prize away to one of the strong players with 2 wins and 1 draw.
The Mission: Modified Annihilation, scoring units are 2 KP each. This worried me a little, as my razorback squads might prove to be a weakness.
Opponent: Black Templar - this guy had a copy of his army list for me
Emp Champ - accept any challenge
Marshall – lightning claw, terminator honors and iron halo.
Assault Terminators 4x lightning claw, 1x thunder hammer, furious charge
LRC smoke launchers and blessed hull
Initiate Squad (9) in rhino (extra armor, dozer blade, smoke) with powerfist, meltagun
Initiate Squad (9) in rhino (extra armor, smoke) with powerfist, meltagun
Initiate Squad (10) in rhino (extra armor, smoke) with powerfist, meltagun
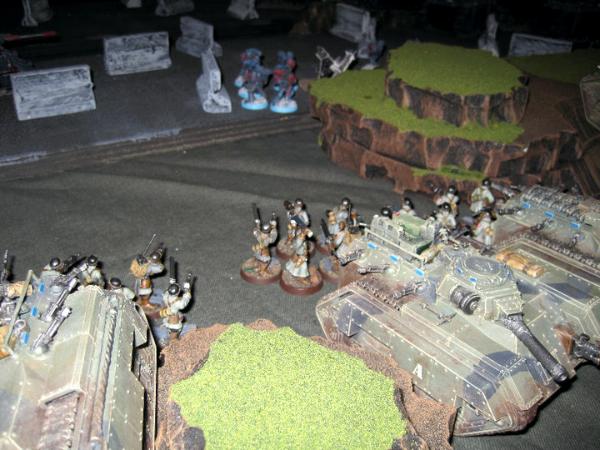
Table: Impassible Volcano in the middle, with lots of DT craters with impassible magma in them. This made maneuvering a bit of a hassle but not as bad as the roads with tons of tank traps.
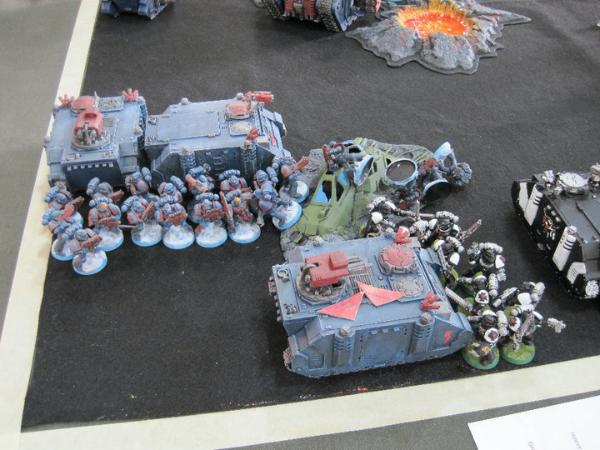
Deployment: He won the rolloff, and went first. Deployment zones were in table halves. After he deployed, I had to deploy 18” away from him. He lined up his marshal in a rhino, with another rhino and LRC on the left side of the field, and the emperor's champ in a rhino on the far right, near the edge. I stuffed everything except the Tornadoes in the corner on the right, hoping to attack his isolated rhino quickly before the rest could get there. From the corner out, I deployed as follows: razorback, razorback, rhino, typhoon, LRC and predator. I left the Tornadoes in reserve, as pretty much no matter where I placed them he would be able to get an assault cannon shot off at the squad.
Seizing the Initiative was not permitted as part of this mission, so he went first. Game scheduled for exactly 6 turns.
Turn 1 BT
He moves up the EC's rhino and pops his smoke. The LRC and rhinos move up on the left. LRC tries some shooting, but does nothing to the front armor of the predator who is the closest target.
Turn 1 SM
LRC moves up a bit, gets just inside range of his LRC. The assault cannon gets 3 penetrating hits on his LRC, and explodes it! Great start for me. The predator kills his lead rhino on the left. Since the right rhino had used its smoke, all the firepower from the 2 razorbacks, ML in the rhino AND typhoon speeders were unable to do more than immobilize the EC's rhino.
Here is what the board looked like after his 2nd turn:
 SM
SM:2 BT:0
Turn 2 BT
Newly dismounted terminators run forward, towards my LRC. The remaining rhino moves up and uses its smoke. Dismounted Marshal's squad advances using the remaining rhino as cover. EC's unit gets out of their ride and shoots at the razorback, missing with the melta. They proceed to assault it and weapon destroy/immobilize it.
Turn 2 SM
The rhino tries to drive through some DT and past the EC's unit, failing its DTT. Hrrrumph. Now the other razorback is kinda locked in the corner, having to drive behind the rhino where there is just enough room to get out. The typhoon moves away from the combat to get some room to shoot unmolested. Together with the 3 squads on foot, I fire on the EC's unit. The EC and 2 guys are left, including a powerfist but not he melta. Tornadoes come on and cruise up to the termies and kill one with MM shots. The LRC moves up, disembarks the terminators and pops smoke. Librarian uses nullzone, fails with perils and takes a wound. The terminators assault, and proceed to lose 3 TH models before they swing. Preferred enemy striking at higher Initiative that most of my models really hurt me there In return I take out 1 model at I4, then 1 more at I1. His TH model's attacks all bounce off my shields. He wins combat 3-2, and I pass my morale. I sure didn't expect to bounce off them like that when I was planning the assault! EC finishes off the Razorback in combat.
Here is a shot of me lining up his terminators, just before running into the slaughter
And another one of me rapid firing the EC's unit.
 SM
SM:2 BT:1
Turn 3 BT
His remaining rhino moves up and unloads near the predator with only the melta peaking out from behind the rhino as he is now using it as cover. The melta misses against the predator. The Marshal's squad moves towards the terminators and fires on the speeders, wrecking one. The EC's unit assaults my 10-strong tactical squad. I lose combat, losing 3 guys while he loses 1. I stick around for more fighting. I lose my Lightning claw model in combat, and he loses his TH model. He now has 1 Lightning claw model left and I have a TH and my librarian.
Turn 3 SM
One squad of marines hops back into their razorback, who races away from the confrontation. The other 5 man squad assaults his immobilized rhino and wrecks it. The remaining Tornado zooms across to the other side of the battlefield, near the Typhoon. The predator backs up and wrecks the rhino in front of it. The LRC moves back a little. The LRC and typhoon open up on the squad without an IC in it and they lose a few models. Combat sees me finish off his Terminators without losing any more models, and consolidate away from the Marshal's squad. I roll poorly and won't be able to escape the coming assault. The tactical marines finish off his initiate squad while taking more wounds from the EC. I lose more models, and pass morale again.
SM:7 BT:1
Turn 4 BT
Marshal's unit shoot then assault the terminators. The marshal uses his superior initiative to finish off the libby while the other models kill the TH before he can swing. He consolidates towards the corner where all the action is. The EC continues to eat away at my marine squad, getting it down to 3 models. The IC-less marines shoot their melta at the LRC, and it bounces off.
Turn 4 SM
I have a healthy lead but he is just scored some KP and has another 2 on the way soon. I decide to just avoid conflict where possible and hold onto the lead. The predator, razorback and foot marines all run up the board towards his long table edge. The LRC goes along my back table edge in the opposite direction. The typhoon shoots some missiles on the initiate squad that is weakened, reducing it to 3 models. The tornado stays away from confrontation. Choosing to shoot the MM at the same target just outside range. Combat sees the EC finish off the marines before they can swing.
SM:7 BT:5
Turn 5 BT
EC assaults the immobilized rhino, and destroys its stormbolter. All my units are pretty far away from him at this point, so he just runs the Marshal towards my predator and razorback. The initiate squad moves at the LRC, missing with the melta. They assault it with a powerfist but can't hit a cruising target.
Turn 5 SM
All my units run away from him, scattering away as far as possible. The LRC cruises again and shoots its assault cannon at the squad chasing it, and along with the typhoon manage to reduce it to 2 models with the melta gunner dead. Combat sees the EC finish off the rhino.
SM:7 BT:6
Turn 6 BT
Last turn and he has ran out of targets. Nothing is in assault range, so he simply assaults the LRC, causing no damage.
Turn 6 SM
Between the typhoon and the LRC, I manage to finish off the initiate squad.
SM:9 BT:6
I win this one 14-4.
Postgame: I understand why he deployed far farward, to try to either force me into reserves to come in a piece at a time, or to limit me to deploying in the corner where he could attempt to pin me down. The early loss of his LRC was pivotal. The immobilization of my rhino gave him a shot to come back, as did the terminators failing when they assaulted. The decision to run away once I had a lead seemed to be the clincher.
With that I win Best General with 54 out of a possible 60 battle points. 2nd place in battle points was 47 and he turned out to be the Best Overall winner.
All around well run event and fun scenarios. Lots of nice armies to see and fun opponents to play
One note I took away was that for the first time ever, I was not in contention for best sportsman. In this event, there was a subjective sportsmanship scoring which was weighted 2/3 for “army sportsmanship” and 1/3 for “player sportsmanship”. There is no comp, the organizers used this format instead of any comp. I ended up scoring lowest in sportsmanship, with 39/60. I'm still waiting to hear the distribution of those points too see if it was player or army where I lost so many points. I don't feel like I was any less pleasurable to play than normal, so I'm kinda eager to find out how I got so low.
Oh well, victory is mine none-the-less!
|
Sangfroid Marines 5000 pts
Wych Cult 2000
Tau 2000 |
|
|
|
|
2010/09/22 08:27:47
Subject: Re:Dracos wins best general @ Mechani-kon 2 (All rounds posted, some pics)
|
|
Rotting Sorcerer of Nurgle
|
Great report bud!
|
|
|
|
|
|
2010/09/22 14:28:38
Subject: Dracos wins best general @ Mechani-kon 2 (All rounds posted, some pics)
|
|

Neophyte Undergoing Surgeries
|
Great read. Title gave away the ending though 
|
In my day if we wanted a 4+ save we had to spend the points on a displacer field.
Ask about the magnets, ask about the magnets! |
|
|
|
|
2010/09/22 16:11:07
Subject: Dracos wins best general @ Mechani-kon 2 (All rounds posted, some pics)
|
|
Painlord Titan Princeps of Slaanesh
|
Well written and great reports on the action, thanks for sharing.
|
|
|
|
|
|
2011/01/08 10:04:51
Subject: Dracos wins best general @ Mechani-kon 2 (All rounds posted, some pics)
|
|

Utilizing Careful Highlighting
|
Outstanding action
Would love more photos next time and maybe if you dont get lists from opponent scribble down in postgame?
Well done on the clean sweep, go Vanilla Marines!
|
Aurora SMs in 5th Ed (18 wins, 3 draws, 13 losses)
1st in Lords of Terra Open (Sydney) 2012
Aurora SMs in 6th Ed (3 wins, 0 draws, 5 losses))
|
|
|
|
|
2011/01/09 17:54:39
Subject: Dracos wins best general @ Mechani-kon 2 (1500 points)
|
|
Plaguelord Titan Princeps of Nurgle
Alabama
|
jy2 wrote:Necrons need a revamp badly. They can't win tournies without the Deceiver.
Right, because it has nothing to do with the general or listbuilding, terrain, dice rolls or the missions being played.
|
WH40K
  Death Guard 5100 pts. Death Guard 5100 pts.
  Daemons 3000 pts. Daemons 3000 pts.
DT:70+S++G+M-B-I--Pw40K90-D++A++/eWD?R++T(D)DM+
28 successful trades in the Dakka Swap Shop! Check out my latest auction here!
|
|
|
|
|
2011/01/09 18:29:48
Subject: Re:Dracos wins best general @ Mechani-kon 2 (All rounds posted, some pics)
|
|
Nimble Mounted Yeoman
|
Awesome job!
|
Bretonnian Army  : 6 Wins 2 Loss 0 Draws : 6 Wins 2 Loss 0 Draws |
|
|
|
|
2011/01/09 23:27:18
Subject: Dracos wins best general @ Mechani-kon 2 (All rounds posted, some pics)
|
|

Fresh-Faced New User
|
Nice report, great pictures-thanks !!
|
|
|
|
|
2011/01/10 01:00:57
Subject: Dracos wins best general @ Mechani-kon 2 (All rounds posted, some pics)
|
|
Awesome Autarch
|
Congratz on the win! Looks like a great tournament.
|
|
|
|
|
|
2011/01/10 01:17:05
Subject: Dracos wins best general @ Mechani-kon 2 (All rounds posted, some pics)
|
|
Decrepit Dakkanaut
Mesopotamia. The Kingdom Where we Secretly Reign.
|
Congratulations for the win! Those are three really well played games.
|
Drink deeply and lustily from the foamy draught of evil.
W: 1.756 Quadrillion L: 0 D: 2
Haters gon' hate. |
|
|
|
|
2011/01/12 08:21:40
Subject: Re:Dracos wins best general @ Mechani-kon 2 (All rounds posted, some pics)
|
|
Angered Reaver Arena Champion
|
Heh there are four games there, out of curiosity which are you leaving out?
|
Sangfroid Marines 5000 pts
Wych Cult 2000
Tau 2000 |
|
|
|
|
2011/01/12 16:23:29
Subject: Dracos wins best general @ Mechani-kon 2 (All rounds posted, some pics)
|
|
Decrepit Dakkanaut
Mesopotamia. The Kingdom Where we Secretly Reign.
|
Oh damn.
Four. Four really well played games. Counting fail. 
Good job with the win!
|
Drink deeply and lustily from the foamy draught of evil.
W: 1.756 Quadrillion L: 0 D: 2
Haters gon' hate. |
|
|
|
|
2011/01/12 18:55:16
Subject: Dracos wins best general @ Mechani-kon 2 (All rounds posted, some pics)
|
|
Fresh-Faced New User
|
Did you eve find out how you scored low on the sportsmanship breakdown?
|
|
|
|
|
2011/01/12 21:28:54
Subject: Re:Dracos wins best general @ Mechani-kon 2 (All rounds posted, some pics)
|
|
Angered Reaver Arena Champion
|
Not exactly. The organizers didn't get into particulars, but I got the impression that my army was scored down pretty hard by a couple opponents. I'm not sure why, I didn't spam anything. The most I did was take sets of 2 units for redundancy.
|
Sangfroid Marines 5000 pts
Wych Cult 2000
Tau 2000 |
|
|
|
|
2011/01/13 19:31:27
Subject: Dracos wins best general @ Mechani-kon 2 (All rounds posted, some pics)
|
|
Fresh-Faced New User
|
There is absolutely NOTHING anyone can complain about when it comes to your list. Its simple, spams no unit (so you have 3 troop choices, that usually seen as a very balanced thing)
Could they have marked you down hard on sportsmanship for how they felt you acted? (i hate those kinda scores ...)
|
|
|
|
|
2011/01/14 09:53:09
Subject: Re:Dracos wins best general @ Mechani-kon 2 (All rounds posted, some pics)
|
|
Angered Reaver Arena Champion
|
The organizers wouldn't get into specifics. I was simply given the impression that I lost points more on army sportsmanship than player sportsmanship.
Again the breakdown was 10 points per game for "army sportsmanship" and 5 points per game for "player sportsmanship". Scored by each opponent secretly. I ended with 39/60 - which was lowest by 1. I've guessed that perhaps I was given 6/10 for army average and 4/5 for player average, which would add up to 40, subtracting 1 for someone giving 3/5 for player sportsmanship.
|
Sangfroid Marines 5000 pts
Wych Cult 2000
Tau 2000 |
|
|
|
|
2011/01/14 12:11:48
Subject: Dracos wins best general @ Mechani-kon 2 (All rounds posted, some pics)
|
|
Warning From Magnus? Not Listening!
|
People can be bitter about losing at times, even with a smile on their face. It's sad, but true. Personally, I don't think there's any reason why a player shouldn't give their opponents a perfect score in this category, unless they themselves were acting like total douche bags.
|
"This One Is Rurouni... Once Again, This One Will Drift..."
"Rushing towards danger without hesitation isn't recklessness, but bravery... And avoiding danger when there's a chance for victory isn't precaution, but cowardice..."
"I can only go forward." |
|
|
|
|
2011/01/14 16:31:07
Subject: Dracos wins best general @ Mechani-kon 2 (All rounds posted, some pics)
|
|
Fresh-Faced New User
|
Where we play there is no player sportsmanship score. The only way to get dinged for poor sportsmanship is if the other player has to call over the ref/organizers due to someone being a dick, and a mediator being required to settle things. Short of that everyone is assumed to have been polite, and competitive. It is a tournament after all.
Can you imagine if a linebacker was deduced points from the teams score due to the trash talk and extra hard hits he routinely did?
It's a competition - prepare to win/lose 
anyway, well played games, sounds like you did well and i think your list goes a long ways towards showing Vanilla Marines can still bring the pain, cheers!
|
|
|
|
|
|
|
|

 .....Bay Area Open GT 2013 - Best Tyranids
 .....LVO GT 2014 Team Tournament - Best Generals
