| Author |
Message |
 |
|
|
|
|
Advert
|
Forum adverts like this one are shown to any user who is not logged in. Join us by filling out a tiny 3 field form and you will get your own, free, dakka user account which gives a good range of benefits to you:
- No adverts like this in the forums anymore.
- Times and dates in your local timezone.
- Full tracking of what you have read so you can skip to your first unread post, easily see what has changed since you last logged in, and easily see what is new at a glance.
- Email notifications for threads you want to watch closely.
- Being a part of the oldest wargaming community on the net.
If you are already a member then feel free to login now. |
|
 |
2019/06/02 19:36:39
Subject: Re:Dungeons and Dragons Blog - DIY magnetic dungeon set - magnetic foam pillars
|
|

Krazed Killa Kan
|
Wow, those brick pillars turned out looking good. I would have cut them into bricks and glued them back together, but that really does the job in a fraction of the time.
|
|
|
|
 |
|
2019/06/02 20:49:28
Subject: Dungeons and Dragons Blog - DIY magnetic dungeon set - magnetic foam pillars
|
|

Battlefield Tourist
|
Theo: Cheers! Yeah, the simplicity of the approach Jeremy shows in his video is definitely the main attraction. I still take a while making each pillar, but I think it is worth it in the end.
Vik: Hah, well I am a middle and high school teacher in an international school here, and we are building an eco-pond. We have been at it all year but we have hit problem after problem, and had to change our plans a bunch of times. Can't see me getting it finished by the years end now, but I will probably take a couple of days of my holidays and get the bricks laid at least.
The kids are doing their best, but I think the project was really too ambitious for them. Can't really fault their willingness to try though!
Syro: I am planning to do some stuff with individual bricks after this, but yeah, for the pillars this method is both easier and the end produce is stronger than it would be with individual bricks.
Currently running Rappan Athuk with my group which has pretty bare maps (just outlines really) so I am hoping to pepper these throughout to keep it interesting and give tactical choices.
On another note, I actually did some real life dungeon crawling today. Here in Nuremberg there is a network of cellars cut into the sandstone of "berg" that go like 25m under ground with 16 kilometers of passageways and rooms. Originally they were used for storing beer for all the breweries, but over the hundreds of years they were there they have been expanded and deepened til there is an entire beer dungeon down there. In the second world war the different cellar complexes were linked with tunnels so that if an entrance was blocked with rubble the people hiding inside could escape through another exit. Pretty crazy, and lots of inspiration for any dungeon master!
I always thought it was a bit unrealistic to have these multilevel dungeons under cities, but I have been walking around on top of one for the past 4 years. Didn't see any beholders or mind flayers down there, though.
|
|
|
|
|
|
2019/06/05 10:34:23
Subject: Re:Dungeons and Dragons Blog - DIY magnetic dungeon set - tiles in play example
|
|
Battlefield Tourist
|
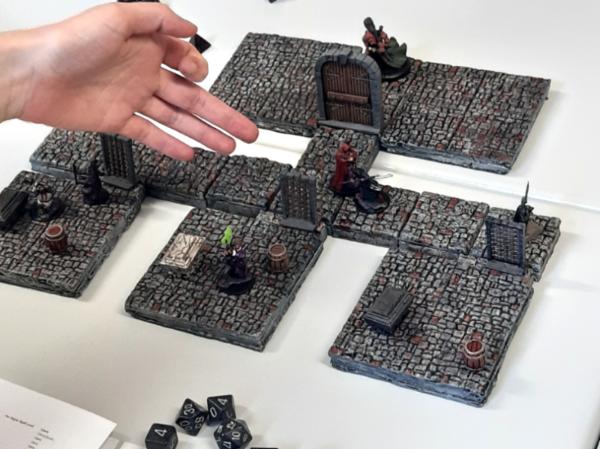
Hey, thought I would post some pictures of the tiles in play and share a fun story from my campaign.
So one of my players has just had a kid, and since she is so into the plot of our main campaign I decided to run a side story where the players are the apprentices of great heroes. Their masters all left for Rappan Athuk, the most fearsome dungeon in the world, long thought lost, when they heard news that a map showing its location had been found (the map was found in the main campaign). Their masters did not return, so the apprentices have set out to find them. They rolled a bunch of level 1 characters and I put basecoats on some minis for their choices:
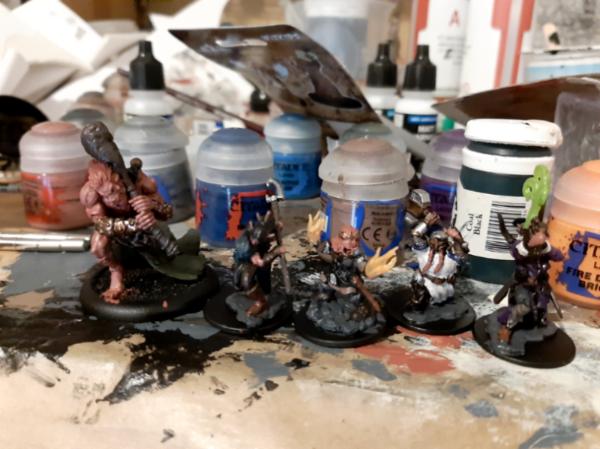
Left to right: Boy, Fir Bolg Fighter, Ha'Triq, Wood Elf Monk, Dagna, Hill Dwarf Wizard, Dunoal, Mountain Dwarf Paladin and Saesta, Human Bard.
The group set out in high spirits along the coast road, looking for the dungeons in the foothills further south. I asked for a marching order and they spread out, 30 feet apart with the wizard on her own in the middle. I had several NPCs warn them of danger ahead and they ignored the NPCs. I had wolves howling in the forest off the road. Well, then, a pack of wolves lead by a Worg rushed the players. They downed the Wizard in one round and started dragging her away. The players had one round to heal her but decided to wait because they did not think I would attack a downed PC. Well, Wolves hunt to kill and eat, so they did kill her and dragged her corpse into the trees. The players, outraged, slew the worgs. Eventually the now reduced party made it to the entrance of Rappan Athuk, which is a huge sunken graveyard. It was swarming with dire rats. A gargoyle animated and flew down the large ominous well in the graveyard. The party shouted, threw things down the well, and then split up while yelling across the graveyard to each other. I described their voices echoing off the hills but they continued. Okay. Roll for random encounters! 2d6 ghouls Oof. I rolled a 10, and the swarm of ghouls came out of the ground between the Dwarf Paladin and the rest of the party. He got swarmed and the rest charged into the save him, and got slaughtered. TPK.
We discussed and the players felt they would like to continue if "it was all a dream". I was not satisfied with that, so I gave them another option. They woke up on cold slabs in stinking cells underground. They had 1 HP, 3 levels of exhaustion, and either scars or internal damage from being roughly returned to life by Orcus, the Lord of Undeath. The cult has decided to break and turn the PCs to use them against their masters. Now it is a prison break scenario. The dead wizard made a new character, a Death Cleric of the Lawful Neutral god of death who is opposed to Orcus. The Fir Bolg player did not want to be raised, and made a Goblin Rogue. We decided the ressurection had gone wrong for the Fir Bolg, and he was now an undead monster (the other players did not know this). I used my Mantic Dungeon Saga furniture and doors here.
The game started with the bard being dragged in to fight the Fir Bolg, and being beaten to a pulp. As time progressed it became obvious they were making all of them fight and die over and over. The Monk and Rogue took their chance when the monk was grabbed and ganged up on the Acolyte. But the Acolyte called for help! They opened the door to Boy, and then the Cleric used Chill Touch to weaken the chain around his neck. The Fir Bolg snapped his chain and began to wail on the Acolyte, So as reinforcements arrived the players slowly fought and widthdrew (using improvised shivs and rocks as weapons!) cleverly using positioning and spells to keep Undead Boy's attention focused on the reinforcements (which included an antipaladin!).
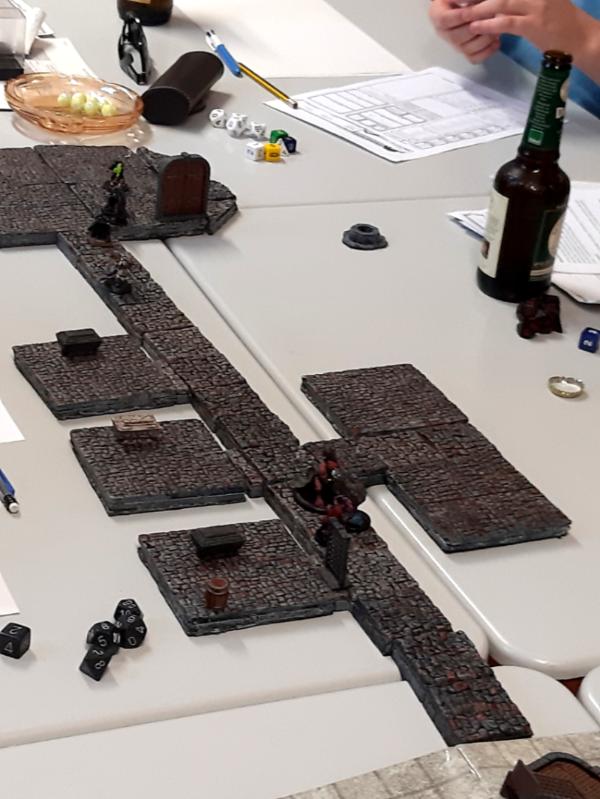
They fled the other direction into a mostly empty room with bones and a body in it, which animated as a wight when touched. With two choices, they spiked the door leading back toward danger and ran for the open corridor heading away.
The cleric turned undead and drove off the Wight and Spectre, and ran to catch up with the others.
Racing down this passageway, they opened a door to a half flooded room, lowering the water level and exposing a rat gnawed tunnel. Quickly, they crawled into the stinking waterlogged tunnel and got into a bigger chamber used by the numerous dire rats (and other things) of the dungeon complex. They covered the entrance from their side and rested, and the pursuit missed them (rolled a 5...).
Pretty exciting session, great chance to use the tiles, and a pretty good recovery from a TPK! The group are now crawling their way to the surface, filthy and starving with extremely limited gear. Let's see how they do out in the rough wilds surrounding Rappan Athuk...
|
|
|
|
|
|
2019/06/05 20:15:17
Subject: Dungeons and Dragons Blog - DIY magnetic dungeon set - game summary and tiles in use
|
|

Gargantuan Great Squiggoth
|
That is looking blooming fantastic sir, well done, very envious, meant to do this kinda thing for years and you have beaten me to the punch and knocked it out the park.
|
|
|
|
|
|
2019/06/06 09:19:44
Subject: Dungeons and Dragons Blog - DIY magnetic dungeon set - game summary and tiles in use
|
|
Battlefield Tourist
|
Thanks!
It is a bit tedious and time consuming to do this, but I would say you could do a fantastic job with your skills and experience if you ever dedicated the time to it!
Still planning on 36 more tiles, but probably gonna take a break from crafting and paint some minis again, because what I have is definitely big enough for most set ups.
|
|
|
|
|
|
2019/06/09 20:35:47
Subject: Dungeons and Dragons Blog - DIY magnetic dungeon set - game summary and tiles in use
|
|

Druid Warder
|
My hat is off - congratulations on an amazing (while being "simple") scenery a well played session! In some shots tiles look too dark, but the first one shows them to be varied enough.
|
Painting progress tracker:
2017: 50 of 50 planned; 2018: 80 of 60 planned; 2019: 75 of 75 planned
Pledge 2020:
6 to sculpt, 75 to paint (2/57 done) |
|
|
|
|
2019/06/09 23:12:03
Subject: Dungeons and Dragons Blog - DIY magnetic dungeon set - game summary and tiles in use
|
|
Battlefield Tourist
|
Thanks! They look much more like the ones in the first picture, the lighting was not the best in our gaming room.
I am really a bit overwhelmed by all the positive feedback. I think this is really achievable stuff, but it is time consuming.
Very satisfying though!
|
|
|
|
|
|
2019/06/11 13:05:35
Subject: Re:Dungeons and Dragons Blog - DIY magnetic dungeon set - game summary and tiles in use
|
|
Battlefield Tourist
|
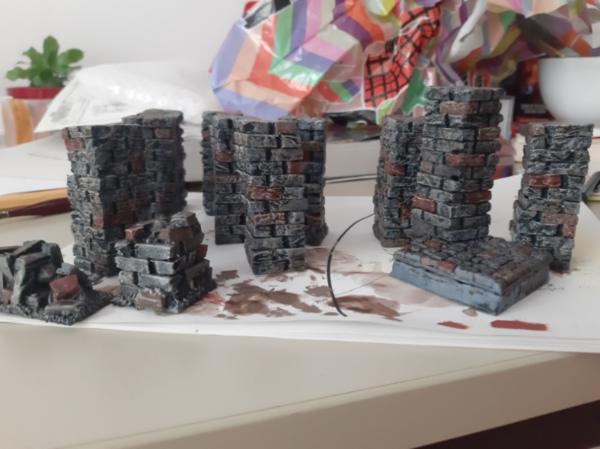
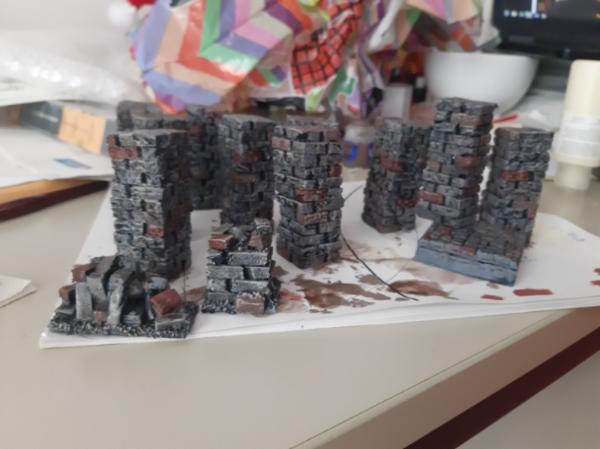
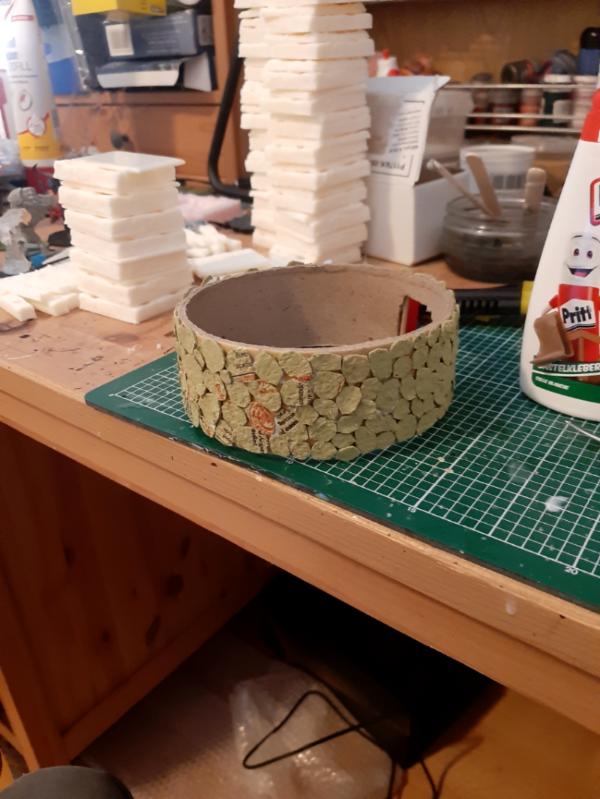
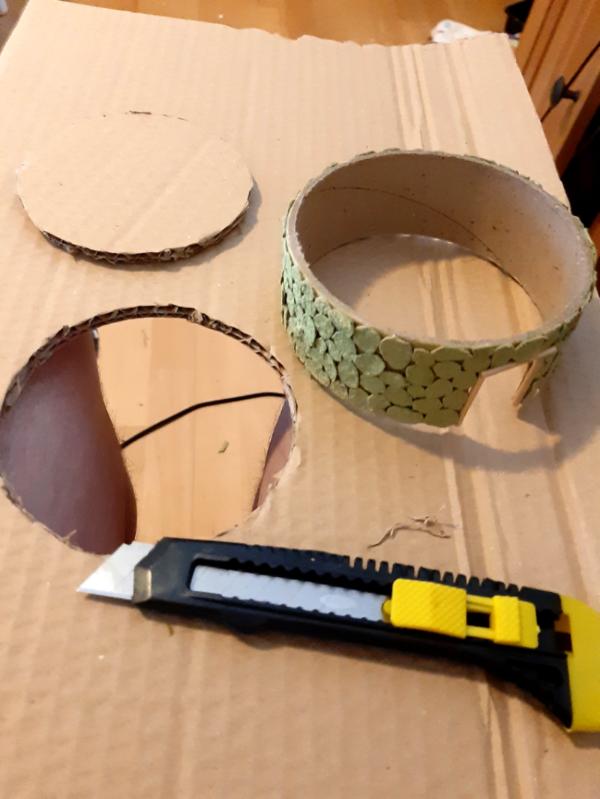
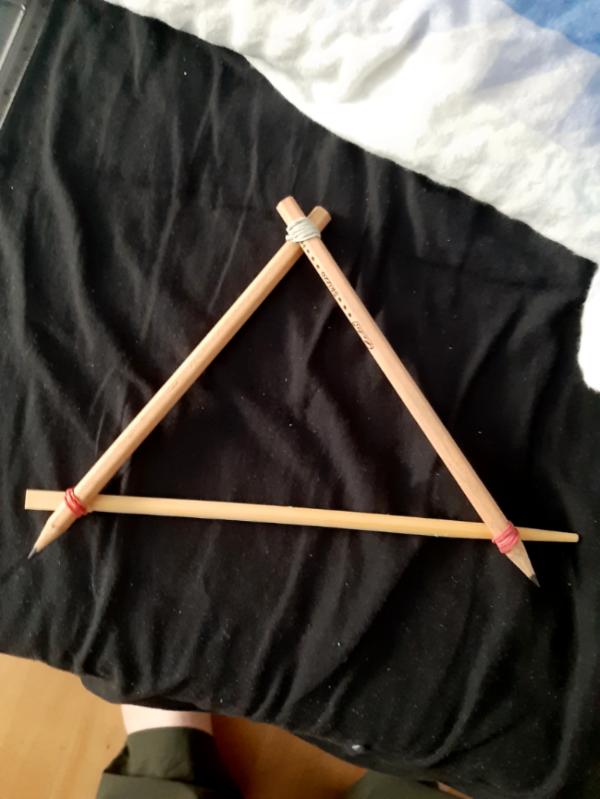
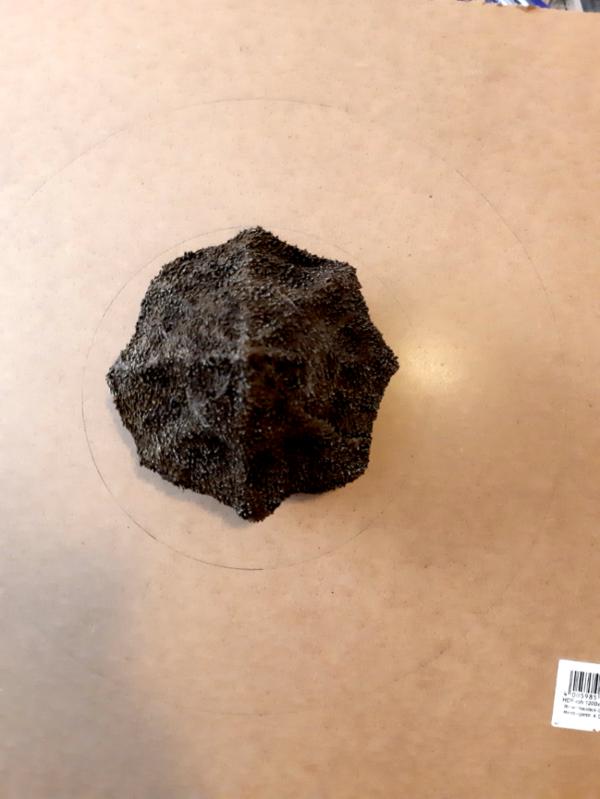
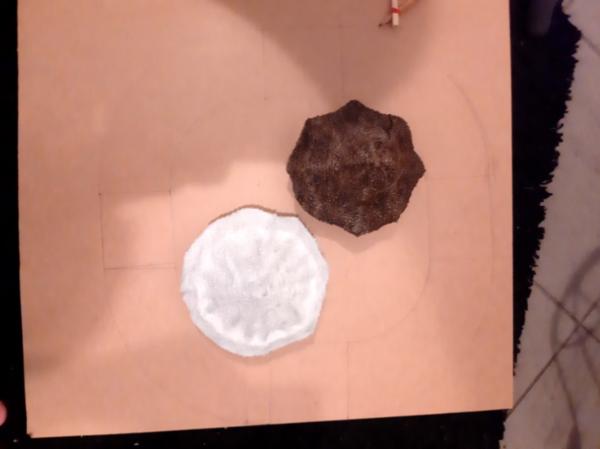
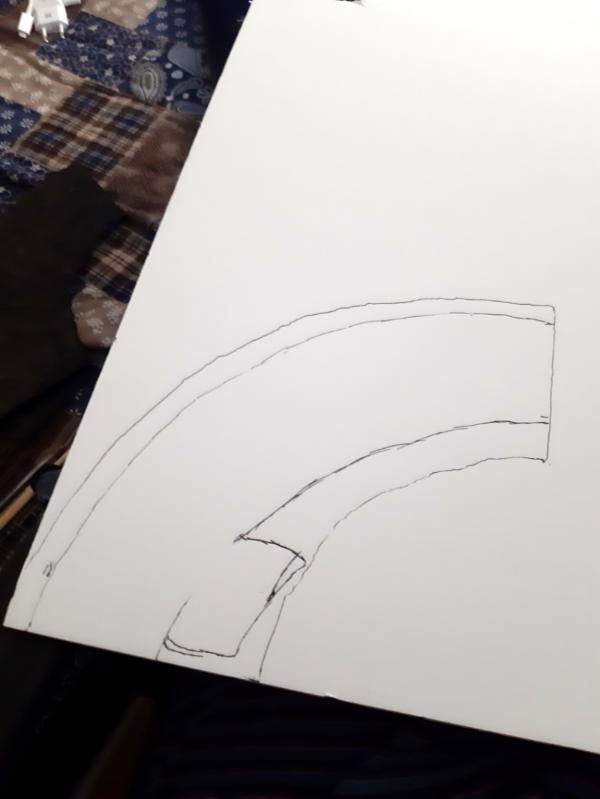
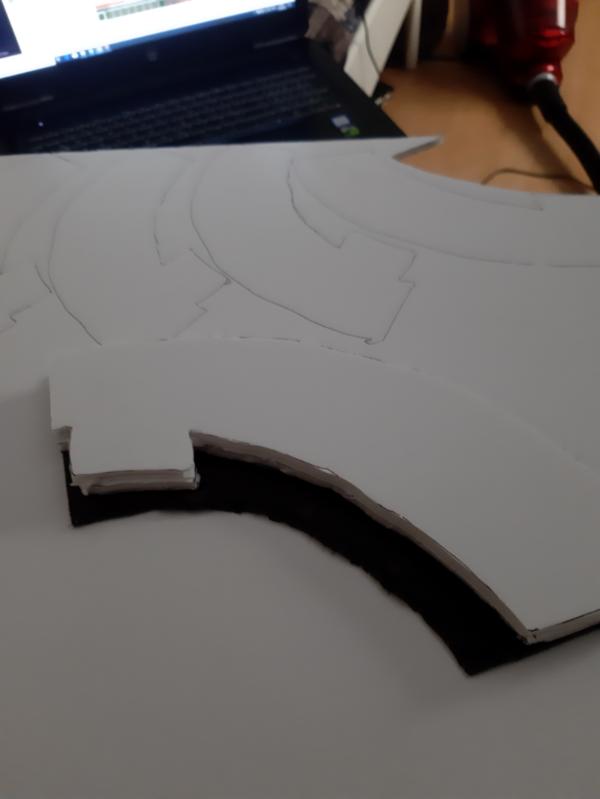
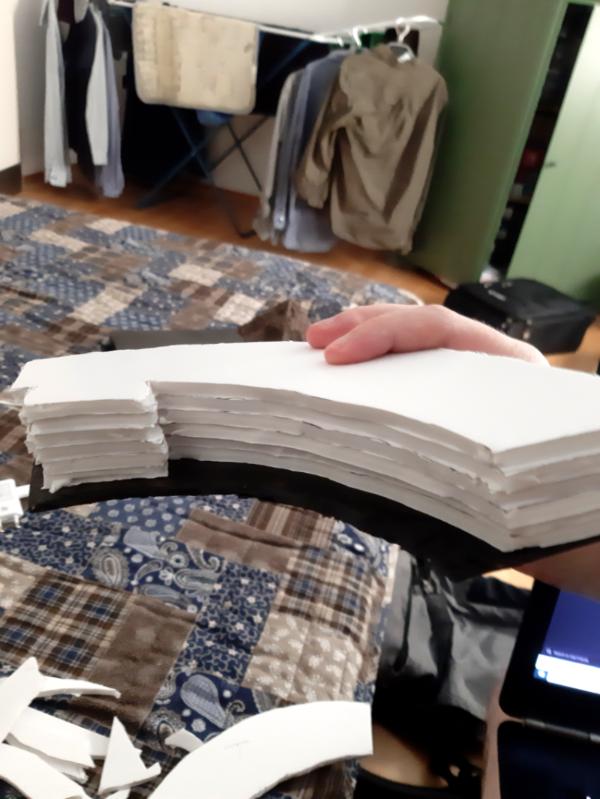
Finished my pillars! After I had glued them all together I rolled some tinfoil along each face to texture them and then painted them with a similar scheme to my floors.
I think they came out looking pretty sweet, and the magnets in the bottom are working well. 10 pillars is probably enough! I also made the broken pillar bits, and plan on making another couple, and probably just some random brick rubble too.
Gonna be running the Banewarrens with my student group and Rappan Athuk with my adult group this afternoon, so looking forward to busting these out for the first time.
First photo focuses on the pillars
Second photo shows the rubble a bit more in focus
|
|
|
|
|
|
2019/06/11 16:18:05
Subject: Re:Dungeons and Dragons Blog - DIY magnetic dungeon set - magnetic foam pillars finished.
|
|
Krazed Killa Kan
|
Wow! The pillars looks great. They turned out really well. You made more than I expected, but looks like you maintained quality all the way through production. 
|
|
|
|
|
|
2019/06/11 20:38:06
Subject: Dungeons and Dragons Blog - DIY magnetic dungeon set - magnetic foam pillars finished.
|
|
Battlefield Tourist
|
Cheers! Yeah I figured may as well use all the magnets and leftover foamboard.
As it happened, I did not use them in either of my two games today. Students fought a dragon in the desert and my adult group slogged through hills and a forest fighting ogres, wolves and bandits.
Ah well! Maybe tomorrow.
|
|
|
|
|
|
2019/06/11 23:12:33
Subject: Re:Dungeons and Dragons Blog - DIY magnetic dungeon set - magnetic foam pillars finished.
|
|
Krazed Killa Kan
|
Blue dragon? Sounds like some fun adventures even without the pillars, but I do hope you get to use them soon.
|
|
|
|
|
|
2019/06/16 10:33:40
Subject: Dungeons and Dragons Blog - DIY magnetic dungeon set - magnetic foam pillars finished.
|
|
Druid Warder
|
I am starting to run out of empty pages in my book of stolen secrets and ideas.  If this bout of rains will turn out to be a short one, I will try to replicate these pillars for a cave system. Cheers!
|
Painting progress tracker:
2017: 50 of 50 planned; 2018: 80 of 60 planned; 2019: 75 of 75 planned
Pledge 2020:
6 to sculpt, 75 to paint (2/57 done) |
|
|
|
|
2019/08/13 21:14:56
Subject: Re:Dungeons and Dragons Blog - DIY magnetic dungeon set - magnetic foam pillars finished.
|
|
Battlefield Tourist
|
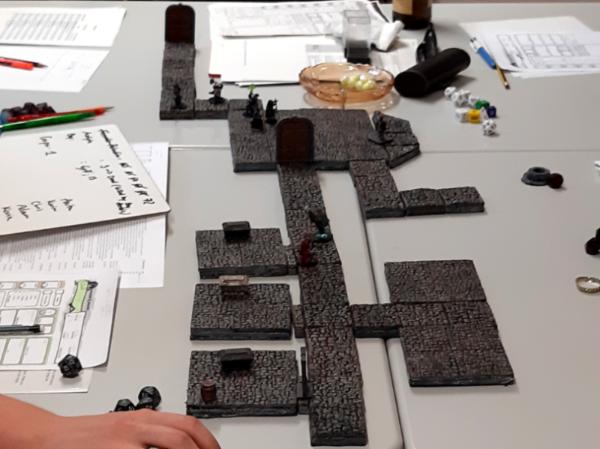
So, the summer has not been as productive as I would have hoped so far. Was away on holidays and have not have much motivation. I made some more tiles, which you can see in the background to this update, and I think I am about done now. I can cover a 2 foot square area with tiles and I can't see myself using more than that in a session.
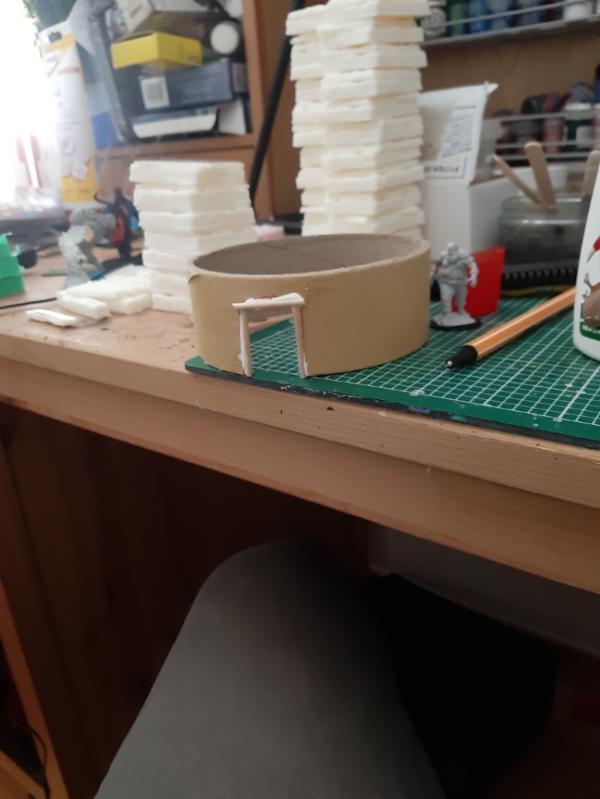
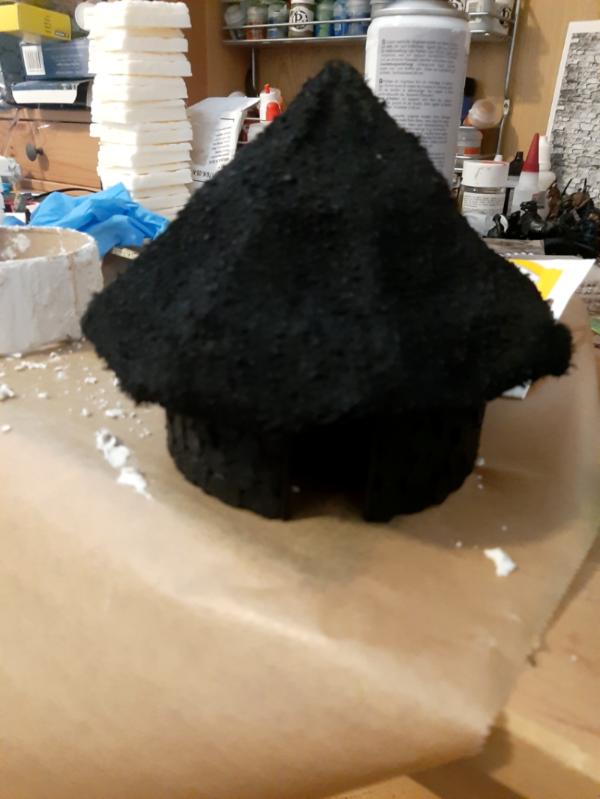
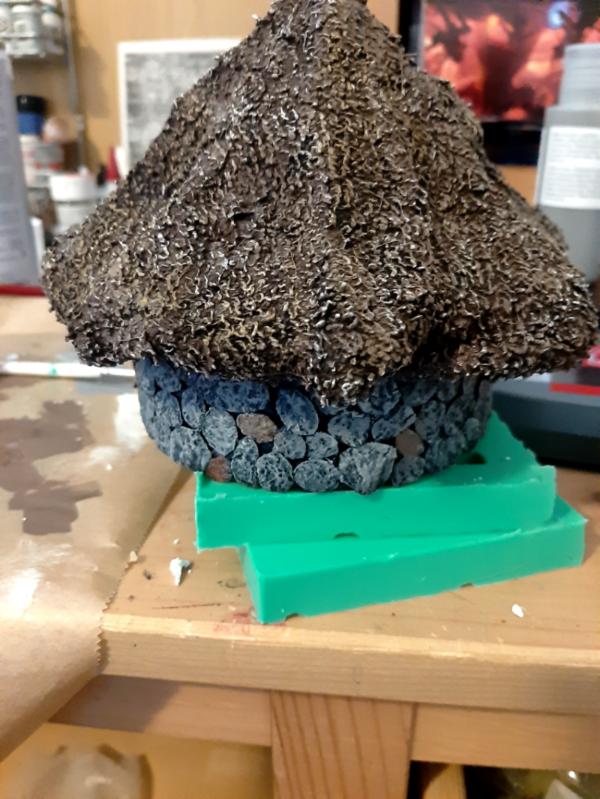
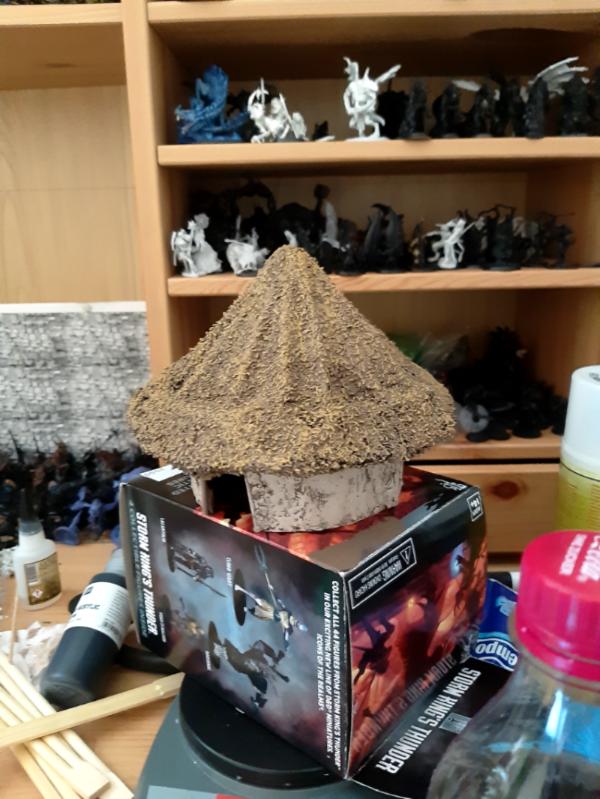
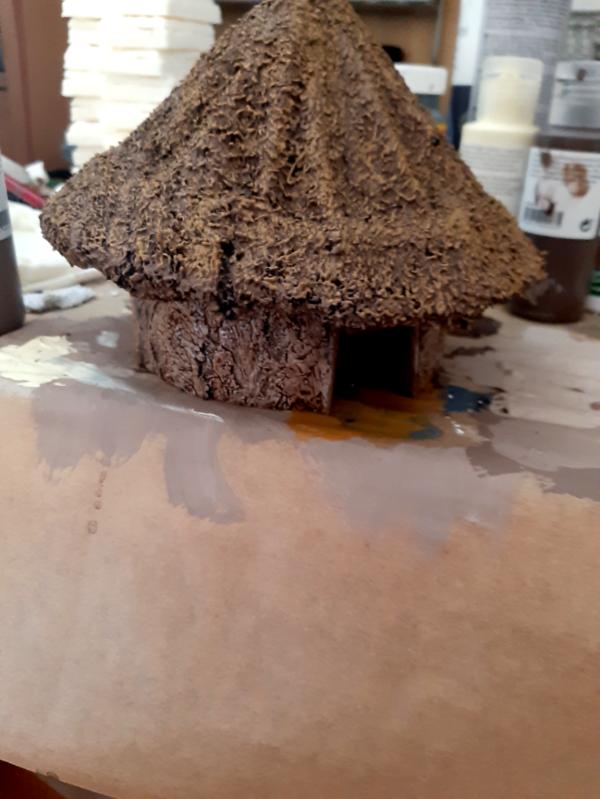
So a project I have been putting off for ages is making some dark ages Irish scenery. I have been building a stock of reference material for years and have bought a pile of celts, vikings and normans to represent the history of my original home in Wexford, Ireland. But not having opponents meant I was never that motivated to complete the project. So I wrote Celt, Norman and Viking analogues into my roleplaying setting, to encourage me to do so. My players have made a stronghold in a traditional celtic ring fort, which looks like this:

We are going to be doing a bit of a warfare themed arc this year so I want to make a model of the stronghold, because it will almost certainly be seiged this year. First on my plan is to make the little celtic house you see in the middle of that photo.
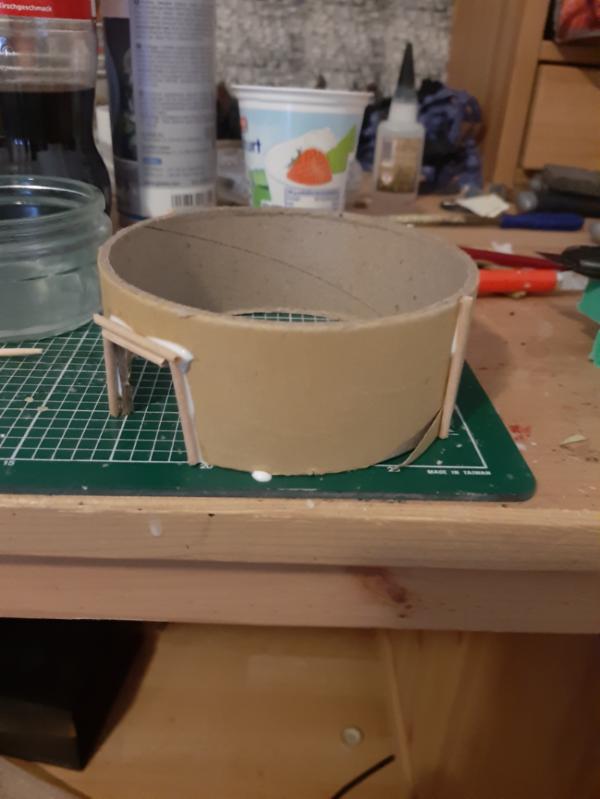
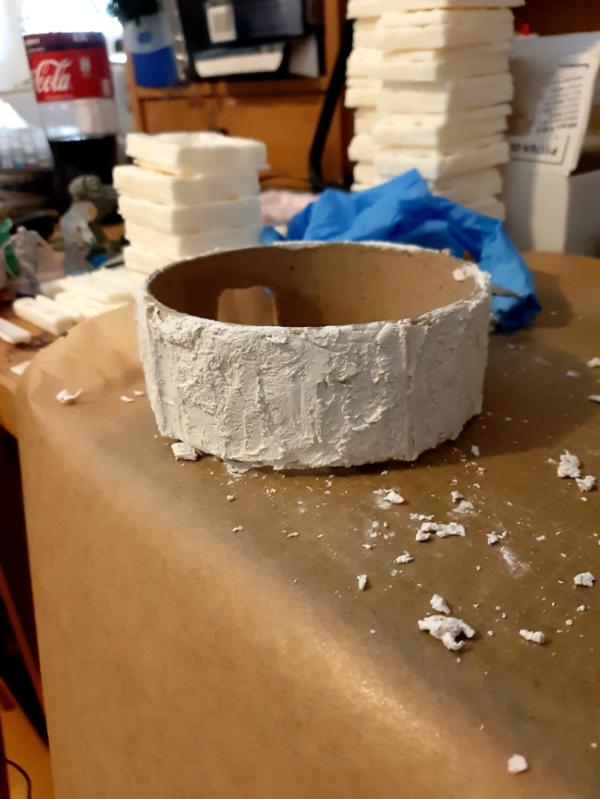
A few years ago I bought a chair from Ikea and it had these little circular cardboard bits in the package. I knew immediately they would be the perfect size and material for making my planned houses out of, so I have kept them through several house moves!
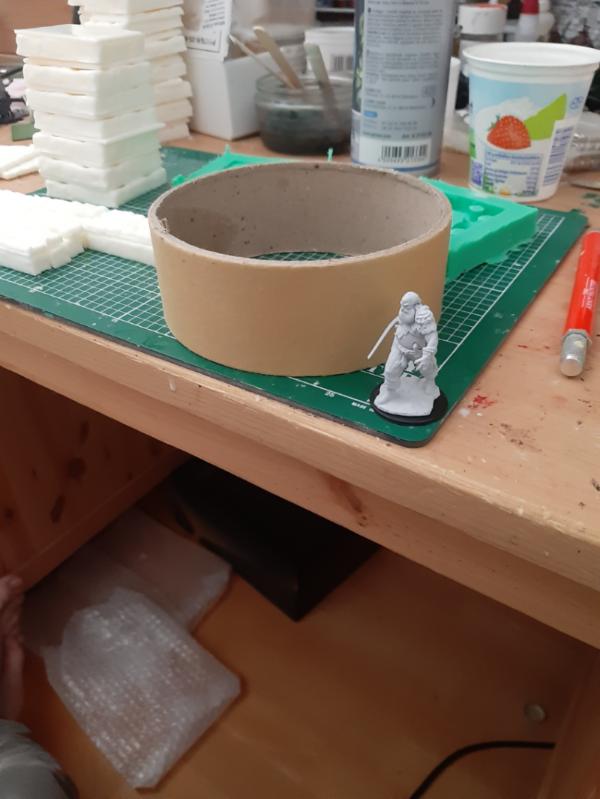
I cut a door into it, intentionally leaving it fairly low, as I had to stoop quite a bit to get into the replica house I showed in the picture.
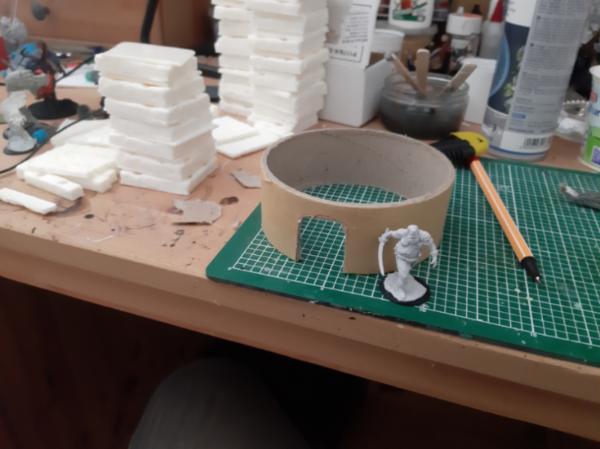
Made a frame out of cocktail skewers. Probably could have roughened this up to make it look more authentic, but it seemed like more effort than it would be worth.
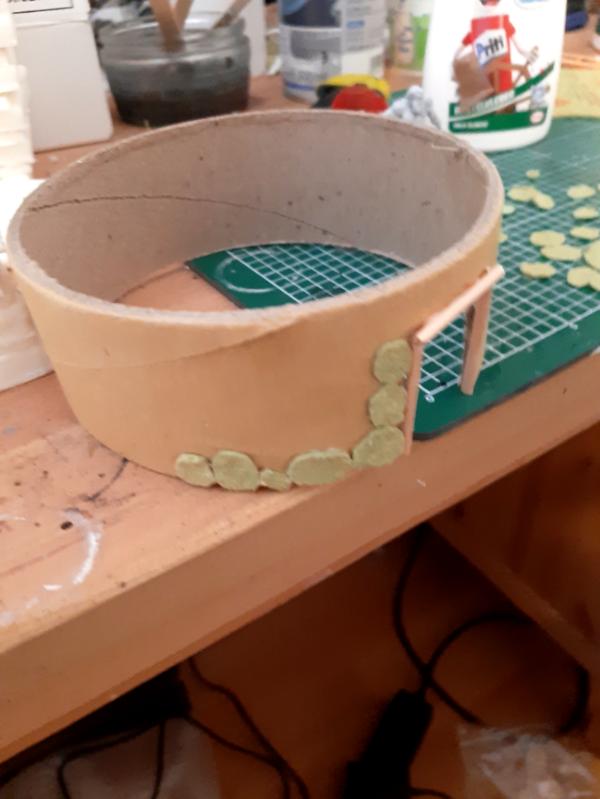
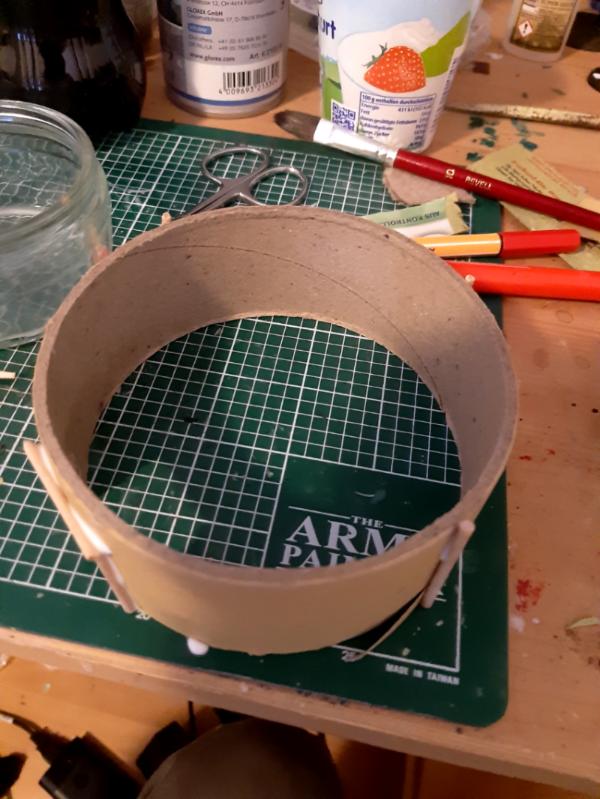
Then I started laboriously cutting stones from egg carton! This took about an hour and a half...
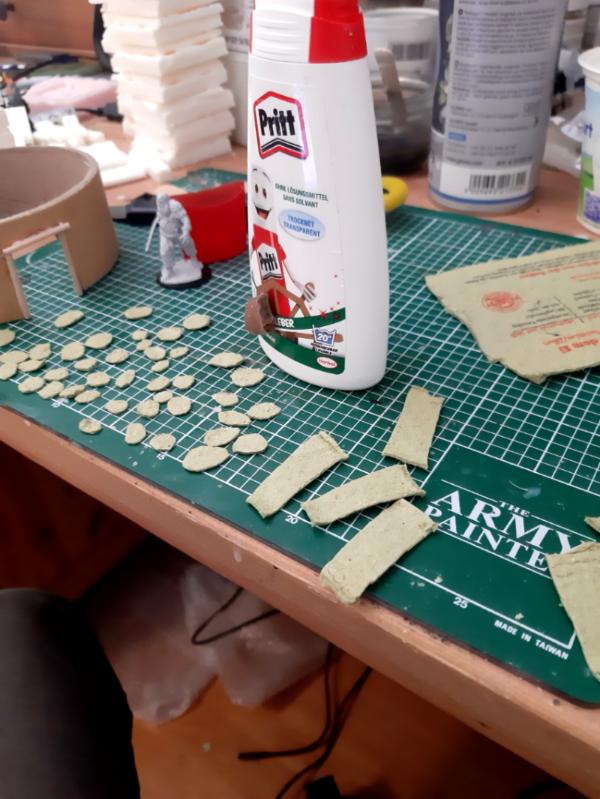
Then stick them on with PVA glue.
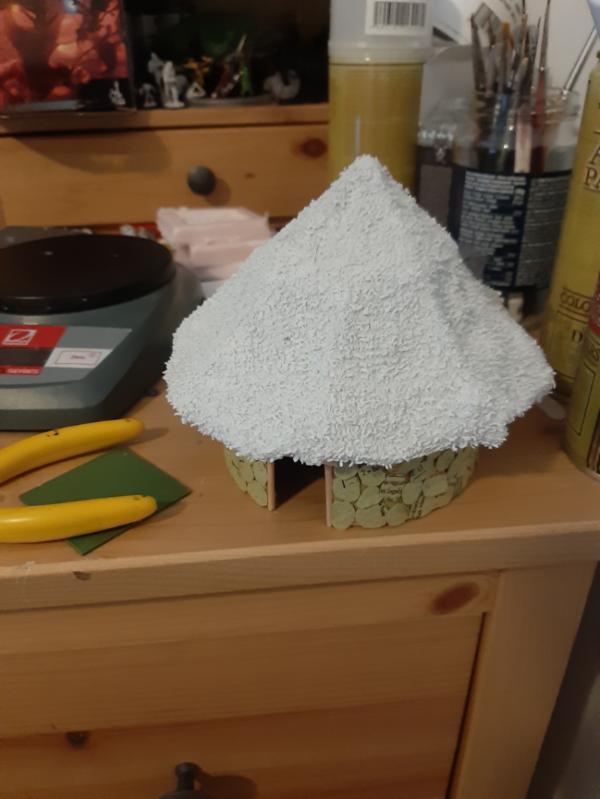
Eventually, I was finished.
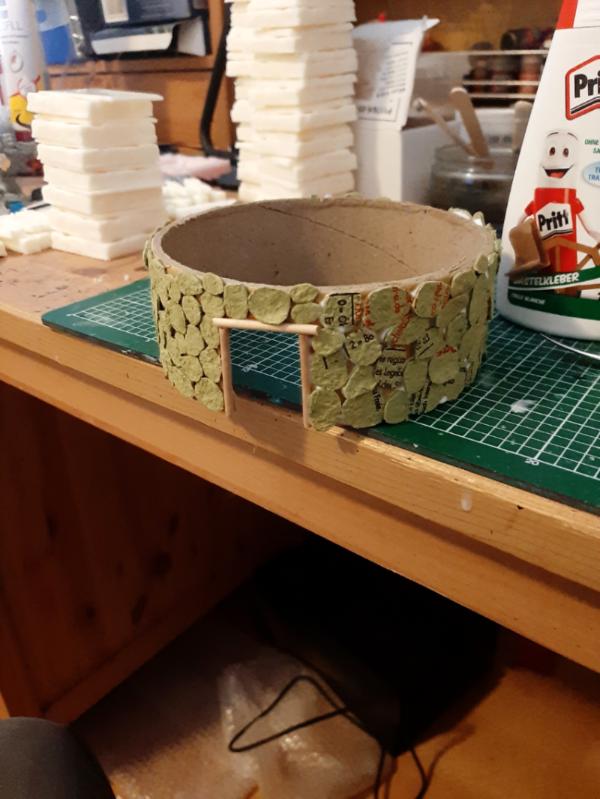
There are some small gaps between the stones, but I think they will not be noticeable when it is painted. If they are, I will fill them in.
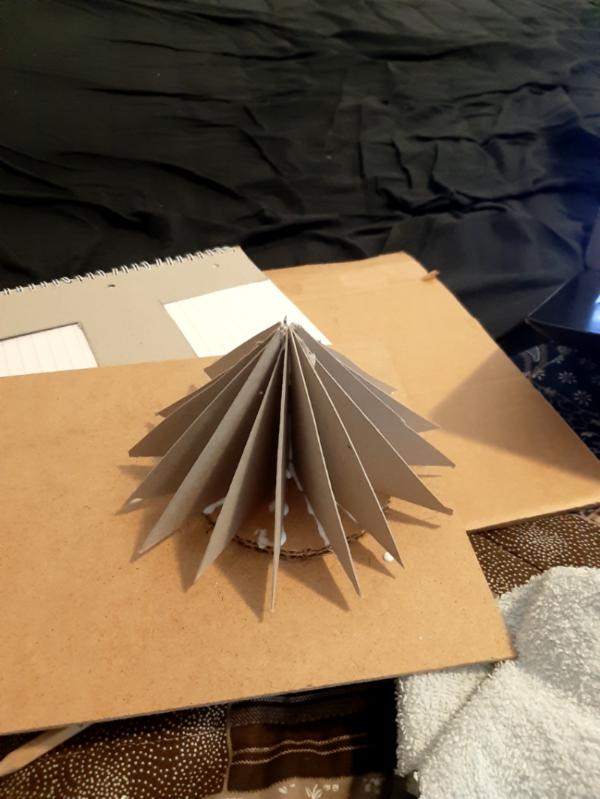
Tomorrow I will make the frame for the roof and probably stick the towel thatch on. I might also make a base "tile" that has detail on it, with magnets in to attach the top to. I have a second cardboard circle, and I will be using filler to make a wattle and daub style house too.
After that, the pallisade wall...
|
|
|
|
|
|
2019/08/13 21:57:19
Subject: Re:Dungeons and Dragons Blog - Dark Ages Terrain - Celtic Ring Fort WIP
|
|

[DCM]
Incorporating Wet-Blending
|
Wow, that's a cool idea. Using egg carton for the stones is a good idea-- already textured, just need to be cut out.
|
|
|
|
|
|
2019/08/13 23:14:44
Subject: Dungeons and Dragons Blog - Dark Ages Terrain - Celtic Ring Fort WIP
|
|
Ultramarine Librarian with Freaky Familiar
|
Love that idea! I've got entire bin bags of cardboard tubes, I'll borrow this for some Middle Earth Dunlending hits. Cheers.
|
|
|
|
|
2019/08/14 01:10:20
Subject: Re:Dungeons and Dragons Blog - Dark Ages Terrain - Celtic Ring Fort WIP
|
|
Is 'Eavy Metal Calling?
|
Looks like a great start, I mucked up something similar for mantic orcs years ago, yours looks better already.
|
LOL, Theo your mind is an amazing place, never change.-camkierhi 9/19/13
I cant believe theo is right.. damn. -comradepanda 9/26/13
None of the strange ideas we had about you involved your sexual orientation..........-Monkeytroll 12/10/13
I'd put you on ignore for that comment, if I could...Alpharius 2/11/14 |
|
|
|
|
2019/08/14 14:04:22
Subject: Re:Dungeons and Dragons Blog - Dark Ages Terrain - Celtic Ring Fort WIP
|
|
Battlefield Tourist
|
JoshInJapan: Egg carton is another idea stolen from Black Magic Craft. I think it will look pretty nice when painted.
Shadow Captain Edithae: Yeah, and they have a lot of other uses too. Circular huts are pretty useful for a lot of cultures and time periods.
Theopony: I think I remember that hut, it was pretty cool! I have been plotting this one for at least 5 years, so about time I got my finger out...
So I cracked on with the roof today, pretty happy with how it is coming along. Not perfect, definitely not, but good enough for my first try.
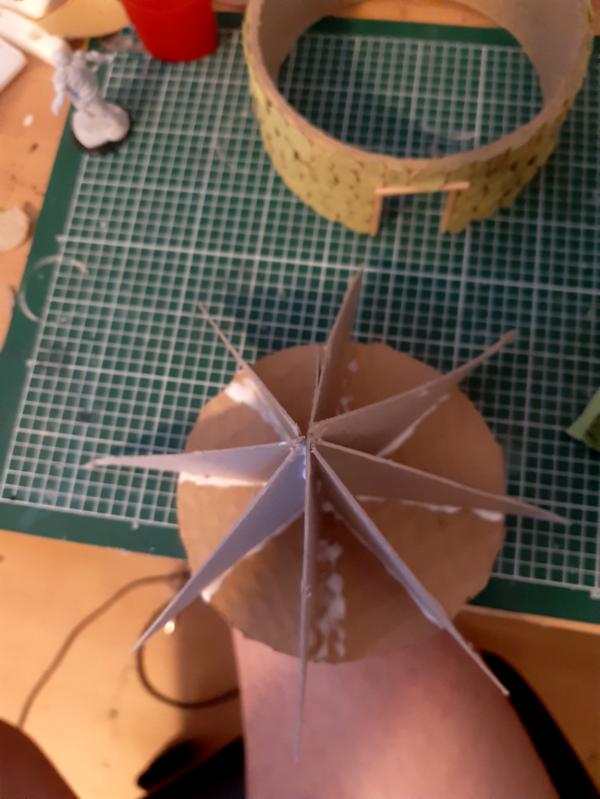
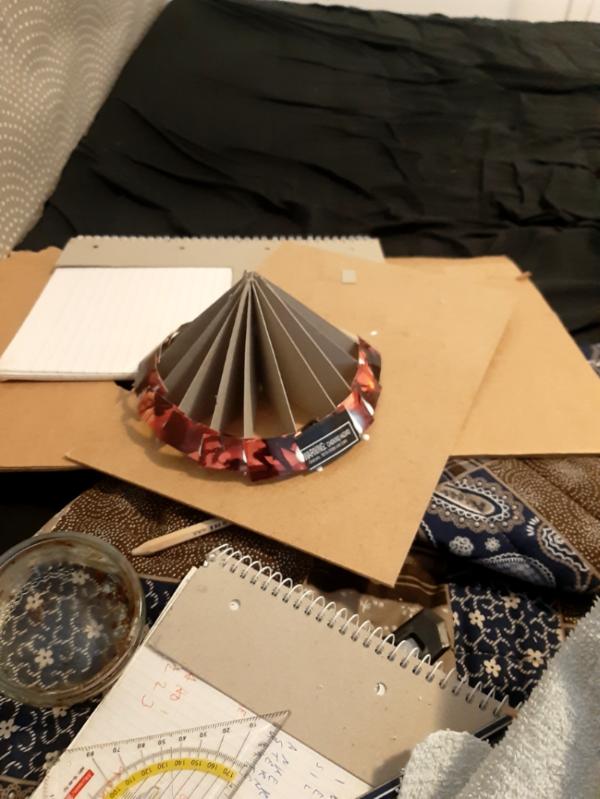
First, I traced around the inside of the building and cut the circle out of some thick cardboard. This is the base for my roof and also helps to attach the structure to the walls.
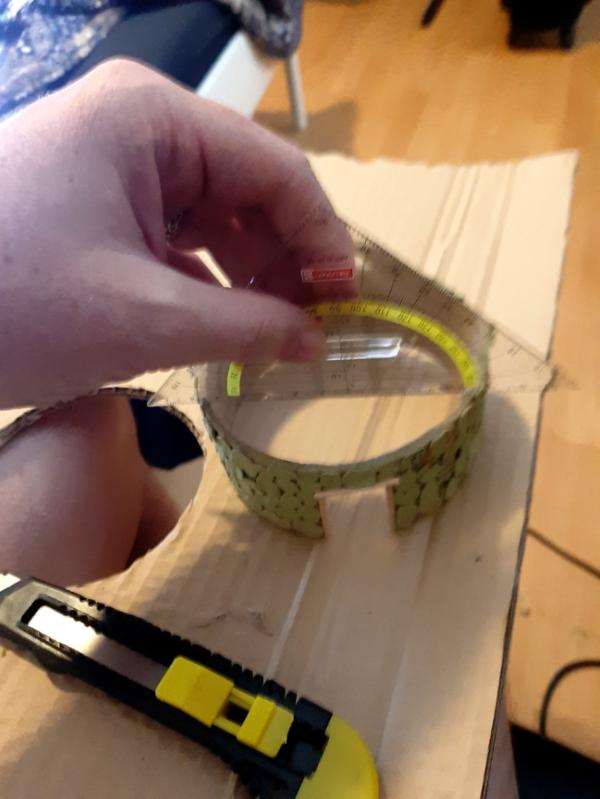
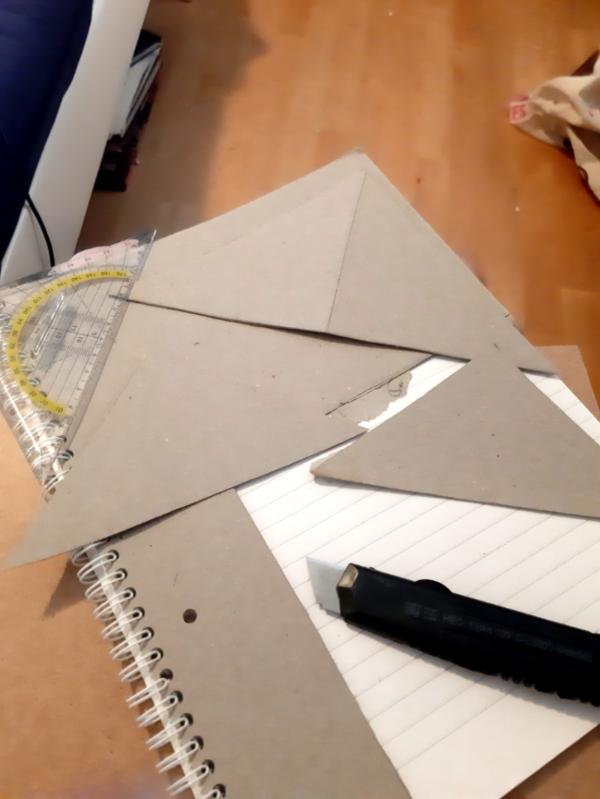
I had been agonising over the angle of the roof way too much, and taking my geodreieck I realised it was probably a perfect template for the roof substructure. So I just traced around it on some notepad carboard and cut my substructure braces.
I wanted an overhang on the thatch like you see in the refernece, as I think it is characteristic of the look I want. So I made the middle template overhang equally on both sides. It was a little tricky getting this all lined up but eventually I decided to just go with what looked good by eye, figuring if it was slightly lopsided it would probably not look too bad in the end.
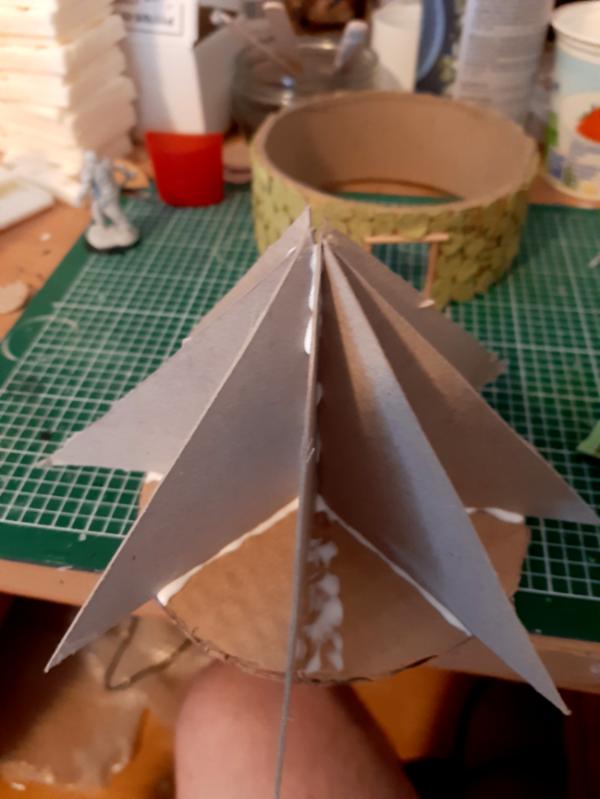
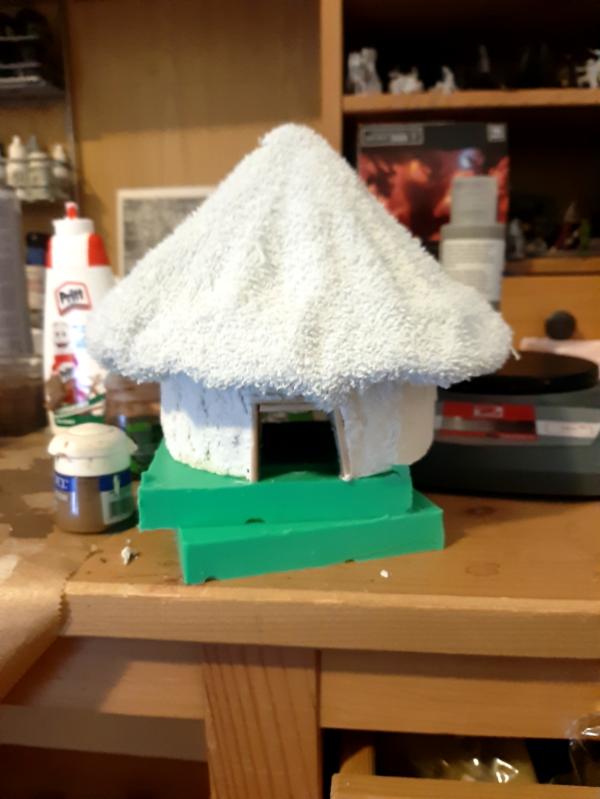
When I tried my towel on this substructure, the gaps between the triangles were pretty noticeable. So I cut some thin card into strips and used them to make some bridging pieces:
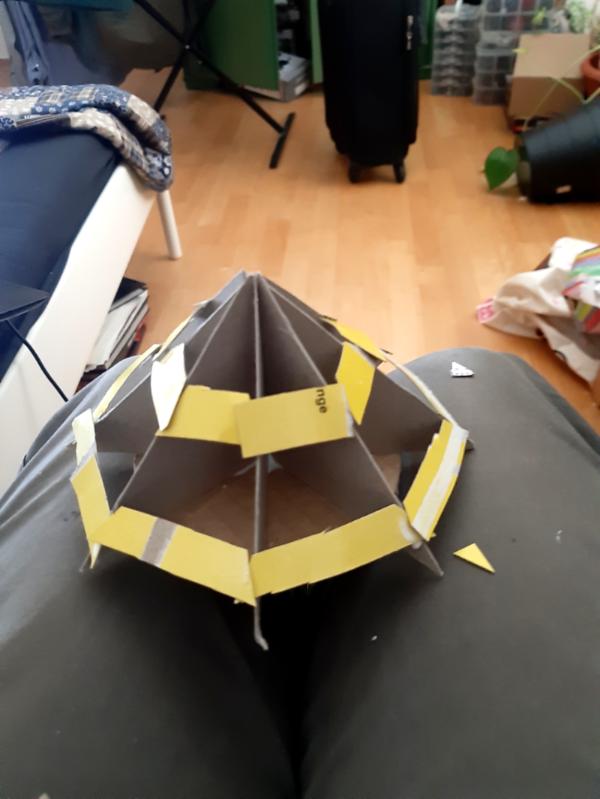
Then I started playing around with my hand towel. At firstI I tried to just lay it on, but it didn't sit properly like that, so I cut it into a roughly round shape and then cut a slit up to the centre.
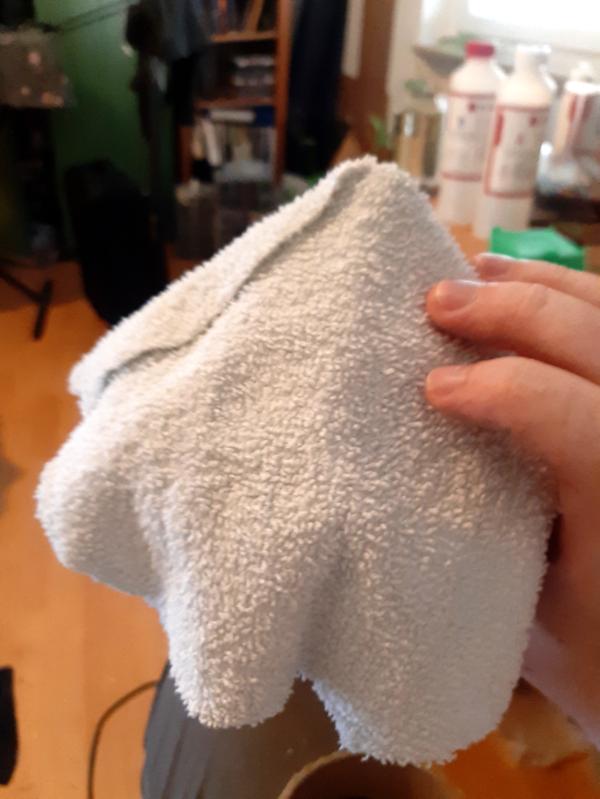
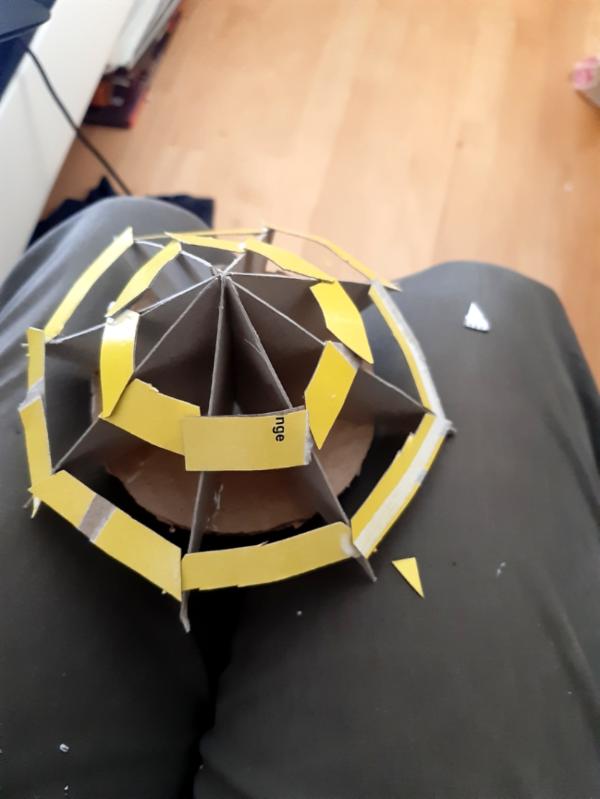
Then I glued it to the structure, using a lot of glue on the slit seam.
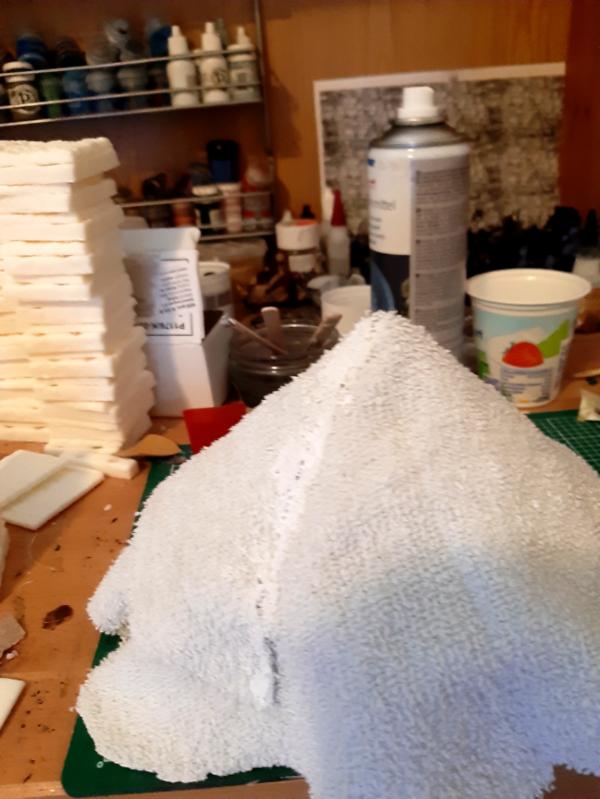
Finally, I turned it upside down and trimmed the edges so that the overhange just folded up to meet the walls. This was a bit tricky and the end result is a bit messier than I would like, but I think it looks fine for my first try. I had a lot of trouble getting the overhang to sit right, but I think it will look okay in the end.
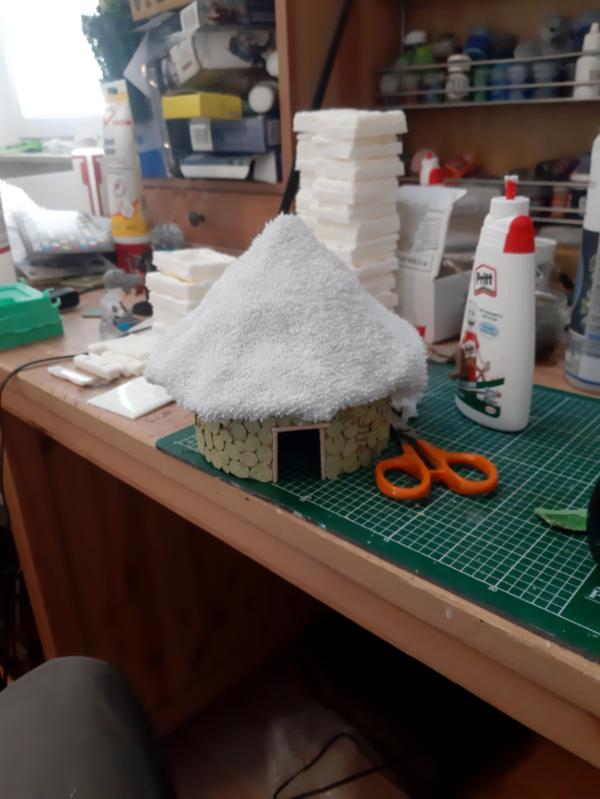
Last step is gonna be painting the whole roof with a 2:1 water:pva mix and then leaving it overnight to stiffen up.
Thanks for the nice comments, hopefully this thing turns out okay!
|
|
|
|
|
|
2019/08/14 21:19:18
Subject: Re:Dungeons and Dragons Blog - Dark Ages Terrain - Celtic Ring Fort WIP
|
|
[DCM]
Incorporating Wet-Blending
|
After spending a week thatching a roof with twine, I have vowed to find another way. I'm watching your washcloth effect with great interest.
|
|
|
|
|
|
2019/08/14 22:53:07
Subject: Re:Dungeons and Dragons Blog - Dark Ages Terrain - Celtic Ring Fort WIP
|
|
[DCM]
Boom! Leman Russ Commander
|
That method of 'thatching' a roof is absolutely brilliant! Very realistic texturing from the washcloth, but the support system is simple and ingenious all in one! 
|
"He fears his fate too much, or his desserts are small, who will not put it to a single touch; to win- or lose- it all."
Montrose Toast

|
|
|
|
|
2019/08/15 11:43:21
Subject: Re:Dungeons and Dragons Blog - Dark Ages Terrain - Celtic Ring Fort WIP
|
|
Battlefield Tourist
|
JoshInJapan: I think your thatch looked pretty great, but this is definitely less effort.
Meer_Cat: If you look for "towel thatch" online you can find some amazing work done with this method. I really wanted my buildings to be thatch rather than shingles (which I gather is more popular in Dungeons and Dragons crafting) because I wanted to maintain the Irish/Dark Ages theme.
So I applied the watered down PVA to the thatch which really helped to stiffen it up for painting, but you can also see that it caused the towel to sag into the gaps left in my support structure. I think in a more traditional prism shaped roof this would not be a problem because that shape is easier to make without gaps, but it is a bit annoying here. I am going to press on, because I suppose when it is finished it will not look too bad.
I left it overnight to dry and then sprayed it:
While waiting for stuff to dry I got to work on my second house. This one is going to be "wattle and daub", as most of the houses in Gaelic Ireland would have been. Mud, dung and straw over a lattice of willow branches. I started with my cardboard circle and put some skewers on it as a sort of frame.
Then I made a support structure for the roof. I doubled the number of support struts in an attempt to combat the sagging on my previous version. I hope it will make it less obvious!
And then I got some ready mixed filler (moltofill) and smeared it all over the bottom part of the structure. This is my first time doing this so it probably came out a bit too rough, but I hope it will look okay when painted.

Will get to painting the primed house now. Pretty pleased with how this is all coming along, I had a lot of worry about doing this project due to my lack of experience but I really should have just bitten the bullet ages ago. gotta do the pallisade wall to finish the fort along with at least an entrance tower. The pallisade will be modular and designed to allow me to do walled towns, motte and bailey style castles and any number of other set ups. Automatically Appended Next Post: 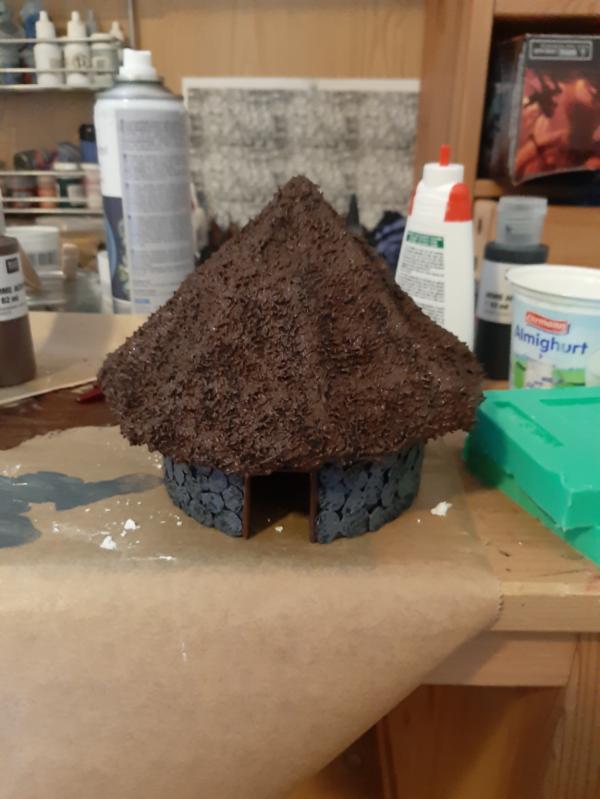
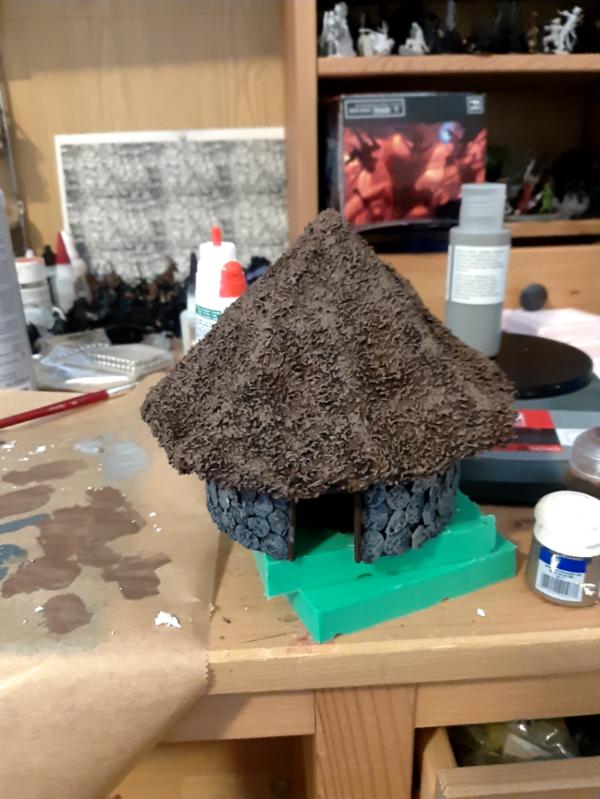
Basecoats on the first house laid down. The thatch is taking a good while to dry! Automatically Appended Next Post: Second basecoat (tan brown for the thatch and light grey for the stones)
 Automatically Appended Next Post:
 So I did my usual picking out of the stones in different colours, and then put a couple more layers of colour on the thatch.
Final step was an earthshade wash. The thatch is quite dark, but the thatch in the reference photo was also dark. Do you guys think it looks alright or should it be lighter? I think I would have to start from a lighter basecoat.
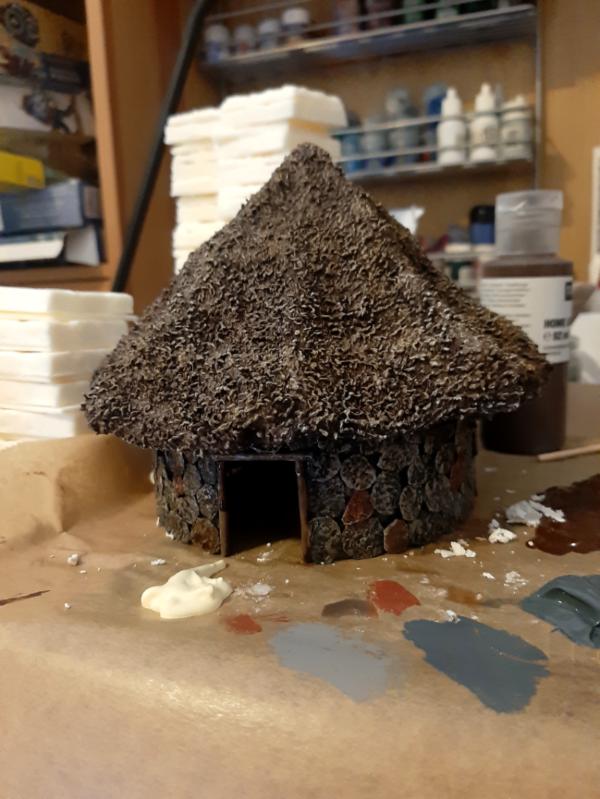
I am not going to put wash on the thatch, I think. It doesn't need it. So I think this is pretty much done now. The stone came out a lot better than I expected and the thatch a little worse than I expected but overall I am pretty happy with this! Automatically Appended Next Post: I would like to finish the second house by tomorrow which means getting the thatch PVA'd up tonight.
So I cracked on with finishing the roof substructure
And then glued the towel onto it and trimmed off the excess.
Phew! I will wait for that to dry and then soak the rest in the 2:1 glue water mix and leave it to dry for the night.
|
|
This message was edited 4 times. Last update was at 2019/08/15 15:18:11
|
|
|
|
|
2019/08/15 23:23:56
Subject: Re:Dungeons and Dragons Blog - Dark Ages Terrain - Celtic Ring Fort WIP Painted
|
|
[DCM]
Boom! Leman Russ Commander
|
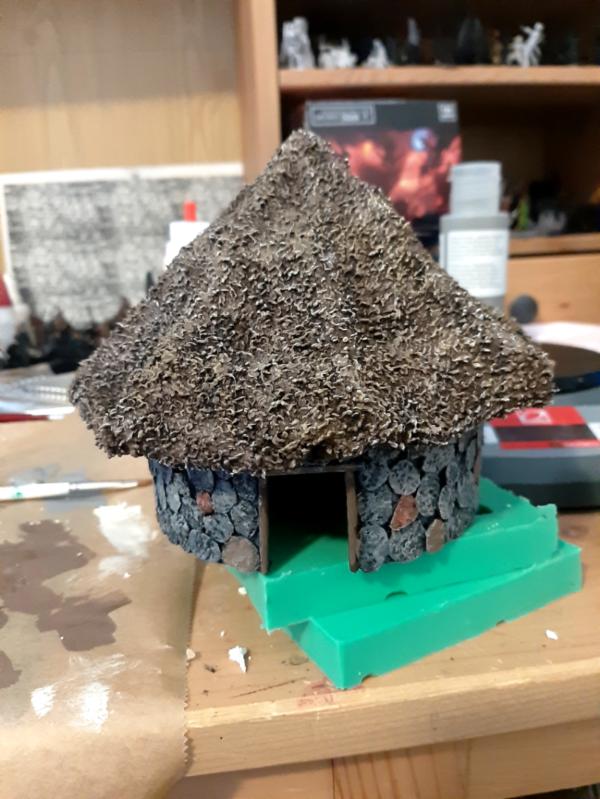
Both houses are looking brilliant. My wife and I only recently finished up watching all the Time Team episodes on YouTube- love that show. They had one where some Royal Army soldiers helped them recreate a wattle and daub hut just like you describe. Frankly, I think you've hit the look spot on.
For supporting the cloth, especially when it is saturated with the glue solution, I'm wondering if there isn't a bit of plastic packaging out there that wouldn't be the right shape? Although getting the exact diameter you need would probably be tricky. The cardboard struts are a great idea, but you need so many of them. Doubling the number on the second house was definitely a good idea.
I like the look of the thatch as you've done it, but the next one might want a lighter basecoat to start up from. Only my opinion- I do like what you've done here. 
Great work all around!
|
"He fears his fate too much, or his desserts are small, who will not put it to a single touch; to win- or lose- it all."
Montrose Toast
|
|
|
|
|
2019/08/16 00:08:01
Subject: Re:Dungeons and Dragons Blog - Dark Ages Terrain - Celtic Ring Fort WIP Painted
|
|
Krazed Killa Kan
|
Huts are looking good Da Boss, I especially like the look of the different painted stones on the huts. it really adds to the look, like on your cool dungeon tiles.
|
|
|
|
|
|
2019/08/16 00:46:21
Subject: Dungeons and Dragons Blog - Dark Ages Terrain - Celtic Ring Fort WIP Painted
|
|
Combat Jumping Ragik
|
That's a right nice hovel there, Mr. Da Boss. Your choice of roofing material is intriguing. I normally see the fake fur used to simulate thatching, not the terrycloth. It works well.
|
|
|
|
|
|
2019/08/16 15:59:05
Subject: Re:Dungeons and Dragons Blog - Dark Ages Terrain - Celtic Ring Fort WIP Painted
|
|
Battlefield Tourist
|
Meer Cat: Thanks! Yeah, definitely agreed about the paintjob on the thatch. Think it is going to need another layer of highlighting, because it is too dark. On the roof shape, it would probably be better to make it out of foam I think, just a cone of foam. But I don't have access to a lot of foam easily and no wire cutter. I am gonna make some viking longhouses after this, and I think with that prism shape it will work better!
Syro: Cheers. I felt a bit lazy with the way I did the stones but it does look good in the end and does not take long to do.
Red Harvest: I think the towel is very convenient and it is something everyone has access to, but I think it is also true that the other methods look better overall. But I am happy with it, looks good enough from table distance at least and was easy to work with.
As well as spraying my second house, I got to work on the part of this project I was dreading the most - cutting the base out of HDF. I have a big sheet of it that has been waiting for me to build up the will to do this, and I was dreading it because I don't really have access to the kind of tools that would make cutting this easy- I had to cut the thing with repeated scoring with a normal craft knife, and the blade was blunted so much I pretty much used up the whole thing (it is one of those ones where you snap off the blunt part).
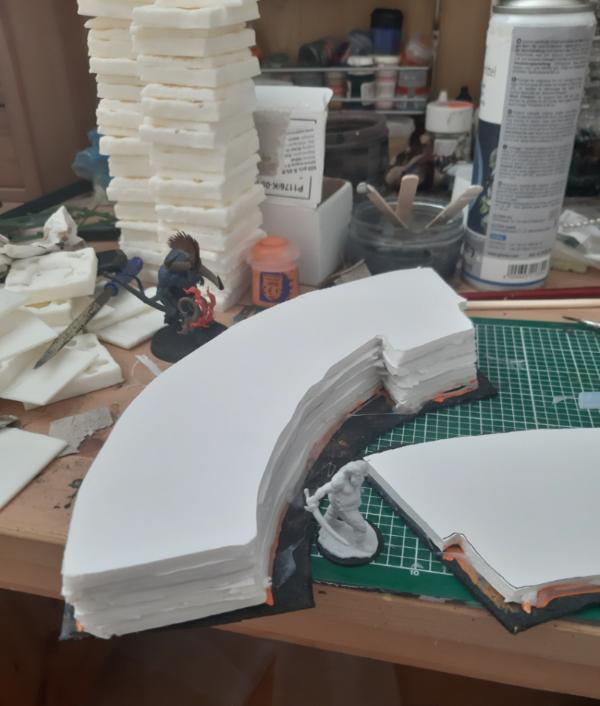
Celtic architecture is very circle based, and ring forts with pallisade walls are probably one of the most common acheological finds in Ireland. They served as the primary form of settlement for Gaelic clans, and were semi-permanent, with one clan likely moving between several different "rath" over time. So I wanted to make my fort have a circular footprint. I thought 4 sections of 12 inch circumference would work well and be suitably modular. So I built myself a compass with a 7.66" radius after doing the math to find which radius I needed.
I decided to make it 3.5 inches wide, wide enough for two ranks of infantry to stand on the top of the wall with space for the pallisade stakes in front and on and off ramps. The outline is a bit hard to see here, sorry!

Unfortunately, as you can just about see in the picture below, the inside of the fort is much too small.
I decided the best plan of action was some "spacers" to insert which were straight, which could also be replaced with a gatehouse piece. This increased the area inside so that the two huts could fit comfortably. It might look a bit small, but I have been inside plenty of raths and reconstructed ones, and they did tend to be about this size and usually only have 2-3 buildings inside them and some cattle pens.
I went out and hacked through the board until I got halfway, and my base pieces are now drying after I coated both sides in black paint and mod podge to prevent warping later.
You can also see the corpse of my craft knife in this shot. Poor lil guy.
|
|
|
|
|
|
2019/08/17 13:39:18
Subject: Re:Dungeons and Dragons Blog - Dark Ages Terrain - Celtic Ring Fort WIP Painted
|
|
Battlefield Tourist
|
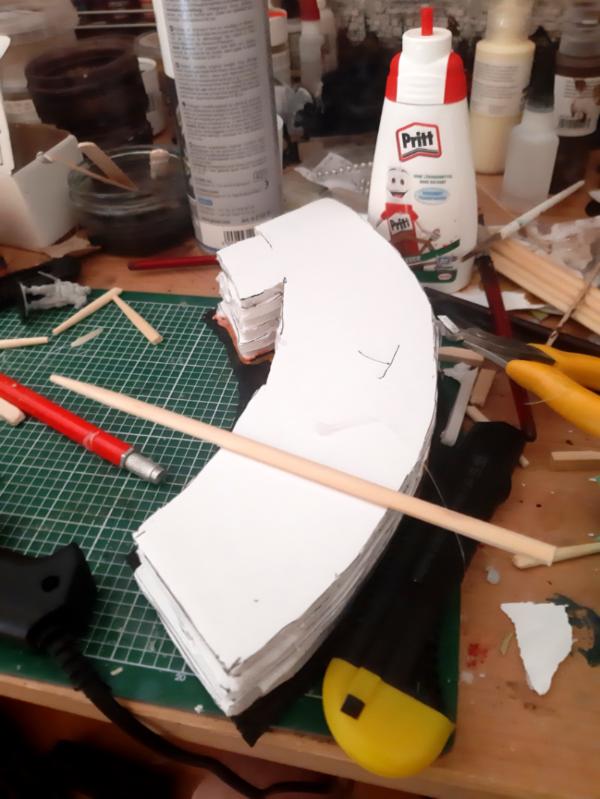
Still working on the Pallisade today. I was going back and forth about what material to make the earthworks part of the pallisade out of, and I decided foamboard was the best bet because it is easy to cut and then I can carve it if I need to.
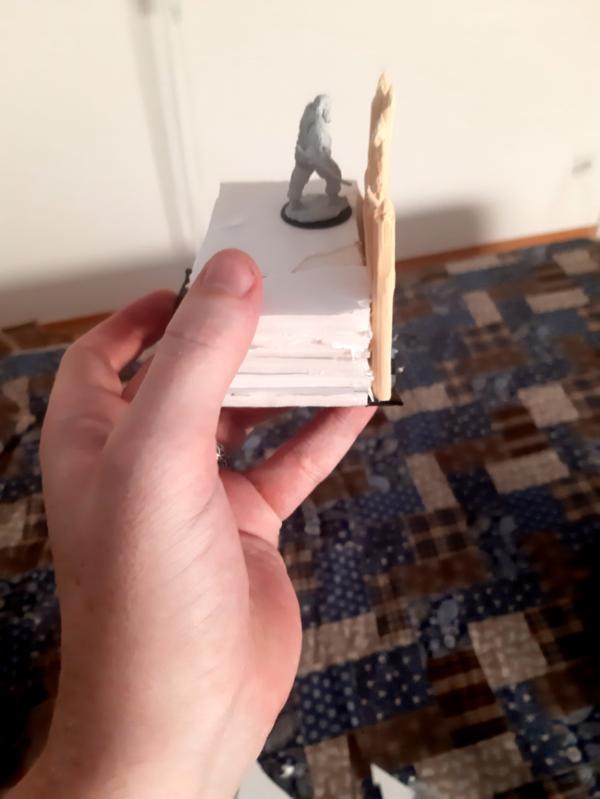
I traced the outline of the HDF base and then drew on where I wanted the raised area to go. I made it just over 50mm wide, so that two 25mm based minis can stand on it comfortably (or one 50mm). It is thicker at one end intentionally to allow for a staircase to come down along the inside curve of the wall, which is something I have seen in lots of Ringforts. The little bit sticking out at the top is the "landing" of the staircase (or slope, depending on what works best).
I cut it out and laid it on the base. The idea is that the ends always match up at the same width, so the stairs will be entirely contained inside one base. There will be a set of stairs at either end of the wall.
Six of them stacked together is a little taller than the average mini, which seems about right.
While I was doing it, I finished painting the second hut. I tried a lighter scheme on the thatch and I think it looks better.
Last step was a wash on the lower portion of the house. Just realised I have to pick out the timbers in brown as well...
This is all coming along pretty well! I think the fort is gonna look sweet when it is done.
|
|
|
|
|
|
2019/08/17 17:38:59
Subject: Dungeons and Dragons Blog - Dark Ages Terrain - Celtic Ring Fort Pallisade WIP
|
|
Bonkers Buggy Driver with Rockets
|
Wow, really impressive scratch building skills and patience. This would be an amazing world to play an RPG.
-Rids
|
|
|
|
|
|
2019/08/18 11:10:46
Subject: Dungeons and Dragons Blog - Dark Ages Terrain - Celtic Ring Fort Pallisade WIP
|
|
Gargantuan Great Squiggoth
|
Nice work and nice catch up. And yes this would be a wonderful scene. Looking forward to progress.
|
|
|
|
|
|
2019/08/18 14:54:27
Subject: Re:Dungeons and Dragons Blog - Dark Ages Terrain - Celtic Ring Fort Pallisade WIP
|
|
Battlefield Tourist
|
Thank you! This is the last of my summer holidays, so I am trying to be as productive as possible.
So first step was making sure my earthbank walkways align. I traced around the foamboard using orange paint to give me a guide for laying hot glue and sticking down the first layer of foam.

Hot glued them together which also added some height. It is about 35mm high now. The texture will make it a bit higher.
After a lot of gluing I have one curve of the wall completed

I bought a whole bunch of chopsticks from my local asian supermarket and cut the bottom part off.
Then I eyeballed the height (I want a 28mm model to be able to look over the pallisade, but I also want it to be uneven) and snipped it with some clippers. Then I used the clippers to chop a rough point onto it.
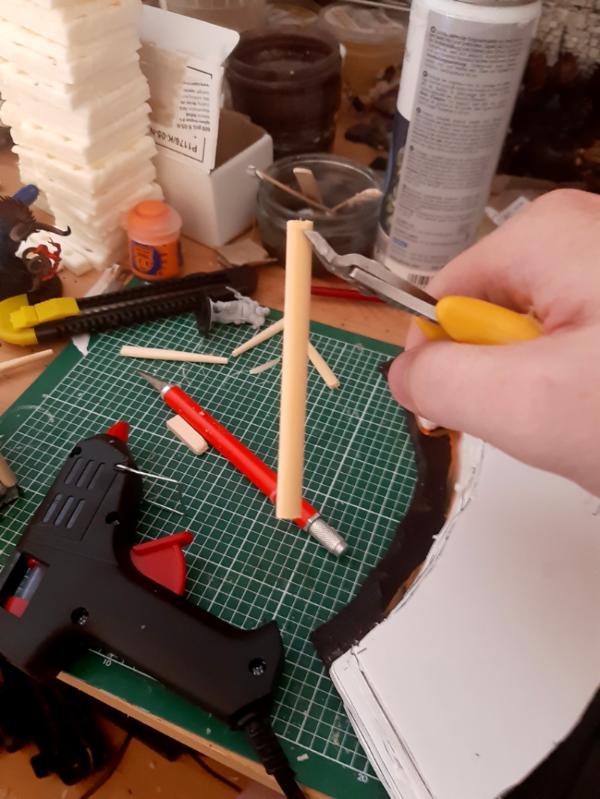
Then I roughed up the chopstick by carving at it with my knife, and also made the points look more roughly hewn. Hot glued it into place.
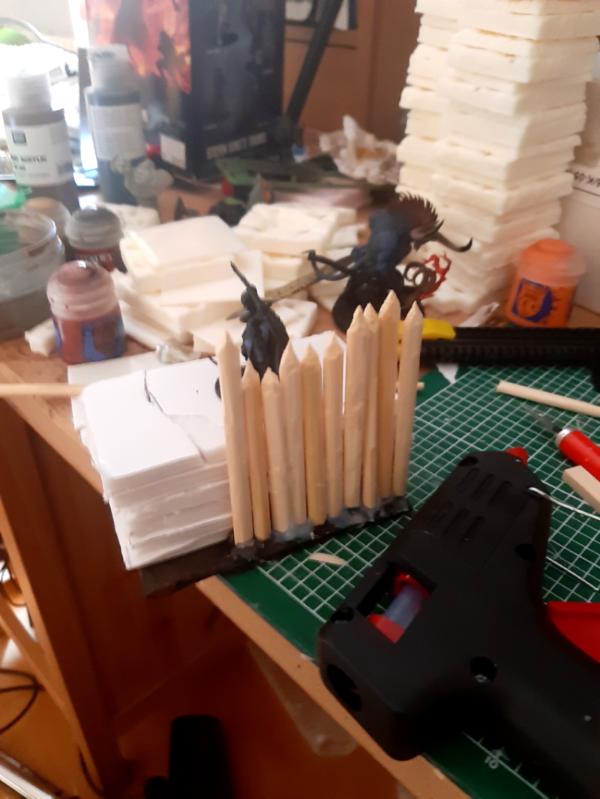
Some tedious work, and a lot of wood chips on the floor of my spare room later, and I had a completed pallisade section!
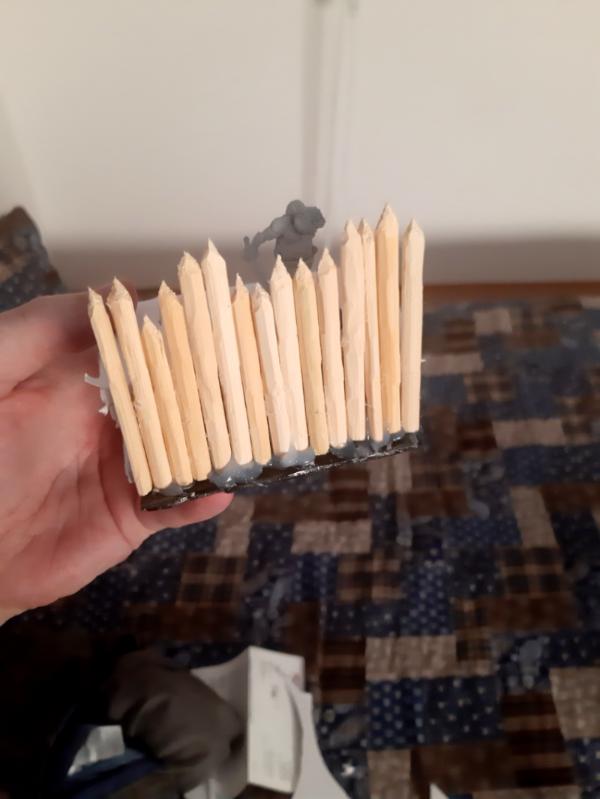

I think it looks pretty great! I thought about collecting small twigs or something for a more "natural" look, but honestly this is enough of a pain in the arse as is. Very sturdy though, cannot wait to get it all finished, textured and painted. I was also worried that it would not look realistically high enough, but now that it is done I actually think it looks grand. I don't think these kinds of pallisades went up much higher than this in most cases, they were just built on earthbanks with trenches in front of them. I may make a water filled moat in the future.
|
|
|
|
|
|
2019/08/18 15:42:59
Subject: Dungeons and Dragons Blog - Dark Ages Terrain - Celtic Ring Fort Pallisade WIP
|
|
Longtime Dakkanaut
|
That's looking really great - Well done!
|
|
|
|
|
|
2019/08/19 17:14:46
Subject: Dungeons and Dragons Blog - Dark Ages Terrain - Celtic Ring Fort Pallisade WIP
|
|
Druid Warder
|
Wow... I have missed so much stuff going on that I don't know how to catch up! Quite a lot of great ideas - loving these round houses!
|
Painting progress tracker:
2017: 50 of 50 planned; 2018: 80 of 60 planned; 2019: 75 of 75 planned
Pledge 2020:
6 to sculpt, 75 to paint (2/57 done) |
|
|
|
|
|
|


