Forum adverts like this one are shown to any user who is not logged in. Join us by filling out a tiny 3 field form and you will get your own, free, dakka user account which gives a good range of benefits to you:
No adverts like this in the forums anymore.
Times and dates in your local timezone.
Full tracking of what you have read so you can skip to your first unread post, easily see what has changed since you last logged in, and easily see what is new at a glance.
Email notifications for threads you want to watch closely.
Being a part of the oldest wargaming community on the net.
If you are already a member then feel free to login now.
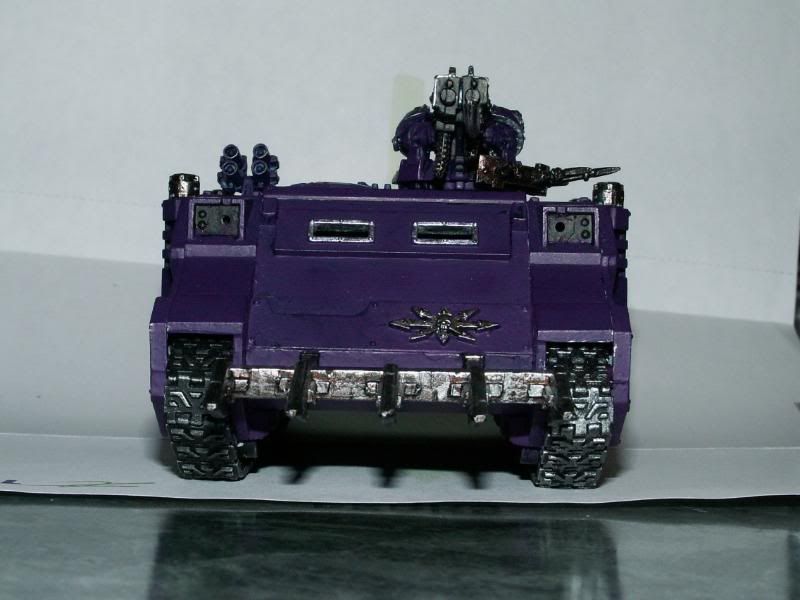
This one is for a rhino, but the technique is transferable to a Land Raider (or even storm raven). It is by "ChrisW" over on the screaming heretics forum.
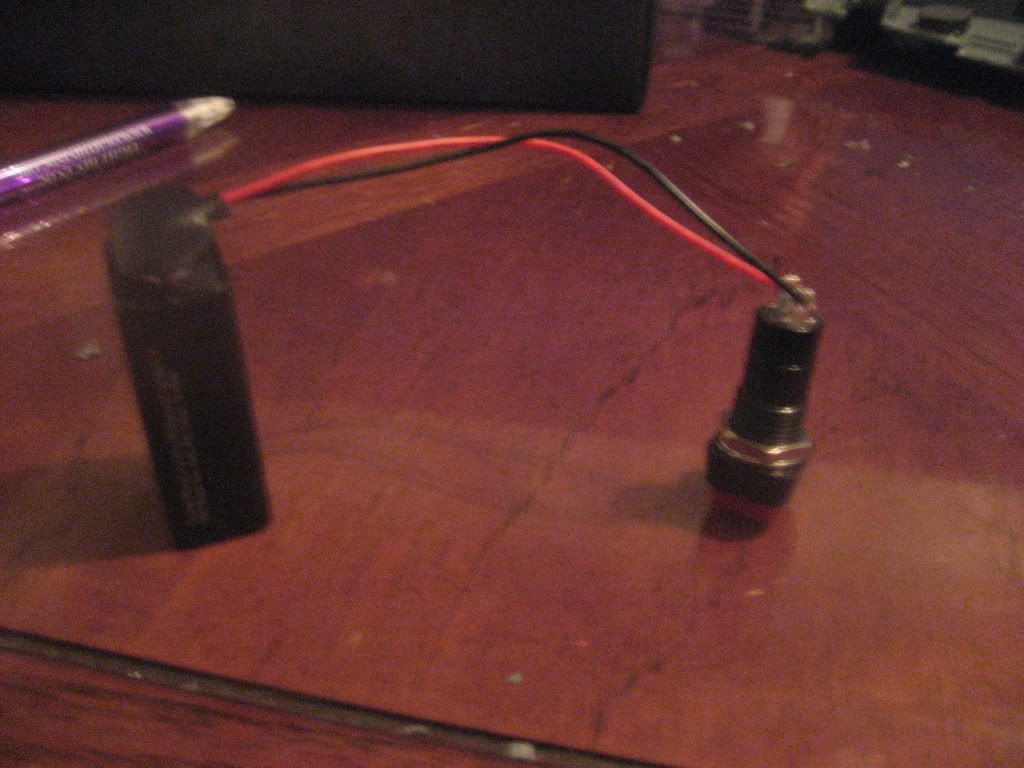
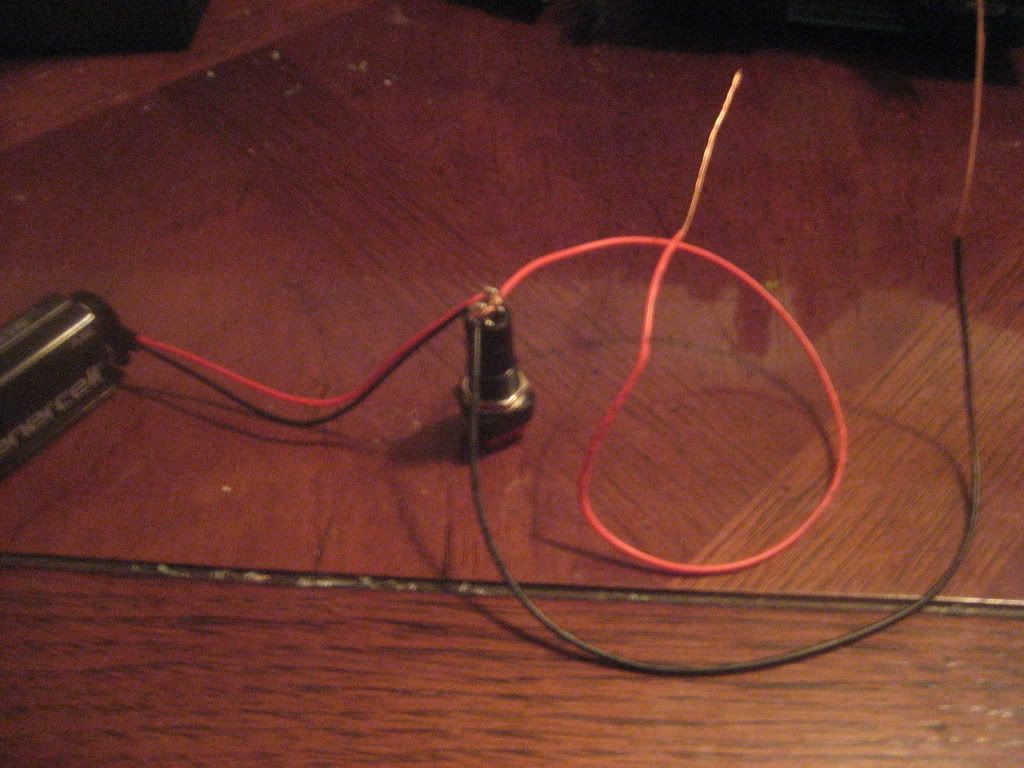
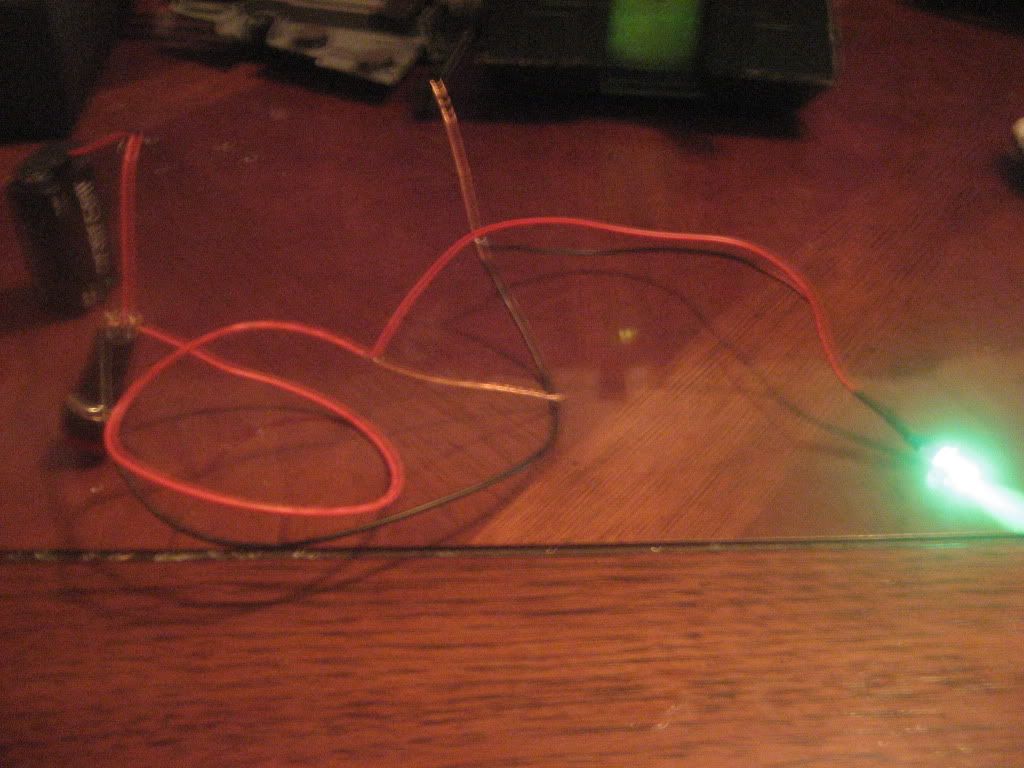
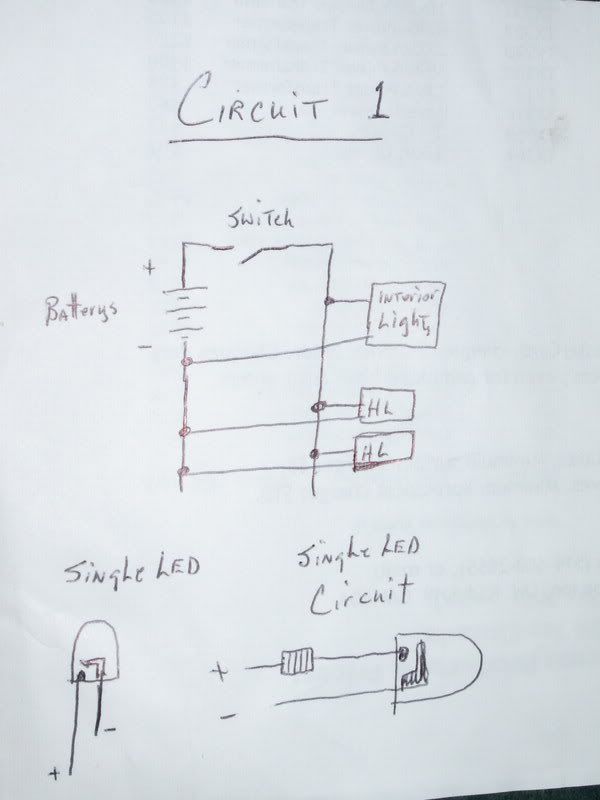
It gives the basic outline for the circuit involved. Switch batteries, and lighting. I drew out a fairly standard LED. To power a resister must be in series with the LED if your voltage source is more than the LED can handle. (It does not matter whether it is on the positive or negative lead). A quick note of resistors: think of a water hose, if you restrict the water flow (adjust the tap or pinch the hose) less water flows. A resister acts much the same on current, the larger (value) the resister the less current will flow.
You could put a LED across an 'AAA' or even a 'D' battery with almost no worries without a resister. These batteries usually supply 1.5 volts which the LED can dissipate with ease. Most LEDs can handle voltage up to 2.5 volts some can handle more some less please check specs if worried.
Sample specs: average orange/red/yellow LED will require 1.3 - 2.5 Volts (V) and will use 20 - 35 milli-Amps (mA) of current. Greens are in the neighborhood of 2.5 V and 30 mA. Blues are hogs 3 - 3.9 V at 25-35 mA.
I'm powering the circuit with a 12 volt source (4 coin cell batteries) a resistor will be required to be in circuit with a LED string, but more LEDs on one circuit would be safe if I had 4 or more in the circuit. In this case the most I have is two, so resisters will also be needed.
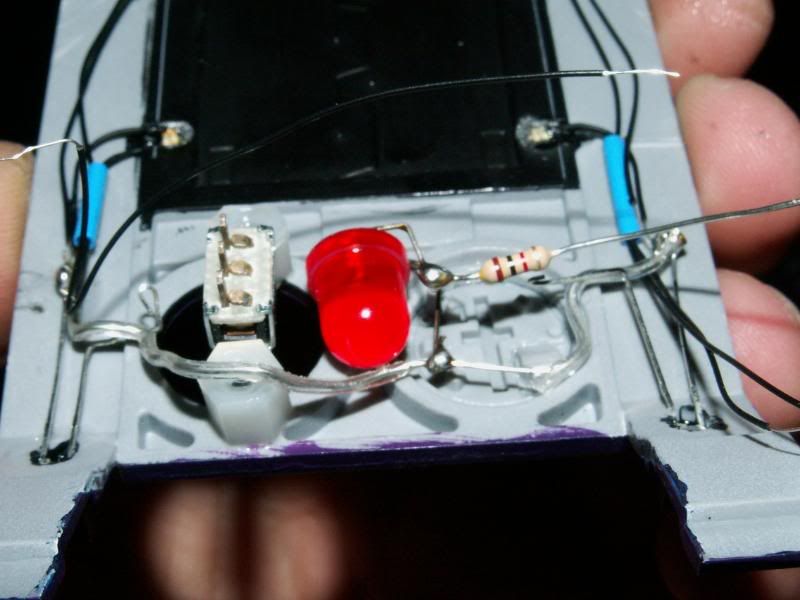
The resistor I have chosen is a 1K0 1/4 watt resistor (1000 ohm 0.25 watt resister), the colour code for this resister is brown black red (there will be a metallic colour after these three on most standard resistors it will be gold or silver. it just represents +/- 5 to 10% error of the printed value). Experiment with other values to determine the brightness that you want.
Back to the fun:
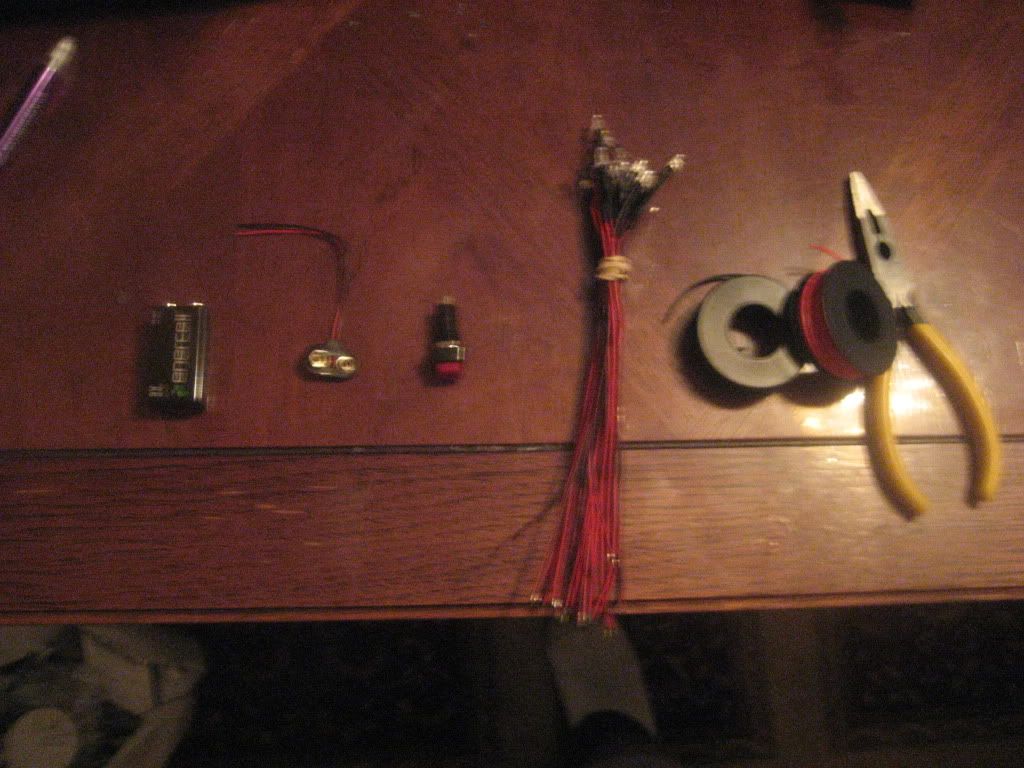
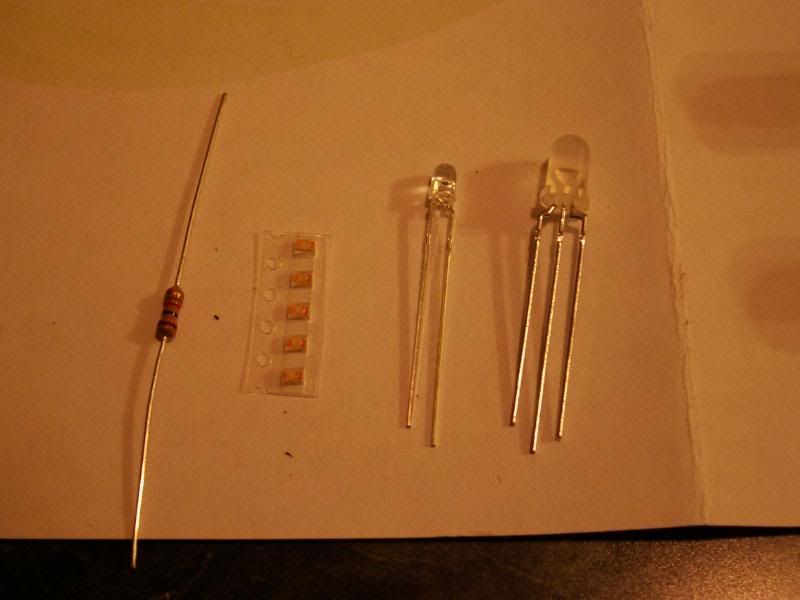
The main components:
Resister, 5 pack of surface mount LEDs, 3mm LED, 5MM bipolar LED (sub in a regular 5mm LED and wire same as 3mm. the bi-polar is a LED that emits two different colours depending on which side is activated. in the case it is a red/green.)
The before shot:
I'm OVER 50 (and so far over everyone's BS, too).
Old enough to know better, young enough to not give a ****.
That is not dead which can eternal lie ...
... and yet, with strange aeons, even death may die.
Electronics stores, mostly.
I wouldn't worry about the surface mount (tiny) LEDs unless you have a temperature controlled (specialised) soldering iron with a very fine tip. Use regular 3-5mm LEDs instead.
LEDs come in differing peak brightnesses (superbrights will suck the power out of your batteries but are plainly visible even in daylight)
I'm OVER 50 (and so far over everyone's BS, too).
Old enough to know better, young enough to not give a ****.
That is not dead which can eternal lie ...
... and yet, with strange aeons, even death may die.
some radio shacks (normally the bigger ones) have these awesome drawers full of stuff, some of that stuff happens to be individual LED lights, switches, battery holders...etc you can than get a sodering iron and wire at home depot and such or right there an then. you also might wanna look into um flux(?) it'll help sodering a bit its basically this acidic stuff that makes sodering easier. uuuuuh yeeeeahh oh make sure your resisters and stuff are the right ones for the LED/battery cause otherwise they'll be dim...or burnt instantly...trust me I've toyed with LEDs with limited knowledge before
lol I'm pretty sure limited could be considered a compliment at this stage. I think I have a sodering iron around here somewhere....
This is going to be interesting -.-
You can even get light kits that have flashing lights on them for your good old fashion turn signals on a land raider... heh. Be sure to post when you get the project completed. I am interested to see how it turns out. Good Luck.
IMMA FIRIN MAH LASCANNON!!!
O o
/¯/________________________
| FREEEEEEEEEEMMMMMMMM!!!
\_\¯¯¯¯¯¯¯¯¯¯¯¯¯¯¯¯¯¯¯¯¯¯¯¯
Molotovsoda wrote:some radio shacks (normally the bigger ones) have these awesome drawers full of stuff, some of that stuff happens to be individual LED lights, switches, battery holders...etc you can than get a sodering iron and wire at home depot and such or right there an then. you also might wanna look into um flux(?) it'll help sodering a bit its basically this acidic stuff that makes sodering easier. uuuuuh yeeeeahh oh make sure your resisters and stuff are the right ones for the LED/battery cause otherwise they'll be dim...or burnt instantly...trust me I've toyed with LEDs with limited knowledge before
You don't really need to worry about separate flux for electronics soldering.
Electronics solder often comes as "flux cored" (there is a fine core of the flux running inside the outer solder core. As the solder melts, it also activates the flux for surface cleaning).
Also: http://led.linear1.org/1led.wiz is a site that can help you calculate some numbers you need, but you DO need to know some basic electronics theory first.
If the LEDs come with datasheets (many do, over here) they will list the "forward voltage" (basically what it needs to turn 'on'). Voltage is simple. That's your power source.
Resistors required depend on your input voltage. The higher the voltage, the higher the resistance.
I'm OVER 50 (and so far over everyone's BS, too).
Old enough to know better, young enough to not give a ****.
That is not dead which can eternal lie ...
... and yet, with strange aeons, even death may die.
or you can go the east route and buy one of those battery powered led strings or even one of those flickering led candles if you want flashing lights? it's easier and can work out cheaper when you buy them in the sales... take them apart and its all done for you
This message was edited 1 time. Last update was at 2012/02/27 12:03:40
I just finished lighting up my monolith yesterday so I will point out things I did wrong and had to go back and correct so you can avoid them.
Firstly when you go to buy a power switch from radioshack or wherever make sure you get one that is a click on/off switch and NOT a momentary switch. Momentary switches only complete the circuit when being pushed otherwise the light would be off. SO they might be cool for searchlights but that is about it.
Second is if you are going to be using more then 1 or 2 LEDs (if you want to do back and front lights) make sure you do a parallel circuit and don't just connect the LEDs to each other. If you don't do a parallel circut they draw too much power from the battery and will appear dim.
Also if you go on ebay you can buy LEDs that are prewired so you save a lot of time dealing with the LEDs and just have to connect them to your circuit.
Ulthwé Eldar 3,211 pts Necrons 10,001 pts W:18 T:1 L:1
Kabal of the Flayed Skull Dark Eldar 2,552 pts W:3 T:1 L:0
Hivefleet Nivalis Tyranids 2500 pts
Where's the best place aside from ebay to get the circuits and switches...pretty much everything. I see the kits for the leds, I would like the best money can buy in this instance (pay for what you get and all) I assume there's not a premade kit for these things? Sounds like I get to learn something!
This message was edited 1 time. Last update was at 2012/02/27 20:19:11
A few more things to consider:
* Unless you absolutely have to, do not buy from Radio Shack. They have a markup of something like 500%. Ebay is the those in the know go to get LED's, fiber optic, and resistors. There are chinese sellers with ratings in the 99.9% range and thousands of reviews, with free 5 day shipping.
* speaking of fiber optic, have you considered using fiber optic? There are some great applications for a little bit of fiber optic on tanks. Simply drill out those really small lights, string through some fiber optic, and glue in place with white glue (NOT super glue or plastic glue). Bundle together the fiber optic to the front of an LED and bind it with electrical tape. Fiber optic can be gotten cheaply off of ebay.
* if you are doing 'interior' lighting (drilling holes and letting the light shine through) consider basing the inside of your tank with white paint (not silver, you want a diffuse effect).
Automatically Appended Next Post: As for other stuff, when I first got into this I had www.allelectronics.com recommended a lot. I did some price checking, and sure enough, they have VERY competitive pricing on most of your basic equipment.
But serious, I can't stress enough how important ebay is for led's, wires, resistors, and the like. I usually avoid it, but this is one area where chinese sellers are THE market leaders.
This message was edited 1 time. Last update was at 2012/02/27 20:36:03
Hmm, I don't mind going to ebay for things lol I haven't checked fiber optics. From what you just said it may be WAY easier to go that route. But, I may need a video or two lol I've gotta get a list started now to what I need to buy then it's time to watch and n
learn XD
Well my project tonight is to wire up a Second Monolith now that I know how to do it. I will try to take some step by step pics of the wiring and post it here for your reference.
This message was edited 1 time. Last update was at 2012/02/27 21:03:56
Ulthwé Eldar 3,211 pts Necrons 10,001 pts W:18 T:1 L:1
Kabal of the Flayed Skull Dark Eldar 2,552 pts W:3 T:1 L:0
Hivefleet Nivalis Tyranids 2500 pts
Oh man, that would be AWESOME! I'm going to pick up the parts I need this week I believe. It's going to be a grey knights land raider. What colors do you guys think would look good on it? Red?
Red could be cool. I personally like different colors so you could go red in the back and white up front. Or instead of white they make UV LEDs that give off the same color as a black-light so that could look eerie or ominous, it also gives you the ability to dink around with UV paint in the future and make thinkgs glow when you Land raider is lighting them up.
This message was edited 1 time. Last update was at 2012/02/27 21:09:38
Ulthwé Eldar 3,211 pts Necrons 10,001 pts W:18 T:1 L:1
Kabal of the Flayed Skull Dark Eldar 2,552 pts W:3 T:1 L:0
Hivefleet Nivalis Tyranids 2500 pts
I had been thinking of starting a lit monolith and came across this project, which really inspired me. I loved how they used thin sheets of green plastic to create a nice 'tron' effect.
Also, and you may already know this, but many lit monoliths have the problem where instead of having a nice glowing portal effect you just end up seeing 2-3 led's glowing behind green plastic. This can be paritally avoided by difusing the light from the LED using a few techniques.
1) a coat of matt varnish on the back side of lit panels will diffuse the source
2) sand the led lightly to diffuse the source. Some even suggest drilling a shallow hole in the peak of the led which will act as a prism
3) stuffed animal batting or teased cotton balls can diffuse light well when stuffed around an led
4) as mentioned before, coat the inside of your model white.
Automatically Appended Next Post: It occurs to me that a combination of the plasma ball disc door mod and the plasma globe power source mod could be truly epic. Perhaps it would just be too much though.
This message was edited 1 time. Last update was at 2012/02/27 21:24:44
If I can get this land raider to look the way I want I'm going to necrons for my next army and I'll DEFINITELY be doing one of those lol. Love the strobing
First thing is you need a 9 Volt, a 9volt connector with Wires (I got mine from Radioshack), a On/Off pushbutton switch (Again got it at radioshack), Pre-wired LEDs (I got Mine at Ebay , and extra wires (again...Radioshack). You will also need wirestrippers.
Second you want to plug the 9Volt into the plug and then wire the 2 wires to the exposed prongs on the push button. MAKE SURE that the wires DO NOT touch eachother or that will complete the circuit and it wont work.
Third you want to take the extra wire. Strip a good amount off of one end and enough to loop into the prongs on the On/Off on the other side. Attach the wires to the On/Off switch again making sure that wires on one prong do not touch wires on the other prong.
Lastly connect each LED to each side of the Exposed Wire. When you are done attaching all LEDs to each side use some Electrical tape and cover the exposed wires and you are done.
Ulthwé Eldar 3,211 pts Necrons 10,001 pts W:18 T:1 L:1
Kabal of the Flayed Skull Dark Eldar 2,552 pts W:3 T:1 L:0
Hivefleet Nivalis Tyranids 2500 pts
lol forgive my ignorance on that one >< I know they mess with credit cards sometimes and cell phones and some other weird things (I realize how powerful those magnets are) but better safe than sorry =D


 !!
!! 


 Ulthwé Eldar 3,211 pts
  Necrons 10,001 pts
  Kabal of the Flayed Skull Dark Eldar 2,552 pts
 Hivefleet Nivalis Tyranids 2500 pts
  1500
1500