| Author |
Message |
 |
|
|
|
|
Advert
|
Forum adverts like this one are shown to any user who is not logged in. Join us by filling out a tiny 3 field form and you will get your own, free, dakka user account which gives a good range of benefits to you:
- No adverts like this in the forums anymore.
- Times and dates in your local timezone.
- Full tracking of what you have read so you can skip to your first unread post, easily see what has changed since you last logged in, and easily see what is new at a glance.
- Email notifications for threads you want to watch closely.
- Being a part of the oldest wargaming community on the net.
If you are already a member then feel free to login now. |
|
 |
2012/08/15 17:39:50
Subject: need help with adding mud/dust to rhinos
|
|

Morphing Obliterator
|
hello dakka,
I'm trying to do some weathering on my rhinos and it's not working out well. here's where I'm at:
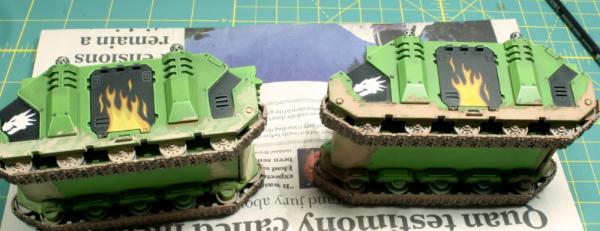
the rhino on the left has a wash made from water mixed with secretweaponminiatures' burning sands pigment and a dash of swm's dark earth pigment. the rhino on the right has two washes of a 50/50 mix of burning sands and dark earth pigments mixed with water.
the problems I'm having are:
1. the mud on the armor panels looks flat. there's no texture to it and I might as well have airbrushed it on instead of using pigments. I do like the look in the crevices of the wheels and the tracks, though, where the pigment had a chance to build up.
2. it doesn't really look like mud spatters. it looks more like the tank was dipped in mud and then lifted out. there's no sense of motion or direction to it.
3. there are tide markings along the top edge of the wash. I'm not sure how to make those go away.
now, the above issues aside, what I *really* want isn't even a muddy look. I want a dusty look, as if these tanks had been rolling around dessert plains. my recent troop models have dessert rock bases and I'm trying to match that color/feel for the weathering on my tanks. before I did the washes on these rhinos, I tried just brushing on dry pigment to get a dusty look but it was either way too subtle or I ended up with smeared bits of pigment where it clumped up instead of an even coating.
I haven't sealed any of the weathering yet, so it's easy enough to strip it off with water and try again. any suggestions for a good, dusty look?
cheers,
v
|
|
|
|
 |
|
2012/08/15 18:04:04
Subject: need help with adding mud/dust to rhinos
|
|

Leader of the Sept
|
I think the one on the left looks rpetty good, but just doesn't go far enough up the tank. There is too hard a transition between dusty and non-dusty. Maybe do a lighter version of the wash on the middle third of the model and some light drybrushing with a dusty colour at the top?
|
Please excuse any spelling errors. I use a tablet frequently and software keyboards are a pain!
 Terranwing - w3;d1;l1 Terranwing - w3;d1;l1
 51st Dunedinw2;d0;l0 51st Dunedinw2;d0;l0
 Cadre Coronal Afterglow w1;d0;l0 Cadre Coronal Afterglow w1;d0;l0 |
|
|
|
|
2012/08/15 18:32:13
Subject: Re:need help with adding mud/dust to rhinos
|
|
Colonel
This Is Where the Fish Lives
|
I use this product to add mud to my models:
)/%5CImages%5CProductImages%5Cav262215.jpg)
It can be mixed with pigments or applied right out of the bottle. After it dries, mix some pigments with water and paint over the dried paste. Use darker pigments for a wet look or lighter ones for a dry look (dry typically looks better on vehicles).
Here's how it looks on a model:
|
 d-usa wrote: d-usa wrote:"When the Internet sends its people, they're not sending their best. They're not sending you. They're not sending you. They're sending posters that have lots of problems, and they're bringing those problems with us. They're bringing strawmen. They're bringing spam. They're trolls. And some, I assume, are good people."
|
|
|
|
|
2012/08/15 20:27:36
Subject: need help with adding mud/dust to rhinos
|
|
Chalice-Wielding Sanguinary High Priest
Arlington TX, but want to be back in Seattle WA
|
ive seen tutorials on other sites that show how to create mud by adding, coffee grounds, brown paint, a small amt of sand and static grass together, then you paint it on with a brush and let it dry on wax paper....looked pretty realistic
|
 4250 points of Blood Angels goodness, sweet and silky W12-L6-D4 4250 points of Blood Angels goodness, sweet and silky W12-L6-D4
 1000 points of Teil-Shan (my own scheme) Eldar Craftworld in progress 1000 points of Teil-Shan (my own scheme) Eldar Craftworld in progress
 800 points of unassembled Urban themed Imperial Guard 800 points of unassembled Urban themed Imperial Guard
 650 points of my do-it-yourself Tempest Guard 650 points of my do-it-yourself Tempest Guard
 675 points of Commoraghs finest! 675 points of Commoraghs finest!
The Dude - "Jackie Treehorn treats objects like women, man."
Lord Helmet - "I bet she gives great helmet."
|
|
|
|
|
2012/08/15 22:05:00
Subject: need help with adding mud/dust to rhinos
|
|
Morphing Obliterator
|
@flinty: I may give that a try, but I'm worried about the tide markings. I think with a ligher (less pigment) version of the wash they're going to be even more prominent. any idea how to avoid that?
@Element206 & ScootyPuffJunior: yeah, I've seen similar tutorials with the structure paste, dirt + varnish, etc. (buypainted has a great tutorial on an ultramarines rhino that uses structure paste + pigment washes). they do look pretty cool for a muddy look, but what I'm really after is a dusty look and I think these would give me too much texture for that.
any other suggestions?
|
|
|
|
|
|
2012/08/15 23:42:00
Subject: need help with adding mud/dust to rhinos
|
|
Colonel
This Is Where the Fish Lives
|
Well, the issue now is that I think you are asking for two different things. Something that is dusty won't have the texture you are looking for. For instance, I work in the construction industry and often I get will come home with a layer of dust on my jeans and boots (I live in Northern Virginia and our soil here is pretty much red clay). The dust has no decernable texture to it, it just changes the color of my clothes. The same thing happens to my truck, and if you look close enough you can see it but I don't feel that it could be replicated at the scale of 40K models.
For straight up dust, pigments will work great. If you wanted extra build up in cracks and corners, mix pigments with glaze or matte mediums to make a thick paste. Other than that, sandy paste or even Liquitex Natural Sand is the way to go.
|
d-usa wrote:"When the Internet sends its people, they're not sending their best. They're not sending you. They're not sending you. They're sending posters that have lots of problems, and they're bringing those problems with us. They're bringing strawmen. They're bringing spam. They're trolls. And some, I assume, are good people."
|
|
|
|
|
2012/08/15 23:54:43
Subject: Re:need help with adding mud/dust to rhinos
|
|
Morphing Obliterator
|
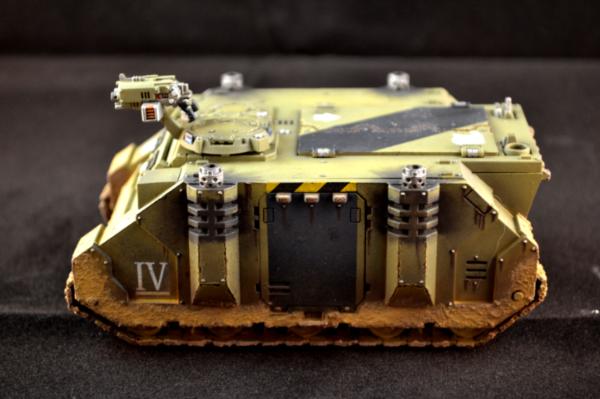
yeah, I probably shouldn't have mentioned mud at all since it's not the end result I'm after 
anyway, I tried brushing on a couple layers of pigment to create a dust effect and it was barely visible even up close. I haven't tried multiple applications, though, so maybe I can get it to build up a bit.
here's an example of the dusty look I'd like to get:

|
|
|
|
|
|
2012/08/16 01:03:54
Subject: Re:need help with adding mud/dust to rhinos
|
|
Colonel
This Is Where the Fish Lives
|
varl wrote:yeah, I probably shouldn't have mentioned mud at all since it's not the end result I'm after
anyway, I tried brushing on a couple layers of pigment to create a dust effect and it was barely visible even up close. I haven't tried multiple applications, though, so maybe I can get it to build up a bit.
here's an example of the dusty look I'd like to get:
You just answered your own question. One layer of pigment applied dry isn't going to be enough for the effect you want. The thicker you want the dust to look, the more you have to add. Also use more than one color to add depth, three is what I have found works the best for me.
Even in that picture you added, the dust doesn't really have any texture to it. Because it's a real tank exposed to weather almost constantly, the "texture" you see is dust settling in the recesses on the armor because it isn't perfectly smooth like a plastic model.
|
d-usa wrote:"When the Internet sends its people, they're not sending their best. They're not sending you. They're not sending you. They're sending posters that have lots of problems, and they're bringing those problems with us. They're bringing strawmen. They're bringing spam. They're trolls. And some, I assume, are good people."
|
|
|
|
|
2012/08/16 02:01:24
Subject: Re:need help with adding mud/dust to rhinos
|
|

Perturbed Blood Angel Tactical Marine
Toronto
|
Check out the weathering done near the end of this video. It's what I'm planning on doing to my own once I'm at that stage.
http://youtu.be/YLLIzv3AK6o
|
|
|
|
|
2012/08/16 03:11:44
Subject: Re:need help with adding mud/dust to rhinos
|
|
Morphing Obliterator
|
@scootypuffjunior: right. will clean off one of the rhinos tonight and try multiple passes of dry pigment. totally with you on the texture thing.
@ulterior: I mentioned this very video in an earlier post in this thread. I do like the result, but I'm looking for dusty vs. muddy and this would add way too much texture for me. thanks, though 
|
|
|
|
|
|
2012/08/16 03:34:31
Subject: Re:need help with adding mud/dust to rhinos
|
|
Fresh-Faced New User
|
Here is an awesome tutorial on weathering powders... Enjoy
http://www.youtube.com/watch?v=WmiyEVluEt4
Another way to get the dust look is to just dry brush dark to light using three colors...you need to make sure that you brush is not wet at all...the paint will come off and while time consuming is nice looking for the flatter areas it will give it that dusty film, rather than the muddy, grimy look. Just remember dust settles top down, so it will be heavier on the top and lighter on the bottom and will only have a slight film on the vertical surfaces...one way you could do this is to gloss coat your model( I would actually use at minimum 3 coats of this, and probably more like 5), then use a thinned down wash of Rubbing alcohol...then actually use a shaker to apply the pigment....really nice and slowly and evenly from the top down... that should give the effect your looking for...then you can use dull coat to knock the gloss back down and seal the "dust" into place. NOTE: Rubbing Alcohol will eat your paint ...you must have a gloss coat or you will undo all your hard work...it eats through the gloss as well so don't over do it with the alcohol.
|
|
This message was edited 2 times. Last update was at 2012/08/16 03:44:34
|
|
|
|
|
2012/08/17 07:15:09
Subject: need help with adding mud/dust to rhinos
|
|
Morphing Obliterator
|
@kelendros: thanks for that. I'd watched through that video before posting as well. it's interesting, as the look he gets in his prep stage before he starts making things really muddy is almost what I had in mind. however, when I tried the same approach (light wash of alcohol, then flick or dab pigment on over that) I got a very different result then he did. much more clumpy and uneven. I wonder if it's just because the surface I'm working on is way smoother than the side of his tank. I suppose it doesn't really look like dust, either. I may just give up on the dust idea entirely, do same paint chipping and call it a day...
anyway, thanks for the suggestion
|
|
|
|
|
|
2012/08/18 04:41:41
Subject: need help with adding mud/dust to rhinos
|
|
Gargantuan Gargant
|
I've done dusty effects with pigments applied both dry and wet.
When applying as a wash, you're bound to get starker boundaries than you want. Thing is, the pigment isn't locked in irreversibly after just using water or rubbing alcohol. Going over the edge of the dried pigment with a stiff brush or a sponge will knock some loose and spread it around like a limited dry application, softening the transition.
If applying dry, I found that it helps to really lay it on there. Don't try to rub it into the surface, actually pile it on in the cracks and spread a decent layer on the flats. To set it, load up a brush with rubbing alcohol and gently touch the pigment here and there - capillary action will help spread it around. If you don't completely flood the thing, the pigment will stay where you put it, more or less (little clumps will soften and spread, a bit, which works to your advantage).
If you want another source of how-to vids, Scale Model Medic on Youtube has some great ones. I highly recommend giving his stuff a look.
|
The Dreadnote wrote:But the Emperor already has a shrine, in the form of your local Games Workshop. You honour him by sacrificing your money to the plastic effigies of his warriors. In time, your devotion will be rewarded with the gift of having even more effigies to worship.
|
|
|
|
|
|
|
 Night Lords P&M Blog:
  Salamanders P&M Blog: