| Author |
Message |
 |
|
|
|
|
Advert
|
Forum adverts like this one are shown to any user who is not logged in. Join us by filling out a tiny 3 field form and you will get your own, free, dakka user account which gives a good range of benefits to you:
- No adverts like this in the forums anymore.
- Times and dates in your local timezone.
- Full tracking of what you have read so you can skip to your first unread post, easily see what has changed since you last logged in, and easily see what is new at a glance.
- Email notifications for threads you want to watch closely.
- Being a part of the oldest wargaming community on the net.
If you are already a member then feel free to login now. |
|
 |
2012/10/03 19:06:01
Subject: WW2 Leman russ vanquisher conversion
|
|

Plummeting Black Templar Thunderhawk Pilot
|
Right, where do I begin?
Recently my fiancee decided that things weren't going to work out, so me being the reclusive geek that I am (and I'm damn proud of it!) decided to delve into the hobby to distract me and keep me from doing anything embarrassing.
Unfortunately I have no pictures at this stage, but I have started work on converting a standard leman russ into a world war 2 style tank destroyer, complete with the vanquisher barrel and side armour.
So far I have...
1. Removed the turret and side sponsons
2. Cut off the hull mounted heavy bolter and replaced it with a pen cassing
3. Traced and cut out (badly) two sets of side armour.
Unfortunately I now need ideas on what I can do with the great big hole that is now left in the top of my tank destroyer. I intend to buy a tank upgrade sprue, or the parts from various members of dakkadakka, and also some dkok tank commanders. For this I need the top to be relatively flat to attach the main hatch and pintle mounted stubber.
So now to get onto why I am here...
How would you guys (and girls) go about doing this? Pictures would be handy, and I will be uploading pictures of my progress so far when I get a chance.
A always, thanks in advance,
LazzurusMan
|
|
|
 |
|
2012/10/03 21:47:51
Subject: WW2 Leman russ vanquisher conversion
|
|
Utilizing Careful Highlighting
|
i did the same thing a few years ago ,i just cut a circle the correct size from plasti card and then a off centre hole in that to hold a space marine hatch then used a targeter from a land raider on a short pole coming out next to the hatch .
|
|
|
|
|
2012/10/03 22:22:29
Subject: WW2 Leman russ vanquisher conversion
|
|
Plummeting Black Templar Thunderhawk Pilot
|
Unfortunately I'm terrible at cutting plasticard...and I think I may need to re-do my armour skirts. They're really wobbly and don't look right :/
|
|
|
|
|
2012/10/03 22:24:19
Subject: WW2 Leman russ vanquisher conversion
|
|

Regular Dakkanaut
|
Make it open-top like a marder or something and build a whole interior. That would be cool.
|
|
|
|
|
2012/10/03 22:28:33
Subject: WW2 Leman russ vanquisher conversion
|
|
Plummeting Black Templar Thunderhawk Pilot
|
And also way out of my comfort zone. :/
I really do have limited supply of stuff here guys. Unless anyone can explain and teach me how to turn it into an open topped tank, then I think I'm gonna have to try to cover the top somehow
|
|
|
|
|
2012/10/04 06:41:06
Subject: WW2 Leman russ vanquisher conversion
|
|
Regular Dakkanaut
San Francisco
|
cut out plasticard and fit it over it, be it square, or round whatever floats your boat. Glue a hatch on top and youre done.
|
|
|
|
|
2012/10/04 08:12:52
Subject: WW2 Leman russ vanquisher conversion
|
|

Guard Heavy Weapon Crewman
|
If you haven't done so already, pop by the nearest hardware or DIY shop and get yourself a good, sharp hobby knife, a steel ruler and an all-steel drafting compass.
Also remember to always draw the cutting lines in pencil on to the plasticard and check your measurements before cutting.
|
Text goes here. |
|
|
|
|
2012/10/04 15:27:21
Subject: WW2 Leman russ vanquisher conversion
|
|
Plummeting Black Templar Thunderhawk Pilot
|
Cheers guys...now for a quick question.
Should I cut out the armour plates the exact same shape as the side of the tank, or just large rectangles with diagonal corners?
LazzurusMan
|
|
|
|
|
2012/10/04 16:07:18
Subject: WW2 Leman russ vanquisher conversion
|
|
Leader of the Sept
|
Cross posted from my reply on the conversions thread
and for weapons destroyed results:
@ LazzurusMan- I found the easiest way to cover the top was to cut off the turret ring and do a whole new top hull.
|
Please excuse any spelling errors. I use a tablet frequently and software keyboards are a pain!
 Terranwing - w3;d1;l1 Terranwing - w3;d1;l1
 51st Dunedinw2;d0;l0 51st Dunedinw2;d0;l0
 Cadre Coronal Afterglow w1;d0;l0 Cadre Coronal Afterglow w1;d0;l0 |
|
|
|
|
2012/10/04 16:43:29
Subject: Re:WW2 Leman russ vanquisher conversion
|
|
Plummeting Black Templar Thunderhawk Pilot
|
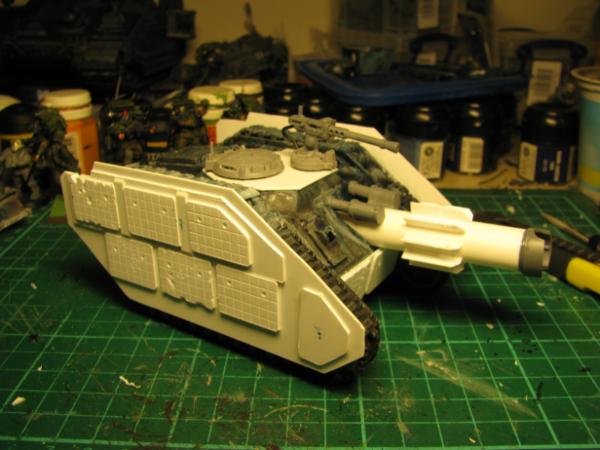
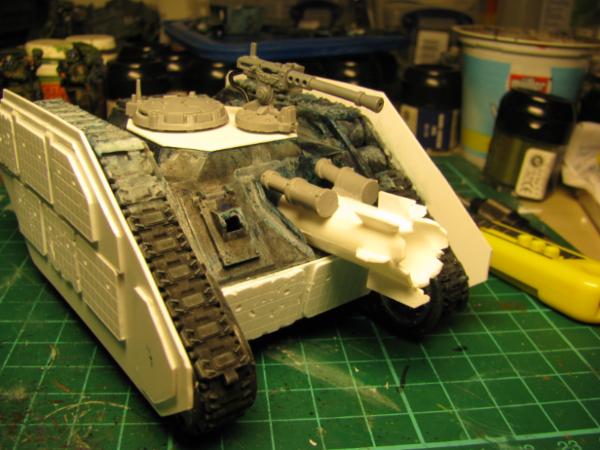
These are some pictures of what I have done so far.
The white thing is my initial attempt at cutting out an armored plate for the russ.
Any input from you guys out there?
|
|
|
|
|
2012/10/04 17:42:42
Subject: WW2 Leman russ vanquisher conversion
|
|
Leader of the Sept
|
The cannon and mantlet look great. If anything the armoured skirt is a bit too precise. Maybe oversize it and then deliberately make it more blocky? I tried not to round mine out too much as rounded edges seem to be anti-imperial 
|
Please excuse any spelling errors. I use a tablet frequently and software keyboards are a pain!
Terranwing - w3;d1;l1
51st Dunedinw2;d0;l0
Cadre Coronal Afterglow w1;d0;l0 |
|
|
|
|
2012/10/04 17:46:08
Subject: WW2 Leman russ vanquisher conversion
|
|
Plummeting Black Templar Thunderhawk Pilot
|
Well like I said in an earlier post, do you think a rectangle with tapered corners would work?
If I can find a picture of a panzer with similar armour I'll post it to show what I mean
LazzurusMan
|
|
|
|
|
2012/10/04 17:48:34
Subject: Re:WW2 Leman russ vanquisher conversion
|
|
Plummeting Black Templar Thunderhawk Pilot
|
Kind of like that, but bigger so less of the track is showing.
|
|
|
|
|
2012/10/04 22:38:44
Subject: WW2 Leman russ vanquisher conversion
|
|
Regular Dakkanaut
|
If you're going to do side skirts, don't make them one solid piece. The german tanks usually had about 4 or 5 individual pieces on each side. It also gives you the option to leave a couple off to show battle damage and break up the flat surface some.
|
|
|
|
|
2012/10/05 02:09:34
Subject: WW2 Leman russ vanquisher conversion
|
|
Plummeting Black Templar Thunderhawk Pilot
|
Okay...I have an idea in mind.
4 pieces On each side. They'll all be pinned so I can remove the if for some reason I don't want extra armour, and all the pin holes will be made to look like battle damage. I can then also remove pieces when I want to to simulate battle damage etc.
Sound good to you guys?
LazzurusMan
|
|
|
|
|
2012/10/05 04:07:52
Subject: WW2 Leman russ vanquisher conversion
|
|
Sneaky Kommando
Austin, Texas USA
|
Question - do you want the side armor to look like it was a factory kit/modification or a field modification?
If you want it to look like it was planned, get some sand paper and smooth the edges, make everything precise.
If you want it to look like a field modification, make the edges rough, and make it look less precise.
|
Eating and sleeping are the only activities that should be allowed to interrupt a man's enjoyment of his cigar. S. Clemons
|
|
|
|
|
2012/10/05 21:06:39
Subject: WW2 Leman russ vanquisher conversion
|
|
Regular Dakkanaut
|
Sounds good. I might even look into side skirts that they already make as after-market products for like 1/35 or 1/48 german tanks, if I were you. It might be worth it for the mounting brackets and such.
|
|
|
|
|
2012/10/05 21:10:15
Subject: WW2 Leman russ vanquisher conversion
|
|
Plummeting Black Templar Thunderhawk Pilot
|
Ah, brilliant idea! Cheers pete
LazzurusMan
|
|
|
|
|
2012/10/06 16:23:29
Subject: Re:WW2 Leman russ vanquisher conversion
|
|
Plummeting Black Templar Thunderhawk Pilot
|
Right, this is nowhere near to scale, and is a very bad drawing, but what do you guys think of this as the extra armour for my vanquisher?
|
|
|
|
|
2012/10/06 19:22:20
Subject: WW2 Leman russ vanquisher conversion
|
|

Longtime Dakkanaut
|
Logically, spaced side armour needs to roughly match the side profile of the tank hull (any more is wasted, any less leaves some of the hull unprotected), leaving enough space at the bottom for the suspension, and at the top so it won't be hit by the turret weapon rotating. So what you have is fine.
Definitely worth digging out more photos of WW2 tanks with spaced side armour - the Germans were particularly fond of it - especially the way it was 'hung' on hooks on a mounting frame for easy removal and replacement. Personally I'd go to the effort of modelling a mounting frame from plasticard girders and hang individual pieces of armour on it - that will both look cool and give you an easy way to remove it when not needed for a particular game.
|
|
|
|
|
2012/10/06 19:30:33
Subject: WW2 Leman russ vanquisher conversion
|
|
Plummeting Black Templar Thunderhawk Pilot
|
Sounds good. And there is quite a bit of armour protruding on the top of my design. This is mainly due to the fact that it doesn't have a turret.
I'll get some pics up as soon as I have the armour cut out, any ideas of how I should do the mounting brackets?
|
|
|
|
|
2012/10/06 20:50:05
Subject: WW2 Leman russ vanquisher conversion
|
|
Regular Dakkanaut
|
I took the liberty of drawing an outline on your previous image. This is just what I would go with, can't wait to see how yours comes out!
http://images.dakkadakka.com/gallery/2012/10/6/418384_md-.jpg
sorry couldn't figure out how to post the actual image
|
|
|
|
|
2012/10/06 21:37:06
Subject: WW2 Leman russ vanquisher conversion
|
|
Plummeting Black Templar Thunderhawk Pilot
|
Anyone got any ideas for how I can mount the armour plates?
I was going to go for a really simple line of plastic card on each plat then glue it to the tank. No time or tools to pin etc.
Anyone got any better Ideas? Automatically Appended Next Post: Right...some decent updates for once!
Cloth has been added to the base of the Vanquisher barrel, an armor plate has been added to the top of the chassis where the old turret used to go, and the left side of armor plates are cut out and ready to be glued onto the tank 
After looking at them, and the tank in general...I might start doing this on commission if people like it enough 
|
|
This message was edited 1 time. Last update was at 2012/10/06 23:41:01
|
|
|
|
|
2012/10/07 12:42:23
Subject: WW2 Leman russ vanquisher conversion
|
|
Regular Dakkanaut
|
They need to be sticking out from the tank a bit. That's the whole purpose of the shields, to cause rockets and such to detonate away from the hull. Google 'shurzen' and look at the first image to see how the germans did it. I would think making that type of mount from plasticard would be pretty simple, maybe a little flimsy but not if you use a rail at the top and bottom of each side.
|
|
|
|
|
2012/10/07 13:20:13
Subject: WW2 Leman russ vanquisher conversion
|
|
Plummeting Black Templar Thunderhawk Pilot
|
In the end I just went for strips of plasticard, they glue onto the hull and keep the armor plates off it. Simple, not too aesthetically pleasing, but they can be glued on, and they will look good.
Just one more quick question before I glue the first panels on...should I have big or very small gaps between the panels?
|
|
|
|
|
2012/10/07 16:24:37
Subject: WW2 Leman russ vanquisher conversion
|
|
Sneaky Kommando
Austin, Texas USA
|
I'd go with small gaps - and warp the lower edges a bit with heat.
|
Eating and sleeping are the only activities that should be allowed to interrupt a man's enjoyment of his cigar. S. Clemons
|
|
|
|
|
2012/10/07 16:52:02
Subject: WW2 Leman russ vanquisher conversion
|
|
Plummeting Black Templar Thunderhawk Pilot
|
Well the left side is glued on...and after some *battle damage*, looks like this thing has been through a war or two
|
|
|
|
|
2012/10/08 12:18:39
Subject: WW2 Leman russ vanquisher conversion
|
|
Regular Dakkanaut
|
We'd love to see pics when you get a chance!
|
|
|
|
|
2012/10/08 20:26:30
Subject: Re:WW2 Leman russ vanquisher conversion
|
|
Plummeting Black Templar Thunderhawk Pilot
|
Thanks for all the input guys
I'm tempted to get a mod to move this to the blog section as this is no longer ideas, but a running commentary on "Astrid" and the progress that's being made
If you take a look at the fourth pic, that's my new armor plate that goes over the horrendous hole I cut into the top of the chassis. Any comments or suggestions on that?
Cheers,
LazzurusMan
|
|
|
|
|
2012/10/08 23:06:44
Subject: WW2 Leman russ vanquisher conversion
|
|
Sneaky Kommando
Austin, Texas USA
|
IMO that third plate is long - I'd shorten the middle one a bit so the third one doesn't overhang so much.
|
Eating and sleeping are the only activities that should be allowed to interrupt a man's enjoyment of his cigar. S. Clemons
|
|
|
|
|
|
|