| Author |
Message |
 |
|
|
|
|
Advert
|
Forum adverts like this one are shown to any user who is not logged in. Join us by filling out a tiny 3 field form and you will get your own, free, dakka user account which gives a good range of benefits to you:
- No adverts like this in the forums anymore.
- Times and dates in your local timezone.
- Full tracking of what you have read so you can skip to your first unread post, easily see what has changed since you last logged in, and easily see what is new at a glance.
- Email notifications for threads you want to watch closely.
- Being a part of the oldest wargaming community on the net.
If you are already a member then feel free to login now. |
|
 |
2013/02/20 11:17:31
Subject: Deathwing Terminator, a noobie's first model.
|
|

Fresh-Faced New User
|
Hi Dakka,
Here's an image of my painted Deathwing Terminator. I only started painting and the whole 40k shebang but i'm lovin it so far!
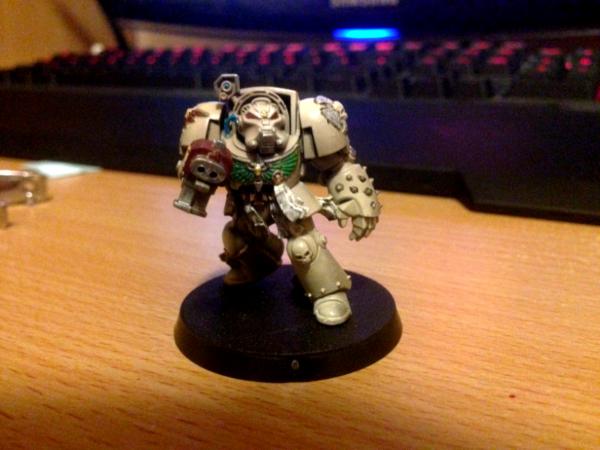
If you could please give me tips, and criticism that would be great!
|
|
|
 |
|
2013/02/20 11:24:10
Subject: Deathwing Terminator, a noobie's first model.
|
|
Fixture of Dakka
|
Very good so far. It's neat and the bone colour has good coverage.
Your next step would be to give it a black or sepia wash followed by some highlights.
|
|
|
|
|
|
2013/02/20 11:26:23
Subject: Deathwing Terminator, a noobie's first model.
|
|
Fresh-Faced New User
|
Where should i do the wash?
|
|
|
|
|
2013/02/20 11:47:14
Subject: Re:Deathwing Terminator, a noobie's first model.
|
|

Esteemed Veteran Space Marine
|
Your wash wants to be primarily around raised edges such as the leg bonding studs, and the aquila on the chest. I usually use a wash of the same colour as the area i'm washing, but obviously a darker hue. You'll probably want to highlight the raised edges of these areas after your wash has dried.
Personally, I would say that it could do with some more gold on it - as befits a Deathwing warrior. Perhaps the studs should be gold? However, it's all your personal taste. 
Looking really good so far for a first model - keep up the good work.
|
|
|
|
|
|
2013/02/20 12:09:55
Subject: Re:Deathwing Terminator, a noobie's first model.
|
|
Focused Fire Warrior
|
Some wash the whole thing, im a fan of shading just the joints. I try to shade the area around the joint with something like sepia and then put in a smaller band of black. Areas like the knee pad crevice get hit with black.
|
|
|
|
|
2013/02/20 12:39:22
Subject: Re:Deathwing Terminator, a noobie's first model.
|
|

Crushing Black Templar Crusader Pilot
|
Very good for a first timer! Im only a little over a year into this and you learn a lot of techniques along the way. I only just started washes a few months ago. Personally where the armor is mostly a bone color I would start with a light brown wash so it settles into the cracks and gives a little texture to the smooth surfaces. It will darken up the armor a bit in addition to the added depth. Then find a suitable light dry brush compound, get a drybrush, and just hit the raised sections with it. Youll end up with the base color, darker recesses, and highlighted raised sections. This works for any surface. Like an easy gun technique would be base it with Leadbelcher (gunmetal), wash it with Nuln Oil (black wash), then drybrush with silver. Gives the gun three levels of color; its easy and it really pops. Youll pick it all up as you go along 
Soon people will suggest you base it. I dont do a ton of basing; on my Templars I paint the base brown, glue some sand on, done. Its a nice contrast to the black armor to make them stand out. With your Termis coloring I would probably do a grassy base to match the green chestpiece and also contrast the overall color. Two cents!
|
|
This message was edited 1 time. Last update was at 2013/02/20 12:43:26
 BLACK TEMPLARS - 2000 BLACK TEMPLARS - 2000  0RkZ - 2000 0RkZ - 2000  NIDZ - WIP NIDZ - WIP  STEEL LEGION - WIP STEEL LEGION - WIP
 |
|
|
|
|
2013/02/20 16:12:25
Subject: Deathwing Terminator, a noobie's first model.
|
|
Near Golden Daemon Caliber
|
A first attempt and the barrels are already drilled out! I see a bright future for this one
Nice bleached bone. Like everyone said washes are cool, and basing increases your model's class by at least 20%. Your purity seals look like they could use another thin layer of white but it could just be the picture.
Keep up the good work!
|
|
|
|
|
|
2013/02/20 16:15:56
Subject: Deathwing Terminator, a noobie's first model.
|
|
Focused Dark Angels Land Raider Pilot
|
A very good early attempt. As said before, a very thin brown wash in those joints can make them really pop out better.
Throw on at least some simple basing (playground sand, flocking, whatever) and you'll be well on your way to the tabletop.
|
|
|
|
|
|
2013/02/20 16:18:29
Subject: Re:Deathwing Terminator, a noobie's first model.
|
|
Esteemed Veteran Space Marine
|
Following on from GrimDork: I don't know what others have to say about them, but I find Citadel's basing and dry-brushing compounds are really quite good for a basic base (You've no idea how painful that sounds - 'basic base' ).
I usually put down a thick layer of the Astrogranite basing compound, followed over by a Nuln Oil Wash, and a final dry-brush with Tyrant Skull - Works great as a base. Hope that helps! :d
|
|
|
|
|
|
2013/02/20 19:50:12
Subject: Deathwing Terminator, a noobie's first model.
|
|
Perfect Shot Dark Angels Predator Pilot
|
Nice work mate. I am a bit worried about painting my Deathwing because I don't want them to look like gak. If I can get mine to look half as good as yours there, I'll be happy.
Personally I like the more austere look without too much gold or ostentation. I think it fits the Dark Angels monastic theme more.
Also good work on drilling the bolter! It's such a basic thing but completely changes the look of any model.
|
|
|
|
|
|
|
|

 Dark Angels (Black Armor Themed)