| Author |
Message |
 |
|
|
|
|
Advert
|
Forum adverts like this one are shown to any user who is not logged in. Join us by filling out a tiny 3 field form and you will get your own, free, dakka user account which gives a good range of benefits to you:
- No adverts like this in the forums anymore.
- Times and dates in your local timezone.
- Full tracking of what you have read so you can skip to your first unread post, easily see what has changed since you last logged in, and easily see what is new at a glance.
- Email notifications for threads you want to watch closely.
- Being a part of the oldest wargaming community on the net.
If you are already a member then feel free to login now. |
|
 |
2013/09/04 19:13:42
Subject: Grim, dirty, weathing & battle damage
|
|

Fresh-Faced New User
|
My usual marines are normally clean and tidy.
I want to change that for my next model, but I have no idea where to begin. I'd like to start with something basic, bit of mud on the boots and some chipped paint etc.
1st of all, can anyone recommend a guide or give advice.
Also what kind of paints/tools will I need, I have access to basic citadel stuff (computer shop in town sells them) but that's about it.
If I need anything, would really like to get an order made tonight, so that (Emperor willing) it turns up for the weekend. 
|
|
|
 |
|
2013/09/04 19:23:32
Subject: Grim, dirty, weathing & battle damage
|
|
Morphing Obliterator
|
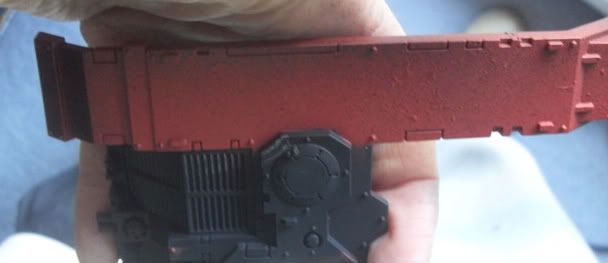
Try dry brushing the boots with a muddy brown, or using inks over your colours to create a "dirty" look.
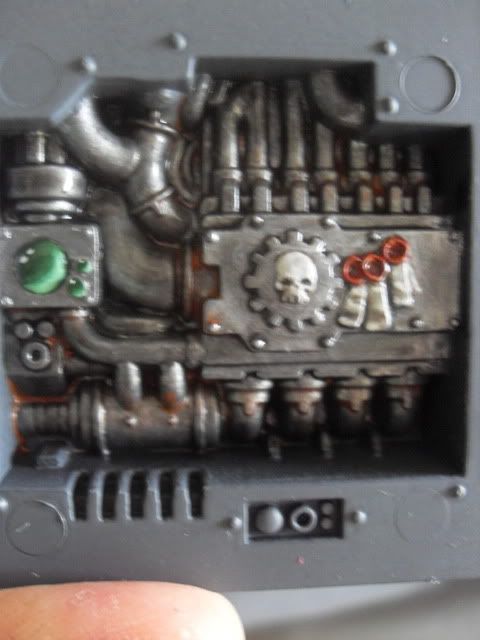
Personally I paint the top third of the model with a heavy coat of water based sepia or black ink. Then using a very wet brush I thin the ink on the model, allowing it to run downwards. This leaves the heaviest concentration of pigments on the lowest part of the model. The banner on the iron warrior below is an example of what I mean
|
|
This message was edited 1 time. Last update was at 2013/09/04 19:24:45
 12000 pts 12000 pts
 5000pts 5000pts |
|
|
|
|
2013/09/04 19:23:38
Subject: Grim, dirty, weathing & battle damage
|
|

Fighter Ace
|
Mud on boots can be easy, just pick up some of the flocking/dirt/sand/gravel from a basing kit and glue some onto the buttoms of the feet and dry brush whatever shadeds of mud you want. Maybe through in a wash first for some darkening around there.
For chipped paint I used to base coat the area I want to chip with whatever metal you want underneath it. Then after you let it dry put on your first coat of the real color you want on top and before it drys hit/smudge it with a sponge or a papertowel. If you need more than one layer of the color just keep hitting the same spot with the sponge/paper towel.
Those are my two quick easy ways of doing it. I'd try it on a test model and see if it's an affect you like.
|
|
|
|
|
|
2013/09/04 20:27:47
Subject: Grim, dirty, weathing & battle damage
|
|
Colonel
This Is Where the Fish Lives
|
http://fromthewarp.blogspot.com/p/archives-and-tutorials.html
Go there and read all the posts under "Weathering and Battle Damage."
|
 d-usa wrote: d-usa wrote:"When the Internet sends its people, they're not sending their best. They're not sending you. They're not sending you. They're sending posters that have lots of problems, and they're bringing those problems with us. They're bringing strawmen. They're bringing spam. They're trolls. And some, I assume, are good people."
|
|
|
|
|
2013/09/04 20:32:43
Subject: Grim, dirty, weathing & battle damage
|
|
Morphing Obliterator
|
An easy Way to do minor battle damage is to paint the mini as usual, then scrape areas with a modelling knife. Then paint silver over the scrape and immediately wipe it off again. This will leave the silver paint in the scratches. You can then use a brown wash over the scratches to give a slightly rusted look
|
12000 pts
5000pts |
|
|
|
|
2013/09/04 21:13:15
Subject: Re:Grim, dirty, weathing & battle damage
|
|
Fresh-Faced New User
|
Wow, thanks for all the advice, looking forward to trying some of them out 
|
|
|
|
|
2013/09/04 21:37:01
Subject: Re:Grim, dirty, weathing & battle damage
|
|

Stormin' Stompa
|
You can also model damage onto the model using a small hand drill and hack saw. Drill a small hole and dig it out with a modelling knife for bullet holes. For slash marks, cut into the plates with a hacksaw and and dig out with a modelling knife.
|
Ask yourself: have you rated a gallery image today? |
|
|
|
|
2013/09/04 21:59:38
Subject: Grim, dirty, weathing & battle damage
|
|

Trigger-Happy Baal Predator Pilot
|
Easiest way to do paintchips would be the sponge technique (load of tutorials about this technique on the internet).
using washes often doesn't lead to a 'dirty' look, but more to a 'messy' look imho. If you want mud you could try using some textured paints (think of it as normal paint, perhaps a bit thicker, with some fine sand mixed in to give it some texture... dab that on boots and lower legs to simulate mud splotches on the logical areas like legs or tank tracks)
|
|
|
|
|
|
2013/09/05 02:13:52
Subject: Grim, dirty, weathing & battle damage
|
|
Gargantuan Gargant
|
I'll also recommend looking at some sponge chipping tutorials. Simple concept and yields great results, with a bit of care. Fine wear on hard metallic edges can be done with graphite - woodless sticks or pencils will both work, with softer leads being preferable (grinding it up gives you a metallic powder that can be more easily rubbed across things like tank tracks, but a solid lead is better for individual scratches and corners).
Washes, ink glazes, and drybrushing are all great ways to dirty up an otherwise pristine model without the need for specialty products, but weathering powders are a great investment, if you're looking to expand your repertoire further, as are oil paints. Plenty of info out there on their uses in weathering, if you want to read up.
|
The Dreadnote wrote:But the Emperor already has a shrine, in the form of your local Games Workshop. You honour him by sacrificing your money to the plastic effigies of his warriors. In time, your devotion will be rewarded with the gift of having even more effigies to worship.
|
|
|
|
|
2013/09/05 09:23:43
Subject: Grim, dirty, weathing & battle damage
|
|

Veteran Wolf Guard Squad Leader
|
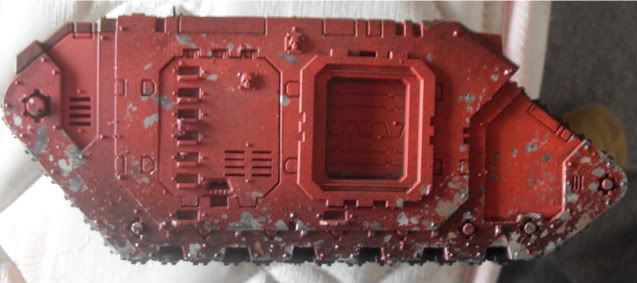
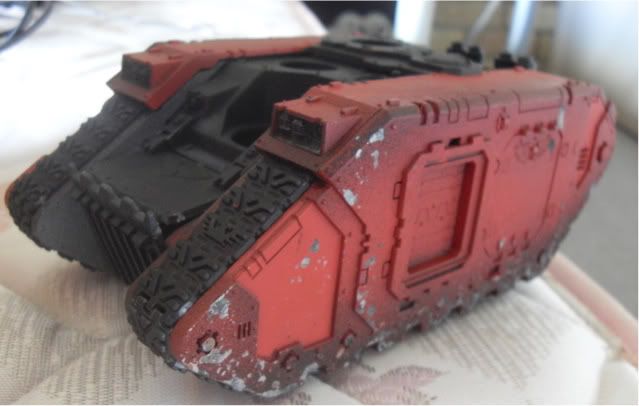
Sponge weathering alongside some washes and glazes will turn up awesome. It can give you something like this:

All the armor is spongeweather with a mud colour and a metal one. I personally don't like drybrushing at all, and think it should be avoided but that is me.
Oil washes and weathering pigments can also be used for different weathering techniques too. Great place to go is the Forgeworld master class books.
|
|
|
|
|
|
2013/09/06 01:43:36
Subject: Grim, dirty, weathing & battle damage
|
|

Wondering Why the Emperor Left
|
One technic that works wonderfully for chipping would be to use releasing agents
 nerdfest09 wrote: nerdfest09 wrote:Here we go again! and this time i'm pumped!  I started building my landraider as a break from the marines that i had had enough of for the time being and I am enjoying it immensely, I used my airbrush again and came across a few issues but i'm still happy with how it turned out considering it was only it's second time out of the box.
Well now first things first I undercoated the sprues chaos black and then clipped off the parts I needed and pushed the two hulls together, then I gave the outside of each one a good brush with boltgun metal then a stippling of mithril silver.
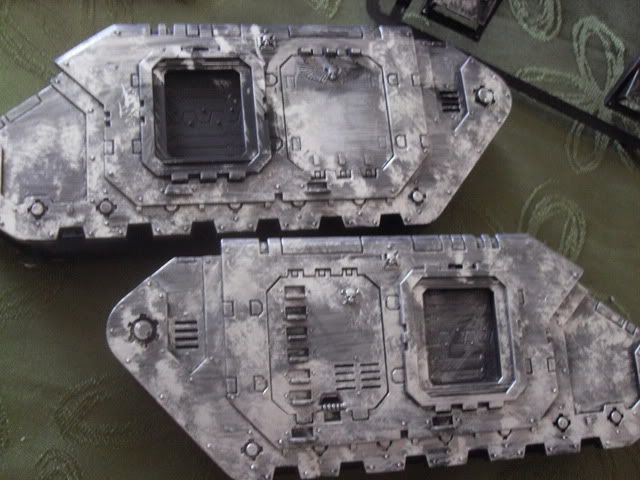
Next step was to just dab a little watered down blazing orange in parts over the hulls.
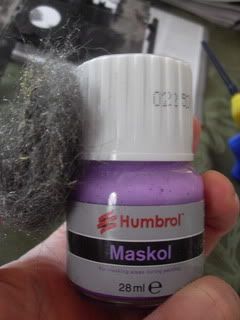
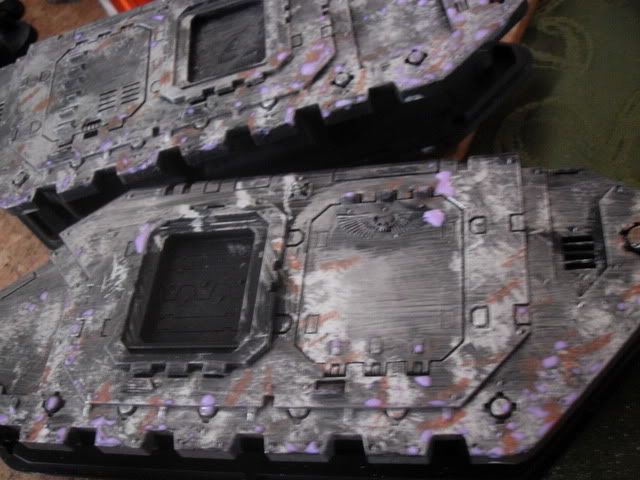
Now that was the quick bit, next thing I did was use a masking liquid, in this instance I used a Humbrol liquid mask and a small piece of fine steel wool and stippled it very gently over parts I felt would get some good chipping and wear and tear.
Whilst this was drying on the body of my raider, i thought i'd give some of the interior a quick paint, nothing too time consuming as it would be rarely seen but just a neat representation that would still hold up with the rest of the models in the army, it turned out well and I am actually happier than I thought i'd be with how it looks.
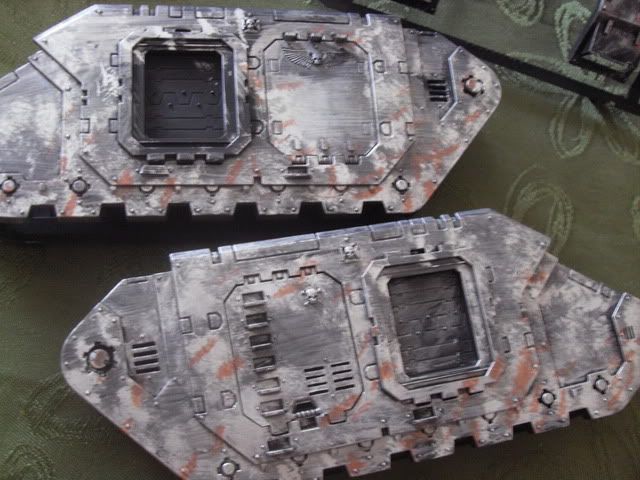
Once the mask had dried I busted out the can of Dragon red army painters colored primer! and I must say i like the product, it gave a nice color and good coverage without obscuring any details, you can see in the pic the 'bubbles' under the paint which are where the mask is and where the chipping will be when i pull it off.
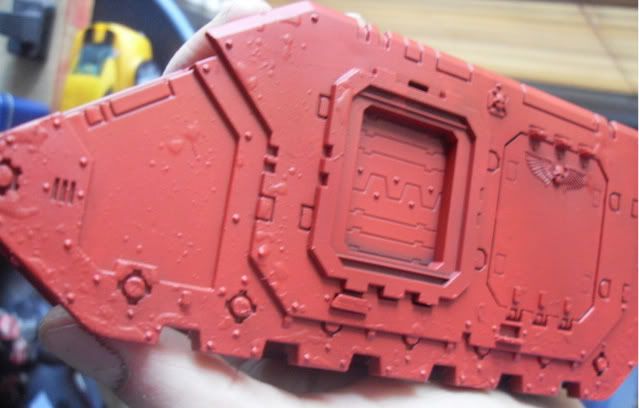
Righto, now it was time to get out the dreaded airbrush for it's second time out, I still had some issues as i'm teaching myself how to run it, sometimes the paint came out too fast with too much pressure so i turned it down and it was better, then the paint came out a bit too 'speckly' not too bad and I did continue with it like that as the effect wasn't bad when you considered the whole model, i'll let you be the judges, but practice makes perfect right? next time I hope i'll get better again, I wasn't sure how to shade the raider so i went the safe route and just went on the lower half and a small burst across the top.
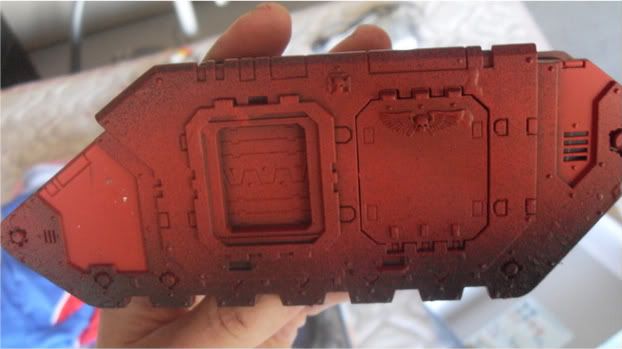
While the airbrush was scaring the bejeezus out of me when it turned itself back on when i wasn't ready! I decided when my heart stopped beating a mile a minute to forgive it and use it to paint the hold of the model, so using barley gray from Vallejo air paints I did....
I was really,really liking how it was working out for me so far, a few errors but nothing to disheartening at this stage, the break from my marines is a good choice I think and has kept the fire burning for this army project, it's always something I love to see on my shelf when you can put a nice tank with a squad of marines charging out into the battlefield, mind you on my shelf the battlefield consists of 40k novels and a few transformers toys!  not exactly threatening!.....although if Bumblebee gets riled up!...... 
moment of truth now, and it's time to peel off the mask, for this task I used a small blob of Blu tac on the end of a brush and brushed it over erasing the mask from under the paint, as it peels away I'm loving the look so far, and tomorrow once I get back into it I shall hopefully add some highlights with a normal brush but I feel the actual chipping and weathering is fine without going crazy and trying to touch it up more.
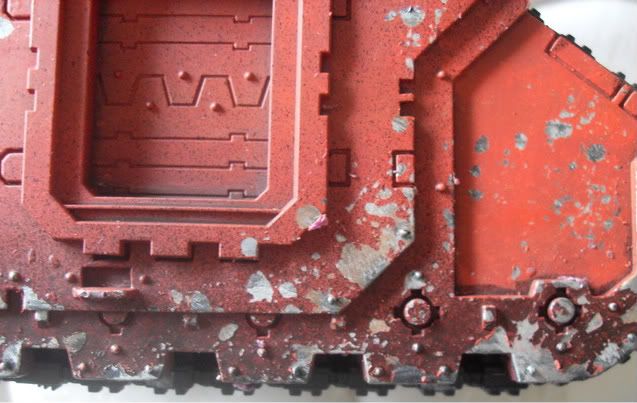
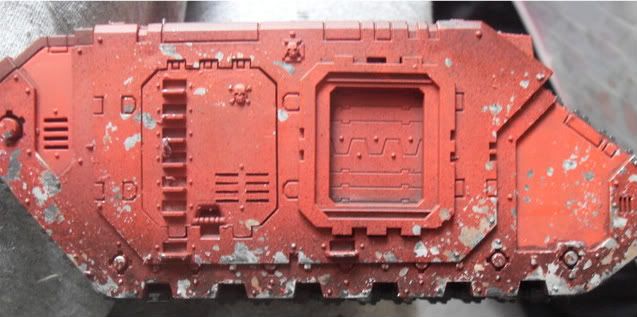
Nice I think so far, now I put the rest of the model together and got a feel for where to go next with it, the more i look at it the more i am happy with my choice of chapter, I love the splash of red throughout with the nice black armor, I think they are a striking looking army and i can't wait to keep moving on with them hopefully producing some models that you all like out there! I took one pic of the Raider together before I gave it up for the day and watched Predators with a mate of mine!
Well that's it unfortunately for me today, I hope you can give me some honest feedback and i'll get working on it more tomorrow and hopefully be able to post pics up soon 
Your pal: Nerdfest09
Automatically Appended Next Post: A bit too wordy...
Sry about that
|
|
This message was edited 1 time. Last update was at 2013/09/06 03:04:10
I have been toying about with the idea of 3 10men sternie squad w/combi weapons with Pedro, chappie and a librarian with null zone and done shield all in  drop pod drop pod |
|
|
|
|
2013/09/06 18:08:46
Subject: Re:Grim, dirty, weathing & battle damage
|
|
Boosting Space Marine Biker
|
I use a mixture of recess washes, sponging and tamiya weathering compounds
|
|
|
|
|
|
2013/09/15 20:38:50
Subject: Re:Grim, dirty, weathing & battle damage
|
|
Fresh-Faced New User
|
Sorry all, I've been a bit lazy lately, meant to actually get started last weekend.
I've painted up some test bits, not the best in the world, but should serve as a victim.
Didn't see any point in highlighting him if the plan is the get him dirty.
I've bought myself a selection of browns, from the citadel range, shades, layers and a texture.
I was going to try the texture paint on the boots, but wanted to have a go at the sponge technique 1st, but I have 1 major question. What colour should I use?
While I'm asking questions, should I look into weathering powders, or is that a bit too advanced for me?
|
|
|
|
|
2013/09/16 12:35:15
Subject: Re:Grim, dirty, weathing & battle damage
|
|
Fresh-Faced New User
|
Well had a go at the sponge technique and failed miserably.
Did a a 80/20 mix of Scab red and Chaos black for the sponging, then tried to highlight with Blazing orange, that's where everything went wrong. Maybe I'm not skilled enough yet to do this kind of tiny highlighting, But I had a real tough time with my citadel fine detail brush.

Not too sure how to fix this.
|
|
|
|
|
2013/09/22 21:23:15
Subject: Re:Grim, dirty, weathing & battle damage
|
|
Fresh-Faced New User
|
Well I did another base coat and tried again


Not really liking the results, getting a little frustrated because I can't seem to get the paint to do what i want. 
I bought new W&N brushes, no.1 and a 00, but it doesn't seem to have helped me, with the 00, I can never seem to paint with the point, there just seem to be any paint there, I've got to be doing something fundamentally wrong.
I'm thinning doing my paints with acrylic thinner, but paints seems to be drying too fast, even on the brush.
Sorry for the rant, not been a good night 
As always, appreciate any help I can get.
|
|
|
|
|
2013/09/26 22:03:18
Subject: Grim, dirty, weathing & battle damage
|
|
Ork Boy Hangin' off a Trukk
|
Two things,
One: try to sponge on the high lights and darken in the center, you may have more to paint in with a brush but if your not as steady at edging in the hilights darkening in the center gives you a bit more room to work with.
Two: As you are talking about thining your paints and they seem to be drying to fast for you. I assume that you might not be using a wet pallet and would recomend trying that.
Hope that helps/
|
|
|
|
|
|
2013/09/27 04:10:31
Subject: Grim, dirty, weathing & battle damage
|
|
Contagious Dreadnought of Nurgle
|
I think your results look good so far.
I have also heard, and seen in use a heavy duty chipping technique. you base coat your model with the color that you want your chips to be, then spray it heavily with hairspray, then paint it again with the color that you want the mini to be as a paint scheme. Soak in water, then rub the mini vigorously to remove bits of paint here or there from high points. It makes a very extensive amount of chipping pretty simple to pull off. I saw a whole army that had been given this treatment. It was a nice effect and since it was army wide and took no time at all to perform, it saved my buddy a lot of time.
For battle damage, i usually use the very tip of a knife and by slowly turning it on the surface of the model, i create craters that simulate gunshots. One of the Landspeeders in my gallery is heavily shot up.
|
Pestilence Provides. |
|
|
|
|
|
|
 2000 Points IG
 2000 Points SM
  3000p
3000p
 2000p
2000p
 7500p
7500p 


 ANYONE FROM NORTH WALES, PM FOR GAMING GROUP INVITE
  Necrons 2500+