

Greetings, fellow Dakkanauts,
We played a 1000 point battle that took us almost 4 hours to finish, and we did so on a 4' by 4' table (instead of the standard 6' by 4') - but hey, for games of 1000 points or under, I think it should be alright.
We rolled
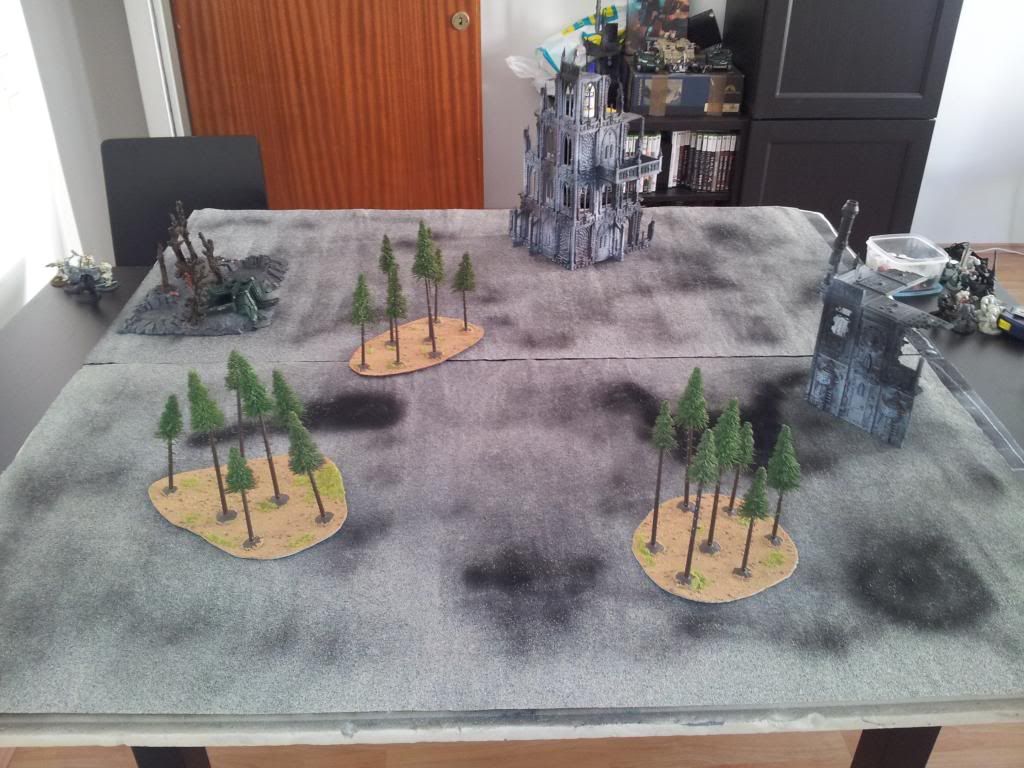
2D6 to choose how many terrain pieces we would decorate our gameboard with, and rolled a 6. My friend - who owns the gameboard - decided that 3 of those should be forests (5+ coversave) and the other 2 ruined buildings (4+ cover save) as well a
citadel battlescape that would count as dangerous terrain, while the others were difficult.
I used the OLD Tau Empire codex for this match as this battle took place in July and I hadnt bought the new Tau codex yet; my friend used the new Dark Angels codex.
It was an interesting game of old vs. new clashing; however quite in line with 6th edition I decided to go with a static gunline approach.
So here are the Armylists:
Tau Empire
(old codex)
HQ:
Shas'
el Commander [Monat], 1 Gun Drone
weapon-systems: Airbursting fragmentation projector, cyclic ion blaster
wargear: Shield generator, hard-wired multi-tracker, hard-wired drone controller
Elite:
Shas'ui XV-8 'Crisis' Battlesuit [Monat]
weapon-systems: missile pod, plasma rifle
wargear: multi-tracker
Shas'ui XV-8 'Crisis' Battlesuit [Monat]
weapon-systems: missile pod, plasma rifle
wargear: multi-tracker
3
Shas'ui XV-25 Stealth Suits (incl. team leader)
3 Gun Drones
weapon-systems: 3 burst cannons, 3 twin-linked pulse carbines
wargear: 3 drone controllers, bonding knife, stealth armor,
infiltrators
Troops:
Firewarriors (6 Shas'la, 1 Shas'ui w. hard-wired multi tracker)
wargear: 7 pulse rifles, 1 markerlight
Firewarriors (7 Shas'la)
wargear: 7 pulse rifles
Firewarriors (7 Shas'la)
wargear: 7 pulse rifles
Kroot Carnivore Squad
12 Kroot
wargear: 12 kroot rifles, infiltrators
Heavy Support:
Hammerhead Gunship
weapon-systems: railgun, 2 burst cannons
wargear: targeting array (included), disruption pod
Hammerhead Gunship
weapon-systems: railgun, 2 burst cannons
wargear: targeting array (included), disruption pod
Total: 999 points
(42 models, 2 tanks, 4 scoring units)
Dark Angels Deathwing]
HQ:
Belial, Master of the Deathwing
+ Terminator Armor
+ Stormbolter
+ Iron Halo
+ Sword of Silence (master crafted power weapon with fleshbane)
+ Teleport Homer (no scatter for units who deepstrike within range)
+ Warlord Trait: The Hunt (+1
VP if enemy warlord is slain in
cc)
+ Tactical Precision (his unit doesn’t scatter when it lands)
Deathwing Command Squad (5 Terminators - I no longer remember how they were armed; at least one had lightning claws)
+ Deathwing Company Banner (+1 attack per
DW model within 6" of banner)
+ Plasmacannon
+ Deathwing Apothecary upgrade (5+
FNP)
+ Deathwing Assault (unit arrives on turn 1 or 2 - you decide - and no need to roll)
+ Vengeful Strike (weapons are twin-linked on the turn when arriving via deepstrike)
Troops:
Deathwing Terminator Squad (2 with Stormbolters and Powerfists, 2 with Thunderhammers & Stormshields, 1 with Pair of Lightning Claws)
+ Cyclone Missile Launcher
+ Deathwing Assault
+ Vengeful Strike
Deathwing Terminator Squad (3 with Stormbolters and Powerfists, 1 with Pair of Lightning Claws)
+ Assault Cannon & powerfist
+ Deathwing Assault
+ Vengeful Strike
Total: 995 points
(16 models, 2 scoring units)
So as you can see, I fielded a quite varied force consisting of infantry, jetpack units, infiltrators, stealth units and tanks while my opponent’s was at first glance fairly simple, but don’t be deceived - he had to remember more special rules and abilities than my pretty straightforward Tau.
We first rolled the deployment method and rolled a 1 on the D3, meaning classic deployment method where players face each other on the long table sides (our table being a 4x4, we decided which one was the "long" side)
We then rolled for the mission and rolled a 6 - Capture the Relic.
I then rolled on the Command Trait table for my Warlord Trait and rolled a 3 (Dust of a Thousand Worlds), which means friendly units in proximity to my Shas'
el Commander gained the Move Through Cover
USR.
We took turns placing the terrain pieces and once all six were on the battlefield...
We rolled to see who deploys and goes first, and my friend won the roll.
He chose to keep his entire army in reserve, so I deployed all my units within 12" of my table side.
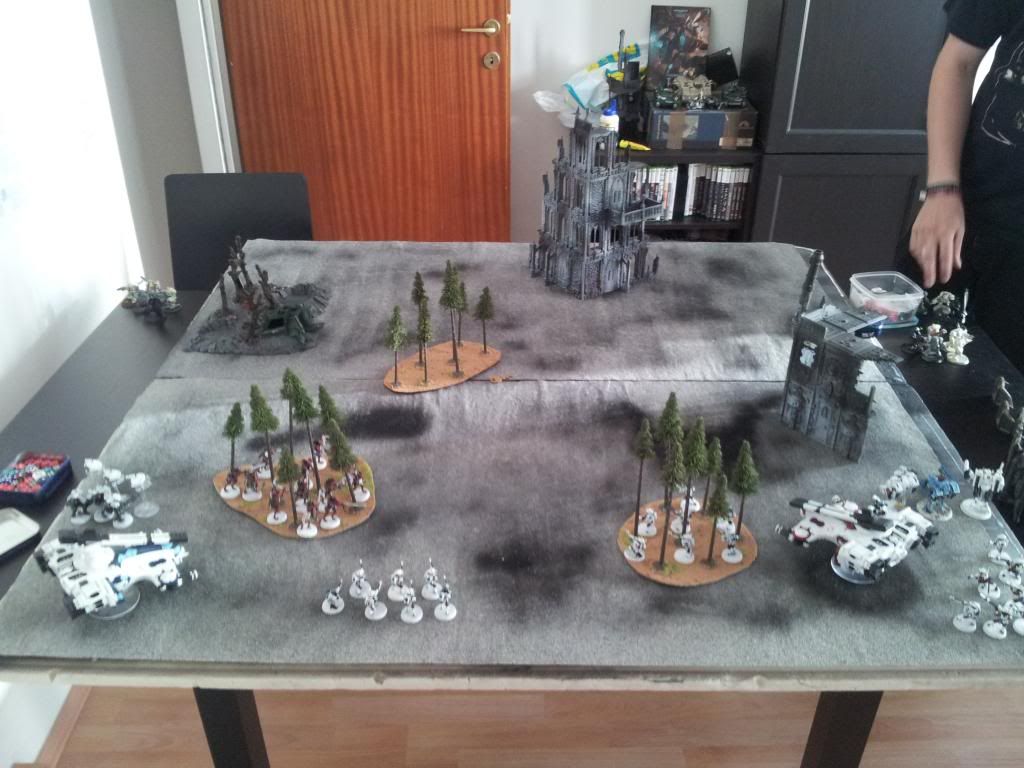
DEPLOYMENT
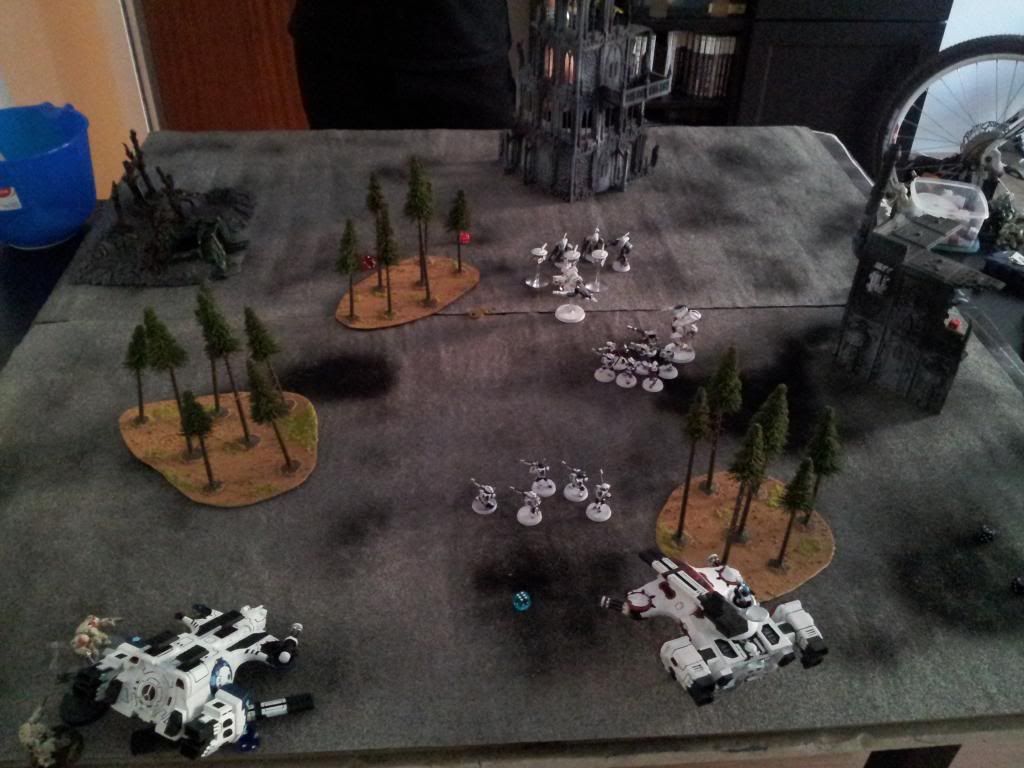
I deployed a Hammerhead on each flank of my side (left = blue, right = red) of the gaming board and placed my 2 independent crisis suits and my
HQ Shas'
el in close proximity to each other near the red Hammerhead. I deployed Firewarrior team #1 behind my red Hammerhead to deny my deepstriking opponent an opportunity to land behind the red Hammerhead and unload into its rear armor.
In the centre I deployed Firewarrior team #2 into the woods, my Kroot carnivore team in the other forest and my Firewarrior team #3 out in the open, in between. The stealth team (and its accompanying 3 drones) was placed North of the blue Hammerhead.
Deployment is shown in the pic below.
Let the game begin!
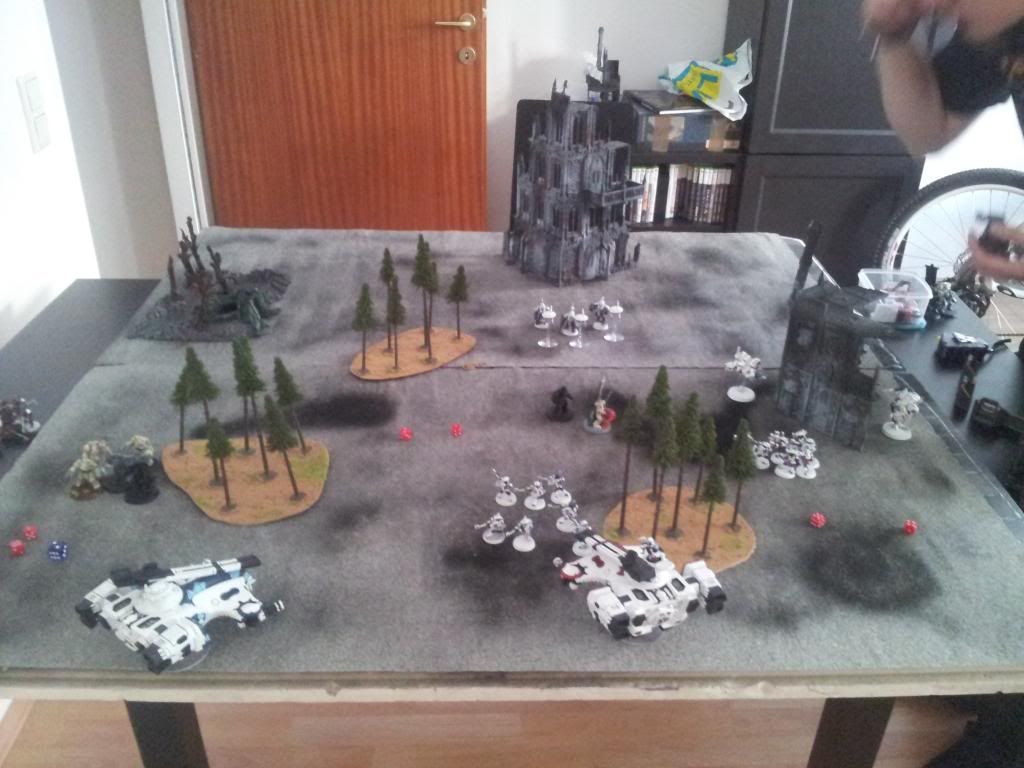
TURN 1 (Dark Angels)
Movement phase: Using the Deathwing Assault and Tactical Precision rule, Belial and his Command squad deepstruck without scatter right next to my Hammerhead, Kroot and Firewarrior Squad #3 on the first turn without a roll needed.
Shooting phase: Belial and the other deathwing terminators shot with their twin-linked (because of Vengeful Spirit) Stormbolters and took 2 of my Firewarriors down, while the command squad's plasmacannon didn't hit anything. But 2 casualties were enough to force a Leadership test on my remaining 7 Firewarriors, and with
LD 7, they failed and almost rolled boxcars for the fallback distance, taking them nevertheless well over the edge of the battlefield.
Assault phase: Belial and friends consolidated 3" towards the Kroot, but didn't (couldn't) do anything else, so
DA ended their turn.
Victory Point earned: First blood.
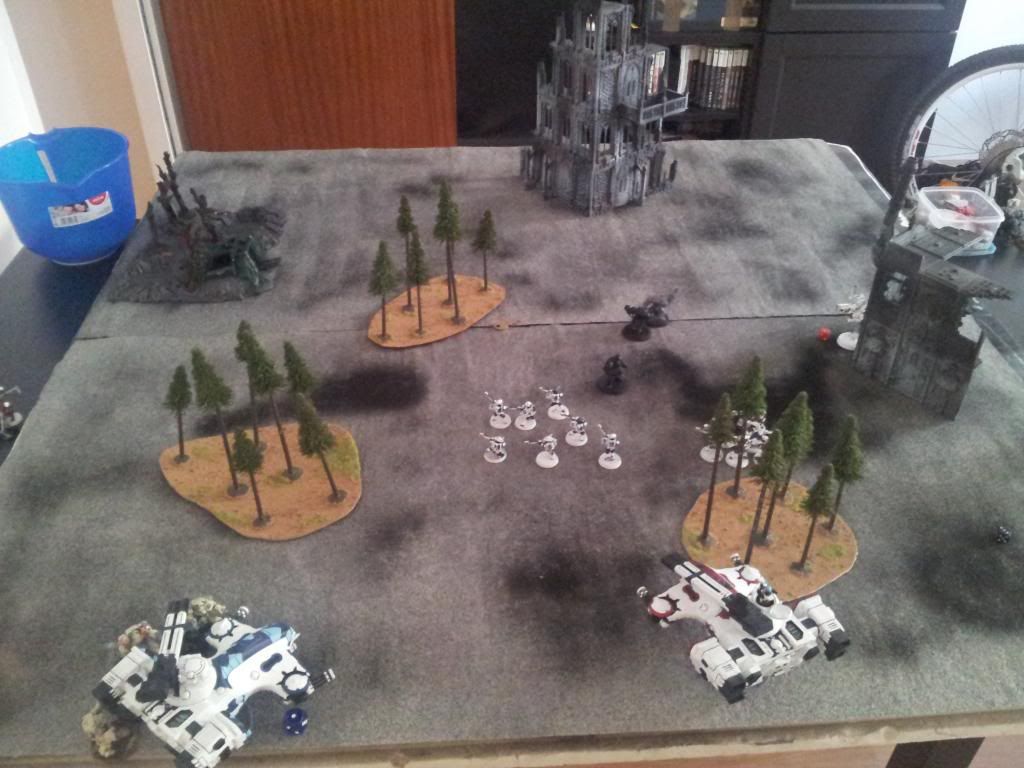
TURN 1 (Tau)
Movement phase: Since my Firewarrior squad #2 and my kroot were in forests, I had to roll on the “mysterious forest” chart and scored Ironbark (3+ cover) for the forest containing my kroot, and Overgrown Spinethorn (good cover save against grenades) for the forest my
FW squad #2 had taken up positions in. I moved my three "Monat" (independent) units 6" toward the middle of the gaming board to come into range of Belial and his squad. The red Hammerhead was moved a little bit south to be able to see past the forest and directly target the Dark Angels with its main cannon denying them a cover save - in the process, I painfully learnt that I had to sacrifice my 2 burst cannons and reduce them to BS1 status for the remainder of the turn. My blue Hammerhead pivoted on the spot (doesn't count as movement) to face the termies with all its weaponry, while my stealth suits remained stationary since they were in good range. The kroot squad and the Firewarrior squad #2 stayed put in the forests, while Firewarrior squad #1 stayed put too (not visible in this picture) to make use of their 30" long range guns.
Shooting phase: I shot with everything I had - the red Hammerhead unloaded its solid shot and the blue Hammerhead its solid shot and both burst cannons, the Kroot sent out 24 S4 rapid fire shots, the stealth team 12 S5 shots, 3 of which weren't
BS 3, but
BS 2 and twin-linked; my 2 Crisis suits unleashed 4 S7 missiles (their plasma rifles were out of range, as was all weaponry of my commander),
FW squad #2 sent out 7 S5 shots and
FW squad #1 another 7. ALL
TO NO AVAIL.
The Deathwing terminators kept rolling 2s and up. And in the occasional happenstance that a one was rolled, the Apothecary's Narthecium game them an
FNP save which they successfully passed, although the rate of this was only 33%. In short: not a single wound was caused. :wookie:
I was flabbergasted.
Assault phase: My stealth suit team made its jetpack assault move northwards, avoiding a potential assault victim scenario in the next turn, while the Crisis suits moved another couple inches closer to the place where they were supposed to be.

End of Tau Turn 1.
TURN 2 (Dark Angels)
Movement phase: My friend rolled for reserves but was unsuccessful, so his one 500 point unit still remained the only thing on the table, at least for another turn, facing the combined might of an army twice its points cost.
Shooting phase: His squad shot into the woods targeting the kroot, and despite Ironbark, I got 3 casualties. Three Kroot makes 25% of the squad of 12, so I had to test for morale and I failed it miserably.
Assault phase: The Kroot ran around 8" out of the forest toward my table edge, and my friend then declared assault, I failed my leadership test again, so my Kroot were wiped out. Belial and company consolidated into the woods.
There was nothing else my friend could really do, so he ended his turn 2.
TURN 2 (Tau)
Movement phase: I moved my three "Monat" (independent) units another 6" toward the middle of the gaming board to come into rapid-firing range of Belial and his squad. The red Hammerhead was moved a little bit west to be able to see past the forest and target the Dark Angels with its main cannon. My blue Hammerhead pivoted on the spot to face the termies with all its weaponry, while my stealth suits moved 6" east toward the relic. Firewarrior squad #2 stayed put in the forests, while Firewarrior squad #1 (not pictured, but to the right of the red Hammerhead) moved 6" towards the center of the board to get to the objective, as they were too far away to effectively do any shooting.
Shooting phase: Again, I shot with everything I had - the red Hammerhead this time shot its large blast marker and both
BS 1 burst cannons; the blue Hammerhead did so as well, along with both its burst cannons; the stealth team let fly 15 S5 shots; my 2 Crisis suits unleashed 4 S7 missiles and 2 S6 plasma bolts. All weaponry of my commander continued to be out of range.
FW squad #2 sent out 7 S5 shots.
AGAIN, NOTHING HAPPENED!

The Deathwing terminators kept rolling 2s and up. And in the occasional happenstance that a one was rolled, the Apothecary's Narthecium game them an
FNP save which they successfully passed.
Assault phase: My stealth suit team made its jetpack assault move toward the relic and finally landed on it, thinking they would capture it at the end of their movement phase next turn (this was my 1st 6th ed game...). The Crisis suits moved another couple inches closer to the place where they were supposed to be.

End of Tau Turn 2.
TURN 3 (Dark Angels)
Movement phase: This time, one of the two Dark Angel Terminator squads held in reserve arrived. Using Belial's teleport homer, they landed 6" to the west and did not scatter. Belial and friends decided to head for the relic too, and marched out of the forest, boldly displaying their Deathwing Banner.
Shooting phase: The only ranged weapon of the arrived reinforcing terminator squad that could hurt my Hammerhead was the Cyclone Missile Launcher, so the termie fired it but didn’t hit the side armor.
Belial and his men tried to shoot at my commander, scored a wound and took out the "bodyguard" Gun Drone - again, their Plasma Cannon proved ineffective as its bolt landed harmlessly onto concrete a little ways away from where it was supposed to land.
Assault phase: Nevertheless, it was time for assault. My crisis suits hadn’t gotten far away enough, it seemed. Belial and his bodyguards declared an assault on my independent character, I declared overwatch (can’t go overwatch with the AFP, but I did fire my Cyclic Ion Blaster, but it did nothing). The squad of monastic extremists reached my Shas'
el and, given Belial's superior initiative, he caused 2 wounds my shield generator couldn't save. Next up in initiative order was his Lightning Claw terminator buddy and he gave my commander the rest and ripped him to shreds. The squad consolidated.
Victory Point earned: Kill the Warlord.
My friend ended his turn 3.
TURN 3 (Tau)
Movement phase: By this time after rules consultation I (we) learned that only scoring units can claim the relic (much to my chagrin), so I moved the stealth team away from it and away from Belial's squad. I then moved
FW team #2 out of the woods and toward the relic (key at the centre of the table). I moved the blue Hammerhead 6" away from the terminator troop, and moved the crisis suits about 3" away from Belial and his men, while moving
FW team #1 closer to the centre of the board.
Shooting phase: My 2 Monat suits were in range, but I waited. I first unleashed fire from my stealth team and finally took down the model closest to them - the APOTHECARY (no more
FNP!!!), then came Firewarrior team #1 who was conveniently in rapid-fire range, followed by
FW team #2. Next up came the two Hammerhead solid shots. All this firing was effective. A further 2 terminators dropped dead this time, finally allowing me to cheer a bit since the battle had started. My 2 Monat suits unleashed a rapid-fire plasma torrent, accompanied by high-yield missiles, and reduced Belial's wounds to 1. Finally the tide was starting to turn.
Assault phase: My stealth suit team made its jetpack assault move northwards, avoiding a potential assault victim scenario in the next turn, while the Crisis suits tried to move eastward, to hide behind the building and henceforth only employ a "jump-shoot-jump" tactic, but only one of the two made it all the way.
End of Tau Turn 3.
TURN 4 (Dark Angels)
Movement phase: The remaining Dark Angel Terminator squad held in reserve landed dead centre on the battlefield, in range of Belial's teleport homer.
Shooting phase: It shot its weapons (including the Assault Cannon) into my Crisis suit outside the manufactorum ruin, but only managed to deal one unsaved wound. Belial shot at it too, but didn’t manage to cause any damage. The terminators on the left side of the board shot the
CML at the blue Hammerhead, but rolled snake eyes.
Assault phase: Belial and his wingman tried to charge, I declared overwatch, didn’t cause any wound, and he didn’t make it all the way to my suit. The terminators on the left side of the board charged my blue Hammerhead, and reduced its Hullpoints to 1, as well as immobilizing it.
TURN 4 (Tau)
Movement phase: FW squad #1 moved toward the left, to try and reach the relic without getting too close to the terminator squads, while
FW squad #2 moved closer to the relic.
Shooting phase: First I opened fire on Belial and the remaining termie with my rapid-firing
FW squads as well as the red Hammerhead until Belial died. My friend told me that there were no "kill points" to be gained by fully wiping out squads in this scenario (as I was accustomed since 5th edition), so I left that 1 terminator from Belial's squad alive and instead concentrated my remaining army's fire onto the newly arrived terminator squad, causing 3 casualties. Since all Dark Angels Deathwing terminators are fearless, there was no need for my friend to pass any leadership tests due to the losses.
Assault phase: My stealth suit team made its jetpack assault move northwards and safely landed behind the basilica administratum, while the Crisis suits tried to move eastward, to hide behind the building and henceforth only employ a "jump-shoot-jump" tactic, but again, only the "healthy" one of the two made it all the way.
Victory Point earned: Kill the Warlord.
End of Tau Turn 4.
 TURN 5 (Dark Angels)
Movement phase:
TURN 5 (Dark Angels)
Movement phase: At the beginning of turn 5 my friend rolled a dice to see whether the game continued and indeed it did. He moved his remaining 2 termies from the reinforcement squad to the relic (an old house key) and ended his movement on it, claiming it. The lone termie from Belial's squad threateningly got in the way of
FW squad #2.
Shooting phase: It opened fire with its stormbolter, but my Shas'la made their save.
Assault phase: In the Assault phase, it declared a charge on my
FW team #2, and they went on overwatch, but couldn’t bring it down despite 14 S5 shots, albeit delivered as
BS 1. Since
FW squad #2 was somewhat spread out, only the northmost 2 Firewarriors could land close combat attacks on the lone terminator, but didn’t even scratch it. The terminator in turn brought its mighty powerfist to bear and caused 2 kills. Having lost combat, the Firewarriors tried to regroup, but rolled boxcars and had to flee. My friend cursed since he wanted to tie up that squad in close combat, and was doubly infuriated since the bulky terminator armor also prevented the termie from making a sweeping advance.
The terminators that had assaulted my blue Hammerhead assaulted it again, and this time wrecked it and then proceeded to hide behind the wreckage. Little did I know what they were planning...
Victory Point earned: Linebreaker
TURN 5 (Tau)
Movement phase: FW squad #2 (that was fleeing) managed to regroup.
FW squad #1 continued their march toward the relic, accompanied by the stealth team and one of the two crisis suits.
Shooting phase: Shooting ensured that the remaining 2 terminators from the reinforcement squad dropped like flies, as did the sole bodyguard terminator. I had cleared the centre of the battlefield off all enemies, and took a potshot at the hiding, last remaining terminator squad among the debris of my blue Hammerhead using the solid shot of my red Hammerhead's railgun and its 2 burst cannons, and took down 2 termies (among them one with the cyclone missile launcher).
Assault phase: Assault moves using the jetpack got my stealth suit team and crisis suit closer to my Firewarrior squad #1.
End of Tau Turn 5.
 TURN 6 (Dark Angels)
At the beginning of turn 6 my friend rolled a dice to see whether the game continued and....rolled a 2, meaning the battle was over.
He rejoiced, as this meant the battering that his once untouchable force of elite warriors had been taking was finally over, and had had achieved the tactical objectives needed to win. The final score in terms of victory points was:
4 : 1
...because he had scored first blood (by making my Firewarrior squad #3 flee the table edge on turn 1), kill the warlord (by taking down my Shas'
el), gained another victory point in doing so due to Belial's warlord trait "The Hunt"; and by having sent one of his troops choices within 12" of my deployment zone (linebreaker).
Comparatively, I had only managed to kill his warlord (Belial).
Had the game continued, I would have been able to claim the relic as (I measured)
FW team #1 was 6.5 inches away from it and you capture it if one of your scoring units gets within 3" of it at the end of their movement phase with no enemies nearby, netting me a draw of 4:4, as the relic is worth 3 victory points. On the other hand my friend didnt fully make use of the Deathwing Assault, otherwise two of his squads would have had to start the game in his deployment zone and the remaining one would have arrived via
DS on turn 1, and then my army would have been faced with the classic Scylla and Charybdis problem of having to focus their firepower either on his scoring units or his
DW command squad, and in the worst case, splitting fire and not being effective anywhere at all. So yes, this was an exciting and close game indeed!
Anyway, it was a fun game, and we both had a lot of fun, albeit the "standing for 3.5 hours" and plethora of dice rolling did indeed get tedious at times, although this was only a smallish 1000 point game. The thing that took most of the time was us constantly referring to stuff in the Big Rulebook, making sure we played as close to the ruleset as possible without forgetting anything.
Post Battle thoughts
My Hammerhead Gunships were only skimmers - not fast skimmers, so according to 6th edition, if they even moved an inch, their secondary weapons would only have BS1, which is ridiculous. I was more often than not coerced into remaining stationary to get my
BS 4 12 S5 burst cannons blazing or I would have lost quite a considerable amount of firepower. But this
not-moving made me sacrifice both the jink save my skimmers could have gotten from movement AND ther disruption pods improving it by +1. Not that it mattered much anyway, as the terminators caused far more damage in close combat than at range.
Something that came real handy was when the lone terminator, although winning the battle, didn’t manage to pursue and destroy my fleeing Firewarriors as his suit of terminator armor didn't allow that. That's one weakness terminators have - they can easily win close combat and make the enemy flee, but not being able to pursue and destroy (or keeping them locked in combat by having dealt less damage) makes them sitting ducks in the next turn - a weakness I brutally exploited to my favor.
As with most
40k games, you tend to forget certain things in the heat of battle. I forgot that one of my Firewarrior squad leaders had a markerlight, and that he also made the squad
LD 8 instead of 7. So technically my armylist came down to 978 points that way, but oh well. I also forgot that my Kroot and Stealth team were infiltrators, but it didn’t matter much anyway, since I positioned the Kroot inside the woods to use them as a pillbox unit instead of going after the objective - and thanks to rolling Ironbark they received a 3+ cover save, though it didn’t really benefit them, and infiltrating with the Stealth team would have also not really been useful as non-scoring units cannot capture the Relic.
Anyways, overall, for a first game of 6th edition - a little over 1 year after it was released, I think I did pretty well. It was interesting to see how the Dark Angels surgically focussed on their objectives while I decided to go on the traditional "kill ‘em all" - or in this case - "shoot ‘em all up" approach befitting to the Tau Empire, but 910 points worth of shooting still didn’t manage to scratch their armor of a mere 6 models for 2 consecutive turns, although their bad luck of lack of reserves did even things out a bit. Afterwards though, when gaping holes started to form in their formation, I think my friend realized that you cannot win against numerically superior Tau, given his extreme limit in terms of retaliative firepower. His strengths lay in taking a lot of small arms punishment, being mobile (deepstrike) and thus the perfect army for objective grabbing and breaking up static gunlines (like mine).
At the end of the battle, his army was reduced to 3 models, but he had 3 more victory points than me, which is a unique flavor of 6th edition that I don’t think could have been encountered in 5th.
I am definitely bringing along a Devilfish for 1k points next time, and will get rid of one of my
FW squads and some upgrades to take a barebones one that will get my guys to objectives quickly and efficiently.
Hope you guys enjoyed this battle report, I'd appreciate your feedback.
Cheers


 2000 l
  2000 l
  2000 l
  1500 l
  1000 l
  1000 l
  Blood Ravens (using Ravenguard CT) 1500 l
  1500 l

 >7000
>7000
 1500
1500


 Hive Fleet Anathema 7300; always growing