| Author |
Message |
 |
|
|
|
|
Advert
|
Forum adverts like this one are shown to any user who is not logged in. Join us by filling out a tiny 3 field form and you will get your own, free, dakka user account which gives a good range of benefits to you:
- No adverts like this in the forums anymore.
- Times and dates in your local timezone.
- Full tracking of what you have read so you can skip to your first unread post, easily see what has changed since you last logged in, and easily see what is new at a glance.
- Email notifications for threads you want to watch closely.
- Being a part of the oldest wargaming community on the net.
If you are already a member then feel free to login now. |
|
 |
2012/01/04 22:05:51
Subject: Re:Baneblade refurbishment. Labour of love. 18th April Baneblade 2 progress.
|
|

Rough Rider with Boomstick
|
You cant change the pink man the whole army has pink wires and purple windows its a feature 
The ID numbers are silver vinal numbers brought from a craft shop in sheets.
I spray the whole sheet skull white and then apply them to the models. They how brilliant I have never had one fall off and they have no edge like a transfer. Tones and tones of people have thought they were hand painted only to be shocked they are vinals.
On another note being a "real" baneblade. That id number is the forgeworld unique id that every model got back in them days. I am afraid I dont know the id of the second baneblade I have though :(
|
|
This message was edited 1 time. Last update was at 2012/04/18 10:03:41
|
|
|
 |
|
2012/01/04 22:31:46
Subject: Re:Baneblade refurbishment. Labour of love. 4th Jan ID number added.
|
|
Battle-tested Knight Castellan Pilot
|
I haven't seen the rest of the army so I didn't know! All i Saw was a pink Necron pylon!
|
|
|
|
|
|
2012/01/04 22:41:07
Subject: Re:Baneblade refurbishment. Labour of love. 4th Jan ID number added.
|
|
Rough Rider with Boomstick
|
http://www.dakkadakka.com/dakkaforum/posts/list/316909.page Check it out mate. Might want to skip to the end and work backwards so you can see finished models
|
|
|
|
|
|
2012/01/06 21:01:01
Subject: Re:Baneblade refurbishment. Labour of love. 4th Jan ID number added.
|
|
Rough Rider with Boomstick
|
Right done a bit more today its really close to done now. Ive done the lights and windows and done some more of the metal work.
I have also added more metal work to the sponsons to try and see if that broke them up a bit after it being pointed out that they are letting the tank down.
Hope you are liking it 
|
|
|
|
|
|
2012/01/07 10:34:07
Subject: Re:Baneblade refurbishment. Labour of love. 6th Jan New pics.
|
|
Battle-tested Knight Castellan Pilot
|
Great work! Personally I think the sponsons are fine.
|
|
|
|
|
|
2012/01/25 15:31:10
Subject: Re:Baneblade refurbishment. Labour of love. 6th Jan New pics.
|
|
Rough Rider with Boomstick
|
|
|
|
|
|
|
2012/01/25 15:34:06
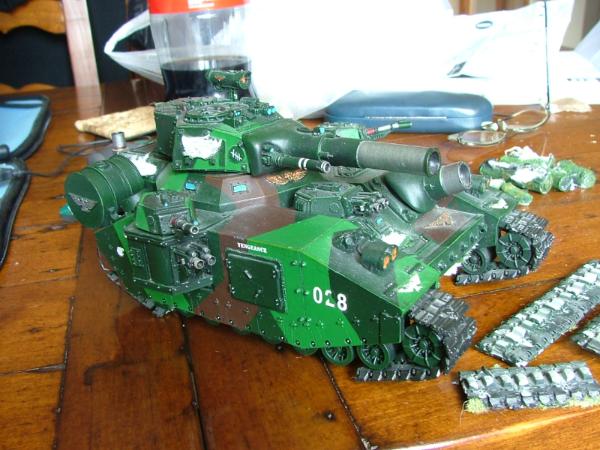
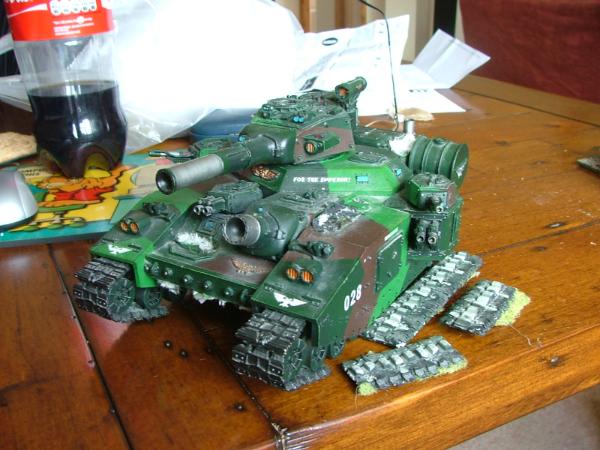
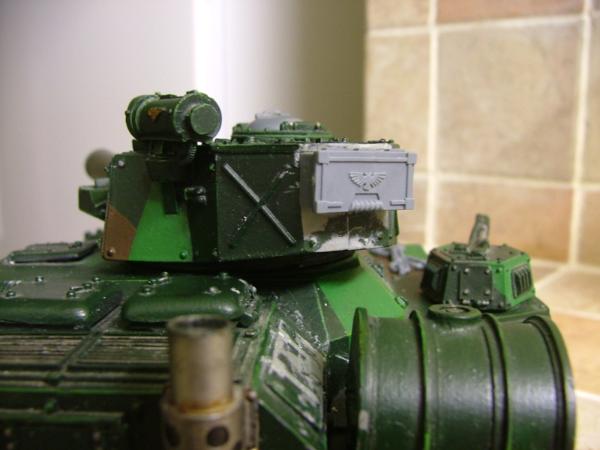
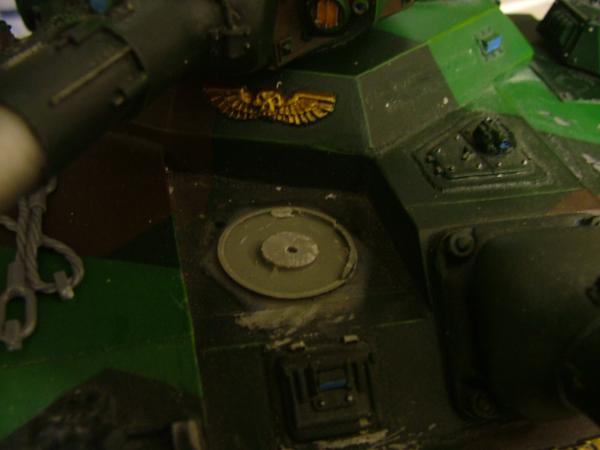
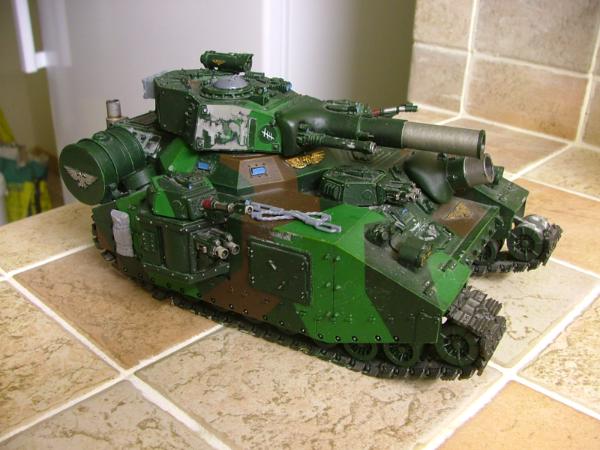
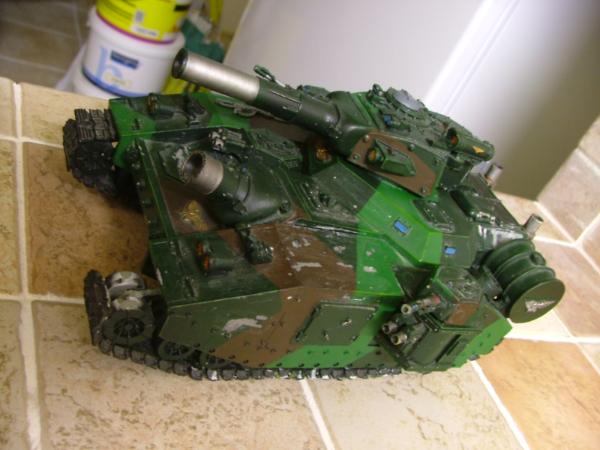
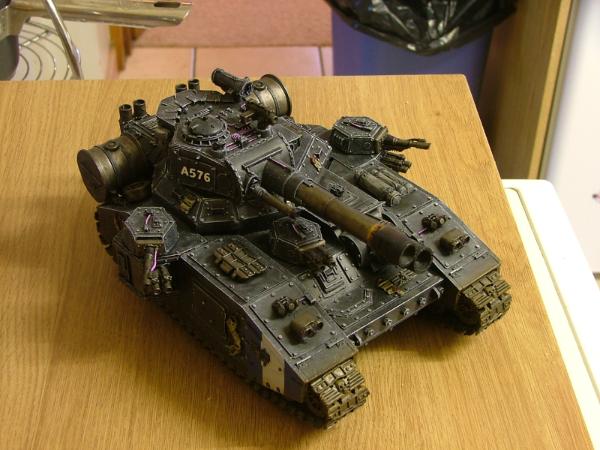
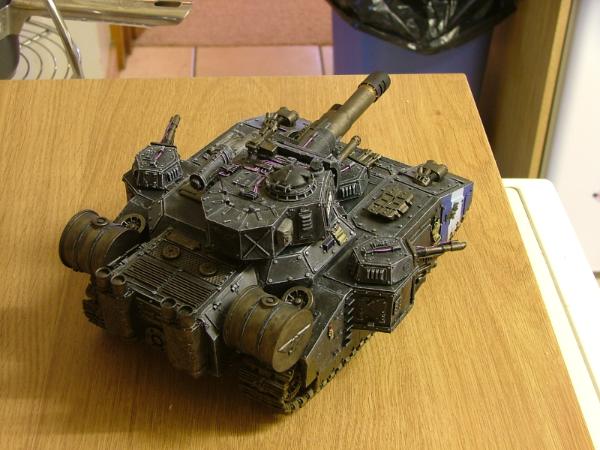
Subject: Re:Baneblade refurbishment. Labour of love. 25th Jan Baneblade 1 finished with pics :)
|
|
Battle-tested Knight Castellan Pilot
|
Well number one looks very cool! I see you have added a few parts from more modern tanks to it.
|
|
|
|
|
|
2012/01/25 15:38:04
Subject: Re:Baneblade refurbishment. Labour of love. 25th Jan Baneblade 1 finished with pics :)
|
|
Rough Rider with Boomstick
|
If you mean the storage thats all forgeworld. The only other bits ive added are a bit of forgeworld spare track and some purity seals
|
|
|
|
|
|
2012/01/25 20:19:58
Subject: Baneblade refurbishment. Labour of love. 25th Jan Baneblade 1 finished with pics :)
|
|
Longtime Dakkanaut
|
Looks the business! Well done Truffle 
|
|
|
|
|
|
2012/01/25 23:43:14
Subject: Baneblade refurbishment. Labour of love. 25th Jan Baneblade 1 finished with pics :)
|
|
Wolf Guard Bodyguard in Terminator Armor
|
Fantastic work! Looks miles better than what it started out like.
Any idea you post a link for the RemoveAll 220? Had a look through google and cant find anything
|
|
|
|
|
|
2012/01/26 00:40:28
Subject: Re:Baneblade refurbishment. Labour of love. 25th Jan Baneblade 1 finished with pics :)
|
|
Rough Rider with Boomstick
|
Thanks guys.
http://www.dtepstore.com/search.aspx?manufacturer=151
That link is in dollars so that us i assume.
To get it in the UK you might have to wait. I just searched and the company that makes the stuff is doing a new website and the E commerce? side of it aint done yet. But if you search for remove ALL 220 uk in google youll get it up.
|
|
This message was edited 1 time. Last update was at 2012/01/26 00:40:55
|
|
|
|
|
2012/01/27 15:40:18
Subject: Re:Baneblade refurbishment. Labour of love. 25th Jan Baneblade 1 finished with pics :)
|
|
Rough Rider with Boomstick
|
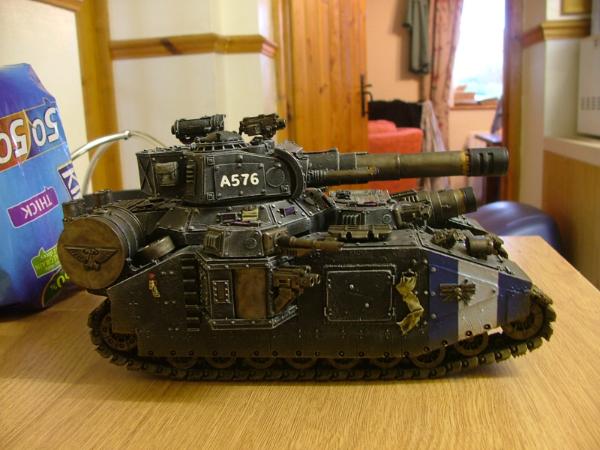
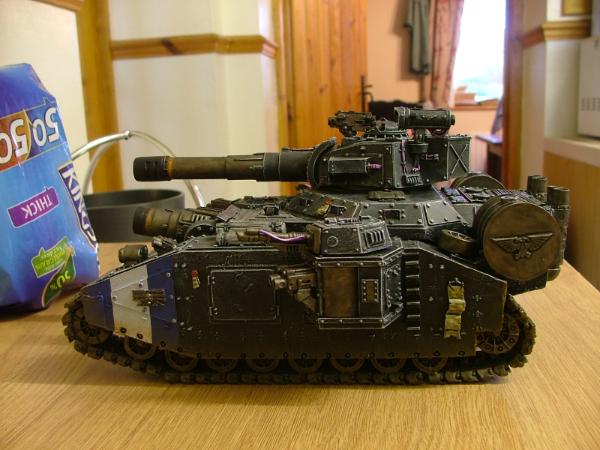
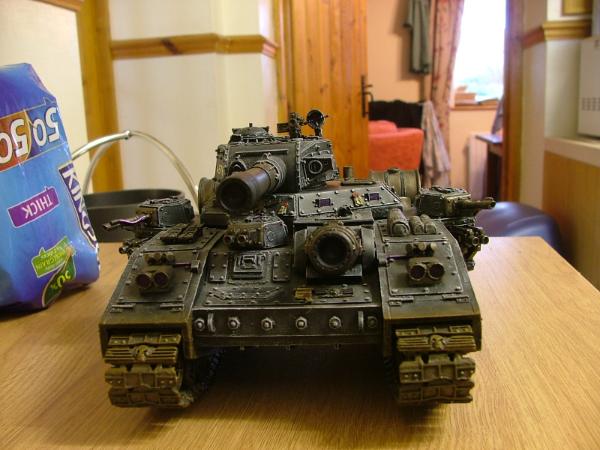
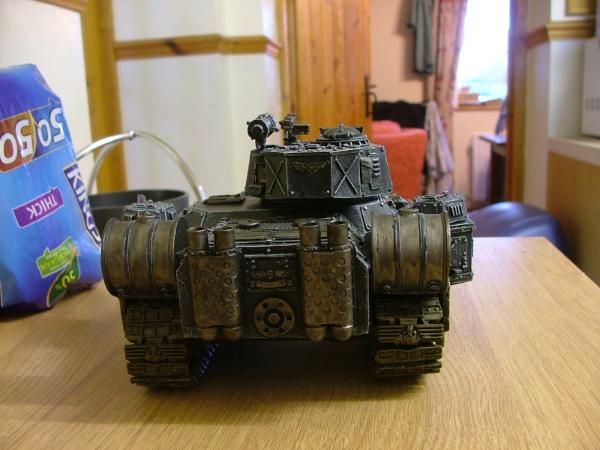
Ok guys. Here she is. This might be one of the saddest images Ive ever seen of a model.
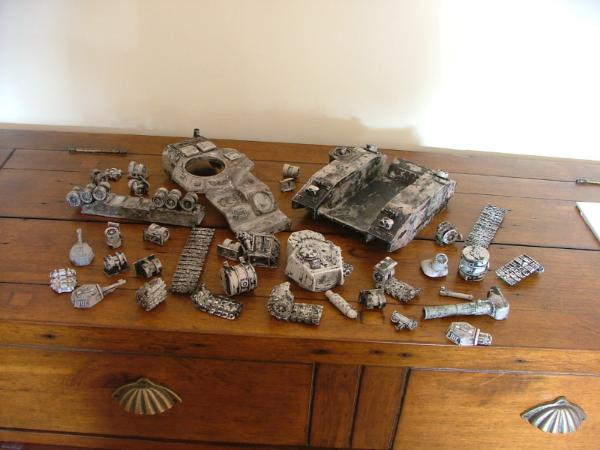
Not even close to ready to be rebuilt yet but im getting there. Some parts need more stripping and there is so much damage to others that well, long road ahead.
|
|
|
|
|
|
2012/01/27 15:47:21
Subject: Baneblade refurbishment. Labour of love. 27th Jan Baneblade 2 begins refurbishment.
|
|

Napoleonics Obsesser
|
Wow looks great! The purple adds a bit of something unique, and I love how the details are picked out so well.
The resin baneblade is clearly superior. I can just tell.
|

If only ZUN!bar were here... |
|
|
|
|
2012/01/28 19:31:41
Subject: Re:Baneblade refurbishment. Labour of love. 27th Jan Baneblade 2 begins refurbishment.
|
|
Battle-tested Knight Castellan Pilot
|
Yes there is lots of work to do there!!
|
|
|
|
|
|
2012/01/28 21:45:37
Subject: Baneblade refurbishment. Labour of love. 27th Jan Baneblade 2 begins refurbishment.
|
|
Quick-fingered Warlord Moderatus
The Great Satan (East Coast)
|
Nice work, the FW Lucius Baneblade is my favorite and I don't think the GW plastic version is at all comparable unless some drastic alterations are performed. ( IMHO)  . I rescued a derelict from ebay years ago and she is still the best Super Heavy I have. My derilict thread; http://www.dakkadakka.com/dakkaforum/posts/list/241594.page
|
|
This message was edited 1 time. Last update was at 2012/01/28 21:48:17
"It is easier to deceive people than it is to convince them that they have been deceived."
|
|
|
|
|
2012/04/15 19:41:44
Subject: Re:Baneblade refurbishment. Labour of love. 27th Jan Baneblade 2 begins refurbishment.
|
|
Rough Rider with Boomstick
|
Good to see Im not the only one. I have a little update. Started the repairs today here are pics.

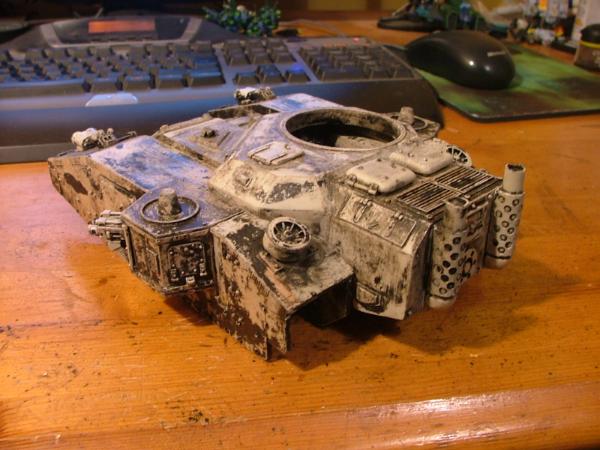
Just got the main hull back together and got the sponsons on it. This one will take much more than the first to sort out.
Also today I won another mar patter baneblade on ebay. So a full squad can be done.
cc
|
|
|
|
|
|
2012/04/15 19:54:23
Subject: Baneblade refurbishment. Labour of love. 27th Jan Baneblade 2 begins refurbishment.
|
|

Longtime Dakkanaut
Thunder Bay, Ontario, Canada
|
Always nice to see someone showing some love to an old abandoned model! Refurbing models is piles of fun
|
|
This message was edited 1 time. Last update was at 2012/04/15 19:54:43
|
|
|
|
|
2012/04/15 22:45:43
Subject: Baneblade refurbishment. Labour of love. 27th Jan Baneblade 2 begins refurbishment.
|
|
Quick-fingered Warlord Moderatus
The Great Satan (East Coast)
|
Nothing has the panache of a FW Mars Pattern Baneblade 'sept mebbe the Lucius pattern. That 2 pounds of sculpted resin just screams badass something the lightweight GW plastic version can only aspire to. Nice to see you are forging ahead with the restoration.
Good luck I'll be watching.
|
"It is easier to deceive people than it is to convince them that they have been deceived."
|
|
|
|
|
2012/04/15 22:57:47
Subject: Re:Baneblade refurbishment. Labour of love. 27th Jan Baneblade 2 begins refurbishment.
|
|
Battle-tested Knight Castellan Pilot
|
Coming along nicely!
|
|
|
|
|
|
2012/04/17 10:52:56
Subject: Re:Baneblade refurbishment. Labour of love. 27th Jan Baneblade 2 begins refurbishment.
|
|
Rough Rider with Boomstick
|
Im glad you all like the progress slow as it is. Tonight I will be getting soomemore done.
Cant quite agree with you blacladder I like the wiseman baneblade more than the mars. That one gets to be squad leader
|
|
|
|
|
|
2012/04/18 10:02:59
Subject: Re:Baneblade refurbishment. Labour of love. 27th Jan Baneblade 2 begins refurbishment.
|
|
Rough Rider with Boomstick
|
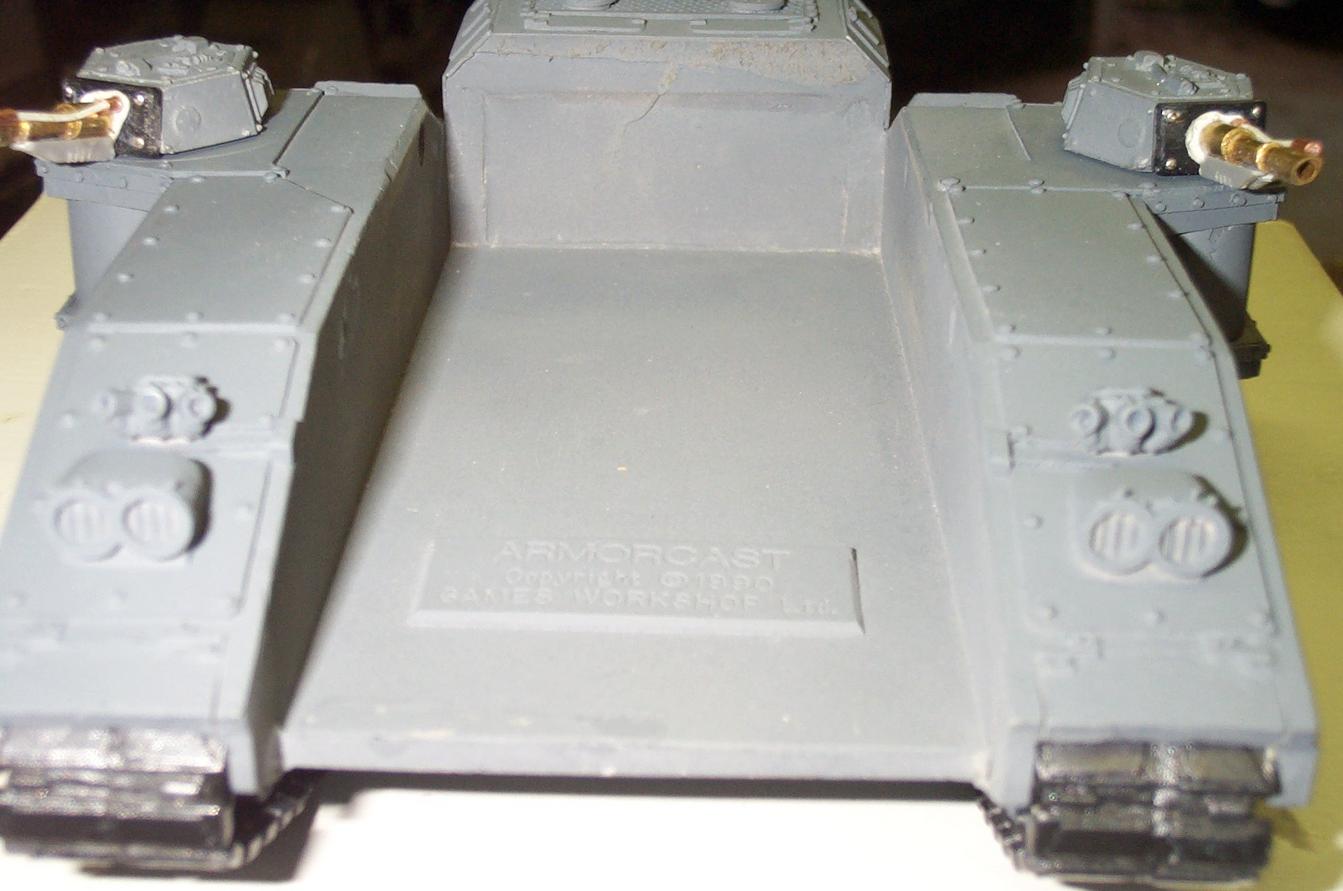
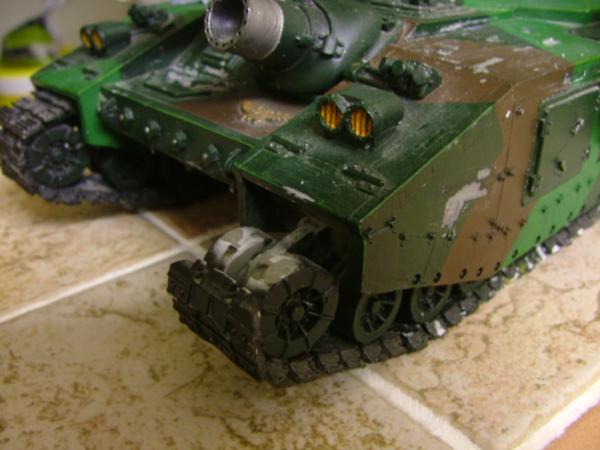
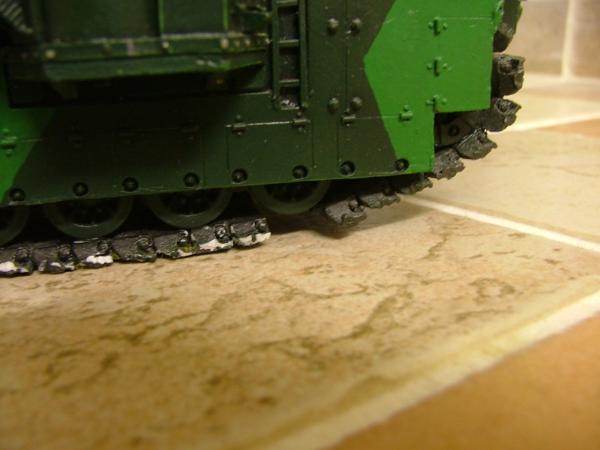
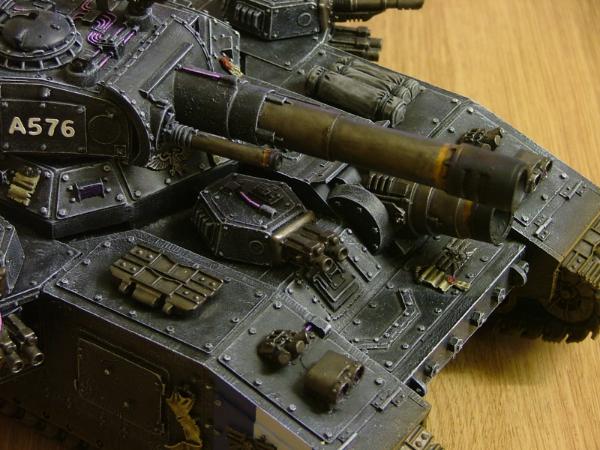
Some prgogress today. The heavy bolter side gun is back on, the demolisher cannon is back on and I have remounted the main gun into the turret.
The biggest bit of progress though is that I have started work on rebuilding the massivly damaged track systems. Heres the pics

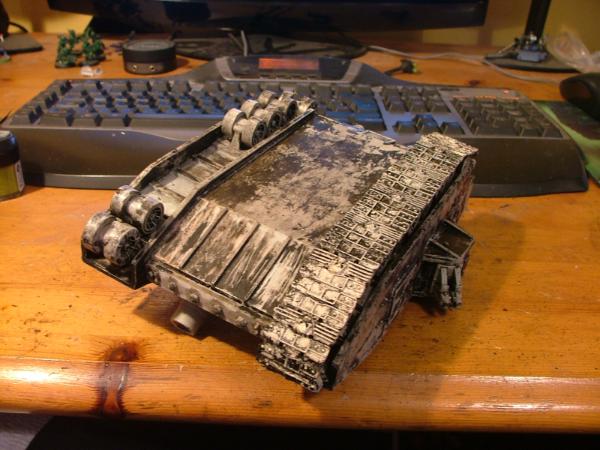
She still looks like a total wreck but at least we are moving forwards.
CC as always guys
|
|
|
|
|
|
2012/04/18 10:18:01
Subject: Baneblade refurbishment. Labour of love. 27th Jan Baneblade 2 begins refurbishment.
|
|
Quick-fingered Warlord Moderatus
The Great Satan (East Coast)
|
Good luck on that one, I tried casting the treads out of aircraft epoxy that came out rather good but you need the pieces to make the mould.
When I restored my tanks the bogies seemed like a daunting task because I was new to scratchbuilding. Now they would be a piece of cake to build. I'll offer suggestions if you wish.
Hope you have the treads; they have to be sculpted.
|
|
This message was edited 2 times. Last update was at 2012/04/18 10:21:02
"It is easier to deceive people than it is to convince them that they have been deceived."
|
|
|
|
|
2012/04/18 10:22:37
Subject: Re:Baneblade refurbishment. Labour of love. 27th Jan Baneblade 2 begins refurbishment.
|
|
Rough Rider with Boomstick
|
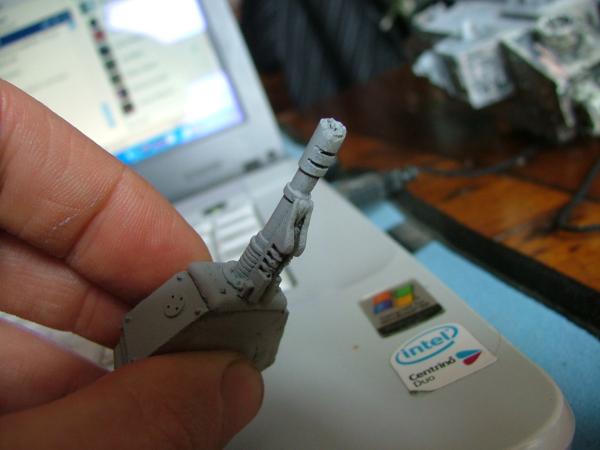
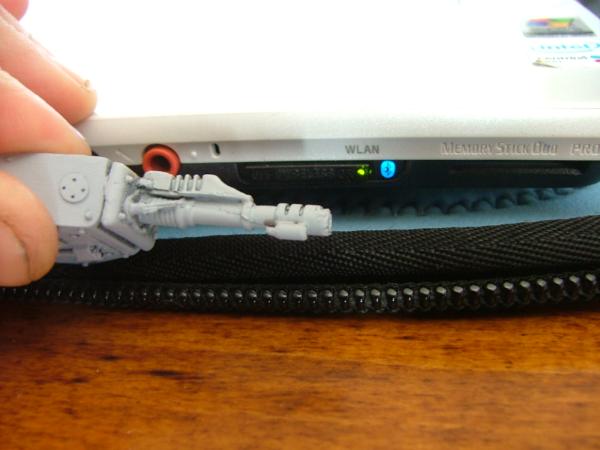
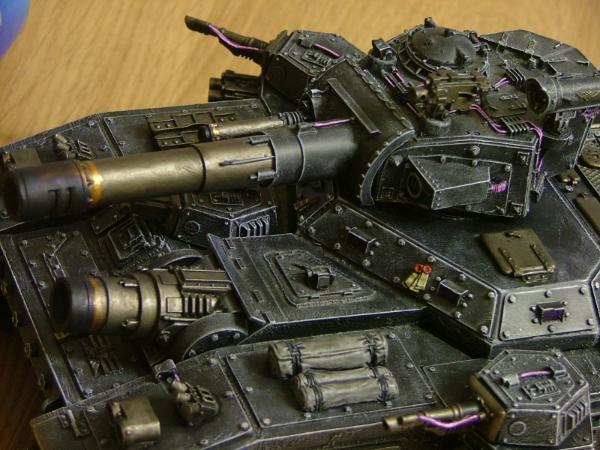
I was just looking through your thread. I like them brass lascannons. The lascannons on this tank are trashed at the ends of the barrels i was just gonna remould them with green stuff as they are to small to replace with plastic ends.
I have all the parts for the tank so I dont need to worry about the tracks they are jsut a bit screwed up and will never look perfect. But as long as the ones at the front and back are ok it does not matter as this girls never being turned upside down in game dead or not
So yeah my plan is to spray the screwed up guns with acid car primer so that I can see them better as they are hard to define at the minute. Then I can greenstuff them then prime the whole tank ready for painting after I have added any extras like storage.
|
|
|
|
|
|
2012/04/18 11:25:21
Subject: Re:Baneblade refurbishment. Labour of love. 18th April Baneblade 2 progress.
|
|
Quick-fingered Warlord Moderatus
The Great Satan (East Coast)
|
FYI I didn't solder the brass together but used cyanoacetate glue instead, I used the thinnest evergreen rod to simulate the wire bundle along side the barrel three or four strands I guess and I used a razor saw to cut the flash suppressors (On a Laser Gun  ?)
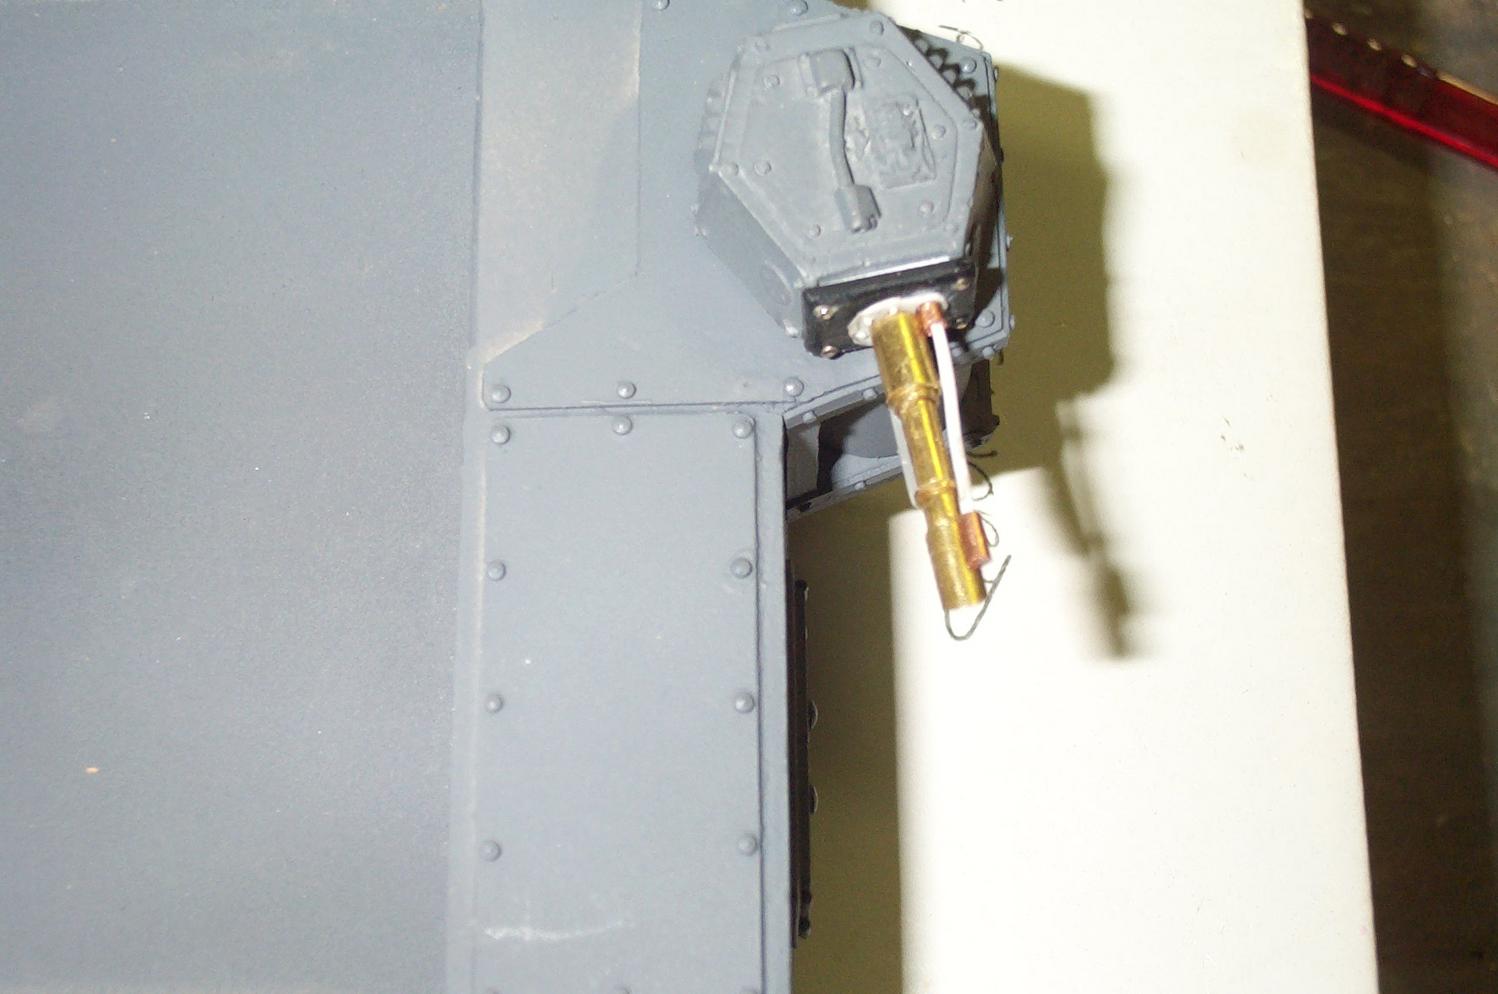
Sorry to hyjack your thread I'll edit the image size when I get home from work.

|
|
This message was edited 2 times. Last update was at 2012/04/18 11:30:41
"It is easier to deceive people than it is to convince them that they have been deceived."
|
|
|
|
|
2012/04/18 21:53:02
Subject: Re:Baneblade refurbishment. Labour of love. 18th April Baneblade 2 progress.
|
|
Rough Rider with Boomstick
|
HA Dunno if they are ment to be flash surpressors or not but I see what ya saying. Dont woirry about the hijack I have done it plenty of times.
Will get some more of the tank rebuilt tomorrow I hope. Before I go and run the local club.
|
|
|
|
|
|
2012/04/19 10:34:20
Subject: Re:Baneblade refurbishment. Labour of love. 18th April Baneblade 2 progress.
|
|
Rough Rider with Boomstick
|
Right I just primed the little turrets and the side sponsons of the baneblade so that I could see how buggered up the ends were.
They are rough as hell.
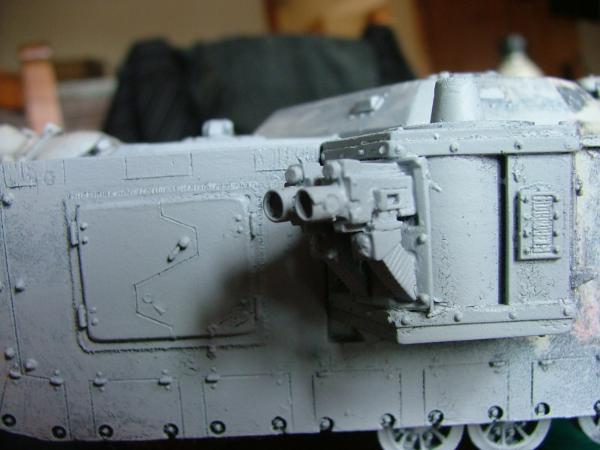

Here are my thoughts. It might be easier to just cut the heavy bolter barrels off and replace them with some plasticard tubing of the same size with a hole drilled through the side of it.
I also have a pair of plastic baneblade lascannon turrets upstairs and they are also tiny so If i cut the barrels off them and used them to replace the resin barrels?
Ideas guys do you think this could work?
|
|
|
|
|
|
2012/04/19 16:00:51
Subject: Baneblade refurbishment. Labour of love. 18th April Baneblade 2 progress.
|
|
Veteran Wolf Guard Squad Leader
|
The first one looks really really good, can we see it with the rest of the army? Also the second one does look in a sad state, but after what i have seen on the first one i imagine the second will look as good
Young Logan
|
30K Blog: hobbyfromtheaett.blogspot.com
  Bran Redmaws Great Company - 5500pts Bran Redmaws Great Company - 5500pts
30K Space Wolves - 1500pts
  Deathguard -2300 pts Deathguard -2300 pts  |
|
|
|
|
2012/04/19 21:45:05
Subject: Re:Baneblade refurbishment. Labour of love. 18th April Baneblade 2 progress.
|
|
Rough Rider with Boomstick
|
Thanks mate. I will take some nice army pics for you when I get a chance. Some point within the next few days.
|
|
|
|
|
|
2012/04/20 10:04:14
Subject: Re:Baneblade refurbishment. Labour of love. 18th April Baneblade 2 progress.
|
|
Rough Rider with Boomstick
|
Brilliant news everyone. Baneblade 3 just arrived in the post and it is nearly perfect condition!
Here are 2 quick snaps do note all the white fluff is what is left of the material storage the owner had put on. I will clean this off easy with a knife.
Basicly from what I can tell so far heres what it needs. All the tiny turrets were glued on. The lascannons came off clean and eprfect but the heavy bolter snapped its joint inside the gun so this will need a new system built in the form of bras rod for it to sit on.
The gak left from his material stuff needs to be cleaned off.
The transfers need filein off.
It needs a hatch.
The bottom tacks need gluing back on. This tank was based and on pulling it off the base the bottom tracks came off and suffered some damage. Light compared to my 2 baneblades so no problem to fix.
Then the really good news. Im pretty sure I can just repain this tank black and it will be fine with no need for paint stripper That saves me a lot of money time and effort and saves the tank from taking massive damage like the other 2 did.
What do you guys think? Any more ideas on what to do to it? Automatically Appended Next Post: Right folks. I have been working on getting baneblade 3 ready for repaint as I was not in the mood to spend time on the more damaged second tank tonight.
Heres the progress. The searchlight broke and has been repaired at a lower level. The crap left from the strange material he stuck over the tank has been removed. Damaged parts that this caused have been filed down and cleaned up.
The tracks have been reglued. This shew me a couple of issues. It appears that a track link is missing on one side (photo included in a moment) Also one of the fron tracks was damaged and really anoying me once i noticed it. To fixe this I have broken of the front unit and ordered some more tracks. Strangely enough you can still order forgeworld baneblade track units in 4s for 5 quid. Dunno why but it helps me a lot and as i got the tank so cheap (£46) I dont mind throwing a fiver at the tracks.
The heavy bolter turret has been drilled so it can now sit on the tank and turn. Little bits of mould lines and stuff have been filed down and cut off.
The main turret has had an ammo box added to the back where a material storage thing had been. When i removed the material i found the aquila under it was fethed so I filed it down and added a box.
I have also added a hatch to the turret and filed down the ends of the lascannons to neaten them up.
Now I cant go much more into the painting untill I get the new tracks which wont be untill next week at best but I can repaint the turrets. That will start sunday as tomorrow im busy.
Anyway here are pics.

Lowered searchlight.
The removed front track section
The missing bottom track link
Back of the turret
The mini heavy bolter turrets new mount.
Side shot showing the side of the turret where material storage was. All removed now and filed flat so that I can add an id number later like the first baneblade. PS the id number will be U028 the reason being I do not know the unique id of the tank so U for unknown and the guy I had got it from on ebay had the id 028 on the side so i will replace it when done as a mark of respect for the tanks past.
A shot of the other side. Note the large flat section on the hull will have spare track links on it once they arrive to cover up any minor damage from removing material crap.
Right guys. I hope you like it so far I await your input
|
|
This message was edited 1 time. Last update was at 2012/04/20 21:51:51
|
|
|
|
|
2012/04/21 11:30:35
Subject: Baneblade refurbishment. Labour of love. 20th April Baneblade 3 arrived :D
|
|
Veteran Wolf Guard Squad Leader
|
May i ask if thre is any reason why you are re-doing the older FW baneblade and not the new GW one. I haven't got a problem, just interested. And good luck with the two that need doing
Young Logan
|
30K Blog: hobbyfromtheaett.blogspot.com
Bran Redmaws Great Company - 5500pts
30K Space Wolves - 1500pts
Deathguard -2300 pts |
|
|
|
|
|
|


 3500pts
  4000pts
  1850pts