| Author |
Message |
 |
|
|
|
|
Advert
|
Forum adverts like this one are shown to any user who is not logged in. Join us by filling out a tiny 3 field form and you will get your own, free, dakka user account which gives a good range of benefits to you:
- No adverts like this in the forums anymore.
- Times and dates in your local timezone.
- Full tracking of what you have read so you can skip to your first unread post, easily see what has changed since you last logged in, and easily see what is new at a glance.
- Email notifications for threads you want to watch closely.
- Being a part of the oldest wargaming community on the net.
If you are already a member then feel free to login now. |
|
 |
2011/11/19 04:15:40
Subject: Make Your own Miniatures Case 2.0. The 19 dollar Plano Wonder!
|
|

Brigadier General
|
Hard to say swampyturtle,
You can shape the case to almost anything, but for mechanized lists, you're probably going to need 2 cases.
|
|
|
|
 |
|
2011/11/19 05:15:12
Subject: Make Your own Miniatures Case 2.0. The 19 dollar Plano Wonder!
|
|
Storm Trooper with Maglight
|
Eilif wrote:Hard to say swampyturtle,
You can shape the case to almost anything, but for mechanized lists, you're probably going to need 2 cases.
thanks for that 
If you dont mind, id love to PM you and bounce some ideas around off you for extra tips on building one of these and pointers
|
|
|
|
|
|
2011/11/19 06:59:03
Subject: Make Your own Miniatures Case 2.0. The 19 dollar Plano Wonder!
|
|
Preacher of the Emperor
|
You'll probably need two. I took the two pieces of egg-crate, glued them together, and cut out form-fit holes to fit 10 rhinos in that space, on their sides. There's enough room for a layer of infantry on top of that, along with maybe a few books, but that's about it.
|
|
|
|
|
|
2011/11/19 13:22:06
Subject: Make Your own Miniatures Case 2.0. The 19 dollar Plano Wonder!
|
|
Brigadier General
|
swampyturtle wrote:Eilif wrote:Hard to say swampyturtle,
You can shape the case to almost anything, but for mechanized lists, you're probably going to need 2 cases.
thanks for that
If you dont mind, id love to PM you and bounce some ideas around off you for extra tips on building one of these and pointers
No problem, I'm happy to help. Feel free to PM me or if it's info that others might gain from feel free to post it here.
|
|
|
|
|
|
2011/11/19 21:45:37
Subject: Make Your own Miniatures Case 2.0. The 19 dollar Plano Wonder!
|
|

Resentful Grot With a Plan
|
Question about your SM here: Could you tell me what you made the missile launchers longer with? They look very good
|
|
|
|
|
|
2011/11/19 22:28:53
Subject: Make Your own Miniatures Case 2.0. The 19 dollar Plano Wonder!
|
|

Land Raider Pilot on Cruise Control
|
Steak wrote:Have so say, thanks a lot for this!
I bought the case before seeing the tutorial because it was so cheap ($10) and after seeing this it blew my mind. Although you can just lay units in between the two layers without cutting holes, its 100% more effective to do so.
I'll upload pictures later when I get home
Yeah but then I'd think you'd get more movement potential... 
|
 ~1200 ~1200
DT:90-S+G++M---B--I+Pw40k10+D+A+/mWD372R+T(D)DM+ |
|
|
|
|
2011/11/19 23:11:30
Subject: Make Your own Miniatures Case 2.0. The 19 dollar Plano Wonder!
|
|
Brigadier General
|
chaoslooksgood wrote:Question about your SM here: Could you tell me what you made the missile launchers longer with? They look very good
The missile launchers are just the stock missile launchers from the second edition box set. The arm and missile launcher are one piece that attaches to a one piece body with a separate backpack.
This fig here (not my pic)
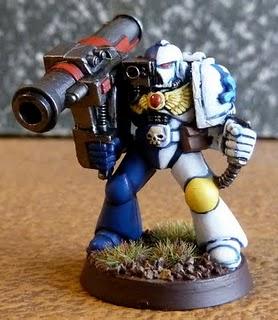
People typically don't find these figs to be very desirable, so even if all you want is the missile launcher arm to put on a regular marine, with an ad here and in Bartertown you can probably get one (or several) for not too much $.
|
|
This message was edited 1 time. Last update was at 2011/11/19 23:12:13
|
|
|
|
|
2011/11/20 01:22:00
Subject: Make Your own Miniatures Case 2.0. The 19 dollar Plano Wonder!
|
|
Krielstone Bearer
|
You could always Heat it with a lighter and melt through....
Do that in a ventalated area
THats what i did 
|
|
This message was edited 1 time. Last update was at 2011/11/20 01:23:24
|
|
|
|
|
2011/11/20 02:18:23
Subject: Re:Make Your own Miniatures Case 2.0. The 19 dollar Plano Wonder!
|
|
Trollkin Champion
|
Heres mine:
I'm holding about 80 boyz, 15 lootas, a warboss, one Mek w/ KFF, a converted Mek w/ KFF, my 2 wip looted tanks and 3 deffkoptas.
Some notes: I tried making a slot in the eggshell to hold deffkoptas but its too shallow, so I use it for loose parts right now. Also, I'm not using any foam for the bottom of the pull and pluck because its sitting on the bottom of the case.
|
|
|
|
|
2011/11/20 03:30:49
Subject: Re:Make Your own Miniatures Case 2.0. The 19 dollar Plano Wonder!
|
|
Cataphract
|
Thanks for the tutorial. I'll be off to look for these at walmart next time I'm there!
|
"The earth shakes as they come, and I doubt any creature alive can withstand the full impact of their weight." Chief Madrak Ironhide |
|
|
|
|
2011/11/20 04:50:47
Subject: Make Your own Miniatures Case 2.0. The 19 dollar Plano Wonder!
|
|
Agile Revenant Titan
|
Thanks for posting this!
|
 Eldar Eldar  -5000 points -5000 points |
|
|
|
|
2011/11/20 12:40:03
Subject: Make Your own Miniatures Case 2.0. The 19 dollar Plano Wonder!
|
|
Brigadier General
|
Papaskittels wrote: You could always Heat it with a lighter and melt through....
Do that in a ventalated area
THats what i did
That actually makes sense in a twisted kind of way. I agree that you should definitely do it outside though, burning foam gives off all kinds of bad bad fumes.
Steak wrote:Heres mine:
I'm holding about 80 boyz, 15 lootas, a warboss, one Mek w/KFF, a converted Mek w/KFF, my 2 wip looted tanks and 3 deffkoptas.
Some notes: I tried making a slot in the eggshell to hold deffkoptas but its too shallow, so I use it for loose parts right now. Also, I'm not using any foam for the bottom of the pull and pluck because its sitting on the bottom of the case.
Looks great! I like the contrast of the red funky foam.
One minor suggestion would be to cut a piece of funky foam the size of the top of the case and just lay it on top of the top layer so the figs won't scratch against the plastic. Plano plastic isn't very abrasive, but it's never a bad idea to not have plastic rubbing on plastic.
|
|
|
|
|
|
2011/11/20 19:42:02
Subject: Make Your own Miniatures Case 2.0. The 19 dollar Plano Wonder!
|
|

Stubborn Hammerer
Rotterdam, the Netherlands
|
This is so cheap and awesome. Makes me sad I don't live in a country with Wal-Marts and gun crazies.
We do have some fishing stores though, perhaps I need to have a stroll through there, although I doubt a reel case would be much cheaper than a real model case over here...
|
|
|
|
|
|
2011/11/21 04:13:49
Subject: Make Your own Miniatures Case 2.0. The 19 dollar Plano Wonder!
|
|
Irked Necron Immortal
|
Amazing!! I'm going to use battlefoam trays in mine for my grey knight infantry and use some of the foam it comes with for tanks.
|
Mathhammer is NOT Warhammer.
**Necrons**Thunder Barons (Counts-as) Grey Knights**Ogre Kingdoms** |
|
|
|
|
2011/11/21 18:54:31
Subject: Make Your own Miniatures Case 2.0. The 19 dollar Plano Wonder!
|
|
Brigadier General
|
Are you sure battlefoam trays will fit?
Not trying to be a downer, I'd just hate to think of someone spending good money on nice trays only to find they don't fit.
|
|
|
|
|
|
2011/11/27 15:52:56
Subject: Make Your own Miniatures Case 2.0. The 19 dollar Plano Wonder!
|
|
Land Raider Pilot on Cruise Control
|
Well, bring a spaceman and your case into the store, a quick check will make sure. If they're gonna make a sale, they won't mind
|
~1200
DT:90-S+G++M---B--I+Pw40k10+D+A+/mWD372R+T(D)DM+ |
|
|
|
|
2011/11/27 22:27:05
Subject: Re:Make Your own Miniatures Case 2.0. The 19 dollar Plano Wonder!
|
|
Storm Trooper with Maglight
|
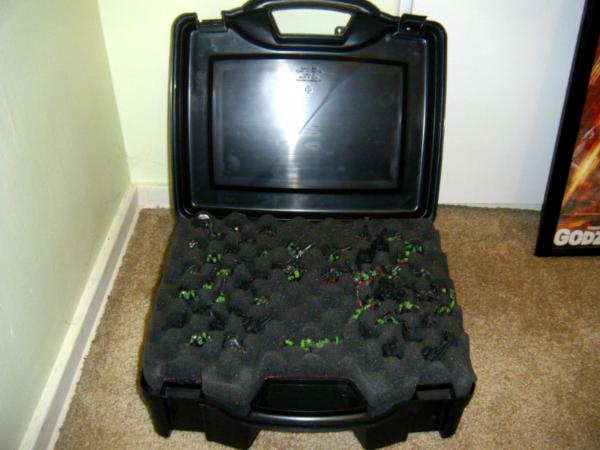
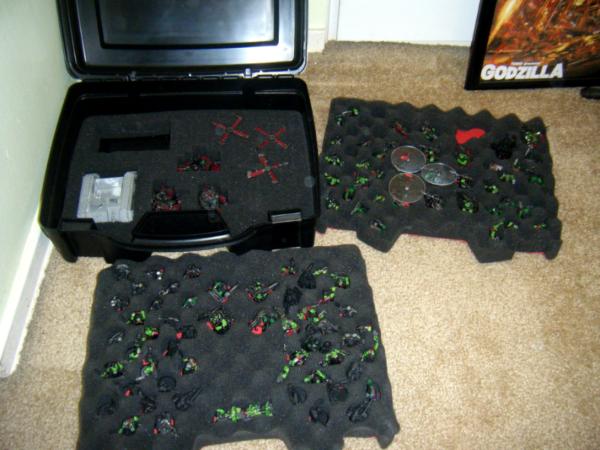
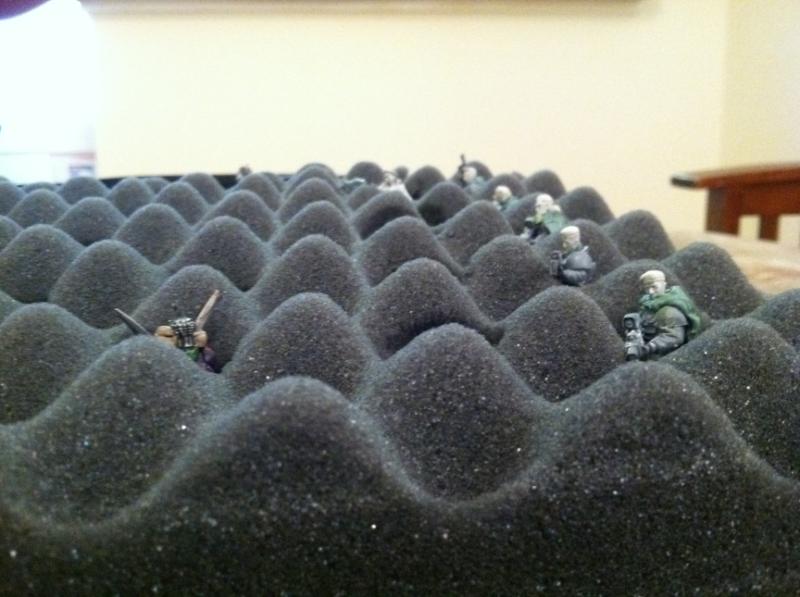
My first case  Thank you for the tut!
I wanted my tanith to have a protective case because there my favorite army and i want to keep my hard work safe. The Tanith (as well as the Padrus and Phantine) are my special project right now. For the Tau, Ive decided that until im done with the tanith they can keep their tool case  The work station
 The trays Before:
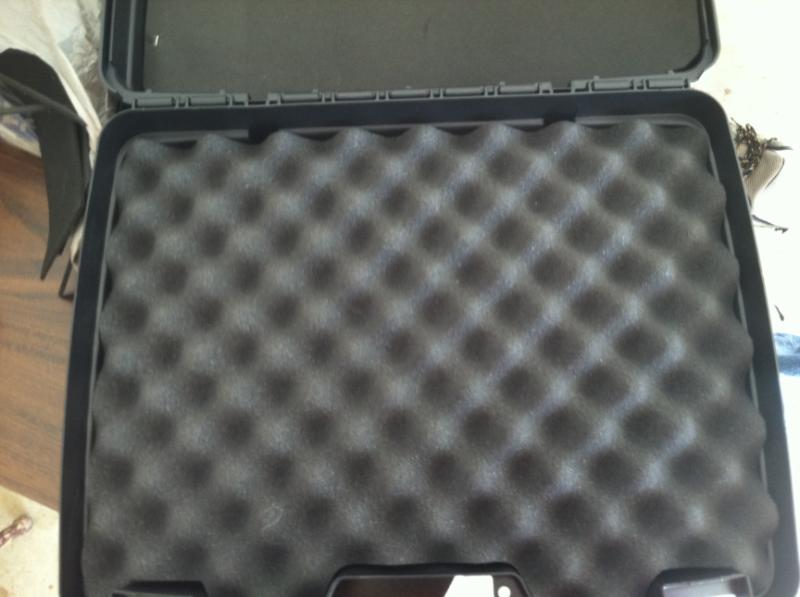 The trays after:
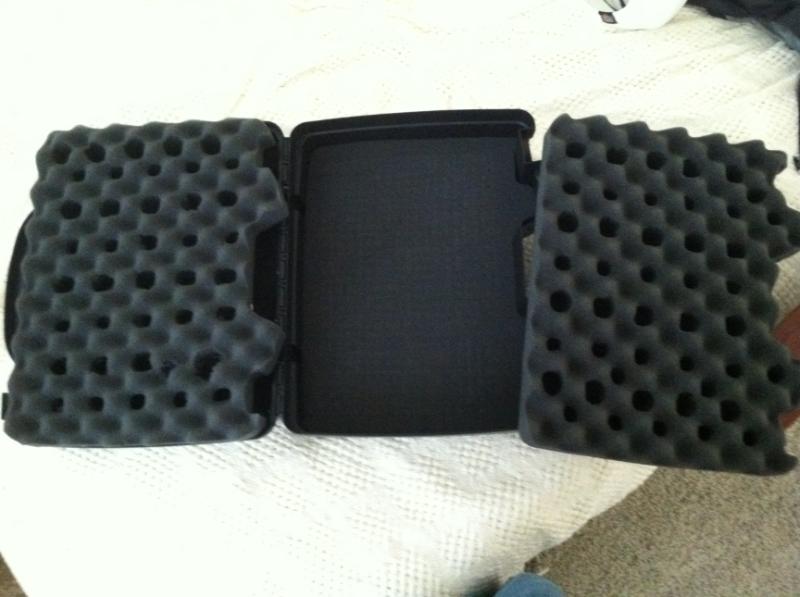
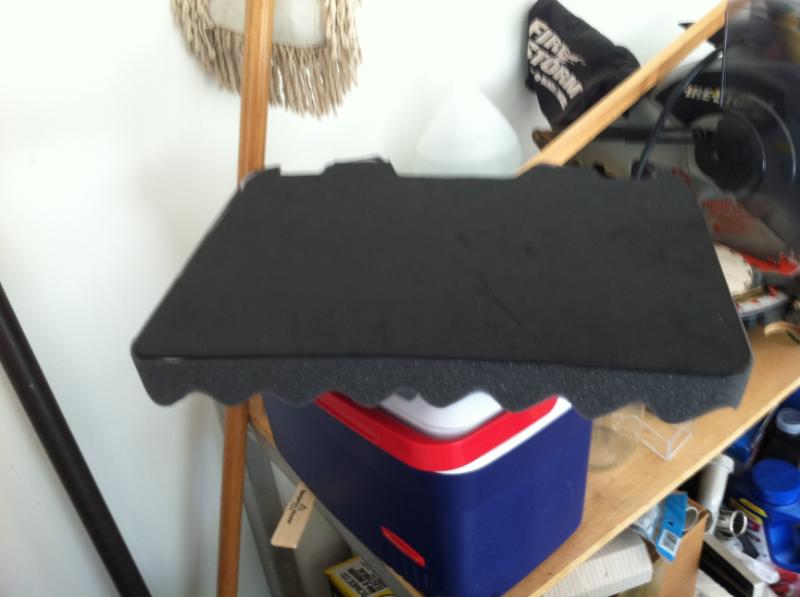
 Final pictures:
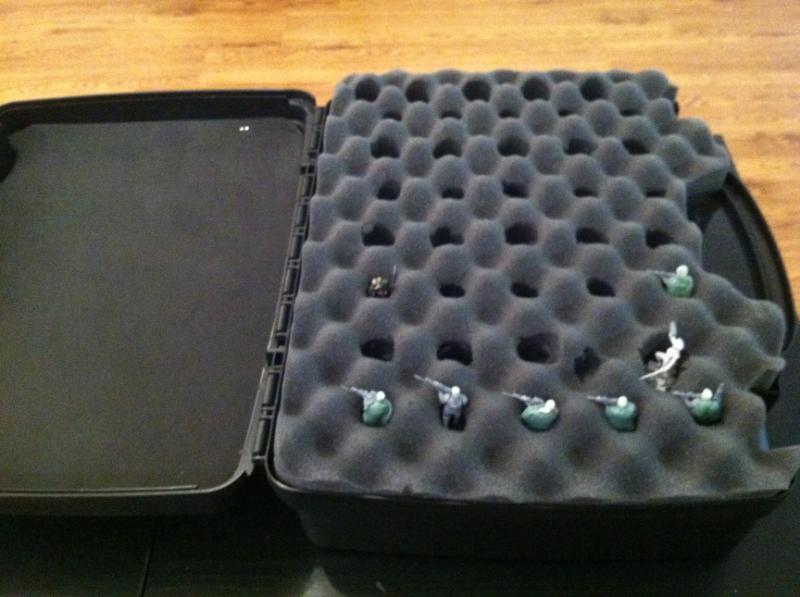
 Final Thoughts
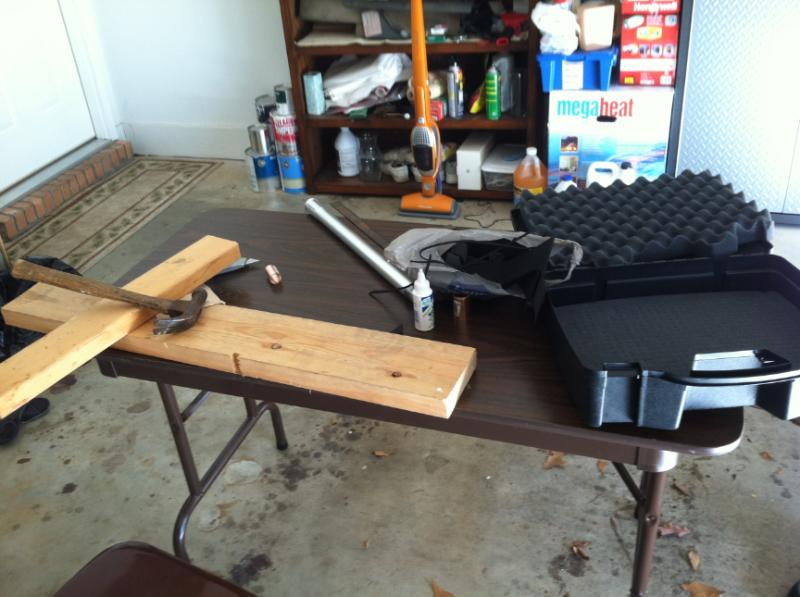
Right, so my final thoughts on the matter.
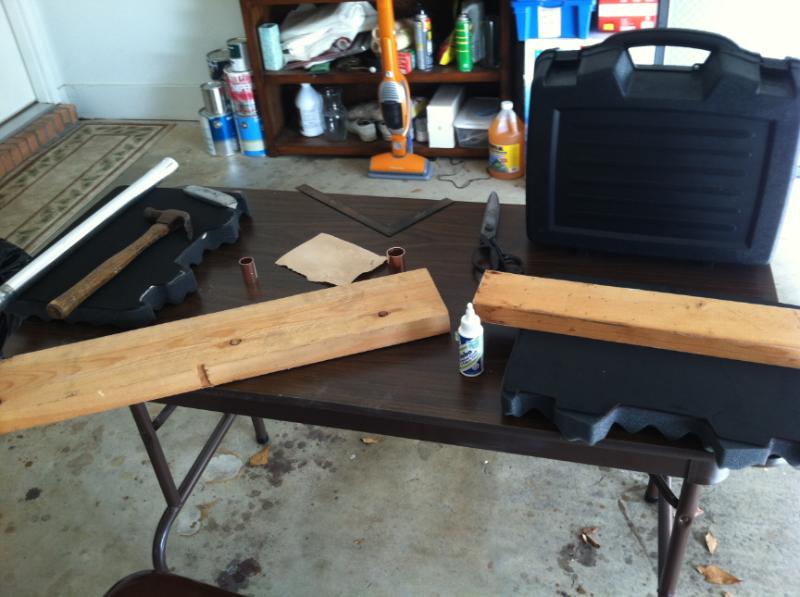
1) The method of making the holes by the copper tubing and twisting till it popped out doesnt work well and takes HOURS! My grandpa (a engineer for 20+ years) suggested a new method. So what you do is Take the copper tubes and place them where you want the hole to go. Turn the foam upside down and take a hammer to the area around where the copper tube is. The foam will come out in a natural circle each time with very little effort. It literally took me a hour using the method in the post above and 30 mins for my second tray using my grandpa's method.
2) dispite the look of the holes seeming too small for your standard models , THEY DO INDEED FIT! It might not look that way but it is. Its a beautiful sight really 
3) Following the tutorial provides does a great deal of justice to making the case but alot of it is trial and error. It took me 2 hours to make my first one. I believe i could crank another out in an hour for my next one. The work does get repetivie so have some music, TV, ect going on to distract you.
4) Its a very easy project and i highly recommand it to anyone looking for a good case for your models that you want to protect
5) I got about 83 slots and have enough room still for many more should i choose to modify it. Once i get home im gonna add my tanks and other items into the bottom layers
|
|
This message was edited 1 time. Last update was at 2011/11/27 22:28:31
|
|
|
|
|
2011/11/27 22:55:44
Subject: Make Your own Miniatures Case 2.0. The 19 dollar Plano Wonder!
|
|
Brigadier General
|
Looks great!
I'm curious about your method of punching the holes. I may give it a try next time I'm making trays.
However, I've not had any trouble with the twist method which only takes about 15-20 minutes per tray for me. Even with split trays (eats up two rows of fig space) I was able to fit 70+ standard infantry figs per level!
What fitting did you use and how sharp did you file the edge to?
Regardless, the case it looks great and I'm glad to see some folks getting use out of my tutorial!
|
|
|
|
|
|
2011/11/28 14:33:29
Subject: Make Your own Miniatures Case 2.0. The 19 dollar Plano Wonder!
|
|
Trollkin Champion
|
swapyturtle, I'd be interested to know how sharp you filed them as well, if at all. It sounds like you may be able to skip that if you use the hammer method.
Also, what type of glue did you use on the foams? I used a industrial strength spray adhesive (although eilif advised against it) because I had it available, and haven't had any issues yet.
|
|
|
|
|
2011/11/28 15:43:53
Subject: Make Your own Miniatures Case 2.0. The 19 dollar Plano Wonder!
|
|
Storm Trooper with Maglight
|
Steak wrote:swapyturtle, I'd be interested to know how sharp you filed them as well, if at all. It sounds like you may be able to skip that if you use the hammer method.
Also, what type of glue did you use on the foams? I used a industrial strength spray adhesive (although eilif advised against it) because I had it available, and haven't had any issues yet.
Before I began I ran the copper tube over sand paper for about 5 minutes per piece (that being the 3/4" and the 1"). I found it did very little except make it easier to hammer out the circle . If anyone is interested I could draw a diagram showing the method. Its really very easy. Take a plank of wood and lay it on the table. Lay the copper tubing of choice in the position of foam area that suits you on top of the wood. Then hammer it around the copper area outline on the direct top of the tube itself (not inside the circle, just the outline)
I found a all purpose glue at hobby lobby for 3 $ that works just as well as adhesive. I don't have it with me (at school) but I can post the name when I get home.
|
|
|
|
|
|
2011/11/28 15:56:49
Subject: Make Your own Miniatures Case 2.0. The 19 dollar Plano Wonder!
|
|
Trollkin Champion
|
swampyturtle wrote:If anyone is interested I could draw a diagram showing the method
I would like that, maybe even a video perhaps? 
|
|
|
|
|
2011/11/28 18:07:39
Subject: Make Your own Miniatures Case 2.0. The 19 dollar Plano Wonder!
|
|
Brigadier General
|
swampyturtle wrote:Before I began I ran the copper tube over sand paper for about 5 minutes per piece (that being the 3/4" and the 1"). I found it did very little except make it easier to hammer out the circle .
That's your problem then. You didn't actually make a cutter out of the tube. Sandpaper is of almost no use at all in making a copper fitting into a cutter.
It takes around 5-10 minutes with a dremmel to turn a copper fitting into a cutter followed by another few minutes with a file to really hone the edge. The resulting cutter will have an edge that can cut flesh and foam with ease.
swampyturtle wrote: Its really very easy. Take a plank of wood and lay it on the table. Lay the copper tubing of choice in the position of foam area that suits you on top of the wood. Then hammer it around the copper area outline on the direct top of the tube itself (not inside the circle, just the outline)
Is it possible to use the hammer method to make a tray where there are neat figure cavities in every indent in the eggshell foam? I would rather use a hammer than wear out my wrist twisting, but I have so many figs to store that a half capacity tray like the ones in your pictures are not an option for me.
swampyturtle wrote:I found a all purpose glue at hobby lobby for 3 $ that works just as well as adhesive. I don't have it with me (at school) but I can post the name when I get home.
I'd love to know the name. I like hobby lobby and the pliobond is bombproof but stinks for a very long time!
Sorry about all the questions, I'm quite curious to see if there's another method that would bring about results as good as mine with less time, effort and odor.
|
|
This message was edited 1 time. Last update was at 2011/11/28 18:08:17
|
|
|
|
|
2011/11/28 19:52:46
Subject: Re:Make Your own Miniatures Case 2.0. The 19 dollar Plano Wonder!
|
|
Storm Trooper with Maglight
|
That's your problem then. You didn't actually make a cutter out of the tube. Sandpaper is of almost no use at all in making a copper fitting into a cutter.
It takes around 5-10 minutes with a dremmel to turn a copper fitting into a cutter followed by another few minutes with a file to really hone the edge. The resulting cutter will have an edge that can cut flesh and foam with ease.
That was my fault then, The orginal tut that i read didnt seem to indicate that method of making the copper into a better cut tool. Unless i missed it somewhere. 
Is it possible to use the hammer method to make a tray where there are neat figure cavities in every indent in the eggshell foam? I would rather use a hammer than wear out my wrist twisting, but I have so many figs to store that a half capacity tray like the ones in your pictures are not an option for me.
Yes it is, In tray number two, ( the one on the right here in the 3 trays picture) look at the bottom row and you can see that there are two small holes in between my rows about 3 rows up. I only made my case half capacity cause A) it was game time for college football on the TV B) i started doubting that the holes could fit the models (my mistake  ) However, the method is no differnt from what ive described above. the only forseeable instance is that you might have to postion the cells just alittle cleaner so that you dont run into any other holes. Again, those two holes are as far as i went with the extra's just to test the theory. Im not sure in practice how much stiffness you'll loose in the foam should you cut out more (though next time i have some free time from uni im gonna figure it out)
I'd love to know the name. I like hobby lobby and the pliobond is bombproof but stinks for a very long time!
Sorry about all the questions, I'm quite curious to see if there's another method that would bring about results as good as mine with less time, effort and odor.
Its called Sobo Premuim craft and fabric glue. You dont have to use alot i found but just enough to get the bond good. It is a weaker bond then pliobond i imagine but it also means should i choose to make more holes in my case (and i do!) then i can strip the bottom off easy. (yes i tested it)
|
|
This message was edited 1 time. Last update was at 2011/11/28 19:54:54
|
|
|
|
|
2011/11/28 20:18:56
Subject: Re:Make Your own Miniatures Case 2.0. The 19 dollar Plano Wonder!
|
|
Brigadier General
|
swampyturtle wrote:[That was my fault then, The orginal tut that i read didnt seem to indicate that method of making the copper into a better cut tool. Unless i missed it somewhere.
That's at least partially my fault. In the first post I don't explain the process, I just refer you to Kutzmon's original article, (linked at the top of the page). It's not until a couple of pages later in this thread that we discuss files vs dremmel-type rotary tools. Rotary rools win by a landslide!
swampyturtle wrote: Yes it is, In tray number two, ( the one on the right here in the 3 trays picture) look at the bottom row and you can see that there are two small holes in between my rows about 3 rows up. I only made my case half capacity cause A) it was game time for college football on the TV B) i started doubting that the holes could fit the models (my mistake ) However, the method is no differnt from what ive described above. the only forseeable instance is that you might have to postion the cells just alittle cleaner so that you dont run into any other holes.
Oh, there it is. Hammering is seeming better and better. I have a wide head hammer, and an extra cutting mat that I could use to keep from ruining the sharpened edges my cutters have on them now. I may just give this a chance.
swampyturtle wrote: Again, those two holes are as far as i went with the extra's just to test the theory. Im not sure in practice how much stiffness you'll loose in the foam should you cut out more (though next time i have some free time from uni im gonna figure it out)
Putting a hole is every eggshell depression gives you a tray that is plenty sturdy though (see below) it is advisable to use a very strong adhesive.
swampyturtle wrote:
Its called Sobo Premuim craft and fabric glue. You dont have to use alot i found but just enough to get the bond good. It is a weaker bond then pliobond i imagine but it also means should i choose to make more holes in my case (and i do!) then i can strip the bottom off easy. (yes i tested it)
Hmm, being able to strip the bottom off is what made me decide to switch from elmers spray adhesive to Pliobond. It probably works ok for plastic figs, but for a tray of metal figs (or for just wanting trays as sturdy as the commercially made ones) I strongly suggest a stronger glue. I want a bond that's so permanent that pulling it apart will tear the foam.
|
|
|
|
|
|
2011/11/28 20:35:12
Subject: Re:Make Your own Miniatures Case 2.0. The 19 dollar Plano Wonder!
|
|
Storm Trooper with Maglight
|
Hmm, being able to strip the bottom off is what made me decide to switch from elmers spray adhesive to Pliobond. It probably works ok for plastic figs, but for a tray of metal figs (or for just wanting trays as sturdy as the commercially made ones) I strongly suggest a stronger glue. I want a bond that's so permanent that pulling it apart will tear the foam.
Yes, i agree with you on that. Again this case really was a learning experience. in all honesty if i did it again, i would make more indents and holes now that i know it works and have a method.
I also agree with you on the glue. Again, i was in a hurry to build this case before the game and so at the store choose the glue that seemed to fit my needs. No one knew what Pliobond was
It works just fine for plastic figures and i assume some metal ones too (havent tested it out yet). As for why im ok with the weaker bond for the moment, its because i know that my case truly isnt complete and i want to add those extra holes in for my IG (130 figures or so). once the case is complete i'll add the bond and hopefully make it 'so permanent that pulling it apart will tear the foam'
|
|
This message was edited 1 time. Last update was at 2011/11/28 20:35:34
|
|
|
|
|
2012/01/11 16:11:10
Subject: Re:Make Your own Miniatures Case 2.0. The 19 dollar Plano Wonder!
|
|
Brigadier General
|
Minor update,
On a trip to Harbor freight today I found these:
 http://www.harborfreight.com/5-piece-1-4-quarter-inch-shank-mounted-stone-set-94992.html
These are grinding stone bits for a regular power drill. As most folks probably have, or have access to a power drill, this makes the issue of whether or not to buy a dremmel moot for this project and at 4 bucks a pack (2.50 on sale!) brings the investment in tools even lower.
I'll still probably use a needle file for the final bit of honing, but I'll be using my power drill from now on for making the cutters.
I'll update the first instructional post as well.
|
|
|
|
|
|
2012/01/11 16:24:47
Subject: Re:Make Your own Miniatures Case 2.0. The 19 dollar Plano Wonder!
|
|
Trollkin Champion
|
Eilif wrote:Minor update,
On a trip to Harbor freight today I found these
I wouldn't get your hopes up. I bought their rotary tool with a million pieces and it came with a couple similar grinding bits. I started to file down the copper fitting with one of them, and I managed to file the bit itself, nothing happened to the fitting.
|
|
|
|
|
2012/01/11 16:33:13
Subject: Make Your own Miniatures Case 2.0. The 19 dollar Plano Wonder!
|
|
Brigadier General
|
Thanks for the heads up. I'll give it a shot. The bits I was using before were Dremmel brand bits and while it did groove the bit, it did a good job on the fitting. I'll report back later with the results.
|
|
|
|
|
|
2012/01/13 01:27:38
Subject: Re:Make Your own Miniatures Case 2.0. The 19 dollar Plano Wonder!
|
|
Trollkin Champion
|
Yeah, I ended up buying the Dremmel bits as well, they work great
|
|
|
|
|
2012/01/13 04:23:20
Subject: Re:Make Your own Miniatures Case 2.0. The 19 dollar Plano Wonder!
|
|

Sinewy Scourge
|
Hey Guys,
I'm planning on doing a tutorial on this same topic, but I have a question related to one of the techniques covered here: in this tutorial, people are sharpening a copper coupling with a dremel and grinding bit. In my case, I'm planning on a variation, but I'll be using a couple sharpened putty knives to do the "press cutting".
My question to you is: do you think a dremel and grinding bit can sharpen a putty knife to a sharp edge?

Thanks!
|
|
|
|
|
|
|
|


 Order of the Sable Heart
 Grave Knights
 House Rouen

 4000 Emperor's Children

 2760 Angels of Redemption

 3310 Bad Moonz
