Forum adverts like this one are shown to any user who is not logged in. Join us by filling out a tiny 3 field form and you will get your own, free, dakka user account which gives a good range of benefits to you:
No adverts like this in the forums anymore.
Times and dates in your local timezone.
Full tracking of what you have read so you can skip to your first unread post, easily see what has changed since you last logged in, and easily see what is new at a glance.
Email notifications for threads you want to watch closely.
Being a part of the oldest wargaming community on the net.
If you are already a member then feel free to login now.
2013/07/08 18:45:07
Subject: Re:GrimDork Hobby Time! Countdown to the Deadzone, TODO or die list added to first post!
Hoping to do more but I'll be glad of 36! Thanks for the comments guys, keepin me going working in this nasty heat. Updates with finished zombie tonight and more as I can. Gotta add to my cheering section!
This message was edited 1 time. Last update was at 2013/07/08 22:21:35
2013/07/08 20:34:40
Subject: Re:Re:GrimDork Hobby Time! Countdown to the Deadzone, TODO or die list added to first post!
Been enjoying your Blog grim, lots of interesting projects you got going on. I've never tried dipping, but I've heard using matt varnish afterwards, gets rid of the shine and makes the models look really tasty. Would love to shoot up your lovely zombies with my Forge Fathers
Adam McCreesh
2013/07/08 22:34:53
Subject: Re:GrimDork Hobby Time! Countdown to the Deadzone, TODO or die list added to first post!
Thanks BmB. The matt varnish on top of the dip is generally what makes it look much better. For stuff like tyranids/aliens you can leave it glossy, but most models benefit from a blast of matt sealer. I'll be doing that to my zombie just as soon as I get over this heat... Wasn't super terrible, just 95 (what's that, 35 or so, for you english folk?), but its humid here and the last couple hours of work were brutal. Been having fun watching your forge fathers progress here and on the mantic boards, keep 'em comin! My zombies would love to get shot up by your lovely Forge Fathers, however you're gonna need some big dakka to get across the pond
I had to be fairly terse earlier as I was just taking a wee break from the heat at work; but I just wanted to say how much I appreciate everyone's comments. Feedback is directly equivalent to motivation Feel free to comment as much as you like!
@Da Boss, the blog posts and picture taking (as horrible as my pictures typically turn out) do take time. But I'm fairly isolated from other hobbyists here in my small town. The closest game stores are an hour away in either direction, and there's just no time to play or mingle. So forums are the only outlet I have for discussion of the hobby. And the blog posts I can usually type up while half-watching the baby/toddler (she walks, not sure when you switch to calling them toddlers lol), so that part isn't so bad.
Think I'm gonna go spend time with baby and wifey, but that zombie is getting based and dusted tonight if it kills me
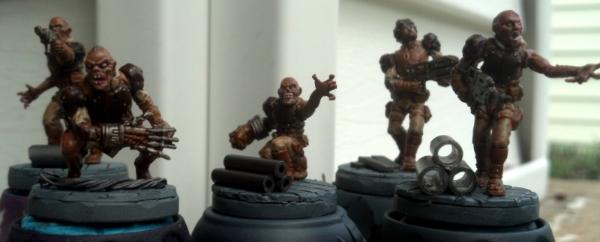
In other hobby news, I think I've decided to make the heavy weapons section into z-corp as well. There are just too many creative zombie-related modifications you can get away with on those bigger bases. For instance, take the mantic zombie thats bursting out of the ground and is just an upper torso, perfect level for firing the big gun! Add in crawling spotters dragging their guts behind them etc.
I feel that the z-corp models are easier and faster for me to paint up, so if I swap the weapon section into z-corp I'm going to add my steel warriors to the TODO or Die(tm) list for december. The extra bits I'll save making the weapon teams into zombies may also let me eke out an additional 5 corporation marines/vets for filling out the vet team to a section or what have you.
Thanks again so much for reading guys
I'll be tacking on zombie images as soon as I get to it!
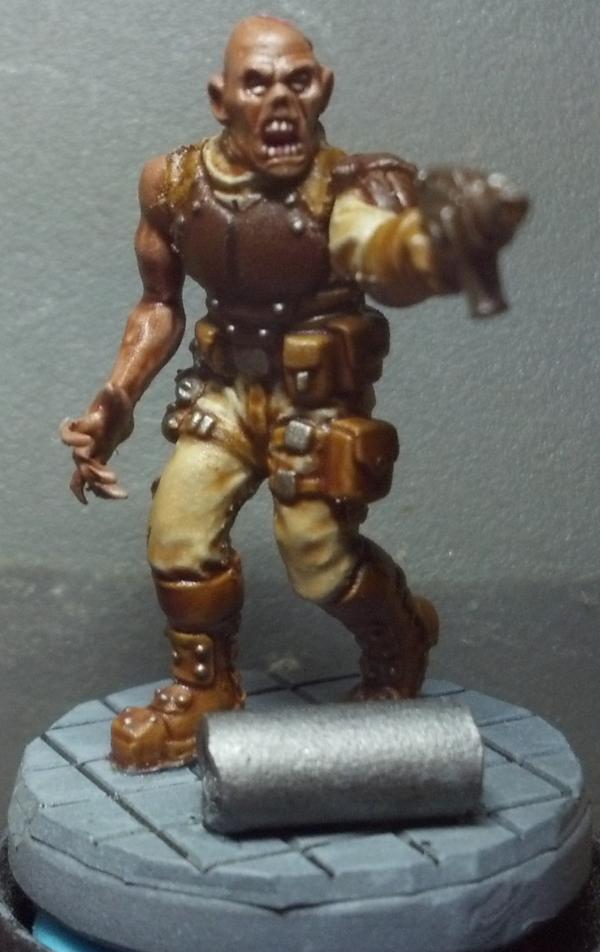
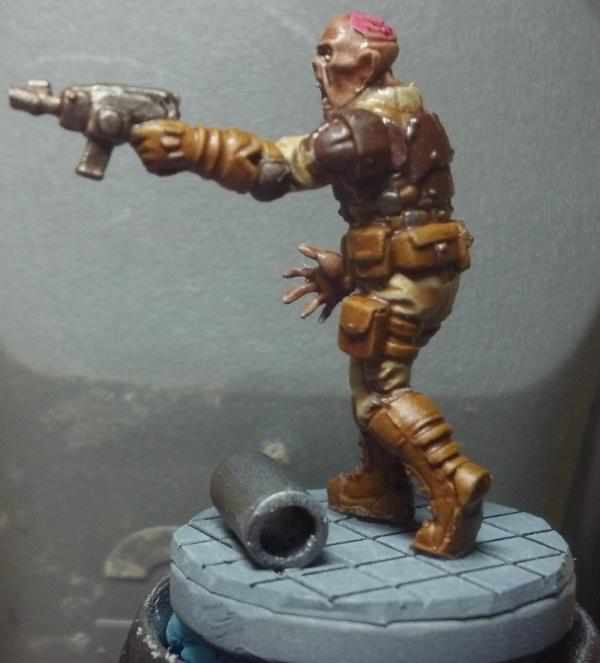
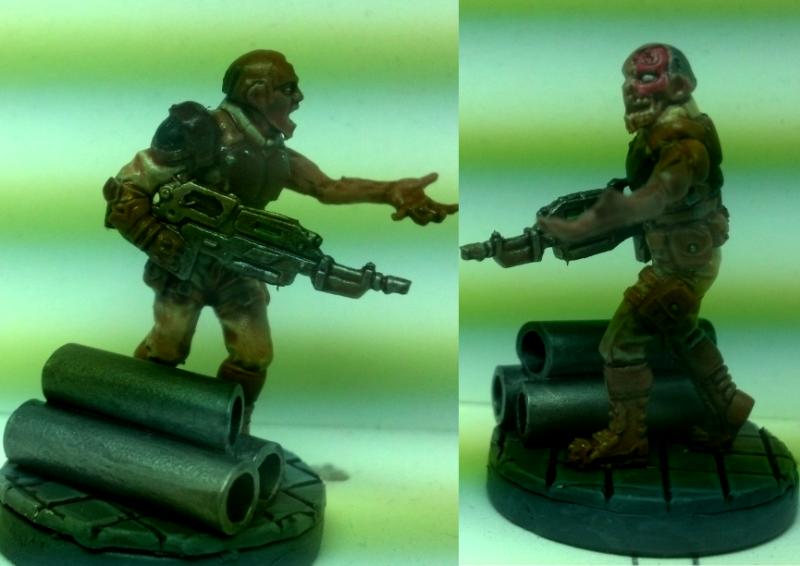
Automatically Appended Next Post: Woot. Finally got mister zombie glued down and dusted off. I think he's a tad shiny in some places, but I didn't want to drown out any detail by soaking him in the stuff.
Makes you wonder if he's even got a charged battery in his gun or not, maybe he's pointing it out of habit?
You can see some funky bits around the neck and join of the arm to torso. This is blu-tak or whatever I ended up filling the gaps with. Its a little rough, but this soldier is meant for the table so it shouldn't come up.
I think the grey matter is a little too pink, we'll work on that for the next brains-out zombie I do! I notice the inside part of his shoulder pad is still brown, maybe I'll fix that once I think of a good color to put there. I think I just noticed part of the exposed area is supposed to be bone!! I'll fix that later
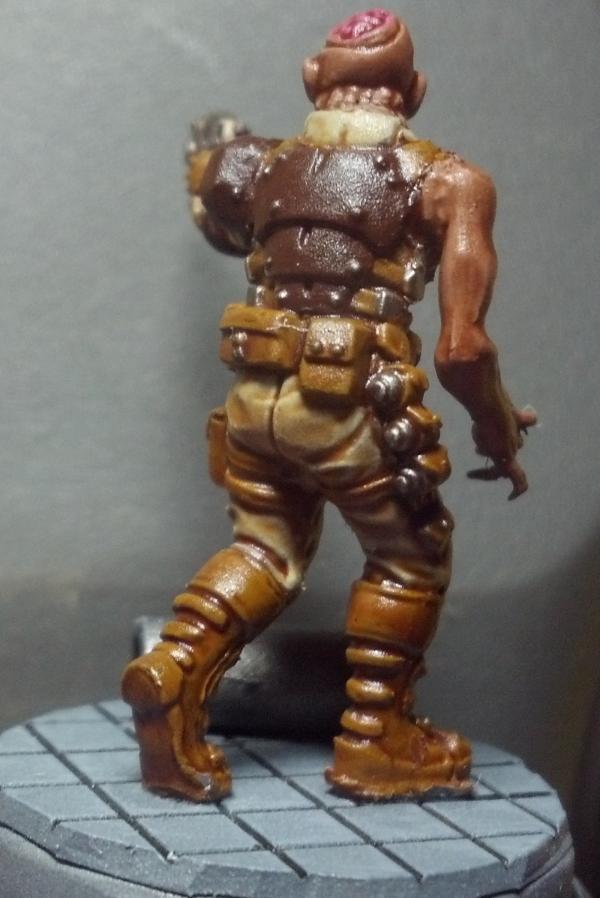
He looks a little shiny from this angle. Not sure why, he isn't that shiny in person.
I've added him to the cheering section, however the picture came out poorly so I'll worry about it later! I am pretty excited about this zombie being done. I think he looks good enough for me to continue on and finish the rest of the first five. And as soon as I post this I'm gonna get a soda and clip out some more zombie bits while I watch TV and dream up some new poses.
I've separated the units, if I want to spare 5 more models for a second vets team (or 5 more to bump 1st into a section), I'm going to have to make each weapon section gunner into two zombie marines AND stretch the nine remaining marines into fifteen zombies. So all this means I'll have to split at least six of the marines down the middle (a tricky prospect) or include a couple of mostly zombie parts marines. So far I like the marines with arm/head swaps and the half marine/zombies. I'll try one zombie body/legs maybe with marine head and arms to see if it'll blend in alright.
Good news everyone! 4 more primed zombies! I think if I rough up my dwindling bleached bone and get it into the airbrush (with copious amount of water) I can severely cut the time it takes to do these.
So as soon as I get to sit back down at the hobby desk, 4 more zombies, more zombies converted, a few bases worked out, and maybe some dwarfs finished up!
Thanks for reading!
Automatically Appended Next Post: Tack this on too!
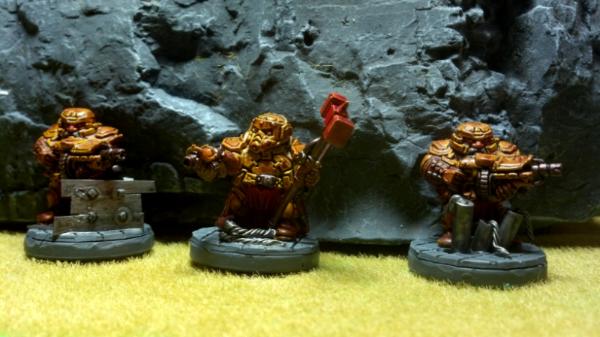
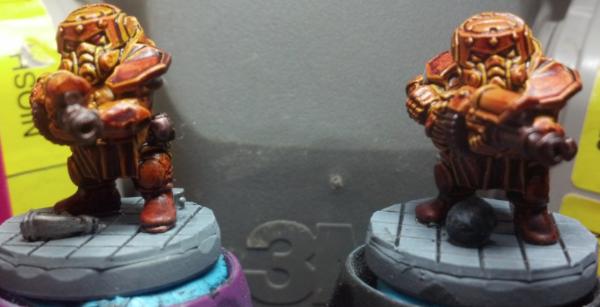
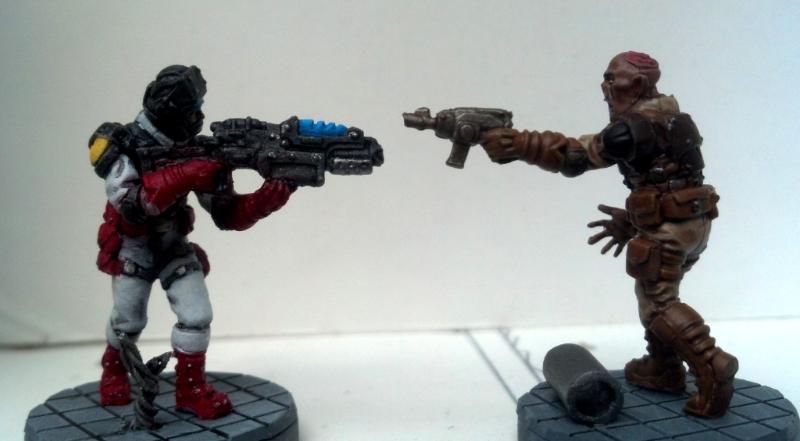
Just realized I didn't take a a shot of my two finished forge fathers on bases yet. It follows below. Future Forge Fathers will have some red and leather, these had too much stay yellow!
DORFS!
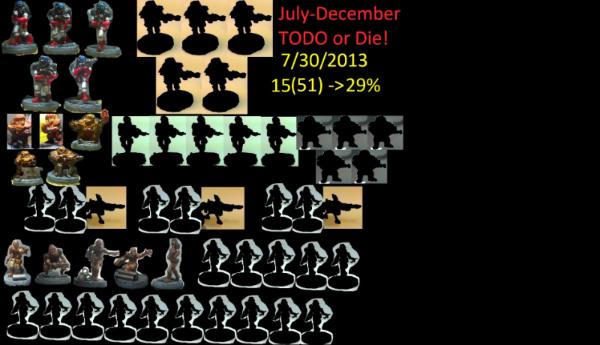
I've also updated the main page with a new TODO or DIE graphic, and even filled in 3 slots! Now, by december--the day my deadzone stuff comes in-- I want to get 51 minis painted. Of course, now its 48, but still! This is up from 36. I changed the weapon teams to zombie weapon teams, added in all 10 steel warriors, and added a team of marines/vets that I hope to have left after zombie conversion. Weee!
This message was edited 3 times. Last update was at 2013/07/09 03:28:17
2013/07/09 19:57:02
Subject: Re:Re:GrimDork Hobby Time! Countdown to the Deadzone, TODO or die list added to first post!
Your finished Zombie totally rocks Grim, i wouldn't change a thing! Looking forward to seeing the squad. Yeah I'm feeling the heat today, my paints keep drying up real quick. So I've been playing Shadowrun on the Genesis!
I lived in the states for a while, would have loved a game with you mate!
I want to get this Forge Father / Marauder project, Dwarf King's Hold, a small Eldar Force (750 points) and a 40k list for my Forge Fathers done, all before Deadzone hits. And maybe something Fantasyish.
Keep at your projects Grim, want to see much more pics! Which Deadzone faction you looking most forward to?
Adam McCreesh
2013/07/09 20:22:47
Subject: Re:GrimDork Hobby Time! Countdown to the Deadzone, TODO or die list added to first post!
Thank you thank you . I'm glad of having the scheme down second try, I've abandoned entire projects due to color scheme woes.
I may load up some quasi old school with some baldurs gate. That or I may play through FTL yet again.
Man, BmB, that's a lot bigger of a list than mine! Good luck knocking that all out!
The enforcers will add in nicely for my corporate forces, but the rebs have the most character (followed by marauders). The terrain is probably my favorite faction though! Got 12 battle zones and 14 accy sprues and I wonder if I need more
Automatically Appended Next Post: I had this crazy idea to do one of the cruisers from FTL scaled to fit 28mm models. I was thinking I could cut the hull out of foam or plaster or plasticard or whatever makes it work, and then have the top as a lid, and nestled inside would be the floor plan of the ship made of deadzone tiles!
I'm doing a rough count right now to see how many tiles it would take. If you treat each square in the grid the game uses as one 3" tile (probably close, I guess the FTL squares are at least 5 feet maybe 8-10).... Actually... you know what, they probably are 5 foot tiles and I read deadzone's 3" tile as roughly 3m or 10ft. I was forgetting about half tiles...
Ok sorry for thinking "aloud" there. Lemme get a tape, I need to see if a couple of models sitting on a 1.5x3" half would look.. proper...
Yeah, so, I think treating each of the FTL grid sections as a 1/4 deadzone tile may be the best way to do it. Gives it more a feeling of a cramped ship optimized to be small and efficient, than the much-too-big-ed-ness of having 10 ft per little square in the game.
Having determined that... It looks like the Kestrel Cruiser would be right around 24-26 inches long, with an interior of 22 inches lengthwise and 9 inches across the mid-section. It would need 8 full tiles and 10 half tiles for the floors. For simplicity I'd use full tiles vertically as well, so... It is kind of hard to count without building anything, at least for me. But it looks like upwards of 40 full tiles for the walls with fairly less half-tiles.
So It sounds to me like I could build the interior of this space craft out of two battle zones. That sounds like a challenge! Maybe if I get my TODO or Die list done crazy early, I could get started on the outer hull. I could see using this for small team boarding actions with deadzone rules, as well as slapping the badboy down on a larger deadzone board with ramps leading up to it in some kind of objective mission (capture/sabotage/escape etc).
Hmm food for thought. This one is on the back-burner though for sure!
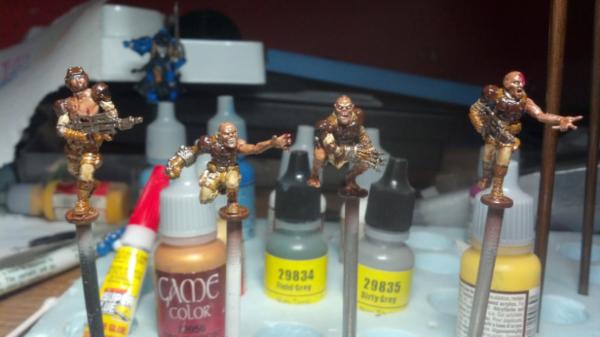
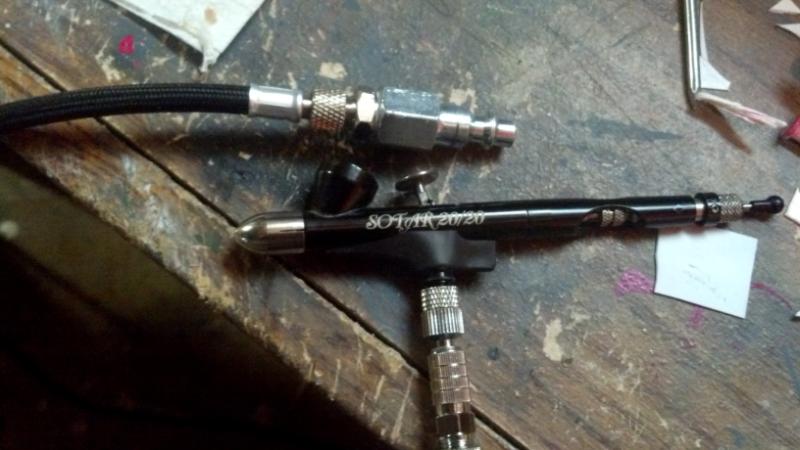
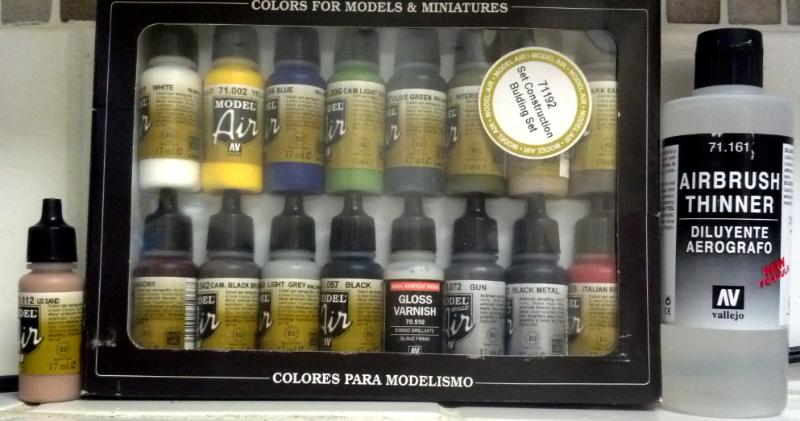
Automatically Appended Next Post: Spending way too much money on this stinkin hobby stuff! Secured a couple of bits for my airbrush set-up including a quick disconnect. I'll be happy to switch to my lighter airbrush hoses, that big one served its purpose but it is getting annoying to work with. That cost me less than lunch, what really irritated my wallet was picking up a 16 color vallejo model air set as well as another color (what will hopefully be somewhat close to bleached bone, or at least a light tan, so hard to tell online!), and a large (for vallejo) bottle of thinner. I realize you can mix your own, but for the same reasons I'm ordering the model air in the first place I want something easy!
Got some BB sprayed onto the zombies but its just too finicky of a paint to work with, so I'll probably wait for the VMA color to try again. Was going to do more but then I got drawn into researching thinners and figuring out which paints I wanted. Bleeigh!
This message was edited 2 times. Last update was at 2013/07/10 04:04:01
2013/07/11 03:03:22
Subject: Re:Re:GrimDork Hobby Time! Countdown to the Deadzone, TODO or die list added to first post!
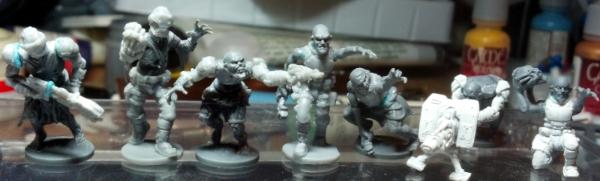
Meh. Got a little done today. This heat is just getting oppressive. And its a much milder summer than last year, guess I'm just out of shape! Didn't get anything finished, but here's a shot of the WIP zombies, mostly done with cloth and leather, a couple of hard-luck cases need another layer or two, then as long as flesh and metals are agreeable we should be getting close...
Note the wonky brush behind them. Its the same brand and tip size as the last one (which has started to split, despite my best efforts with brush soap and careful use), but the handle is ridiculously thick. I'm not really sure what purpose/benefit the thickness of the handle serves, but its taking me a minute to get used to it
So, only wednesday. Surely I can get these guys done by the weekend? I could finish the rest of the steel warriors in an hour or two as well, really boost my progress, but I may save them for a pick-me-up when I inevitably bog down on the white/details of the next 5 normal corporation minis.
That kestrel project has been haunting my dreams I'm thinking of maybe getting one of those 4'x8'x1" insulation boards we typically make terrain/tables out of and building it from layers of the foam. 3-4 layers the same shape for the middle and then 1-2 layers tapering up and down to finish the shape. I can fill in the gaps or trim the slots down to make the smoother shape of the hull. Could either make the nacelles out of the same body foam layers, or make them separately. I think I would need 1-2 deadzone antenocitis bundles to detail the interior, with most of the items carved into the walls to maximize functional floor space. Alright, that's enough about this one, I'll keep it in the back of my mind for insight, but I've a lot of minis to paint before deadzone arrives, and many many more after that!
Thanks for reading, should have something nicer to look at by the weekend
2013/07/13 17:50:10
Subject: Re:Re:GrimDork Hobby Time! Countdown to the Deadzone, TODO or die list added to first post!
Zombies are looking real good Grim, but its the weekend, where are these nicer things? Just breaking your balls mate, sure is a steamy weekend, hope you get some chill time!
Adam McCreesh
2013/07/13 19:37:48
Subject: Re:GrimDork Hobby Time! Countdown to the Deadzone, TODO or die list added to first post!
Haha. The zombies are dipped, all I need to do is dust them off and glue them to bases. Gotta finish two more bases to have enough, but that doesn't take long. If I'm efficient, could probably have a few done tonight after the girls are in bed without having to stay up too much later. Undercoat-basecoat-metals-drybrush, won't take long.
Want to get a little effort put in on the first five rangers today too, but it sounds like we may be taking a trip to a nearby town (model train store, hobby lobby, more money into hobby weeee) here in a bit.
Zombies will be up tomorrow, as early as I get the chance to spray them. Hopefully with some more interesting bits
I should not have fired up FTL to look at the specs for the Kestrel. I'm not too worried about the ship project until my deadzone stuff is here, i can wait. But the game is somewhat addictive to me, one of those things where you just want to do one more jump... but then its a harrowing 5-10 minute ship battle... then you forget you were going to quit... kind of like reading a good book, but more stressful
Fortunately, I played the crap out of when I first got it, and these little spats quickly devolve into ennui, so I should be back to more productive painting mode soon!
Automatically Appended Next Post: They will look better after the sealer if the first zombie is any indication. Not the best photo and oh so shiny atm.
More later, now is time for supply run/ family drive!
Automatically Appended Next Post: Bah. The family drive portion of the evening was alright but the supply run was terrible. I think I'm done with the train store, guy doesn't seem to restock and its cheaper to order online than driving almost an hour out of my way. Hobby lobby was 20 more minutes out and there was nothing we needed so meh. I did get my 1/4" / 1/8" male male adapter and my 1/8" quick disconnect so now I can use my little airbrush hose with my big compressor, small quality of life change but I'll take it!
It's getting late and I'm not looking to pile up sleep-debt, I may go undercoat those bases, but I doubt I'll paint them.
Finished zombies tomorrow!
This message was edited 2 times. Last update was at 2013/07/14 04:40:30
2013/07/14 19:58:44
Subject: Re:Re:GrimDork Hobby Time! Countdown to the Deadzone, TODO or die list added to first post!
So, I'm pretty happy with the zombies. They aren't breaking the bank in terms of work-load, but I think they will look pretty ok on the table. This puts me at 7/51, roughly 13-14% to the goal. So, still shy for the month, but we've still got a couple of weeks to go. Hopefully I can get the first five rangers done in a week or two, and those forge fathers can be completed pretty quickly whenever I get nervous
Kind of superfluous, but here's the new hose set up for my airbrush. 1/4-1/8 adapter and quick connect are new. Had the hose but couldn't use it before. This is a bit lighter and the quick disconnect lets the set up swivel better. Minor quality of life upgrade, but I'll take it
And his painted cheering section grew four sizes that day...
That's all for now, though I may try to take a few more pictures while the sun is still out, get some better shots of my favorite details. Or some theme/action shots. I think with the advent of my Deadzone stuff, that I want to get into taking some fancier photos especially when I get some of the terrain done. May need something more dedicated than just my phone camera for that, though it will all be happening around xmas so who knows
I should have some hobby time in an hour or two as well, hope to get the rangers clipped and up on nails, and undercoated as well-- if possible. While I wait for things to dry I may dig up some more oddball things to pop up here, maybe some of my accumulated plastic shame, or some neat conversions (if I find any ).
So stay tuned as its time to send in the rangers!
This message was edited 2 times. Last update was at 2013/08/04 19:35:42
2013/07/14 20:44:33
Subject: GrimDork Hobby Time! Count down to Deadzone,TODO or Die 7/51!
The bases are really dull without extras, the pipes are getting a little on the large side, but I wanted push boundaries around a little bit as the smaller bits from before are kind of underwhelming.
I think unless I just get a huge case of boredom or alt-itis, I should get done ahead of schedule. I'm hoping for this as it will give me time to get a board ready for Deadzone and maybe get started on my ship.
The airbrush and I are still just acquaintances, but I'm trying to work on that. Hopefully when my vallejo model air order comes in and I just have to worry about how to spray, and not as much about if the paint is mixed right, I can get a little better.
Now, off to the basement with me to get to work on these rangers. Silly FTL tried to steal my attention but hobby time is now!
Automatically Appended Next Post: Did somebody say Forge Fathers?
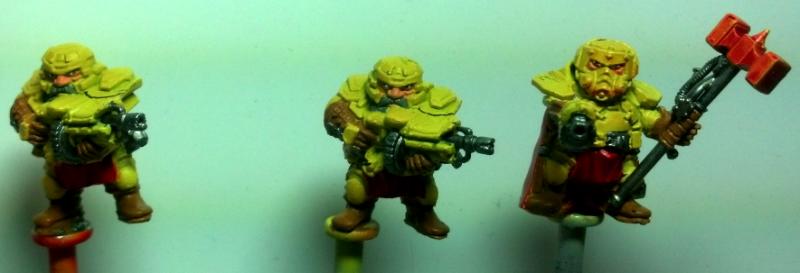
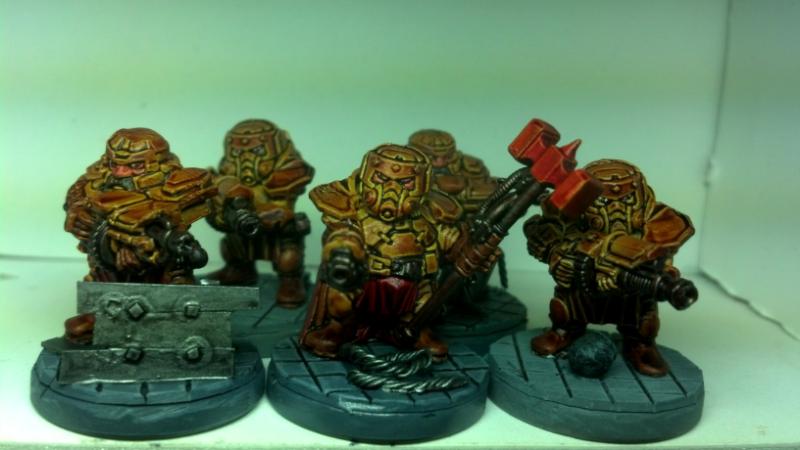
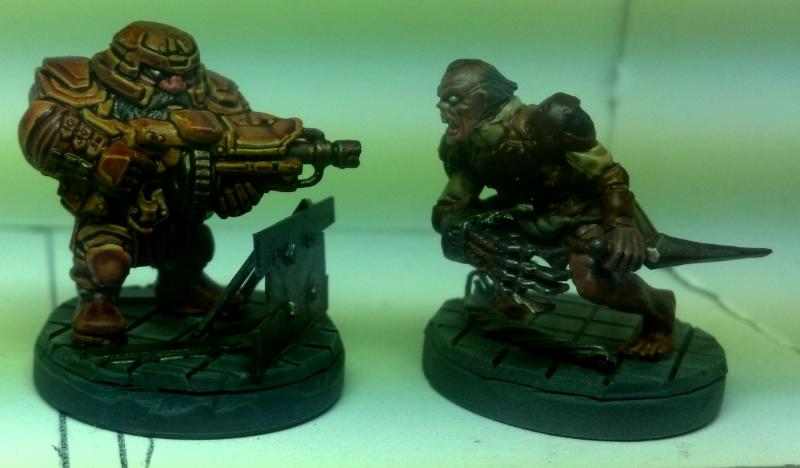
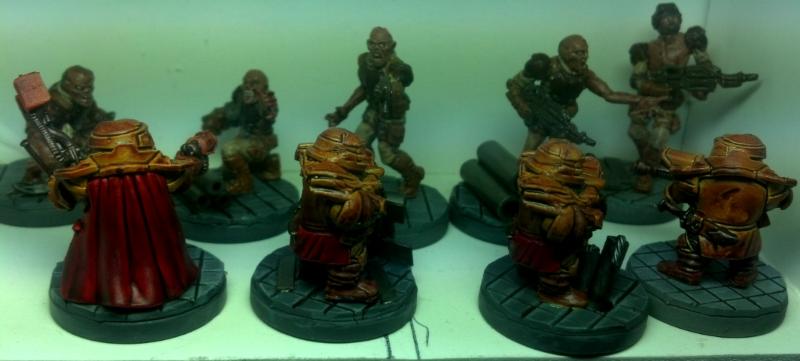
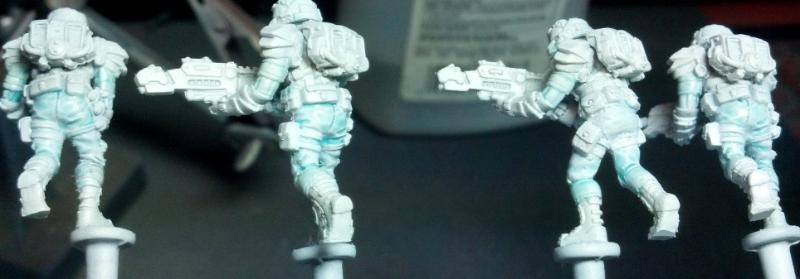
These guys are very nearly done, though they hardly look it. A trip to the minwax and they'll just need matte sealer and a base. Added some color over the first two, though the palette and execution are still simple and rushed. The heat hammer is probably going to need some treatment after the dip. Usually dipping and sealing happen last and directly in order, but I just don't see that hammer holding up, and it doesn't look good anyway. I'll do some looking around and see if my available paints can duplicate a nice heat effect someone else has perfected. Another odd move for me is the eyes. I was going to leave them white, but they're so much bigger than human eyes that it seemed more reasonable to try. Gotta go back and hit the first two. There wasn't much choice on the two gunners, but it was a bit odd of me (who hates painting eyes) to paint what could have been lenses as eyes. Oh well. Will have to be careful the dip doesn't destroy them! I went with grey beards as I wanted them to look like seasoned fighters even if they are just basic infantry.
*edit* minwax visit completed, now I just need to get them onto bases and sealed. Unfortunately there is only one complete base, will have to get a couple done before I can finish the unit. Need to get back to being ahead on those!
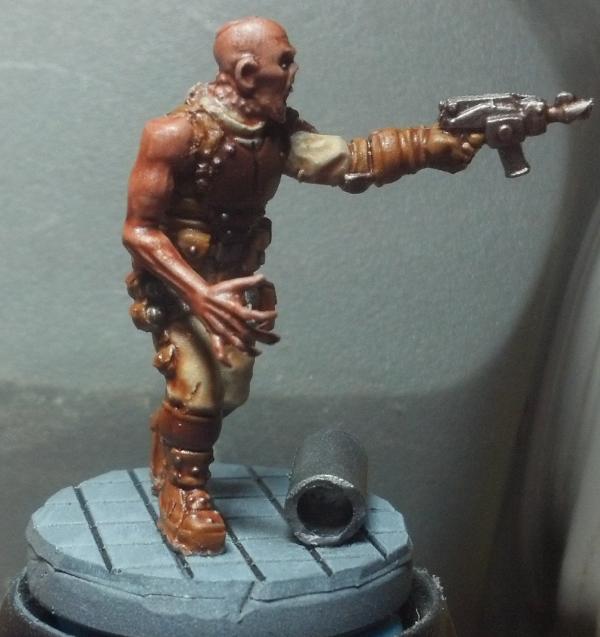
I want to get a better shot of this guy, he's become my favorite. From one angle (and far enough away) he looks like a wounded soldier... but... GOTCHA! zombie! Seems like the kind of reveal you'd see in a movie or something.
I was going to take some more shots of interest but I didn't realize they had enough light. This looked too dark to keep when it was on my camera, but it seems fine here. Outside in a tiny makeshift light box, still a little dark. These models look rough up close, fortunately they aren't meant for closeups really.
And here's a step in the right direction. Got these guys off of their mini-bases and primed before the dwarfs distracted me. I had a mind to start on them, but I'm going to wait until my airbrush paint comes in and try to spray more than brush them. Box is within driving distance, so maybe tomorrow. If not, the dwarfs should be done (may have to wait for pictures till I get more bases finished though!)
So this week should see the fabulous first five forge fathers finally finished for reals friends (alliteration!). Also, we should see some work on the rangers. Till then!
This message was edited 2 times. Last update was at 2013/07/15 03:51:47
2013/07/16 01:15:46
Subject: Re:GrimDork Hobby Time! Count down to Deadzone,TODO or Die 7/51!
Thanks to the warstore I've got my VMA in short order. I'm not happy with my choice of US Sand, it just isn't what I thought, hard to pick colors on the netz... Oh well. I got the building set because they were sold out of the other 2-3 starter set things. Its an interesting array of colors, leaning more towards earthy tones with the olive/interior/camo green, light brown/dark earth/mahogany/black brown. But you still get a lot of staples like white, blue, yellow, a kind of red, and black. And throw in some extras like gun metal, black metal (and I'm dying to see how it looks) and some gloss varnish. I didn't know the set came with gloss varnish till it arrived today, i'm not thrilled about it. Anything I dip will already be shiny and I can just mask before matte sealing, plus I picked up one of GW's 'ardcotes to brush on small areas. I guess if I find an entire model that I want shiny that I also do not intend to dip...
Also got a large bottle of their thinner. I know you can mix your own, but I hear vallejo paints can have trouble with certain things (alcohol or acetone or something) and I think this stuff is a bit milder in terms of putting bad stuff in the air. Hopefully it fixes some of the issues I've had with certain paints.
So, in-depth analysis of a vallejo paint set is kind of dull. But I put in a few extra hours today and am sleepy. Not sure I'm gonna get down to finishing those two bases so I can seal the dwarfs. Maybe if baby sleeps sooner than later!
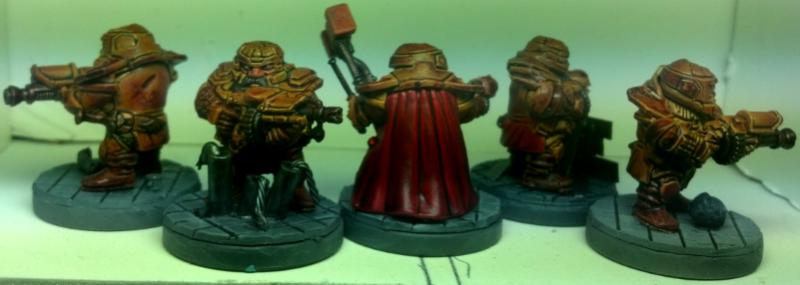
Automatically Appended Next Post: Better late than never, better short and ugly than good and dead!
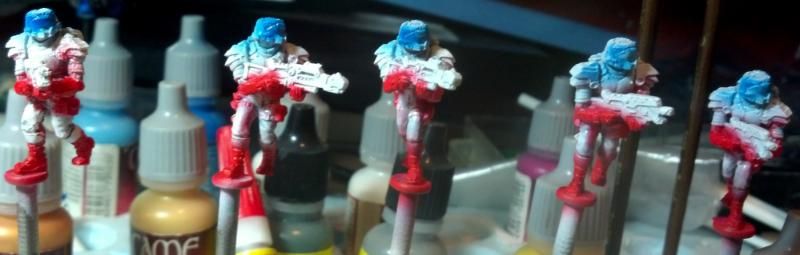
Boom 5 forge father steel warriors. Really basic scheme dipped in super dark Bombay mahogany stain. Will do more pics tomorrow but I'm piling up sleep debt as I write this. Mr. Sousa requested space dwarfs and who am I to deny my few watchers!
This message was edited 2 times. Last update was at 2013/07/16 04:19:20
2013/07/16 15:18:39
Subject: GrimDork Hobby Time! Count down to Deadzone,TODO or Die 7/51!
Thanks! Eyes are hard, thankfully these dwarf eyes are oversized. I'm glad I did eyes instead of lenses though, gives them more character.
I don't get to talk to or discuss stuff with other gamers often so sometimes I blab extra junk up here. I figure folks can read it or just go TLDR and scroll down for more pictures
Of course the blogs origin was in me breaking down and reviewing the corporation army box. I hope to do the same with my massive deadzone hoard when it arrives.
I may bog down a tad in these rangers but I'm hoping to pick up the pace with my new airbrush paints!
Thanks for reading!
2013/07/17 00:34:07
Subject: Re:GrimDork Hobby Time! Count down to Deadzone,TODO or Die 7/51!
Well, I think update #102 today is going to be it before we have to lock in our Deadzone surveys. I think I conned myself into two more battlezones! I have the same number of battlezones and accessory sprues ordered now =\. Or, I will as soon as I finish my survey. Need to send it in again or I'm gonna end up with triple marauders and LSV walker things I dont really want at this point. Spoilered are my thoughts on exactly how to arrange my incoming hoard of scenery tiles and accessory sprues. Just gotta decide how I want to distribute my battlezones...
Spoiler:
4 themes. 14 battlezones. How to split my battlezones?
core worlds/landing pad/fortification/ruins
8/2/2/2, solid set of main tiles with some of each of the others. or 8/3/0/3, solid core, but no fortifications cause I get the defense line already. or 8/3/1/2, solid core, extra landing pad, one fortification just to have it, and enough ruins to do the ruin board below. or 9/2/1/2, extra core BZ because I don't need 3 landing zones, but don't want two forts or three ruins.
I think option 3 is the best. I only "need" 2 landing zones for sure, but extra corner bits and barricades/lasers won't hurt my feelings, especially if I'm only getting one fortification sprue. I could get zero forts, but I'd feel like I'm missing out on the gates and other bits. Four sets of defense lines seems overkill, but I'll need a lot for the blast shields on my space port, maybe I'll use them with the fort BZ as a weaponized bunker protecting the space port. Two ruins should be plenty, and I'm hopefully not overdosing on core worlds at 8.
Construction zone(3bz/5accy): Primarily core worlds, this area will have few complete buildings favoring the paintball/jungle gym style seemingly favored by Jake/the rules. The terrain will vary from high to low, likely having good sniper nests as well as lots of ladders and walkways with fairly high density scatter terrain. The main dominating feature I want to do is a large crane capable of lowering deadzone tiles into place to construct the buildings. Many of the accessory sprue ladders will be used here to help establish vertical play, in both reaching heights and fighting there (ladders turned into railing/walkways).
Warehouse district(3bz/5accy): Primarily core worlds, this area focuses on complete buildings and will be designed with two of its sides intended to face out (with open walls for the buildings for ease of manipulation) when added to other buildings. I may dabble with some kind of easily removable wall sections, we'll see. The buildings will be of reasonably consistent size, probably lower to the ground, and areas between warehouses will have clear fire lanes. Many accessory sprues will be used and large piles of crates/barrels/canisters will also block line of sight, and provide cover in some areas. This board doesn't have a dedicated central feature, though those gates fortification is supposed to have may be implemented.
Ruins/Site Zero(4bz/2accy): Half ruins, half core worlds, this area will have a lot of bombed out buildings. It will be more of a fusion between construction zone and the warehouse district, with intact buildings that still allow LoS (via ruined tile set) and 'clear lanes of fire' that have a lot of scatter terrain. Tall terrain in this section is unlikely, as such structures will have been destroyed. It is possible I will construct a tower and then "knock it over" possibly leaving some of the supporting structure intact with the tower building on its side. Defining feature may be a reasonably clear center of the board where the alien artifact was uncovered (also a great killing field for a single objective game type). When I get to making the floor plan, I will think on how a research facility may have been laid out, as this is most likely where the artifact was unleashed. Less barrels and ladders here, more piles of ruins.
Space Port(4bz/2accy): Half landing pad, half core worlds (or possibly parts of one fortification sprue split with other boards), this area will have two landing pads connected into one large pad meant to accept a small space craft. If things go well and I complete my Kestrel, this is where it will live. The Kestrel will be roughly two feet long, but not nearly as wide, except for the nacelles. One of the core world battlezones will be included inside the ship itself, and will be a useable interior area (we will assume the top of the ship is intact but is electrified/forcefielded to disallow play there). Regardless of the presence of the ship, this section will have a high area (pads, lifted at least 6 inches) and a lower zone underneath the pads. If there is any room left on the 2x2 the fourth battlezone will be included to add reasonable buildings or fortifications to service/protect the spaceport. If absolutely necessary, I will use the third landing pad to make ample room for the ship, otherwise, I'll disperse the angled bits evenly throughout the sectors as required.
I feel these four boards will end up being projects unto themselves, though they will all be designed with connectivity in mind. The space port and warehouse district make sense together, and the ruins will compliment the warehouse and construction sites. The construction zone and warehouse district are the best candidates for being left modular to allow me to have a set of tiles for traveling deadzone activities. The construction and warehouse sectors are most likely to be assembled first given the simpler designs desired. I could generate a lot of themed battles with this arrangement of terrain, but all four sectors should be fine together as well.
I used to be able to sketch stuff, but not so much anymore as far as I can tell. I would draw up some loose plans to display, but I don't think I can do my thoughts justice at this point. We will just have to settle with some more shots of those Steel Warriors from yesterday, and maybe some random hobby odds and ends (its been awhile, hasn't it?). I intend to try to ply the airbrush on the rangers later, but I doubt I'll have enough progress to really warrant picture taking, you guys have seen step by step for the last 15 corporation guys right? May be back to do some bragging on the vallejo model air range and their liquid mask though.
Automatically Appended Next Post: Ahem, I think I promised more pictures. I didn't find too much oddball stuff, but I shot quite a few for fun. Still need to get a proper light box (and camera), but time is limited!
DWARF SPAM! Alt positions from the first shot
Jes try somethin!
Seeing eye to eye?
Hold the line!
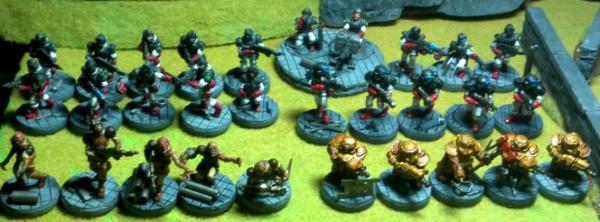
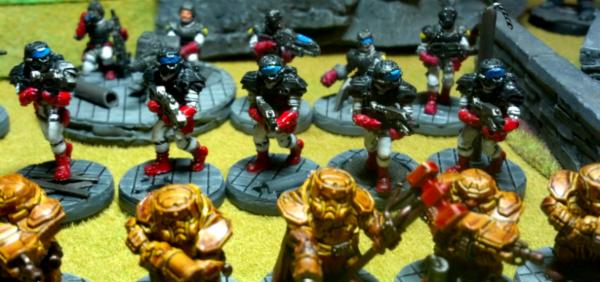
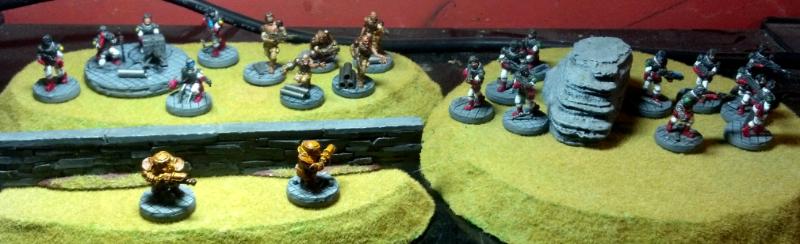
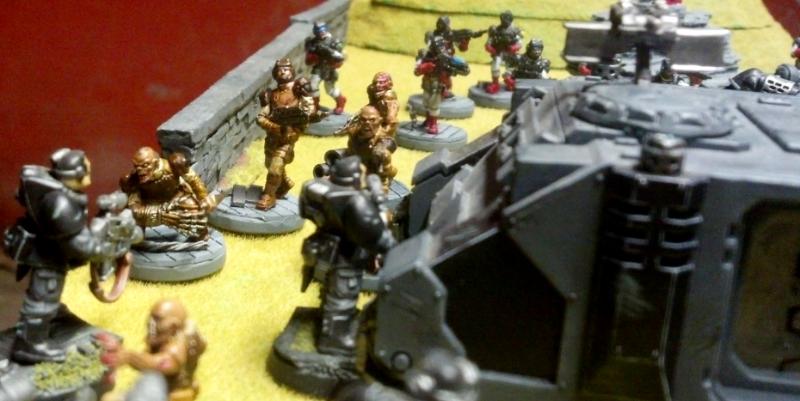
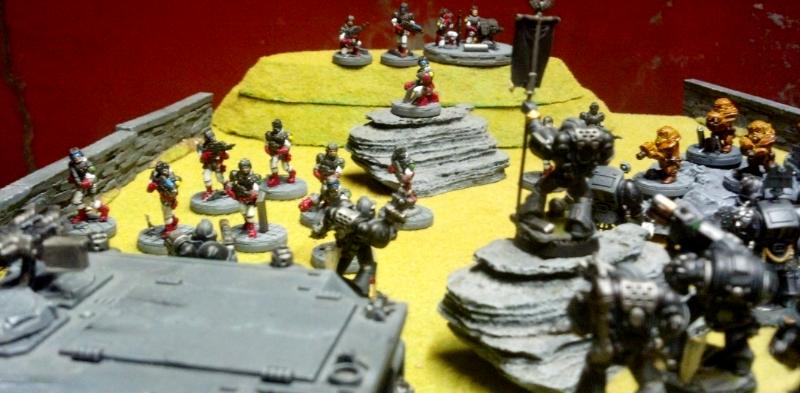
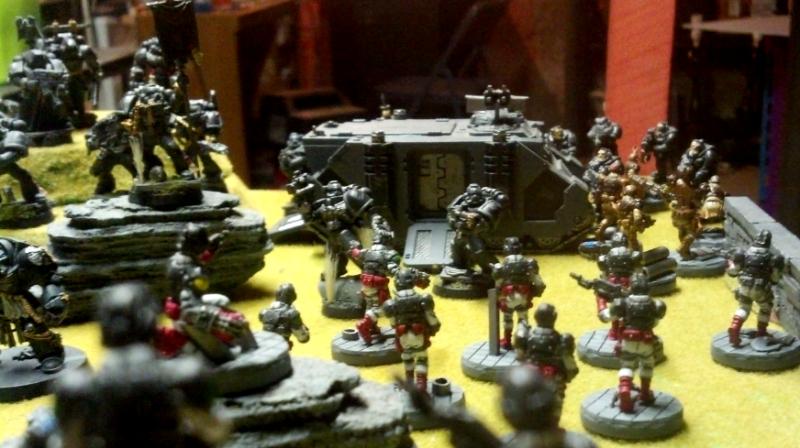
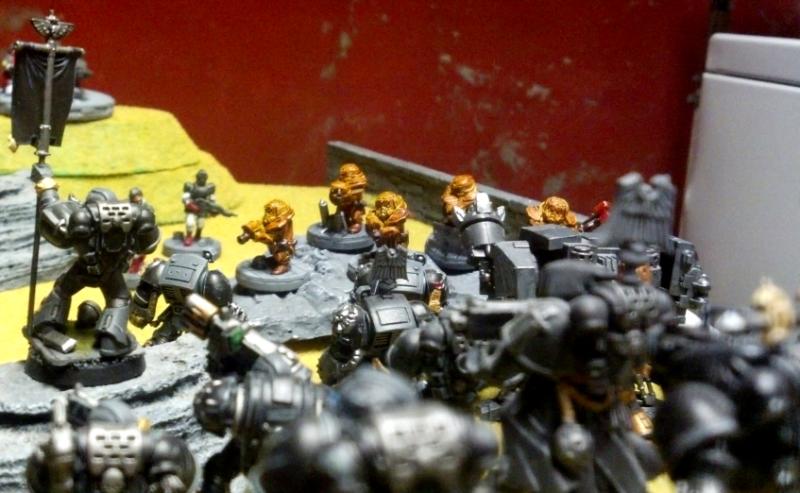
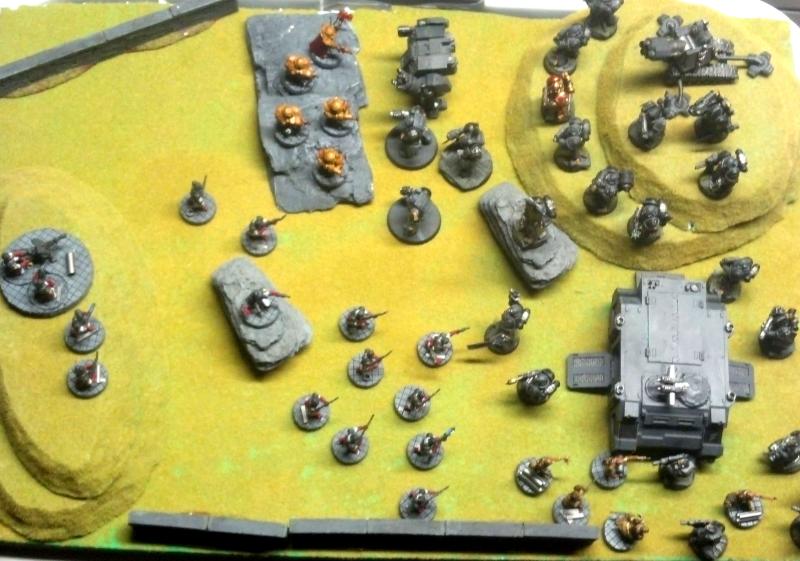
While I had the camera out, I thought I'd have fun with the painted cheering section. So now, for the foreseeable future, my painted cheering section will include my completed space marines being slowly overtaken by my growing mantic horde! I thought that I would arrange them a bit more dynamically for fun The Emporer's finest seem to have a slight edge with a few vehicles and some terminators, but the rangers are on the way to blow up that backfield!
Spoilered since there are 7 of them and I'm not sure how much people care
Spoiler:
Long shot, shadow knights defending a hill, corporation attacking.
Zombies have broken through to the scouts' lightly defended position!
Will the bottleneck be enough to halt the charge?
Corporation marines advancing. Brave souls to dare the bite of those bolts!
Shadow Knights defending their transport.
These Steel Warriors may have bitten off more then they can chew, but try telling them that!
Battle report style!
I still need to get around to taking some extra shots of random hobby bits, but I figured painted what-nots were better for now
I got the liquid mask down on the rangers, though I may need to add in a bit more. I was going to paint a section up as armor instead of cloth, but now that I've had some time to ponder, I think I'll stick to what I was doing on the regular marines. The section will be easier to paint regardless (the upper arms between gloves and shoulder pads) as its less wavy and cloth-like (hence why I pondered painting it as armor) and should help speed progress along. I'm gonna mask off the white and airbrush the grey and red, as long as it turns out faster. Then I can peel off the mask and finish with washes and details like I've been doing. Hoping to shave time per model down a bit if possible, got used to the easy street of zombies and steel warriors
Should get more painted tomorrow, got some errands instead of work, but should be less exhausted.
See you, when we see you!
This message was edited 3 times. Last update was at 2013/07/17 05:25:10
2013/07/18 01:28:22
Subject: Re:GrimDork Hobby Time! Count down to Deadzone,TODO or Die 7/51!
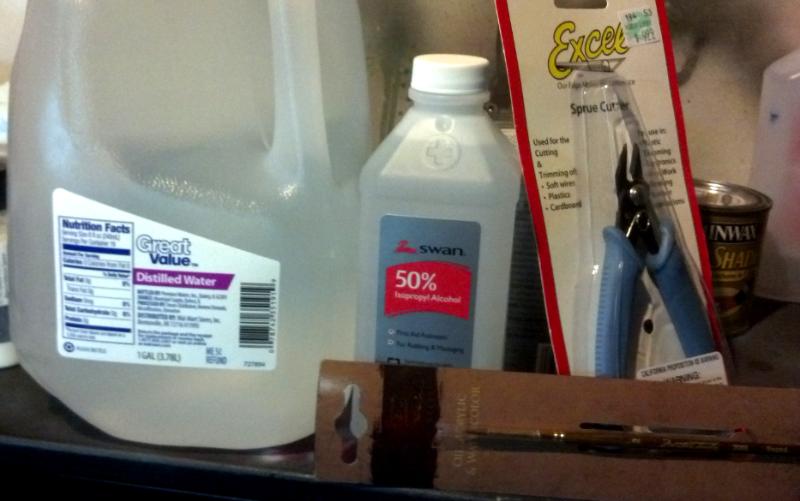
Small update. Had some errands out of town and went to the Zoo with wife and baby. Got to stop by a hobby lobby (for about 10 minutes, baby was getting cranky!) and walmart and picked up a few tools and consumables.
Spoiler:
Tools of the trade. 40% off coupon made the clippers $6, so thats nice. Brush was 50% off too so Idunno $2something.
I'm trying out my liquid mask on these rangers. You can maybe just see that I applied it if you squint, its a very light blue-ish color.
It goes on easy, thinner than most GW paints. How well it comes back off remains to be seen as there is some more spraying to do.
And here's what we got done in an hour or so: Thinking about sealing them at this stage and grumbling something about 'not being patriotic' to anyone who complains
Anyways, got the red sprayed on, didn't try to minimize overspray too much due to the mask, but we'll see if that was a mistake. Also tried to use the airbrush to blend the face shield. Minimal success, may just redo it by hand or possibly wait till the project is done and I'm doing guilt-touchups, will make decisions after I've painted the rest of the model and removed the mask (so you can't quite see how well/poorly its blended cause that's mask on top of it ).
In trying to remove the mask from parts of the first ranger, it seems kind of hard. I was really getting frustrated until I rolled up the remnants of the mask I had on my paint palette into a ball and used them to roll up the mask on the model a lot easier. Its very sticky and clings very well to itself, so having a blob of it laying around is quite handy. I think part of the problem is that since it is so thin, it's easy to get areas that are hard to peel off. So I double layered it over the visors, and we'll see if that helps at all. Last airbrushing will be the gray. Not sure if I want to mask the red bits or just be really careful/hand mask with a bit of card, not sure I fully trust the liquid mask yet!
More to go as the week progresses!
This message was edited 1 time. Last update was at 2013/07/18 01:28:39
2013/07/29 05:34:55
Subject: Re:GrimDork Hobby Time! Count down to Deadzone,TODO or Die 7/51!
Gah! It's been at least a week! Too tired to check the exact duration. Been trying to work on the models instead of update the blog
So ranger team 1 is done. I swear they took longer than the regular marines for some reason. Note the super-amateur attempt to transition the visors with the airbrush. We'll try to step that up on the next batch.
So.
Sick.
Of.
Painting.
White.
FFS.
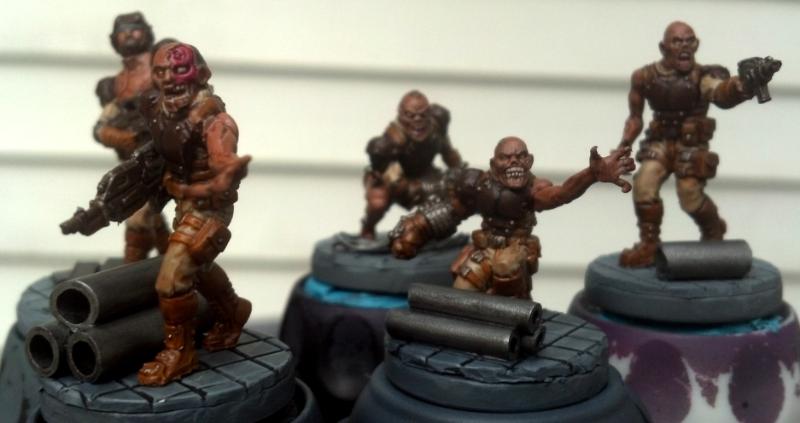
I dunno why, but I just hate that step. The liquid mask made things worse too, I'll delve into that next time. Just wanted to pop in to deploy a simple completed image and announce that I'm still in the game. Time permitting, tomorrow I will update the TODO or Die list, and get some more pictures. I've got about 4 zombie marines into acceptable poses and will trim+glue them soon. Hopefully undercoated and working on them by the weekend. More is coming, time permitting
Done! I have a few minutes of touch-ups where I de-nailed the feet and spilled superglue onto the bases, plus matte sealer, but I'm calling it.
2013/07/29 10:34:38
Subject: Re:GrimDork Hobby Time! Count down to Deadzone,TODO or Die 7/51!
Worry not, they look fantastic You are more than excused to call it done!
I have to admit my favorite models are the forge fathers. I don't know why, but I really dig those colors for the "space dwarves"! What colors did you use? I kinda want to steal your paint scheme
"Fear is freedom! Subjugation is liberation! Contradiction is truth! These are the truths of this world! Surrender to these truths, you pigs in human clothing!" - Satsuki Kiryuin, Kill la Kill
2013/07/29 12:10:01
Subject: Re:GrimDork Hobby Time! Count down to Deadzone,TODO or Die 7/51!
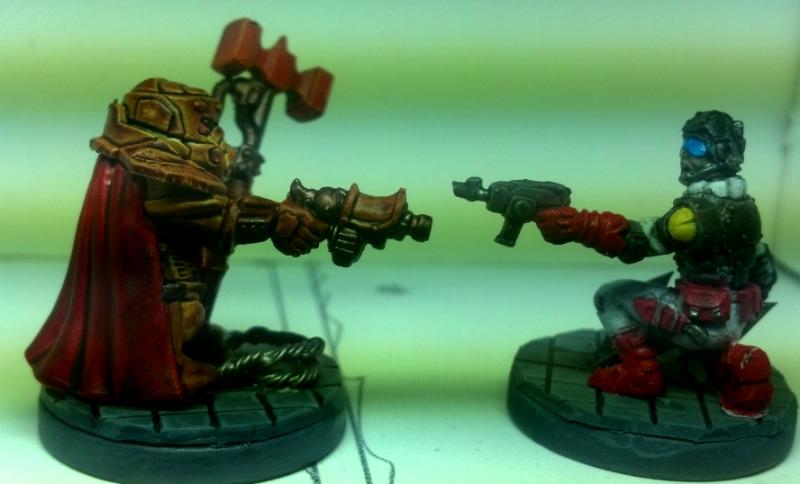
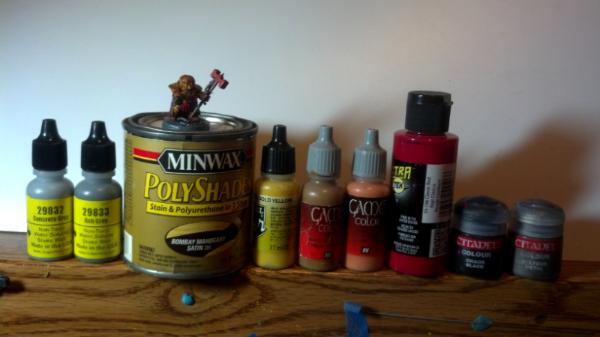
Colors used. Vallejo dwarf skin is hard to read and the red is spectra tex.
May switch the red out for VMA Italian red which is my new corp marine boot/leather color. Forgot to include the matte sealer. If you can't get Bombay mahogany locally the darkest army painter may come close? I think if you were going to steal a scheme you should ask blessmybeard for his, they're much nicer.
More later gotta head to work
Automatically Appended Next Post: Quick shot of wip zombies. Now I really gotta go work :p
Need to work in more guns in the next batch.
This message was edited 1 time. Last update was at 2013/07/29 12:28:15
2013/07/29 13:50:57
Subject: Re:GrimDork Hobby Time! Count down to Deadzone,TODO or Die 7/51!
Oooohh, so is that Bombay mahogany thingy that turns the yellow into dark yellow / brown that looks so awesome? That thing must be made of magic and win
"Fear is freedom! Subjugation is liberation! Contradiction is truth! These are the truths of this world! Surrender to these truths, you pigs in human clothing!" - Satsuki Kiryuin, Kill la Kill
2013/07/29 14:06:49
Subject: GrimDork Hobby Time! Count down to Deadzone,TODO or Die 7/51!
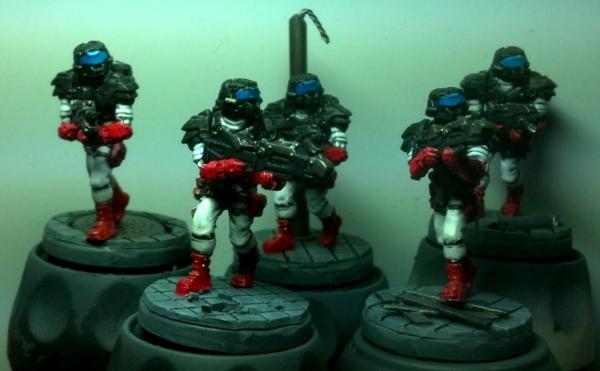
Yes, yes it is. If you scroll up or back a page you can see the dwarfs before dip, basically McDonalds colors. Then the matte sealer. The matte sealer is what makes it look good cause the varnish is high gloss. Sealer also seems to brighten the colors just a teensy bit which also usually helps.
Its also nice because you have a hard coat of polyurethane ANDsealer on top so the models are extra sturdy. The zombies gget the same stuff but much lighter.
I hear good things about army painter if you can't get minwax, not sure how their dark tone compares.
2013/07/29 18:35:11
Subject: GrimDork Hobby Time! Count down to Deadzone,TODO or Die 7/51!
GrimDork wrote: Yes, yes it is. If you scroll up or back a page you can see the dwarfs before dip, basically McDonalds colors. Then the matte sealer. The matte sealer is what makes it look good cause the varnish is high gloss. Sealer also seems to brighten the colors just a teensy bit which also usually helps.
Its also nice because you have a hard coat of polyurethane ANDsealer on top so the models are extra sturdy. The zombies gget the same stuff but much lighter.
I hear good things about army painter if you can't get minwax, not sure how their dark tone compares.
Hum, I have only heard good stuff about the Army Painter's Quickshade.. That dipping shades stuff like a pro I have 4 Forge fathers, I think they can be possible test subjects for the Quickshade
"Fear is freedom! Subjugation is liberation! Contradiction is truth! These are the truths of this world! Surrender to these truths, you pigs in human clothing!" - Satsuki Kiryuin, Kill la Kill
2013/07/30 02:16:06
Subject: GrimDork Hobby Time! Count down to Deadzone,TODO or Die 7/51!
Dipping is pretty awesome. Greatest thing for simpler/tabletop paint jobs since drybrushing and washes It can sometimes take some trial and error to figure out how dark of a dip to go with. That bombay mahogany, for instance, was unusable on my (defunct) tyranid project. The models were bleached bone and a medium red-brown, and you could barely tell the bleached bone apart after dip, had to go up a couple of shades. And of course the lighter ones are barely noticeable and imo aren't dark enough to look like shadows. The army painter stuff is probably a little more rough and ready, user friendly or what have you.
On another note, no progress tonight. Wife has switched jobs into more hours which leaves me with more baby sitting. And I'm just tired. I could get in a good hour now, probably finish the zombie builds, but too sleepy.
No, for now I'm going to relax and catch up on sleep (lost a couple hours 'finishing' those rangers), but not before checking out TDL's P&M blog! Phone doesn't let me see people's sigs and that's where most of you store your wonderful blog links. Half the fun of doing this blog is going and seeing what everyone else is up to
2013/07/30 11:04:35
Subject: Re:GrimDork Hobby Time! Count down to Deadzone,TODO or Die 7/51!
Ah, raising a future painter to help Dad out I see. Just give him a brush and let the lazy bum do some work for you
You did the right call, I already fell asleep when painting and the results were frustrating
"Fear is freedom! Subjugation is liberation! Contradiction is truth! These are the truths of this world! Surrender to these truths, you pigs in human clothing!" - Satsuki Kiryuin, Kill la Kill
2013/07/30 12:25:26
Subject: GrimDork Hobby Time! Count down to Deadzone,TODO or Die 7/51!
I was more worried about staying up late and being tired today. Don't wanna drop a 50-60 pound block and test my steel toes or drive some kind of heavy equipment into the fence or pool :p!
I'll take it easy a bit, don't wanna burn out and those rangers were pushing it.
2013/07/30 21:46:20
Subject: Re:GrimDork Hobby Time! Count down to Deadzone,TODO or Die 15/51!
Alright time for a proper update. I got some more pics and have a minute to type this out for once
I gotta say, one of the more infuriating things I've experienced lately (aside from traffic in town on fridays ), has to be DROPPING MY NEWLY PAINTED AND SEALED MODELS ONTO THE HARD UNFORGIVING CONCRETE THE MOMENT THEY ARE DONE .... I mean seriously, it happened TWICE for crap's sake. And it happens at least once per batch! I think I dropped one of those last batch of marines or zombies without snapping the base, but he came away with a not-unnoticeable chip that got past the sealer
Anyway, rant done Pictures in exchange for patience!
Everything up to date. It may not be a lot compared to some of you folk, but getting 30 models done is a pretty good accomplishment for me lately
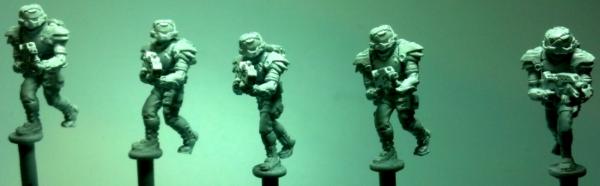
Freshly drafted rangers rank up with the rest
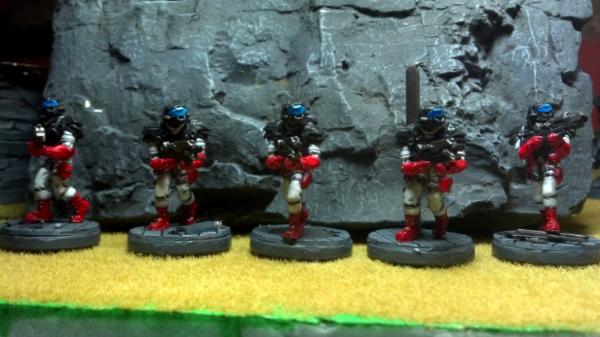
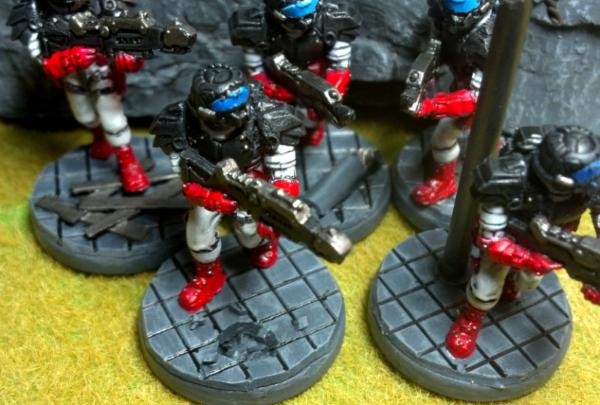
Rangers stand alone!
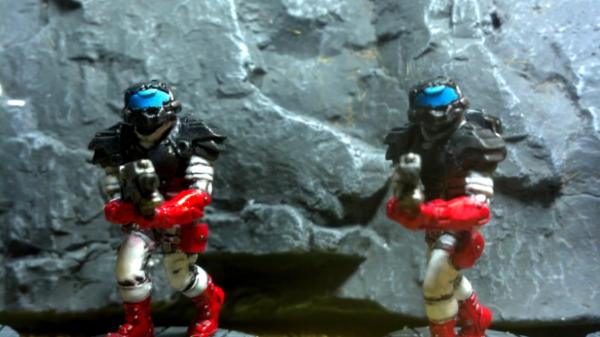
A couple rangers closer up to give a better view of the visors. I think with a big of practice I can make them smoother and more obvious...
Better angle on the bases, trying different stuff out to see what I like the most
And a bonus shot of the most recent Steel warriors. I needed a shot to update the TDOD list and this one turned out well enough to pop it onto the blog too.
Alright, ran out of pictures! So here's the deal with the rangers. The red is much much brighter. I'm not going to do a side-by-side, but you can tell. The white and 'black' should be about the same. I added more metal to the weapons because they're chunkier than the standard laser rifles and would have looked bad all black. I just realized there are no shots of the backs of the rangers, so I'll get one next time I'm down in the cave. I went with basic metal on the vents because these rangers are walking and their packs only work for deployment so I figure they've had time to cool off (and its a tabletop standard army that I didn't want to bog down for hours trying to come up with something i like ).
State of the project analysis:
Spoiler:
Whoops, left too much black off to the side in paint, makes the picture display smaller, will fix with next zombie batch!
15/51 makes for 29%. So I'm just a bit under 1/3 of the way with 4 months to go. 36 models left. If I manage to push myself to get 15 models a month done, I'll have over a month and a half for a mini project before deadzone arrives. I'll be more comfortable making such claims when I've got more than less of the project behind me There are few things that could potentially bog me down, most prominently apathy towards white, and difficulty finding good zombie poses. I'm still pretty enthusiastic about the project as a whole and you folk popping in to say 'hi' helps a LOT with that. I think I can get ten more marines/rangers out, and painting the dwarfs and zombies can only get easier (more airbrush paints to play with). So as long as I can get all of the zombies put together in short order, I should be good to go. The weapon teams are proving to be a challenge, but I'm getting close to having desirable poses for the gunners, and the spotters aren't an issue.
I've got a few things I would like to do at some point. I may get to them if I can bust out this project, or I may use them as candy/bait to keep painting deadzone. I really, *really* want to make one of those stormwolf/madcat conversions that have been popping up. I have the storm talon and extra weapons/missiles, but I'm not willing to buy the legs, so I'd have to extensively improve my scratchbuilding abilities to manage one of those. I also have a couple of ideas for dreadnought conversions inspired by the Armored Core series of games. Basically, I would take the top half of a dreadnought and add a head, using either a 1/2-2/3 length rhino as a tank legs... and/or replicating one of those awesome quad-leg ACs using scratchbuilding and drop pod parts.
Kind of like this, but with the rhino shortened so the dread doesn't look too small on top. I'd like to reduce the height too, but that seems too hard without significant risk of wasting the rhino etc.
Spoiler:
Then again, maybe I need to play the game again
Even more excited for the quad legs variety. These would both be getting heads added as well as thrusters on the back and shoulder mounted weapons.
Spoiler:
I would be going for something heavier and blockier to match the chunkier dreadnought top, but there's an idea.
And, of course, I may still try to get to work on the Kestrel early too. So there we have some catching up done Hopefully I get these zombies slapped together and get to work painting them by the weekend!
This message was edited 3 times. Last update was at 2013/07/30 22:08:30
2013/07/31 10:02:37
Subject: Re:Re:GrimDork Hobby Time! Count down to Deadzone,TODO or Die 15/51!
I know the feeling. Remember the Ninja you saw in my blog? I must have dropped her over 4 times so far. 4! I just don't understand it, I swear I'm being careful and next thing I know, BAM.
The Visors already look very good, a bit more layering would make them even better but it's not that necessary. They already look damn good. Only thing I think they are lacking are 2 white dots, one bigger than the other representing reflected light on the upper left (my left, not the model's left) corner (the one with the darker blue).
I see plenty of well-painted minis already, keep up the great work
Oh, and Quad Legs ftw!
"Fear is freedom! Subjugation is liberation! Contradiction is truth! These are the truths of this world! Surrender to these truths, you pigs in human clothing!" - Satsuki Kiryuin, Kill la Kill
2013/07/31 13:18:11
Subject: Re:GrimDork Hobby Time! Count down to Deadzone,TODO or Die 15/51!
Tried dots didn't look good. Will look up some more visors and see cause I agree with you. Excited about quad legs but will have to step up my game to do them.
2013/08/01 01:56:50
Subject: Re:Re:GrimDork Hobby Time! Count down to Deadzone,TODO or Die 15/51!
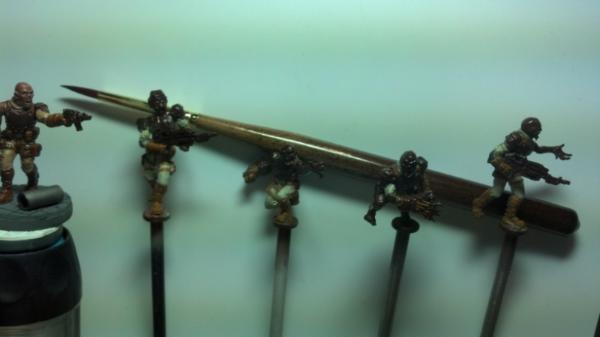
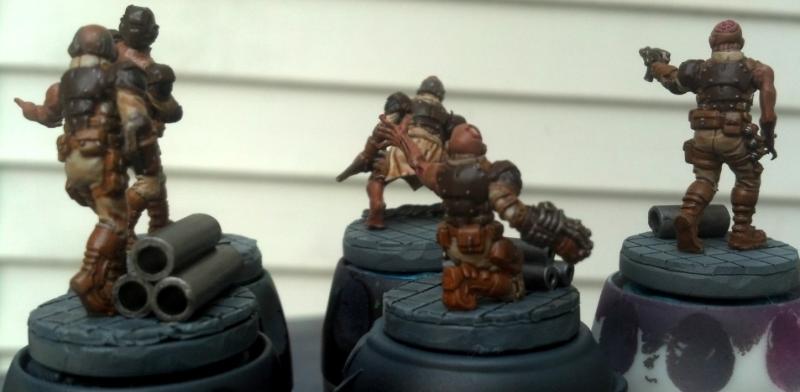
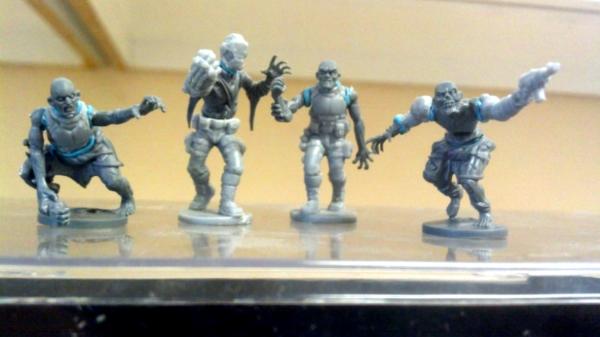
The little one took a decent nap this evening and I managed to get 4/5 of the next zombies trimmed and glued. I also got the first weapon team done, the rightmost two, what do you think? The leftmost zombie still needs posed and glued, he looks too wide-chested, will have to do some modification.
Baby is not napping now and is fairly uninterested in my hobby blog so I better make with the entertaining afore she hides my shoes again!
*edit*
Hmm... I think I may try to put the other two weapon teams together and go nuts painting all 11 at once. The zombies are way simpler than the marines and rangers, and it will help me make a stab at getting done extra early. Worst case, I can just back down and only do the five zombies and leave the teams for later. Good excuse to do up a good batch of bases to get ahead too. Got some ideas for the bases, I want to stretch my tiled plasticard a bit and make things a bit more interesting for Deadzone bases (where I'll be looking for flatter bases due to the handling of LOS). I need some rivets though. Wanna try out these micro beads I've heard tell about. Local walmart is terrible at keeping stocked though, so now we turn to our dear friend Amazon.
This message was edited 1 time. Last update was at 2013/08/01 02:58:26
2013/08/01 12:36:38
Subject: Re:Re:GrimDork Hobby Time! Count down to Deadzone,TODO or Die 15/51!
But, but, the leftmost zombie looks awesome :( They probably don't have leaders since they are zombies but he looks pretty cool and different!
I dont know about painting 11 at once, for me that's impossible I still can't do "production lines" that well, I die of boredom but if you are up for a challenge, good luck!
"Fear is freedom! Subjugation is liberation! Contradiction is truth! These are the truths of this world! Surrender to these truths, you pigs in human clothing!" - Satsuki Kiryuin, Kill la Kill


 ), has to be