Forum adverts like this one are shown to any user who is not logged in. Join us by filling out a tiny 3 field form and you will get your own, free, dakka user account which gives a good range of benefits to you:
No adverts like this in the forums anymore.
Times and dates in your local timezone.
Full tracking of what you have read so you can skip to your first unread post, easily see what has changed since you last logged in, and easily see what is new at a glance.
Email notifications for threads you want to watch closely.
Being a part of the oldest wargaming community on the net.
If you are already a member then feel free to login now.
As I sat down at the workbench, cleaning mold lines off of some lovely (but damnable restic ) miniatures, a thought occurred to me: Every so often, I was stropping my knife blade. I've been here for a number of years, but I don't believe I've once heard mention of a strop. The hamsters (entirely of their own accord, I assure you) jumped into their wheels and the gears started turning. We, as miniature painters and modelers, have various other hobbies, jobs, and educations (technical or otherwise). Any number of tools unfamiliar to the average modeler might prove useful to him, just as a seemingly unrelated skill or area of knowledge might improve his results within this very different sphere.
So, P&Mers of Dakka, what uncommon tools, techniques, and/or perspectives have you brought into this hobby?
Are you a woodworker, finding yourself working plastic parts like they were tiny lumber? Do you model your terrain ideas in 3D using software before building or do you draft architectural floor plans? Do you use a tool common to another pursuit but neglected in ours? Are you an engineer, checking your scratchbuilds with a micrometer? Do you use more 'painterly' techniques on 3D surfaces, owing to traditional, 2D training? Are you a history, literature, or film buff that themes forces to suit your other interests? Inquiring minds (the hamsters and I, at the very least) want to know.
Personally, I'd consider myself a bit of a jack of all trades. Far from a Rennaisance man - I wouldn't ever make it as a handyman, either - but I have varied interests and have dabbled in a number of different pursuits, from crafts and hobbies to household maintenance to more academic studies. It's helped me acquire a number of tools I've found useful, but would likely never have bought/made just for working on miniatures: Small woodcarving chisels, an engraving burin, dip pens, hole punches (rotary, for leather, and a sheet metal punch with interchangeable dies), aviation shears, leather working stamps, knives, and pricking irons, soldering equipment, drafting tools, various drilling, driving, and grinding bits... the list could go on.
Well, what about all of you? Any (unintentionally) secret weapons we should all start hunting down? Topics we should start researching?
The Dreadnote wrote:But the Emperor already has a shrine, in the form of your local Games Workshop. You honour him by sacrificing your money to the plastic effigies of his warriors. In time, your devotion will be rewarded with the gift of having even more effigies to worship.
Hey Oadie! Thanks for starting a neat thread like this one. I love hearing about tools 'n tips!
I use all manner of strange things around the house for my hobby toolbox Some of my favorites:
- Razor tweezers, originally for plucking eyebrows - Very sharp small scissors with a rounded tip, again, from the cosmetic counter. - Q-tips with a pointed (instead of rounded) tip -- these are very expensive from the hobby shop, and nearly free from the drug store. - Silhouette Portrait, originally for scrapbooking, which I use to make stencils out of vectors images that I draw on the PC - Stencils! - Painter's masking tape -- it's a lot cheaper than the Tamiya stuff, though that's pretty awesome when precision counts. - Spice jars & Spice Racks - Kitchen drawer organizers - An old customer loyalty card (credit card size) to use as a shield for airbrushing - Netting as a stencil for airbrushing - Saranwrap to wrap the part of the model I don't want to get paint on when airbrushing - Screw/small parts organizers, for keeping unused bits sorted - Dremel tool, for all the obvious uses
Edit: One more thing! Lighting from my Photography toolkit. I have some great, fairly inexpensive constant lighting kits, which use 5500k, 400W equivalent CFL bulbs (they're giant squiggly bulbs) that consume about 80W of electricity each, but generate TONS of light. Two or three of them will bring a work table to sunlight levels of brightness!
This message was edited 3 times. Last update was at 2015/04/27 04:43:07
Honestly I'm unsure what I use that would be considered outside the norm, because I internalise everything I do as pretty standard. I do know that i find it absolutely impossible not to meddle and tweak a kit to be (my idea of) better. Currently one of my friend's is considering reporting me to the Internet at large for wanting to chop the head off the official Black Library Ciaphas Cain figure.
As for favourite tools/bits...
I use a lot of haberdashery/tailor supplies in my work, from dressmaker's pins in paint bottles, to thick embroidery threads as fake ropes and bindings. I've "riveted" sheets of thin plastic using a sewing machine before.
There's a lot of electrical circuitry patched into my ork vehicles and terrain, actual soldering for welding, etc.
I accidentally discovered hat breaking down old flat-pack chests of drawers is an excellent source of tiny ball-bearings.
Perhaps less practical, I enjoy using foreign currency as bases (or inside bases) for figures themed to that country. Chinese dragons on large Chinese coins, American civilians on American currency, etc.
And then there's this thing that I keep in my painting box (pardon the dramatic morning lighting):
Spoiler:
Answers on a postcard as to why I have that in there.
This message was edited 1 time. Last update was at 2015/04/27 05:07:43
Talys: Great minds (we'll assume ) think alike - I use a number of the things listed, myself. Knowing how I tend to write... and write, and write, ad nauseum, I kept my list a bit short.
I have shoe boxes of doodads and parts containers packed with tiny screws, bearings, springs, etc. along with a drawer full of larger circuit boards and random wires stripped from dead electronics. A spice rack serves as an additional wall-mounted paint/additive rack. Plastic (old prescription pill bottles are a favorite, as they secure tightly and come in a variety of heights and diameters) and glass jars hold all manner of stuff, from decanted thinners to Q-tips to baking soda (wonderful stuff - fine abrasive, snow flock, andCA accelerator/filler, all in one!) to my "Mek mix" (patent pending not really) - the spilled dregs of various basing grits mixed with wood/plastic shavings, curls of metal trimmed from sheet, small offcuts of sculptor's mesh, etc. - basically, I sweep whatever falls off the mat and is too small to pick up into a jar for spilling onto any future Ork/post-apoc bases/terrain.
Buttery Commissar: I'm kind of with you - I don't assume that everything I do is normal, just that it's perfectly sensible. Most of my sewing supplies are used only for sewing (more leather than cloth, of late - all of my buttons have been firmly reattached, already), but I have appropriated a number of larger needles for scribing/sculpting tools, as well as using small straight pins to shore up glued joins in foamcore structures (all the better for industrial/grimdark terrain - you can leave the head proud and it's just another rivet). I can't bring myself to break open drawer slides for their bearings, though - they're far too useful as they are and I have other sources for little balls (microbeads, airsoft BBs, etc.).
As for the pictured mystery tool...
Spoiler:
Is that a (sailmaker's?) sewing awl? Looks like it could be punched through rough canvas, grab a (thick) thread, and be retracted to pull it through. Looks too new for the age of canvas sails, though, and I imagine any field repairs are done with a lock-stitching awl, if not adhesive patches. Actually, you'd be hard pressed to rip a modern sail... It's certainly not an ineffective and incredibly painful speculum... I hope. Eyelash curler that punishes you for poor aim? And what could you use it for when painting? I'm stumped!
Keep 'em coming folks (that aren't on the US East coast - we should all be in bed, by now).
The Dreadnote wrote:But the Emperor already has a shrine, in the form of your local Games Workshop. You honour him by sacrificing your money to the plastic effigies of his warriors. In time, your devotion will be rewarded with the gift of having even more effigies to worship.
buttery commissar mentioned sewing pins for shaking up paint bottles... i went down that road some years ago too... thinking t would be cheap and effective... it ended up with having a larger number of rusted paints...thus... i changed paints and then got me glass mosaic stones... they´re roughly around a 1cmx1cm and smaller and quite heavy... very good for shaking up paint pots!
then i have to stress the use of big make up brushes for dry brushing larger surfaces... works a treat AND they even clean up again a treat... a feat i sometimes have a hard time to achieve...
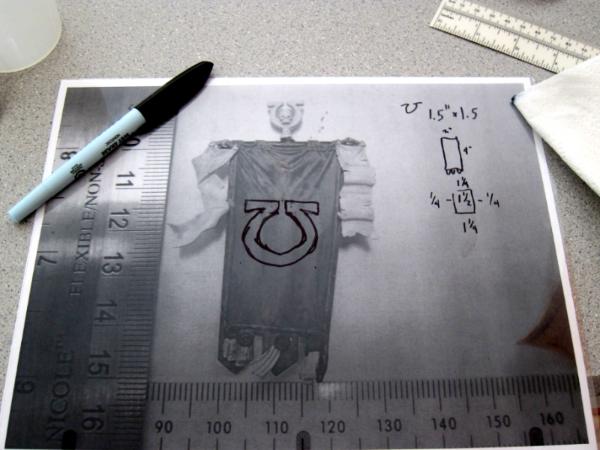
i once developed a new method of precise cutting myself with a custom made set f rulers/spacers... i do have pics explaining this im my gallery... if there is a demand i could post it here too...for all the scratch builders here that ave difficulties getting these bits cut in the right measurements...
This technique is probably common for some people I just haven't seen it while browsing through hours of blog and youtube tutorials: Unlike some, I prefer to paint minis before assembling them completely, especially now since I recently got into airbrushing. I drill 0.8 mm holes in the parts and then mount them on toothpicks. The toothpicks then go into blocks of styrofoam. The big advantage is that you have complete freedom on how to place a large amount of parts for batch painting.
One piece of styrofoam only lasts so long untill you have to throw it out. Every now and then I find myself salvaging styrofoam pieces from my compounds trashbin. Especially when I am lucky and the parts are heavy, dense styrofoam parts in the right size. My girlfriend gives me the looks, my dog gets it.
Drafter's templates are a really handy tool and have been used by AFV modelers for ages (they make painting road wheels on tanks a breeze). I'm also a fan of my trusty metal ruler, it comes in handy quite a bit. Forstner bits are invaluable when it comes to drilling flat bottom holes and are perfect for building displays with removable models.
A styrene cutting tool (similar to a paper cutter) is worth its weight in gold if you do lots of scratch building. Photo etch benders are another valuable tool; much better than trying to bend PE with razor blades!
d-usa wrote: "When the Internet sends its people, they're not sending their best. They're not sending you. They're not sending you. They're sending posters that have lots of problems, and they're bringing those problems with us. They're bringing strawmen. They're bringing spam. They're trolls. And some, I assume, are good people."
Oadie, I refuse to believe you've never seen a strop on a GW forum.
Buttery Commissar: I don't see what's so strange about that. Since the first Caiaphas Cain book I've wanted to cut his head off too.
And I don't know what that tool is but it looks terrifying.
I use a fair amount of tools from craft and hobby shops; dunno how many of them are that novel, though. I have several different sizes and shapes of knife blades and saw blades and the handles to put 'em in. (a couple of types of little 'micro' blades are handy for aspects of this scale model hobby) Paper embossers can be handy when sculpting, but I know other people use them too. Dental quality wax carvers, cheap from ebay; Tamiya plastic scriber; GW mould line tool; tube cutter; Masqmini tube tool plates; syringes and blunt needles from old inkjet cartridge refill sets; balsa strip cutter; and so on.
I once bought cheap bannister rails 'cos the curvy, lathed middle bits would make decent elf towers for Warmaster. That's more terrain, though. Still need to do anything with them, too.
Aside of all the hideously unprofessional things I do like using my desk as a pallette and 'priming' with normal black paint, here are a few of my more unusual techniques:
- Bits Box= Tool Box when it comes to sculpting. Rather than use an actual sculpting tool, I'll just grab something of the appropriate shape from the bits box. For example, if I want short parallel lines, I'll grab a set of Lightning Claws and press them in, if I want a flat edge I'll use a plasticard offcut ect. Its also a good way to quickly apply textures, basically using anything as an inverse press mood.
- artist's chalks make great cheap weathering powders, just buy some cheap ones from a local craft store and brush them on as you would the 'proper' stuff. Typically reds and browns are the most useful, but colours be good for simple OSL and things like heat discolouration on meltas/flamers.
Plastic food tubs are a cheap source of plasticard. Obviously they need a good wash first, but the boxes vegetables come in or butter tubs are great things to have on hand to hack up for wreckage or put together a skeleton for a scratch build. Same goes for the plastic lids from coffee machines.
One thing I imported into the hobby from the kitchen is an offset spatula. Well, a paint scraper tool that is set up like one. If you’ve ever frosted cakes or cookies with a normal spatula, the angle is wrong, you get in your own way etc. So much easier with the proper tool. So when I was smearing a flock paste onto the base of a mini with an old dull hobby knife, I had a lightbulb moment. So next time I was at a craft store, I picked up a new friend:
(The wooden handled one on the left)
Something I grabbed from my tabletop RPG time is report covers and wet-erase markers. I also use them for record sheets in various wargames that have damage sheets. But for painting, I took a picture of the mini I was working on, printed it out, and then stuck it into the sheet and started doodling. For the Banner of Macragge, it helped get the placement right, and the right ratios, for the Crimson Hunter, it helped get the aesthetic I wanted. Easier then deciding I didn’t like what I had painted and stripping the whole model.
Vermis wrote: Oadie, I refuse to believe you've never seen a strop on a GW forum.
Nevelon: I always end up tracing the outline of images I want to sketch modifications over. Never thought to use clear plastic over printed images. When I eventually get a new (and functioning, this time ) printer, I may use that. I'd probably use a sheet of clear polystyrene and hold the pair on a clipboard, though, since that's what I already have (and have no other use for the page protectors). Wait a second... I have a computer and clear styrene is stiff - I can just lay a sheet right over my monitor! All the expediency and control of doodling by hand, none of the waste of numerous printouts!
Paradigm: Never thought to use bits as tools. Don't think I'll start, as I'm a bit of a tool whore and would insist on adding any tool to the collection, permanently, but the approach is still novel, to me. As for plastic food containers, those are all appropriated for storage, except the widest, flattest one I have at any given moment. That one becomes my wet palette container.
Thanks for sharing, folks!
The Dreadnote wrote:But the Emperor already has a shrine, in the form of your local Games Workshop. You honour him by sacrificing your money to the plastic effigies of his warriors. In time, your devotion will be rewarded with the gift of having even more effigies to worship.
Sometimes the bit is the perfect tool for the job. A case in point: When magnetizing jump packs I need to sculpt a concave depression on the pack to fit the nub on the back of the marine. I could use some rounded sculpting tool to try to get the right shape, or I could just wet the back of a marine and press him in!
Not particularly fancy green stuff work, but simple and it works.
oadie wrote:Buttery Commissar: .... I can't bring myself to break open drawer slides for their bearings, though - they're far too useful as they are and I have other sources for little balls (microbeads, airsoft BBs, etc.).
As for the pictured mystery tool...
Spoiler:
Is that a (sailmaker's?) sewing awl? Looks like it could be punched through rough canvas, grab a (thick) thread, and be retracted to pull it through. Looks too new for the age of canvas sails, though, and I imagine any field repairs are done with a lock-stitching awl, if not adhesive patches. Actually, you'd be hard pressed to rip a modern sail... It's certainly not an ineffective and incredibly painful speculum... I hope. Eyelash curler that punishes you for poor aim? And what could you use it for when painting? I'm stumped!
Oh, no, the drawers in question were astoundingly shagged when I harvested the balls. For a while I kept finding the little balls in my main tool drawer, and assumed I'd dropped them from my bits box. Then wondered if they were breeding. Then the drawer collapsed one afternoon due to the amount of Important Things stashed in there.
The tool I inherited from an artist friend of mine (in a box of similarly terrifying tools and exceptionally sharp chisels) who's father was a cobbler. So I believe that small leatherwork would be the original purpose, but as she is no longer with us, I have to just smile and speculate.
As for what I use it for... None of the above.
Viktor von Domm wrote:buttery commissar mentioned sewing pins for shaking up paint bottles... i went down that road some years ago too... thinking t would be cheap and effective... it ended up with having a larger number of rusted paints...
Apologies, I was unclear. I keep large, glass headed pins in dropper bottles when they're open on the table, keeps the spouts clean, and my fingers from becoming painty fishing a small pin out.
Vermis wrote:Buttery Commissar: I don't see what's so strange about that. Since the first Caiaphas Cain book I've wanted to cut his head off too..
Haha, I haven't read his books, I was just enamored by the silliness of this little piece: http://www.solegends.com/citle/citle2000/blacklibrary/blciaphus/index.htm But look at that chimpy face, he's just crying out for something less munter-y. With there only being 1000 or whatever, I do have a little hesitation.
Here's something I remembered when tidying up the desk, I suppose this may count as unusual. I really like it. I came across this old thing in a book-recycling place in NYC, and my immediate thought was "This would be really fething good for coming up with limited palette colour schemes." It's tactile and joyful.
From the subtle...
To the "please stop"...
I've used it now and then for regiment colour-schemes. When I get onto painting tanks, I may have a dabble with some of the more untold horrors within.
This message was edited 1 time. Last update was at 2015/04/27 21:12:51
Apologies, I was unclear. I keep large, glass headed pins in dropper bottles when they're open on the table, keeps the spouts clean, and my fingers from becoming painty fishing a small pin out.
ah... that makes sense
that book is really cool... i once found a websiite that had a good colorwheel option....but i lost it...:(
Haha I have a couple of dental tool I use! Hahaha.. one is a tooth brush, one is used to clean the plastic particles on my files and the 2nd is for cleaning my airbrush needle. The other tool is used to clean wisdom teeth socket!!!!! AHAHAHAAH
I got it from the dentist when I got the them taken out. its a decent sized syringe with a plastic tip (no metal needle)..I used it to suck up water and then shoot in my airbrush for cleaning. It works great!!
Apologies, I was unclear. I keep large, glass headed pins in dropper bottles when they're open on the table, keeps the spouts clean, and my fingers from becoming painty fishing a small pin out.
ah... that makes sense
that book is really cool... i once found a websiite that had a good colorwheel option....but i lost it...:(
"Good" being the operative word, there. The jaws on mine are so rounded and uneven that they aren't even good for locking in place and comparing diameters, let alone taking actual measurements. I'd take a crappy vernier scale with good jaws over a precise dial or digital readout that changes, depending where on the jaws you measure. An upgrade is the next thing on my list and I've been shopping around for one of the cheaper (but still decent) digital models. I was actually planning on swinging by the stores after work, tomorrow.
The Dreadnote wrote:But the Emperor already has a shrine, in the form of your local Games Workshop. You honour him by sacrificing your money to the plastic effigies of his warriors. In time, your devotion will be rewarded with the gift of having even more effigies to worship.
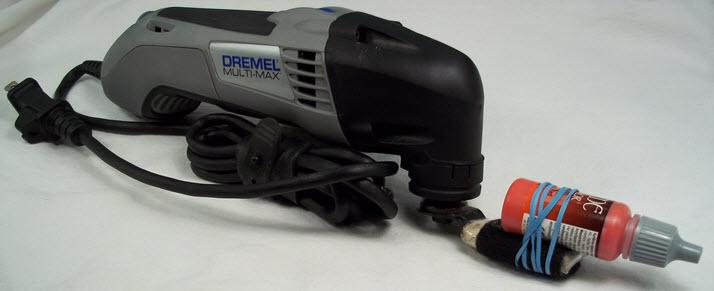
This is a paint shaker made out of a Dremel Multimax. I wrapped the saw blade in rubber bands, clear packing tape, and a couple of velcro cable ties (fuzzy side out). The blade vibrates at a speed between 10,000 and 21,000 oscillations per minute. I normally run it at about 15,000 and at that speed even the most heavily separated bottle of paint is perfectly blended in under 15 seconds.
These are magnetic paint brushes made by drilling out the ferrules of two old paint brushes and gluing in 1" x 1/16" magnets. They make handling magnets much easier and are color-coded to distinguish polarities .
“I do not know anything about Art with a capital A. What I do know about is my art. Because it concerns me. I do not speak for others. So I do not speak for things which profess to speak for others. My art, however, speaks for me. It lights my way.”
— Mark Z. Danielewski
These are magnetic paint brushes made by drilling out the ferrules of two old paint brushes and gluing in 1" x 1/16" magnets. They make handling magnets much easier and are color-coded to distinguish polarities
Can I... Can I just hire you to sit in my house and make sure I magnetise things less stupidly?
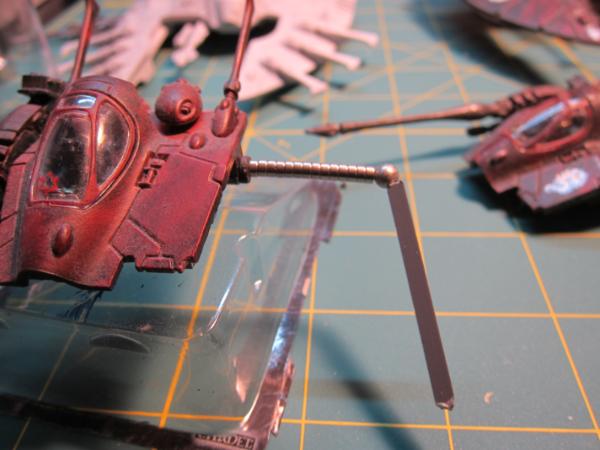
I embedded a dozen magnets into the top of a drop pod on my forgeworld Aquila only to find out I'd alternated them and half of them were the wrong way. I drilled them out, I started again, and I repeated the same fething mistake.
I use:
- magnets to switch out weapons, arms, backpack/jump packs.
- washers inside the bases tp give the models a better stand on the tabletop and keep them in place in the transport boxes covered with magnetic film.
Being a media designer for web and print, and liking the mission objectives and psyker cards GW puts out, I use InDesign to design cards for chapter tactics, Special rules and units with a custom loadout to access everything quickly and without flipping through books.
I also use Photoshop to design a custom game mat and letting a guy from my wargaming group print it on PVC canvas.
Hmmm. I use the probes, tweezers and scalpels from my college dissection kit. I use a bench hook-- normally a wood working tool-- instead of a cutting mat, plus all manner of drafting and woodworking tools. Orchid stem clips as clamps, also a 10 pound weight as a clamp.
Hanskrampf wrote: I use:
- magnets to switch out weapons, arms, backpack/jump packs.
- washers inside the bases tp give the models a better stand on the tabletop and keep them in place in the transport boxes covered with magnetic film.
Being a media designer for web and print, and liking the mission objectives and psyker cards GW puts out, I use InDesign to design cards for chapter tactics, Special rules and units with a custom loadout to access everything quickly and without flipping through books.
I also use Photoshop to design a custom game mat and letting a guy from my wargaming group print it on PVC canvas.
On the topic of play aids, I also make my own. I use a (free) program called Magic Set Editor. It is an easy to use program that you can just drop pictures in, type text where it needs to be, and then outputs cards. No mussing about with margins, sizes, etc.
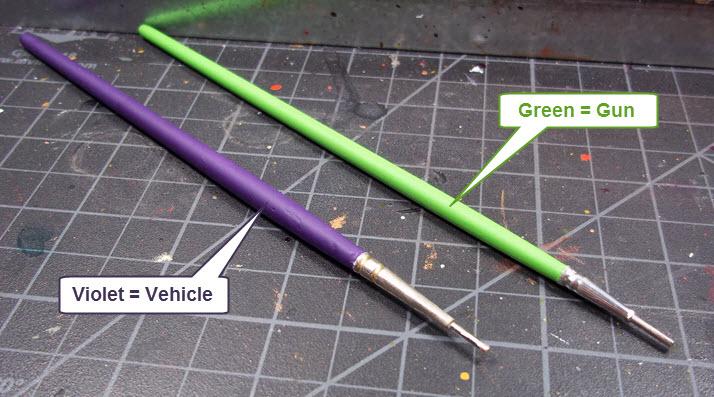
With magnets, I find using a stack at a time helps with consistency. I do have a special tool I sometimes use, which is a BB glued to a piece of sprue.
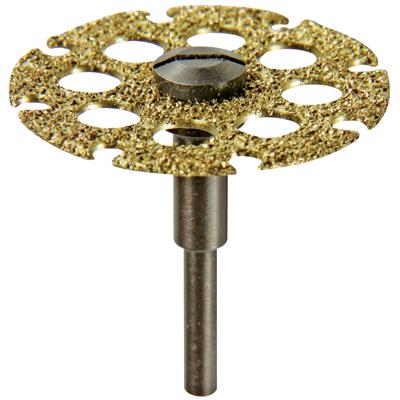
I make extensive use of the Dremel 543 bit and I can't say enough about it
I think alot of hobbyists avoid it because at $17 it's rather expensive compared to other motor tool bits. However, it is a terrain maker's dream because it cuts grinds and sands and unlike the common fibre dremel cutting wheels this grit-encrusted slab of metal never breaks. I've had mine for 3 years and even as much of the grit has worn off it still works great.
I love it so much I dedicated half a blog post to it.
http://chicagoskirmish.blogspot.com/2014/08/toy-bashing-urban-terrain.html
It chews through wood and thick plastic and even some soft metals like butter and makes short work of modifications that would take a long time with a razor saw such as cutting apart the thick plastic of pegasus gothic building pieces. Most usefully for me, it's a dream for cutting up the resale shop toys that I base so much of my terrain around. Whether modifying them, grinding away toy'ish details or cutting them down into useful greebles for enhancing other projects, I've carved up dozens of resale shop toys, saving gobs of money by using it to "make" my own greebles.
This message was edited 2 times. Last update was at 2015/04/30 22:45:12
Checked out the blog post, Eilif - some nice toy terrain fodder, there.
Even having a rotary tool with both muscle and finesse (B&D RTX-B - a bit heavy (mitigated by flex shaft, when necessary), but double the torque of an entry-level Dremel, with a sturdier body, more reliable speed control, and a surprisingly comfortable "pencil" grip), I almost never find myself using it for miniatures or terrain. Perhaps if I had enough space to set up work stations with all of my tools permanently plugged in and hanging, awaiting use, I might, but it always seems like hand tools are just as quick, once I factor in digging the power tools out, cleaning up the swarf they spit out, putting them away again, etc.
Quick tip for those that already have abrasive cutting disks (fiber-reenforced or plain) and want to use them to grind: Stack'em up! The standard 1/8" shank mandrel for rotary tools has at least 1/4" of threading on the screw that hold the disks in place. You can easily load 3-4 disks at once to increase both the contact area and the resistance to lateral pressure. Keep your stack together (don't use one on its own, then add the others back in) and it'll wear evenly, too. Stacked fiber wheels on a rotary tool is the poor man's version of a die grinder for cleaning up hard to reach welds, etc. The abrasive wheels remove stock much faster than cheap stone grinding bits, at the cost of being semi-disposable. Trick I learned from an armorer who couldn't get his 4-1/2" angle grinder into helmet interiors, even with worn-down wheels.
The Dreadnote wrote:But the Emperor already has a shrine, in the form of your local Games Workshop. You honour him by sacrificing your money to the plastic effigies of his warriors. In time, your devotion will be rewarded with the gift of having even more effigies to worship.


 ) miniatures, a thought occurred to me: Every so often, I was stropping my knife blade. I've been here for a number of years, but I don't believe I've once heard mention of a strop. The hamsters (entirely of their own accord, I assure you) jumped into their wheels and the gears started turning. We, as miniature painters and modelers, have various other hobbies, jobs, and educations (technical or otherwise). Any number of tools unfamiliar to the average modeler might prove useful to him, just as a seemingly unrelated skill or area of knowledge might improve his results within this very different sphere.

 Thanks for starting a neat thread like this one. I love hearing about tools 'n tips!
 Some of my favorites:


 ) think alike - I use a number of the things listed, myself. Knowing how I tend to write... and write, and write, ad nauseum, I kept my list a bit short.
  Eyelash curler that punishes you for poor aim? And what could you use it for when painting? I'm stumped!


 Ultramarines, 3rd Co. and friends, 16k+
  4k
4k  4k Points


 ) printer, I may use that. I'd probably use a sheet of clear polystyrene and hold the pair on a clipboard, though, since that's what I already have (and have no other use for the page protectors). Wait a second... I have a computer and clear styrene is stiff - I can just lay a sheet right over my monitor! All the expediency and control of doodling by hand, none of the waste of numerous printouts!
 None of the above.