| Author |
Message |
 |
|
|
|
|
Advert
|
Forum adverts like this one are shown to any user who is not logged in. Join us by filling out a tiny 3 field form and you will get your own, free, dakka user account which gives a good range of benefits to you:
- No adverts like this in the forums anymore.
- Times and dates in your local timezone.
- Full tracking of what you have read so you can skip to your first unread post, easily see what has changed since you last logged in, and easily see what is new at a glance.
- Email notifications for threads you want to watch closely.
- Being a part of the oldest wargaming community on the net.
If you are already a member then feel free to login now. |
|
 |
2016/10/24 14:27:04
Subject: X-Wing 1:41
|
|

Steadfast Grey Hunter
|
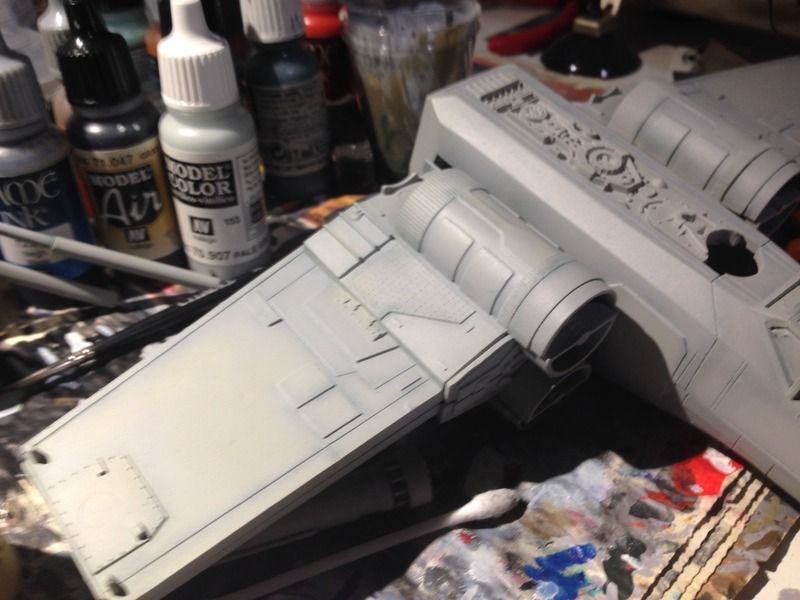
Not a gaming piece exactly, but close enough I guess..
Painted this for one local scale modeling show, scale is roughly 1:41. Kit was MPC's (notice not Force Awakens but Return of the Jedi promotion  ) form the 1980's. I acquired the kit through some random channels almost decade ago. I have tried to complete on several occasions, but always failed, part of the reason was that it was missing some pieces, most notably the hatch for the cockpit.

Never the less, I was able to finish the model now, even with a scenic hangar base and with some custom built parts..
Process:
The original cockpit was bit plane so I added some details, like the seat padding and joystick


Landing gear casings also got some more details.

Building the basic shades
Red ones go faster!

Finishing the painting before final assembly

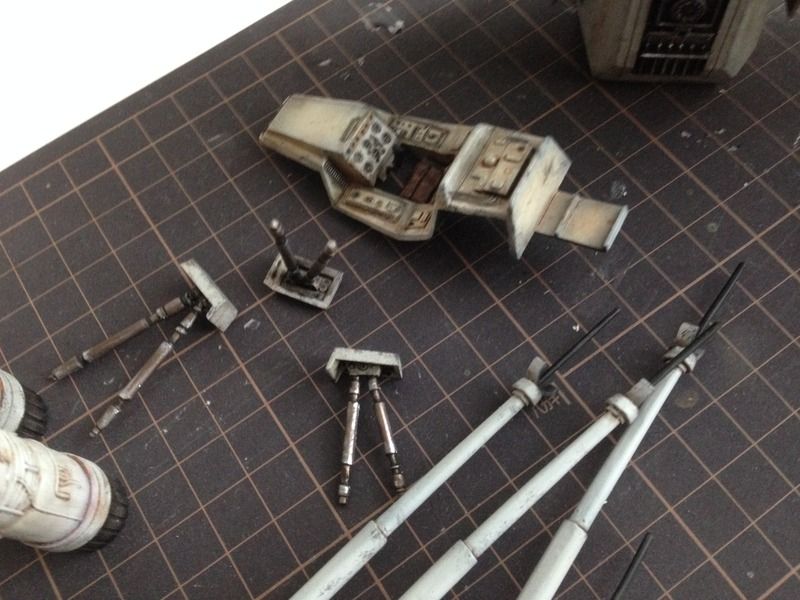
I had to 3D print the new cover for the cockpit. The blob inside is to support the frame during the print so that the fragile frame wont brake during the printing process.

Sketching the base

Final Model:


Cockpit


Cannons and wing


Engines


Front and bottom


For scale comparison FFG's X-wing from X-wing Miniature game

C&C always welcome
|
|
|
|
 |
|
2016/10/24 14:33:27
Subject: X-Wing 1:41
|
|

Storm Trooper with Maglight
|
looks great
|
"Elysians: For when you absolutely, positively, must have 100% casualties" |
|
|
|
|
2016/10/25 09:08:47
Subject: X-Wing 1:41
|
|

Longtime Dakkanaut
|
Very nice.
|
|
|
|
|
|
2016/10/25 09:28:26
Subject: X-Wing 1:41
|
|
Is 'Eavy Metal Calling?
|
Lovely, authentic stuff!
|
|
|
|
|
|
2016/10/25 10:23:14
Subject: X-Wing 1:41
|
|
Been Around the Block
|
That is stunning! Love it!
|
|
|
|
|
|
2016/10/25 11:38:10
Subject: X-Wing 1:41
|
|
Decrepit Dakkanaut
|
Can you explain your process for the distressed look on the red paint? That looks really nice
|
|
|
|
|
2016/10/25 16:34:18
Subject: X-Wing 1:41
|
|
Secretive Dark Angels Veteran
|
That is seriously sick! How did you paint the actual distressed white? I love that look! great job
|
 ~Ice~ ~Ice~ 
Da' Burnin Couch 2018 Best Overall
Beef and Wing ITC Major GT Best Overall 2018
2019 ITC #1 Overall Best Admech
LVO 2019 #1 Admech |
|
|
|
|
2016/10/25 18:27:12
Subject: X-Wing 1:41
|
|
Steadfast Grey Hunter
|
Thanks for the nice words people.
 KingCracker wrote: KingCracker wrote:Can you explain your process for the distressed look on the red paint? That looks really nice
After you have masked the area (as shown in the red part painting pic) you spray over the area still visible with hair spray. Let it dry and then paint over it with the red(or the color of your choice) let the paint dry. Then take a rigid brush like drybrush (Or toothbrush could work as well), dip the brush in warm water and then start rubbing off the red paint with the brush. The warm water will dissolve the hair spary under the paint and create the chipping. I advice small movement with the brush here as quite large ares can chip easily. Afterwards I recommend varnish coat to seal the area, because the area can chip quite easily even from accidents e.g. sweaty palm or finger.
 Icelord wrote: Icelord wrote:That is seriously sick! How did you paint the actual distressed white? I love that look! great job
Thanks, the white(assuming you are talking about the white stripes at the base) is done with the same technique as the red, see above breakdown.
Also video below to actually illustrate the technique:
https://www.youtube.com/watch?v=zwr61o2Hp_k
|
|
This message was edited 2 times. Last update was at 2016/10/25 18:44:51
|
|
|
|
|
2016/10/25 18:37:14
Subject: X-Wing 1:41
|
|
Secretive Dark Angels Veteran
|
Any particular hairspray? That's a great tip!!
|
~Ice~
Da' Burnin Couch 2018 Best Overall
Beef and Wing ITC Major GT Best Overall 2018
2019 ITC #1 Overall Best Admech
LVO 2019 #1 Admech |
|
|
|
|
2016/10/25 18:45:51
Subject: X-Wing 1:41
|
|
Steadfast Grey Hunter
|
I have tried few different brands, seems to work the same.
|
|
|
|
|
|
2016/10/25 19:27:02
Subject: X-Wing 1:41
|
|
Perfect Shot Black Templar Predator Pilot
|
This looks amazing! I really wanted to do a X-Wing after my Tie Fighter. This might have spurred my interest a bit!
|
|
|
|
|
|
2016/10/26 10:21:17
Subject: X-Wing 1:41
|
|
Pious Palatine
|
Excellent work. The chipped paint and generally wear on it look really good and really fit with the look from the original trilogy.
EDC
|
|
|
|
|
2016/10/26 12:55:36
Subject: X-Wing 1:41
|
|

Longtime Dakkanaut
|
Fantastic, love the weathering and extra details.
|
--Lord of the Sentinels Eternal-- |
|
|
|
|
2016/10/28 13:29:42
Subject: Re:X-Wing 1:41
|
|
Nasty Nob
|
Nice weathering. Very cool model. Thanks for sharing! 
|
|
|
|
|
|
|
|