| Author |
Message |
 |
|
|
|
|
Advert
|
Forum adverts like this one are shown to any user who is not logged in. Join us by filling out a tiny 3 field form and you will get your own, free, dakka user account which gives a good range of benefits to you:
- No adverts like this in the forums anymore.
- Times and dates in your local timezone.
- Full tracking of what you have read so you can skip to your first unread post, easily see what has changed since you last logged in, and easily see what is new at a glance.
- Email notifications for threads you want to watch closely.
- Being a part of the oldest wargaming community on the net.
If you are already a member then feel free to login now. |
|
 |
2011/07/28 20:56:01
Subject: Re:Scratchbuilding an Arvus
|
|

Been Around the Block
|
Nalyd wrote:This work is amazing. I cannot even begin to think of how you come up with the little details. Just pure and simple talent.
Great work.
Thanks. Is there any specific little details that you'd like explained? It's all really simple stuff. I can probably explain each detail in a couple of sentences or less.
|
|
|
 |
|
2011/07/28 21:11:39
Subject: Re:Scratchbuilding an Arvus
|
|

Bounding Assault Marine
|
Bar wrote:Nalyd wrote:This work is amazing. I cannot even begin to think of how you come up with the little details. Just pure and simple talent.
Great work.
Thanks. Is there any specific little details that you'd like explained? It's all really simple stuff. I can probably explain each detail in a couple of sentences or less.
Nah. I don't need anything explained ( thanks for the offer) my creative process in my brain is just not so great at coming up with the little bits. I tend to stick to converting things over scratch building. Also those LED lights with the metal guards are just awesome!
|
|
|
|
|
2011/07/28 21:20:07
Subject: Re:Scratchbuilding an Arvus
|
|
Been Around the Block
|
Nalyd wrote:[Nah. I don't need anything explained ( thanks for the offer) my creative process in my brain is just not so great at coming up with the little bits. I tend to stick to converting things over scratch building. Also those LED lights with the metal guards are just awesome!
Okay. No worries.
Thanks for your kind words. It's not hard, really. When you realise that even general model making skills lend themselves to scratchbuilding, then nothing is beyond your ability to create from scratch.
And when you BELIEVE that, you can make anything.
|
|
|
|
|
2011/07/28 23:52:32
Subject: Re:Scratchbuilding an Arvus
|
|
Omnious Orc Shaman
A long time ago in a galaxy far, far, away...
|
Wow, some really lovely work here and loving your other WIPS, your work bench looks amazingly tidy though which is worrying - far too organised 
Seriously though, I think scratch building is (for me) one of the most rewarding sides of this hobby. Hats of to you good sir...
BTW, I don't think anyone answered this for you ?
Bar wrote:Chibi Bodge-Battle wrote:* Do I see Glenrothes on that bus?
My bro used to live near in Pitcoudie, now in Burntisland
Just seen the Saltaire though your Dakkaflag is the stars and bars
I don't know how that happened. I am very much in Glenrothes... How do you go about changing the flag???
Your Brother used to stay in Pitcoudie? It's a small world. I am half a mile away from there...
The flag displayed next to your posts is set automatically based on your IP address. Sometimes this is detected incorrectly, so if you want it to be reset to a fixed override, PM a moderator or admin and they can lock your flag to a specific country. Hope that helps - I had the same when I joined - PMd Legoburner and he kindly fixed it for me.
|
|
|
|
|
|
2011/07/29 02:37:16
Subject: Scratchbuilding an Arvus
|
|
Noble of the Alter Kindred
United Kingdom
|
 oops sorry Bar!
Guilty as charged
Thank you Ruglud.
Keep up the good work, fascinating to watch! 
|
|
|
|
|
|
2011/07/29 10:20:54
Subject: Scratchbuilding an Arvus
|
|
Been Around the Block
|
Eilif wrote: Chibi Bodge-Battle wrote: oops sorry Bar!
Guilty as charged
Thank you Ruglud.
Keep up the good work, fascinating to watch!
Thanks. Glad it's interesting to see.
Ruglud wrote: Wow, some really lovely work here and loving your other WIPS, your work bench looks amazingly tidy though which is worrying - far too organised
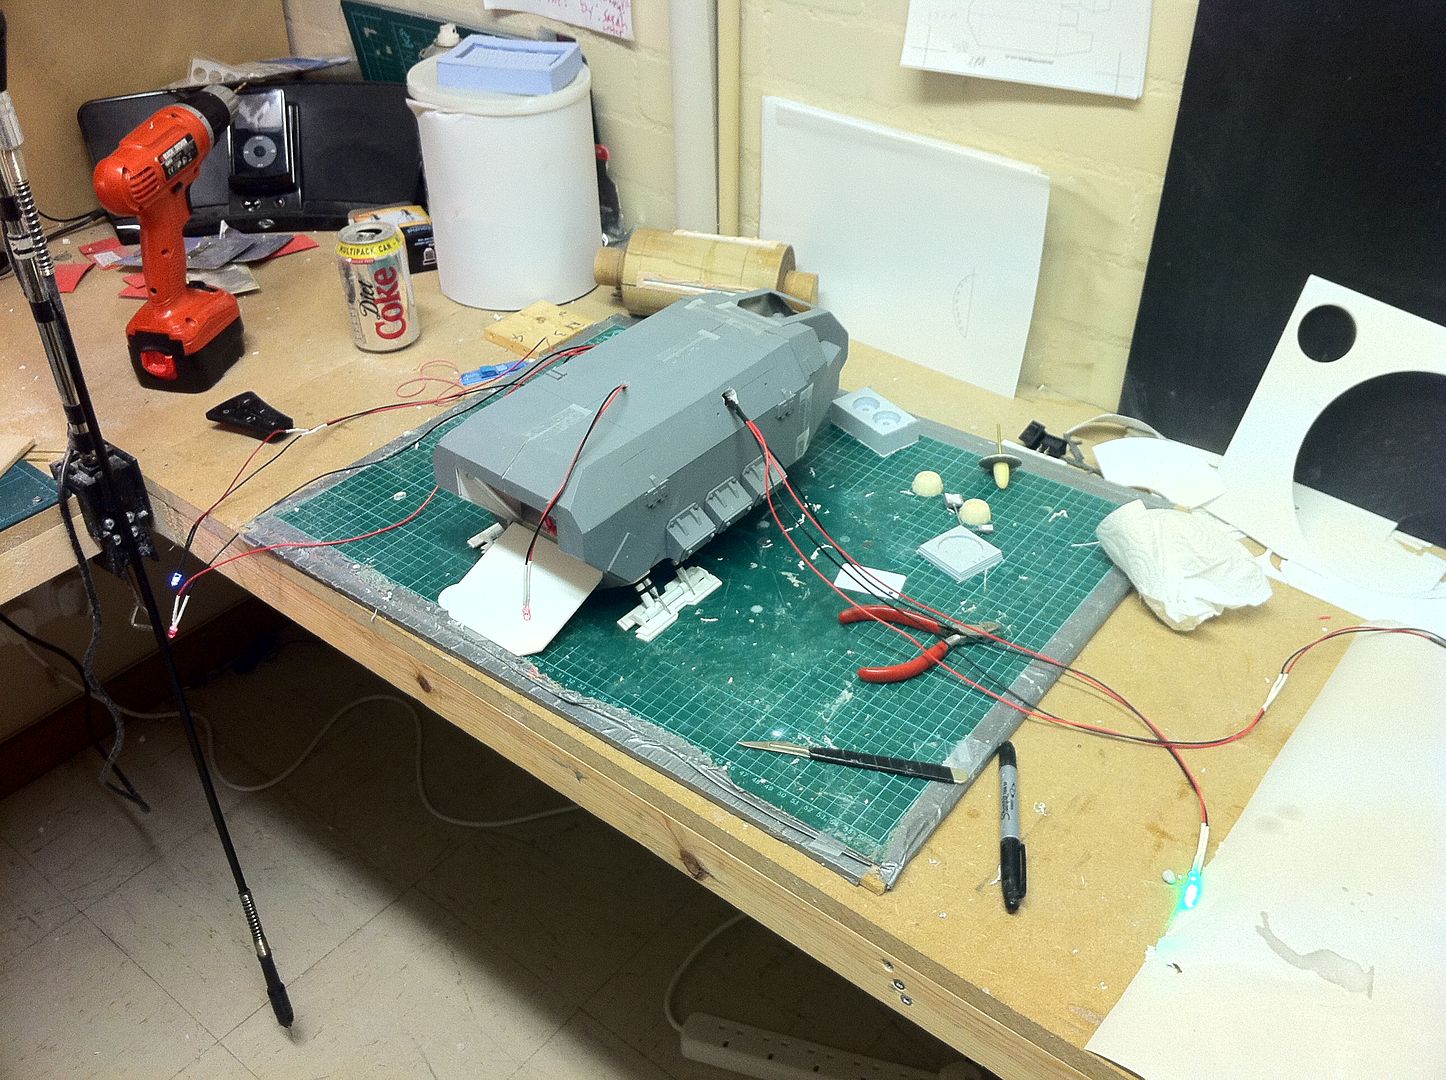
It's a but dusty right now. I have unexpectedly had to work from home today, so no more work on the Arvus right now. I might be able to go up there tonight. Or tomorrow perhaps. I want to get the engine details nailed down finally. There are so many small jobs needing done on this one befor eeach piece is finished. I look at it as a pile of small jobs, rather than an endless large pile...
Ruglud wrote:Seriously though, I think scratch building is (for me) one of the most rewarding sides of this hobby. Hats of to you good sir...
Thanks. I feel the same way. It's a pleasant experience seeing something that didn't exist before and now it does because you made it yourself.
Ruglud wrote:BTW, I don't think anyone answered this for you ?
The flag displayed next to your posts is set automatically based on your IP address. Sometimes this is detected incorrectly, so if you want it to be reset to a fixed override, PM a moderator or admin and they can lock your flag to a specific country. Hope that helps - I had the same when I joined - PMd Legoburner and he kindly fixed it for me.
Thanks. I'll see about getting that done today.
|
|
This message was edited 1 time. Last update was at 2011/07/30 15:34:15
|
|
|
|
|
2011/07/30 15:38:59
Subject: Re:Scratchbuilding an Arvus
|
|
Been Around the Block
|
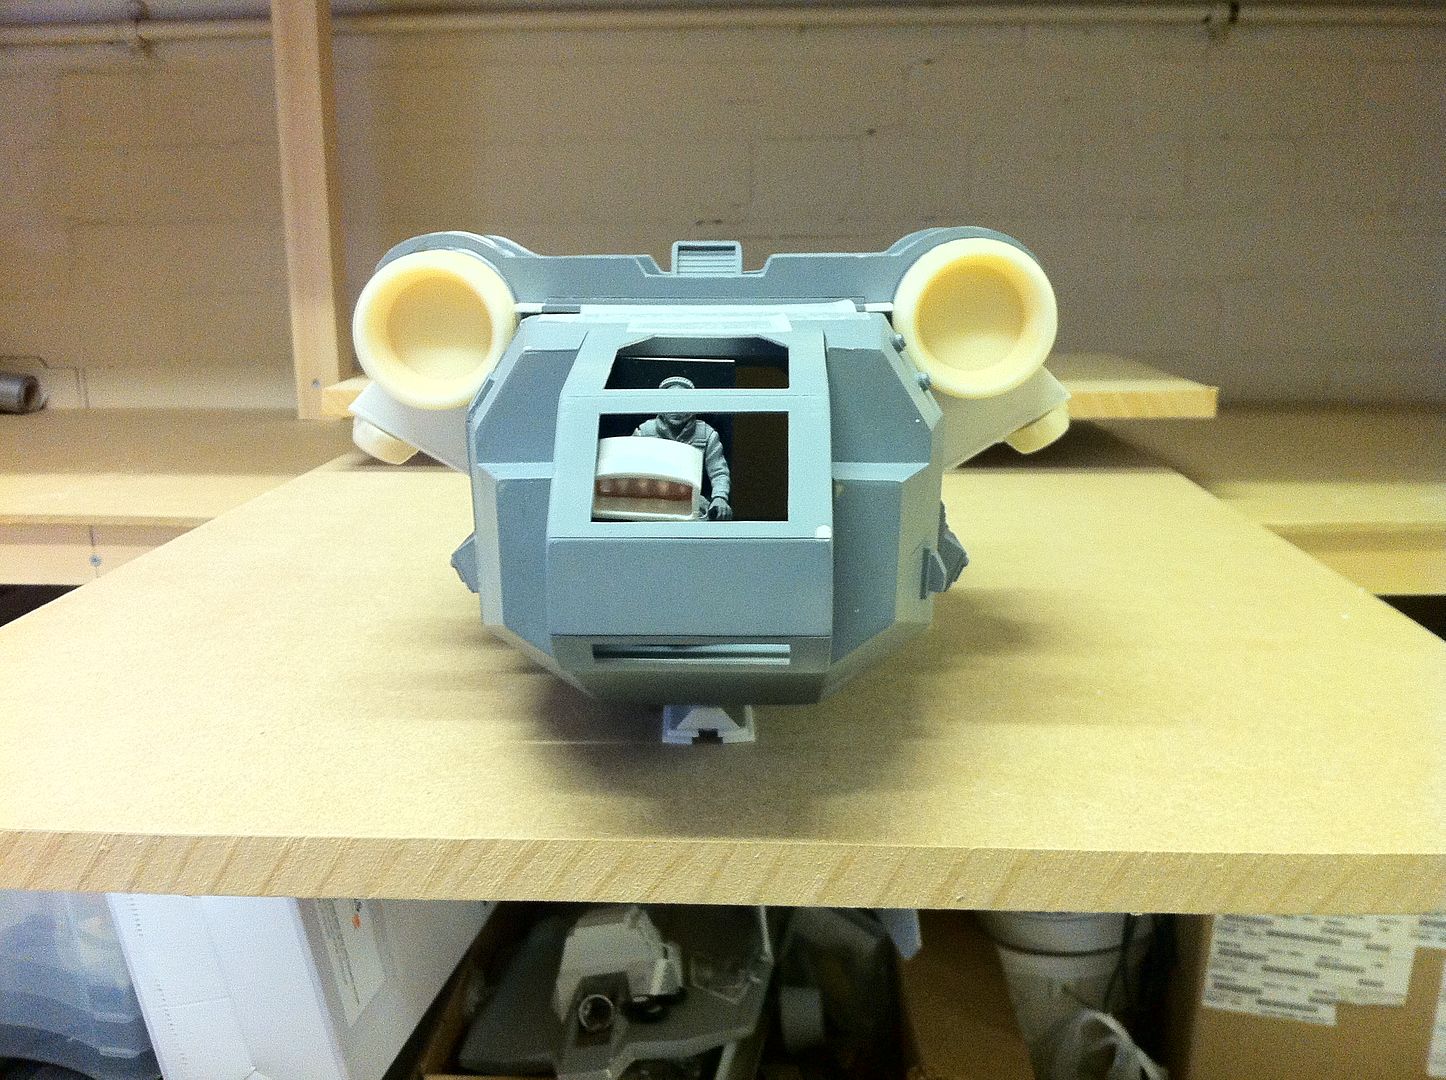
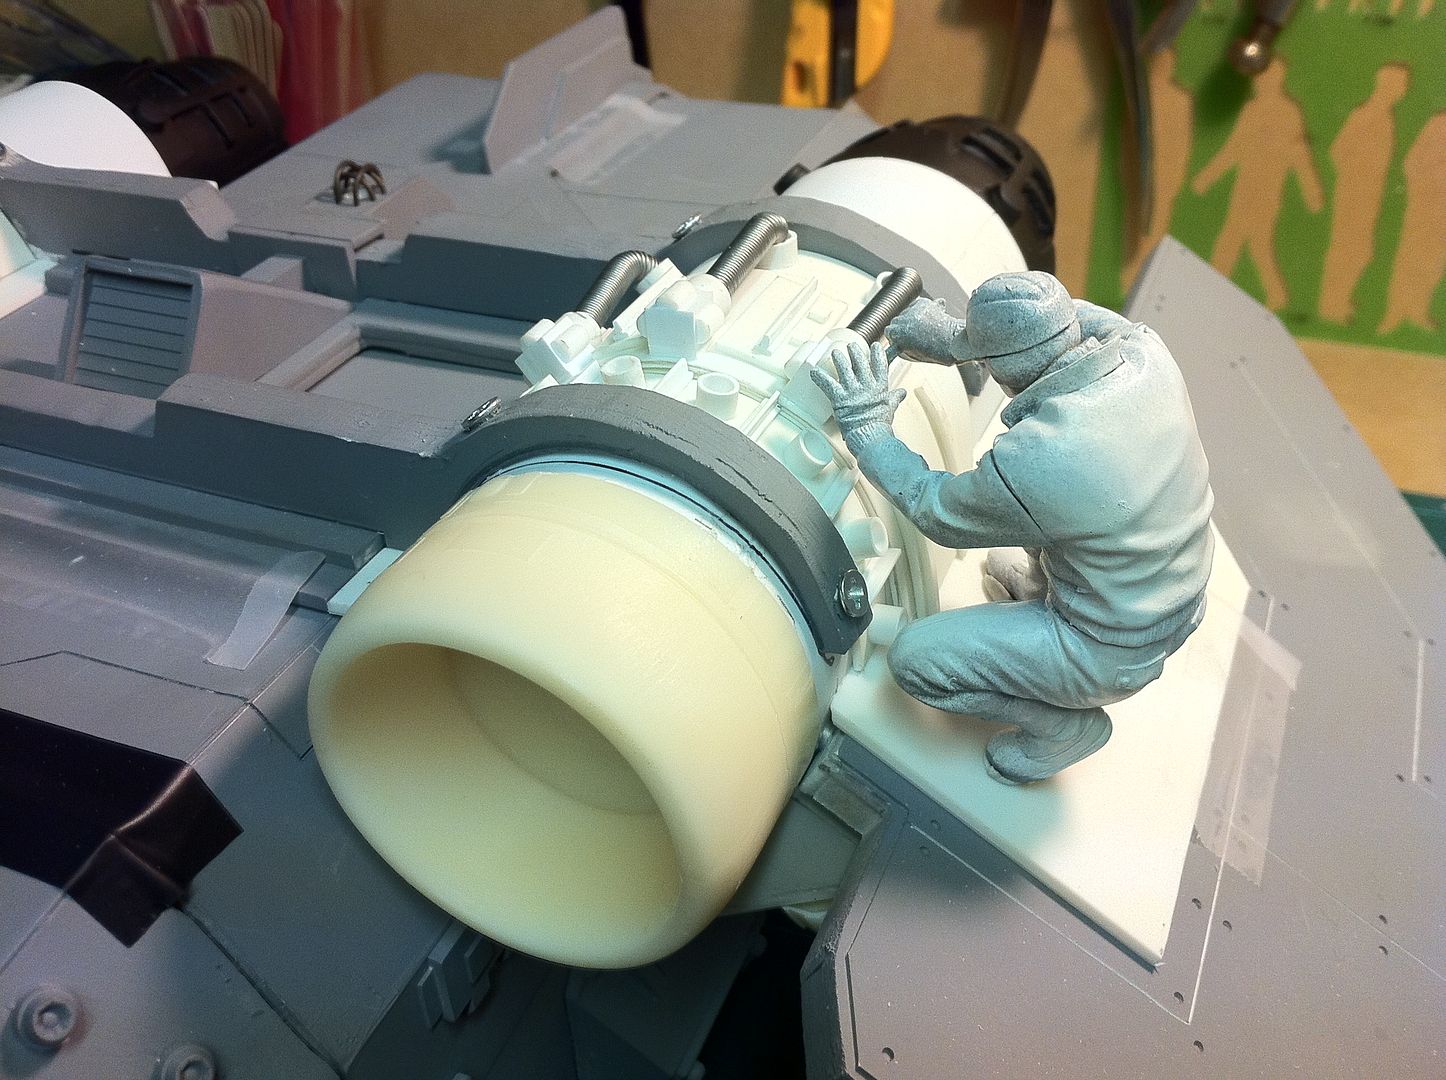
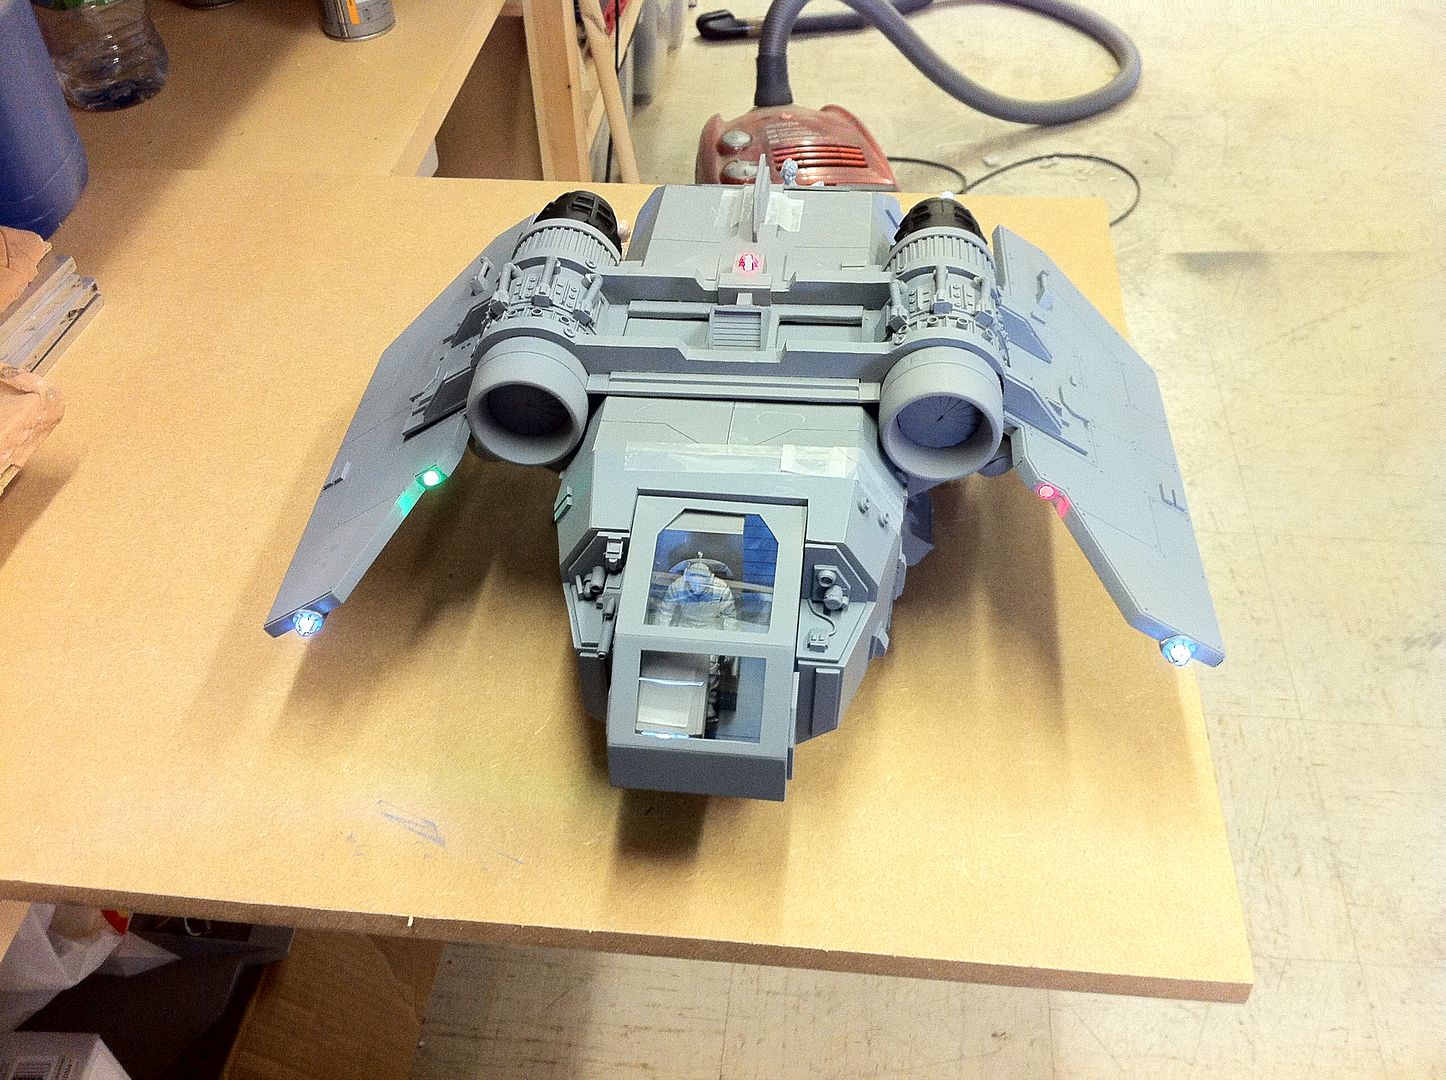
Okay. Not a huge update. Got up to work this morning and it was cloudy and, after an hour of pottering about, the sun came out, so i went home and got my pushbike and went out for a run to enjoy the sunshine...
But, while i WAS there, i got the second thruster cone hollowed out and primed, plus i was able to clean my workbench...(It was dusty, lol...).
Anyway, just one pic. The engines turned on and the camera dazzled...
Enjoy!
|
|
|
|
|
2011/07/30 16:43:40
Subject: Scratchbuilding an Arvus
|
|
Noble of the Alter Kindred
United Kingdom
|
You have been working the crew too hard by the looks of things, or have they just had a hard night and keeled over? 
Looking fantastic, Bar
|
|
|
|
|
|
2011/07/30 18:29:03
Subject: Scratchbuilding an Arvus
|
|
Unteroffizier
|
Wow, your work is amazing. I think the 1/20 scale really allows you to appreciate details that would otherwise be lost in heroic scale.
|
The best thing about this particular signature is that by the time you realise it doesn't say anything it's far too late to stop reading it. |
|
|
|
|
2011/07/30 21:58:25
Subject: Scratchbuilding an Arvus
|
|
Omnious Orc Shaman
A long time ago in a galaxy far, far, away...
|
Good job on cleaning the workbench !!
|
|
|
|
|
|
2011/07/31 17:36:02
Subject: Re:Scratchbuilding an Arvus
|
|
Never-Miss Nightwing Pilot
|
Bar wrote:
Somebody needs to get these slackers back in gear. Instead of laying there planking, they need to be busting out the rest of this Arvus...
Ghidorah
|
|
|
|
|
|
2011/08/01 07:45:04
Subject: Scratchbuilding an Arvus
|
|
Been Around the Block
|
Chibi Bodge-Battle wrote:You have been working the crew too hard by the looks of things, or have they just had a hard night and keeled over?
Looking fantastic, Bar
Lol. I never thought of that. Wasn't paying attention to them. I will pick them up for today's round of WIP images when i get to work.
TheBlueRedPanda wrote:Wow, your work is amazing. I think the 1/20 scale really allows you to appreciate details that would otherwise be lost in heroic scale.
Yes. It allows the details to pop i think.
And for images to really sell the size and scale of the dio.
Ruglud wrote:Good job on cleaning the workbench !!
Thanks. It's dusty once again...
Ghidorah wrote:Somebody needs to get these slackers back in gear. Instead of laying there planking, they need to be busting out the rest of this Arvus...
Ghidorah
Yeah. I'll be getting right on that when i get up to work in the next half hour or so.
Thanks for looking guys.
I'll have serious progress tonight. I swear.
|
|
|
|
|
2011/08/01 21:49:49
Subject: Re:Scratchbuilding an Arvus
|
|
Been Around the Block
|
I got a little bit done on the Arvus today. I expect it will be well recieved. I certainly enjoyed doing the work anyway!
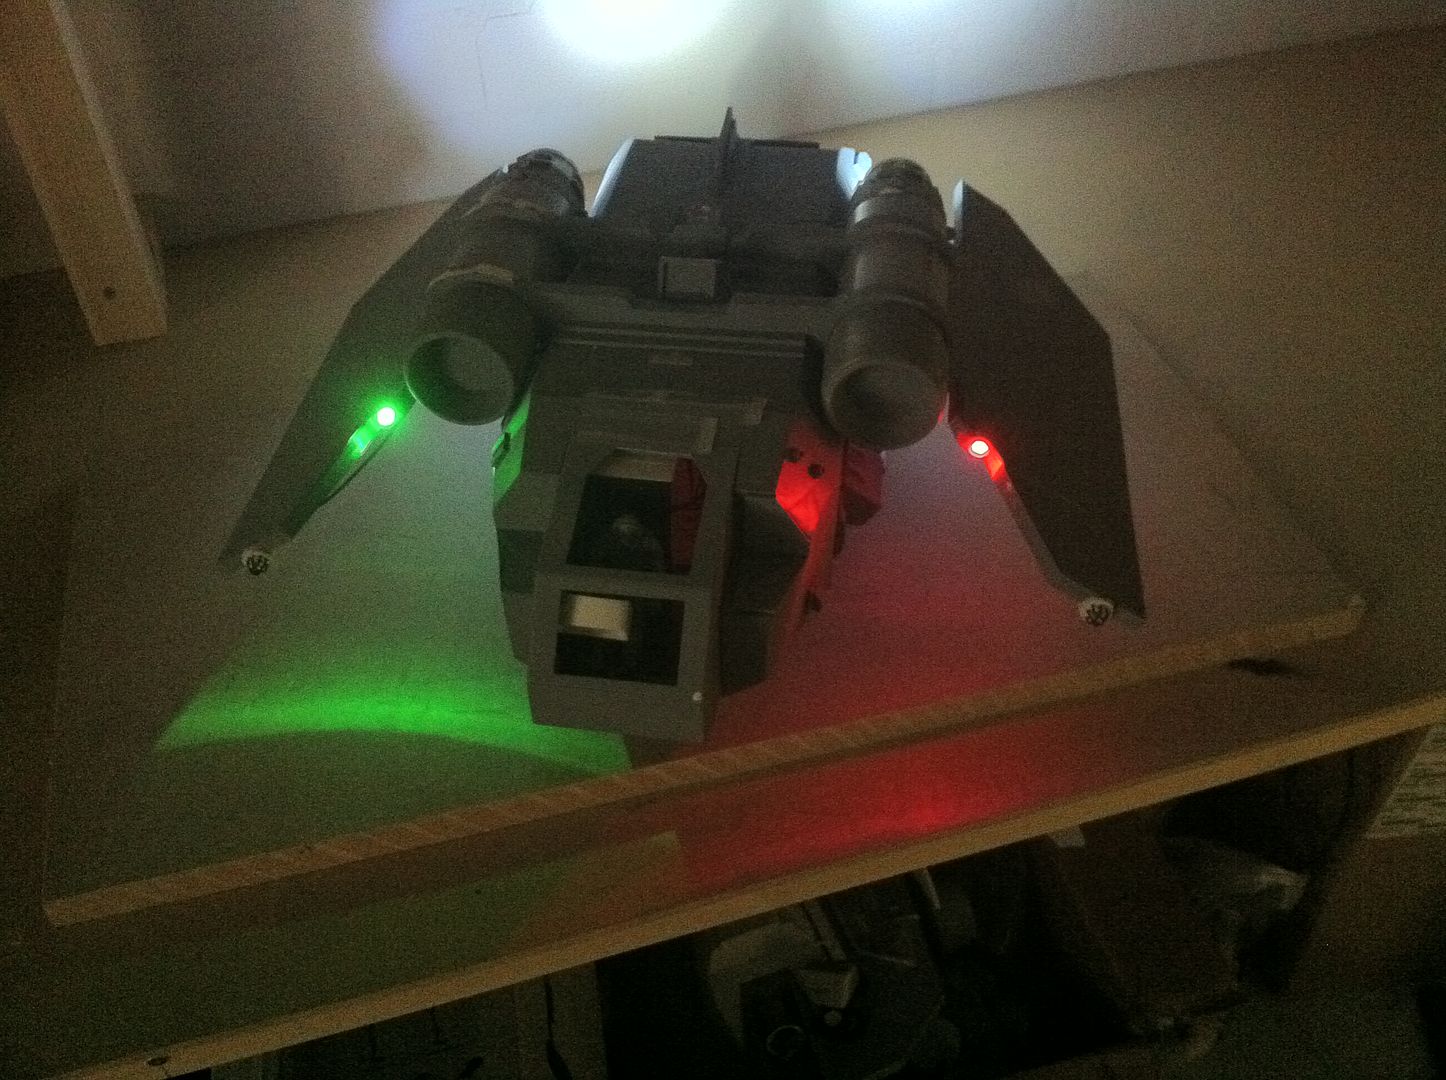
I did a few lighting tests of the nav light rig.
Pics and vids of that. I'd appreciate comments on how good that looks...
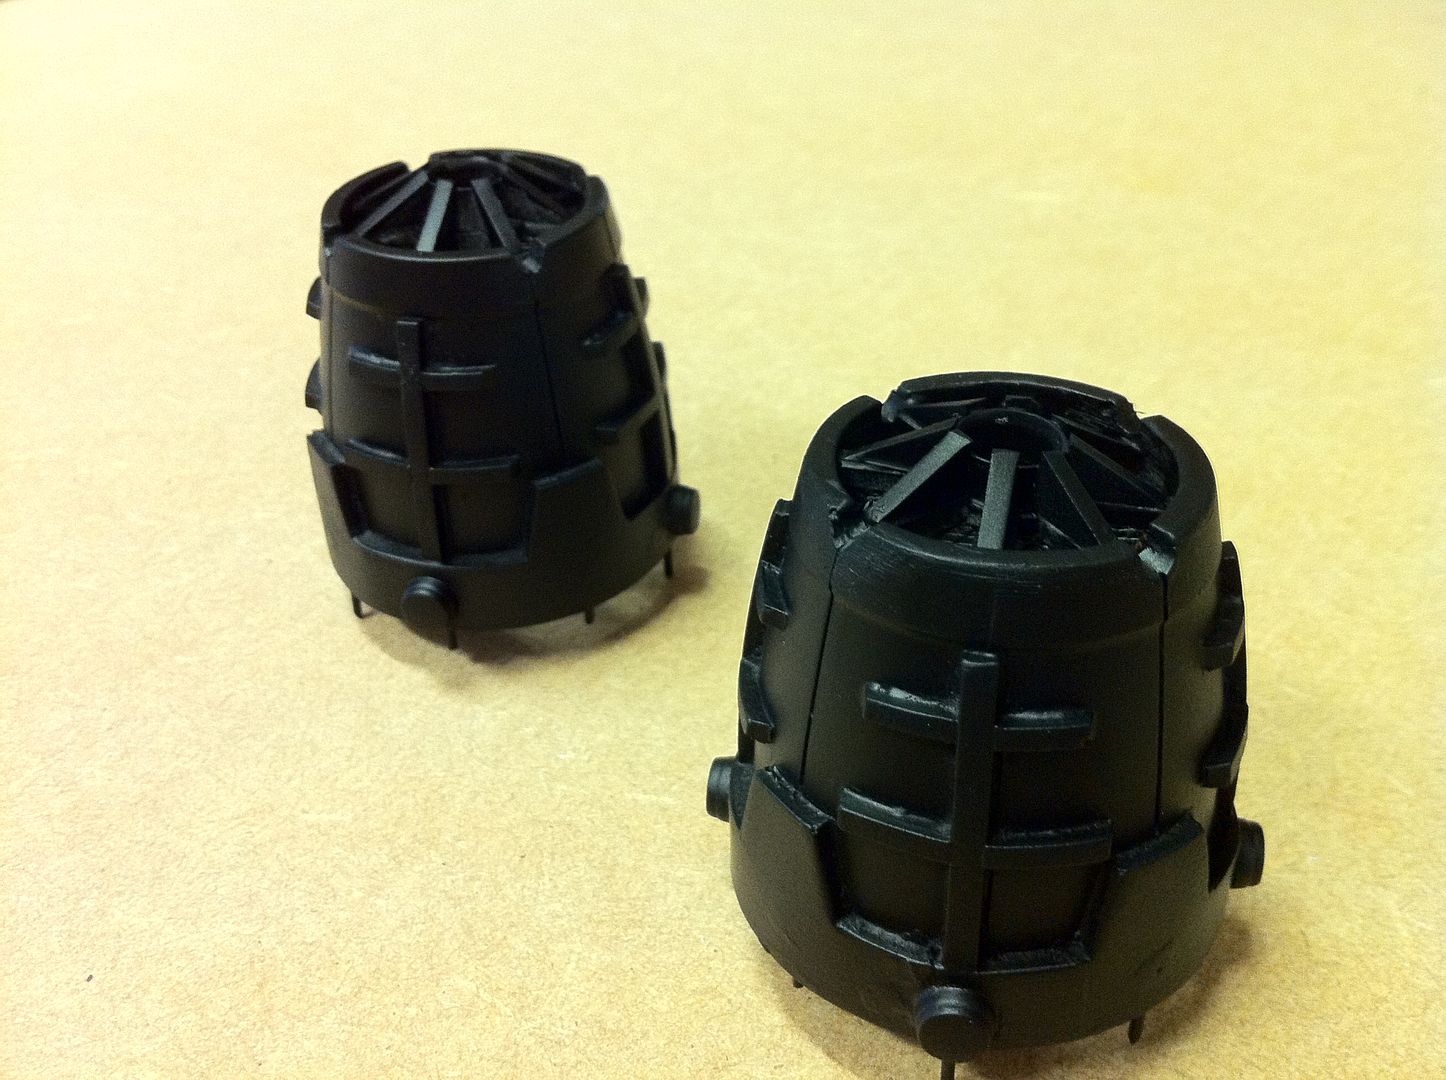
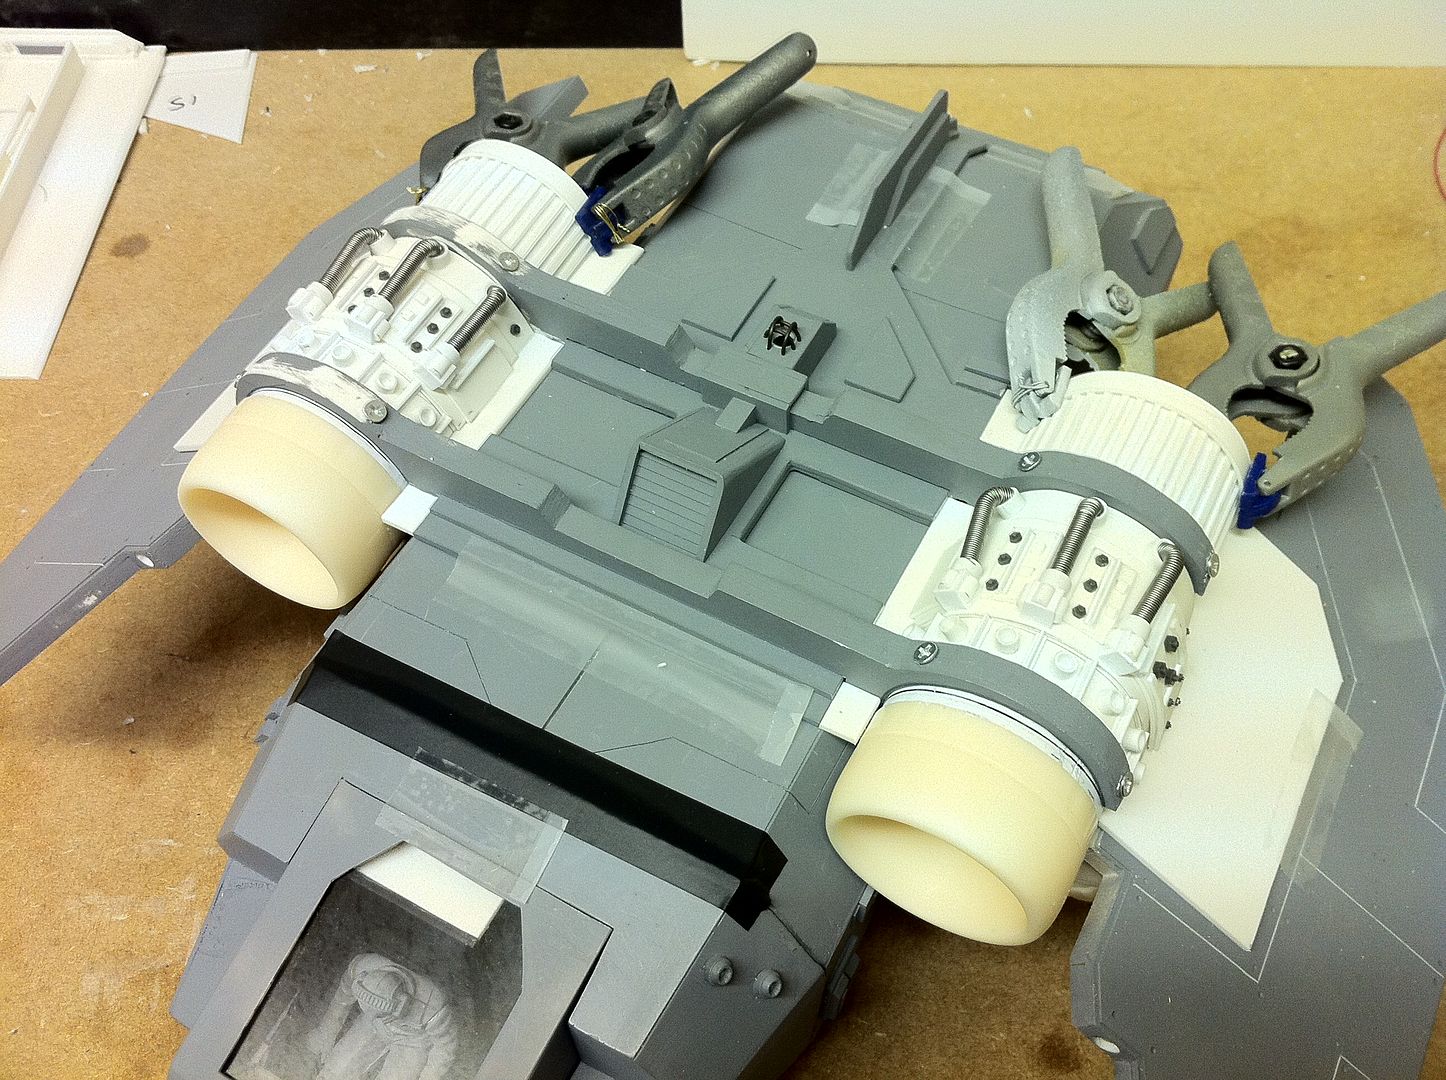
I realised a bit late in the game that the engines being totally hollow could be handy to stash the lighting rigs in, so i made a new set(Again...). These were skinned in styrene and the engine cones were gven location pegs. the torches are now well seated in the engine tips.
I also made the VTOL shoulders under the wings and blutacked on the lift fans to see what they looked like.
Feel free to be as verbose as you like.
Here are the pics.
Enjoy.
 http://www.youtube.com/watch?v=CCrQyf6o0J8
http://www.youtube.com/watch?v=wDyHVc9t0EU
http://www.youtube.com/watch?v=CCrQyf6o0J8
http://www.youtube.com/watch?v=wDyHVc9t0EU
|
|
|
|
|
2011/08/02 09:15:58
Subject: Scratchbuilding an Arvus
|
|

Shroomin Brain Boy
|
just watched the vids of your lighttests and i have to say: when the engine torches are alight the magic truly works... my only concern is here that when they aren´t working the flat surface of the led torches looks a bit out of place...my idea here would be a clear cover that more resembles a enginelike look... don´t know what really woud suit that nonfunctioneing effect...
to the fans ...i think you will shortly felsh out the connection and position of the fans, as you mentioned you only bluetaced them in place for the look...the only thing i here can say is if you think the asymetrical look is what you wanted than i am fine with that... otherwise i would suggest either adding a fourth fan or put the midlle one truly in the middle...
beside those thoughts of mine all i can say is that i really enjoy this built^^
cheers, vik
|
|
|
|
|
|
2011/08/02 11:53:00
Subject: Scratchbuilding an Arvus
|
|
Been Around the Block
|
Viktor von Domm wrote: just watched the vids of your lighttests and i have to say: when the engine torches are alight the magic truly works... my only concern is here that when they aren´t working the flat surface of the led torches looks a bit out of place...my idea here would be a clear cover that more resembles a enginelike look... don´t know what really woud suit that nonfunctioneing effect...
That's fair comment. I really like this type of constructive criticism. If something doesn't look right, i like to know it from people.
As for an engine outlet, i will see what i can do. I have the day off today, and i am about to go back to work to see if i can get anything else done today. I will take this on board and try to get that fixed.
Viktor von Domm wrote:to the fans ...i think you will shortly felsh out the connection and position of the fans, as you mentioned you only bluetaced them in place for the look...the only thing i here can say is if you think the asymetrical look is what you wanted than i am fine with that... otherwise i would suggest either adding a fourth fan or put the midlle one truly in the middle...
beside those thoughts of mine all i can say is that i really enjoy this built^^
cheers, vik
Thanks a lot Vik. I appreciate all your comments.
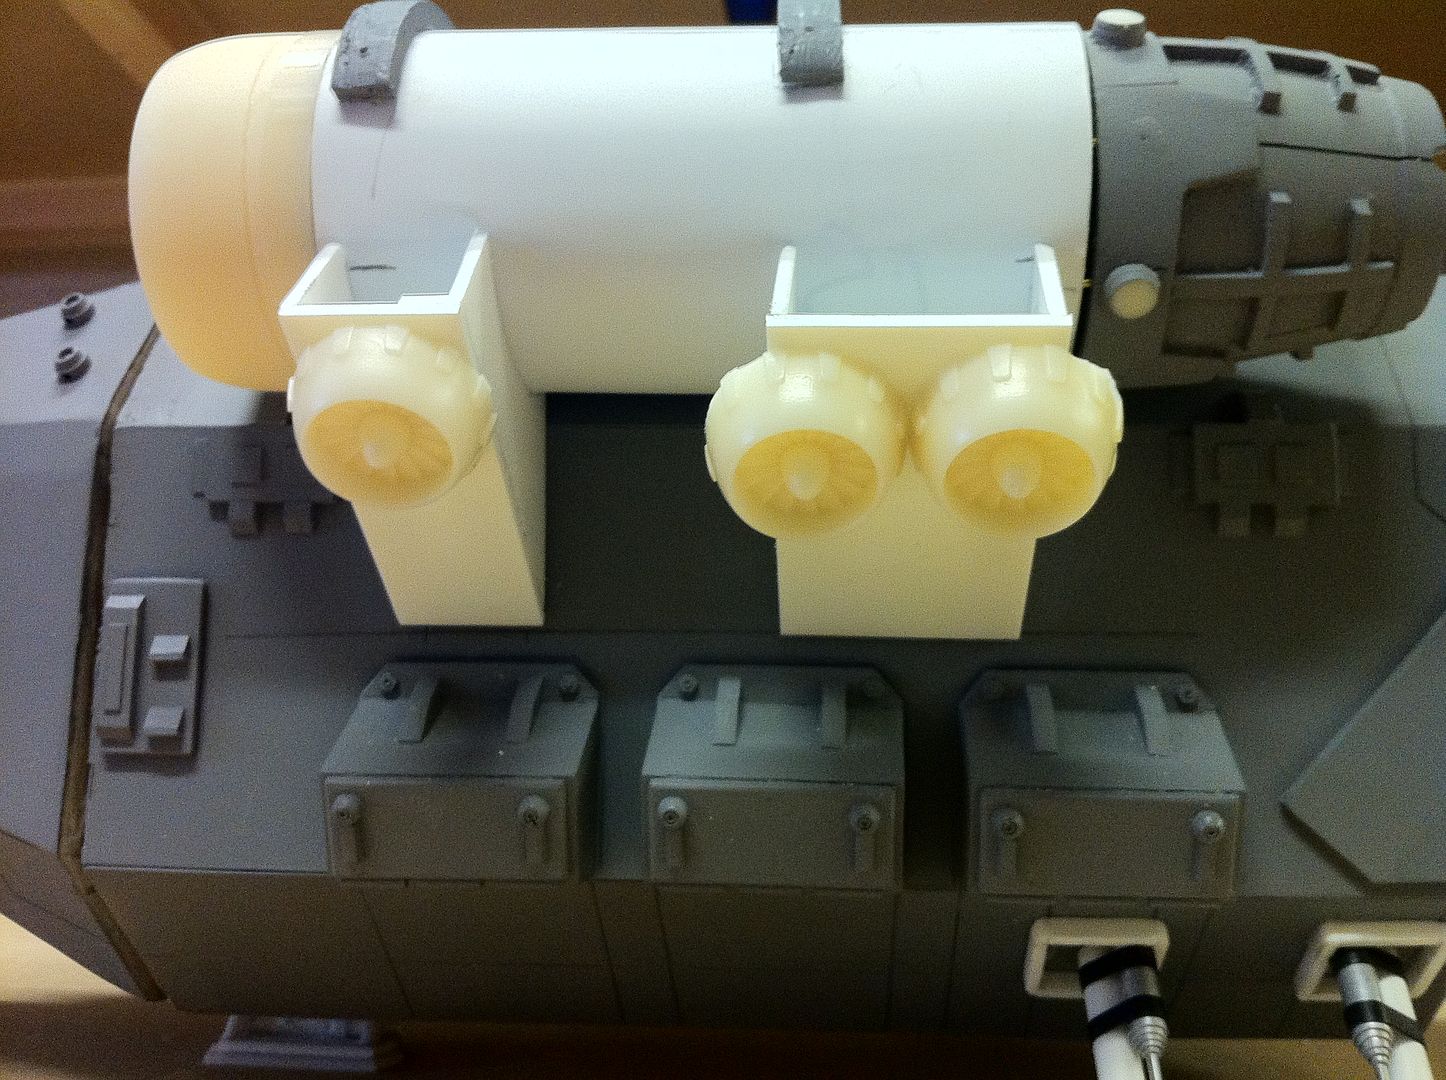
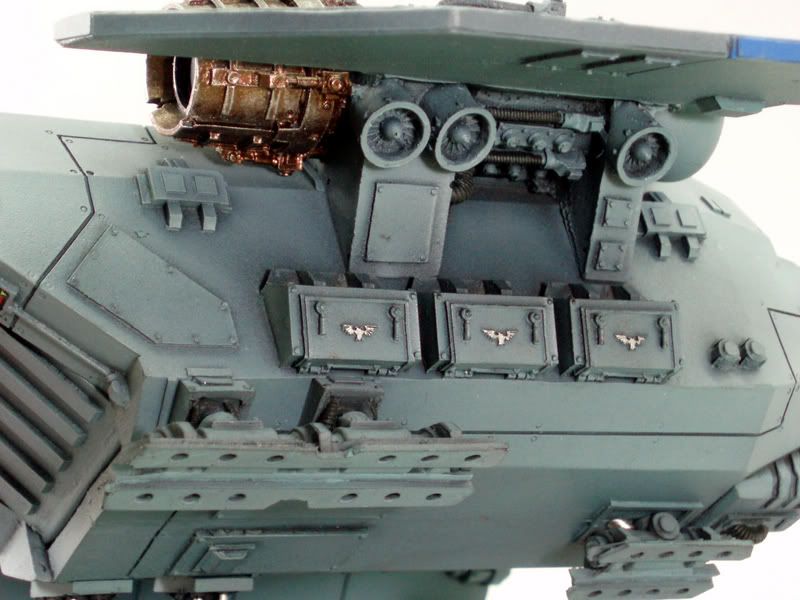
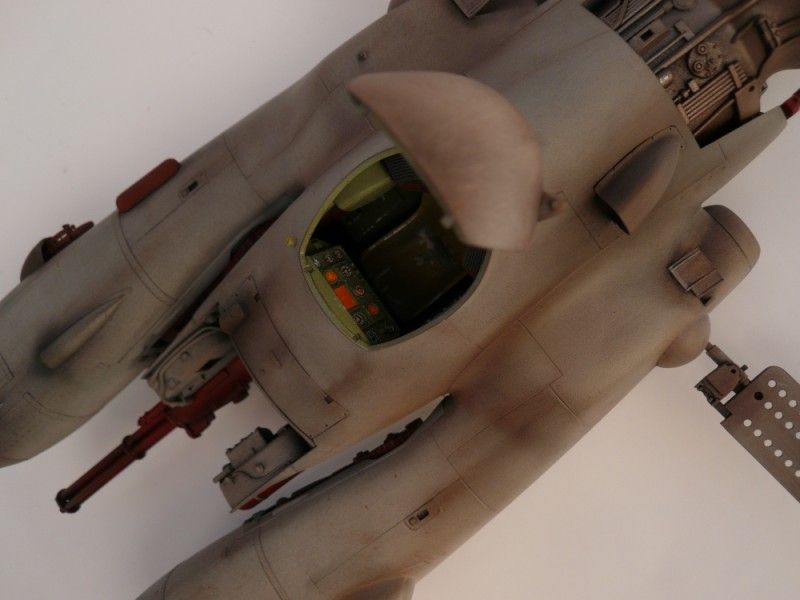
As for the fans, although i am using a different part(And have very slightly modified the arrangement), the official position of the fans are two to the rear and one to the front on each side.
Here are pics of the Forgeworld kit(If you still think i should change it, let me know):

|
|
|
|
|
2011/08/02 12:37:22
Subject: Scratchbuilding an Arvus
|
|
Shroomin Brain Boy
|
ok... i have to admit that by keeping it the "asymetrical" way you would be true to the FW model...with my laymen knowledge of aerodynamics tho i wonder if said setup would cause stability or the opposite...then again this is a sifi model and not a realistic one it just merely hints a nod towards realism...so i guess you should stick to your plan...
actually i too like constructive and even negative constructive criticism as this is so rare here on this board...and i think you are on to something truly grande here and i think now is still the good time to tweak and readjust ...it is the main thing i like about modeling...and your work is so much harder as you try to rebuild something as oposite to my work as i go to totally new boarders...thus shaving off a bit of the possabilities for constructive criticism^^ on my work^^
i had a quick and fleeting vision of a substance like:

but i am not sure if this might work and actually this might dampen serioulsy your lighteffect...ach such a poor world for not producing actual working jetengines for a 1:20 model...
vik
|
|
|
|
|
|
2011/08/02 18:46:48
Subject: Scratchbuilding an Arvus
|
|
Been Around the Block
|
Viktor von Domm wrote:ok... i have to admit that by keeping it the "asymetrical" way you would be true to the FW model...with my laymen knowledge of aerodynamics tho i wonder if said setup would cause stability or the opposite...then again this is a sifi model and not a realistic one it just merely hints a nod towards realism...so i guess you should stick to your plan...
Thanks. The way i see it is that the lift fans will be controlled by the pilot via a fly by wire system. And i think that (fully laden), the Arvus would be a bit "ass-heavy". I think that's why the rear set is a double line of fans on each side.
Viktor von Domm wrote:actually i too like constructive and even negative constructive criticism as this is so rare here on this board...and i think you are on to something truly grande here and i think now is still the good time to tweak and readjust ...it is the main thing i like about modeling...and your work is so much harder as you try to rebuild something as oposite to my work as i go to totally new boarders...thus shaving off a bit of the possabilities for constructive criticism^^ on my work^^
Sure. I would like people to tell me straight if they think i am going in the wrong direction.
And i appreciate you saying scratchbuilding your own designs are fun, but as you say, they never challenge you to totally stick to a predetermined design. Sometimes that is good too. Just stick to a specific design and try as hard as you can to get it right.
Viktor von Domm wrote:i had a quick and fleeting vision of a substance like:
but i am not sure if this might work and actually this might dampen serioulsy your lighteffect...ach such a poor world for not producing actual working jetengines for a 1:20 model...
vik
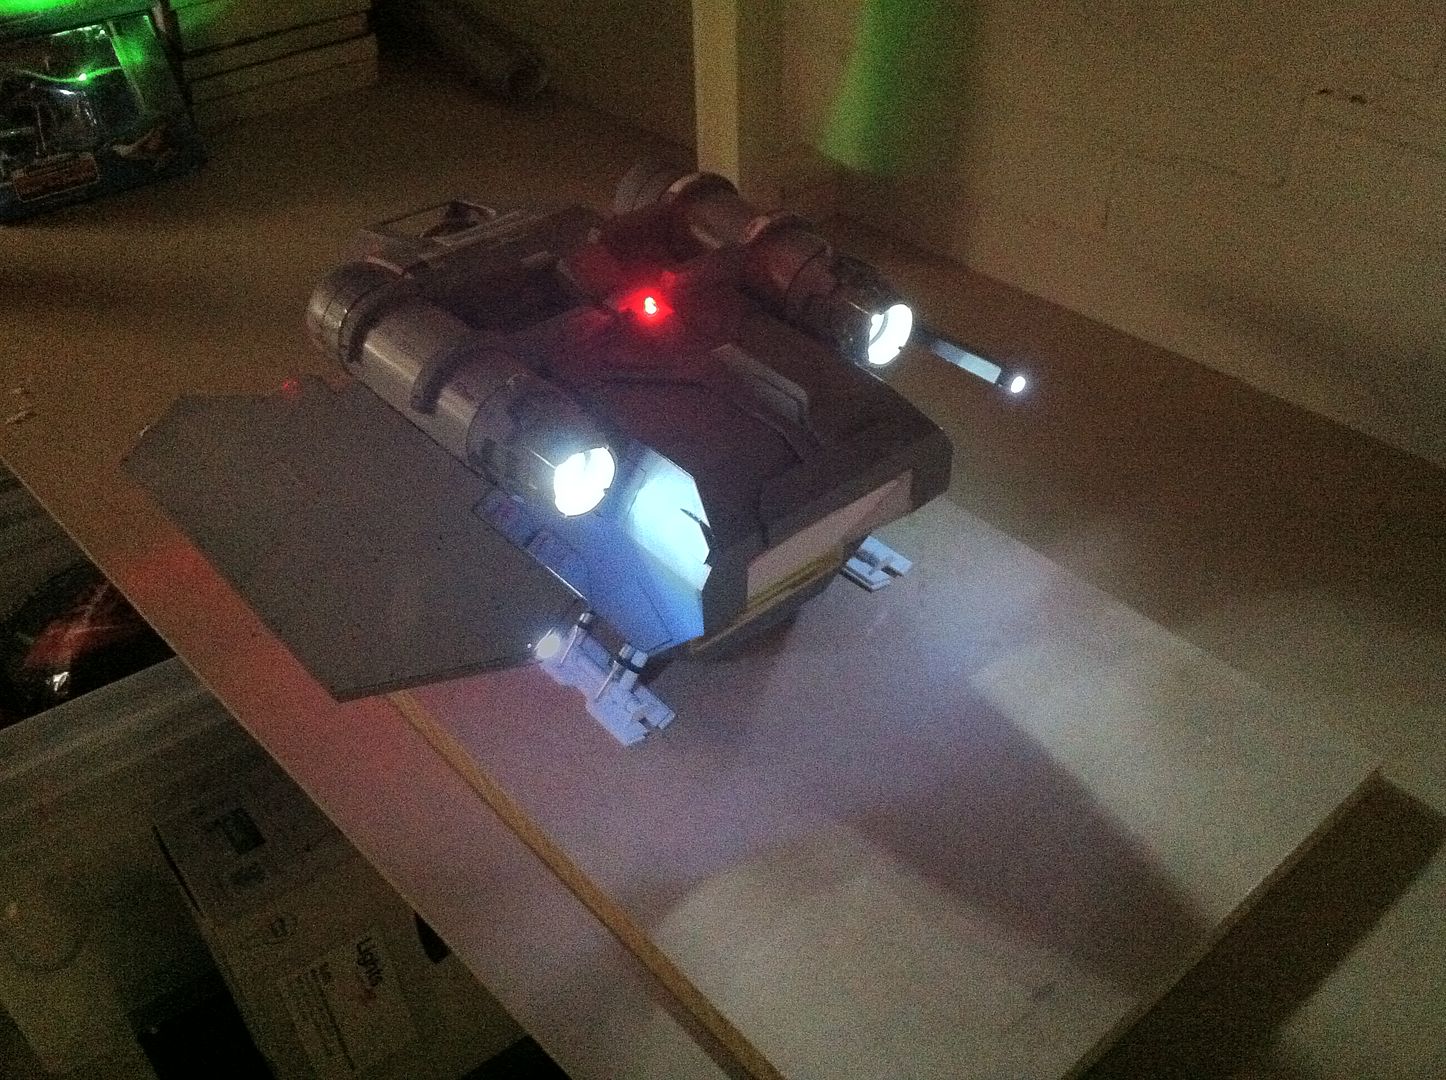
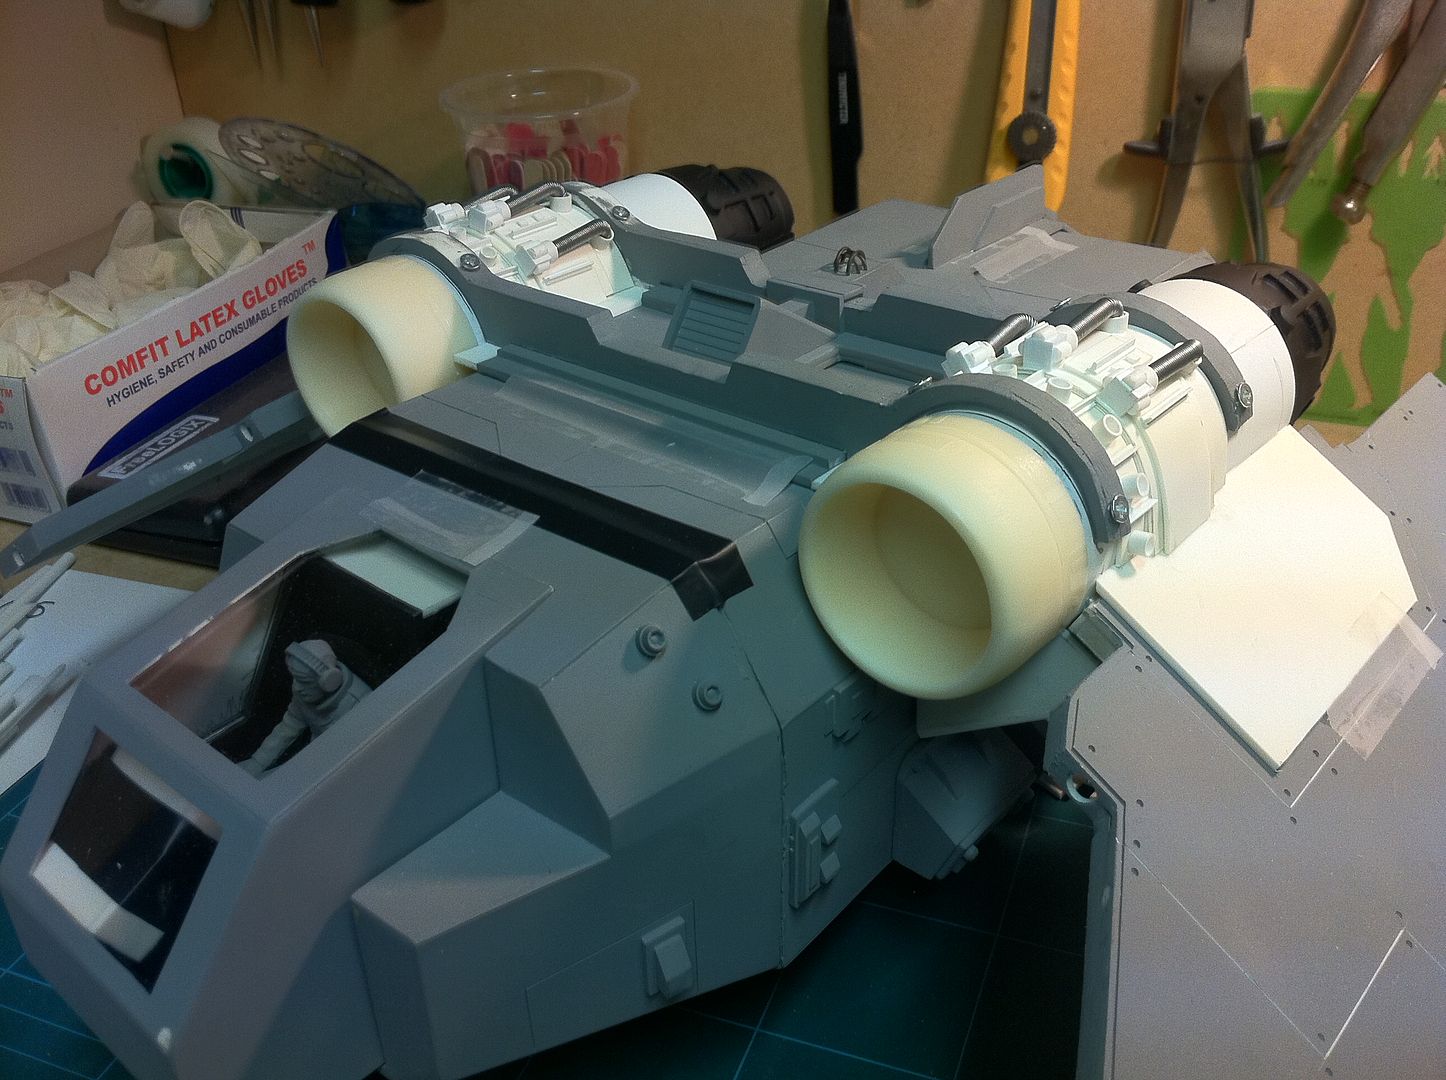
Thanks for that. I have come up with something waaaaay better... Let me know what you think of the pics below.
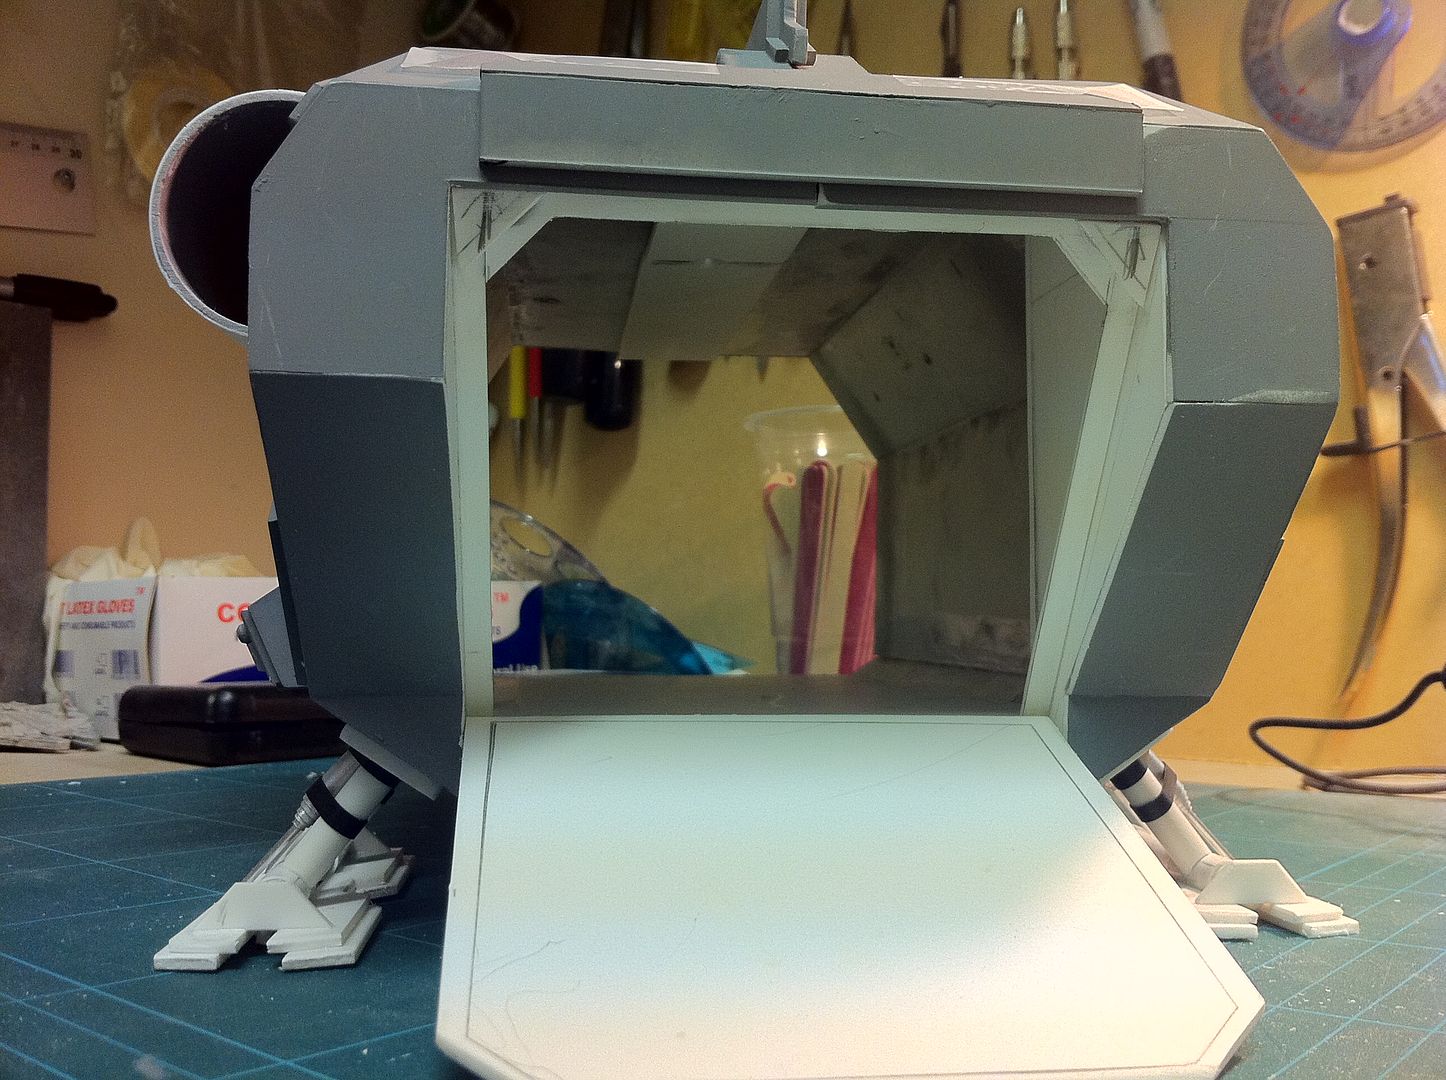
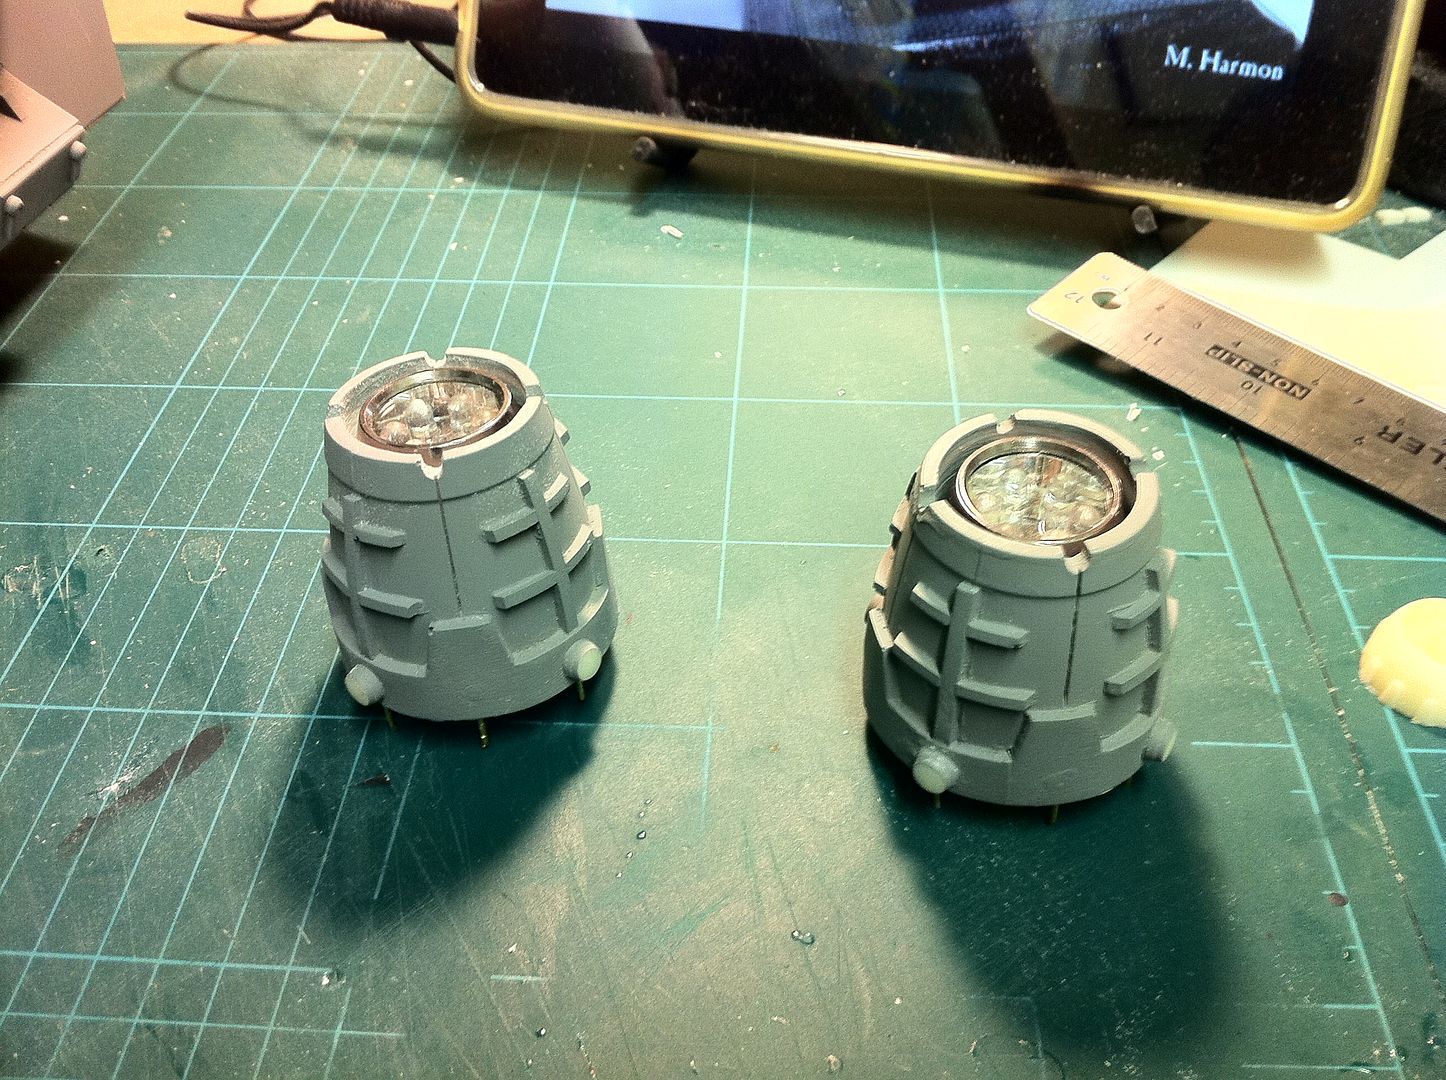
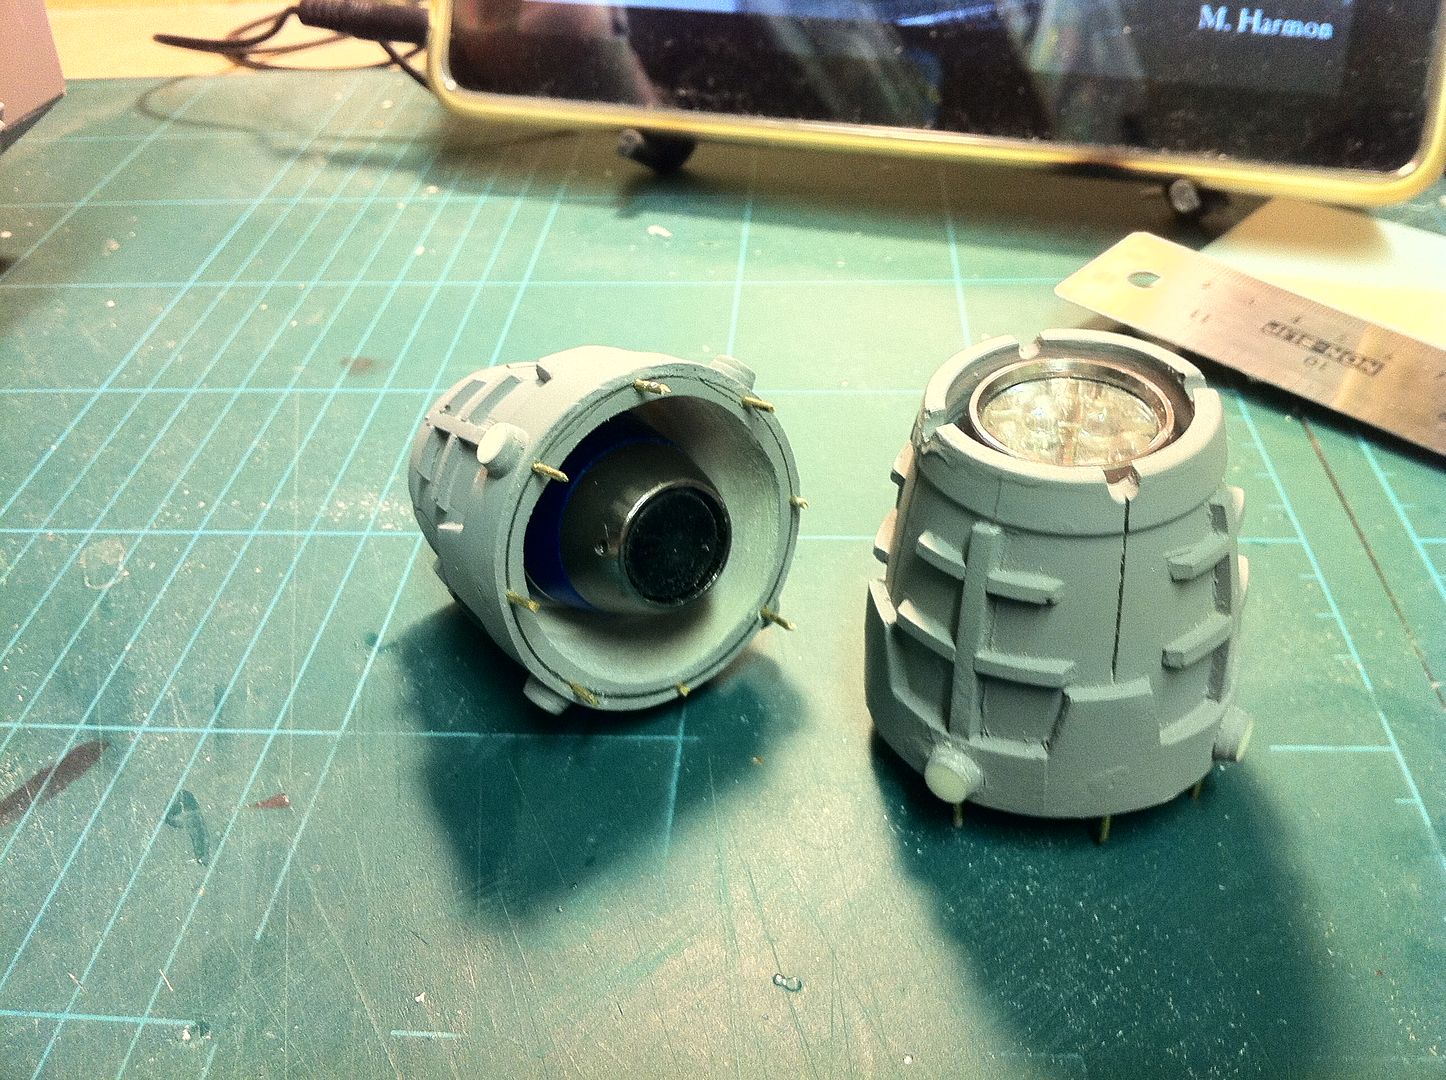
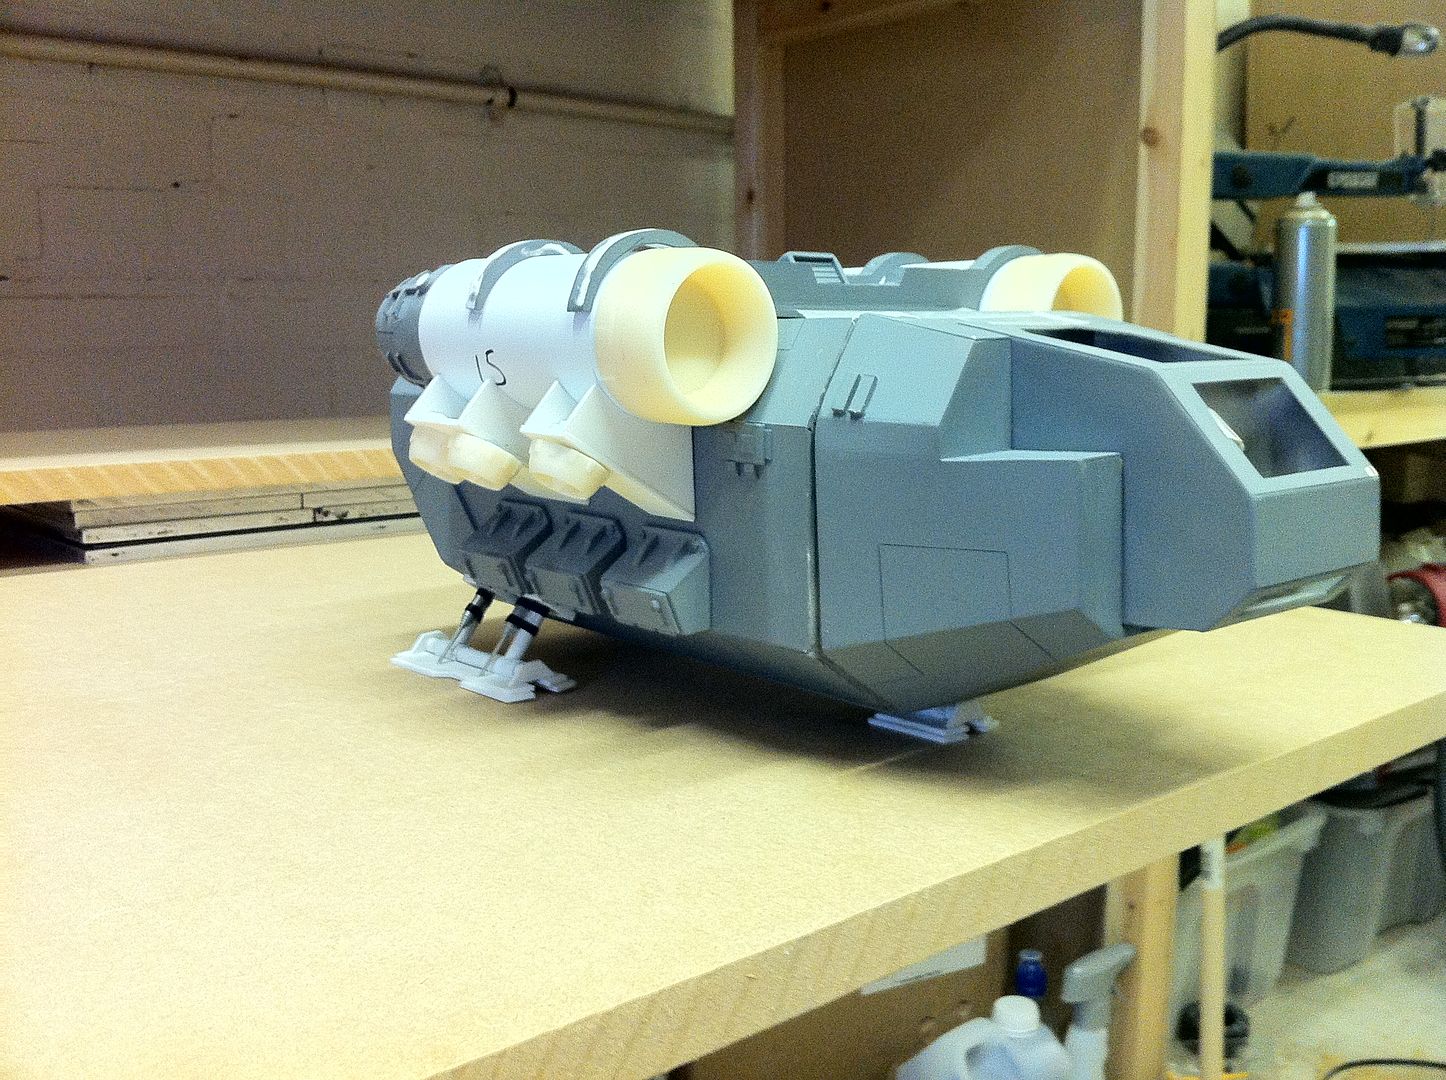
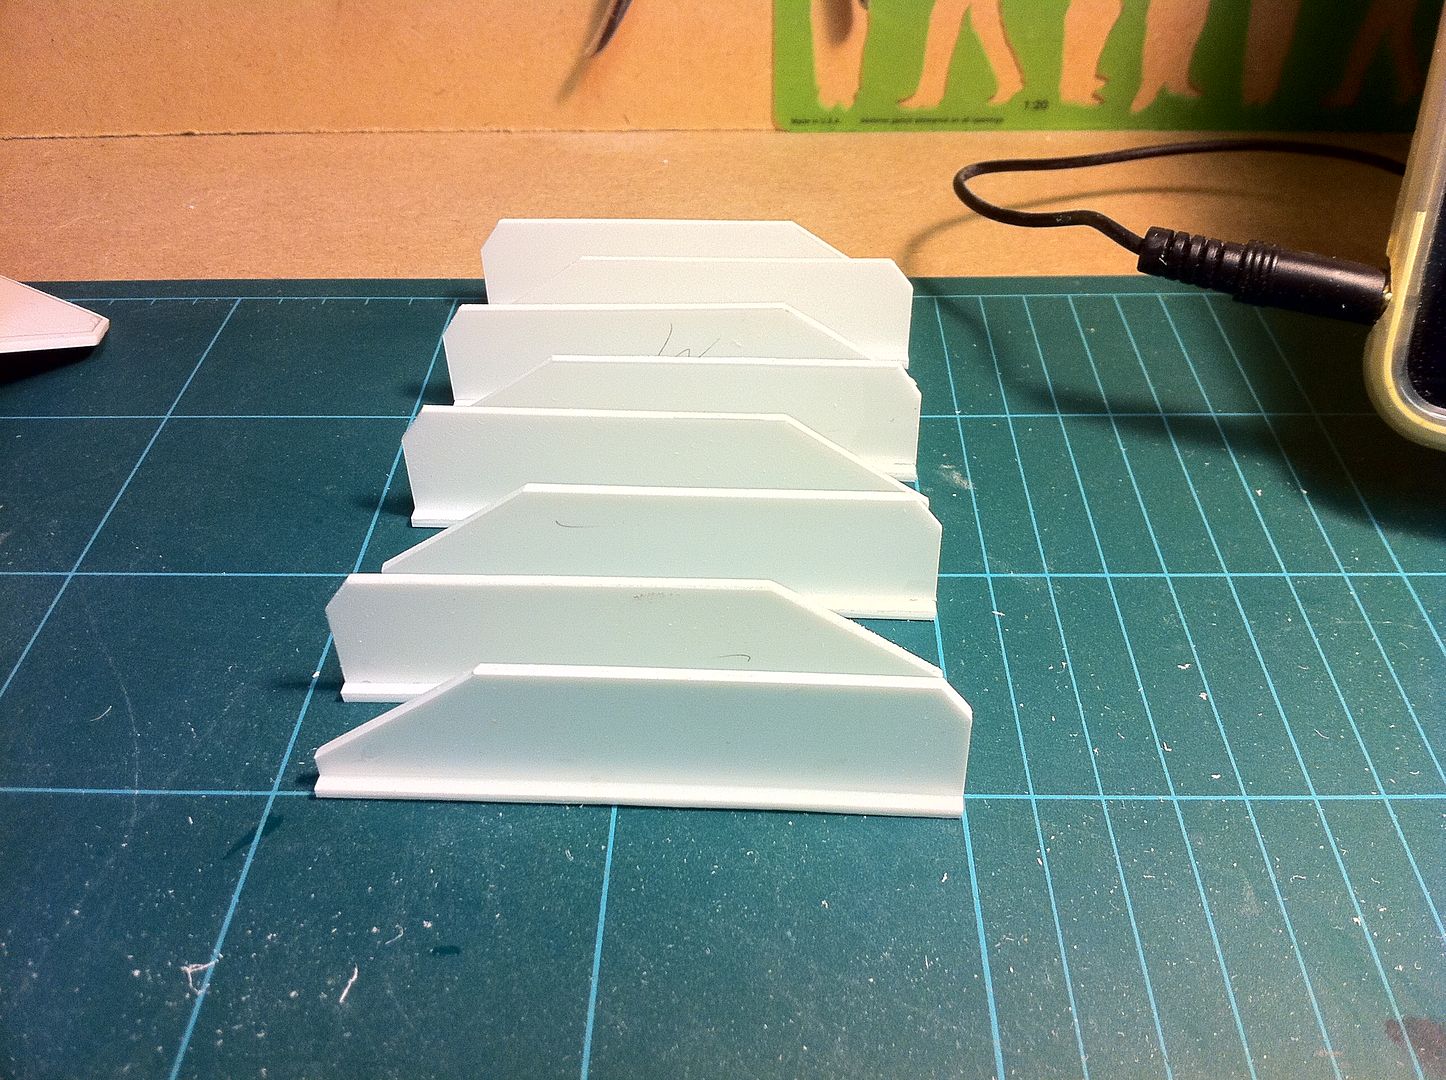
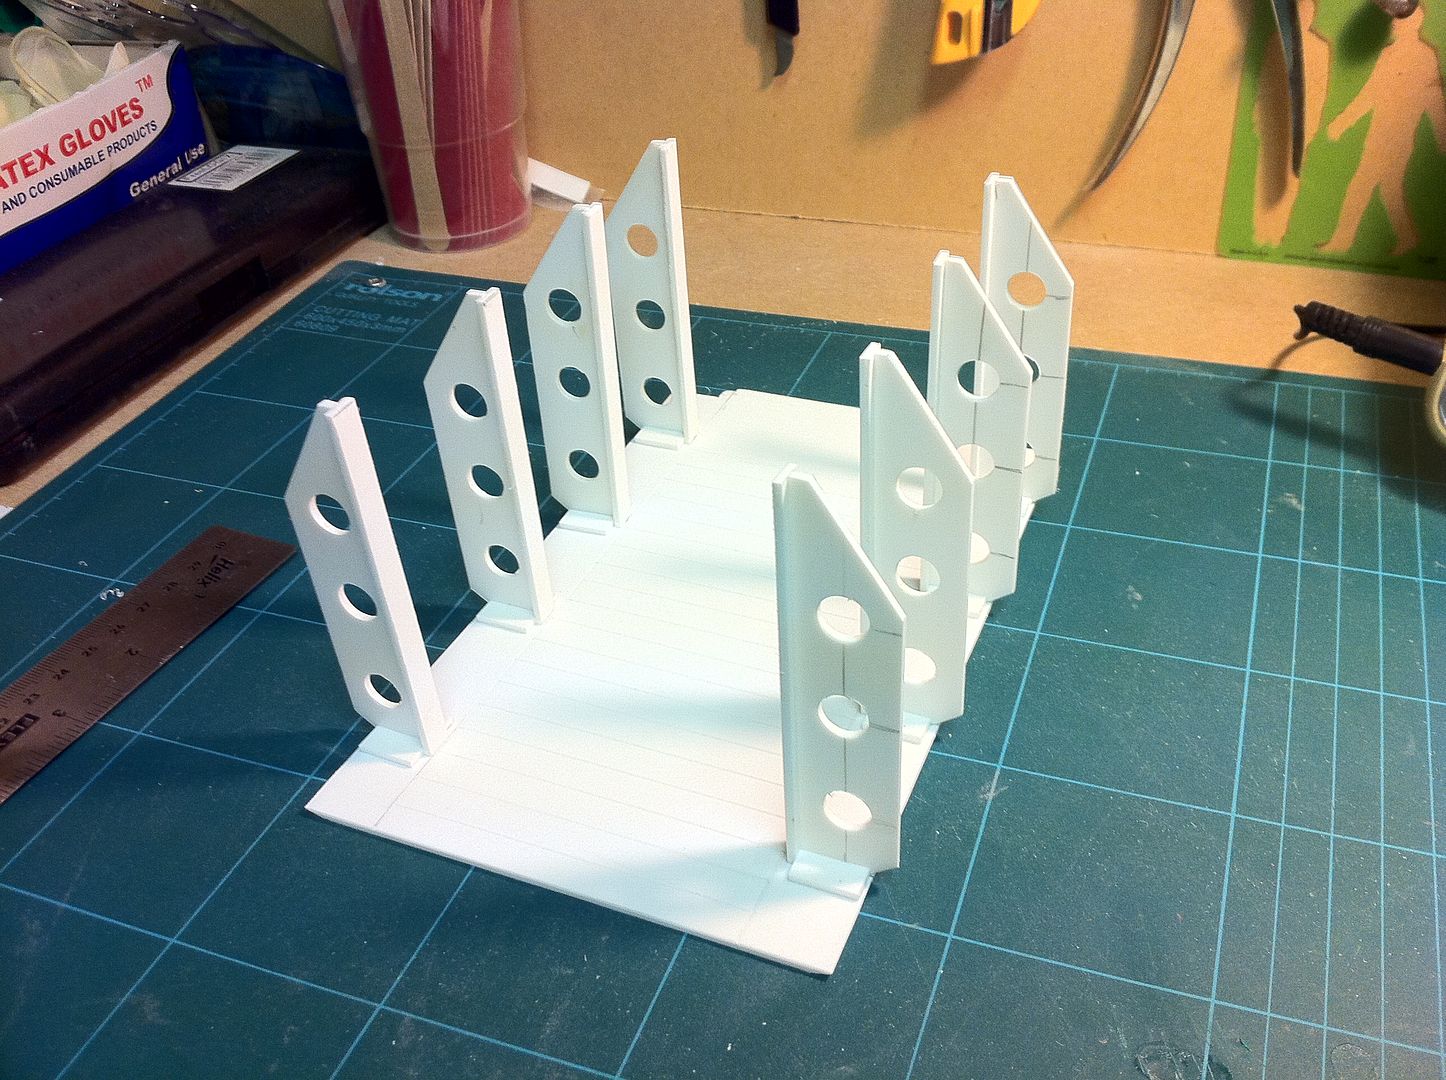
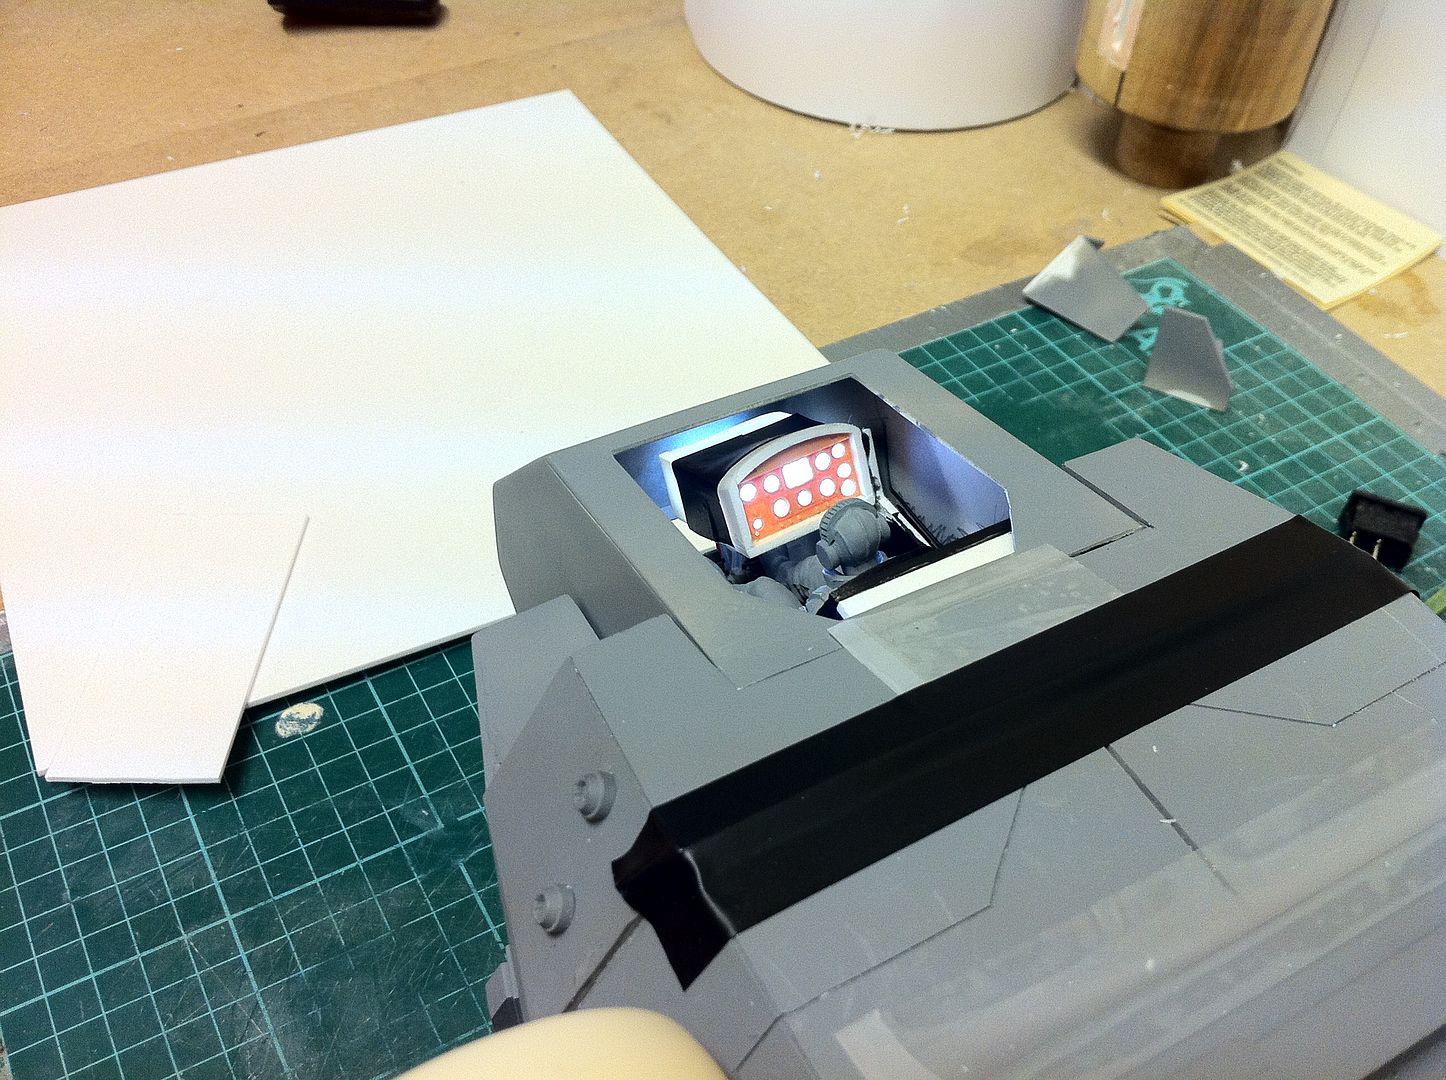
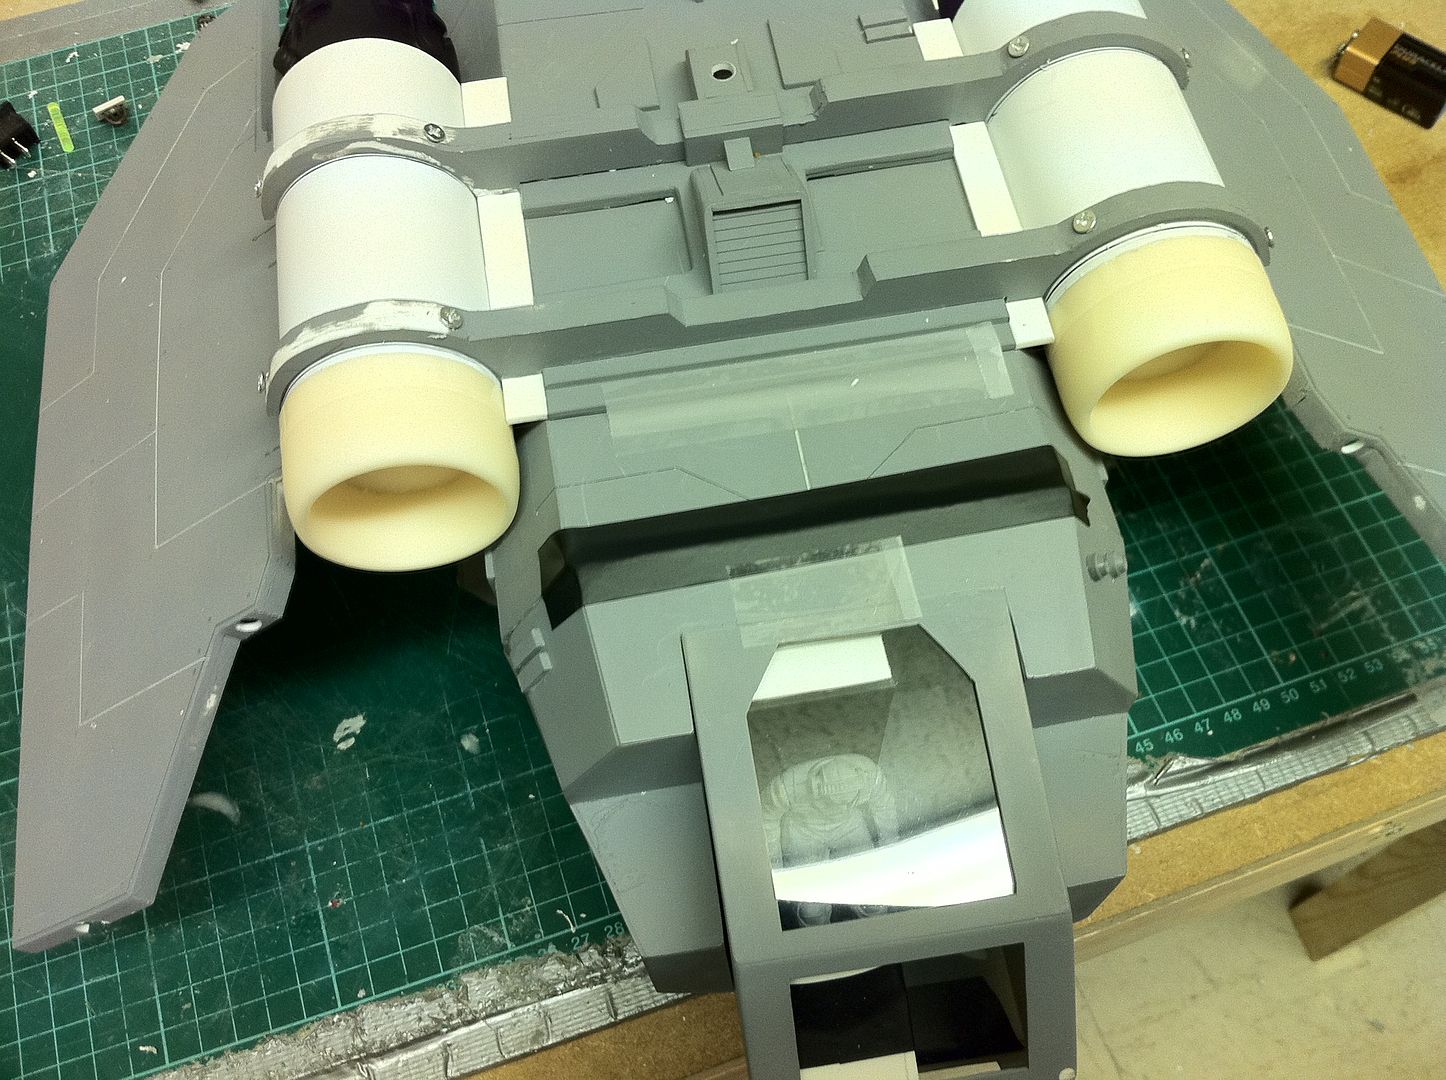
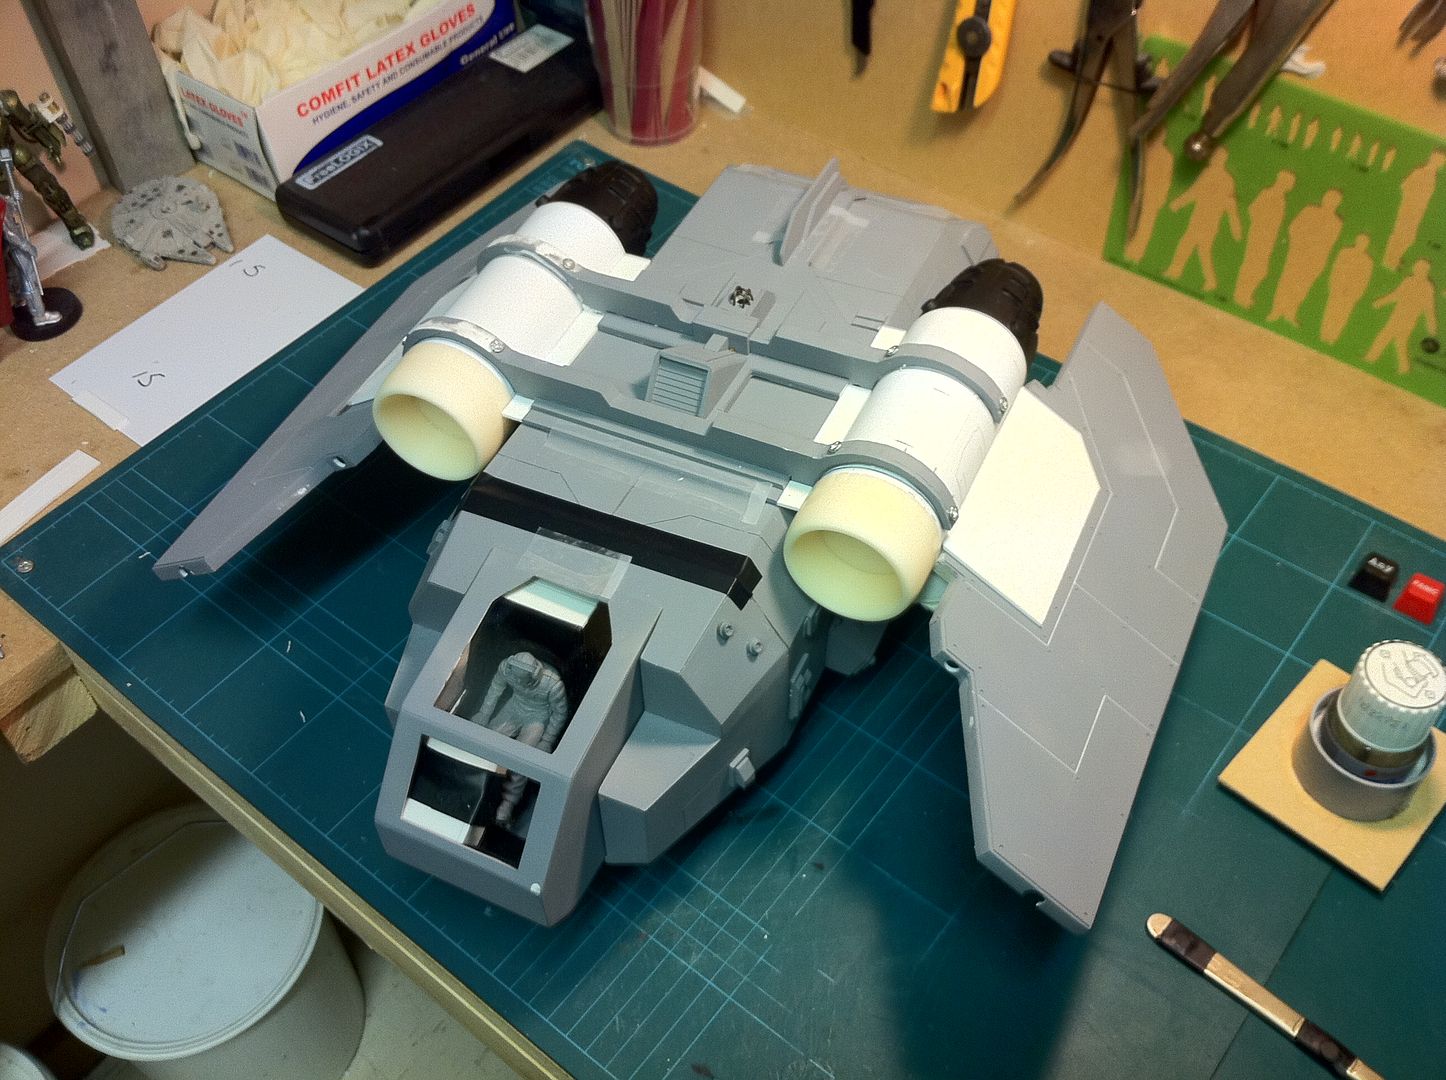
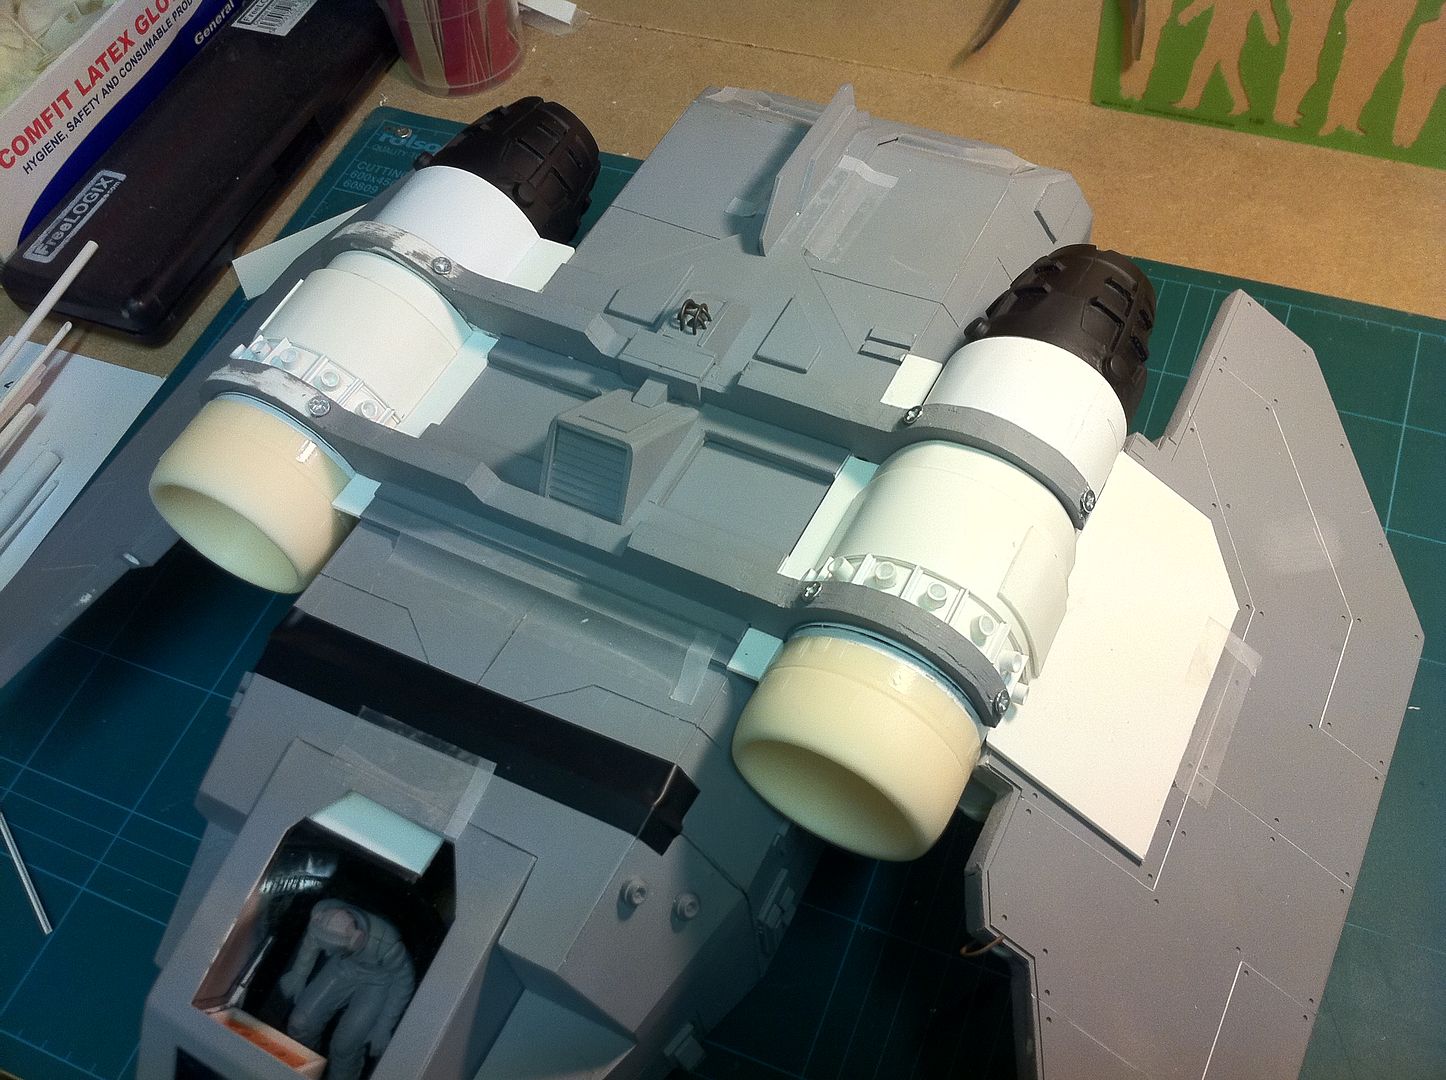
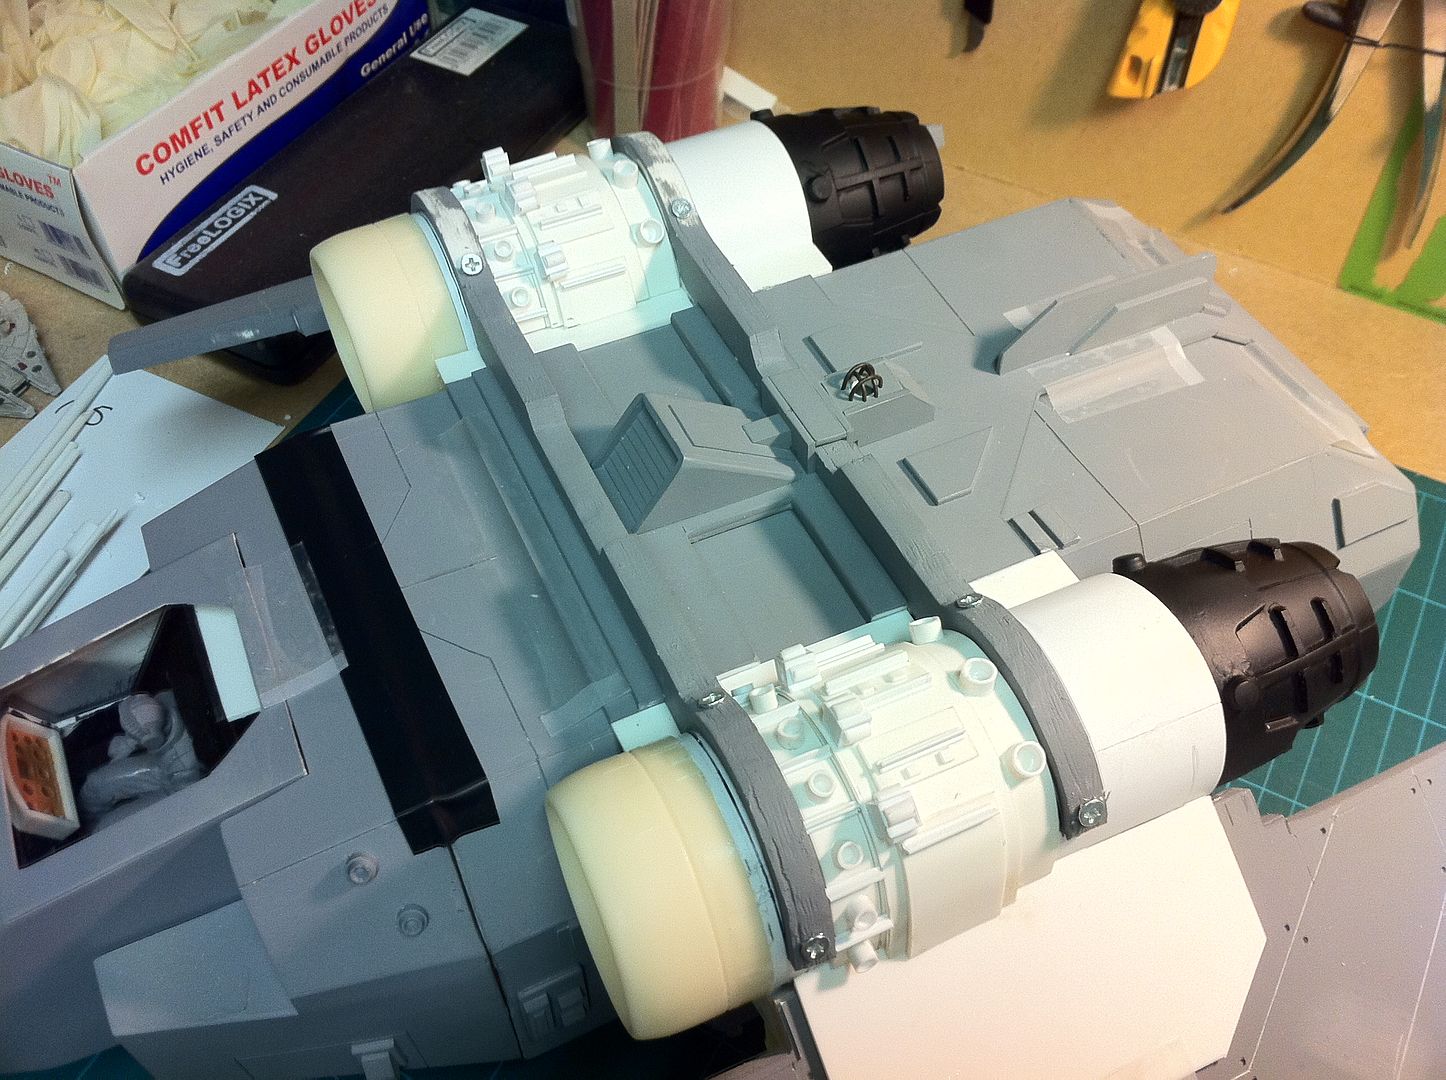
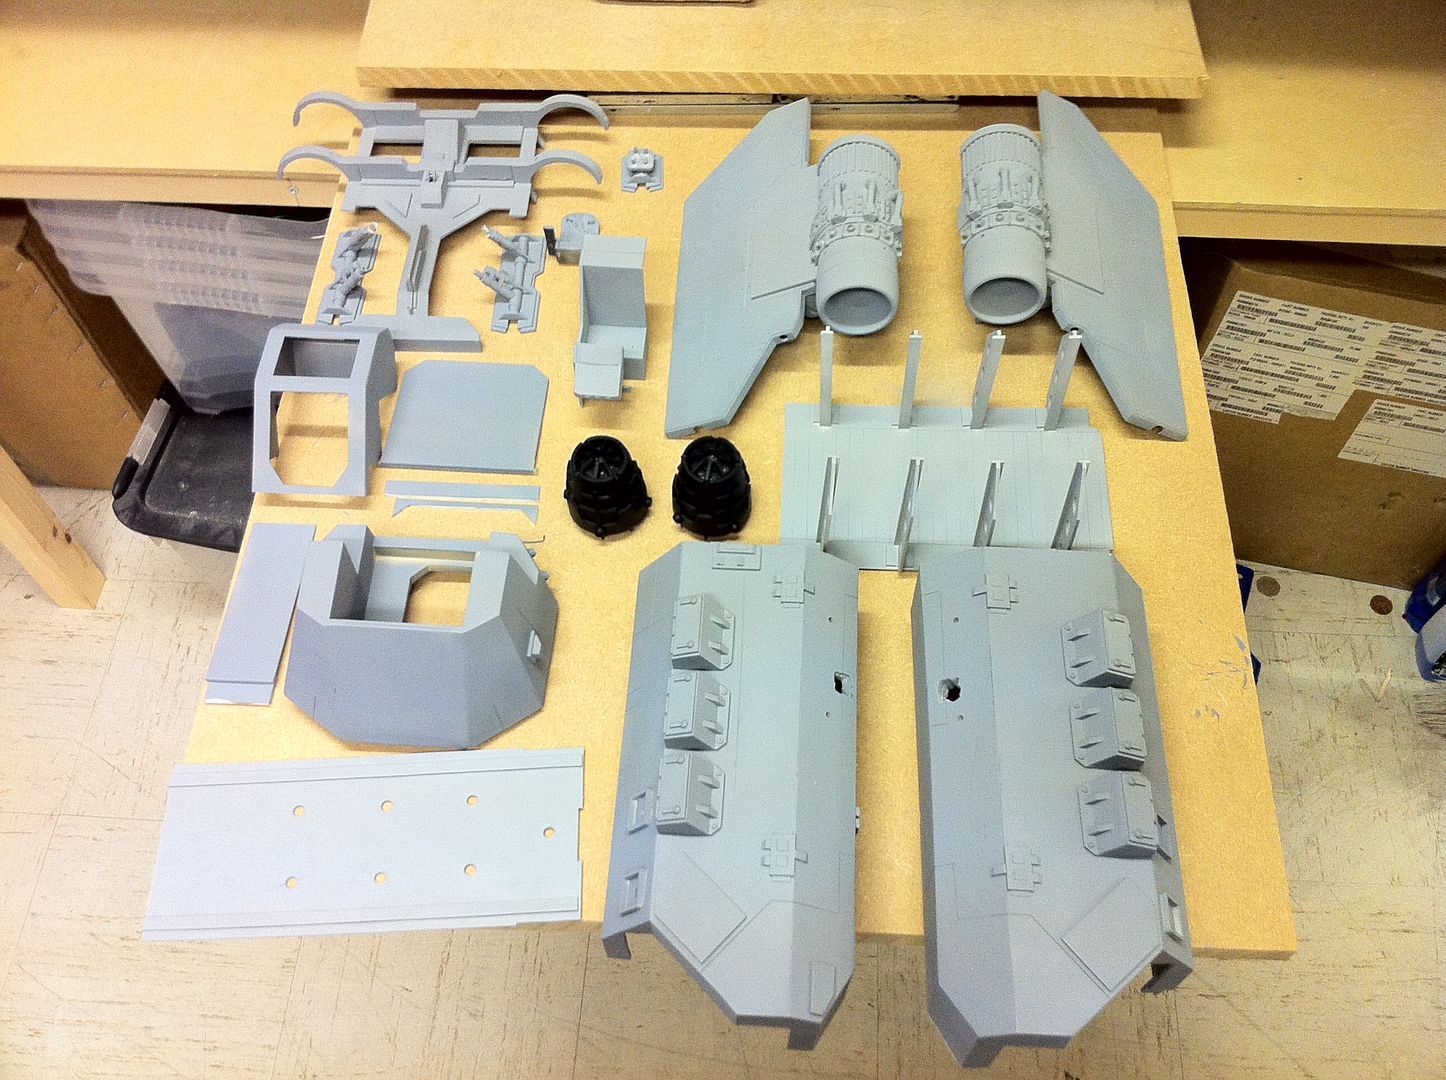
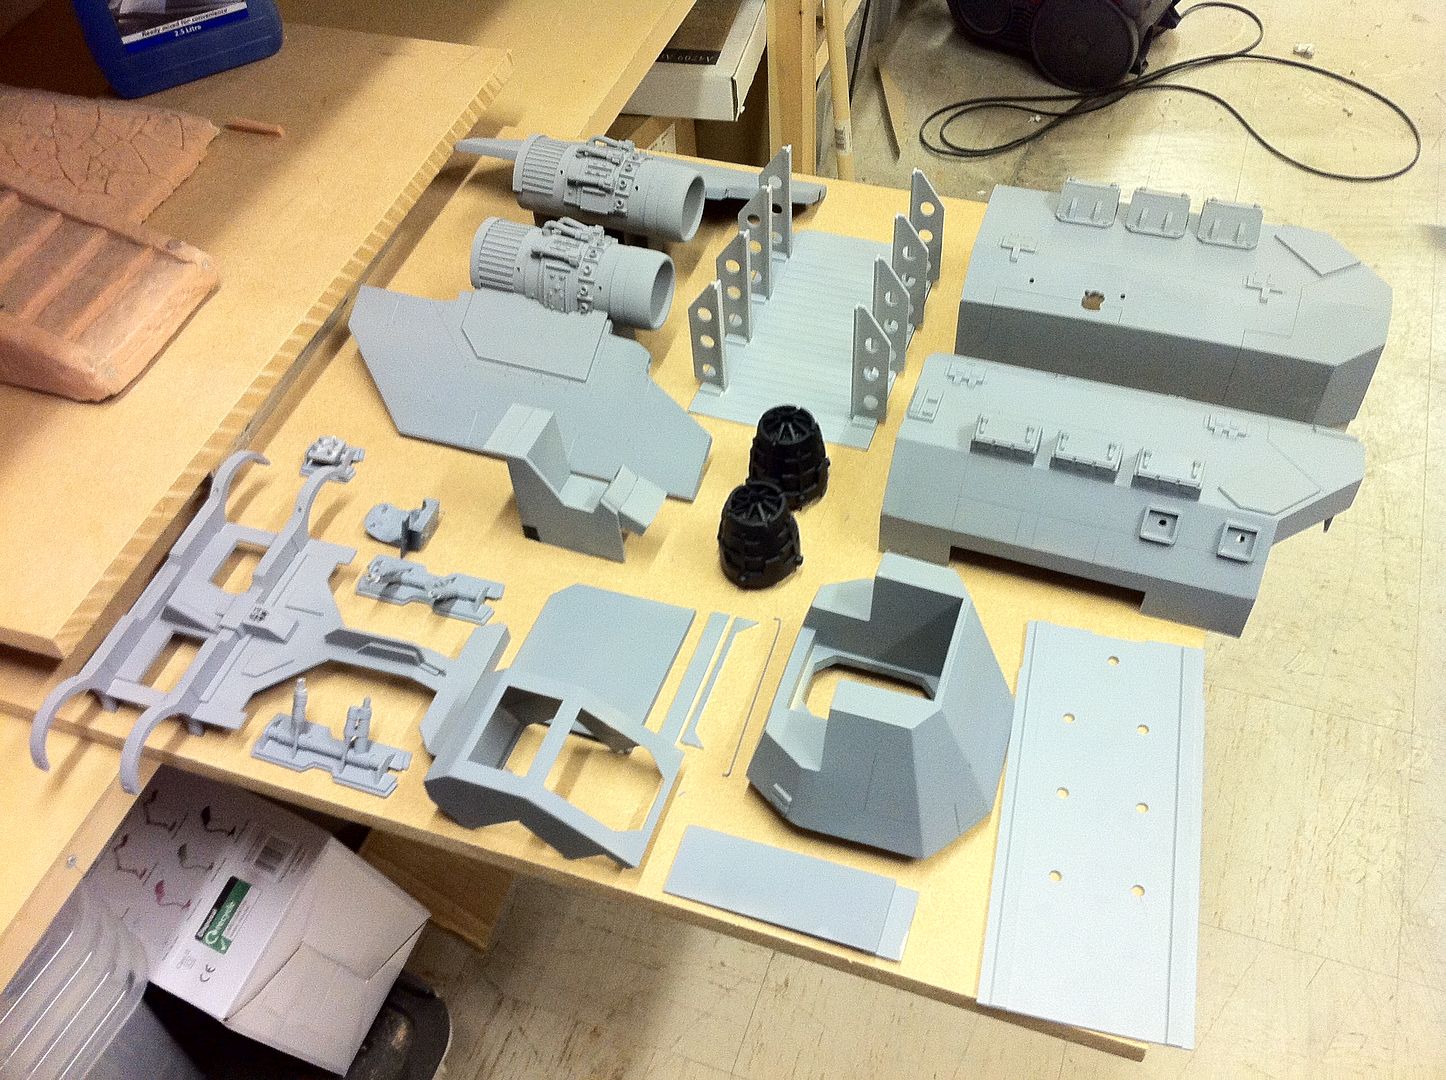
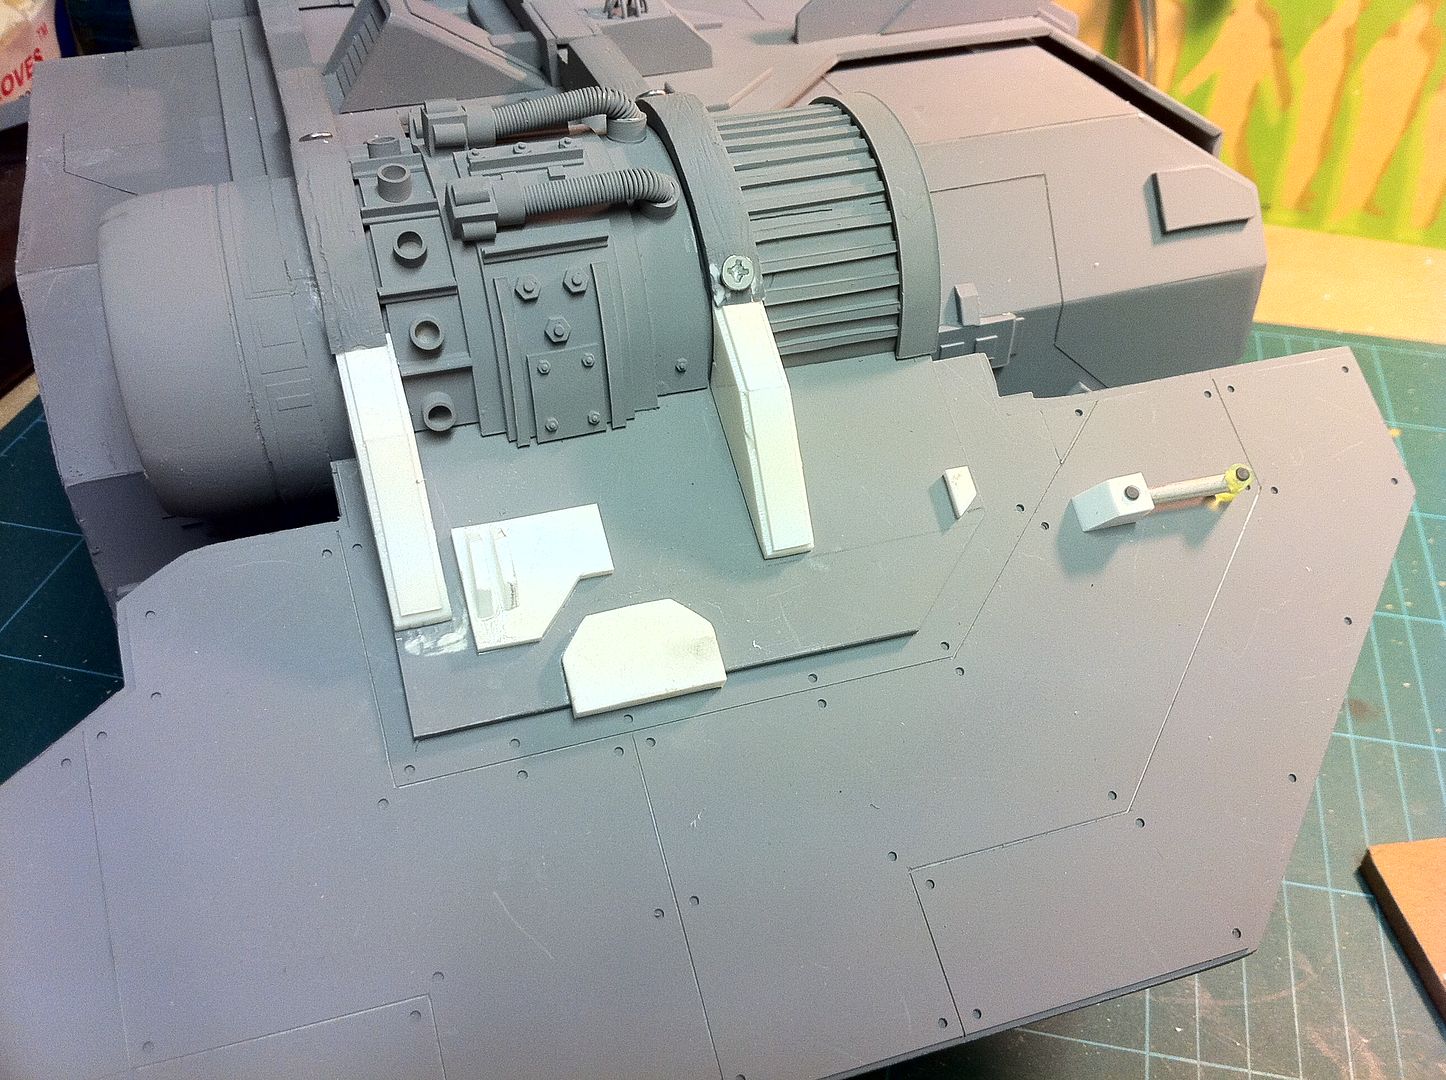
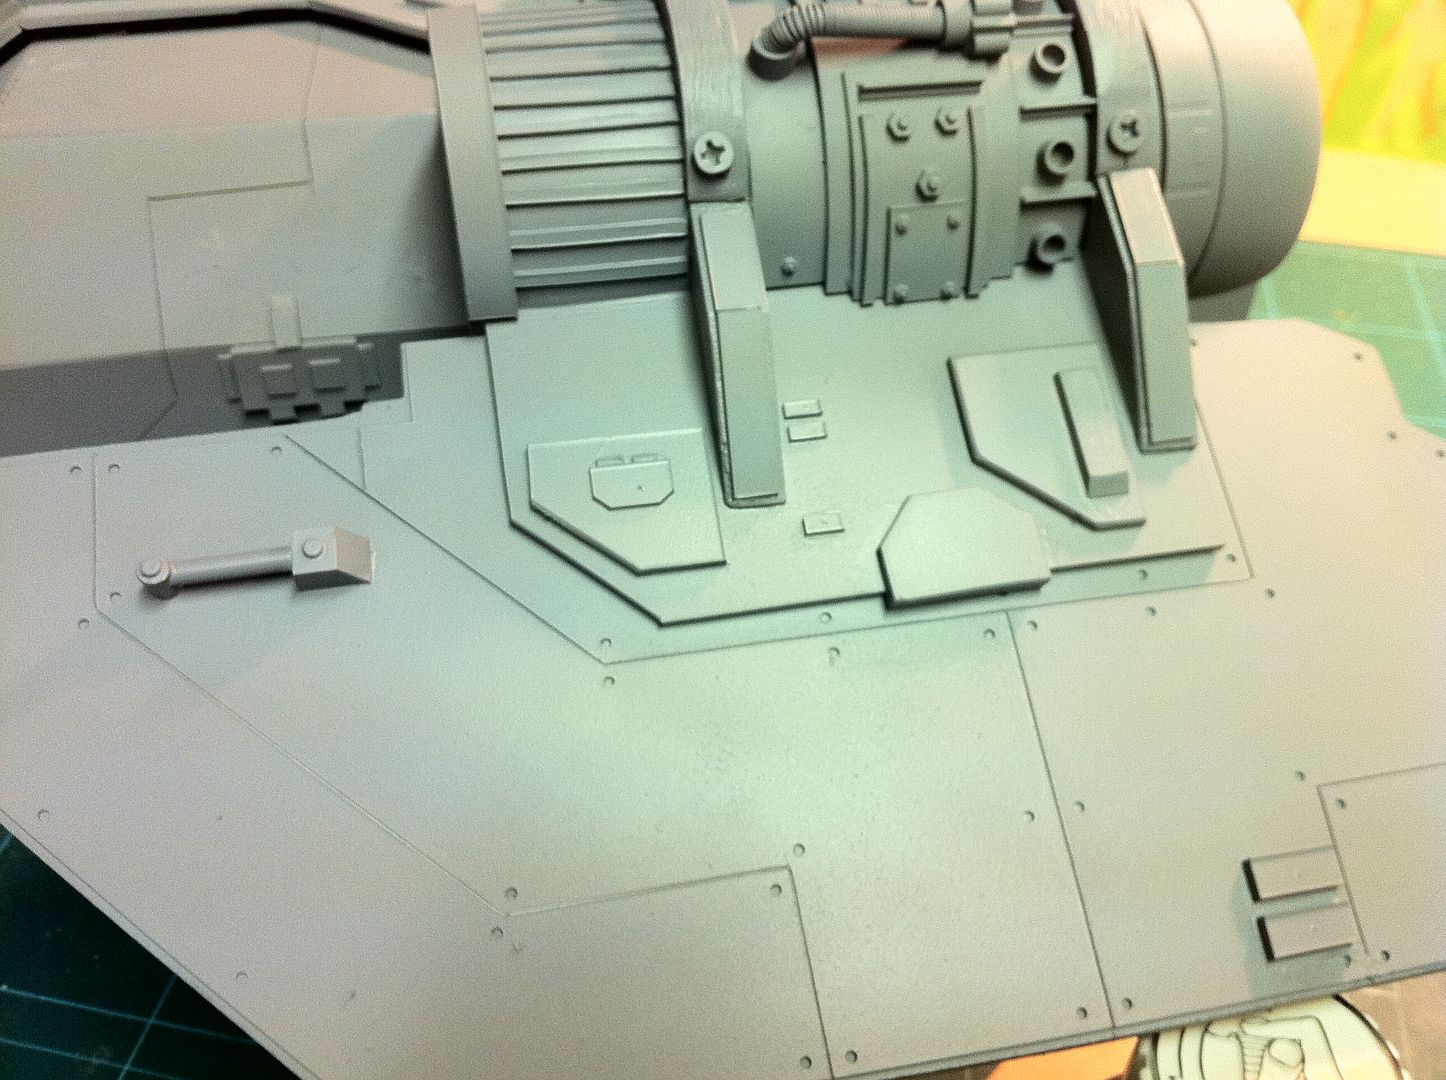
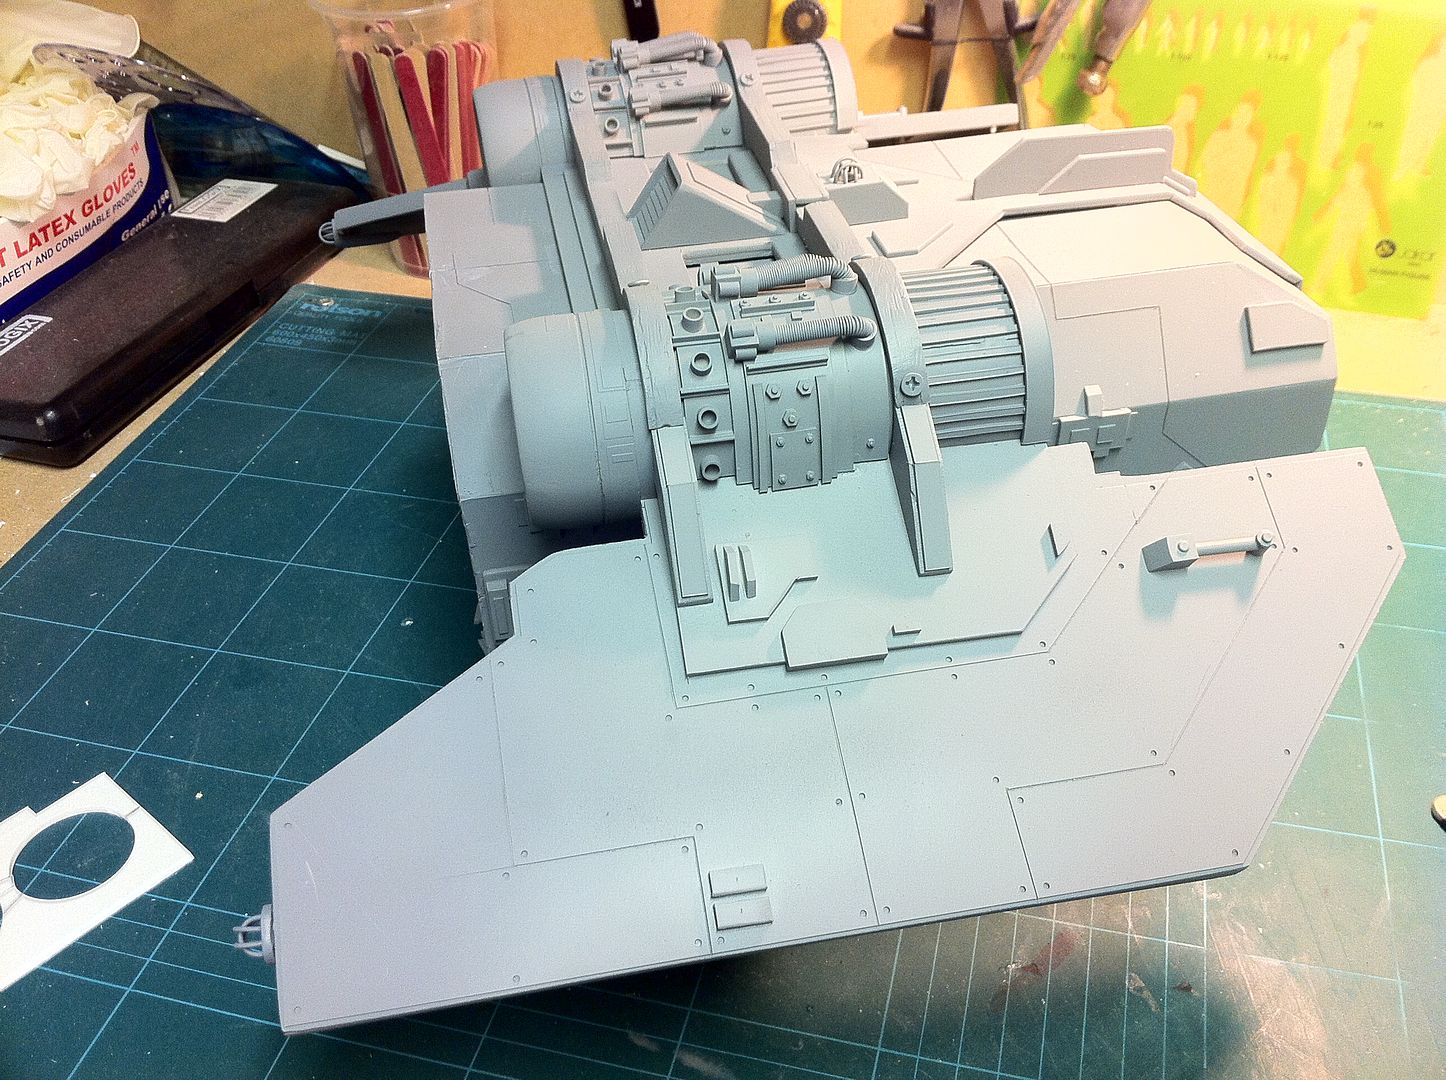
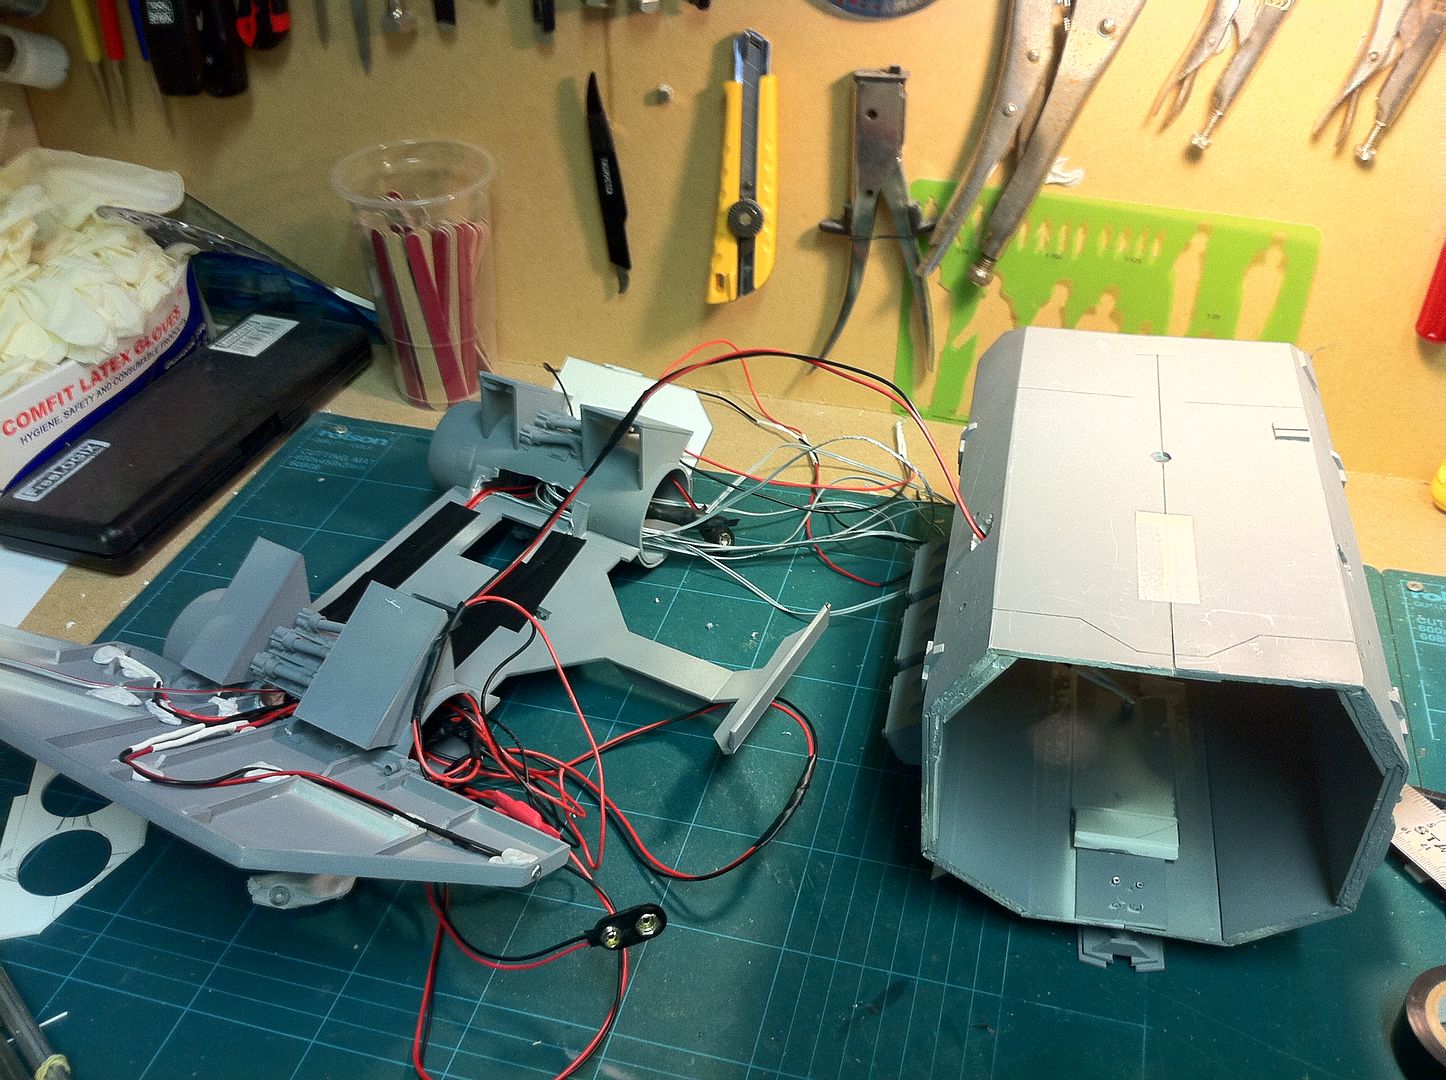
Some small measure of progress. It's my day off, so i was right back up to work and getting stuff done on the Arvus.
I got the internal bulkheads done. I then drilled them for that "Drilled H-Beam" look. They are attached to the floor, which is still wild, and the roof will glue on top, so the entire interior will slot inside in one piece. The floor has been scribed but i didn't get pics of that. Maybe tomorrow.
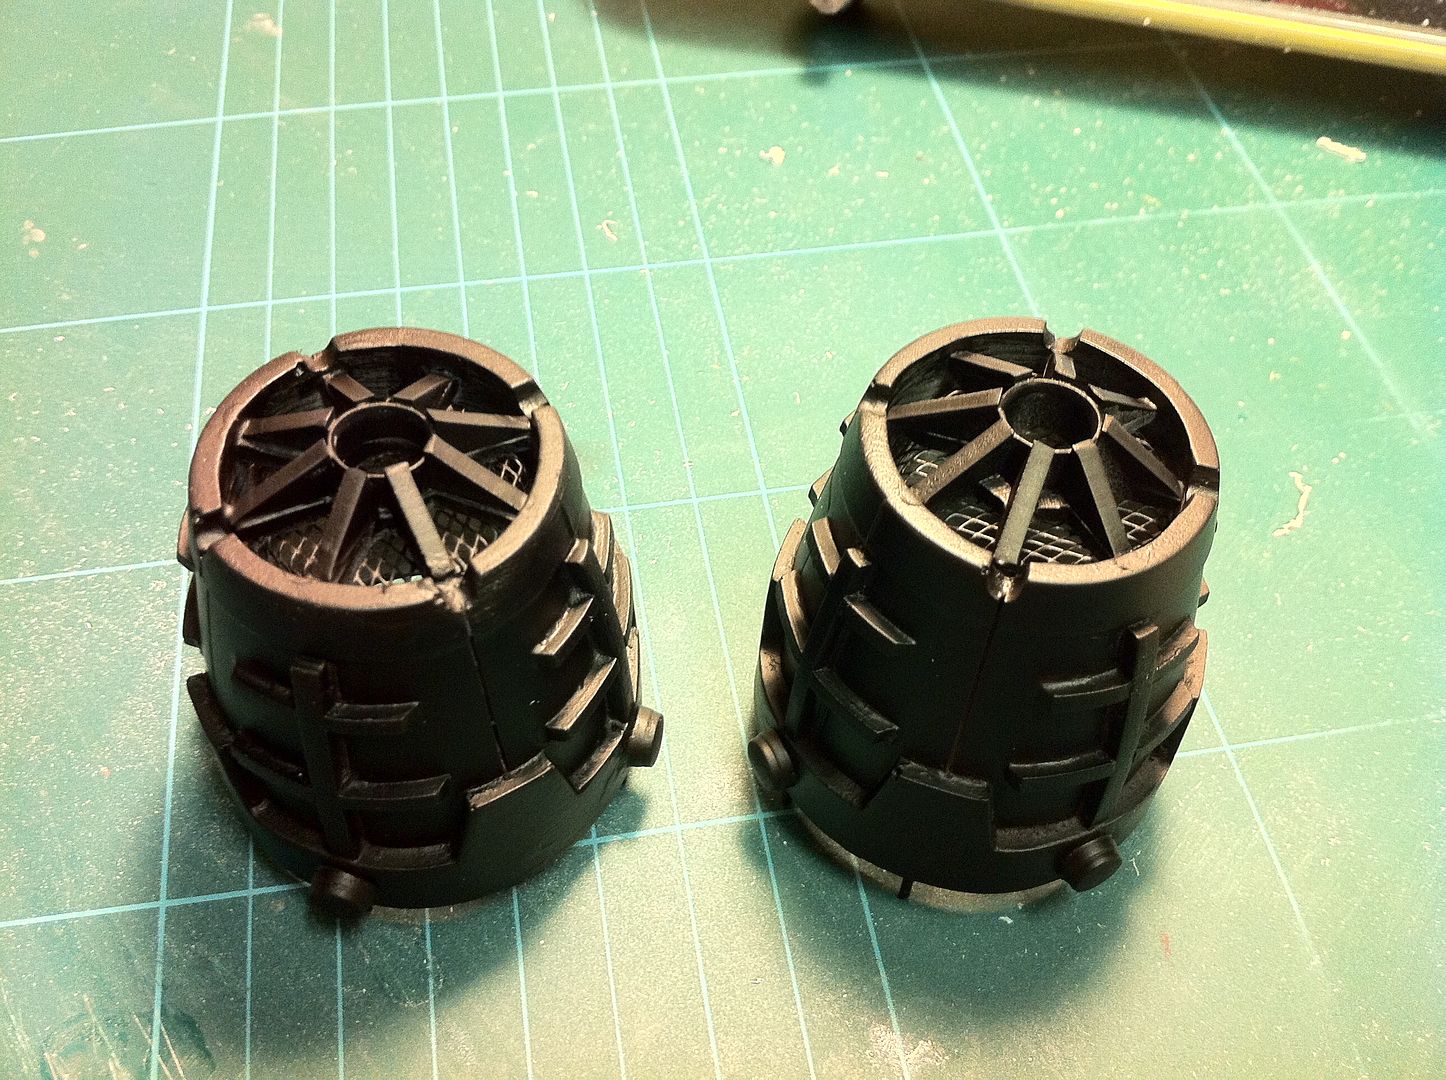
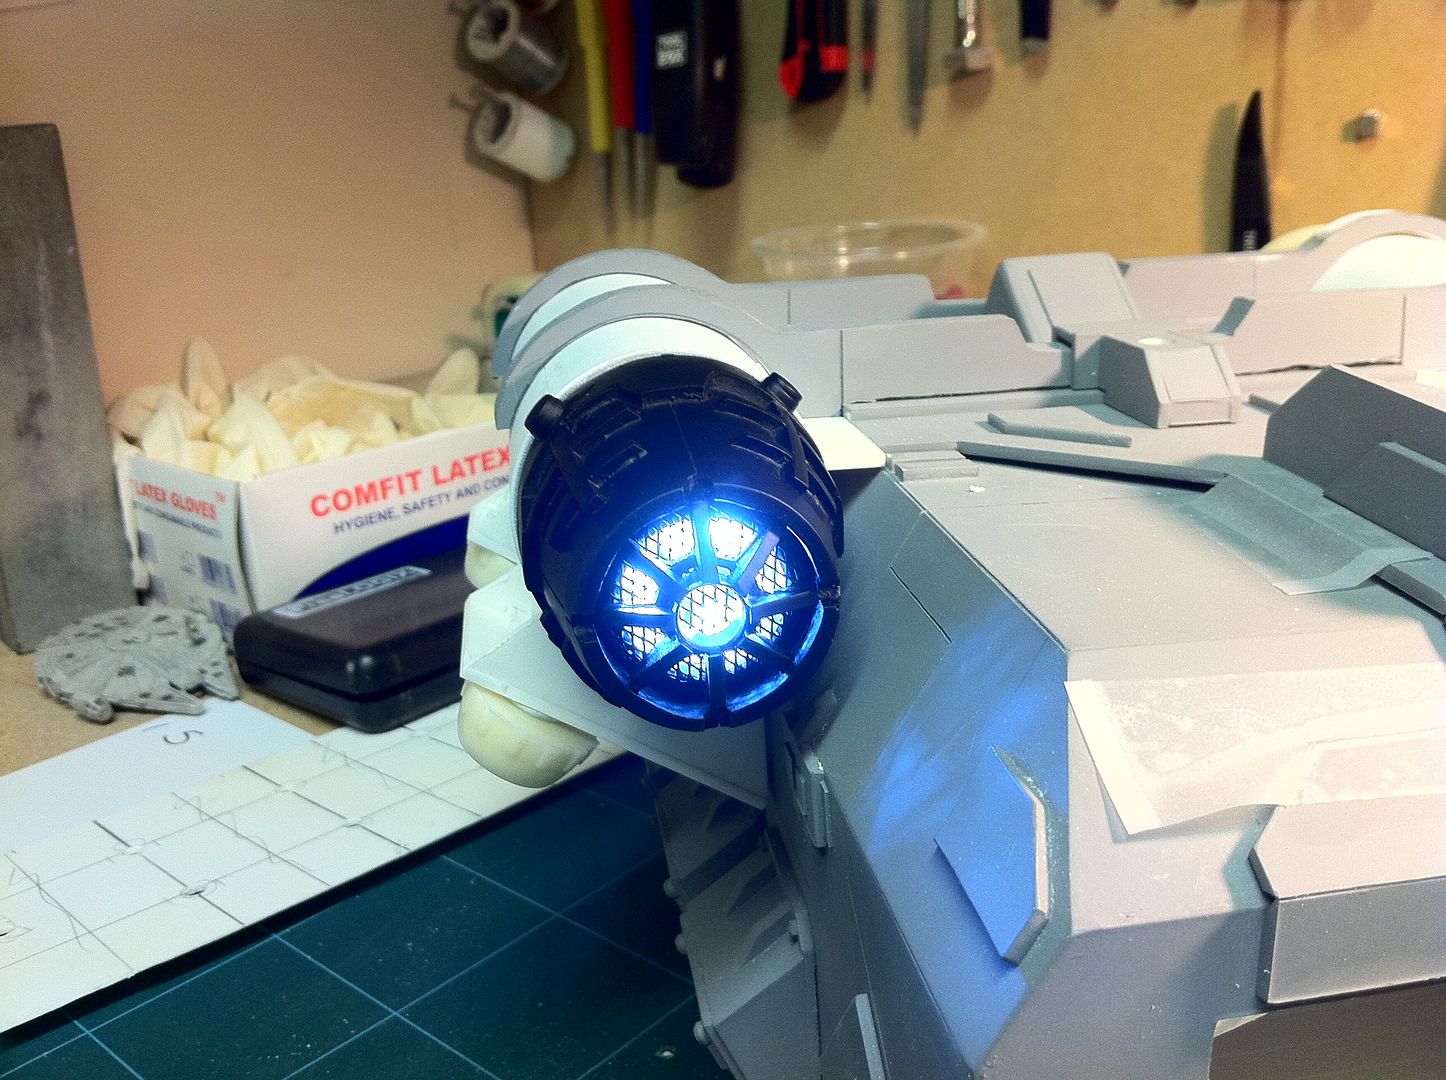
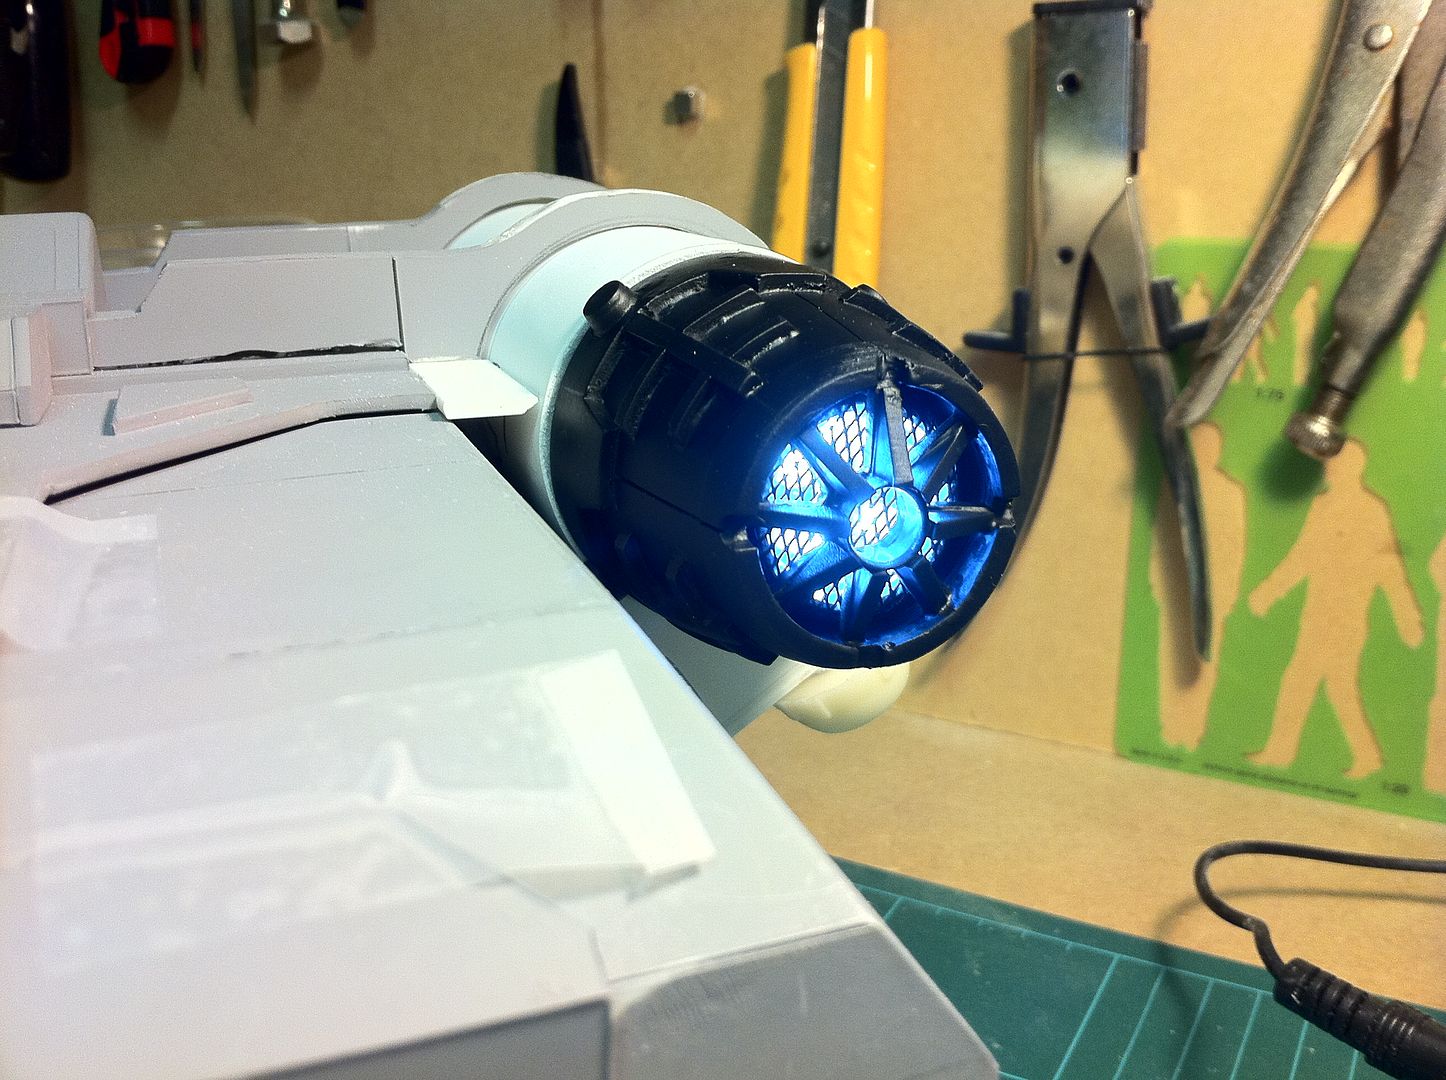
I also took on board a comment made Vik here about the engines... So i detailed the end caps of the thrusters and now it looks a bit better(There's less light getting out now, but they look a lot better when they are turned off).
Comments welcomed on that.
Enjoy the pics.

|
|
|
|
|
2011/08/02 19:28:53
Subject: Scratchbuilding an Arvus
|
|
Shroomin Brain Boy
|
i bow before your ideas... a whole hell of a better idea in my book! now this is what i have to call a workable look!!! the engines are now a definte hit at the right spot! and i have to add that i now have a little TIE-Fighter feel about the engines...and thats something i say in a good way! yep that part of the model is truly done now^^
as for the H-beams... yep now the inner part of the arvus is forming up very well...i like that cold steal feel about the beams... that adds volumes to the functional look of the model! what did you say you wanted to add inside the cargospace...seats for deployments or cargo? either way the interior now looks the way that it could hold the purpose...
(somehow i fear my enthusiasm got the better of me and my language skills have much slipped during that post^^...)
by the way i like your style of taking athmospheric shots... that way the arvus looks so life like! and to tell you the truth... whenever i see that damsel i get a fuzzy feeling^^
cheers, vik
p.s. someday i have to make a model and stick to a design just to test my own abilities! and threads like this fully well count for motivating me^^
|
|
|
|
|
|
2011/08/02 19:49:25
Subject: Scratchbuilding an Arvus
|
|
Been Around the Block
|
Viktor von Domm wrote: i bow before your ideas... a whole hell of a better idea in my book! now this is what i have to call a workable look!!! the engines are now a definte hit at the right spot! and i have to add that i now have a little TIE-Fighter feel about the engines...and thats something i say in a good way! yep that part of the model is truly done now^^
There are actually a lot of details still needing added to the end cans for the proper look, but that's not a big job. Thanks for your kind words.
Viktor von Domm wrote:as for the H-beams... yep now the inner part of the arvus is forming up very well...i like that cold steal feel about the beams... that adds volumes to the functional look of the model! what did you say you wanted to add inside the cargospace...seats for deployments or cargo? either way the interior now looks the way that it could hold the purpose...
I am going tp put foldup seats inbetween the H-beams, and cargo hooks on the floor. I have just the parts for that. More on those later.
Viktor von Domm wrote:(somehow i fear my enthusiasm got the better of me and my language skills have much slipped during that post^^...)
It read fine for me. You are speaking better english than i speak German, so that's something.
Viktor von Domm wrote: by the way i like your style of taking athmospheric shots... that way the arvus looks so life like! and to tell you the truth... whenever i see that damsel i get a fuzzy feeling^^
Thanks. I actually just held the engine "torch" behind her to give a lot of shadow.
Viktor von Domm wrote:p.s. someday i have to make a model and stick to a design just to test my own abilities! and threads like this fully well count for motivating me^^
For sure.
The first one seems like the biggest challenge. When you realise you can build anything, there will be no stopping you...
Incidentally, i am getting closer to nailing down the final paint scheme. And for the interior i will be using Ford Highland Green. A friend of mine used this for the interior of a model recently and i was very impressed. It's a pale green the likes of which they usually paint the interiors of military vessels(No matter what the exterior looks like).
Here is an example of the Highland Green:
|
|
|
|
|
2011/08/02 20:23:16
Subject: Scratchbuilding an Arvus
|
|
Shroomin Brain Boy
|
i guess to really make the model look like the real thing it needs a truly ugly paintscheme... that is not to say that it should be painted ugly...just the use of such depressive colorchoices all around the world uses in old hospitals and administrative offices and military vehicles/buildings...that cross between vomit green and poobrown...sounds gross? but i bet you have witnessed these depressing usage of colors in certain areas... it is that kind of look...
just did a google search and the Ford Highland Green is a quite positive color^^ looks good
by the way, will you add hazardstripes in the inside?
as for what to add to the engines... probably cables would be a nice thing...
The first one seems like the biggest challenge. When you realise you can build anything, there will be no stopping you...
and with lots of things mastery comes through practice... a virtue you show^^ fer sure^^
It read fine for me. You are speaking better english than i speak German, so that's something
pun or for real? i always wonder about the motivation for people to learn german... it is a nasty and hard language...lots of other languages that would be more fun in my book...but tastes might be different^^ and should^^
vik
|
|
|
|
|
|
2011/08/03 07:06:18
Subject: Scratchbuilding an Arvus
|
|
Been Around the Block
|
Viktor von Domm wrote: i guess to really make the model look like the real thing it needs a truly ugly paintscheme... that is not to say that it should be painted ugly...just the use of such depressive colorchoices all around the world uses in old hospitals and administrative offices and military vehicles/buildings...that cross between vomit green and poobrown...sounds gross? but i bet you have witnessed these depressing usage of colors in certain areas... it is that kind of look...
just did a google search and the Ford Highland Green is a quite positive color^^ looks good
The trick is not to make the paint scheme simply a cool one, but one that looks like a proper military craft. It's hard to get right. But i am hoping i manage.
Viktor von Domm wrote:by the way, will you add hazardstripes in the inside?
It will have all manner of the proper markings. And hazard stripes will be done, yes. I have a clever technique to do those without needing to mask and paint...
Viktor von Domm wrote:as for what to add to the engines... probably cables would be a nice thing...
Yes. There's still a whole hell of a lot needing done to the engines. They will be VERY detailed when i am done. But that is all finishing details. I am still building structure right now.
Viktor von Domm wrote:Bar wrote:The first one seems like the biggest challenge. When you realise you can build anything, there will be no stopping you...
and with lots of things mastery comes through practice... a virtue you show^^ fer sure^^
Thanks a lot. I look forward to the day you break your shackles and just build something specific as an exact replica! If i can inspire that in just one person reading that will be enough for me.
Viktor von Domm wrote:Bar wrote:
It read fine for me. You are speaking better english than i speak German, so that's something
pun or for real? i always wonder about the motivation for people to learn german... it is a nasty and hard language...lots of other languages that would be more fun in my book...but tastes might be different^^ and should^^
vik
I was being serious. I have never been motivated to learn another language.
I have been lazy by virtue of the fact that most people learn english, so it's never been enough of an issue.
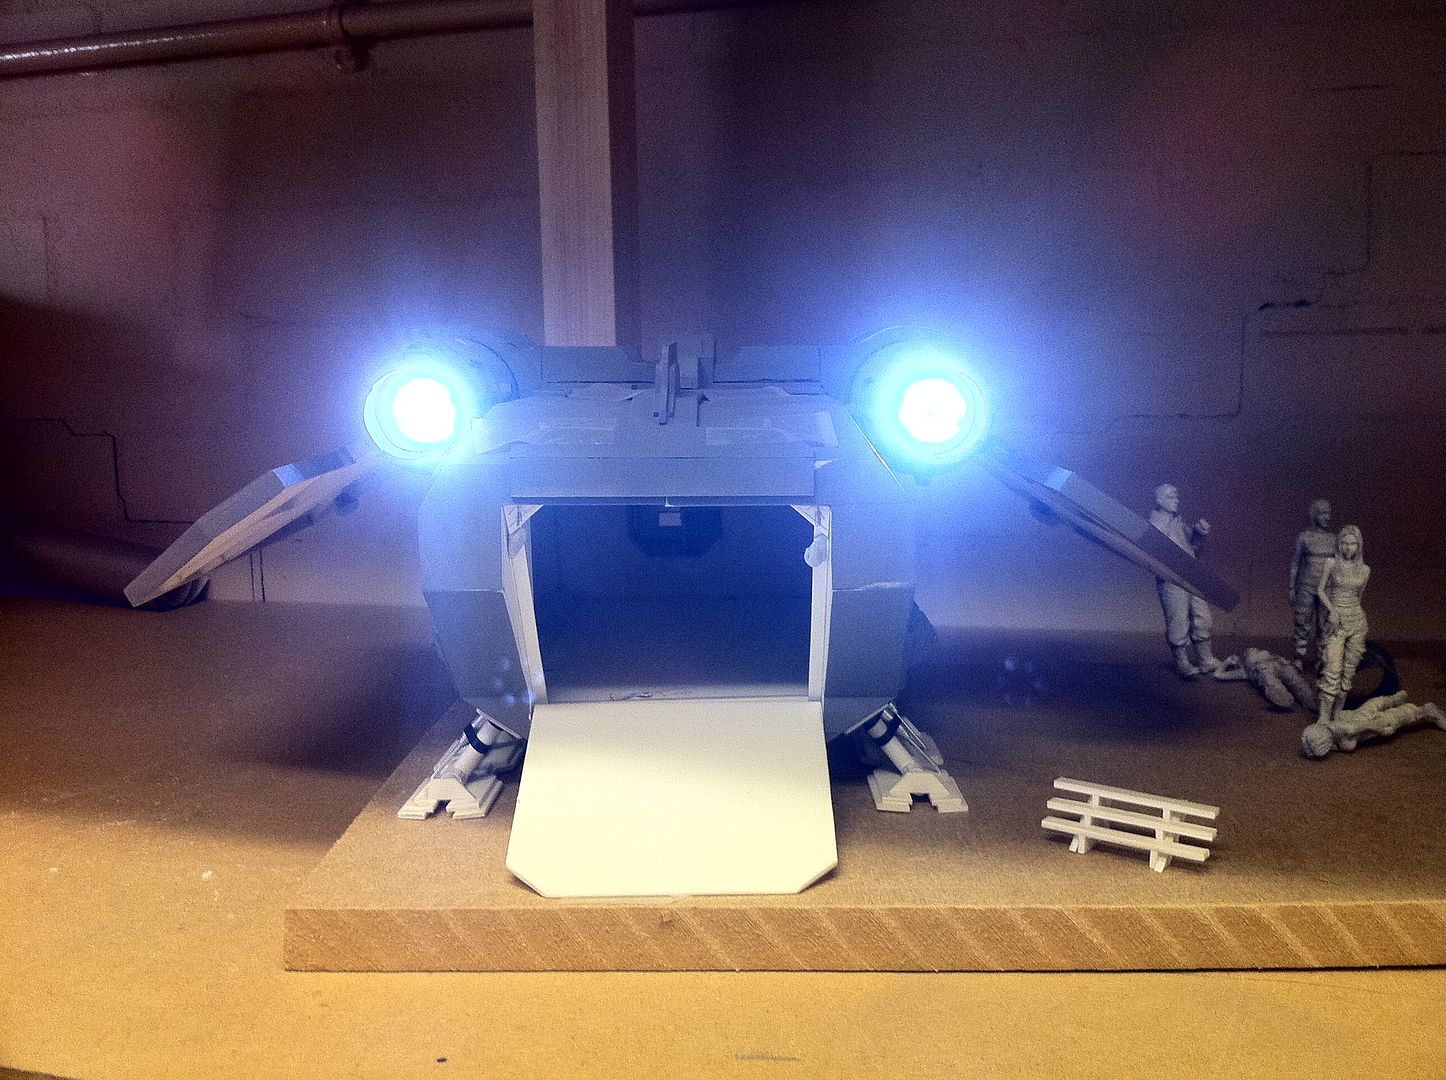
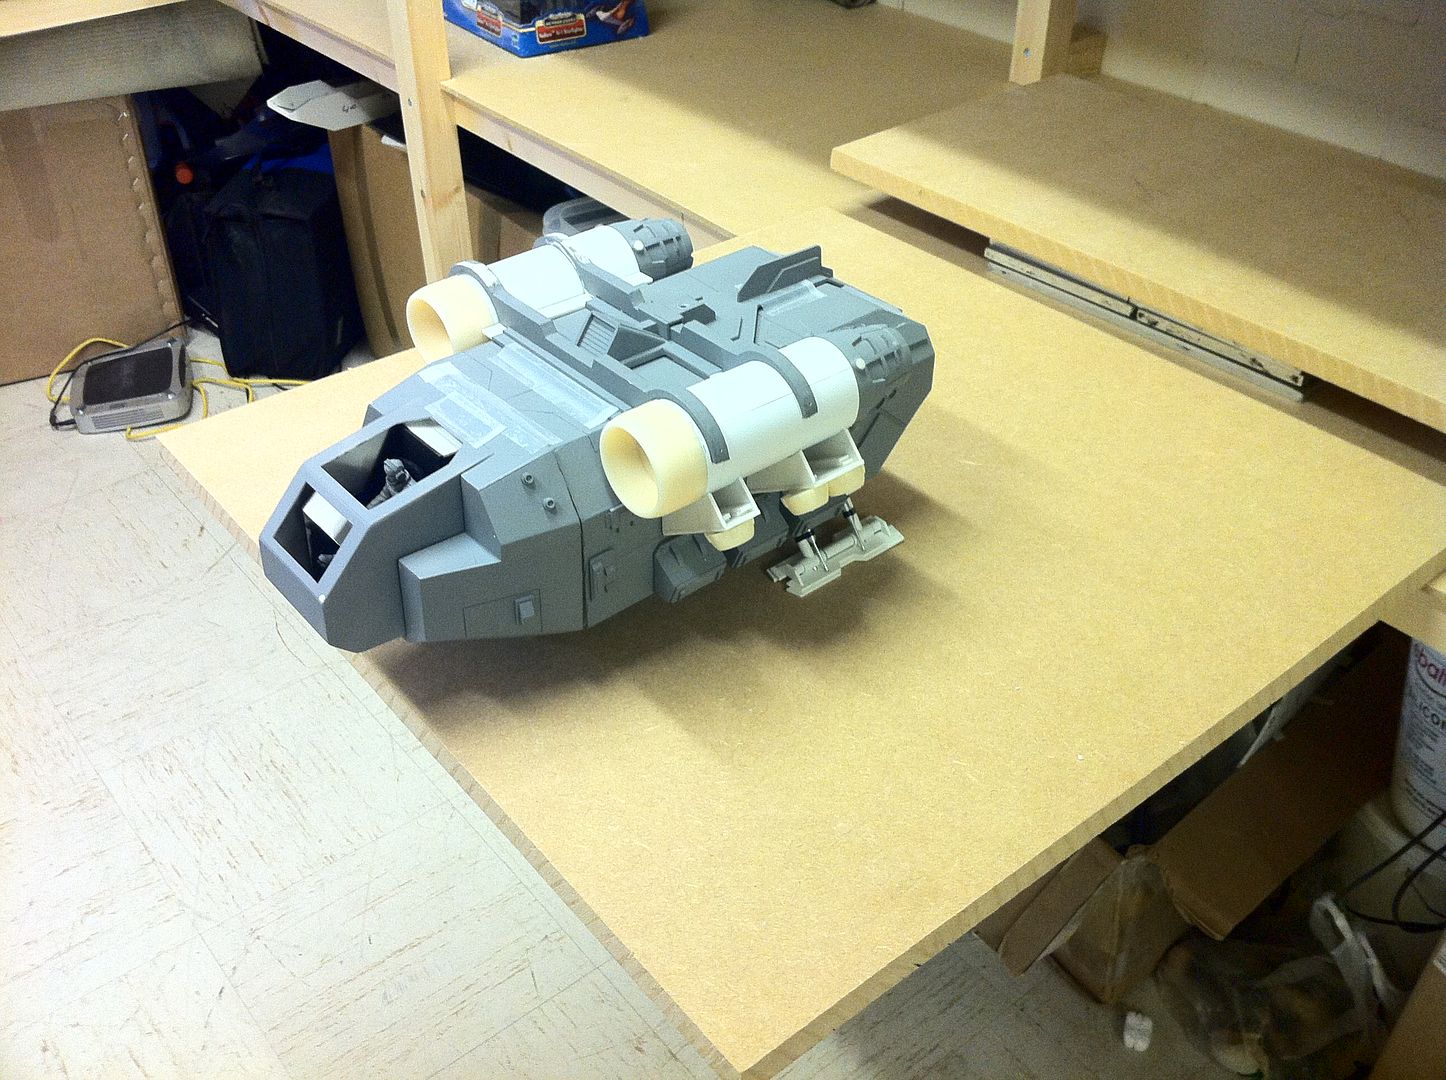
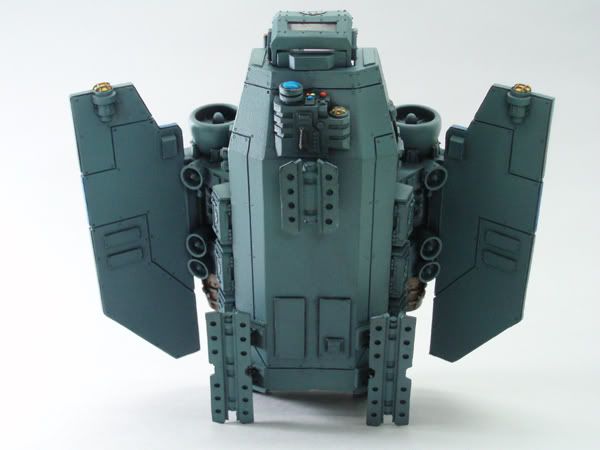
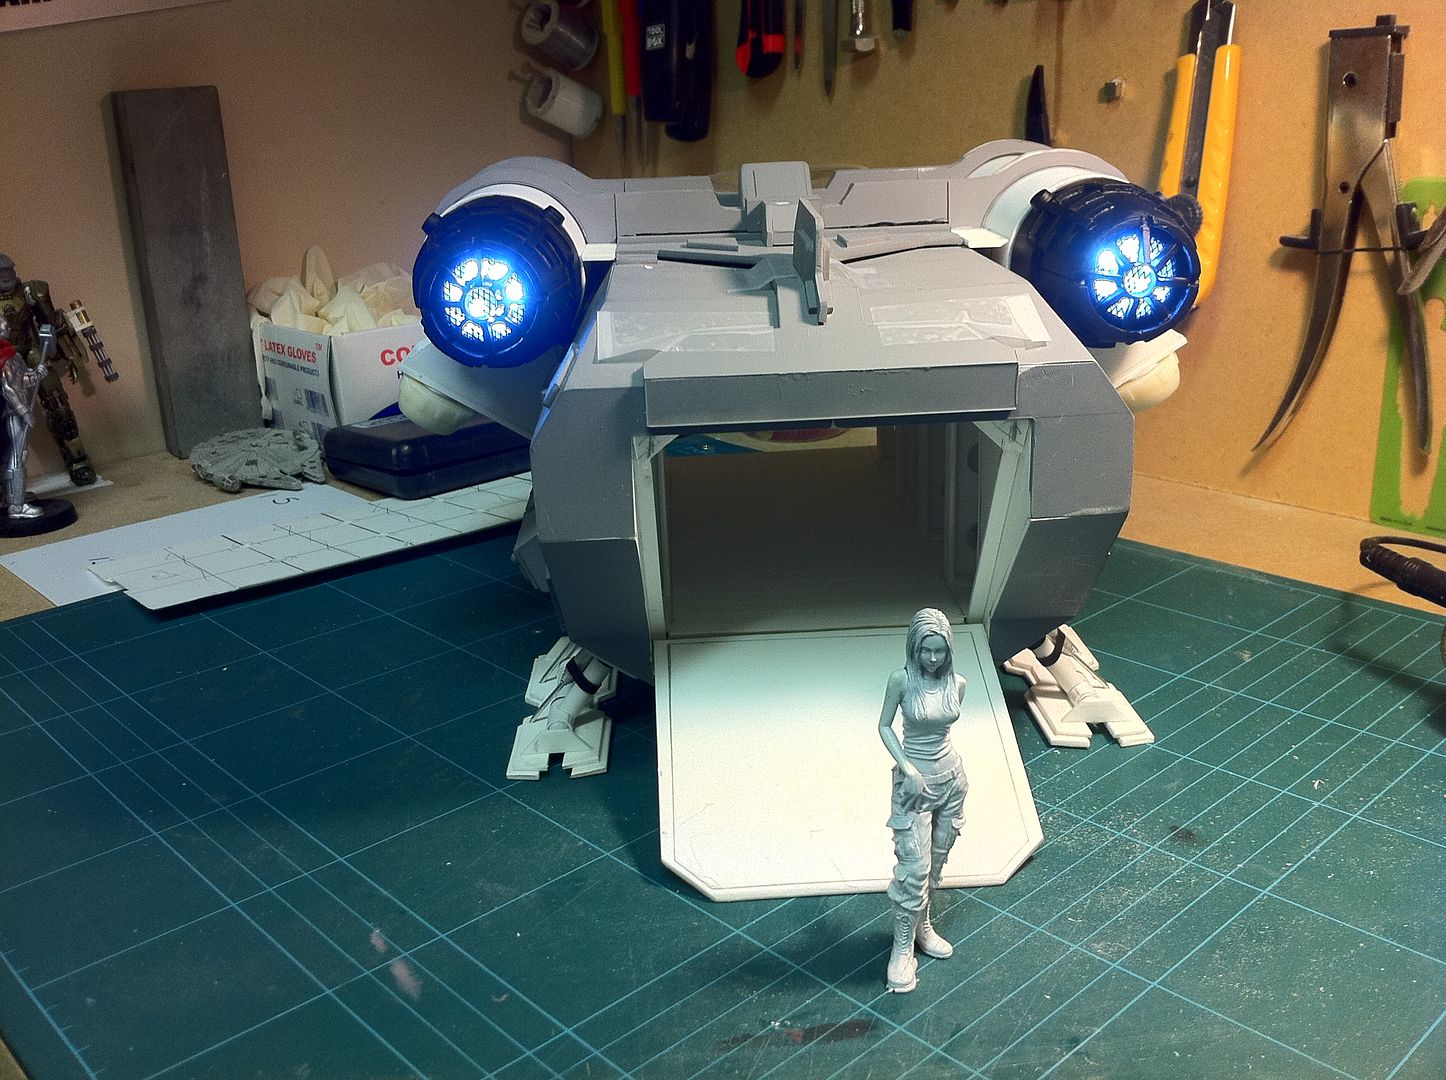
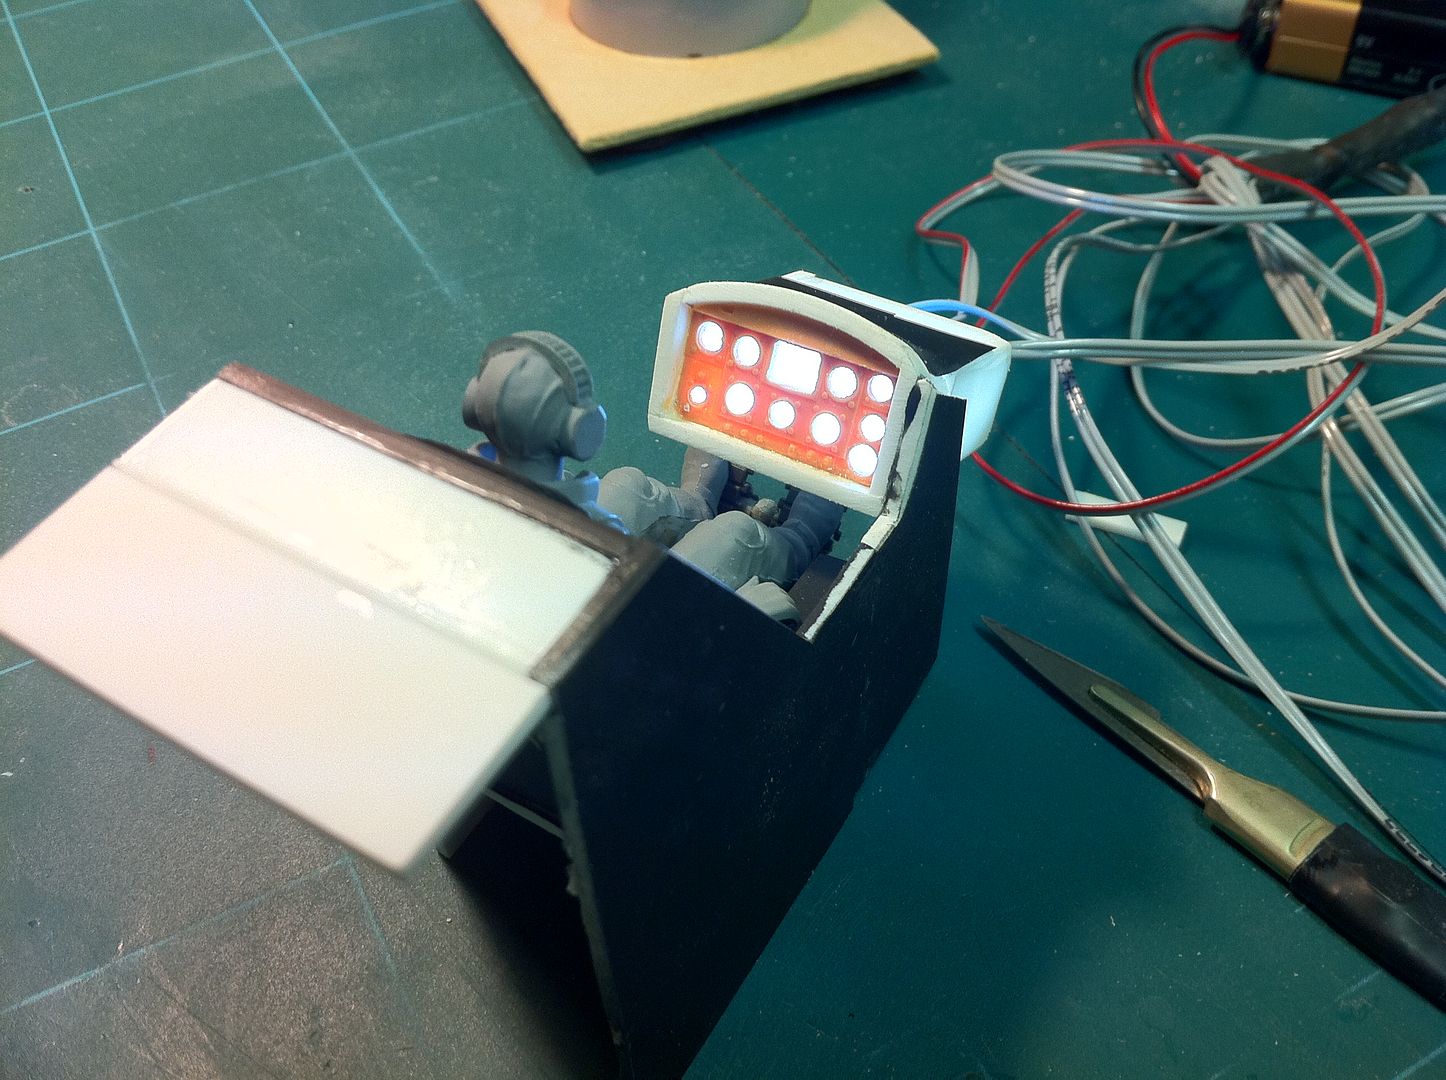
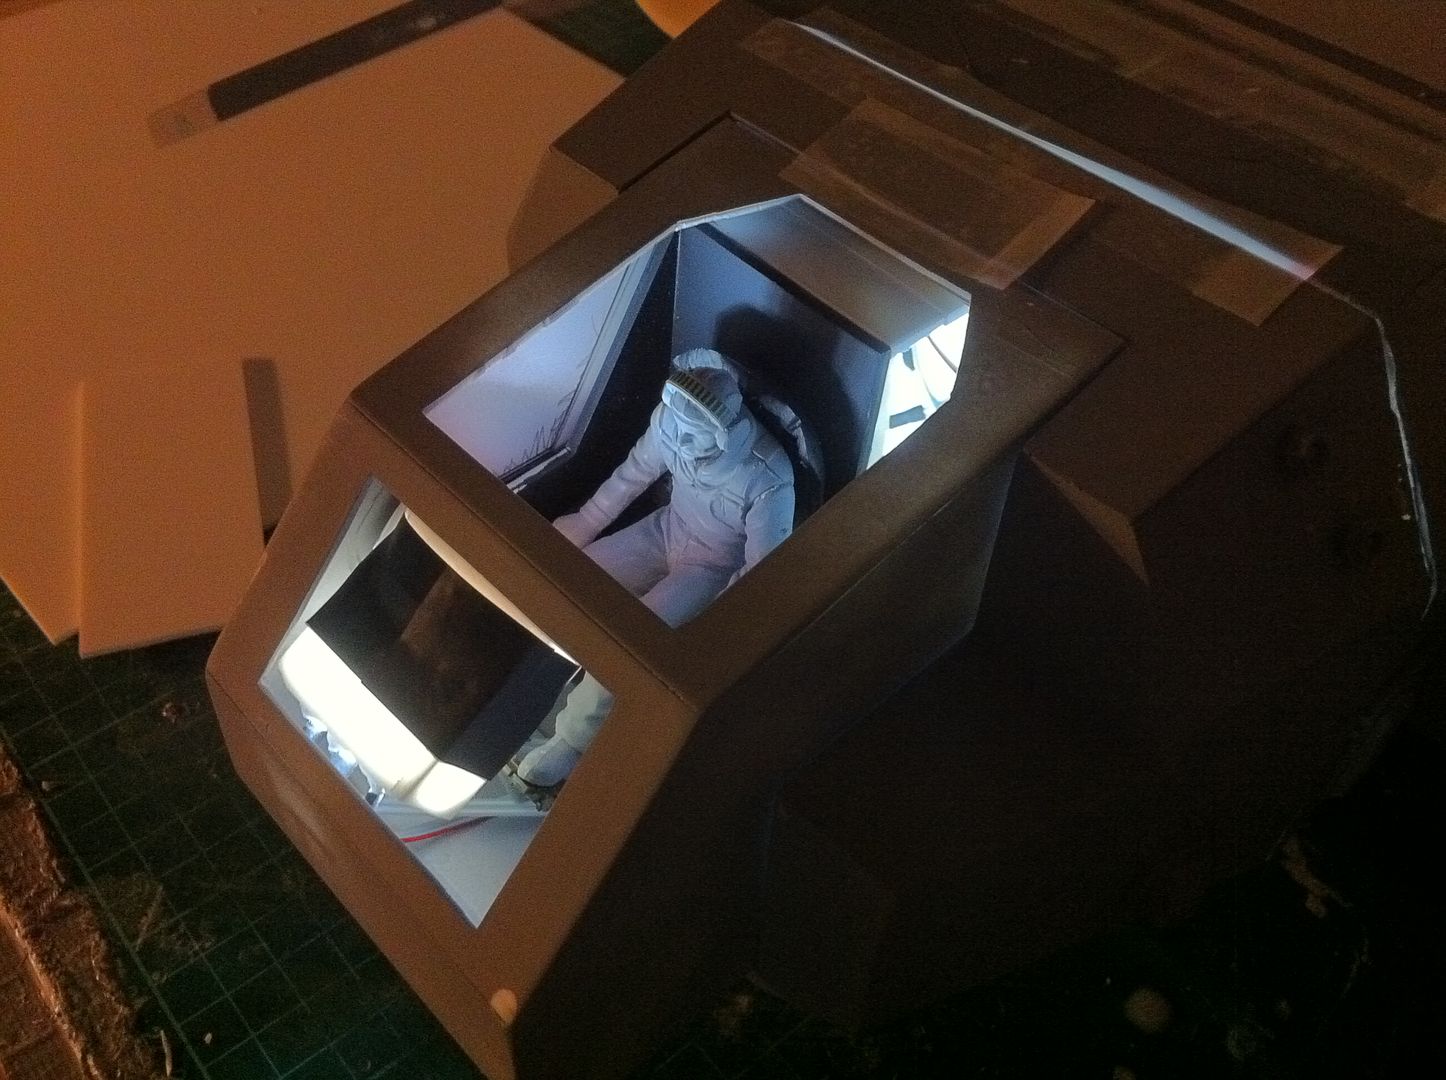
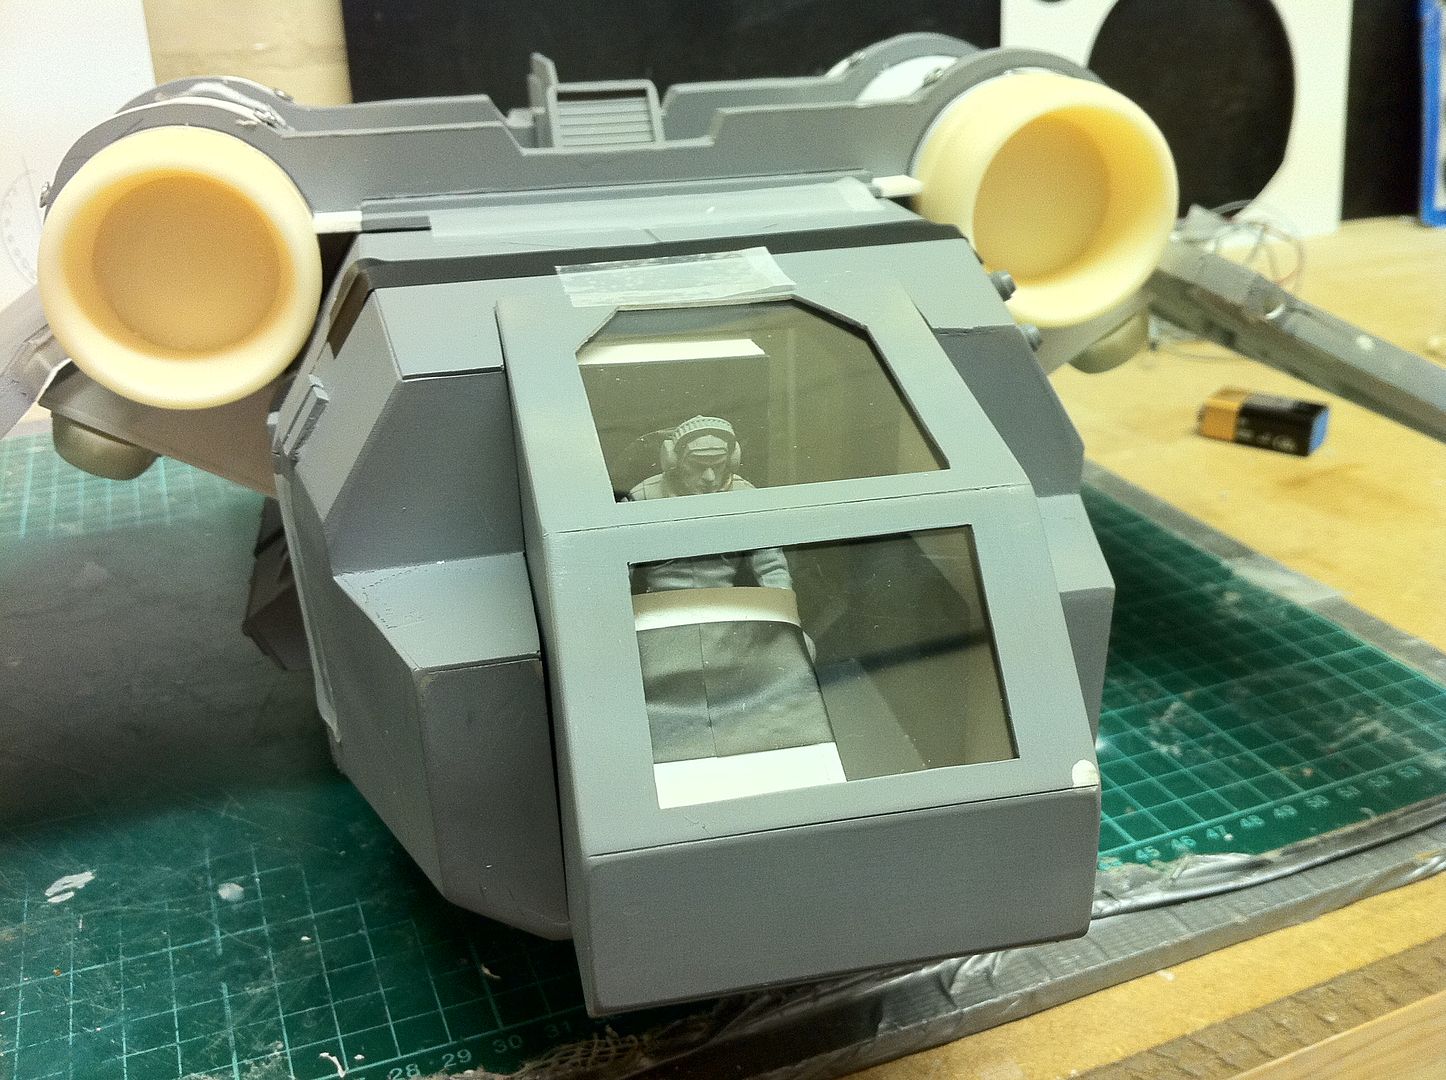
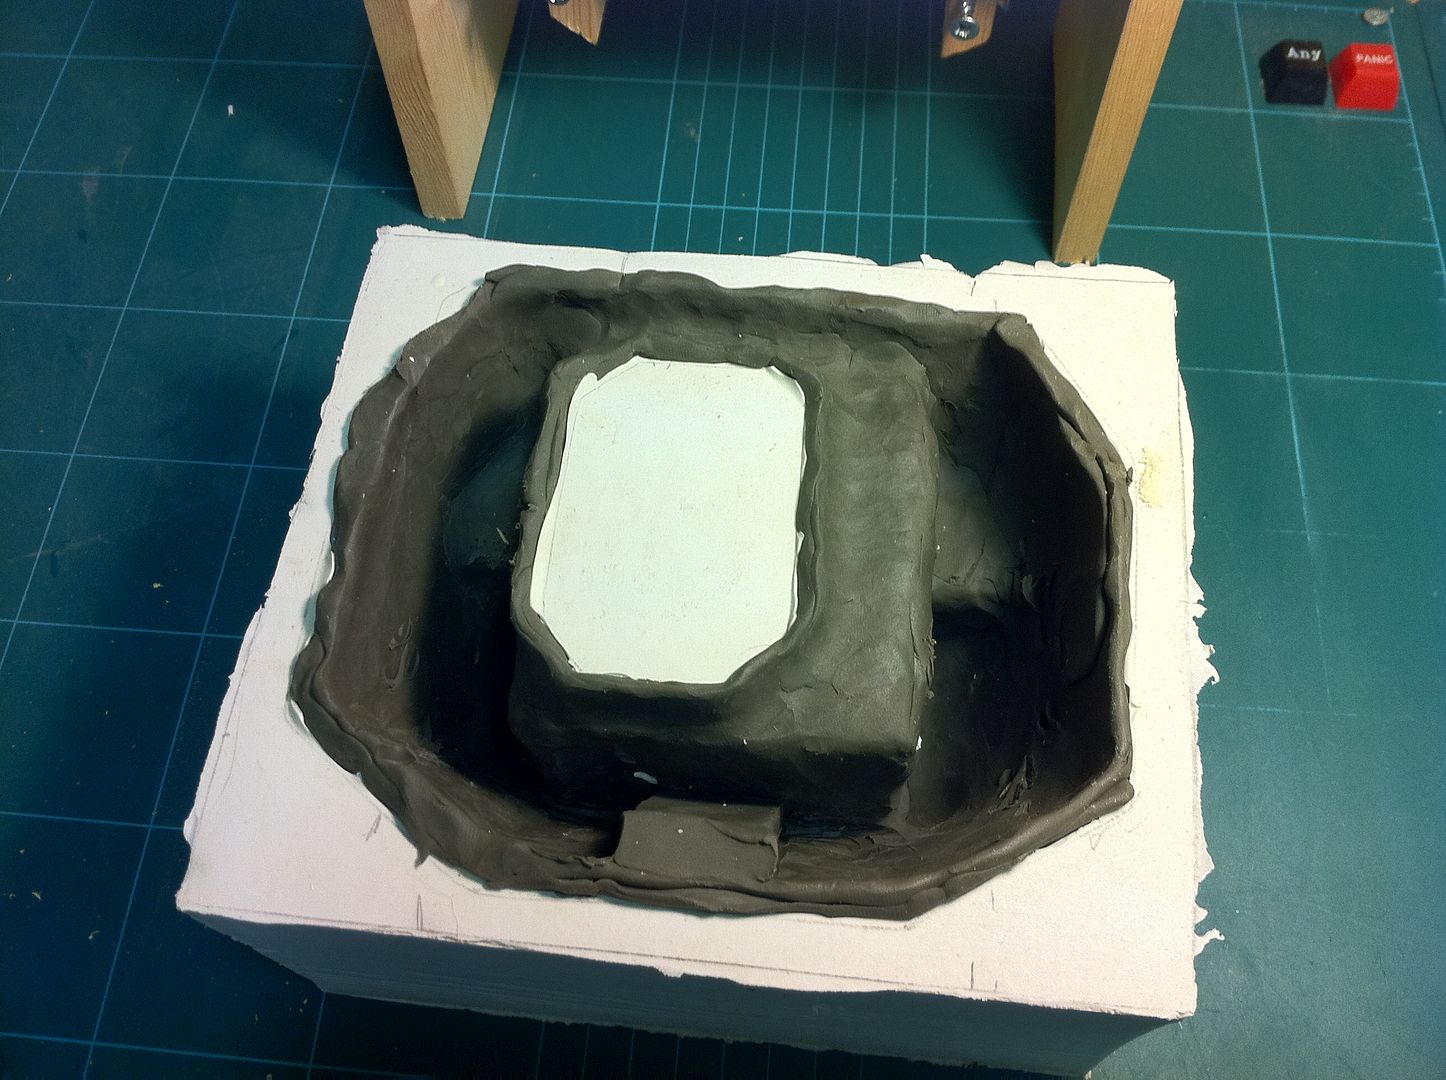
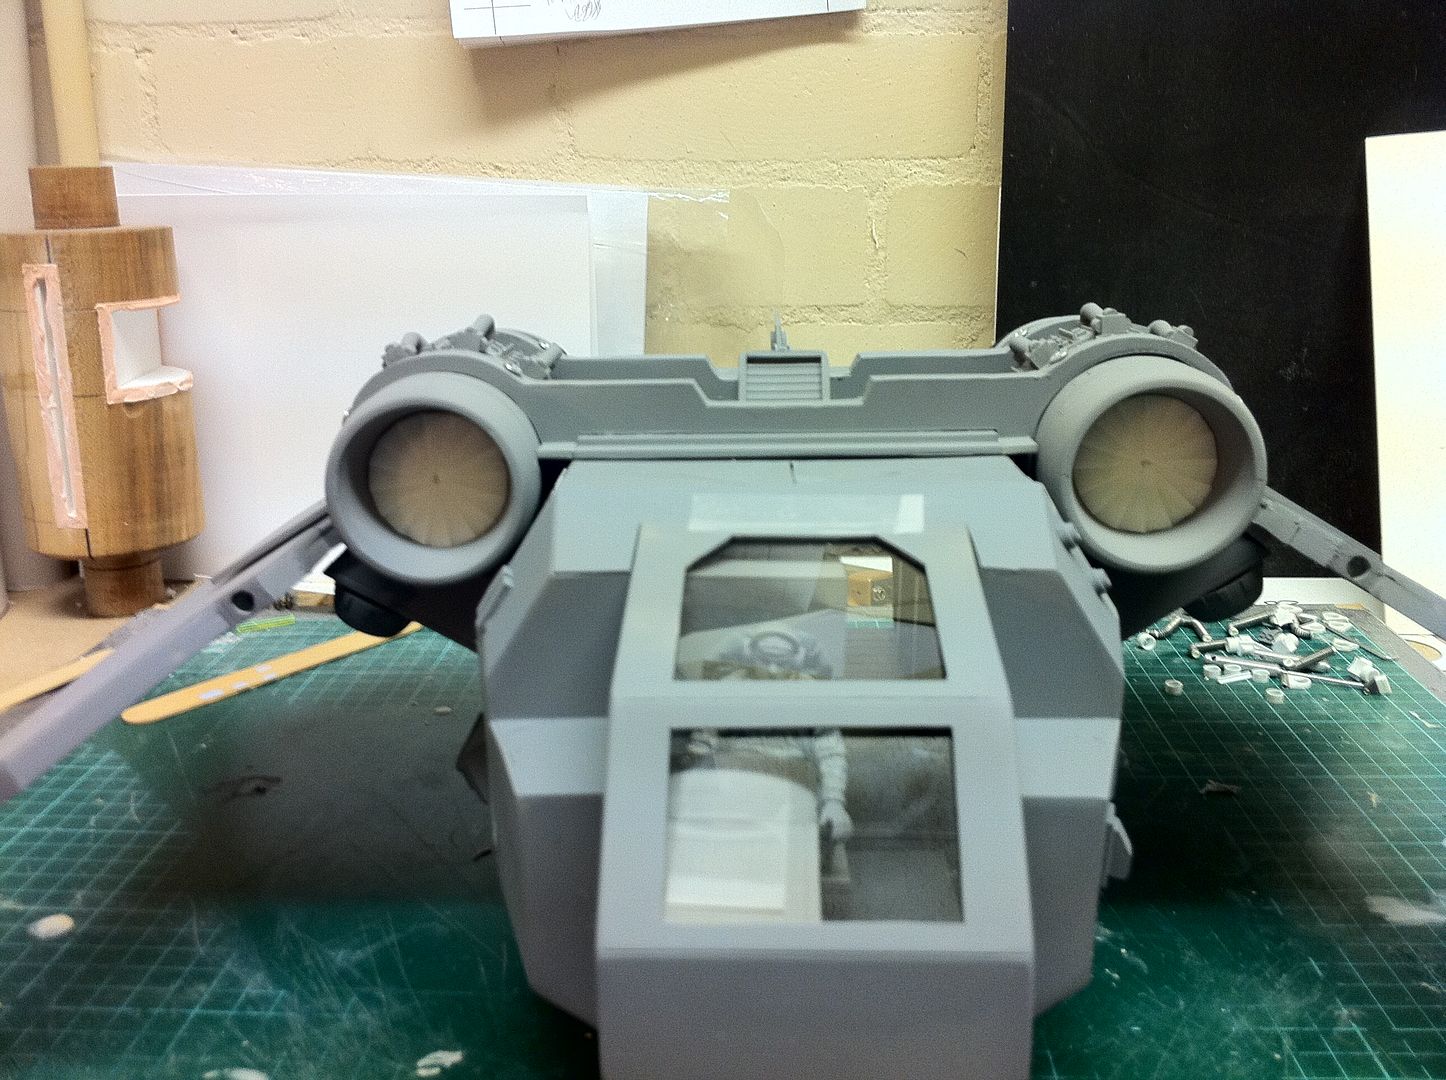
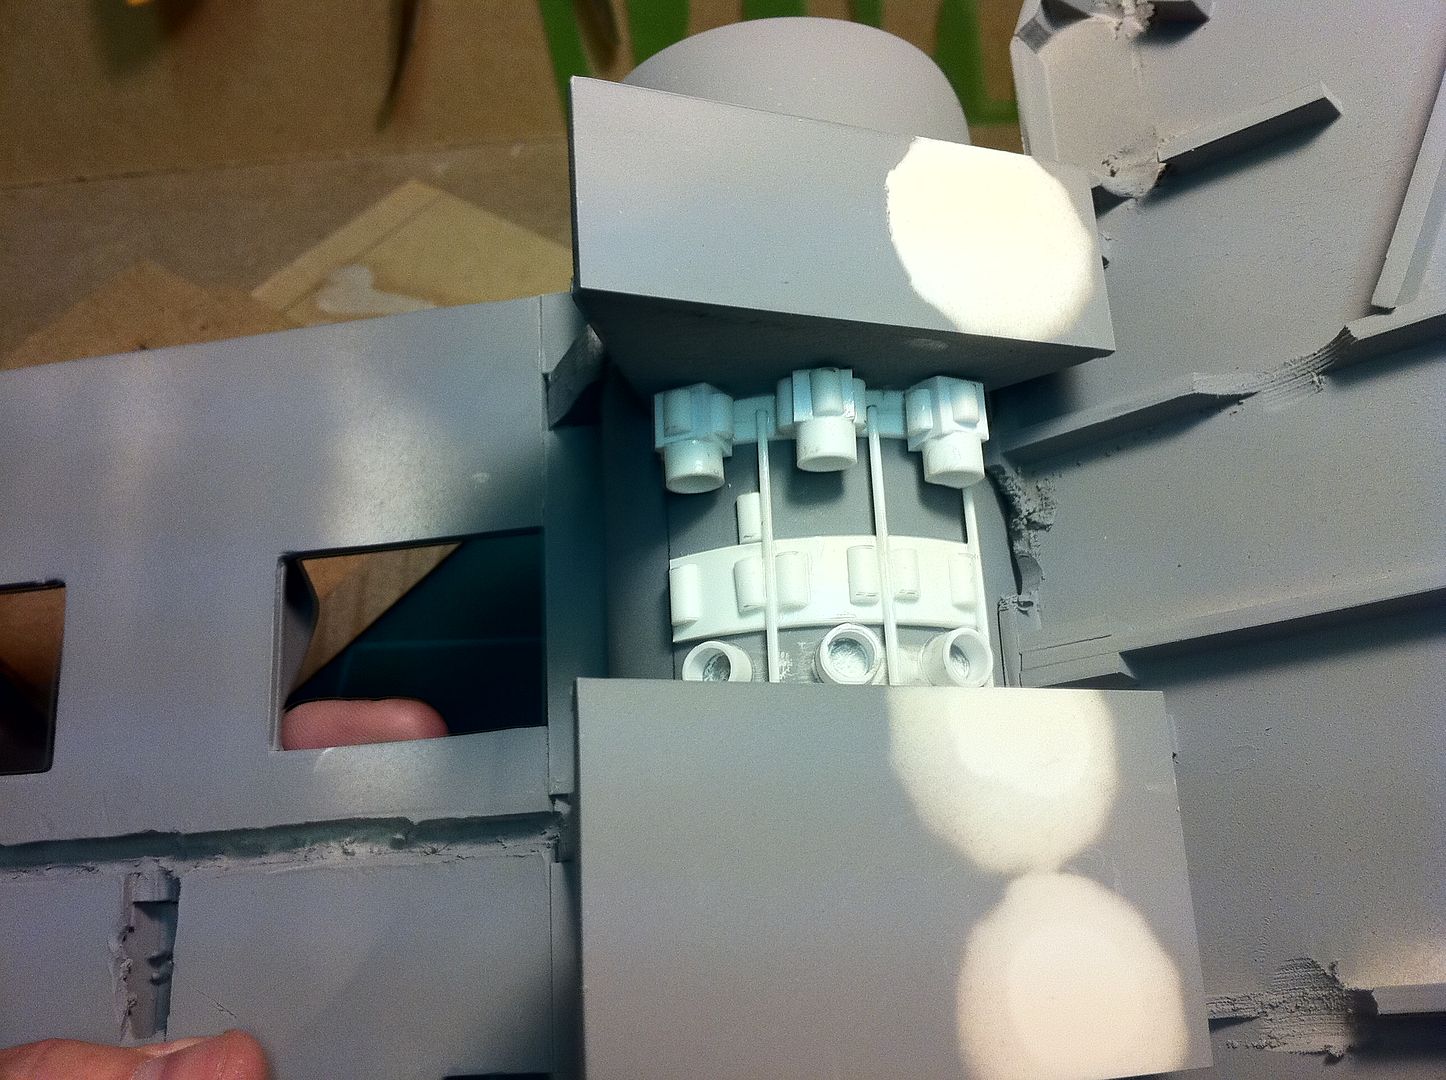
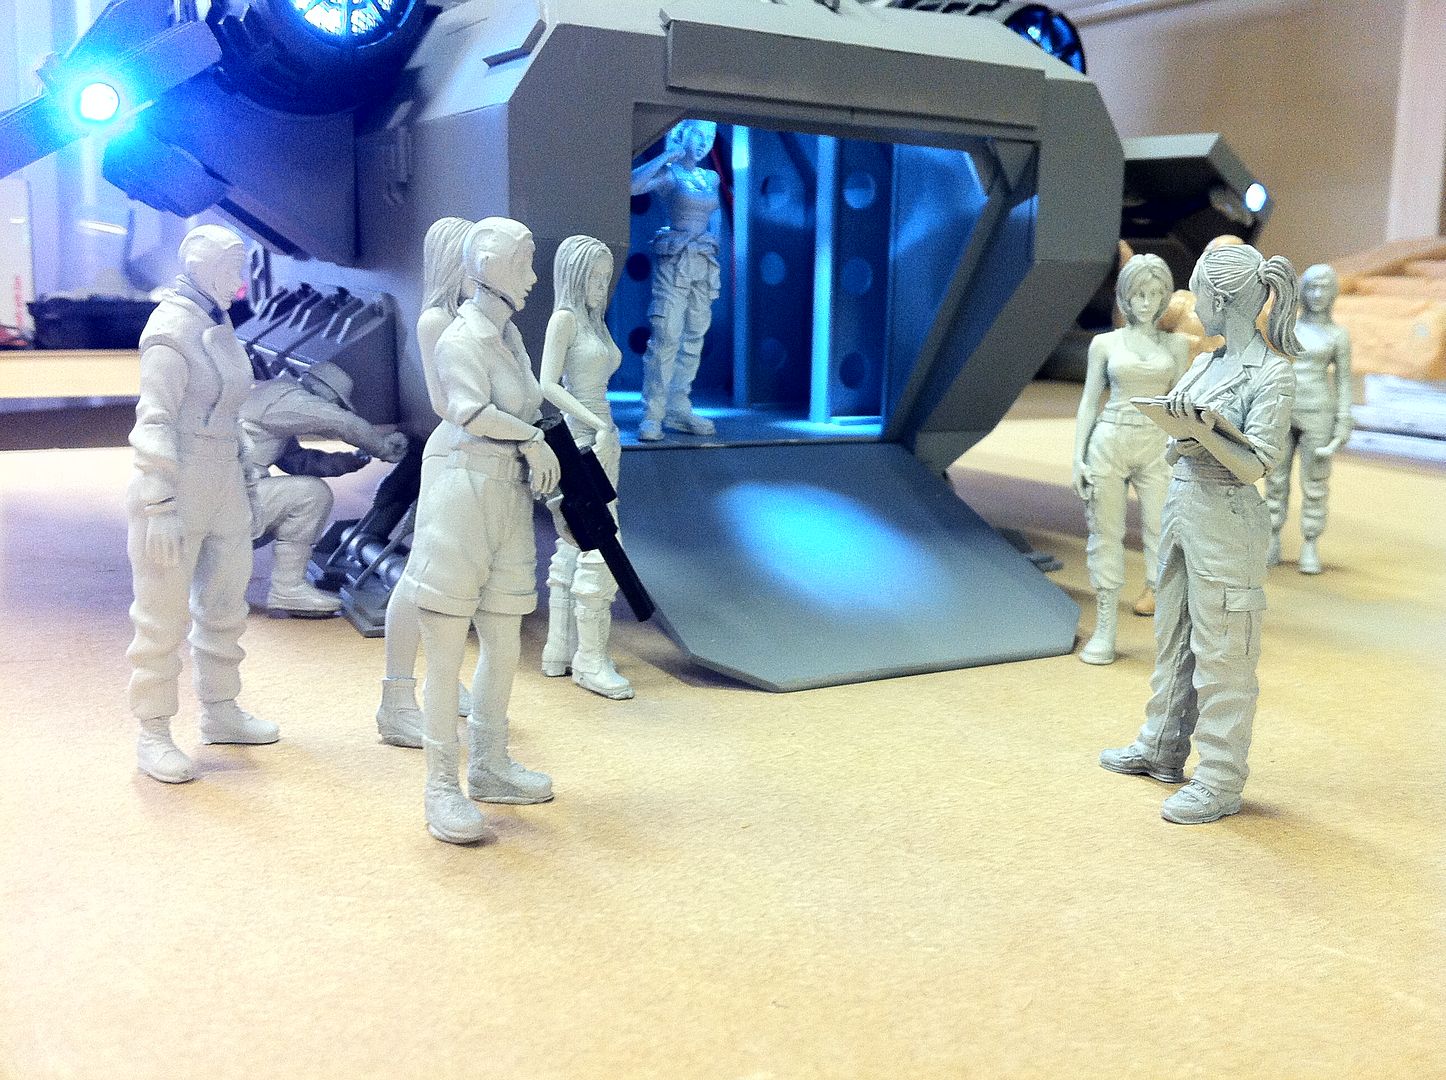
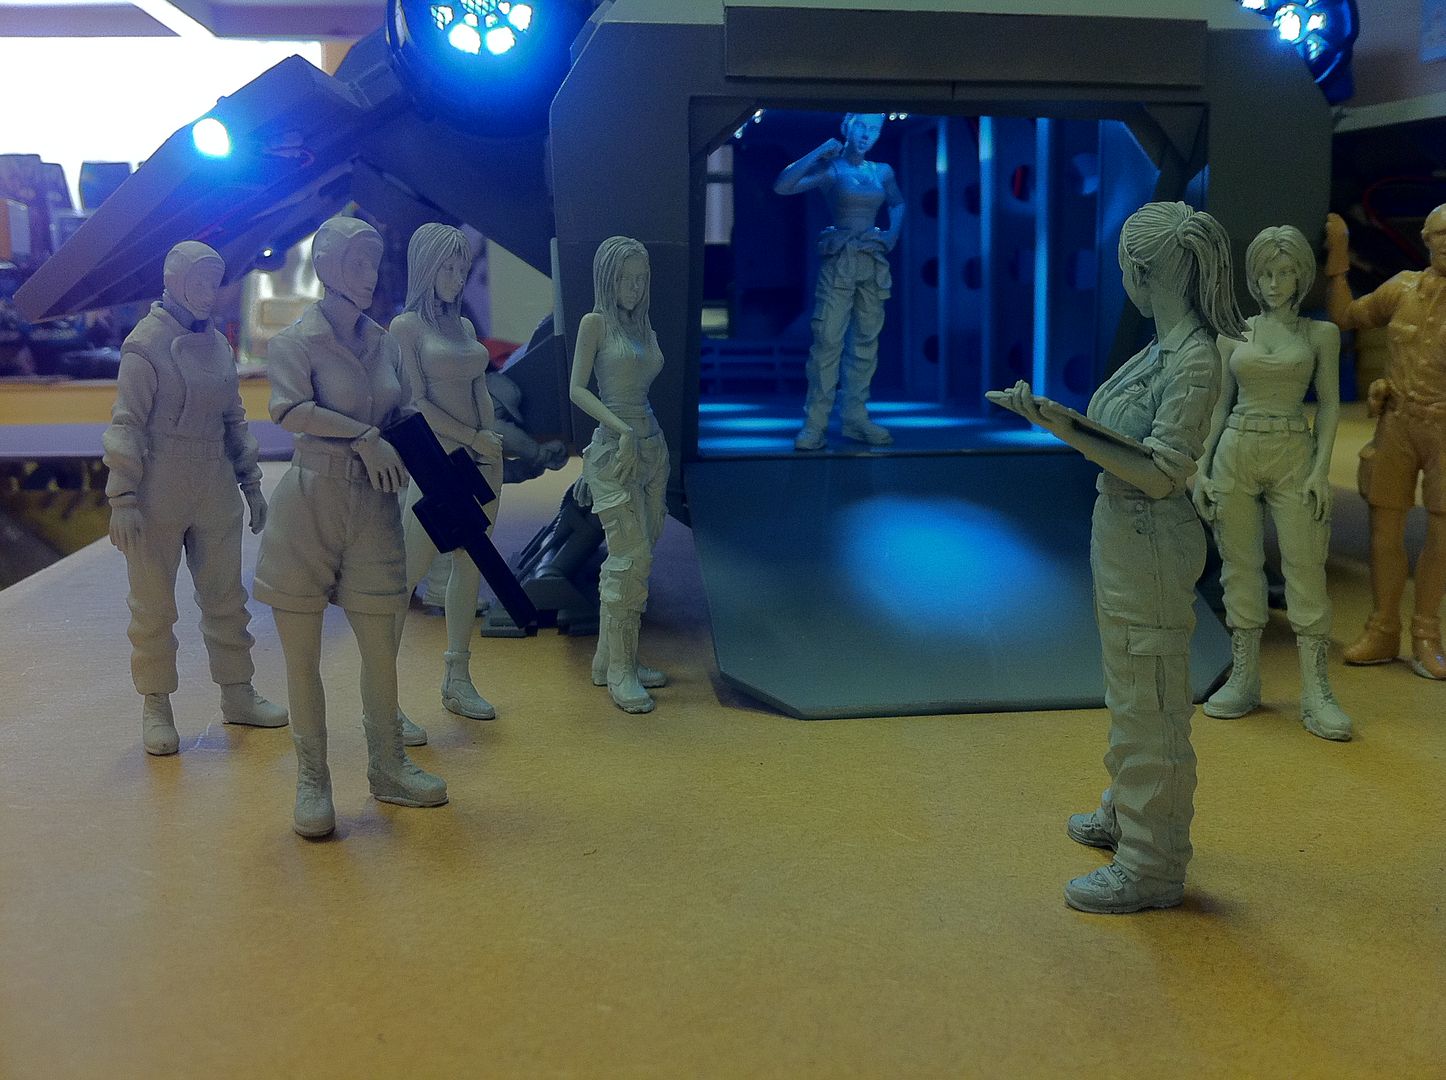
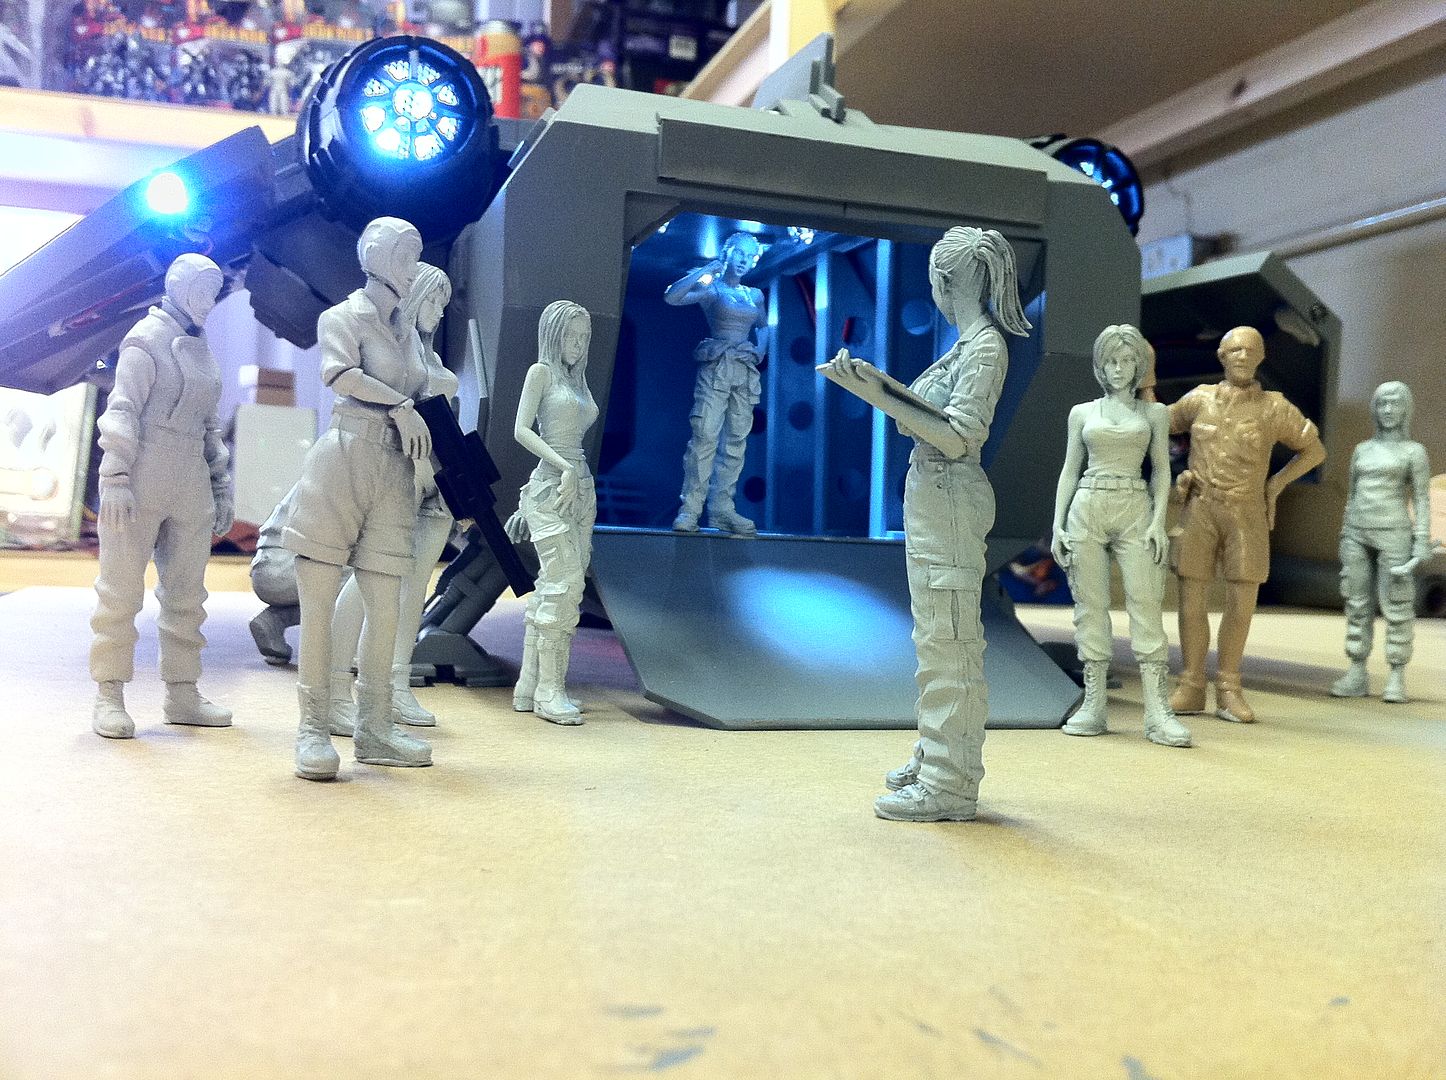
But i was being honest. Automatically Appended Next Post: Today at work, i WAS going to add the engine detailing(And to that end i screwed the engines in place on the half circle supports), but instead, i did a light test on the pilot's display(In low light and office light conditions. this fulfuls a dual purpose of making the cockpit seem more real, and also throws a LOT of light onto the pilot. I think it looks great), and also skinned the front end mould. I have been approached by a couple of people who also fancy giving this a go and(as it is), the front end mould takes more resin that the original Arvus kit, so by skinning the mould with plasticene and pouring sillicone into the gap, i can make skin castings and save maybe 50 to 70% of the resin used in the one i am making right now and it will be easier to add lights in the resultant casting.
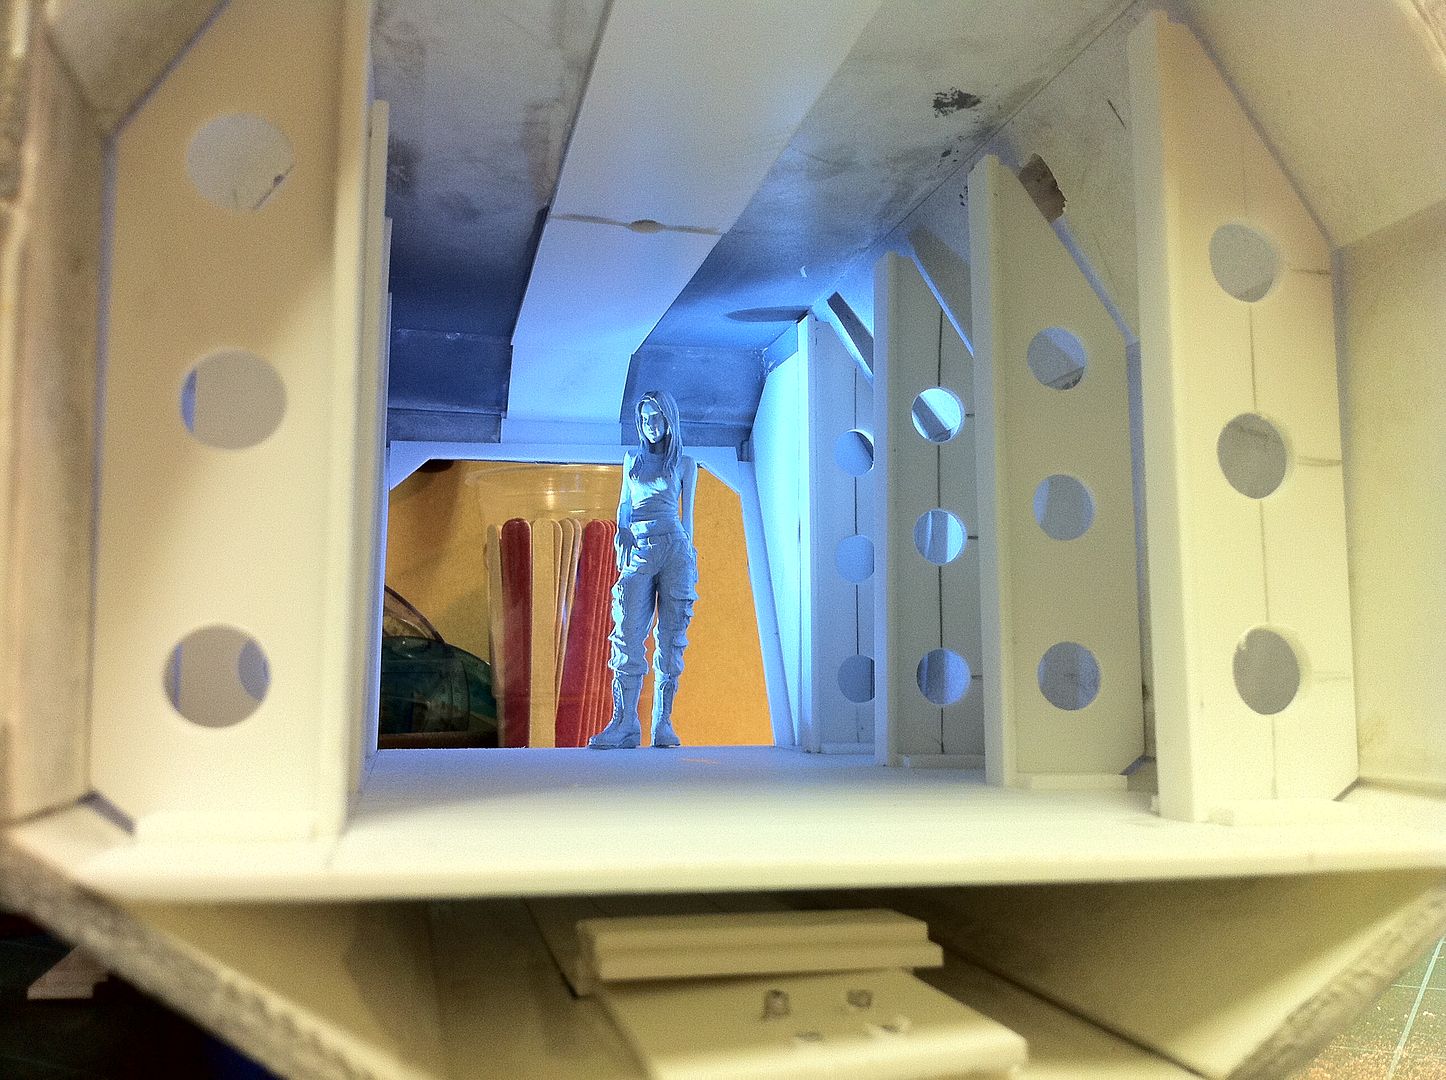
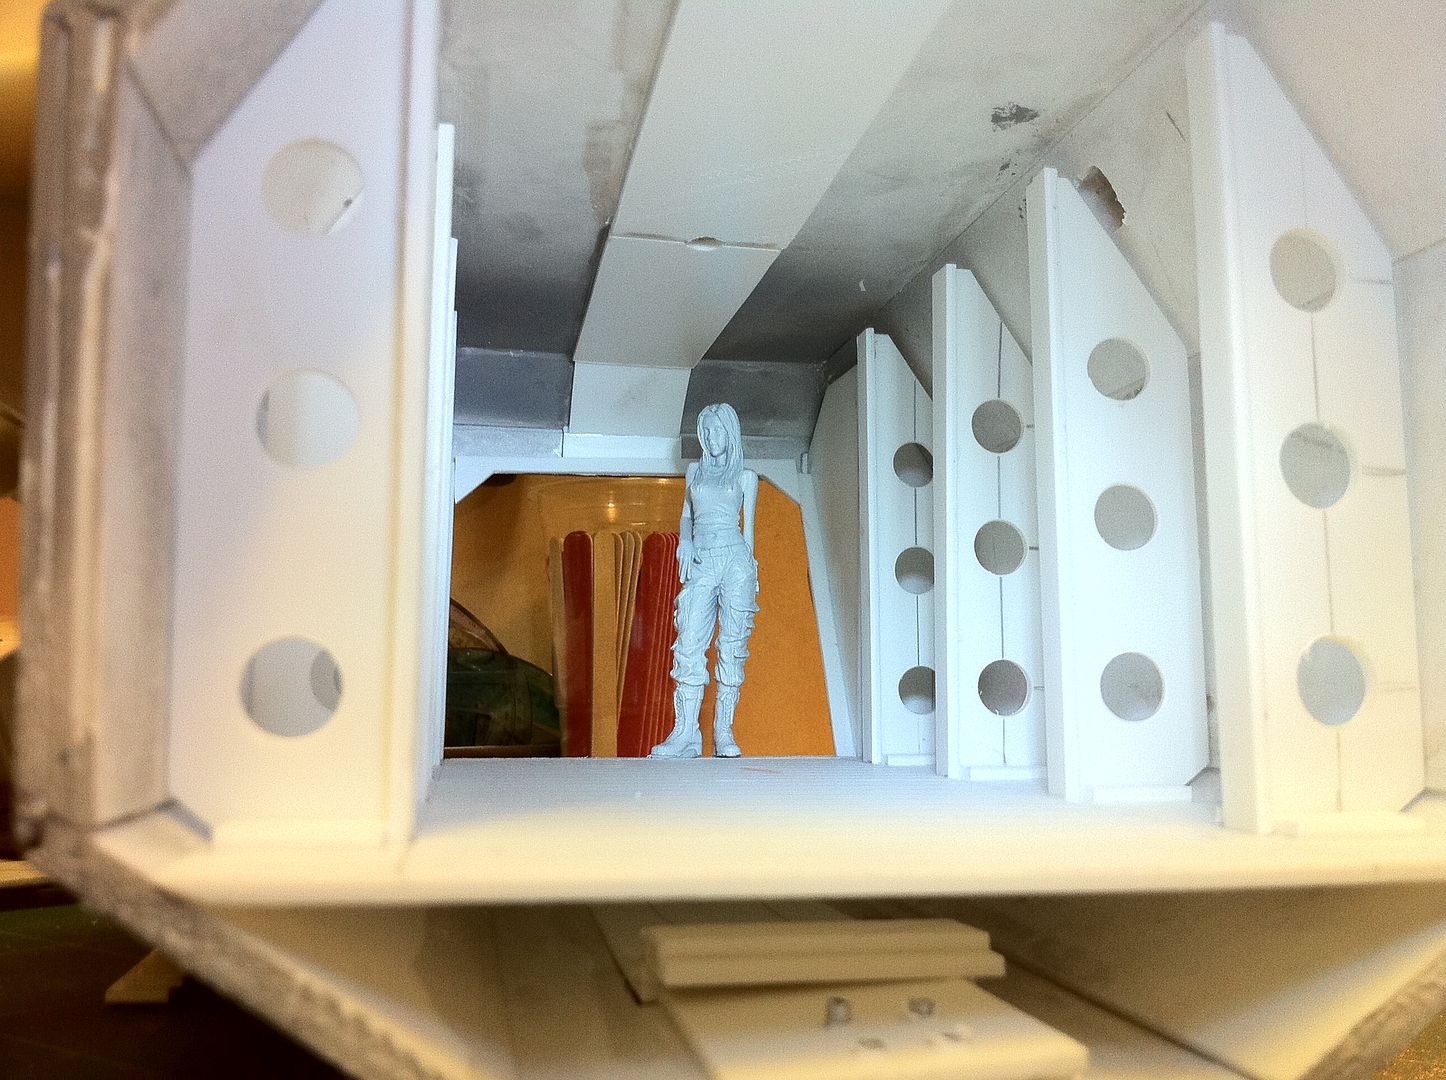
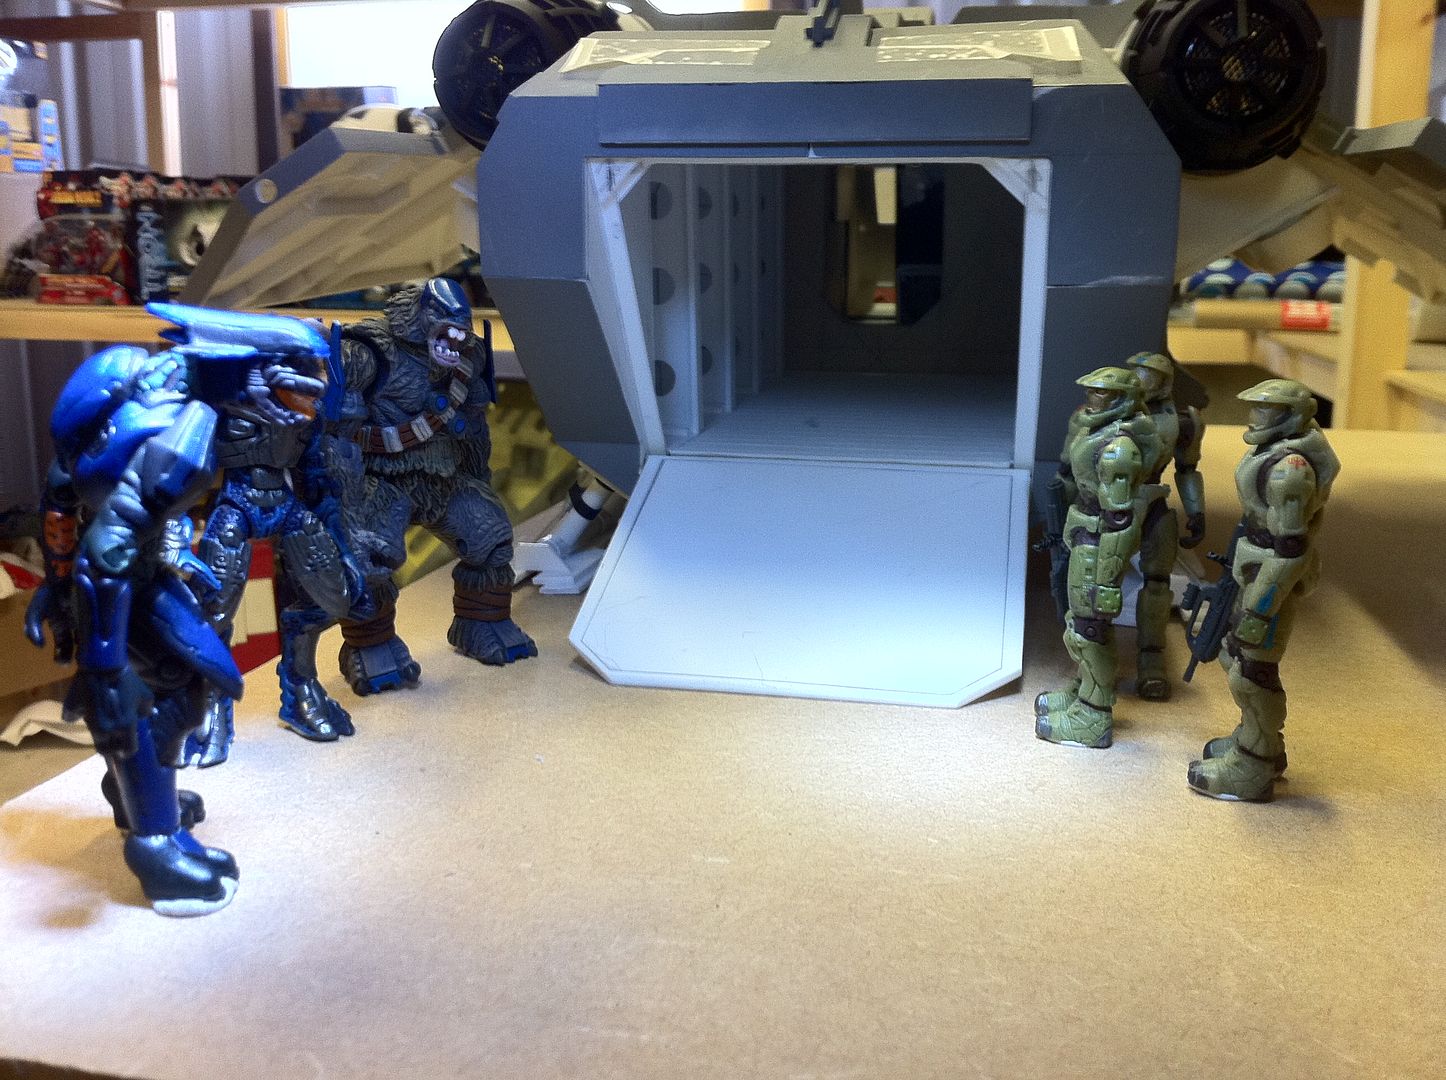
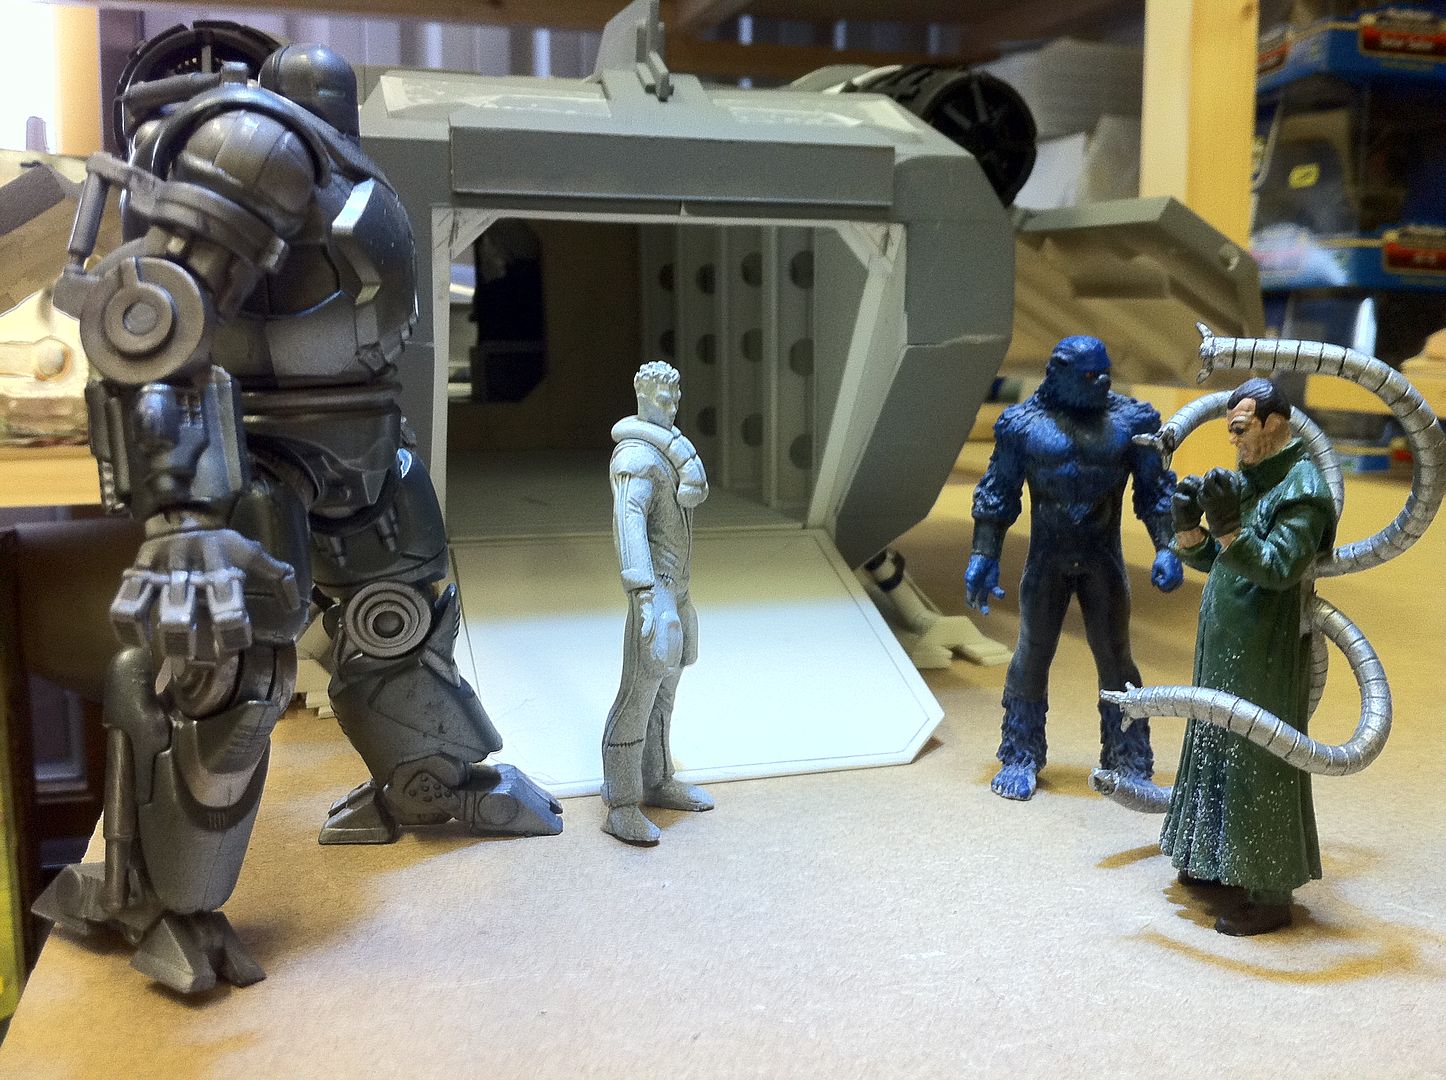
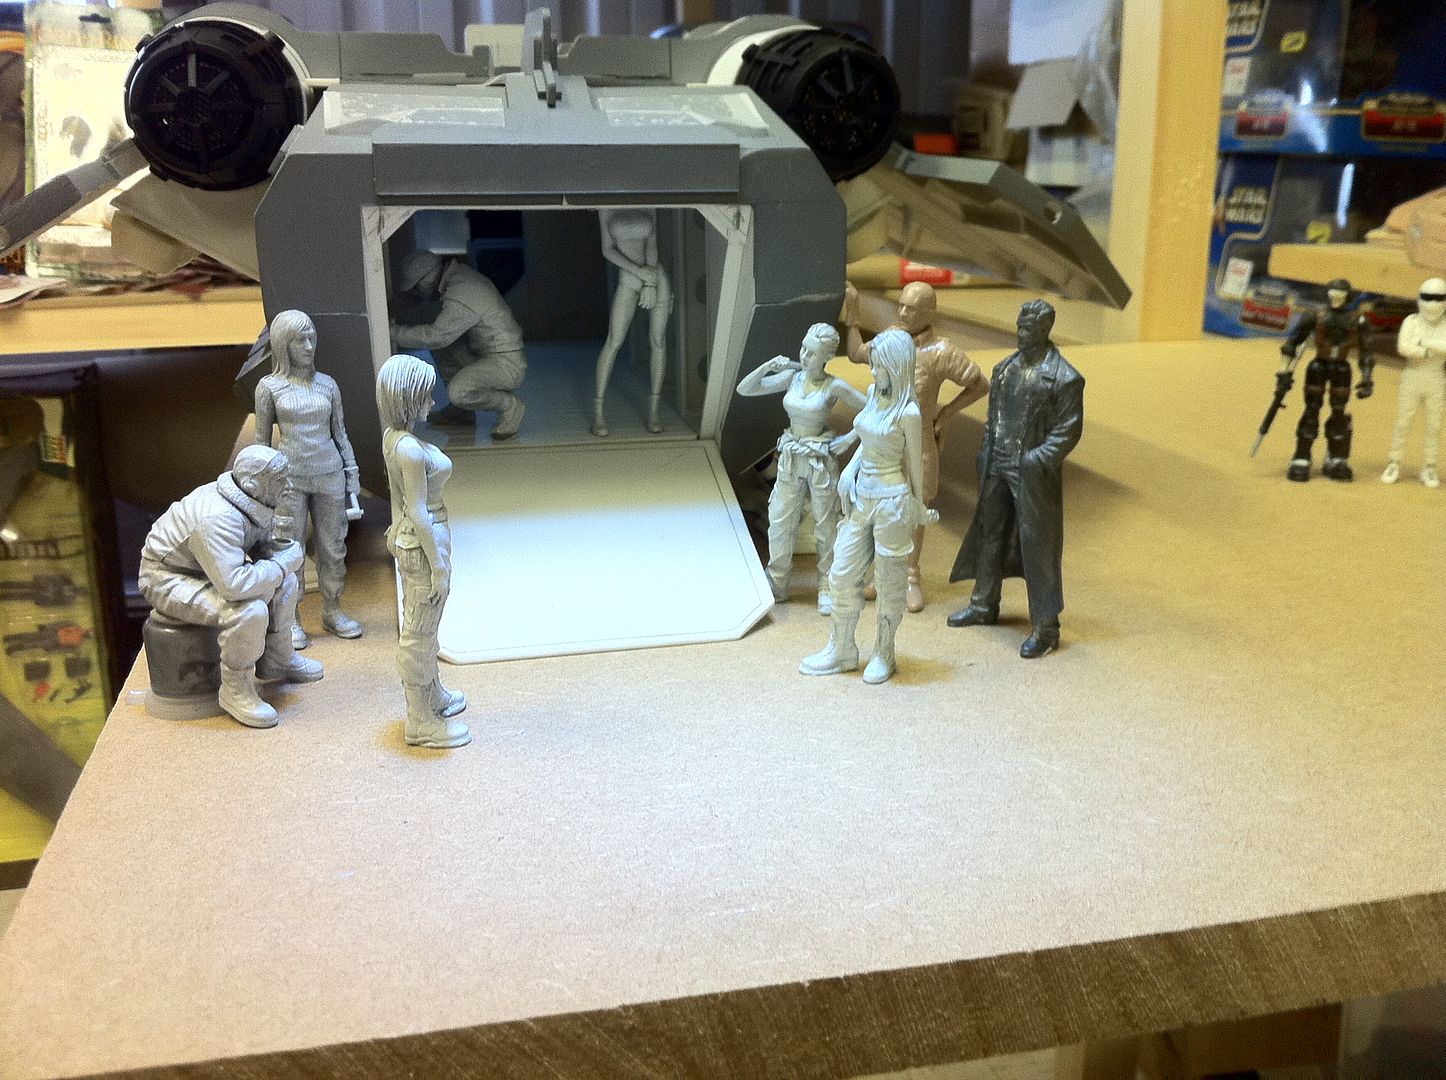
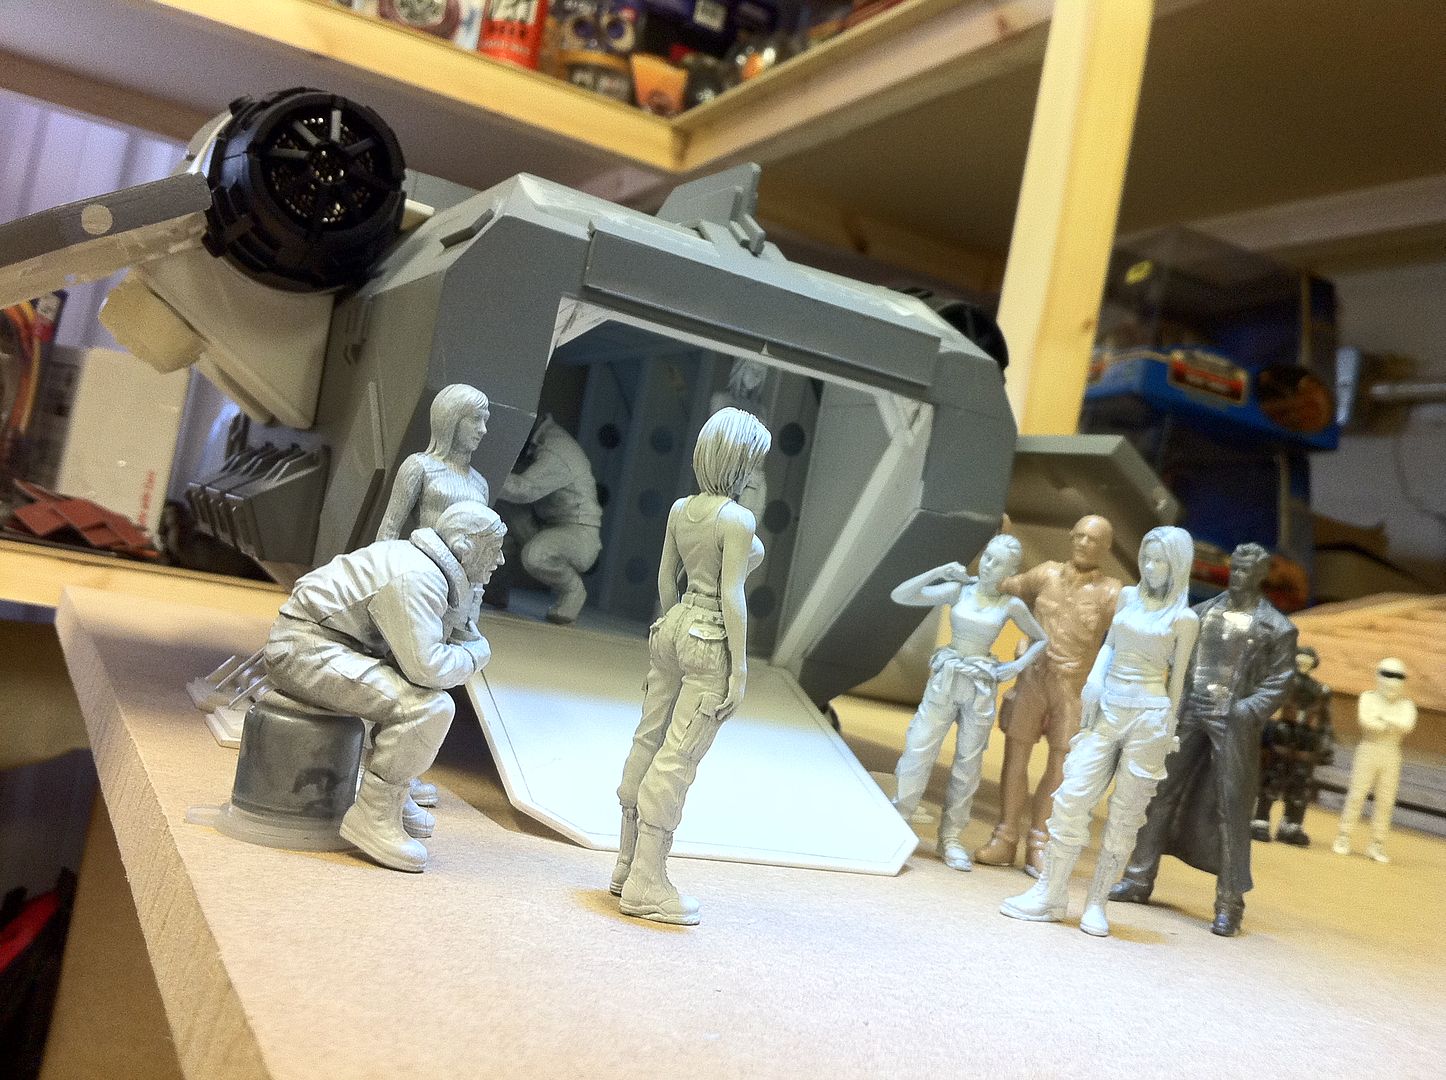
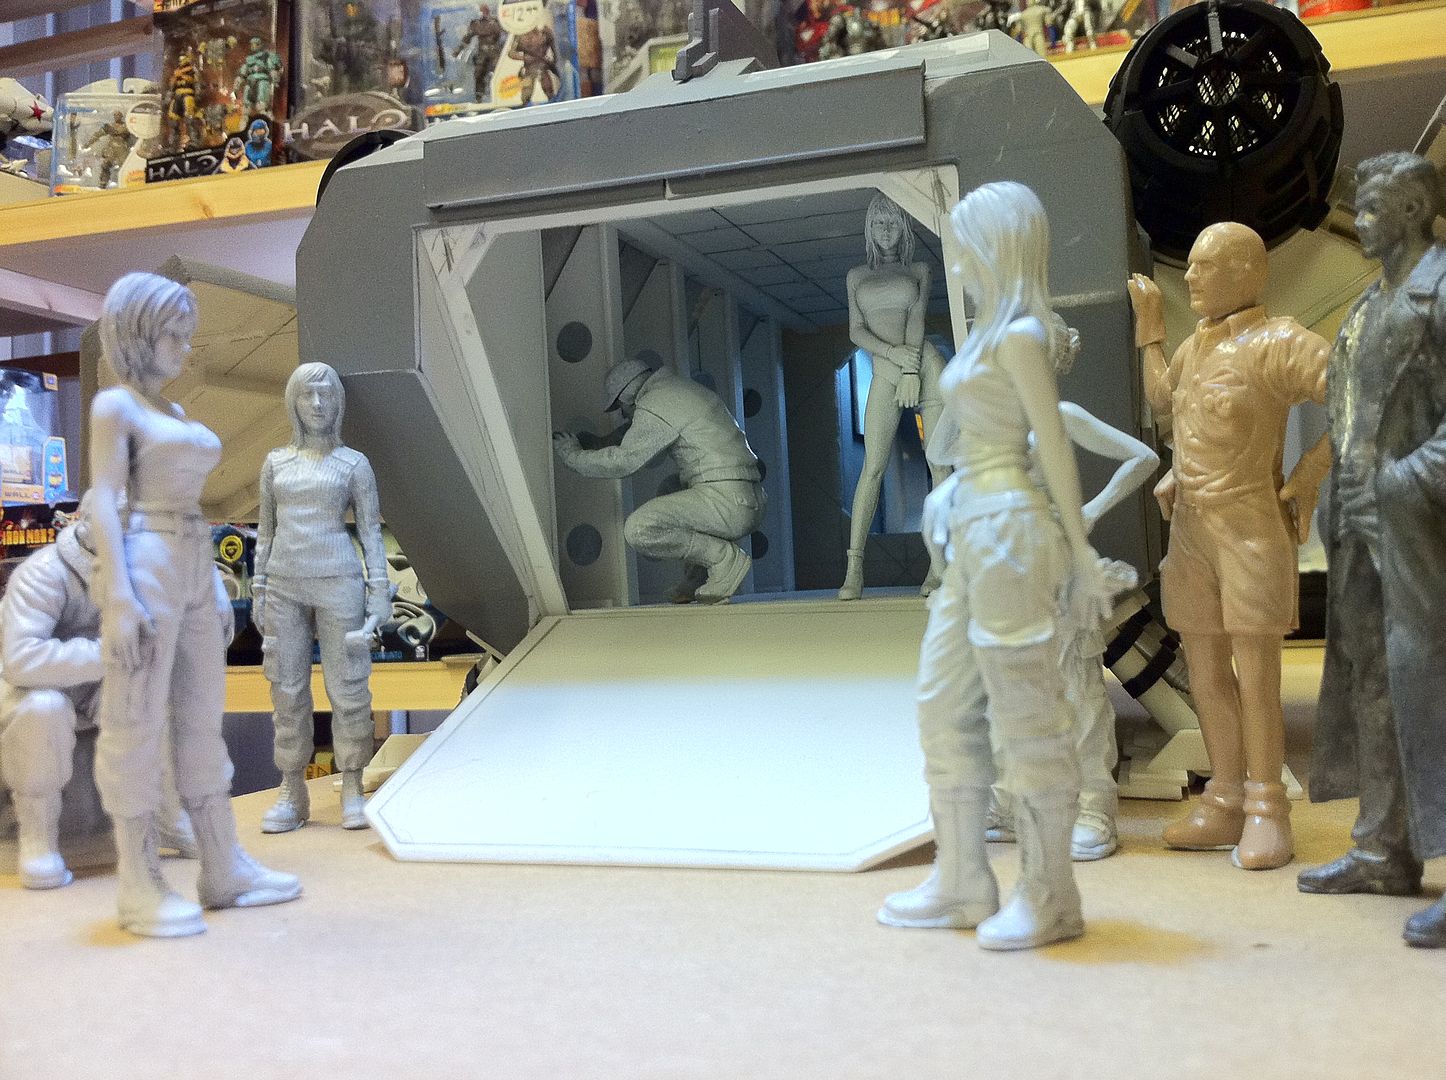
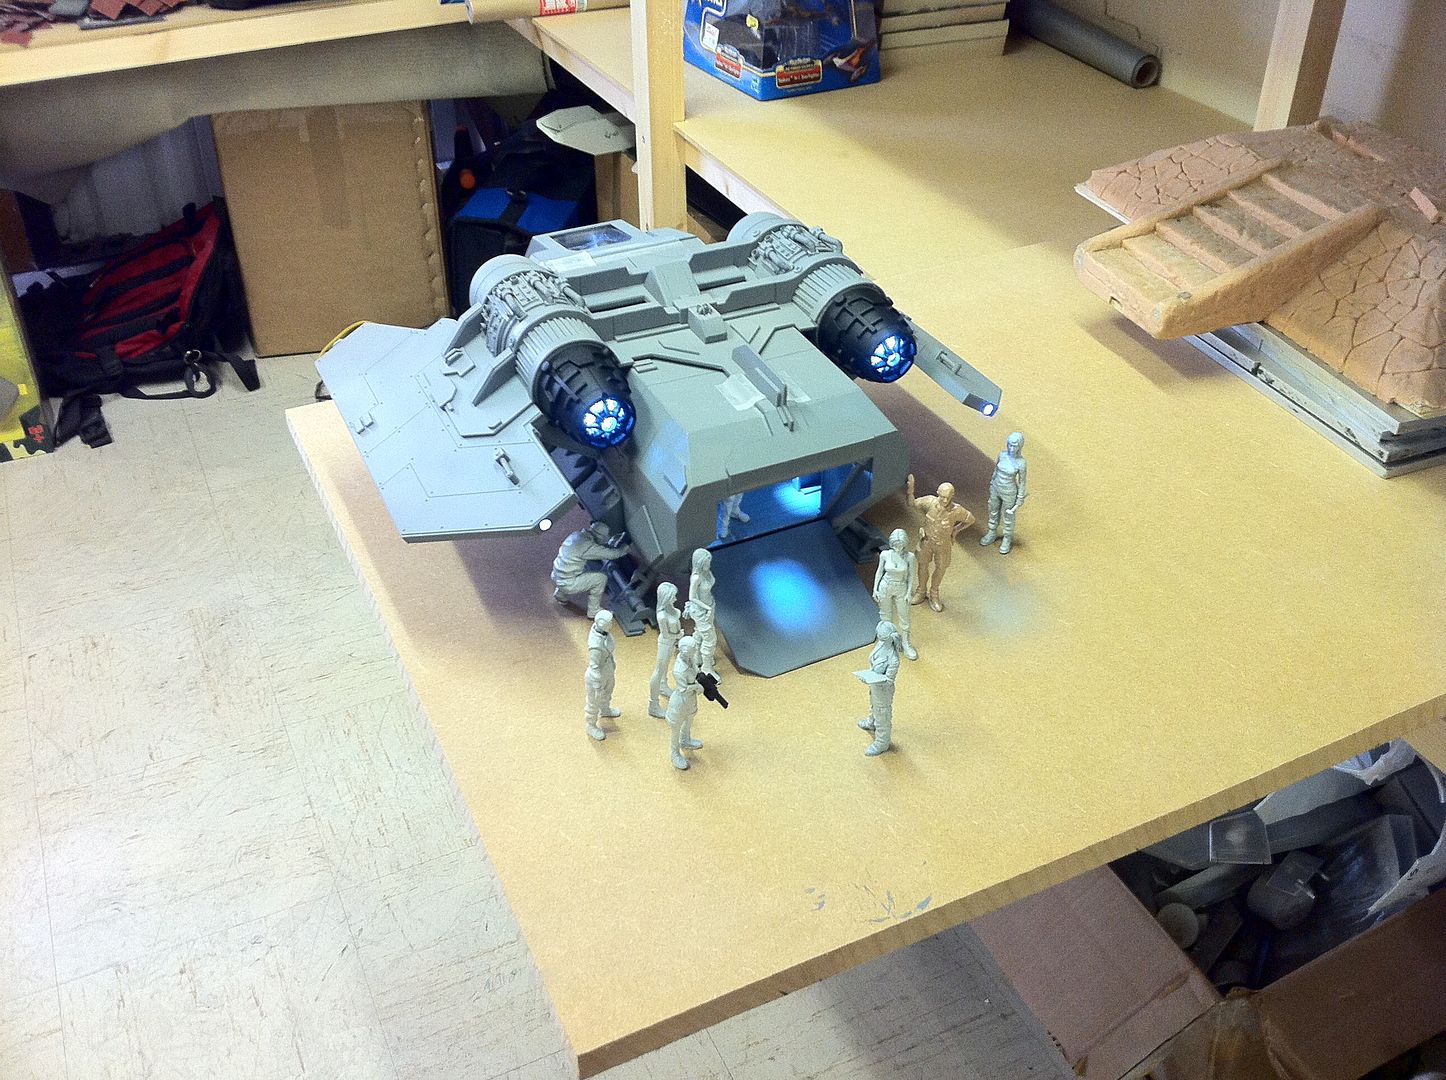
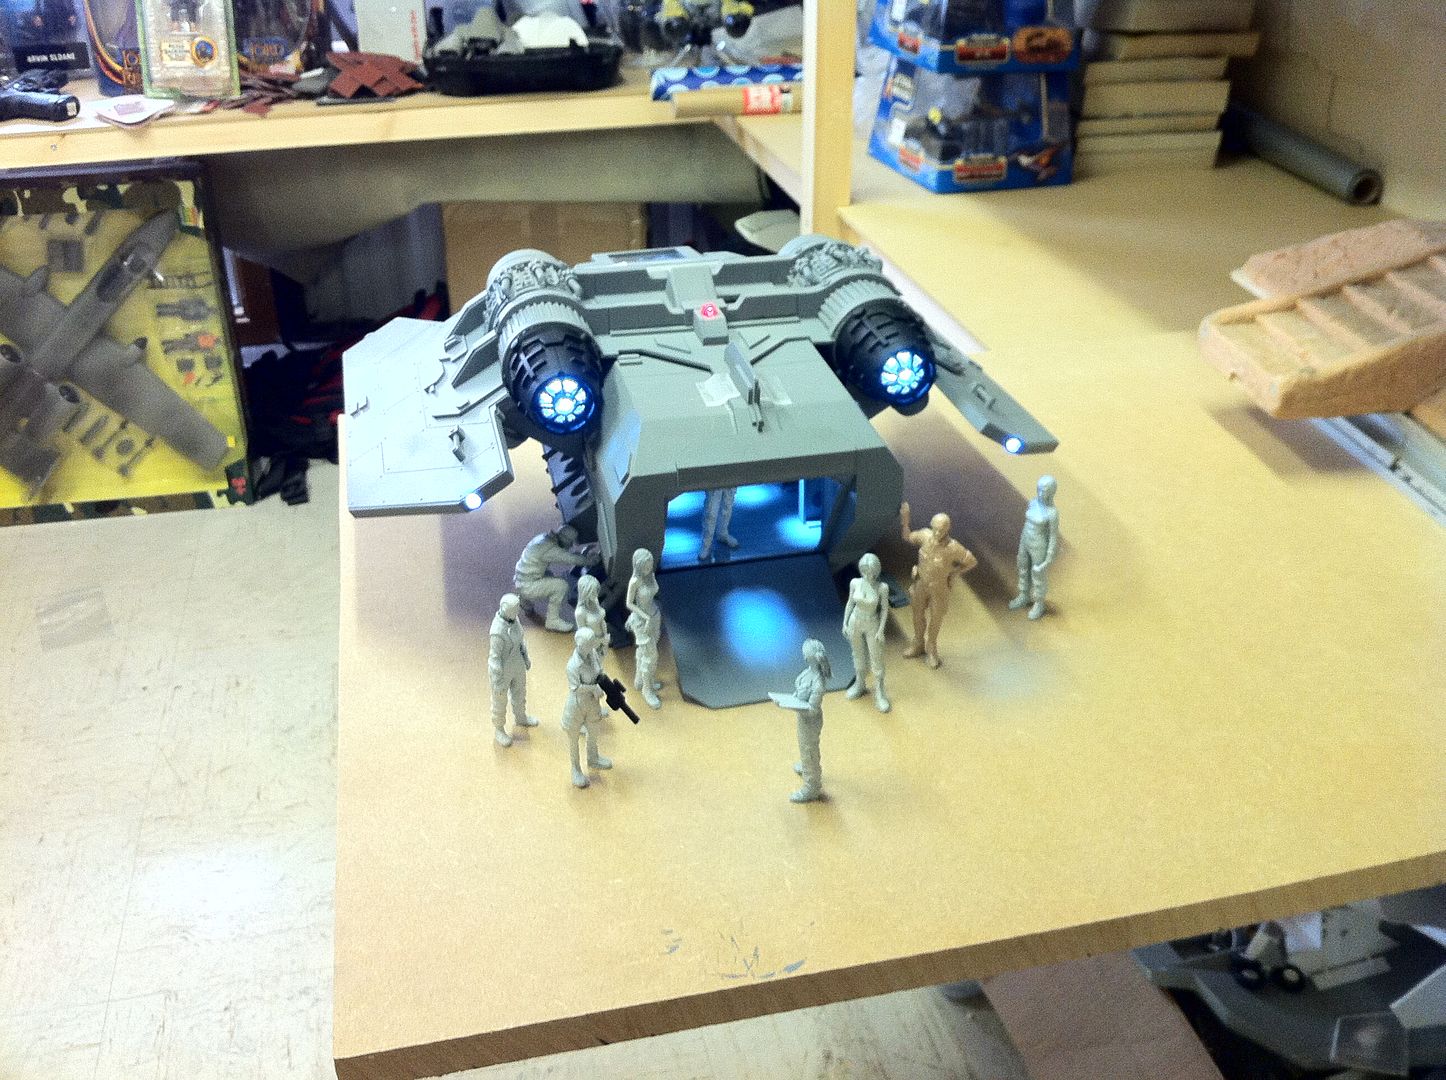
I also took some images of the craft with various figures standing around Halo figures, Marvel characters, and the standard Ma.K figures. You can see the interior bulkheads in the images. They really add a touch of realism to the interior.
The inside is still wild, as you can see from the first image. This will make it a loit easier to paint, that's for sure.
Enjoy the pics.

|
|
This message was edited 1 time. Last update was at 2011/08/03 18:02:46
|
|
|
|
|
2011/08/04 18:55:50
Subject: Re:Scratchbuilding an Arvus
|
|
Been Around the Block
|
I popped out the skinned mould today and it looks very good. I have no need to make a front end right now,
but when i do, it will use less than half the resin it did before, lengthening the life of the mould.
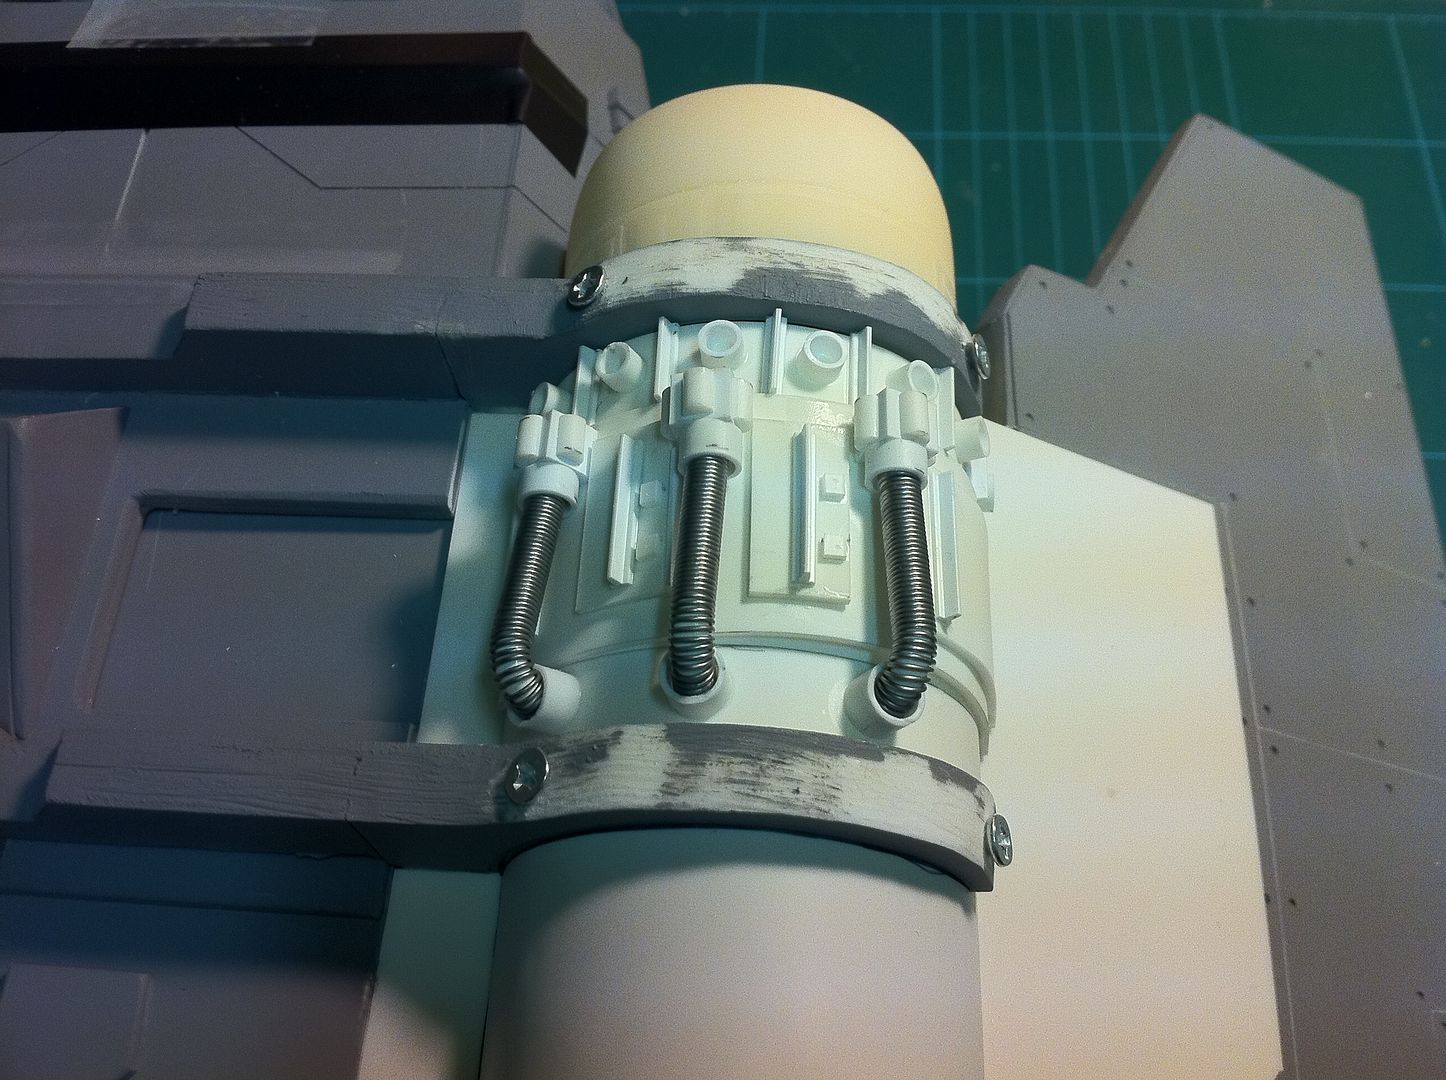
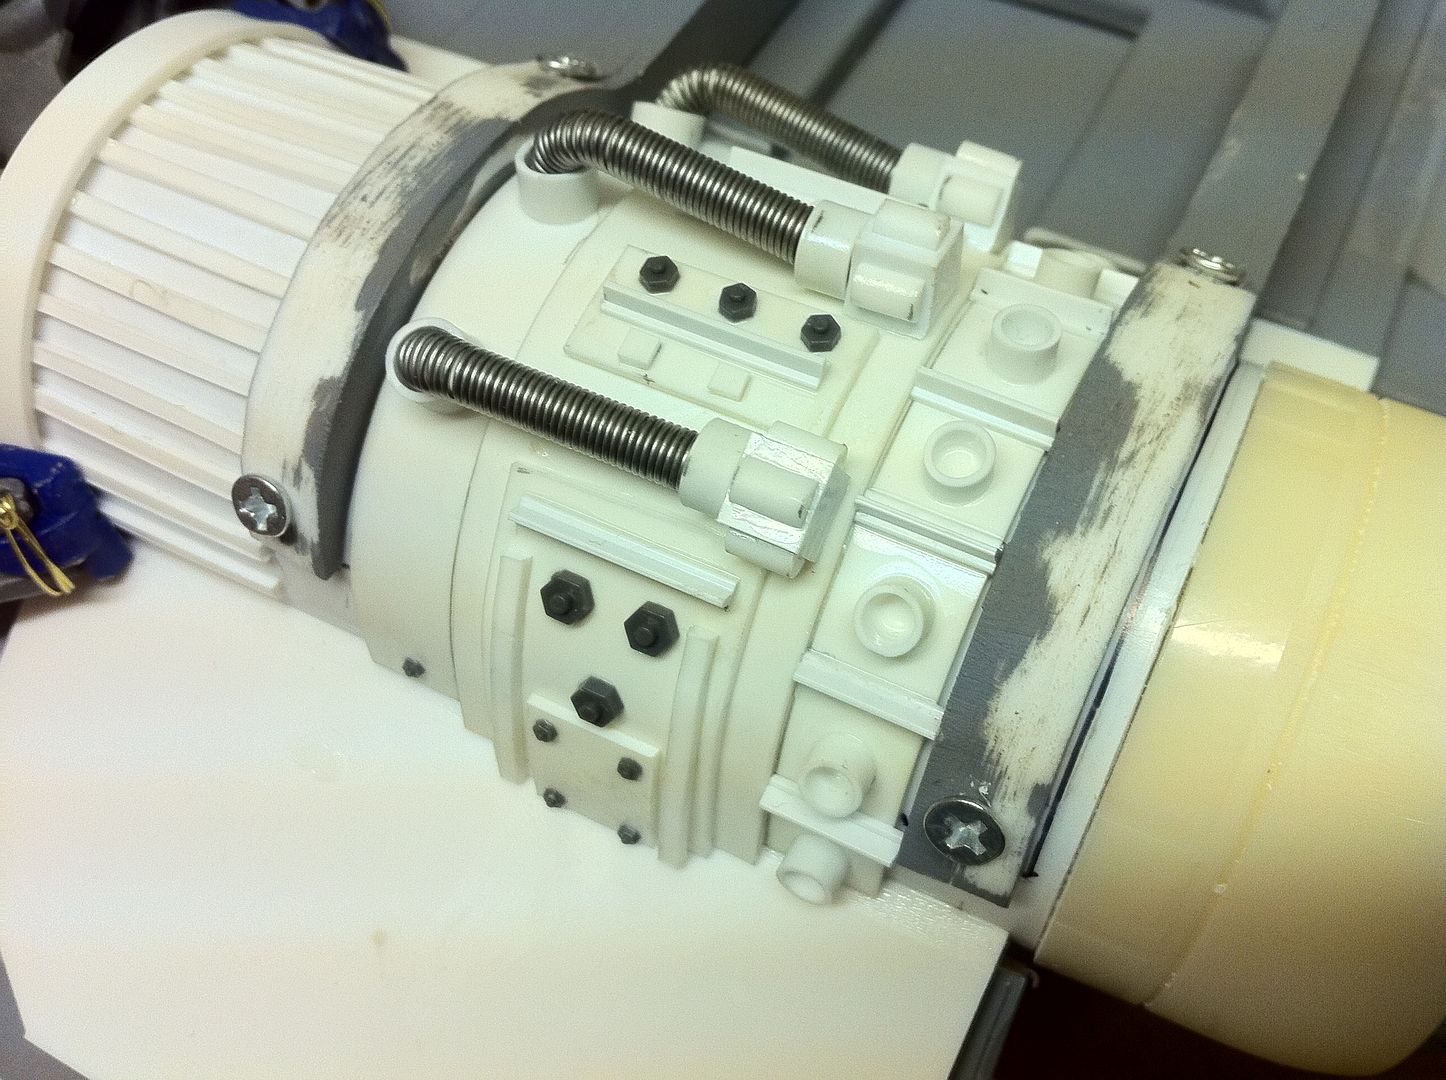
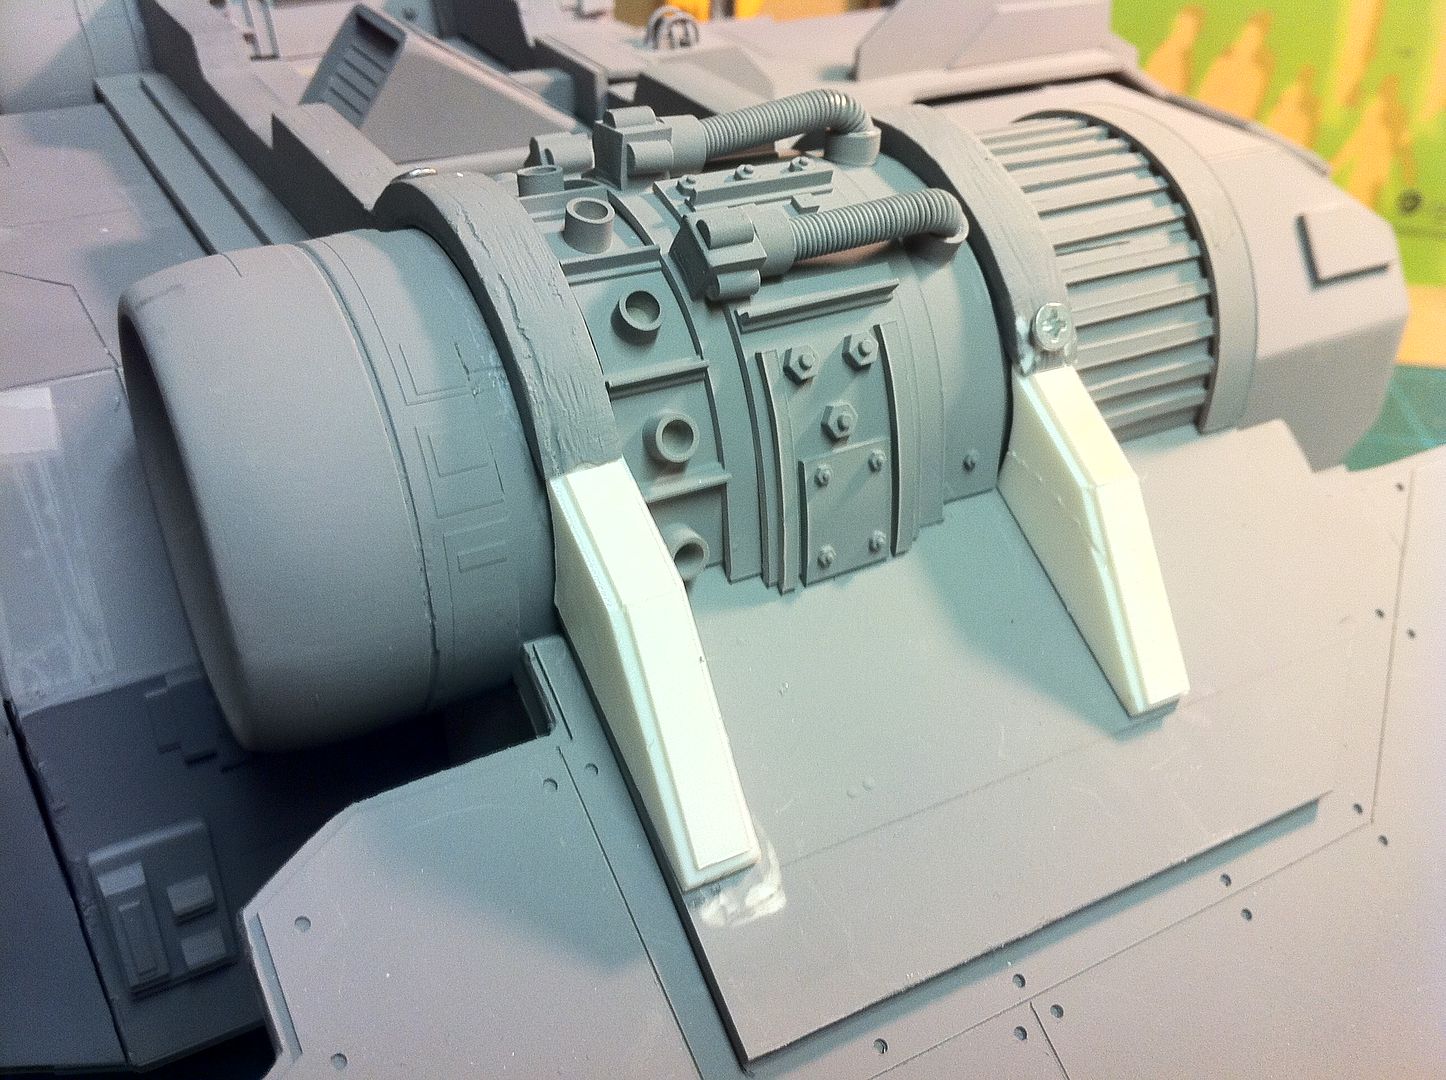
I also got a lot of work done on the engine details today(Finally. I thought i was NEVER going to get that started...)
There is only a small quadrant of the engine needing done(Under the wing. A part which will likely never get seen,
but i want to do it anyway). The detailing parts i used today are just evergreen stock, added in different
combinations, some solid square, some tube, some half round to try and replicate the bits on the original Arvus,
koto nut parts and vinyl tubing with very thin solder attached wrapped round.
Before i left work today i sprayed everything grey, including all previous parts that had signs of wear, and also any
recently made bits and bobs. It will all be ready to rock tomorrow. I'll get the rest of the engines detailed and
start on the interior stuff.
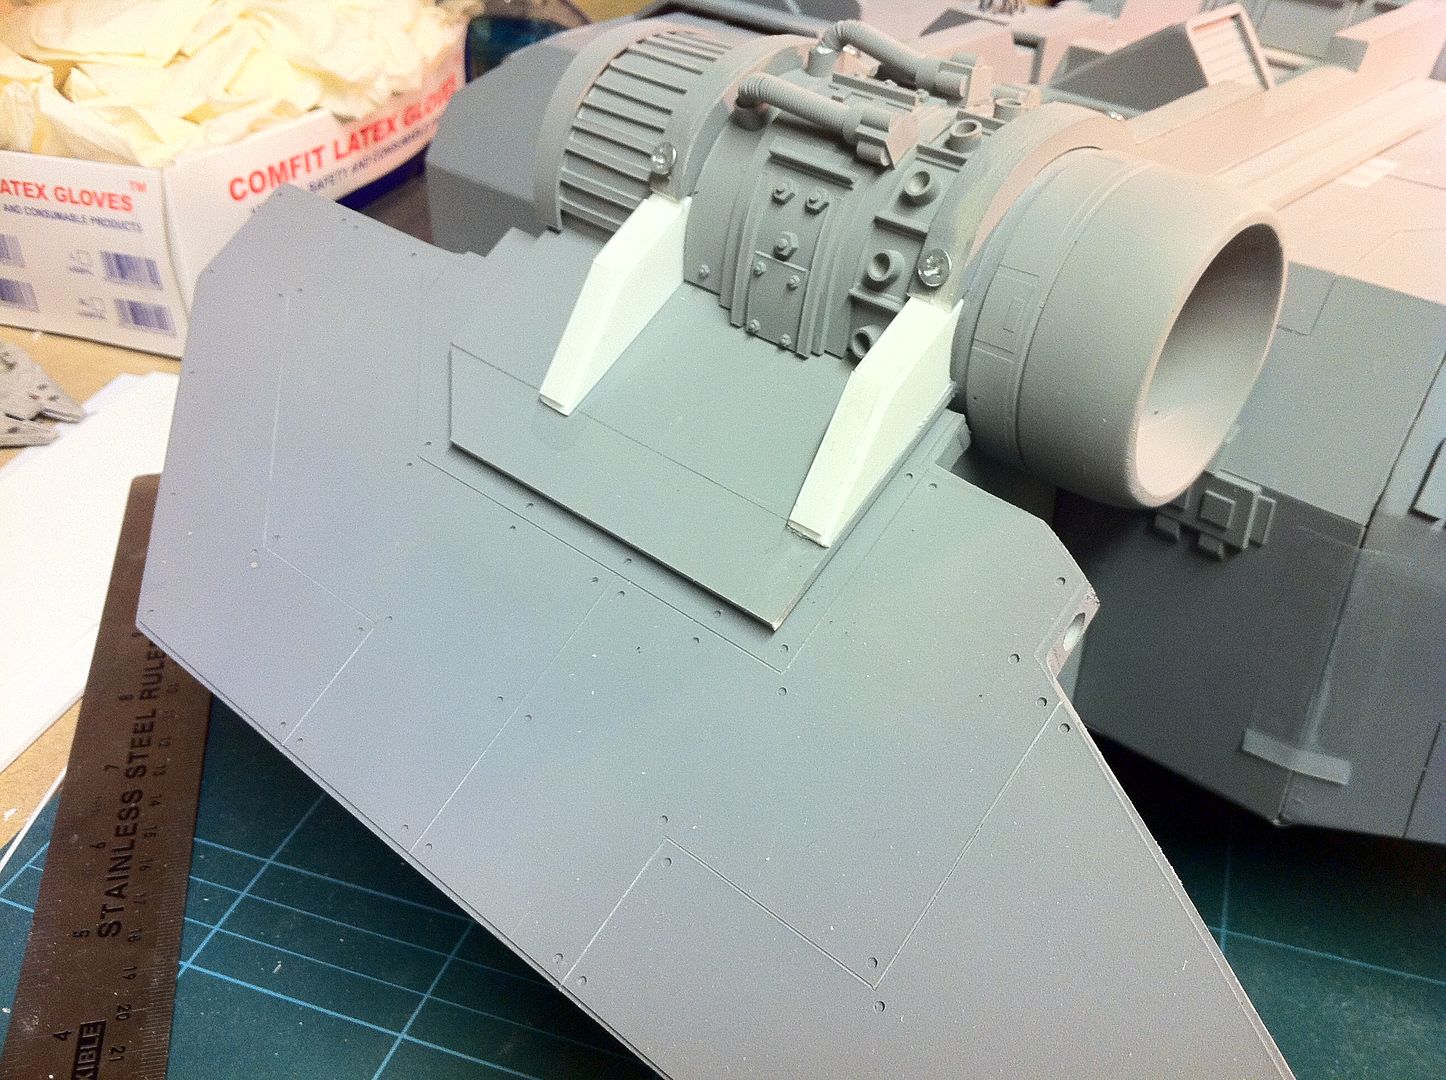
A couple of wing butresses and the wings are done(All except the skinning of the underside of the wings,
which cannot be done till the craft is painted, lighting installed and ready to have the wings sealed).
Interior mega detailing will commence tomorrow.
There will be hydraulics for the rear door(Which now has a stop bar to prevent it from opening too far),
oxygen cyllinders on the walls, fold down bench seats for passengers inbetween the bulkheads, a couple of
weapons racks(Shotguns, rifles, grenades etc) overhead storage bins for gear and packs and although it will not
be too visible, there is enough room behind the pilot's seat for a head. There will be a doorway with a "LADIES"
sign on it...
Anyway.
Here are the pics.

|
|
|
|
|
2011/08/05 16:36:01
Subject: Re:Scratchbuilding an Arvus
|
|
Been Around the Block
|
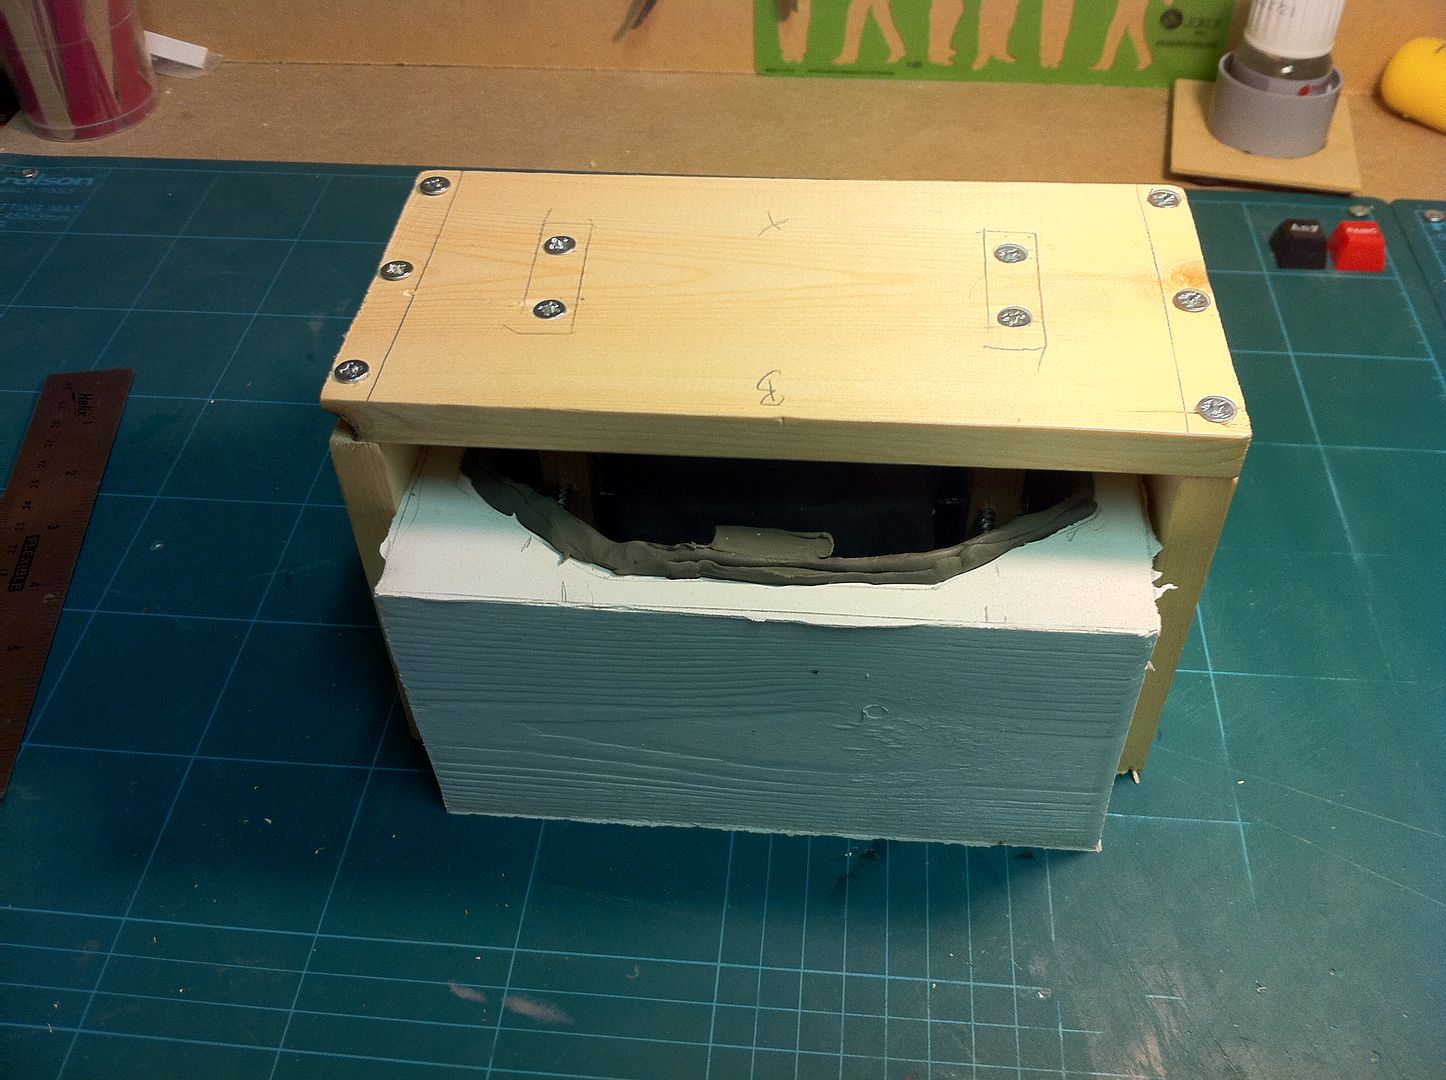
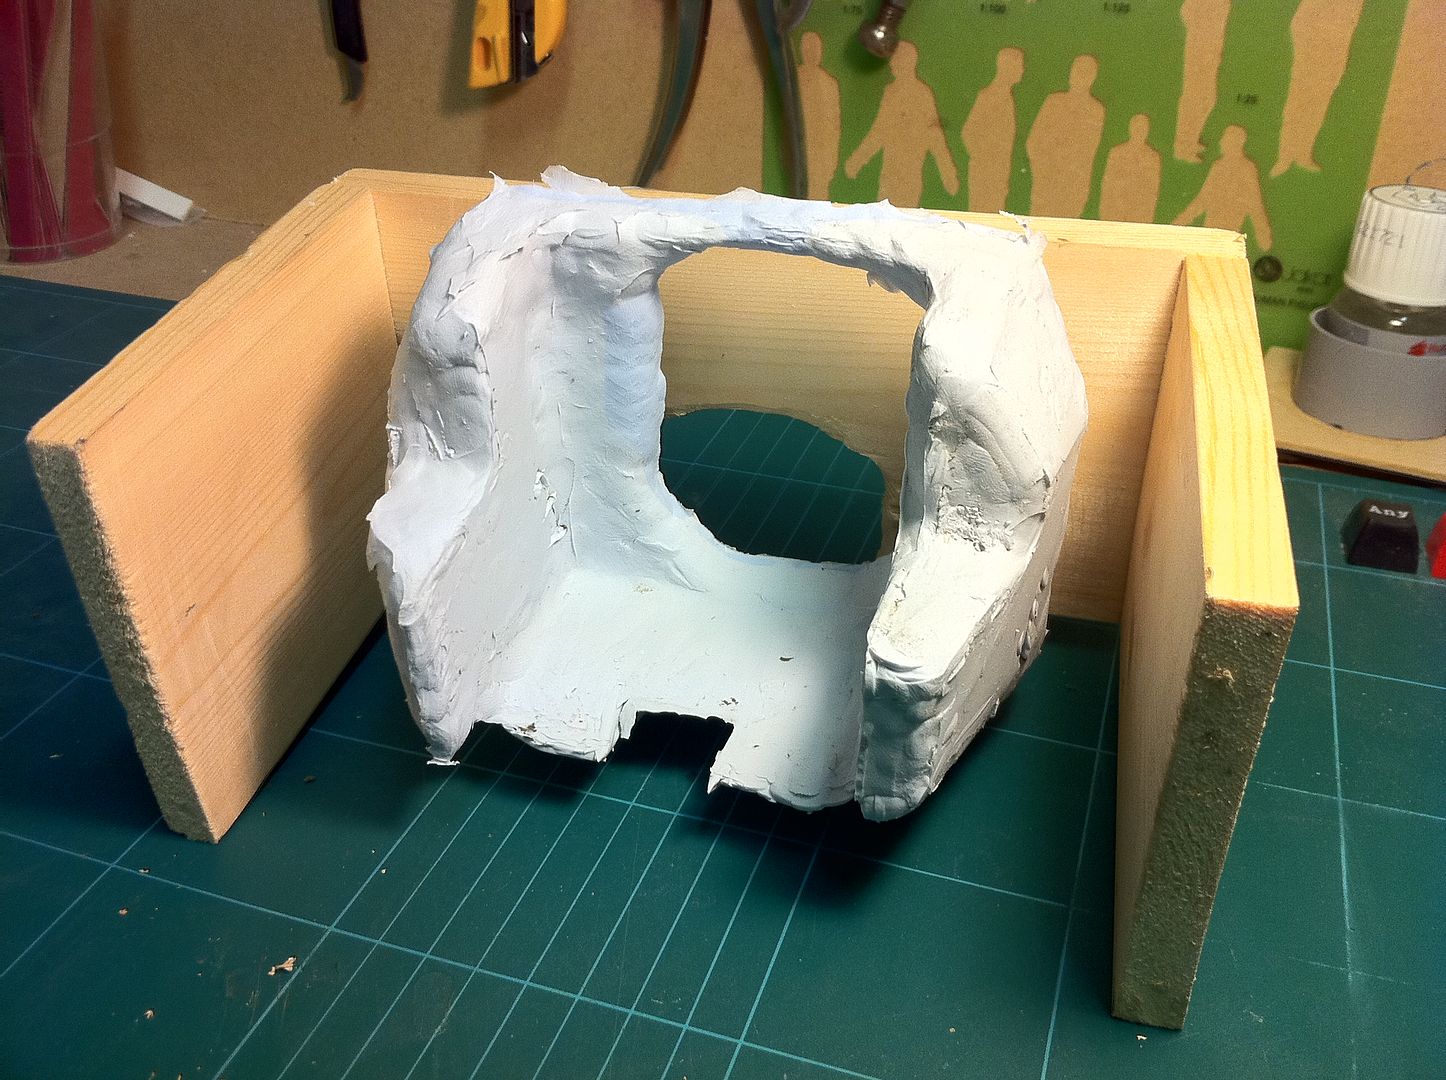
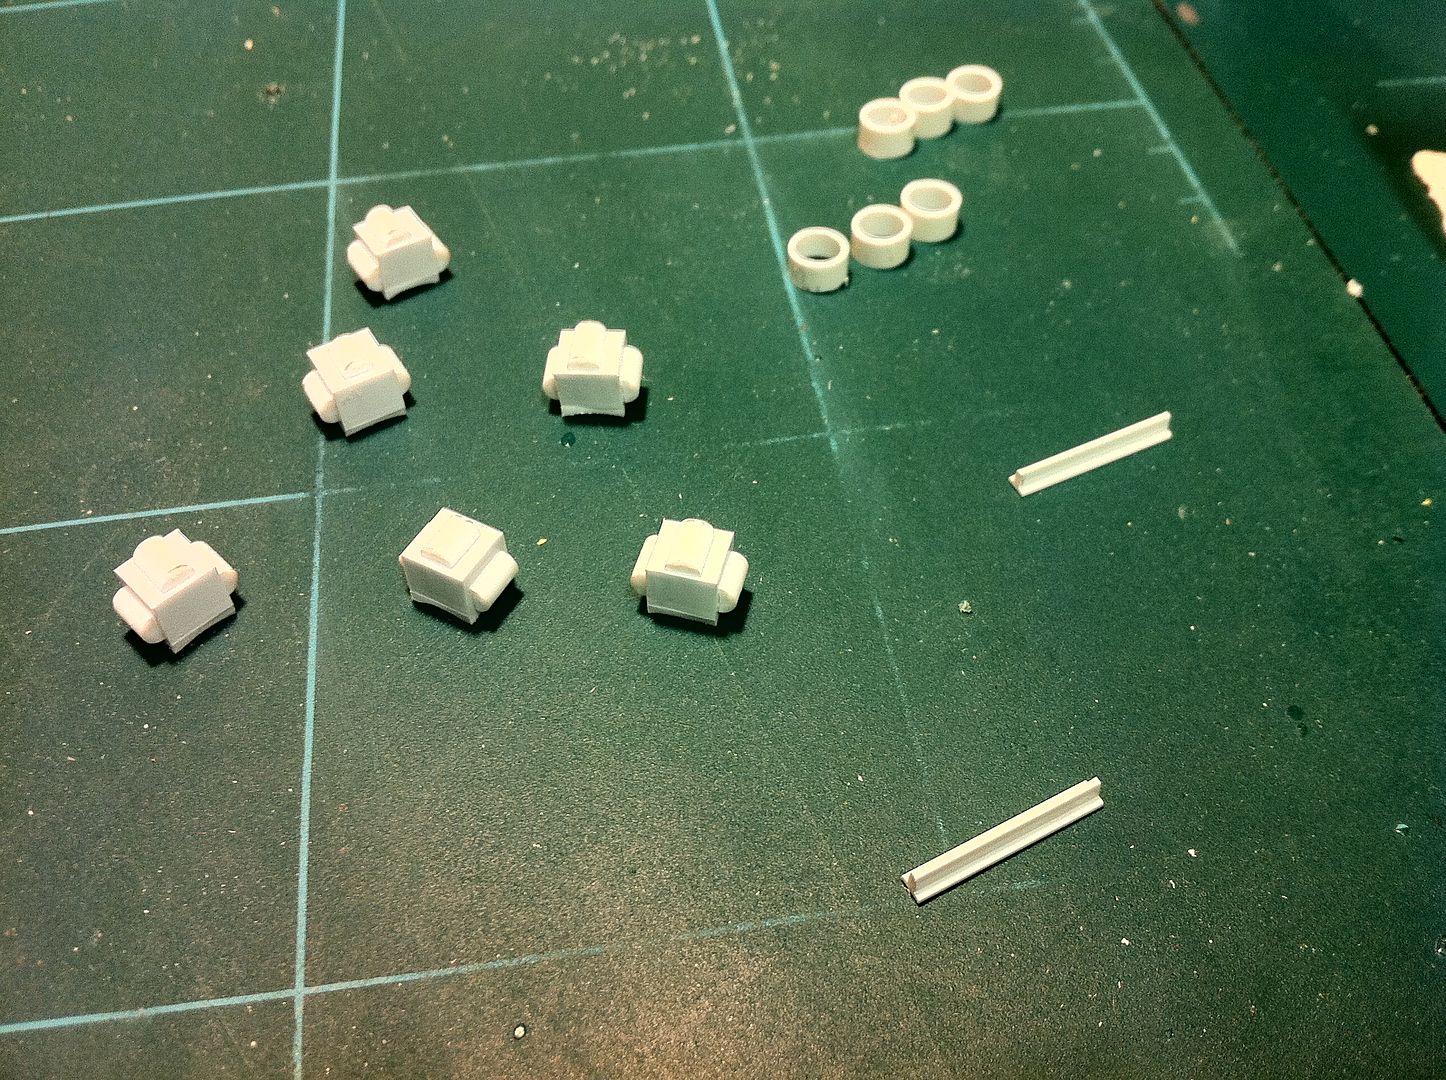
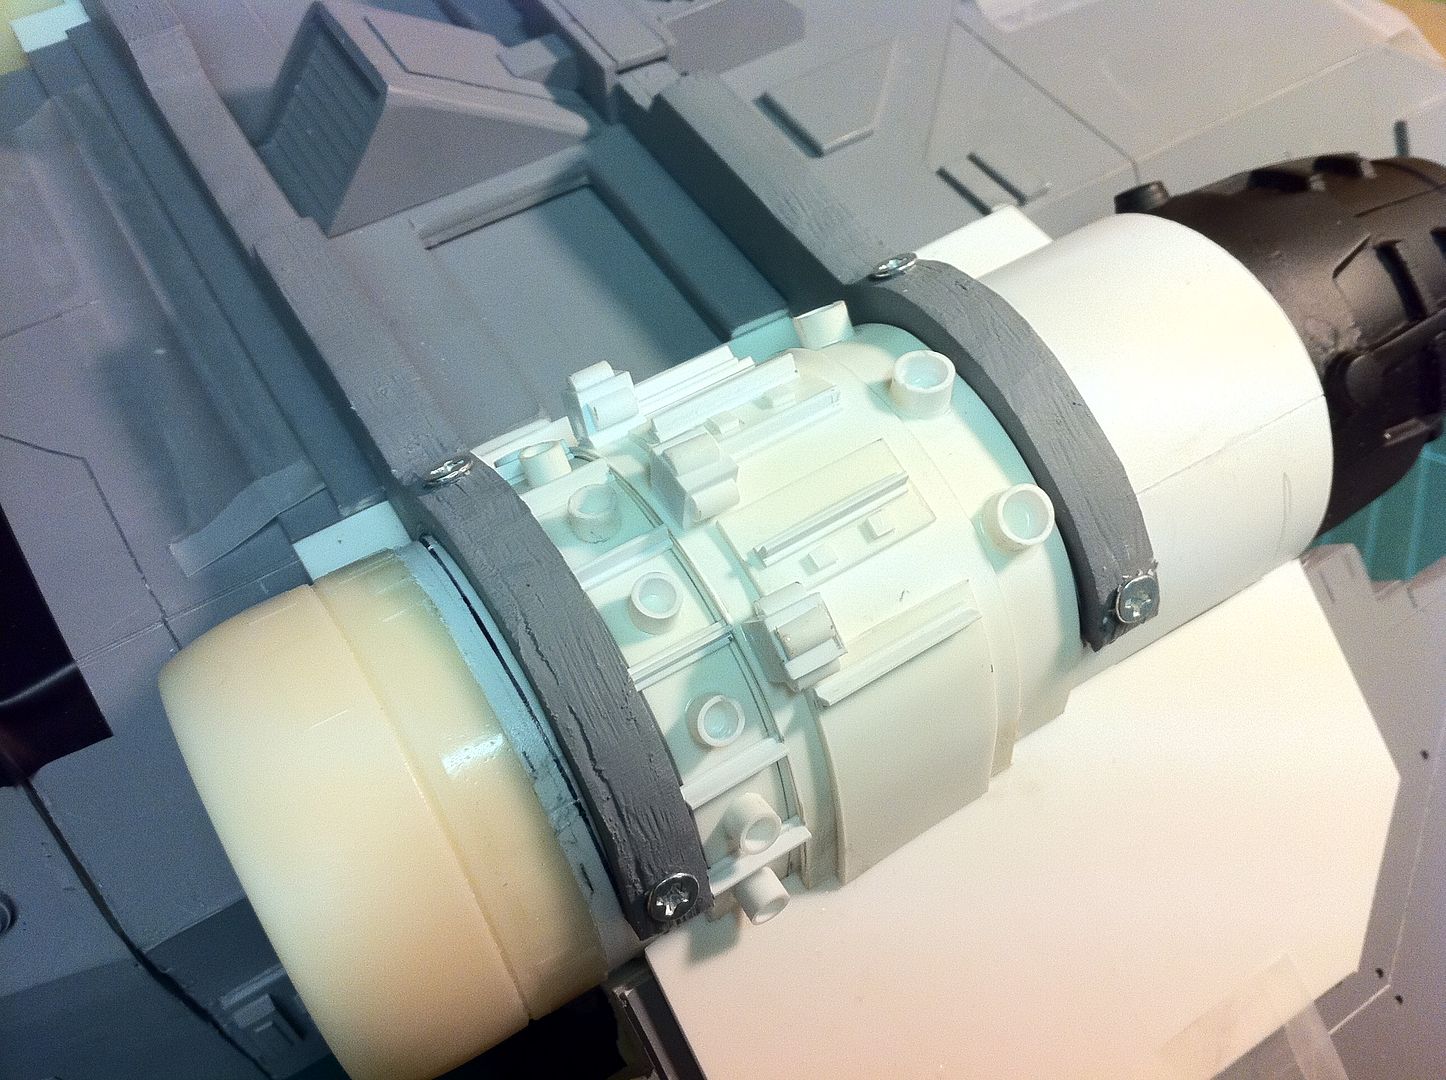
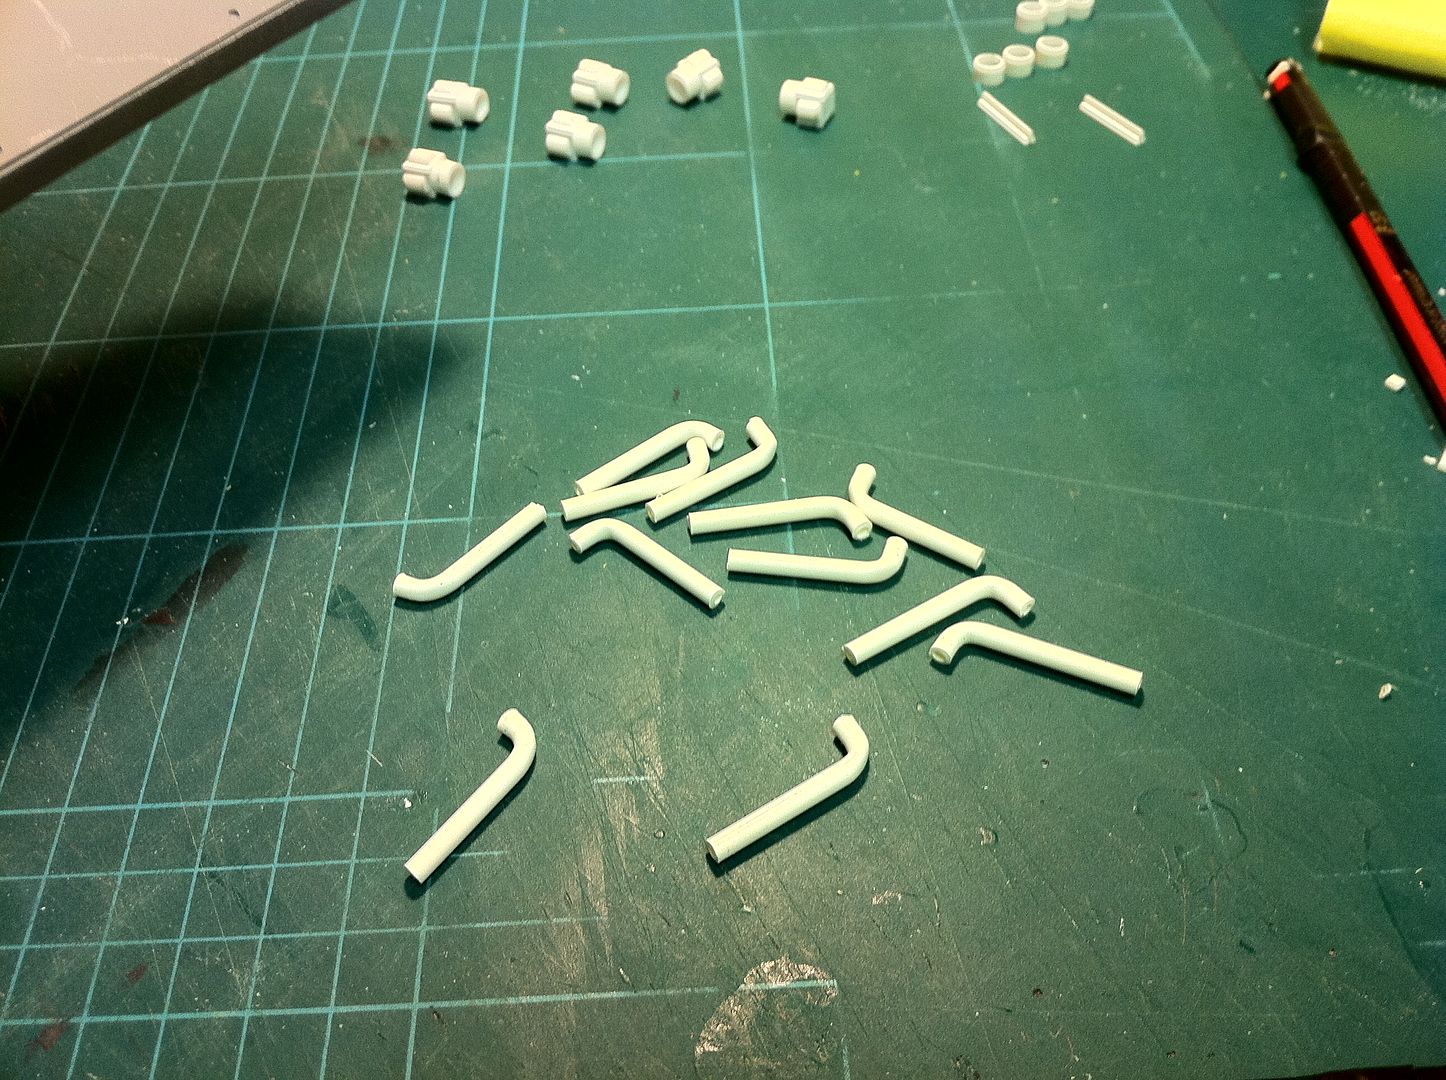
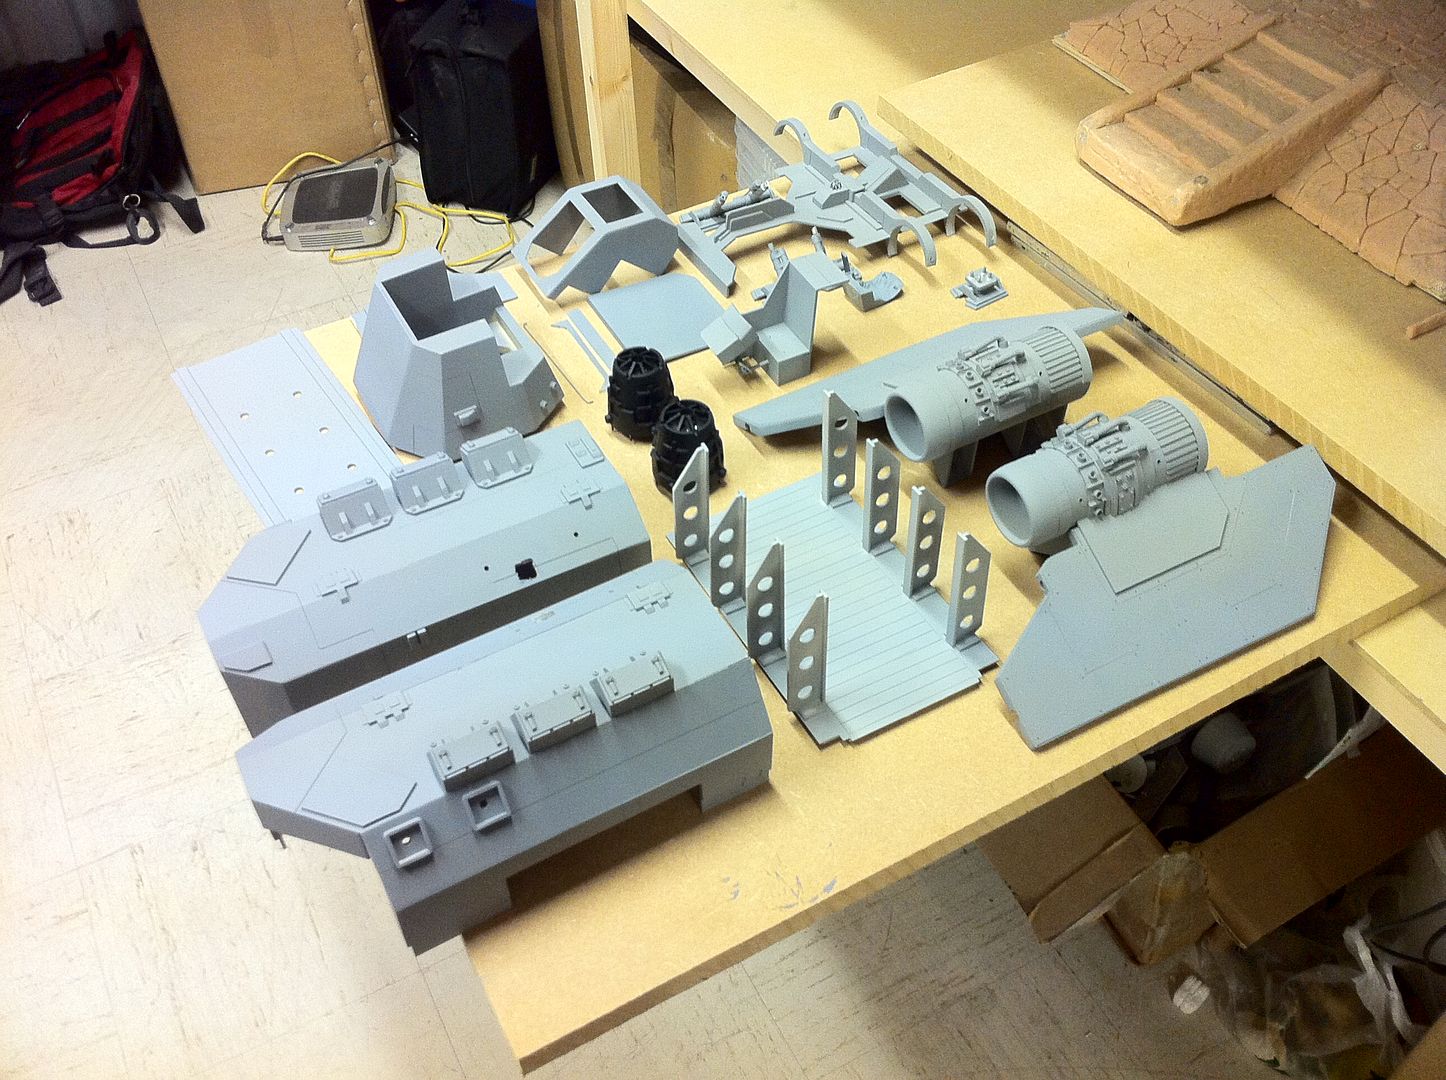
As is always the way, i was at work since 0800 today but, due to a friend coming in who wanted me to make him a mould box for some gaming wall part he had, i managed to get two lines drawn on the arvus... In pencil...
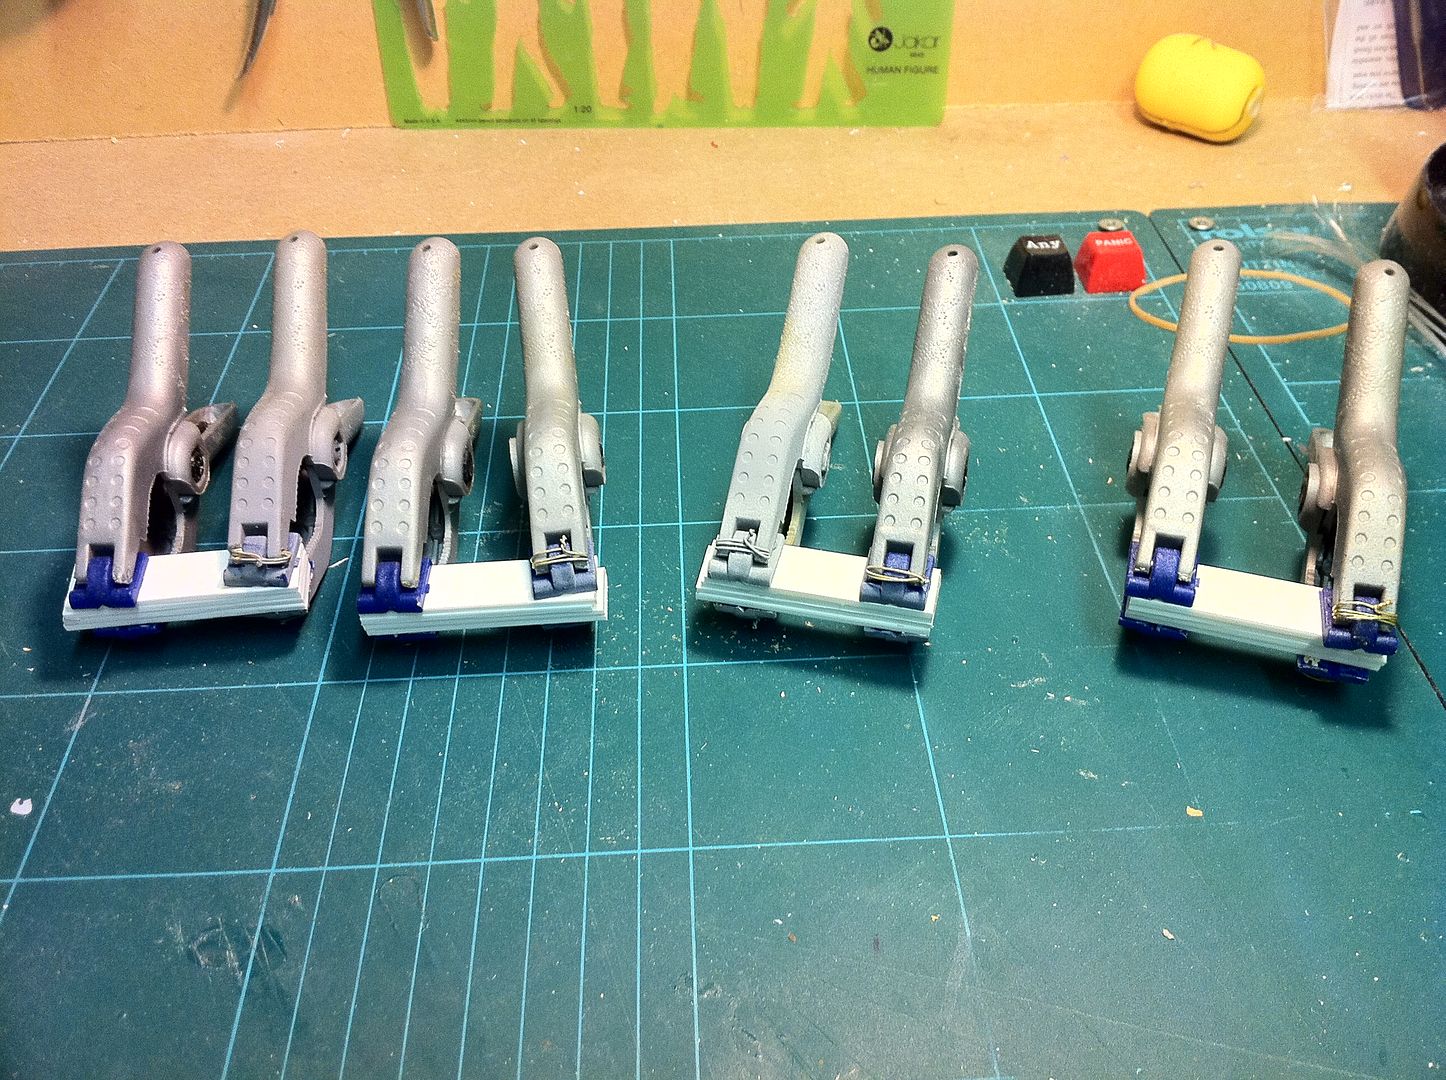
I did get pics of the component parts as they are right now though, and a pic of the engine intake vane parts.
Here are the pics:
|
|
|
|
|
2011/08/05 16:39:24
Subject: Scratchbuilding an Arvus
|
|
Veteran Inquisitorial Tyranid Xenokiller
|
Looks like it is comming along nicely. Great work, makes me inspired to do something like this. 
|
|
|
|
|
|
2011/08/05 16:47:40
Subject: Scratchbuilding an Arvus
|
|
Been Around the Block
|
40k Ninja wrote:Looks like it is comming along nicely. Great work, makes me inspired to do something like this.
Thanks a lot. I'd like to see your works if you ever start something.
Is it an Arvus you'd like to build? Or something else?
|
|
|
|
|
2011/08/06 00:16:27
Subject: Scratchbuilding an Arvus
|
|
Rampaging Reaver Titan Princeps
|
Glad to see you've finally got one of those tiny lazy people to actually help you. The details on the engine are superb and the light effect is great? Are you planning to do dials and a variety of colours on the dashboard?
|
"But me no buts! Our comrades get hurt. Our friends die. Falkenburg is a knight who swore an oath to serve the church and to defend the weak. He'd be the first to tell you to stop puling and start planning. Because what we are doing-at risk to ourselves-is what we have sworn to do. The West relies on us. It is a risk we take with pride. It is an oath we honour. Even when some soft southern burgher mutters about us, we know the reason he sleeps soft and comfortable, why his wife is able to complain about the price of cabbages as her most serious problem and why his children dare to throw dung and yell "Knot" when we pass. It's because we are what we are. For all our faults we stand for law and light.
Von Gherens This Rough Magic Lackey, Flint & Freer
Mekagorkalicious -Monkeytroll
2017 Model Count-71
|
|
|
|
|
2011/08/06 20:44:43
Subject: Scratchbuilding an Arvus
|
|
Been Around the Block
|
Llamahead wrote:Glad to see you've finally got one of those tiny lazy people to actually help you. The details on the engine are superb and the light effect is great? Are you planning to do dials and a variety of colours on the dashboard?
Lol. That's the only one who helps me out...
The dashboard WILL have dials. There also might be flashing buttons on the armrest. I am undecided on that.
More on that in later updates.
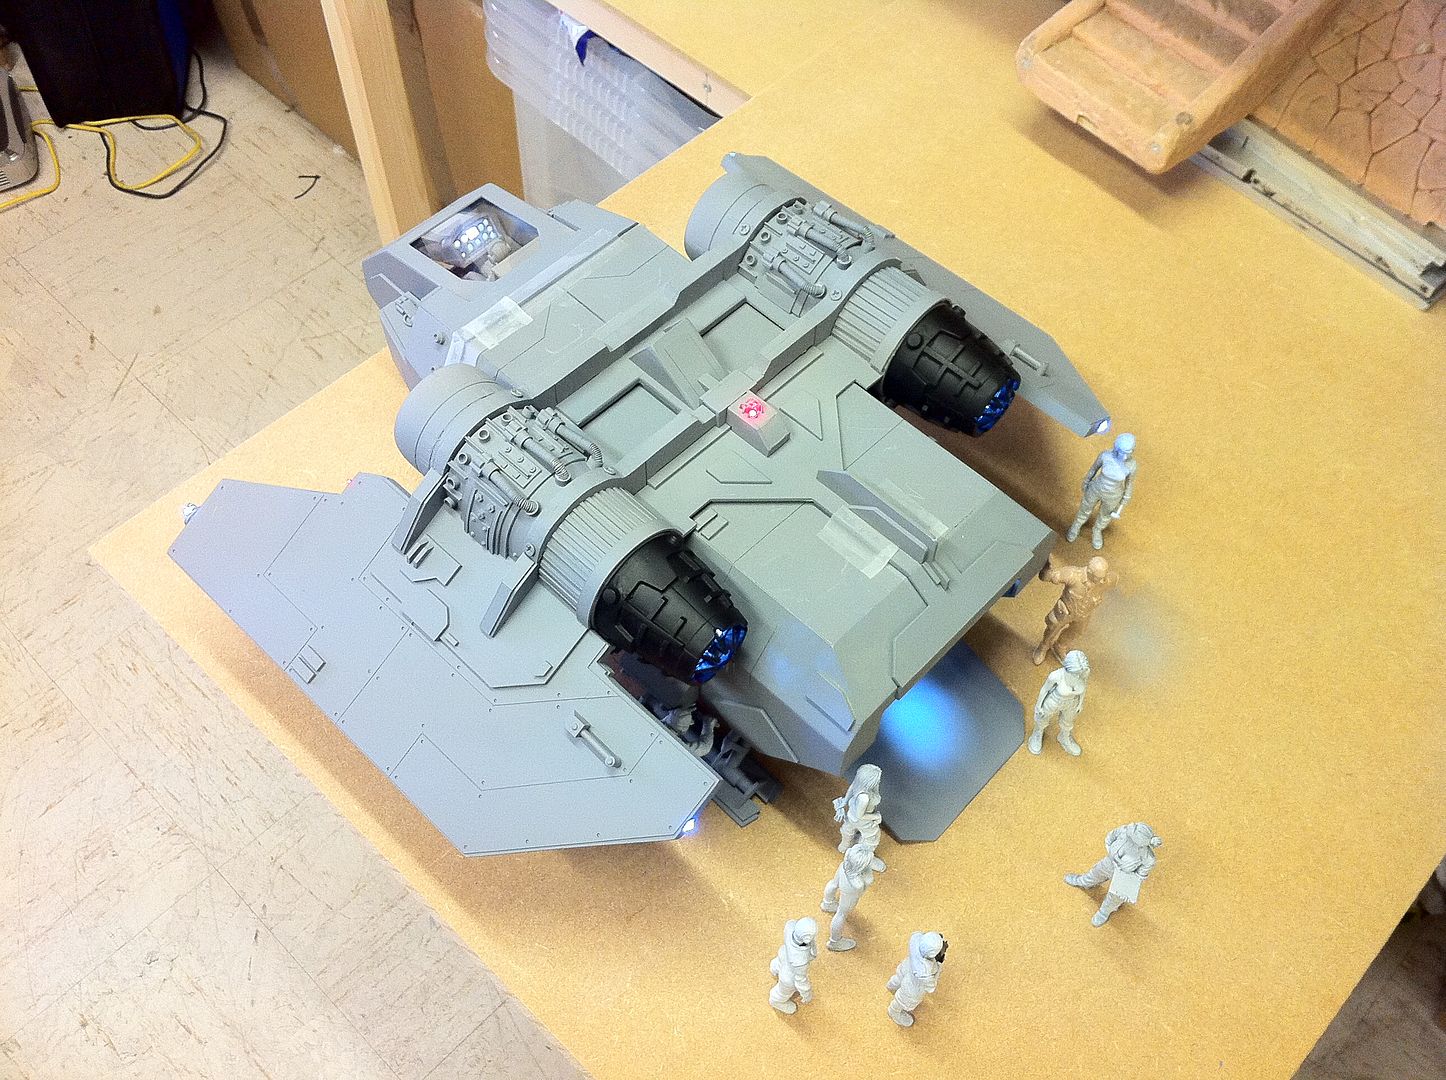
I added the engine details under the wing today. I didn't go overboard as no-one will ever see it because it will be hidden under the wing. But i will know it's there...
And for all the extra detail, the reason for that is that this build is absolutely gigantic. It deserves a bit extra, even if that is made up for this build. If the Arvus was real, you'd expect extremely fine detailing. Rest assured i WILL be going nuts with the detailing...
As it is, i am tempted to scribe new panelling on the whole craft BECAUSE it's so huge. A real craft would be COVERED in panels. All with rivetting. I have a rivetting tool for this one, incidentally.
I will accept thoughts on whether i should scribe the whole craft with new panelling. Feel free to chime in on that note.
I'll have to get a picture of it with me holding it. This one even dwarfs the 1/24 F-302 from Stargate i built a while ago(Not in wingspan of course, but in sheer volume).
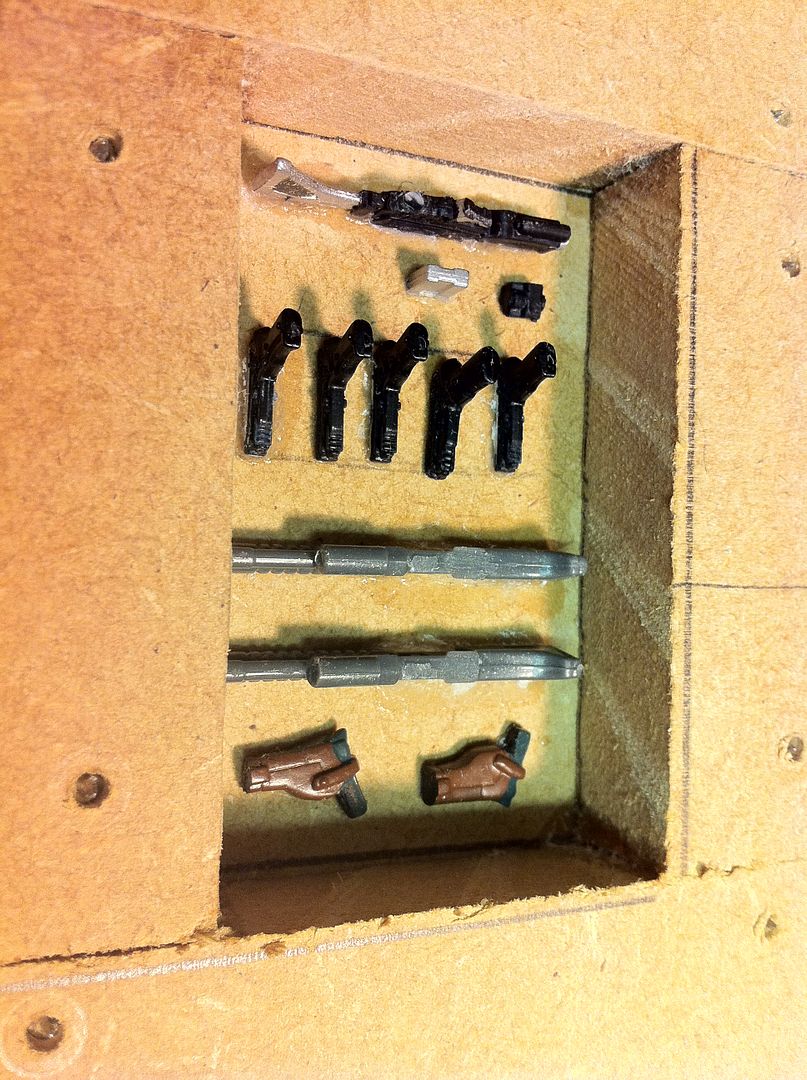
I Also found some weapons to use in the gun locker the Arvus will have. A GI JOE pistol(Slightly large in the scale i am doing, but at the back of the craft it will not be too noticable), a GI JOE rifle(I have cut that up into rifle body, scope mount, and ammo clip. I will cast multiples of the parts so i can not only have several rifles in the rack, i can also have a shelf full of extra ammo clips), two holstered Sigma Six pistols and two Megabloks HALO shotguns. The weapons locker will have enough to equip a ten man team with handguns, rifles and shotties, plus plenty of ammo for all weapons. The weapons locker will be on the front wall of the cargo bay, on the left after exiting the cockpit.
In addition, just for the hell of it, i took a picture of the mechanic gal standing at the back of the cockpit behind the pilot...
Here are the pics:

|
|
|
|
|
2011/08/08 20:56:47
Subject: Re:Scratchbuilding an Arvus
|
|
Been Around the Block
|
Okey cokey.
Time for a reasonable update. I hope everyone reading this is as impressed with the work here as i was when i flipped the switches to turn on the lighting systems today when i was finished.
First of all a list of what i got done.
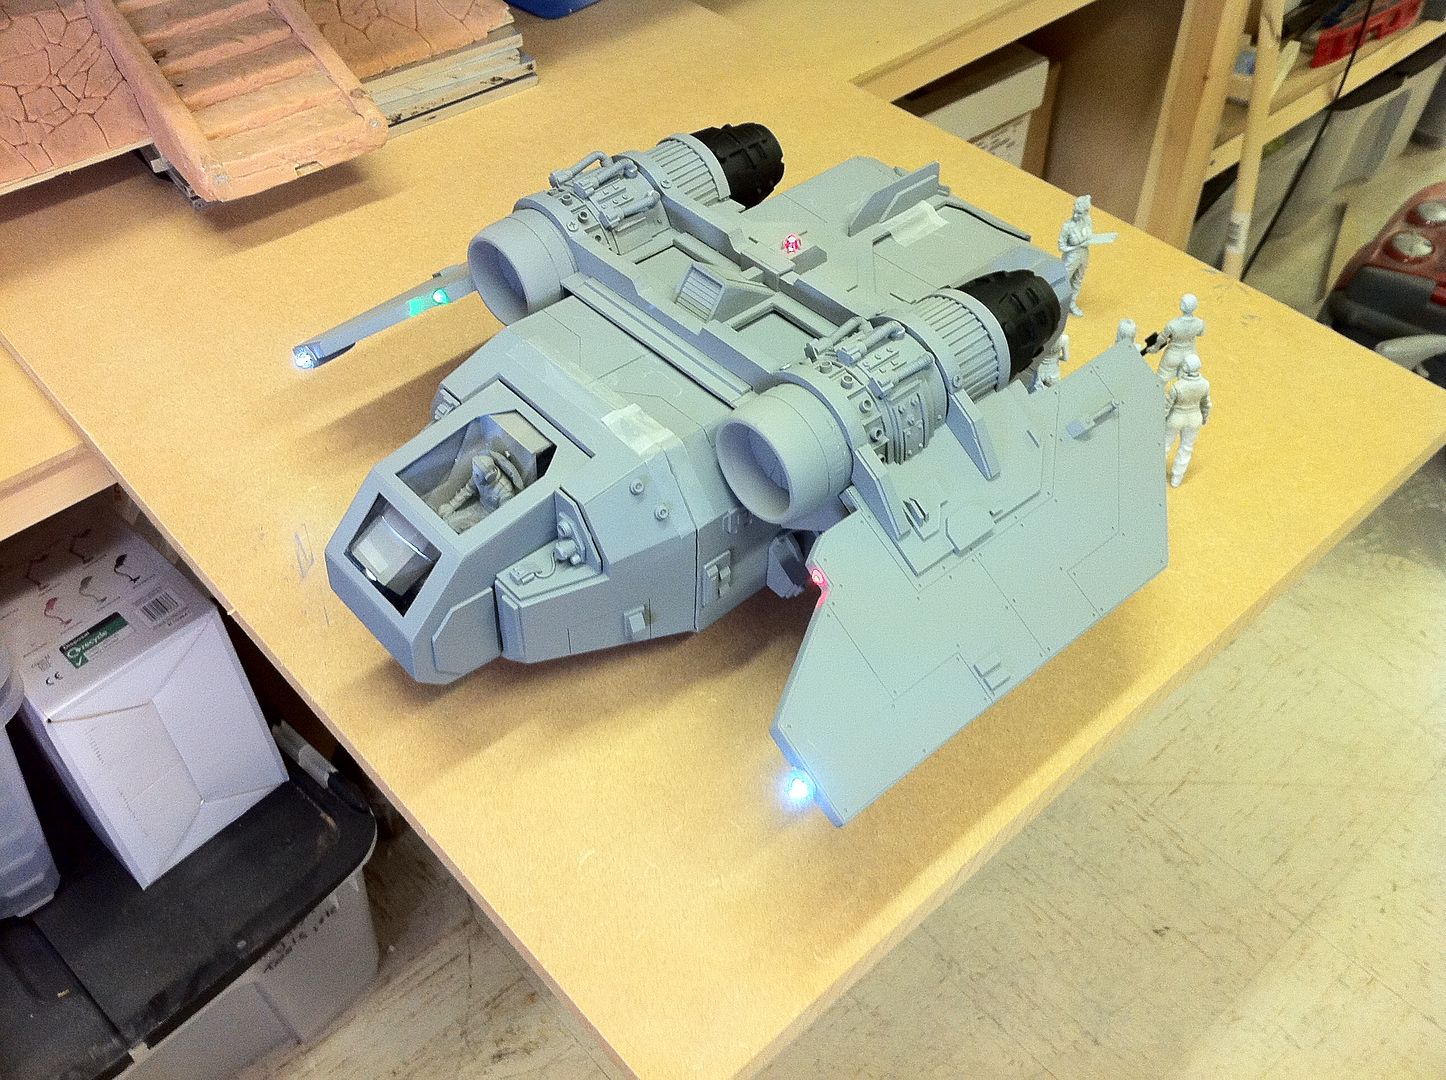
I got the upper wing support butresses finished finally. With them sanded into shape, i added the rest of the upper wing details.
I got the rest of the parts primed as i intend to show this off tomorrow to a few people i know. I decided i needed to do a full lighting test just to make sure there was room for everything, and that none of the lights needed extra cabling.
It turns out the cockpit dashboard light could do with being maybe 6cm longer. I'll get that done on wednesday at work.
But for now, everything seems to fit and, except for the undersides of the wings(Which i have yet to do), the craft is pretty much finished except for painting.
I have a few pics of the ship during the WIP stuff today, several of the lights all on, and three Youtube vids of the lights working.
I'd REALLY appreciate comments guys if you like the work.
Thanks for looking and enjoy today's update.
More soon, i promise.

And now the vids.
Enjoy!
http://www.youtube.com/watch?v=CVlNwJE8tlA
http://www.youtube.com/watch?v=zemu5cKicJg
http://www.youtube.com/watch?v=8FqKI25sXfI
|
|
|
|
|
2011/08/09 09:31:18
Subject: Scratchbuilding an Arvus
|
|
Shroomin Brain Boy
|
wow...the amount of detail you have been putting on the arvus is astonishing! i was out for a coupla days due to some health issues and this is waht i have missed... darn...but i was at least able to recap it all and i have to say the engines now look really superb! though i have to say (i might have overscrolled this part...) how will you cover up the RL screws you used to but parts together?
also i just love the figure of the hulkbuster iron man! this is a very good model and could even fit in as a dreadknight for 28mm warhammer...also the halo soldiers look very good with the arvus and could fully well be droptroops for the compartment!
brilliant work all over!!!
cheers, vik
|
|
|
|
|
|
2011/08/09 10:20:49
Subject: Scratchbuilding an Arvus
|
|

Regular Dakkanaut
|
Oh god! so impressive! this is the best scratch build i'd evere seen here!
now, all you need is to create some good internal detail and a good crew!
|
|
|
|
|
|
|


