| Author |
Message |
 |
|
|
|
|
Advert
|
Forum adverts like this one are shown to any user who is not logged in. Join us by filling out a tiny 3 field form and you will get your own, free, dakka user account which gives a good range of benefits to you:
- No adverts like this in the forums anymore.
- Times and dates in your local timezone.
- Full tracking of what you have read so you can skip to your first unread post, easily see what has changed since you last logged in, and easily see what is new at a glance.
- Email notifications for threads you want to watch closely.
- Being a part of the oldest wargaming community on the net.
If you are already a member then feel free to login now. |
|
 |
2015/10/12 16:30:52
Subject: Re:Mr Bug Man blog
|
|

Using Object Source Lighting
|
Thanks all. Time permitting I will keep doing some little tutorials 
@Bottle, I like the idea of using bits for the counters. I can also see lots of potential funny ideas for the gobbos like little mushroom people or simply mini squigs etc. That would a be a nice sculpting project too.
@Boss Salvage You should have grabbed the fella its a really nice sculpt.  the bases for the doomdiver are all individually home made and dead easy to do, I would spend more time casting stuff or learning how to do it because its something Im not really interested in, than just carving some putty.
|
|
|
|
 |
|
2015/10/12 17:00:58
Subject: Mr Bug Man blog
|
|

Omnipotent Lord of Change
|
Oh! Well nicely carved in that case. What white material are you using? And I do see some ballast in there, now that I look closer.
- Salvage
|
|
|
|
|
|
2015/10/12 17:59:20
Subject: Re:Mr Bug Man blog
|
|
Using Object Source Lighting
|
I used DAS clay, first do like a huge thin pancake and let it dry. Once its dried just cut chunks of it so you can make rocks for your base take the time to carve some scratches too. Dip it in diluted pva glue too seal the rocks. Once fried its ready to be added to your bases.
You can do this with plaster too but its more brittle.
|
|
|
|
|
|
2015/10/12 18:28:16
Subject: Mr Bug Man blog
|
|
Omnipotent Lord of Change
|
You know, I think I remember Migs doing his bases with a similar process. Cheers for the rundown Nav
- Salvage
|
|
|
|
|
|
2015/10/15 21:27:40
Subject: Re:Mr Bug Man blog
|
|
Using Object Source Lighting
|
Random update, Im painting some Tau, Yay!
Going for very strong contrasts and colours, so far just reds.
WIP pic

|
|
|
|
|
|
2015/10/18 12:18:41
Subject: Re:Mr Bug Man blog
|
|
Using Object Source Lighting
|
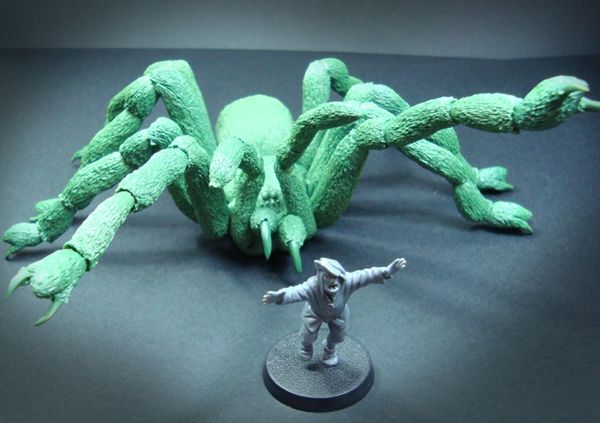
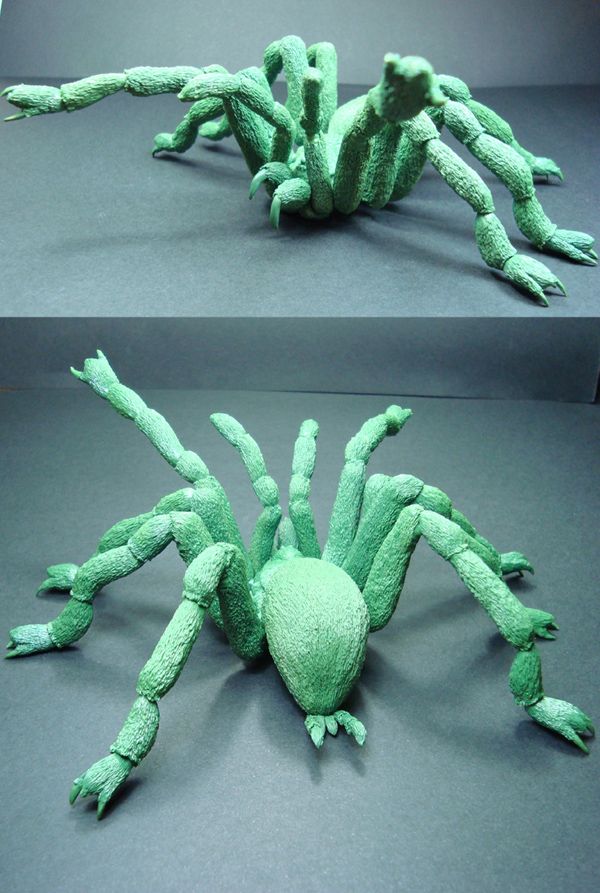
Spider time.
Years a go I sculpted a Huge tarantula for otherworld miniatures and I will use it for my 2nd Arachnarok for AOS.
The bits
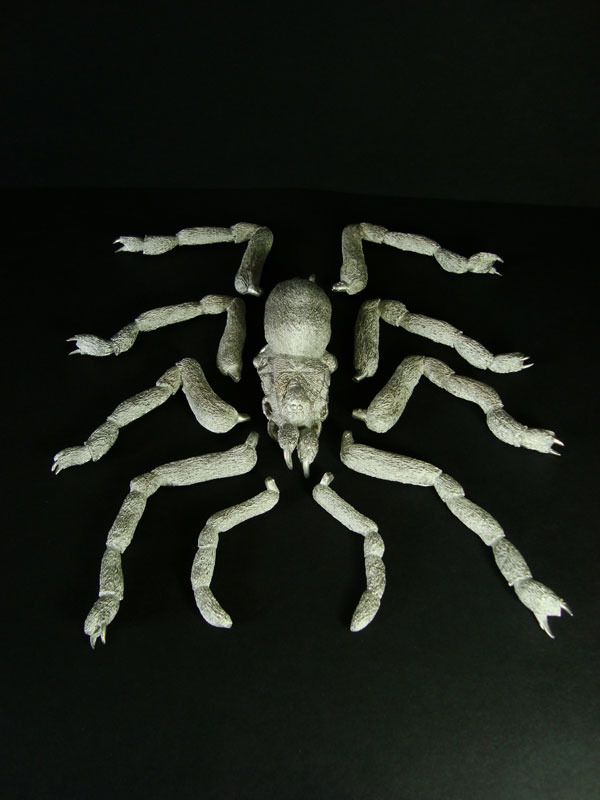
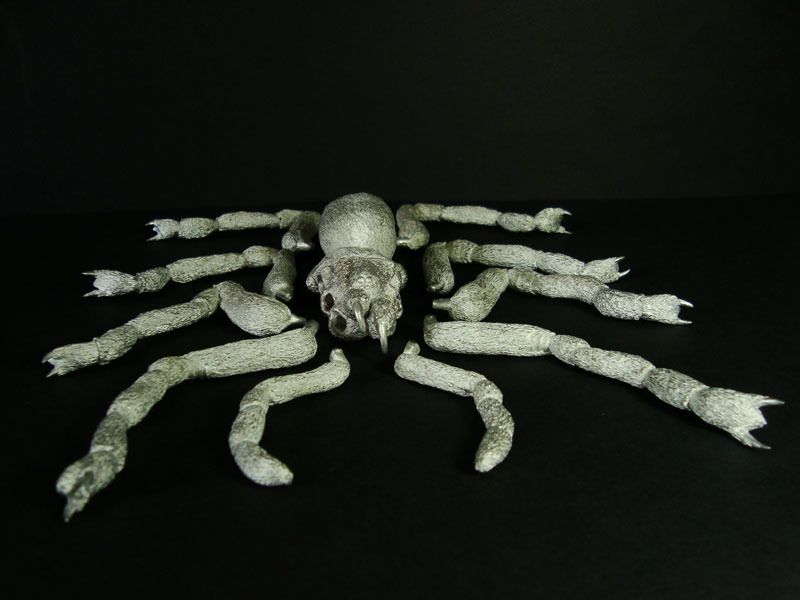
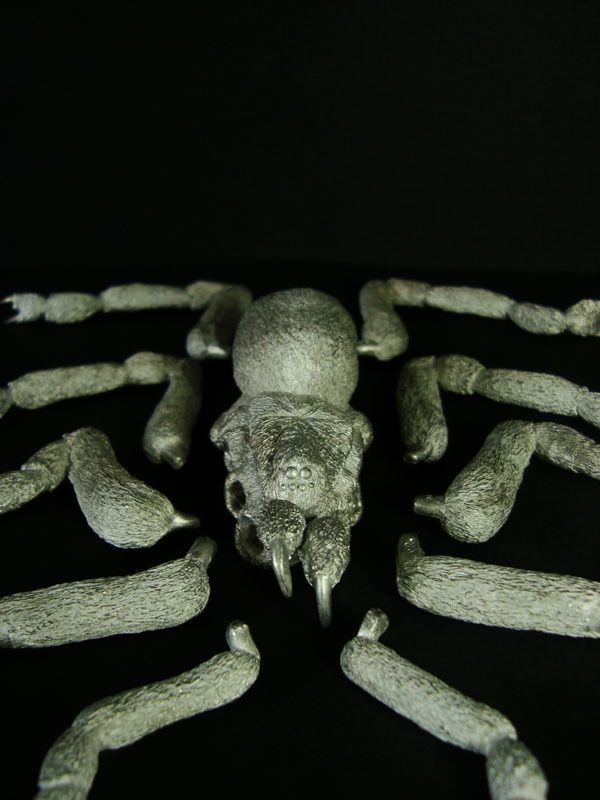
All metal goodness!
Comparison pics
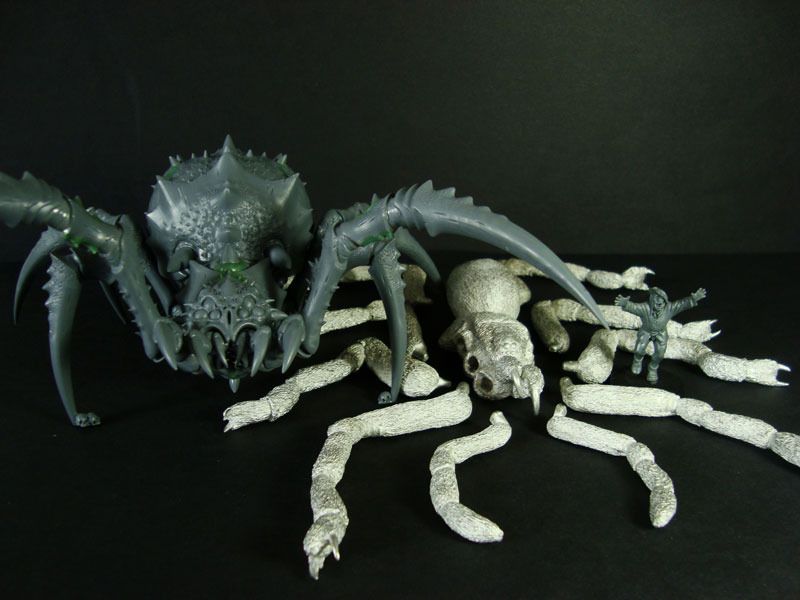
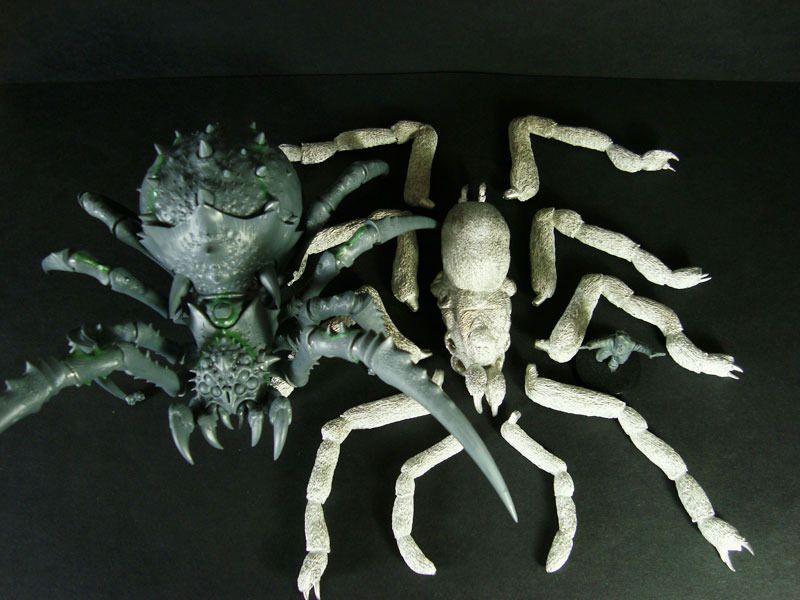
It has a oldschool feel it and it will look great with 4 gobbos with spears on its back.
|
|
|
|
|
|
2015/10/18 14:49:36
Subject: Mr Bug Man blog
|
|
[DCM]
Dankhold Troggoth
|
The long grass tutorial is great, and that is one creepy looking spider!
|
|
|
|
|
2015/10/24 13:48:20
Subject: Re:Mr Bug Man blog
|
|
Using Object Source Lighting
|
|
|
|
|
|
|
2015/10/24 18:56:30
Subject: Re:Mr Bug Man blog
|
|
The Hammer of Witches
|
Amazing work! Your tips on using GS are highly valued.
|
|
|
|
|
|
2015/10/24 21:59:31
Subject: Mr Bug Man blog
|
|
Nasty Nob
|
Nice whip work, would be cool to see the rest of the army on here
|
|
|
|
|
|
2015/10/25 16:28:51
Subject: Re:Mr Bug Man blog
|
|
Using Object Source Lighting
|
Thank you all I will post a tutorial of the Whip very soon, hopefully will give you some ideas for your own sculpting projects.
On the top of my sculpting projects Im now making a huge rock giant and this is my concept for it.
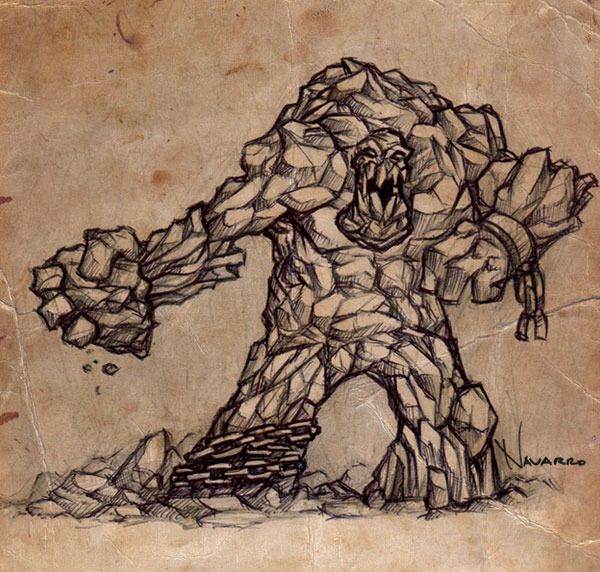
I will lose the chains idea, but apart from that its pretty close of what Im sculpting...
|
|
|
|
|
|
2015/10/25 22:17:36
Subject: Mr Bug Man blog
|
|

Arch Magos w/ 4 Meg of RAM
|
Sweet! Lovely concept sketches - should look really fantastic sculpted up
|
|
|
|
|
|
2015/10/25 22:28:00
Subject: Mr Bug Man blog
|
|
[DCM]
Dankhold Troggoth
|
That's a sweet concept, can't wait to see you start work on the sculpt!
|
|
|
|
|
2015/10/31 13:47:37
Subject: Re:Mr Bug Man blog
|
|
Using Object Source Lighting
|
Thanks folks.
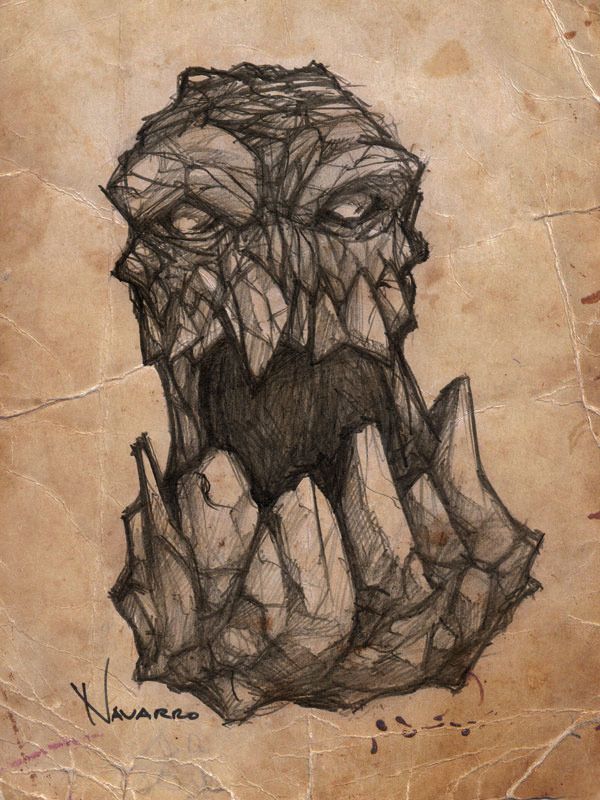
I leave you a teaser of my latest Commission sculpt...

Happy Halloween DAKKA!
|
|
|
|
|
|
2015/10/31 13:58:35
Subject: Mr Bug Man blog
|
|
Pious Palatine
|
Cool spider. Looming forward to the reveal of the creature lurking in the dark.
EDC
|
|
|
|
|
2015/10/31 22:27:32
Subject: Mr Bug Man blog
|
|
Fixture of Dakka
|
That looks like an octopus.
|
|
This message was edited 1 time. Last update was at 2015/10/31 22:28:30
|
|
|
|
|
2015/11/29 09:43:14
Subject: Re:Mr Bug Man blog
|
|
Using Object Source Lighting
|
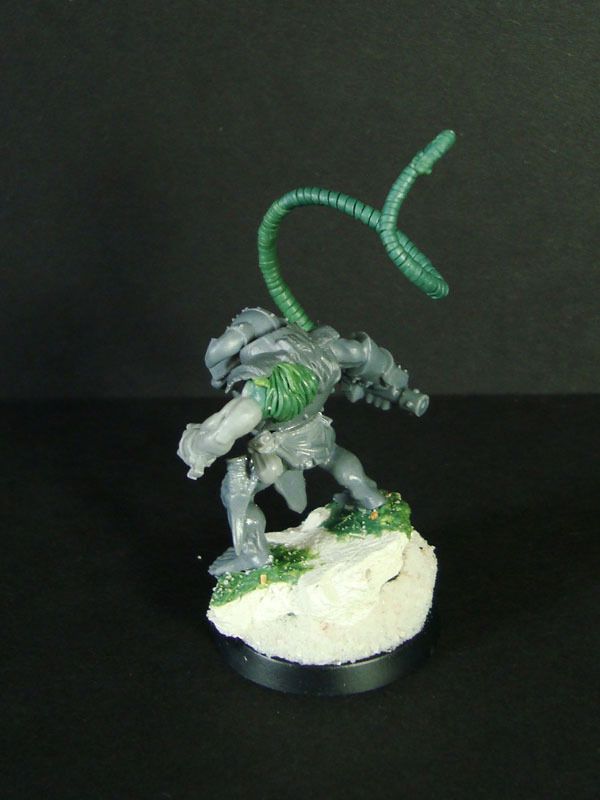
Time for another tutorial.
_____
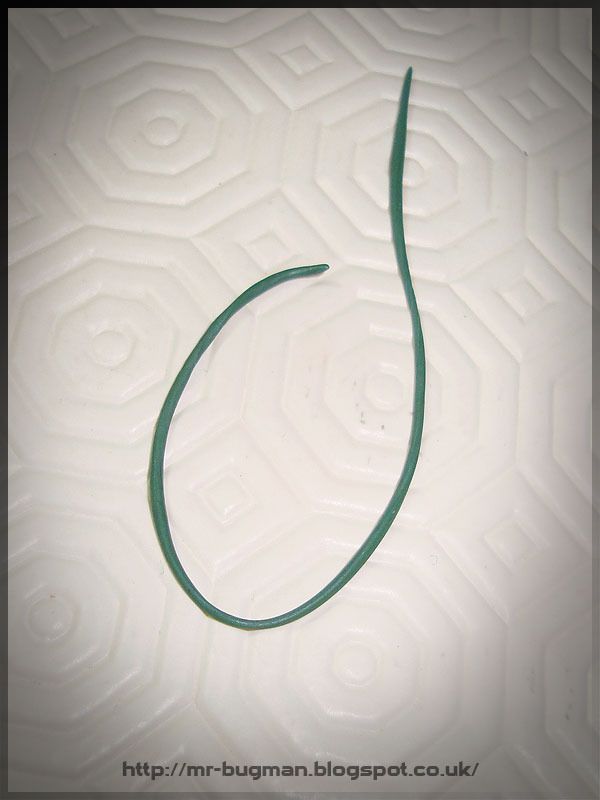
I have just finished another little greestuff tutorial and this time we will sculpt a Whip. These things are useful if your looking to add some spice to your chariot crew or just a beast handler, so lets pick up a paper clip and some greenstuff.

Just straighten the Clip and cover it with greenstuff, try to make it as thin as possible because this will get fatter on the next stage. The reason we do this is because the putty will stick better to putty rather than to the metal. You should end up with something like this.

Let it cure for 2.5 hours instead of the normal 4 so its still a bit sticky and ideal to take the next layer.
So now roll a really thin huge sausage of fresh putty.
Start with the bottom of the paper clip but leave that extremely free of putty because this will be the bit that you will stick to your mini.

The fun begins now. Pick your favorite flat sculpting tool and grab the other end of the paper clip.
With your fingers on the clip you slowly rotate the cured sausage and with your sculpting tool you tap, tap, tap the fresh greenstuff into place. Notice that the fresh sausage is now flat as you tap it into place. Keep on tapping!

As you approach the end of the Whip its good to make your fresh sausage thiner and thiner because it looks better. Grab the clip with a tool to help with the sculpting of the final tip of the Whip.

On the very end of the Whip I wanted some kind of metal thing so I added some miniscule rivets to it.
I will explain riveting with greenstuff later on in this tutorial. Remember do your riveting with fresh putty rivets on top of fresh greenstuff surface so that the bound is stronger and you have more control.

Let it fully dry overnight. Next day things should look like this unless you sculpted under the influence of a good whisky.

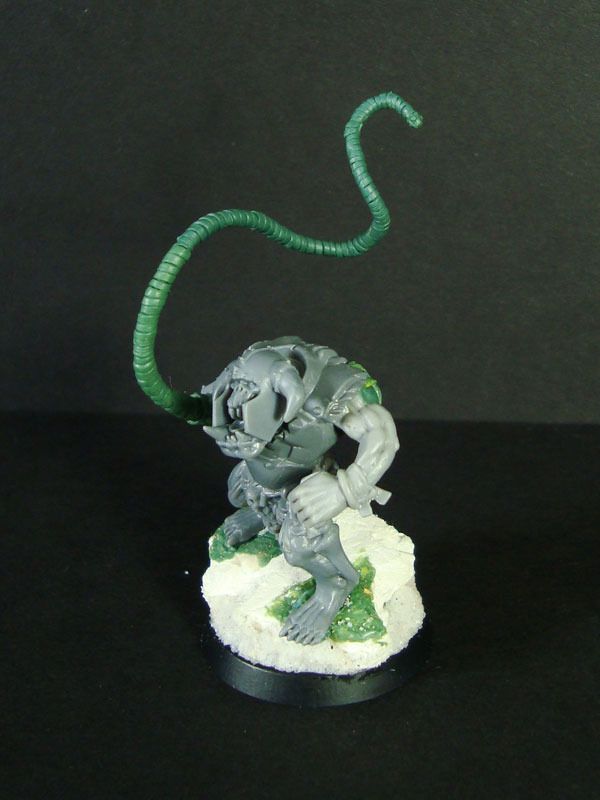
Now pick up your mini and drill a hole on the hand that will hold the Whip. My subject is a Orc Bully.

Now you can bend the, covered with greenstuff, paperclip at the angles you choose. I went with some dynamic Indiana Jones kind of angles. When your happy with it you can superglue the clip to the drilled hole but just leave a gap so you can sculpt some more details.

Almost there. Lets finish up the Whip hand grip.
Mix a small bit of putty and apply it to the gap.

Pick a sculpting tool and tap it into place so its stuck to the mini in a way that will not move.

Still looks very soft but because now the putty its stuck to the mini we will use a sharp flat tool to sharpen those edges. First pull it outside then push inside do it many times until you have something sharp.

Only some riveting left to do now, be quick because you want to set them while the surface is still sticky. So make some tiny balls of greenstuf (1), then push them into place(2) and that will make them flat and big. Finally with the fine tip of a sculpting tool reduce the size of the rivet by making circular movements on the edges of the rivet (3).

You can see how the rivets are now smaller and blended into the surface.
Job done.

Pick another bottle of Whisky and watch the putty dry...


____
I really need to create some articles pages here with all my tutorials but for now you can check them on this thread, or on my blog.
Cheers
|
|
|
|
|
|
2015/11/29 10:01:28
Subject: Mr Bug Man blog
|
|
Arch Magos w/ 4 Meg of RAM
|
Great stuff man. Whip looks ...cracking 
Really nice and helpful tut 
|
|
|
|
|
|
2015/11/29 10:07:33
Subject: Mr Bug Man blog
|
|
Pious Palatine
|
Wow. Cool tutorial.
Thanks for sharing.
EDC
|
|
|
|
|
2015/11/29 10:56:19
Subject: Mr Bug Man blog
|
|
Decrepit Dakkanaut
|
Wonderful tutorial!- Thank you!
|
|
|
|
|
|
2015/11/30 15:09:32
Subject: Mr Bug Man blog
|
|
Omnipotent Lord of Change
|
An excellent tutorial! Related: what tool is that in Step 3: Circular Movement? Is it just a clay shaper? Seems pretty big!
- Salvage
|
|
|
|
|
|
2015/11/30 18:12:45
Subject: Mr Bug Man blog
|
|
Using Object Source Lighting
|
 Boss Salvage wrote: Boss Salvage wrote:An excellent tutorial! Related: what tool is that in Step 3: Circular Movement? Is it just a clay shaper? Seems pretty big!
- Salvage
Yeah its a HUGE clayshapper, I find them quite useful sometimes. THis one had a really sharp tip which is quite important when sculpting.
THanks all! The Huge rock monster is almost completed too.
|
|
|
|
|
|
2015/11/30 20:16:10
Subject: Mr Bug Man blog
|
|
Omnipotent Lord of Change
|
 NAVARRO wrote: NAVARRO wrote:Yeah its a HUGE clayshapper, I find them quite useful sometimes. THis one had a really sharp tip which is quite important when sculpting.
You happen to know what it's called / where I can get one? 
- Salvage
|
|
|
|
|
|
2015/11/30 21:13:08
Subject: Mr Bug Man blog
|
|
Fixture of Dakka
|
Great tutorial Nav! Always love seeing the tips on how to sculpt, even if I know my attempts will fall short
Here Salvage. I think the one he uses is the left most one, or the one in the middle there.
|
|
|
|
|
|
2015/11/30 21:56:59
Subject: Re:Mr Bug Man blog
|
|
Using Object Source Lighting
|
I have a collection of those shappers and I find different brands a bit everywhere… These big ones I got a deal at Lidl some years ago but any clayshapper with a fine tip will do just fine.
|
|
|
|
|
|
2015/12/01 15:36:16
Subject: Mr Bug Man blog
|
|
Omnipotent Lord of Change
|
Great link Wehr! Nice set, quite cheap. I actually have a set of shapers that I've tried to get mileage out of, but they're not hard enough to do much with GS. From all I've seen, I should have gotten the white ones, not the black ones 
*fixes that*
- Salvage
|
|
|
|
|
|
2015/12/01 18:41:07
Subject: Mr Bug Man blog
|
|
Using Object Source Lighting
|
Boss Salvage wrote:Great link Wehr! Nice set, quite cheap. I actually have a set of shapers that I've tried to get mileage out of, but they're not hard enough to do much with GS. From all I've seen, I should have gotten the white ones, not the black ones
*fixes that*
- Salvage
Usually the black are the hard ones then grey for medium and white for soft. The thing with clayshappers is that they are good for fine tuning a form by making it smoother or sharper but to really make deep recesses on the GS you should use some metal tools.
|
|
|
|
|
|
2015/12/01 18:46:28
Subject: Mr Bug Man blog
|
|
Omnipotent Lord of Change
|
NAVARRO wrote:Usually the black are the hard ones then grey for medium and white for soft. The thing with clayshappers is that they are good for fine tuning a form by making it smoother or sharper but to really make deep recesses on the GS you should use some metal tools.
Hmm. When I bought mine, I recall having the option of going one step harder, but didn't take it, and ever since I've felt like my rubber tools hardly budge the GS I'm trying to smooth out after ravaging them with metal tools. Not sure I want more, softer tools, though I still like that big pointy lad ...
- Salvage
|
|
|
|
|
|
2015/12/01 20:01:10
Subject: Mr Bug Man blog
|
|
Fixture of Dakka
|
Boss Salvage wrote: NAVARRO wrote:Usually the black are the hard ones then grey for medium and white for soft. The thing with clayshappers is that they are good for fine tuning a form by making it smoother or sharper but to really make deep recesses on the GS you should use some metal tools.
Hmm. When I bought mine, I recall having the option of going one step harder, but didn't take it, and ever since I've felt like my rubber tools hardly budge the GS I'm trying to smooth out after ravaging them with metal tools. Not sure I want more, softer tools, though I still like that big pointy lad ...
- Salvage
I am trying so hard to make some puerile joke based on this post, but I just can't do it. I wonder if I am coming down with something...
|
|
|
|
|
|
2015/12/01 20:40:02
Subject: Mr Bug Man blog
|
|
[DCM]
Dankhold Troggoth
|
Wow, what a great tutorial, awesome pictures! Cheers Navarro
Side note: Salvage, what are you working on that requires clay shapers? Hope some of this is inspiring you to jump back into your minis projects a bit
|
|
|
|
|
|
|