| Author |
Message |
 |
|
|
|
|
Advert
|
Forum adverts like this one are shown to any user who is not logged in. Join us by filling out a tiny 3 field form and you will get your own, free, dakka user account which gives a good range of benefits to you:
- No adverts like this in the forums anymore.
- Times and dates in your local timezone.
- Full tracking of what you have read so you can skip to your first unread post, easily see what has changed since you last logged in, and easily see what is new at a glance.
- Email notifications for threads you want to watch closely.
- Being a part of the oldest wargaming community on the net.
If you are already a member then feel free to login now. |
|
 |
2013/05/06 18:46:49
Subject: How do I sculpt clear fire? EDIT: Now with experiment results.
|
|

Lesser Daemon of Chaos
Utah
|
I have a project coming my way where the client wants to have clear blue flame sculpted onto the models. I was thinking of buying clear resin, mixing in a blue dye, then after it dries, either carving it or heating it into place. I know there are some companies out there that make products that could be used, but I have been unable to successfully google any usable results. Any ideas or advice from the community? Thanks in advance!
-Igen
|
|
This message was edited 1 time. Last update was at 2013/07/12 01:03:45
"Accept that Tzeentch has a place for all of us in his grand scheme, and be happy in the part you have to play."  "This is Chaos. We don't "ka-frickin'-boom" here." "This is Chaos. We don't "ka-frickin'-boom" here." |
|
|
 |
|
2013/05/06 18:51:57
Subject: How do I sculpt clear fire?
|
|

Avatar of the Bloody-Handed God
Inside your mind, corrupting the pathways
|
If you want a flaming hand or something that is easy enough to separate from the model itself, consider sculpting the flames as you would normally from GS/miliput/etc, then cut off the arm/hand/etc and casting it using clear resin with colourant in. Just paint the non-fire parts and then stick onto the model.
If you are talking little bits of fire on the rest of the model... I guess you could partially cure clear liquid resin with colourant, then transplant it and tease it into flame shapes, possibly after the mode has been painted (but I would certainly experiment with some waste parts/models/sprue before trying this out on your actual model).
If much of the model will be in flames, it might be worth sculpting then casting the entire model in blue tinted resin, then painting the bits in between.
|
|
This message was edited 1 time. Last update was at 2013/05/06 18:52:36
|
|
|
|
|
2013/05/06 18:55:07
Subject: How do I sculpt clear fire?
|
|
Longtime Dakkanaut
|
Teasing clear resin into flames should work perfectly for small bits like hands and heads and things. More than that and I just don't know if it can be done without looking bad.
|
|
|
|
|
2013/05/06 20:35:42
Subject: Re:How do I sculpt clear fire?
|
|
Hurr! Ogryn Bone 'Ead!
|
I would sculpt it in clay, then make a 2 part mold and cast it in clear resin with some coloring, then affix it to the model. To get realistic though, it has to blend from red to yellow which is hard to do. Seen it done before though.
|
The Emperor loves me,
This I know,
For the Codex
Tells me so....
http://fallout15mm.wordpress.com/ |
|
|
|
|
2013/05/06 23:27:51
Subject: How do I sculpt clear fire?
|
|
Guarding Guardian
|
The first thing I thought of when I saw this was Water Effects. There are a ton of products for it, and all of them are clear and allow you to tease them up into shapes as they set.
|
"It is not I who am Mad, it is I who am krazy!" |
|
|
|
|
2013/05/07 01:27:04
Subject: Re:How do I sculpt clear fire?
|
|
Hoary Long Fang with Lascannon
|
It takes a lot of practice, and patience (my example could be better if I'd had more of those) but what I did was take some clear polystyrene plastic, in this instance it was from a plastic fork, and warmed it over a tea candle. Then carefully with tweezers, pulled it into the shape I wanted. The hardest part was getting it hot enough to move like you want, without getting it too hot, or moving too quickly or too slowly. This was then just painted with Tamiya Clear Red. I imagine a similar thing could be done for fire, I'm not sure exactly which colors are available in Tamiya Clear, but there are several.
|
|
|
|
|
|
2013/05/07 06:27:24
Subject: How do I sculpt clear fire?
|
|
Gargantuan Gargant
|
Silicone sealant is self-adhesive, dries clear, and has enough body to be teased and sculpted into peaks (big gouts of flame would be tricky, but little licks of fire are perfectly doable). After it sets, a bit of work with blue ink would give you the proper tint while keeping things transparent. Much easier than mucking around with molds and resin and much cheaper than buying dedicated water effects. Granted, it won't help you one bit if you're only looking for big flames, but it should work a treat for more subtle effects.
|
The Dreadnote wrote:But the Emperor already has a shrine, in the form of your local Games Workshop. You honour him by sacrificing your money to the plastic effigies of his warriors. In time, your devotion will be rewarded with the gift of having even more effigies to worship.
|
|
|
|
|
2013/05/07 07:41:17
Subject: How do I sculpt clear fire?
|
|
Hurr! Ogryn Bone 'Ead!
|
Maybe heating clear acrylic rod or clear sprue, then layers of blue wash.
|
|
|
|
|
|
2013/05/07 08:05:30
Subject: How do I sculpt clear fire?
|
|
Tough Tyrant Guard
|
 oadie wrote: oadie wrote:Silicone sealant is self-adhesive, dries clear, and has enough body to be teased and sculpted into peaks (big gouts of flame would be tricky, but little licks of fire are perfectly doable). After it sets, a bit of work with blue ink would give you the proper tint while keeping things transparent. Much easier than mucking around with molds and resin and much cheaper than buying dedicated water effects. Granted, it won't help you one bit if you're only looking for big flames, but it should work a treat for more subtle effects.
If its a small area I would recommend this. It is much cheaper than casting.
|
It's my codex and I'll cry If I want to.
Tactical objectives are fantastic |
|
|
|
|
2013/05/07 08:08:29
Subject: Re:How do I sculpt clear fire?
|
|

Sneaky Striking Scorpion
|
Resin is usually pretty toxic and you should have a vented area and a respirator.
Alternately it may seem kinda ghetto, but low temp hot glue dries clear and you could go over it with Tamiya clear paints. way easier, safer and cheaper because you probably have a hot glue gun if you make terrain.
|
|
|
|
|
|
2013/05/07 11:12:49
Subject: How do I sculpt clear fire?
|
|
Grim Dark Angels Interrogator-Chaplain
|
Glue gun glue?
|
 Stormonu wrote: Stormonu wrote:For me, the joy is in putting some good-looking models on the board and playing out a fantasy battle - not arguing over the poorly-made rules of some 3rd party who neither has any power over my play nor will be visiting me (and my opponent) to ensure we are "playing by the rules"
|
|
|
|
|
2013/05/07 18:11:29
Subject: Re:How do I sculpt clear fire?
|
|
Crazed Spirit of the Defiler
|
|
|
|
|
|
|
2013/05/07 18:29:35
Subject: How do I sculpt clear fire?
|
|
Lesser Daemon of Chaos
Utah
|
Thanks for the advice guys! I will try the silicone calking first, due to the low cost, see what results i can get with that. I will post the results later this week.
|
"Accept that Tzeentch has a place for all of us in his grand scheme, and be happy in the part you have to play." "This is Chaos. We don't "ka-frickin'-boom" here." |
|
|
|
|
2013/05/07 21:38:35
Subject: How do I sculpt clear fire?
|
|
Avatar of the Bloody-Handed God
Inside your mind, corrupting the pathways
|
You may find the silicone doesn't take paint at all. I used some that I had left over to fill in some cracks on a scenic base and it just will not bond with any paint that I applied to it. So you might find that your ink for colouring the flame doesn't go on at all.
|
|
|
|
|
|
2013/07/12 01:03:16
Subject: How do I sculpt clear fire?
|
|
Lesser Daemon of Chaos
Utah
|
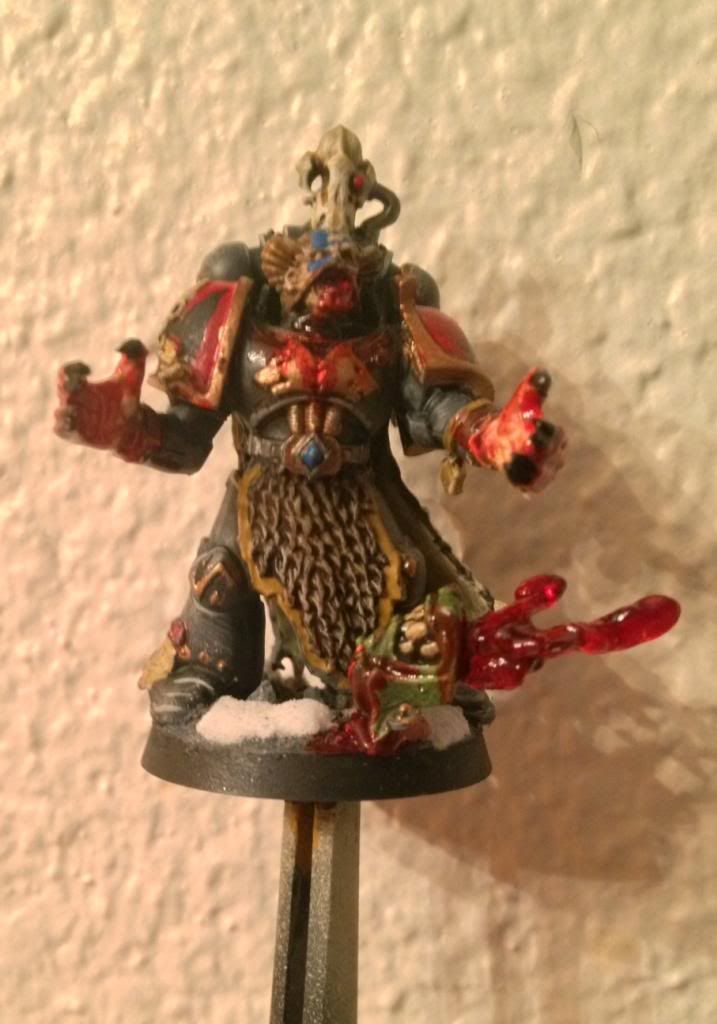
Wow its been a while... Any way
So results of testing.
Product one was DEP Clear Silicone Caulking. It peaked nicely and was easy to sculpt into a fire display. Sadly. Drying time was 3-7 days. Once dry, it was soft and delicate, but could produce the desired effect with eaither mixing in a clear ink or doing a paint wash once dry.
Product two was Loctite Clear Silicone Caulk. It was easy to sculpt into a fire shape and had a good stiffness to it. Dry time was 2-20 hours. And I was able to dab it on the models and give them a paint wash the next morning. This ended up being the moethod we used for the effect.

Several other experiments were done, mainly using clear casting resin, with undesirable results. Mainly because the Silicone Caulking can more easily be applied, while an exact mold or creative cutting is needed for the resin. Also polymer clay and natural dirt clay make very poor impression casting material for using the clear resin with...
|
"Accept that Tzeentch has a place for all of us in his grand scheme, and be happy in the part you have to play." "This is Chaos. We don't "ka-frickin'-boom" here." |
|
|
|
|
|
|


 Sven Bloodhowl's Great Company 2750
 Nihilakh Dynasty WIP
 Loki's Thousand Sons: 700 WIP


