| Author |
Message |
 |
|
|
|
|
Advert
|
Forum adverts like this one are shown to any user who is not logged in. Join us by filling out a tiny 3 field form and you will get your own, free, dakka user account which gives a good range of benefits to you:
- No adverts like this in the forums anymore.
- Times and dates in your local timezone.
- Full tracking of what you have read so you can skip to your first unread post, easily see what has changed since you last logged in, and easily see what is new at a glance.
- Email notifications for threads you want to watch closely.
- Being a part of the oldest wargaming community on the net.
If you are already a member then feel free to login now. |
|
 |
2016/12/10 21:50:11
Subject: Re:My adventure into (making money with) modelling: Now painting: Han and Gan...dalf.
|
|

Mastering Non-Metallic Metal
|
Thanks SirRamirez, Next... in terms of models, I'm not sure. But once I've finished these and the tank over in my other blog, I have a practical build I want to do to allow me to make better use of my airbrush; a small extraction booth (because the ones that you can buy don't look much better than I can make, are over-priced, and are too big to fit on my desk). I have fans and a power source already, just need to plan and build a box.
While I mention this, does anyone have suggestions on the "best" filter material to use in an airbrush extraction hood?
Gitsplitta wrote:Both Han and Gandalf are looking great!
Thanks Gits'. More below...
A silver dry-brush on Han and it's just the lights etc. on the sides to do:
And I've been working on the lighting for Gandalf:
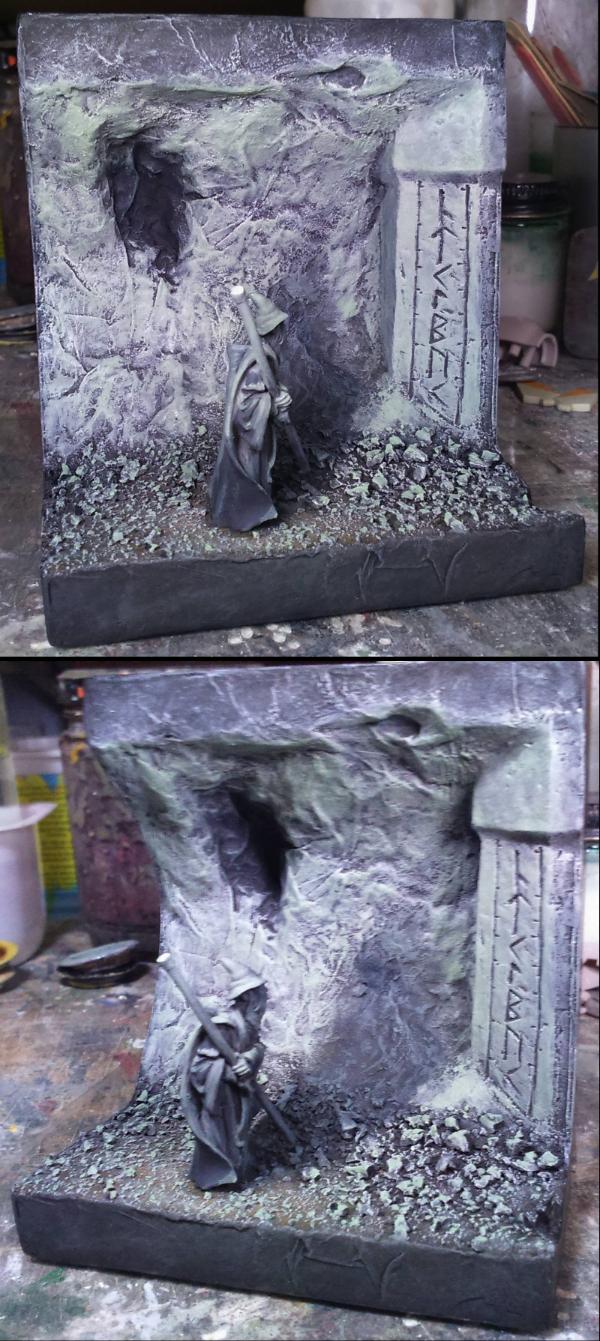
This is early in the lighting work, there's more layers to do to bring up the brightness nearer the source, sharper highlights all over, and some shading to show the drop-off of the light.
I went for a green hue to the light to add some colour to the model and to contrast with the blue hue I've added to the shadow.
|
     Mastodon: @DrH@dice.camp Mastodon: @DrH@dice.camp
The army-                   ~2295 points (built). ~2295 points (built).
 
* -=]_,=-eague Spruemeister General. * A (sprue) Hut tutorial *
Dsteingass - Dr. H..You are a role model for Internet Morality!  // inmygravenimage - Dr H is a model to us all // inmygravenimage - Dr H is a model to us all 
Theophony - Sprue for the spruemeister, plastic for his plastic throne! // Shasolenzabi - Toilets, more complex than folks take time to think about! |
|
|
 |
|
2016/12/11 23:05:49
Subject: Re:My adventure into (making money with) modelling: Now painting: Han and Gan...dalf.
|
|
Mastering Non-Metallic Metal
|
And more on Gandalf for those of you that lurk at the weekend.
Getting a good photo on him is tricky. The contrast between the light and dark areas is challenging my phone's camera.
In normal, everyday lighting, the whole piece doesn't look quite so light as it does in the photos, but darkening the photos looks unnatural. It'll be better when I set up some neutral background and more even lighting.
The above are all lit from "over the shoulder" as you see from the camera.
I'm quite pleased at how it looks in the last photo though.
|
Mastodon: @DrH@dice.camp
The army- ~2295 points (built).
* -=]_,=-eague Spruemeister General. * A (sprue) Hut tutorial *
Dsteingass - Dr. H..You are a role model for Internet Morality! // inmygravenimage - Dr H is a model to us all
Theophony - Sprue for the spruemeister, plastic for his plastic throne! // Shasolenzabi - Toilets, more complex than folks take time to think about! |
|
|
|
|
2016/12/11 23:40:32
Subject: My adventure into (making money with) modelling: Now painting: Han and Gan...dalf.
|
|

Combat Jumping Ragik
|
Gandalf. Nice little character study.
Show a photo or two of your extraction hood plans, so we can have a clue about what sort of filter to suggest. I use a HEPA filter meant for furnaces. (20"x20"x1" HEPA filter and a 20"x20" box fan. Works a charm. A bit loud though.)
|
|
This message was edited 1 time. Last update was at 2016/12/11 23:47:18
|
|
|
|
|
2016/12/12 08:15:05
Subject: My adventure into (making money with) modelling: Now painting: Han and Gan...dalf.
|
|
Gargantuan Great Squiggoth
|
Looking stunning bud, OSL effect is coming on nicely.
Interested in booth designs as well, need to do something like it myself.
|
|
|
|
|
|
2016/12/12 09:53:50
Subject: My adventure into (making money with) modelling: Now painting: Han and Gan...dalf.
|
|
Decrepit Dakkanaut
|
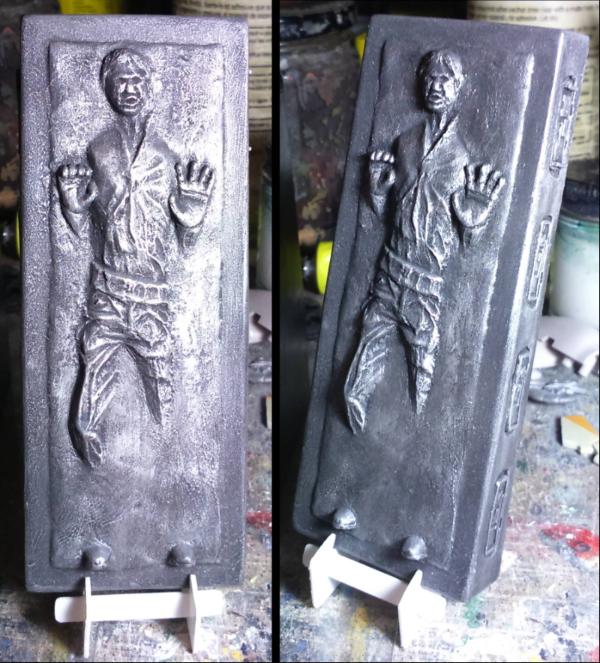
Love Gandalf, and the green is a good shout. The Carbonite seems a bit shiny? Might just be pic though.
|
Theophony"... and there's strippers in terminator armor and lovecraftian shenanigans afoot."
Solar_Lion: "Man this sums up your blog nicely."
Anpu-adom: "being Geek is about Love. Some love broadly. Some love deeply. And then there are people like Graven. |
|
|
|
|
2016/12/12 13:49:31
Subject: My adventure into (making money with) modelling: Now painting: Han and Gan...dalf.
|
|
Mastering Non-Metallic Metal
|
Red Harvest wrote:Gandalf. Nice little character study.
Thanks Red'.
Show a photo or two of your extraction hood plans, so we can have a clue about what sort of filter to suggest. I use a HEPA filter meant for furnaces. (20"x20"x1" HEPA filter and a 20"x20" box fan. Works a charm. A bit loud though.)
I've not drawn up plans myself yet, but the idea is based on these portable airbrush hoods that are all over the internet:

As you see, a collapsible box with a fan at the rear and a filter between.
You can see that the depth of the box and painting area is noted at being 19", which won't fit on my desk as it is, and that doesn't take into account that the hose extends from the rear at least half that again... Also notice that it appears to have a single 120mm fan, and the cheapest I've seen from a quick search is ~£50.
I have a pair of 120mm fans and a 12V plug adaptor that will run them at full speed (being 12V computer fans). More being better?! 
But I will have the exit on top/rear of the box, pointing up, and feed that through a similar hose (as it's only a cheap tumble-dryer hose), saving space and spewing fumes out the window.
So the filter is only to prevent the paint from getting on the fans.
I'll probably also fit some white LEDs, but will have clear sides all around for good lighting,
and a front sash to improve airflow, like I am used to on a proper chemical fumehood (but on a hinge to allow freedom of movement / size of items). I can't see that large opening and a single 120mm fan lending itself to a good airflow...
That's about as far as I've got with thinking about it. Once I've finished these models I'll put more thought into the design.
I just saw those online, saw they are too big and too expensive, and cheaply built, and thought "I can do better for less".
Camkierhi wrote:Looking stunning bud, OSL effect is coming on nicely.
Thanks Cam'.
Interested in booth designs as well, need to do something like it myself.
I'll likely be sharing the building on here, so stay tuned.
inmygravenimage wrote:Love Gandalf, and the green is a good shout.
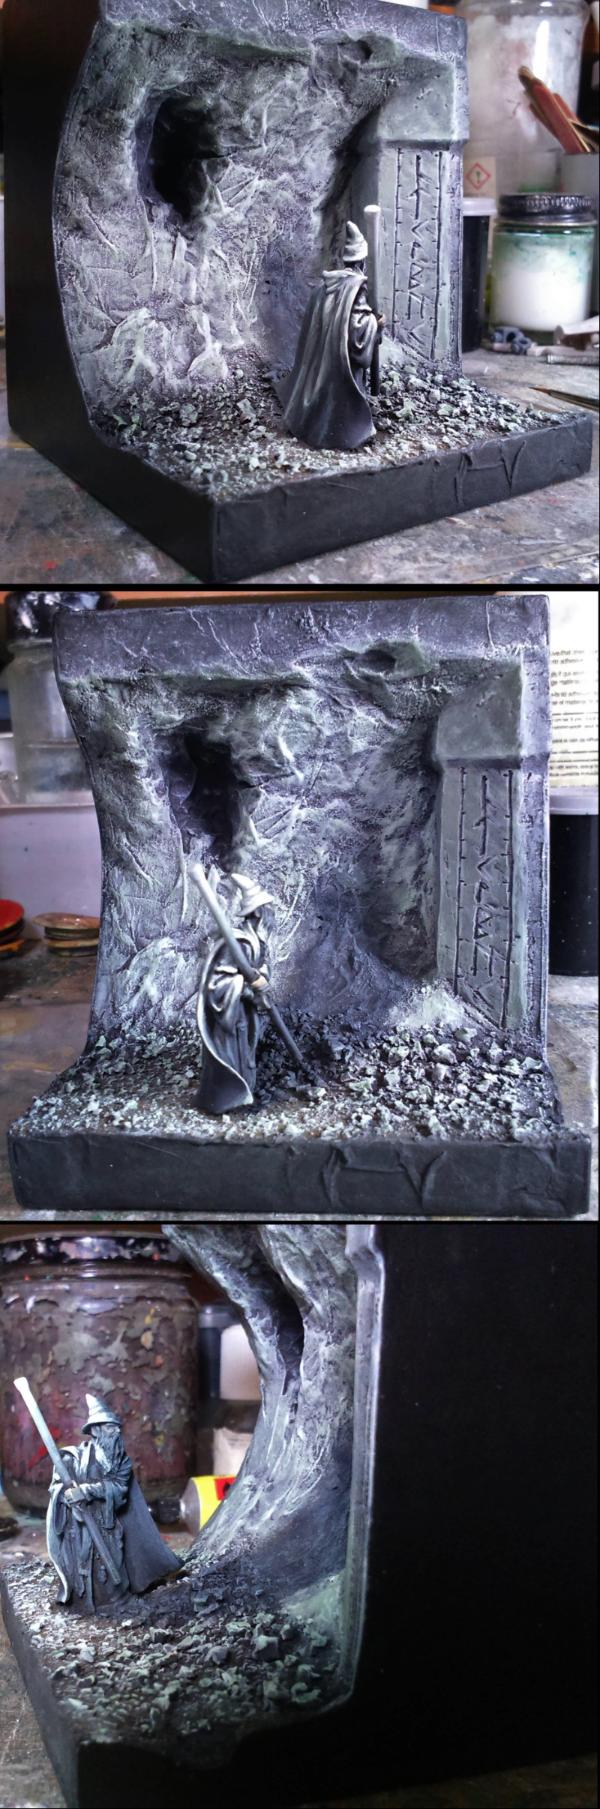
Thanks. Yeah, it needed a touch of colour. You may also see a slight skin-tone to the face and hands. Even with these colours it's still going to be very monochrome in appearance. But then, so was the scene in the film:

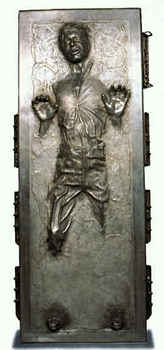
The Carbonite seems a bit shiny? Might just be pic though.
From most of the photos I've seen it seemed to have a metallic finish. I'll bow to greater nerd knowledge of the carbonite finish. I could give it a matt varnish to knock back the shine?
There's only a few little touches left on those two, and then I have the final project to paint, and more than I week to go.
|
Mastodon: @DrH@dice.camp
The army- ~2295 points (built).
* -=]_,=-eague Spruemeister General. * A (sprue) Hut tutorial *
Dsteingass - Dr. H..You are a role model for Internet Morality! // inmygravenimage - Dr H is a model to us all
Theophony - Sprue for the spruemeister, plastic for his plastic throne! // Shasolenzabi - Toilets, more complex than folks take time to think about! |
|
|
|
|
2016/12/12 14:14:18
Subject: My adventure into (making money with) modelling: Now painting: Han and Gan...dalf.
|
|
Gargantuan Great Squiggoth
|
Han in Carbonite was always a more patina bronze to me, maybe a Sepia wash will do the trick.
|
|
|
|
|
|
2016/12/12 16:05:20
Subject: My adventure into (making money with) modelling: Now painting: Han and Gan...dalf.
|
|
The Hammer of Witches
|
That's starting to look really realistic Dr H. Do You use the enamel paints in your airbrush set-up? I bet that would need a hood. I found the lack of suitable ventilation to be a stumbling block to using my air-brush in my pokey flat! I should just sell it to free up cupboard space.
Automatically Appended Next Post:
Apologies if you already said, I probably missed it.
|
|
This message was edited 1 time. Last update was at 2016/12/12 16:06:09
|
|
|
|
|
2016/12/12 17:37:03
Subject: My adventure into (making money with) modelling: Now painting: Han and Gan...dalf.
|
|
Mastering Non-Metallic Metal
|
Camkierhi wrote:Han in Carbonite was always a more patina bronze to me, maybe a Sepia wash will do the trick.
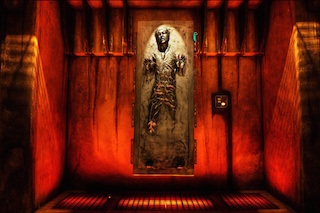
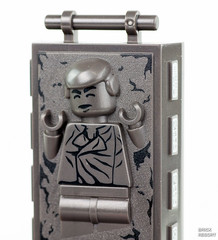
Curious. The only pictures I can find where it looks bronze is due to lighting:


Whereas, all the other pictures show it as a grey metal:

Even props/replicas and toys:

Notice the lighting.
weetyskemian44 wrote:That's starting to look really realistic Dr H. Do You use the enamel paints in your airbrush set-up? I bet that would need a hood. I found the lack of suitable ventilation to be a stumbling block to using my air-brush in my pokey flat! I should just sell it to free up cupboard space.
Apologies if you already said, I probably missed it.
Not mentioned it in this blog, I think. I did show my current setup in my other blog:
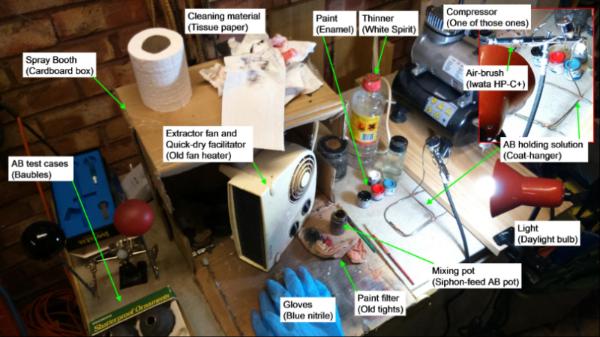
Yes, I use Enamels. This was the reason for buying a decent airbrush as the rubber seals in the cheap-o one that came with my compressor didn't like the solvents; as a result, that airbrush behaved weird.
At the moment, I have to set up all that above, down in the garage, every time (the only flat surface available is the top of a chest freezer so I can't leave it there). This means I'm less inclined to whip out the AB to paint something.
|
Mastodon: @DrH@dice.camp
The army- ~2295 points (built).
* -=]_,=-eague Spruemeister General. * A (sprue) Hut tutorial *
Dsteingass - Dr. H..You are a role model for Internet Morality! // inmygravenimage - Dr H is a model to us all
Theophony - Sprue for the spruemeister, plastic for his plastic throne! // Shasolenzabi - Toilets, more complex than folks take time to think about! |
|
|
|
|
2016/12/13 06:43:18
Subject: My adventure into (making money with) modelling: Now painting: Han and Gan...dalf.
|
|
The Hammer of Witches
|
Bummer - so no quick break halfway through airbrushing for ice cream snacks! It'd be great to have a studio. One day huh.
|
|
|
|
|
|
2016/12/26 18:26:46
Subject: Re:My adventure into (making money with) modelling: Now painting: Han and Gan...dalf.
|
|
Mastering Non-Metallic Metal
|
No, sadly no snacking during air-brushing without prior planning. It would be great to have more space indeed.  One day, as you say. Happy Boxing day everyone. Here's this years Christmas presents. Han Solo Carbonite brick. 1:20th scale. 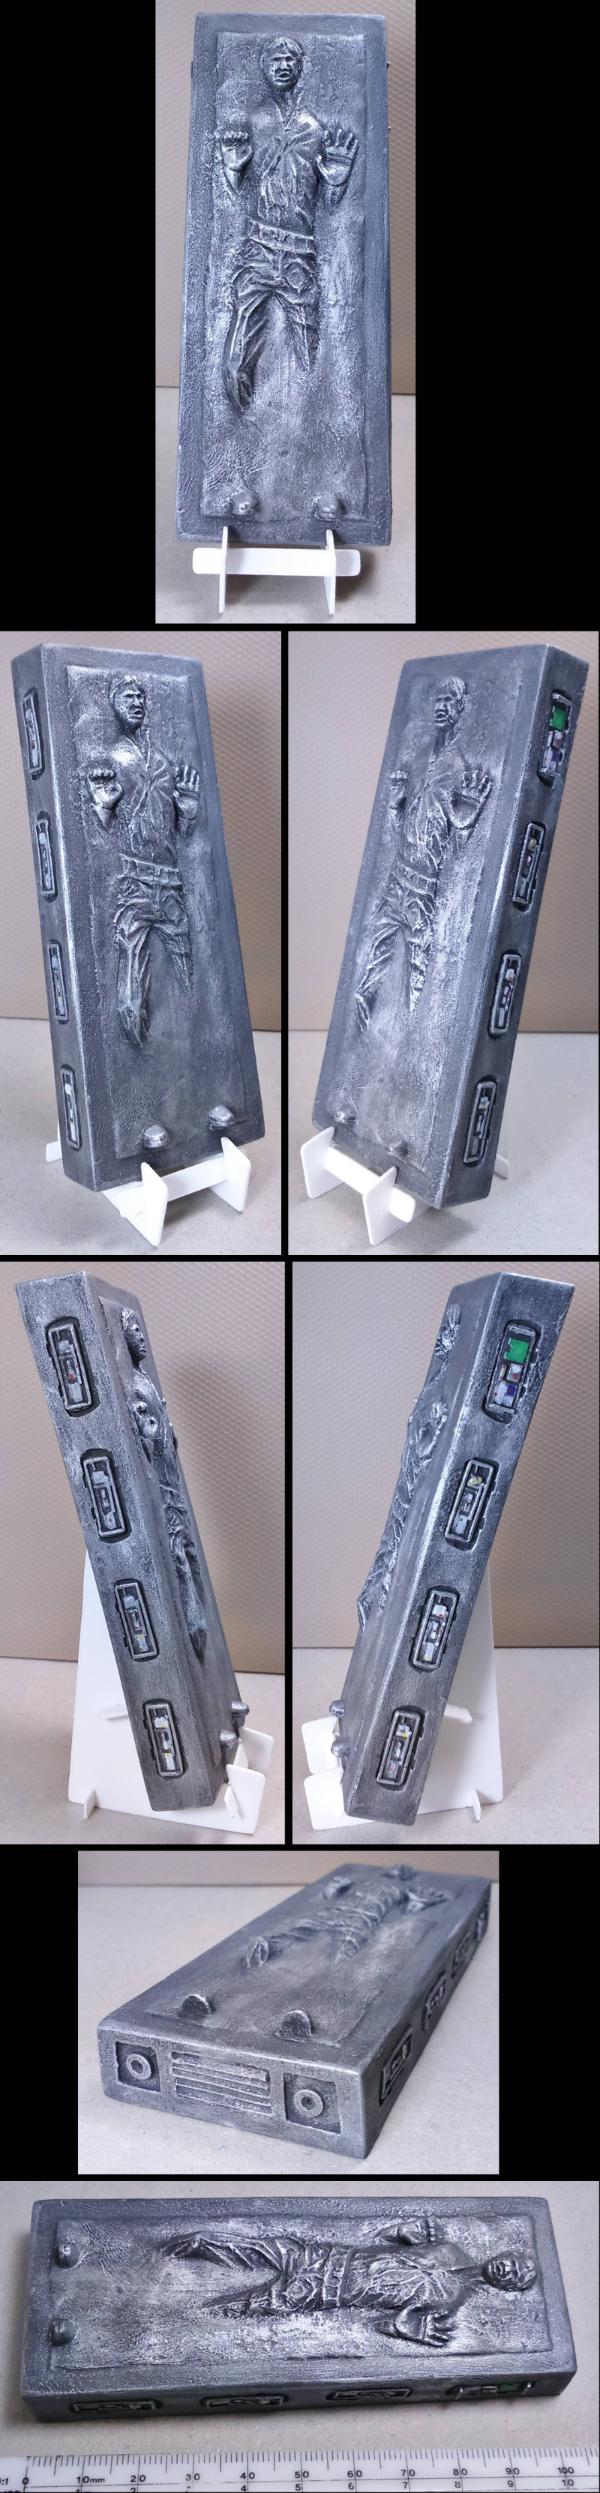 Pretty pleased with this one. There's a couple of things that are a bit off, but mostly better than I expected. Gandalf wonders what the dwarf's think about Christmas.  Also pretty pleased with the effect, especially in that last angle. I suppose I can no longer say I have no experience in OSL any more... The Washing Fairy. This is an inside joke. Whereby dirty items left lying about disappear and then reappear, clean, folded and warm (which must be leftover energy from the magical cleaning). The equivalent of a knowing smile to those that do the real work.  This piece had many problems in it's making; the first attempt looked like a rugby player in a tutu (and a male one at that). So I cut it off at the shoulder (keeping the base, washing and arm) and then re-sculpted the fairy from scratch. But I resorted to the kind of clothing that I'm used to sculpting rather than something new I had attempted initially. I still need to work on my face and hand sculpting work. I'm planning on picking up one of those wooden pose doll things. Mainly to help me with the initial bulking work; I tend to put too much bulk in and can't carve down enough once I've put the outer layers on. Pictures on the internet are only so good for sculpting work. Onwards to a new year. Who can tell what it may bring.
|
|
This message was edited 1 time. Last update was at 2016/12/26 18:27:01
Mastodon: @DrH@dice.camp
The army- ~2295 points (built).
* -=]_,=-eague Spruemeister General. * A (sprue) Hut tutorial *
Dsteingass - Dr. H..You are a role model for Internet Morality! // inmygravenimage - Dr H is a model to us all
Theophony - Sprue for the spruemeister, plastic for his plastic throne! // Shasolenzabi - Toilets, more complex than folks take time to think about! |
|
|
|
|
2016/12/26 21:38:54
Subject: My adventure into (making money with) modelling: Now painting: Han and Gan...dalf.
|
|
Decrepit Dakkanaut
|
Awesome work, especially the fairy!
|
Theophony"... and there's strippers in terminator armor and lovecraftian shenanigans afoot."
Solar_Lion: "Man this sums up your blog nicely."
Anpu-adom: "being Geek is about Love. Some love broadly. Some love deeply. And then there are people like Graven. |
|
|
|
|
2016/12/27 23:57:36
Subject: My adventure into (making money with) modelling: Now painting: Han and Gan...dalf.
|
|
Combat Jumping Ragik
|
Uhm, it's the Cleaning Brownies. Fairys, or Faeries, don't clean squat. They are the messiest of the Fey.
Nice colors on the piece.
I have no clues about the hood. With the VOC based stuff, All I can say is get a good mask-- and not just a nuisance dust mask but a proper one. A HEPA filter will catch the paint particles, but the fumes/vapors? Nope.
You may have to widen you search for ideas. Airbrush artists that paint motorcycles use oil based paints.
|
|
|
|
|
|
2017/01/03 21:33:24
Subject: My adventure into (making money with) modelling: Now painting: Han and Gan...dalf.
|
|
Mastering Non-Metallic Metal
|
Thanks Graven.
 Red Harvest wrote: Red Harvest wrote:Uhm, it's the Cleaning Brownies. Fairys, or Faeries, don't clean squat. They are the messiest of the Fey.
Bah! You say Brownies, I say Beavers... I didn't go to Beavers, I went straight in to Cubs... Wait, what were we talking about... 
Though searching for "cleaning brownies" doesn't provide half as many useful pictures as "cleaning fairies". Unless you've just thrown some food down your front.
Those fairies have a strong publicity section.
Nice colors on the piece.
Ta. I wanted it to be colourful as white sheets don't make a very exciting piece.
I have no clues about the hood. With the VOC based stuff, All I can say is get a good mask-- and not just a nuisance dust mask but a proper one. A HEPA filter will catch the paint particles, but the fumes/vapors? Nope.
I plan to have all fumes pumped out the window... maybe I should give the neighbours some masks...
You may have to widen you search for ideas. Airbrush artists that paint motorcycles use oil based paints.
Good idea.
Been AWOL from DDakka, and just getting back to normal operations. Much to catch up on.
|
Mastodon: @DrH@dice.camp
The army- ~2295 points (built).
* -=]_,=-eague Spruemeister General. * A (sprue) Hut tutorial *
Dsteingass - Dr. H..You are a role model for Internet Morality! // inmygravenimage - Dr H is a model to us all
Theophony - Sprue for the spruemeister, plastic for his plastic throne! // Shasolenzabi - Toilets, more complex than folks take time to think about! |
|
|
|
|
2017/01/13 17:49:07
Subject: Re:My adventure into (making money with) modelling: Now building: Airbrush extraction hood.
|
|
Mastering Non-Metallic Metal
|
Proof of concept. This means the final product won't look like this. Disclaimer: If you are inexperienced or unsure around electrical circuits, find someone else to help with teaching you or doing the wiring for you. I'm not responsible if you electrocute yourself following what I show here. Also, if you are experienced with electrical wiring, be prepared to wince at what I'm about to show. -------------------------------------------------------------------------------------------------------------------------------------------------- Why? In order to do any airbrushing, I have to carry all my equipment, paints and models out to the garage and set up a temporary arrangement on top of a chest freezer. There's no heating, The lighting is poor (I even carry one of my lamps out to be able to see anything), It's temporary, And inconvenient. All this means I tend to avoid using the airbrush I spent good money on. If I had an extraction hood I could use in my room, I will get much better use out of my airbrush. But commercial hoods are expensive for what the build quality looks like. I'm sure I can do better, for less, and it can be designed to fit my unique workspace. This is the start of me showing you that I can (or can't) deliver on this... The parts: The main commercial version that you'll find has a single 120mm fan, like that you would find in a computer. I just so happen to have a couple (well, more than a couple, but 2 will do) of 120mm PC fans spare. 2 being better than 1, and not just because: Either, they will move more air = better. Or, they will be quieter for the same quantity of air = better. I also happen to have a 12V power supply adaptor laying about. Where it came from, what did it originally power? I don't know. It was in my bag of wires (the fans were in my other bag of PC-related wires and things). Fans, check. Power, check. But I can't just plug them straight in, I need a switch. Cue another rummage... I find a power switch from a broken (and long disassembled) PSU. It's a switch, it goes "on" and "off", that'll do. It has an extra wire that I don't need; something to do with 220V to 12V power supply earthing, but is irrelevant to my 12V to 12V setup. (note the "ignore this wire" in the picture below) This is what they look like:  The design: The commercial hood has the fan and hose pointing straight out the back of the box. This is not useful for my desk setup, so I'm moving the hose attachment to the top of the box. I plan on using a tumble-drier vent hose to pipe my fumes out the window and these come in a standard 100mm / 4inch diameter. Therefore, I need to fit my 2 120mm fans to one 100mm hole. There are 2 options for this; 1. is to mount the fans flat to the top of the hood box and build a sloped adaptor (imagine a pyramid cross-section) to bring ~250mm to 100mm. 2. is to mount the fans in a "V" shape either side of the 100mm hole. (no need to imagine this, see below) Option 1 would be good to maximise the space inside the hood, but for my setup I want to keep the maximum height of the hood to a certain value (being 300mm). From some drawings and measurements I found that option 2 would be easier to accomplish, neater on the outside, and doesn't lose out on interior hood space to option 1. With all the planning and drawings and measurements done, I set about some old cardboard box (that until now was my airbrush accessories container and over-spray catcher) and built the below to test the airflow.  Success! I feel. Considering that this is loosely taped together cardboard (with many leaks) I get a modest airflow. Notes on the design: The front half of the top will be angled upwards to give a larger space for tall objects, and will have a flap to close the opening for better airflow if needed. The filters we have been discussing, will fit in between the bottom edge of the front of the fan box (the white part) to the rear corner of the painting area; this will maximise the painting area inside the box (I have limited depth to work with also). The whole front half of the box will be transparent to aid lighting and visibility (together with some LED strips inside, maybe). I'm off to think more about the expanding front half...
|
|
This message was edited 1 time. Last update was at 2017/01/13 17:53:05
Mastodon: @DrH@dice.camp
The army- ~2295 points (built).
* -=]_,=-eague Spruemeister General. * A (sprue) Hut tutorial *
Dsteingass - Dr. H..You are a role model for Internet Morality! // inmygravenimage - Dr H is a model to us all
Theophony - Sprue for the spruemeister, plastic for his plastic throne! // Shasolenzabi - Toilets, more complex than folks take time to think about! |
|
|
|
|
2017/01/13 18:12:01
Subject: My adventure into (making money with) modelling: Now building: Airbrush extraction hood.
|
|
Decrepit Dakkanaut
|
Looks promising mate.
|
|
|
|
|
|
2017/01/14 16:31:11
Subject: My adventure into (making money with) modelling: Now building: Airbrush extraction hood.
|
|
Rogue Inquisitor with Xenos Bodyguards
|
ah, another one goes airbrush, I feel old fashioned using brushes of the old style.
|
"Your mumblings are awakening the sleeping Dragon, be wary when meddling the affairs of Dragons, for thou art tasty and go good with either ketchup or chocolate. "
Dragons fear nothing, if it acts up, we breath magic fire that turns them into marshmallow peeps. We leaguers only cry rivets!


|
|
|
|
|
2017/01/14 22:55:25
Subject: My adventure into (making money with) modelling: Now building: Airbrush extraction hood.
|
|
Mastering Non-Metallic Metal
|
Thanks Gits', we shall see how it turns out. As with all my projects, I'm attempting to solve all possible problems before starting any building or spending any money. Shas': I've had an airbrush for quite a while now, but it doesn't get much use; so far only the occasional prime and basecoat. Below is the concept for the expandable spray area/volume. Again, this entire front half will be clear plastic (looking like Acrylic is the best option). This will allow me to adjust the flow characteristics of the hood and accommodate larger model/stands/etc. Like this, the internal height can vary from ~170mm up to ~220mm at the peak, and the front opening can vary from ~70mm to ~220mm. Maybe more if I extend those side pieces.  I'll probably use pegs to set the height, simple is best (says the person designing an adaptable extraction hood). I've looked up filters, hoses and clear plastic sheets, next is to look into hinges...
|
|
This message was edited 2 times. Last update was at 2017/01/14 22:56:56
Mastodon: @DrH@dice.camp
The army- ~2295 points (built).
* -=]_,=-eague Spruemeister General. * A (sprue) Hut tutorial *
Dsteingass - Dr. H..You are a role model for Internet Morality! // inmygravenimage - Dr H is a model to us all
Theophony - Sprue for the spruemeister, plastic for his plastic throne! // Shasolenzabi - Toilets, more complex than folks take time to think about! |
|
|
|
|
2017/01/16 22:12:13
Subject: Re:My adventure into (making money with) modelling: Now building: Airbrush extraction hood.
|
|
Mastering Non-Metallic Metal
|
I have hinges. Also found a short length of 4" hose that has confirmed my height theory (so no drastic change in plans), and a long length of 3" hose that allowed me to test the extraction properties of this design...
...it worked.
I could spray smelly white spirit into the hood, as I would for airbrushing a model, and I didn't choke on the fumes, couldn't smell a whiff.
I also didn't blow myself up as the solvent fumes passed through the PC fans.
I've ordered the filters (cheap test cases), a 2m length of 4" hose, and the acrylic for the front half of the box.
In the mean time, I've drawn up the design a bit better than some biro scrawls on a notepad. Thought I'd share for those interested.
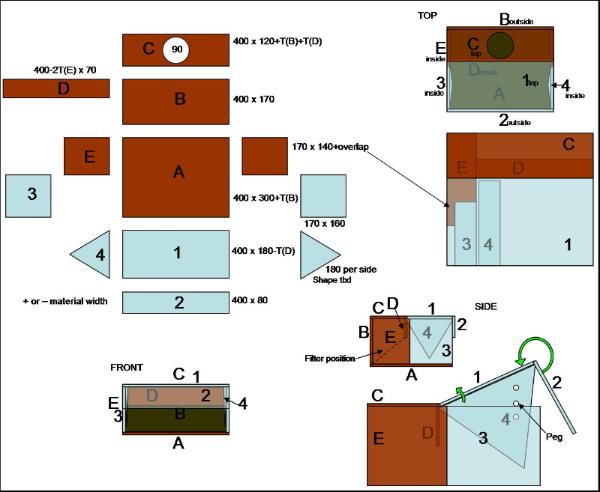
You'll notice some + or - T(x) in some measurements, this is (or will be) to take account of the thickness of adjoining pieces. It's only by drawing up the design like this that I could decide where these + and -'s were going.
I just need to find some wood to use for the rear section and then I'll know what these variables will be.
|
Mastodon: @DrH@dice.camp
The army- ~2295 points (built).
* -=]_,=-eague Spruemeister General. * A (sprue) Hut tutorial *
Dsteingass - Dr. H..You are a role model for Internet Morality! // inmygravenimage - Dr H is a model to us all
Theophony - Sprue for the spruemeister, plastic for his plastic throne! // Shasolenzabi - Toilets, more complex than folks take time to think about! |
|
|
|
|
2017/01/19 20:20:27
Subject: Re:My adventure into (making money with) modelling: Now building: Airbrush extraction hood.
|
|
Mastering Non-Metallic Metal
|
A search of the garage turned up some hardboard that is apparently 3 decades old. high time it got some use then...
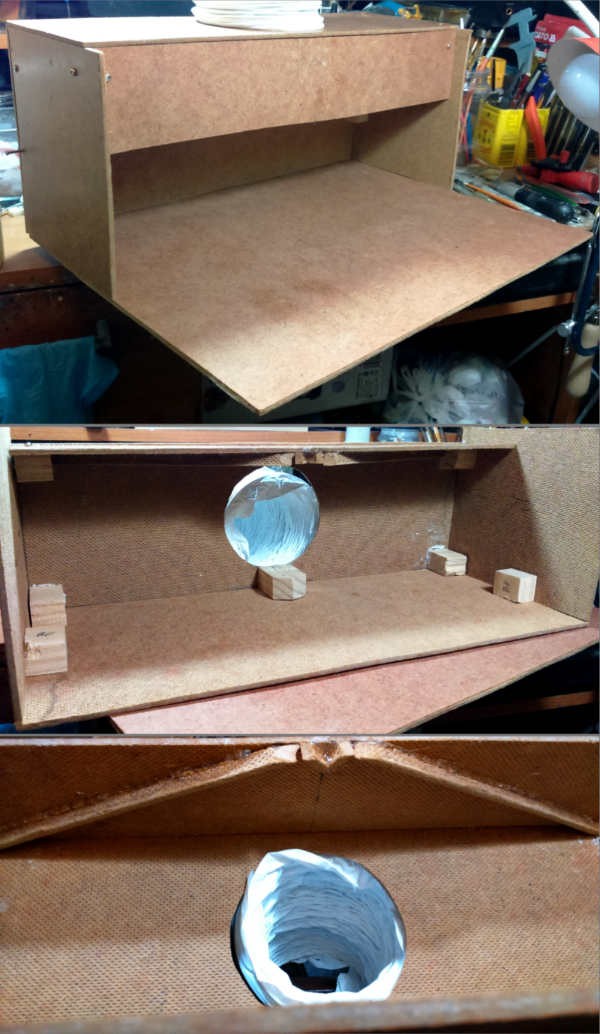
I'll find some nice screws tomorrow and countersink the holes. This is just so I can get an idea of how it's going together and allow me to see how the fans might be mounted...
There's the angled block at the back that the fans will screw into and the angled pieces at the front that they should rest on.
The back panel of the box will remain removable to aid service of the fans, but any and all gaps around them and the rest of the box will be sealed with hot glue.
Once the acrylic turns up I'll be able to build the front half (that should fit this half perfectly).
And I need to start thinking about how the filter will be mounted... depends on what I think of the filter when that turns up.
|
Mastodon: @DrH@dice.camp
The army- ~2295 points (built).
* -=]_,=-eague Spruemeister General. * A (sprue) Hut tutorial *
Dsteingass - Dr. H..You are a role model for Internet Morality! // inmygravenimage - Dr H is a model to us all
Theophony - Sprue for the spruemeister, plastic for his plastic throne! // Shasolenzabi - Toilets, more complex than folks take time to think about! |
|
|
|
|
2017/01/20 17:29:49
Subject: Re:My adventure into (making money with) modelling: Now building: Airbrush extraction hood.
|
|
Mastering Non-Metallic Metal
|
Re-screwed and fans in, wired up and switch installed.
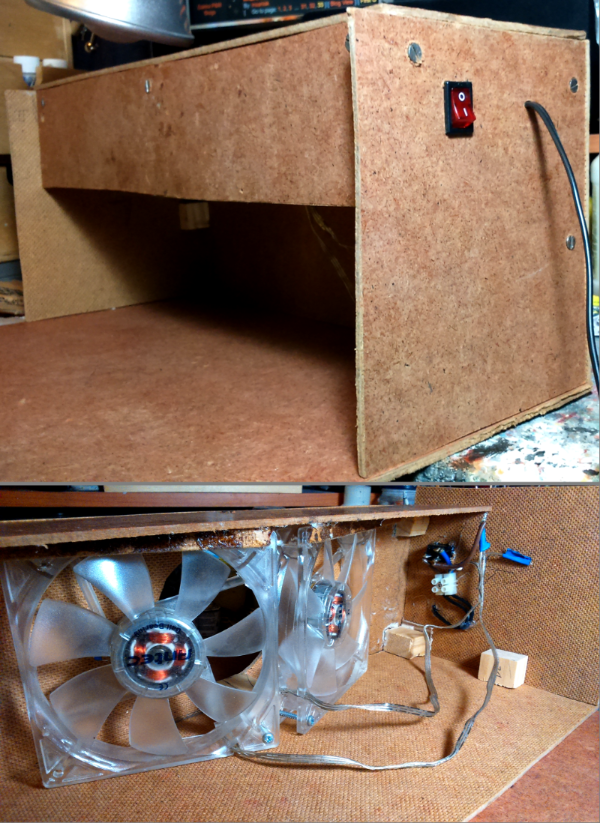
Nice and neat, outside.
Total mess, inside.
I'll probably rotate the fans 90deg and run the wired behind the short front wall.
And I'll tidy up the mess of wires... might even hide them behind an enclosure too.
|
Mastodon: @DrH@dice.camp
The army- ~2295 points (built).
* -=]_,=-eague Spruemeister General. * A (sprue) Hut tutorial *
Dsteingass - Dr. H..You are a role model for Internet Morality! // inmygravenimage - Dr H is a model to us all
Theophony - Sprue for the spruemeister, plastic for his plastic throne! // Shasolenzabi - Toilets, more complex than folks take time to think about! |
|
|
|
|
2017/01/21 03:44:13
Subject: My adventure into (making money with) modelling: Now building: Airbrush extraction hood.
|
|
Decrepit Dakkanaut
|
THAT is looking sharp! A word of advice, caulk the wood joints. They leak air. Try to control the airflow. That will serve you well for a long time!
|
"dave you are the definition of old school..." -Viktor Von Domm    My P&M Blog : My P&M Blog :
It's great how just adding a little iconography, and rivets of course, can make something look distinctly 40K-adamsouza
"Ah yes, the sound of riveting.....Swear word after swear word and the clinking of thrown tools" "Nope. It sucks do it again..."- mxwllmdr
"It puts together more terrain, or else it gets the hose again...-dangledorf2.0
"This is the Imperium, there is no peace, there are only rivets" -Vitruvian XVII
"I think rivets are the perfect solution to almost every problem"- Rawson
More buildings for the Building God! -Shasolenzabi
  |
|
|
|
|
2017/01/21 10:04:39
Subject: My adventure into (making money with) modelling: Now building: Airbrush extraction hood.
|
|
Combat Jumping Ragik
|
Flathead screws? Doc, please, come into the 21st century already.
Also, what Dave said about sealing the joints, but reinforce them too. You could always lap strips of the hardboard onto it to make a frame effect.
Did you cut that hardboard without any kind of fence? It looks that way.
|
|
|
|
|
|
2017/01/21 14:31:02
Subject: My adventure into (making money with) modelling: Now building: Airbrush extraction hood.
|
|
Mastering Non-Metallic Metal
|
Thanks Dave, Red'.
Gaps will be sealed up at the end when I'm sure that I don't need to dismantle anything.
Reinforcement will also happen as it starts to become more permanent in it's construction, and where it appears that it needs it.
I'm using as many things as possible that I can find in the garage (hence 30 year old wood) to save on money.
But for the length I required, the flathead screws were the best option, all our phillips-heads and pozidrives were too long.
Why go through the bother of going and buying some when we have boxes of perfectly good screws. 
Anyway, in a world with Trump and Brexit, we're all going backwards; more like the 19th century than 21st. (this is about as political as I can get, I'm not politically minded)
Red Harvest wrote:Did you cut that hardboard without any kind of fence? It looks that way.
There's only 2 types of "fence" than come to mind; one surrounds an area of land and the other buys stolen goods. I didn't use either for this.
I used a jigsaw-alike thing (so far out of my depth with woodworking); Black&Decker scorpion
I now have the acrylic I need and can look at how best to cut this up... Not nearly as much room for error with this as the wood had.
Chop Chop.

|
Mastodon: @DrH@dice.camp
The army- ~2295 points (built).
* -=]_,=-eague Spruemeister General. * A (sprue) Hut tutorial *
Dsteingass - Dr. H..You are a role model for Internet Morality! // inmygravenimage - Dr H is a model to us all
Theophony - Sprue for the spruemeister, plastic for his plastic throne! // Shasolenzabi - Toilets, more complex than folks take time to think about! |
|
|
|
|
2017/01/21 18:30:57
Subject: My adventure into (making money with) modelling: Now building: Airbrush extraction hood.
|
|
Omnious Orc Shaman
A long time ago in a galaxy far, far, away...
|
I think Red may be referring to a table saw 'fence' ? I'm no woodwork expert, but it's another use of the term... http://www.instructables.com/id/Do-it-yourself-Table-Saw-Fence/
I've always wanted a good table saw - one day maybe... Need to get a good quality pillar drill first...
Really impressive work though. It's excellent to see all your steps in this build
|
|
|
|
|
|
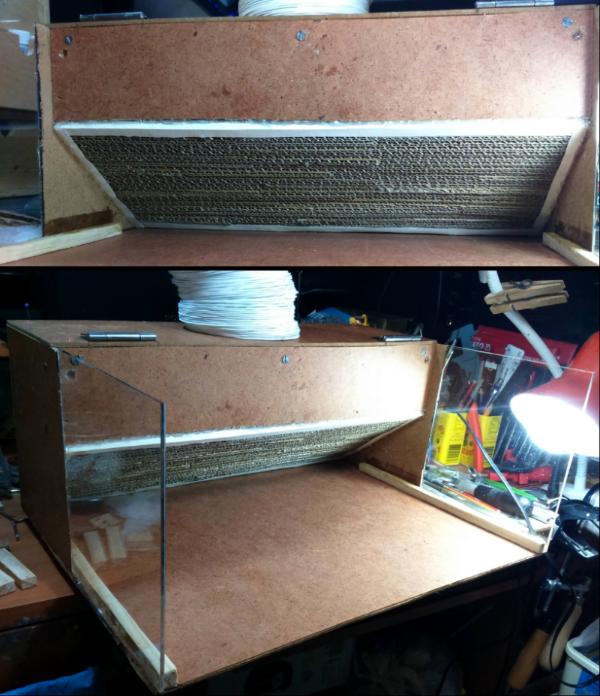
2017/01/23 17:28:28
Subject: Re:My adventure into (making money with) modelling: Now building: Airbrush extraction hood.
|
|
Mastering Non-Metallic Metal
|
Yeah, I assumed it was something to allow cleaner cuts as mine are quite rough in places; sanding or ignoring will solve these.
A table saw would have made much of this much easier, but I have to make do without. We do have a couple of circular saws, one is "freehand" and the other is for mitre cuts; both are a bit... brutal... for this stuff. I dunno, don't take woodworking advice from me.
Continuing with "how not to build a wooden structure":
I can report that acrylic can be "cut" with the score 'n' snap technique (the internet tells me up to 6mm thickness) and this worked well on my 3mm perspex up to 400mm length "cuts".
Was a very "clench and go" moment for the first snap.
Here's a few pictures to show where I am now.
The wiring has been tidied.
Some of the wooden joints have been glued/sealed.
Various edges have been straightened with a combination of cutting/sawing/sanding.
It turns out that the hardboard is the same thickness as the acrylic, so my cunning overlapping plan is out.
Part one of the new plan (which isn't really a plan, I'm attempting to make it up as I go), is the corner braces at the bottom that will hold the two halves of the side walls straight with each other and the baseboard.
Hinges have been added to the top ready to attach the acrylic "roof", but that will wait until I bite the "drilling acrylic" bullet.
Tank for scale.
And what's that at the back?
As similar as it may appear to the flooring that Guildenstern used for her current LoER contest entry, I actually came across this elsewhere on the internet as part of someone's filter solution for their airbrush hood.
I needed something to "mount" my filters against, and this should do the trick.
For those unaware, this is strips of cardboard box, glued on top of each other to give a mesh.
Fairly strong, rigid and good airflow.
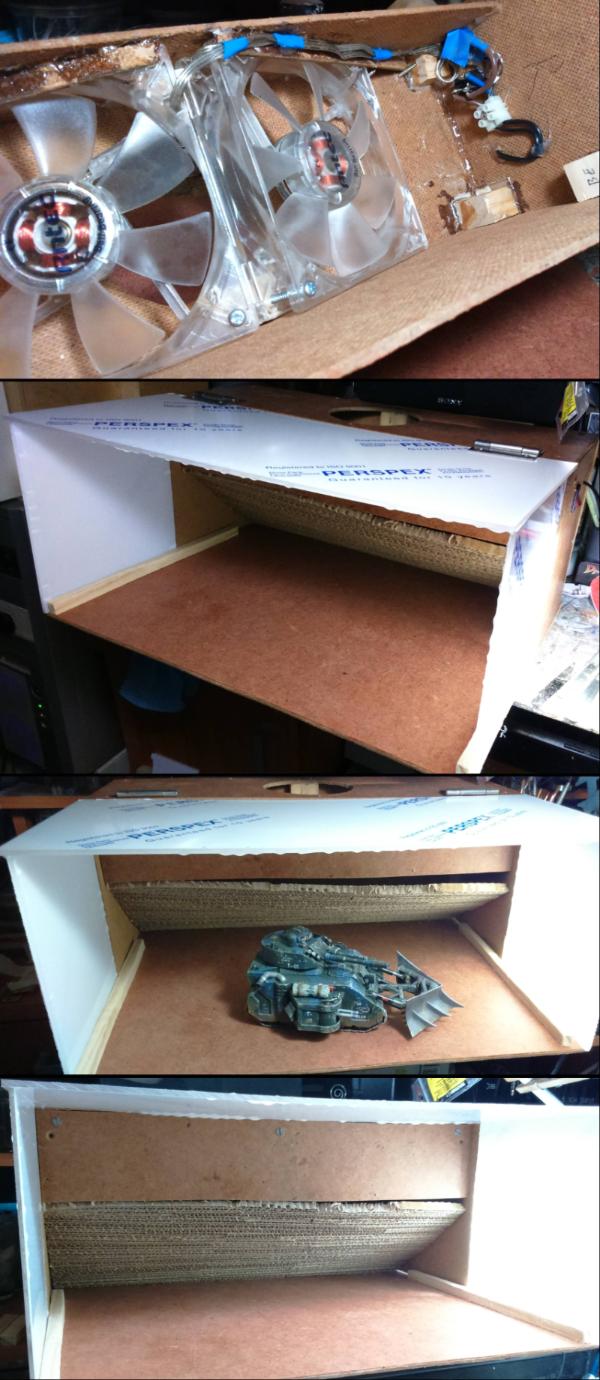
Next, is to tidy the edge of that filter solution (thin card glued on very permanently), and mount it in the box.
Then it'll be a combination of attaching it all to the baseboard and attaching the acrylic parts.
|
Mastodon: @DrH@dice.camp
The army- ~2295 points (built).
* -=]_,=-eague Spruemeister General. * A (sprue) Hut tutorial *
Dsteingass - Dr. H..You are a role model for Internet Morality! // inmygravenimage - Dr H is a model to us all
Theophony - Sprue for the spruemeister, plastic for his plastic throne! // Shasolenzabi - Toilets, more complex than folks take time to think about! |
|
|
|
|
2017/01/23 18:22:09
Subject: My adventure into (making money with) modelling: Now building: Airbrush extraction hood.
|
|
Combat Jumping Ragik
|
Yeah, a woodworking fence, also called a cutting guide. Do you have something to serve as a straight edge, and a pair of C-clamps? ( or G-Clamps? They are apparently called that in places.) You could use them to make a cutting guide for the jigsaw. Similar to using a straight edge to cut anything else.
Drilling Acrylic? Ah, slow drill speed, very slow. otherwise the plastic melts-- it may well anyway, but less messy with a slower drill speed, and gentle pressure to avoid cracking.
The plexiglas can be cut too. A circular saw will cut it-- when used with a cutting guide. I would not use a jigsaw. Plexiglas can also be filed and planed.
|
|
This message was edited 1 time. Last update was at 2017/01/23 18:24:12
|
|
|
|
|
2017/01/24 13:23:20
Subject: My adventure into (making money with) modelling: Now building: Airbrush extraction hood.
|
|
Decrepit Dakkanaut
|
That perspex stuff looks interesting! It takes a lifetime of experience to cut straight freehanded with an electric saw. I think this looks very nice.
|
"dave you are the definition of old school..." -Viktor Von Domm My P&M Blog :
It's great how just adding a little iconography, and rivets of course, can make something look distinctly 40K-adamsouza
"Ah yes, the sound of riveting.....Swear word after swear word and the clinking of thrown tools" "Nope. It sucks do it again..."- mxwllmdr
"It puts together more terrain, or else it gets the hose again...-dangledorf2.0
"This is the Imperium, there is no peace, there are only rivets" -Vitruvian XVII
"I think rivets are the perfect solution to almost every problem"- Rawson
More buildings for the Building God! -Shasolenzabi
|
|
|
|
|
2017/01/24 23:41:30
Subject: My adventure into (making money with) modelling: Now building: Airbrush extraction hood.
|
|
Mastering Non-Metallic Metal
|
Red Harvest wrote:Yeah, a woodworking fence, also called a cutting guide. Do you have something to serve as a straight edge, and a pair of C-clamps? ( or G-Clamps? They are apparently called that in places.) You could use them to make a cutting guide for the jigsaw. Similar to using a straight edge to cut anything else.
Yeah, it's a very good point. I can't saw a straight line to save my life... and yet I keep on trying.
Drilling Acrylic? Ah, slow drill speed, very slow. otherwise the plastic melts-- it may well anyway, but less messy with a slower drill speed, and gentle pressure to avoid cracking.
Indeed. I'm planning on using a hand-drill and taking it very carefully (for the first hole or two and then getting impatient, speeding up, cracking it and swearing).
The plexiglas can be cut too. A circular saw will cut it-- when used with a cutting guide. I would not use a jigsaw. Plexiglas can also be filed and planed.
That's what I found in the internet, but due to my aforementioned sawing ability, I went for score 'n' snap. I even used a ruler!
dsteingass wrote:That perspex stuff looks interesting!
It will look better when the protective covers are off. Clearer than glass. See below.
It takes a lifetime of experience to cut straight freehanded with an electric saw. I think this looks very nice.
Good to hear. I should start using straight edges when sawing.
Thanks.
Progress:
The cardboard filter mesh has had it's surrounding edges neatened up with some thick paper.
That has been glued in and sealed all around.
The hose has been attached with Duck Duct tape on the inside.
The top has been glued to the baseboard.
Strips of wood added to the sides to stiffen the baseboard and give something more to glue the acrylic sides to.
And the acrylic sides have been glued on.
Next; Attaching the top.
Need to adapt it's length (a little too long in spite of all my measuring),
Drill holes,
Mount the front flap also,
Start thinking about the side pieces that keep the hood "sealed" when the top is raised...
|
Mastodon: @DrH@dice.camp
The army- ~2295 points (built).
* -=]_,=-eague Spruemeister General. * A (sprue) Hut tutorial *
Dsteingass - Dr. H..You are a role model for Internet Morality! // inmygravenimage - Dr H is a model to us all
Theophony - Sprue for the spruemeister, plastic for his plastic throne! // Shasolenzabi - Toilets, more complex than folks take time to think about! |
|
|
|
|
2017/01/25 09:33:20
Subject: My adventure into (making money with) modelling: Now building: Airbrush extraction hood.
|
|
Combat Jumping Ragik
|
 Dr H wrote: Dr H wrote:Yeah, it's a very good point. I can't saw a straight line to save my life... and yet I keep on trying.
Nobody can, that's why we used fences/guides Well, not entirely true, I can saw a perfectly straight line with a gent's saw, or a dovetail saw, or a back saw, or a crosscut saw, or a... But then I've been doing it for a very long time-- not quite a lifetime, but I did get my first saw when I was 5 years old. Still have it too . For power saws, always use a guide. No reason not to. I still have trouble at times with Japanese saws. Those you pull rather than push to cut. They give much finer cuts --thinner kerfs-- due to their thinner blades.
Final plexiglas note. Make sure the plexiglas is solidly supported underneath the bit, and cannot flex.
You've got a fine looking extractor there. Now, if you test it with water through the airbrush, what effect will that have on the cardboard filter mesh? Or did you answer that and I missed it. Been a rough few days for me.
|
|
This message was edited 1 time. Last update was at 2017/01/25 09:34:25
|
|
|
|
|
|
|


