Forum adverts like this one are shown to any user who is not logged in. Join us by filling out a tiny 3 field form and you will get your own, free, dakka user account which gives a good range of benefits to you:
No adverts like this in the forums anymore.
Times and dates in your local timezone.
Full tracking of what you have read so you can skip to your first unread post, easily see what has changed since you last logged in, and easily see what is new at a glance.
Email notifications for threads you want to watch closely.
Being a part of the oldest wargaming community on the net.
If you are already a member then feel free to login now.
2015/03/11 17:12:37
Subject: How to build a box of 40K Gretchin (grots) in 8 easy steps
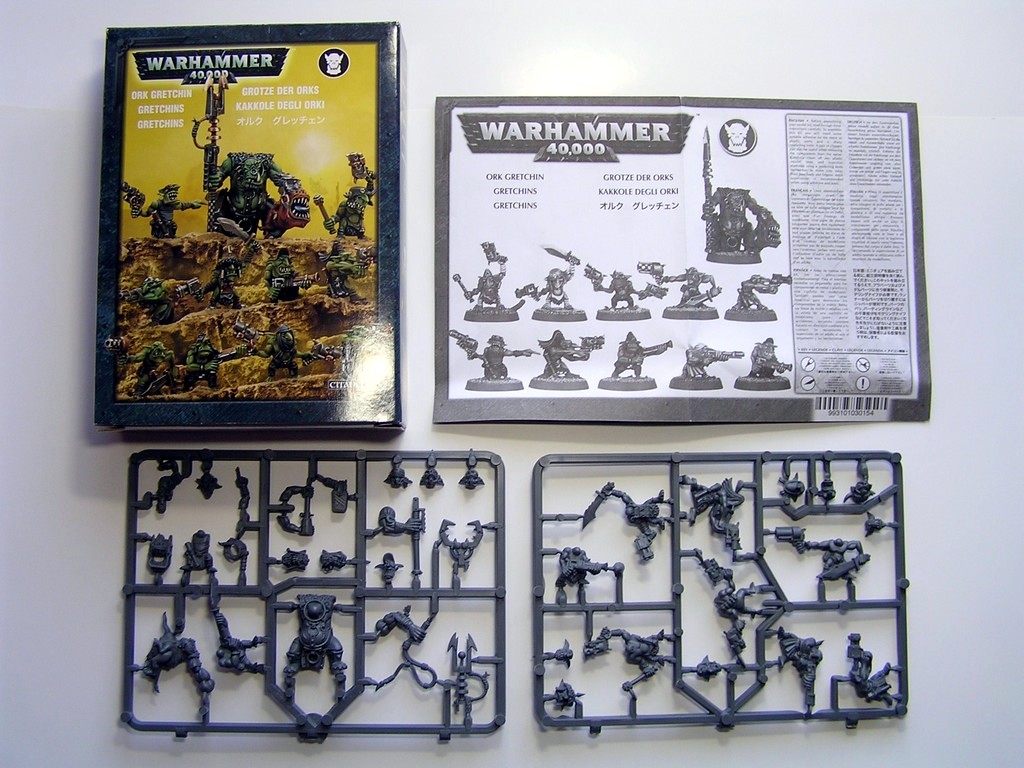
Here, I present to you, a gretchin building tutorial. Box Contents:
Spoiler:
You will need: A box of Gretchin, clippers, hobby knife, plastic superglue, a flat surface to work on, time, a good light source
Time: Depends on how fast you build, it only took me 30-45 minutes.
1. Open the box. You should have the box, the instructions, 11 25mm bases, and two sprues, as in the image listed above.
2. It is best to build the Runtherd first. Clip out the Runtherd body on the left sprue, as shown in the image above. He has the options for a squig hound and a grabba stick, or a squig hound and a grot prod. He has two head options. Depending on which variant you want to build, clip out the squig hound, the squig hound face, the pole next to the grabba stick, and either the grabba stick or the grot prod. I did the grot prod. Glean the pieces with your hobby knife. Use your plastic superglue to glue the Squig hound's face onto the Squig hound's body. Do not use too much or it will look deformed. A miniscule amount around the edge is enough. Then, and this is where it can get tricky, apply the squig hound and the grot prod arms. This can be tricky because they can slide off, especially if you use too much glue, a common mistake for me. Next, choose the head variant. I used the head variant with no night goggles, as the other head variant had night goggles. Glue the Runtherd to a base and set him aside to dry. Drying can take anywhere from 12-24 hours, depending on how much glue you used. It is best to let it set overnight.
3. Next, clip the grots with heads and arms already attached. There should be three of them. These require no work, so just glean them with your hobby knife, glue them onto three of the bases, and set them aside to dry.
4. Next, clip out the grots that have no heads but do have arms. There should be six of them. For these, you will need to attach the heads. There are many head options in this set, choose one for each grot. Note that one of the grots has two grot blastas. Give this grot the coolest grot head you can find in this set, if you would like to. Gue the heads on, then glue the grots, now with heads, onto 6 of the bases. Set those grots aside to dry.
5. You should have one grot with no arms or a head left. This is where you can get creative (with building, at least). There are a two weapon options for him: a grot blasta and a point finger, and a stikkbomb. These should be located on the sprue that the Runtherd was on. I gave this grot a stikkbomb. Glue the grot blasta and pointy finger or the stikkbomb onto his arm sockets, a head on his head sockets, and then glue him onto his base. Set him aside to dry.
6. Let grots and runtherd dry for 12-24 hours, depending on how much glue you used. You should have 10 grots and 1 runtherd, 11 minis in all.
7. Prime grots with spray paint.
8. Start painting.
Suggestions for improvement on these instructions are appreciated.
INSANE army lists still available!!!! Now being written in 8th edition format! I have Index Imperium 1, Index Imperium 2, Index Xenos 2, Codex Orks Codex Tyranids, Codex Blood Angels and Codex Space Marines!
PM me for an INSANE (100K+ points) if you desire.
2015/03/11 21:58:27
Subject: How to build a box of 40K Gretchin (grots) in 8 easy steps
INSANE army lists still available!!!! Now being written in 8th edition format! I have Index Imperium 1, Index Imperium 2, Index Xenos 2, Codex Orks Codex Tyranids, Codex Blood Angels and Codex Space Marines!
PM me for an INSANE (100K+ points) if you desire.
2015/03/12 06:07:08
Subject: Re:How to build a box of 40K Gretchin (grots) in 8 easy steps
Snrub wrote: More assembly pictures wouldn't go astray.
Pictures showing various combinations of parts is always good.
OK, thanks.
INSANE army lists still available!!!! Now being written in 8th edition format! I have Index Imperium 1, Index Imperium 2, Index Xenos 2, Codex Orks Codex Tyranids, Codex Blood Angels and Codex Space Marines!
PM me for an INSANE (100K+ points) if you desire.
2015/03/13 01:37:48
Subject: How to build a box of 40K Gretchin (grots) in 8 easy steps
So this is a tutorial...on how to just take the parts out of the box and glue them together?
I thought this was gonna be some creative method to get more variety out of the Gretchin kit.
"Got you, Yugi! Your Rubric Marines can't fall back because I have declared the tertiary kaptaris ka'tah stance two, after the secondary dacatarai ka'tah last turn!"
"So you think, Kaiba! I declared my Thousand Sons the cult of Duplicity, which means all my psykers have access to the Sorcerous Facade power! Furthermore I will spend 8 Cabal Points to invoke Cabbalistic Focus, causing the rubrics to appear behind your custodes! The Vengeance for the Wronged and Sorcerous Fullisade stratagems along with the Malefic Maelstrom infernal pact evoked earlier in the command phase allows me to double their firepower, letting me wound on 2s and 3s!"
"you think it is you who has gotten me, yugi, but it is I who have gotten you! I declare the ever-vigilant stratagem to attack your rubrics with my custodes' ranged weapons, which with the new codex are now DAMAGE 2!!"
"...which leads you straight into my trap, Kaiba, you see I now declare the stratagem Implacable Automata, reducing all damage from your attacks by 1 and triggering my All is Dust special rule!"
2015/03/13 14:30:28
Subject: Re:How to build a box of 40K Gretchin (grots) in 8 easy steps
There's no need for these entirely unhelpful comments. This is far from the worse tutorial out there. There's room for improvement, sure. But it's not a bad start.
Badrukk, If I may offer a few suggestions to improve your future tutorial writing skills.
1. Post Format In your OP you have presented us with a singular picture and a wall of text. This doesn't make for easy reading.
- Spaces between steps breaks up the wall-o-text and makes it much easier to distinguish each step. Which in turn makes the whole thing easier to follow. This goes for any posts really, but it's particularly relevant in a situation like this.
- Another useful tool when writing a tutorial are the bold, italic and underline features. As well as the postsize and post colour. I'm not saying it's essential to all of these, or indeed any of them. But they are useful tool and you'd be remiss to forget about them.
- Also don't feel like you have to spoiler your pictures. People who come looking for a tutorial should expect to pictures and well taken photos of your work go along way to enhancing the tutorial.
- There are times when spoilering pictures might become advisable or even necessary. But I think it's better to not spoiler them when they are part of a tutorial.
Which brings us to the next point.
2. Pictures When creating tutorials the more pictures you can muster the better. Pictures really worth a thousand words in situations like this. If every step has a picture that's fantastic. If you end up putting 2 or 3 pictures per step, even better.
3. Word Count The best thing you can remember when writing a tutorial is K.I.S.S.
Keep It Simple Stupid.
Keep the word count to the minimum needed to explain your process. Don't go waffling on or complicating thigns unnecessarily. If a picture can say what a half a paragraph of words can't then bin the words and use the picture.
Although I think on this count you've done quite well. You've said what's needed to be said and left it at that. At this point pictures would be a real boon.
To that effect, here's a re-do of your OP with some of the above points implemented.
I spoilered it because.... why not.
Text in red is where i've changed what you've written so that it reads clearer or might make use of an imaginary photo or something, etc etc.
Text in green is my commentary.
You will need: A box of Gretchin, clippers, hobby knife, plastic superglue, a flat surface to work on, time, a good light source.
Time: Depends on how fast you build, it only took me 30-45 minutes.
1. Open the box. You should have the box, the instructions, 11 25mm bases, and two sprues, as in the image listed above.
[When dealing with a model like the Runtherd who is basically two seperate parts (Herder & Squig) it might be better to split the step in two. One for the Herder and one for the Squig.]
2. It is best to build the Runtherd first. Clip out the Runtherd body on the left sprue, His parts are shown in the image below.
He has the options for a...
- Squig hound and a grabba stick or a squig hound and a grot prod.
- He also has two head options.
Depending on which variant you want to build, clip out the squig hound, the squig hound face, the pole next to the grabba stick, and either the grabba stick or the grot prod. I did the grot prod. <-- This bit. Too wordy. Remove it and use pictures instead
[Picture of the Runt Herd components.] [Picture of the assembled Herder, minus the Squig]
2a. Next clip out the Squig components. Glue the Squig hound's face onto the Squig hound's body. Do not use too much glue or it will look deformed. A minuscule amount around the edge is enough. Then, and this is where it can get tricky, apply the squig hound and the grot prod arms. This can be tricky because they can slide off, especially if you use too much glue, a common mistake for me. Next, choose the head variant. I used the head variant with no night goggles, as the other head variant had night goggles. <-- [Little bit of waffling]
[Picture of the Squig components.] [Picture of the assembled Squig]
2b. Glue the Runtherd + Squig to a base and set him aside to dry. Drying can take anywhere from 12-24 hours, depending on how much glue you used. It is best to let it set overnight.
[Picture of the assembled Herder & Squig]
3. Let's move onto the Grots. There are 3 types of Grots. - Complete grots, - Grots with arms but without heads, - Grots without arms or a head..
3a. Clip the grots with heads and arms already attached. There should be three of them. These require no work, so just glean them with your hobby knife, glue them onto three of the bases, and set them aside to dry.
[Photo of the complete grots]
4. Next, clip out the grots that have no heads but do have arms. There should be six of them. For these, you will need to attach the heads. There are many head options in this set, choose one for each grot. Note that one of the grots has two grot blastas. Give this grot the coolest grot head you can find in this set, if you would like to. Gue the heads on, then glue the grots, now with heads, onto 6 of the bases. Set those grots aside to dry.
[Photo of the dissembled grots] [Photo of the assembled grots]
5. You should have one grot with no arms or a head left. This is where you can get creative (with building, at least). There are a two weapon options for him: a grot blasta and a point finger, and a stikkbomb. These should be located on the sprue that the Runtherd was on. I gave this grot a stikkbomb. Glue the grot blasta and pointy finger or the stikkbomb onto his arm sockets, a head on his head sockets, and then glue him onto his base. Set him aside to dry.
[Photo of the dissembled grot] [Photo of the assembled grot] [Here it would be good to have photos of the grot with the arms blu-tac'd on. This way people can see the different combinations available without you needing to have multiple grots on hand.]
6. Let grots and runtherd dry for 12-24 hours, depending on how much glue you used. You should have 10 grots and 1 runtherd, 11 minis in all.
7. Prime grots with spray paint.
8. Start painting.
Thank you for reading my tutorial. Suggestions for improvement on these instructions are appreciated.
Hope that that is useful to you. It's hardly a definitive guide on writing tutorials. Especially considering i've written a grand total of 1 tutorial myself. But maybe you'll find something useful there for next time.
Wow, that's pretty good! Thanks!
INSANE army lists still available!!!! Now being written in 8th edition format! I have Index Imperium 1, Index Imperium 2, Index Xenos 2, Codex Orks Codex Tyranids, Codex Blood Angels and Codex Space Marines!
PM me for an INSANE (100K+ points) if you desire.
2015/03/13 15:56:47
Subject: How to build a box of 40K Gretchin (grots) in 8 easy steps


 ~2800 points