| Author |
Message |
 |
|
|
|
|
Advert
|
Forum adverts like this one are shown to any user who is not logged in. Join us by filling out a tiny 3 field form and you will get your own, free, dakka user account which gives a good range of benefits to you:
- No adverts like this in the forums anymore.
- Times and dates in your local timezone.
- Full tracking of what you have read so you can skip to your first unread post, easily see what has changed since you last logged in, and easily see what is new at a glance.
- Email notifications for threads you want to watch closely.
- Being a part of the oldest wargaming community on the net.
If you are already a member then feel free to login now. |
|
 |
2015/09/15 15:30:53
Subject: Re:Your P&M tip for the day?
|
|

Ork Boy Hangin' off a Trukk
Moncton, New Brunswick, Canada
|
 Theophony wrote: Theophony wrote:If you begin to nod off while painting a model youve got hours into, put the model down, close up your paint bottles, clean your brush and go to sleep.
This. Big time this.
Also, using the right tool for the job makes a huge difference. It was years before I got around to buying a razor saw and mitre box and couldn't believe how much easier it made cutting larger pieces, and for years I used a cheap pin vice where the hole that the drill bit fit into was slightly off-set, so my holes were often irregular and larger than intended. And as my budget allowed, I eventually picked up some of the other toys pictured here.
 
|
|
|
|
 |
|
2015/09/15 15:36:54
Subject: Your P&M tip for the day?
|
|

Decrepit Dakkanaut
|
Same goes for just having woken up.
Have your breakfast, have a coffee, breathe some air. Don't sit straight down to your minis after waking up and washing.
In late August I stumbled downstairs after getting dressed and washed, and opened up my new craft knife. Pulling off the blade cover, I cut through the end and side of my finger so deeply that it's still healing now, despite being very clean.
In retrospect I should have got it taped at A&E, but I was home alone and still sleepy.
|
|
|
|
|
|
2015/09/15 15:46:34
Subject: Your P&M tip for the day?
|
|

Regular Dakkanaut
|
What's a mitre box and how does it work?
I can google it if you don't fancy telling me, it just looks intriguing and I bet a lot of the google hits will be from a non-miniatures point of view 
|
|
|
|
|
2015/09/15 16:07:21
Subject: Your P&M tip for the day?
|
|
Lieutenant General
|
Wikipedia article on the mitre box.
|
'It is a source of constant consternation that my opponents
cannot correlate their innate inferiority with their inevitable defeat. It would seem that stupidity is as eternal as war.'
- Nemesor Zahndrekh of the Sautekh Dynasty
Overlord of the Crownworld of Gidrim |
|
|
|
|
2015/09/15 19:37:33
Subject: Your P&M tip for the day?
|
|

Incorporating Wet-Blending
|
Pro tip: superglue that bad boy back together next time.
|
|
|
|
|
2015/09/15 21:37:21
Subject: Your P&M tip for the day?
|
|
Ork Boy Hangin' off a Trukk
Moncton, New Brunswick, Canada
|
mockingbirduk wrote:What's a mitre box and how does it work?
I can google it if you don't fancy telling me, it just looks intriguing and I bet a lot of the google hits will be from a non-miniatures point of view
@Ghaz's link pretty much covers it, except it's a smaller plastic or metal version that works with a razor saw (see the pics in my post above). Most of these tools can be found at a model train store, or can be ordered from here: http://www.micromark.com/
|
|
|
|
|
|
2015/09/15 23:57:11
Subject: Your P&M tip for the day?
|
|

Arch Magos w/ 4 Meg of RAM
|
As I discovered this morning - throw nothing away!! (at least when it coming to finding/needing/rediscovering stuff for conversions) - having trouble finding the right stuff to make a convincing mount for a swivel platform for the back of a kataphron. Come to work look around my office desk and in my classroom - all neccessary pieces found within 10 minutes. The simplest stuff can be repurposed in the most amazing ways  Automatically Appended Next Post: Automatically Appended Next Post: oh - on another note - anyone have any tips for bending/remolding sprue. I need to turn a lenght of sprue into circular frame..... hot water (as with FW resin) or hairdryers work dak??
|
|
This message was edited 1 time. Last update was at 2015/09/15 23:59:02
|
|
|
|
|
2015/09/16 00:14:52
Subject: Your P&M tip for the day?
|
|
Decrepit Dakkanaut
|
Hold it about 3-4 inches above over an electric oven ring on medium heat and then form it around a can or circular object.
You have a few seconds to do this after taking it away from the heat, don't try and juggle doing it over the ring. You can reheat and do more if you don't get as far as you like. Automatically Appended Next Post: kb_lock wrote:
Pro tip: superglue that bad boy back together next time.
It was bleeding too much to seal or bind. I filled my sleeve in a matter of seconds whilst keeping it elevated.
DCM perk: You can see a picture of what was still pouring out after I bound it.
|
|
This message was edited 1 time. Last update was at 2015/09/16 00:16:05
|
|
|
|
|
2015/09/16 00:18:36
Subject: Your P&M tip for the day?
|
|
Arch Magos w/ 4 Meg of RAM
|
Sweet - cheers BC. That'll be the last piece of the puzzle in place. Gonna get htis thing built this afternoon while the wife is at work.....can just seethe look on her face with me fething about with hot rings and plastic......it wouldnt end well!
|
|
|
|
|
|
2015/09/16 00:21:26
Subject: Your P&M tip for the day?
|
|
Decrepit Dakkanaut
|
I had to do this with the canopy piece I was replacing, I found out afterwards that I should have been moving the piece I was pressing into the mould away from the ring and then doing it.
The entire time I was like "Feeeeeeethhhh I'm gonna punch the oven ring when this gives suddenly and lose all the skin on my hands."
I am not clever some days.
|
|
This message was edited 1 time. Last update was at 2015/09/16 00:21:51
|
|
|
|
|
2015/09/17 04:43:49
Subject: Your P&M tip for the day?
|
|
Wondering Why the Emperor Left
Seattle
|
My tip?
Know your limits, but don't be bound by them. If you can't paint a certain thing well, practice it as much as you can, on as many different types of model as possible. Eventually you'll either figure out the "proper" technique or find an alternative method.
|
|
|
|
|
|
2015/09/24 19:13:31
Subject: Your P&M tip for the day?
|
|
Maniacal Gibbering Madboy
|
Explore dipping! For those of us who are not the most amazing painters, try dipping your models to get through an army nice and fast!
|
|
|
|
|
2015/09/24 20:00:15
Subject: Your P&M tip for the day?
|
|

Incorporating Wet-Blending
|
 goblinzz wrote: goblinzz wrote:Explore dipping! For those of us who are not the most amazing painters, try dipping your models to get through an army nice and fast!
Seconded. No matter your skill level, painting forty zombies, goblins, or Imperial Guardsman is a drag, especially if you're trying to get something finished for a tournament or whatever. Dipping is your friend in these instances.
|
|
|
|
|
|
2015/09/24 21:15:13
Subject: Your P&M tip for the day?
|
|
Decrepit Dakkanaut
|
goblinzz wrote:Explore dipping! For those of us who are not the most amazing painters, try dipping your models to get through an army nice and fast!
Yep. I've only just posted this elsewhere, but I think it's a very useful little example sheet.
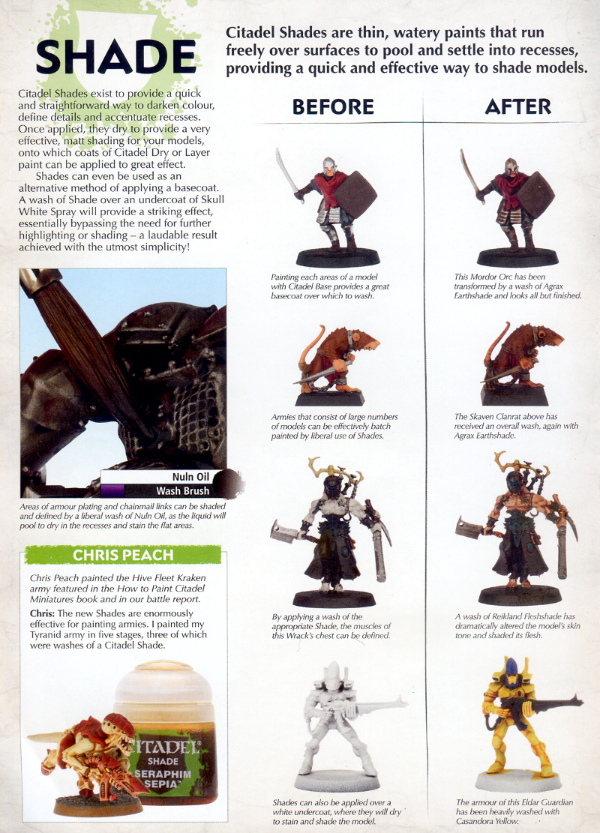
I try generally not to upload current tutorials that can still be bought, but I don't think anyone can object to an old page of White Dwarf plugging a paint line.
|
|
|
|
|
|
2015/09/24 21:21:24
Subject: Your P&M tip for the day?
|
|
Legendary Master of the Chapter
|
 Buttery Commissar wrote: Buttery Commissar wrote: goblinzz wrote:Explore dipping! For those of us who are not the most amazing painters, try dipping your models to get through an army nice and fast!
Yep. I've only just posted this elsewhere, but I think it's a very useful little example sheet.
I try generally not to upload current tutorials that can still be bought, but I don't think anyone can object to an old page of White Dwarf plugging a paint line.
Dip and Shade are different techniques.
but dammit i love instances of talent in a can or bottle.
|
 Unit1126PLL wrote: Unit1126PLL wrote: Scott-S6 wrote: Scott-S6 wrote:And yet another thread is hijacked for Unit to ask for the same advice, receive the same answers and make the same excuses.
Oh my god I'm becoming martel.
Send help!
|
|
|
|
|
2015/09/24 21:32:54
Subject: Your P&M tip for the day?
|
|
Decrepit Dakkanaut
|
They may be different product, but the theory is the same. Insta-shade.
|
|
|
|
|
|
2015/09/24 23:39:49
Subject: Your P&M tip for the day?
|
|
Incorporating Wet-Blending
|
Don't be afraid of doing stuff.
I never liked mixing paints because it is hard to reproduce a colour, or it isn't what is written on the box. That was poor logic on my part, mixing paints is a brilliant way of sliding your gradients around and exploring new effects.
I also never liked modifying or customising things (I still don't, to a large extent), but some times you need to do what you need to do, and not having those skills can be to your detriment. Case in point, donlad's devs was missing a left arm, so I cast one in greenstuff using instamold, and more recently, MSRC sent me a flying hive tyrant which has both stupid feet, and a stupid base - I am going to cut the feet off and give it hooves (if he is happy for me to mangle a FW model).
I could not do these things if I was afraid of doing it. Don't make it a big thing, we are playing with plastic dollies, you really can't ruin anything that matters here (aside from your bank balance, or with an exacto knife, or giving yourself cancer with chemicals - BUT IGNORE ALL THAT)
|
|
|
|
|
2015/09/28 04:28:42
Subject: Re:Your P&M tip for the day?
|
|
Focused Fire Warrior
|
When working with resin models, make sure you wash them first, regardless of which phase you are in (removing form sprue, mold lines removal, assembly). Reason why is because they are greasy (in order to be removed from the initial mold.)
It will make your life easier.
|
|
This message was edited 1 time. Last update was at 2015/09/28 04:30:43
|
|
|
|
|
2015/09/28 15:01:17
Subject: Re:Your P&M tip for the day?
|
|
The Last Chancer Who Survived
|
When working with 6mm scale minis, individual detail is not important. What's important is the overall effect of the force when assembled. What up-close looks like a rough job will look amazing when multiplied by 200, and viewed from 3 feet away.
|
|
|
|
|
2015/09/28 21:37:02
Subject: Re:Your P&M tip for the day?
|
|
Posts with Authority
|
Selym wrote:When working with 6mm scale minis, individual detail is not important. What's important is the overall effect of the force when assembled. What up-close looks like a rough job will look amazing when multiplied by 200, and viewed from 3 feet away.
Beat me to it. The thought sprang to mind when I read this:
goblinzz wrote:Explore dipping! For those of us who are not the most amazing painters, try dipping your models to get through an army nice and fast!
... and this...
kb_lock wrote:Don't be afraid of doing stuff.
My own thought is that people are put off by the tiny details of 6mm, and up to 15mm, because they imagine the minis have to be painted in the same way as 28mm minis, complete with blended layers, delicate washes and glazes, tiny highlights, etc. (Or so I imagine) In my experience that's not really necessary, and the techniques that look rougher on 28mm, like heavier washes and even drybrushing, look a lot better at 6-10mm. I wonder if it's something about the tinier details being better at catching the dry paint and the surface tension than larger areas of 28-32mm, but anyway. I'll point to these great Warmaster orcs. Just sprayed green, drybrushed, basecoats picked out, and given a dark wash, but wow!
And Selym's right - worrying about painting and look of individual minis at these tiny scales is missing the point!  One of the themes of this entertaining rant.
|
|
This message was edited 1 time. Last update was at 2015/09/28 21:56:46
|
|
|
|
|
2015/09/28 22:22:03
Subject: Re:Your P&M tip for the day?
|
|

Veteran Wolf Guard Squad Leader
|
Magnetise Magnetise Magnetise! If you don't particularly enjoy assembly, the thought of spending another hour or 2 drilling holes and magging seems like unwelcome effort. However for me it comes down to a simple choice. You can spend 2 hours making a model's weaponry interchangeable, or you can very possibly spend 4x that time and your hard earned cash at a later point buying, constructing and painting a second model to get your desired weapon loadout. (You never know what is going to become a desirable / obselete loadout in the next codex).
The most typical example I can think of is magnetising a predators sponsons and top hatch, to allow you to switch it to a rhino or razorback in 10 seconds. However is also worthwhile doing this to a model's weapon arms, particularly models with power weapons and the like. Planting a magnet on a soldiers back or backpack is also dead handy for affixing interchangeable combi and power weapons as desired.
|
|
This message was edited 2 times. Last update was at 2015/10/04 09:48:16
I let the dogs out |
|
|
|
|
2015/09/30 20:58:31
Subject: Re:Your P&M tip for the day?
|
|
Maniacal Gibbering Madboy
|
 thegreatchimp wrote: thegreatchimp wrote:Magnetise Magnetise Magnetise! If you don't particularly enjoy assembly, the thought of spending another hour or 2 drilling holes and magging seems like unwelcome effort. However for me it comes down to a simple choice. You can spend 2 hours making a model's weaponry interchangeable, or you can very possibly spend 4x that time and your hard earned cash at a later point buying, constructing and painting a second model to get your desired weapon loadout. (You never know what is going to become a desirable / obselete loadout in the next codex).
The most typical example I can think ogf is magnetising a predators sponsons and top hatch, to allow you to switch it to a rhino or razorback in 10 seconds. However is also worthwhile doign this to a model's weapon arms, particularly models with power weapons and the like. Planting a magnet on a soldiers back or backpack is also dead handy for affixing interchangeable combi and power weapons as desired.
Definitely! In addition, consider how your going to swap out weapons and equipment as you build, you'd be amazed at just how versatile you can make your squads and vehicles!
|
|
|
|
|
2015/09/30 21:15:17
Subject: Your P&M tip for the day?
|
|
The Last Chancer Who Survived
|
Pro tip: There are different sizes of 1:285 scale models. Most of them don't work in epic 40k.
|
|
|
|
|
2015/10/07 20:44:59
Subject: Re:Your P&M tip for the day?
|
|
Veteran Wolf Guard Squad Leader
|
Reposing space marine arms using wire and putty is fairly straightforward. Reposng their legs is considerably harder and much more time consuming, particularly if the ankle has to be cut and repositioned. I've found it preferable to source GW or 3rd party legs in the desired position than converting them.
And on a related note, if reposing limbs, try and pick the plainest, most clutter-free / bling-free limbs to work off, as more often than not you'll end up having to painstakingly remove cloaks, pouches, furs and loincloths that get in the way of reposing the limb. More efficient to work off a plain unadorned limb and model detail onto the limb when you're finished, if necessary.
|
|
This message was edited 3 times. Last update was at 2015/10/08 09:49:03
I let the dogs out |
|
|
|
|
2015/10/08 00:21:20
Subject: Your P&M tip for the day?
|
|
Decrepit Dakkanaut
|
My thought for today is that whilst superglue and pinning is a more labour intensive method than epoxy, in the long run it allows for you to change your mind. I very rarely epoxy and never with resin.
|
|
|
|
|
|
2015/10/08 14:54:46
Subject: Your P&M tip for the day?
|
|

Dakka Veteran
|
Don't know if this has been said before but when gluing small bitz onto something I found using a toothpick, put some prestik (think its blue tack for everyone else) on the tip and pick the small part up with that, instead of putting the glue on the piece, put a drop on something else and applie they glue by just touching it with the piece on the toothpick, put part in its place. Was gluing little pieces to my fingers a couple of times before I clicked. Everybody does it that way most propaboly - but I did not know.
|
|
|
|
|
2015/10/08 14:56:11
Subject: Your P&M tip for the day?
|
|
The Last Chancer Who Survived
|
I've never seen that method before. Does the prestick not leave residue?
|
|
|
|
|
2015/10/08 15:00:27
Subject: Your P&M tip for the day?
|
|
Dakka Veteran
|
You only put a little bit on the tip, where you not gonna put glue.
|
|
|
|
|
2015/10/08 17:11:41
Subject: Your P&M tip for the day?
|
|
Veteran Wolf Guard Squad Leader
|
KINGPIN54 wrote:Don't know if this has been said before but when gluing small bitz onto something I found using a toothpick, put some prestik (think its blue tack for everyone else) on the tip and pick the small part up with that, instead of putting the glue on the piece, put a drop on something else and applie they glue by just touching it with the piece on the toothpick, put part in its place. Was gluing little pieces to my fingers a couple of times before I clicked. Everybody does it that way most propaboly - but I did not know.
Thanks for the tip, sticking small bits to my hand, to my knife (and pretty much to everything except the connecting part), is the bane of my life. I will be giving your suggestion a try.
|
I let the dogs out |
|
|
|
|
2015/10/14 17:17:14
Subject: Re:Your P&M tip for the day?
|
|
Grim Dark Angels Interrogator-Chaplain
|
After what happened last night, I will reiterate something I and others said before:  Don't paint or model when you're drop dead tired. I was working on Cypher (for the monthly challenge) late last night, and while I was drybrushing I bobbled him. The mini struck the frame of my bed where I was sitting, then the floor. His arm and backpack came off. Luckily, he didn't have a lot of wet paint all over him and the damage will be a quick fix, but it just goes to show how being tired can lead to stupid things happening  .
|
|
|
|
|
|
|
|


 6th Skylight Patrol Contingent
 = 131
= 131  ~16000 Astra Militarum:
  ~1200 | Imperial Knights:
  ~2300 | Leagues of Votann:
  ~1300 | Tyranids:
  ~3400 | Stormcast Eternals:
  ~5000 | Kruleboyz:
  ~3500 | Lumineth Realm-Lords:
  ~700
~700