| Author |
Message |
 |
|
|
|
|
Advert
|
Forum adverts like this one are shown to any user who is not logged in. Join us by filling out a tiny 3 field form and you will get your own, free, dakka user account which gives a good range of benefits to you:
- No adverts like this in the forums anymore.
- Times and dates in your local timezone.
- Full tracking of what you have read so you can skip to your first unread post, easily see what has changed since you last logged in, and easily see what is new at a glance.
- Email notifications for threads you want to watch closely.
- Being a part of the oldest wargaming community on the net.
If you are already a member then feel free to login now. |
|
 |
2022/06/11 17:31:50
Subject: Albertorius' 3d Printing, Painting Modelling Blog (30k in 15mm, p.17)
|
|

Grizzled Space Wolves Great Wolf
|
Always love your painting of 15mm models, they come out so well and I imagine they look great on the table top. You're mostly just using contrasts/speedpaints, yeah?
Also curious, what layer height do you go for when printing small scale stuff? Are you using a printer with 50um XY resolution (like 2k / 6"), or something higher res?
|
|
|
 |
|
2022/06/11 17:36:32
Subject: Albertorius' 3d Printing, Painting Modelling Blog (30k in 15mm, p.17)
|
|

Inspiring SDF-1 Bridge Officer
|
AllSeeingSkink wrote:Always love your painting of 15mm models, they come out so well and I imagine they look great on the table top. You're mostly just using contrasts/speedpaints, yeah?
Also curious, what layer height do you go for when printing small scale stuff? Are you using a printer with 50um XY resolution (like 2k / 6"), or something higher res?
Thank you 
Well, I mostly combine methods, but contrasts/speed paints tend to work well with this scale.
I'm currently using a Mars 3, which is 4k (about 38 microns on the XY), with 0.025 layers, high light off times and slow movements. That said, most of my Epic stuff was done on a 2k printer, and it never seemed to be an issue.
|
|
This message was edited 1 time. Last update was at 2022/06/11 17:37:04
|
|
|
|
|
2022/06/16 02:13:06
Subject: Re:Albertorius' 3d Printing, Painting Modelling Blog (Battletech and 15mm, p.15)
|
|
Grizzled Space Wolves Great Wolf
|
 Albertorius wrote: Albertorius wrote:
One of the joys of 3d printing is being able to do stuff like this very easily, if you so choose
Can I ask how you did that? I'm trying to add an Imperial Fist logo to a shoulder pad with Blender. When I "shrinkwrap" it flattens it out into nothingness.
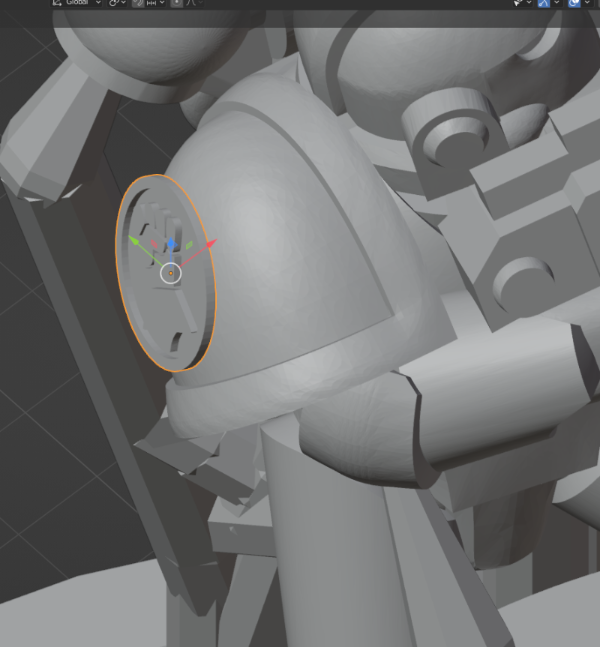

I suppose I could modify the symbol into a 2D shape instead of the 3D shape, shrink wrap it, then somehow try to "thicken" it afterwards. Dunno if Blender has a "thicken" function though.
EDIT: After screwing around for far too long I figured out one way of doing it. Tried the 2D shape thing but that created a lot of ugly artefacts, in the end I did it with the 3D emblem....

But it was way more of a pain in the arse than I was expecting. For anyone else who wants to do it, the process was...
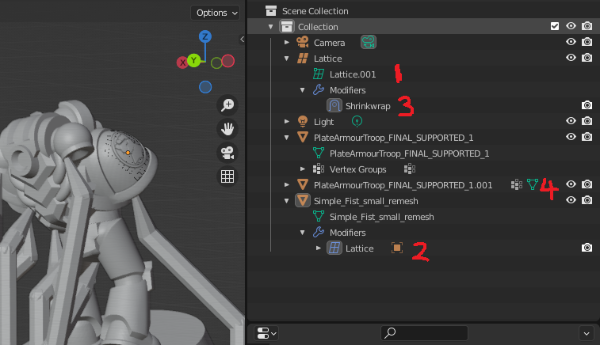
1. Create a 1 element thick lattice and move the lattice so it's just inside the emblem
2. Add a "lattice modifier" to the emblem and link it to the lattice from step 1. Then move the lattice and emblem to roughly where they should be. I also remeshed the emblem to make it more refined when it gets deformed in the next step.
3. Go back to the lattice and create a shrinkwrap modifier and point the target to the shoulder pad.
4. Unfortunately the shrinkwrap snaps to the nearest geometry in the target, so unless the emblem is very small it was snapping to the backpack or the rim of the shoulderpad.... so I had to go into modelling, select only the faces of the shoulder pad, duplicate them, and create a new selection which was only made up of those faces. I then went back to the shrinkwrap from step 3 and pointed it at this new shoulder pad geometry.
I got that technique from the following thread: https://blender.stackexchange.com/questions/44758/emboss-text-onto-curved-surface
That's in addition to the basic thing of making sure it's aligned where you want it and scaled correctly. Not sure if I can be bothered doing it to the other models, I just wanted to do a test print to see how it looked, wasn't expecting it to be that fiddly. 
If you have a quicker way of doing it, let me know.
|
|
This message was edited 2 times. Last update was at 2022/06/16 06:14:27
|
|
|
|
|
2022/06/16 06:36:48
Subject: Re:Albertorius' 3d Printing, Painting Modelling Blog (Battletech and 15mm, p.15)
|
|
Inspiring SDF-1 Bridge Officer
|
AllSeeingSkink wrote:Can I ask how you did that? I'm trying to add an Imperial Fist logo to a shoulder pad with Blender. When I "shrinkwrap" it flattens it out into nothingness.
I did it with Window's 3D Builder And go Edit -> Emboss
There you can add an image (vector preferred), use one of the predefined ones or add text.
|
|
This message was edited 1 time. Last update was at 2022/06/16 06:37:02
|
|
|
|
|
2022/06/16 06:41:47
Subject: Re:Albertorius' 3d Printing, Painting Modelling Blog (Battletech and 15mm, p.15)
|
|
Grizzled Space Wolves Great Wolf
|
Albertorius wrote:AllSeeingSkink wrote:Can I ask how you did that? I'm trying to add an Imperial Fist logo to a shoulder pad with Blender. When I "shrinkwrap" it flattens it out into nothingness.
I did it with Window's 3D Builder And go Edit -> Emboss
There you can add an image (vector preferred), use one of the predefined ones or add text.
That sounds a lot easier than what I ended up doing, haha. I've never heard of 3D Builder, is that what you mostly use rather than Blender?
|
|
|
|
|
2022/06/16 06:57:22
Subject: Albertorius' 3d Printing, Painting Modelling Blog (30k in 15mm, p.17)
|
|

Leader of the Sept
|
For simple stuff like combining, splitting and adding text and magnet holes and suchlike, 3D Builder is really user friendly and effective. You should Definately look it up as it’s free.
|
Please excuse any spelling errors. I use a tablet frequently and software keyboards are a pain!
 Terranwing - w3;d1;l1 Terranwing - w3;d1;l1
 51st Dunedinw2;d0;l0 51st Dunedinw2;d0;l0
 Cadre Coronal Afterglow w1;d0;l0 Cadre Coronal Afterglow w1;d0;l0 |
|
|
|
|
2022/06/16 08:53:10
Subject: Re:Albertorius' 3d Printing, Painting Modelling Blog (Battletech and 15mm, p.15)
|
|
Inspiring SDF-1 Bridge Officer
|
AllSeeingSkink wrote: Albertorius wrote:AllSeeingSkink wrote:Can I ask how you did that? I'm trying to add an Imperial Fist logo to a shoulder pad with Blender. When I "shrinkwrap" it flattens it out into nothingness.
I did it with Window's 3D Builder And go Edit -> Emboss
There you can add an image (vector preferred), use one of the predefined ones or add text.
That sounds a lot easier than what I ended up doing, haha. I've never heard of 3D Builder, is that what you mostly use rather than Blender?
Yeah, for fixing meshes and simple stuff is really handy.
|
|
|
|
|
2022/06/16 10:52:37
Subject: Re:Albertorius' 3d Printing, Painting Modelling Blog (Battletech and 15mm, p.15)
|
|

The New Miss Macross!
|
Albertorius wrote:AllSeeingSkink wrote:Can I ask how you did that? I'm trying to add an Imperial Fist logo to a shoulder pad with Blender. When I "shrinkwrap" it flattens it out into nothingness.
I did it with Window's 3D Builder And go Edit -> Emboss
There you can add an image (vector preferred), use one of the predefined ones or add text.
I didn't know that was an option. Thanks!
|
|
|
|
|
2022/06/16 11:05:12
Subject: Albertorius' 3d Printing, Painting Modelling Blog (30k in 15mm, p.17)
|
|
Grizzled Space Wolves Great Wolf
|
I'll be sure to check out 3D Builder, thanks for the tip.
Blender has a pretty crazy learning curve. I have a background in engineering-type CAD design which is very different, and I know some folks at work use Blender so I figured I'd give it a go, but it takes some time to get your head around the menus, options, what can and can't be done, etc. And everyone talks in terms of shortcuts, which is fine for experienced users but for a newbie it just makes tutorials harder to follow.
|
|
This message was edited 1 time. Last update was at 2022/06/16 11:06:27
|
|
|
|
|
2022/06/16 20:37:11
Subject: Albertorius' 3d Printing, Painting Modelling Blog (30k in 15mm, p.17)
|
|
Slaanesh Havoc with Blastmaster
|
That's a great tiny Ghazghkull
|
|
|
|
|
2022/06/18 20:42:38
Subject: Re:Albertorius' 3d Printing, Painting Modelling Blog (30k in 15mm, p.17)
|
|
Inspiring SDF-1 Bridge Officer
|
Thank you, Fluid_Fox!
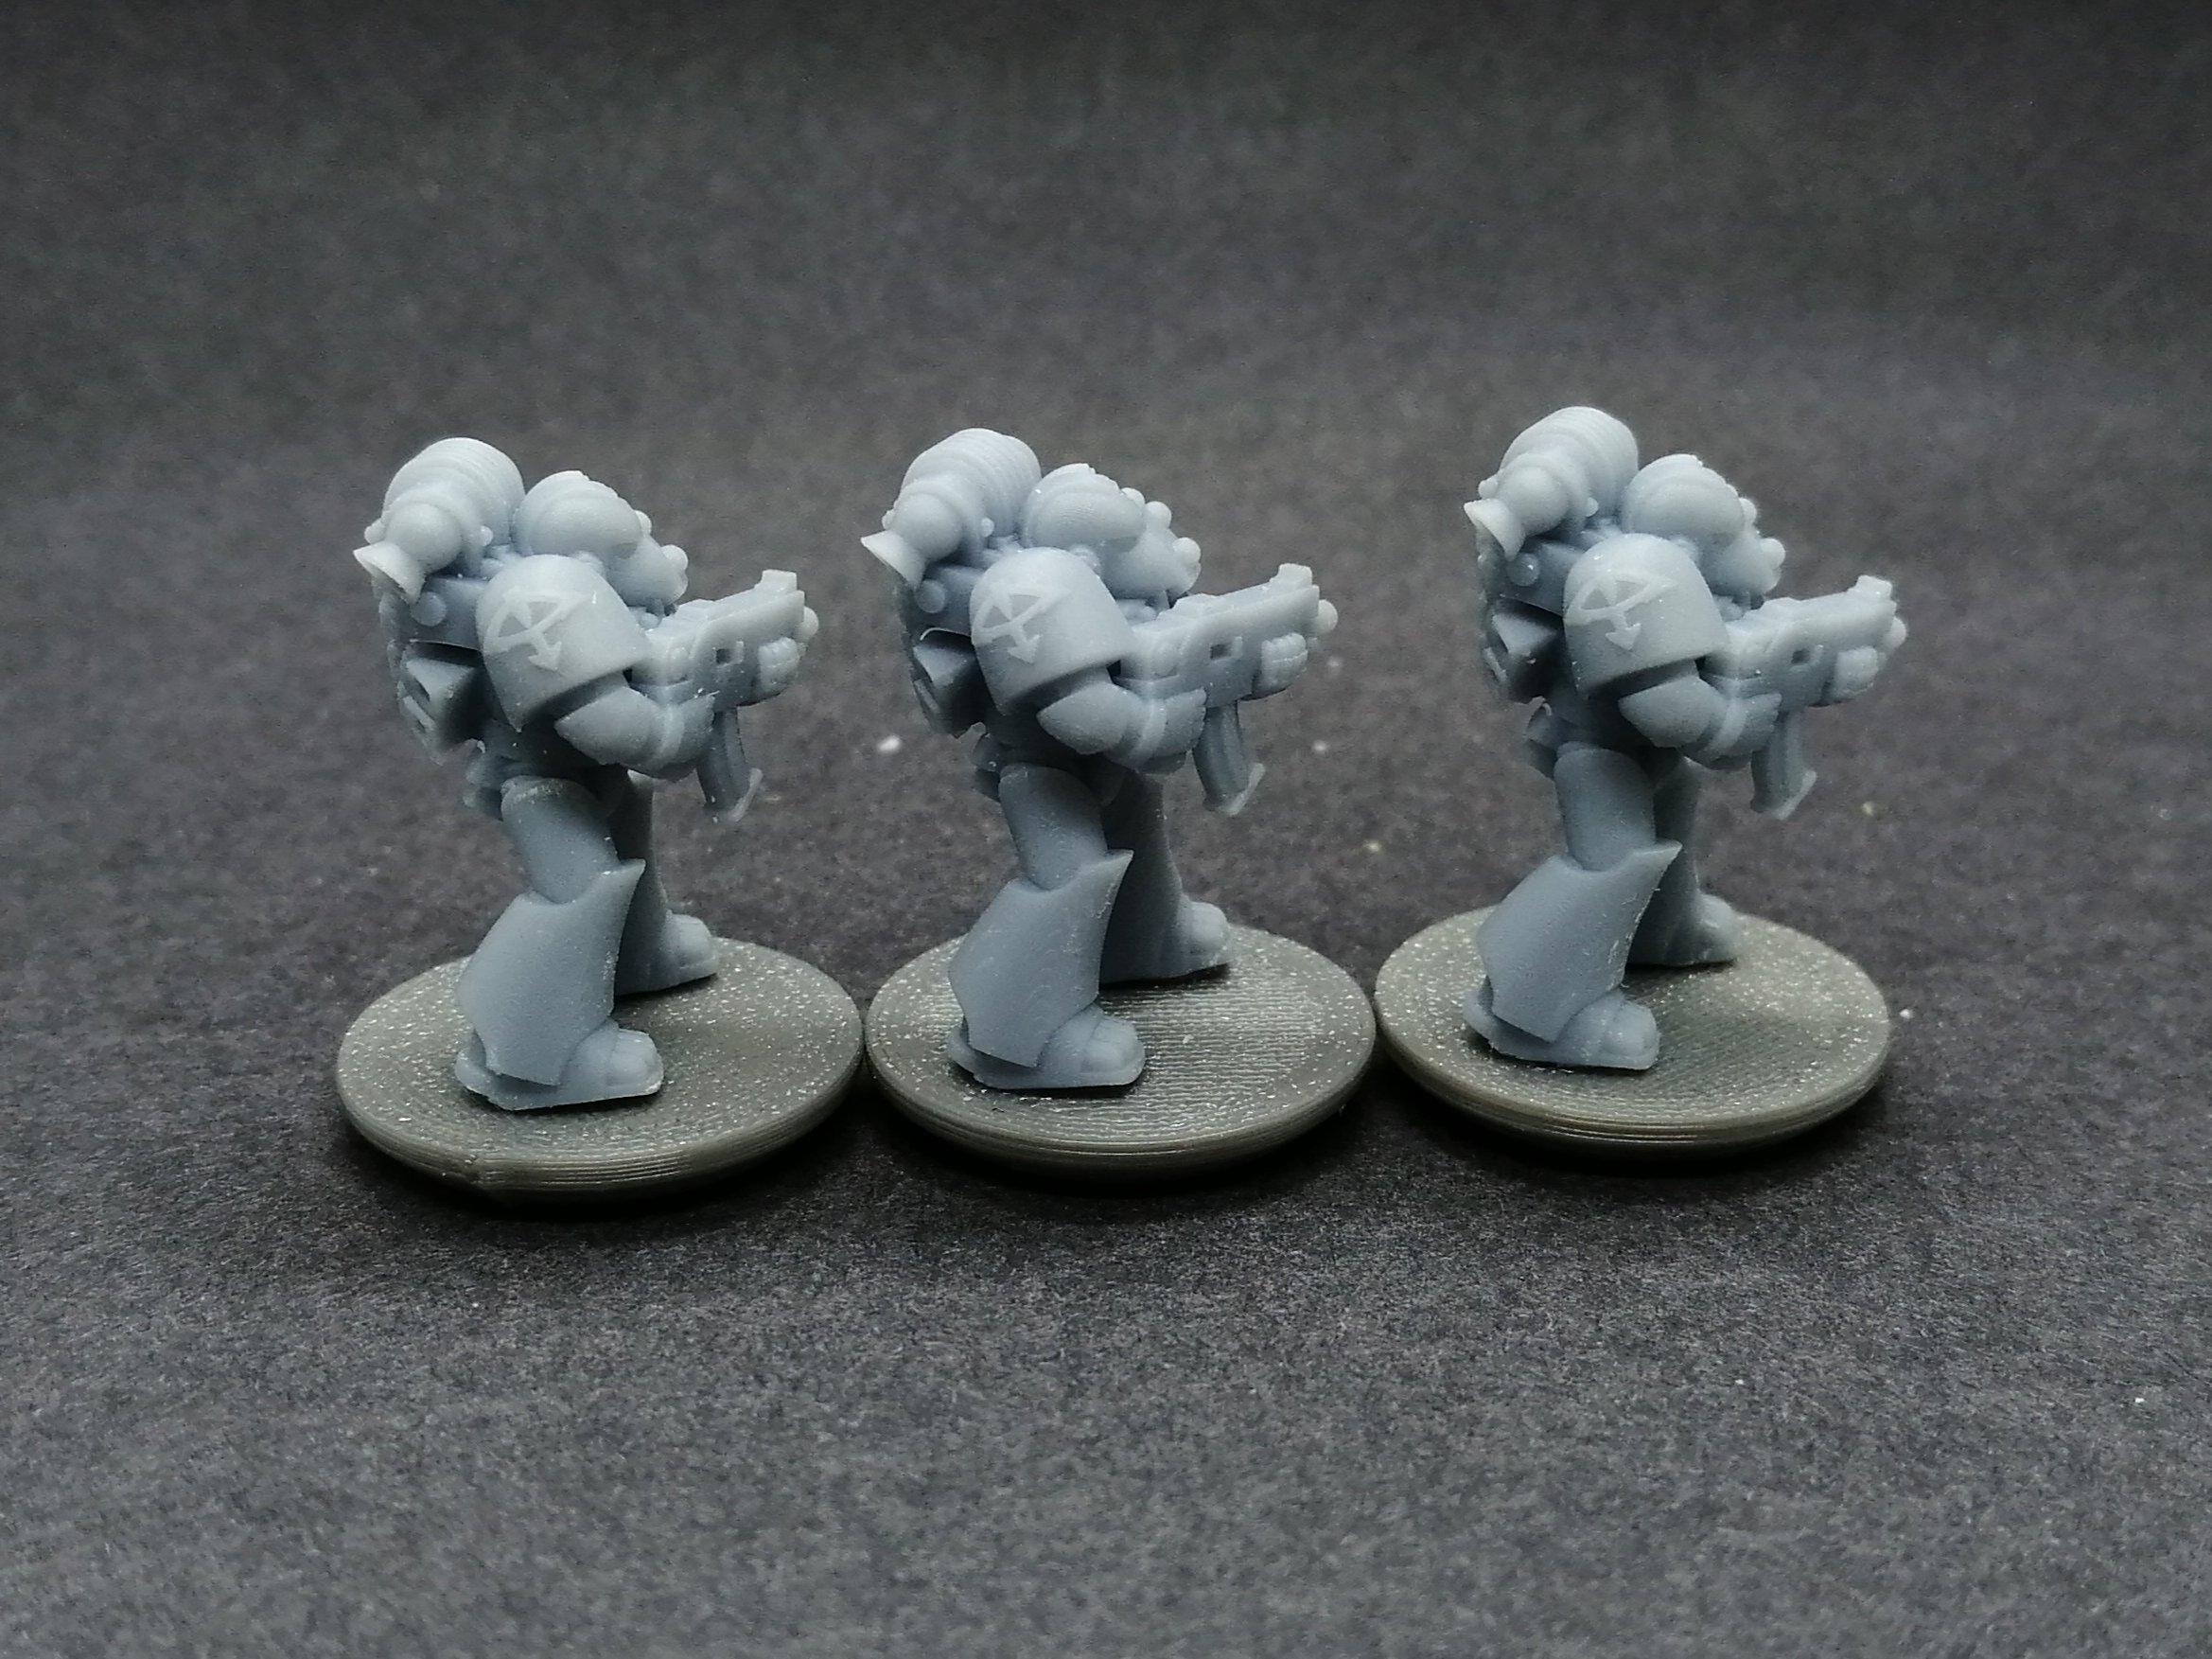
Been printing some stuff for my regular sized heresy marines, for some reason ^^
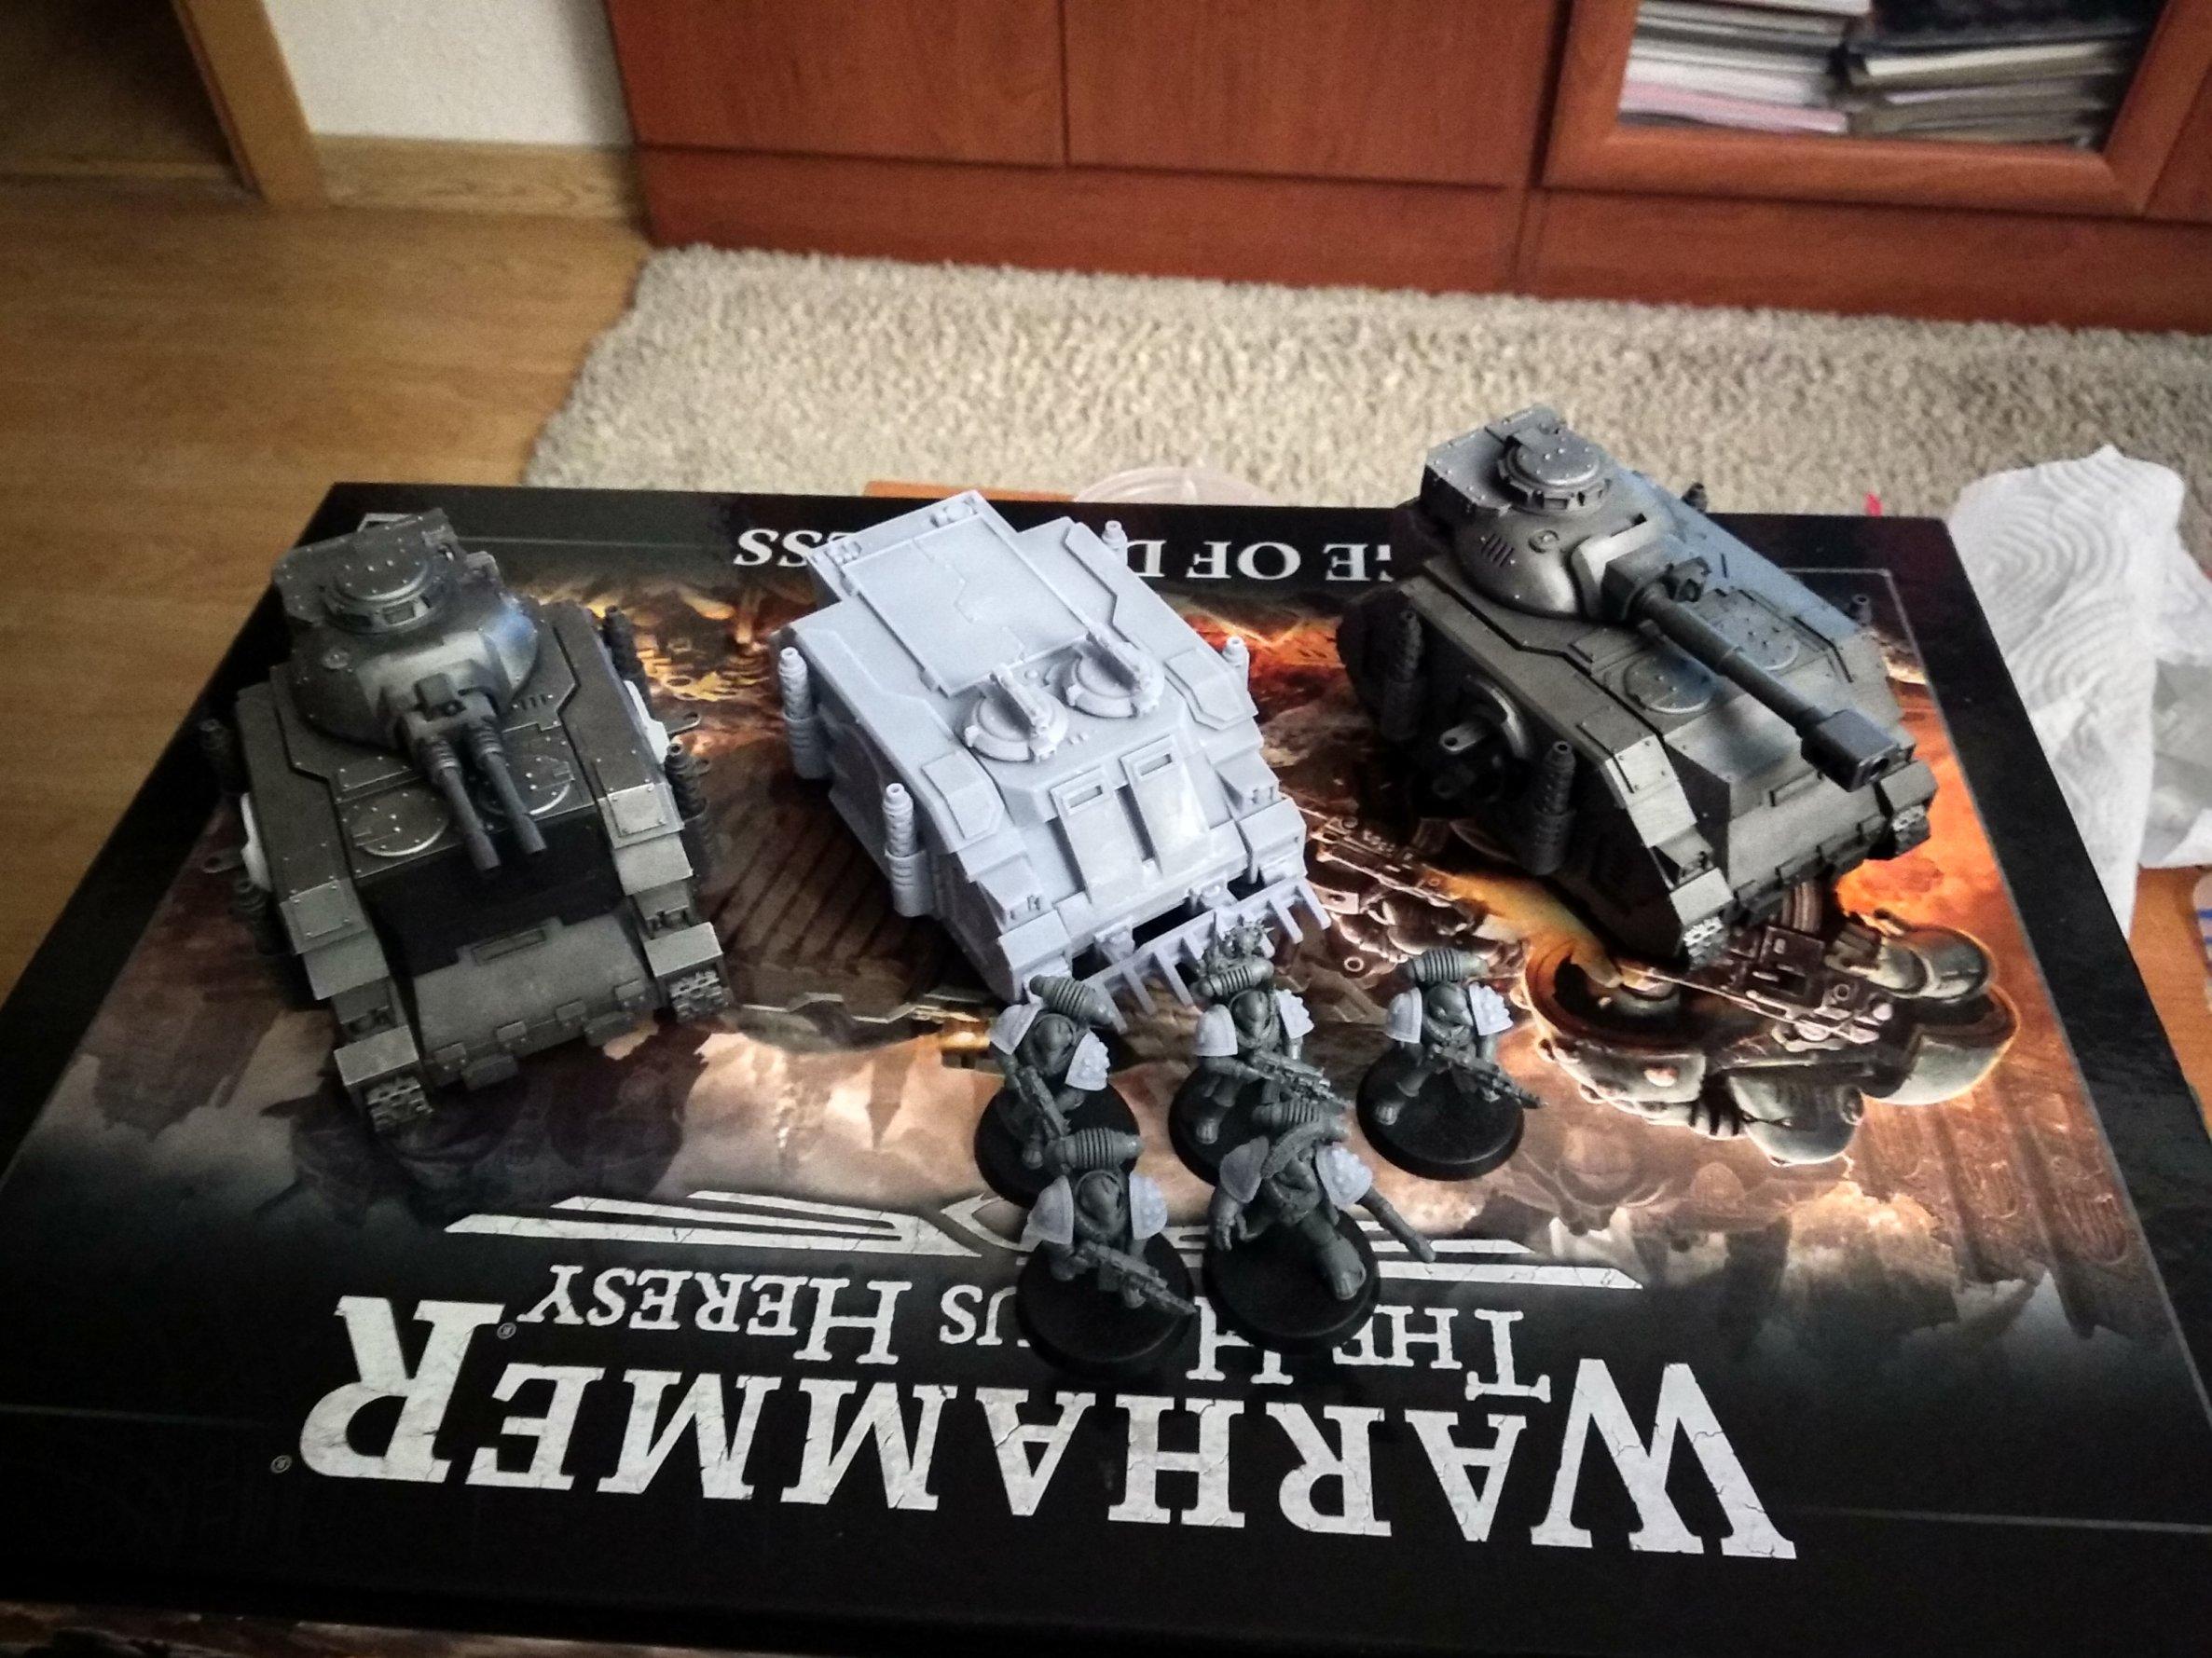
I'll probably add bigger stuff when the Saturn arrives.
Today I printed a batch of 60 shoulder pads while I was assembling some beakies, because feth to all hell and back seams on the fething middle of a fething studded shoulder pad. Just no.
|
|
|
|
|
2022/06/21 15:13:52
Subject: Re:Albertorius' 3d Printing, Painting Modelling Blog (30k in 15mm, p.17)
|
|
Omnipotent Lord of Change
|
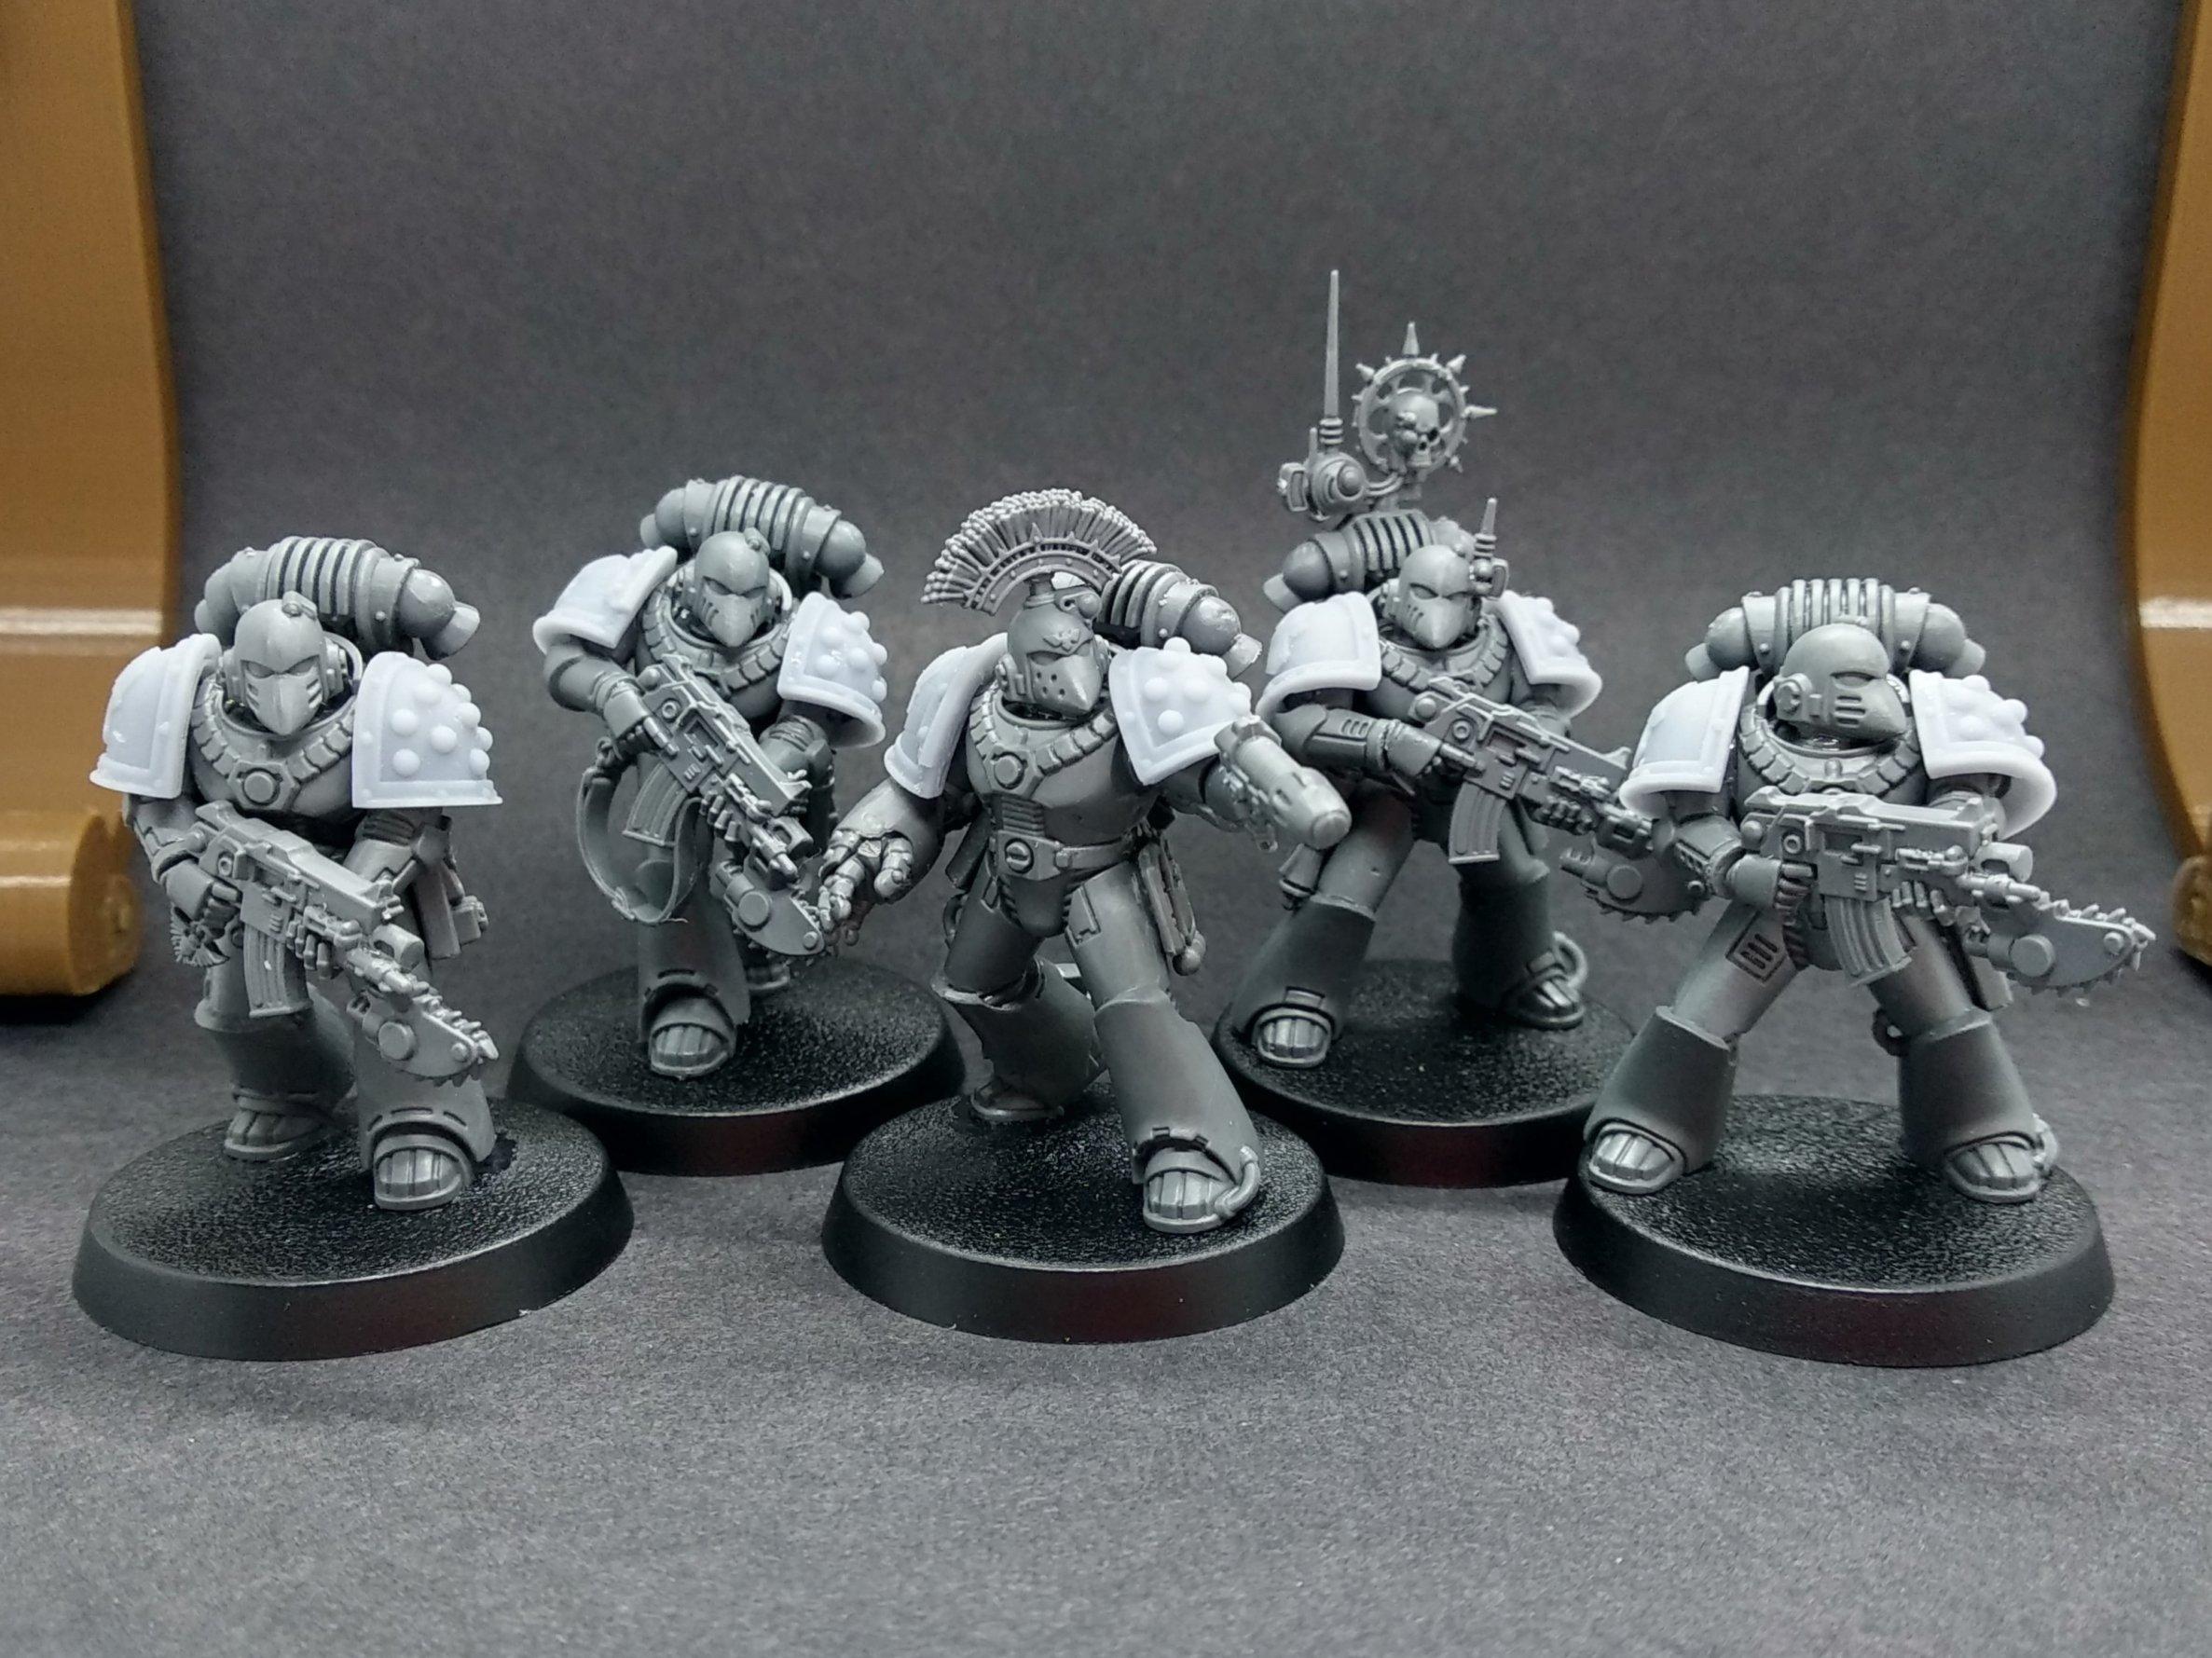
Albertorius wrote:Today I printed a batch of 60 shoulder pads while I was assembling some beakies, because feth to all hell and back seams on the fething middle of a fething studded shoulder pad. Just no.
*dry heaves* sweet baby primarchs, that's horrible of GW, but warp bless the powers of the printer to fix this indiscretion! The built marines look the business - that's the standard heresy powerfist? Damn.
I missed you were getting a Saturn, excited to see what BIG stuff you get up to, after ironically working on TINY stuff.
|
|
|
|
|
|
2022/06/21 16:35:50
Subject: Re:Albertorius' 3d Printing, Painting Modelling Blog (30k in 15mm, p.17)
|
|
Inspiring SDF-1 Bridge Officer
|
 Boss Salvage wrote: Boss Salvage wrote: Albertorius wrote:Today I printed a batch of 60 shoulder pads while I was assembling some beakies, because feth to all hell and back seams on the fething middle of a fething studded shoulder pad. Just no.
*dry heaves* sweet baby primarchs, that's horrible of GW, but warp bless the powers of the printer to fix this indiscretion! The built marines look the business - that's the standard heresy powerfist? Damn.
I missed you were getting a Saturn, excited to see what BIG stuff you get up to, after ironically working on TINY stuff.
Honestly, at this point I'm thinking scenery ^^
|
|
|
|
|
2022/06/21 17:11:25
Subject: Albertorius' 3d Printing, Painting Modelling Blog (30k in 15mm, p.17)
|
|
Leader of the Sept
|
Not sure if it’s too late, or a deliberate choice, but I though mk6 pads didn’t have any edging.
I mean it’s not the most important thing in the world about someone else’s toy soldiers, but though it should mention it
Also the prints look lovely as always.
|
Please excuse any spelling errors. I use a tablet frequently and software keyboards are a pain!
Terranwing - w3;d1;l1
51st Dunedinw2;d0;l0
Cadre Coronal Afterglow w1;d0;l0 |
|
|
|
|
2022/06/21 17:51:07
Subject: Albertorius' 3d Printing, Painting Modelling Blog (30k in 15mm, p.17)
|
|
Inspiring SDF-1 Bridge Officer
|
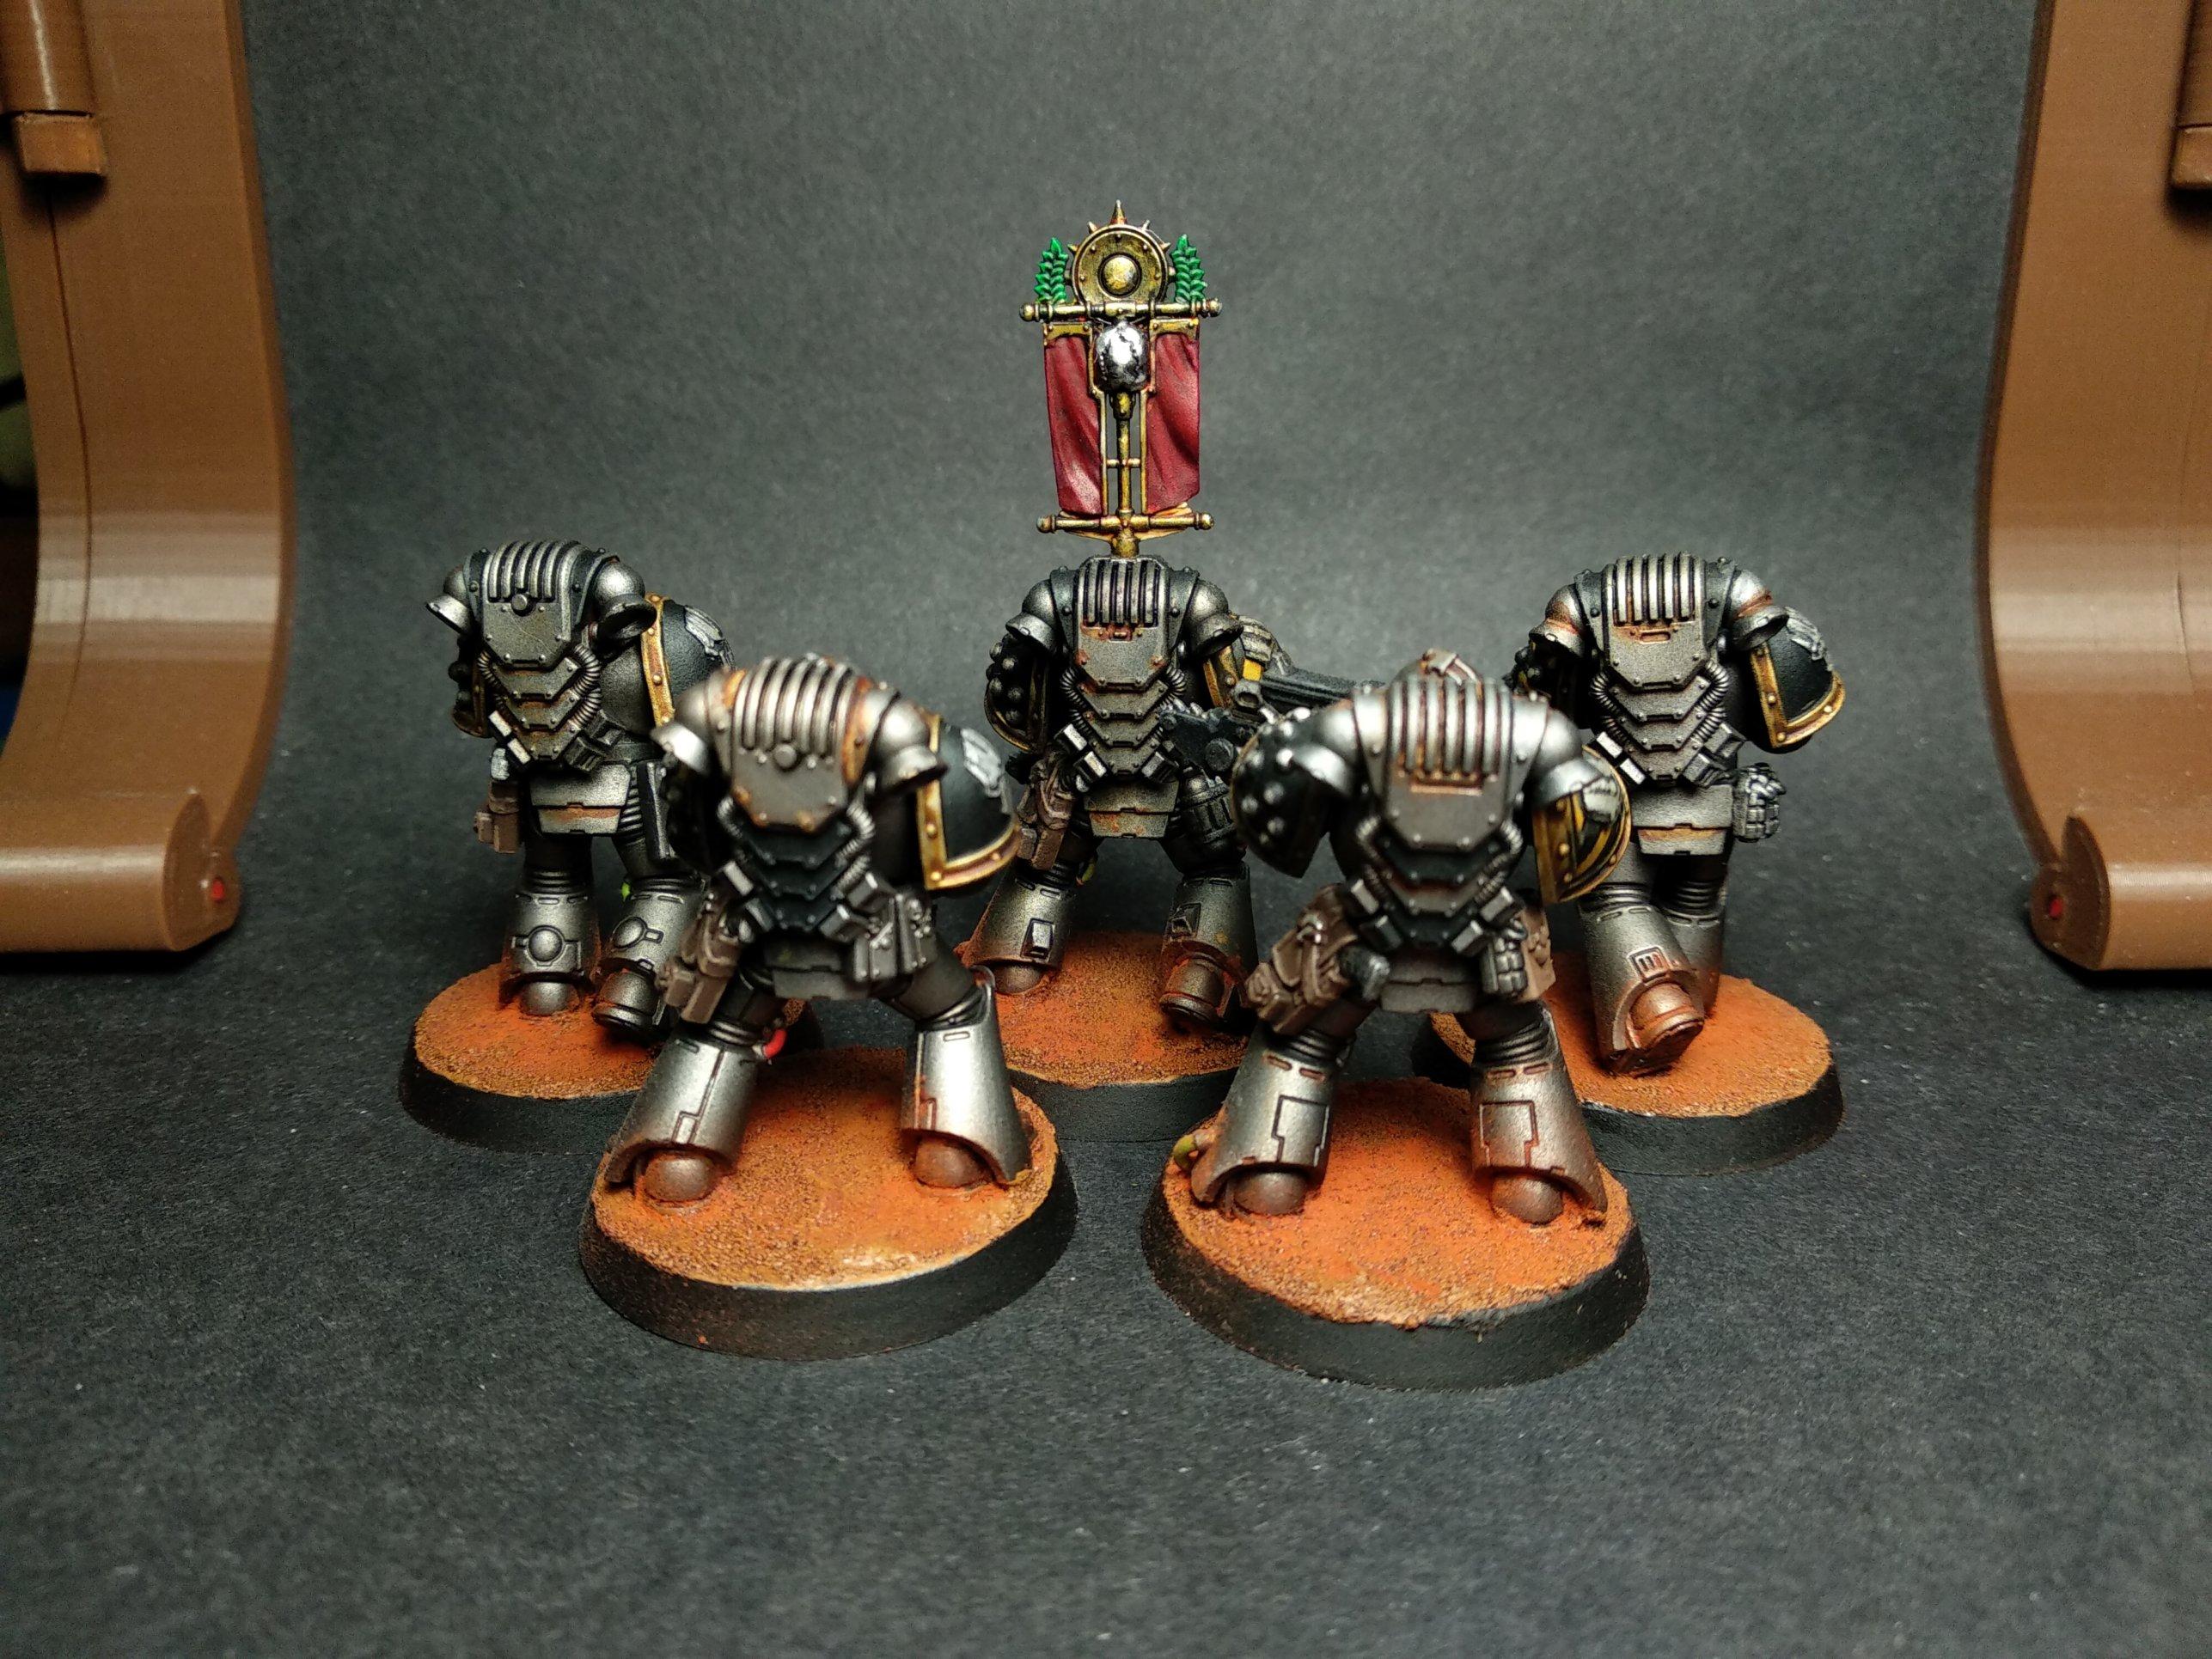
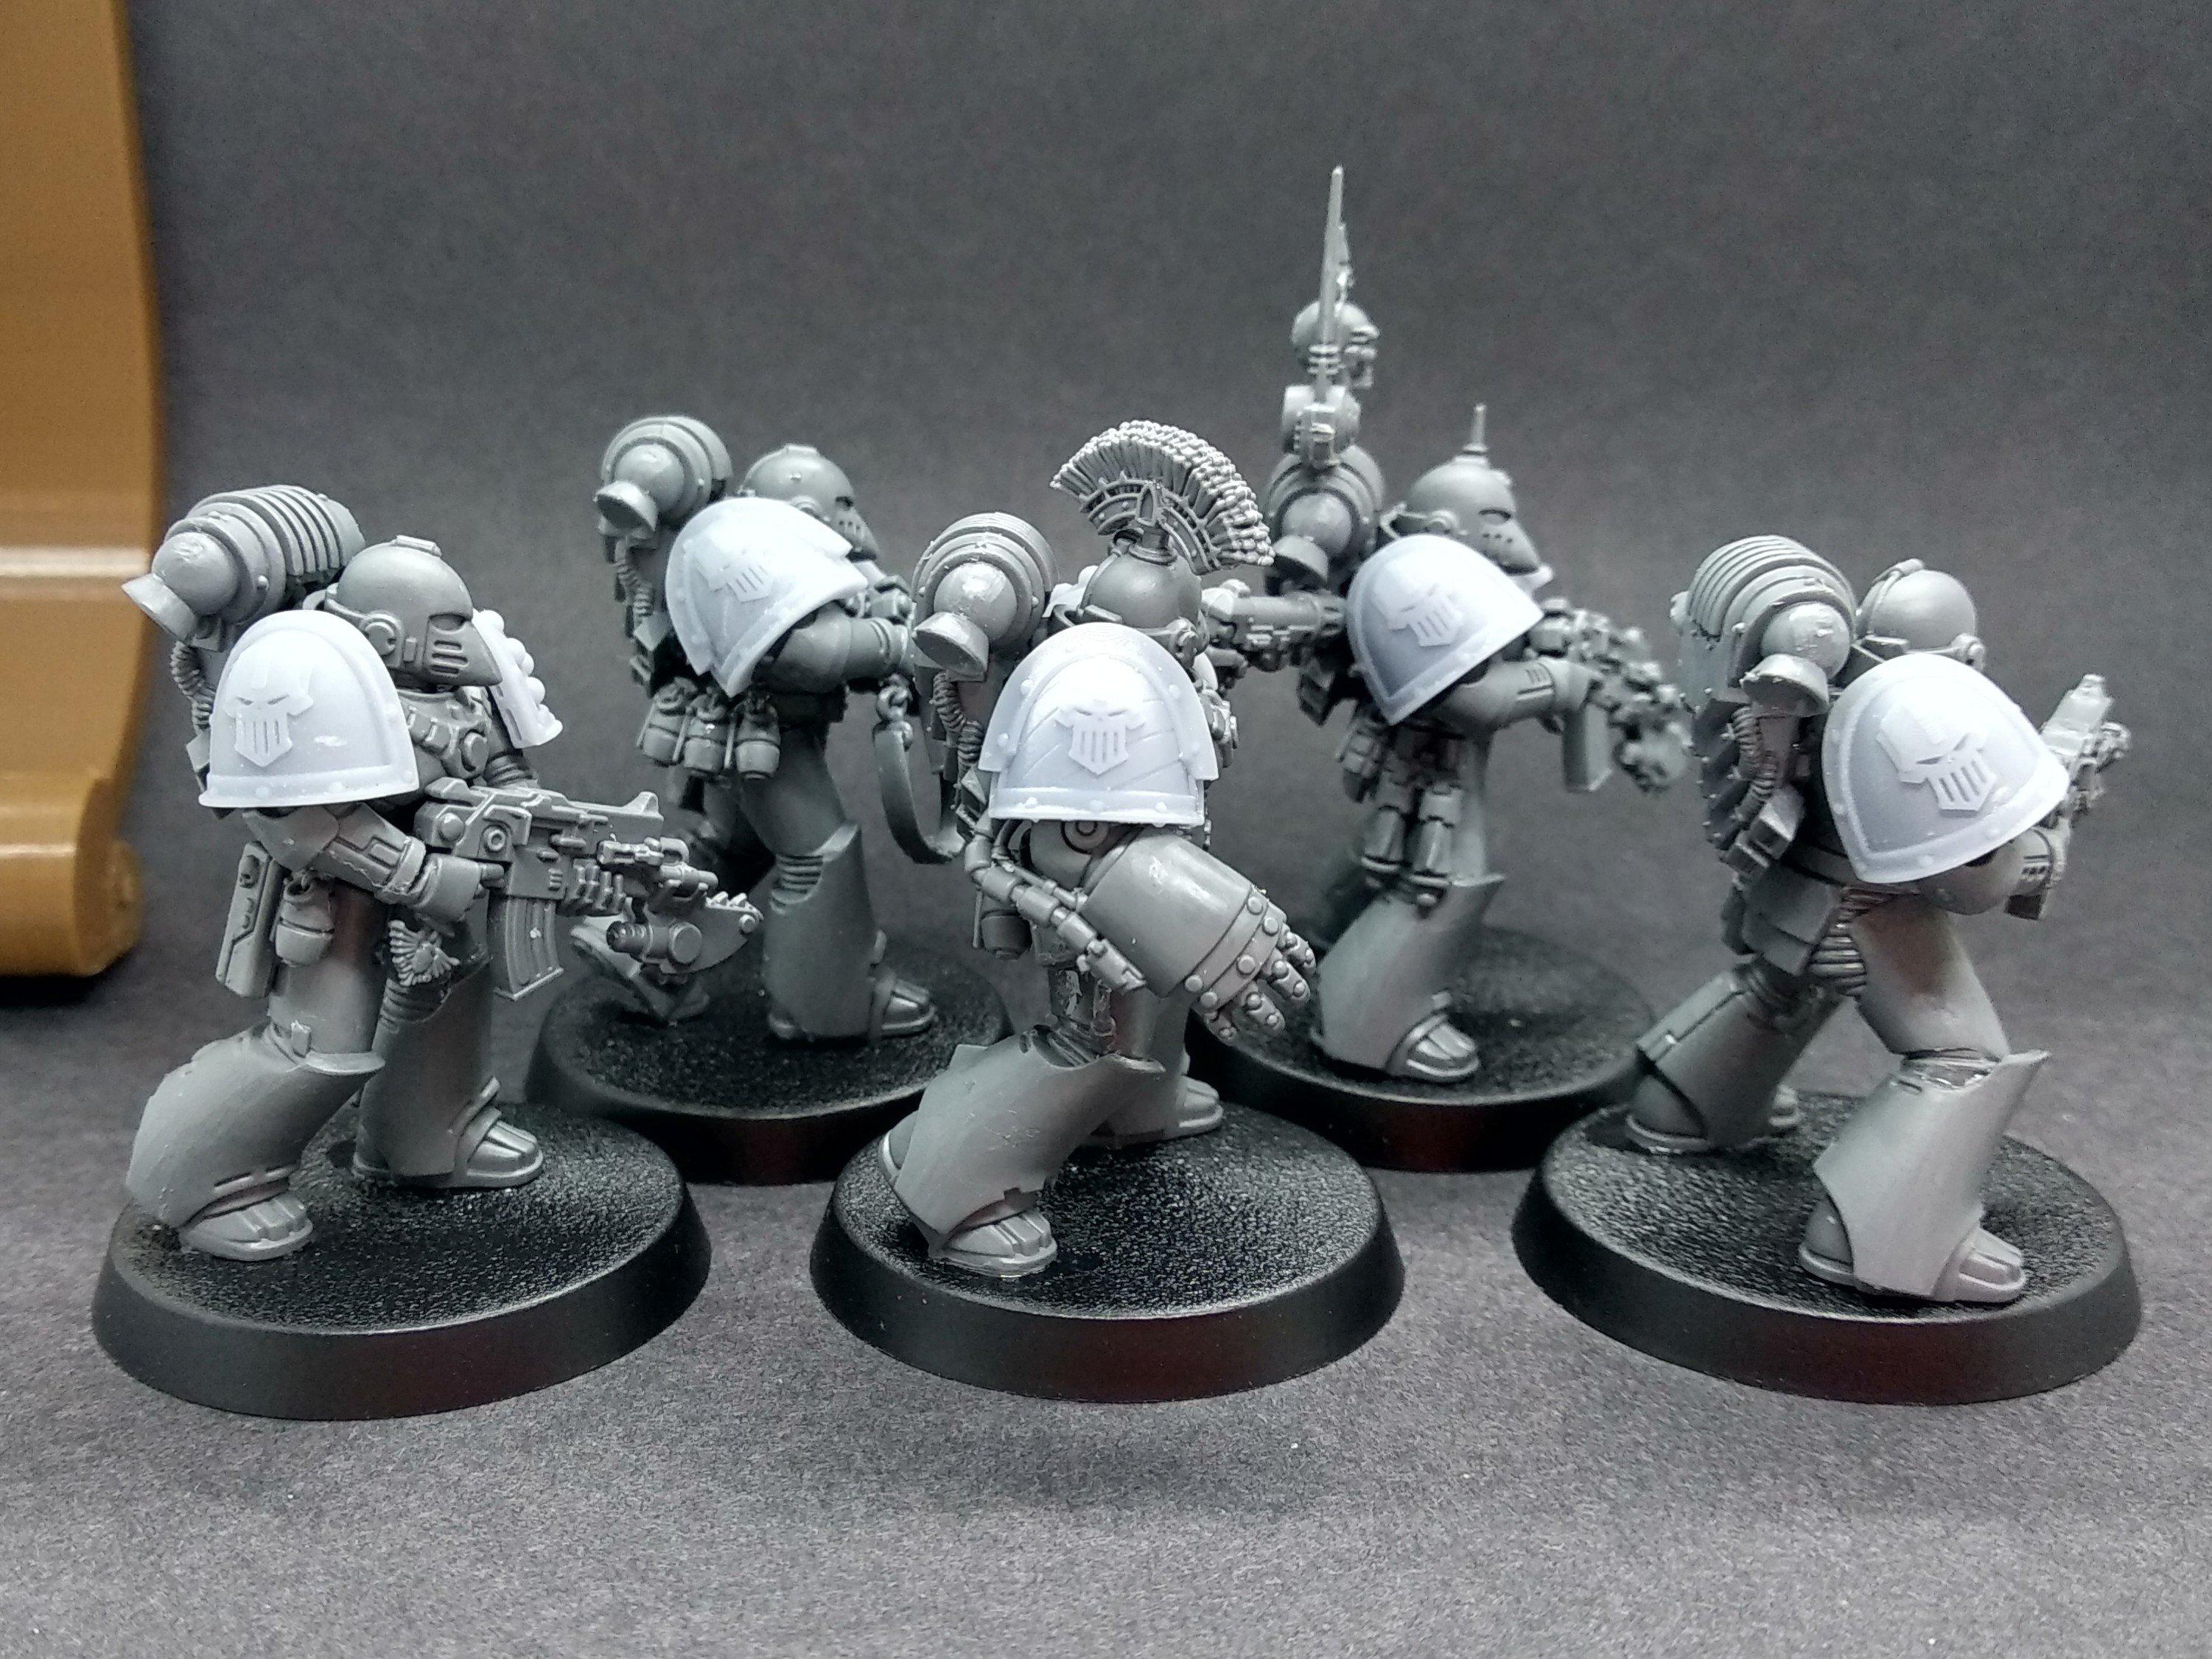
 Flinty wrote: Flinty wrote:Not sure if it’s too late, or a deliberate choice, but I though mk6 pads didn’t have any edging.
I mean it’s not the most important thing in the world about someone else’s toy soldiers, but though it should mention it
Also the prints look lovely as always.
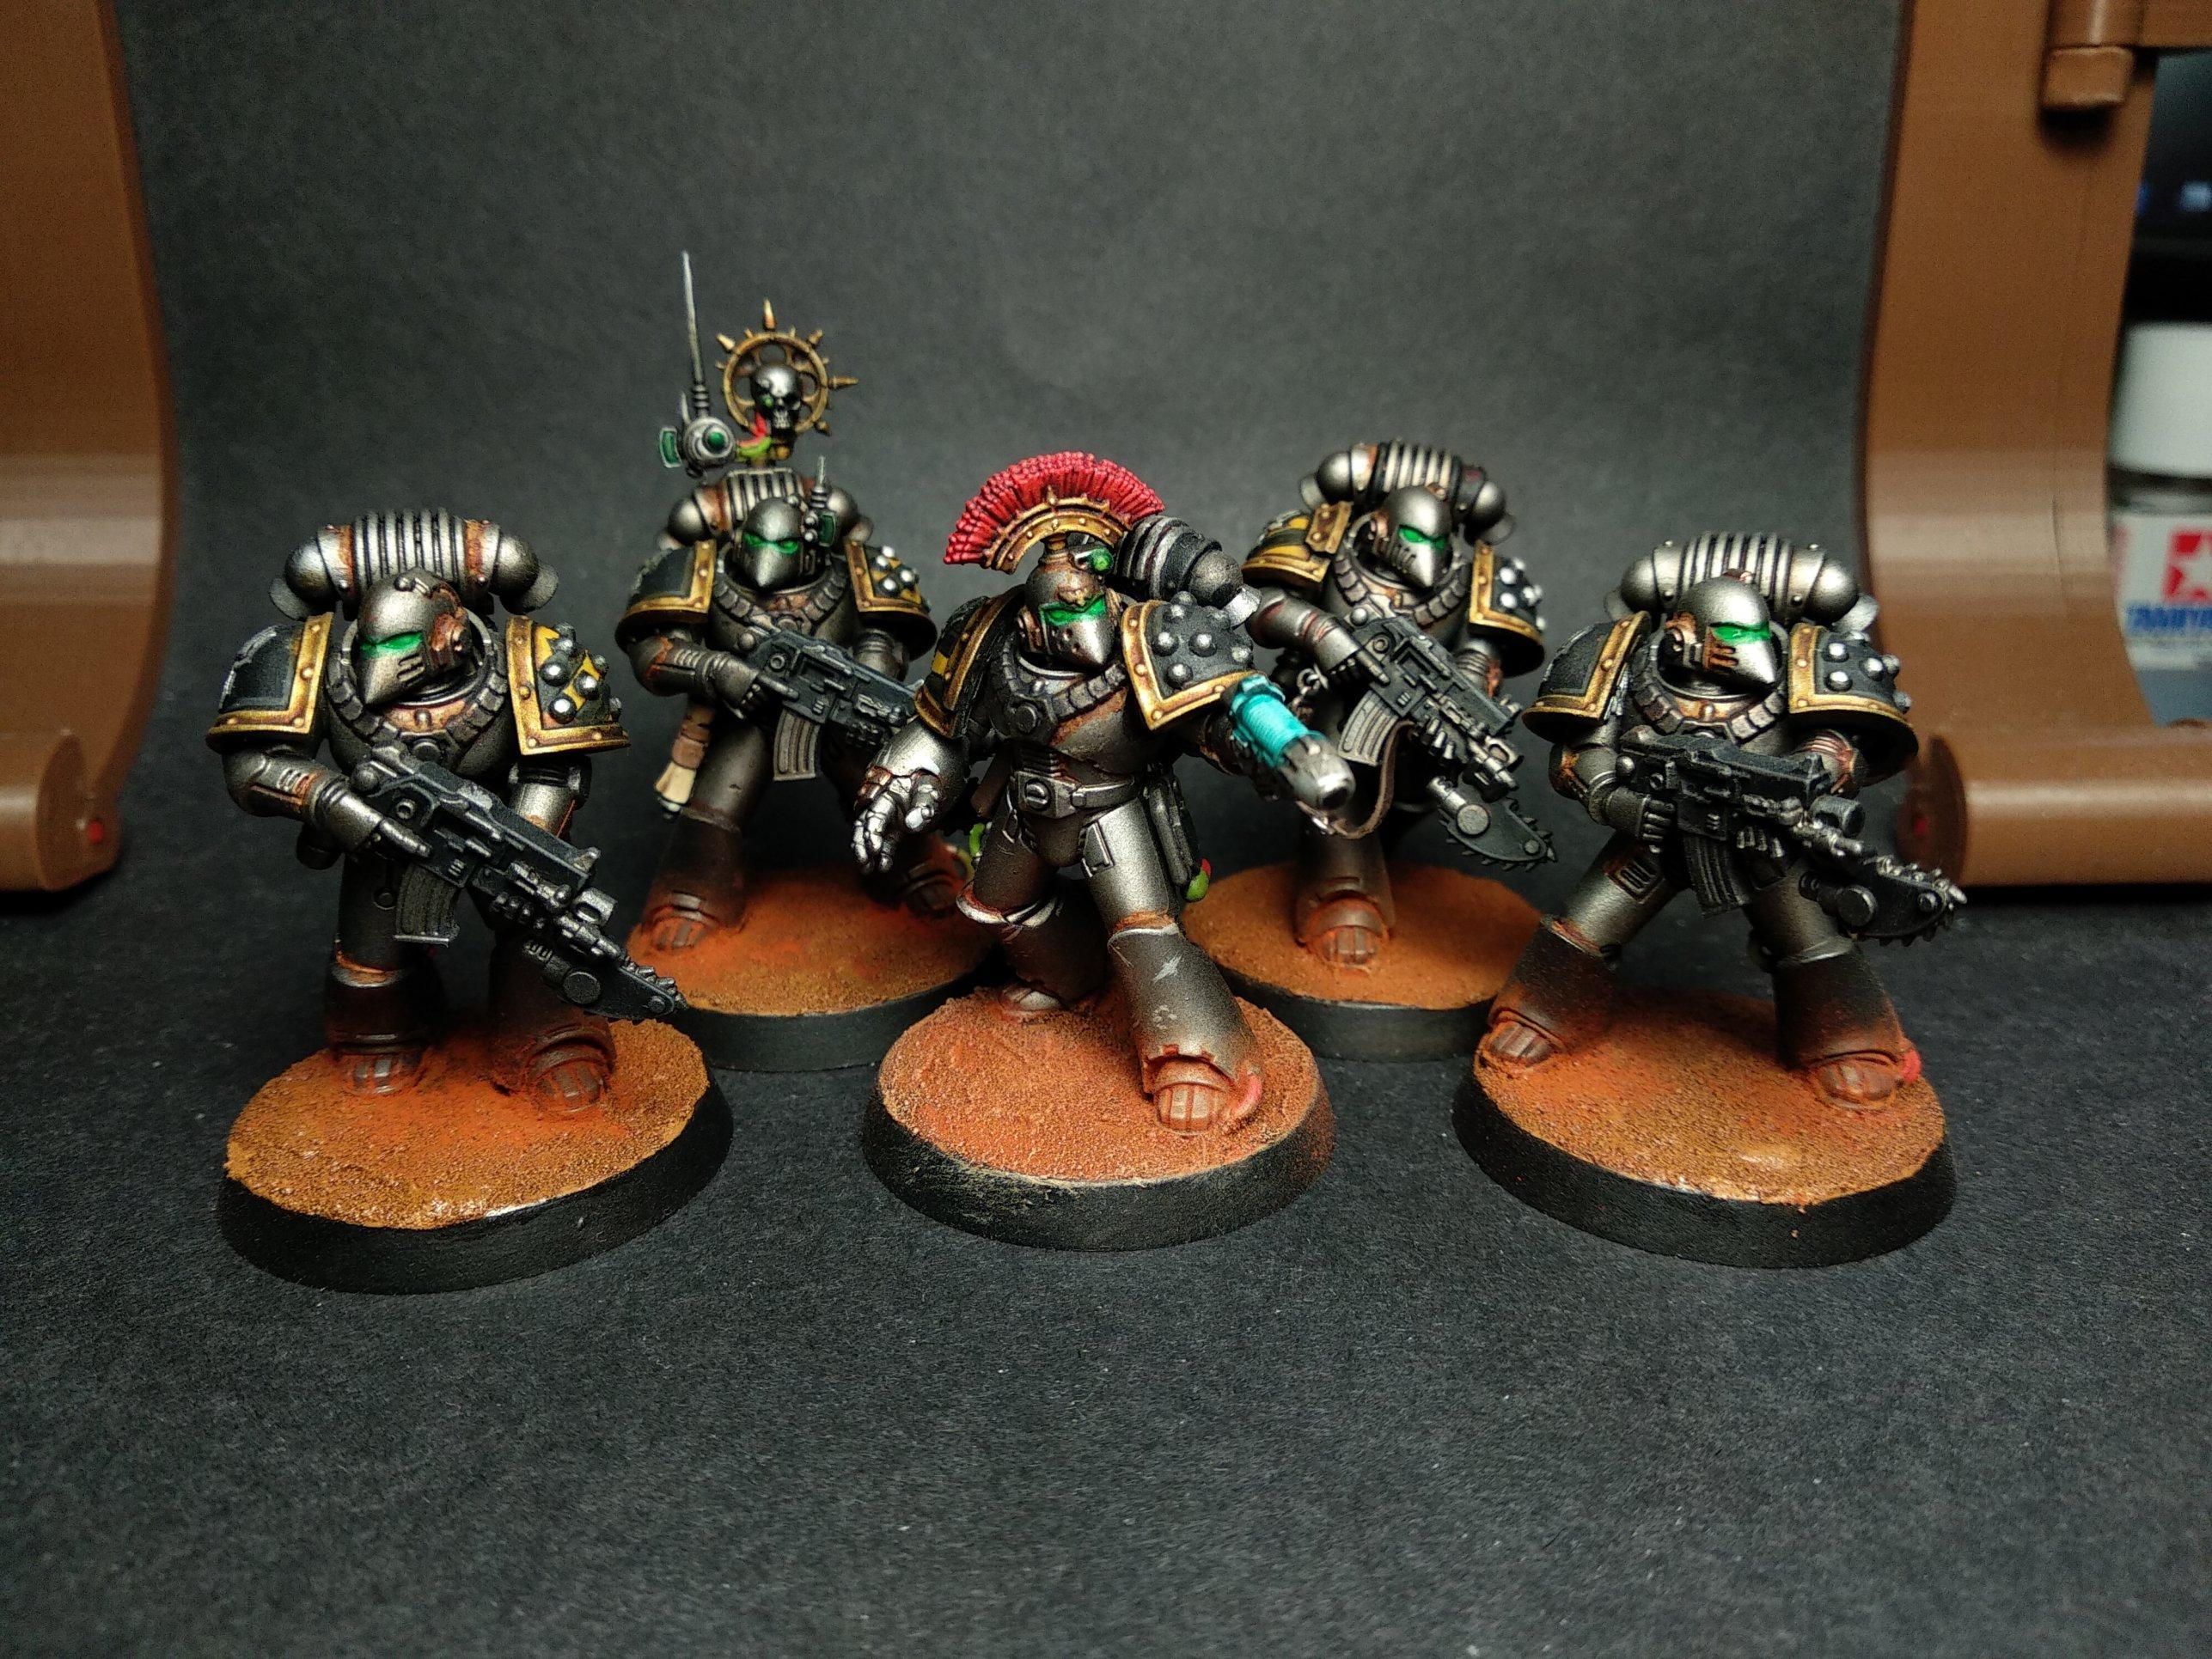
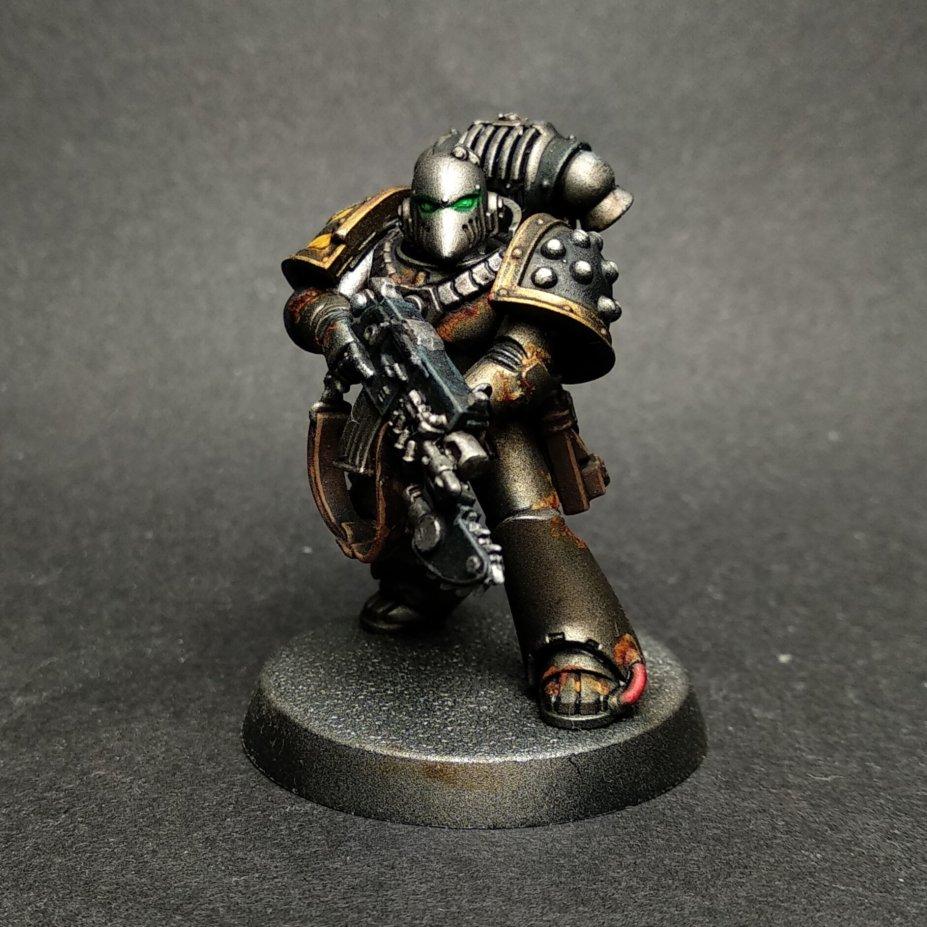
Thanks!
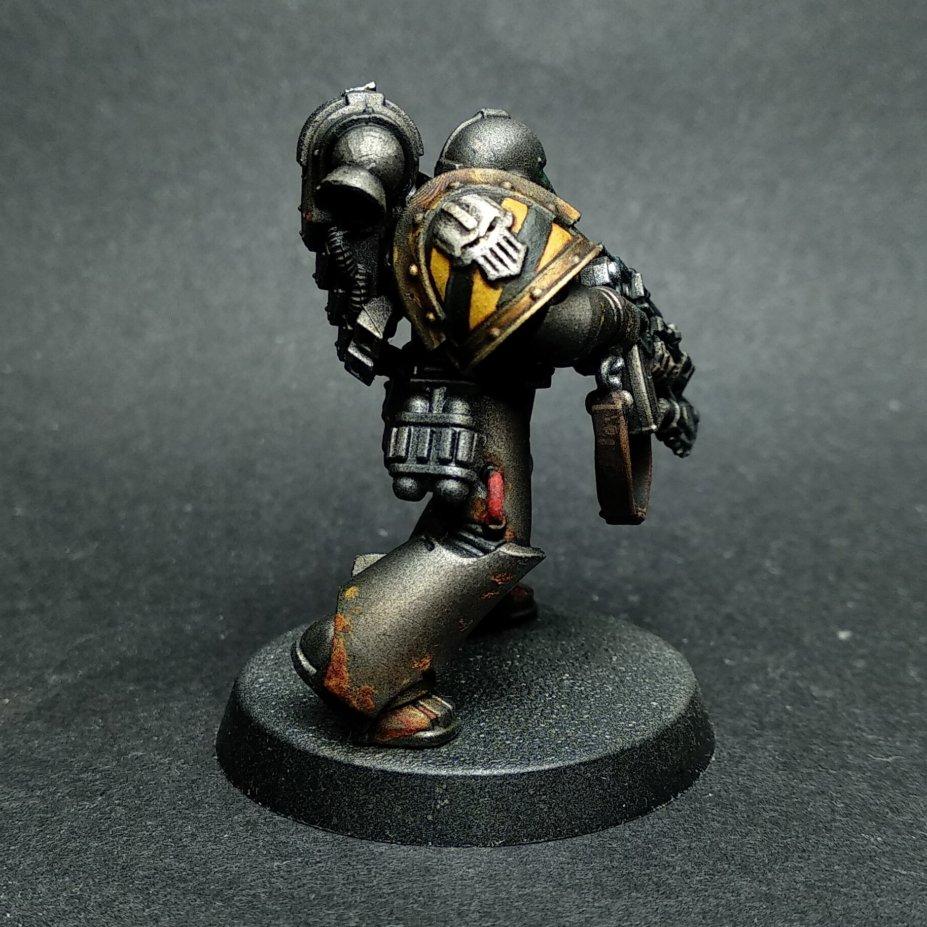
No, regular corvus pads don't have any rim, but I felt that IWs needed some place to have a different metal color, so I thought it would be better like this.
This is the finished first test:
|
|
|
|
|
2022/06/21 23:21:02
Subject: Albertorius' 3d Printing, Painting Modelling Blog (30k in 15mm, p.17)
|
|
Grizzled Space Wolves Great Wolf
|
Looks cool, did you make those or are they available to download somewhere?
Not fluffy, but I have thought the shoulder pad you used on his right would look cool on the left side, because Marines are all right handed they'd have their left shoulder toward the enemy and that's the one with the big chunky rim acting like a "shield" of sorts, and also showing off the chapter markings to the enemy.
I had considered using that same style of shoulder pad on the left and a regular Mk6 on the right, intentionally creating an asymmetry like "this is my defence arm, this is my attack arm".
|
|
This message was edited 1 time. Last update was at 2022/06/21 23:23:07
|
|
|
|
|
2022/06/21 23:44:13
Subject: Albertorius' 3d Printing, Painting Modelling Blog (30k in 15mm, p.17)
|
|
Leader of the Sept
|
The design logic behind the left pad getting the studs is that marines don’t really need their left arm to fire their bolter, so the better protection goes on the right, with the left being lower quality stud bonded plates. It was written a long time ago though. It was only when the Tau came along that they realised having a better pad toward the enemy might make sense
|
|
This message was edited 1 time. Last update was at 2022/06/21 23:44:56
Please excuse any spelling errors. I use a tablet frequently and software keyboards are a pain!
Terranwing - w3;d1;l1
51st Dunedinw2;d0;l0
Cadre Coronal Afterglow w1;d0;l0 |
|
|
|
|
2022/06/22 00:03:12
Subject: Albertorius' 3d Printing, Painting Modelling Blog (30k in 15mm, p.17)
|
|
Grizzled Space Wolves Great Wolf
|
Flinty wrote:The design logic behind the left pad getting the studs is that marines don’t really need their left arm to fire their bolter, so the better protection goes on the right, with the left being lower quality stud bonded plates. It was written a long time ago though. It was only when the Tau came along that they realised having a better pad toward the enemy might make sense
Just think of all the poor Marines that died during the Horus Heresy because of that
|
|
|
|
|
2022/06/22 06:41:37
Subject: Albertorius' 3d Printing, Painting Modelling Blog (30k in 15mm, p.17)
|
|
Inspiring SDF-1 Bridge Officer
|
Flinty wrote:The design logic behind the left pad getting the studs is that marines don’t really need their left arm to fire their bolter, so the better protection goes on the right, with the left being lower quality stud bonded plates. It was written a long time ago though. It was only when the Tau came along that they realised having a better pad toward the enemy might make sense
I actually was under the impression that it was the other way around: the studded ones are reinforced, hence the bonding studs (to better affix the added layer of protection with low tech stuff).
Automatically Appended Next Post:
AllSeeingSkink wrote:Looks cool, did you make those or are they available to download somewhere?
Not fluffy, but I have thought the shoulder pad you used on his right would look cool on the left side, because Marines are all right handed they'd have their left shoulder toward the enemy and that's the one with the big chunky rim acting like a "shield" of sorts, and also showing off the chapter markings to the enemy.
I had considered using that same style of shoulder pad on the left and a regular Mk6 on the right, intentionally creating an asymmetry like "this is my defence arm, this is my attack arm".
Look up LoggyK on Cults.
He has a Heresy set:
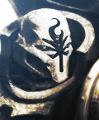
/https://files.cults3d.com/uploaders/14273319/illustration-file/2ae79962-a088-4551-b63e-85e318ac1054/shoulders_IW_HH.png)
And a post-Heresy one:
/https://files.cults3d.com/uploaders/14273319/illustration-file/22acef86-21a4-4148-b863-fa484c04f04e/iron_warriors_shoulders.png)
Plus a lot more cool stuff (beware of the bodies, though, they have voids inside that need fixing).
Red Warden also has a lot of cool extras to peruse.
|
|
This message was edited 2 times. Last update was at 2022/06/22 06:46:07
|
|
|
|
|
2022/06/22 06:53:07
Subject: Albertorius' 3d Printing, Painting Modelling Blog (30k in 15mm, p.17)
|
|
Leader of the Sept
|
In the original fluff, they only had limited high quality ablative reactive awesomeness shoulder doohickeys, so they were used in the right, while the left shoulder was made up of lower quality materials and reinforced with the studs. It’s the same reason the mk5 heresy armour has all the studs as they make up for lower quality base materials.
|
Please excuse any spelling errors. I use a tablet frequently and software keyboards are a pain!
Terranwing - w3;d1;l1
51st Dunedinw2;d0;l0
Cadre Coronal Afterglow w1;d0;l0 |
|
|
|
|
2022/06/22 07:12:56
Subject: Albertorius' 3d Printing, Painting Modelling Blog (30k in 15mm, p.17)
|
|
Inspiring SDF-1 Bridge Officer
|
Flinty wrote:In the original fluff, they only had limited high quality ablative reactive awesomeness shoulder doohickeys, so they were used in the right, while the left shoulder was made up of lower quality materials and reinforced with the studs. It’s the same reason the mk5 heresy armour has all the studs as they make up for lower quality base materials.
Yeah, but IIRC, that made them heavier, not less protective. But you're right, is specifically spelled out on the mark 6.
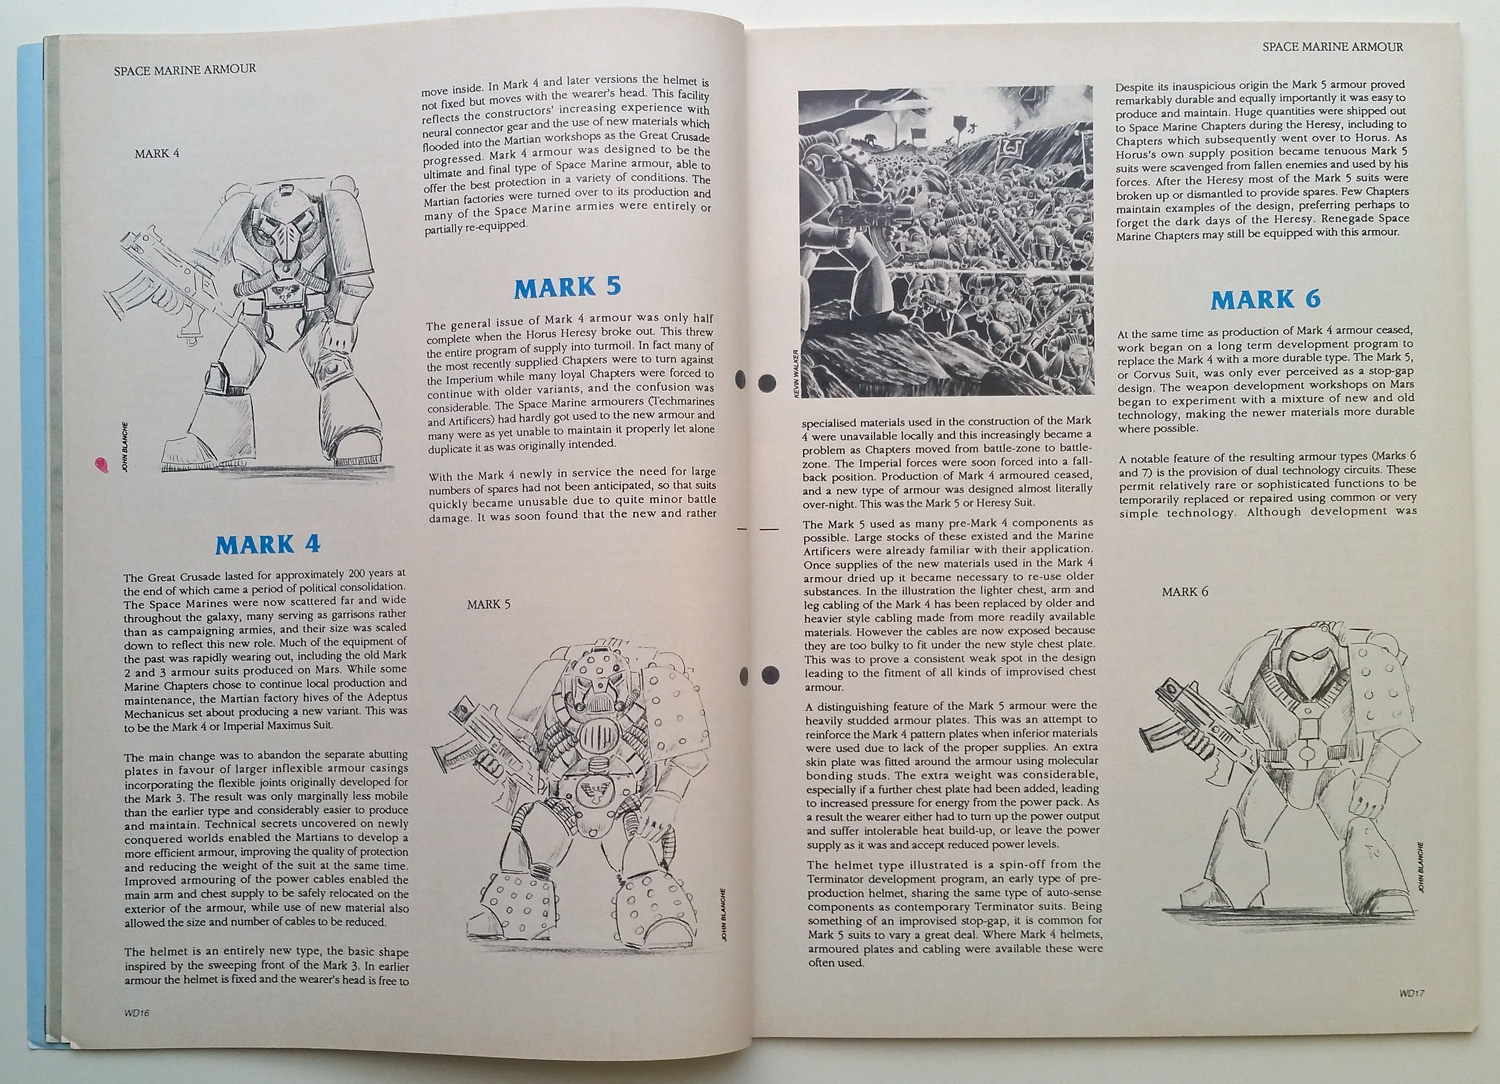
"A distinguishing feature of the Mark 5 armour were the heavily studded armour plates. This was an attempt to reinforce the Mark 4 pattern plates when inferior materials were used due to lack of proper supplies. An extra skin plate was fitted around the armour using molecular bonding studs. The extra weight was considerable, especially if a further ches plate has been added, leading to increased pressure for energy from the power pack. As a result, the wearer either had to turn up the power output and suffer intolerable heat build-up, or leave the power supply as it was and accept reduced power levels.
The left shoulder amor (on the Mark 5 armour) retains the same construction method as earlier Mark 5 and for the same reasons. Where supplies of material were short it is the right side of the warrior which needs to be better protected while he fires his weapon, thus the left side could be most easily replaced by slightly less effective plates. The need to economise in this way was very real at the time. Later the studded pad became associated with the Terran campaign and the final heroism of the Space MArines so that it became a traditional emblem of those days."
Honestly, it almost feels like someone had a bit of a brain fart there ^^, as it looks like the original point (in the mark 5 writeup) was that they were reinforced, but much heavier than they should due to poor materials and strained the power plant. Sort of like welding steel plates to a pickup.
( BTW, I love that article. It's the first thing I read after coming back to 40k with 2nd edition)
|
|
This message was edited 2 times. Last update was at 2022/06/22 07:15:25
|
|
|
|
|
2022/06/22 07:28:56
Subject: Albertorius' 3d Printing, Painting Modelling Blog (30k in 15mm, p.17)
|
|
Leader of the Sept
|
It quotes poorer materials under the mk5 entry as well. To get the same level of protection you end up with a heavier overall package.
|
Please excuse any spelling errors. I use a tablet frequently and software keyboards are a pain!
Terranwing - w3;d1;l1
51st Dunedinw2;d0;l0
Cadre Coronal Afterglow w1;d0;l0 |
|
|
|
|
2022/06/22 08:48:43
Subject: Albertorius' 3d Printing, Painting Modelling Blog (30k in 15mm, p.17)
|
|
Inspiring SDF-1 Bridge Officer
|
Flinty wrote:It quotes poorer materials under the mk5 entry as well. To get the same level of protection you end up with a heavier overall package.
Yes, but as a reinforcement for the mark 4 plates. But as I said, it states as much in the mark 6 entry, so it's kinda moot anyways.
|
|
This message was edited 1 time. Last update was at 2022/06/22 08:49:49
|
|
|
|
|
2022/06/23 18:03:35
Subject: Re:Albertorius' 3d Printing, Painting Modelling Blog (30k in 15mm, p.17)
|
|
Inspiring SDF-1 Bridge Officer
|
|
|
This message was edited 1 time. Last update was at 2022/06/23 18:04:12
|
|
|
|
|
2022/06/23 18:51:28
Subject: Albertorius' 3d Printing, Painting Modelling Blog (30k in 15mm, p.17)
|
|
Leader of the Sept
|
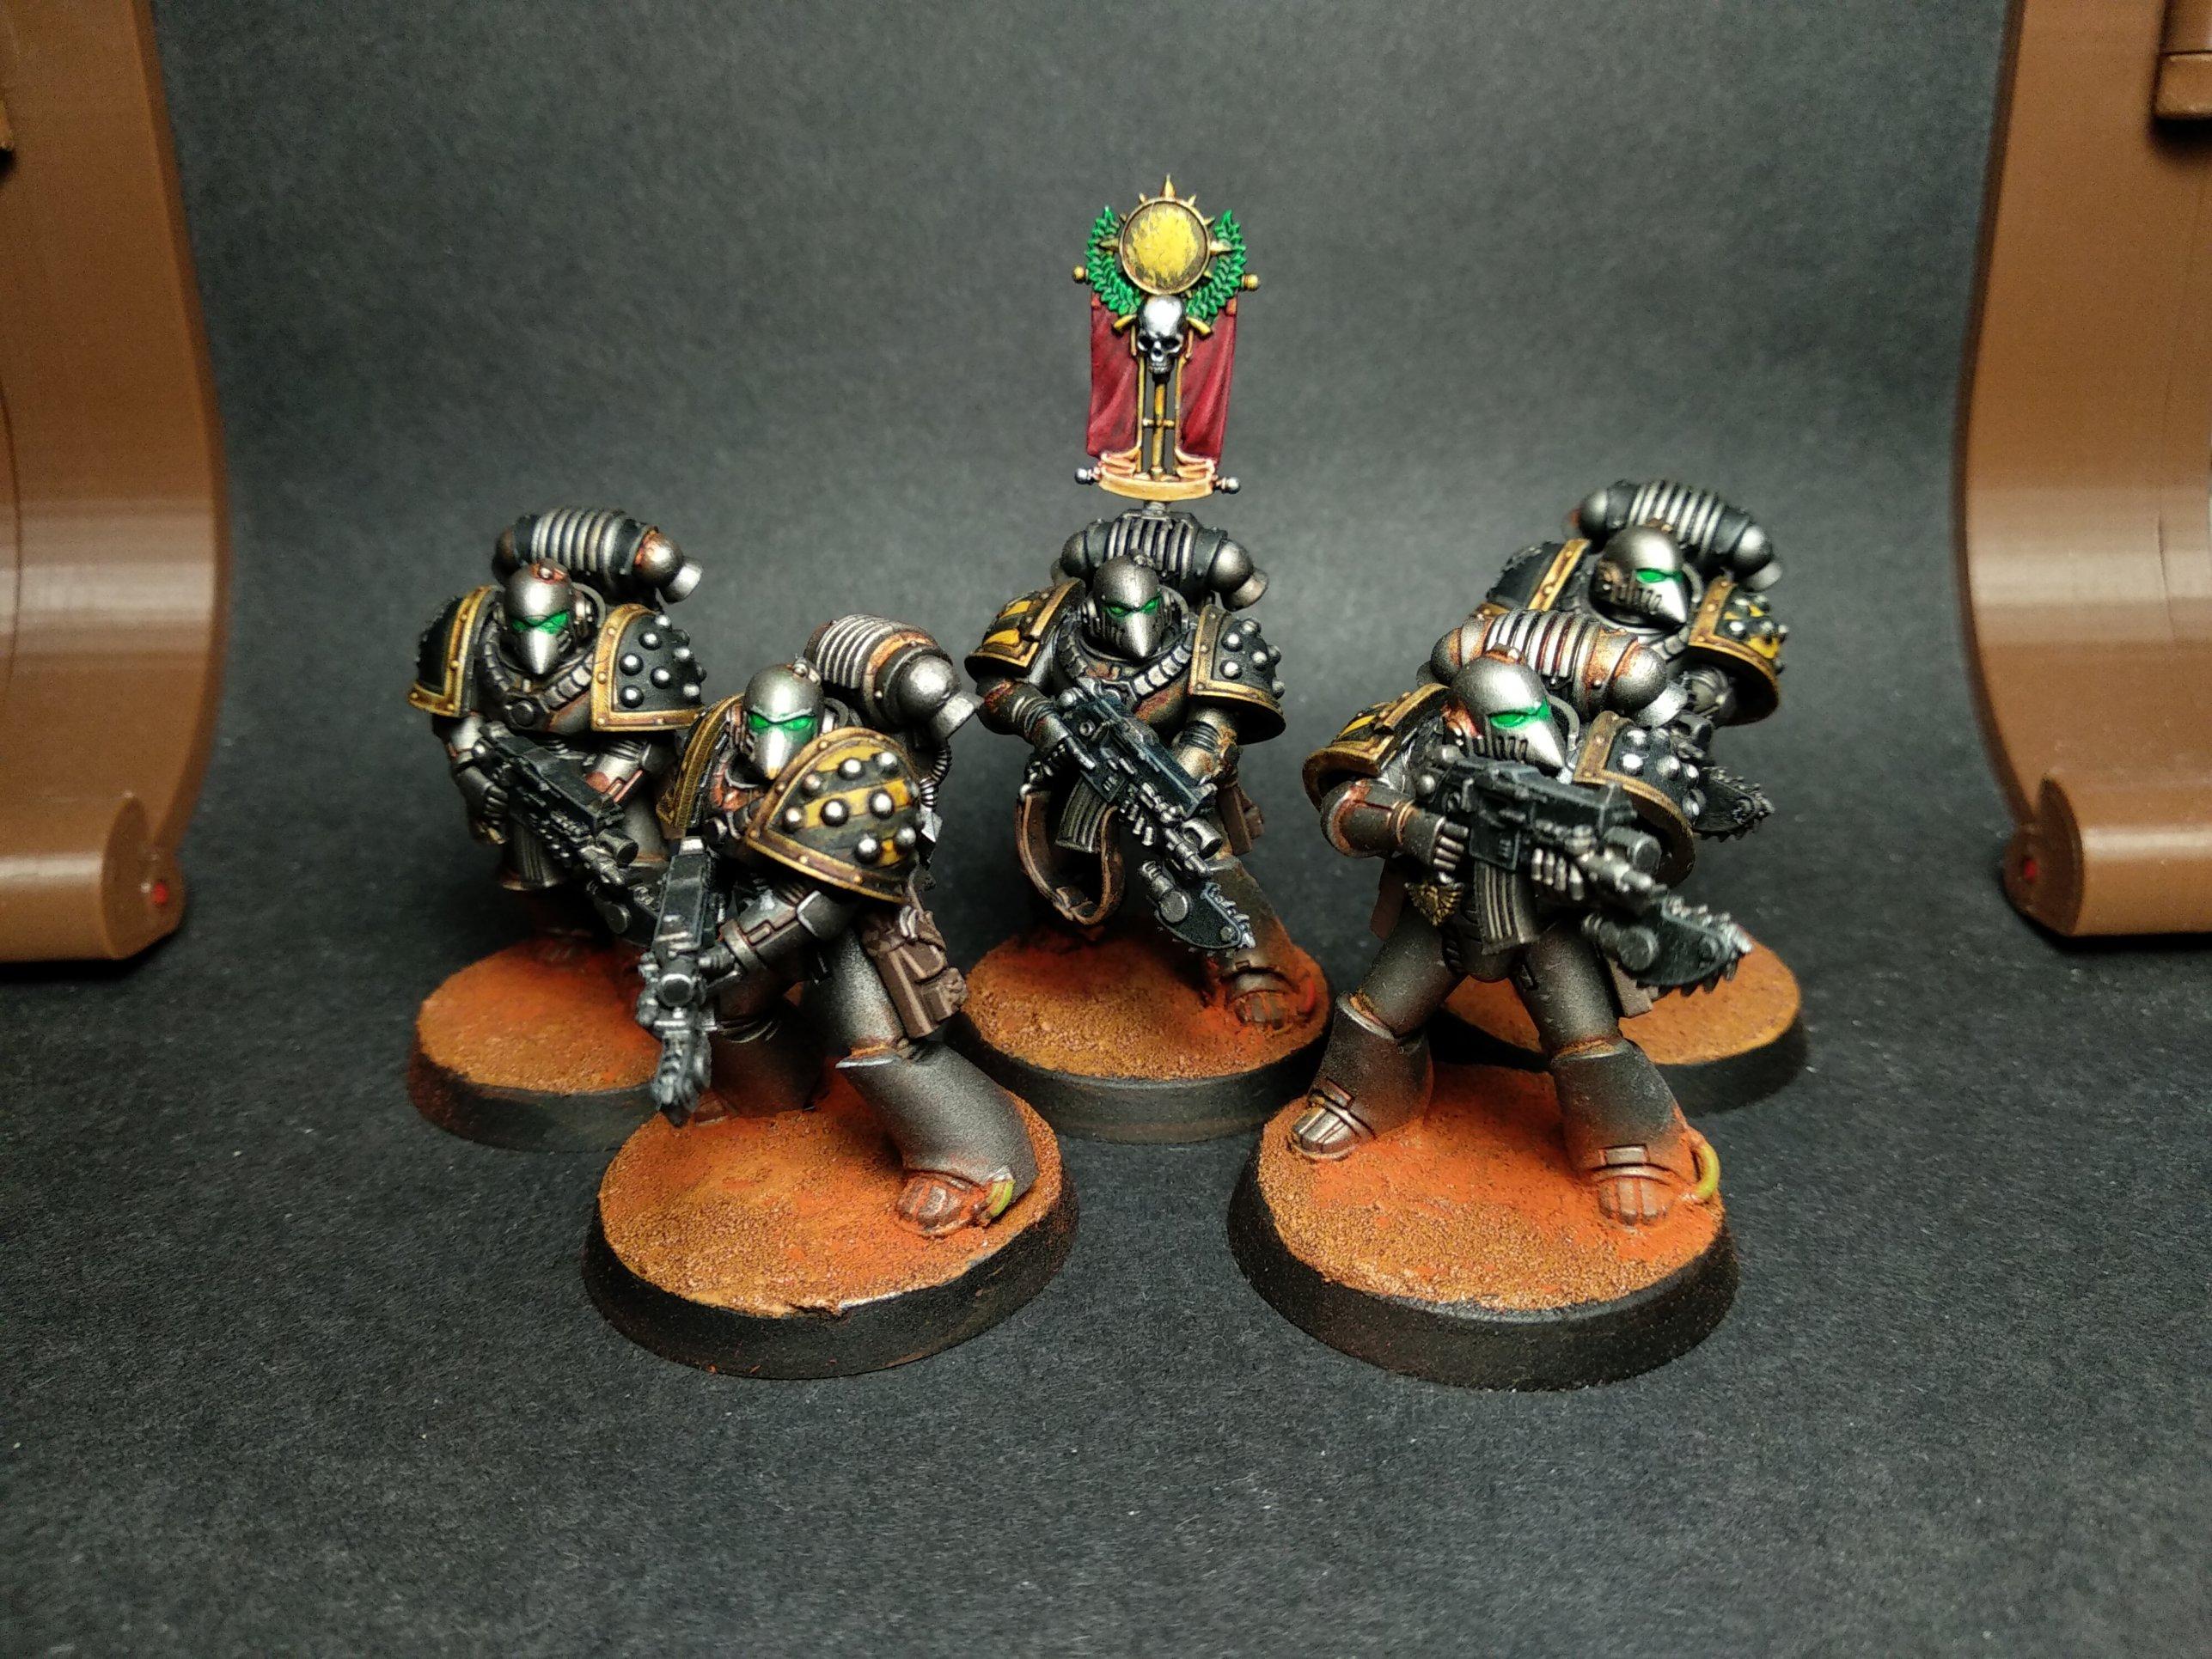
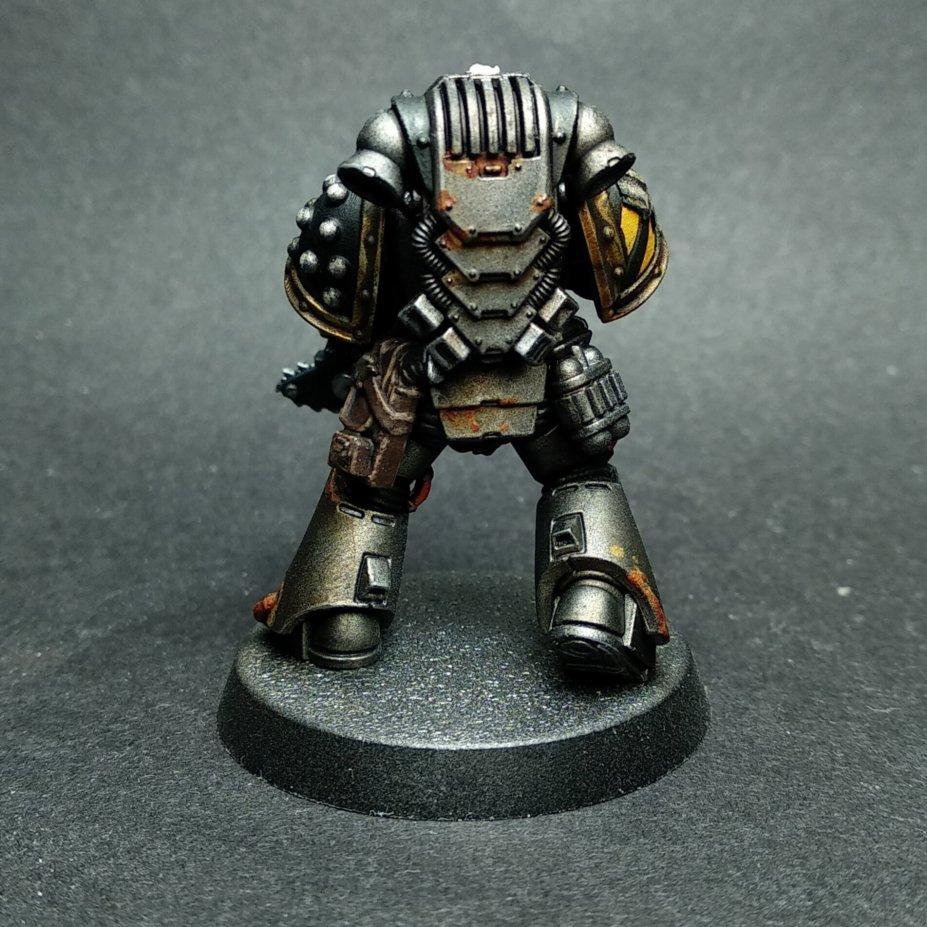
They look super slick. The darker colour scheme suits them well, rather than super shiny metal.
|
Please excuse any spelling errors. I use a tablet frequently and software keyboards are a pain!
Terranwing - w3;d1;l1
51st Dunedinw2;d0;l0
Cadre Coronal Afterglow w1;d0;l0 |
|
|
|
|
2022/06/23 19:16:35
Subject: Albertorius' 3d Printing, Painting Modelling Blog (30k in 15mm, p.17)
|
|
The New Miss Macross!
|
Very nicely done. What metallics/washes/techniques do you use for the armor accents?
|
|
|
|
|
2022/06/23 19:40:32
Subject: Albertorius' 3d Printing, Painting Modelling Blog (30k in 15mm, p.17)
|
|
Inspiring SDF-1 Bridge Officer
|
 warboss wrote: warboss wrote:Very nicely done. What metallics/washes/techniques do you use for the armor accents?
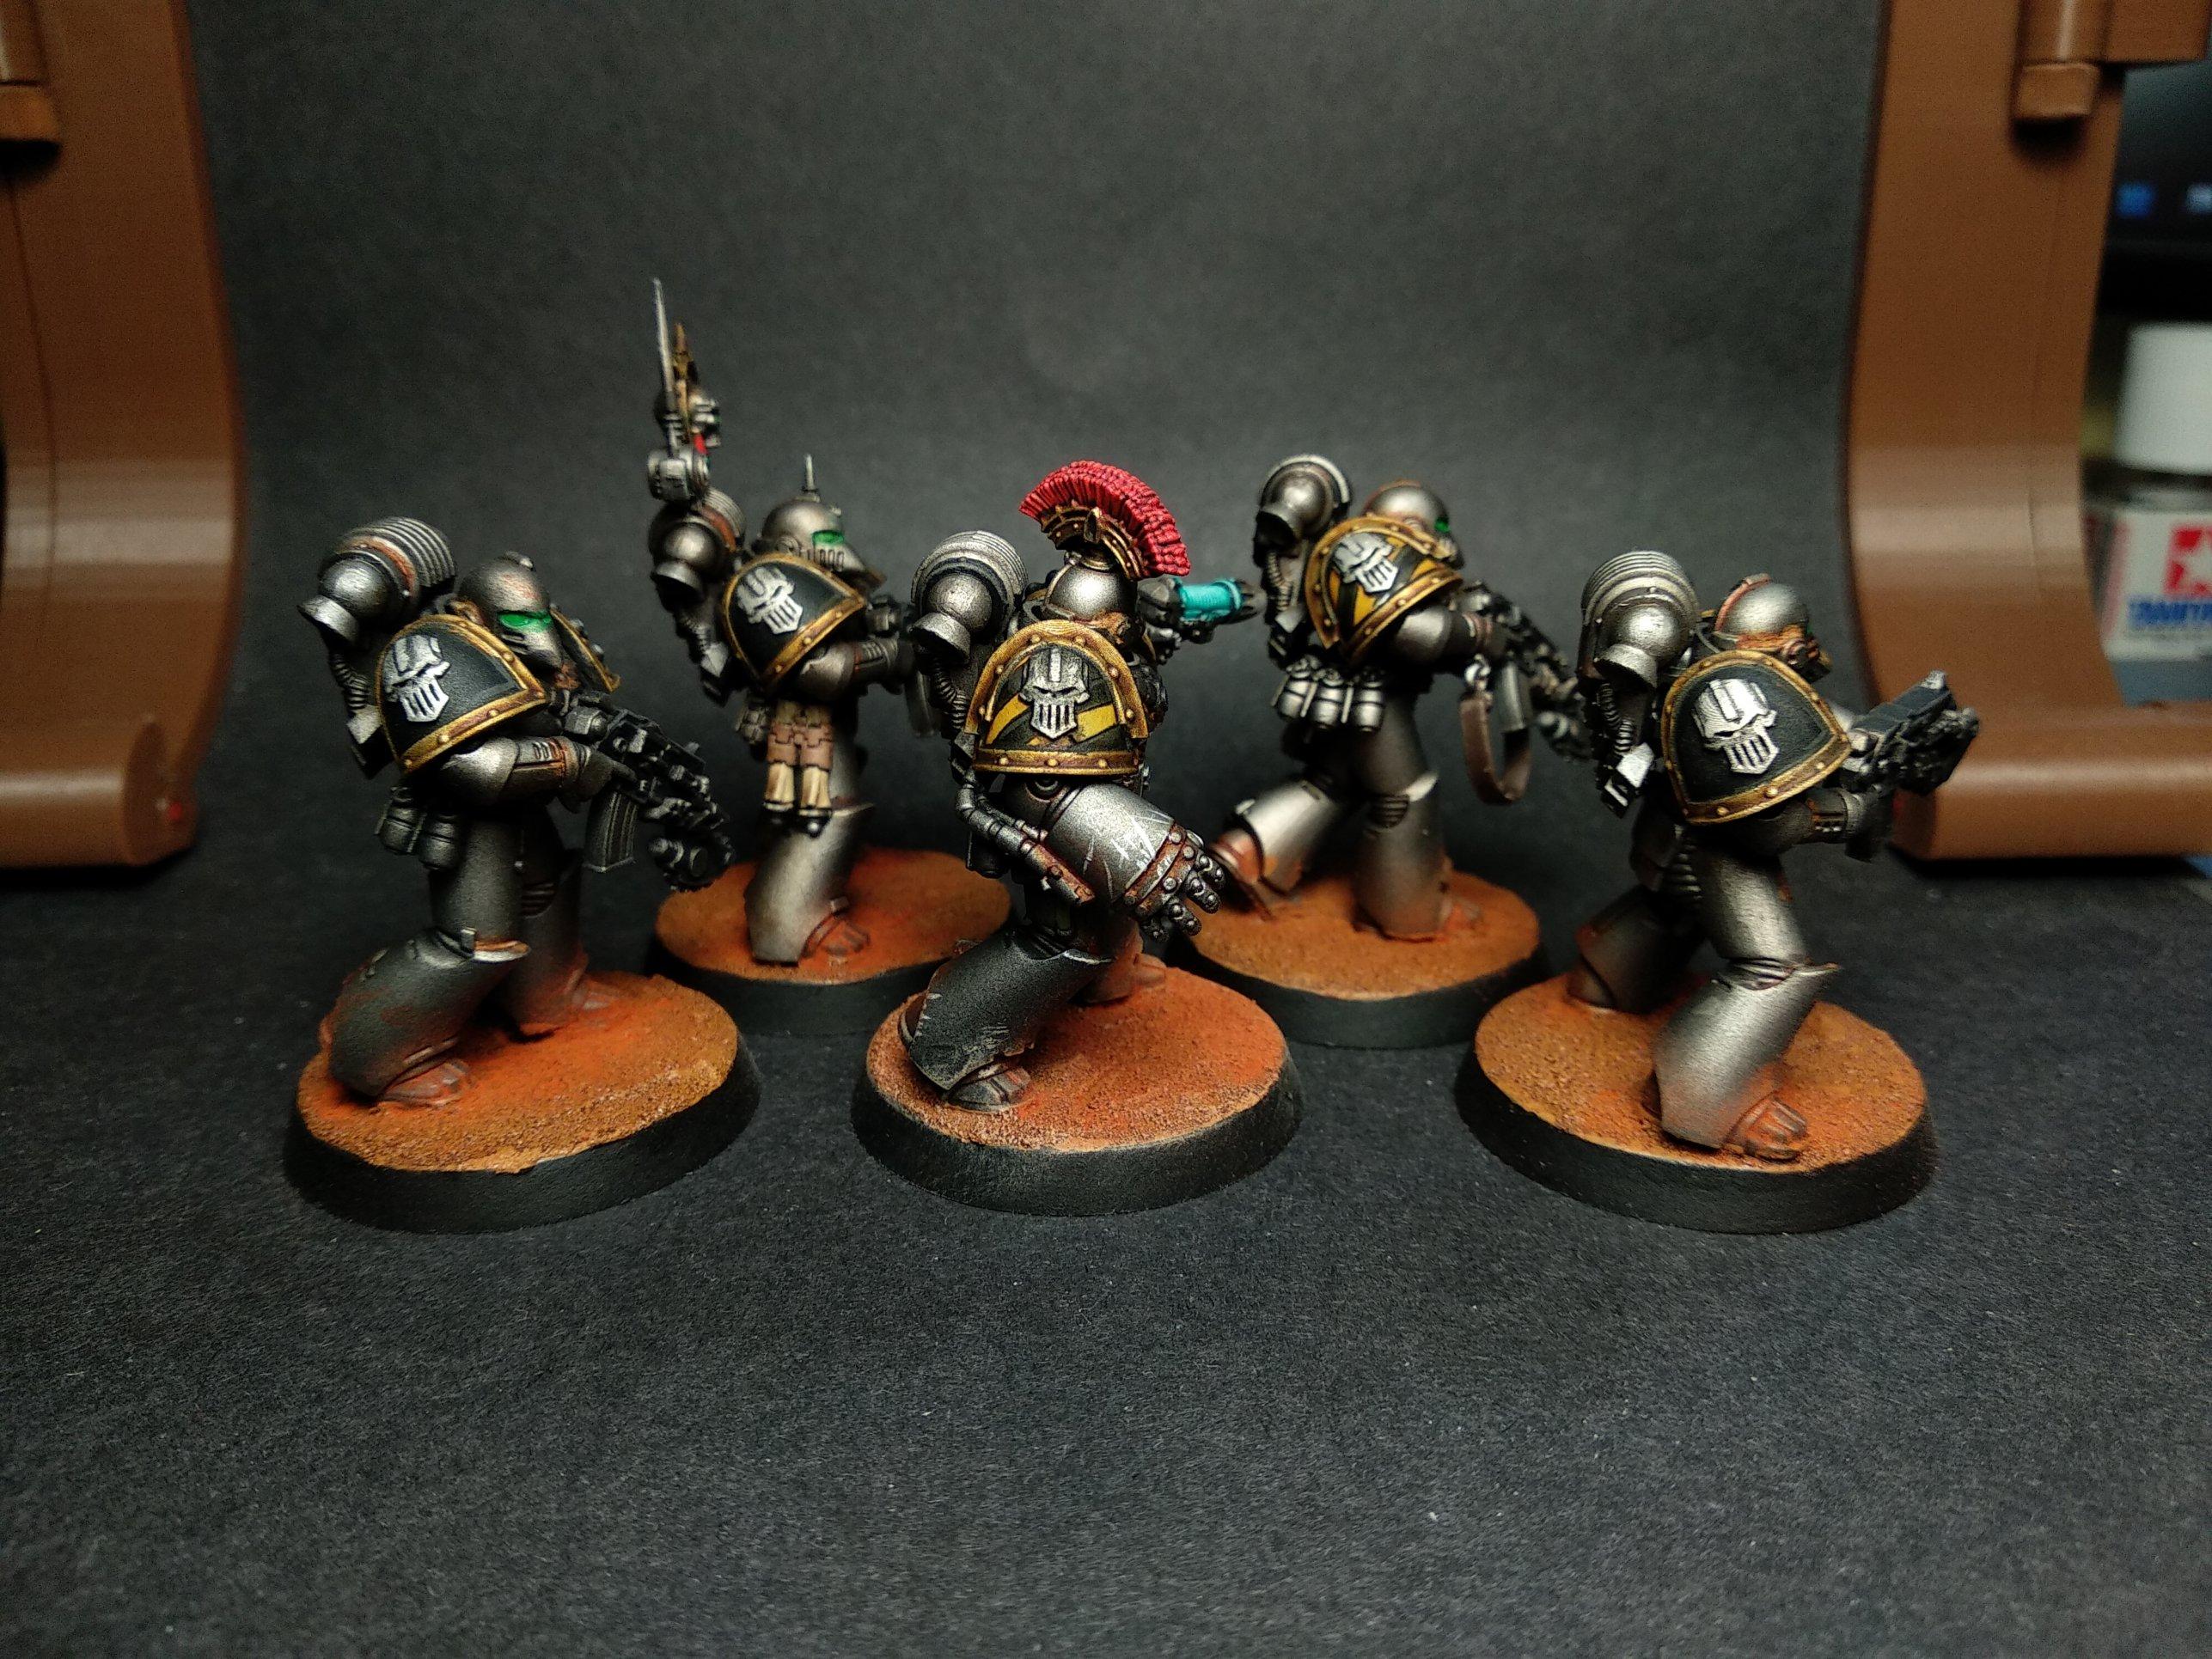
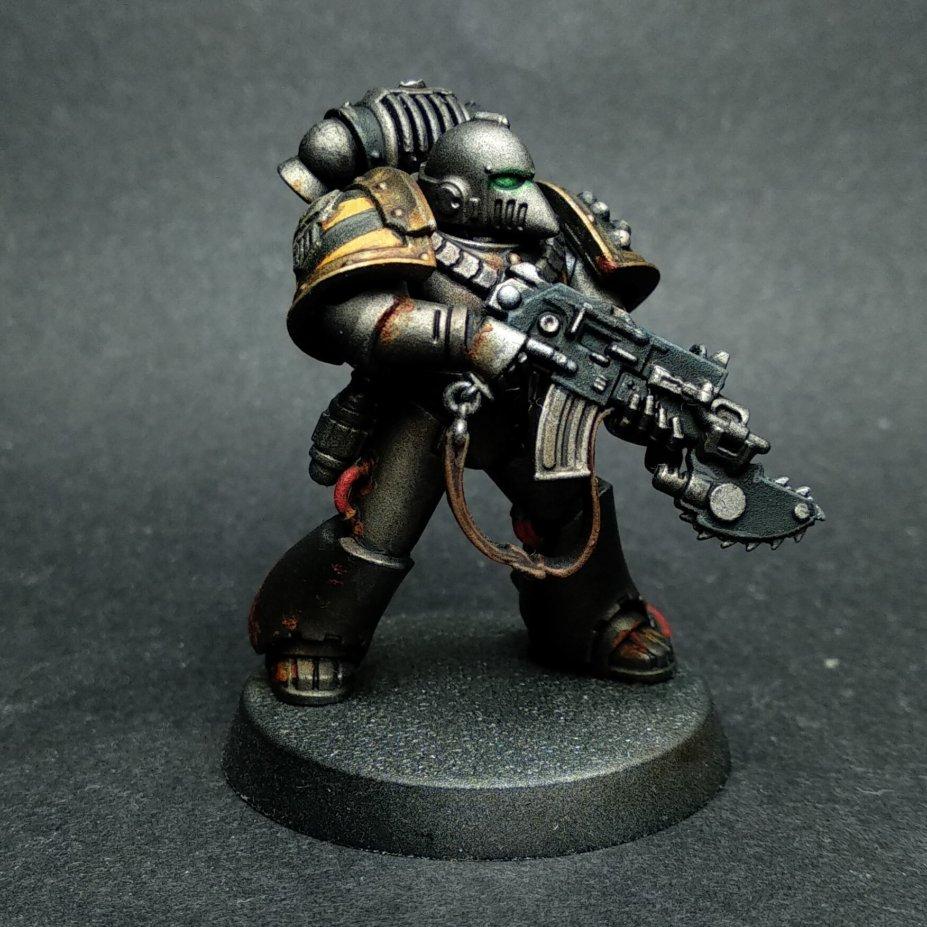
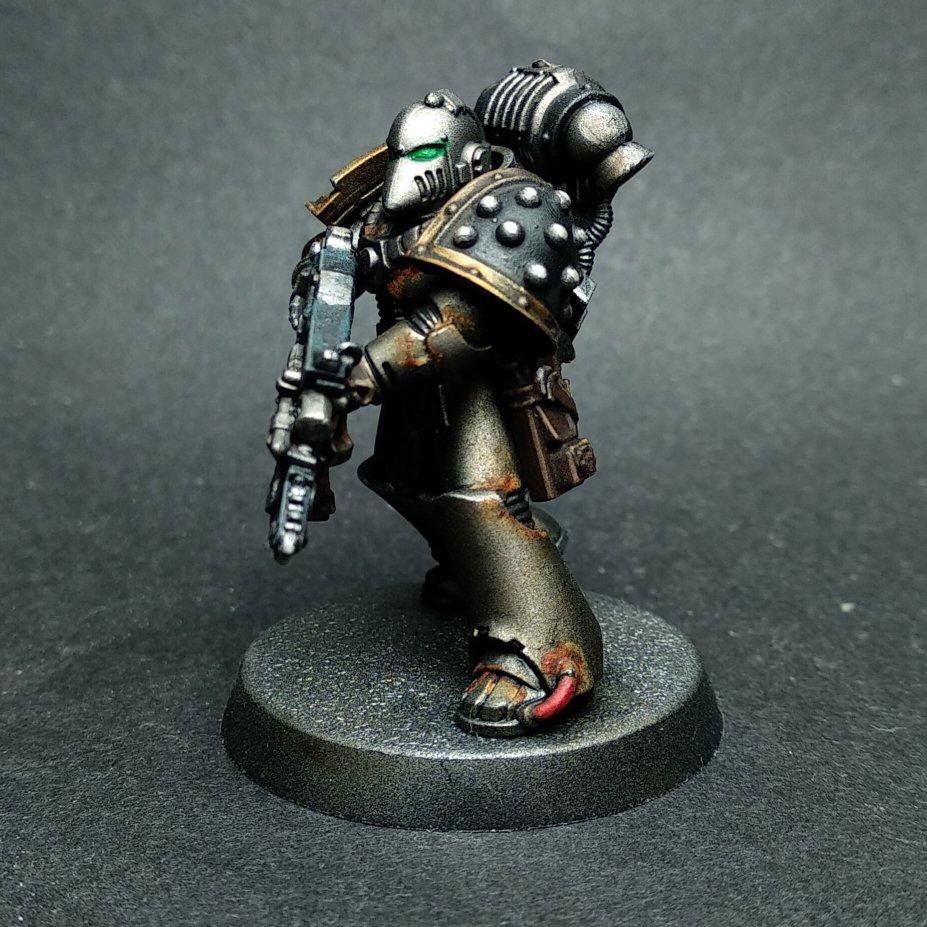
Lets see... firstly the armor has a basecoat of Vallejo Metal Color Steel with a zenithal highlight using Dark Alluminum. After that it has an overall Agrax Earthshade wash to tone down the color, and then I worked on the weathering. Some parts have a pinwash using Vallejo Dark Rust wash, while the heaviest and lightest parts are done applying carefully dirtydown's Rust. the scratches are painted on with a fine brush using Vallejo Alluminum, which is very light.
The shoulder pad rims are done with a basecoat of Alluminum and painting over it with Contrast Aggaros Dunes. As it's done before the Agrax wash, it was also washed with it.
|
|
|
|
|
2022/06/23 20:08:40
Subject: Albertorius' 3d Printing, Painting Modelling Blog (30k in 15mm, p.17)
|
|
Is 'Eavy Metal Calling?
|
Looking super! Love how strong the accent colours and weathering are versus the muted silver, incredibly striking effect.
|
|
|
|
|
|
2022/06/24 06:26:23
Subject: Albertorius' 3d Printing, Painting Modelling Blog (30k in 15mm, p.17)
|
|
Inspiring SDF-1 Bridge Officer
|
Thank you! I just tend to think the bare metal needs a bit of something extra to make it properly pop.
|
|
|
|
|
2022/06/25 12:46:35
Subject: Re:Albertorius' 3d Printing, Painting Modelling Blog (30k in 15mm, p.17)
|
|
Inspiring SDF-1 Bridge Officer
|
Printed a contemptor with C-Beamer and volkite culverin, just to feel extra fancy:
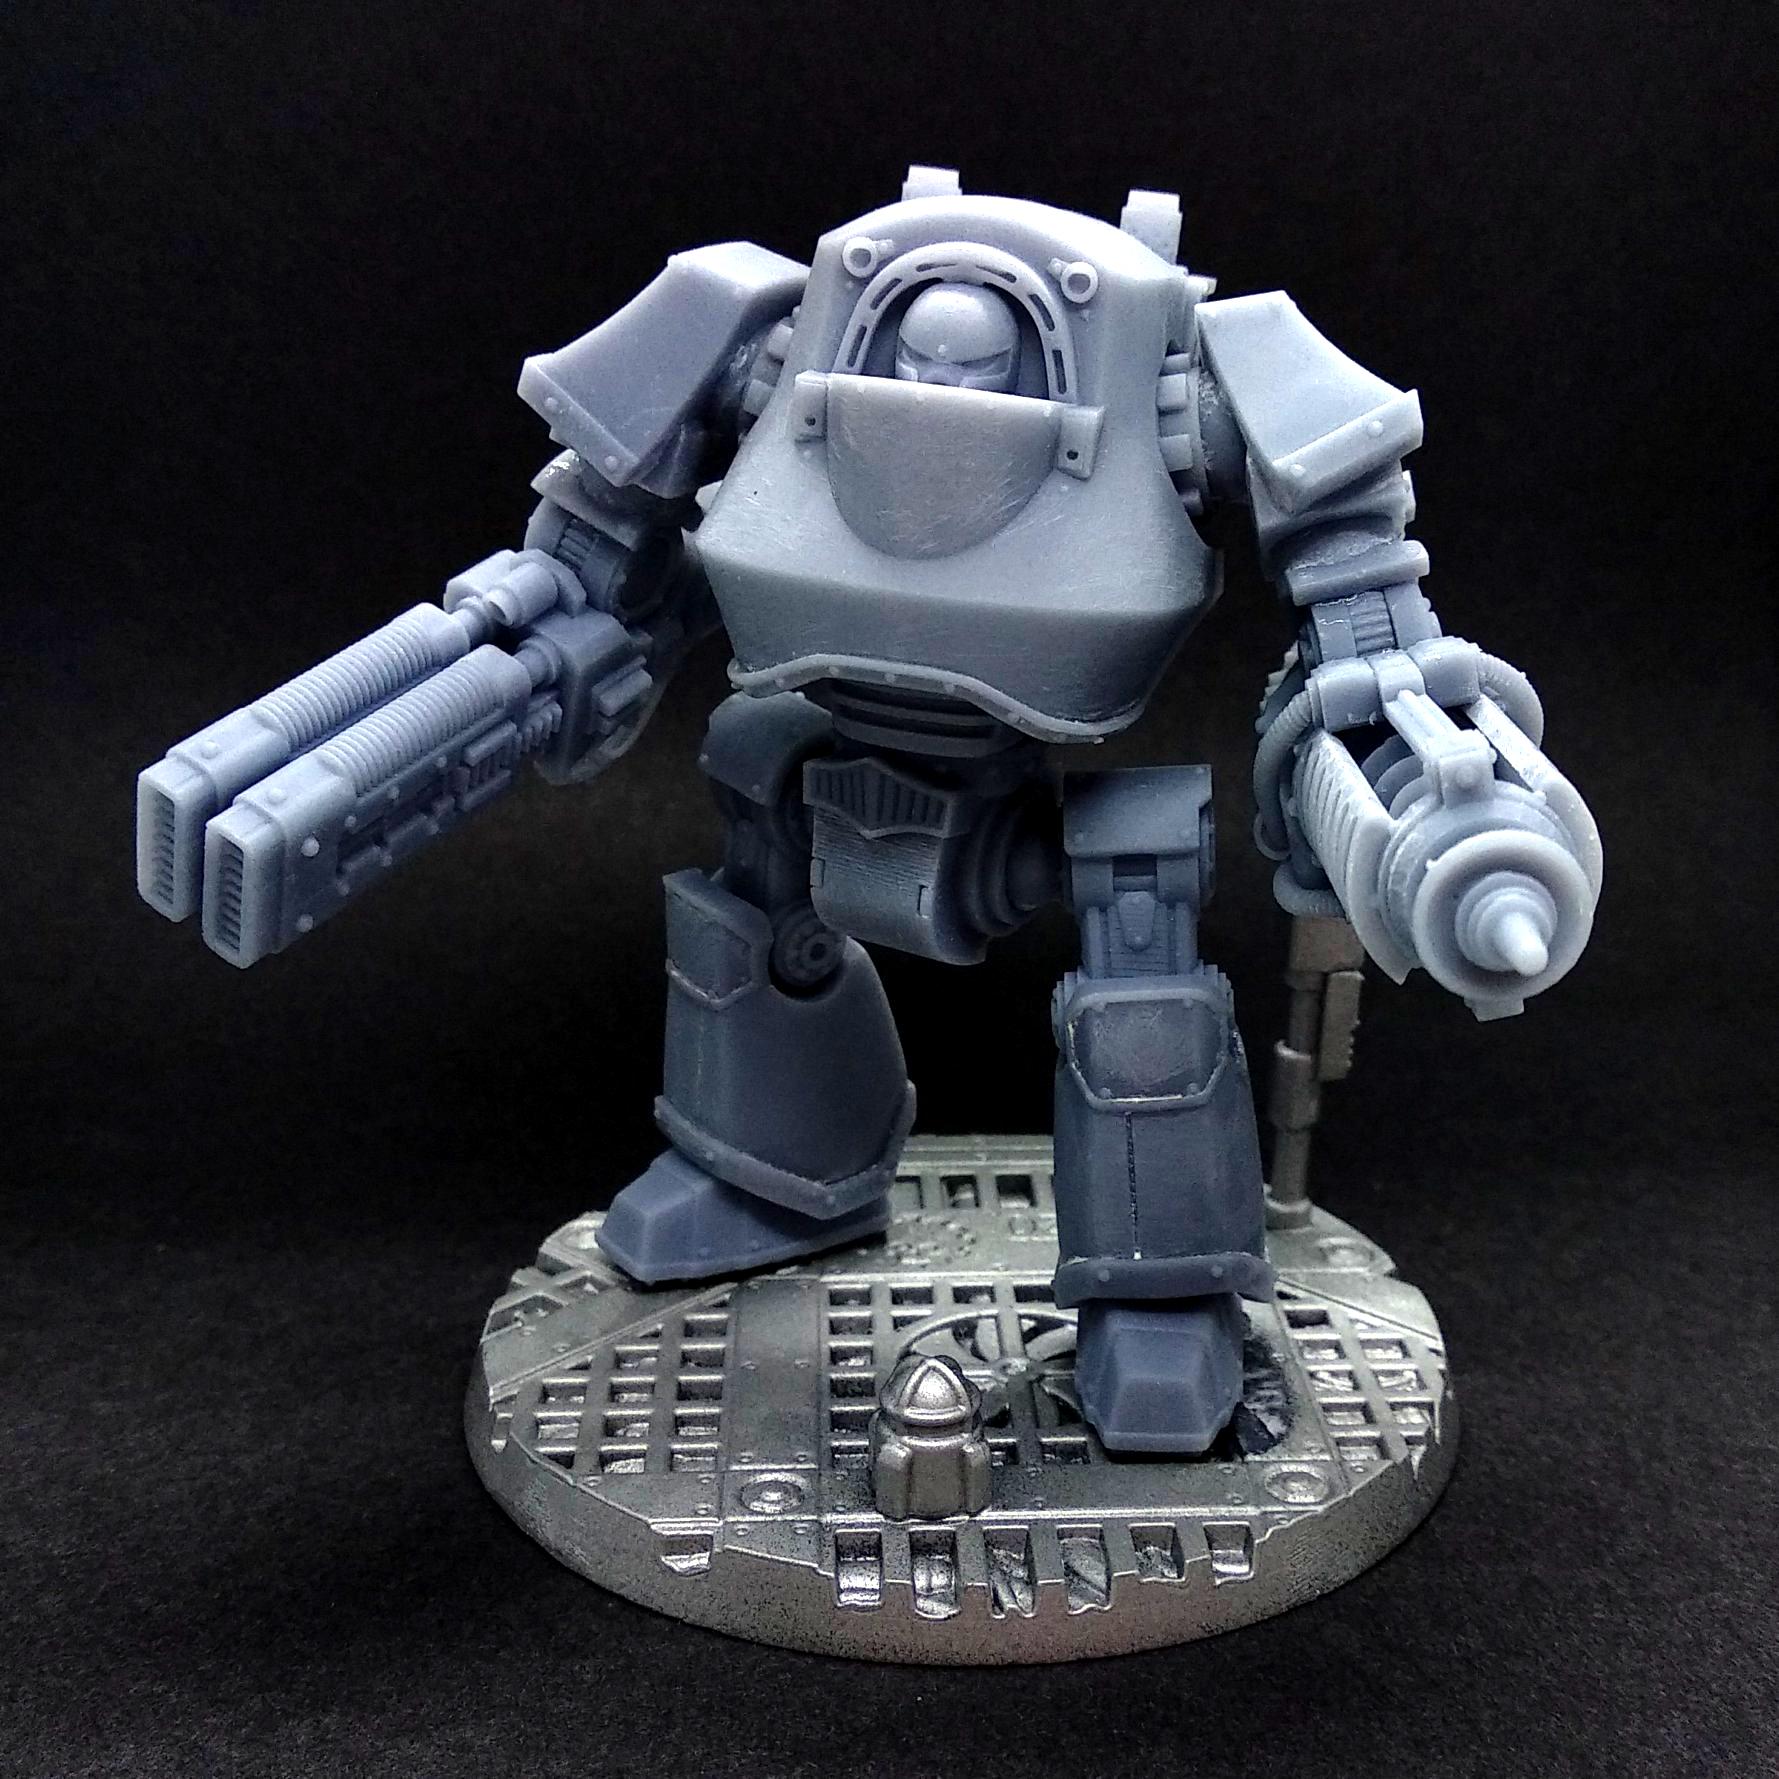
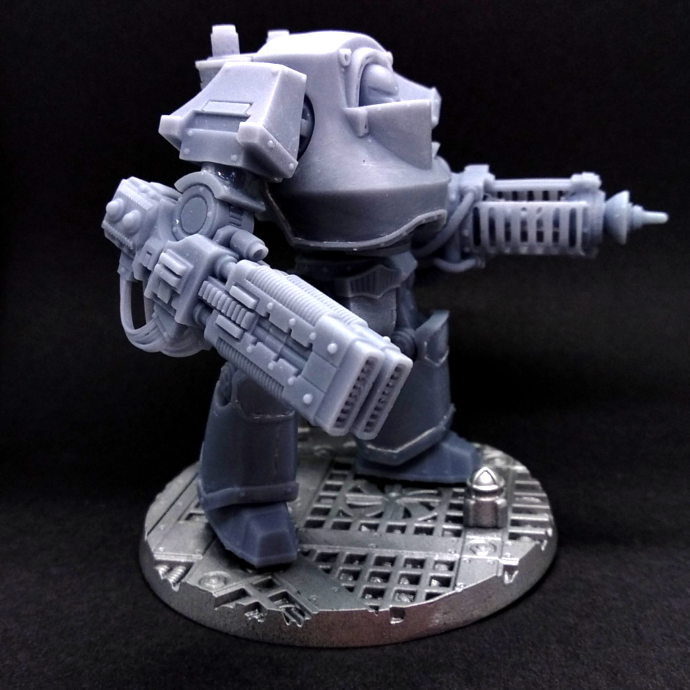
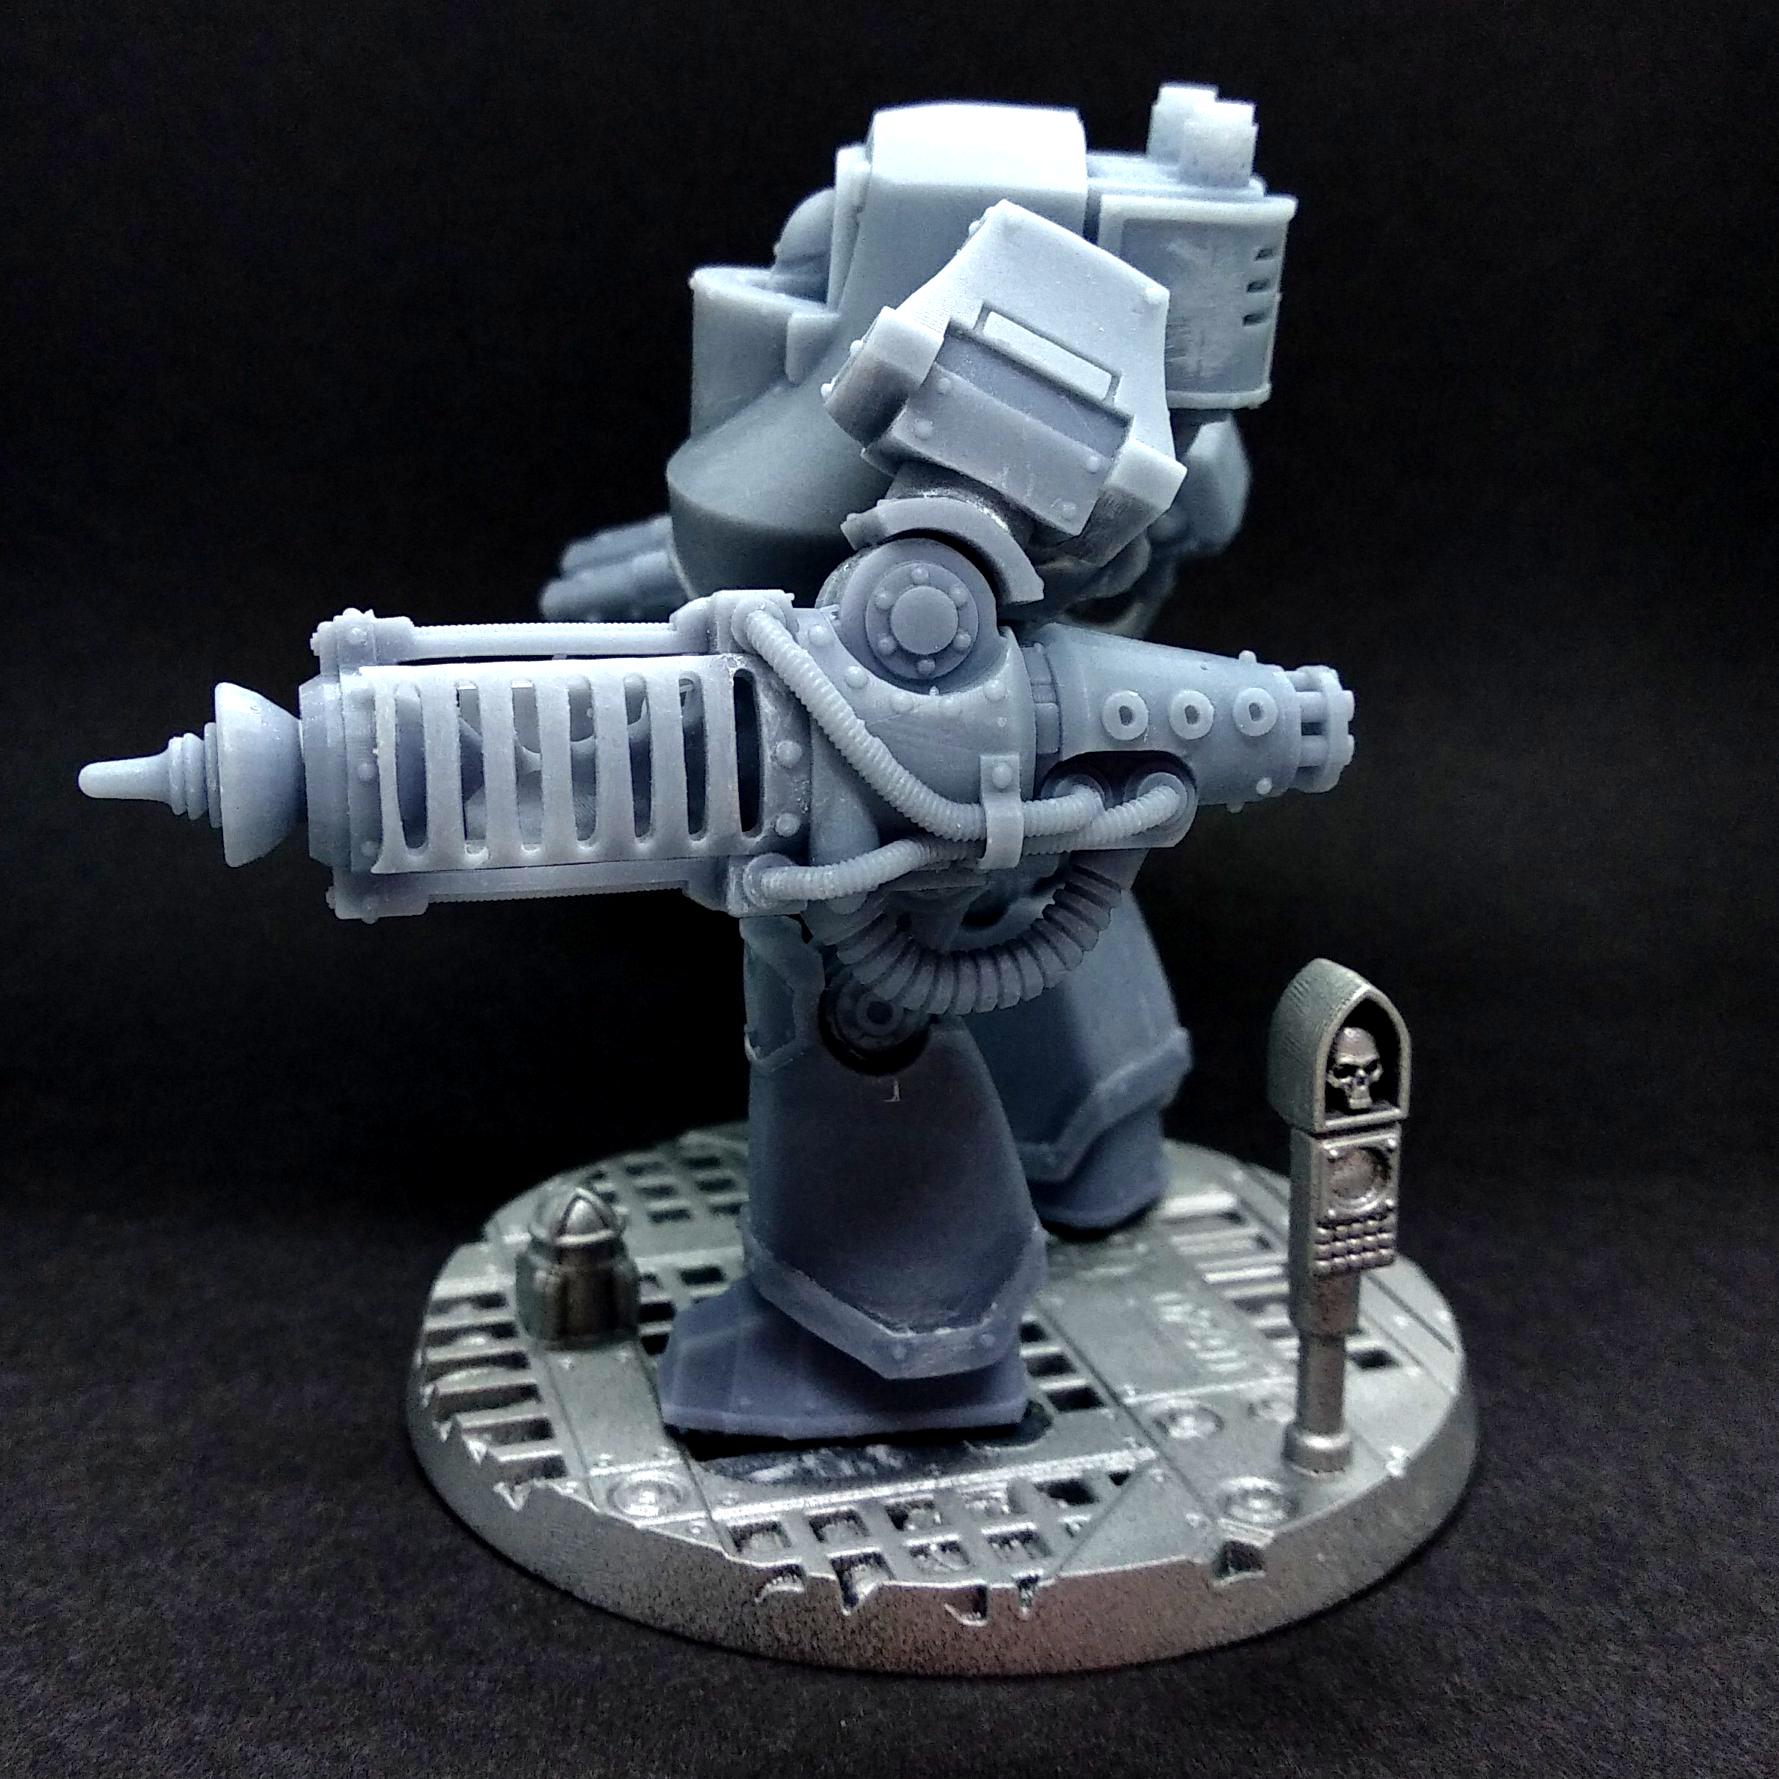
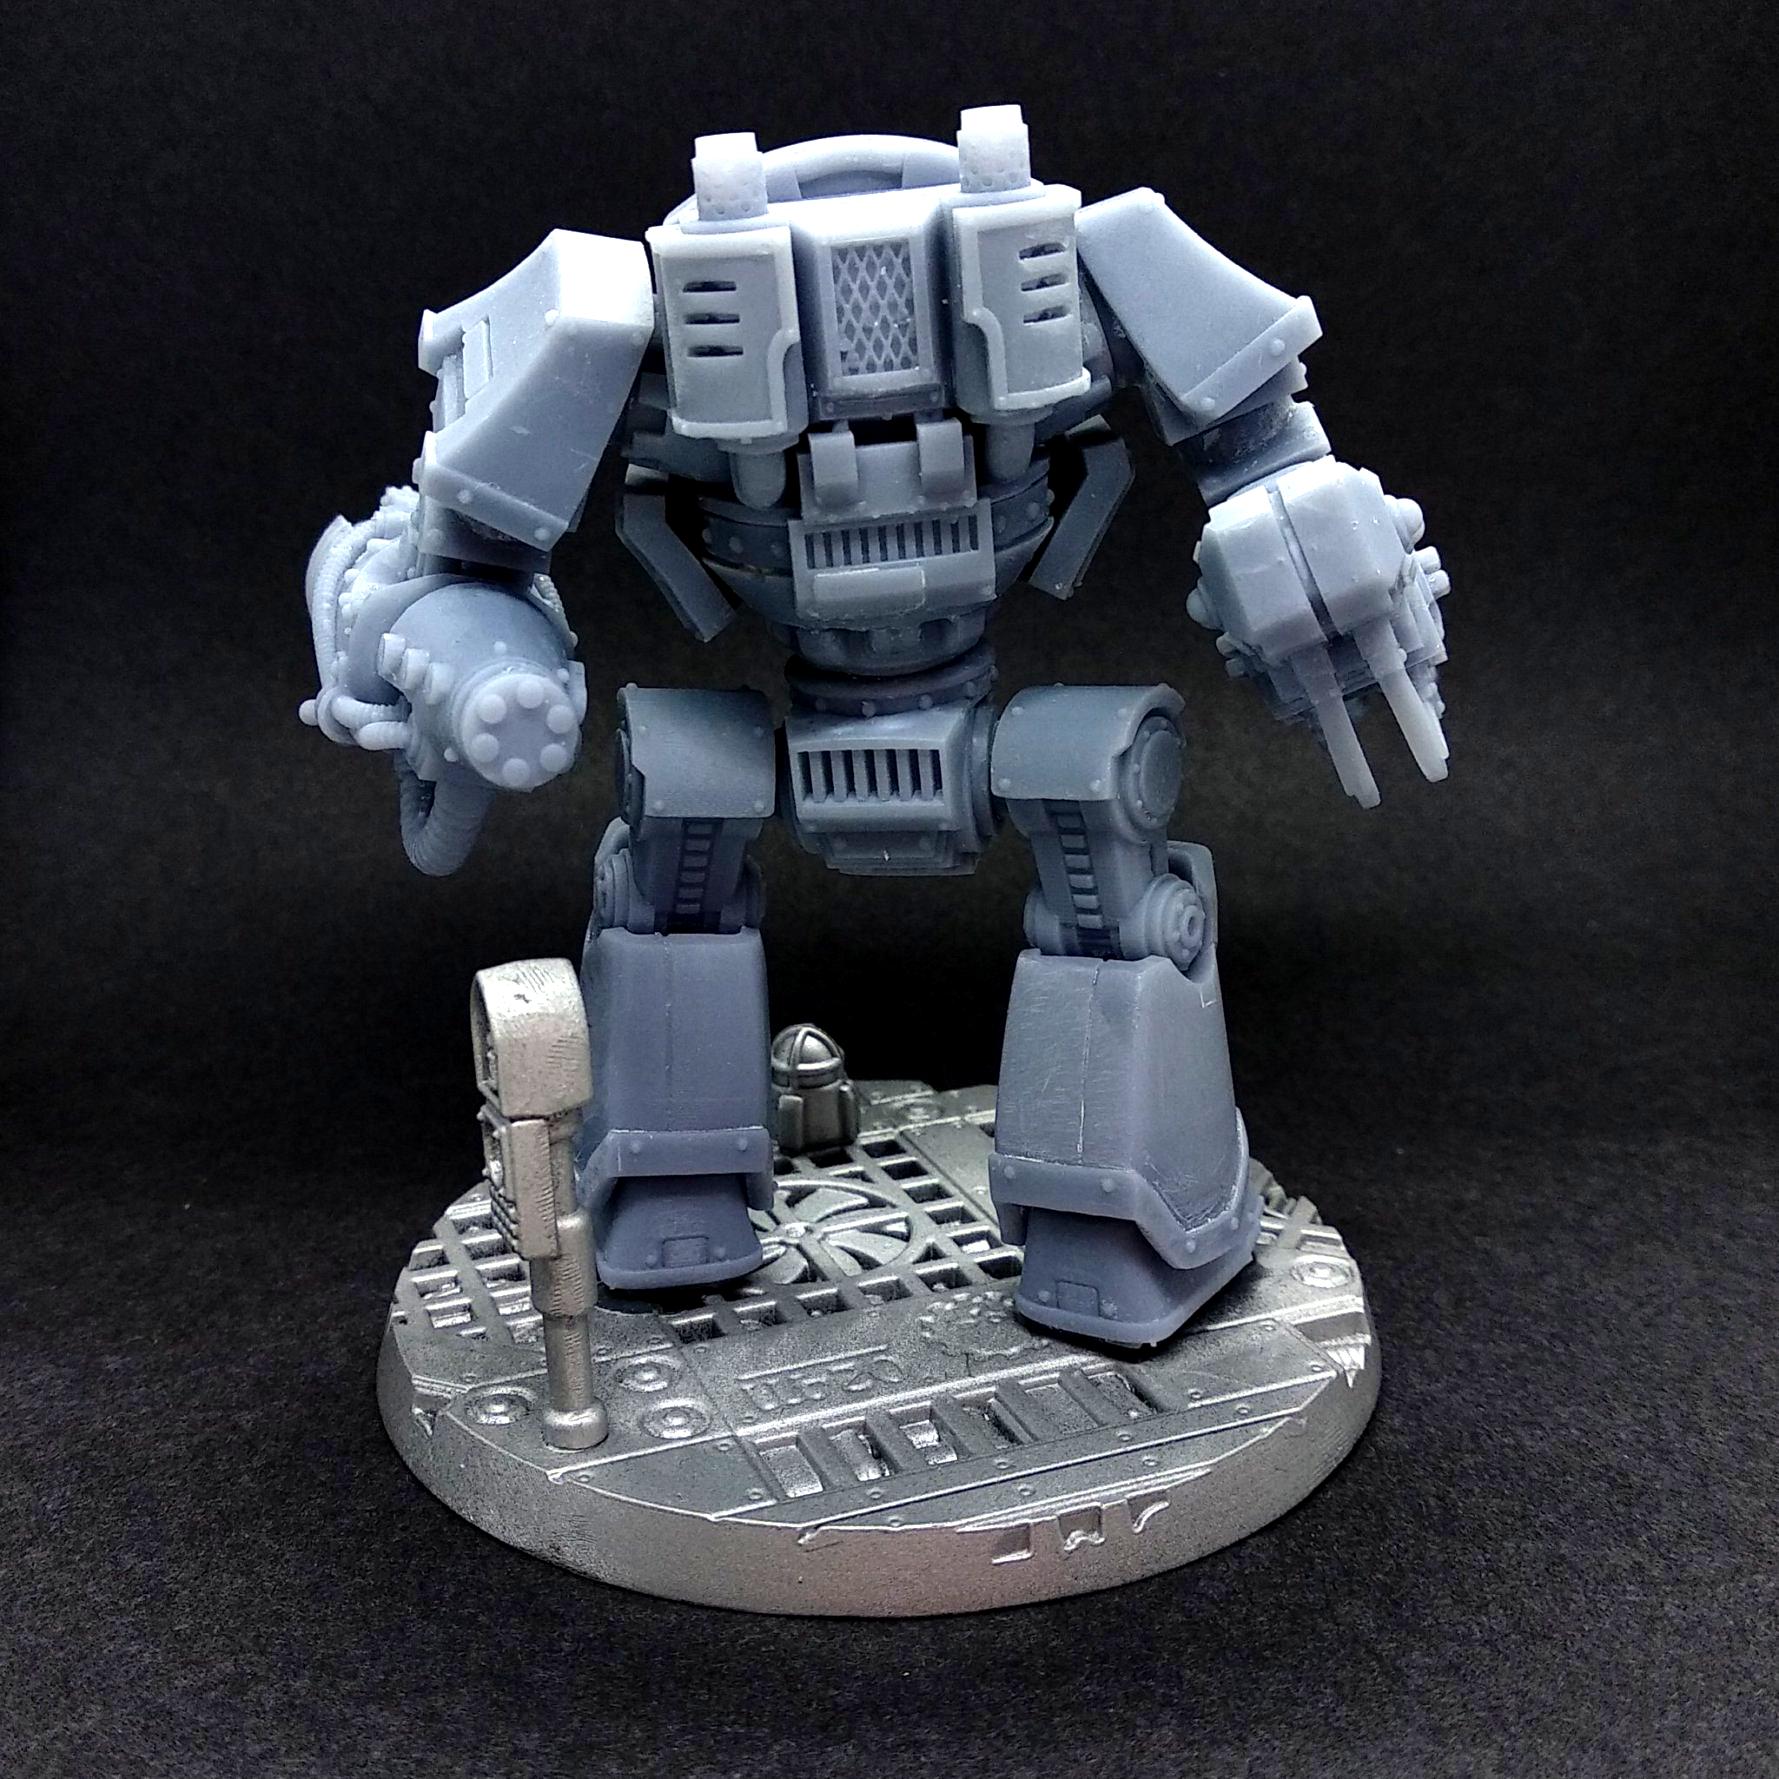
I've sliced it on Lychee, and it seems for some reason that the layer lines are much more noticeable than using Chitubox... weird (same times, retractions, wait times and AA).
|
|
|
|
|
|
|