Switch Theme:

Classic HeroQuest, D&D and more!  [RSS] Share on facebook Share on Twitter Submit to Reddit
»
Author Message
Advert


Forum adverts like this one are shown to any user who is not logged in. Join us by filling out a tiny 3 field form and you will get your own, free, dakka user account which gives a good range of benefits to you:
  • No adverts like this in the forums anymore.
  • Times and dates in your local timezone.
  • Full tracking of what you have read so you can skip to your first unread post, easily see what has changed since you last logged in, and easily see what is new at a glance.
  • Email notifications for threads you want to watch closely.
  • Being a part of the oldest wargaming community on the net.
If you are already a member then feel free to login now.


Made in at
Bounding Assault Marine


Austria, Segmentum Solar

Behold!


I recently ordered a used set of the Classic 1989 HeroQuest board game and just picked it up at the post office today. In this thread I will be detailing my progress on painting the miniatures, furniture and doing some minor repair work if necessary. I must say considering the age of this box, it has survived in a remarkably pristine condition. My only gripe with it is that it was apparently stored in a household where people smoke, so it still retains some of that odour unfortunately. I have done my best to clean the box thoroughly, so eventually, it should hopefully go away.

If you are interested in old school HeroQuest, I'd love to welcome you to follow along as I work my way through this box. I will also be sharing my D&D minis and terrain in this thread, so this might also be something that interests you. I'm very much looking forward to working on this box, and I hope to see you around and get some feedback from you. See you soon!

   
Made in gb
Pestilent Plague Marine with Blight Grenade


Bristol, UK

Yo this is crazy. Talk about overlapping interests. I *just* finished painting all the minis my 1989 Hero Quest box. Very excited to see yours coming together!

   
Made in at
Bounding Assault Marine


Austria, Segmentum Solar

 Tek wrote:
Yo this is crazy. Talk about overlapping interests. I *just* finished painting all the minis my 1989 Hero Quest box. Very excited to see yours coming together!


No way dude, that's nuts! Would love to see your stuff, I'm sure it's amazing as always

Alright, time for an update. I've been chipping away at the HeroQuest furniture over the past few days. Let's take a look at what I managed to do!

First thing I jumped at was the fireplace:


Pretty simple piece as only the base needed painting. I tried to emulate the colours of the yellowish (sand)stone on the carboard and I'm pretty satisfied with the results.

Next, I decided to tackle the stone objects, namely the Hero's tomb and the Sorcerer's Table. Again, I attempted to match the colours of the cardboard as closely as possible, which meant I had to mix a warm grey and a warm white. The tomb is pretty straightforward, with nothing but a basecoat and a quick drybrush to accomplish the desired effect:


The sculpted knight on top of the sarcophagus is really cool IMO. I would really love to make a mould of that part and use it for a conversion of a venerable Castraferrum dreadnought at some point, but I doubt I'll have time for such shenanigans in the near future with all the projects I'm trying to work on already

The Sorcerer's table was a little more involved. For some reason, it didn’t come with a cardboard base. First, I thought this piece had gone missing, but it turns out that apparently, that’s intentional. I didn’t like the look of the bare plastic sitting on the ground, so I decided to build a base myself:


Put together:


I painted the stone table with the exact same paint mix I used for the tomb. Here’s what it looks like now:


I had to do some repairs on the candles which had unfortunately broken off. I just cut the parts down and carved a new candle top with flame from the resulting stumps. I think it works well enough to be readable. I also didn’t glue these parts in because they are a pretty tight push fit and that way, I can repair them again later if anything should happen.


The book is a bit of an issue. Annoyingly, my brown wash is still shiny as ever, which made the whole book look weird. Also, I’m not too happy that they actually decided to sculpt the writing into the pages. I will probably have to go over it again and make the pages look nicer, but the picture gives you a pretty good impression of what I’m going for.


Something I did to add a little visual interest was paint on some cracks onto the stone surface, a technique I haven’t used in ages. I’m pretty happy with how they came out, and I hope they help sell the illusion of this being a stone table.


Looking at the pictures, I might have to add some more cracks to the top surface as well to make it more convincing. Anyway, pretty satisfied with this piece so far. Moving on.

Next is the Alchemist’s Bench:


This piece is still WIP. I’m not quite happy with the colour of the wood on this one as I want it to match the base, too. Also, all of the little utensils and bits on the bench still need a wash and a couple of highlights to look good, but I think you can see where this is going.

Then we have the Throne:


Also still WIP. I’ll have to find a suitable paint to replicate the wood grain on the back here:


Finally, here’s the three treasure chests that came with the set:


Pretty chuffed with how they turned out, but I will probably tweak the wood colour a little more to better match the cardboard.

Let’s take inventory:
✅1 x Fireplace
✅1 x Tomb
✅1 x Sorcerer’s Table
❌1 x Alchemist’s Bench
❌1 x Throne
✅3 x Treasure Chest
❌2 x Table
❌1 x Torture Rack
❌2 x Bookcase
❌1 x Cupboard
❌1 x Weapons Rack

A final shot of everything together:


And that is all I have to show you for today. I hope you enjoyed this update and you will stay tuned for more! Until next time!


Made in gb
Pestilent Plague Marine with Blight Grenade


Bristol, UK

So clean, I love it. I really think these old school minis really benefit from an old school paint job. You can't beat a nice bit of quality drybrushing.

And your cardboard scratchbuilding is a thing of beauty. Great work mate.

   
Made in at
Bounding Assault Marine


Austria, Segmentum Solar

 Tek wrote:
So clean, I love it. I really think these old school minis really benefit from an old school paint job. You can't beat a nice bit of quality drybrushing.

And your cardboard scratchbuilding is a thing of beauty. Great work mate.


Thank you very much Tek! I'm having a lot of fun painting these classic pieces tbh. Glad you like what I'm doing, and I appreciate your kind words and encouragement as always!


Quick update on the furniture tonight!

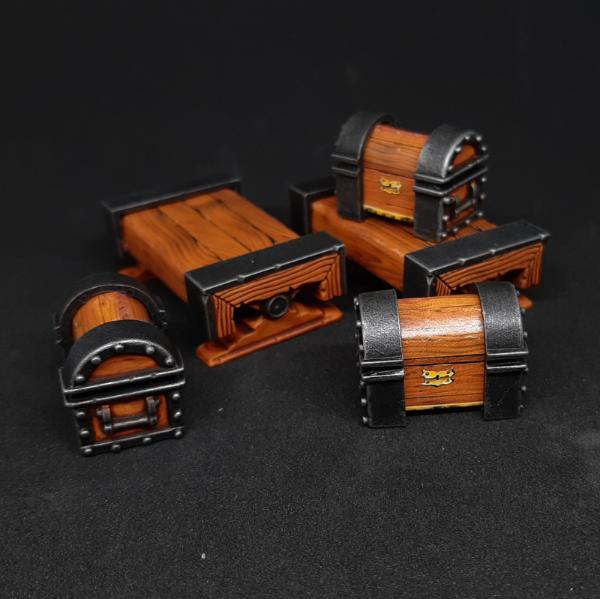
As mentioned, I eventually managed to find a good paint scheme to match the rich brown of the printed cardboard pieces. It’s just a simple basecoat of GW Tau Light Ochre, followed by 2-3 washes of Ogryn Fleshshade. I’ll be using this recipe for all of the brown furniture in the set. First thing I painted with this technique were the two tables in the set:


Pretty happy with the results

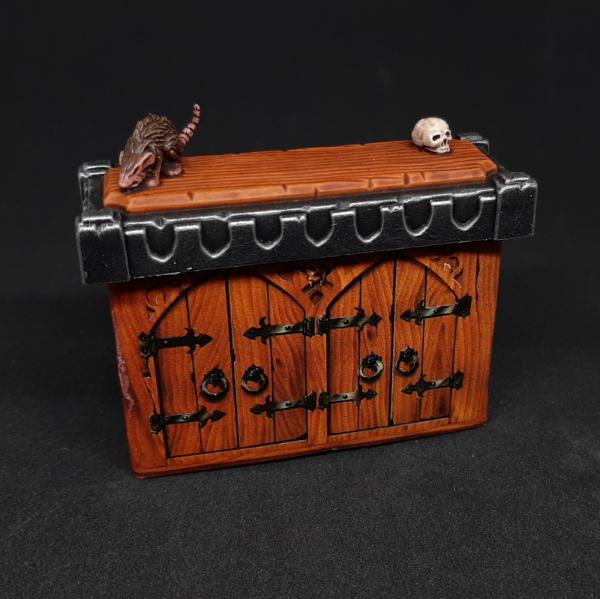
Next, as mentioned, I decided to go back over the chests to touch up the wood colour:


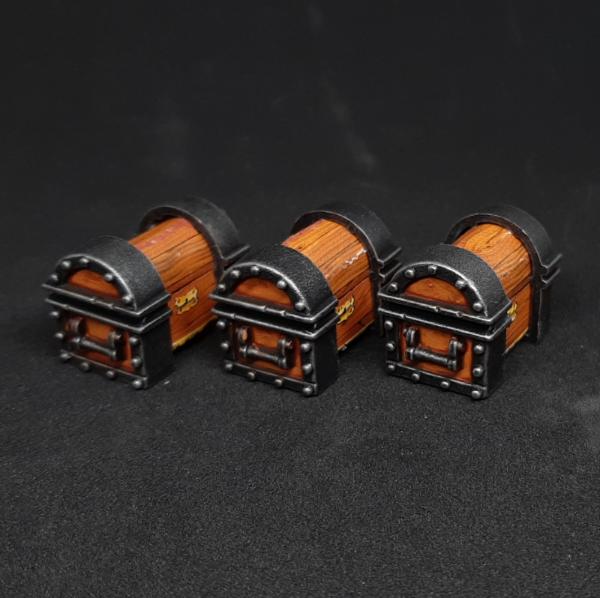
The colours now all really match up quite nicely across the different pieces:


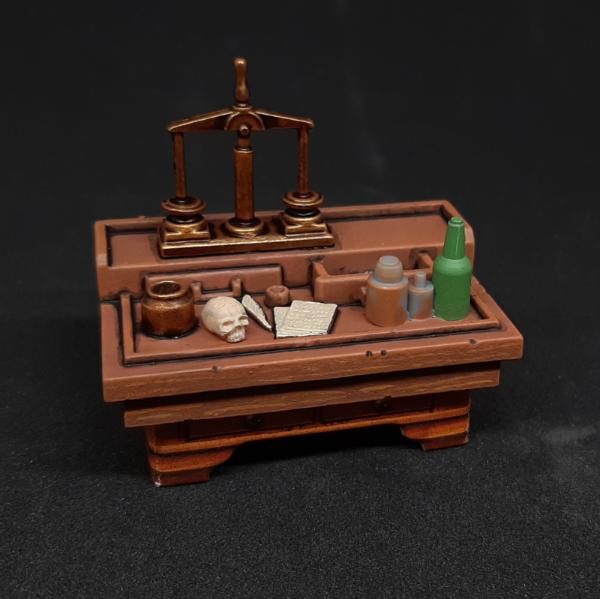
I also repainted the pages of the book on the Sorcerer’s table. This time, I used Agrax Earthshade wash for the shading. While it does dry a bit glossy, it is probably still the best option for a brown wash I have atm.


I added some freehand writing and a symbol to the right page. I’ve seen some crazy good freehand out there for this piece of furniture, but I doubt I could pull off any thing that elaborate, so I’m just gonna leave it like that for now and call it done.


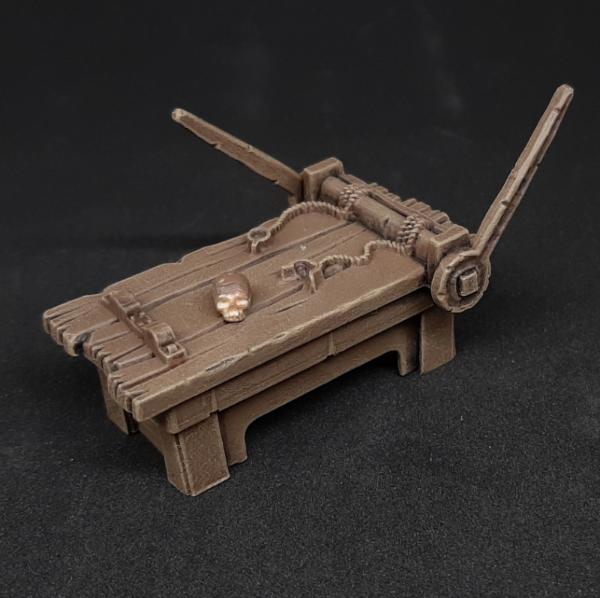
Moving on to the Rack. This piece is still WIP, as I need to paint all the details on it. While I did have the original cardboard base, I really, really didn’t like the paintjob on it. Thus, I decided to convert it and paint the whole thing in a nicer, less saturated brown. While I do feel a bit naughty for ruining this piece of history, I had to make an exception in this case I’m afraid. The colours on the cardboard were just all over the place, A much too rich, saturated brown not befitting of a gritty torture device, some way too shiny, new iron banding as well as the gaudy, bright red blood streaks. The paint just had to go. I hope the final result will make up for me destroying this rare piece.


Next, let’s take a look at the alchemists bench which is also still WIP. I’ve been putting off painting this thing for a while now, as I’m simply not sure how to make the paintjob look good. I’m currently trying to create a faux wood grain texture with my paintjob, but I’m still not sure whether I like where it is going. I'll keep messing with it until something gives.


Finally, I have some more finished pieces to show off which I’m really proud of. First is the cupboard:


Once again, I used my trusty recipe for the rich brown, and I think it came out great, especially with the wood grain. The banding was also pretty straightforward, as I once again used the metal recipe of my chests: Abaddon Black Basecoat followed by a Leadbelcher drybrush. Simple, yet effective. Some detail shots:


The Cupboard and Shelves tended to want to tip over as they were rather top-heavy. Luckily, I found several of these peculiar copper discs in my girlfriend’s purse which I could use to weigh down the furniture at the base.


This gives them a nice bit of weight and keeps them from tipping over constantly.

Then, we have the two bookshelves which also look really nice IMO. The printed cardboard works so well with the painted plastic, which is pretty satisfying:


The second one:


Finally, let’s take a look at all the finished stuff set up together once more:


Looking pretty cool I'd say

The to do list is getting smaller already:
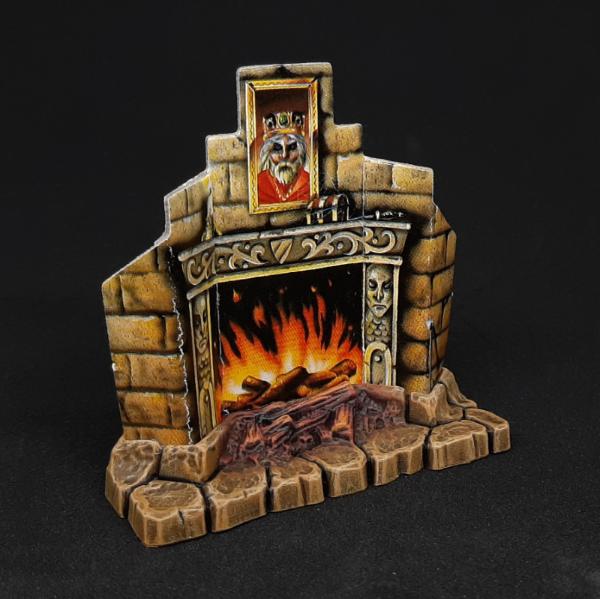
✅1 x Fireplace
✅1 x Tomb
✅1 x Sorcerer’s Table
❌1 x Alchemist’s Bench
❌1 x Throne
✅3 x Treasure Chest
✅2 x Table
❌1 x Torture Rack
✅2 x Bookcase
✅1 x Cupboard
❌1 x Weapons Rack

As you can see there's not too much more to go! I hope you liked this update and will stay tuned! Thanks for looking, and see you next time!


This message was edited 1 time. Last update was at 2025/03/20 00:02:02


Made in es
Regular Dakkanaut


Madrid, Spain

It's looking amazing, the paintjob really elevates this sculpts.

Also known as KeiserS! muette is my old name.

I also have a 3d models shop, check it out here! https://cults3d.com/en/users/keiserspandp/creations 
   
Made in ca
Long-Range Ultramarine Land Speeder Pilot


Wow, those came out very nicely. That's an interesting effect too with the printed card stock.
Be really careful with those copper discs though, I hear they are used in witchcraft.
   
 
Forum Index » Dakka P&M Blogs
Go to: