| Author |
Message |
 |
|
|
|
|
Advert
|
Forum adverts like this one are shown to any user who is not logged in. Join us by filling out a tiny 3 field form and you will get your own, free, dakka user account which gives a good range of benefits to you:
- No adverts like this in the forums anymore.
- Times and dates in your local timezone.
- Full tracking of what you have read so you can skip to your first unread post, easily see what has changed since you last logged in, and easily see what is new at a glance.
- Email notifications for threads you want to watch closely.
- Being a part of the oldest wargaming community on the net.
If you are already a member then feel free to login now. |
|
 |
2009/04/02 16:23:13
Subject: The Praetors of Calth: Pre-Heresy Ultramarines
|
|

Enginseer with a Wrench
|

As a commander your tools and devices shall be myriad,
yet the wise man knows that battles are won by flesh, not the machine.
Flesh can learn, whilst the machine must be forever instructed.
Flesh knows loyalty to its brothers and veneration of the Emperor,
whilst the machine knows not these things.
Whenever the day is darkest and victory in doubt,
look not to the machine for aid, but to your Battle-Brothers.
The machine can only bring you victory
if you tell it how such a thing can be done.
Your brothers will walk through fire,
they will stride through the most terrible carnage
at a single word from your lips,
And they will bring you victory
simply because you ask it of them."
|
|
This message was edited 2 times. Last update was at 2009/04/03 09:59:42
|
|
|
 |
|
2009/04/02 16:32:08
Subject: The Praetors of Calth: Pre-Heresy Ultramarines
|
|

Tough Traitorous Guardsman
|
Intriguing! I would like to know more...
|
|
|
|
|
|
2009/04/02 16:32:49
Subject: The Praetors of Calth: Pre-Heresy Ultramarines
|
|
Pestilent Plague Marine with Blight Grenade
|
Awesome.
|
|
|
|
|
|
2009/04/02 16:38:39
Subject: Re:The Praetors of Calth: Pre-Heresy Ultramarines
|
|

Longtime Dakkanaut
|
I shall test thy brothers in combat
Whom shall stand no chance in face of our righteous superiority
In time I shall spit on the grave of thy father, son of Roboute, the Murderer of the first head.
Alpharius
|
|
This message was edited 1 time. Last update was at 2009/04/02 16:42:40

“Of the fabulous hydra it is said, cut off one head and two will grow in its place”
- antique proverb
LEGION of PLASTIC blog |
|
|
|
|
2009/04/02 16:39:47
Subject: Re:The Praetors of Calth: Pre-Heresy Ultramarines
|
|
Longtime Dakkanaut
|
|
“Of the fabulous hydra it is said, cut off one head and two will grow in its place”
- antique proverb
LEGION of PLASTIC blog |
|
|
|
|
2009/04/02 16:39:48
Subject: Re:The Praetors of Calth: Pre-Heresy Ultramarines
|
|
Stoic Grail Knight
|
Has the great Apologist made his way to Dakka? I've followed your blogs all the way back since the original concept work on your Adeptus Mechanicus army, so I greatly look forward to any posts you make here! 
|
|
|
|
|
2009/04/02 16:42:10
Subject: Re:The Praetors of Calth: Pre-Heresy Ultramarines
|
|
Longtime Dakkanaut
|
Accolade wrote:Has the great Apologist made his way to Dakka?
And what more fitting reason than for the schemes of the youngest legion!
|
“Of the fabulous hydra it is said, cut off one head and two will grow in its place”
- antique proverb
LEGION of PLASTIC blog |
|
|
|
|
2009/04/02 16:57:02
Subject: The Praetors of Calth: Pre-Heresy Ultramarines
|
|
Incorporating Wet-Blending
|
They are big, ya ya ya. They're not small, no no no!
Very cool. But how will you do the termis?
|
-James
|
|
|
|
|
2009/04/02 17:02:50
Subject: The Praetors of Calth: Pre-Heresy Ultramarines
|
|
Sword-Wielding Bloodletter of Khorne
Salt Lake City, UT
|
Some good looking Marines! Some more pics and/or different angles to look at would be great!
|
|
|
|
|
|
2009/04/02 18:10:14
Subject: The Praetors of Calth: Pre-Heresy Ultramarines
|
|

Did Fulgrim Just Behead Ferrus?
|
Oh boy...this is going to be really cool isn't it? 
|
|
|
|
|
|
2009/04/02 18:12:58
Subject: The Praetors of Calth: Pre-Heresy Ultramarines
|
|
Ork-Hunting Inquisitorial Xenokiller
|
HOLY SMOKES!
This guy is gonna be one to watch!
|
 The oonivers vill burn! The oonivers vill burn! |
|
|
|
|
2009/04/02 18:48:30
Subject: Re:The Praetors of Calth: Pre-Heresy Ultramarines
|
|
Stoic Grail Knight
|
migsula wrote: And what more fitting reason than for the schemes of the youngest legion!
So is the appearance of the Ultramarines due to the manipulations of the legion of subterfuge??
|
|
|
|
|
2009/04/02 19:03:09
Subject: The Praetors of Calth: Pre-Heresy Ultramarines
|
|
Lone Wolf Sentinel Pilot
|
Nice.
sA
|
My Loyalist P&M Log, Irkutsk 24th
"And what is wrong with their life? What on earth is less reprehensible than the life of the Levovs?"
- American Pastoral, Philip Roth
Oh, Death was never enemy of ours!
We laughed at him, we leagued with him, old chum.
No soldier's paid to kick against His powers.
We laughed - knowing that better men would come,
And greater wars: when each proud fighter brags
He wars on Death, for lives; not men, for flags. |
|
|
|
|
2009/04/02 20:39:26
Subject: The Praetors of Calth: Pre-Heresy Ultramarines
|
|
Lone Wolf Sentinel Pilot
|
Apologist where is more of your work posted? I would love to see it.
|
My Blog http://ghostsworkfromthedarkness.blogspot.com/
Ozymandias wrote:
Pro-painted is the ebay modeling equivalent of "curvy" in the personal ads...
H.B.M.C. wrote:
Taco Bell is like carefully distilled Warseer - you get what you need with none of the usual crap. And, best of all, it's like being a tourist who only looks at the brochure - you don't even have to go, let alone stay.
DR:90S+GMB+I+Pw40k01-D++A++/areWD 250R+T(M)DM+ |
|
|
|
|
2009/04/02 20:51:40
Subject: The Praetors of Calth: Pre-Heresy Ultramarines
|
|
Did Fulgrim Just Behead Ferrus?
|
He's all over the internets man! 
|
|
|
|
|
|
2009/04/02 22:03:44
Subject: The Praetors of Calth: Pre-Heresy Ultramarines
|
|
Member of the Malleus
|
Good to have you aboard and involved in this community.
Looking forward to more.
Cheers,
Dante
|
|
|
|
|
|
2009/04/02 22:42:44
Subject: The Praetors of Calth: Pre-Heresy Ultramarines
|
|
Did Fulgrim Just Behead Ferrus?
|
Now all we need is to have Synapse come over and put those forces together with Migsula's Alpha Legionnaires!
|
|
|
|
|
|
2009/04/03 01:36:04
Subject: The Praetors of Calth: Pre-Heresy Ultramarines
|
|
Stoic Grail Knight
|
Malika2 wrote:Now all we need is to have Synapse come over and put those forces together with Migsula's Alpha Legionnaires!
The three of them together will birth some sort of unholy fifth Chaos god...I would warn you against creating a force so potent
|
|
|
|
|
2009/04/03 02:07:43
Subject: The Praetors of Calth: Pre-Heresy Ultramarines
|
|
Did Fulgrim Just Behead Ferrus?
|
I thought that's what we wanted/needed over at DakkaDakka? To show the rest of the internetz which 40k community rules them all or something?
|
|
|
|
|
|
2009/04/03 03:47:52
Subject: Re:The Praetors of Calth: Pre-Heresy Ultramarines
|
|
Stoic Grail Knight
|
Well in that case I need to get working on my  DAKKA FOR THE DAKKA GOD!! chanting
|
|
|
|
|
2009/04/03 09:17:29
Subject: Re:The Praetors of Calth: Pre-Heresy Ultramarines
|
|
Enginseer with a Wrench
|
Our presence remakes the past
Thanks for the warm welcome! I've been posting on here as Cpl_Saint for the past few years, but got a bit fed up of the username, so decided to start again with my new moniker. Hope that's okay! If you search for 'Praetors of Calth', you'll find a nascent version of this blog somewhere on Dakka, but it's a bit scattered and untidy.
With that in mind, I thought I'd start again and show the process of building these guys. Because I don't need to worry about keeping them up-to-date, this version of the log should be a definitive one, with all the correct background in place.
I hope you enjoy it – here's a tutorial for how I make 'em.
+++
Adept Apologist's true-scale tutorial
(With gratitude to Elusive71, Synapse, Doghouse et al.)
Whether you call them true-scale, art-true, heroic, actual-scale or just plain 'embiggened', larger Astartes are a great project and modelling opportunity. My direct inspiration comes from the artwork – Karl Kopinski's seminal Crimson Fist in the rulebook, but also this awesome piece:

This tutorial covers the intimidating chest and legs. The model can be finished with any terminator arms and shoulderpads, a standard marine head and backpack.
You will need:
Modelling putty
Sculpting tool
One or more sets of terminator legs
One or more standard marine torsoes and backs
Some lubricant (You can get little pot of vaseline lip balm, which is ideal)
Patience (If you don't have much, have a cup of camomile tea and relax – or apply to your local techpriest for the Rite of Pure Thought)
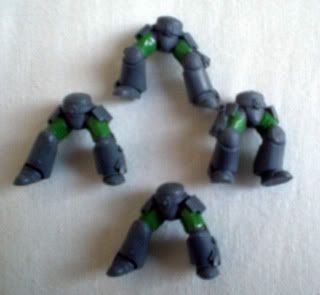
Legs:
1. Clean and prep a pair of terminator legs. I trim the 'bolts' from the side of the knee to slim the legs down subtly, but you can ignore this step if you prefer. I like to work on four or five sets at once (it gives uniformity, and stops you wasting greenstuff).
2. Next, mix your putty and let it cure for ten minutes or so, so it's still fairly sticky. Using the greased blade (vaseline is good) of your sculpting tool, cut a small block (approx 2 x 2mm) and press it into the recess of the inner thigh.
+++Tip+++
For modelling putty, I recommend ProCreate, available from Heresy miniatures. If you're using the GW greenstuff, cut away the join between the yellow and blue parts before mixing. This part will have partially cured, and give you lumps in your work – not nice!
3. Press the putty into place with the rounded end of your sculpting tool, then grease the flat side and smooth it into place until the putty is flush with the support struts of the inner thigh.
4. Fill in the other areas on the legs in the same way. Work the inner thighs, then the outer thighs, and leave the backs of the calves (these will need a larger piece of putty – 3 x 4mm or so) until last. This approach means you can handle the piece as much as you need without smearing your work.
+++Tip+++
I use a GW modelling tool; but you can get by with a sharp knife and a tool with a smooth and a flat end. I'd also recommend clay shapers, which look a little like a paintbrush with a silicon end. These make smoothing and shaping putty a breeze, and won't stick.
5. This should have filled in the recesses without overflowing. If there are gaps, gently press in tiny pieces of putty until they are full. As an aside, I prefer the lower legs to look like there is a heavier plate at the front, and so I do not smooth the calf area round to the front, but simply fill in the recesses (see the picture below).
6. Grease the flat end of your sculpting tool, and with a gentle pressure, draw it down over the first area of putty, from top to bottom, to smooth it. Start at one of the hidden support struts, and work gradually round the area until you reach the other side.
This part is not difficult, but can be frustrating – so work patiently! If you've put a little too much greenstuff in the recess, this may cause the excess greenstuff to spill over the edge of the area. Carefully trim it away with the blade of your sculpting tool.
+++Tip+++
If the greenstuff starts to lift away, you're using a little too much pressure. Press the greenstuff back into place, and work on another area while it hardens a little.
7. Being careful not to smudge or smear your work, smooth out the other areas in the same way. If you find the support struts start to show through the greenstuff, or the curve is not perfect, try adding a little more greenstuff and smoothing it in.
8. You may find that the upper legs are quite frustrating to smooth. You can cheat a little by using the flat of the tool to 'lift' a little of the greenstuff at the edges of the plates (i.e. at the groin and above the kneejoint). This creates the illusion of a hard edge.
9. At this point, you should have a set of legs that look like giant power armour. Nice one! Wait for ten minutes or so, and add any details that you like now – I use the blade to make a little recessed box on the front of the thigh and use the point of the tool to make two little dots. Little techy details like this really help give the impression of scale.
10. Bask in the glory of making your own pair of legs for true-scale marines. They should look a little like this:
...and the back:
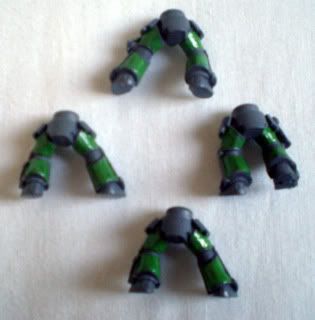
(Only hopefully not so blurry!).
11. Leave for a day, and you can file down, smooth off and generally tidy up the greenstuff.
Torso
+++ Abdomen+++
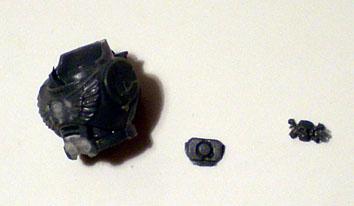
1. Clean and prep a normal marine torso and back. Carefully trim away any of the circular vents or other details you find interesting and put them to one side. Trim the belt buckle away carefully – you'll need it later. Like the legs, I like to work on four or five sets at once.
2. Glue the torso to the prepared legs.
3. Next, mix your putty and let it cure for five minutes or so, so it's still sticky. Place the putty on a tile or other non-absorbent surface (blister pack plastic is good), then spread it out to make a thin sheet. Check you can lift it off the surface without it distorting. If you can't, rub a tiny touch of vaseline on the tile and start again.
4. Cut a thin block of putty (8 x 2mm) and use the rounded end of the sculpting tool to press it gently into place round the waist. It should wrap the whole way round the marine, and thicken the whole waist to the width of the plastic upper chest.
5. Grease the round side of the sculpting tool and smooth the putty into place until the greenstuff is flush with the belt. This should cover the awkward join of the terminator legs and the marine torso, creating a smooth vertical column from the top of the terminator belt to the base of the marine chest.
6. Allow to dry overnight.
+++ Stomach plate/cabling+++
7. Prepare the putty as above, letting it cure for 10 minutes this time. Place the putty on a tile, then place baking parchment over the top and use a pen or dowel as a rolling pin to ensure the putty is nice and thin. A depth of 1mm is great.
8. Remove the baking parchment and use the greased blade of your sculpting tool to cut a small block of putty (approx. 2 x 3mm). Place this over the cabled stomach area, and gently press it into place with the rounded end of the sculpting tool. If it distorts, gently nudge the edges back in from the side to sharpen them up. (In the image above, I've used the blade of the sculpting tool to make cabling by pressing it into the uncured putty).
+++ Chest+++
9. Cut a rectangle of putty approx. 8 x 3mm, and place it over the chest of the marine. Press it into place slowly and gently, making sure that the edges of the rectangle reach from armpit to armpit.
+++Tip+++
Stage 8 allows for many different options – the rectangle described will create a traditional marine chestplate, but you can make a Mk IV plate by making a T-shaped piece and covering the abdomen; or make a n-shaped piece to cover the laterals and flanks of the marine. Experiment and have fun, and use the artwork as reference.
10. Use the rounded end of the sculpting tool to smooth the top of the rectangle of putty down onto the top of the chest piece. Do not allow it to touch the neck of the plastic torso (see image below), or you'll lose all the lovely detail. Smooth the top corners into place, so that they blend with the curve of the plastic piece. This stage can be frustrating, but be patient and you'll get it.
 +++Tip+++
Like the legs, you can cheat a little by using the flat of the tool to 'lift' a little of the putty at the edges of the plates (i.e. at the bottom of the chestplate and at the sides of the stomachplate). This creates the illusion of a hard edge.
11. Allow to cure overnight.
12. Glue the belt buckle in place, and add small squares of 0.5mm plasticard as spacers to the shoulder joints to finish.
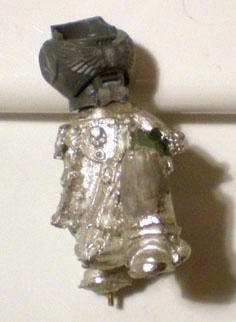
Success!
If you'd like a more complex one, feel free to experiment!
 Additional banding was added here to finish off and add detail. This is the fun bit, so have a blast!
 I used the rounded end of the sculpting tool to press into the centre of the chest piece, creating a small depression. The detail I carved from the original torso was then glued in place once the putty had cured. The stomach plate was replaced with piping made by scraping lines into the plate while it was uncured. A plasticard belt was also added, and the belt buckle glued onto this.
 This example is slightly more complex, but much more effective. As well as piping in place of the stomach plate, small vents were pressed into the corners of the torso plate while uncured; and a textured central reinforcement was added by rolling the grip of a drill over the putty on the tile, then cutting a block of the textured putty and gluing it in place once cured.
 This torso involved adding a plasticard belt, securing various additional plates made separately, mounting carved details and also cutting into an over-extended chest piece to make a recessed protective collar. A mark III/IV hybrid appearance was added by extending the chest piece over the stomach area.
Although considerably more complex, the methods used are the same.
Experiment, give it a go, and don't be put off by failure. Success will come with practice, patience and a steady hand.
I hope that the tutorial's helpful, and good luck! With a little paint, you'll soon be well on your way to making a whole army of these fellas.
|
|
This message was edited 1 time. Last update was at 2009/04/03 10:50:04
|
|
|
|
|
2009/04/03 09:26:30
Subject: The Praetors of Calth: Pre-Heresy Ultramarines
|
|
Lone Wolf Sentinel Pilot
|
Your work is an inspiration and an aspiration for many of us. The fluidity of the poses and the cinematic effects that you've included in your models add up to make a truly excellent look which is unique.
Thanks a great deal for the tutorial, I'll finally use that free White Dwarf Termie for something useful yet...
I hope you enjoy your (updated) stay at Dakka,
Happy Hunting.
sA
|
|
This message was edited 2 times. Last update was at 2009/04/03 10:35:56
My Loyalist P&M Log, Irkutsk 24th
"And what is wrong with their life? What on earth is less reprehensible than the life of the Levovs?"
- American Pastoral, Philip Roth
Oh, Death was never enemy of ours!
We laughed at him, we leagued with him, old chum.
No soldier's paid to kick against His powers.
We laughed - knowing that better men would come,
And greater wars: when each proud fighter brags
He wars on Death, for lives; not men, for flags. |
|
|
|
|
2009/04/03 10:31:15
Subject: The Praetors of Calth: Pre-Heresy Ultramarines
|
|
Stalwart Veteran Guard Sergeant
|
Thats some nice impressive work!
|
|
|
|
|
|
2009/04/03 10:34:50
Subject: The Praetors of Calth: Pre-Heresy Ultramarines
|
|
Member of the Malleus
|
A great tutorial, something thats always nice to see. The only thing I would say is that a number of the pics don't work for me, just getting red crosses. You might be getting bandwidth issues so might be an idea to copy them to the Dakka galleries?
Cheers,
Dante
|
|
|
|
|
|
2009/04/03 11:07:04
Subject: Re:The Praetors of Calth: Pre-Heresy Ultramarines
|
|
Enginseer with a Wrench
|
CMDante wrote:A great tutorial, something thats always nice to see. The only thing I would say is that a number of the pics don't work for me, just getting red crosses. You might be getting bandwidth issues so might be an idea to copy them to the Dakka galleries?
Done! What a useful tool they are, too.
Accolade wrote:migsula wrote:
And what more fitting reason than for the schemes of the youngest legion!
So is the appearance of the Ultramarines due to the manipulations of the legion of subterfuge??
Who better than the sons of Macragge to keep an eye on those slippery upstarts?
Now, where's my auspex?
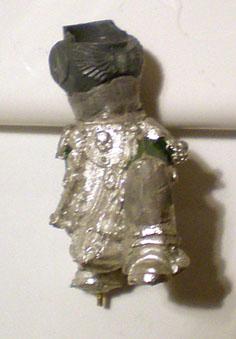
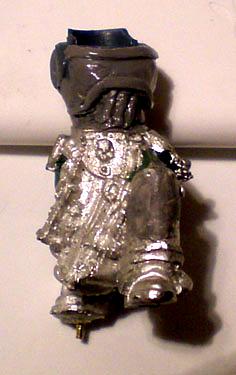
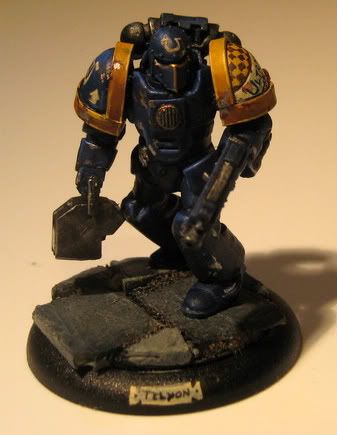
Brother Neoprotos of the Locrians [Calthan extraction]
 Equipped with a broad-band modified Auspex, designed to penetrate and counter any of the distonal Enigma variations, Neoprotos of Calth is pictured checking the screen for nearby ambushes.
The extermination campaign waged against the Nekulli on Moracre saw the deployment of many strange weapons by the xenos. None were more effective than the Nekulli's electro-magnetic warfare instruments, deployed to deadly effect in the second month of the campaign. The eerie sound of the varying Enigma-Hex devices disabled autosenses, caused unexpected power-downs in power armour servos and saw many Astartes isolated from their brethren and killed, unable to raise reinforcements, create meaningful counter-tactics or receive orders.
Equipped with a broad-band modified Auspex, designed to penetrate and counter any of the distonal Enigma variations, Neoprotos of Calth is pictured checking the screen for nearby ambushes.
The extermination campaign waged against the Nekulli on Moracre saw the deployment of many strange weapons by the xenos. None were more effective than the Nekulli's electro-magnetic warfare instruments, deployed to deadly effect in the second month of the campaign. The eerie sound of the varying Enigma-Hex devices disabled autosenses, caused unexpected power-downs in power armour servos and saw many Astartes isolated from their brethren and killed, unable to raise reinforcements, create meaningful counter-tactics or receive orders.
 Neoprotos' heraldry bears the diagonal stripe of Calth against a red field. The white hue of the stripe (known as the 'Blade' is thought to represent knowledge cutting through ignorance. Note the three additional asymmetrical stars, a traditional decoration of the techniclans of Kilch-Wriss.
Reports became strangled and patchy, with reports almost impossible to transmit and pict-captures temporarily reduced to Scrapshunt malcode. The Ultramarines and supporting Alpha Legion were driven to dig in, with no solution in sight.
Neoprotos' heraldry bears the diagonal stripe of Calth against a red field. The white hue of the stripe (known as the 'Blade' is thought to represent knowledge cutting through ignorance. Note the three additional asymmetrical stars, a traditional decoration of the techniclans of Kilch-Wriss.
Reports became strangled and patchy, with reports almost impossible to transmit and pict-captures temporarily reduced to Scrapshunt malcode. The Ultramarines and supporting Alpha Legion were driven to dig in, with no solution in sight.
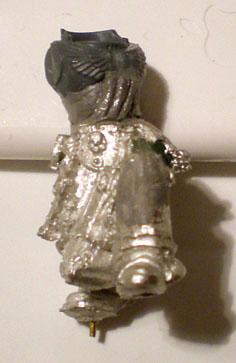
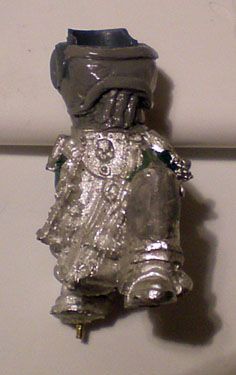
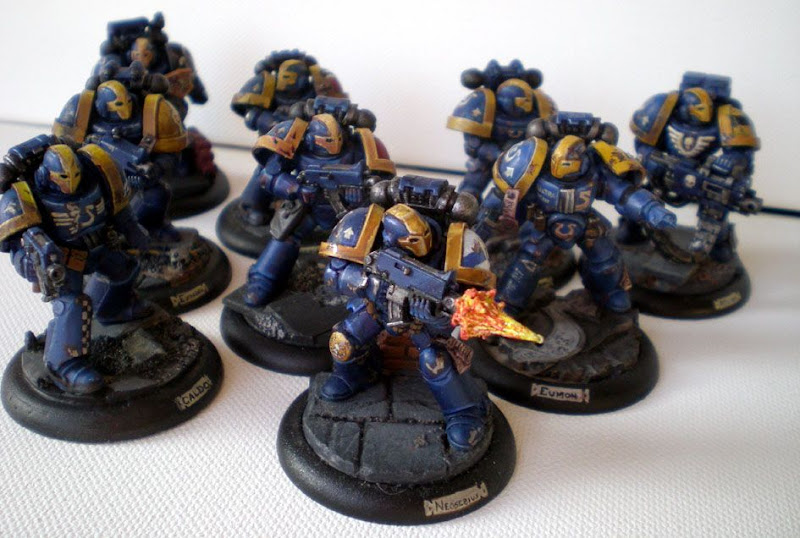
 This rear view shows the marine's Chapter number (in this case, 15). The Fifteenth Chapter of the Ultramarines Legion was led by Orpheus 'Orkbane', and was granted the honorific 'Praetors of Calth' after Compliance was brought to the Hypon system. This shot also shows Neoprotos' slung boltgun (left) and sidearm (right).
Fortunately, the Praetors of Calth were second-to-none in technomantical support, and supported a long tradition of tech-savvy Astartes raised by the techniclans of Calth. Brother Neoprotos, late of clan Kilch-Wriss; was the first to decipher the Nekulli Enigma, and lift the machine-hex from his brethren. A counter-code was swiftly developed and patched through to Polonin, the Ultramarines' newly-instated Master of the Forge, who saw the developing code transmitted throughout the fleet, and to all the supporting forces.
This rear view shows the marine's Chapter number (in this case, 15). The Fifteenth Chapter of the Ultramarines Legion was led by Orpheus 'Orkbane', and was granted the honorific 'Praetors of Calth' after Compliance was brought to the Hypon system. This shot also shows Neoprotos' slung boltgun (left) and sidearm (right).
Fortunately, the Praetors of Calth were second-to-none in technomantical support, and supported a long tradition of tech-savvy Astartes raised by the techniclans of Calth. Brother Neoprotos, late of clan Kilch-Wriss; was the first to decipher the Nekulli Enigma, and lift the machine-hex from his brethren. A counter-code was swiftly developed and patched through to Polonin, the Ultramarines' newly-instated Master of the Forge, who saw the developing code transmitted throughout the fleet, and to all the supporting forces.
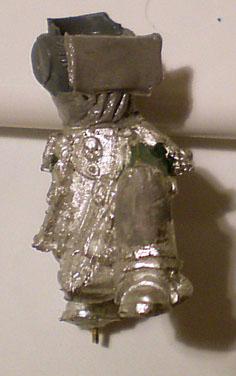
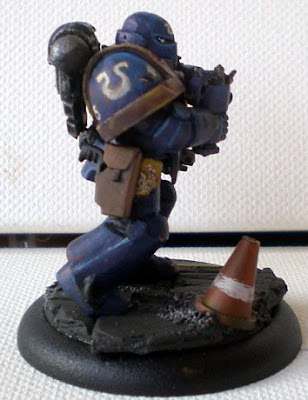 This pict capture shows the Legion symbol (an inverted omega) and the tactical marking (see front of pad to left of image). Note also the army badge on the hip plate, an alternative official location for armour without separate kneepads.
Neoprotos was amongst those Astartes seconded to the Alpha Legion forces deployed on Moracre for the campaign, and his report noted that his cousin-Astartes were friendly if stand-offish; easy-going and well-trained but far from garrulous. His dataslate notes on the Alpha Legion's stealth tactics later formed a minor section of an early draft of the Codex Imperialis.
This pict capture shows the Legion symbol (an inverted omega) and the tactical marking (see front of pad to left of image). Note also the army badge on the hip plate, an alternative official location for armour without separate kneepads.
Neoprotos was amongst those Astartes seconded to the Alpha Legion forces deployed on Moracre for the campaign, and his report noted that his cousin-Astartes were friendly if stand-offish; easy-going and well-trained but far from garrulous. His dataslate notes on the Alpha Legion's stealth tactics later formed a minor section of an early draft of the Codex Imperialis.
|
|
This message was edited 4 times. Last update was at 2009/04/03 11:35:15
|
|
|
|
|
2009/04/03 11:11:02
Subject: Re:The Praetors of Calth: Pre-Heresy Ultramarines
|
|

2nd Lieutenant
|
how do you use the plasticard for the belt and shoulders, i have experience in greenstuff, but sadly hardly none in plasticard 
your models look great btw, thanks for the tutorial
|
*Ex Username: Gutteridge*

|
|
|
|
|
2009/04/03 11:50:34
Subject: Re:The Praetors of Calth: Pre-Heresy Ultramarines
|
|
Enginseer with a Wrench
|
Gutteridge wrote:how do you use the plasticard for the belt and shoulders, i have experience in greenstuff, but sadly hardly none in plasticard
Very simply, it's a case of cutting a long strip of 0.5mm thick plasticard. I aim for strips that are about 1.5mm wide. These are then cut to length and glued in place. It take a little while to get used to it, but as long as you keep your fingers clean of poly cement, you should be alright. Any little gaps between strips should be filled with putty.
|
|
|
|
|
|
2009/04/03 13:04:21
Subject: The Praetors of Calth: Pre-Heresy Ultramarines
|
|
Rampaging Reaver Titan Princeps
|
I really like the traffic cone. Thanks a lot for this tutorial I'll have to add it to my list of someday maybe projects.
|
"But me no buts! Our comrades get hurt. Our friends die. Falkenburg is a knight who swore an oath to serve the church and to defend the weak. He'd be the first to tell you to stop puling and start planning. Because what we are doing-at risk to ourselves-is what we have sworn to do. The West relies on us. It is a risk we take with pride. It is an oath we honour. Even when some soft southern burgher mutters about us, we know the reason he sleeps soft and comfortable, why his wife is able to complain about the price of cabbages as her most serious problem and why his children dare to throw dung and yell "Knot" when we pass. It's because we are what we are. For all our faults we stand for law and light.
Von Gherens This Rough Magic Lackey, Flint & Freer
Mekagorkalicious -Monkeytroll
2017 Model Count-71
|
|
|
|
|
2009/04/03 14:11:00
Subject: The Praetors of Calth: Pre-Heresy Ultramarines
|
|
Did Fulgrim Just Behead Ferrus?
|
Thanks for the update on the tutorial dude! I was already pondering on how to do the torso!
|
|
|
|
|
|
2009/04/03 14:15:16
Subject: Re:The Praetors of Calth: Pre-Heresy Ultramarines
|
|
Enginseer with a Wrench
|
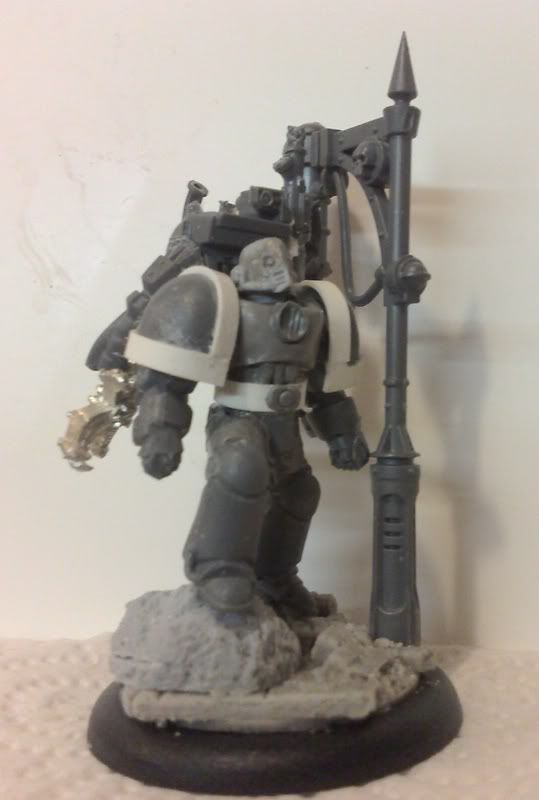
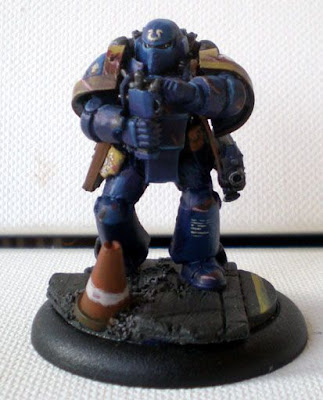
Brother Atlion
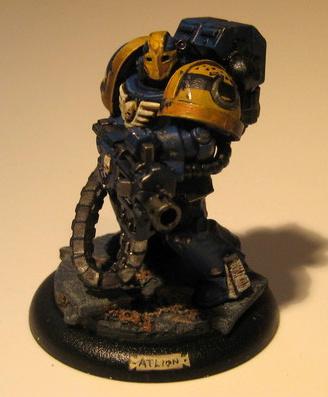 All Space Marines are trained in the use of specialist weaponry, but those who show particular aptitude tend to be assigned squad support weaponry, such as Brother Atlion, known as 'Straightback'. Unfortunately, the records of this particular marine are lost, and the origin of this appelation are unknown. Indeed, it is only through indirect records in the Apocrypha that we know his name and heraldry at all; the Hyponian Hololith having been damaged at some unknown date.
This is a particular shame, as the presence of the Imperialis (winged skull) on his chest was later to become the campaign badge for the Loyalist forces during the Horus Heresy – and this seems to be the earliest recorded instance of its use.

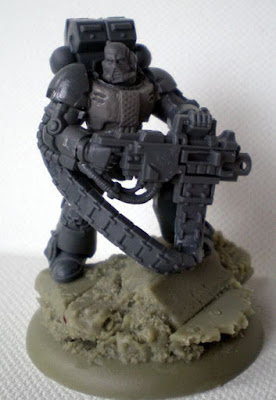
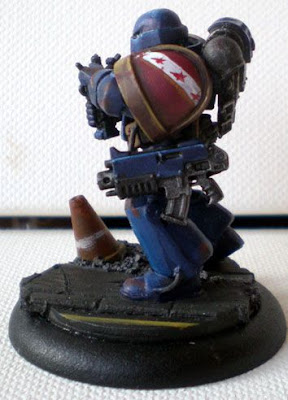
Note the reinforced cabling below the arms. Despite suspensors and power-augmented strength, this mark of Heavy Bolter (Braun VI Malfeasance ) was near-impossible to control under fire, and only the very strongest marines could hope to use it with any accuracy. Additional power cabling and improved couplings helped somewhat, but it was still far from ideal.
Note also the additional Truesight targeter integrated onto the helm. The versatility and adapatable nature of the Astartes Crusade armour was a great boon to the artificers and warriors who used it.
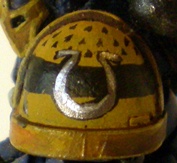
A tripartite design with a single bold horizontal stripe denotes a native of Iax. The silver inverted omega traditionally represents Indomitable Strength, and the yellow and black patterned upper part is a common Iaxian design after a fierce native predator.
|
|
|
|
|
|
|
|


 2000 Points
 1000 Points