| Author |
Message |
 |
|
|
|
|
Advert
|
Forum adverts like this one are shown to any user who is not logged in. Join us by filling out a tiny 3 field form and you will get your own, free, dakka user account which gives a good range of benefits to you:
- No adverts like this in the forums anymore.
- Times and dates in your local timezone.
- Full tracking of what you have read so you can skip to your first unread post, easily see what has changed since you last logged in, and easily see what is new at a glance.
- Email notifications for threads you want to watch closely.
- Being a part of the oldest wargaming community on the net.
If you are already a member then feel free to login now. |
|
 |
2009/04/14 11:59:11
Subject: "The Lines are drawn" The Battle of Kursk Summer 1943 - Soviet KV-1 WW2 Diorama
|
|

Regular Dakkanaut
|
Following on from my recent T34-76 Diorama, I decided to work on another Soviet Tank to keep for my own collection.
This time it will be a KV-1 Heavy Tank, set in a pre-battle scene before the Battle of Kursk. I decided to go with Kursk for a number of reasons. Firstly my last Diorama was great fun to make but only a generic scene, I wanted this one to have a solid historical setting to a specific engagement so I could really go into some depth and research the battle, terrain, and armour alot more.
Kursk also gives me a chance to try something different and model a summer setting, which brought a whole new load of options for terrain and environment.
The setting of Kursk was also the last time that massed numbers of KV-1's were used in the War, marking the swansong of the Tank. After this date KV-1's were used much less and in much smaller quantities as production by that time had already ended in favour of massed numbers of T34's, Kursk saw the destruction of a large number of the Red Armies KV-1 stock.
I also decided on a pre-battle scene on the front lines, as it gave some interesting modelling options, allowing me to show the Officers and troopers preparing and briefing for the battle ahead. A calm before the storm, and a chance to show a wide range of figures that you usually wouldn't get in a action battle scene (like my last diorama).
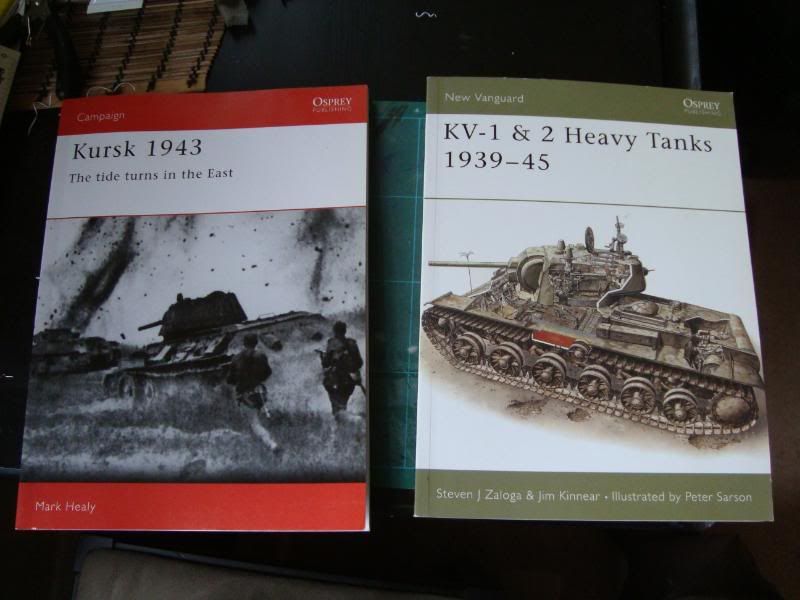
Here are the two main books that I'm using for my research and reference material:
I'm also using a large number of modeling magazines and internet material.
I spent alot of time thinking about how to paint and model the KV-1. I really wanted to model a specific tank this time based on reference material from Kursk, so that it would be historically acurate. I found a great example of a tank called the I.D Papanin, that fought in Kursk as well as numerous other engagements all throughout the War. Sadly it was a different model KV-1 to the example I had with the Tamiya kit. The Tamiya kit being a KV-1 1941 model and the I.D Papanin was a KV-1 S model that had a much different turret and chasis design, in the end I decided that the conversion work required to turn my KV-1 in a KV-1 S would have been to vast. I had already bought alot of photo-etch components that were KV-1 specific and those would have been lost if I had scratch built the turrent and remodelled the upper hull.
Perhaps I'll do this for my next project though as its a really interesting tank with some great history.
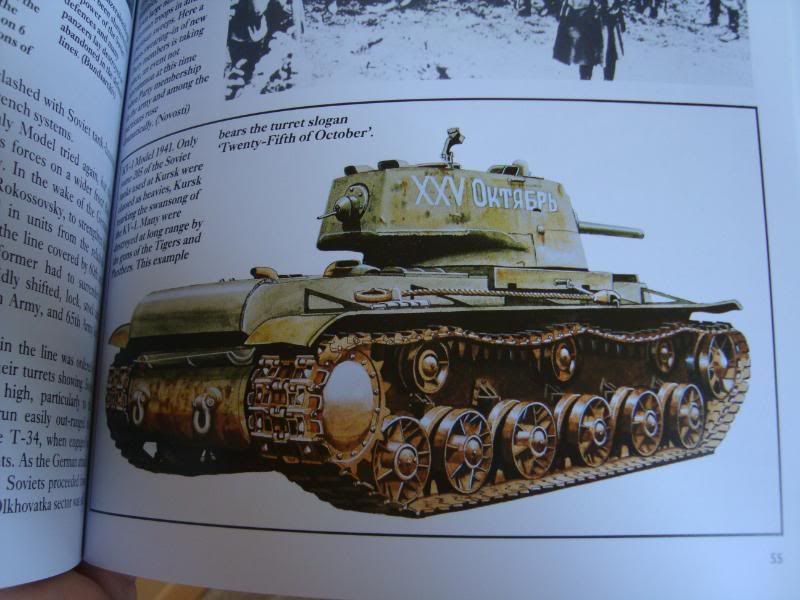
After a lot of research I decided on this example from Osprey's Kursk - The tide turns in the East. It's KV-1 1941 model with the Turret slogan "25th October" a reference to the revolution.
Here are the kits that I'll be using for this project:
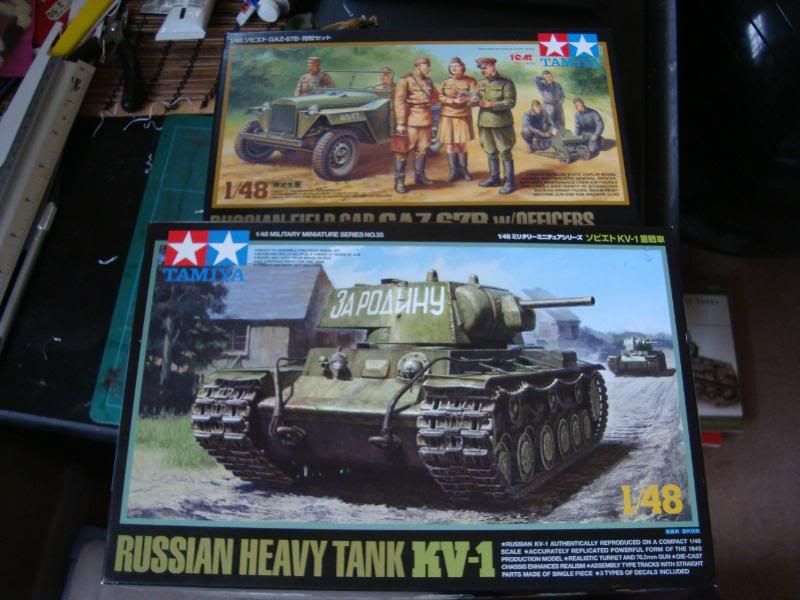
The Tamiya 1:48 KV-1 and the Tamiya GAZ67-B Jeep with the fantastic figures from ICM models Ukraine.
I'll also be using alot of Photo etch, much more than my last project. Since there is no complete internal detail set for the KV-1 in 1:48 scale I decided to seal the tank and super detail the exterior.
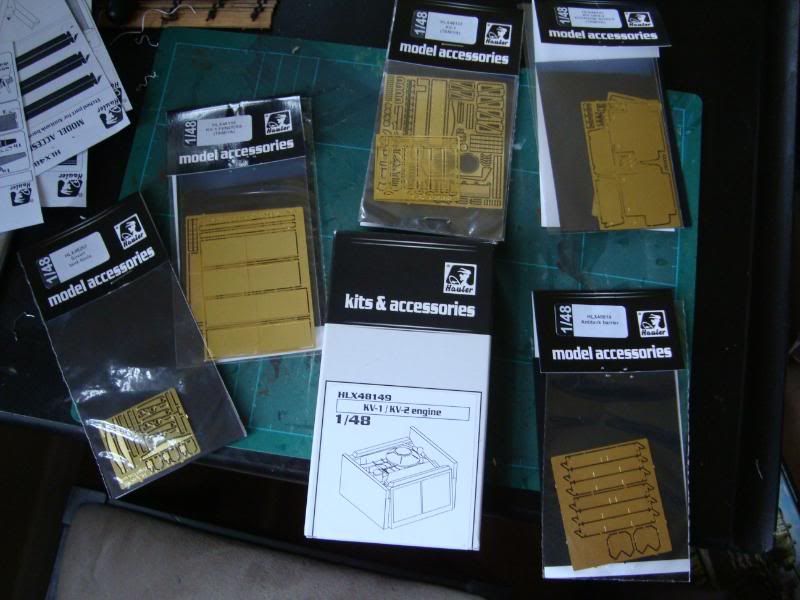
All these Photo etch parts are from Czech manufacturer Hauler, and include a Resin Engine, as well as new fenders, storage cases, grilles, and various other turret and hull details.
|
|
|
|
 |
|
2009/04/14 12:38:43
Subject: Re:"The Lines are drawn" The Battle of Kursk Summer 1943 - Soviet KV-1 WW2 Diorama
|
|
Regular Dakkanaut
|
Time for some WIP shots:
This kit much like the T34 also has a cast metal hull that adds considerable weight to the model and makes it feel really nice in the palm of the hand. Much more impressive than a all plastic or resin kit.
Detail on this is also quite good better than the detail in the Verlinden resin replacement hull I used for the T34/76, although it is less detailed than some other plastic lower hulls such as those produced by Hobby Boss.
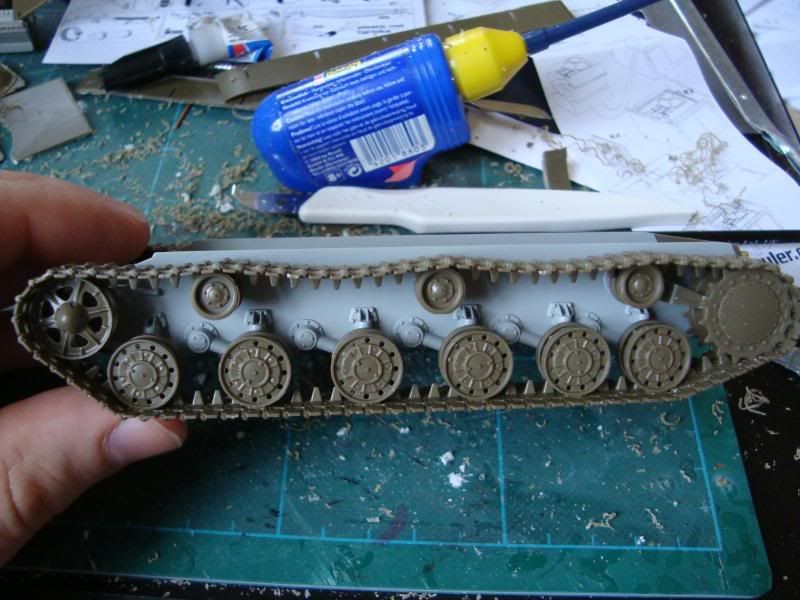
The most time consuming part is often making up the road wheels and adding the tracks. The tracks on this kit though were much better than the tracks on the T34. They were modelled very well with a lot of detail and had a nice sag to them where they hung between the return rollers on the top of the wheels. I did consider getting a metal track set for this tank, but when I saw how nice the plastic treads were I decided against it.
Even at this stage though preparing the wheels and lower hull I had to start straight away with the photo etch.
The photo etch parts in the Hauler set are a lot more intricate than those in the Lion Roar set that I used for the T34. This one required all the little struts to be glued into place before attaching to the lower hull. I also had to fill a large area that accomodates plastic detail part for this component with greenstuff and remove another part and replace with a photo etch alternative. Photos of this area and work to follow.
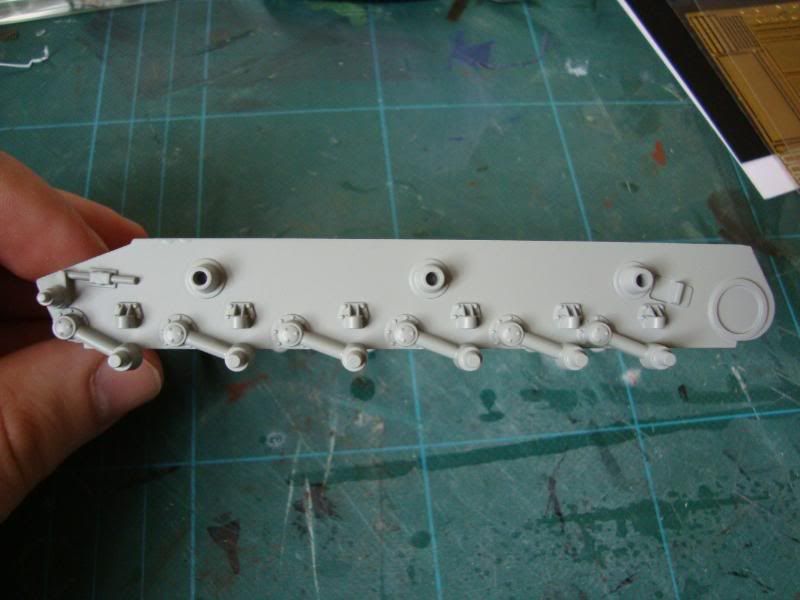
The Upper Hull would also need a great deal of work, both plastic fenders needed to be removed and weld seams need to be added as the Tamiya kit lacks weld seams and surface detail and looks a bit dull when compared to other kits.
The upper hull before:
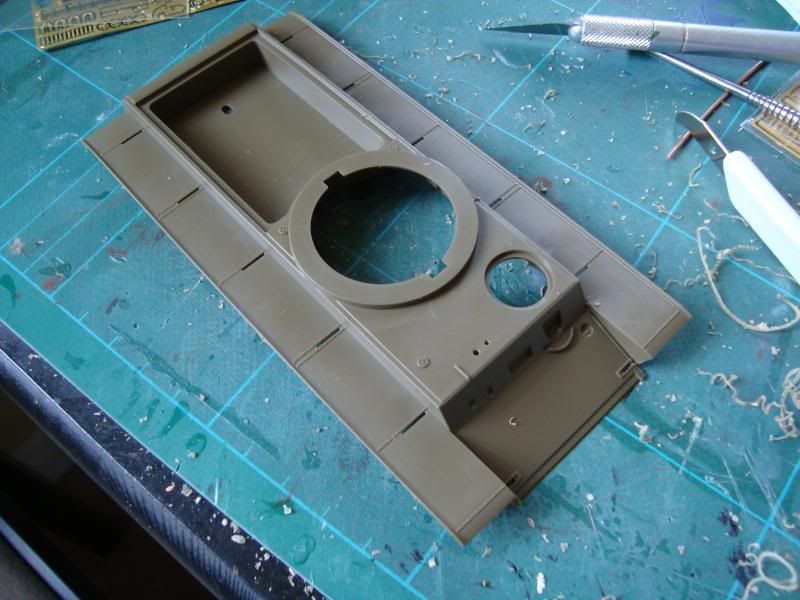
Removing the Fenders:
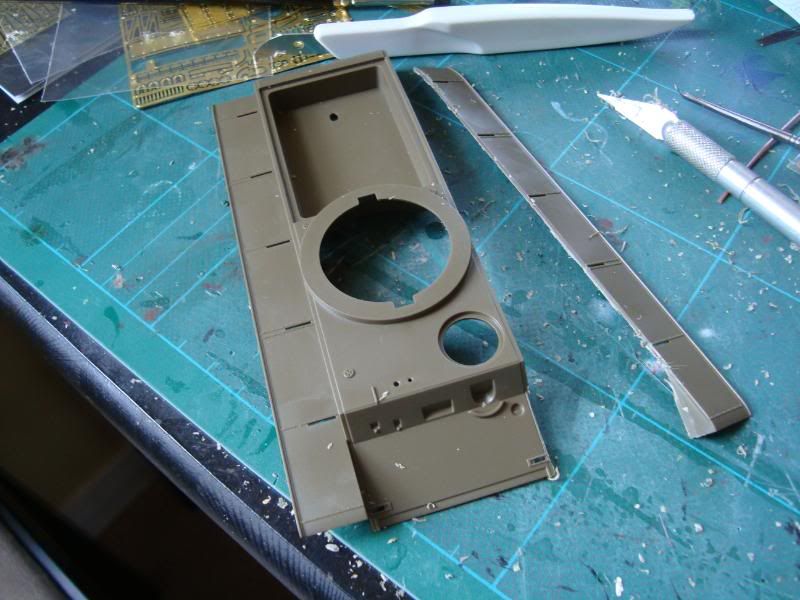
The Upper Hull after:
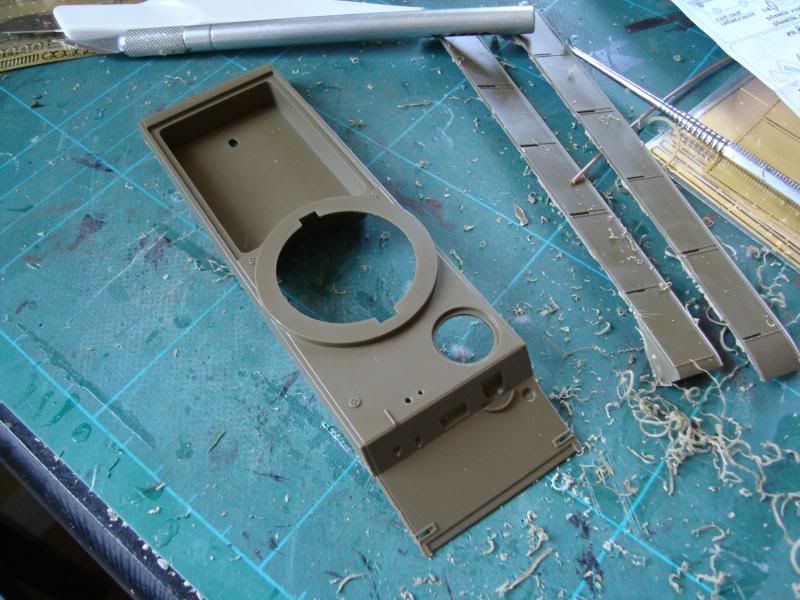
A large section of the hull was also cut away and removed to accomodate the Resin Engine deck:

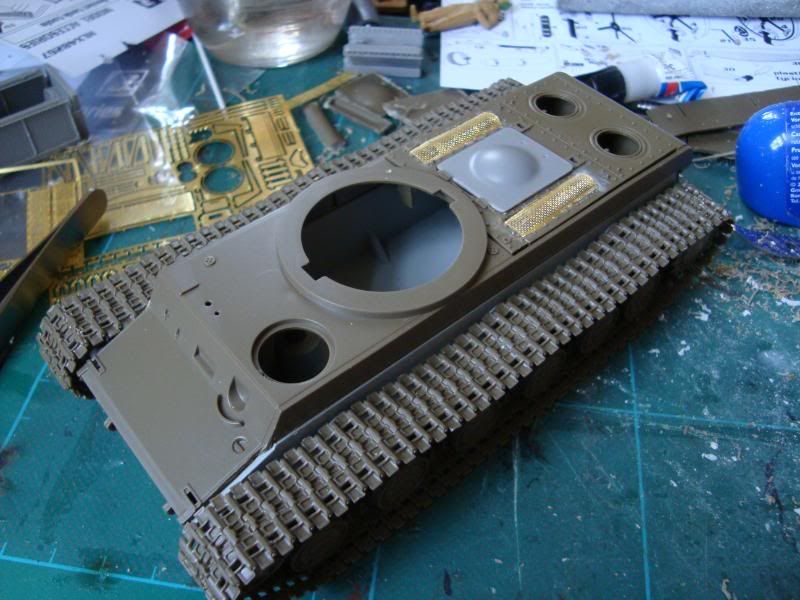
Work then started on the engine hatch, this area needed extensive work to remove the moulded plastic grilles and hatch much like my T34.
Removing the plastic engine hatch, and the new resin upgrade hatch:
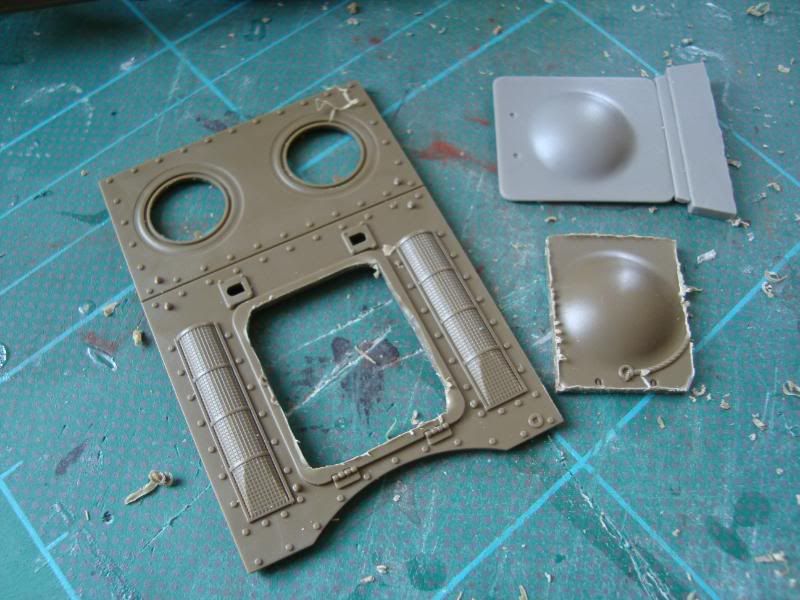
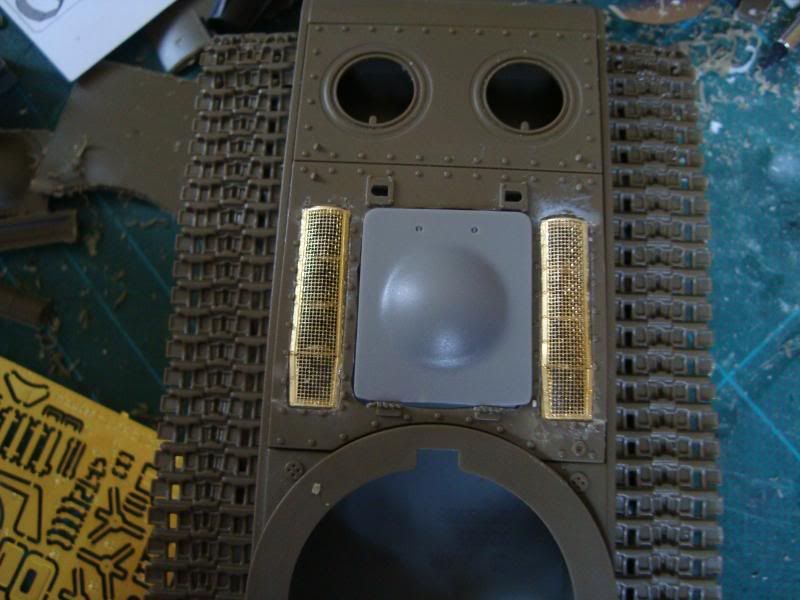
Adding the new raised photo etch grilles, comparison with the plastic moulded grilles:
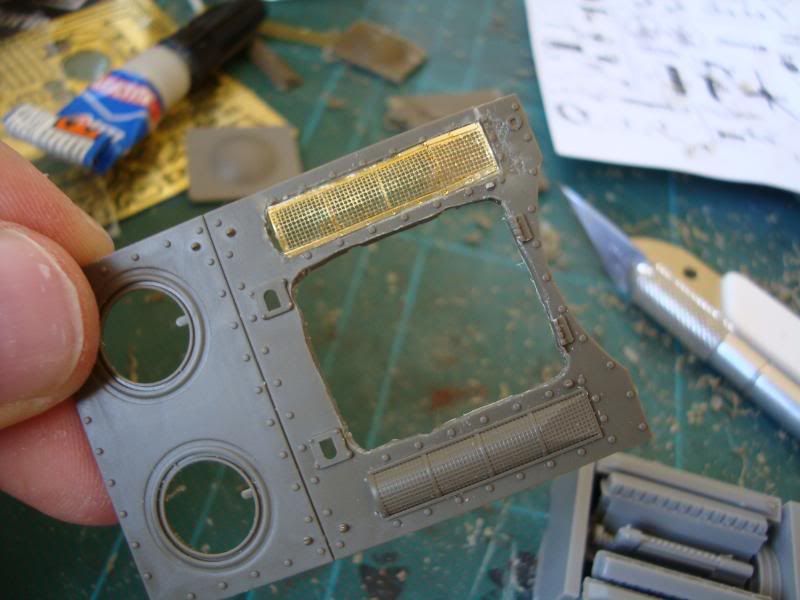
As you can see in this photo, unlike the flat grilles of the T34 the KV-1 Grilles give a nice raised detail. This was very tricky to model and required a flat grille mesh to be bent to shape and attached to a photo etch frame made up of 5 seperate tiny parts:
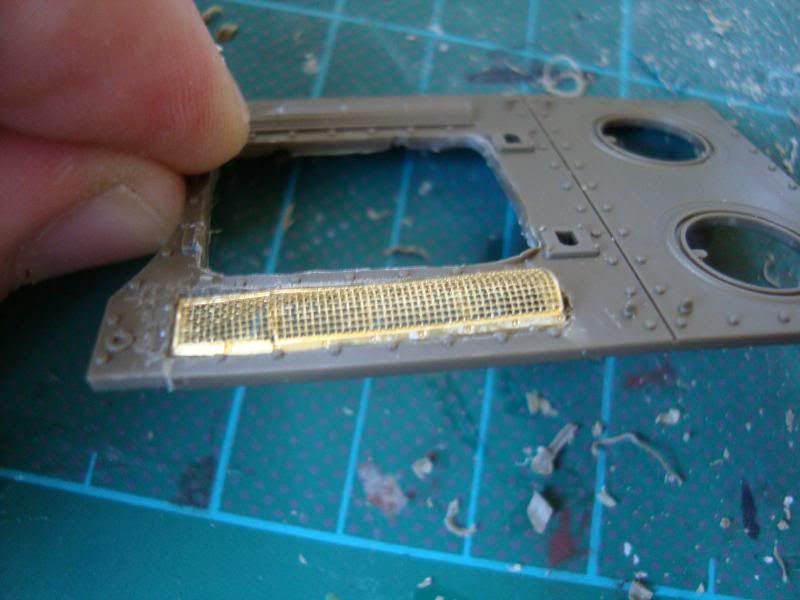
Both Grilles finally inplace:
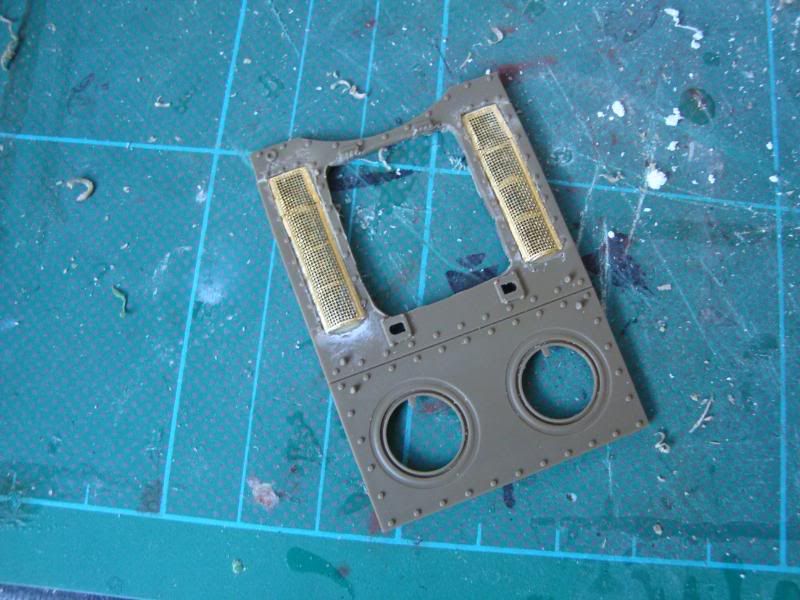
As with the T34 this was very tricky and time consuming, the hardest part being remvoing the original plactic areas without damaging the rest of the parts on the hatch area. However once cut out and the new Grilles placed in the effect is really worth it. Not only is it alot more detailed it is also transparent and allows you to see through the grilles into the engine area. Any messy areas or uneven cuts can then be filled and tidied up after the photo etch glue has dried.
|
|
This message was edited 3 times. Last update was at 2009/04/14 12:53:36
|
|
|
|
|
0114/12/26 19:08:28
Subject: "The Lines are drawn" The Battle of Kursk Summer 1943 - Soviet KV-1 WW2 Diorama
|
|
Wing Commander
|
Looking beautiful already! Can't wait to see the end result, maybe better than the T-34!
|
"In the Grim Darkness of the far future; there is only countless Requisition Forms, filled in Triplicate."
|
|
|
|
|
1809/01/14 18:55:05
Subject: Re:"The Lines are drawn" The Battle of Kursk Summer 1943 - Soviet KV-1 WW2 Diorama
|
|
Regular Dakkanaut
|
Thanks disjointed, hopefully it will be a better end result. I actually prefer this tank kit to the T34 kit, theres a lot more to it. Especially with all this extra photo-etch.
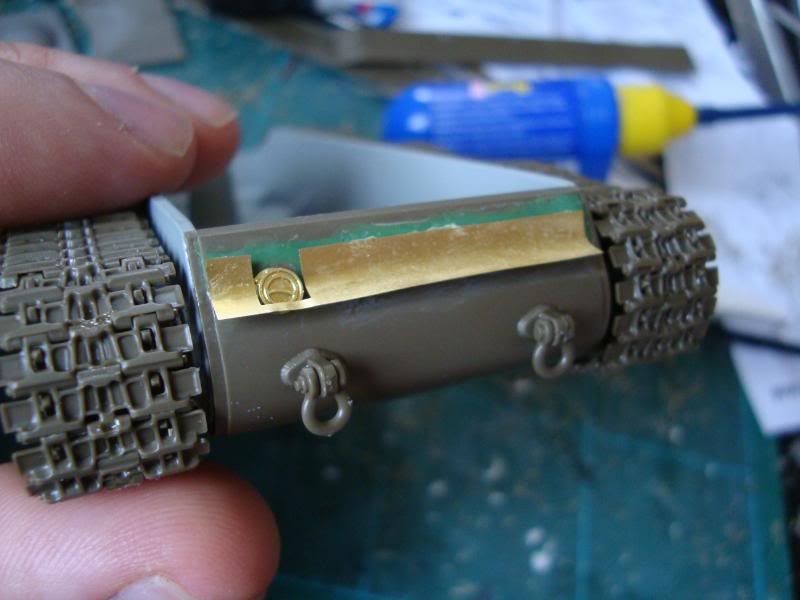
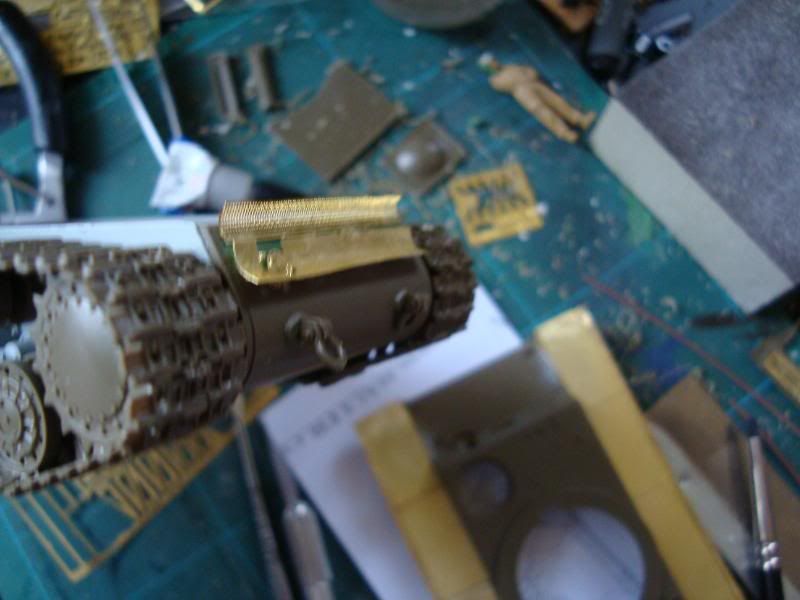
Heres some more developments, the photo etch added to the rear lower hull:
Tracks:
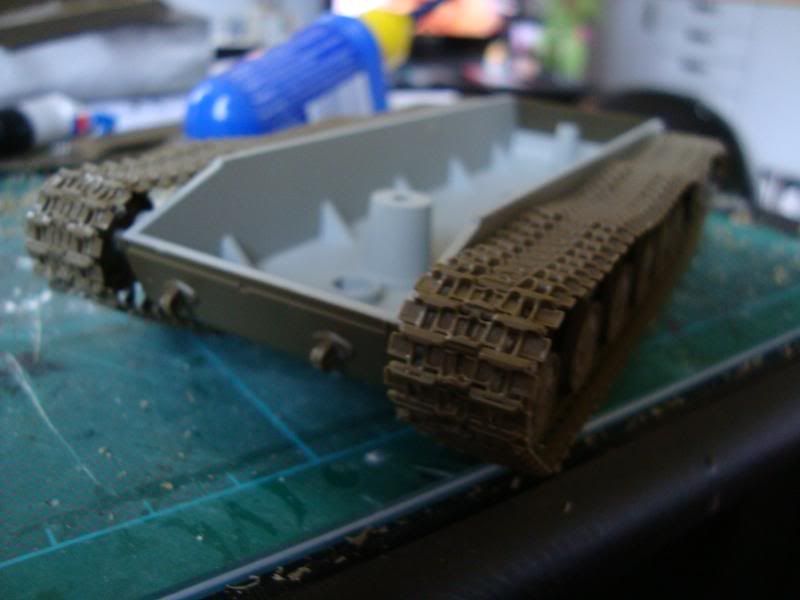
Dry run with the upper hull:
Grilles and Resin engine hatch:
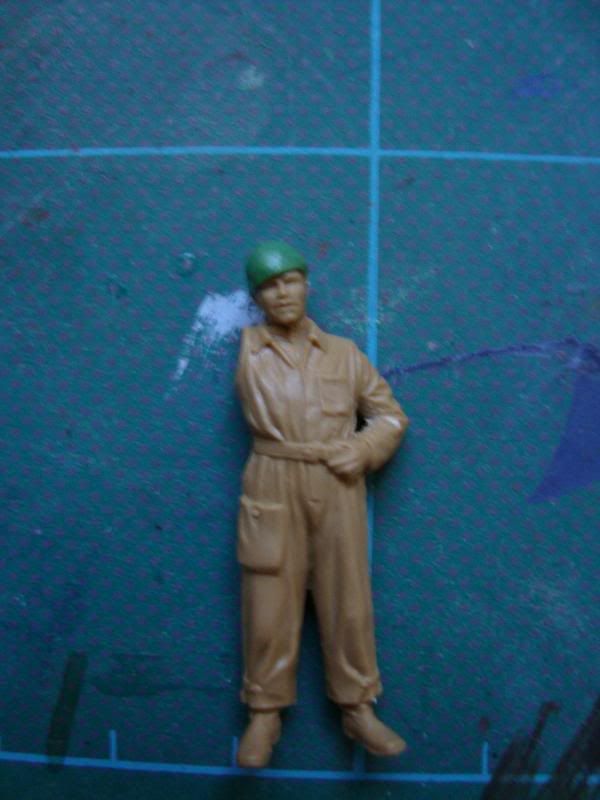
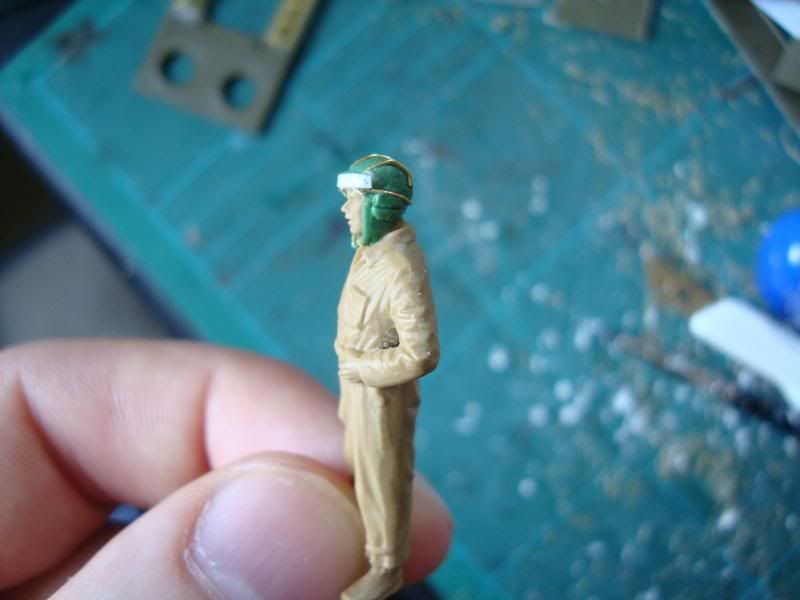
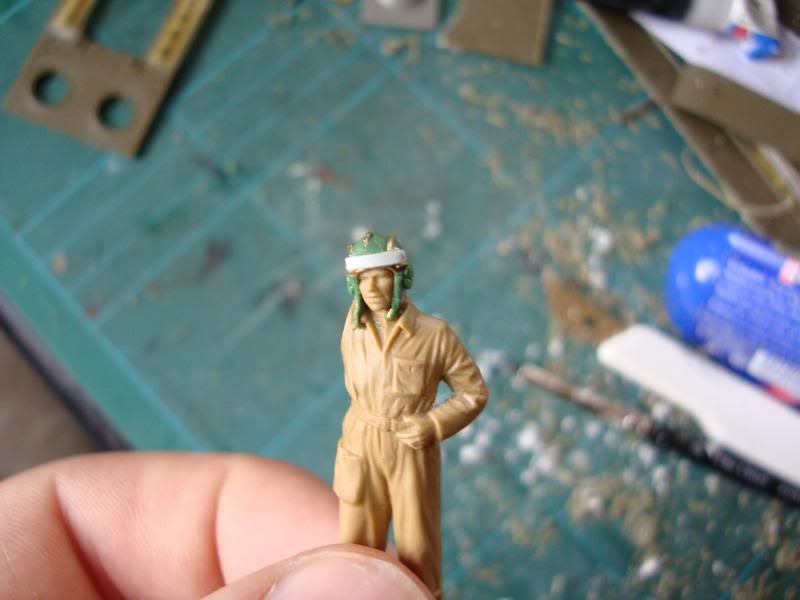
I also did some work on the figures. The ICM minis are based on generic Soviet airforce ground crew. For the officers this is no problem as Soviet army and airforce uniforms were identical. The engineers however need a little converting to make them into tankers, the overalls are spot on but they lack the tankers helmets, coming only with peaked caps.
Heads as in the kit:
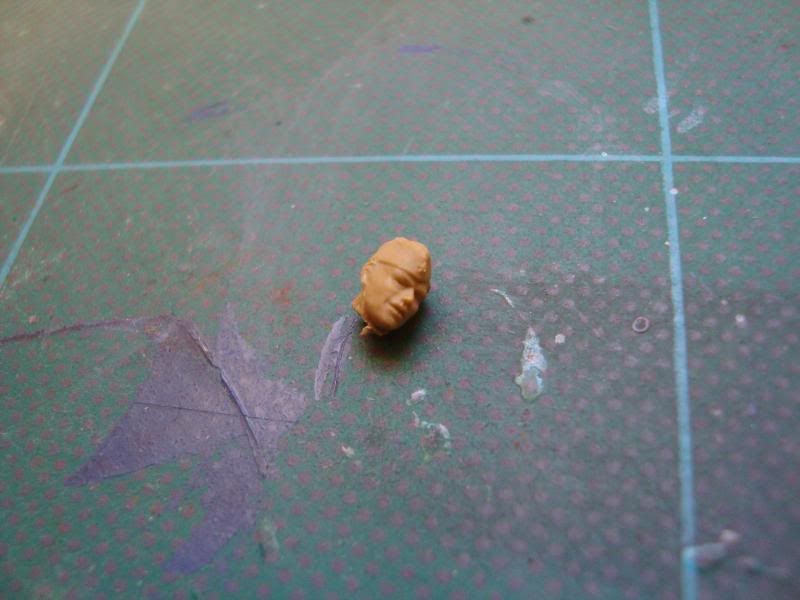
Bodies in overalls

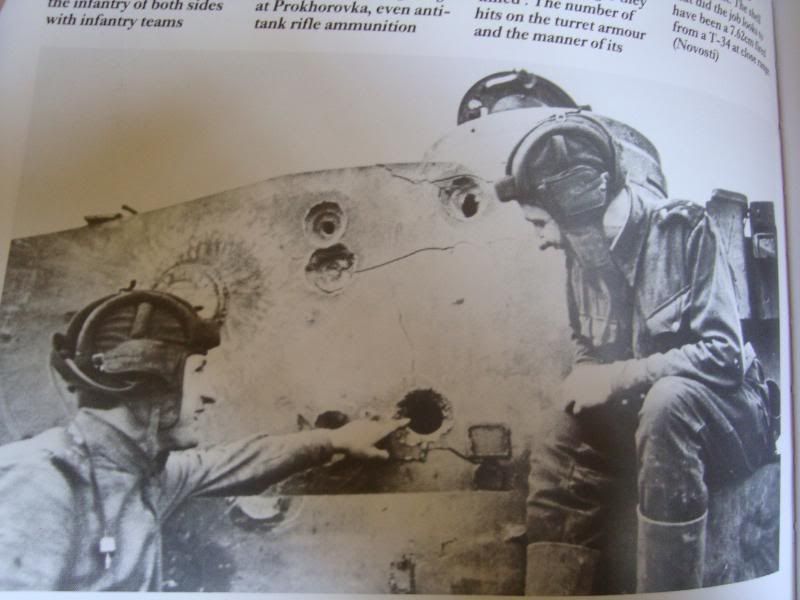
My reference photos of Russian Tankers helmets:
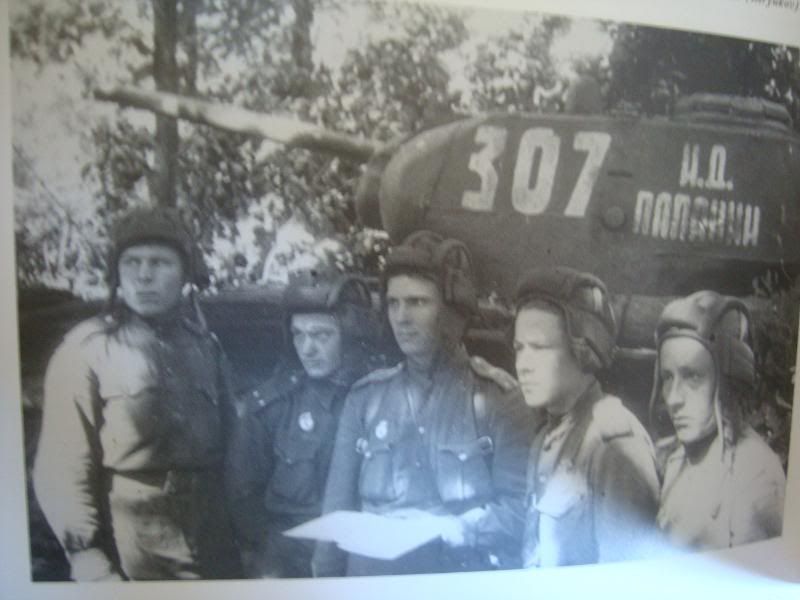
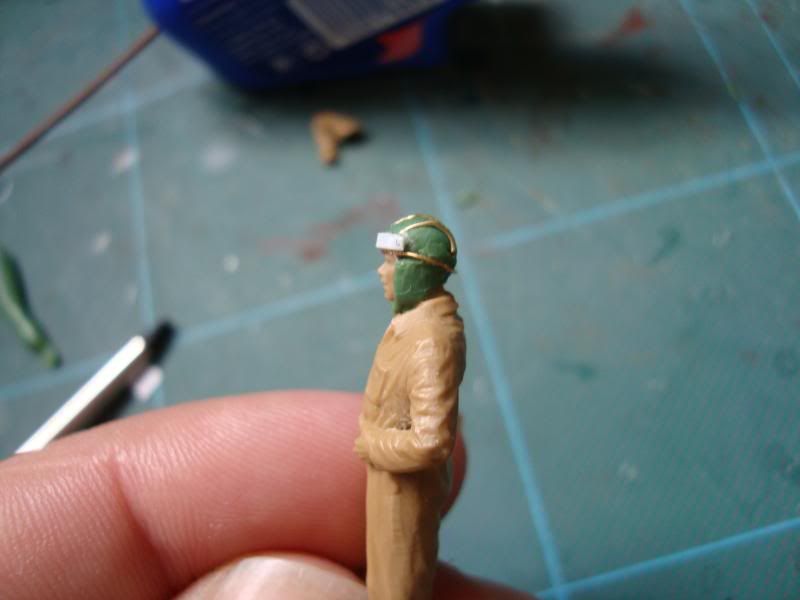
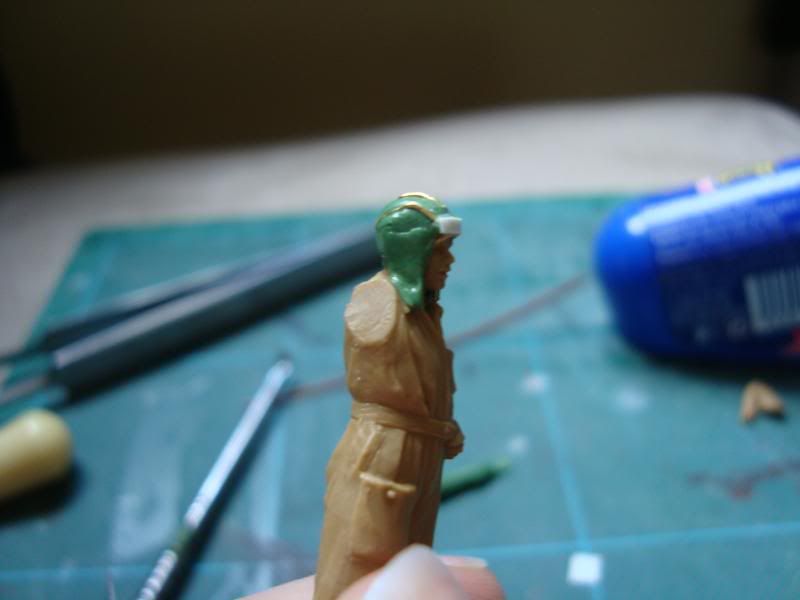
Building the tank helmets from scratch WIP:

|
|
|
|
|
|
2009/04/14 19:00:02
Subject: "The Lines are drawn" The Battle of Kursk Summer 1943 - Soviet KV-1 WW2 Diorama
|
|
Wing Commander
|
Looking good! From what I've seen of actually tanker's helmets, thats a damn good representation!
|
"In the Grim Darkness of the far future; there is only countless Requisition Forms, filled in Triplicate."
|
|
|
|
|
2009/04/14 19:15:15
Subject: Re:"The Lines are drawn" The Battle of Kursk Summer 1943 - Soviet KV-1 WW2 Diorama
|
|
Regular Dakkanaut
|
Thanks for the feedback! The trouble is you actually have to make the helmets look quite crude because the tech level during WW2 was quite basic. I was worried that the sculpting would suffer as a result and not look too good.
Sculpting figures isn't my strong point and I'm by no means an expert at all. I'm still quite pleased with how the helmets are going so far though. I found the wire frame really helped the shape, and the extra wire parts help the detail alot.
|
|
|
|
|
|
2009/04/14 19:22:04
Subject: "The Lines are drawn" The Battle of Kursk Summer 1943 - Soviet KV-1 WW2 Diorama
|
|
Wing Commander
|
Yeah, they look really good! Are you going to cover them with thin cloth to give the entire "Slightly Padded" look or just go for the straight up leather cap?
|
"In the Grim Darkness of the far future; there is only countless Requisition Forms, filled in Triplicate."
|
|
|
|
|
2009/04/14 19:35:27
Subject: Re:"The Lines are drawn" The Battle of Kursk Summer 1943 - Soviet KV-1 WW2 Diorama
|
|
Regular Dakkanaut
|
These ones will be leather caps, since the Soviet Tankers didn't use fabric padded caps often. The vast majority were padded leather.
|
|
|
|
|
|
2009/04/14 19:37:03
Subject: "The Lines are drawn" The Battle of Kursk Summer 1943 - Soviet KV-1 WW2 Diorama
|
|
Wing Commander
|
True, true.
I just wondered if the tankers who crewed the tank you're basing this on wore padded or not.
|
"In the Grim Darkness of the far future; there is only countless Requisition Forms, filled in Triplicate."
|
|
|
|
|
2009/04/14 19:42:23
Subject: Re:"The Lines are drawn" The Battle of Kursk Summer 1943 - Soviet KV-1 WW2 Diorama
|
|
Regular Dakkanaut
|
From what I can make out from the reference details and my research they wore brown padded leather helmets, although near the end of the war this changed to black canvas helmets.
So I have a bit of leeway on this.
With my T34 diorama I went with black helmets but these weren't sculpted by me they were on the kit as was and had no surface detail.
|
|
This message was edited 1 time. Last update was at 2009/04/14 19:42:38
|
|
|
|
|
2009/04/14 19:43:46
Subject: "The Lines are drawn" The Battle of Kursk Summer 1943 - Soviet KV-1 WW2 Diorama
|
|
Wing Commander
|
Fair doos,
best of luck with the diorama!
|
"In the Grim Darkness of the far future; there is only countless Requisition Forms, filled in Triplicate."
|
|
|
|
|
2009/04/14 21:19:16
Subject: "The Lines are drawn" The Battle of Kursk Summer 1943 - Soviet KV-1 WW2 Diorama
|
|
Rampaging Reaver Titan Princeps
|
Really nice stuff intrigued by the sculpting are those wires a former for the hat or will they show through on the finished model.
|
"But me no buts! Our comrades get hurt. Our friends die. Falkenburg is a knight who swore an oath to serve the church and to defend the weak. He'd be the first to tell you to stop puling and start planning. Because what we are doing-at risk to ourselves-is what we have sworn to do. The West relies on us. It is a risk we take with pride. It is an oath we honour. Even when some soft southern burgher mutters about us, we know the reason he sleeps soft and comfortable, why his wife is able to complain about the price of cabbages as her most serious problem and why his children dare to throw dung and yell "Knot" when we pass. It's because we are what we are. For all our faults we stand for law and light.
Von Gherens This Rough Magic Lackey, Flint & Freer
Mekagorkalicious -Monkeytroll
2017 Model Count-71
|
|
|
|
|
2009/04/14 21:23:07
Subject: "The Lines are drawn" The Battle of Kursk Summer 1943 - Soviet KV-1 WW2 Diorama
|
|
Bonkers Buggy Driver with Rockets
|
Superb the last WW2 themed Diorama you did was fantastic! I expect great things of this one!
|
They dont call me Garybrandy for nothing!
how is it off topic? we hardly know what the topic even is!
|
|
|
|
|
2009/04/15 07:59:32
Subject: Re:"The Lines are drawn" The Battle of Kursk Summer 1943 - Soviet KV-1 WW2 Diorama
|
|
Regular Dakkanaut
|
Thanks guys, Llama the wire parts of the helmet are going to be left visible as they will help make up the surface detail. I used a wire frame for the front of the helmet to aid sculpting the hanging chin straps, but the wire on the top of the helmet is going to be incorporated into the design.
BOSS - I'll try not to disappoint! 
|
|
|
|
|
|
2009/04/15 10:43:55
Subject: Re:"The Lines are drawn" The Battle of Kursk Summer 1943 - Soviet KV-1 WW2 Diorama
|
|
Regular Dakkanaut
|
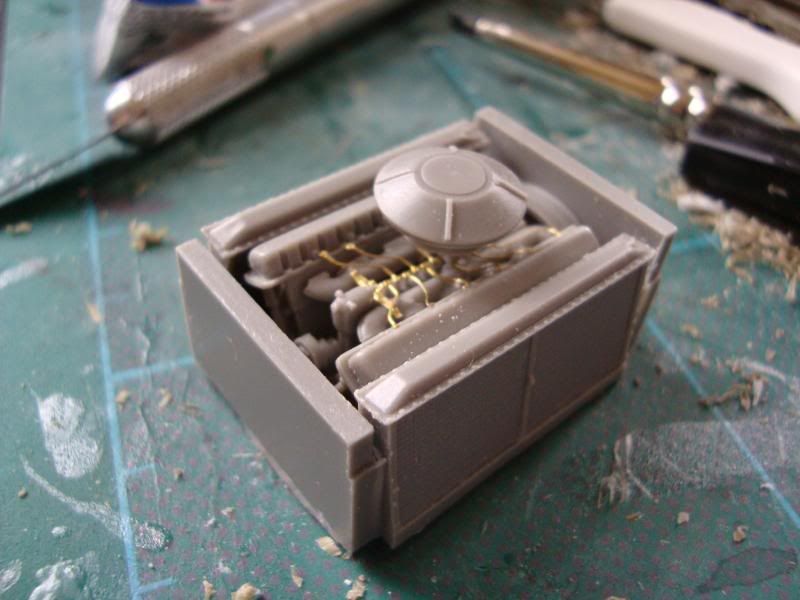
How do you add detail to resin one of the most detailed modelling mediums? Add photo etch, for super detail madness!
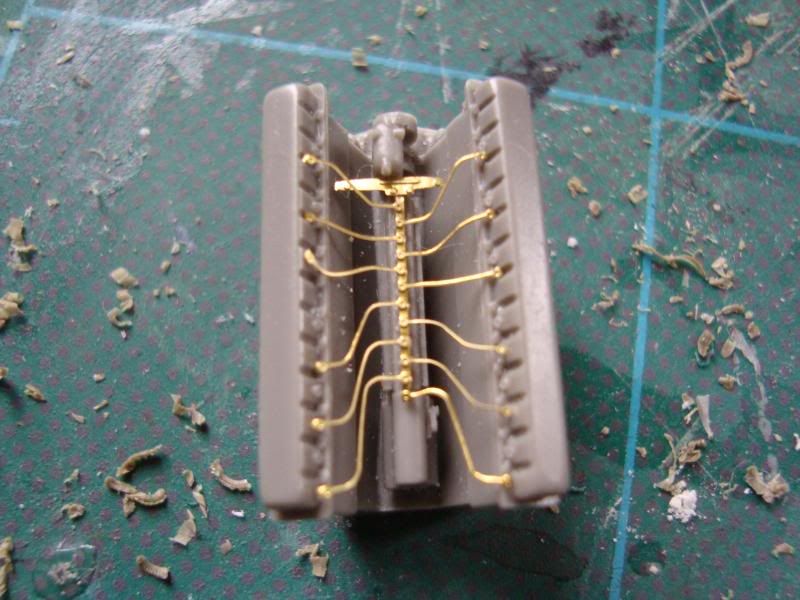
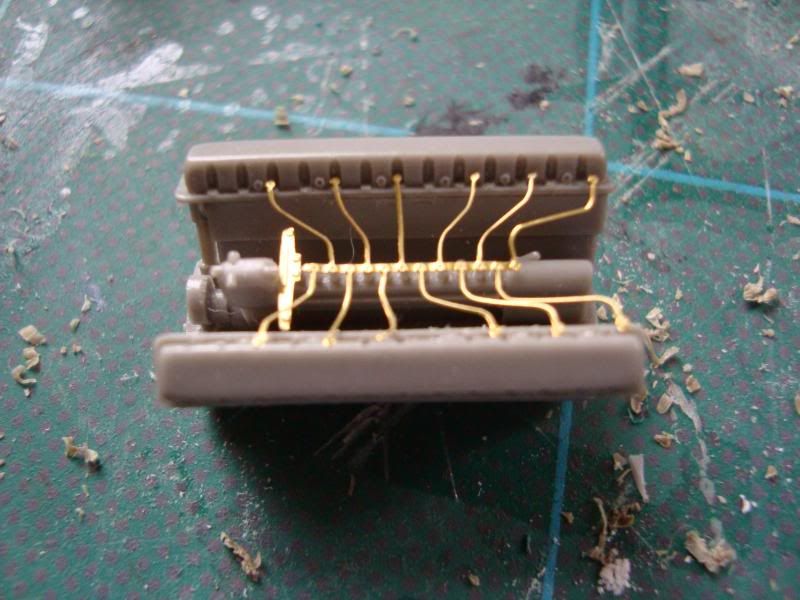
These photo etch wires are absolutely tiny! Getting them in place and lined up was a bit tricky! The ends will be super glued to the tiny little holes on the resin when finished to make them perfect.
Adding the other resin components to the Engine

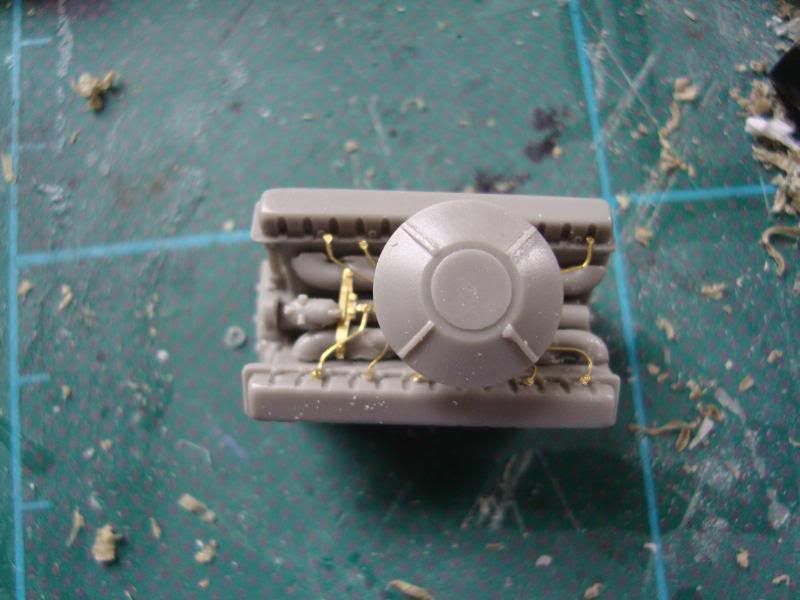
The Engine inside the Engine deck
My next stage this evening is working on the Photo etch fenders that will replace the plastic ones that I removed already.
|
|
|
|
|
|
2009/04/15 11:04:19
Subject: "The Lines are drawn" The Battle of Kursk Summer 1943 - Soviet KV-1 WW2 Diorama
|
|
Regular Dakkanaut
|
This looks great. The new grilles and hatch really improve the model. I'm looking forward to seeing how it progresses.
|
My blog:
http://miniaturemiscellany.wordpress.com/ |
|
|
|
|
2009/04/15 11:09:24
Subject: Re:"The Lines are drawn" The Battle of Kursk Summer 1943 - Soviet KV-1 WW2 Diorama
|
|
Regular Dakkanaut
|
Thanks Hobbit. Actually theres still a lot more to do with the grilles, I have to use some filler to tidy up the little gaps and clean up the messy areas around the outside of the photo etch.
Same goes for the area around the main hatch, I need to straighten up the edges with some filler and sand/file it down. The resin hatch will actually be modelled to be up and open so you can see the engine detail. I'm planning to have a tanker sitting on the top on the engine area conducting repairs whilst the Tank Commander is briefed by the officers on the ground.
|
|
|
|
|
|
2009/04/15 20:42:31
Subject: "The Lines are drawn" The Battle of Kursk Summer 1943 - Soviet KV-1 WW2 Diorama
|
|
Member of the Malleus
|
Read through this log last night before bed and have to say, wonderful and very interesting stuff.
Always loved the level of detail miliatry model makers put into kits so will be watching this develop.
Cheers,
Dante
|
|
|
|
|
|
2009/04/16 11:43:09
Subject: Re:"The Lines are drawn" The Battle of Kursk Summer 1943 - Soviet KV-1 WW2 Diorama
|
|
Regular Dakkanaut
|
Thanks Dante, I'm glad you've enjoyed the blog so far. I've certainly enjoyed researching and preparing it myself. Some of the stories of heroism that come out while you research these things are quite extra-ordinary and it really makes you stop and think what it must have been like to have lived during such a dramatic and harrowing period of history.
As I've said in my other blog these are my first steps into serious scale modelling and I'm far from an expert, but I've found it very interesting and I've enjoyed the challenge and the opportunity to test myself and build on my skills. Unfrotunately I'm lacking some of the specialist tools needed, for example I don't have a photo etch mate (this is like a kind of small vice that lets you shape photo etch sheets very easily) so I have to rely on cruder methods, which actually has been rather tough with some of these parts. Especially the photo etch fenders... my god those were a nightmare to shape!
I'm hoping though as my collection of tools builds up and as I develop my skills more I'll be able to get much better results. Perhaps after a few 1:48 kits I can also move up to some more ambitious 1:35 stuff.
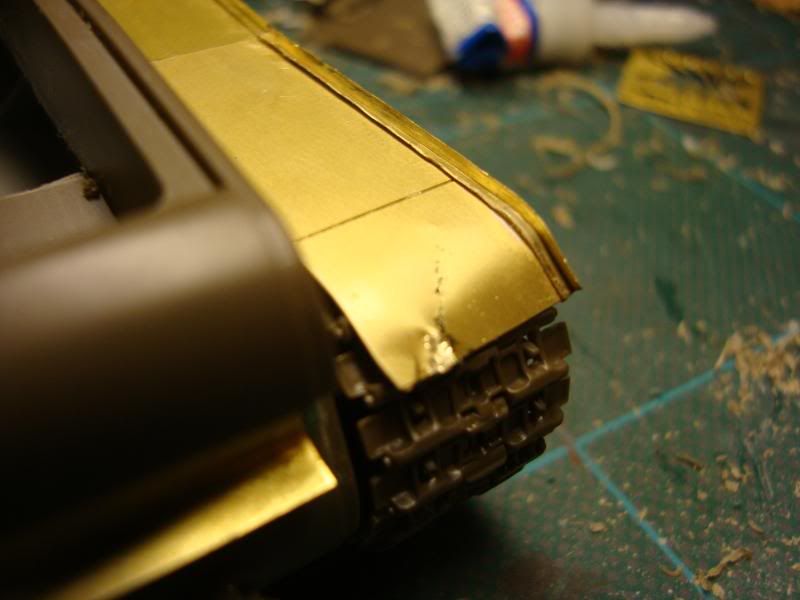
After many hours of laborious work I finally managed to make some progess with the fenders... It was seriously tough and bending and shaping such tiny components was a real challenge without the proper tools. Still I managed it in the end. The great thing about Photo etch is that the metal sheets are very easy to shape and bend, so you can recreate damage and wear very easily. Personally I think having such wear and tear on the parts really helps bring life to a model, and shows it in a much more realistic battlefield way.
It's important though not to go too over the top with this wear and damage. Subtle bending warping and tears/dents will look much more realisitic than a fender covered with huge blast holes and shreds (unless the tank is a burnt out wreck of course!).
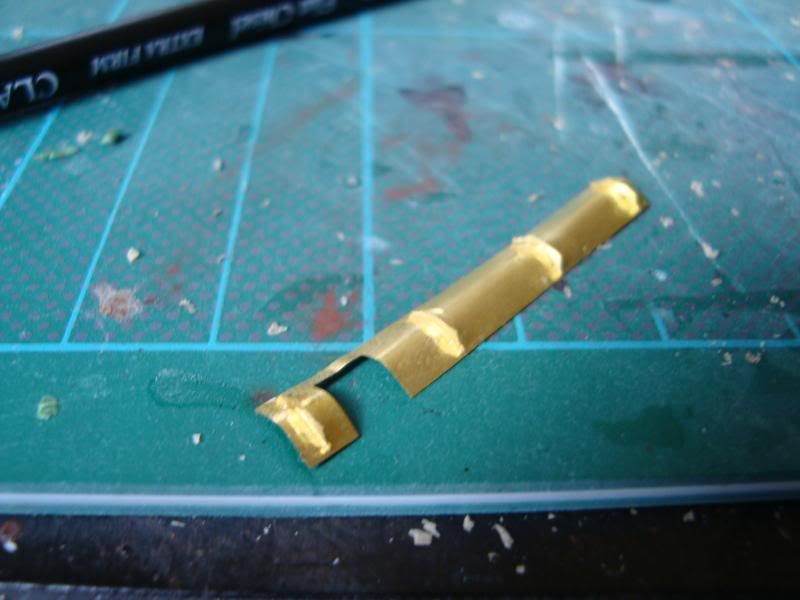
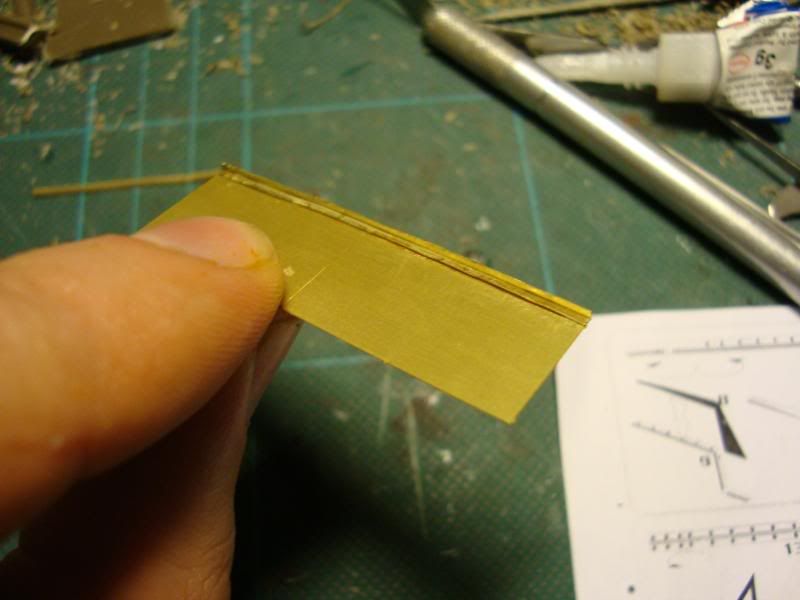
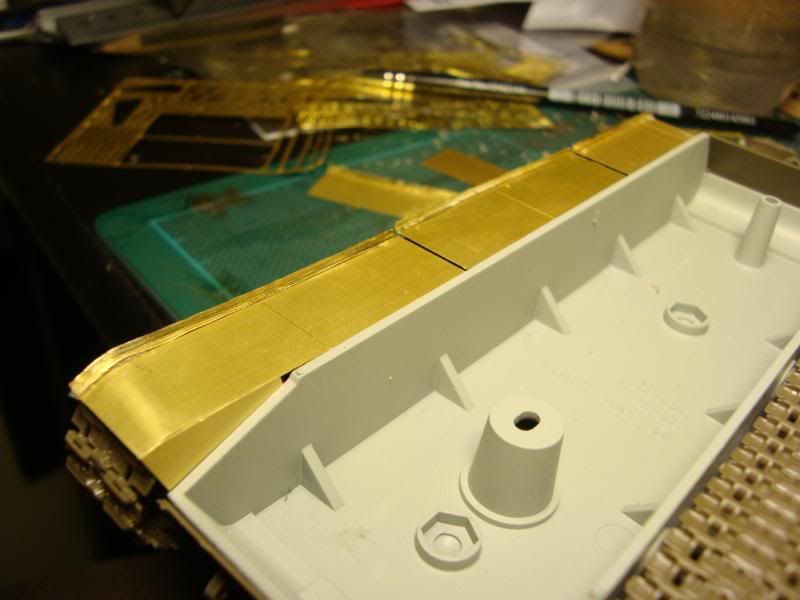
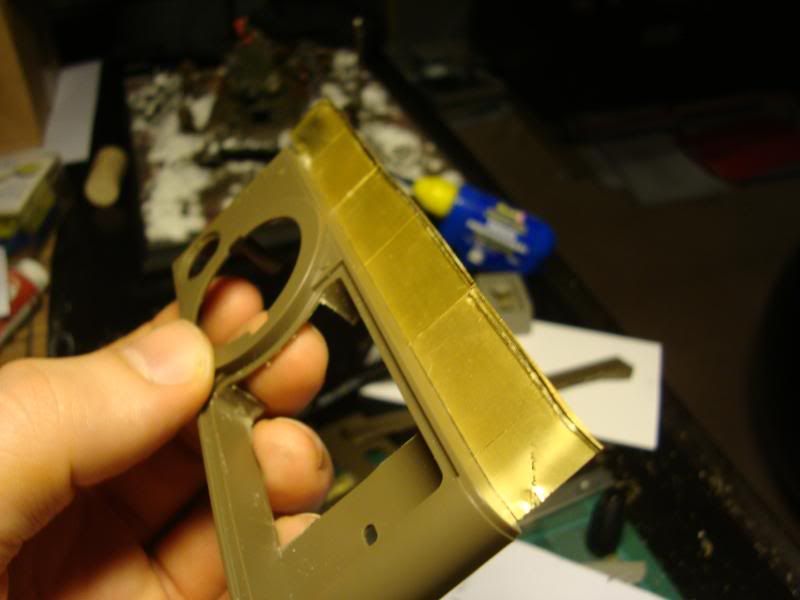
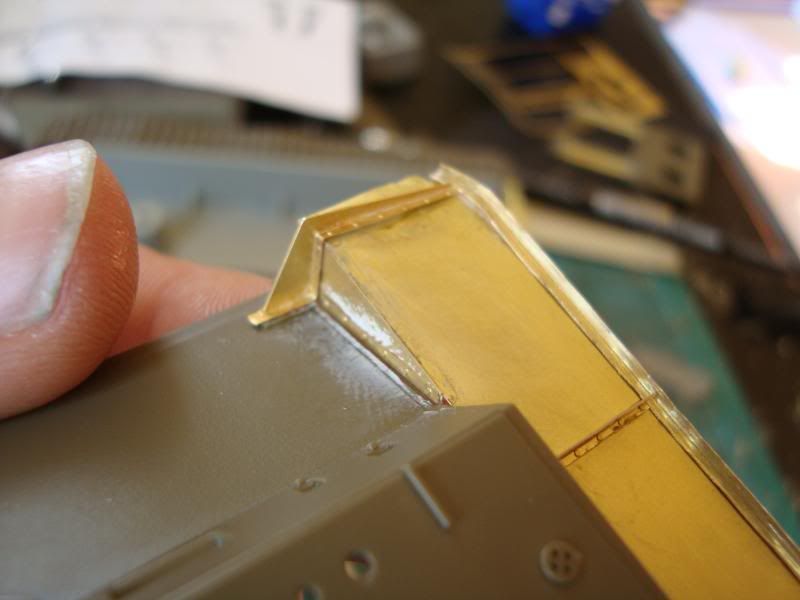
The Fenders are made up of three flat lengths of etch that need to be shaped at each end, as well as having rims added to the outside edge and struts and supports on top.
The first stage is bending the tiny rims and then attaching them to the main fender. Once they are attached (or before if you prefer) you can shape them into rough shapes to show wear and damage. On the central flat areas its best to show wear in this way by distressing the rims.
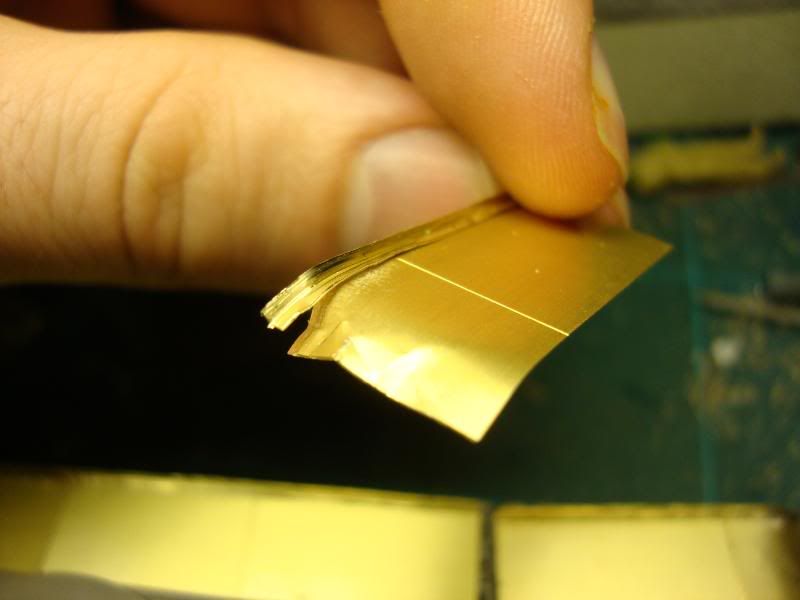
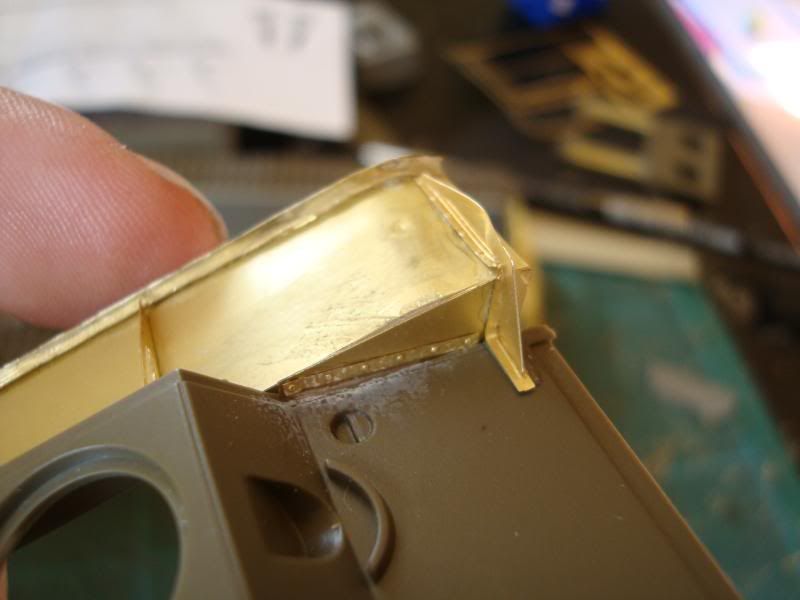
The front ends of the fenders as well as being shaped to a gradula curve also need to have extra panels added to the side.

When you get to the ends of the fenders that overlap the treads you have much more opportunity for damage on the fenders than on the flat parts. Dents, tears, and buckled components can all be recreated very easily with a small pair of pliers:
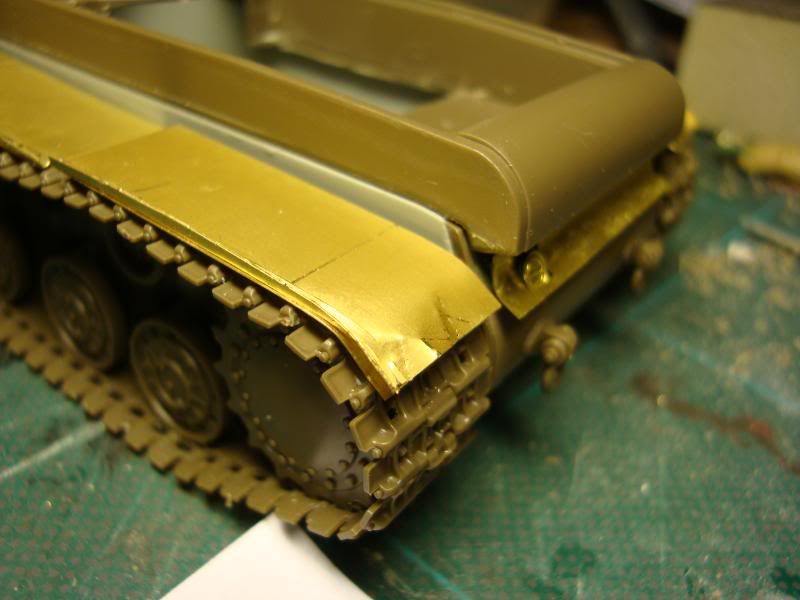

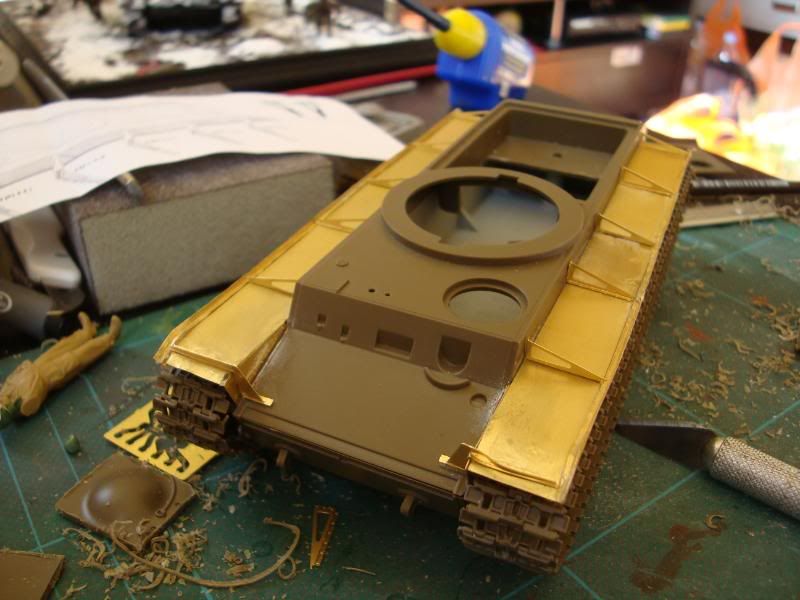
Whole fender dry run:
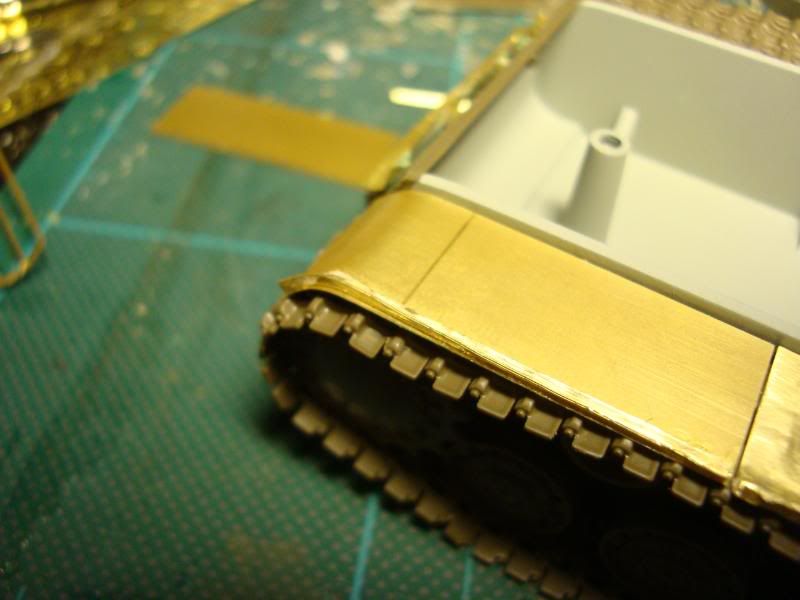
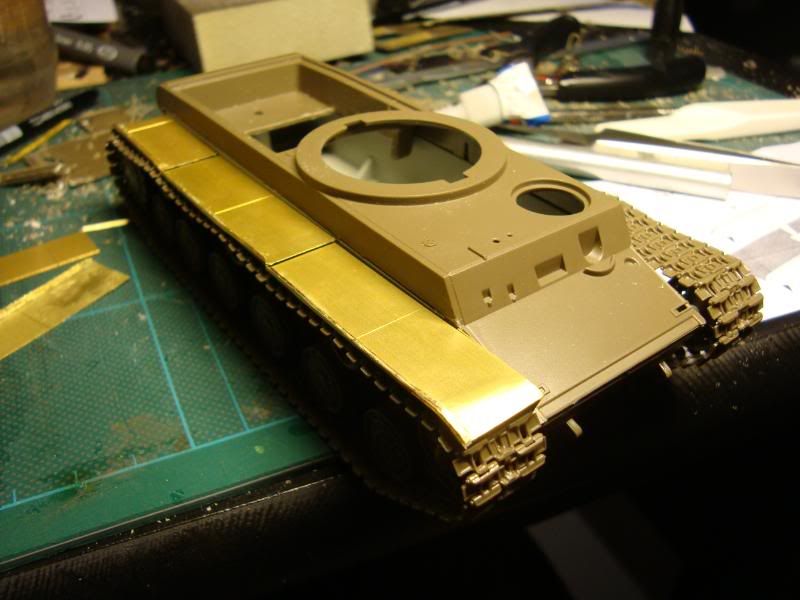
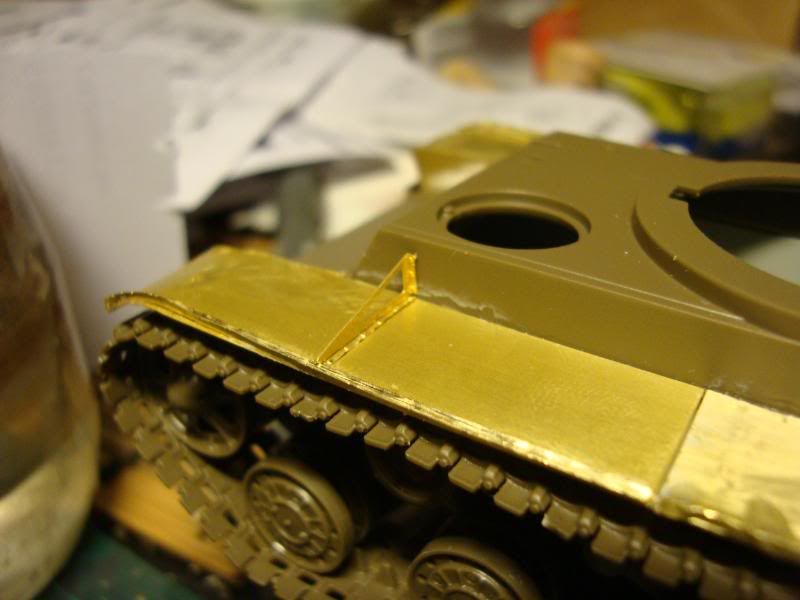
The fenders are then attached very carefully to the upper hull with superglue, making sure that enough space is left for the treads, so that they don't scrape the tracks.
Once these are in place and dry supports and struts are then carefully shaped out of photo etch and attached:
While I was waiting for the fenders to dry I also finished off the photo etch detailing on the rear lower hull adding the grille:
|
|
This message was edited 1 time. Last update was at 2009/04/16 11:47:45
|
|
|
|
|
2009/04/16 19:50:13
Subject: "The Lines are drawn" The Battle of Kursk Summer 1943 - Soviet KV-1 WW2 Diorama
|
|

Been Around the Block
|
The amount of detail in those foto etch parts is amazing. I can't imagine how fidly it is to apply these parts to a plastic kit. Do you use an activator for the superglue to dry as fast as possible? Or do you end up with a lot of patience and glueing your fingers together on a regular basis.
Impressive to see you pickup such project so soon after completing the last one.
|
|
|
|
|
|
2306/11/02 10:59:04
Subject: Re:"The Lines are drawn" The Battle of Kursk Summer 1943 - Soviet KV-1 WW2 Diorama
|
|
Regular Dakkanaut
|
Hi Kagar! I don't use an activator on the glue, just very fine lines of superglue applied with a scalpel blade, then usually I apply the parts by gently holding them in place or in the case of the smaller components by a very fine pair of modeling tweezers.
The first application of glue will hold the photo etch in place to get the position but it will need to be reinforced with a second layer to finally set it. Again I carefully apply some superglue with a scalpel from the back/underside of the fender or grille and run it along the line where the photo etch meets the plastic.
If you're careful you can also use the superglue as a filler at this stage to fill any tiny gaps, it has the advantage over modelling putty on delicate components like this as no pressure or touching is needed to apply it. Using modelling putty would make the photo etch parts bend or fall off.
|
|
|
|
|
|
2009/04/17 12:52:49
Subject: Re:"The Lines are drawn" The Battle of Kursk Summer 1943 - Soviet KV-1 WW2 Diorama
|
|

Fixture of Dakka
drinking ale on the ground like russ intended
|
http://www.n344rb.com/plans/brakeplans.pdf
This is what you need but smaller and cheaper than a pro built one.
|
 Logan's Great Company Oh yeah kickin' Logan's Great Company Oh yeah kickin'  and not even bothering to take names. and not even bothering to take names.  2nd company 2nd company  3rd company ravenguard 3rd company ravenguard  House Navaros Forge world Lucious & Titan legion void runners House Navaros Forge world Lucious & Titan legion void runners    314th pie guard 314th pie guard  warboss 'ed krunchas waaaaaargh This thred needs more cow bell. Raised to acolyte of the children of the church of turtle pie by chaplain shrike 3/06/09 Help stop thread necro do not post in a thread more than a month old. "Dakkanaut" not warboss 'ed krunchas waaaaaargh This thred needs more cow bell. Raised to acolyte of the children of the church of turtle pie by chaplain shrike 3/06/09 Help stop thread necro do not post in a thread more than a month old. "Dakkanaut" not "Dakkaite"
 Join the Church of the Children of Turtle Pie To become a member pm me or another member of the Church Join the Church of the Children of Turtle Pie To become a member pm me or another member of the Church  |
|
|
|
|
2009/04/17 13:41:56
Subject: Re:"The Lines are drawn" The Battle of Kursk Summer 1943 - Soviet KV-1 WW2 Diorama
|
|
Regular Dakkanaut
|
Thanks Russ, but I was thinking something a little more like this:
http://misc.kitreview.com/tools/images/etchmatereviewbg_1.jpg
|
|
|
|
|
|
2009/04/17 13:51:30
Subject: "The Lines are drawn" The Battle of Kursk Summer 1943 - Soviet KV-1 WW2 Diorama
|
|
Junior Officer with Laspistol
|
This is an amazing project, man. Do you know where I might find a comparison picture between a model done with photo etch parts and one out of the box? It'd be good to be able to really appreciate the difference in quality!
|
|
|
|
|
|
2009/04/22 09:23:05
Subject: "The Lines are drawn" The Battle of Kursk Summer 1943 - Soviet KV-1 WW2 Diorama
|
|
Regular Dakkanaut
|
The Dreadnote wrote:This is an amazing project, man. Do you know where I might find a comparison picture between a model done with photo etch parts and one out of the box? It'd be good to be able to really appreciate the difference in quality!
Hi Dreadnote, sorry for the delay in answering your question.
I'll see if I can dig out some photos for you to show the comparison, its a lot more than you'd think. The etch parts really bring out a whole new level of detail to a kit.
|
|
|
|
|
|
2009/04/22 09:31:19
Subject: Re:"The Lines are drawn" The Battle of Kursk Summer 1943 - Soviet KV-1 WW2 Diorama
|
|
Regular Dakkanaut
|
Some more updates, sadly last weekend I was very busy and away from home so I didn't have anytime to work on the project. However I'm now back and have progressed quite alot on the photo etch and detailing.
Adding the struts and supports to the fenders:

Battle damage:
Finished fenders:
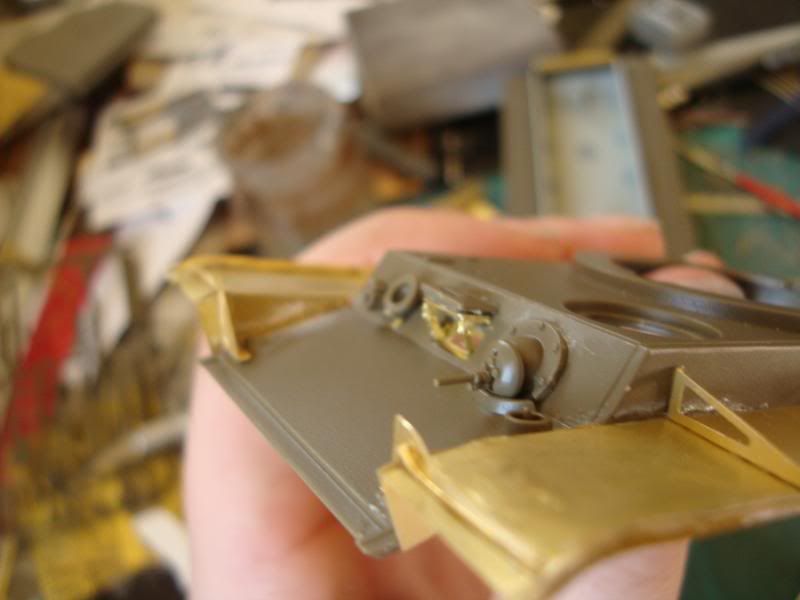
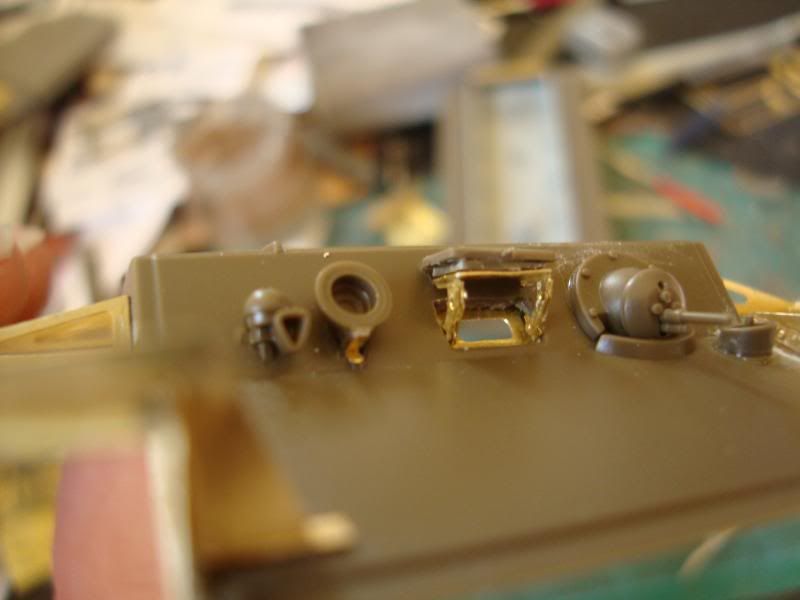
Once the fenders were done I moved onto the rest of the upper hull detailing. There were some extremely detailed and tiny parts that went into these acessories, the drivers hatch in particular was very tricky and needed me to cut a small hole out of the plastic hull before converting and reattaching the hatch.
This drivers hatch had 4 seperate parts for each support that holds the hatch, they were tiny and needed super fine tweezers and very sharp eyes to build:
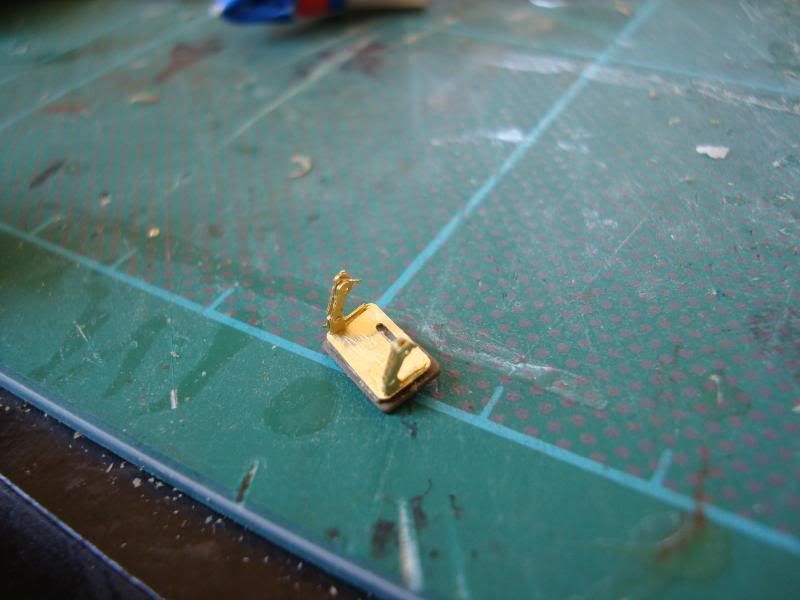
Drivers hatch and machinegun:
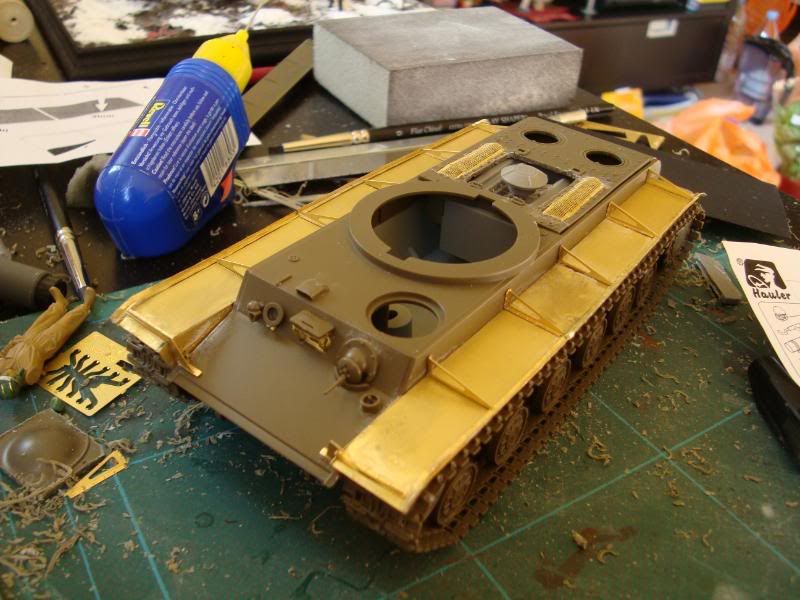
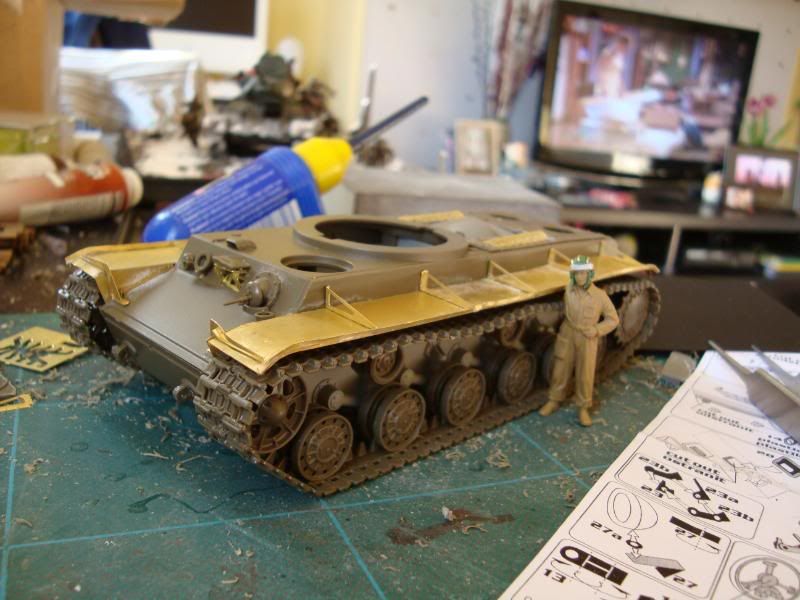
Current progress dry fit:
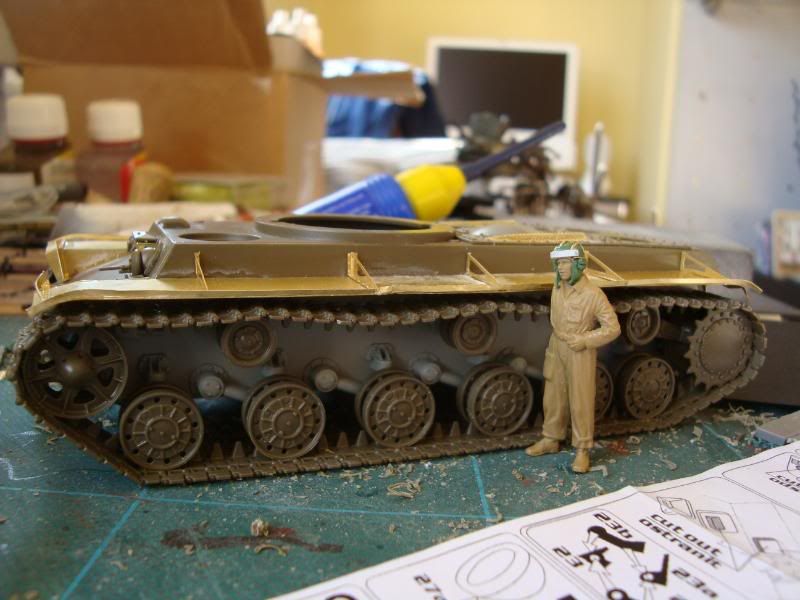
Scale comparison with the Tank crewman:
|
|
This message was edited 1 time. Last update was at 2009/04/22 09:38:40
|
|
|
|
|
2009/04/22 10:03:03
Subject: "The Lines are drawn" The Battle of Kursk Summer 1943 - Soviet KV-1 WW2 Diorama
|
|

Junior Officer with Laspistol
|
Very nice,I love historical minis!!!
|
"I refuse to join any club that would have me as a member."-Groucho Marx
|
|
|
|
|
2009/04/22 23:28:27
Subject: Re:"The Lines are drawn" The Battle of Kursk Summer 1943 - Soviet KV-1 WW2 Diorama
|
|
Tough Traitorous Guardsman
|
Hey GM, looking good!
When I first saw you cutting off the plastic fenders I thought "Oh no, he's crazy!" Now that I've seen the brass-etched fenders I know you're crazy. That's and awesome level of detail to go to. I also like the "one size fits all" tanker helmet. Nice work.
This diorama will eclipse your T-34, without a doubt.
Cheers
Dave
|
|
|
|
|
|
2009/04/23 00:09:13
Subject: Re:"The Lines are drawn" The Battle of Kursk Summer 1943 - Soviet KV-1 WW2 Diorama
|
|
Sybarite Swinging an Agonizer
Ann Arbor, MI
|
Nice model thus far... Oh, look! Friends!
-J.
|
In Vino Veritas. ("In wine there is truth.")
"If a man dedicates his life to good deeds and the welfare of others, he will die unthanked and unremembered. If he exercises his genius bringing misery and death to billions, his name will echo down through the millennia for a hundred lifetimes. Infamy is always more preferable to ignominy." -Fabius Bile


 |
|
|
|
|
2009/12/12 11:54:33
Subject: Re:"The Lines are drawn" The Battle of Kursk Summer 1943 - Soviet KV-1 WW2 Diorama
|
|
Regular Dakkanaut
|
Thanks guys, Dave - Yeah those fenders were tough work but I think they give a much more realistic finish than the plastic ones. You can bend, wear, and shape the photo etch parts into any kind of damage or weathering you want. Looks much more battle harderned.
Alazahr - Sharp eyes sir! Yes that is indeed freinds. I do most of my modelling in the late afternoon so all thats on TV is reruns of friends and scrubs!
|
|
|
|
|
|
|
|


