Switch Theme:

Macro Photography and miniatures.  [RSS] Share on facebook Share on Twitter Submit to Reddit
»
Author Message
Advert


Forum adverts like this one are shown to any user who is not logged in. Join us by filling out a tiny 3 field form and you will get your own, free, dakka user account which gives a good range of benefits to you:
  • No adverts like this in the forums anymore.
  • Times and dates in your local timezone.
  • Full tracking of what you have read so you can skip to your first unread post, easily see what has changed since you last logged in, and easily see what is new at a glance.
  • Email notifications for threads you want to watch closely.
  • Being a part of the oldest wargaming community on the net.
If you are already a member then feel free to login now.


Made in nz
Road-Raging Blood Angel Biker


Auckland, New Zealand

Intro:

Macro photography is a bitch. It’s plain and simple. It’s a pain to do it well, and even if you do it perfectly; taking photos of a small object like a miniature and blowing them up for all to view exposes flaws and problems that you usually cannot see with the naked eye, and make all that hard work you’ve done on a miniature look like gak. That being said, it’s also hard to get constructive criticism if you have crappy photos. I often get asked how I take mine, so I figured I’d fire out this tutorial. It’s a little more complex than my last one, but hopefully won’t be too hard to follow.

Taking a photo to showcase a miniature is broken down into four distinct steps: Equipment, Set-up, taking the photo and editing the photo before upload. I’ll look at each step in turn, and outline how I do it, and the tools I use.

1 EQUIPMENT

I hear a lot of people whine that good photos can only come when you have a good camera and all the little bits and pieces that go with it. First things first, let’s clear that up. Yes. Having a decent camera will always be a help when you want to take a photo (Shocking isn’t it). But these days entry level cameras will have everything you need to take decent shots of your miniatures. So quit whining and spend a little time getting to know what your camera can and cannot do. So let’s have a look at what I use to take photos:

a. CAMERA: I use a Sony DSC – H7 for most of my photo-taking. It’s small enough for easy use, but still has good features, including a x15 zoom (Which I never use). I purchased this camera the Christmas of 2007 and it has weathered well under the storm of how tough I am on electronics.

b. PHOTO-TENT: I purchased a little folding photo-tent for the simple fact that I am a lazy bastard who prefers to buy things rather than make them. How do I reconcile this with the fact I love to paint miniatures? I don’t. It’s just one of those things that make no sense in my life. Any decent camera store will sell a photo-tent, and they shouldn’t be that expensive. Unless you make a habit of buying and painting Titans or Super Heavy Tanks then you shouldn’t need a large Photo-Tent. Now I can hear some of you switch off at the prospect of spending money on a photo tent, and since I’m such a nice bastard and Google was already loaded I found a photo-tent making tutorial (http://www.photo-info.co.nz/articles/building-homemade-light-tent). It’s easy and even has a good shot of the lights. Ignore the camera that was used, because that puppy is hooked up to a computer and has a telephoto macro lens and that kind of stuff is waaaaay outta your price-range if you have to read the tutorial and make your own tent… HA!

c. LIGHTS: I’ll say more about lights in a little bit, but for equipment purposes you need a few lights. I usually say one for every side of your tent, minus the back, but you can get away with only two from each side. The lights you purchase shouldn’t be anything majorly special. You don’t need special photography bulbs or flashes. Just go to your local hardware store and get some bed-side lamps with wattage equivalent to 100watts. Most bulbs come in three kinds these days, Cold, Warm and Daylight. You want Daylight. I use eco-bulbs because the white is whiter, which is another shocking example of color physics…

d. BACKGROUNDS: You’ll hear people say that white is fine. And you know what, they’re right. White is fine. But who wants “fine” when you’re taking a photo of something that you’ve invested time, effort and money into?! A decent background serves multiple purposes. So shell out the dollar and print one out you cheapskate! I’ll be uploading the Backgrounds I use to DAKKA DAKKA Soon enough, but all props for them, except the gradient one, goes to Corvus Miniatures (http://corvusminiatures.blogspot.com/). Corvus knows his stuff, trust me... A4 size is good for regular single miniatures, but if you’re going to be taking shots of units, or groups, vehicles or monsters then you may want to pay the extra couple of dollars to get a few of them in A3 or even A2, they’re a hassle to store, but useful… I’ll leave that up to you…

e. TRIPOD: Really? A tripod? I hear you ask. Damn straight. Macro photography is super-sensitive to movement. Thus we want to eliminate all movement. Any tripod is fine so long as your camera attaches to it that is…

So there we go. That’s all the stuff I use when I take photos of my miniatures. It may seem like a lot, but in reality it’s very quick and easy to set up and break down. Next up we put it all together.

2 SETUP

Putting all the equipment together and taking a photo is the next step, but there are still a few things that need to be examined:

a. POSITIONING: First off, find the best natural light available to you. I cannot stress this enough. Natural light will always beat artificial light. ALWAYS. However not all of us live in a picture perfect world, which is why we have lights. You can use a mixture of lights and daylight so position your setup in an area with good natural light. But make sure the natural light is NOT directly hitting the miniature. We use a tent to diffuse light. Have your set up on a hard surface. Nothing worse than trying to take photos on a bed or soft chair.

b. BACKGROUND: One of the keys in using a background successfully is to have the miniature sit on it, and bend it up behind the miniature. NEVER FOLD YOUR BACKGROUNDS! Always have a bend. Having a bend the miniature sits on gives the illusion of forever (Holy crap, what?!). This means the miniature looks like it’s floating rather than sitting on something, and allows you to capture the entire miniature. Confused? Good, welcome to my existence…

c. LIGHTS: Set up your lights so the light is diffused through the tent. There should be NO direct light on your miniature. Direct light creates shadows, especially in Macro photography. Place your miniature on the background and angle the lights towards the miniature. Get right in close to see how it looks.

d. CAMERA: Set up your camera on the Tripod and get it into the position in which you want to take all your shots. When you start taking photos you’re going to want to move the camera as little as possible so each one comes from the same angle. HUGELY IMPORTANT POINT: Macro photography means the camera is REALLY close to the subject. I’m talking almost touching here people.

Your setup should look something like this:
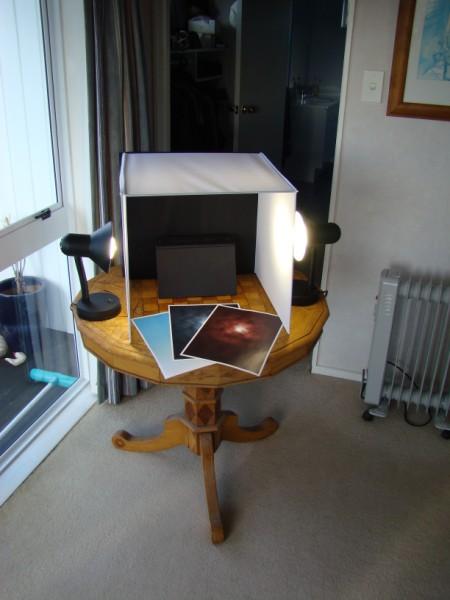
Now we should be ready to actually take a photo…

3 TAKING THE PHOTO

This is the business end of what we're trying to do, but it can also be the most subjective...

a. SIZE: Ignore the size you want your finished photo to be. Set your camera to take the largest shot it can. For my H7 it’s A3 sized, or roughly 8k megapixels. Just work with what you’ve got. We’ll crop and shrink it before uploading, so don’t be worried.

b. CAMERA SETTINGS: OK, here’s the annoying stuff. I can tell you the camera settings I use for the photos I take today, with these cameras, but all camera brands have slightly different settings, and abilities. It’s gonna take some playing around to work out what is best for your camera, but the principles stay the same.

i. MACRO SETTING: This may seem like the most obvious thing in the world, but I swear it’s the most overlooked. The macro setting looks like a flower. MAKE SURE IT’S ON!

ii. THE ‘AUTO’ SETTING: Cameras can only work with what we tell them to work with. It cannot tell if a light source is artificial or natural. But most cameras assume that you’re using natural light. This means that that the ‘Auto’ setting might not be the best one to use. Especially if you’re using artificial lights. To take macro shots I use the Aperture Priority Shooting setting (This is usually the A on your camera). This lets me manually choose the Aperture value while the camera chooses the rest of stuff. It also allows me to manually choose what the light source is via the menu. Here is the Image of the settings when I took these photos.
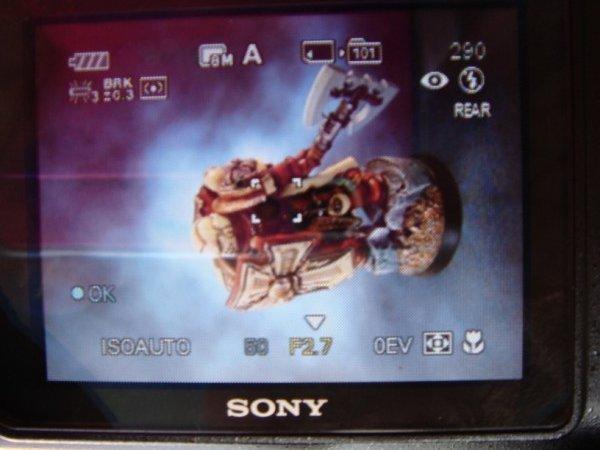


If you’ve got the wrong light setting, or have the camera on Auto, chances are you’ll get something very yellow, like this:
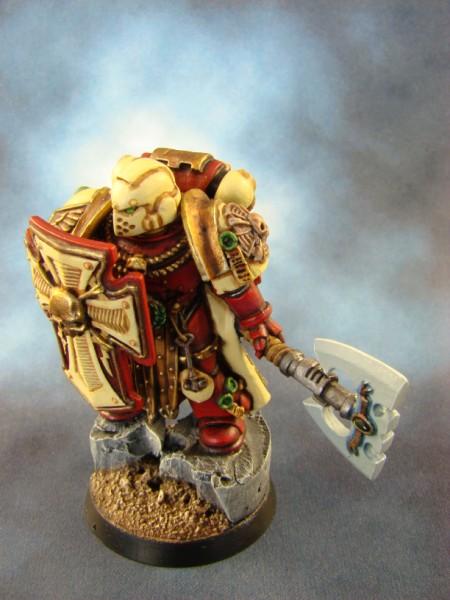

iii. ZOOM: For macro photos the zoom is often thought to make things better. Unless you have a special lens the zoom is going to be useless beyond x2.0 magnifications. The idea with a macro is to get closer to the mini. As we’re taking the shot at the largest size possible we can crop and reduce the size of the image to suit, so unless you’re sure what you’re doing. Don’t use the zoom.[/INDENT]

c. TAKING THE SHOT: Macro shots are exceptionally sensitive to movement. This is why we’re using the tripod. Additionally even pressing the shutter button can cause a shudder so use the timer on your camera. This can be a little annoying, but trust me it makes a difference.

d. GROUP SHOTS: Take more than one photo when you sit down. I take about five images for every one that gets uploaded. With a range of Exposure Values (That’s what the little EV means). Many cameras these days allow you to take batch shots with differing EV values. IE you press the button and it takes three shots EG: -0.3, 0.0, 0.3 you can then choose which image is best.

When you’ve taken your shot it’ll look something like this, only a lot bigger:
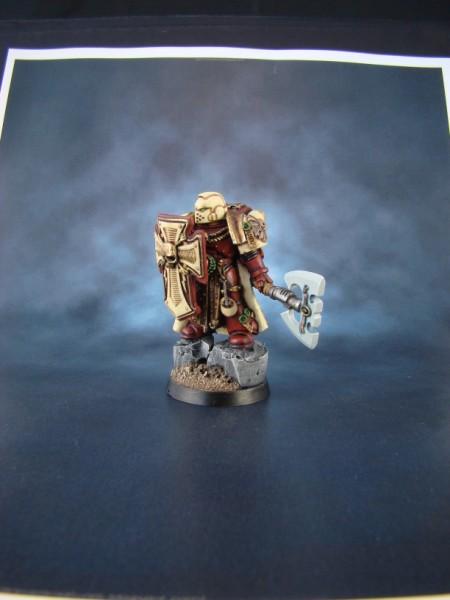


So now you’ve taken some shots. The next step is putting them on your computer and then editing them.

4 EDITING

People will often just take the photos, stick them on their computer and then upload them. But taking a little extra time to crop the photo and resize them for easier viewing makes it more likely that people will take the time to write some comments back. I use a couple of free programs to crop and shrink the images.

a. CROPPING: Make sure you Crop the image before resizing it. Otherwise you’ll get an image which is too small to do any good. I use GIMP (http://www.gimp.org/). It’s free and it’s good. There are others, but this one works for me. Whatever you use just crop the image so the edges are neat.

b. RESIZING: Now even after cropping, chances are your image is still going to be huge. This is where resizing comes in. You can use GIMP to do this if you want, but if you’ve taken a few photos it can be tiresome. Pix Resizer (http://bluefive.pair.com/pixresizer.htm) can do all the images in one hit, which makes it quicker. Which will leave you with your finished image:
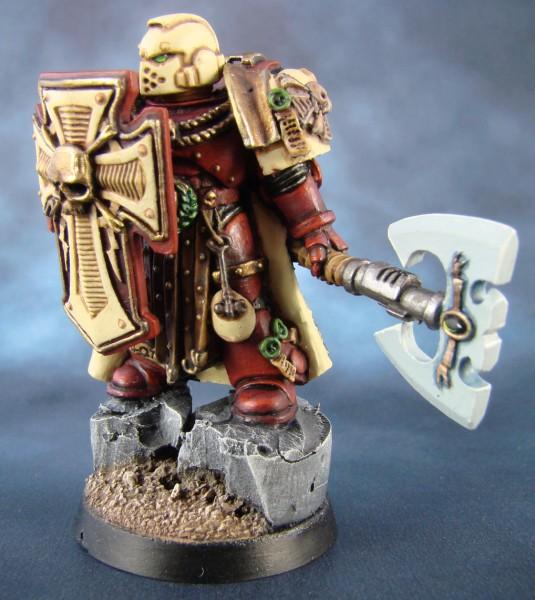


You generally want the largest dimension to be about 700pixels. But anywhere before 650 and 800 is generally acceptable. And you’re done! Upload and show them off!


Well, that’s pretty much it. I hope this has been of use to someone. Remember the key to anything is practice. You'll need to tinker with your own camera to work out settings and lighting that is best for you, but these are the basic steps...

This message was edited 1 time. Last update was at 2011/12/03 06:25:05


Made in gb
Thunderhawk Pilot Dropping From Orbit


London, England

Excellent stuff Vent, thanks for this.


No trees were hurt in the making of this sig, however many electrons were disturbed.
 
   
Made in gb
Stealthy Dark Angels Scout with Shotgun


Great Yarmouth UK

Great tutorial, one thing I will say though is along the lines of your "better camera does not automatically mean better pics" advice. A P+S is going to give much better results out of the box than a more expensive DSLR or other interchangeable lens system as they often come with lenses that won't focus closer than 40cm and require a dedicated macro lens.

I'd also like to reinforce the point about exposure bracketing and taking a lot of shots. More often than not the pics displayed on the camera screen after you take them will look a lot different on the PC.

Lastly, Windows Live Photo Gallery is great for 1 click fixing of your pics, it's not perfect but it is fast.

Matt
40K and Fantasy bits, Magnets and more at http://www.modelbits.co.uk 
   
Made in fi
Hardened Veteran Guardsman


Helsinki, Finland

Great Tut. Thanks.

Never Give Up, Never Surrender!
IG REDregiment 3000pts
I like to drink tea with Lady Luck  
   
Made in nz
Road-Raging Blood Angel Biker


Auckland, New Zealand

Here's the direct link to the Backgrounds from Corvus.
   
Made in us
Guardsman with Flashlight


Utah,Usa

THAT is a lovely mini my Friend YOU sir have Skills...Also I love the tut I will be using this as the "standard" from now on when I take pictures of my minis for Tuts and Display

10% of something is better than 100% of nothing..


Made in us
Scouting Shadow Warrior


Longbeach CA

wow thanks for the Tutorial!!


I am White/Black
 
   
Made in us
Fixture of Dakka


Lancaster PA

Well done sir! Oddly I have been doing everything BUT putting my camera right up against the model. It always complained a bit (with the red box instead of green) so I never got closer, but I will have to try that out since I am never terribly happy with my pics.


Woad to WAR... on Celts blog, which is mostly Circle Orboros
"I'm sick of auto-penetrating attacks against my behind!" - Kungfuhustler 
   
Made in us
Fresh-Faced New User


Iowa

Wow, I never would have thought about using the timer to prevent blur. Thanks a lot!
   
Made in us
Nasty Nob on Warbike with Klaw


St. Louis, MO

Nice tutorial. Filled with common sense.

I look forward to getting home & seeing the images you posted, as well as those backgrounds.

Eric

Black Fiend wrote: Okay all the ChapterHouse Nazis to the right!! All the GW apologists to the far left. LETS GET READY TO RUMBLE !!!
The Green Git wrote: I'd like to cross section them and see if they have TFG rings, but that's probably illegal.
Polonius wrote: You have to love when the most clearly biased person in the room is claiming to be objective.
Greebynog wrote:Us brits have a sense of fair play and propriety that you colonial savages can only dream of.
Stelek wrote: I know you're afraid. I want you to be. Because you should be. I've got the humiliation wagon all set up for you to take a ride back to suck city.
Quote: LunaHound--- Why do people hate unpainted models? I mean is it lacking the realism to what we fantasize the plastic soldier men to be?
I just can't stand it when people have fun the wrong way. - Chongara
I do believe that the GW "moneysheep" is a dying breed, despite their bleats to the contrary. - AesSedai
You are a thief and a predator of the wargaming community, and i'll be damned if anyone says differently ever again on my watch in these forums. -MajorTom11 
   
Made in gb
[SWAP SHOP MOD]
Yvan eht nioj


In my Austin Ambassador Y Reg

Really excellent guide, many thanks. I will try these techniques soon. I have to admit I am one of those who has been standing ~1m away and using the zoom so I won't do that in future.

One quick question, when you say you take the picture right up close, what sort of a distance are we talking? Literally right next to the mini?

=====Begin Dakka Geek Code=====
DC:80-S--G+MB+I+Pw40k95+D++A+++/sWD144R+T(S)DM+
======End Dakka Geek Code======

Click here for retro Nintendo reviews

My Project Logs:
30K Death Guard, 30K Imperial Fists

Completed Armies so far (click to view Army Profile):
 
   
Made in us
Neophyte Undergoing Surgeries


Shorewood, Illinois

What type of paper is your background printed out on? I printed out on photo paper but had a big glare in the curve of the bend up.

633 pts.
1846 pts. 
   
Made in nz
Road-Raging Blood Angel Biker


Auckland, New Zealand

Thanks everyone, I'm glad the tutorial is of use

filbert wrote:One quick question, when you say you take the picture right up close, what sort of a distance are we talking? Literally right next to the mini?


Two - four inches. It'll come down to how much light you can get in there. You can take it back a few inches more if you want it, but I like to be close.

hawkphan44 wrote:What type of paper is your background printed out on? I printed out on photo paper but had a big glare in the curve of the bend up.


Photo paper is glossy by design so any light put into it will result in a flare up. Just use regular printer paper. It bends better and is cheaper.
   
Made in us
Nasty Nob on Warbike with Klaw


St. Louis, MO

Agreed on the 2-4 inches. The closer I can get to my minis, the better.
I find that, if one of my light sources is RIGHT above the lens on my camera, focused straight towards the subject, it really fills it in with light, allowing for a very close range... Just make sure you have at least 2 (3 preferred - for me) other sources of light, so as to eliminate any shadows.

Eric

Black Fiend wrote: Okay all the ChapterHouse Nazis to the right!! All the GW apologists to the far left. LETS GET READY TO RUMBLE !!!
The Green Git wrote: I'd like to cross section them and see if they have TFG rings, but that's probably illegal.
Polonius wrote: You have to love when the most clearly biased person in the room is claiming to be objective.
Greebynog wrote:Us brits have a sense of fair play and propriety that you colonial savages can only dream of.
Stelek wrote: I know you're afraid. I want you to be. Because you should be. I've got the humiliation wagon all set up for you to take a ride back to suck city.
Quote: LunaHound--- Why do people hate unpainted models? I mean is it lacking the realism to what we fantasize the plastic soldier men to be?
I just can't stand it when people have fun the wrong way. - Chongara
I do believe that the GW "moneysheep" is a dying breed, despite their bleats to the contrary. - AesSedai
You are a thief and a predator of the wargaming community, and i'll be damned if anyone says differently ever again on my watch in these forums. -MajorTom11 
   
Made in de
Feldwebel


Hamburg, Germany

Great tutorial!

Specially since it's adressed to normal cameras (as opposed to SLRs). I'm a photographer so I'm always looking at other peoples tutorials. I'm happy to see that everything is adressed: tripod, timer, ...

I would only want to add few things:

Since you use a tripod, you can set the ISO to the lowest possible setting. Higher ISO settings could add graininess.

Some lenses have a minimum distance. So for some lenses the 2 - 4 cm distance might not be a good idea.

Torben


--+- Death Korps of Krieg - Muddy Times -+--
--+--+--+--+--+--+--+--+--+--+--+--+--+--
 
   
Made in gb
Painting Within the Lines


Poole Dorset UK

Holy frak!

MACRO SETTING: This may seem like the most obvious thing in the world, but I swear it’s the most overlooked. The macro setting looks like a flower. MAKE SURE IT’S ON!


So my camera does have a macro setting.

I'm glad you took the time to state the obvious, going to re do my photo (Not many so won't take long).

Great tutorial and nicely written, sort of feel like we've just discussed photo taking over a beer.

mmmmm beer.

Cheers dude
Hangfire


FOW: Soviet - Tankovy
Infinity: Aleph


Made in us
Chalice-Wielding Sanguinary High Priest


Arlington TX, but want to be back in Seattle WA

brilliant post....so many things i had never considered before when it comes to taking photos

4250 points of Blood Angels goodness, sweet and silky W12-L6-D4
1000 points of Teil-Shan (my own scheme) Eldar Craftworld in progress
800 points of unassembled Urban themed Imperial Guard
650 points of my do-it-yourself Tempest Guard
675 points of Commoraghs finest!

The Dude - "Jackie Treehorn treats objects like women, man."

Lord Helmet - "I bet she gives great helmet."


Made in nz
Road-Raging Blood Angel Biker


Auckland, New Zealand

Thanks guys. I'm glad it's been of use to you

doubleT wrote:
I would only want to add few things:

Since you use a tripod, you can set the ISO to the lowest possible setting. Higher ISO settings could add graininess.

Some lenses have a minimum distance. So for some lenses the 2 - 4 cm distance might not be a good idea.

Torben


Thanks Torben. You're right of course, and I think I'll add the points of ISO setting in there soon enough. I just didn't want to get bogged down to much in the technical aspects. But I should add it in there. Good call
   
Made in gb
Hardened Veteran Guardsman


Hastings, East Sussex

Awesome tutorial buddy just tried all what you said and the result was a sweet looking picture!

FOR THE EMPEROR!
2500PTS
1250PTS

501st Lyxian Airbourne "The Avengers"
52nd Lyxian "City Wardens"

"Emperor have mercy to the fool who stands against me, for I shall not"


Made in nz
Road-Raging Blood Angel Biker


Auckland, New Zealand

aliasrm13 wrote:Awesome tutorial buddy just tried all what you said and the result was a sweet looking picture!


Thanks man, always nice to hear ^_^
   
Made in us
Longtime Dakkanaut


44.328850 / -73.110190

Open question to anyone re: field of focus.

I have a Canon Powershot A480 and know absolutely nothing about proper photography, I just know what I think is a good picture and I'm not taking many of those these days. Sometimes I'm using macro setting and it refuses to focus on the miniature, instead setting in on the background. I've re-adjusted, moved things around, changed lighting, no effect. Then other times under very similar conditions (same lights / background objects / distance from subject) it works w/o issue.

It's been more of an issue lately and I'm taking a lot of pictures so I can sort through them and take the 1 or 2 good ones out of the dozen or so I took. As you can imagine this becomes a tedious task when I am taking 5-8 new pics for my P&M blog.

Thanks for reading and thank you for any assistance you can offer.


 Gitsplitta wrote:
That's.... dirt... Skalk. Actual dust. (09/08/2021)
 
   
Made in gb
Journeyman Inquisitor with Visions of the Warp


@ skalk have you tried using the manual settings as opposed to the auto?

Great tutorial Vent .thanks mate , crooping and resizing is a good idea
   
Made in gb
Decrepit Dakkanaut


Mostly, on my phone.

Great tutorial mate, lots to think about and try!

Theophony"... and there's strippers in terminator armor and lovecraftian shenanigans afoot."
Solar_Lion: "Man this sums up your blog nicely."

Anpu-adom: "being Geek is about Love. Some love broadly. Some love deeply. And then there are people like Graven.  
   
Made in eu
Regular Dakkanaut


Germany / Switzerland

Great tutorial - thank you :-)

I will definitely try all of it ( still got a huge number of miniatures, I wanted to show, but pics were just too crappy :( )

Night Lords: 5500 points / 1750 points painted
Orks: 1250 points / 300 points painted
Orcs & Goblins: 6000 points / 2500 points painted
Tomb Kings: 3000 points / 1500 points painted 
   
Made in us
Longtime Dakkanaut


44.328850 / -73.110190

neil101 wrote:@ skalk have you tried using the manual settings as opposed to the auto?


No, but I'm going to tonight.


 Gitsplitta wrote:
That's.... dirt... Skalk. Actual dust. (09/08/2021)
 
   
Made in us
Nasty Nob on Warbike with Klaw


St. Louis, MO

@Skalk

You might be too close or too far away from your mini.
How close are you taking the picture from?

Eric

Black Fiend wrote: Okay all the ChapterHouse Nazis to the right!! All the GW apologists to the far left. LETS GET READY TO RUMBLE !!!
The Green Git wrote: I'd like to cross section them and see if they have TFG rings, but that's probably illegal.
Polonius wrote: You have to love when the most clearly biased person in the room is claiming to be objective.
Greebynog wrote:Us brits have a sense of fair play and propriety that you colonial savages can only dream of.
Stelek wrote: I know you're afraid. I want you to be. Because you should be. I've got the humiliation wagon all set up for you to take a ride back to suck city.
Quote: LunaHound--- Why do people hate unpainted models? I mean is it lacking the realism to what we fantasize the plastic soldier men to be?
I just can't stand it when people have fun the wrong way. - Chongara
I do believe that the GW "moneysheep" is a dying breed, despite their bleats to the contrary. - AesSedai
You are a thief and a predator of the wargaming community, and i'll be damned if anyone says differently ever again on my watch in these forums. -MajorTom11 
   
Made in rs
Happy We Found Our Primarch


Serbia / Belgrade

Great tutorial Vent thanks mate

Its not easy being a man you know. I had to get dressed today… and there are other pressures.

My gallery Gallery and Shop
 
   
Made in nz
Road-Raging Blood Angel Biker


Auckland, New Zealand

Skalk Bloodaxe wrote:Open question to anyone re: field of focus.

I have a Canon Powershot A480 and know absolutely nothing about proper photography, I just know what I think is a good picture and I'm not taking many of those these days. Sometimes I'm using macro setting and it refuses to focus on the miniature, instead setting in on the background. I've re-adjusted, moved things around, changed lighting, no effect. Then other times under very similar conditions (same lights / background objects / distance from subject) it works w/o issue.

It's been more of an issue lately and I'm taking a lot of pictures so I can sort through them and take the 1 or 2 good ones out of the dozen or so I took. As you can imagine this becomes a tedious task when I am taking 5-8 new pics for my P&M blog.

Thanks for reading and thank you for any assistance you can offer.


A few things:

Distance to target is important when using a macro. Macro's are designed to be used at very close range with little or no zoom. I dunno if you're always using the same distance and what that distance is, but remember, closer is better with a macro.

Some cameras will try and focus on the thing that it thinks you want taken. If you've got a grid setting for you LCD screen turn it on, it helps you work out exactly what should be in what space.

Are you sure your camera setting is on automatic? Many cameras come with many settings. If you're new to cameras you'll want to make sure it's on Auto.
   
Made in us
Jovial Plaguebearer of Nurgle


SF Bay Area, California

Nice tips!

   
Made in us
Longtime Dakkanaut


44.328850 / -73.110190

Apologies for not acknowledging the replies. I hadn't returned to this thread since my last post because I intended to do some testing but did not.

I did read the manual however. At this point I can say that I am using autofocus with Indoor and Macro settings, and I am using the grid. I have Verilux lamps at my desk (full spectrum white light) and use that instead of firing a flash. I do not have a light box, cannot qualify the distance because it changes all the time, and I do not have a tripod.

I've been spending a lot of time on Dakka working on my Death Guard PM blog (among other things) and with the number of photos I am taking I really should give the same attention and preparation to a photo area as I have my work area for conversions and painting. To that end, My next purchase is going to be a tripod and my next project is going to be a light box. I will be setting this up so that when I use it my lighting and distance will be uniform from shot to shot.

I'll be back to post a pic of my progress. Thanks to all for your time replying.


 Gitsplitta wrote:
That's.... dirt... Skalk. Actual dust. (09/08/2021)


Forum Index » Painting & Modeling Tutorials
Go to: