Forum adverts like this one are shown to any user who is not logged in. Join us by filling out a tiny 3 field form and you will get your own, free, dakka user account which gives a good range of benefits to you:
No adverts like this in the forums anymore.
Times and dates in your local timezone.
Full tracking of what you have read so you can skip to your first unread post, easily see what has changed since you last logged in, and easily see what is new at a glance.
Email notifications for threads you want to watch closely.
Being a part of the oldest wargaming community on the net.
If you are already a member then feel free to login now.
2010/12/03 07:17:36
Subject: Terrain and other storeys: 9th November NEW!! everso very nearly finished BOGGART!!(p9)
Need to get this finished ASAP for a Necro campaign at our after school club in the local library.
So for once will try and update a Blog
Fisrt up, the idea came from a Youtube video, and will try and dig it out.
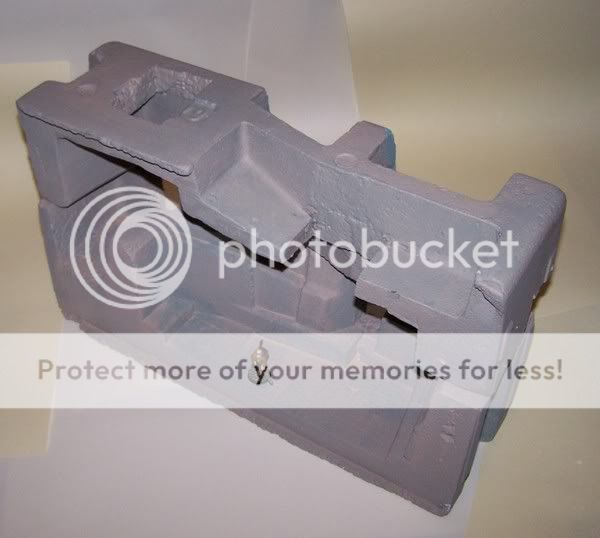
The concept uses polystyrene packaging to provide the gaming surfaces.
Have adapted it to hopefully have a modular system in which the blocks can be rotated to add variety to the terrain.
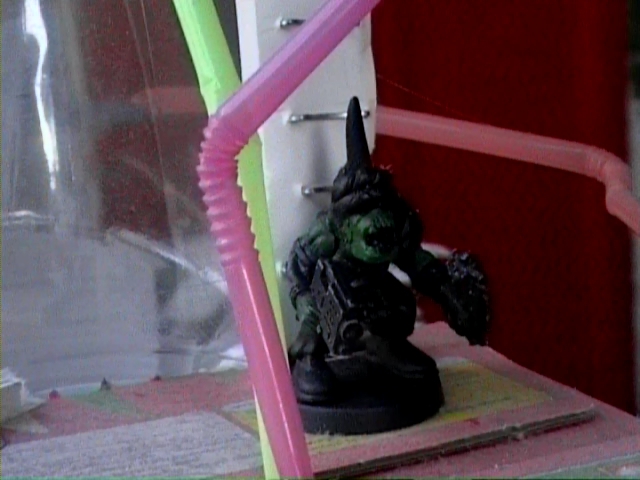
the figure is a Delaque ganger bought off a very nice chap on ebay ready painted for scale reference.
I think this came from TV packaging so there are 4 pieces which means a mirror copy.
They have been chopped slightly differently, but have just two on display to give an idea.
Now I know they have some fearsome mutants down in the Underhive, but YIKES!...
Not only can the units be rotated but the intention is that they can be stacked also.
To support the walkways have made some concrete pillars though looking at the pics not happy with the scale.
They were inspired, not by disposable cups, but the concrete pillars where the limestone was stored are now used for climbing practice
due to the flexibility of use, and time constraints, detailing will be minimised unfortunately.
However I still want to add more character to the Art Brut concrete. (thanks to Neil on Vik's Steampunk Airship thread for reminding me of the term)
Would ideally have liked to have the expansion lines but that will be too time consuming. Maybe another project in tribute to the architect Tadao Ando
Still may do some UnderHive movie posters if I have time.
Thanks for looking
any comments and ideas will be welcomed please.
Finally
Inspiration!
This message was edited 9 times. Last update was at 2011/11/09 04:08:23
nice to see your started with your necromundan idea. the polysterene bloks look very promising. lots of difficult terrain situations there. also the prospect of having more than one piece of the foam formed the same is something that helps to create that actual architectual feel...the term art brute concrete is so fitting, yet i havent heard it that way. the video of the of the landschaftspark duisburg is also as close to beeing grim dark 40k related as it could be in real life without having to attach lots of skulls everywhere.^^
that said the scenery reminds me of lots of dire history in this rotten country of mine...but move on^^
may i make some suggestions? i would carve/cutt cardboard any old how and even tear it and then glue it with pva glue to the polystyrene so that you will get a got cover for the paint you certainly will aply. will you spray the things? i guess it would be the fastest way but then you risk the "burn" syndrom of that maerial...
the blocks could even be played stacked , so you could create a "death race" campaign, object marker on the oposite level and all run and fight like hell to get there...
for the pillars i would suggest looking for toilet cardboard rolls...i know for sure one day i need them and i collected so much of them that i will not be in short suply any time near, quite th oposite^^...
i like the idea with the bandages to create texture so...
this will be getting soon one of my favorite blogs i guess, have fun building and ploting^^
I have been applying a mixture of a universal filler/PVA/Acrylic paint to try and tone down the polystyrene texture. The numer of coats with the addition of Johnsons Klear floor polish will protect the polystrene.
I think my next stage with be another coat or two of paint and some washes.
Ideally I would have cut squares of plastic sheet and tiled the structure to make the expansion joints that you get in concrete. That would probably benefit only myself as the kids won't care about such details. It just won't be worth the effort!
More of the same mix will be going on the supprts to take off the textue a bit. The bandages were coated with the mix so they would harden otherwise the cups wiould not be strong enough. It Worked! they are hard and tough now!
I put bandage on some foam board walkways. But just with pve but they are still too springy. However It does give a quick if too irregular texture that mimics metal mesh walkways. But I may use that on the underside as I am going to try and cast some resin sections for the upper surface. So watch this space
also I may be recycling some floppy discs as bulkheads and making and casting resin ladders.
The casting will be simple push moulding. Nothing fancy, but hopefully effective. Also will be using the resin that you get from the car repair shops. Not the expensive stuff
ever the cheapskate
This message was edited 1 time. Last update was at 2010/12/04 10:08:44
a while back, when I was obsessed with Necromunda, I started a thread where I put on home made posters fornecromunda. But it never got past the first poster.
2010/12/04 11:26:53
Subject: Re:Art Brut Necromunda Terrain. Pic Heavy
That video was excellent.....I've spent the last twenty mins (and I assume the rest of the day) listening to various Einstürzende Neubauten tracks, I haven't done that since I stopped dabbling with that goth look I was rocking in the late 90's.
I've saved the picture of rock climbers the industrial scenery in the background is great inspiration.
As for the polystyrene buildings the shapes are good, that was lucky because the last tv i got had really poor shapes. A quick and easy way to make it look more structural is getting say a 2cm strip of card and folding it down the middle and sticking it to the corners. These could then be painted in rusting metallics to contrast with the stone colour.
ah this is getting better´n better...
you get resin in car repaishops??? will have to pay them a visit me guesses...
at first when i saw these structures the gave me the impression of making me afraid and of complete unorder...
now through this thread i see the potential and even the beatuy in these bulking structures...quite the change there...
for reinforcing metal grirds, do you absolutly dont want to use them or have no idea? if the later then i would recommend the use of chopsticks... they could work really good. but i understand when you dont want to create sharpe edges on the terrain, afer all your playing it with kids...
personaly i would also go for naughty graffitis but i fully understand your point, we discussed that already^^
hope to see some shots soon. also back to your use of materials, yep a floppy deisk can be a godsend^^
Hey Chibi, I think it was on Scrazza's blog that i mentioned, Brutalism http://en.wikipedia.org/wiki/Brutalist_architecture which is post war civilian style ,but also very closely related to german military and the rest of european 2nd world war archetecture , as vik mentioned earlier , although this style of bunker building is more appropriately named blockhouse style http://en.wikipedia.org/wiki/Blockhouse the best example of this i have found is the German Flaktürme , Flak Towers, in fact i love these buildings so dkokhttp://en.wikipedia.org/wiki/Flak_tower just realised how big that pic was
good start on the blog matey, will definately like to see where this goes,
This message was edited 1 time. Last update was at 2010/12/04 20:04:48
2010/12/04 16:43:02
Subject: Re:Art Brut Necromunda Terrain. Pic Heavy
Chibi please stop showing me gorgeous pictures of rusty metal....if I ever get round to starting my board I'm going to need a million drinking straws of various gauges!
No reinfocing rods....but but they would give you some cover!
i used to live near an old flak tower for about two years...it had a marvelous view over the city...well it is to be expected after all it should have this view for knocking out some of the british aircafts disturbing the air in the nights and day of the early 40ies.... on some parts of the walls you can still see the gunshots that left nasty holes in it... alwas send shivers down my spine....i guess i have to persuade my folks to visit it to give you fellas some pics for referrence ...
One thing I forgot to ask advice for what to use on the walkways as barriers. At the moment the best I can think of is a solid wall of foamboard strips. But am very reluctant to do that as aesthetically and realistically it would be poor. I could scratch build from sprue but that will be far too much work. There is a ton of stuff to do as it is
Any ideas for an effective but cheap source of walkway barriers please? No use suggesting Warblasters Bitz Inc, the bank manager wil be tearing me off a strip if i start spending cash!
Other thing is, Grafitti and posters effectively means the end of the idea to rotate the sections, unless it is deemed acceptable to have the posters and graffiti on the floor or upside down. Should have thought of that first. Will ressuerct the poster thread if the mods allow to ask for suggestions. May consider printing decals from artwork
This message was edited 1 time. Last update was at 2010/12/05 23:51:46
2010/12/06 00:11:34
Subject: Re:Art Brut Necromunda Terrain. Pic Heavy
Fence/grating style barriers using aluminium mesh? You could use two horizontal strips of sprue with a few uprights, kind of a pre-formed concrete fence, you'd just have to clean up the sprue, although that might need a bit of work to get the uprights right. Solid concrete barriers not very pretty, but plenty practical and brutal.
Graff would be a problem. You could try a few non-orientated symbols, but paint drips might be an issue (Shame, I'd have liked to see a mini-banksy on there too)
A bit out-there, but how about posters made of thin card/plasticard with a smaller, thicker bit of plasticard stuck to it's back, the smaller piece has a magnet or pins attached to fit into place Be pretty awkward getting weathered, torn edges and corners though
ok i have an idea abouzt the art... posters and grafitti... since you will make all the terrain look like concrete yo will still have some areas that look like they have a painted civilian surface? yes? well then it is quite easy. put your grafitti and posters on a cardpoard piece you ripped apart to get uneven edges... the put a pin in it and stick it to the terrain on the walls. now if you just use one pin you can just circle it any way you want to have it. ans since the cardboard is the holding thing its easy to change too...
nah? sounds good or what? if this works i want a webcookie^^
vik
Had a look and this may be a solution. Two parts (the pair that are represented by the second of the sections in the photos) are probably best suited as in the pic.
That means they can be done "This Way Up"^
The other pair have two good sides, so it may be possible to do all the signage/graffiti etc in such a way as to have it showing the right way up. Hope that makes sense. It makes it a tad tricky because it involves simple logic as to which face is orientated which and to get the graffiti the right way round.
Sadly I don't do simple logic!
The aluminium mesh is a great idea except I don't have any. Will have to check out prices but it doesn't seem cheap from what I recall. Still, have a bit of time before I need it so can mull it over a little longer.
Thanks for all the ideas and support chaps. Please keep it going, it is appreciated.
Automatically Appended Next Post: What do you guys reckon please?
Have made a ladder from sprue mounted on styrene card.
Did a quick impression into some playDOH! to see if it could be cast in resin from the simple pressmould.
However, I liked the "concrete" projections that could have paper clip rungs embedded.
Did a quick concept sketch on the graphics palette so is a tad rough as still not used to drawing directly onto the screen.
hope you get an idea of how it could look.
Would be extra work drilling the holes for the rungs but would look a lot better than just a ladder.
This was supposed to be a quick project!!!
This message was edited 2 times. Last update was at 2010/12/08 03:41:47
2010/12/08 08:48:33
Subject: Re:Art Brut Necromunda Terrain. Pic Heavy
nice sketch chibi, have you considered using staples for ladders, i use them on foamboard for simple orky ladders. the are quite effective for that rustic look. , other wise the ladders look good mate. but moulding is a chore.... you coud grab some from one of the many bitz shops online though
Staples sounds good Neil thanks, and I may well use that idea in places. eg on the support columns.
I still like the idea of more substantial ladders in certain key locations, but your idea will cut down the work immensly
The moulding will only be simple push moulding so it is not too bad, but still time consuming.
What size do you use please?
I need a good heavy gun for stretching canvas so now I have even more incentive for an investment.
sorry mate not sure the size, but it is also a heavy duty stapler, although i was only cheap from a hardware shop. i got it to recover some chairs. i bought two different sizes of staples , and one didnt fit so , i will have a look tonight mate. there is a pic of the ladders i am talking about
http://www.dakkadakka.com/s/i/at/at2/2010/11/15/7a1a8b959e842fc85ea8eeab0acaddc3_34119.jpg
2010/12/08 10:59:41
Subject: Re:Art Brut Necromunda Terrain. Pic Heavy
Been thinking about it Neil and my original concept may go bye-byes.
While it looks to scale it will be too big if that is not too much a contradiction.
In the Underhive they would be fine, but they take up too much space relative to the available wall space on the terrain.
Thats a shame because i really like the block style you were thinking of, maybe you could cut smaller foambard cuboids and then add staples to them. either way its a really nice design that screams brutalism and utilitarianism, exatly what i would expect from a hive. But i think the simple staples are are an effective and quick way of achieving the same look. never found out the sizes though. a few broken rungs might look good , i wanted to do that , but never got round to it


 (Shame, I'd have liked to see a mini-banksy on there too)