| Author |
Message |
 |
|
|
|
|
Advert
|
Forum adverts like this one are shown to any user who is not logged in. Join us by filling out a tiny 3 field form and you will get your own, free, dakka user account which gives a good range of benefits to you:
- No adverts like this in the forums anymore.
- Times and dates in your local timezone.
- Full tracking of what you have read so you can skip to your first unread post, easily see what has changed since you last logged in, and easily see what is new at a glance.
- Email notifications for threads you want to watch closely.
- Being a part of the oldest wargaming community on the net.
If you are already a member then feel free to login now. |
|
 |
2012/04/06 11:18:20
Subject: Tutorial: Lava Bases
|
|

Dipping With Wood Stain
|
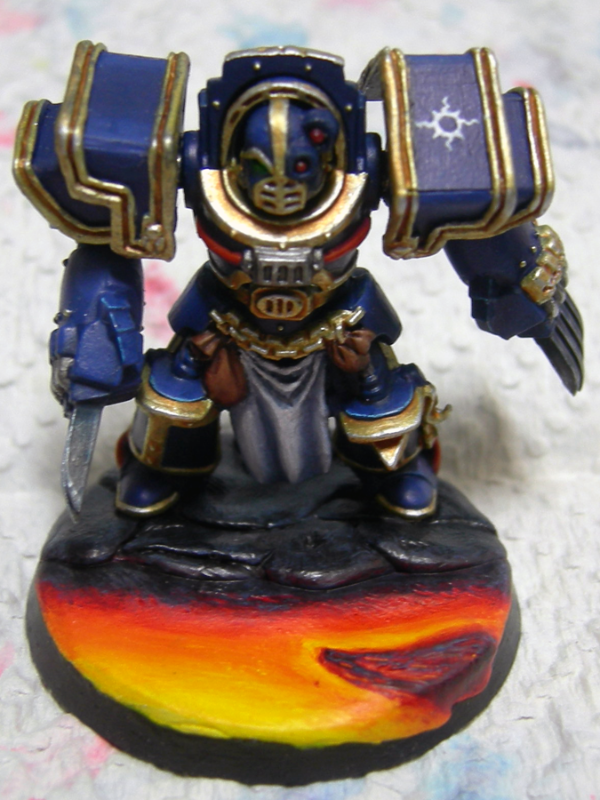
Just using my current project to show how I do my lava bases, for those interested!
First things first - reference pictures. GET SOME. I've got a whole folder full of photos of lava from Google.  The main one I've been using lately though for my current lot of terminators is this photo. Reference isn't meant to be copied exactly, just used to give you a more solid idea of what you want to make and how to paint it.
Anyway, once you have reference, make your base - assuming you don't have a pre-made one anyway, heh.
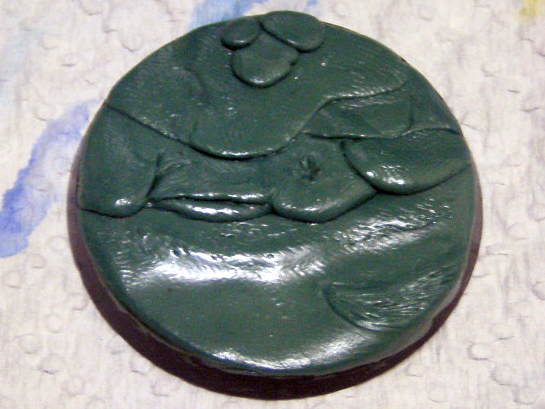
Once the greenstuff is dry, basecoat! I just hand-painted my basecoat on. Having a white base for the lava is the easiest thing to do. If you use a spray basecoat, I'd suggest using a white or grey spray, then painting over it like this.
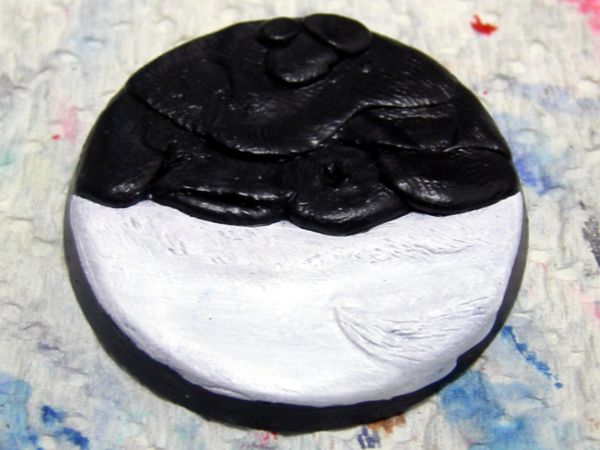
Be warned, if you're anything like me you will keep mistaking this for an Oreo cookie every time you glimpse it out of the corner of your eye. x_x
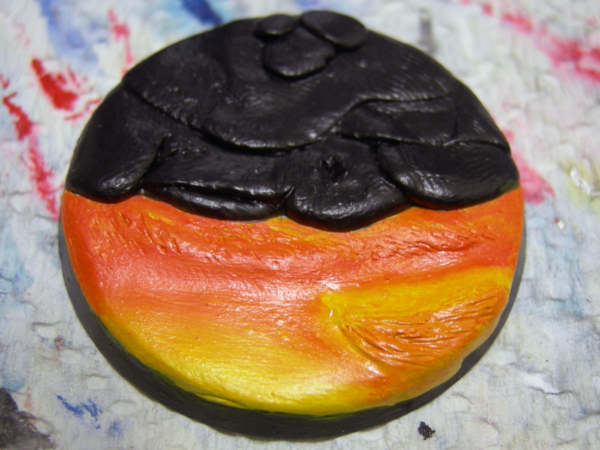
Next step - yellow. I used an old version of Sunburst Yellow - nice and thin, so the white shows through and it's easy to get some variation in the white/yellow. This is why you need a white basecoat, heh. Depending on the sort of lava you're doing, you might leave some areas where the white shows through, for the hottest sections of lava. The area I'm basing this base on though doesn't have any of those hotspots.

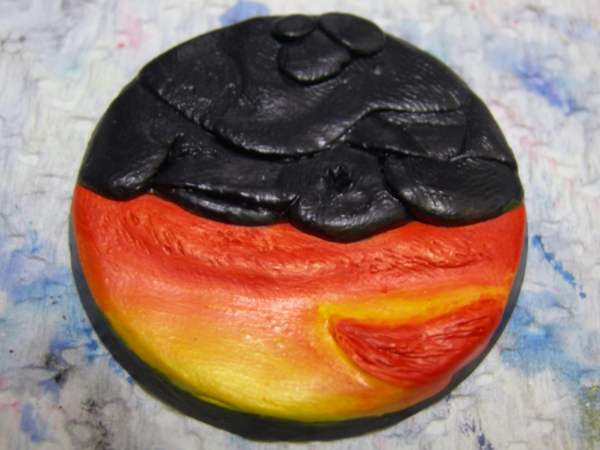
Orange! I used Blazing Orange, and blended it in with the yellow to get a nice gradient. Make sure you thin your paints if they're not thin already, makes it easier to blend. Refer to your reference pictures to see what areas stay yellow and what goes orange. Drybrush over the rougher areas to leave some yellow in the crevices, though that doesn't really show in these photos unfortunately.
Blood Red next. Again, refer to your references, keep your paints fairly thin, and drybrush the rougher areas to leave some yellow and orange in the crevices.
Next I used Red Gore, though you could probably skip this one without too much trouble and go straight to a darker red. Second verse same as the first - reference, thin paint, drybrush.
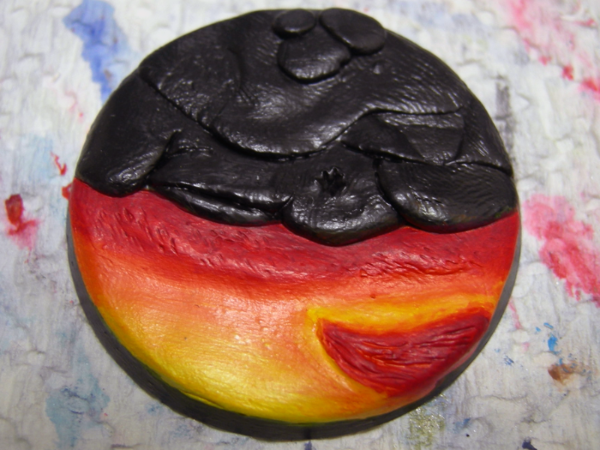
Scab Red. Third verse same as the first, little bit louder and a little bit worse! Also, you can start drybrushing some of the red on the underside of the rocks at the edge of the lava, to get the effect of the lava glowing off the rocks. I didn't do that much for this one, since the lava's relatively cool and not giving off much light right next to the rocks.
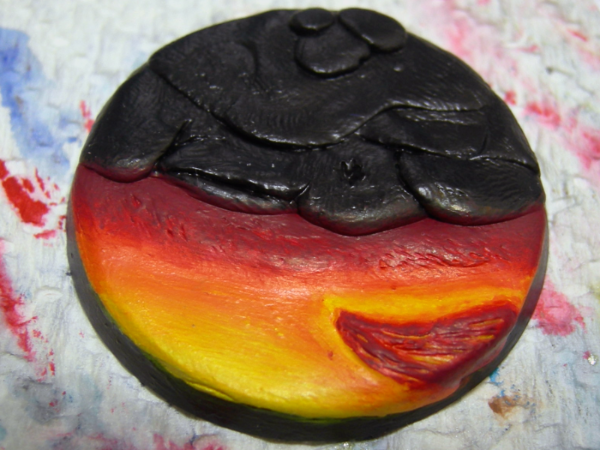
Almost done. Black next, for the highest areas of lava where it's cooled to a near-solid crust on top of the molten stuff. This is mostly just drybrushing by this point, to avoid the black getting into the crevices.
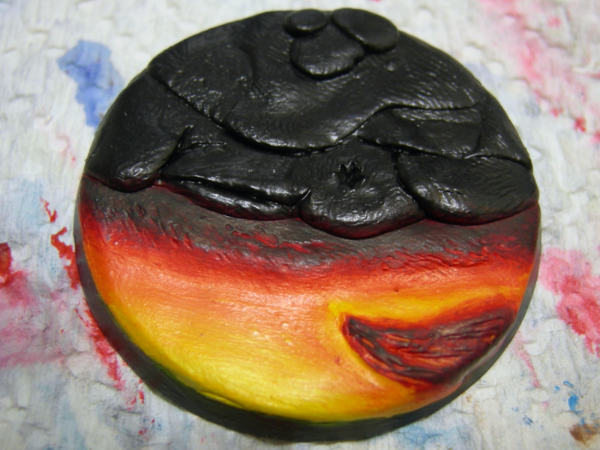
You could easily stick a fork in it and call it done at this point. I just added one more step to give the rock a bit more variation and texture, and add a bit of lighter colour to the top of the lava crust. I very carefully drybrushed a thin coat of Fenris Grey over the black, bringing out the highest points of the crust and rocks. If the grey's standing out too much, you can then bring it back down a little with a wash of black.
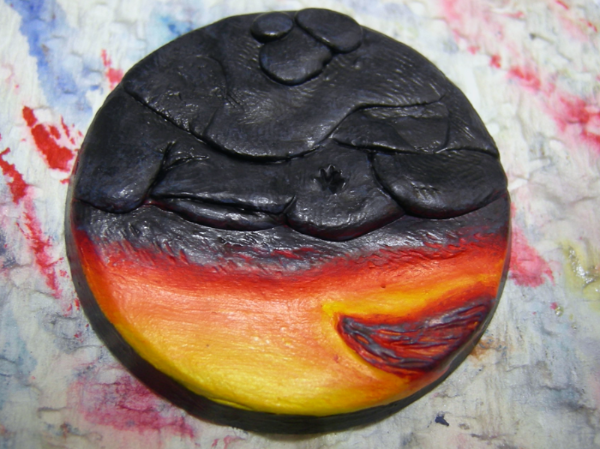
The final result!
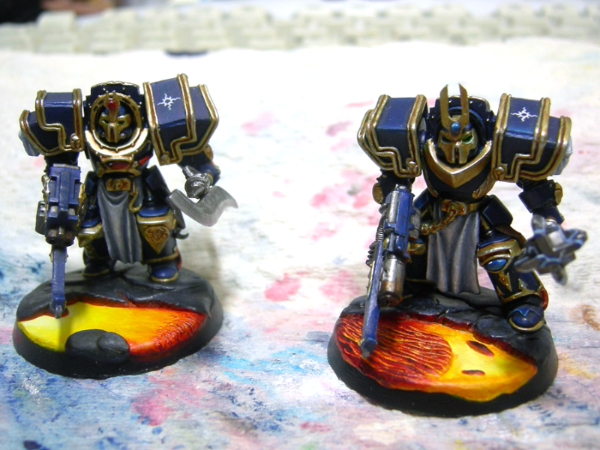
And a couple of other Terminators using the same reference photo for their bases, and showing a bit more of the lava glowing off the underside of the rocks.
I hope this has been helpful, or at least somewhat interesting!
|
|
|
|
 |
|
2012/04/08 08:14:54
Subject: Tutorial: Lava Bases
|
|

Twisted Trueborn with Blaster
|
Oh yeah that is completely insane! Thanks a million this is how I'm gonna do all my bases/scenery now!
|
DA:00S++GM++B++I+Pw40k09+D+A+/eWD311R+T(F)DM+ |
|
|
|
|
2012/04/08 08:23:12
Subject: Tutorial: Lava Bases
|
|
Dipping With Wood Stain
|
Hehe thanks! Glad it was helpful!
|
|
|
|
|
|
2012/04/08 10:22:22
Subject: Tutorial: Lava Bases
|
|
Psychic Prisoner aboard a Black Ship
|
Awesome. you've completely converted me from urban bases, and my new grey knight army is gonna be bass this way, thanks man .
|
peace through superior firepower.    |
|
|
|
|
2012/04/08 10:58:42
Subject: Re:Tutorial: Lava Bases
|
|

Nurgle Veteran Marine with the Flu
|
nice tutorial for different terrain type. plain and simple! congrats!
|
|
|
|
|
|
2012/04/08 15:29:51
Subject: Tutorial: Lava Bases
|
|
Dipping With Wood Stain
|
@someone: Hehehe, sweet! Join ussss, we have cookies! And now I'm half-tempted to make a model with a Grey Knight wading THROUGH lava. 'Cause we all know they're just that damn badass.
@avedominusnox: Thank you!
|
|
|
|
|
|
2012/04/11 18:21:01
Subject: Tutorial: Lava Bases
|
|

Slippery Scout Biker
|
Any tips for painting lava between cracks in rocks?
|
 
Nocturne's Sons: w/d/l 4/3/6


Thunder Lords 18/12/5
 |
|
|
|
|
2012/04/11 20:48:06
Subject: Tutorial: Lava Bases
|
|
Druid Warder
|
Wild wrote:Any tips for painting lava between cracks in rocks?
If your doing it this way then, its much easier to do the fire portion of the lava first. Then base coat the rocks in black, and then dry brush the rocks.. Its pretty simple really..
|
|
This message was edited 1 time. Last update was at 2012/04/11 20:48:24
|
|
|
|
|
2012/04/11 20:58:03
Subject: Tutorial: Lava Bases
|
|
Member of the Malleus
|
SO, I like the technique. looks good.
my complaint, is that particular type of lava doesn't lend it's self to standing on safely. so while it looks good, its not very practical.
/soapbox 
|
 
[url]www.newaydesigns.com
[/url] |
|
|
|
|
2012/04/12 01:06:55
Subject: Tutorial: Lava Bases
|
|
Dipping With Wood Stain
|
@Wild: Basically what ruff said, heh. Pretty much do 'em the same way the lava's done except it's mostly just drybrushing - start with white, build up from there with drybrushing over the cracks and leaving a little of the previous colour showing deeper in the cracks. That should give you the lava and the glow on the sides of the cracks. Then paint the rocks black and drybrush whatever rock colour you want on 'em.
If the cracks are large enough, you can always touch up afterwards with a fine detail brush. Hopefully that helps.
@Rimmy: And that's why they're standing on the nice safe rocks, and not standing on the lava itself.  Hehehe, thanks!
|
|
|
|
|
|
2012/04/12 16:40:53
Subject: Tutorial: Lava Bases
|
|
Furious Raptor
Fort Worth, TX
|
I have to say, that's pretty awesome stuff there. I might have to steal this idea, should I ever want to be more creative.
|
I  out with out with  in both 40k and WHFB. in both 40k and WHFB.
Co-host of the HittingOn3s Podcast
|
|
|
|
|
2012/04/13 08:04:09
Subject: Re:Tutorial: Lava Bases
|
|

Yellin' Yoof
|
I have to say, that's pretty awesome stuff there. I might have to steal this idea, should I ever want to be more creative.
xD may i hit this into my signature?
|
|
This message was edited 1 time. Last update was at 2012/04/13 08:04:35
its nobs vs tervigon what you gonna do?
 INSANE COURAGE and dont care! INSANE COURAGE and dont care! |
|
|
|
|
2012/04/13 09:29:48
Subject: Re:Tutorial: Lava Bases
|
|

Primered White
Torun, Poland
|
Excellent work! We are currently working on our bases too! Project you've done is really inspiring.
|
|
|
|
|
|
2012/04/13 11:35:09
Subject: Tutorial: Lava Bases
|
|
Dipping With Wood Stain
|
Thanks all! I'm glad this is so inspiring for people!
|
|
|
|
|
|
2012/04/13 22:35:53
Subject: Tutorial: Lava Bases
|
|
Stalwart Strike Squad Grey Knight
Jacksonville, NC
|
Great looking bases and models!
|
|
|
|
|
2012/04/15 17:37:35
Subject: Tutorial: Lava Bases
|
|
Slippery Scout Biker
|
Once again, amazing. does anyone have any recommendations for making a base look like volcanic ash?
|
Nocturne's Sons: w/d/l 4/3/6
Thunder Lords 18/12/5
|
|
|
|
|
2012/04/15 23:33:27
Subject: Re:Tutorial: Lava Bases
|
|
Dipping With Wood Stain
|
Thank you!
As for volcanic ash... hm. Quick google search to find some reference...
Looks basically like fine grey sand. Is that the sort of volcanic ash look you'd be going for? Maybe use fine snow flock or fine sand flock, with some larger bits added, and give it all a watered down black or grey wash. Or just paint it a suitable light grey and drybrush some lighter/darker grey over it.
If those are still too grainy, I wonder how well talcum powder works as a base...
Have a play around with it! Sorry I couldn't be more help, it's not something I've tried. Hopefully this gives you a starting point at least!
|
|
|
|
|
|
2012/04/16 00:30:20
Subject: Tutorial: Lava Bases
|
|
Courageous Space Marine Captain
|
What are the models in the endpiece?
|
I'm celebrating 8 years on Dakka Dakka!
I started an Instagram! Follow me at Deadshot Miniatures!
DR:90+S++G+++M+B+IPw40k08#-D+++A+++/cwd363R+++T(Ot)DM+
Check out my Deathwatch story, Aftermath in the fiction section!

Credit to Castiel for banner. Thanks Cas!
|
|
|
|
|
2012/04/16 01:12:43
Subject: Re:Tutorial: Lava Bases
|
|
Dipping With Wood Stain
|
Those are my customised Thousand Sons Terminators. There's in-progress shots of 'em in my blog, linked in sig.
|
|
|
|
|
|
2012/05/22 01:38:55
Subject: Tutorial: Lava Bases
|
|
Annoyed Blood Angel Devastator
Boston
|
Thanks was looking for a tutorial! Also never thought to use the Green stuff thanks for saving my wallet too!
|

 We are winged salvation, but we are a terrible, final salvation, and our wings embrace the horizon with fire. We are the Blood Angels. To confront us is to die, and death is my remit, my reality, my unbounded domain. I have known death, and defeated it, claimed it as my own. To my cost, to my strength, death is my one gift to bestow, and I am nothing if not generous. We are winged salvation, but we are a terrible, final salvation, and our wings embrace the horizon with fire. We are the Blood Angels. To confront us is to die, and death is my remit, my reality, my unbounded domain. I have known death, and defeated it, claimed it as my own. To my cost, to my strength, death is my one gift to bestow, and I am nothing if not generous. |
|
|
|
|
2012/05/22 02:28:52
Subject: Re:Tutorial: Lava Bases
|
|
I'll Be Back
|
lol if only when you followed those steps the terminator at the end came with it. Cool tut!
|
Planning  's @ around 1000 's @ around 1000 |
|
|
|
|
2012/05/22 14:38:54
Subject: Tutorial: Lava Bases
|
|
Dipping With Wood Stain
|
@BrotherGnaeus: No worries, glad this could help! And given how expensive this hobby can get, anything that'll help people save money on it is fantastic, imo.
@Ace De Diamant: Hah, they do if you make 'em yourself! Just takes a bit more time and effort, hehehe. Thanks!
|
|
|
|
|
|
2012/05/23 01:10:31
Subject: Tutorial: Lava Bases
|
|
Mutated Chosen Chaos Marine
|
Wow! That's fantastic and very easy! Thanks for this! Awesome custom Terminator too!
|
|
|
|
|
|
2012/05/23 01:49:09
Subject: Tutorial: Lava Bases
|
|
Dipping With Wood Stain
|
No worries, and thank you!
|
|
|
|
|
|
2012/05/28 07:00:57
Subject: Tutorial: Lava Bases
|
|
Bloodthirsty Bloodletter
|
Nice one, I do like how your very last base looks, goo contracts and movement in the cooler and more dense lava.
|
The Good: 8,000
Ultramarine, Scouts, Blood Angels, Dark Angels
The Bad: 8,000
Chaos, Daemons, Dark Eldar, Orks
      VS VS    |
|
|
|
|
2012/05/28 08:50:49
Subject: Tutorial: Lava Bases
|
|
Dipping With Wood Stain
|
Thank you! It was fun to play with different varieties of lava, hehe. And when the whole squad's lined up together... 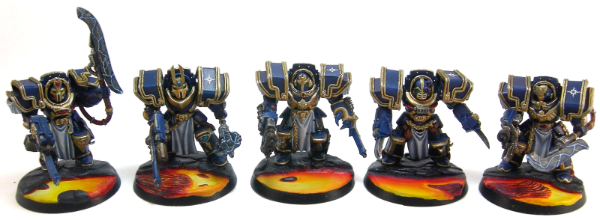 Designed so the lava flow is continuous across all the bases. The first and last bases match up as well, so I can loop 'em around or whatever.
|
|
This message was edited 1 time. Last update was at 2012/05/28 08:53:15
|
|
|
|
|
|
|

 My Chaos Space Marines showcase so far:

 Tons!
Tons!
 Tons!
Tons!