| Author |
Message |
 |
|
|
|
|
Advert
|
Forum adverts like this one are shown to any user who is not logged in. Join us by filling out a tiny 3 field form and you will get your own, free, dakka user account which gives a good range of benefits to you:
- No adverts like this in the forums anymore.
- Times and dates in your local timezone.
- Full tracking of what you have read so you can skip to your first unread post, easily see what has changed since you last logged in, and easily see what is new at a glance.
- Email notifications for threads you want to watch closely.
- Being a part of the oldest wargaming community on the net.
If you are already a member then feel free to login now. |
|
 |
2014/01/07 13:58:47
Subject: Razormage's WHFB alternatives Thread - Updated 2/19, still working on that dragon
|
|

Average Orc Boy
|
So for about six months now, I've been running a blog over at http://www.thebeerwaaagh.blogspot.com. I've been having a lot of fun with it, and figured I'd start sharing the stuff I'm working on with the Dakka populace, as you guys are a lot of fun, too!
I first got into Mierce Miniatures back in November of 2011, under circumstances that are very similar to how Cool Mini or Not was almost completely destroyed. I took a gamble on some of their stuff, had my order fulfilled, and went back and ordered even more. A year later, I've got almost everything in their range, and am constantly on alert for how I can use their models! This blog is going to be the story of how I integrate them with my existing armies, and in one case build an entire army (Warriors of Chaos) around their range. As the name of my blog indicates, I'm primarily an Orc player, and frequently drink beer as I'm painting. Since I'm shameless about it, a number of the pictures might have alcohol pictured, so consider this blog rated 12+ for some alcohol use.
So, the introduction is out of the way. Now, let me point you to the three threads on this topic I've already done, since I don't just want to paste their content here:
Glaun, Tawrdraig, who I will be using as a Chaos Chariot.
Kaastaruk, Skull Bearer of the Tarvax, a Minotaur Standard Bearer
Aradae Mawr, Cawrdraig of the Brythoniaid, a Dragon Ogre.
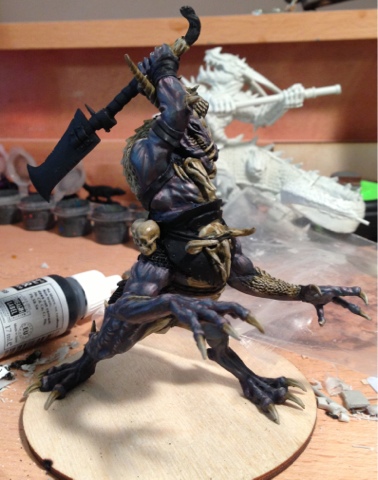
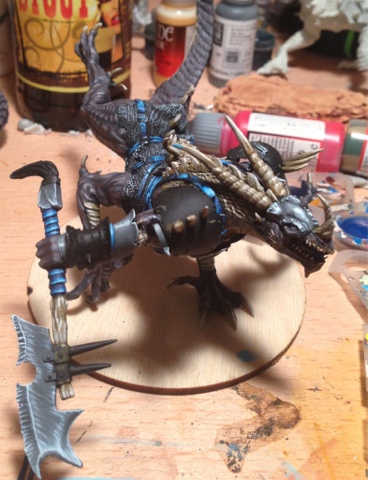
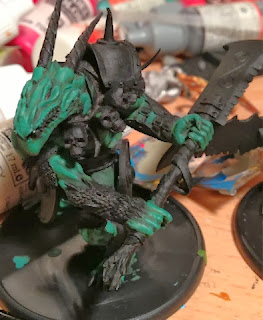
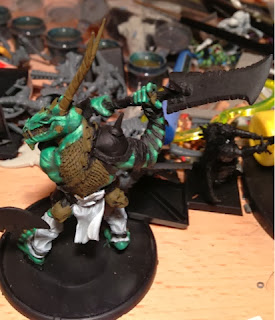
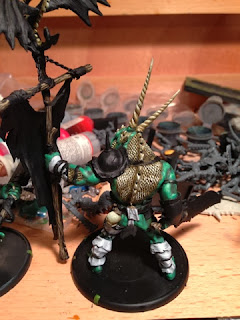
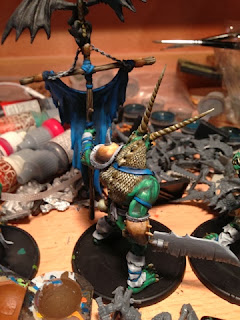
The last of those links is the most relevant to what I'm about to throw on, as it's the work I did on a second Dragon Ogre. I know a lot of people have been using Aradae Mawr as a Shaggoth, but I intend to use a different model to fill that role.
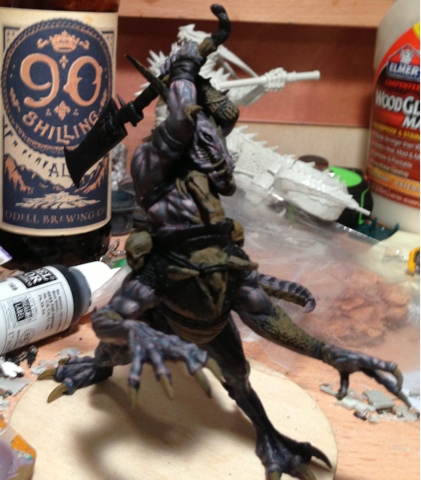
Without further ado, here's the second of my Dragon Ogres! I painted him back in September, and the blog post with his info can be found here. Follow the link if you want a bit more detail, or discussion of the beers you're seeing in the background.
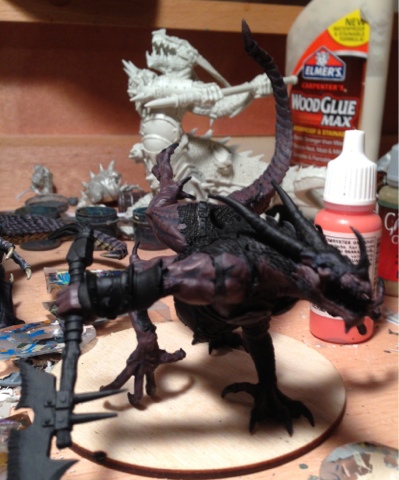
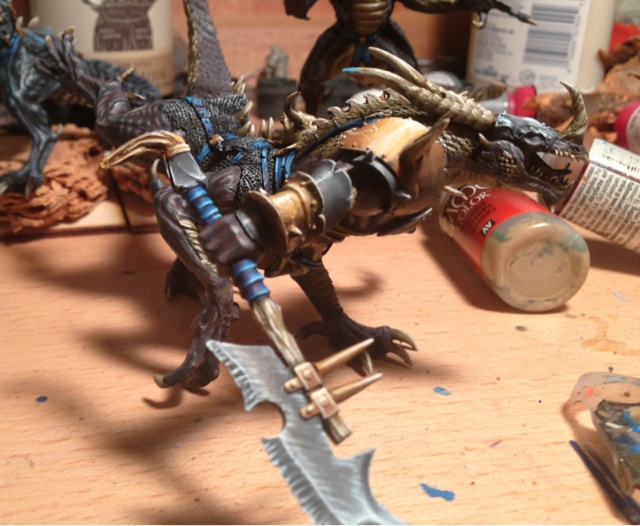
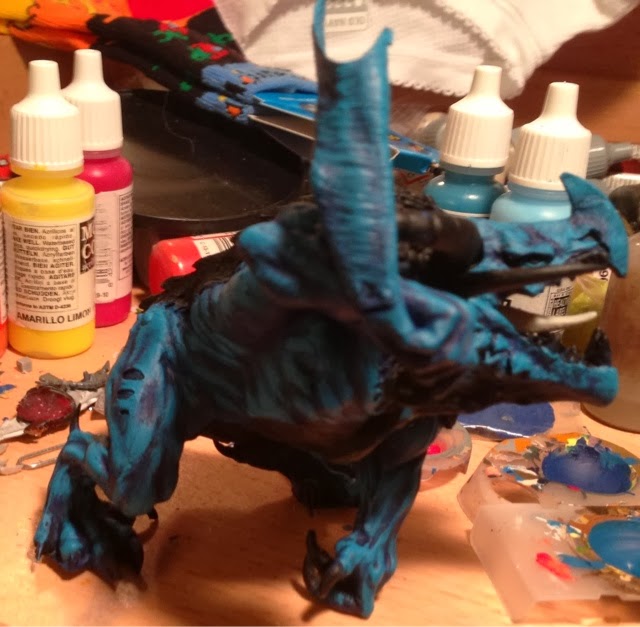
Well, as you can see at the outset, my camera has decided to focus on the beer instead of the model. I think that's where my focus may have been as well. The first layer is the same as Aradae's was: 3 drops of Vallejo Carmine Red to two drops of Medium Blue, with two more drops of SS Camo Black Brown for darkness.
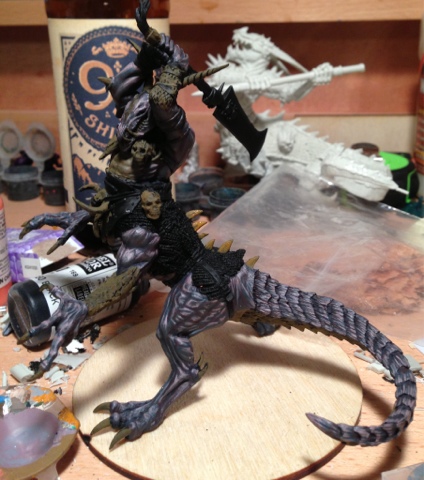
I'm beginning to think I'm the only modeling blogger that doesn't care when his WiP photos are out of focus, as long as there's a beer in the background that stole it.
Oh, wait, the model? Learning from the mistakes I made on Aradae Mawr, I skipped the second and third layers that I'd used for his skintone, and jumped straight from the first to the fourth. In addition, I under-added the blue to the proportions I'd noted, to keep the skin purple without drifting into the strong blues and then zagging back into reds on the next layer. This one's 2 parts Carmine Red : 2 Parts Bloody Red : 3/4 part Medium Blue.
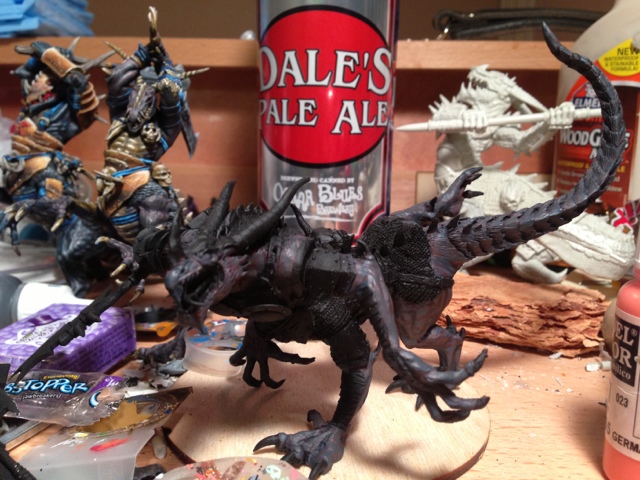
It's now Monday night and I have to go to work in the morning, but I have a fantastic Imperial Porter and have hit a stride in painting. Who needs sleep for the work week? About this point I realized that the camera keeps focusing on the background, so I also fixed that problem (finally). This shade is 3 parts bloody red to 3/4 part Medium Blue. I also transitioned from the Games & Gears brush that I pretty much only use for the first layer or two, to my trusty Winsor & Newton Series 7s. I think I grabbed the 1 for this one, and then decreased size for each subsequent layer.
Same mix as above, except with a drop of German Orange for good measure. W&N Series 7 size 0, if I remember correctly.
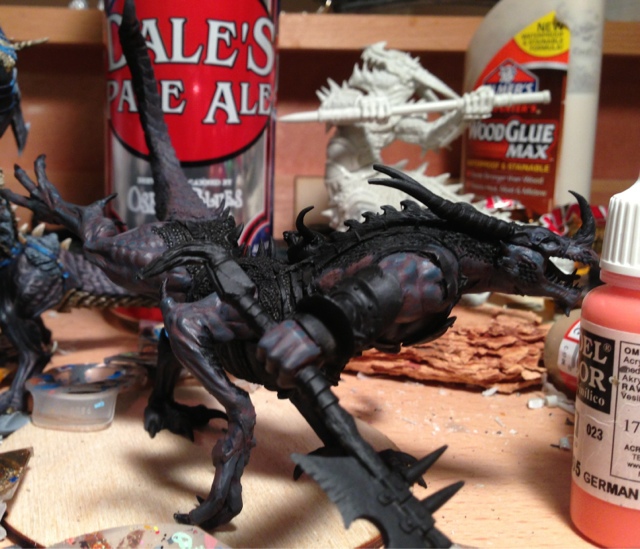
Tuesday was pretty much a Monday in disguise, and I only got two layers in. This layer was 3 drops Bloody Red, 1 drop German Orange, 1/2 drop Medium Blue, and 1/2 drop Sky Blue, applied with a W&N Series 7 00 brush.
The second layer for Tuesday finished up the skintone! This layer was 3 Bloody Red : 1 Sky Blue, applied with a W&N 000. I would have liked to press on, but 2 AM was just too late to keep going...
... until Wednesday happened.
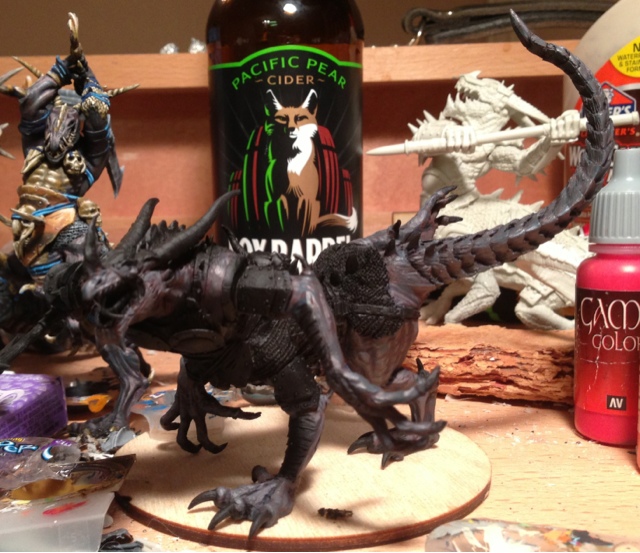
Wednesday featured a (boring nonsense you don't care about, so go to the blog if I'm wrong on that). I finished that task at 2:30 AM, and decided that I didn't care; I was going to get at least one layer in. With the skintone done, I moved on to the bone/scales. This layer is a simple 50/50 mix of Cobra Leather and SS Camo Black Brown.
By Thursday night it was clear to me that, despite having Monday off work, the rest of the week was all going to consist of Mondays. I gritted my teeth, grabbed a pint from one of my kegs, and got down to work. The second layer on the bone is all Cobra Leather.
The second layer concluded, I just started plowing through layers. I did a 50/50 mix of Cobra Leather and Vallejo Medium Grey, forgot to take photos, and moved on to the ones pictured here, which show the next layer, which was all Medium Grey.
The next two layers were 50/50 Medium Grey to Pale Flesh, and a layer of all Pale Flesh. Again, I was zoned in on painting and just plowing through it, so I forgot to take a photo of the intermediate layer. Sorry about that!
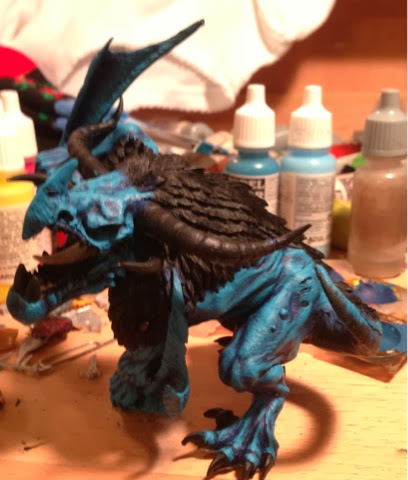
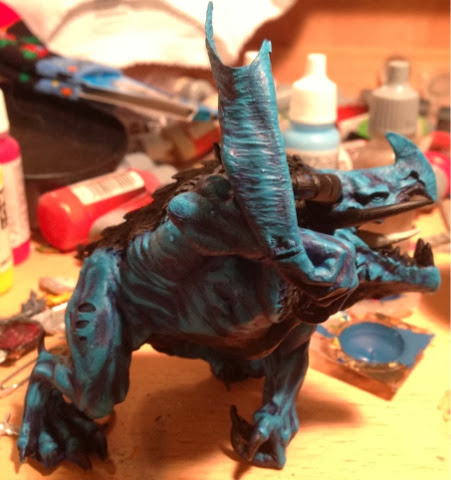
The bone out of the way, I jumped right into the blues, and got three layers in before I remembered to take photos. The base coat was all Stormy Blue, followed by a 50/50 mix of Stormy Blue and Medium Blue. I then did all Medium Blue (shown). After that, I added another stop of 50/50 Medium Blue and Sky Blue, then a layer of Sky Blue. At that point, it was 4 AM, I forgot to take photos, and I went to sleep instead.
After a relaxing weekend of going to bed at a reasonable time and playing with my kids, I jumped back in for the non-metallics on Sunday night.
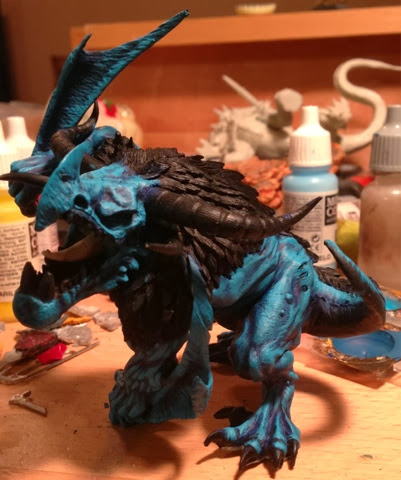
I rapid-fired these with wet blending, so I don't have any WiP shots of them. The steel is my typical mix of 1.5 black : 3 SA Camo Black Brown : 3 Basalt Grey for the dark points, shaded up to Basalt Grey, then Medium Sea Grey, and up through Wolf Grey. A touch of white was added for the bling.
For the bronze, I used a new color scheme I had been wanting to try: 5 bestial brown : 1.5 blazing orange : 0.5 bone white for the midtone, shaded down to SS Camo black Brown, and then up through bronzed flesh to bone white. Again, pure white was used in touches to make it shiny.
I liked the bronze look so much that I even went back and repainted Aradae Mawr's golden chrome to be the same bronzed color. I may come back and add some pitting effects to it to make it look more weathered, but I haven't decided for sure yet.
Even with my high-contrast paint style, the gawdy golden chrome look was too much. I'm much, much happier with the bronzes.
Before/after:

|
|
This message was edited 13 times. Last update was at 2014/02/19 14:35:02
Creator of The Beer Waaagh: http://www.thebeerwaaagh.blogspot.com
The Mierce Painting Thread
Tournament Credentials:
Best Army or Painted: Alamo 2009, 2010 (2nd), 2012; Bayou Battles 2010-2011, [2012 2nd overridden by 2nd Overall], 2013 (2nd); Capital City Carnage 2010-2011; Lone Wolf [2011 overridden by 1st Overall], 2012; Quake City Rumble 2012-2013; War Games Con 2010
Player's Choice: Alamo 2012, 2010, 2009 (3rd); Bayou Battles 2009-2013; Capital City Carnage 2010, 2011 (2nd); Lone Wolf 2011-2012; Quake City Rumble 2012 (2nd), 2013
Sportsman: Bayou Battles 2009 (3rd); Capital City Carnage 2009; Lone Wolf 2011 [overridden by 1st Overall]
Overall: Lone Wolf 2011; Bayou Battles 2012 (2nd); Quake City Rumble 2012 (2nd)
General: Over my dead body.
|
|
|
 |
|
2014/01/07 14:02:37
Subject: Razormage's Mierce Miniatures thread (WHFB Alternatives)
|
|
Martial Arts Fiday
|
Dude, you're insane.
I love it! 
|
"Holy Sh*&, you've opened my eyes and changed my mind about this topic, thanks Dakka OT!"
-Nobody Ever
Proverbs 18:2
"CHEESE!" is the battlecry of the ill-prepared.
 warboss wrote: warboss wrote:
GW didn't mean to hit your wallet and I know they love you, baby. I'm sure they won't do it again so it's ok to purchase and make up. 
Albatross wrote:I think SlaveToDorkness just became my new hero.
EmilCrane wrote:Finecast is the new Matt Ward.
Don't mess with the Blade and Bolter! |
|
|
|
|
2014/01/07 14:13:16
Subject: Re:Razormage's Mierce Miniatures thread (WHFB Alternatives)
|
|
Average Orc Boy
|
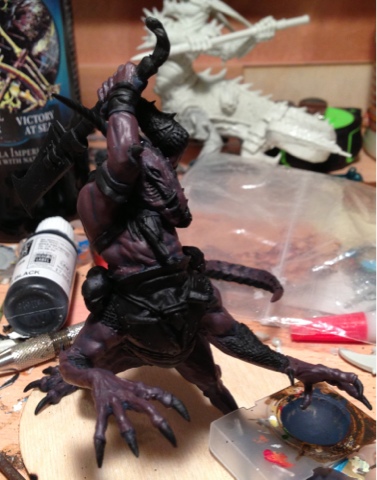
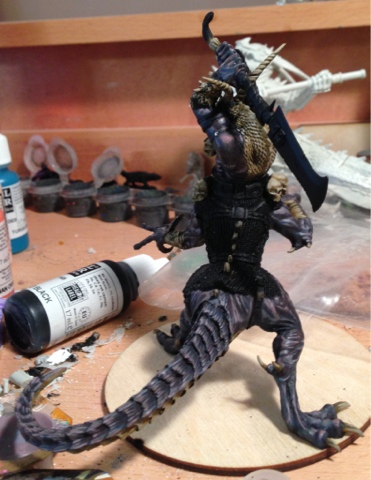
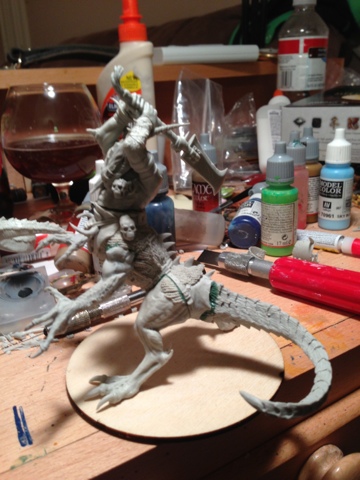
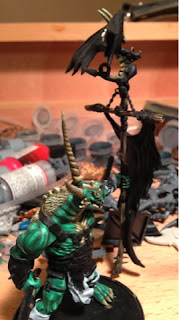
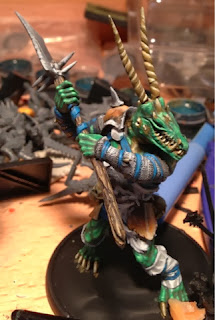
I just realized, by starting on the second Dragon Ogre, that I skipped a step in that unit. Specifically, how I went from three Aradae Mawr models to what you see above!
The answer is posted below! (Spoiler alert: it involves sawing apart very expensive resin models and then gluing them back together)
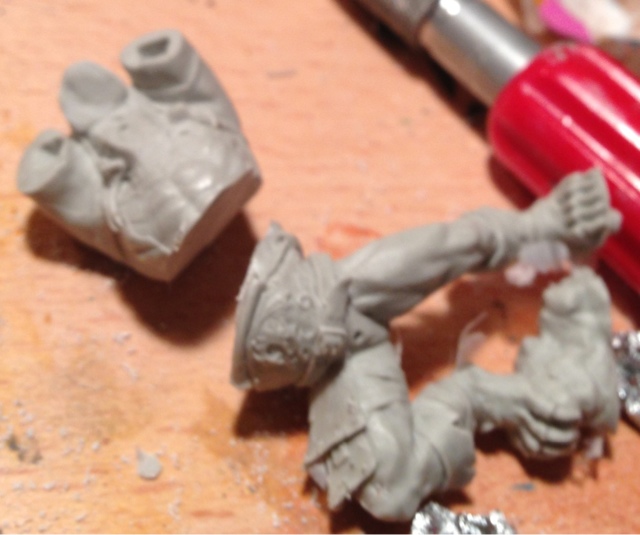
I started off with the duplicate Brythoniaid model I got from the first Mierce Miniatures Kickstarter (the unit came with 5 models, and 1 duplicate) After learning my lesson about using a knife to cut one of these models apart, I broke out a 1.5" razor saw that I'd bought specifically for sawing apart resin models, and set to work. I picked a point above the gut plate, and sawed in as straight a line as I could.
I've noticed a trend that monstrous centaur-styled models all seem to be rearing up on their back legs, grasping at the air or invisible rocks or something. I wanted to try to show one at a gallop, with both of his front legs down. To make this more feasible, I sawed both the forelegs and back legs apart at the "wrists". Note that the hand for the left foreleg was missing a finger when I unpacked it, either from a mold issue or damage from shipping. Knowing I was going to have to sculpt one finger onto the model actually made me more bold in carving it up further.
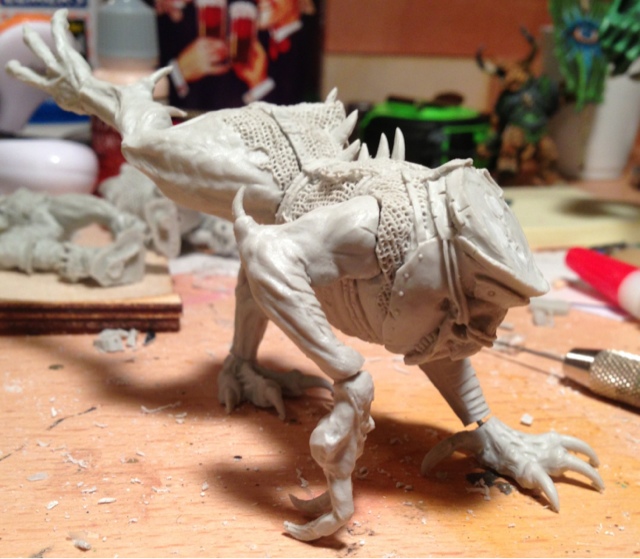 
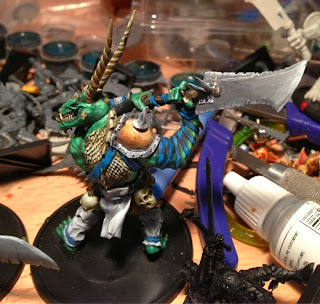
Well, after gluing all the legs on and working with the hands, my initial goal of having him running on his two front legs was proved infeasible. The bend of the right foreleg makes any running position unrealistic, as a running creature's plant legs are almost always straight. Instead, I decided to show him mid-run by having his right foreleg look as though he's lifting it up and preparing to bound forward. The back leg is kicked up a little higher than I would prefer, but the only way around that requires a complete resculpt of the back leg, and I'm not confident enough in my greenstuff skills to try *that*.
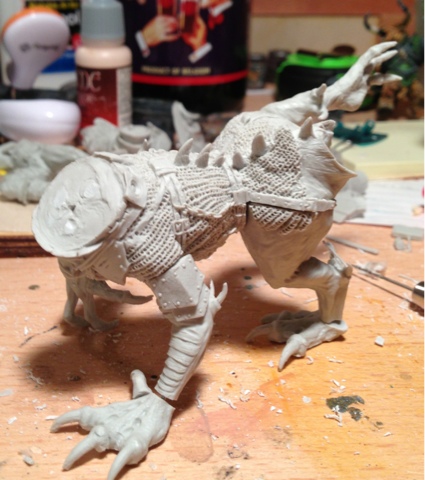
You can see from the reverse angle shot that I've got a lot of greenstuff work ahead of me - all the ankles need to be re-done. The left hindleg looks very awkward because of the size of the toes, but I'm hoping that the sheer mass of this model is going to distract any viewer from noticing that. If not, I'm going to have to saw off the left and right toes and swap them out.
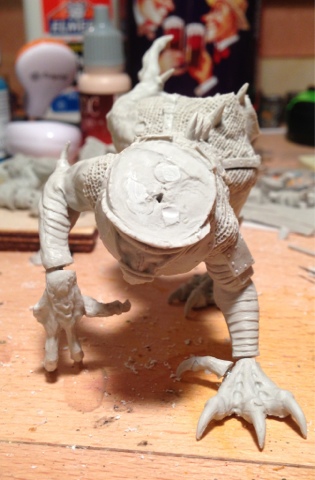
A view from the front. The old forefeet have both had their thumbs sawn off, and have been replaced on the hand and foot that are being used as the new forefeet. The right forefoot used to be the left forefoot, and the old right forefoot is now the right hindfoot. The new right forefoot needs some filing to get rid of the place where the thumb used to be, and needs to have a new fourth finger sculpted onto it.
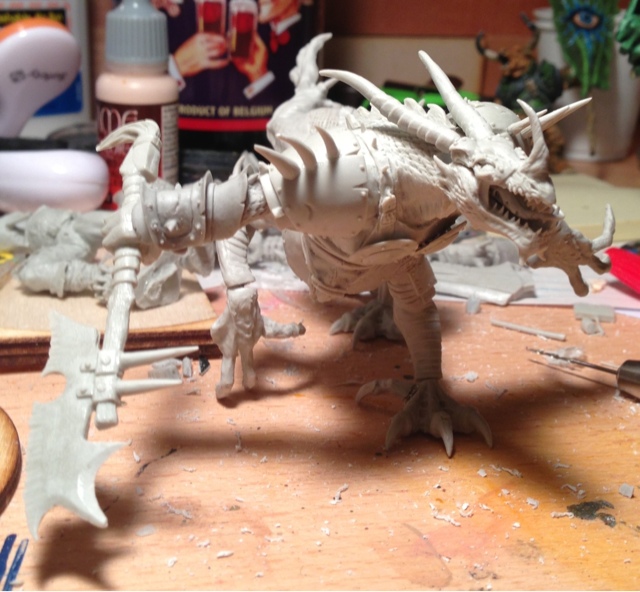
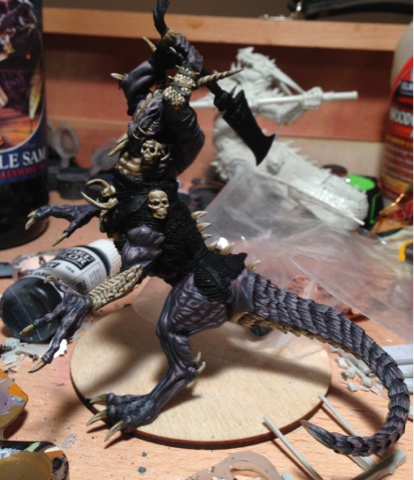
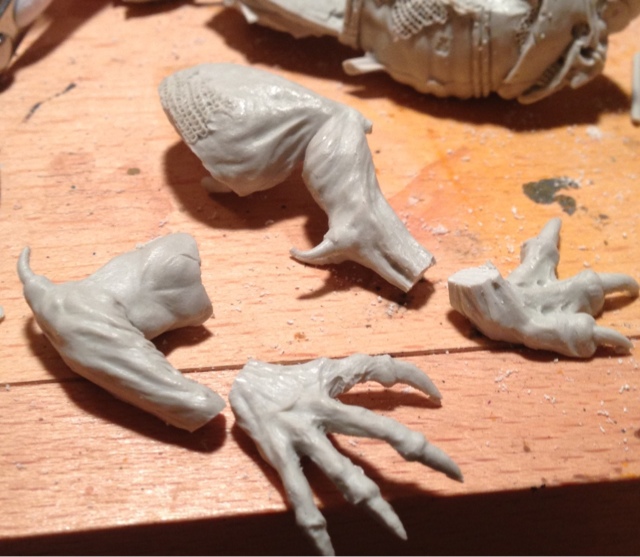
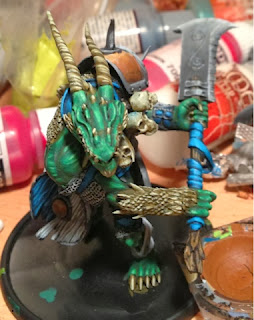
After some playing, it became very obvious, very fast, that the torso from the first picture wasn't going to work with this one. A model that's charging forward at an alarming clip isn't going to be bringing its massive weapon down; it's going to be roaring as loud as it can! Fortunately, I happen to have a torso I prepared earlier, that's glued to a different Cawrdraig. As it happens, I'm not too pleased with how that model is looking either, so I inserted a knife through its carefully resculpted waist and twisted...
I then pinned the upper torso, just so I could see how it fit. Boy, was I pleased. The Moro-reflex appearance it had on the old lower body is gone, now it looks sleek and dangerous. Unfortunately the head was still looking at the ground, so I popped it off and re-pinned it prior to this picture.
A shot of the head after drilling and pinning it in place. It will need sculpting on the top and bottom (the joint currently looks like "><"  , but at this point I've got days of sculpting ahead on this model anyway.
A view from above, showing the motion I'm trying to convey. After this was taken, it all went in a warm water bath with some soap to clean the release agent off. While I was doing that, I put the tail in some very warm water and bent it into a straighter position, so that it looks like it's flowing with the model. Unfortunately, that step went undocumented.
  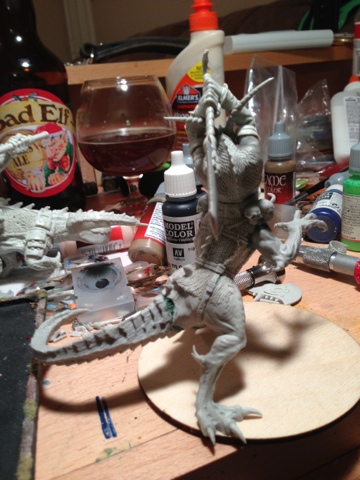
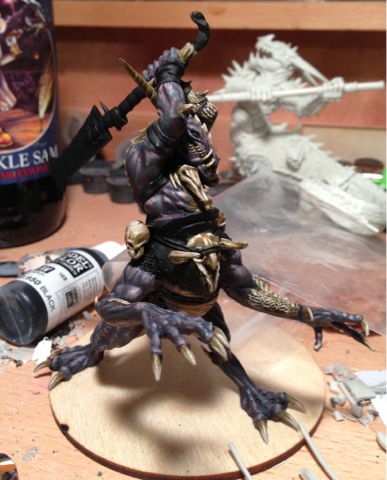
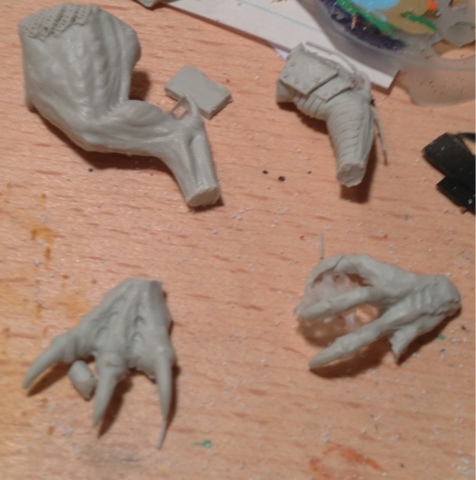
I was worried that the other Dyndraig torso would be too scrawny for the Tawrdraig torso, but am pleased that it doesn't look too odd.
The rear view shows the waist is still proportionate. I debated sculpting another layer to the guy plate to bulk it out, but think I can suffice by just extending the chest sculpt down into the existing plate.
Side view. With the tail straight up, it looks very dynamic. Front-on view, with that tail reinforcing the motion of the model. I accidentally snapped the tip while bending it in warm water, but just flipped it upside down and pinned it back into place. That little flip did a ton to make the tail look as though it is whipping around.
That upward leg is something I'm still not 100% sold on, but I'm happy with everything else! The final (undocumented) steps were filling the gaps and smoothing out the additions! I also added a finger to the right foreleg.
|
Creator of The Beer Waaagh: http://www.thebeerwaaagh.blogspot.com
The Mierce Painting Thread
Tournament Credentials:
Best Army or Painted: Alamo 2009, 2010 (2nd), 2012; Bayou Battles 2010-2011, [2012 2nd overridden by 2nd Overall], 2013 (2nd); Capital City Carnage 2010-2011; Lone Wolf [2011 overridden by 1st Overall], 2012; Quake City Rumble 2012-2013; War Games Con 2010
Player's Choice: Alamo 2012, 2010, 2009 (3rd); Bayou Battles 2009-2013; Capital City Carnage 2010, 2011 (2nd); Lone Wolf 2011-2012; Quake City Rumble 2012 (2nd), 2013
Sportsman: Bayou Battles 2009 (3rd); Capital City Carnage 2009; Lone Wolf 2011 [overridden by 1st Overall]
Overall: Lone Wolf 2011; Bayou Battles 2012 (2nd); Quake City Rumble 2012 (2nd)
General: Over my dead body.
|
|
|
|
|
2014/01/07 14:23:55
Subject: Re:Razormage's Mierce Miniatures thread (WHFB Alternatives)
|
|
Average Orc Boy
|
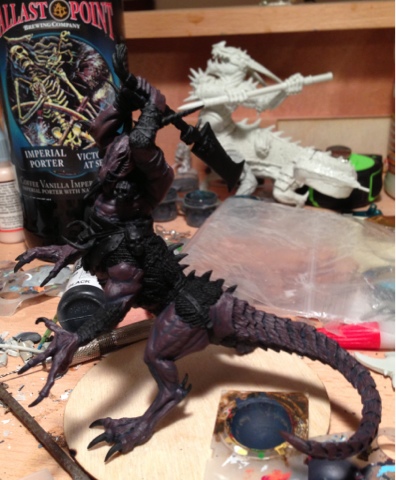
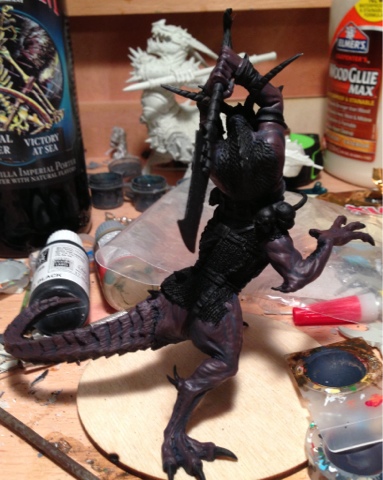
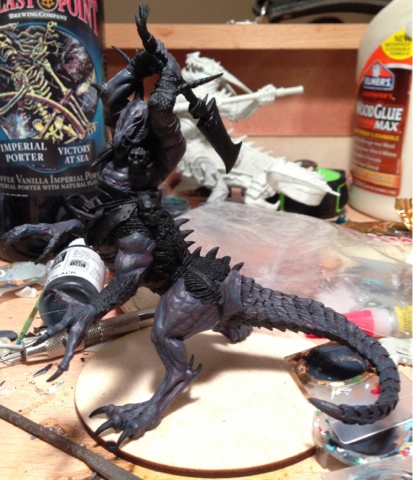
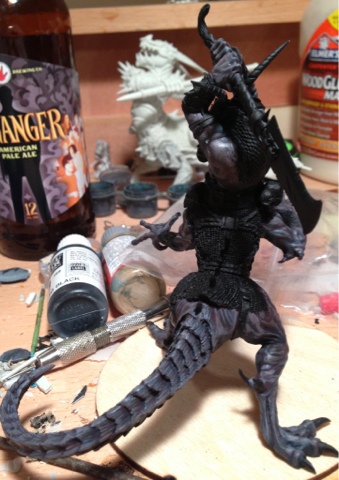
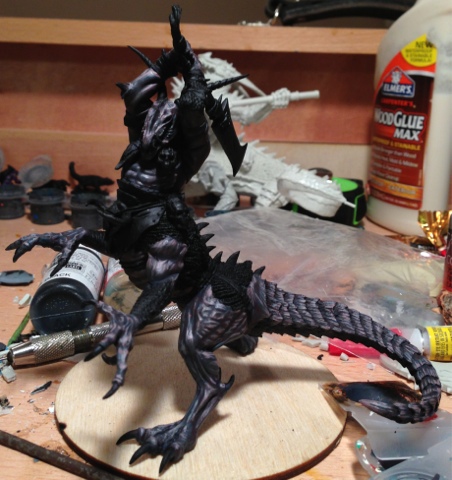
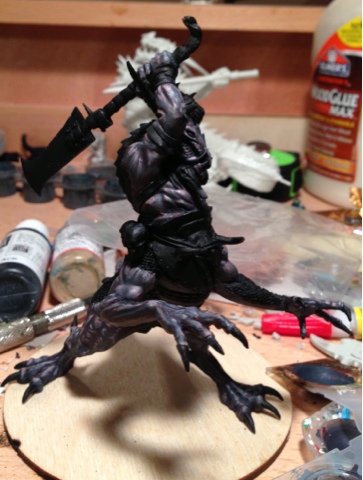
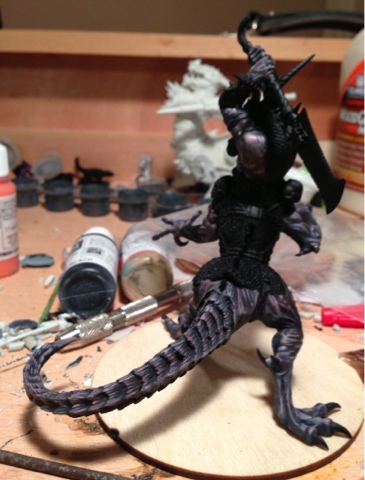
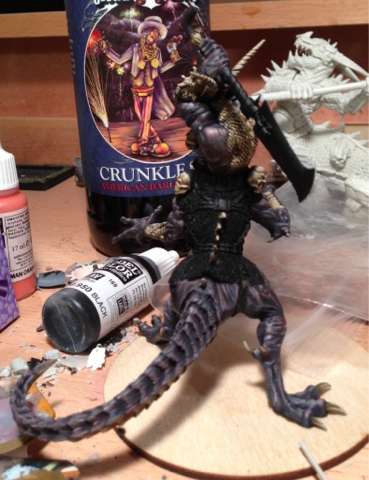
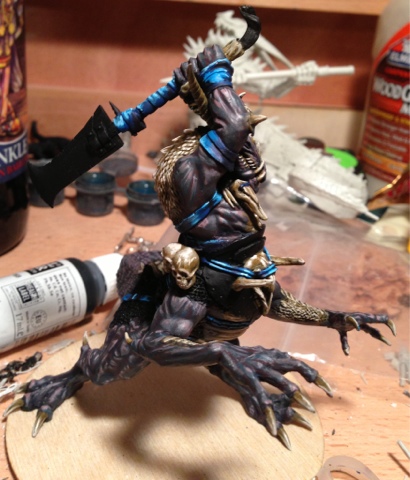
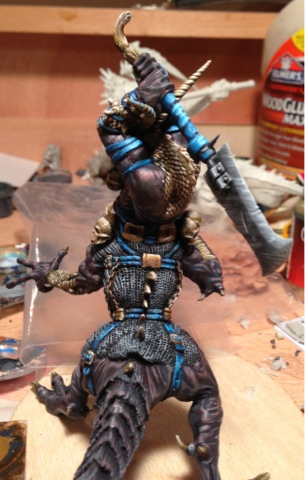
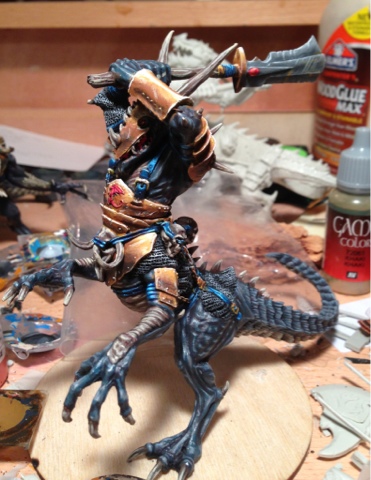
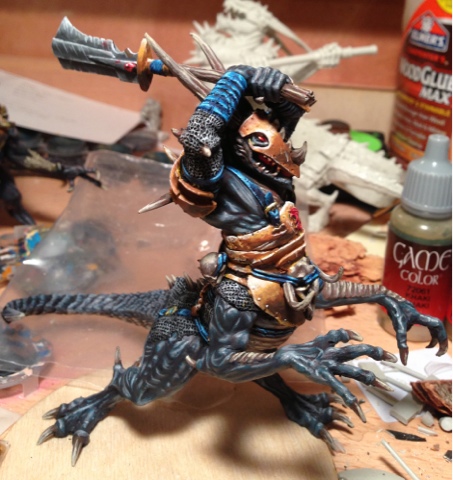
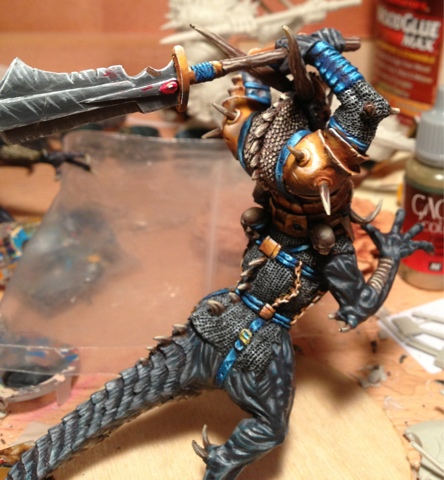
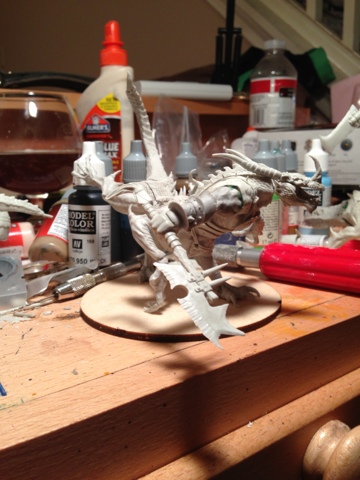
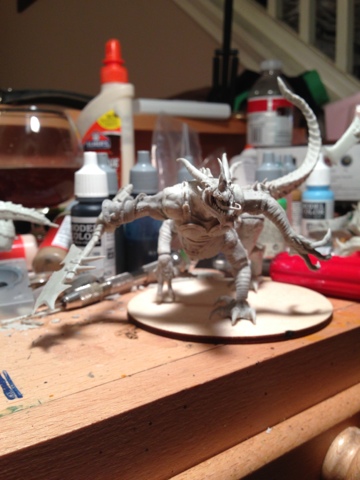
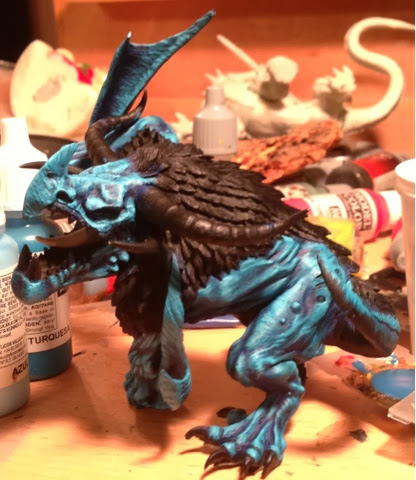
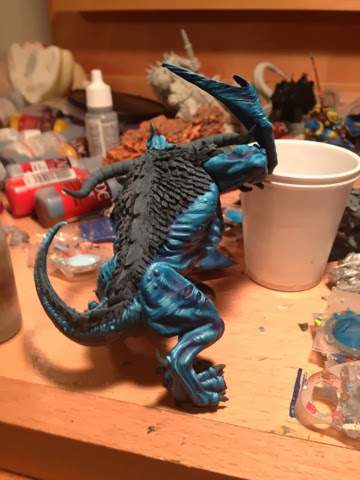
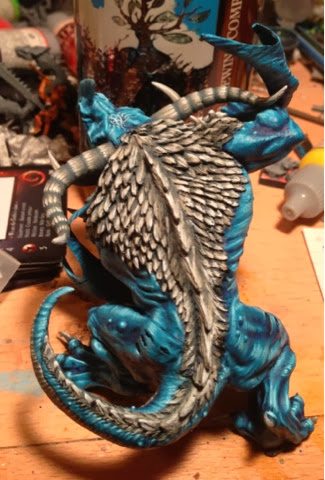
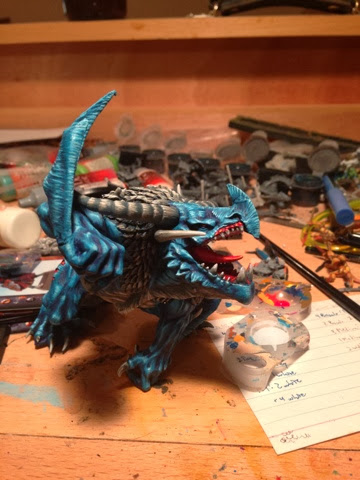
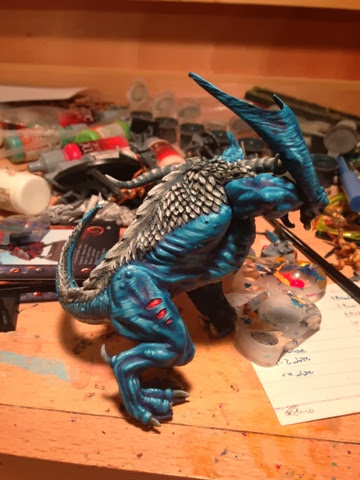
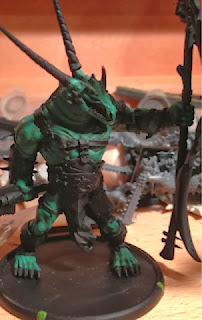
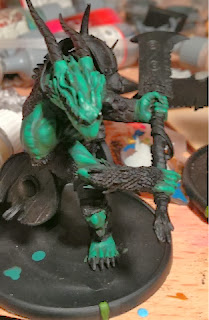
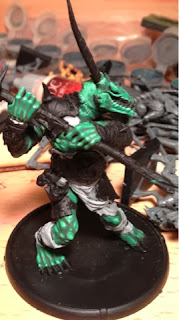
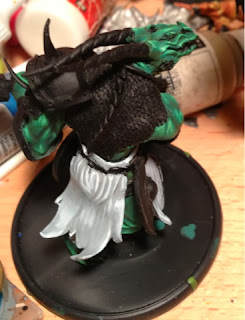
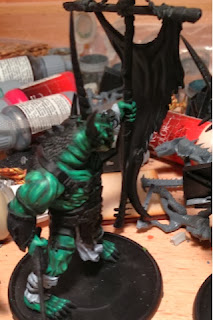
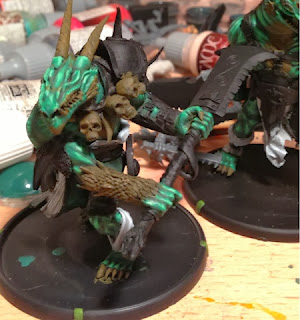
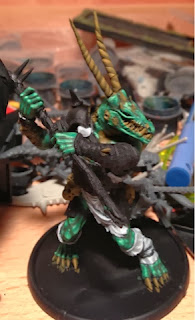
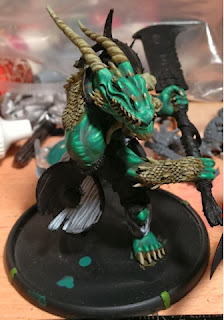
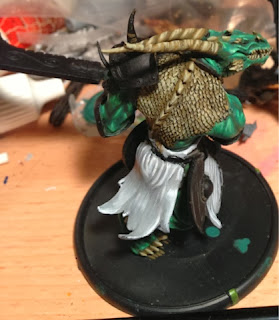
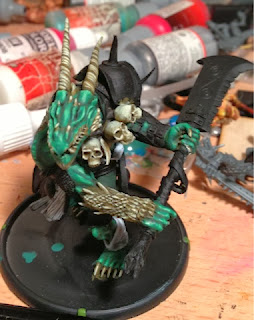
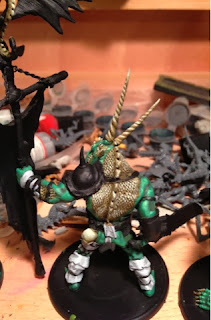
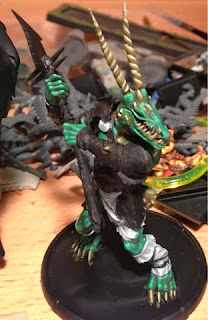
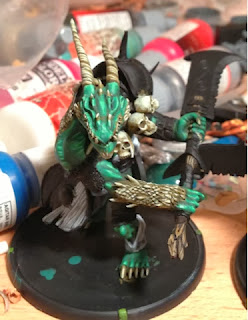
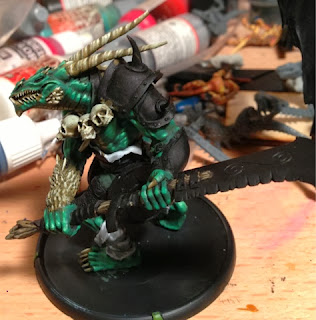
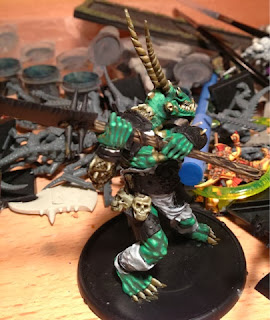
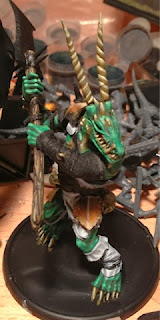
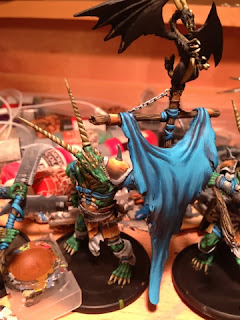
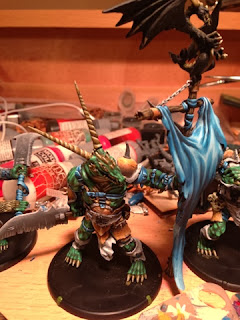
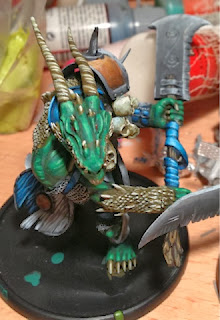
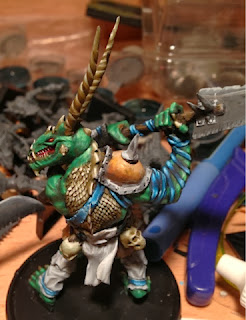
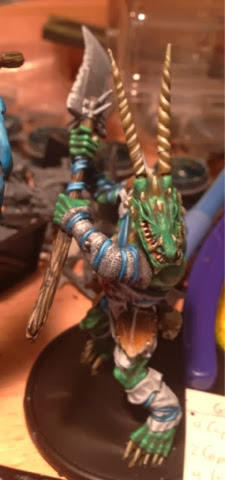
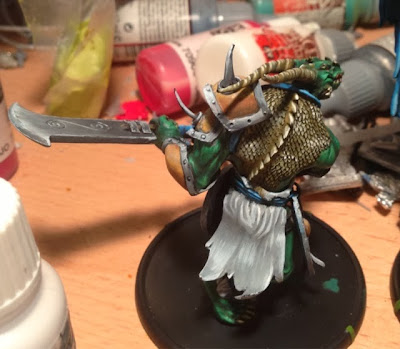
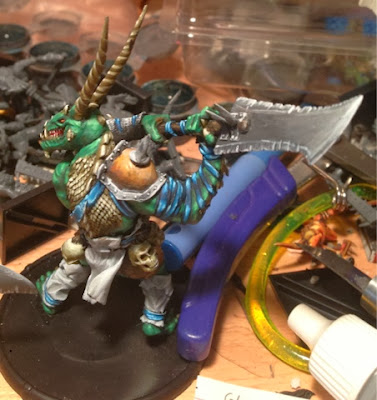
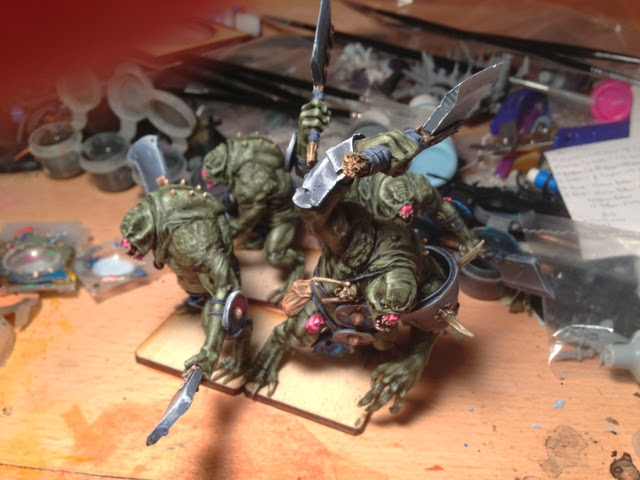
Well, I figure a couple of blog posts should be enough for one morning, so here's the third in my trio of Dragon Ogres, as discussed here. This is the paint job on the most heavily converted of the three, the one I'll use as the Shartak if I spend the points for that upgrade.
Intro layers of skintone. Since I've already painted up two of these bad boys here and in a post above, I'm going to be focusing less on the step-by-step work of the layers, and more on the process of painting the same kind of model for a third time.
First off, the first few layers of skintone. There's a trap that would be very easy to fall into with this model; specifically, painting the highlights in the same places I painted the other two. Because of the conversion work that's been done, I can't just blindly follow the same highlight pattern I used before. There are similarities, but because the hips have been repositioned, the light is going to strike the model slightly differently. This is most visible in the tail, which actually turns upward as it gets closer to the tip. When highlighting the skin, I have to redo all the visualization in my head about where the light hits, and adjust accordingly.
You can see that the highlights on the tail, rather than going along the ridgeline that gives us the creature's spine, instead are shading up along the edges of the plates of the tail. In addition, the feet are highlighted completely differently, as the light is hitting it from a very different angle than the previous two Dragon Ogres.
There's a lot going on with the skintone, including my continued attempts to find a purple scheme I like. I went with a bit more red on this layer to get it away from the blues, but fear I may have gone too far.
It's OK, though, because the joy of painting is the next highlight can correct it back to closer to where it's wanted! The skin highlights look good, for now. I'm debating coming back and giving all of them one extra highlight for popping, but I'll wait until I have the whole unit painted to make that decision.
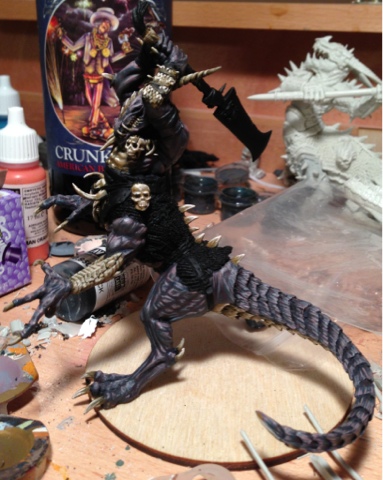
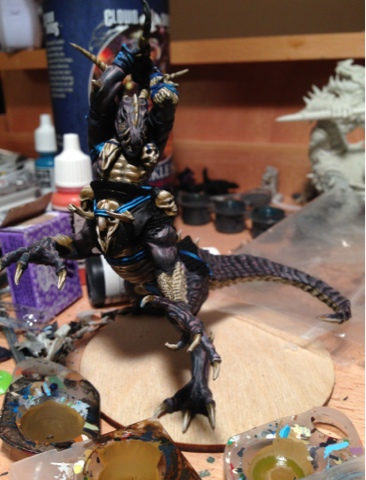
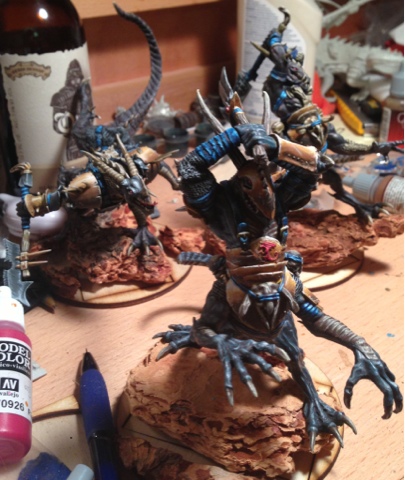
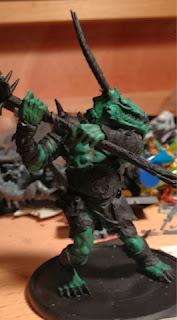
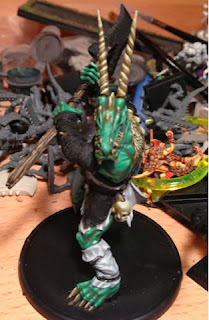
On to the bone/scales/wood color! These photos were taken about halfway through the layering, at the Leather Brown/Medium Grey stage.
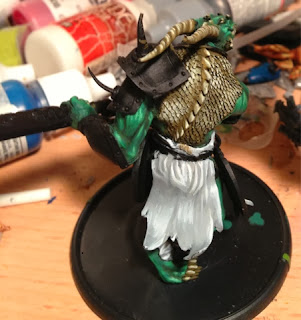
Here, the bone is completed. The earlier models didn't really give a sense of the bone-white underbellies of the creatures, so having this one posed so dramatically gives me a chance to show that detail off, especially on the tail, where it really pops through.
 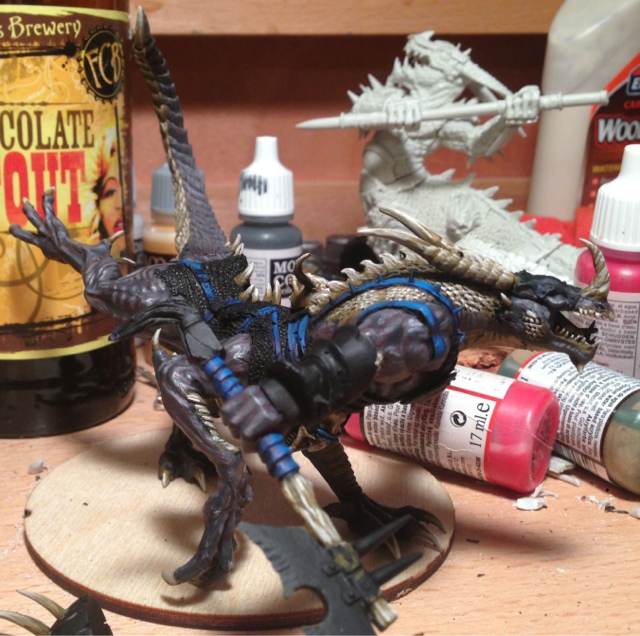
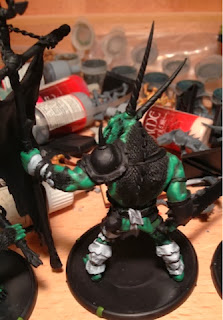
I've moved on to the blue here; this is about three layers in. One of the things this vibrant blue layer does is give the model some color and make the palette a lot more interesting. One of the traps that's easy to fall into with miniatures painting is to make everything dark and gloomy. Adding sharp colors like this can take a dark, gloomy model and give it a little spark of life, and bring some playfulness into it.
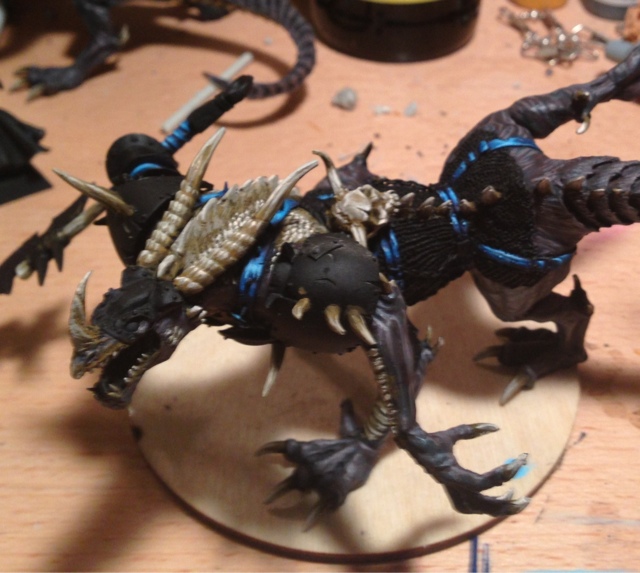 
The blue's all highlighted, now. I'm not going as light with my highlights on these guys as I normally would, because the Darklands aesthetic that I've seen so far seems, well, dark. Instead, I'm starting my layers one shade darker than I normally would, and stopping the highlighting one shade early. The darkness-to-light contrast ratio is kind of the same, so the model still "pops" in my style, but it's not highlighted up to a step away from white. If I become really upset with the way it looks, adding that last highlight to everything will probably be my first step, as I mentioned earlier while discussing skintone.

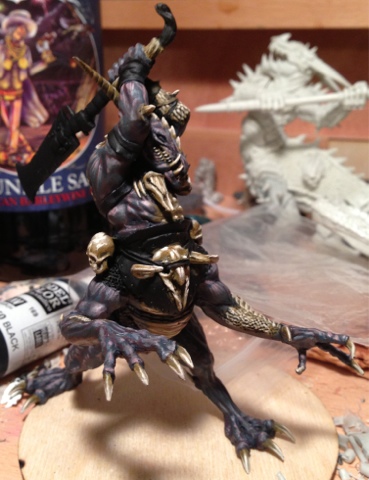
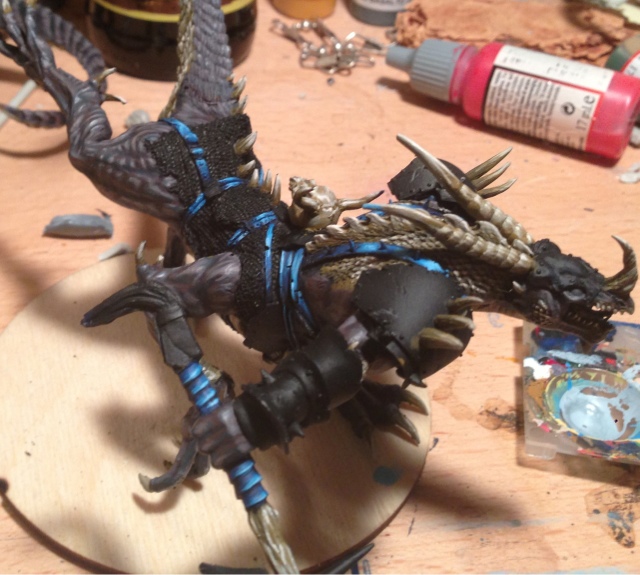
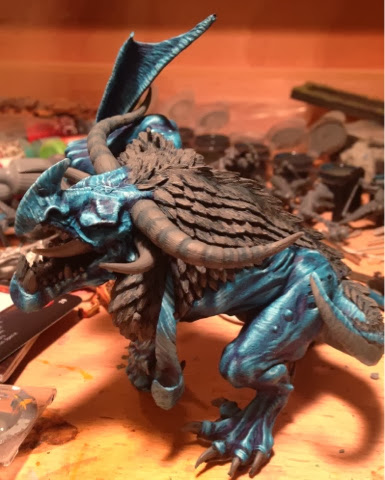
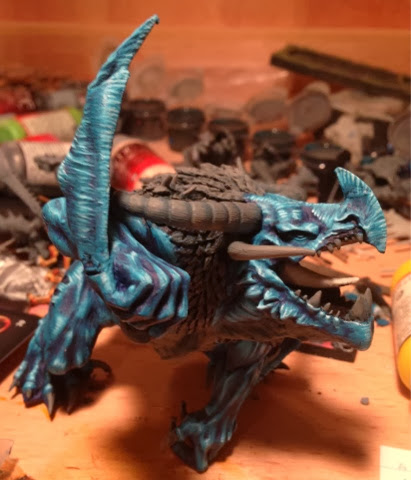
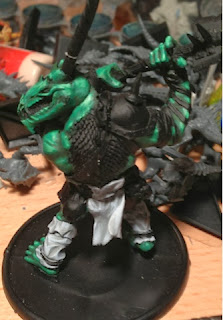
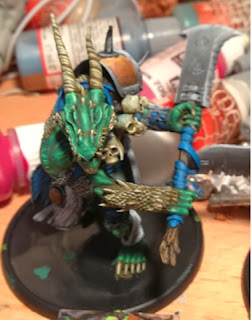
Next up, we add some non-metallic metals. The chainmail was a nice little challenge, because the highlights hit it completely differently when the model is standing this way. There are ripples to the chainmail that get picked up in a different way because of the angle the light's coming from, which makes it seem like I'm painting a new model and not the same one for a third time. I also made the decision to do the head armor in iron instead of the gold I'd been using for Cawrdraig, to set it off more from the horns and claws (which share a similar color palette with my bronze).
The sword blade, as usual for a model like this, was done last. For most of my NMM it's a combination of layering and wet blending to get the transitions right. For large, flat surfaces like this, I prefer to just wet blend the entire piece, and then come in and pick out the highlights later. It adds a rougher, more burnished look to have these linear highlights come in over a wet blended metallic, and makes them seem like scratches and reflections, rather than random freehand.
Remember me talking earlier about not highlighting up to white? I kind of lied about it; with NMM, I always come in with a touch of pure white to finish up the metallic effect. It's very visible up top on the mask, and on the bracer on his right arm.

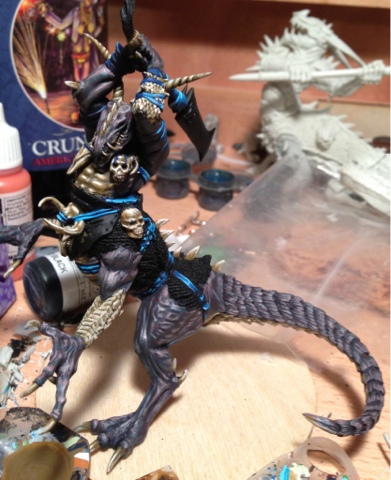
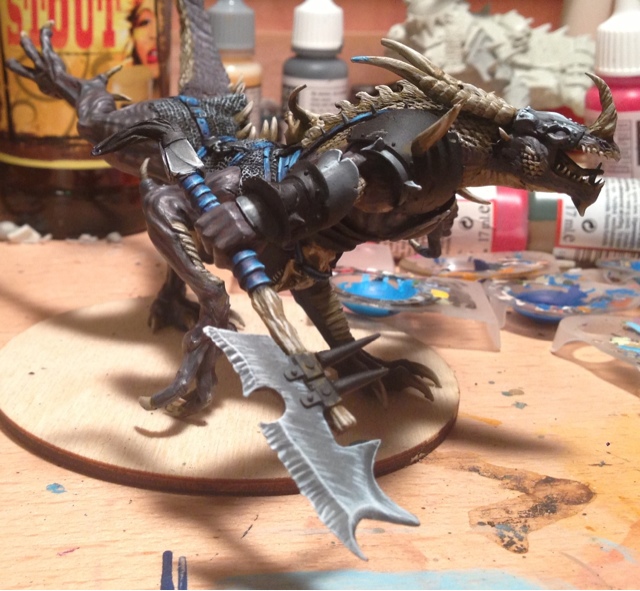
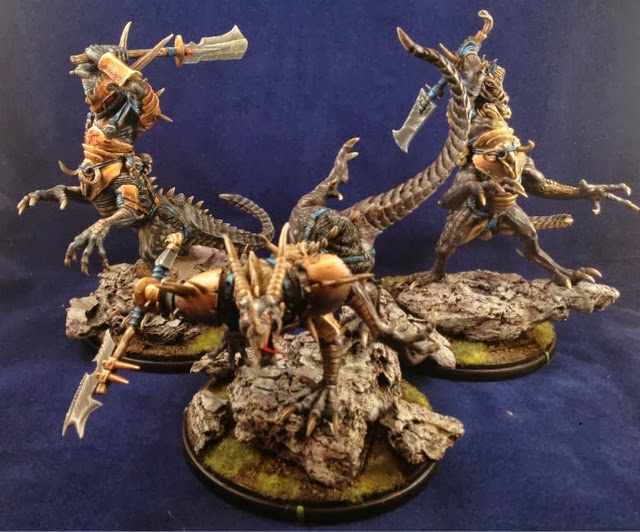
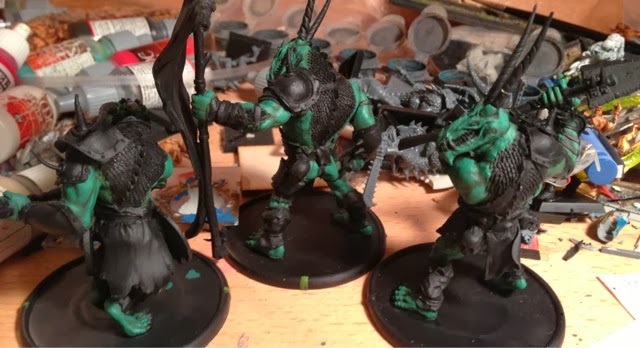
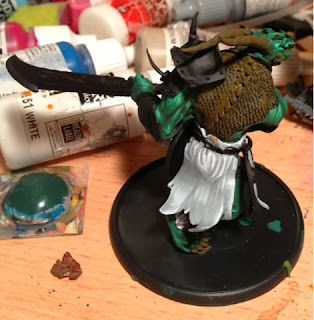
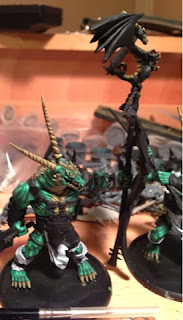
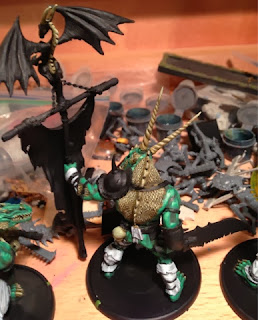
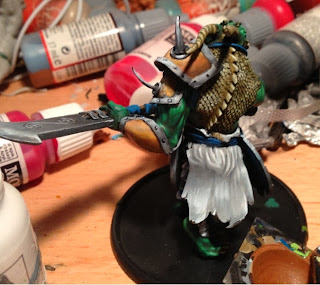
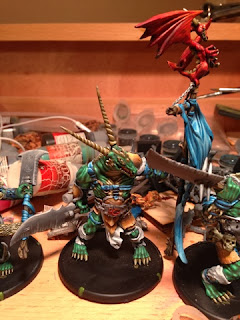
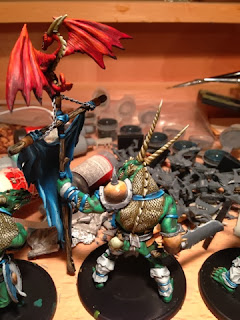
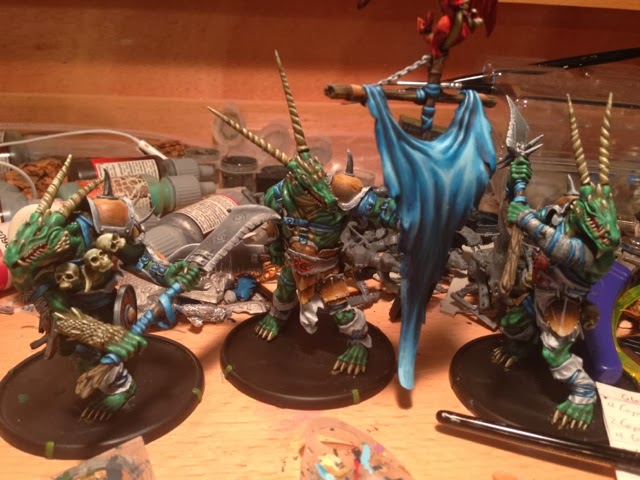
First off, last night I needed to get some basing work done before I could dive into the NMM-bronze blending on the last of the Cawrdraig. Here's the unit, ranked up and (just barely) fitting on their 50mm x 75mm bases. But, wait, why would anyone want to put Darklands models (on 100mm round bases) on 50x75mm bases? Ooooooh... I see what I did there... The bases are 1/8" balsa wood run on a laser engraver. The round parts insert into the 100mm Darklands bases, while the 50x75mm rectangles make them useful for Warhammer Fantasy.
And, the bronze is finished. This was a wet-blend special, and went very quickly (hence why there are no WiP shots of it). The midtone is 5 Bestial Brown : 1.5 Hot Orange : 1/2 Bone White. It's shaded down to 3 Bestial Brown : 2 SS Camo Black Brown, and down further to 3 SS Camo Black Brown : 1.5 black. The highlights were done with bronzed flesh, and bone white. Finally, I picked out a few of the very brightest highlights with pure white. I'm very pleased with the way this bronze has been coming out.
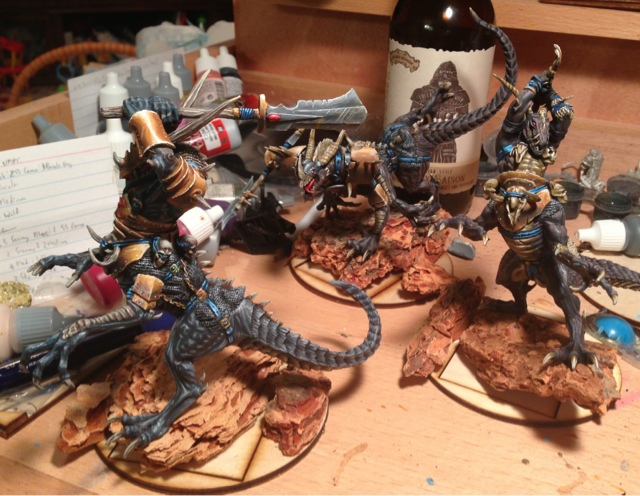
Here are the three Cawrdraig on their 100mm round inserts. They're not attached to the bases yet (so I can prime and paint them without messing up giant dragon feet), but it's easy to identify where the footholes are supposed to be. The challenge will be in flocking the bases so the seams of the 50mm x 75mm inserts are not visible...
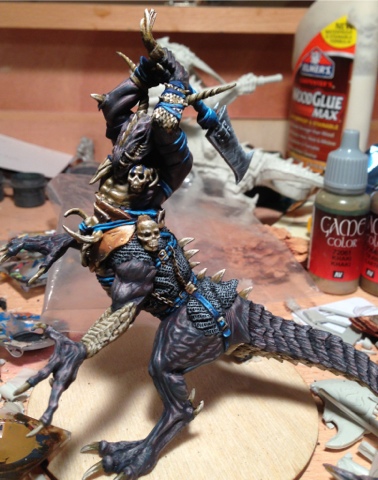
Reverse view of the unit, with bad lighting around it. I don't take my best photos at 2 AM. Automatically Appended Next Post: Well, I figure a couple of blog posts should be enough for one morning
I lied. Here are the shots of the final unit, ranked up, and not able to fit adequately within my lighting box. The color is all off based on the lighting box.
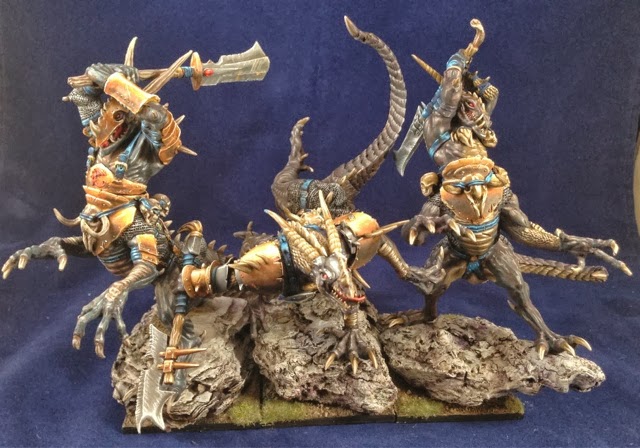

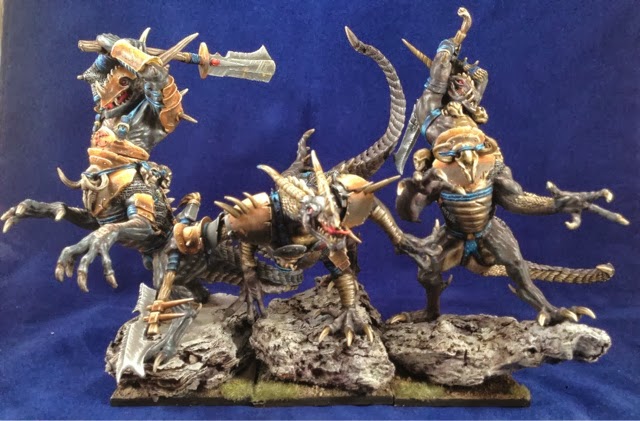
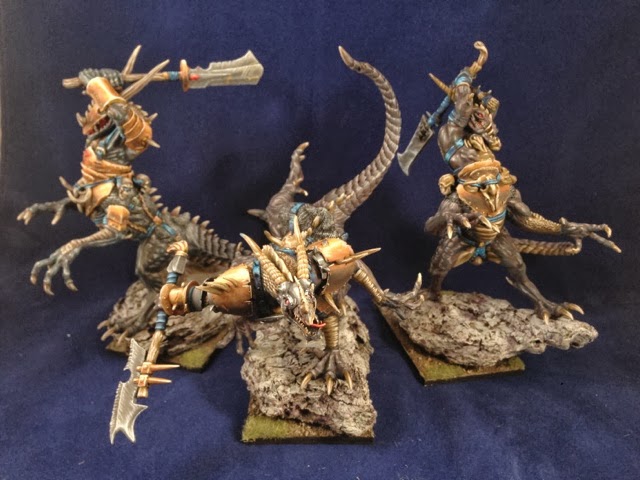
And on the Darklands bases:
|
|
This message was edited 1 time. Last update was at 2014/01/07 14:29:46
Creator of The Beer Waaagh: http://www.thebeerwaaagh.blogspot.com
The Mierce Painting Thread
Tournament Credentials:
Best Army or Painted: Alamo 2009, 2010 (2nd), 2012; Bayou Battles 2010-2011, [2012 2nd overridden by 2nd Overall], 2013 (2nd); Capital City Carnage 2010-2011; Lone Wolf [2011 overridden by 1st Overall], 2012; Quake City Rumble 2012-2013; War Games Con 2010
Player's Choice: Alamo 2012, 2010, 2009 (3rd); Bayou Battles 2009-2013; Capital City Carnage 2010, 2011 (2nd); Lone Wolf 2011-2012; Quake City Rumble 2012 (2nd), 2013
Sportsman: Bayou Battles 2009 (3rd); Capital City Carnage 2009; Lone Wolf 2011 [overridden by 1st Overall]
Overall: Lone Wolf 2011; Bayou Battles 2012 (2nd); Quake City Rumble 2012 (2nd)
General: Over my dead body.
|
|
|
|
|
2014/01/07 19:57:11
Subject: Razormage's Mierce Miniatures thread (WHFB Alternatives) - Dragon Ogres
|
|
Longtime Dakkanaut
|
Nicely done!
|
|
|
|
|
2014/01/07 20:24:31
Subject: Razormage's Mierce Miniatures thread (WHFB Alternatives) - Dragon Ogres
|
|

Fixture of Dakka
|
They are very impressive.
|
|
|
|
|
|
2014/01/08 19:07:44
Subject: Re:Razormage's Mierce Miniatures thread (WHFB Alternatives) - Chaos Chariot
|
|
Average Orc Boy
|
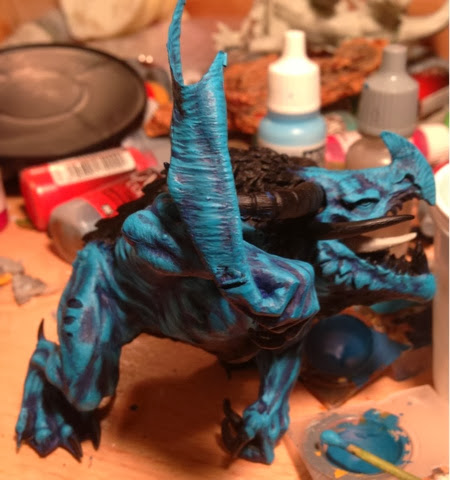
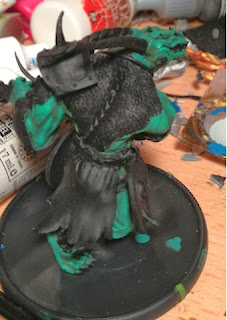
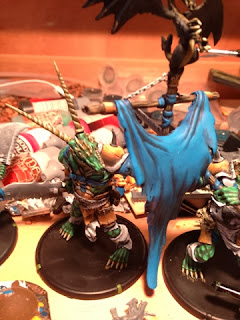
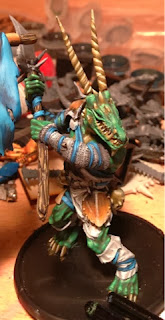
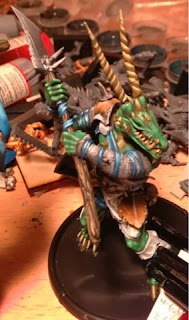
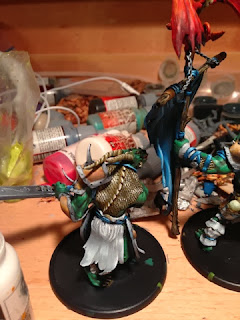
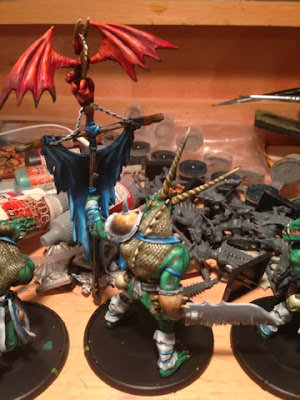
I've already painted up one Glaun, Tawrdraig of the Brythoniaid, to use as a Chaos Chariot. As we all know, Chariots are even more awesome in pairs, so I procured a second Tawrdraig for the same use. However, Glaun's sculpt is rather static, and has a lot of large joins that are not easily converted. What was I to do?
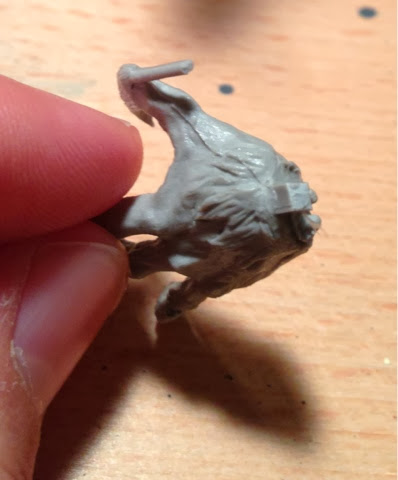
Well, the first step was to add some point to that blunt nose of his. When I first got the model I feared it had sheared off in packaging, but I've seen enough now to know that it's an intentional design choice. So, I sculpted a new snout onto the top of him.
Next, I flipped the big horns around and went more Longhorn than Bull Dragon.
Finally, I did a bit of repositioning on the tail, which required some gap filling. Nothing major, just a slight tweak.
The snout, in profile.
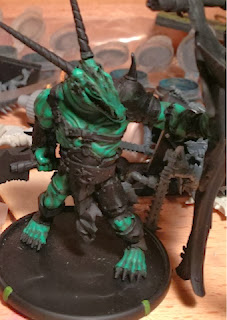
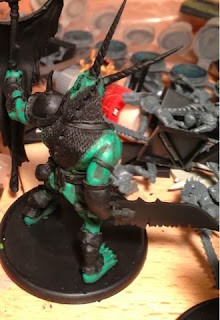
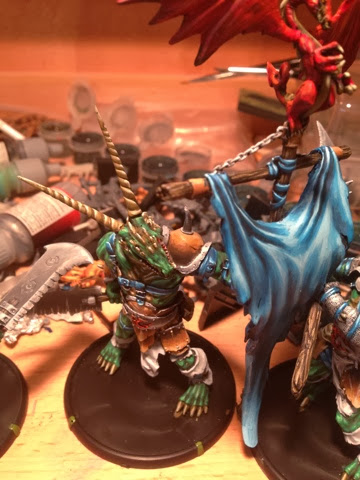
I also had a concept for doing one in a light blue color. Then Breffini released pictures of his amazing light blue job, and I knew anything I was going to do would be derivative of that. As a result, I decided to go with a turquoise, and over-highlight it as only I could.
The base coat is 4 drops of Stormy Blue to one drop of Turquoise.
For the second layer, I went with 1 part Stormy Blue to 2 parts Turquoise. You can already see the blue-green shades I was hoping for.
The third layer was all Turquoise, and I began to fear I'd made a terrible, blurry, sea-foam-green mistake...
The fourth layer went with 2 Turquoise to 1 Sky Blue.
 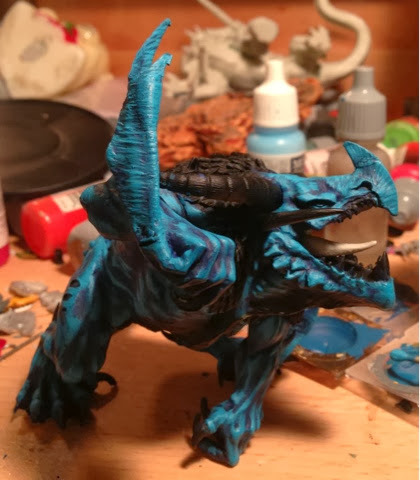
The Fifth layer was 2:2 Turquoise to Sky Blue, with an extra drop of white.
For the next step, I went even more extreme with 1:1 Turquoise to Sky Blue, then added 2 parts white.
 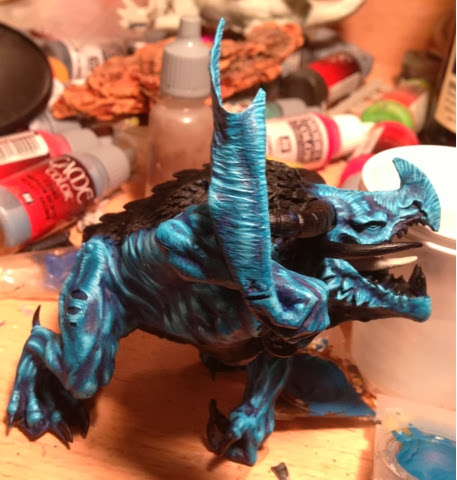
For the last layer of the blue, I added four drops of white to what was left over from the previous layer, and went EXTREMELY light on the model. This last layer, I think you'll agree, is what makes it pop out at you.
 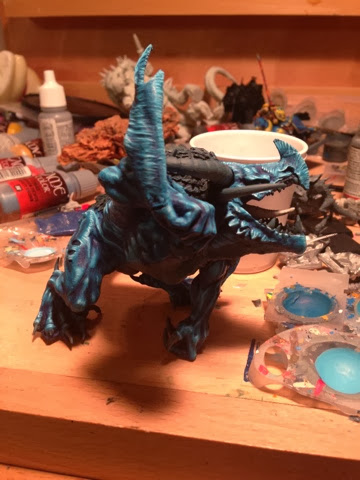 
For the claws, teeth, horns, and scales, I wanted something that would mix with what I did for Glaun, but not look the same. I started with a layer of 4 parts Basalt Grey to 1 part Turquoise, to keep my shade semi-consistent.
The second layer is equal parts Basalt Grey and Medium Grey, which you may remember as my go-to color for browns and/or greys.
For the next layer I went with 3 parts Medium Grey to 1 part Wolf Grey. I started with a layer of pure medium, but it was more brown than I wanted it to be.
For the fourth layer, I went with 1 part Medium Grey : 3 parts Wolf Grey.
For the fifth layer, I went with 2 parts Wolf Grey to 2 Parts White.
 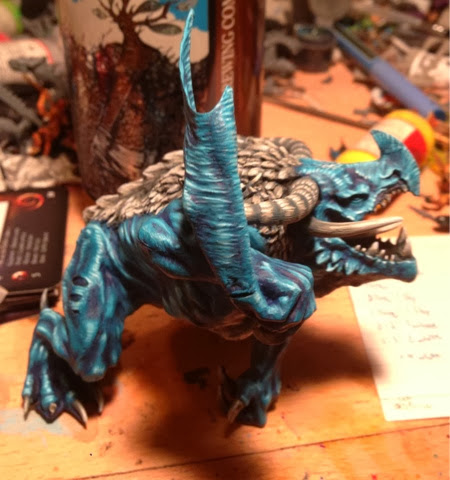 
Finally, I added a bit more white to the mixture and went over the tips one more time.
The mouth and eyes were shockingly fast, and I only bothered with a last photo of them. I started with Vallejo Rojo, moved up to Vallejo Carmine Red, then shifted to Hot Orange and finally Moon Yellow.
|
Creator of The Beer Waaagh: http://www.thebeerwaaagh.blogspot.com
The Mierce Painting Thread
Tournament Credentials:
Best Army or Painted: Alamo 2009, 2010 (2nd), 2012; Bayou Battles 2010-2011, [2012 2nd overridden by 2nd Overall], 2013 (2nd); Capital City Carnage 2010-2011; Lone Wolf [2011 overridden by 1st Overall], 2012; Quake City Rumble 2012-2013; War Games Con 2010
Player's Choice: Alamo 2012, 2010, 2009 (3rd); Bayou Battles 2009-2013; Capital City Carnage 2010, 2011 (2nd); Lone Wolf 2011-2012; Quake City Rumble 2012 (2nd), 2013
Sportsman: Bayou Battles 2009 (3rd); Capital City Carnage 2009; Lone Wolf 2011 [overridden by 1st Overall]
Overall: Lone Wolf 2011; Bayou Battles 2012 (2nd); Quake City Rumble 2012 (2nd)
General: Over my dead body.
|
|
|
|
|
2014/01/08 19:55:19
Subject: Razormage's Mierce Miniatures thread (WHFB Alternatives) - Dragon Ogres and Chaos Chariot
|
|
Longtime Dakkanaut
|
I like what you do.
|
|
|
|
|
2014/01/09 13:40:15
Subject: Re:Razormage's Mierce Miniatures thread (WHFB Alternatives) - Chaos Ogres
|
|
Average Orc Boy
|
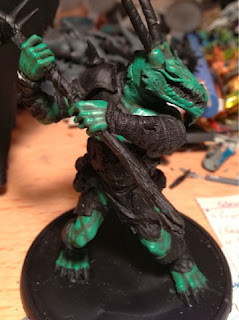
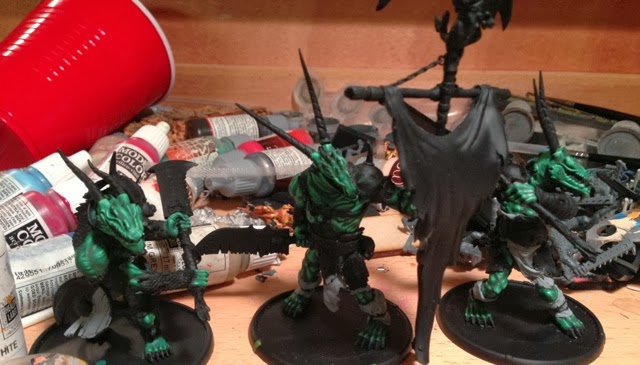
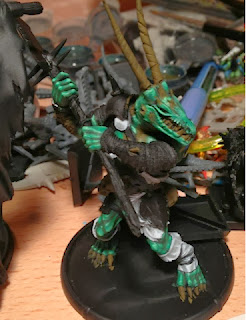
Next up: three of the Dyndraig of the Brythoniaid. Eventually this unit will have six models, where it will fill a Chaos Ogres role in my Dragon Cult list.
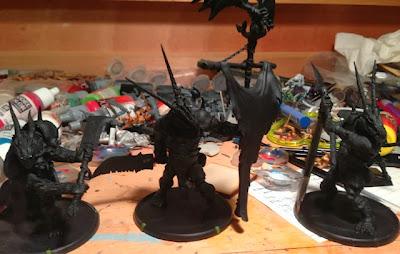
Three primed models. When painting a unit in shifts like this (where I come back to finish the unit later), I tend to take painstaking notes as to what I'm painting, so I can ensure color consistency.
As always, I tend to start on the lowest layer of the model when painting. Hence, we start with skin, then we'll do the wraps and cloth over the skin, then the claws and horns on top of the skin, then the metal armor on top of everything else. This unit was painted over three weeks, so any jumps in layering, note-taking, or bits where I just sort of did all the non-metallic-metals without talking about it are to be taken in stride.
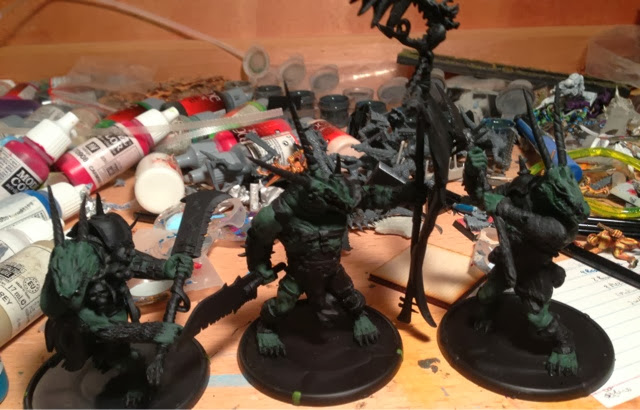
So, we'll start with the greens. Base coat is 4 parts Vallejo Cayman Green : 1 part SS Camo Black Brown : 1.5 parts Turquoise. I'm using turquoise to tie the green and blues of this army together; I have some units who will be primarily one and other units the other. Using the turquoise will hopefully bridge the difference between the two and make for a more consistent palette.
Second layer of greens used 2 parts Cayman Green to 2 parts Goblin Green, followed by 1 part SS Camo Black Brown and 1.5 parts Turquoise.
The third layer used 2 parts Goblin Green to 3 parts Scorpion Green, with 1 part SS Camo Black Brown and 1.5 parts Turquoise. I started an intermediate shade here of just 4 parts Goblin Green to the SS Camo Black and Turquoise, but it was indistinguishable from the previous shade, so I just painted over the top of it.
  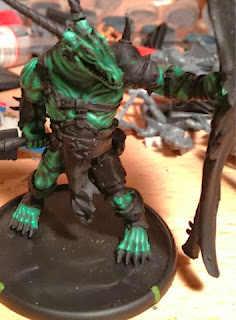 
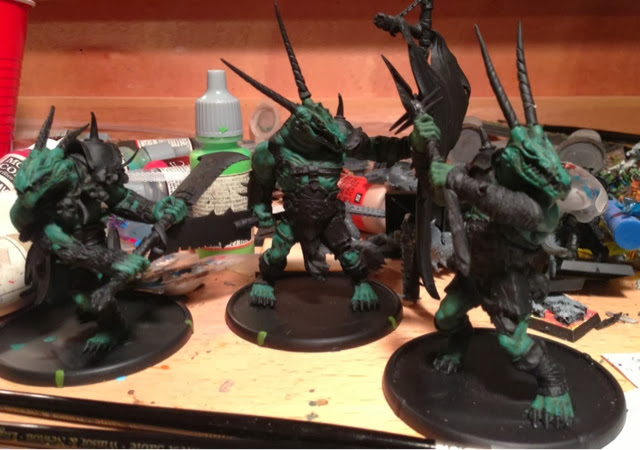
The unit, with four more rapid-fire layers down. The fifth layer was 4 parts Scorpion Green to 1 part Lemon Yellow, with 1 part Turquoise and half a part SS Camo Black Brown. I then did a sixth layer with 2 parts Scorpion Green, 2 parts Lemon Yellow, and the same Turquoise/ SS Camo Black Brown ratios. Once that layer was done, I added two drops of Lemon Yellow, painted another layer, and then added 3 parts Lemon Yellow and 2 parts White and did a very, very fine highlight with that last shade.
 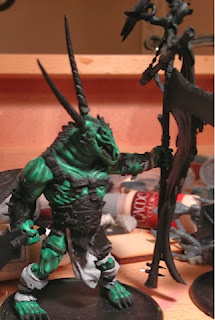 
The first three layers of white. I started with a base coat of Medium Sea Grey, then added a layer of 1:1 Medium Sea Grey and Wolf Grey, then a layer of just Wolf Grey.
For the final layer of white, I used a 50/50 mix of Wolf Grey to white. It's brighter than I'm used to having on a non-metallic portion of the model, so I was nervous about it. Hopefully it would just help the rest of the model to pop forward...
|
|
This message was edited 1 time. Last update was at 2014/01/09 13:47:19
Creator of The Beer Waaagh: http://www.thebeerwaaagh.blogspot.com
The Mierce Painting Thread
Tournament Credentials:
Best Army or Painted: Alamo 2009, 2010 (2nd), 2012; Bayou Battles 2010-2011, [2012 2nd overridden by 2nd Overall], 2013 (2nd); Capital City Carnage 2010-2011; Lone Wolf [2011 overridden by 1st Overall], 2012; Quake City Rumble 2012-2013; War Games Con 2010
Player's Choice: Alamo 2012, 2010, 2009 (3rd); Bayou Battles 2009-2013; Capital City Carnage 2010, 2011 (2nd); Lone Wolf 2011-2012; Quake City Rumble 2012 (2nd), 2013
Sportsman: Bayou Battles 2009 (3rd); Capital City Carnage 2009; Lone Wolf 2011 [overridden by 1st Overall]
Overall: Lone Wolf 2011; Bayou Battles 2012 (2nd); Quake City Rumble 2012 (2nd)
General: Over my dead body.
|
|
|
|
|
2014/01/10 14:25:47
Subject: Re:Razormage's Mierce thread (WHFB Alternatives) - Dragon Ogres, Chaos Chariot and (1/9) Chaos Ogres
|
|
Average Orc Boy
|
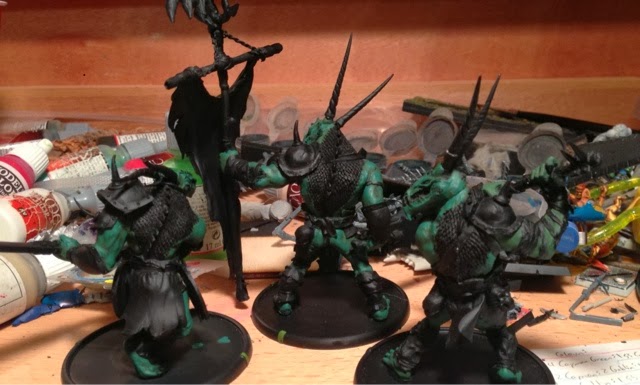
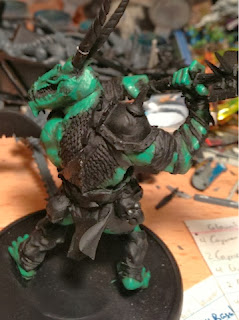
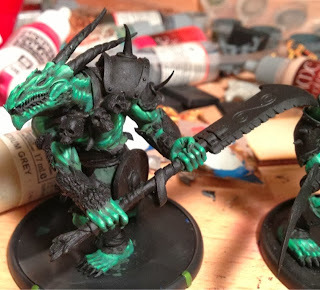
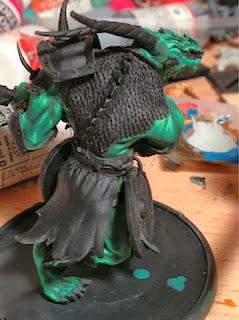
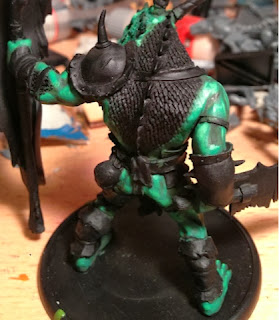
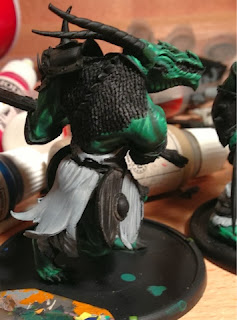
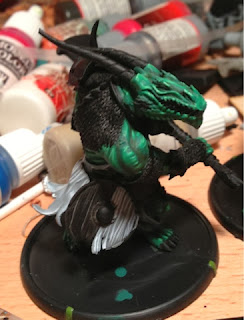
More work on the Ogres:
On to the teeth, horns, wood,and bone! I used my standard bone shades for this, starting with 4 parts Leather Brown to 4 parts SS Camo Black Brown, with a drop of Goblin Green to show the bone reflecting the green skintone.
I came back and went into the second layer of the bone: 4 parts Leather Brown to 2 parts SS Camo Black Brown. I still added 1 part Goblin Green for the tint.
For the third layer, I used 4 parts Leather Brown : 1 part Goblin Green : 1 part Medium Grey. I love Medium Grey for bone.
For the fourth layer of bone, I went with 1 part Leather Brown to 3 parts Medium Grey with a drop of Goblin Green. I'm pleased with how the scales on the backs of the unit are turning out, but frustrated with the horns.
For the fifth layer, I used 1 part Medium Grey to 3 parts Pale Flesh. I then did a sixth layer with 2 parts Pale Flesh to 2 parts White. The sixth layer is VERY subdued, but is what makes the model pop.With that concluded, I moved on to the brass:
I used the same shades for my brass as I did for the Tawrdraig. It's done with wet blending, and careful painting over it repeatedly. I then followed by wet blending my metallic silvers (again using the Tawrdraig colors), and started on the blues.
The first layer of blue was 4 Medium Blue : 1 part black. Once that base coat was down, I came back with a layer of pure Medium Blue, mixed 3:1 with Turquoise (again, keeping my palette similar between units).
For the third layer of blue, I used 2 Medium Blue : 1 part Sky Blue. For the fourth layer, I used 1 part Medium Blue to 3 parts Sky Blue.
Finally, I hit the highest points with a mixture of 3 Sky Blue : 1 Skull White. This made the blues very distinctive in contrast, as they've gone from Black to White.
For the reds, I started with 3 parts Red : 1 part Red. The reds are very subtle on the models: They comprise the eyes, the guns and tongue, and any dragon iconography on their gut plates. I also used it to paint the wyrmling on the top of the standard.
With the base coat in place, I then did a pair of additional layers, using Bloody Red and Orange Fire.
Half of the final unit, minus the banner freehand and basing.
|
Creator of The Beer Waaagh: http://www.thebeerwaaagh.blogspot.com
The Mierce Painting Thread
Tournament Credentials:
Best Army or Painted: Alamo 2009, 2010 (2nd), 2012; Bayou Battles 2010-2011, [2012 2nd overridden by 2nd Overall], 2013 (2nd); Capital City Carnage 2010-2011; Lone Wolf [2011 overridden by 1st Overall], 2012; Quake City Rumble 2012-2013; War Games Con 2010
Player's Choice: Alamo 2012, 2010, 2009 (3rd); Bayou Battles 2009-2013; Capital City Carnage 2010, 2011 (2nd); Lone Wolf 2011-2012; Quake City Rumble 2012 (2nd), 2013
Sportsman: Bayou Battles 2009 (3rd); Capital City Carnage 2009; Lone Wolf 2011 [overridden by 1st Overall]
Overall: Lone Wolf 2011; Bayou Battles 2012 (2nd); Quake City Rumble 2012 (2nd)
General: Over my dead body.
|
|
|
|
|
2014/01/13 13:36:58
Subject: Re:Razormage's Mierce thread (WHFB Alternatives) - Updated 1/13 with some Trolls
|
|
Average Orc Boy
|
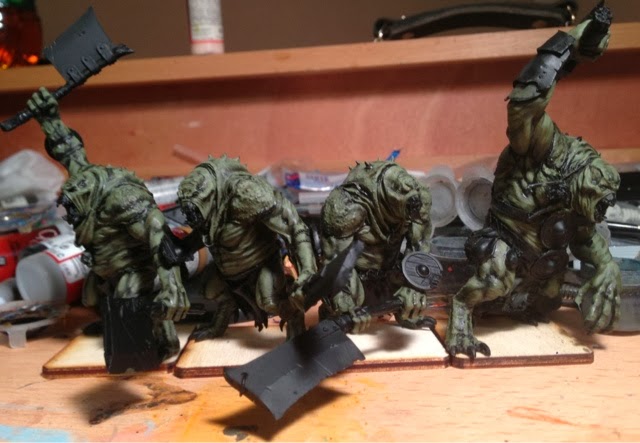
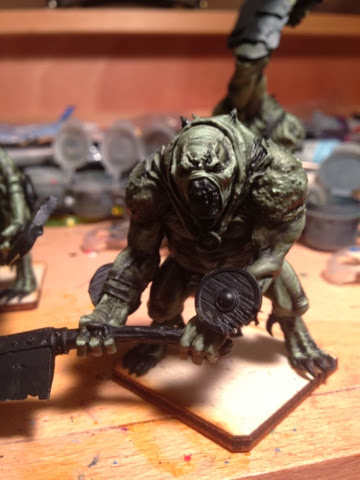
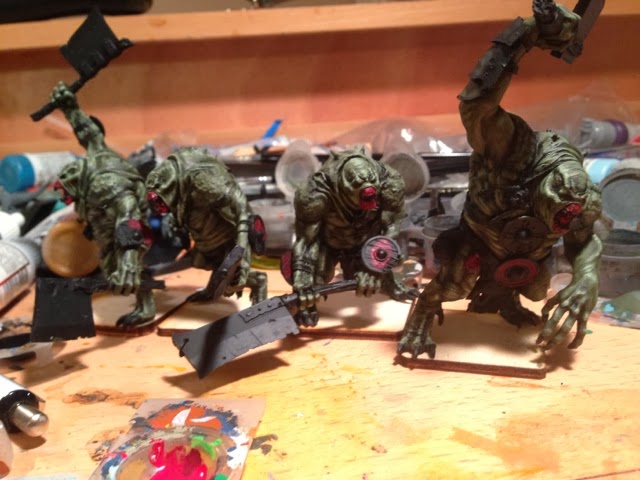
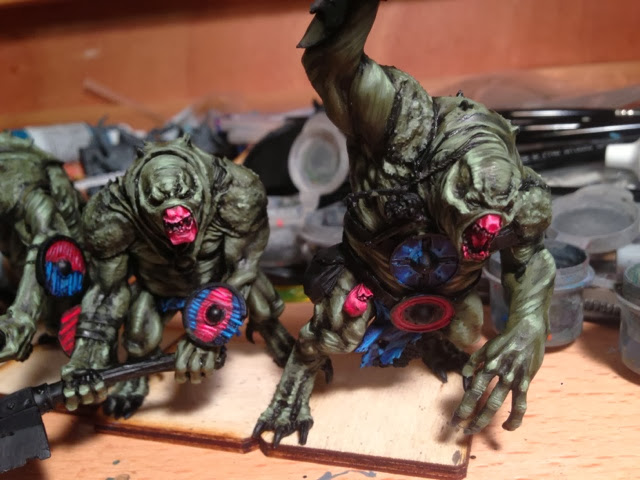
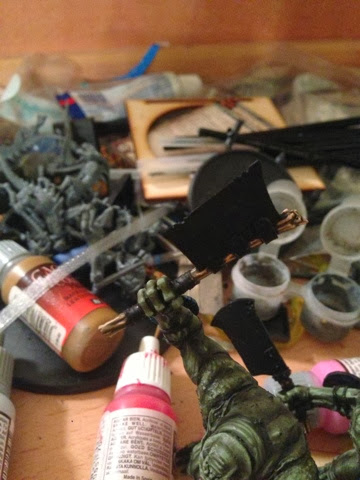
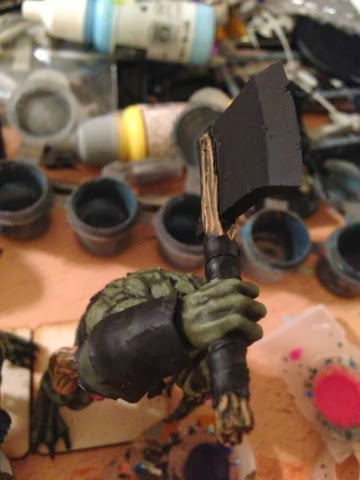
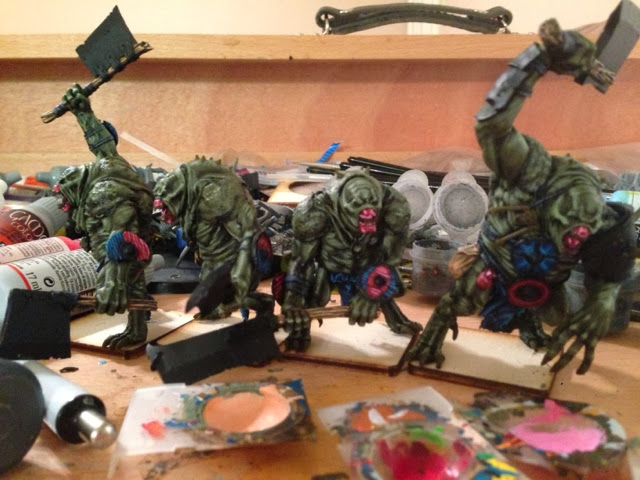
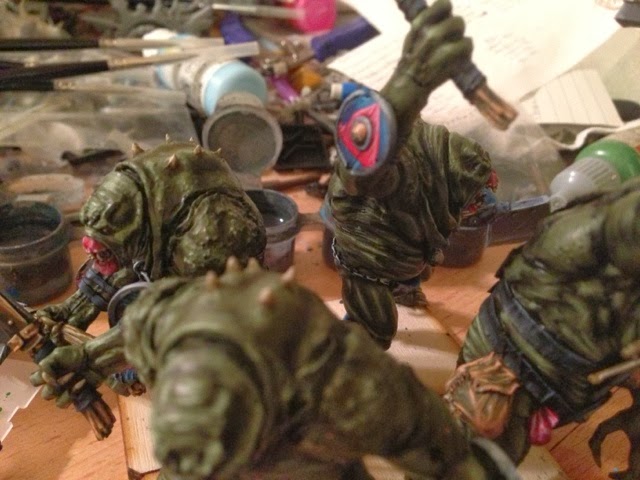
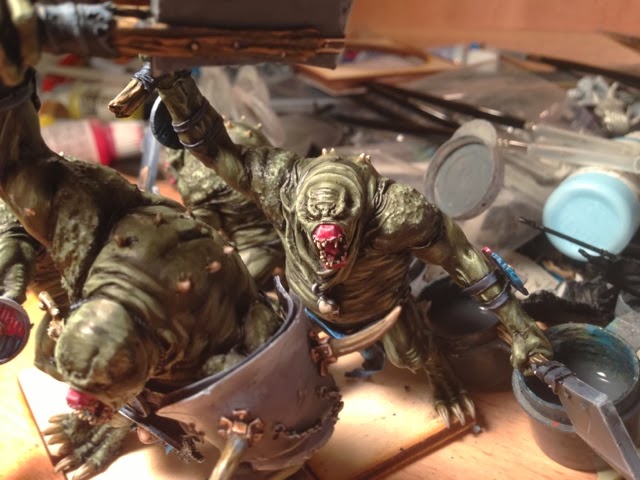
Next on the paint block: some Darklands Trolls!
Originally, I'd intended to do them in a red/grey color scheme, but after doing a high contrast blue/bone paint job on a Privateer Press Dire Troll, I began to play in different directions. My wife finally gave me the inspiration to go with greens, but to "muddy them up". Normally I paint greens with yellow for highlights; this time around I'll be using a brown palette to make the trolls look like they just emerged from the San Antonio Riverwalk.
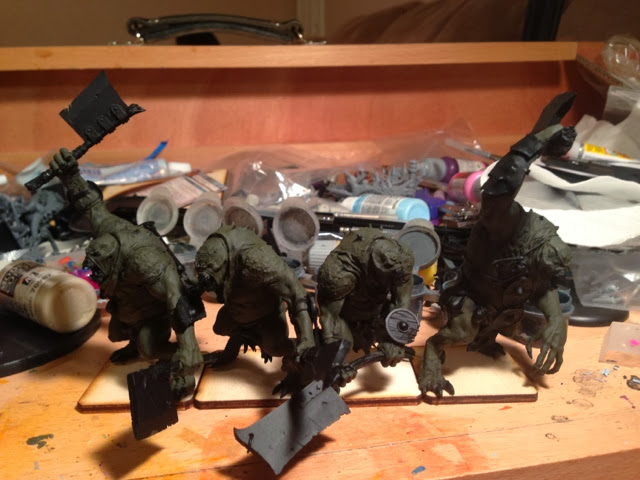
The base coat is down! I did a mix of 2 parts Cayman Green : 1 part SS Camo Black Brown, using a Games and Gears size 1. I'm really starting to rely on the Games and Gears brushes for base coating and washes, so I'm glad to be getting some usefulness out of them after nearly binning the whole line.
For the next two layers, I enjoyed a Cockeyed Cooper Bourbon Barrel Barley Wine, from Uinta Brewing. Uinta's new to my area, and this is the third of their offerings I've tried (along with the Laybrinth Black Ale and Detour Imperial IPA). I recommend checking them out if you have the opportunity!
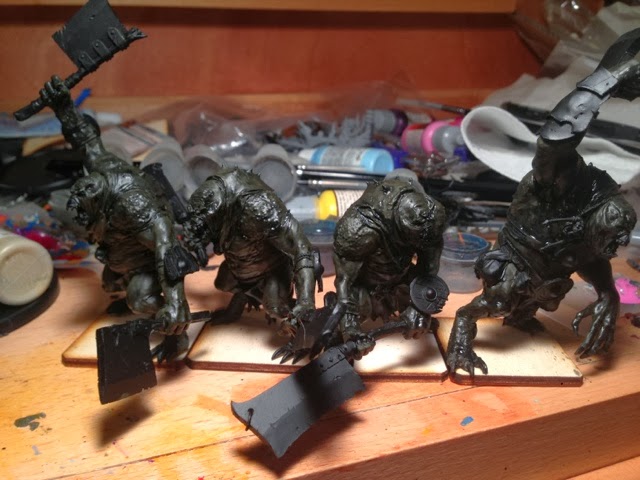
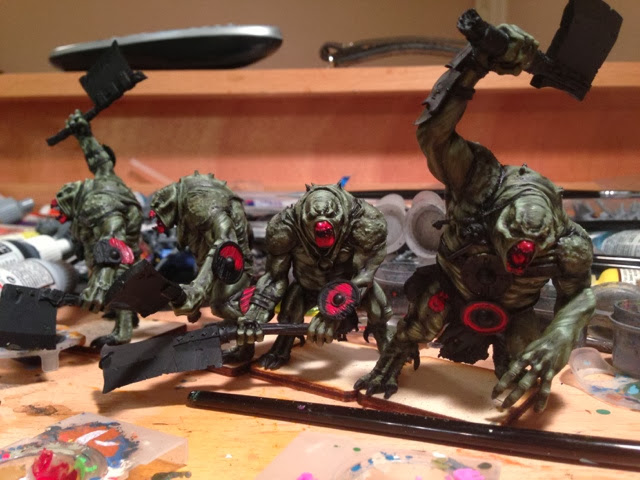
I was extremely disappointed with how bright the models looked after the base coat, so I went back and decided to do a wash to bring them in line with the models in The Beer Waaagh. Those models were completely base coated and then dipped with a pure-black wood stain. For the trolls, I used an eyedropper mix of 1 part Black Ink, to three parts Purple Wood Stain, to 15 parts water/future floor wax. This allowed the dark stain to run into the cracks and crevices, while allowing the base coat to shine through. It also gives me a strong light-dark contrast ratio, which plays into the cartoony style I use for Orcs & Goblins.
For That Guy who thinks I just endorse dipping: pay attention! The dip was the second layer for these models. I'll do another 5-8 on top of the dip! There's no excuse to call base coat + dip + 1 layer of highlights an amazing paint job! You still have more work to do! Also, this is a wash; these models weren't dipped.
For the next step, I re-mixed the base coat and re-applied it, this time letting the wash stay underneath. You can already see the depth it's adding to the models, even with the failure on the Gothi's side where I fell asleep (I fixed it before the next layer).
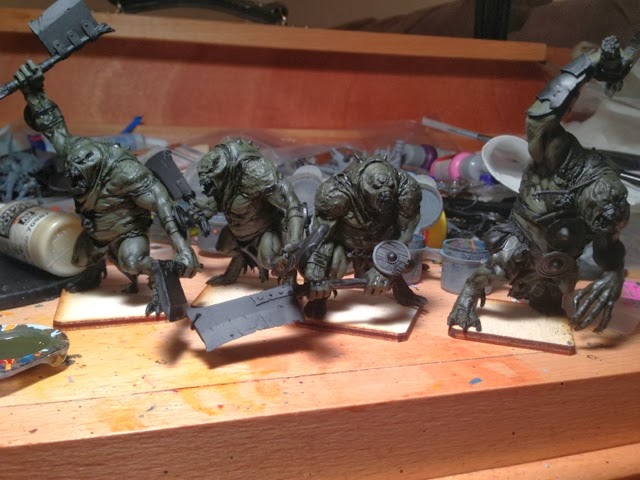
This photo marks Day 3 of painting the Trolls. For this layer, I took some Tilburg's Dutch Brown Ale and poured it into a snifter, then mixed 2 parts Cayman Green to 1 part Bestial Brown and added a drop of water. I used a Games & Gears 00 brush for the second layer. I'm finding that, as these brushes splay, they become very useful for feathering (which I'll be using for muscle tone) and doing pointilism (which I'll be trying for their chitinous backs).
For the next layer, I enjoyed a surprisingly fruity Dogfish Head Festina Peche. The paint is 2 parts Cayman Green : 1 part Khaki, with my typical drop of water 3:1 with the paint. I used a Games and Gears 000 brush to allow me a bit more feathering; after this I'll be switching over to my trusty Winsor-Newton Series 7s.
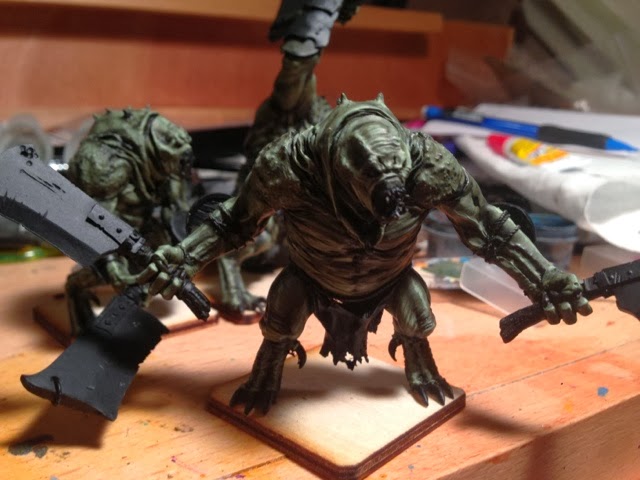
I realized that I've only been showing the same angle with every shot, so here are the troll backsides.
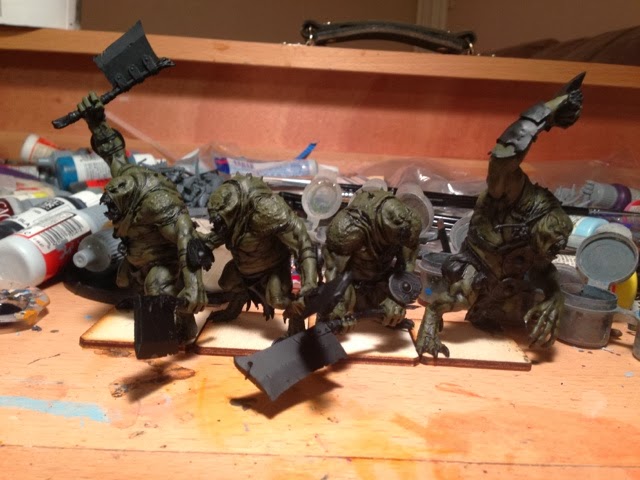
Here's the Gothi. you can see some of the feathering on his quads and biceps.
One of the rank-and-file trolls, with horrible lighting.

When this guy's painted up, I'm going to take a picture of him and caption it, "Come at me, bro!"

The fourth of the trolls. You can see the feathering in places on his tummy.
|
Creator of The Beer Waaagh: http://www.thebeerwaaagh.blogspot.com
The Mierce Painting Thread
Tournament Credentials:
Best Army or Painted: Alamo 2009, 2010 (2nd), 2012; Bayou Battles 2010-2011, [2012 2nd overridden by 2nd Overall], 2013 (2nd); Capital City Carnage 2010-2011; Lone Wolf [2011 overridden by 1st Overall], 2012; Quake City Rumble 2012-2013; War Games Con 2010
Player's Choice: Alamo 2012, 2010, 2009 (3rd); Bayou Battles 2009-2013; Capital City Carnage 2010, 2011 (2nd); Lone Wolf 2011-2012; Quake City Rumble 2012 (2nd), 2013
Sportsman: Bayou Battles 2009 (3rd); Capital City Carnage 2009; Lone Wolf 2011 [overridden by 1st Overall]
Overall: Lone Wolf 2011; Bayou Battles 2012 (2nd); Quake City Rumble 2012 (2nd)
General: Over my dead body.
|
|
|
|
|
2014/01/14 18:18:37
Subject: Re:Razormage's Mierce thread (WHFB Alternatives) - Updated 1/13 with some Trolls
|
|
Average Orc Boy
|
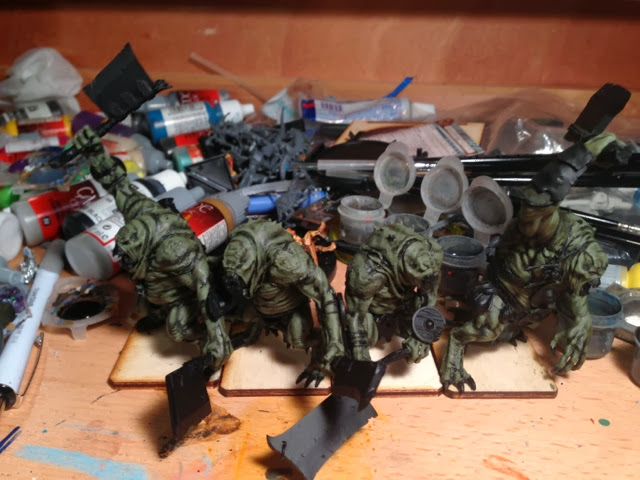
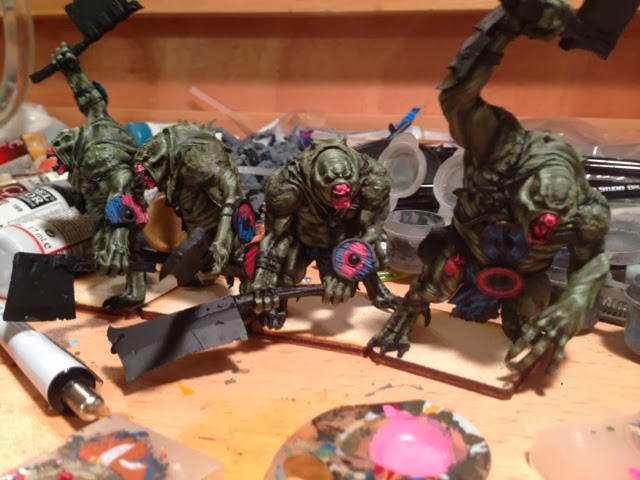
The next layer was 3 parts Cayman Green to 2 part Elf Flesh. I switched over to a Winsor-Newton Series 7 size 0 brush for this one.
Another shot from higher, to show the work on the back.
I then did a fast layer of 1:1 Cayman Green to Pale Flesh. Not satisfied, I mixed up one last layer: 1 part Cayman Green to 1 Part Scorpion Green, with one part Pale Flesh and one part White. However, I did this transition so fast that I forgot to take a picture of the Green/Pale layer! Sorry about that! Typically for my models, those last two layers cause the paint job to "pop", and bring the contrast ratio up to what I want.
Extreme close up!
One day, I'll learn my lesson about taking photos at 1:30 in the morning. Specifically: DON'T!!
Another horribly lit shot. Usually by this point in the night I'm just ready to go to bed, and this was no exception.
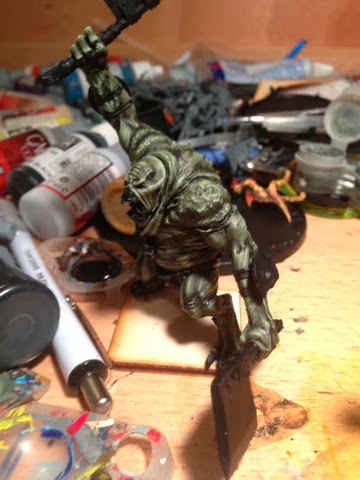
One last shot of the skin tone. Tomorrow, I get to choose whether to work on straps or bone/claws/teeth!
|
Creator of The Beer Waaagh: http://www.thebeerwaaagh.blogspot.com
The Mierce Painting Thread
Tournament Credentials:
Best Army or Painted: Alamo 2009, 2010 (2nd), 2012; Bayou Battles 2010-2011, [2012 2nd overridden by 2nd Overall], 2013 (2nd); Capital City Carnage 2010-2011; Lone Wolf [2011 overridden by 1st Overall], 2012; Quake City Rumble 2012-2013; War Games Con 2010
Player's Choice: Alamo 2012, 2010, 2009 (3rd); Bayou Battles 2009-2013; Capital City Carnage 2010, 2011 (2nd); Lone Wolf 2011-2012; Quake City Rumble 2012 (2nd), 2013
Sportsman: Bayou Battles 2009 (3rd); Capital City Carnage 2009; Lone Wolf 2011 [overridden by 1st Overall]
Overall: Lone Wolf 2011; Bayou Battles 2012 (2nd); Quake City Rumble 2012 (2nd)
General: Over my dead body.
|
|
|
|
|
2014/01/15 17:39:42
Subject: Re:Razormage's Mierce thread (WHFB Alternatives) - Updated 1/14 with some Trolls
|
|
Average Orc Boy
|
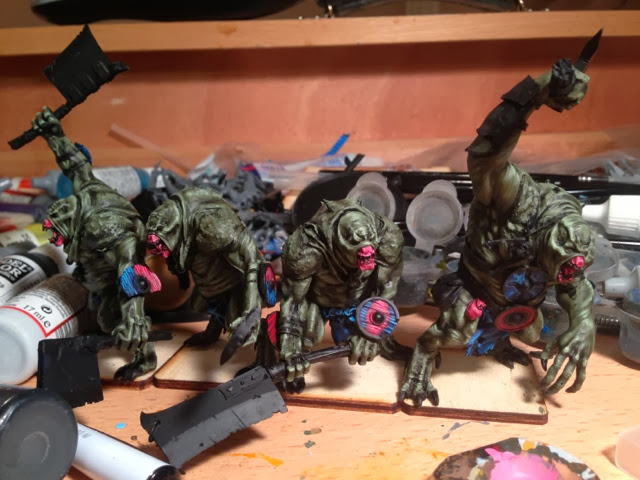
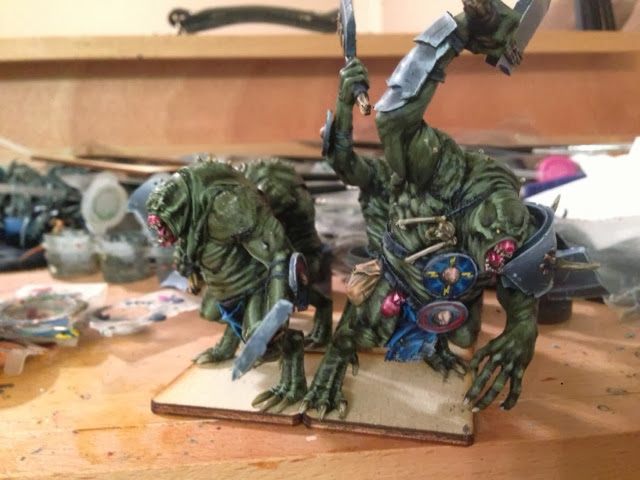
I only had an hour and a half for painting, so I knew I couldn't get into the NMM or the bone in a way that would make sense. Instead, I went after the reds. I used these on the mouths, and on the shields. The first layer is 3:1 Vallejo Dark Red to SS Camo Black Brown, pretty typical for my red blends.
Next highlight of red. Same as above, but with no SS Camo Black Brown
This layer is all Bloody Red.
At this point I was getting nervous about the orange-ness of the color, so I did something I never do with reds - I highlighted with pink. Usually I feel it cheapens the red (I highlight red with yellow 95% of the time), but I think it worked really well on the gums, and don't mind the shields looking a bit pink.
Well, when you're drinking a liter of beer, you sometimes forget to take pictures of painting steps, especially when you're doing layers in 5 minutes. First layer was Stormy Blue, the second was Medium Blue.
Two more layers of blue in rapid-fire succession (2:1 medium blue to sky blue, and then 1:2 of the same), and I called it a night and took a pair of close-up shots to let you see how the red highlights had come out.
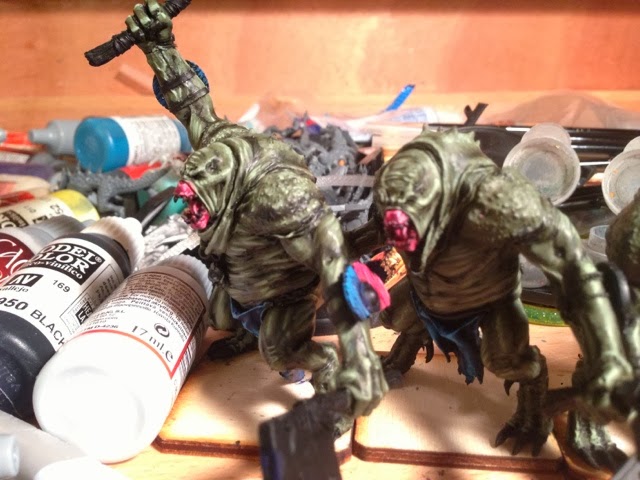
Two more shots, with a lot of background clutter. The plan for tomorrow: the wood handles of the weapons (brown), the straps (black), and the skulls/teeth/claws (obvious color)!
|
Creator of The Beer Waaagh: http://www.thebeerwaaagh.blogspot.com
The Mierce Painting Thread
Tournament Credentials:
Best Army or Painted: Alamo 2009, 2010 (2nd), 2012; Bayou Battles 2010-2011, [2012 2nd overridden by 2nd Overall], 2013 (2nd); Capital City Carnage 2010-2011; Lone Wolf [2011 overridden by 1st Overall], 2012; Quake City Rumble 2012-2013; War Games Con 2010
Player's Choice: Alamo 2012, 2010, 2009 (3rd); Bayou Battles 2009-2013; Capital City Carnage 2010, 2011 (2nd); Lone Wolf 2011-2012; Quake City Rumble 2012 (2nd), 2013
Sportsman: Bayou Battles 2009 (3rd); Capital City Carnage 2009; Lone Wolf 2011 [overridden by 1st Overall]
Overall: Lone Wolf 2011; Bayou Battles 2012 (2nd); Quake City Rumble 2012 (2nd)
General: Over my dead body.
|
|
|
|
|
2014/02/05 13:37:48
Subject: Re:Razormage's Mierce thread (WHFB Alternatives) - Updated 1/14 with some Trolls
|
|
Average Orc Boy
|
Without further ado, let's start on the wood.
The woodtones started with a basecoat of 50/50 Earth and SS Camo Black Brown.
Second layer for the wood was all Earth, with a third layer of 50/50 Earth and Dwarf Skin
Some closer shots of the wood. The third layer was pure Dwarf Flesh, with the last layer being about 3:1 Dwarf Flesh to White.
Final shot of the unit with the wood fully painted. I also went back at this point and added a final highlight to the reds, as I was really unhappy with how dark they were.
I let my wife pick the color for all the straps. Surprisingly, she went with Black! As most painters know, black is one of the hardest colors to get right. Let's see if I can do it... 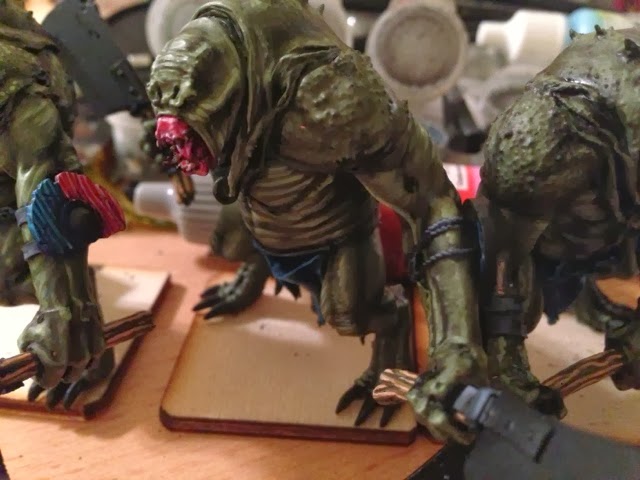
A close-up to show the black straps. The first layer was 4 Black : 1 Stormy Blue : 1 Basalt Grey. I then decreased the proportion until the last layer, which was 1:1 Stormy Blue to Basalt Grey.
Some close-ups of the individual models. Vortunn's shoulder pad can now be glued on, as I'm done with the skintone and straps, and need it in place for the next step, the bone.
The first layer of bone was done with a 1:1 mix of SS Camo Black Brown and leather brown.
Second layer was a 2:1 mixture of Leather Brown and SA Camo Black Brown.

Third layer, done with all Leather Brown.

Fourth layer: 2 parts Medium Grey to one part Leather Brown

Fifth and sixth layers: 2 parts Pale Flesh to 1 part Medium Grey, and 2 parts Pale Flesh to 1 part Skull White. Tomorrow: the metals!
|
Creator of The Beer Waaagh: http://www.thebeerwaaagh.blogspot.com
The Mierce Painting Thread
Tournament Credentials:
Best Army or Painted: Alamo 2009, 2010 (2nd), 2012; Bayou Battles 2010-2011, [2012 2nd overridden by 2nd Overall], 2013 (2nd); Capital City Carnage 2010-2011; Lone Wolf [2011 overridden by 1st Overall], 2012; Quake City Rumble 2012-2013; War Games Con 2010
Player's Choice: Alamo 2012, 2010, 2009 (3rd); Bayou Battles 2009-2013; Capital City Carnage 2010, 2011 (2nd); Lone Wolf 2011-2012; Quake City Rumble 2012 (2nd), 2013
Sportsman: Bayou Battles 2009 (3rd); Capital City Carnage 2009; Lone Wolf 2011 [overridden by 1st Overall]
Overall: Lone Wolf 2011; Bayou Battles 2012 (2nd); Quake City Rumble 2012 (2nd)
General: Over my dead body.
|
|
|
|
|
2014/02/06 13:46:13
Subject: Re:Razormage's Mierce thread (WHFB Alternatives) - Updated 2/5 with more Troll progress
|
|
Average Orc Boy
|
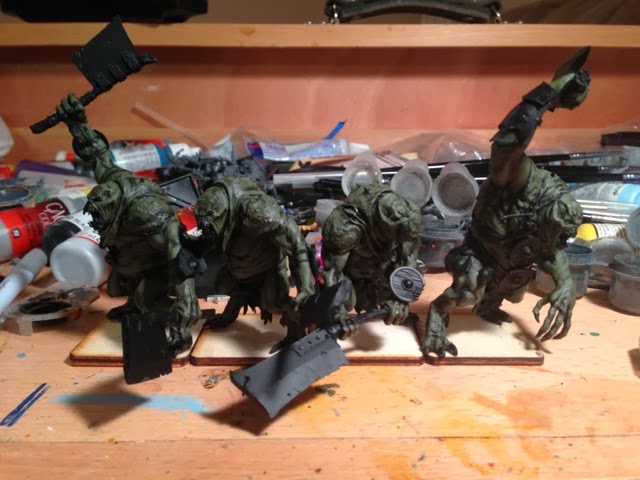
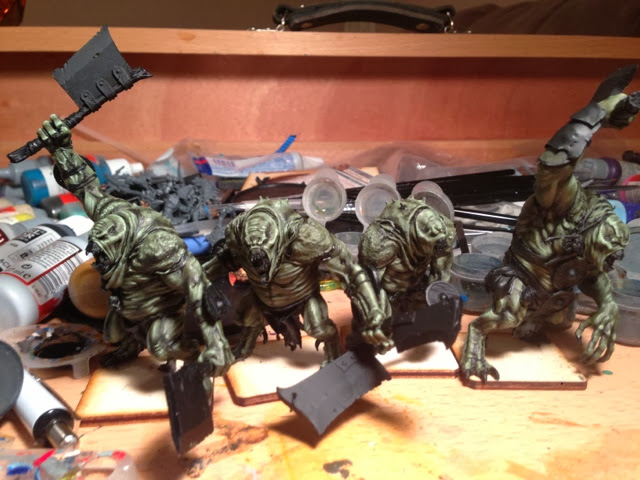
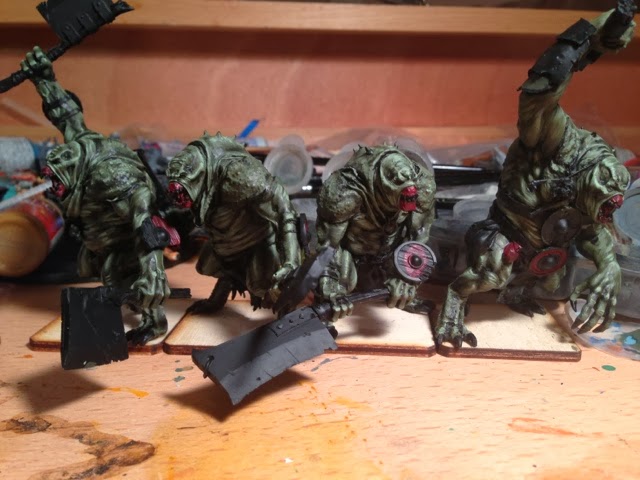
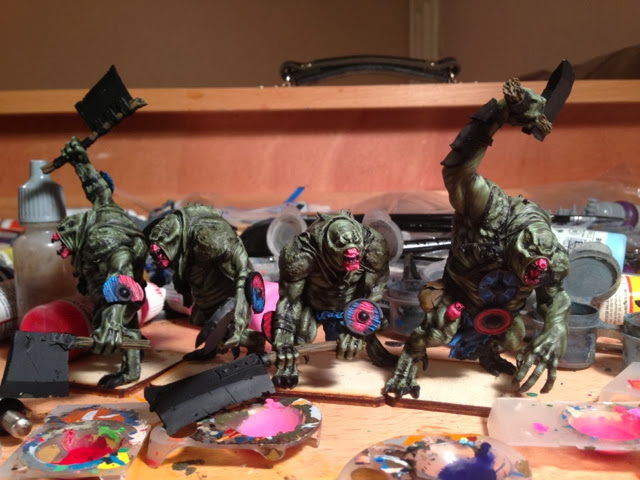
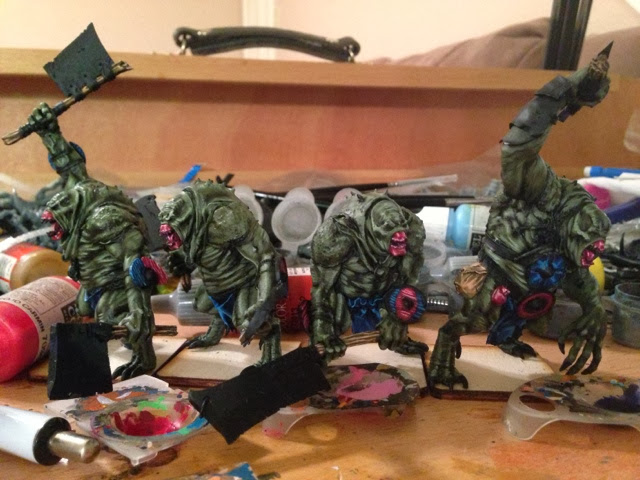
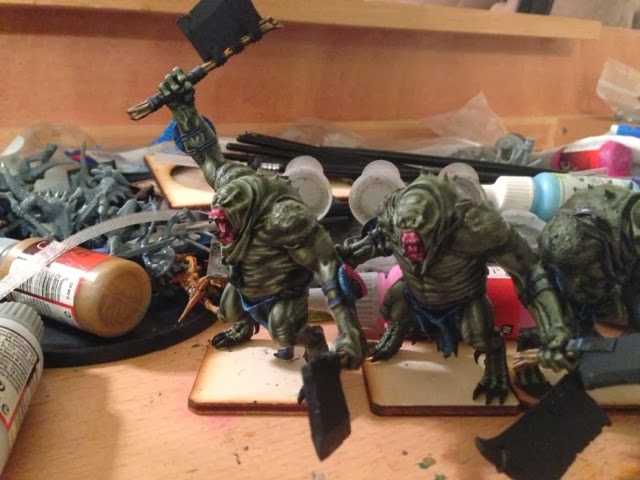
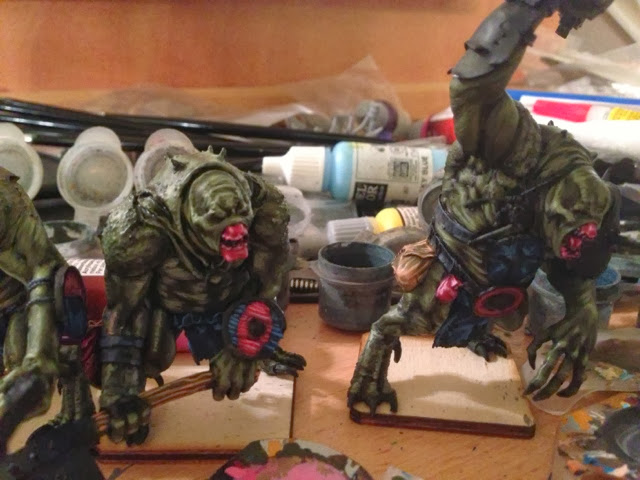
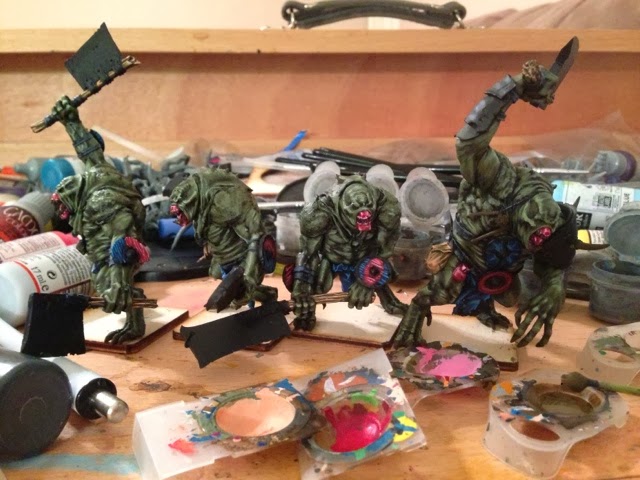
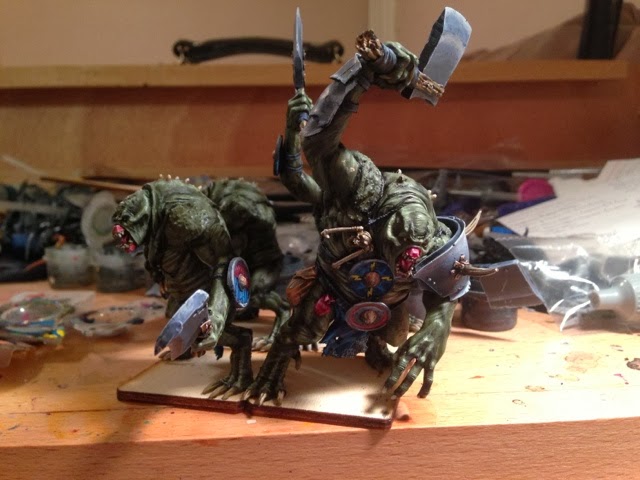
Well, I finished the trolls! Sorry for the picture quality; one day I'll remember not to take photos at 4 AM. I've only been saying that for six months...
 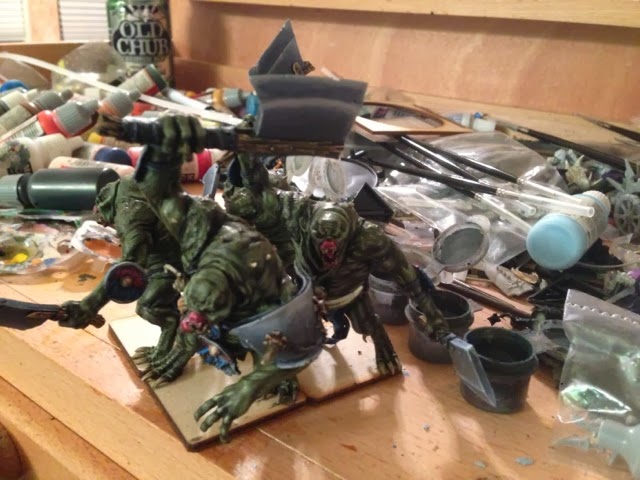
The silvers are all done.
The unit ranked up 2x2 for some reason. I've done the bronze at this point as well, again using the same mixture I used for the Tawrdraig.
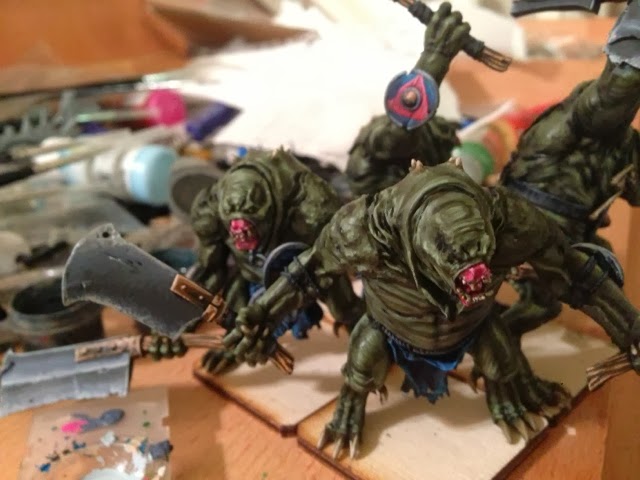
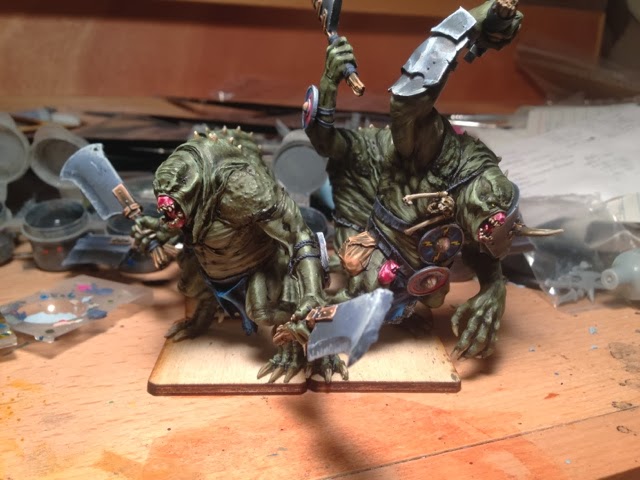
A shot of the middle of the unit, showing the highlighting on the black straps on Vortunn, and the generic red triangle design on one of their shields.
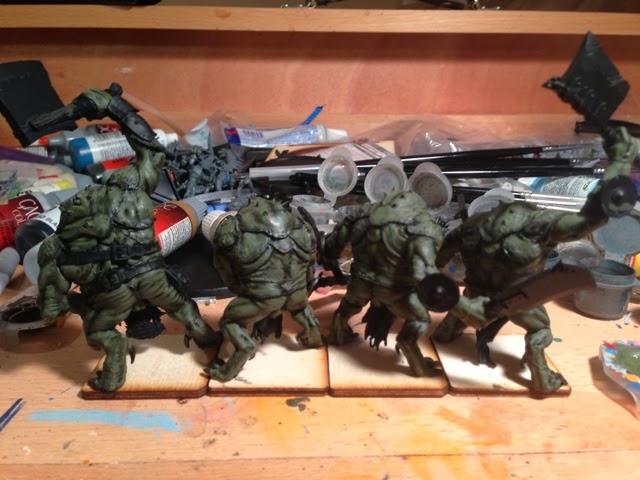
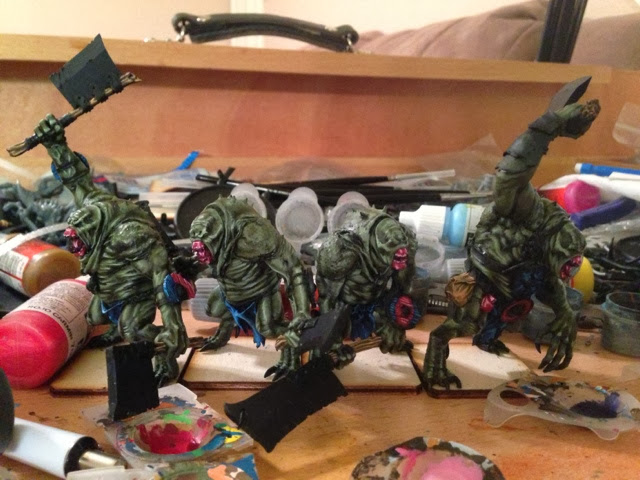
Overly dramatic lighting. What was I thinking?
Ah, that's better! Pushed them back a bit.
A closer shot.
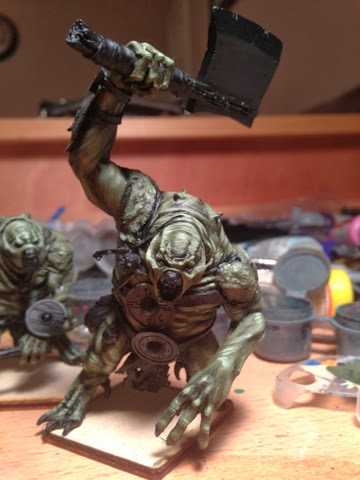
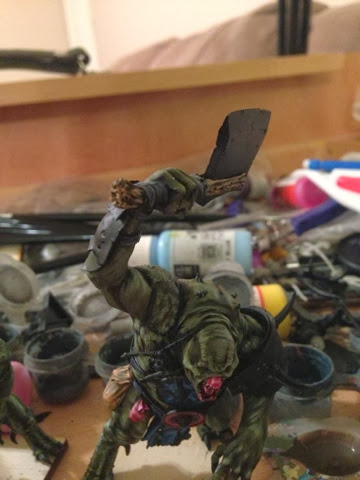
A shot of the troll in the back, roaring over his commander's shoulder pad.
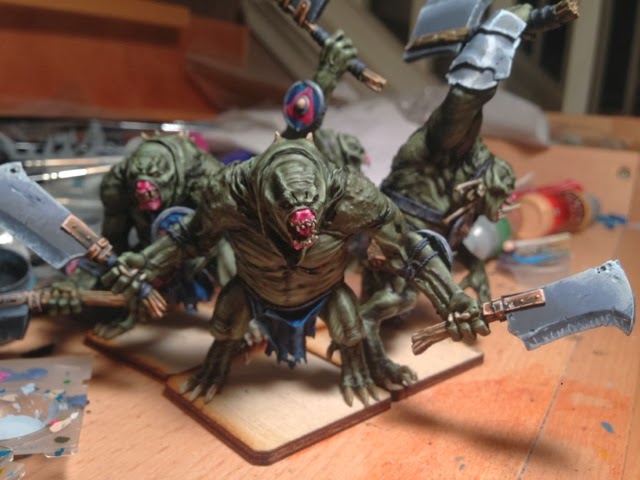
I still think this model should be referred to me as the "Come At Me, Bro" troll.
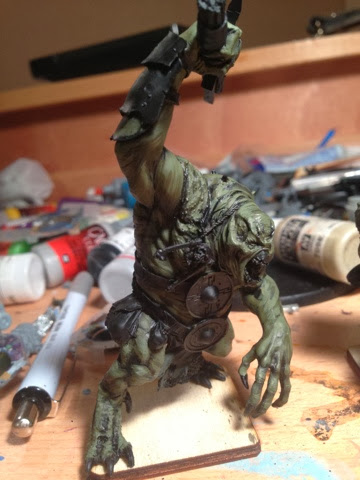
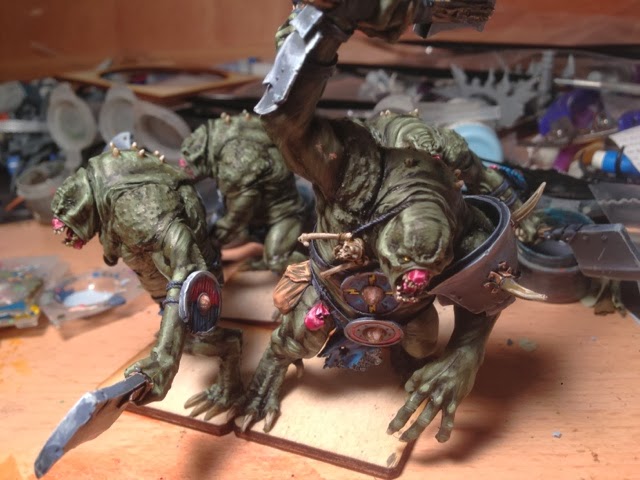
The one in the back left, guarded by a massive cleaver.
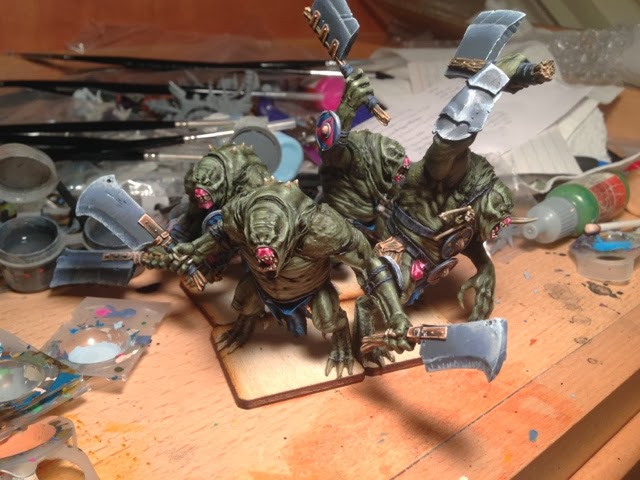
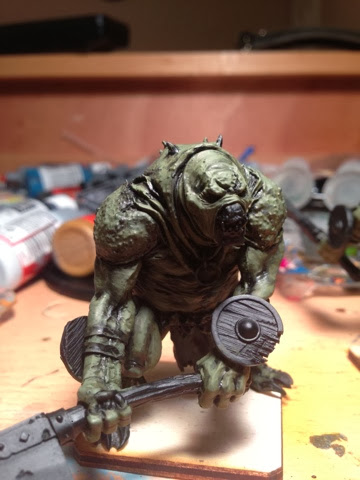
Apparently I didn't want to bother, you know, spreading them out to take a picture. 2:30 decision making, you're not the best!
A top view to show off the bone color of their back spikes, and just give you a player's eye view of what the unit looks like.
|
Creator of The Beer Waaagh: http://www.thebeerwaaagh.blogspot.com
The Mierce Painting Thread
Tournament Credentials:
Best Army or Painted: Alamo 2009, 2010 (2nd), 2012; Bayou Battles 2010-2011, [2012 2nd overridden by 2nd Overall], 2013 (2nd); Capital City Carnage 2010-2011; Lone Wolf [2011 overridden by 1st Overall], 2012; Quake City Rumble 2012-2013; War Games Con 2010
Player's Choice: Alamo 2012, 2010, 2009 (3rd); Bayou Battles 2009-2013; Capital City Carnage 2010, 2011 (2nd); Lone Wolf 2011-2012; Quake City Rumble 2012 (2nd), 2013
Sportsman: Bayou Battles 2009 (3rd); Capital City Carnage 2009; Lone Wolf 2011 [overridden by 1st Overall]
Overall: Lone Wolf 2011; Bayou Battles 2012 (2nd); Quake City Rumble 2012 (2nd)
General: Over my dead body.
|
|
|
|
|
2014/02/06 14:03:15
Subject: Re:Razormage's Mierce thread (WHFB Alternatives) - Updated 2/6 with finished Trolls!
|
|
Is 'Eavy Metal Calling?
|
I hate it when people remind me of how bad a painter i am, I'd press the ignore button on this thread, but this is just so amazing. They look lifelike
|
LOL, Theo your mind is an amazing place, never change.-camkierhi 9/19/13
I cant believe theo is right.. damn. -comradepanda 9/26/13
None of the strange ideas we had about you involved your sexual orientation..........-Monkeytroll 12/10/13
I'd put you on ignore for that comment, if I could...Alpharius 2/11/14 |
|
|
|
|
2014/02/07 15:14:31
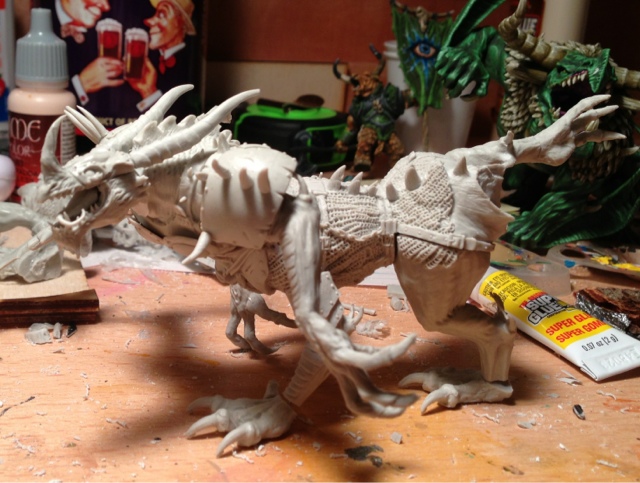
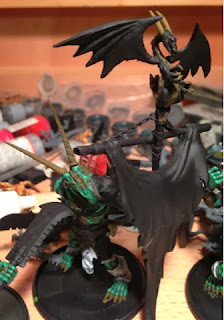
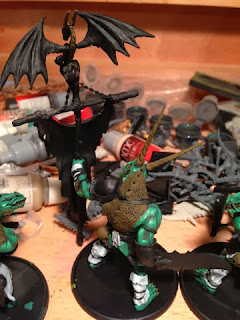
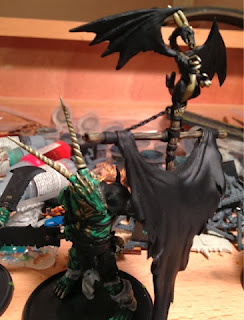
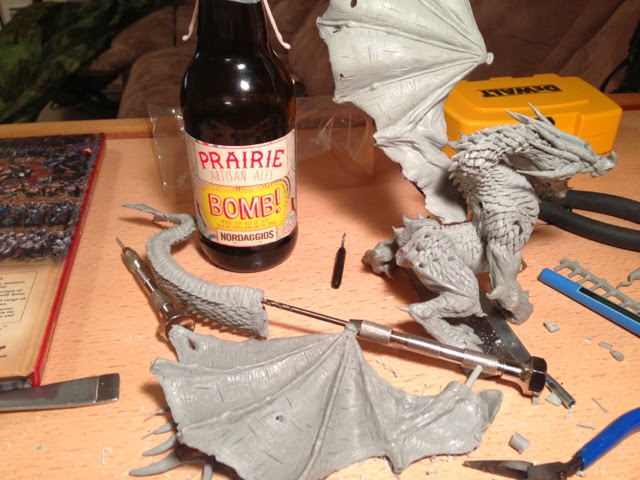
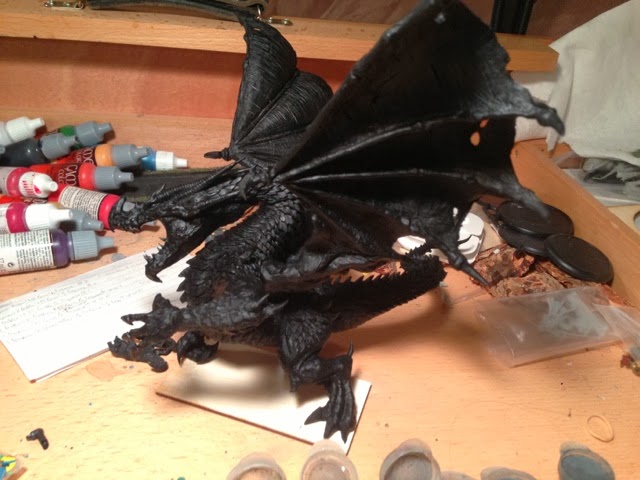
Subject: Re:Razormage's Mierce thread (WHFB Alternatives) - Updated 2/7 with a GIANT FREAKING DRAGON!!!
|
|
Average Orc Boy
|

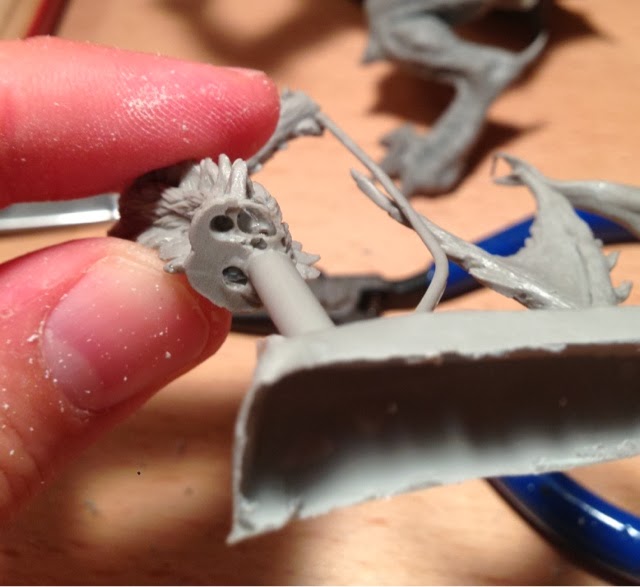
Here are all the components, spread out after cleaning them off in hot soapy water. The sprue on the top-left is the horns, the middle-left is the claws for the right hand, the two on the bottom are the talons for the wings, and the one in the top-right is the tail and tongue.
Mold Lines:
Any model this large is going to have mold lines. The question is how critical they are to the sculpt. Most of them, like the one pictured below
The mold line shown on this hand was easily trimmed down with a sharp knife. The tail and horns had a bit more significant mold lines, but they were primarily in places that would not be visible unless someone picked up the model.
Gaps:
Any model this large is going to have gaps. Let's look at how noticeable they are..
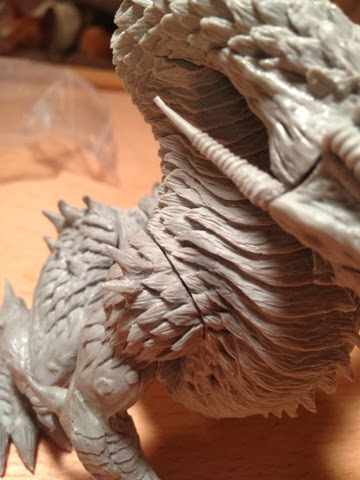
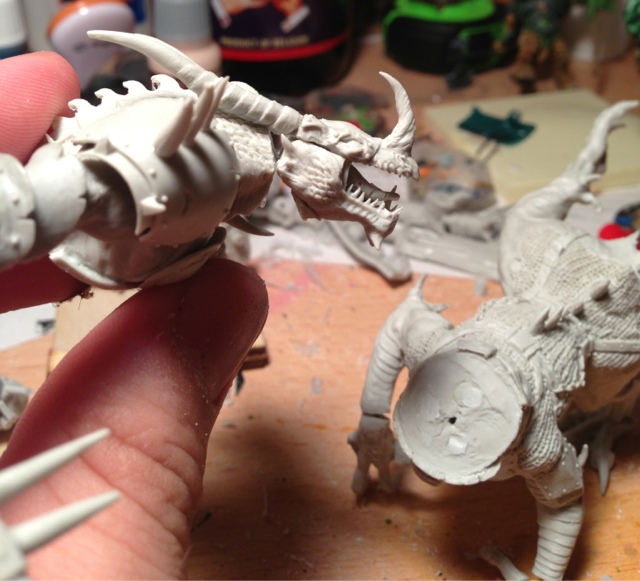
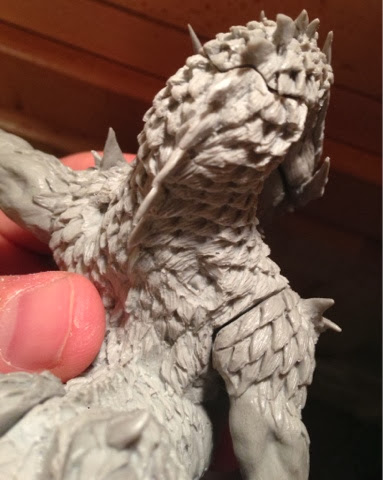
Two are shown here: the head/neck, and the right shoulder to the body. Both were easily greenstuffed (see below).

The head-neck gap still had a bit more issue, but look at how cleanly that left arm fits into the body! One of the best seams I've ever seen on a model, right there.
Another shot of the head/neck joint.
The neck/body seam is a bit obvious from below, but is largely unseen if you view the model from a player's viewpoint.
I also had some gaps you could see between the lower jaw and the body, but these were really easy to fix with greenstuff.
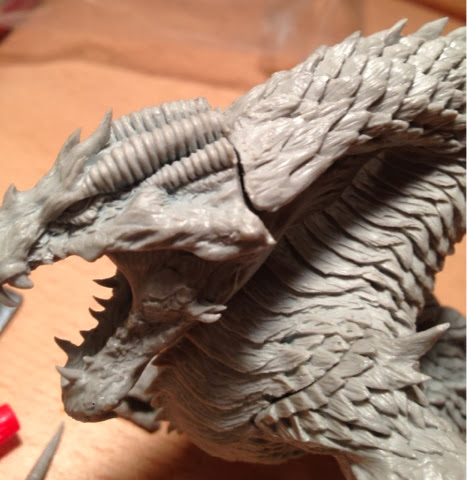
The horns and back of the head needed a bit of adjustment to fill the seams, as did the wrist to the left hand.
Air Bubbles:
I had three air bubbles that could be clearly seen in the resin.
The first, in this tail (next to the perfectly round hole) made the fit difficult, but couldn't be seen once the tail was assembled. The second was actually inside a wing, and could be seen if you held it up to the light, but was completely enclosed. The third was on the body just before where the tail connected, and actually was in place of a horn. I intended to replace it with green stuff, but once the wings were in place it was very difficult to see, so I might leave it alone.
Assembly:
The biggest problem I had with the assembly came with the horns; I could not figure out if they went left to right, or right to left. I e-mailed Mierce and got the response (sadly the next day) that the horn labeled I went on the model's left cheek, and they moved from that cheek across.
Mine are all kinds of wrong, and are (from right cheek to left cheek, left to right across the screen): I, V, III, IV, II, VI. In the end, I just put them in the way that fit best. III was the only one that didn't seem to line up correctly with any of the others, and I ended up greenstuffing the transition to make it work.

The right claws slot into the holes shown above. I strongly recommend pinning the thumb (labeled IV on the sprue).

See those thin plastic pegs connecting the claws to the sprue? DO NOT CUT THOSE! If you do, you're going to have to pin those claws to the foot. I made that mistake with two of them, and had to pin both.
This shot shows the hole where the right wing is supposed to slot in. This must have been one of the last casts they used from this mold (they re-made the mold the day after this was cast), because the hole is almost completely filled in with a resin plug. It's not a big deal though, as you'll see when I show you how I'm attaching the wings.
This is what the hole should look like on your model: a nice, clean channel for the wing peg to slot into.
The only mold slippage issue I had: this join for the wing talon should be flat, but you can see the mold slipped a bit just to the left of the peg. It was easily corrected with a knife. I was worried about which tips went on which wings, but it's easy to tell: one wing has pegs and the tips have holes, while the other wing has holes and the tips have pegs. I strongly recommend replacing the pegged wingtips with pins, but the other one seems to be holding well.
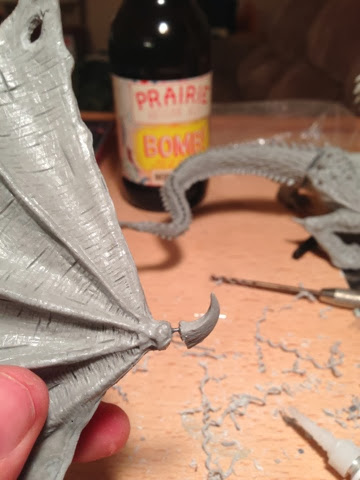
I also recommend pinning the talon on the top of the wing, as it's in a position that will break off very easily.
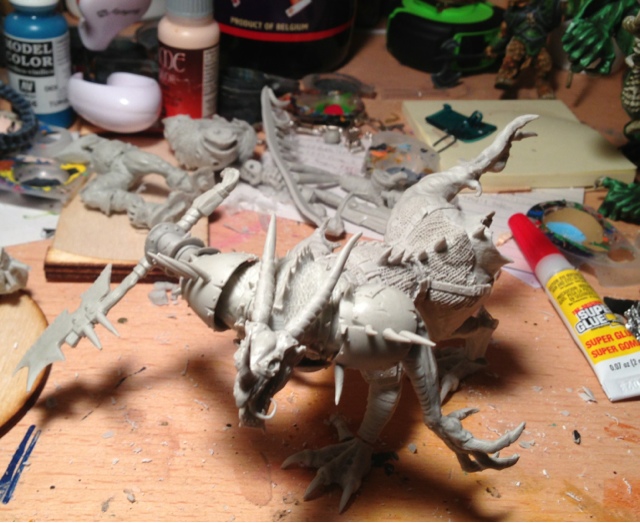
I pinned the wings and tail with paper clips initially, just to set up this photo. That will change shortly.
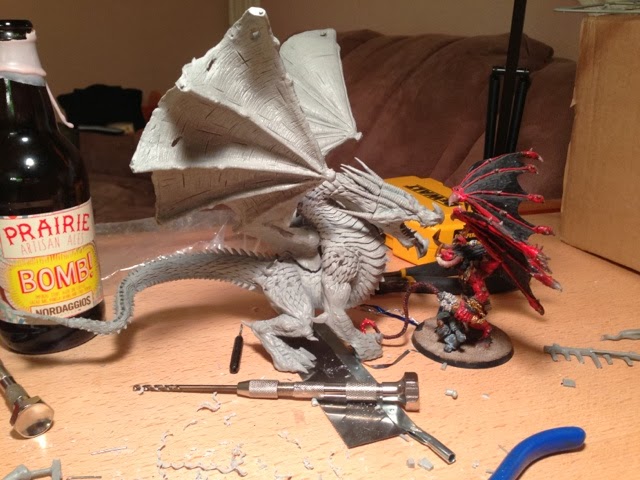
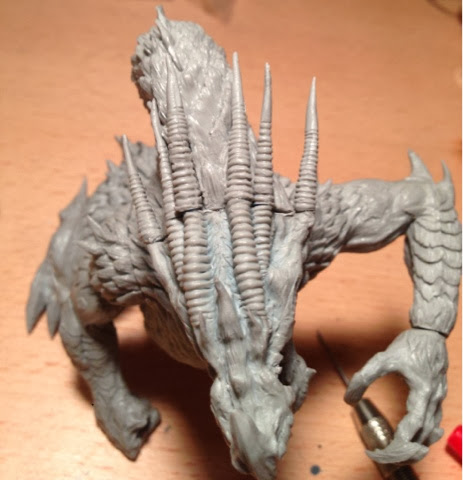
While I had him pinned together roughly, I grabbed my Bloodthirster just to emphasize how big this dragon is. It's very, very, very large. See that giant drill bit in the pin vise? Let's use that next!
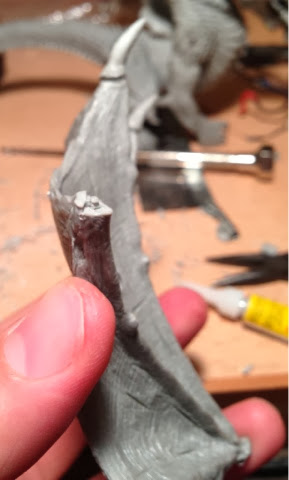
Gap filling/pinning the wings and tail:
This model is going to be traveling, and will have to make at least one airline trip. To make it easier to put into foam, I decided very early that the wings and tail would be detachable, to reduce its footprint.
I have some round plastic sprue from an old model airplane kit that I keep around for use as rod, and so I pulled it out of a cubbyhole, and grabbed the 1/8" drill bit that I know works for it. Using the channels I'd already drilled for my pins, I drilled them out. With a 1/8" drill bit.
The wing receptacles, with 1/8" holes drilled in them.
Drilling out the bottom of the tail with a 1/8" drill bit.

The pinned tail, partially inserted into the base of the model.

The left wing showing the pin coming out. The greenstuff here is purely to fill the gap; I'll sculpt the texture over the top tomorrow when it's set.
Gap filling
Here's the greenstuff to fill the gaps in the tail.

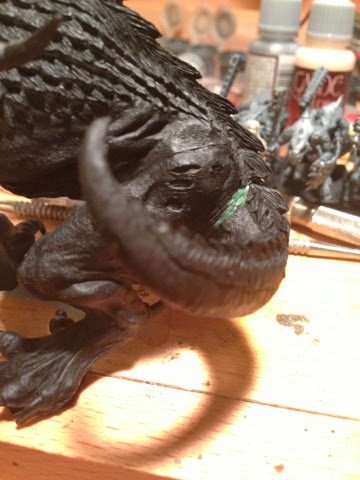
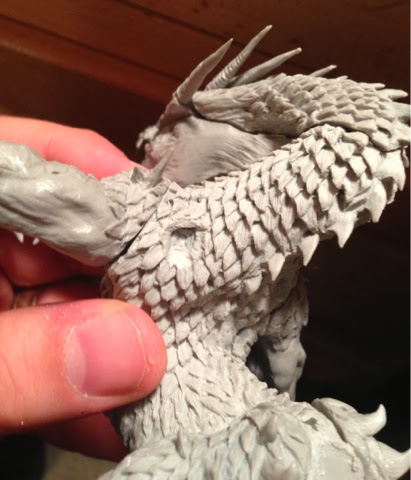
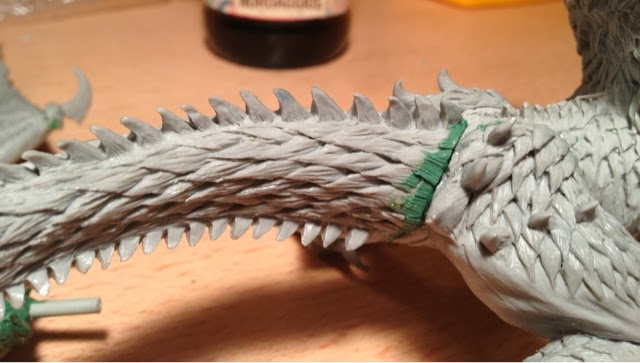
Greenstuff filling the gaps around the head (including a custom scale between the bottom and second horn), and a fake horn rim to bring the sizes closes together.

The right shoulder and hip required very little work to fill the gaps.

The gap fill on the left side of the tail.

Another custom scale to fill the gaps between the bottom and middle horn on the left, as well as the gap between the lower jaw and the neck.
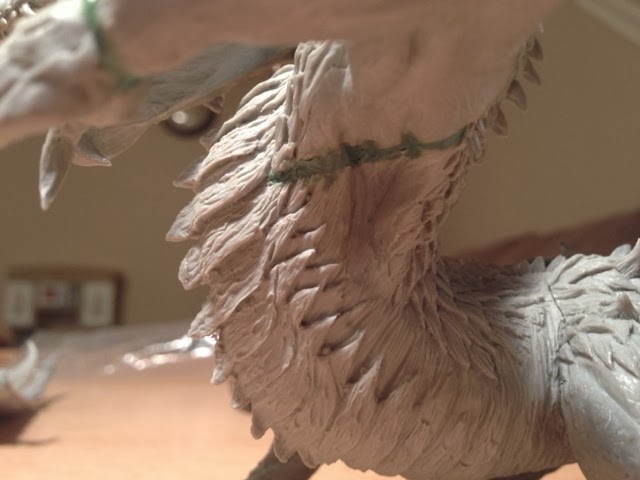
The biggest gap in the model, underneath the left arm, was pretty straightforward to fill.
|
Creator of The Beer Waaagh: http://www.thebeerwaaagh.blogspot.com
The Mierce Painting Thread
Tournament Credentials:
Best Army or Painted: Alamo 2009, 2010 (2nd), 2012; Bayou Battles 2010-2011, [2012 2nd overridden by 2nd Overall], 2013 (2nd); Capital City Carnage 2010-2011; Lone Wolf [2011 overridden by 1st Overall], 2012; Quake City Rumble 2012-2013; War Games Con 2010
Player's Choice: Alamo 2012, 2010, 2009 (3rd); Bayou Battles 2009-2013; Capital City Carnage 2010, 2011 (2nd); Lone Wolf 2011-2012; Quake City Rumble 2012 (2nd), 2013
Sportsman: Bayou Battles 2009 (3rd); Capital City Carnage 2009; Lone Wolf 2011 [overridden by 1st Overall]
Overall: Lone Wolf 2011; Bayou Battles 2012 (2nd); Quake City Rumble 2012 (2nd)
General: Over my dead body.
|
|
|
|
|
2014/02/07 15:32:41
Subject: Razormage's Mierce thread (WHFB Alternatives) - Updated 2/7 with A GIANT FREAKING DRAGON!!1!1
|
|
Decrepit Dakkanaut
UK
|
Many thanks for posting that assembly guide as I'm sure I'd have made a few of your slips like with the claws & horns
now I can make my own unique mistakes!
|
|
|
|
|
|
2014/02/07 16:13:43
Subject: Razormage's Mierce thread (WHFB Alternatives) - Updated 2/7 with A GIANT FREAKING DRAGON!!1!1
|
|
[DCM]
Dankhold Troggoth
|
That assembly looks like it was quite a bit of work, you've done a nice job of it, though!
And the painting on your dragon ogres and trolls is excellent  . Loving all this Mierce goodness... my only request would be a space marine for scale in some of the final assembly pics. I didn't have one so traded for one from a Dakkanaut for the same purpose
|
|
|
|
|
2014/02/07 16:17:53
Subject: Razormage's Mierce thread (WHFB Alternatives) - Updated 2/7 with A GIANT FREAKING DRAGON!!1!1
|
|
Average Orc Boy
|
 RiTides wrote: RiTides wrote:my only request would be a space marine for scale in some of the final assembly pics.
The Bloodthirster up there wasn't enough? 
Joking aside, I will do it moving forward. I didn't for most of the stuff above because I'd already done it on my Scale post and that Space Marine ended up back in his box. I shall do it moving forward, particularly for these newer models that don't already have a lot of documentation in terms of their size.
|
|
This message was edited 1 time. Last update was at 2014/02/07 16:20:12
Creator of The Beer Waaagh: http://www.thebeerwaaagh.blogspot.com
The Mierce Painting Thread
Tournament Credentials:
Best Army or Painted: Alamo 2009, 2010 (2nd), 2012; Bayou Battles 2010-2011, [2012 2nd overridden by 2nd Overall], 2013 (2nd); Capital City Carnage 2010-2011; Lone Wolf [2011 overridden by 1st Overall], 2012; Quake City Rumble 2012-2013; War Games Con 2010
Player's Choice: Alamo 2012, 2010, 2009 (3rd); Bayou Battles 2009-2013; Capital City Carnage 2010, 2011 (2nd); Lone Wolf 2011-2012; Quake City Rumble 2012 (2nd), 2013
Sportsman: Bayou Battles 2009 (3rd); Capital City Carnage 2009; Lone Wolf 2011 [overridden by 1st Overall]
Overall: Lone Wolf 2011; Bayou Battles 2012 (2nd); Quake City Rumble 2012 (2nd)
General: Over my dead body.
|
|
|
|
|
2014/02/10 15:20:22
Subject: Re:Razormage's Mierce thread (WHFB Alternatives) - Updated 2/7 with A GIANT FREAKING DRAGON!!1!1
|
|
Average Orc Boy
|
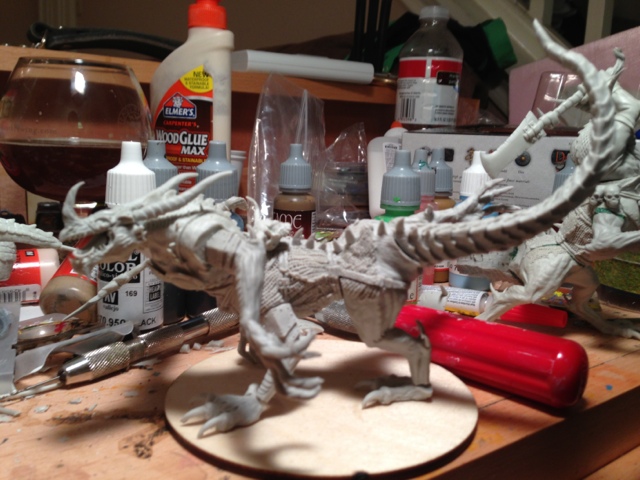
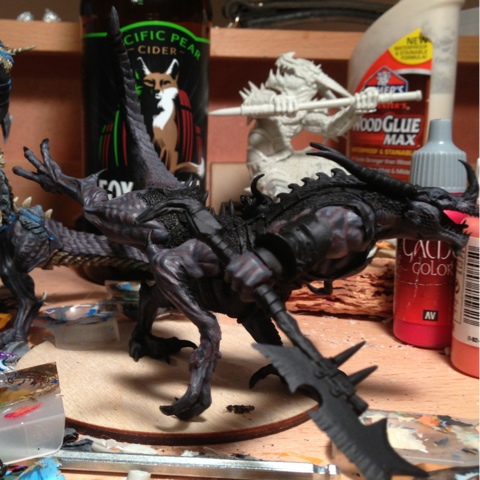
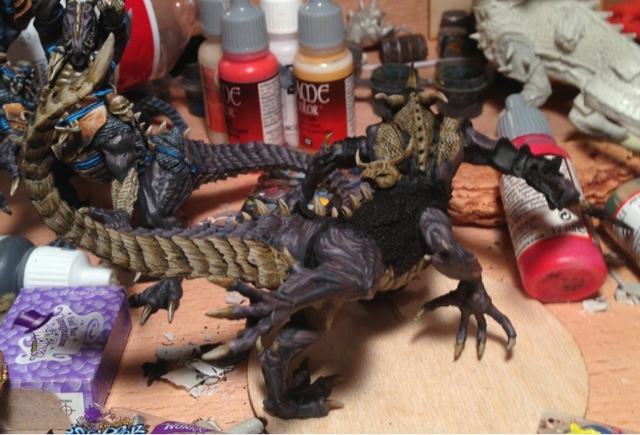
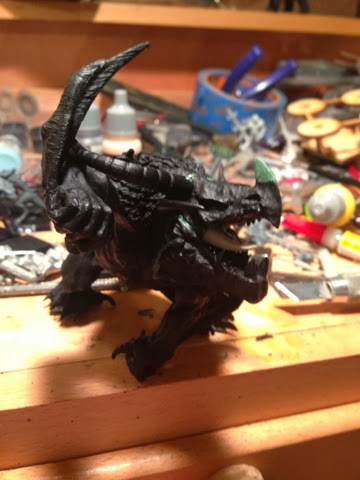
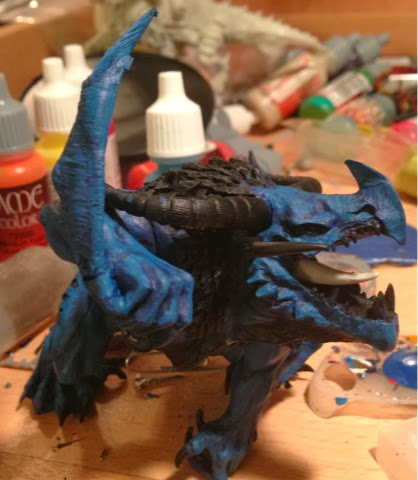
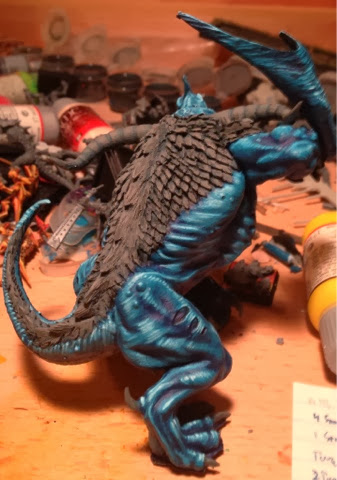
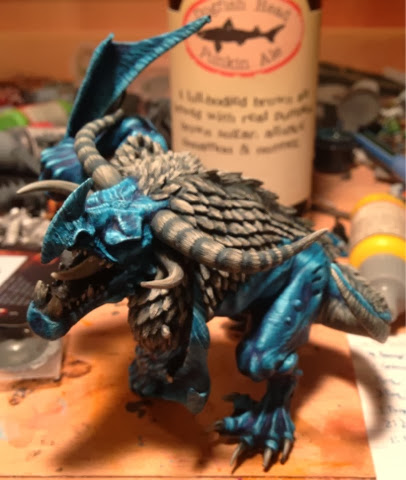
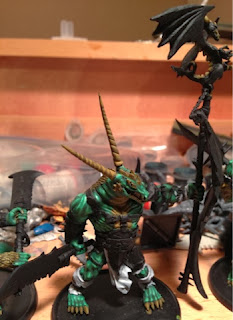
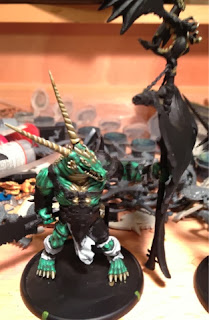
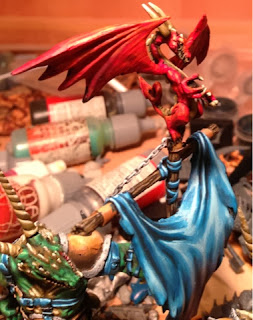
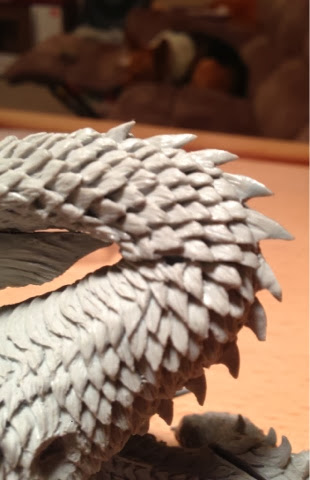
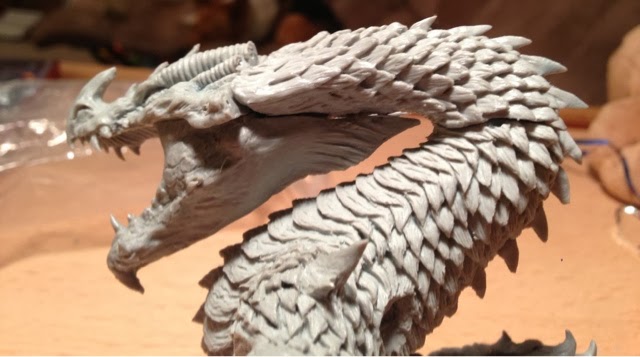
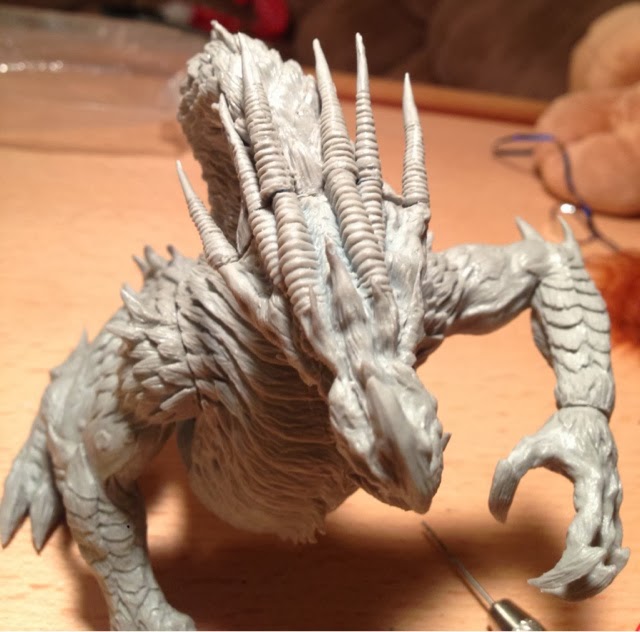
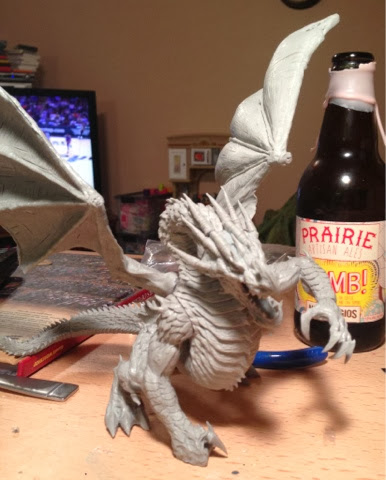
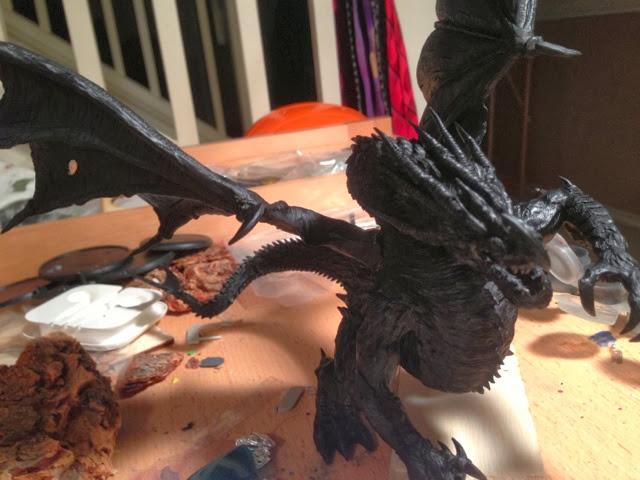
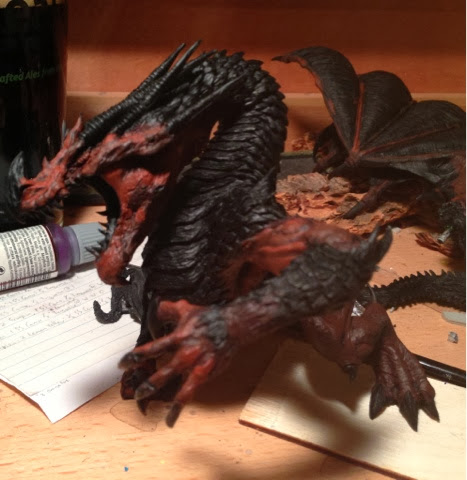
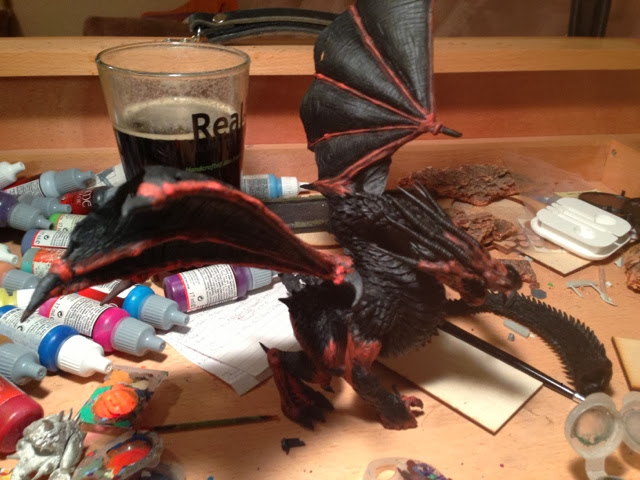
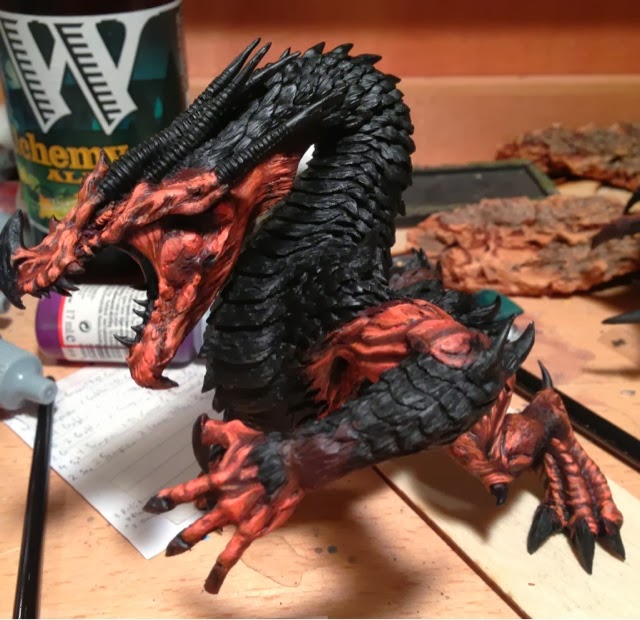
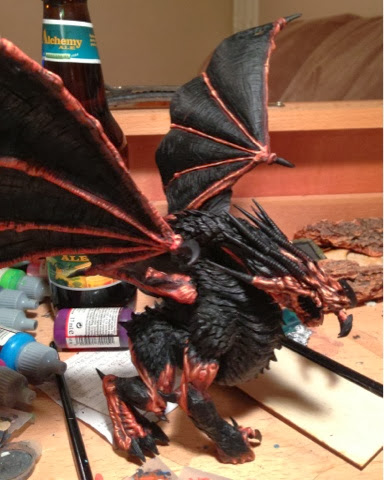
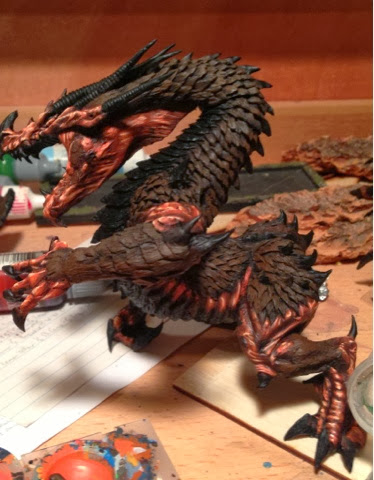
See how awesome he is? Check out all his majesty!
I spent an hour last night after priming him just staring at him, trying to figure out how I wanted to paint him up. I went online and started researching draconic color schemes, trying to find one that was just right. When I finally did, and clicked the thumbnail: surprise! It was Sebastian Picque's official Mierce-commissioned Angrislaug. While I try to use the manufacturer's original color schemes where I can, I know that I'm not at Sebastian's level of painting, and just trying to copy what he did is would result in a poor copy of what he did. His work is amazing, and brilliant, and there's a reason that he's paid a lot of money to paint models on commission, and I just paint stuff and post it on a blog.
I grumbled for a bit, and opened a bottle of my second-favorite beer: Avery's Samael (16.8% ABV). I started getting ideas. The Samael ran out, so I poured a pint of my Krull's Sabbitical clone of Avery's The Beast (15% ABV). I drank that pint, too. I started feeling a bit better.

Finally, I pulled out my paint and just started throwing it down on a piece of wood.
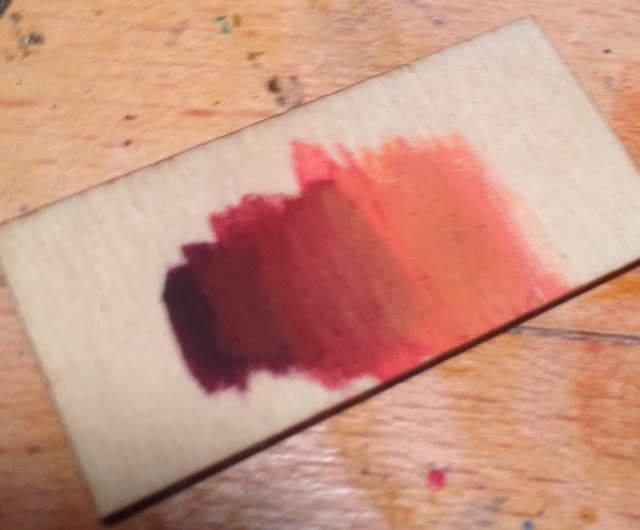
Hey, look, an out-of-focus color scheme! I was literally just mixing drops of paint together and slapping them down. However, it provided me a flash of insight. The swatch above is a mix of reds and browns. While I stared at it, I had a nice buzzed flash of insight. My resolve set, I started mixing paint and set of on what I hope will be the coolest paint job I've ever done.

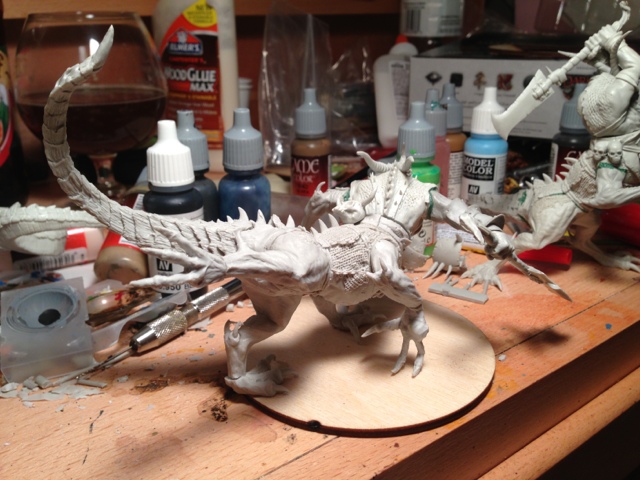
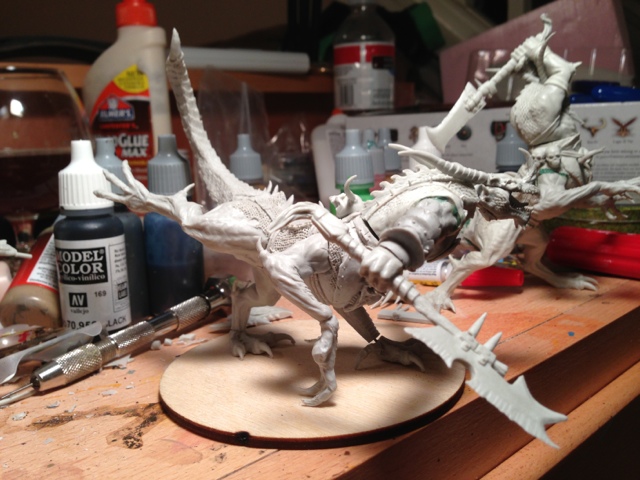
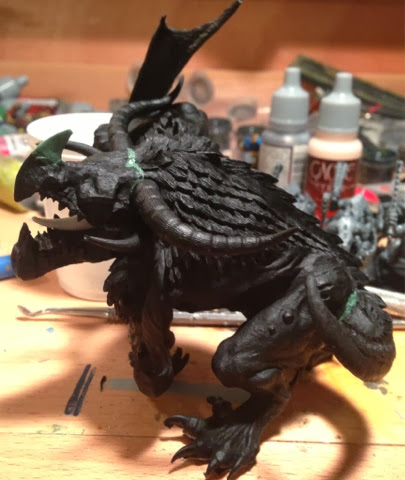
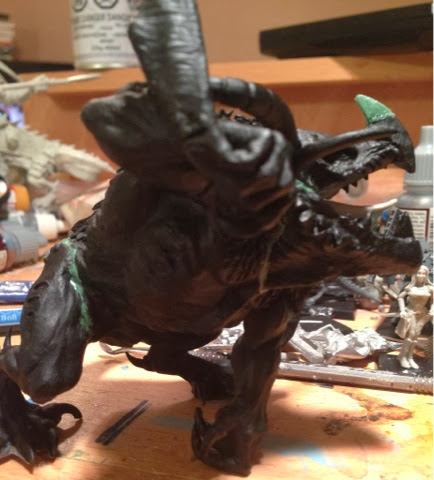
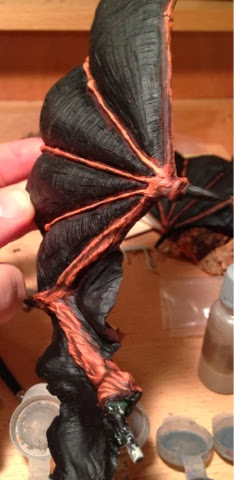
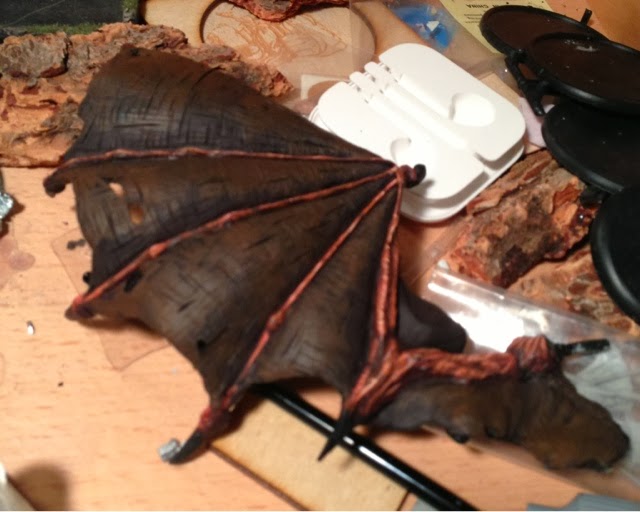
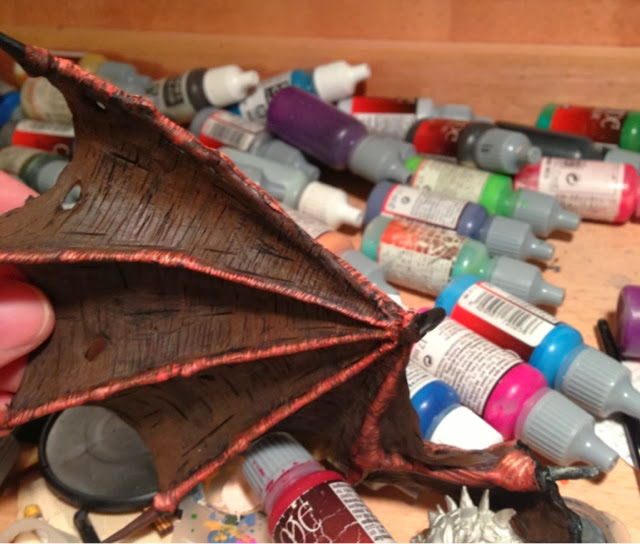
I decided to paint Angrislaug in sections. The model is designed to be detached into four parts - a body, two wings, and a tail - and I'm probably going to paint him in those sections.
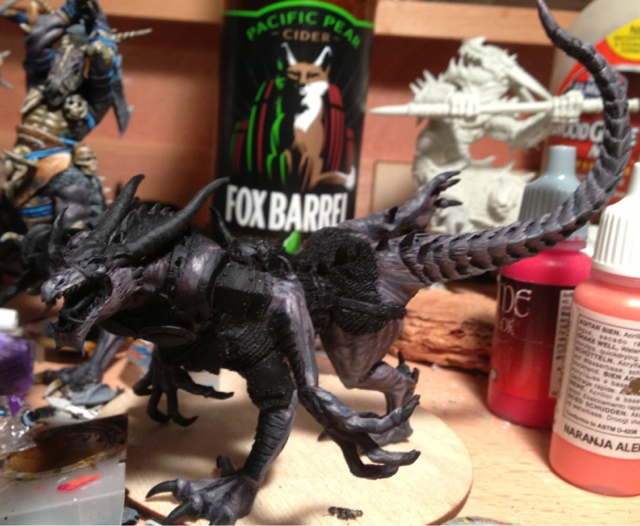
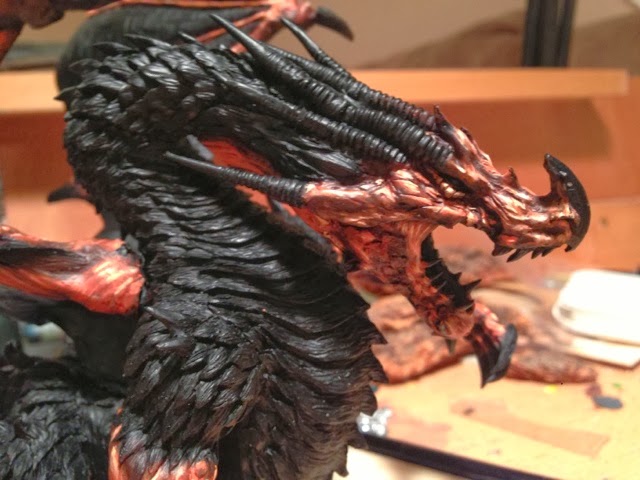
The buzzed flash of insight I had was to split my color palette to differentiate between Angrislaug's bare hide, and his armored scales. The palette I mixed above was equal parts of red to brown. For the model, I'm going to throw that proportion off: the skintone will be 2:1 red to brown, and the scales will be 2 brown to 1 red. This will do two things: it will set off the scales and allow me to keep them separate (and darker) from the skintone, which will let me emphasize the shine on them, and it will make this model different from Mierce's official model.
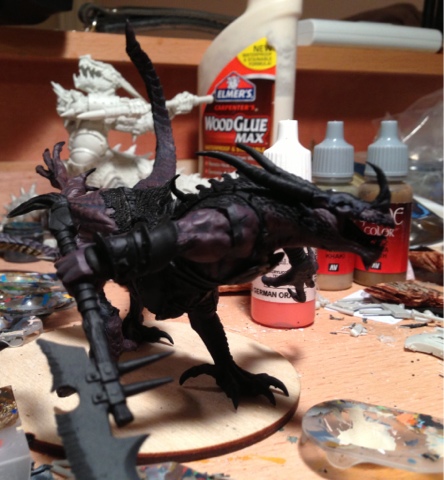
The first layer of red is 2 parts of Vallejo Red to 1 part SS camo Black Brown. I mixed 8 drops to 4, and then added two drops of black to make the tint dark. I'm deliberately trying to keep my colors dark here, to fit the aesthetic of the Darklands, and keeping the option open for me to do some cool source-lighting tricks. I'm using browns instead of yellows for the mix color for the same reason: it'll let me do some source lighting in yellow and make it distinct from the colors actually used to paint the model.
The first shade completed. I've also decided that the underbelly is going to be a lighter shade of brown, and I'm intending to use that lighter shade on the wings (hence why the area between the finials is still black).
Feeling less intimidated, I poured myself a pint of Karbach's Sympathy for the Lager, and kept working.

The second shade is 2 parts Vallejo Red to 1 part Beasty Brown. This time I did the 8:4 mix, but added a single drop of black to keep it dark.
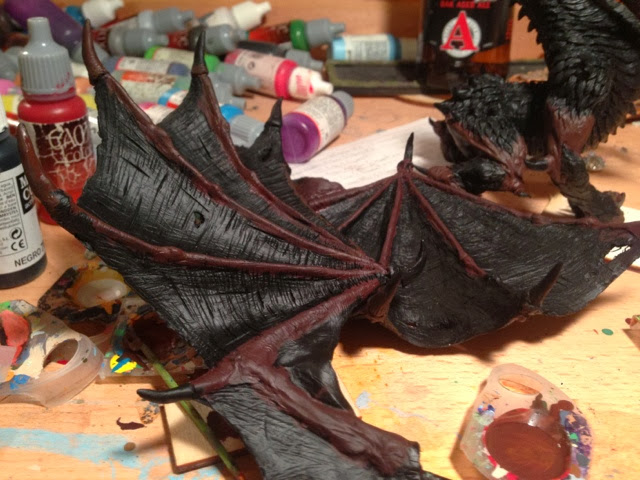
A shot of the wings, to show that they're getting painted too! The tail is getting neglected in this layer, but I'll live with that.

A reverse of the second layer. I'm two layers in, and pour myself another pint.
I painted a third layer (using Vallejo bloody Red and Beasty Brown), but finished at about 2 AM, and with quite a buzz going from all the beer. As a result, I forgot to take pictures of the status! I'll start tomorrow's update with those pictures. Sorry for the inconvenience.
|
Creator of The Beer Waaagh: http://www.thebeerwaaagh.blogspot.com
The Mierce Painting Thread
Tournament Credentials:
Best Army or Painted: Alamo 2009, 2010 (2nd), 2012; Bayou Battles 2010-2011, [2012 2nd overridden by 2nd Overall], 2013 (2nd); Capital City Carnage 2010-2011; Lone Wolf [2011 overridden by 1st Overall], 2012; Quake City Rumble 2012-2013; War Games Con 2010
Player's Choice: Alamo 2012, 2010, 2009 (3rd); Bayou Battles 2009-2013; Capital City Carnage 2010, 2011 (2nd); Lone Wolf 2011-2012; Quake City Rumble 2012 (2nd), 2013
Sportsman: Bayou Battles 2009 (3rd); Capital City Carnage 2009; Lone Wolf 2011 [overridden by 1st Overall]
Overall: Lone Wolf 2011; Bayou Battles 2012 (2nd); Quake City Rumble 2012 (2nd)
General: Over my dead body.
|
|
|
|
|
2014/02/11 19:25:01
Subject: Re:Razormage's Mierce thread (WHFB Alternatives) - Updated 2/10 with MOAR DAGRON [sic]
|
|
Average Orc Boy
|
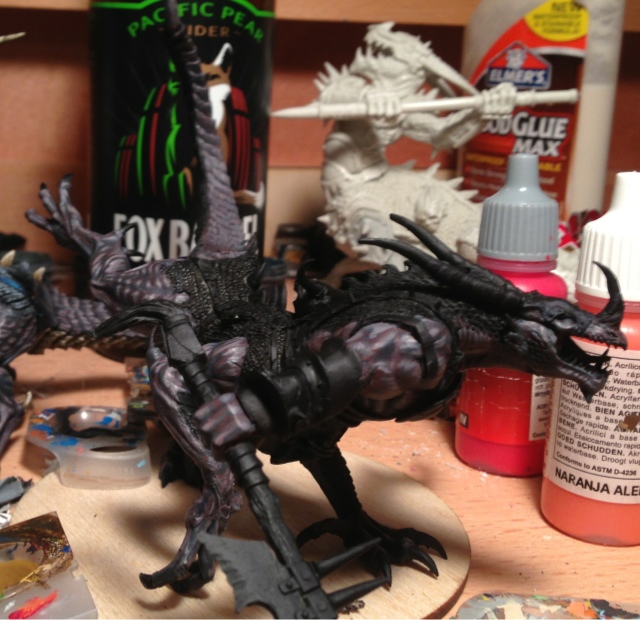
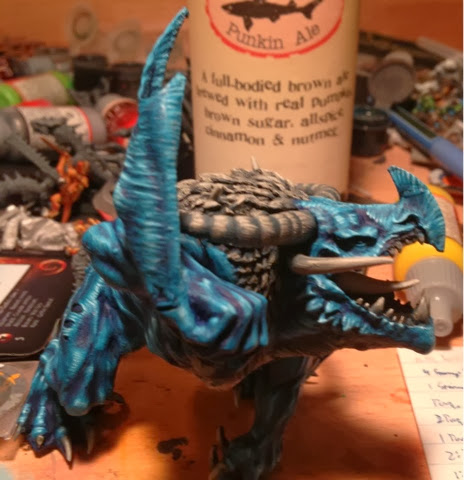
Well, as promised, we'll start off with the third layer from yesterday. This one is 2 parts Bloody Red : 1 part Bestial Brown. No black was added, which is why it's so crisp. 
A reverse of the third layer. I'm using a Size 2 brush from Games & Gears, and viewing it today realize I was doing a lot of drybrushing, which I try to avoid. We'll see if I can rescue the paint job in the next few layers... 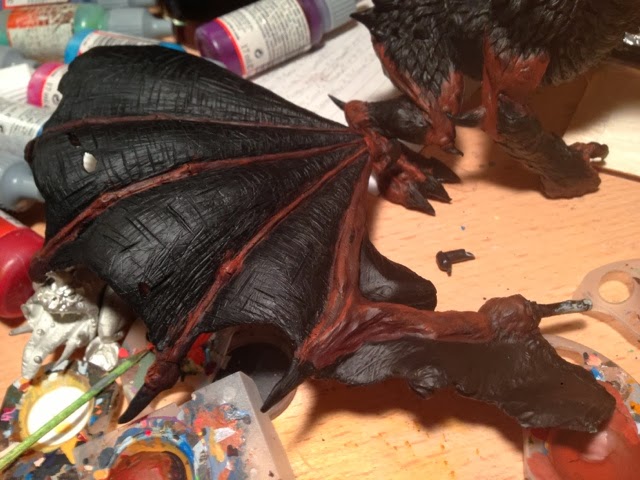
The third layer on the left wing.
Third layer on the right wing. No politics jokes, please.
Here's the fourth layer. I switched to a Games & Gear 0 for this one, but it's still looking a lot more drybrushed than I want, and I feel like I'm losing a lot of detail. I might have to just start over if I can't fix it. 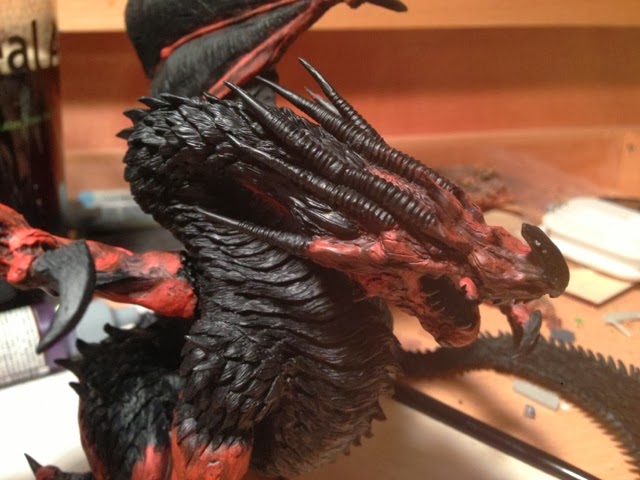
A close-up on the face for the fourth layer. You can see the rough transition strokes from the drybrushing. The fourth layer is 2 parts Bloody Red : 1 part Plague Brown.

The left side, fourth layer.
For the fifth layer I switched over to a Winsor-Newton Series 7, and upped the mix to 2 parts Hot Orange : 1 part Plague Brown. 
You can see that the colors are starting to pop out in my typical style.
A reverse view of the fourth layer. The Winsor-Newton brush is giving me more control, but I'm still not satisfied, as you'll see in a second.
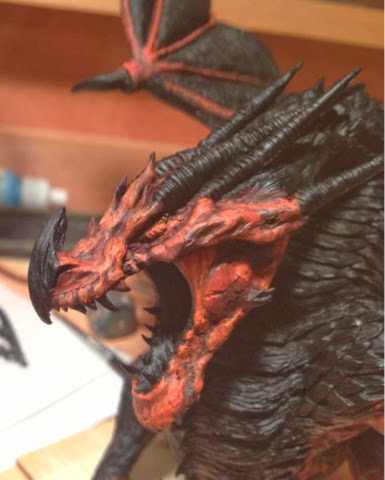
Here's a close up (and for some reason poorly exposed) shot of the head. I can see really rough transitions in this layer, and feel like I'm trashing a lot of the detail with this paint job. At 2 AM I quit for the night, thoroughly disheartened.
Once in bed, I laid awake for a while trying to figure out how I'm going to salvage the paint job. For now, I think I'm going to do the last two layers of highlights, and then see if I can run a midtone red glaze to clean up the transitions. If that doesn't work, well, I can always paint over it! We'll see what tomorrow brings!
|
Creator of The Beer Waaagh: http://www.thebeerwaaagh.blogspot.com
The Mierce Painting Thread
Tournament Credentials:
Best Army or Painted: Alamo 2009, 2010 (2nd), 2012; Bayou Battles 2010-2011, [2012 2nd overridden by 2nd Overall], 2013 (2nd); Capital City Carnage 2010-2011; Lone Wolf [2011 overridden by 1st Overall], 2012; Quake City Rumble 2012-2013; War Games Con 2010
Player's Choice: Alamo 2012, 2010, 2009 (3rd); Bayou Battles 2009-2013; Capital City Carnage 2010, 2011 (2nd); Lone Wolf 2011-2012; Quake City Rumble 2012 (2nd), 2013
Sportsman: Bayou Battles 2009 (3rd); Capital City Carnage 2009; Lone Wolf 2011 [overridden by 1st Overall]
Overall: Lone Wolf 2011; Bayou Battles 2012 (2nd); Quake City Rumble 2012 (2nd)
General: Over my dead body.
|
|
|
|
|
2014/02/12 21:20:43
Subject: Razormage's WHFB alternatives Thread - Updated 2/11 with more work on the big freaking dragon.
|
|
Average Orc Boy
|

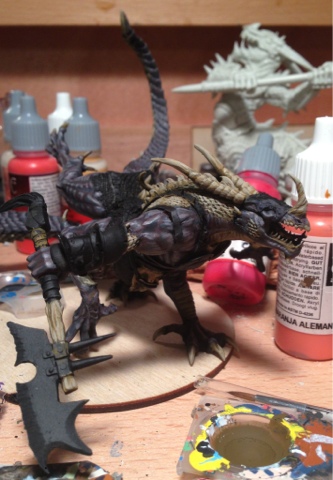
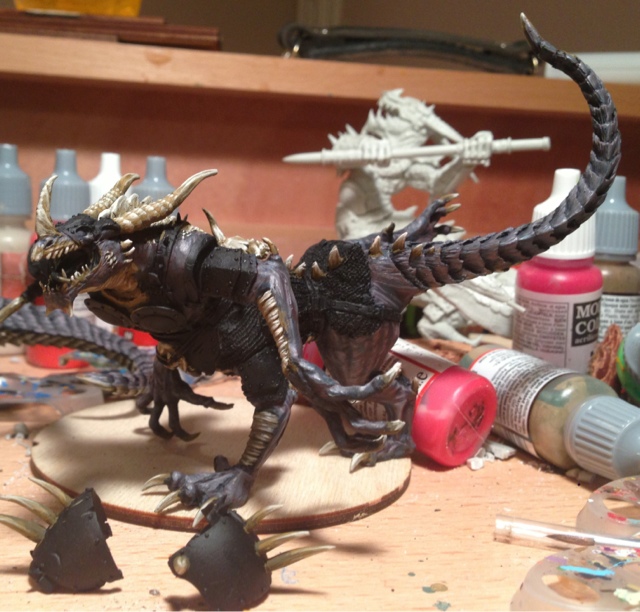
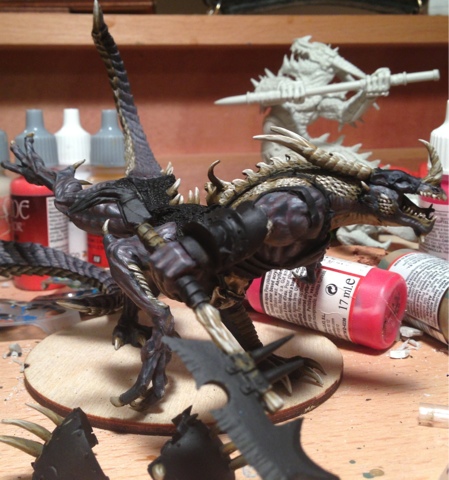
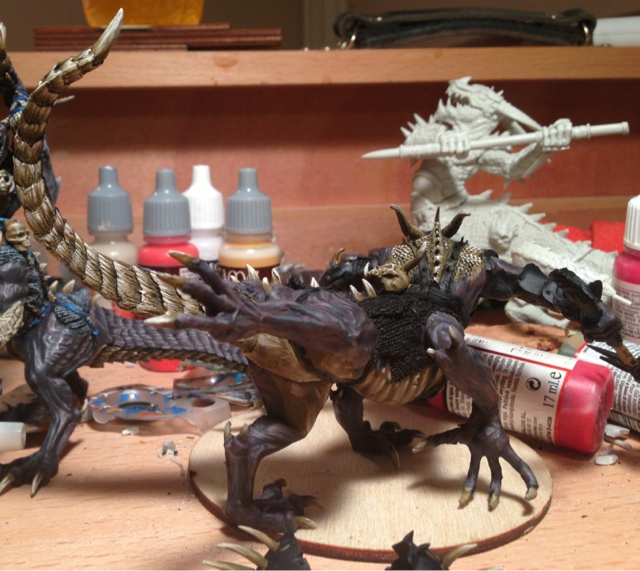
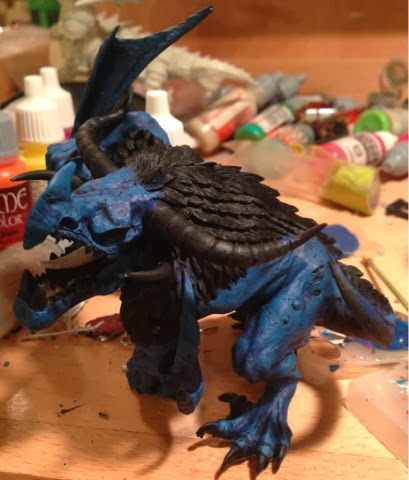
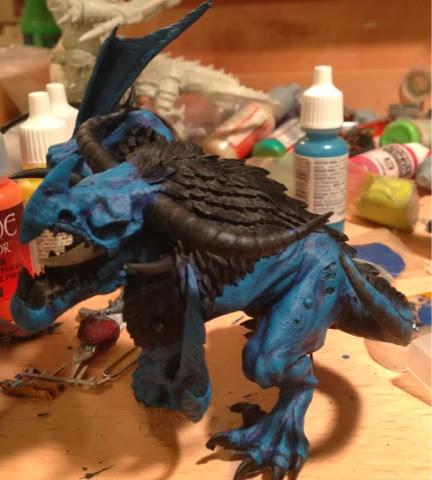
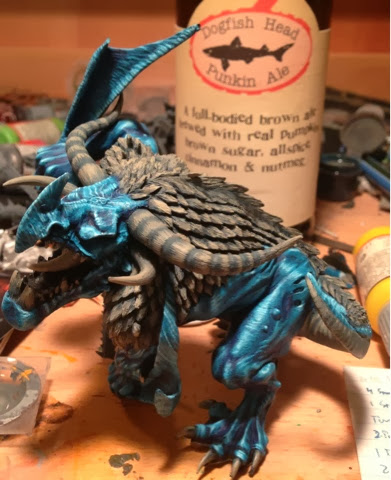
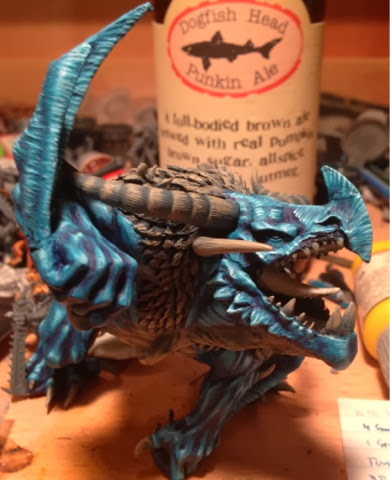
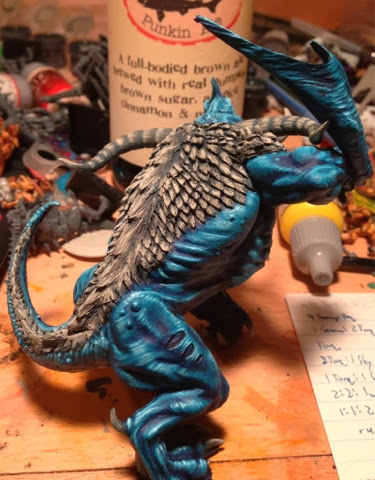
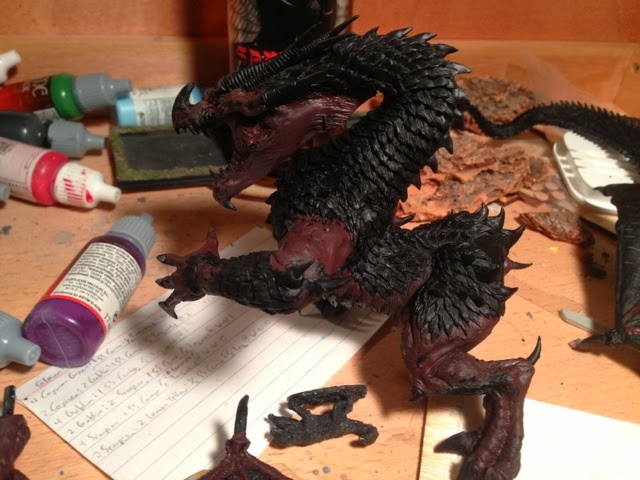
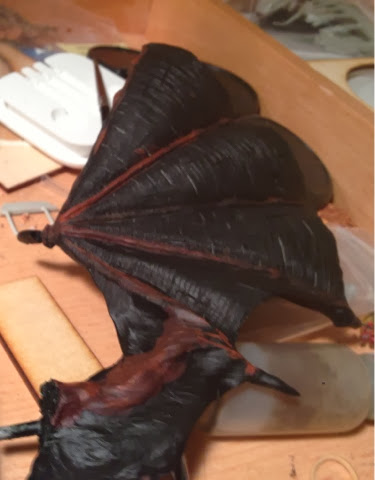
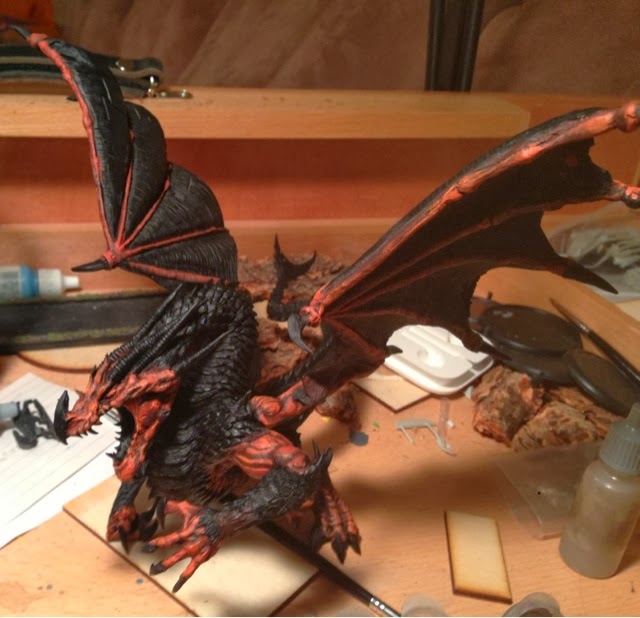
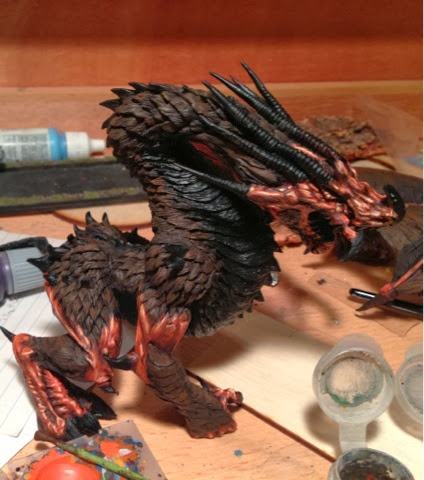
While I left the last post somewhat skeptical of the color choice, I overcame a similar mental block with the Dragon Ogres, and resolved to plow along and see how it looks with all the highlights done. So resolved, I mixed a concoction of 3 Hot Orange : 1 Dwarf Flesh. I dropped brush size to a 00, and set to work!
The reverse of the face. There are places the highlights are working - like the feet and hands - and places they are not - like the biceps.
 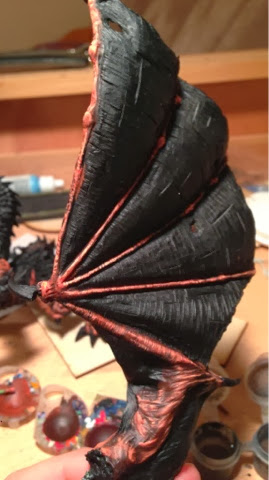
The two wings get off pretty easily, because they're only minor amounts of painting.
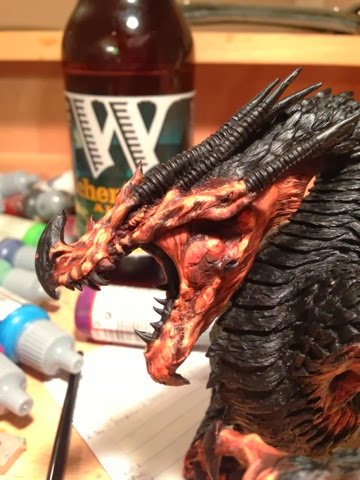
For the sixth layer, I went all dwarf skin. This had the effect of "yellowing" the skintone, but it was required because the orange was just pulling the shade too dark.
At a distance, the transititions don't seem so bad.
In the close-up of the face, you can see that the transitions are looking cleaner as the highlighting continues. It's the larger, flatter areas that seem to be suffering from the style.

Stuck the wings back in for a full-body shot.

For the final layer, I added some white to the last mixture and used it very sparingly.
[img]https://lh3.googleusercontent.com/-m65yL6z-GVE/UvjprKjGN0I/AAAAAAAACKI/Su5EyvskTOo/s640/blogger-image--971964733.jpg/img]
Again, it's working on the smaller portions, but I'm unconvinced about the larger. Maybe it's because there are large, unpainted black areas tricking my eye? I guess that's the next stop!
|
Creator of The Beer Waaagh: http://www.thebeerwaaagh.blogspot.com
The Mierce Painting Thread
Tournament Credentials:
Best Army or Painted: Alamo 2009, 2010 (2nd), 2012; Bayou Battles 2010-2011, [2012 2nd overridden by 2nd Overall], 2013 (2nd); Capital City Carnage 2010-2011; Lone Wolf [2011 overridden by 1st Overall], 2012; Quake City Rumble 2012-2013; War Games Con 2010
Player's Choice: Alamo 2012, 2010, 2009 (3rd); Bayou Battles 2009-2013; Capital City Carnage 2010, 2011 (2nd); Lone Wolf 2011-2012; Quake City Rumble 2012 (2nd), 2013
Sportsman: Bayou Battles 2009 (3rd); Capital City Carnage 2009; Lone Wolf 2011 [overridden by 1st Overall]
Overall: Lone Wolf 2011; Bayou Battles 2012 (2nd); Quake City Rumble 2012 (2nd)
General: Over my dead body.
|
|
|
|
|
2014/02/19 14:34:33
Subject: Razormage's WHFB alternatives Thread - Updated 2/12 with more work on the big freaking dragon.
|
|
Average Orc Boy
|
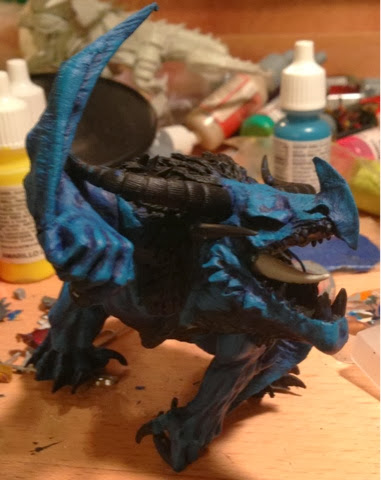
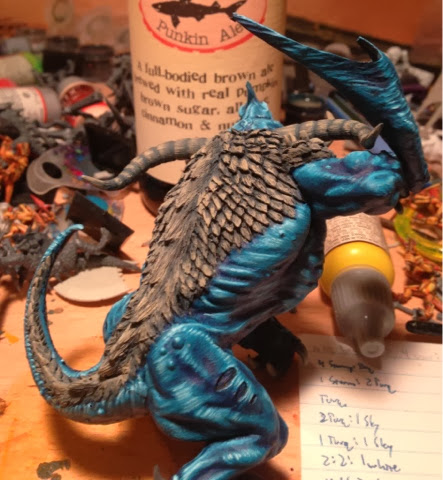
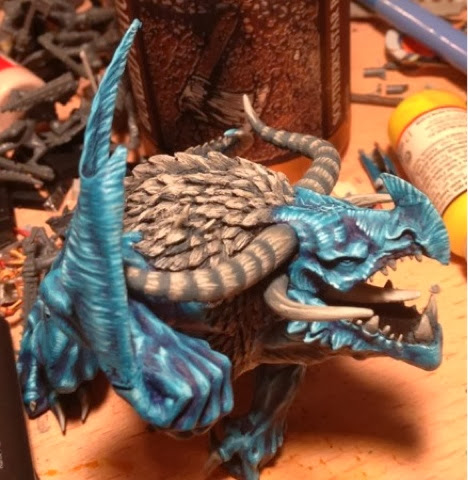
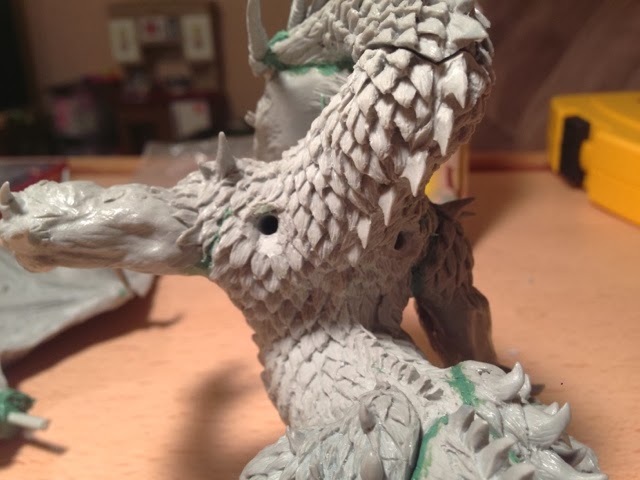
After taking Saturday night off for some much-needed sleep after eight 2- AM nights in a row, I started Sunday on the brown shade. These will be used for the scales on the top of the model and the interior of the wings.

For the first blurry layer, I started with 6 parts SS Camo Black Brown : 3 parts Red : 2 parts Black. See the symmetry between this color and the reds? Yep, the reds and browns are reversed. Hopefully it will make the model seem cohesive, with the same tints running throughout.
A shot of the base coated wings.
The inside gets the same layer as the outside, though the highlighting will be inverted.
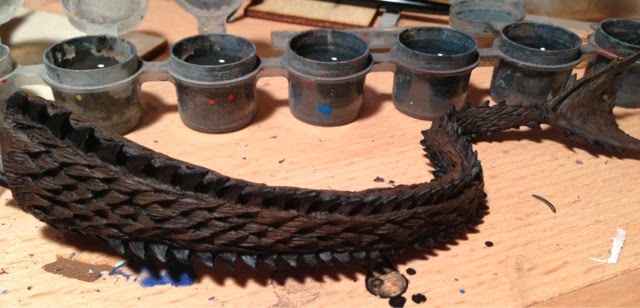
Finally, some paint on the tail!
For the second layer, I used 6 parts Bestial Brown : 3 parts Red : 1 part Black.
You can see that the contours of the scale, along with the texture sculpted into it, is going to make my life a lot easier for this shade than the red. I can be lazier painting, and let the model do more of the work!
I hit 1:30, and called it a night. Tonight, I hope to get three more layers down on the brown. We shall see how I can do; the middle layers seem to take the longest!
|
Creator of The Beer Waaagh: http://www.thebeerwaaagh.blogspot.com
The Mierce Painting Thread
Tournament Credentials:
Best Army or Painted: Alamo 2009, 2010 (2nd), 2012; Bayou Battles 2010-2011, [2012 2nd overridden by 2nd Overall], 2013 (2nd); Capital City Carnage 2010-2011; Lone Wolf [2011 overridden by 1st Overall], 2012; Quake City Rumble 2012-2013; War Games Con 2010
Player's Choice: Alamo 2012, 2010, 2009 (3rd); Bayou Battles 2009-2013; Capital City Carnage 2010, 2011 (2nd); Lone Wolf 2011-2012; Quake City Rumble 2012 (2nd), 2013
Sportsman: Bayou Battles 2009 (3rd); Capital City Carnage 2009; Lone Wolf 2011 [overridden by 1st Overall]
Overall: Lone Wolf 2011; Bayou Battles 2012 (2nd); Quake City Rumble 2012 (2nd)
General: Over my dead body.
|
|
|
|
|
|
|
|


