| Author |
Message |
 |
|
|
|
|
Advert
|
Forum adverts like this one are shown to any user who is not logged in. Join us by filling out a tiny 3 field form and you will get your own, free, dakka user account which gives a good range of benefits to you:
- No adverts like this in the forums anymore.
- Times and dates in your local timezone.
- Full tracking of what you have read so you can skip to your first unread post, easily see what has changed since you last logged in, and easily see what is new at a glance.
- Email notifications for threads you want to watch closely.
- Being a part of the oldest wargaming community on the net.
If you are already a member then feel free to login now. |
|
 |
2016/02/22 06:17:27
Subject: Blood Angels army progress
|
|

Been Around the Block
|
Finally started work on my Blood Angels!
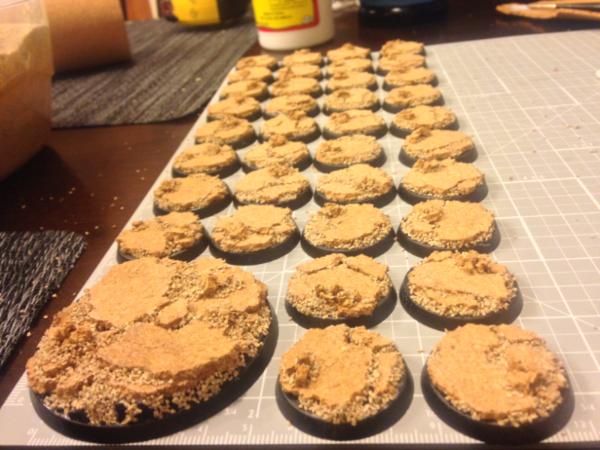
I went ahead and did the bases for a sanguinary priest, sanguinary guard, 10x death company, 20x tacticals, and a furioso dread...
Used cork to layer "stone" slabs, then medium fine ballast to add "gravel", and finally tiny pieces of cork and more ballast to do small piles of rocks. These will be sealed with watered down PVA tomorrow evening, then base coated sometime this week.
I'll keep this thread going by regularly posting new pics of progress every few days.
Thanks for looking! Feedback always appreciated!
Automatically Appended Next Post:
.... Omg... Why does this forum hate me?!
I attach 5 different files and they all look fine until I hit "submit", then they all post as the first image...
Then, I get to edit them only to have the edited post not show ANY pics.
I give up. Sorry. Mods, please get rid of this thread if possible. Trying to post pics here is way too much of a headache.
| Filename |
image.jpeg |
![[Disk]](/dakkaforum/templates/default/images/icon_disk.gif) Download
Download
|
| Description |
|
| File size |
1776 Kbytes
|
|
|
This message was edited 2 times. Last update was at 2016/02/22 06:21:04
|
|
|
 |
|
2016/02/22 06:48:07
Subject: Blood Angels army progress
|
|

Pious Palatine
|
It's easy. All you have to do is from your Dakka Gallery paste the link marked forums, here's the pic of your bases:
They look good by the way!
EDC
|
|
|
|
|
2016/02/25 02:47:53
Subject: Blood Angels army progress
|
|
Been Around the Block
|
Thanks evildrcheese! This is the first forum I've joined that doesn't handle images like all the others...
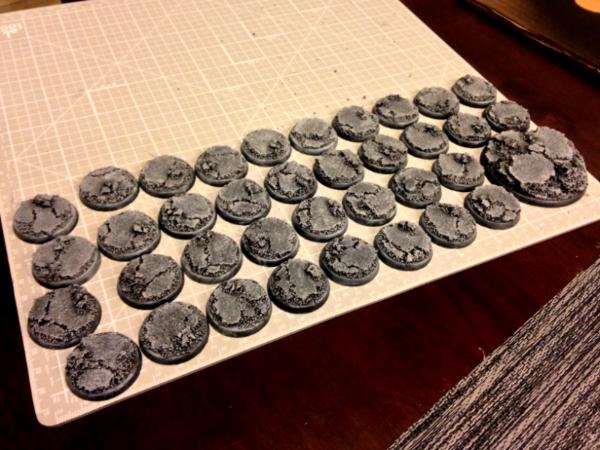
Anyway, this is after base coating with chaos black, dry brushing thick with eshin grey, then dry brushing lightly with eshin grey/white scar mixture.
I still need to paint the sides of the bases with Abaddon black to clean them up, then seal with matte varnish.
|
|
|
|
|
2016/02/25 10:49:26
Subject: Blood Angels army progress
|
|
Blood-Drenched Death Company Marine
|
Bases are looking pretty awesome so far man! Keep up the great work!
Looking forward to seeing more of your models as you get to working on them. Following along here will help me keep motivated to keep painting my Blood Angels. 
Take it easy for now.
-Red__Thirst-
|
You don't know me son, so I'll explain this to you once: If I ever kill you, you'll be awake, you'll be facing me, and you'll be armed. |
|
|
|
|
2016/02/25 18:25:50
Subject: Blood Angels army progress
|
|
Secretive Dark Angels Veteran
|
Is that just sand or is it ballast? I like the bases. I bought some cork to try something similar but was wondering how you filled the rest. THanks
|
 ~Ice~ ~Ice~ 
Da' Burnin Couch 2018 Best Overall
Beef and Wing ITC Major GT Best Overall 2018
2019 ITC #1 Overall Best Admech
LVO 2019 #1 Admech |
|
|
|
|
2016/02/25 19:42:11
Subject: Blood Angels army progress
|
|
Homicidal Veteran Blood Angel Assault Marine
|
Good job with the bases. It's the exact same method I use on my BA and the sand between the cork really helps hide the fact that they're torn up cork. Look forward to seeing the models
|
|
|
|
|
|
2016/02/26 01:29:43
Subject: Blood Angels army progress
|
|
Been Around the Block
|
 Icelord wrote: Icelord wrote:Is that just sand or is it ballast? I like the bases. I bought some cork to try something similar but was wondering how you filled the rest. THanks
It's medium ballast. It worked out pretty nicely with just PVA glue. If I had to do it again, I'd mix fine ballast with the medium just to give a bit more variation in the rubble.
Also, make sure you go over them and touch up before you seal them with matte sealer; the cork likes to chip in some spots and some of the ballast may come off when you're dry brushing. I glued the cork to the bases, then glued the tiny rubble piles, then added ballast, then brushed over the entire thing with very watered down PVA glue (like the consistency of skim milk). After that dried, I sprayed them all with chaos black, then dry brushed heavily with eshin grey. I then made a dark mixture of eshin grey and white scar and dry brushed even lighter, then a much lighter mixture of eshin grey and white scar for the final, very, very light dry brushing. I'm going to paint the sides of all the bases with Abaddon black then spray seal them.
I'm going to pin my models to them after they're painted as I don't want them pulling the cork up; I want a nice, strong bond between the model and the actual plastic base.
|
|
|
|
|
2016/02/26 01:40:58
Subject: Blood Angels army progress
|
|

Incorporating Wet-Blending
|
Yeah, this forum is pretty terrible mechanically - it has been modified so much over the years that it is effectively it's own thing, which means some stuff will simply never work. I am going to guess you're using an iphone - that is generally the issue with images.
http://www.dakkadakka.com/core/gallery-search.jsp?u=101371
That is your gallery with 5 pics in it, looks really good to me mate - makes me want to redo my bases 
|
|
|
|
|
2016/02/26 19:56:58
Subject: Blood Angels army progress
|
|
Been Around the Block
|
To anyone trying this basing method:
I used Rust-oleum matte finish sealer for "art and crafts". It went on pretty thick even though I only did a very quick dusting. I was horrified when I saw that it dried with a satin-ish sheen (very slightly glossy), which made the bases look like plastic... :-( BUT, the bases are pretty much indestructible now.
However, I picked up some Testors Spray Laquer (1260 Dullcote) with the clear frosted cap. Sprayed a very thin layer and it knocked it back down to the original look. Very, Very pleased with this stuff.
I'm not going to use the Rust-oleum on the actual models because I can see it would be hard not to clog up tiny detail, and I don't think the actual models need that much protection. I saw some models finished with the Testors at my local TT shop and they look like you never ever sealed them... Perfect!
|
|
|
|
|
2016/02/26 23:42:40
Subject: Re:Blood Angels army progress
|
|
Blood-Drenched Death Company Marine
|
Yea you have to be careful with what paint you use when it comes to spray paint. A satin or gloss finish can be a GIANT problem. Always test spray a little paint on a box or other surface and let it dry before you use it to make sure you're not about to put something on your minis that doesn't need to be.
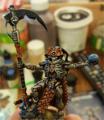
As far as spray primers, I HIGHLY recommend using Army Painter brand Dragon Red. It's how I basecoat my Blood Angels and produces some fantastic results.
An example:
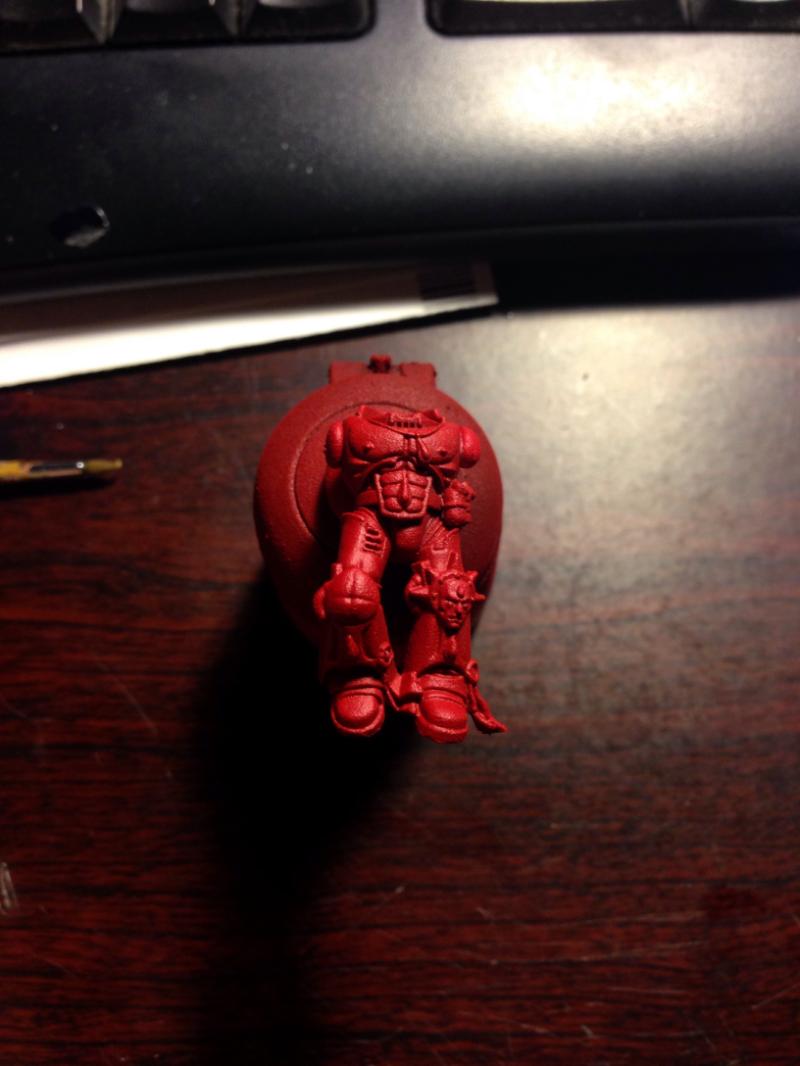
That's the base coat of spraypaint, and with two thinned coats of Mephiston Red you wind up with this:
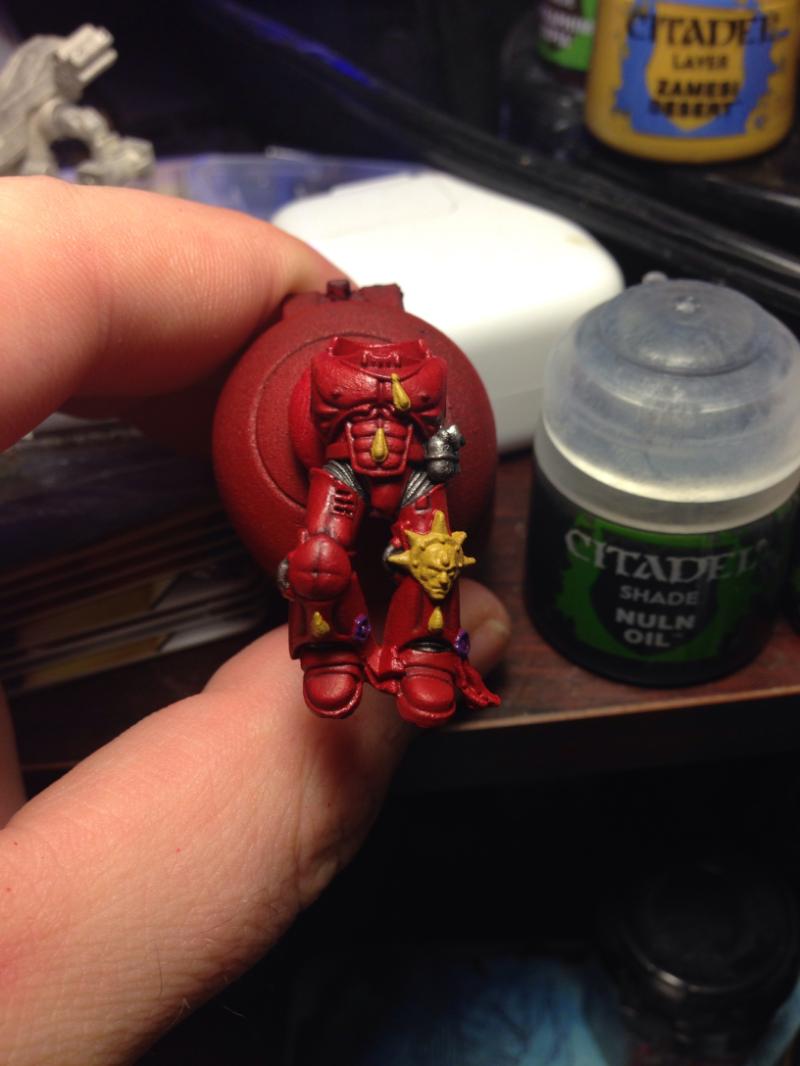
(Some shading work done there as well of course, but it produces a great red shade.)
And the finished model:
I cannot say enough good things about the army painter spray. If you use it properly (good weather conditions outside, not spraying too close, and properly shaking it up, etc.) It produces great results.
Hopefully that helps. Take it easy and feel free to PM me if you want or need any tips or help there Pilgrim. Painting red can be a stone cold pain in the backside. Another person I would suggest taking advice from is Talys. His Blood Angels put mine to absolute and utter shame. 
Take it easy.
-Red__Thirst-
|
You don't know me son, so I'll explain this to you once: If I ever kill you, you'll be awake, you'll be facing me, and you'll be armed. |
|
|
|
|
2016/02/27 16:17:55
Subject: Blood Angels army progress
|
|
Been Around the Block
|
That spray job looks really good!
I like how you did the power weapon too; I'm wasn't looking forward to having buy even more colors to do the 6 power weapons I'll have, so I'm going to try Mephiston red base, then evil sunz scarlet where the lightning will be, then white lightning
|
|
|
|
|
2016/02/28 08:52:44
Subject: Blood Angels army progress
|
|
Blood Angel Terminator with Lightning Claws
|
Looks solid, I totally want a nid army so I can use this and a simple dipping technique to build an army.
|
|
|
|
|
|
2016/03/15 04:10:04
Subject: Blood Angels army progress
|
|
Been Around the Block
|
Well, holy moly! Sorry for the long delay; I was taking 3-4 tests a week at school over the last couple weeks!
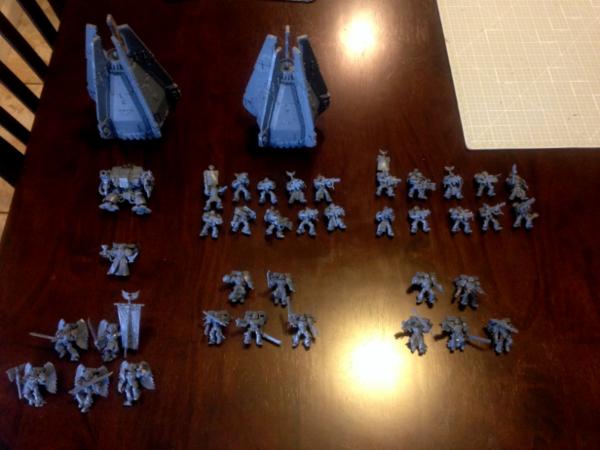
Anyway, finally got around to building the rest of my army (besides the 3rd drop pod I just ordered). My new drop pod should be here Wednesday or Thursday, and I'm really looking forward to painting soon!
From left to right, top to bottom:
- drop pod
- drop pod
- furioso dreadnought
- tac squad
- tac squad
- sanguinary priest
- death company
- death company
- sanguinary guard
|
|
|
|
|
2016/03/15 06:05:42
Subject: Blood Angels army progress
|
|
Blood-Drenched Death Company Marine
|
Looking good!
Can't wait to see paint on them man. Well done so far and keep up the great work.
Take it easy.
-Red__Thirst-
|
You don't know me son, so I'll explain this to you once: If I ever kill you, you'll be awake, you'll be facing me, and you'll be armed. |
|
|
|
|
2016/03/15 06:39:59
Subject: Blood Angels army progress
|
|

Fixture of Dakka
|
For those bases that you coated with rust-o-leum that you're unhappy with, just hit them with a coat of black primer, drybrush them with gray, and paint the lips. They'll look great!
|
|
|
|
|
2016/03/20 02:43:38
Subject: Blood Angels army progress
|
|
Been Around the Block
|
|
|
|
|
|
2016/03/20 03:53:25
Subject: Blood Angels army progress
|
|
Blood-Drenched Death Company Marine
Little Rock, Arkansas
|
That is easily on par with my most high-effort jobs, and way past my medium-effort stuff. (Of course I make no claim to be a great painter.)
|
|
This message was edited 1 time. Last update was at 2016/03/20 03:53:53
 20000+ points 20000+ points
Tournament reports:
1234567 |
|
|
|
|
2016/03/20 06:10:33
Subject: Blood Angels army progress
|
|
Been Around the Block
|
 niv-mizzet wrote: niv-mizzet wrote:That is easily on par with my most high-effort jobs, and way past my medium-effort stuff. (Of course I make no claim to be a great painter.)
Well, that makes me feel better! Thanks for the compliment!
I'm waiting for Red_Thirst to show up and notice I'm rocking 5th company, lol!
|
|
|
|
|
2016/03/20 10:03:23
Subject: Blood Angels army progress
|
|
Irked Necron Immortal
|
Love your bases! Might have to steal this idea!
Great models too, keep the pics coming
|
|
|
|
|
|
2016/03/20 15:05:01
Subject: Blood Angels army progress
|
|
Been Around the Block
|
 D4V1D0 wrote: D4V1D0 wrote:Love your bases! Might have to steal this idea!
Great models too, keep the pics coming
Thank you! The bases were pretty easy to do, but time consuming. I like them as well. When I was in my local shop the other day, I saw someone painting a Skitarii and he used this paint that dries cracked. It looked like dry, cracked desert ground. I think that's what I'm going do if I ever feel like blowing another few hundred on another army in the future.
|
|
|
|
|
2016/03/20 19:12:48
Subject: Blood Angels army progress
|
|
Blood-Drenched Death Company Marine
|
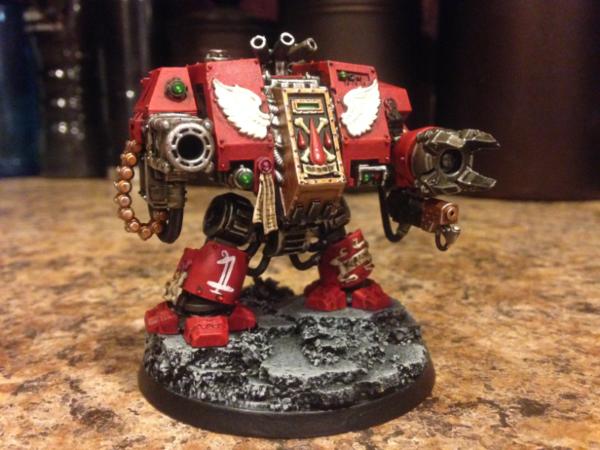
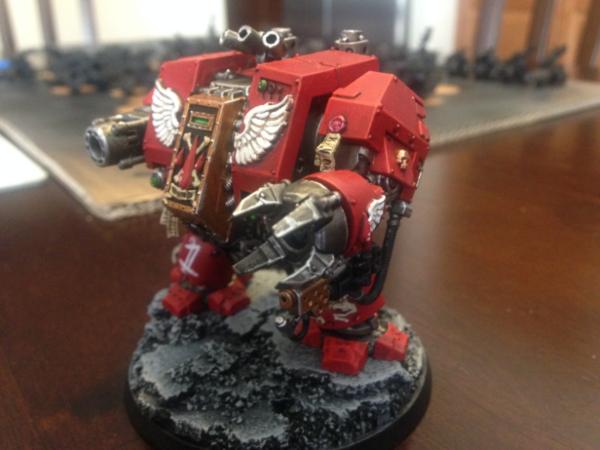
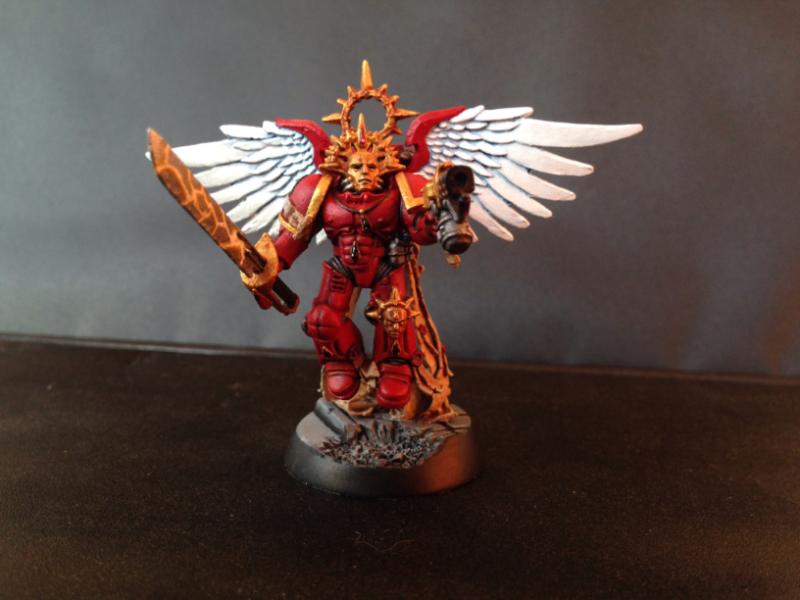
Man! For a first effort that is OUT-FREAKING-STANDING dude!
Good decal placement and nice freehand on that number 1 on the right shin also! 5th Co. Represent! Also, great work on placing the little decorations such as Purity Seals and the like. Well executed on that.
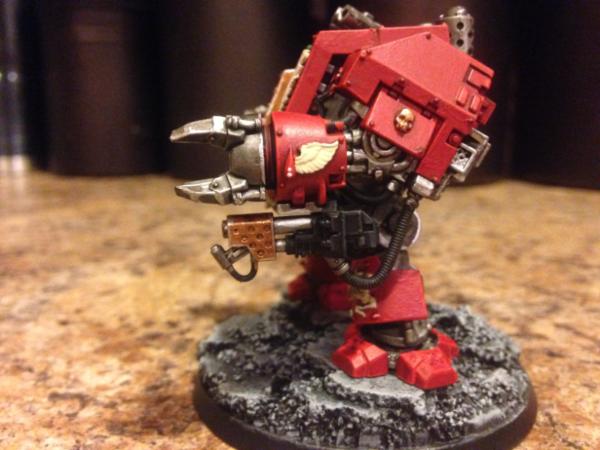
An extremely solid showing and well above 'regular' tabletop standard. Moving forward, if you'd like a little feedback, you could hit the wing on the Close Combat Weapon forearm with a Sepia or similar shade wash to help define the off-white wing detailing. Also, use that same wash on the ammo belt for the Frag Cannon to help darken down the recesses on and between the shells (If you've done this already, and the lighting just doesn't show it, then disregard).
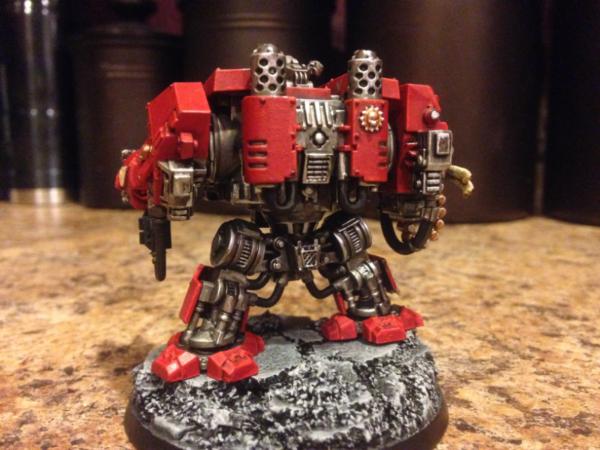
Great job on the metallic paint as well. Looks suitably grimy and worn but still in working order.
Nice touch using gold on the sarcophagus also. Subtle but effective. May swipe that for my Furioso when I get around to painting it.
Basing looks excellent as well. If you keep painting like this you'll have a fully painted Blood Angels army I'd be proud and privileged to see across the table from me in no time at all.
Keep at it, it's seeing things like this that keep me motivated to keep painting when life gets hectic or busy for a few weeks as it has lately. Fingers crossed the painting will continue here this evening.
For now, I look forward to future updates! Take it easy for now Pilgrim.
-Red__Thirst-
|
You don't know me son, so I'll explain this to you once: If I ever kill you, you'll be awake, you'll be facing me, and you'll be armed. |
|
|
|
|
2016/03/21 00:46:06
Subject: Blood Angels army progress
|
|
Been Around the Block
|
 Red__Thirst wrote: Red__Thirst wrote:Man! For a first effort that is OUT-FREAKING-STANDING dude!
Good decal placement and nice freehand on that number 1 on the right shin also! 5th Co. Represent! Also, great work on placing the little decorations such as Purity Seals and the like. Well executed on that.
An extremely solid showing and well above 'regular' tabletop standard. Moving forward, if you'd like a little feedback, you could hit the wing on the Close Combat Weapon forearm with a Sepia or similar shade wash to help define the off-white wing detailing. Also, use that same wash on the ammo belt for the Frag Cannon to help darken down the recesses on and between the shells (If you've done this already, and the lighting just doesn't show it, then disregard).
Great job on the metallic paint as well. Looks suitably grimy and worn but still in working order.
Nice touch using gold on the sarcophagus also. Subtle but effective. May swipe that for my Furioso when I get around to painting it.
Basing looks excellent as well. If you keep painting like this you'll have a fully painted Blood Angels army I'd be proud and privileged to see across the table from me in no time at all.
Keep at it, it's seeing things like this that keep me motivated to keep painting when life gets hectic or busy for a few weeks as it has lately. Fingers crossed the painting will continue here this evening.
For now, I look forward to future updates! Take it easy for now Pilgrim.
-Red__Thirst-
Good call on the ammo belt... I was thinking it was too 1 dimensional looking with no shading as well. I'll probably hit that up tonight.
The pictures were taken a bit apart, so the wing on the power fist arm looks just like the wings on the front armor now (base coat screaming skull, agrax earthshade wash, then highlight with white scar).
I did the sarcophagus gold since that's how I see it in most pics of the Furioso, but thanks for the kind words!
I definitely want to pick up seraphim sepia since the agrax earthshade is a bit too brown for the wings...
EDIT: oh, and by the way, no decals at all. It's all free hand
|
|
This message was edited 1 time. Last update was at 2016/03/21 00:47:01
|
|
|
|
|
2016/03/21 05:32:07
Subject: Blood Angels army progress
|
|
Blood-Drenched Death Company Marine
|
Huh, that decal looks very much like a freehand painted design. Guess that's the point.
And good deal, glad to hear the arm has been given the same treatment as the front of the torsos. Jobs a good-'un then.
Looking forward to seeing your next update soon I hope. Take it easy for now.
-Red__Thirst-
|
You don't know me son, so I'll explain this to you once: If I ever kill you, you'll be awake, you'll be facing me, and you'll be armed. |
|
|
|
|
|
|