Thank you, Wyomingfox! I have to admit, these have been fun to paint up. I'm debating getting a miniaturist's visor (with the different strength lenses) to try to do more with the eyes and faces. With my glasses and a 3x power magnifying lens desk lamp I still just can't see well enough. Or try to use washes differently to highlight and contrast the facial features better. Lots more of 'em to practice on!
Thanks very much for the tip, Wyomingfox- I'm going to try a set and see how things work out. I was looking through some photos in the galleries here earlier (I try to vote for something every day) and noticed that a lot of people who paint Aeldari/Elves have the highpoints on the face (cheekbones, foreheads, etc) in lighter color than the wash would create, so I'm doing to try some fine touch up on my riflecats and see what happens. I've also got a unit I painted a few years ago- the King's Own Space Borderers (based on my own Clan Leslie's King's Own Scottish Borderers) that most definitely need new face painting, so may give them a tryout as my practice canvas.
For tonight, the base colors for the second fire team of riflecats is about 3/4 done:
To try to speed things along, I painted the whole of the rifles flat black, rather than try to avoid the gun metal parts- and like the all black look better. I'll do some very light drybrush with silver or lead to show some weathering and then leave them alone. It's like hitting the UGG boots with some brown wash- now I've done some, I have to go back do them all.
Second fire team is done, for a total of one TomCat, one 10 riflecat squad and one 8 Ranger scout-sniper detachment:
The last two are of everybody:
I was thinking of moving on to another type of project with the completion of the rifle squad, but I've got a close combat veteran squad armed with shotguns that looks like fun and a battery of heavy bolters- what's a ground force without on-call hip pocket arty? Plus there are personalities to paint, and the command squad. I might be cranking out Doom Pixies for a little while, yet.
As always, thank you for looking in and for your constructive criticism.
Thanks, Josh! The TomCat and crews were the first items I painted up and as I finished off both crews it seemed a shame not to use them both. Initially I figured to scratch build a jet cycle or something, but just sitting the second crew behind the first almost fit perfectly- it only took a little modification and it's as if it was made to be that way. And the four of them do look like they're having fun!
Merry Christmas Cam! I always remember the quote, but always forget the speaker (but you do) , who said:
"usually when I close my show I wish that your God be with each of you; but at this time of the year I wish for our God to be with us."
Steve Allen(?)
Merry Christmas, Wyomingfox! I'm gradually maturing (50 years into the hobby!) and spending more time on all aspects of a miniature: at first I only basecoated, then I learned to drybrush and now use washes; started by painting faces brown, now have fleshtones and try to paint features; used to glue painted figures directly to base plastic bases and now try to at least paint them, if not texture, terrain, and customize.
I agree that the Doom Pixies' bases lack any oomph- I have some static grass and straw- maybe will jazz 'em up a bit to create more visual interest. And the CQB shotgunners will be in urban camouflage pattern, so a natural path to take for their bases.
For any who drop in- thank you! And may our God be with us always, as each of us understands.
Welp, I'm afraid tonight's entry is in the 'good news/bad news' characterization.
To try to put a good spin on things up front, I was finally able to get started painting the close quarters battle Winterguard (aka The Doom Pixies). I had a bit of a hiatus as I was able to take a proper vacation for the first time in eight years- spent Christmas until after New Year's at my family's farm in Pennsylvania. I didn't take any figures or paints with me as I knew there were a ton of things that needed catching up whilst I was home. I figured to return to living/working part-time in Northern Virginia and dive right into the painting again.
This is a small view of what I found when I got back to my little apartment:
Bearing in mind I just went through this last June, and this is the sixth time there has a been flooding bad enough to need mitigation.
This is what just the kitchen area looks like now that water mitigation is complete again:
All the carpeting in the whole apartment had to come out, all the lower kitchen cabinets, all the baseboard and all the drywall to a height of two feet- everywhere except one narrow strip along the outer living area wall and the bedroom. The man came today and ran a camera down the drain and it turns out that the pipe has developed a 'belly' and will have to be dug up (from in the middle of the living room) and replaced. He can't see what's blocking everyone else's apartment drain lines that are backing up into my kitchen- so that may never get fixed properly.
I've asked to be let out of my lease, but the property management company is maintaining the position for now that they are fixing everything at great expense and there is no reason to move. My position is they can't troubleshoot where all the other water is coming from, or what's causing it, and I'm a sucker for sticking around so long as it is. Normally, to break the lease you have to continue to pay rent until the owner finds another tenant and I can't afford to pay two rents, so either they let me out or I'm thinking of calling the health department and having the unit declared uninhabitable.
So, CQB Doom Pixies are started (yay!) but apartment is destroyed worse than it has ever been (boo!).
Thank you for letting me vent a bit-I've tried to be very polite and patient with everyone I've had to deal with so far. More follows as soon as I can.
Thank you all for the support, it means a lot. I also apologize for including the pictures; my intent was not to garner sympathy, but to provide proofs of the bad luck I've had here. Many people at work hear the list of problems and look at me like I'm crazy (or stupid) for not leaving a long time ago. Perhaps they're right. But each time the property management company was (usually) pretty fast to get in and put things right, that my thinking was "wow, so- struck by lightning! What's the odds of that happening again?" And of course, as it turns out, the odds have been very, very good.
So, no more whining. I've got a square foot of painting table, some reasonably good brushes and some awesome figures to get on with. Here's first WIP shot of the 'Snow Pixies', Close Quarters Battle specialists, armed with shotguns:
On the right is Major Tanya; as I get subsequent units of these painted she will rise in rank from Fire Team Leader, to Squad Leader, to Platoon Sergeant, to Company Commander.
You can't really see it, but in addition to the skin being basecoated, the jackets are also, in a color called Dove Grey. I wanted a very light grey, and this one almost blends in with the Rustoleum Flat White (Primer and Paint in one) primer coat. I may try again with something a little darker. On the other hand, these are Winterguard, so there's that. I'm also toying with the idea of adding some flektarn type camo splotches- most of these figures have some good, flat areas of greyish/whitish coat to do justice to some camo. Major Tanya may be the test subject for that; she's carrying so much extra gear that if it looks good on her, it'll look great on the others.
No reason to feel bad for letting us know what you're going through Meer, but jeez. The amount of headaches and stress water has caused in your apartment is insane. I'm sorry you've been having to deal with this for years. Doom pixies are looking good.
Thanks very much Syro and JoshinJapan. I hope to get some more painting in on Monday, but may have to delay until Tuesday, as they are planning, apparently, to tear up the floor to replace the pipe on Monday. They don't tell me, I just live there.
I'm thinking that the Dove Grey will give the effect I'm hoping for when the other primered areas- notably the UGG boots, are painted. I also have a grey wash from Scale75 to try, which should provide some contrast on the coats. Still debating whether to try a camo pattern or not...decisions, decisions.
Nice work on the girls. Off white was a good choice. All sounds good at mo. Not sure about camo though. I am sure you could pull it off. Just not sure it's needed.
Thanks Cam! I got a bit of painting in tonight and I don't think the flektarn is going to work. I'll look to use it on a different project. Looking at the light grey/white jackets as other colors get added makes me think that I'll bases in snow, rather than 'city street rubble', like I first thought.
Still basecoating and still rough: UGG boots and web gear done and the zipper seam stripe on the coat:
I tried a light blue grey for the stripe and it was too close to the other colors- too muted, so I tried red, which I think is too bright. Maybe a grey?
Oh, and this is what the rest of the place looks like:
The property management company had gotten everyone in to get their estimates and were going to get started repairing the pipe and fixing the apartment on Monday when the condominium association entered the chat and want their own pet companies to give estimates. I think the fight between the owner's insurance company and the condo association's insurance company has started.
Thanks Warboss! It took some time, but I got to where I wanted to do something other than step around things and watch the original Avengers (Patrick McNee!) on DvD. I think part of how energetic they're being this time around is my stating that I expected to be let out of my lease, and when can we telecon to set a move out date? I've been having a lot of fun with these Winterguard- anime is fairly different for me to tackle, although I did do the Chibi Ponies....
Theo- that there is funny! They should have all my paint colors, carpet colors and depth and baseboard dimensions on speed dial- heck, probably a macro key on their computer inventory keyboard. The property manager guy was polite but a little disbelieving at my demand to get out of the unit this time, until I explained that this was the sixth flood (the fourth requiring water mitigation and carpet replacement), the HVAC has been replaced completely twice, it took seven service calls to fix the washing machine and there was a 'low grade, smoldering fire' (language of the fire inspector) in the ceiling due to a short in the halogen living room light. Then he asked me why I'd stayed so long. You really think that after you get past any one of these you've used up your bad karma for awhile, you know?
Thans wyomingfox! I'm not feeling my mojo yet with this set, like with the others I've already finished- part of that is changing color schemes, I think. I'm also getting my steady hand back, after nearly a month not painting. The figure on the right is a separate personality piece named Major Tanya- she's a one-cat whirlwind berserker of destruction, apparently. I've placed another order with the seller on Etsy and noticed that the prices of some things have gone up (some, like the TomCat walker, by a lot) and some aren't offered anymore. I got a set of three personalities for about US$5, now they are still offered but US$4-6 apiece. I'm wondering if I promoted them too well and now everyone wants them? Or, as the seller is a resin printer of various lines, if the on-hand stock is now low and scarcity dictates price, until he gets more made up? Dunno, but glad I grabbed what I have when I did.
I found a 'wind tank' on Etsy and ordered it; I plan to use some of the extra Winterguard heavy weapon crews to man it, which means probably executing a different uniform color scheme. Not problem for today, though.
I was by Wallyworld today and picked up some inexpensive craft paint shades of grey to try on the jackets. I may or may not get some painting in tonight, but will update the post if I do. Thank you all for looking in! More follows soonest.
Got some decent painting time in tonight- here's a WIP:
Basecoating is almost complete, then the touchups and washes and drybrushing. I'm liking these a bit better, but my hand still isn't settled back down yet. Wanted to keep at it though, as I was on a good roll before Christmas, want to get back there again.
I made a start on the shotgun shell holders on the forearms of the shotguns- it's a really neat detail and I want to do it justice. This is a start, with a great deal to go.
Also, have a great idea for a sweet ride for these cat-ladies, anxious to get started on that next. Been a little bit since I took on a vehicle project (the Skidoo BA-64).
Some progress on the Snow Pixies tonight- lot of time spent on hair touch up, ears, tails, scarves/bandannas, head work. Part of which was discovering that painting the inside of the ears made for some nice contrast with the grey fur. So had to go back and retro-fit the whole kit and kaboodle:
Closer-up (for me, this is outstanding photography!):
You can kinda-sorta see the new coloring on the inside of the sniper's ear. I also note that I need to drybrush some faded green on everybody's Hello Kitty tactical bag- the WWII US Olive Drab is nice but too uniform.
I also got a supply drop in from Greenstuff World in the form of a whack-ton of weirdly colored flocks and grasses for basing (the Martian Colors), so I reckon to add those to Rangers and regular infantry. I will probably do the CQB (shotgunners) bases in urban or Arctic.
I like the group shot (in mass lies perfection) and how overall the force is shaping up. I should have these CQBers done tomorrow night and then will either do the other five or start their transport.
I'm excited by the ideas of have for their ride, but don't have a lot of space to work with at the moment in the partment- no place to set up my airbrush. But the first phase is assembly and customizing, so may do it anyway.
Yes the small detail of painting th3 inside of the ears really makes the model pop. Looking forward to the basing. It was my favorite part of painting my Tau.
Thanks, Wyomingfox! I'm fiddling with bases now, have no real plan and still not fully decided between snow bases and urban- although leaning towards urban. Mostly because I haven't included a good, strong color to make each figure 'pop' if I put (realistically) white fatigues or camo against a white base- might seem kind of blah. But I've some ideas for the urban setting- simple stuff, but out of my normal lane, so all good learnin'. I also went back and retro-fitted some foliage to the Rangers and Regulars, I'll get a pic up directly.
Some work done tonight:
Basecoating is done, time for washes, dry-brushing and some detailing. And as you can see, made a start on the bases. I've some police crime scene tape and industrial hazard marking tape I want to put down and will probably add something in the way of debris (spent shell casings, broken bricks, bent steel) to give them some more character.
Thank you very much Captain! I'm flattered that you thought enough of the piece to comment, let alone Exalt the posting- I don't think any of my work has had that recognition before. I had some fun building it and added some skills to my repertoire. While I regret not weathering/rusting the tank more thoroughly, I was pushing to meet the deadline for the most recent League of Extraordinary Riveters and did so by undertaking a much simpler paint and weathering scheme.
Thank you again for your kindness. It's good to see you posting again.
Hi Wyomingfox- the extraction facility build started on the bottom of page 38 and carried onto 39. I learned a lot on this and got to try some new things. Thank you for looking in!
To paraphrase the line from Indiana Jones and the Raiders of the Lost Ark when Salah says "Indy, my friend! I am so pleased to see that you are not dead!" I'm not dead, just been a hectic couple of weeks.
The good news is that the first fire team of Winterguard Close Quarters Battle specialists (aka: The Snow Pixies) are done. I got the time in to try a couple of little flourishes and am overall pretty pleased with how they came out.
One of the 'flourishes' was to try to improve my photography using Camkhieri's suggestion to make a backdrop. I think it helped give the camera some help in sorting out what is supposed to be in focus in the foreground, whilst setting the depth of a given background. I just plunked an unpainted, undiorama'd, un-anthing'd demolished wall terrain piece by the people who make Tehnolog and I think it actually looks pretty good! Maybe all this painting and terraining and sanding and stuff is highly overated?
I used a number of different washes and airbrush tints to try to give the hair some dimension and think I succeeded with yellow, pink and maybe the purple (I need to drybrush some of the original Wisteria back on, it's too dark on Major Tanya). Green and blue aren't there yet.
Remember I couldn't decide whether to do urban warfare or winter/snow bases? I combined both, using AK's Terrain Snow and Micro-balloons from the SnowCat project.
Another flourish was putting some time in on the shotshell holders on the shotgun forearms. Signal Red, Brass, US Dark Green webbing and Nuln Oil wash.
Aaaargh- I'll try for a better picture. I actually have a lot of upgrades to show off for all the Doom Pixies- new basing materials, new hair washes, some work on the faces, so more pictures follow later.
And one more of Major Tanya, just because she's a pretty cool figure:
I really want to do the second fire team, because the round number 10 resonates with me, but I also really want to try out some ideas I have for their 'counts as Chimera' transport, so may do that first. Plus there is the LOER competition and I have an idea for that, and I found a neat gubbin in the barn working on stall lights last weekend, so that needs doing......
The Doom Pixies were great value when I first discovered them, but given the crappy economy and recession that isn't plus possibly some popularity that I may have helped generate in a small way, they've gone beyond what I'm willing to pay, so what I have is it (and I have a lot to go, so that's really not a problem). So more definitely follow, and soon.
Thanks very much for looking in, Ezki- and more Snow Pixies coming soon!
Tonight I've got only a brief update on the start of the next Doom Pixies project; I've gotten a fair amount done but still at a stage where the results don't look like a lot. I want to post now as I may not have opportunity over the upcoming weekend and the fight between insurance companies is finally over and the crew will be here on Monday to break up the concrete floor and replace the drain pipe that (they claim) has been causing all the flooding problems. So, I may literally have no place to continue working for a little bit. It is progress though, so I'll take it.
The ride for the Pixies was going to be a BTR-50PK, but I got a kit in 1/35 scale and the footprint is much too big- it is as big as a Shadowsword tank. I'm saving it for when the Pixies need a Shadowsword and I'll use it as a basis for kitbashing.
No problem- I also had a 1/35 BTR-152 armored personnel carrier kit- also 'way too big.
So I settled for these 1/35 Renault UE tankettes to make into Doom Pixie transports; I say "these" because when I bought the kit, I thought it was one vehicle with three possible variants- turns out it is three total vehicles, so I've got some fun work for a bit: not just building and weathering vehicles (which I enjoy) but converting some of my Doom Pixie infantry into vehicle crewmen (always a challenge working with cast resin figures- they're brittle).
The Panzerjeagers have the Hanomag variant I built as the Athena Command & Control Vehicle? The Doom and Snow Pixies have the 'Honey-mags'.
Here's the start:
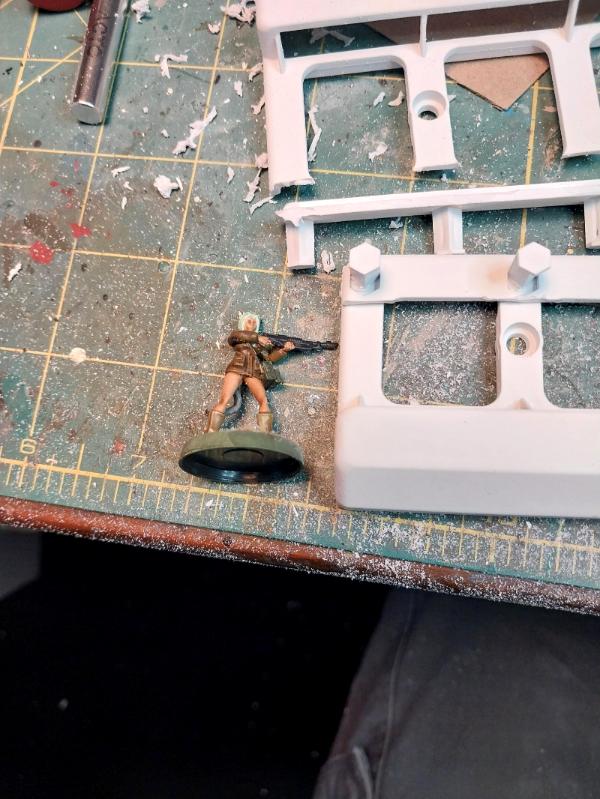
Snow Pixie for scale. I've got some ideas for heraldry/logos to try with these as well. Hopefully I can break out my airbrush when the time comes, it'll make painting a lot faster and easier.
Here's hoping the pipe works go smoothly and you are back to some semblance of order soon.
Like where you are going on the transport. It is a shame 1/35 is just a little big and 1/48 just a little small. Even the 1/56 scale ( supposed 28mm scale) is way too small. GW knew what they were doing! But I think your girls will work in perfect in your choice of wheels.
Thanks very much, Olthannon! I'm having a great deal of fun messing around with these and trying some new things, so it's all good for me. I'm cautiously optimistic about the end result as I get started building the tankettes.
Thanks for the good wishes Cam! As it turns out, the workmen did a pretty good job, as far as I can tell: the concrete they installed over the new pipe is nicely laid and amazingly, there isn't a ton of dust and debris everywhere. They really cleaned up after themselves nicely. Of course, to balance that, they left the sliding glass door wide open- the one that faces the walkway at ground level, where passersby can see three 3D printers and a ton of modeling stuff, but hey, you can't have everything, right?
Vehicle for Warhammer-ish games is a perennial question, and it relates directly to the figures themselves: do you model true scale or 'heroic' scale? It's like setting up those nice porcelain buildings for Christmas: do I go for realism or whimsy? Should people be as tall as the first storey, or just the door way?
In the end, I try to balance both, I guess. The BA-64 SnowCat has the footprint of a Chimera, but clearly isn't modeled to be a squad-level transport; which won't stop me using it as one if I ever get to game it! The Doom Pixies are already somewhat smaller than their IG counterparts, but I don't know if I can call them 'true scale', I mean, how tall is a mutant killer cat lady, anyway? But I did want something for them, at least at first, that was smaller and more nimble, like they are, so settled for the Renault tankettes.
No worries on all those gargantuan 1/35 scale kits though- I got them for very good prices and can resell easily (it's a crime what model kits are going for these days) but am more likely to convert them into super-heavy tanks- especially the BTR-50PK- that's just too cool a vehicle not to do something with.
No model building tonight- work ran long- but hopefully tomorrow. Thank you all for looking in, it means a lot.
First Honeymag done, second begun. This first one is the heaviest variant, with two built up (and literally bolted on) armored cupolas that mount heavy guns. I've Warhammer'd them up to include a heavy bolter (more or less 'hull mounted') and a lighter, infantry version plasma rifle in the commander's perch.
The kit only came with parts for one heavy like this- I have some extra parts that came with it (from a different manufacturer) to equip the second with the heavy bolter cupola and a cargo bin that bolts on the back and the third will only have the cargo bin. Although the pictures on the box show a 'Screamin' Meemie' type multiple rocket launcher that bolts onto the cargo bin and I bet I can scratchbuild that.... we'll see. I'll finish the hatch on this first one when I see how I'm going to stick a crewcat in.
I'm excited to get the hulls built, so that I can get on to painting and decaling them and also heavily modifying some of my Doom Pixies into crewcats. Let's see, if they're in woodland camo they are Doom Pixies, if they are in winter camo they are Snow Pixies, I guess these must be Mech Pixies, or better yet- Panzer Pixies!
I think I'm on the right track to build all three- but one at a time. The parts are so small and fiddly, it's like playing tiddly-winks assembling the bogeys. And you see the track segments in the foreground of the pic below- these kits are extremely detailed and very painstaking to put together- made by a Polish company.
The tracks were a horror! At one point I considered fixing a rubber band around the bogies to have something to guide them along and glue down to, but the clearances were too tight. I'm hoping what I learned from the first will make the second go easier and that the third will be a snap, but you see me here not holding my breath.
The good thing is, I have (I believe, anyway) a minor talent for muddying up vehicles- so a healthy dose of mud, crud and possibly snow will hide a lot of the crazt quilt look (fingers crossed).
I admire your perseverance. Exactly once in my life, I have tried to build a tank with separate tracks like that. I gave up well before the half-way mark, and have never wanted to try anything like that again.
I didn't realize these were individual track links either, when I bought the kit. I built one before- a B-6 self-propelled Soviet artillery piece and it was enough to make me build a small shrine and light a candle to the guy that invented stretch-rubber treads to put on tank models. The track units from the SP howitzer wound up on the ammo carrier I scratch-built several pages back.
And those links were intended to actually, you know, link together. These don't, you have to glue them up.
Having said that, we're getting them done- and mud hides a multitude of sins.
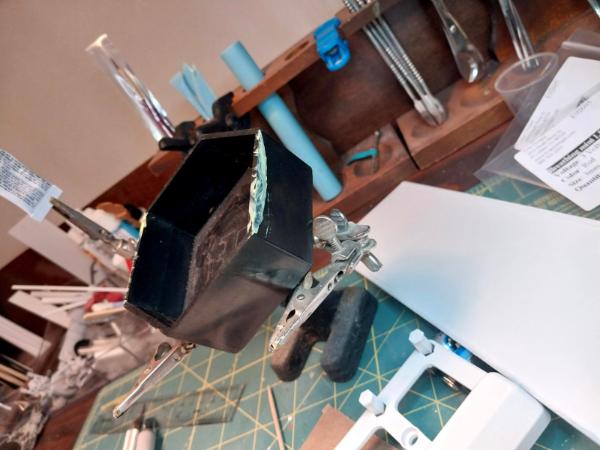
The third Honeymag tankette is really nearly complete, despite the look in the photo- just needs the bogeys, rollers and drive sprockets assembled and attached and then the tread links themselves. This one I don't have the heavy weapon assembly for and not sure if I want to scratchbuild either that or a missile rack. It does have the basket/box for hauling supplies, so I may do that.
As is usual though, there is a lot more I want to do with these, not least of which is people them with crewcats- drivers, tankette riders and a scout sniper. It might be that whilst I am kitbashing those and painting them up, I will also scratchbuild something to make an innocent little tankette goods-hauler into an assassin of the battlefield.
All three Honeymags are done and primered, here's the vehicle group shot:
One done up as an InfanteriePanzer, the middle as a FlammPanzer and the last as a FlugabwehrraketePanzer (Anti-aircraft Missile). What else would the Panzer Pixies ride around in? The sharp-eyed among you may recognize the flamer attachment for a plastic Terminator Marine from the original Space Hulk boxed game. I'll add a hose from the barrel to the flamer shroud when everything is painted up. You got 10 plastic figures (I think) basically standing there in the same pose, armed with bolters. This flamer piece pressed down on top of the bolter to make it a flamer. I think 4 came with the game and most people only ever used 2, as squads in the game scenarios were 5 Terminators, one of which was the flame gunner. Very shortly after white metal Terminator figures started coming out with lightning claws, heavy bolters, chainfists and all the rest, and Space Crusade came out with scenarios you could use them in. I've got my original boxed set around somewhere, with two painted up squads of Termies and a bunch of plastic Genestealers (pure strain ones) that were really quite good figures and all the game tiles- I'll dig it out and post some pics to the Oldhammer blog.
Scattered in front are the figures that I'm going to use as tank riders- I cut down one of the CQB shotgunners to actually ride in a hatch, but the rest will either be standing on the cargo platform in the back or- two of them- are posed such that they 'sit' on the front slope fairly convincingly. I prefer vehicle models- especially armor- to have lots of crew or infantry support with them: to me this is what gives them animation. Otherwise they are just static, lumps of plastic pretending to be lumps of metal just sitting there. Thy could be abandoned, they could be museum pieces, they could be kiddie rides for a quarter in front of the local supermarket- without people to give them scale and life, they don't hold much attraction for me.
I broke down and ordered some 'guard position' Nekkomimi Winterguard- you can still get them fairly inexpensively, and a couple of other doodads. I'm still a little saddened that the price has gone up so much, and even some pieces aren't available anymore, even though I understand why.
The apartment is still in disarray- they haven't started, let alone finished, fixing anything yet- but Monday or Tuesday I hope to root out my airbrush and everything I'll need to give the vehicles their basecoat of flat, light grey. I'm probably not going to try to give them any sort of camo pattern, although they will get a good grubby weathering, as I have some great decals to try out for them.
Believe it or not, these were all historical configurations for the Renault armored carriers. The French used them pretty much like the British used the Bren Universal Carrier. But when Germany knocked France out of the war, they captured so many they put them to use in a lot of different roles. The ones with the machinegun towers on them (what I'm calling an InfanteriePanzer) were for patrolling roads at night, especially after the Maquis started getting more active. They never had a 'fire and forget' missile carrier, but they did mount the Nebelwerfer multi-rocket bombardment weapon on some and many were used to tow V2 rockets into launch position.
Except the FlammPanzer. That one I pretty much made up; it looks almost Orkish, with the drum strapped on the side.
I had to up-gun them with Warhammer shooty things-the correctly scaled MG42s that they really carried were just too spindly!
The Soviets are usually my go-to guys for interesting looking vehicles that are perfect for Warhammer 40k, but the Germans had some and even the French, British and Americans had the odd one here and there.
One project I have the basic pieces for is an M50 Ontos type multiple heavy weapon carrier- possibly with pairs of auto-cannon, lascannon and heavy bolters, each. I just need the 26 hour day to get to everything in my Pile of Shame.
Got some work done yesterday and tonight, results as follows:
First up, found this wonderful Rustoleum 'Chalked' paint. I wanted a blue-grey like the German Army of World War II and this is darn near spot on:
It dries very smooth and very dull- exactly what I wanted. On a side note: all the spray paint cans are locked in a case now, a clerk had to open for me to get the one I wanted. I asked her why and she told me that many people would spray paint on the shelves, the floor or the walls to test the color (I suspect some out of pure cussedness), so now they have to lock them up. I know it's a small thing compared to the crime raging out there, but really: so-called 'ordinary, normal' people think it's okay to vandalize someone else's property? The Walmart I went to keeps a very clean store- most of them do. The floors are nicer than almost anybody had when and where I was growing up. And some jerks mess it up buying paint? Makes my blood boil.
Anyhoo- rant over. Here's a closer up of one vehicle, to show off the color:
Next, the rest of tonight was spent applying decals. These are Panzer Pixies, so I wanted lots of color and an anime feel to them. I think I succeeded:
Front slope:
Left side:
Infanterie Panzer, right side:
Flamm Panzer, right side:
I used Walther's Solvaset (I've also had good success with Decal-Fix) to set the transfers; believe it or not, there are no wrinkles or air bubbles in those decals- the Solvaset snugged them right down over the small moldings in the armor and the imperfections of my gluing the pieces together. Wonderful stuff.
Next step is to paint everything that shouldn't be Wehrmacht blue-grey, treads, guns, and then weather everything. I've got the Dipping paints from Green Stuff World plus my other washes and secret recipes (lots of actual dirt, really) and the vehicles are done. Then it's on to the nine tank riders I've got and the whole thing will be finished. I don't intend to mount each vehicle on a base and turn them into mini-dioramas; they'll sit on my photography backdrop and platform scenery (just as soon as I make one).
The panzer pixie tanks are looking great Meer_Cat. That paint is a nice find. (I agree about how frustrating it is that some people are so self-centered and lacking in basic politeness and class to not spray paint a store's shelves and floor). I also like all the decal work, it fits nicely in the theme. I'm looking forward to your continued progress on this.
Thanks much for looking in, Syro- this Doom Pixie kick is lasting a lot longer than I thought it would! No painting tonight, but hopefully tomorrow.
In addition to finishing these Honeymags with their tank riders, I'd like to finish the full squad of Snow Pixies with five more, do the command group that I have, add the second TomCat walker and I've got two pieces of heavy armor for them in mind(good grief, another uniform pattern to think out!). Plus everything else in my Mountain of Shame.
Oh wow, way to use an old 40k imperial sprue for the missile launcher. I owned a couple 2nd edition rhinos back in the day and had to take a double take when I saw your tanks.
Thanks for the review on the Solvaset! Another tool I'll look to add.
I'm glad I can give something back for all the tutorials on your pages, Wyomingfox, and thank you for looking in. I can't remember how long I've had those missile bits kicking around! I was going to scratchbuild something like a 'Stalin's Organ' multiple rail missile launcher, but with things still at 6's and 7's in the apartment it was hard to muster any enthusiasm. I was looking through all my junk for more ready-made alternatives and found a model hobbyist's 5 gram crack bag of plastic goodness. I do like the look of it and only wish I had a third machinegun tower so the third vehicle cold ahve a sporty decal like the others- but I'm happy with the surface to air anti-aircraft missile!
A little work done tonight- tracks base painted and the first of several layers of dirt and grime applied. The trick for me is to keep the level of dirt evocative of Day 10 of a field deployment- not Day 100, which is more my forte.
Been thinking about how to do a light grime on the top surfaces and am undecided between thinning down Nuln Oil or something like that or applying a mist via airbrush.
For now, here's what we've got:
Tracks are base painted flat black, with Greenstuff World's Dipping paint Elfwood Brown splashed on top. I really like these dipping paints- I also used a green shade for the Tom Cat Walker and am impressed with their coverage.
Two more shades of brown for the lower half, some black, oily grime for the top and then detailing for the weapons and mostly done. Oh, and rust for the exhausts and manifolds. Some limited stowage but not a lot, as the tank riders will be the focal point to hopefully make the vehicles pop.
I may hold off on doing the tank riders until I get my LOER project started/done. I was pleased to get my last one in on time and want to try for two in a row.
Have you successfully thinned down nuln oil that amount before? I have very inconsistent results when I try to thin down a wash with water. I don't know if you would need to make it into a glaze or something using medium? The airbrush idea sounds interesting, but I know nothing about air brushes. Good luck either way
I'm glad you left a comment, Syro- I've never really tried to thin a factory made wash before! I tried my thinnest air brush 'oily wash' instead in a couple fo places and didn't like the look at all. Thank goodness for Vallejo Game Wash Pale Grey- same as I used on the coats of the Snow Pixies. It dulled down the shiny paint and decals and is pretty subtle- I basically painted it over the whole of the upper half of the vehicle and it is still hard to see. I may go back and stipple some more on the really obvious raised places: like hinges, grab irons and panel outlines.
I tried some acrobatics with the FlammPanzer- was applying different brown wash to the treads- and tossed it, almost caught it twice and watched it hit the floor in slow motion (which is concrete, at the moment, until they pull their head out of their fourth point of contact and get started fixing things). Even then it didn't immediately burst into shards- it waited an entire second then fell apart. So, a lot of time gluing things back together and we'll finish up with brown washes and finishing the grey wash tomorrow.
Also basecoated the hatch covers and have a couple of ideas on how to mount them depending on whether there will be a driver in heads up or torso up pose or no driver at all. Definitely time to move on to the tank riders.
Not sure if I'll be able to participate in the LOER this time or not- I can't find half the things I already had for my idea and can't haul everything out from where it's stacked in the bedroom in case these yokels actually start work. Venting, sorry- coming up on three months of bunker life, now. We'll see.
If I can refrain from throwing my toys on the floor, more follows soonest!
1) The tankettes are done (going to have to think of a suitably Winterguard-ish name to call them) and waiting for their drivers and tank riders- safely out of the way of my flailing hands.
2) The tank riders are started base coating colors. I'm using three different skin colors and the jackets have their first coat of paint. In addition to the Blizzard Company figures (they have bits of armor and electro-death visors on their helmets) I'm doing up three Rifles, one Ranger and one Snow Pixie who are 'along for the ride'. I've always maintained that people (cats, in this case) are what make vehicles come alive, so I include them whenever I can. A buttoned up Tiger at Kursk probably didn't have a lot of panzer grenadiers hitching a ride, but short of that, I stick 'em on. The Blizzard Company figures get a different uniform pattern as they are yet another branch or corps within the Winterguard structure- in this case, they are my stand-ins for 11M Mechanized Infantry (or 'drive by shooters' as we used to call them).
Another lick of paint for their coats and then the detail work can begin with webgear, grenades, knives, etc.
Most of the common color basecoating is now done- all the troop-types (Snow Pixies, Rifles, Rangers and Panzer Pixies) have the same color (mostly) rifles, web gear and Ugg boots. Tomorrow night (hopefully) will see some of the troop-type specific colors filled in, like the shell holder for the Snow Pixie, the armor pieces for the Panzer Pixies, etc.
Something that shows a bit in this photo is my attempt to use different basic skin colors amongst all the tank riders- from Warrior Flesh to Dark Elven to Light Skin Tone- hit tip to Ezki for showing just what a great affect a little variation like this can add to a small unit!
Meer_Cat wrote: I'm glad you left a comment, Syro- I've never really tried to thin a factory made wash before! I tried my thinnest air brush 'oily wash' instead in a couple fo places and didn't like the look at all. Thank goodness for Vallejo Game Wash Pale Grey- same as I used on the coats of the Snow Pixies. It dulled down the shiny paint and decals and is pretty subtle- I basically painted it over the whole of the upper half of the vehicle and it is still hard to see. I may go back and stipple some more on the really obvious raised places: like hinges, grab irons and panel outlines.
...
Not sure if I'll be able to participate in the LOER this time or not- I can't find half the things I already had for my idea and can't haul everything out from where it's stacked in the bedroom in case these yokels actually start work. Venting, sorry- coming up on three months of bunker life, now. We'll see.
If I can refrain from throwing my toys on the floor, more follows soonest!
I'm happy to hear that you had such good luck with the Vallejo Game wash. Also, if anyone was going to throw your toys on the floor it's sadly more likely the workmen when they show up.
Syro: I'm afraid I let my very good experience with GW washes limit my vision as to what might be possible- ie: if they didn't make it, I didn't use it (even after I started making and using my own black, brown and green washes). Now I've got more options and applications- the Doom Pixie hair is much better looking with a pastel basecoat, darker wash and very limited highlight drybrush! And tomorrow marks the 90-day anniversary, one quarter of a year, since coming home after Christmas and New Year's to find the apartment flooded again; at this point I'll accept some random breakage if the condo company (that the owner belongs to, I just rent) will only pull their fething head out of their fourth point of contact and _do_ something.
Wyomingfox: Thank you! If I have any small talents in any aspect of our hobby, I believe it is in making grubby tracks and tires!
JinJ: Also, thank you! I'm gradually working my way up to trying to detail faces a bit better, something beyond one-basecoat-fits-all and some flesh wash. The sky's the limit!
Tonight's work: the basecoating is complete, now on to washes, dry-brushing and (inevitible) retouches:
So, this lot of tank riders is done, and the last bits I ordered to finish these three vehicles have come in- so as fast as I can get them painted up, then everything and everybody can get glued on and this project is finished and on to the next.
Infantry like tanks around-even little bitty ones like these Renaults- because everybody else on the battlefield is looking to shoot at them and leave us grunts alone in the mud. Tankers like enemy infantry (they call 'em 'crunchies') except for those pesky panzerfaust and other types of tank killer teams out there- then they like infantry of their own to clear out the missileers.
Here's the first nine riders and drivers:
You've got one Ranger Scout-Sniper, one Snow Pixie, a couple of Doom Pixie Rifles and three Blizzard Company Panzer Pixies. This is the last time you'll see them on their temporary painting bases, next time they'll be loafing on their Kitty Karrier Tankettes.
Thanks very much, Wyomingfox! That's a trick I picked up from one or more of the contributors here. I actually started the last three figures yesterday without attaching them to temporary bases and it's just so awkward handling them that I don't know how I managed to get anything done the first fifty years of my painting career!
I have a couple of different styles of painting 'handles' also- one or two that clamp to a base and others where you glue a magnet underneath the base and that sticks it to the handle, but I haven't really tried those to any great degree yet.
I'm hoping to really push to get the last pieces done and glued on, so that I can start taking photos tonight and get a wrap-up posted tonight or tomorrow of the whole Kellie's Hereos: Panzer Pixies project.
I already know what I'm tackling next and it includes a tank, Panzer Pixies and LEDs!
Thanks very much, Olthannon! I greatly appreciate all those who drop by for a look and especially those, like you, who leave a comment.
Kellie's Heroes are done- three Scat Kat Traks with assorted Panzer Pixies, Snow Pixies, Doom Pixies and a Ranger Scout-Sniper. Lots of fun on this one and I'm still not burned out on painting Nekomimi Winterguard.
This batch of photos brought me up to an even 1500 I've uploaded since joining Dakkadakka.
The apartment is still torn apart- if anything, worse, as they've started the reconstruction (naturally without telling me anything, quite the sight to come home to tonight)- but I tried to make a bit of a photo platform. I really need to make a good photography terrain piece so I can do better justice to the models.
Anyways, here are some photos:
Not good pics, I'm afraid, and I really want to show these off- but the best I can do until I'm better positioned to do an army shot.
Thank you for looking in. Next project may not include LEDs, as I'm testing now to see if any light will be visible. More follows soonest.
Tanks look brilliant en masse. The weathering is beautiful as well and really makes the little bursts of colour in hair or clothing pop. A very cool/unique project!
Congratulations of finishing them! They look great, even without ideal conditions for photographing.
It's ridiculous they they didn't even bother telling you, but does your apartment being torn apart mean they are finally attempting to fix the problem?
Thanks, Olthannon, Syro! I'm going to use that panzer blue spray paint as a theme color for the Winterguard army- the other units with 'background' I've got will have other base colors.
Funny about the repair work- they show up unannounced last Wednesday, install all the drywall that needed to be put in and no one has been back since. I don't mind accommodating their schedule, would just like to know when they're going to be in so I can locm away laptops, shroud 3d printers, etc.
I have the next project already primered/basecoated and should be able to show some progress on Monday.
Thank you all for looking in, more follows soonest.
Thanks very much, Wyomingfox. The next project is an armored vehicle that scales out a bit small, so it's perfect as another unit for the Panzer Pixies. I'm hoping to get some painting in tonight to have something worth showing and get some pictures up.
Automatically Appended Next Post: Addendum: here's the next project, will be labeled under 'Vehicle Projects' although it will be manned (catted?) as you can see by Nekomimi Winterguard Panzer Pixies. I've actually foreshadowed this project some time ago and lo, and behold! someone printed it in resin and put it on Etsy.
Thanks for looking in and commenting, Wyomingfox! I'm glad it looks clean and sharp, because these intricate resin cast parts were a right bear to paint! Some very hard to reach spaces, especially in amongst the bogie wheels on the track sections.
For all that, the vehicle shouldn't require a terrible lot more work, then I can get on with the Officer Commanding and the crewcat.
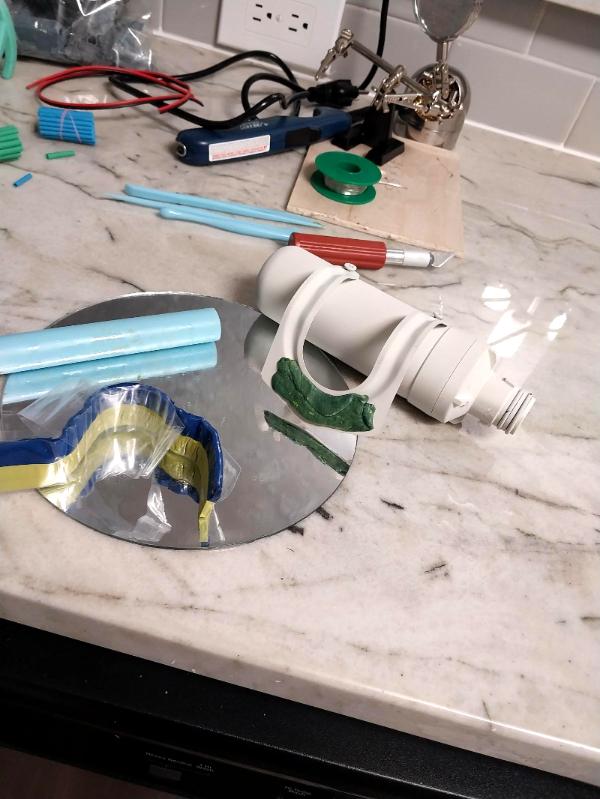
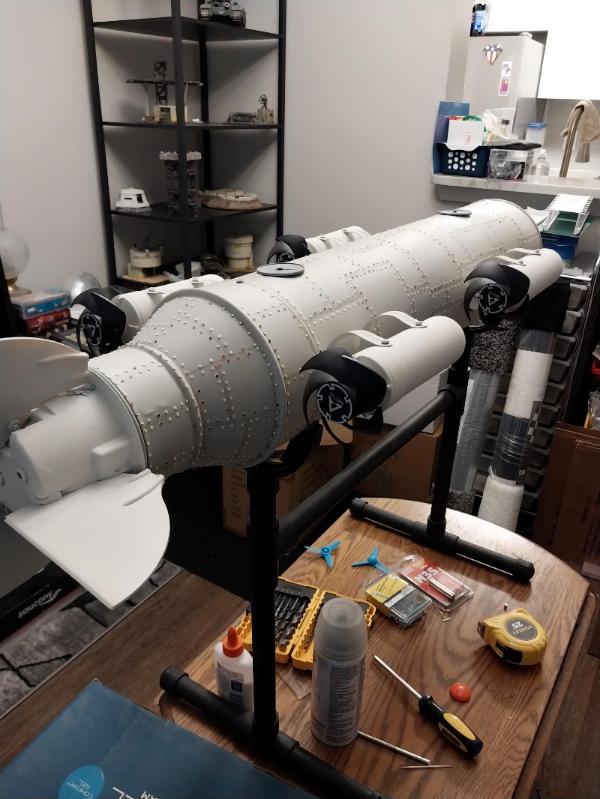
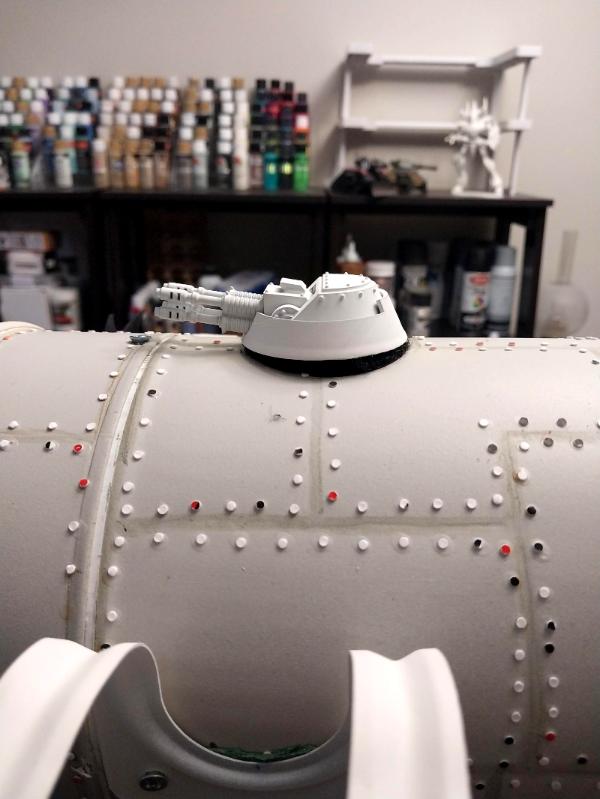
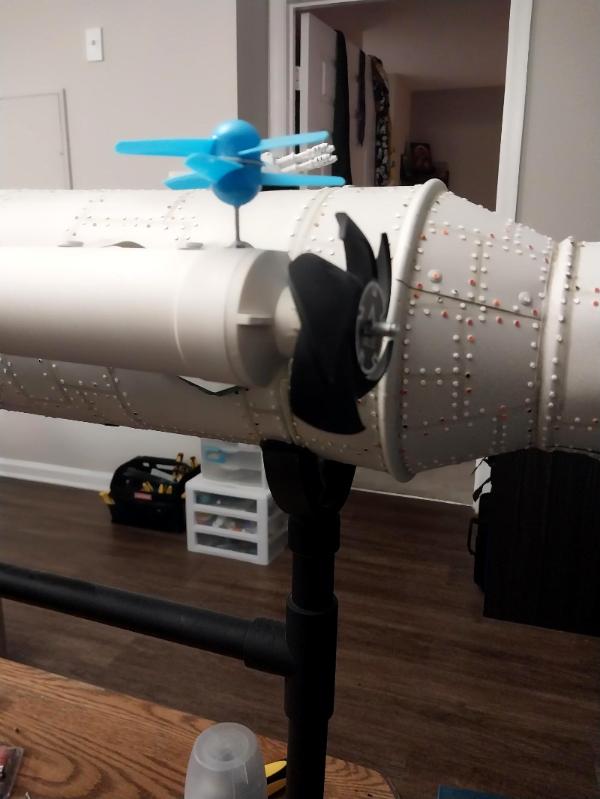
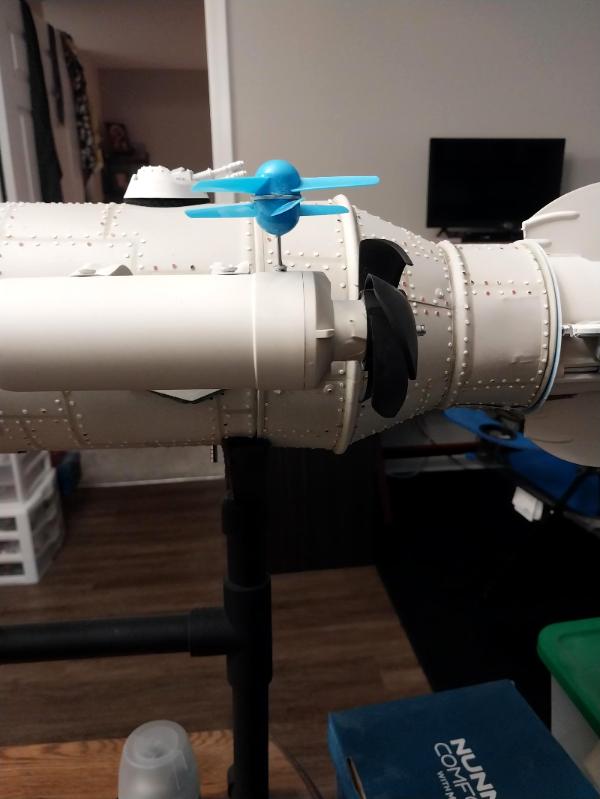
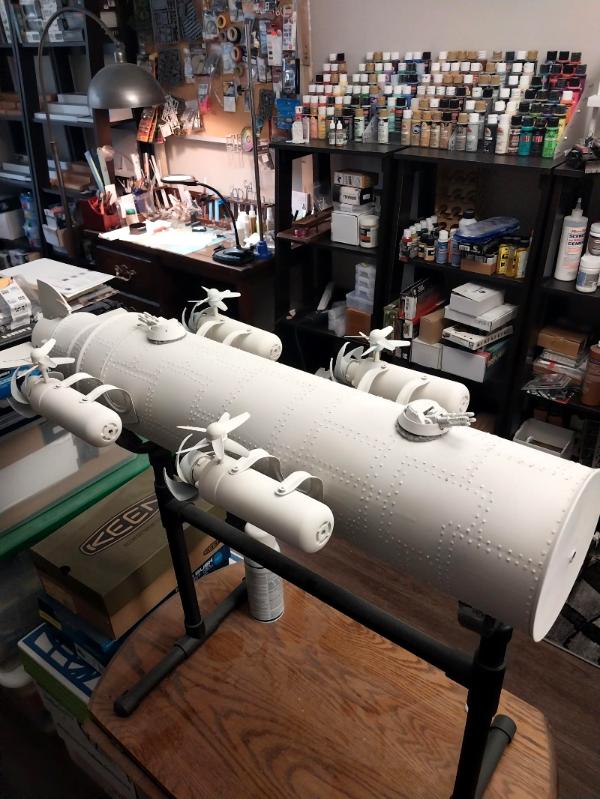
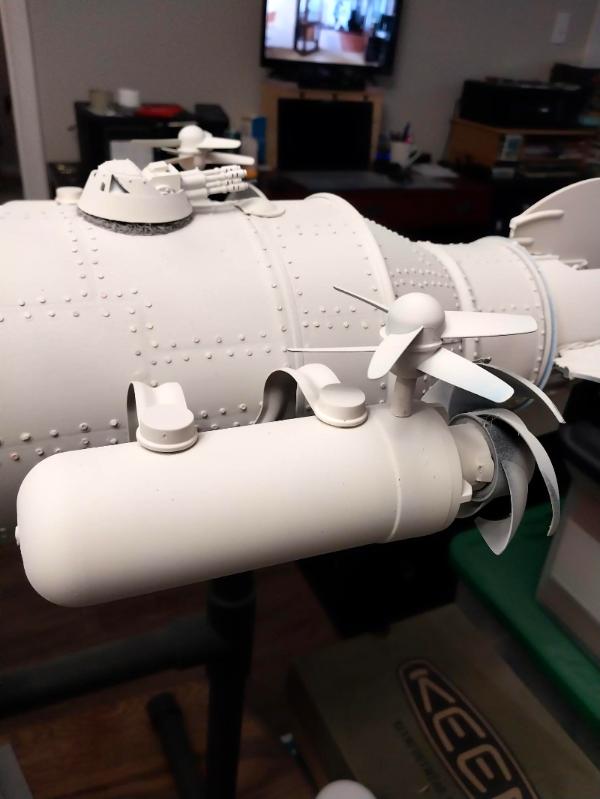
Not a lot of painting time this week, but some forward progress on the Winterguard Sirocco Wind Tank:
This is still WIP, have a few doodads to attach yet and then some light washes here and there. I'm not going to grunge this one up (which is a hard decision, because I'm somewhat good at grunge). There's so much detail on this piece that I'd hate to hide it under gunk unless I just can't get the look right. I think some pin painting and light washes to highlight the rivets (or maybe just some highlight drybrushing) and that will be good.
As is typical for me, a little color to make the otherwise homogeneous paint scheme pop and there is still the crew to paint up (Panzer Pixie uniform scheme).
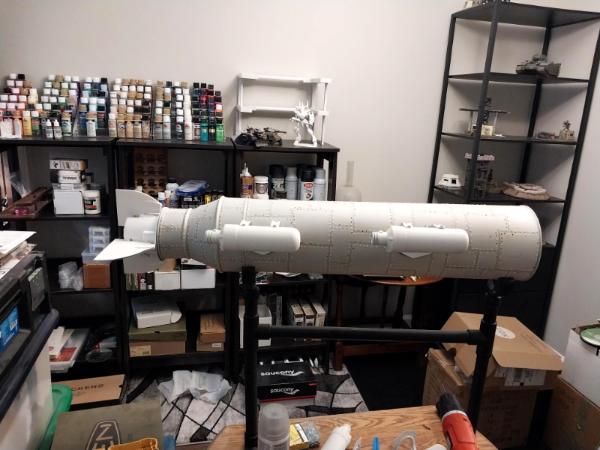
A difficult week, last week, but some solid painting yesterday and today. The Sirocco Wind Tank is complete, right down to its decals and burnt pipe washes. The crew are well along, although this isn't the best photo in the world:
They should be finished tomorrow, and final project pics posted. These are Panzer Pixies, but _crew_, the other Panzer Pixies with the lighter green jackets must be Panzertruppen Pixies. I think you can make out that the officer isn't wearing the standard rank-and-file UGG boots but instead has on Doc Martin patent leather man-killers. Among other differences.
I'm looking forward to showing you all the finished project.
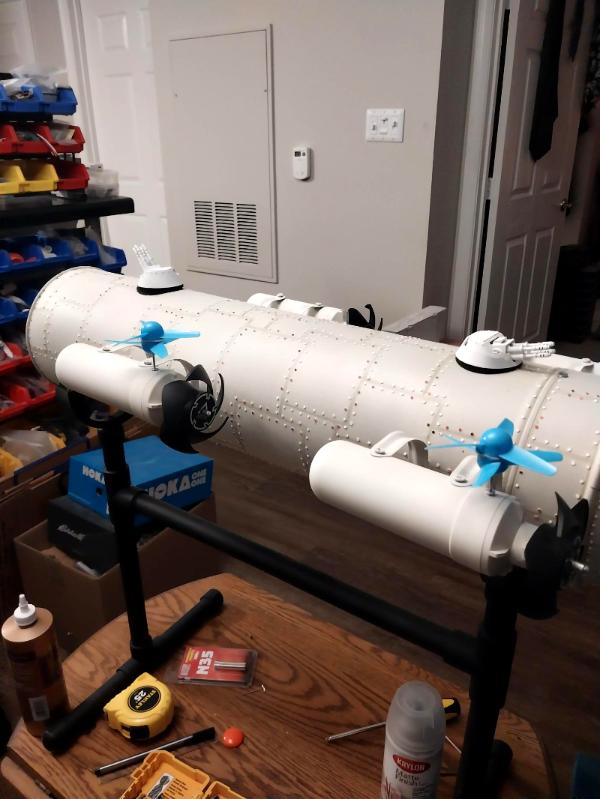
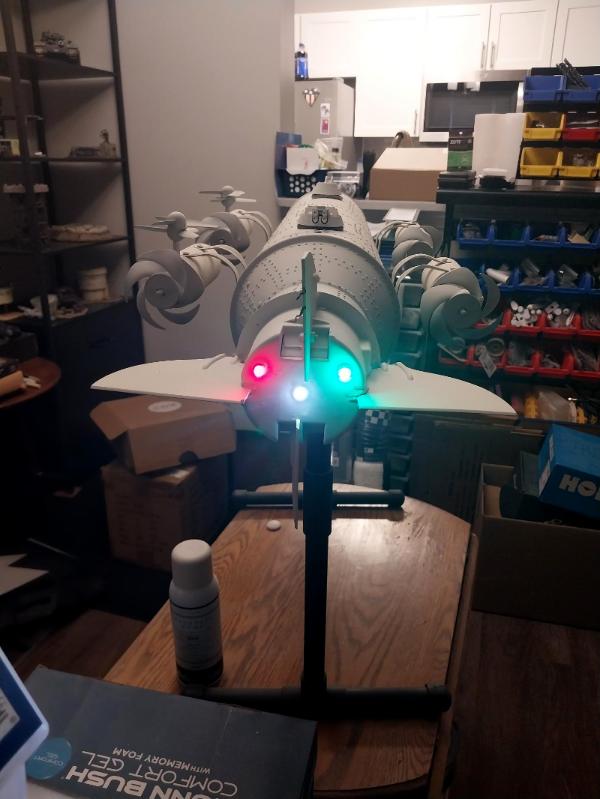
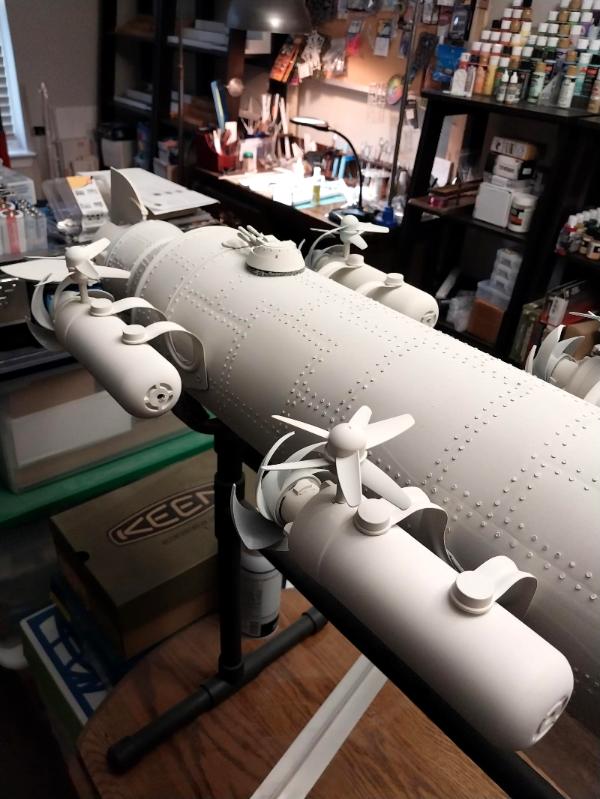
Okay, the Sirocco Wind Tank and crew project is complete as of tonight. A really neat medium-sized vehicle and based (an exact replica, really) of a real machine, apparently used to snuff oil well fires.
On a side note, I was looking at maybe buying another one of these resin kits, but the price has increased from US$30 to US$65, so no. I don't blame the seller- everything costs more and it's a wonder most of these folks can stay in business, even on eBay and Etsy and related sites. It was the same thing with the Doom Pixies: the Tom Cat Assault Walker I paid $14 for a few months ago is now $45. There are still deals out there, but harder to find.
So, here are pics of the Sirocco Wind Tank, part of the Panzer Pixie Ensemble:
I will mention that this is as 'clean' a vehicle model as I've done for a very long time- most of my stuff is extremely weathered and grimy, to hide my many mistakes. This type of tank though, I thought was more like the 'parade' type of vehicle that's never really fielded but saved to pass in review for fancy occasions.
Anyway, the end of one and the beginning of another, hopefully tomorrow.
Thank you, Wyomingfox! I remember seeing the original picture (that seems to be too big to upload here, I'll look for another) and thinking "I want to scratchbuild that!" and then somebody went a resin printed it out!
And the Commie Pixie was a first- hadn't done one of the 'peaked hat' officers before. They're slightly different from all the others because they get to wear tap pants under their four-pocket jacket (my photography isn't good enough to show that pretty minor detail).
I've got a couple more new items to knock out for the Doom Pixies and then can think about moving on to something else or painting up enough rank and file of the Snow Pixies and Rifles to actually field an army, if I ever get to play again. Starting tonight is the Feral Cat Main Battle Tank- another resin casting, but details to be appended in a bit (if I get anything done! )
Automatically Appended Next Post: Here's a pic of the real thing in real life- I didn't realize the two jet engines could be independently aligned. I wonder if it is remotely operated, or where does the crew stand so they don't get sucked in?
Clearly on my Sirocco Tank this is why the Panzer Pixies don't wear mini-skirts!
Automatically Appended Next Post: Also also- I may have to add a fuel bunker to mine. I'm assuming that's what the angular structure at the rear of the one in the picture is and it makes sense.
Exactly- it's the world's biggest candle snuffer! I think those are literally jet turbine engines, oriented so the thrust comes out the forward end. You'd hit the switch and FOOF! a localized and temporary vacuum as the air feeding the fire is displaced and the fire itself literally snuffed out. I'll have to do some more reading, was thinking oil well fires, but aircraft fires would need something special to put t=out- especially once the aluminum components start to burn.
I think the crew must have to stay inside the hull once the beast goes into operation- there's no way they could be exposed outside, what with a jet engine right in front of them plus the heat from the actual fire!
Of course, real people aren't Panzer Pixies, either.
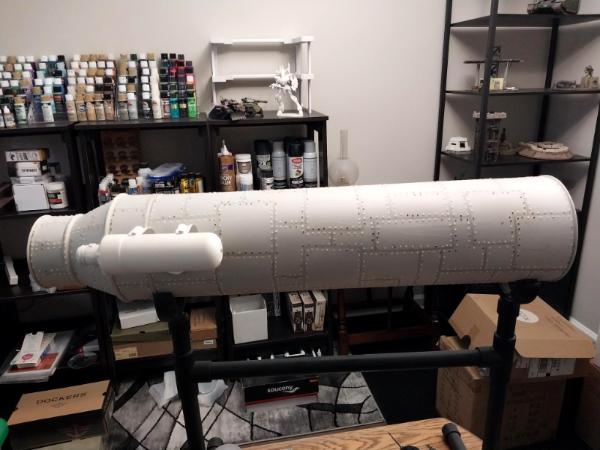
This is the Smilodon class main battle tank of the Nekomimi Winterguard. It's a resin casting also obtained on Etsy before prices went crazy for so many things and is, as you can see, a fairly substantial piece. I've got quite a lot to say about it, but will wait for now. The camo scheme I want to try is best applied with my airbrush and with the apartment still torn apart awaiting repair (23 weeks now) I just can't get everything I need dug out to put the airbrush into action.
So I'm going to do this piece next:
This is a Snow Leopard Self-propelled Gun (SPG). It's really a repurposed D.U.S.T SPG, but a very nice model, I think. As pictured it came with both a 65mm gun and a 107mm mortar to outfit it- I may keep both for this one platform or scratchbuild a second platform, we'll see. (I haven't scratchbuilt any vehicles for awhile, now.) It's been waiting around for years for its moment and that moment is now. The primering/basecoating is already complete and a big part of the project will be converting Winterguard figures into crewcats (artillery and heavy weapons are Boom Pixies- yet another uniform scheme I might try to come up with).
I guess in an actual game it could be played as a Sentinel, or possibly a Cataphract; in a game amongst friends it could have the same weapons' stats as a standard lascannon, the movement of a Rough Rider, but its own footprint- which leads to greater vulnerability to counterfire.
In any event, another cool addition to the Doom Pixie Brigade.
Thanks, PaddyMick! I loved that movie, and yes- the Nekomimi Winterguard when combined with armour have distinct Tank Girl vibe.
The Snow Leopard is nearly done- just a bit with some washes to go and then on to the crew. The figures I have are very much infantry, and the resin they are cast from is brittle, so it's going to be interesting converting a couple.
I'm indulging one fundamental and suppressing another with this build: on the one hand I love vehicles with crew and tank riders and things, it's the people who make the piece come alive. On the other, as mentioned before, I seem to have a small talent for dirtying up vehicles, but I want a bit of a cleaner profile on the Leopard, as with the Sirocco tank.
So, no hobby work for awhile. The good news is- after five months- they are finally starting to repair the flooding damage to the apartment, Horrible pic, but here's what things look like at the moment:
That's the new flooring for the kitchen area and some of the replacement cabinets plunked in the middle of the concrete bunker I call a living room.
The bad news is, after telling me for five months that the modeling/hobby junk on the remaining strip of carpet didn't have to move, now they want it moved. Fortunately, they won't be back to do the carpet until 10JUN23, so I have next week to box some things up and stash them, because to move the shelf units out means having to deflate my air mattress to make room in the bedroom (which is already holding everything else) for them. At first, the email I received made it seem like they were coming back this coming Saturday (03JUN23) and my blood pressure went right through the roof. The true situation is slightly better.
I'd hoped to finish the washes on the Snow Leopard tonight and make a start on kitbashing the three crewcats for it, but I just can't muster any enthusiasm, knowing I'm going to have to stop before the project is done to accommodate the work.
Thanks for letting me whine, more follows after this word from our corporate sponsor <insert Drink Tab Cola commercial here>
The minions of chaos have finally replaced the bottom two feet of sheet rock, spackled, painted, laid new kitchen flooring, new carpeting over 70% of the apartment, and installed new lower kitchen cabinets. And all in only five and half months (or 23 weeks, if you prefer, or 161 days, or half a year). All that remains is the very minor detail of rehanging the valance across the bar that supports the vertical blinds (which they knocked off somehow) and confirming that they have, in fact, reconnected all the appliances in the kitchen properly. I'm very used to different crews coming through and concentrating on just their area of primary responsibility and there is no overall supervision. When I went to check the washing machine they had connected the feed hoses, but not the drain line; if I wasn't such a suspicious old curmudgeon I'd have flooded the whole place again. I'm particularly worried about the natural gas range- most states require a technician to unhook and rehook the gas lines and I doubt these miscreants did that. So I'm not using a fething thing until I have something saying in writing that it's okay. And the restoration job ain't complete until the appliances are usable, so says the Virginia Housing Authority.
Over the past two days I've been able to get a lot of my junk back where it belongs- enough that I hope to pick up painting again on the Snow Leopard and its crew and get moving on with the Doom Pixie Army of Total Heck.
Meantime, an odd supernatural (or supranatural) phenomenon has manifested itself on my painting desk:
Can anyone explain to me what that odd, bare, wooden-looking area is on the left side of the picture? I've never seen it before, usually only having the parts for fifteen or so projects scattered about.
Yes, that is a strange phenomenon on your painting desk. And sorry, I can't help you identify it, as I have never encountered it myself Thank goodness you discovered the outlet was hooked up, and I think it's very wise that you are waiting to make sure everything is hooked up properly with paperwork to support it. Looking forward to when you can get back to the Doom Pixies.
Welp, flooded again. I waited an extra two weeks after the repairs to the apartment were declared 'complete', waiting for official word, in writing, that all the appliances had been hooked up correctly and were safe and ready for use (was really worried about the gas stove). I received an email to that effect on 29JUN23. Tonight, the clothes washer flushed all its water out onto the floor- all the carpet and walls is soaked again. It appears something was broken when they yanked it out to replace the flooring under it, in its little laundry cabinet. I was actually excited to sit down once I got home from work to finish up the Snow Leopard. Laugh or cry time, I reckon.
Tonight I broke out the airbrush (meaning: moved its little table back where it belongs, found all the bits and bobs and put everything back together) and added a little bit of winter camo to the Snow Leopard- I should either have put the white blotches on heavier or the German Medium Camouflage Brown lighter. Also hit it with some Nuln Oil wash and added a little bit more detail to the gun action.
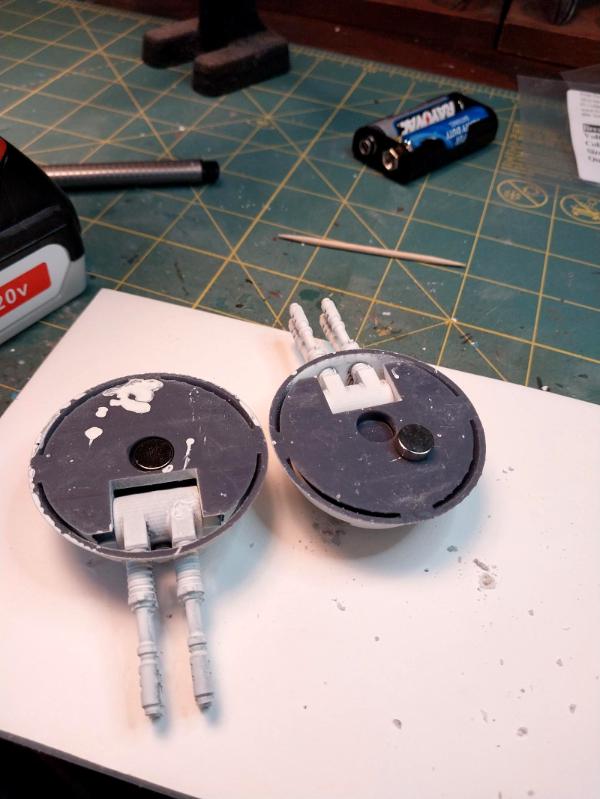
I also cut out a couple of disks from treadplate plastic to add a fighting platform under the gun- so that the crewcats move with it instead of being fastened to the actual deck and restricting how much you can traverse the gun.
I can start on the crew now, and also the heavy mortar that also came with this kit, so it can be either a tank destroyer or an assault support artillery piece (we used to call mortars 'hip pocket artillery').
I'm hoping to start on the remaining pieces tomorrow night.
Thanks very much, Syro! There's still a fair bit of 'putting back' to do, but I was very happy to get a small lick of painting in. Need two more sessions this week to meet Goldfinger's definition of 'enemy action':
"Once is an incident, twice is coincidence, three times is enemy action."
More follows soonest (hopefully later tonight).
Automatically Appended Next Post: Some work done tonight- two of Goldfinger's three data points to indicate deliberate action (or a trend line, in analysis):
The heavy mortar (from the relative size compared to the admittedly slender Doom Pixies, probably a 150 or 160mm) is mostly done, but in the photo I see where the blue expanses are entirely too clean- this will require some additional weathering- I may just hit it with some white from the airbrush, so it blends with the prime mover better. Also looking to see where there is space to add the signature Schwarz Kat decal. The mortar and the anti-tank cannon are interchangeable.
The crewcats are assembled, primered and have their first skin tone base coat layer. The oddly positioned ones are going to be the drivers- in better pictures you'll see that the Snow Leopard has separate lateral track controls, like in the World War I Mark I's and II's- it literally takes two people to steer the vehicle straight or in anything than a circle in one direction.
So, proof of life with tonight's posting. I really want to get this project finished, as I am on the road for work next week and would like to have a clean work desk waiting to start something new, but we'll see.
These Panzer Pixie Redlegs (Mech Artillery) are completed for basecoating, all that remains is to apply the several washes and drybrush a couple of highlights, glue them to their gun platforms and- in the case of the drivers- add their remaining arm and paint that and bob's your uncle- they're done:
There's a lot yet to do in non-hobby related work, so we'll see.
As for what's next, I'd like to build a ground mount that will accept the anti-tank gun or the heavy mortar- so that whichever isn't on the Snow Leopard could be used as a ground mounted heavy weapon, or fixed emplacement heavy weapon. Nothing elaborate. After that, I really need some more Doom Pixie and Snow ixie infantry- my vehicles almost outnumber my grunts! If I'm ever gonna game them, I need more cannon fodder.
In my quest to catch up with DDakka blogs, 7 pages of Meer_Cat today.
Ah yes, miniature pony miniatures. I had forgotten about that.
Nice little stable you gave them.
I remember painting the eyes of my San conversion. Tricky at first. you just have to take a deep breath...
I think I followed a digital anime tutorial when I did it.
Sorry to have been gone so long- life, the universe and everything all wanted their turn and I then had to overcome non-painter's inertia (NPI- it's a thing) to pick this nearly finished project up and get it across the line (so's I can start something new and even more cooler!).
The basis of the build was a DUST game Soviet anti-tank gun carriage which also came with a heavy mortar. I've configured both to fit and scratchbuilt a stand for the non-vehicle mounted piece, as I hate to see anything sitting off to the side. It can be a fixed defense piece when not riding around putting large holes in the enemies of the Emperor.
Group shot leads off, then both guns showing on the gun carriage, then the fixed point defense stand then a Nekomimi Winterguard Army shot.
Clearly, I need more infantry. Also clearly, I need to get onto making that photo base to lend a better look to my work. And I'll have to find a place for the Oldhammer guys hanging out in the back right corner that's just for them.
Next project (more grunts, err, kittens) is already started, pics follow hopefully tomorrow. Thank you for looking in and for your constructive criticism.
I reckon this next can be considered an 'intermediate' project, as I truly do need to build up my infantry numbers, and Not Online!'s recent complete army paint up has me inspired to emulate his ambition, albeit on a much reduced scale.
So this next is another five Close Quarters Battle (CQB) Snow Pixies to round out that squad, plus a regular Winterguard Doom Pixie lascannon team, to continue building up those numbers.
Not much of a picture, more a 'sign of life' rather than even a WIP:
Continued with Inso's tip to mix up the skin tones on groups of similar equipped and posed figures to help build out the individuality- there are three skin tones here (although you can't really see them in the crappy pic): very fair/pink, tan and dusky.
The basecoating of almost everything is done- skin, jacket and Ugg Boots. The Dove Grey on the Snow Pixie jackets is so close to the primer color I use I wonder why I don't just use that as the basecoat.... Skin needs another layer, it's awful easy for me to try to cover light tones in ine go and then it looks chalky and clunky- trying to avoid that. Tomorrow- hopefully!- web gear and shotguns and maybe some more detail work. Possibly the ears, tail and neon hair tints.
In the background are representative samples of Snow and Doom Pixies as a reference (I have the paint scheme written down, too) but you can sort of see the Doom Pixie riflecat needs a better shade of hair than violent metallic blue (I saw Violent Metallic Blue open for the Stones back in '67 ). The Sno Leopard is hanging out because the left side driver needs a pack that I painted to sit on, otherwise she's 'planking' on just her tail alone.
That's it for tonight, thank you for looking in. More follows soonest.
Back in the groove, more or less. After three gaffed appointments, the subcontractor has finally installed the new washer/dryer stack unit, (mostly) ending the refurbishment of the apartment that began with the flooding on 05JAN23. I say mostly because the electrical box the unit ties into is dripping loose wires and the unit itself is not level at all- off by 3/4 of an inch over a 26" width. I'm told that can affect the balance of the agitator and lead to problems in short order, so I'll report it and hope to be done with it all as soon as possible.
For tonight's work, I've added the second coat of skin tones (all three), and the base coat for the shotguns and web gear. I've also stated terraining the base for the lascannon, building a berm of the estimable Bruce Hirst's plaster-cast sandbags (I've probably used that mold more than any other, except for the castle blocks- see the castle keep project a few pages back). Next up will be hair, shotgun shells, ears/tails, and then into washes and highlights.
I'm going to mess with my printer and see if I can make extremely small print stickers that read 'Coach' so they can all be carrying Coach bags.
More follows soonest.
The Snow Pixies are nearly done, a little more detail work on their parkas and then its washes and dry brushing time. The lascannon team is also nearly complete and the base is scenicked and ready for a last primer coat and then painting. I'm trying a different method of plasma coil painting to try to get a look I like, we'll see. Possibly more pics later tonight, definitely tomorrow.
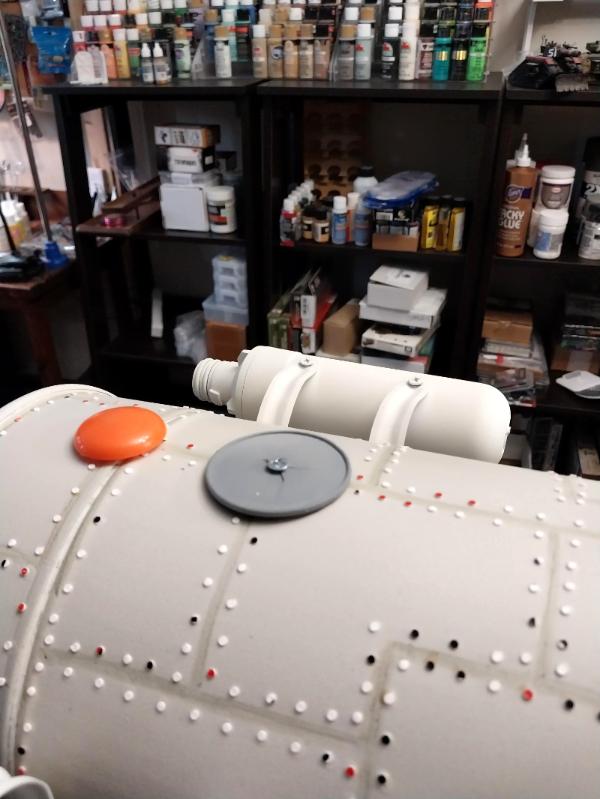
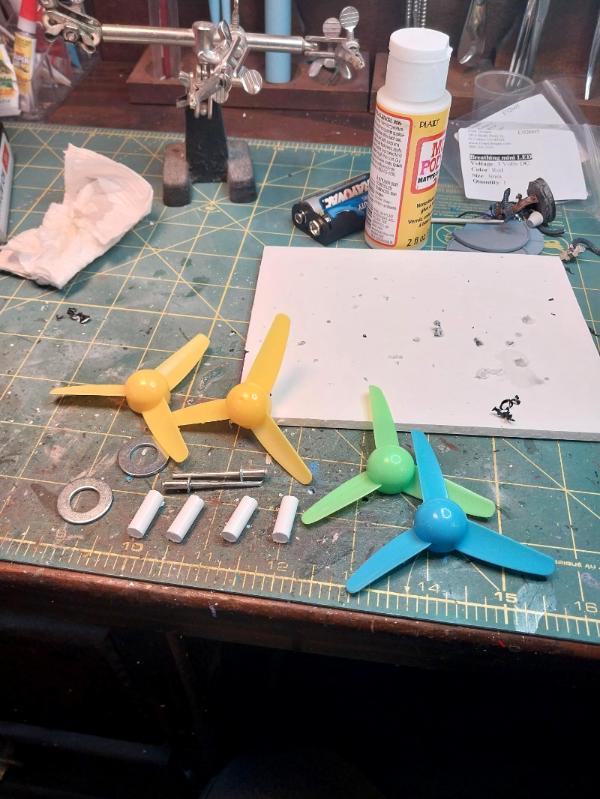
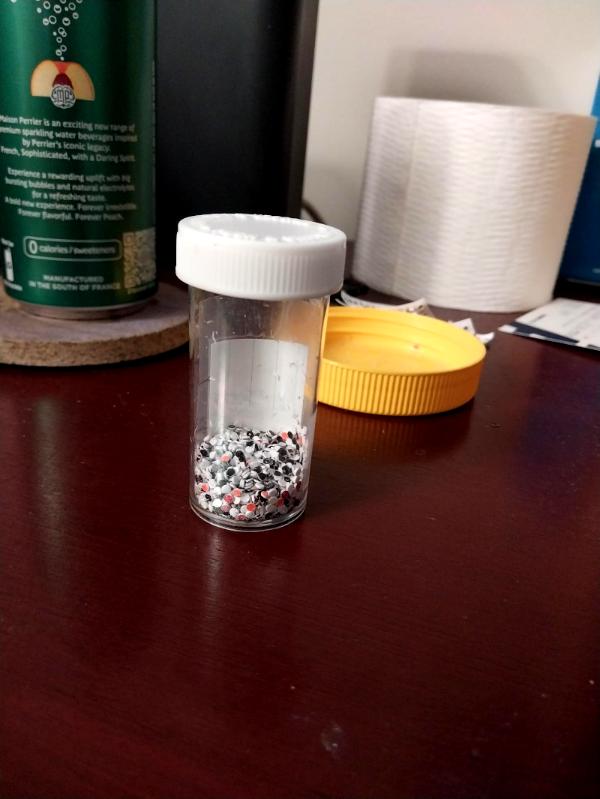
For now, here's a new item I picked up on clearance at Walmart:
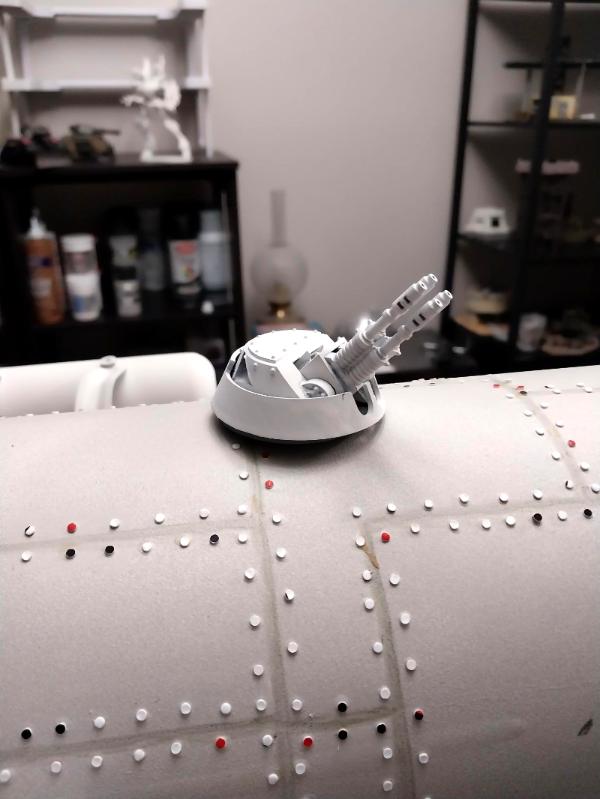
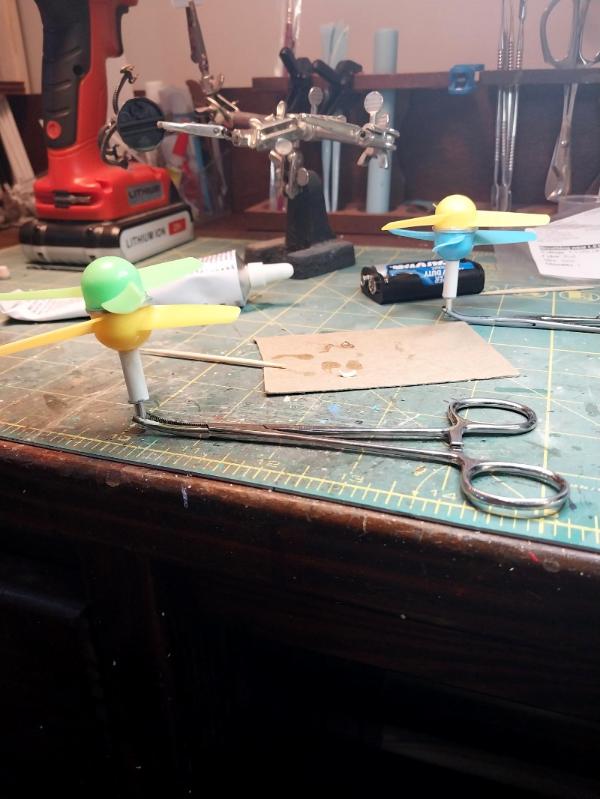
It's an illuminated bobber for night fishing and I gave a dollar for it, because as soon as I saw it I was thinking: "this is a Tau gadget if ever I saw one". Here's how it looks sticky taped to an insect fogger lid in normal kitchen light:
And with only indirect light sneaking in from the living room:
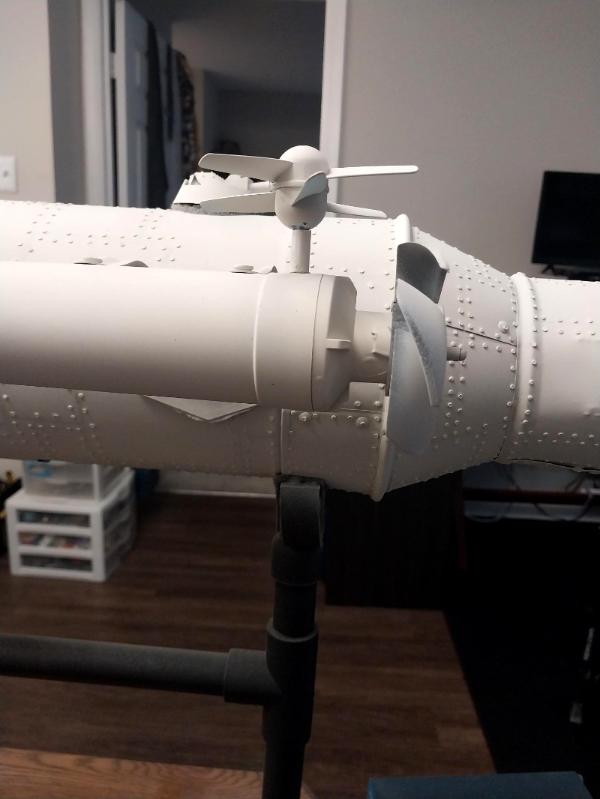
And the same thing, but this time sticky taped to the lid from one of those air freshener pots you stick in your closet:
It uses two button batteries (they come with) and turns on by twisting the base one half rotation. I'm thinking after I finish this fire team of Snow Pixies, I'll scratchbuild a proper plinth for this guy- and I don't even play Tau! Just too cool.
Quite a bit of progress tonight, the Snow Pixies and heavy weapon crewcats are nearly done, the bases are well along and the lascannon is nearly finished. The 'plasma glow' effect I tried this time I like better, but still not quite what I'm looking for. While I like mixing up the skin tones a' la Inso, I'm not liking how the light/pale skin tone with a red wash came out- I may try over with sepia wash, but I'm concerned that it will come out looking more or less like the other two skin tines (medium and tan) and lose the striking effect of being from far northern climes. We'll see. A bit of washing to do yet- the Pixies hair, notably, and the rest of the muzzle burn on the 'cannon, plus some touch up details and done:
Kind of in a hurry tonight, so these pictures are rushed.
The Snow Pixie fire team is done:
Giving me one full squad of them:
The base for the lascannon team needs only a little dry brushing, and then they and it are done also- I should have pictures on Monday. I've also primed the figures and bases for a full squad of Doom Pixies- I figure I need to build up a little more infantry before I undertake another vehicle. I should be able to start them on Monday also and I intend to try a modified 'speed painting' approach- see what economies of scale I can incorporate (I don't think I've tried to do ten at once before, not even the Panzer Jaegers).
Took a quick minute to finish up the Rifles' Heavy Weapons Lascannon team (may go back and smudge up the cannon muzzle, rather than leave the attempt at muzzle burn I tried):
Thank you for looking in and your constructive criticism/pointers for improvement are always welcome.
Starting a full squad of Rifles tonight, they're primered but need mounting on temporary bases and everything else.
Awesome job on the lascannon! Yeah I use quite watered down paints to create heat burn and layer them up. Looks like yours just needs a little over the top to blend it in and should be excellent!
Thanks, Olthannon! I'll try a wash (not sure which one yet) to try to tie things together- the worst that happens is that I paint it out and try something else.
Ah, the joys of a project completed and that pre-dawn silence before the next starts, a pristine desk, new, clean paint palette, crisp, new figures waiting for the brush....
Enough of that unnatural nonsense- on to the next:
Basecoating largely complete: skin tones (two coats), Ugg Boots and North Face jackets, all done. Next up is the web gear and rifles, then hair and on to the washes and highlights.
Yup, got done what I had hoped to tonight (but unfortunately not more, but hey, you take what time you can get)- rifles and web gear are done:
Next is the special metallic bits on the chain sword and bayonet, grey fur, and hair and basecoating is done and it's on to washes and highlights.
I might have them done tomorrow- I hope to- but won't get the bases done until later.
Debating on the next project- on the one hand I've got a really neat and little known Soviet tank hunter from WWII (not one of the SU's) that will look cool with its Panzer Pixie crewcats, but on the other I've got these nifty wannabe Ice Warriors that are just itching to get started and on the third hand are some new Space Samurai infantry, plus another unit of Tang Dynasty infantry, or.....
"Get your paws off me, you dang dirty ape!" Charlton Heston
Thanks for looking in, shas!
Got good work done tonight- all that's left is the washes (skin, coats, hair, web gear, boots) and basing and this squad is done. First time doing a whole squad at once and sometimes getting the base colors on was a drag (Norwegian Death Metal music to keep the momentum going, also The Bangles) but for rank-and-file grunts (meows?) I would consider doing them in lots of ten again.
I'm up to the farm tomorrow, so will probably not get to these until Monday.
Thanks very much, Syro and shas! Thanks for looking in.
I think that I'm not really 'speed painting', really just using the same techniques when I paint them up five at a time, but because there are ten I'm painting more. Instead of painting five jackets and taking a small break to stretch, I'm painting all ten. I also remember something Camkhieri said a long time ago, that the explanation for his prodigious rate of production was because when he sat down to work, that's all he did- no TV, no radio, just him and his Muse and the figures to paint or the structure to build.
I cheat and play music, but otherwise, yeah- no distractions, just painting time.
And so many things to tackle next: I'm not worn out on Nekomimi Winterguard, but there's Ice Warriors and all sorts of things waiting; these are nice problems to have! (Although also a stain on the escutcheon of my Mountain of Plastic Shame. )
It may not look it (and is surely hard to see in my lousy photography) but there are five different washes on the unforms, and another four to do the different hair colors. Sepia, Agrax Earthshade, Athonian Camo, Reikland Flesh and Nuln Oil. This lot just need their bases, and the squad is done. I'm going to use the same base coat of green as the first squad of rifles, but different color ground cover, to make it easy to group them as they got painted. (I'm weird that way: the last FLGS that I was able to go to lost their 'F' and I stopped going because when we gamed, the guy overwatching/helping/'keep it moving people' would calculate the results of dice rolls faster than us- so no learning going on- and then grab figures off the table. I asked him twice not to do that, but he didn't so I stopped going. My stuff may not be connoisseur-level, but it is mine.)
I think I'm going to do the Soviet ZIS-30 tank hunter next.
So, figures done, bases done. I used Huge Miniature's 4 in 1 (Bog) pre-mixed flocking this time, I like the look.
I started looking over the instructions and sprues for the ZIS-30 tank hunter (which in Nekomimi Winterguard parlance will be named the Puma) and it has an interesting twist that I haven't run into before- I'll explain more goodlier tomorrow.
New project: the self-propelled anti-tank gun/tank hunter: Bagheera (the Black Panther from The Jungle Books).
It's based on this Maquette model of the ZiS-30 SPG:
There is some interesting video on YouTube and other places of surviving units, and their history is amazing. Essentially, the Soviet Union was not ready for Operation Barbarossa and had no good self-propelled gun that could surge to wherever the highly mechanized German forces were, so they took the existing komsomelets artillery tractor and stuck their current production towed 57mm anti-gun on top and viola: instant tank hunter.
These little buggers were so small that they had to deploy ground jacks in the rear or park with the tail upslope- to avoid flipping over from the recoil of the gun when fired!
This is a 1/35 scale kit, so it's hard to scale it with no figures in the picture but the crew was usually three, sometimes four- two dudes in the tiny cab and two hanging on for dear life, one on each side of the gun. I like early war vehicles from the Soviet Union and some German because they're so small and fit the scale of the Nekomimi Winterguard better (even when they are printed at 105%). I was thinking of doing up a crew of two for this piece, but given all the space there is going to be, I'll probably put half a dozen or more on it- really hype up the anime vibe.
This is the third kit by Maquette I've built (the first was the Snowcat Scout Car, the second provided the tread units for the Phaeton Ammunition Hauler a ways back) and I've another on hand to be built 'sometime' (the M-8 armored rocket launcher/carrier) and they are great little kits- lots of details and very exacting tolerances. This one is a bit different, however, in that it has instructions in both English and Russian (my reading in Russian is very weak):
And the instructions themselves seemed very clear, with numbered parts and indications where everything should fit:
The problem is, the sprues don't have any numbering- and most of the parts on the sprues aren't on the instruction sheets. And there is only the one view of the complete machine on the box cover!
So, building this beast is going to be interesting- I'm going to have to get some additional images from the Innerwebz to see what it's supposed to look like, then figure how I'm going to cUstoMiZe it for the Winterguard and then get building. I've made start tonight:
Thank you for looking in, Shas and PaddyMick! I'd never seen anything quite like this one and discovered it only recently. This little tankette is literally the short guy at the range trying to fire a Barrett .50 calibre from the hip- over he goes, brass over tea kettle!
A lot of work tonight for little to show- and this is no longer building a ZiS-30 kit- it's a full on customization, as the parts are so tiny, so fragile and so incomprehensible that I'm having to fashion a lot of my own to get it to work. The bogeys are particularly finicky and I'm probably going to have to scratchbuild something. I still love the design though, and that my Bagheera will at least trace its lineage to the ZiS-30.
The panels that extend out are the original full bench seats if you were to build this kit as a standard Komsomolets[i] artillery tractor and are now the footboards for the exterior fighting compartment. I'll add some struts under the ends so that it's a bit stronger and less likely to break off.
The gun is even more finicky than the hull- can't wat to start that[i]!
A good evening's work- although a lot of it doesn't show. I did have to scratchbuild some simple bogeys for the Bagheera tank hunter- the model parts were too fragile and complicated for something that isn't going to be historically accurate anyway. And if I have to assemble tracks one fingernail-paring width track link at a time again, it'll be too soon.
But the fiddliest bits should be over- just a question of attaching the other hull parts and doodads like running lights and then on to the gun and finally the crew. I've two courses of action in mind for the crew- a fairly simple one using mostly existing figures and poses and a more complex one requiring substantial modification to unforgiving resin. We'll see what time and tide dictate when the time comes.
Most of the build for the vehicle and gun is done tonight- some gubbins to add but the heavy lifting is done. Dove deep into my bits box and found a number of old Rhino items that work perfectly:
The gun was as fiddly as the vehicle and I'm going to end up not using a lot of the detail parts- 'way too small and fragile and no instructions on where they should go. It is interesting that the sprues for the gun components must be from the standard kit for the towed version, because I've got the trails and the spades, but no footplate (so I've got a lot of extra parts that the tankette wouldn't need, but not everything to build a towed version).
I hope to finish gluing up tomorrow night and maybe get a coat of primer on. And I can start looking at what crewcats I can use to populate this critter.
Success! The Bagheera build is complete, crew figures are selected and customized (surprisingly little cutting was required) to become Panzer Pixies and everything is primered:
One of the many good things about posting photos to Dakkadakka, is I can see all the Testor's Model Cement threads festooned everywhere that have to get cobwebbed off before I spray the base coat of paint!
You can see the 'anti-recoil-flipping-over' trails I cut down from the extra pieces on the gun sprue, in a hark-back to the real ZiS-30 (theoretically, they swing out and down to lock inn place preparatory to firing). I've already fixed a fair amount of personal gear in place, but will probably add more bags, packs and tarps- this hull is too uncluttered. May have to make some more of everything from greenstuff, I'm running low on pieces.
Painting the vehicle is next, then the gun and finally the crew.
Thank you for looking in and commenting Meatshield and Alaricuk!
I'll use the blue-gray shaker can I've got to do the base color the same as the other Winterguard vehicles (the Kitty Karriers, Snow Leopard and the Windstorm tank) but I saw pictures of Wehrmacht vehicles in the Soviet Union in 1942/43 with horizontal faded white stripes overlaid, I think to help distort the outline of the vehicle if not actually help it blend in with the winter landscape- I may try to carry that off.
Some progress tonight, the Bagheera is basecoated and a fair start made on the crew for basecoating also:
I need to dig out a 1/35 crew figure and stand it next to the vehicle- this thing was intended to pull alight artillery piece and have its six-man crew ride on it- it's an artillery tractor and really, really small. The head of a man standing next to it would be about level with the gun tube (the driver and where the bow gunner woul dsit would have had them folded up like an envelope to get into that tiny cab). But for my little Winterguard- it's the size of a King Tiger- lots of room for anime crowdedness! I think I explained it badly before when I was saying how I liked early WWII German and Soviet vehicles- some French and British as well but not as many- because they are smaller in real-life.
The commander figure almost made me have to invent another paint scheme for a Nekomimi Winterguard General Staff, as she is wearing a plastron/breastplate and has a ton of doodads and ribbons and epaulettes and such dangling about- but I decided she's just a highly decorated Panzer Pixie, so nothing to worry about.
And to give the Panzer Pixies a fair go, the next vehicle project for them is the Smilodon Main Battle Tank- super heavy equivalent. It was going to be next, before the Bagheera, but it's going to be a big job and I wanted something I could turn out sooner.
Not a lot of time to paint last night, so here is two nights' work, and maybe some time a bit later:
Still thinking about doing the horizontal 'snow streaks' on the Bagheera, but think that technique might carry off better on a vehicle with larger flat surfaces- not a lot here on the ole Baghie. Instead, may just winterize the heck out of it- slush in the corners, streaking, rust.
* Crew are complete for basecoating and ready for the several washes each will need to be complete
* Some more doodads on the vehicle chassis are basecoated
* Started detailing the gun
Next steps are to apply the washes to the crew and finish them up, then complete the basecoating on the gun and install it permanently. I'm going to glue it down, so it will have no traverse (the historical one did, but couldn't use it for fear of flipping over sideways) but will have elevation and even about 10 degrees of depression. I have decided to 'winterize' the whole thing, s lots of application of AK's snow and snow balloons to simulate hoarfrost and slush. Not entirely consistent with the driver/pilot's state of en deshabille but it must be awfully hot inside a Bagheera.
Thank you much, Alaricuk, Olthannon, for looking in and your encouraging words- it means a lot.
The crew is finished tonight (nine different washes):
Commander, Master Gunner, Driver/pilot, Assistant Gunner and Loader/Fuse Trimmer.
I had an idea to use an old can of Citadel Overcoat that had gone bad and made for a great misty/frosty look. but the nozzle and the valve in the can under it had finally solidified after nearly twenty years and it just isn't usable anymore, so tomorrow- all other things permitting- I'll hit the chassis with the airbrush and start that 'winter yuck' look.
The Bagheera (Black Panther from the Jungle Books) is done. Lots of pictures:
I was pleased at how well the little vignette within the diorama piece came out, with the Master Gunner reaching down with her power gloves to take the shell from the Assistant Gunner.
Suitably leading from the front, but she probably wants to be out from under and in front of the gun when it engages.
Leftside view featuring the driver/pilot.
The ammo carrier/fuse cutter, a cut down 'parade rest' Winterguard trooper.
A last shot of the Bagheera next to my other tank hunter, the Snow Leopard:
In real life, the Leopard would be about twice the size of the Bagheera- different scaled kits. All the snow effects- which were a blast to play with, I'm very pleased how they came out- are Snow Sprinkles and Microballoons from AK Interactive.
The airbrush gave the layered look I was hoping for, with the rattle can base coat of Rust-o-leum Blue Harbor, overlain with brushed on Nuln Oil wash and airbrushed Vallejo Brown Wash, then airbrushed Scalecolor White from their Non-Metallic Metals set.
I have to say this was a lot fun and came out better than I planned considering:
-the kit was a fething bear to put together
-I had no real plan and was modeling by the seat of my pants
-I haven't done a lot of other 'winterized' pieces- just the one squad of Snow Pixies and the BA-64 Snow Cat
Thank you for looking in and for your constructive criticism.
Next up: A squad of Winterguard Rifles Doom Pixies or Snow Pixies (whichever I have enough figures on hand to do) and then the Smilodon Main Battle Tank & Scratching Post.
The next Doom Pixies project is started: three more heavy weapons and crews.
The Etsy seller that I get all these from very kindly included an extra autocannon on one order, so I used a Master of Ordnance figure as the crew leader and modified a Blizzard Company trooper (on the right, kneeling, in the pic- they're kind of like Scions with a hot shot lasgun) by cutting away the cables and extra bits for the hotshot.
The weapons themselves are primed, basecoated Rust-o-leum Harbor Blue and have had a wash of Nuln Oil:
They'll get rust washes and some chipped metal/scratches drybrushing and be mostly done. The muzzles aren't grimed because I needed someplace to hang onto them, so I'll either catch them up with Nuln Oil on the muzzles too, or maybe try for some heat color distortion.
And I've made a start on some basing for everything:
The plaster pieces I cast from Hirst Arts molds, the metal junk is all from my bits box(es).
Thank you for looking in and your constructive criticism. More follows soonest.
Those thanks look great mate! It's great fun if you don't know how it will turn out, innit? I've nothing to add in the way of constructive criticism, excet to say - if you transport them anywhere, pack some superglue
Thanks very much, PaddyMick! Yup, when gaming, I carry superglue in the convenient 55 gallon drum!
Progress tonight:
Heavy weapons systems got the rest of their Nuln Oil and I added decals to the gun shields (went back and retro-fitted the lascannon previously completed):
Got some primer on the bases:
And have the major areas basecoated on the Doom Pixies:
The Master of Ordinance and converted medic figure (the Unhealthcare Specialist- hat tip to the Fat Electrician) have a surprising amount of detail to them nd will require some thought and care in completing, so as not to waste it.
Also, the people that made these also recently had a Kickstarter with a new set of figures that are sort of more than Scions but less than Space Marines- they announced today that physical production is complete and shipping will start on Monday- yippee! This streak of painting Doom Pixies may just continue for quite a bit longer!
Hi NotOnline!!! Yes, the Bagheera is based on the Maquette kit of a ZiS-30 self-propelled anti-tank gun- which was itself a 'wartime-emergency' kitbash of a towed Zis-10 57mm anti-tank cannon and the T20 komsolent artillery tractor. The machine was so small it could flip over backward from recoil if the recoil legs weren't deployed.
The other tank hunter in the earlier pic- the Snow Leopard- is a DUST model based on an actual WWII Soviet machine. In this case the DUST pieces are 'way underscaled (in my opinion) and the vehicle makes the Doom Pixies look big.
The kit I used is 1/35 scale, and the Doom Pixies are 'small' 28mm figures, so they make it look big. In reality, the areas on the sides is actually the space that the bench seat would normally be and seat only two (pretty small) men. The driver's position in the cab must have been positively claustrophobic!
Thank you, Alaricuk- these have been fun to work on, but you bring up a good point: the one thing the Doom Pixies don't have yet is really heavy artillery- that's something I'm going to have to think how to resolve going forward!
Progress tonight:
The crewcats have their TA-50 web gear done and hair appointments complete:
The guns themselves have their rust (and another coat of Nuln on top, as they were looking 'way too orangy without it may still be too much and I'll have to dilute with a thinned out blue-grey, or maybe a brownish dirt):
And the bases now have a layer of 'crackle spackle'- I've tried this stuff before and don't remember if I liked it, so am trying again. The worst that happens is I drown it all in glue and sand and paint again:
Thank you for looking in and I look forward to your comments.
Thanks MeatShield! I'm trying to introduce some more styles/variables in the way I do some things, since I've been on this Nekomimi Winterguard kick for so long- don't want to get stale!
Meer_Cat wrote: Thank you, Alaricuk- these have been fun to work on, but you bring up a good point: the one thing the Doom Pixies don't have yet is really heavy artillery- that's something I'm going to have to think how to resolve going forward!
Progress tonight:
The crewcats have their TA-50 web gear done and hair appointments complete:
The guns themselves have their rust (and another coat of Nuln on top, as they were looking 'way too orangy without it may still be too much and I'll have to dilute with a thinned out blue-grey, or maybe a brownish dirt):
And the bases now have a layer of 'crackle spackle'- I've tried this stuff before and don't remember if I liked it, so am trying again. The worst that happens is I drown it all in glue and sand and paint again:
Thank you for looking in and I look forward to your comments.
More follows soonest.
Seems you are progressing fast.
And very well.
Heavy artillery is always a chore to find though, unless you are willing to fork over far too much for things like FW.
Even looking through the bargains on Etsy and eBay, you're right- heavy artillery can run to some coin. I may get ambitious and scratchbuild something from the ton-plus of scrap pieces in my bits (box doesn't seem an adequate descriptor) dumpster- that would let me anime it up a great deal more than a more "conventional" science fiction artillery piece!
Interesting question, isn't it? To model something that mimics an Earthshaker, or even real 20th century artillery? Or ot loose the bonds of surly earht and soar to heights unimagined by mortal man, and make something really crazy!!!
Finally got some painting in this week- it's been a busy time.
I tried adding some more schmutz/Nuln Oil to tone down the rust and don't think it really changed anything, so I'm leaving these alone and calling them done:
The crew are finished for basecoating- next up the nine washes:
And the bases are basecoated and read for washes, highlighting and some additional doo-dads:
I backed the Kickstarter for Scale75's Dro & Paint which are supposed to be good for airbrushes, so I'm going to try some ideas on the 'junkyard' base to see how they go. The Crackle Spackle wasn't very impressive after it dried, until it had a basecoat of paint on, then you could see all the cracks and it's really quite cool.
A week night and back at it, the guns and crews are now complete and the bases well along.
After touching up the base colors, I used Vallejo Game Washes Flesh Wash to give the crackle spackle some depth of color and provide something besides another shade of brown to look at:
And the crew are ready to install as soon as the bases are done:
With a bit of luck I might can get the bases finished tomorrow night and final pictures on Wednesday, but we'll see- I'll take the time as I get it.
Work got busy, so not as much time (or energy!) to work this week, but here;s the progress on the bases, I think they're nearly done:
I'd like to add some drybrush dust effect on top, and that's it.
The guns and crews are finished, so then it's just a matter of assembly. Next time I think I'd like to try some Snow Pixie heavy wepps, and work with the AK Interactive Snow Effects some more. Plus, I have a resin-cast aerosan that's just itching to become a Snow Pixie ride, so there's that. And then new Ice Warriors, Space Samurai, and a bunch of other things.....
This set of heavy weapons is finished. Lots of fun, tried some new things, as Yancy Butler's character tells Wesley Snipes in the movie Drop Zone "You jumped, you fell, you lived, it's a good start."
Autocannon #1:
I may go back and reposition the gunner so the butterfly trigger plte lines up better with the breach of the receiver.
Autocannon #2
Heavy Bolter:
The only thing I think I'd do differently is pick either a different color for the soil of the bases, or not use the rust on the wheels and frames- they seem a bit close in color. Although maybe its just that the wheels are covered in rust colored mud!
I'm torn now, because I've wanted to get to the Smilodon MBT for awhile now, but my Idunni Mining Consortium kickstarter figures are here (to be used as either powered armor infantry (which the IG could have back in the Book Before Any Codexes) or maybe as Scions. I don't have a place to game at the moment, so the question is somewhat moot.
I've never really tried to build an 'army' before, never more than a platoon-sized element, maybe with attachments. But these Doom Pixies are really starting to accumulate, in terms of vehicle they already have more than any other element I've built up. And for infantry alone,, only the Lucky 7's ('way at the beginning of this blog) have more body count.
I'm really torn on what to start next, because I have this RBT (Really Big Tank) that looked good on Etsy, not so good in person, but I have big ideas on how to make it into something really cool (hence the cUstoMiZing bit of the blog title) but at the same time, the Idunni Mining Consortium are in and they have some wicked cool pieces.
Decisions, decisions! These are nice problems to have!
Thank you both for looking in and for your comments.
Seriously nice work. Heavy looking great. As to an army, you would be surprised as to how easy it is to get a couple thousand points together. The trick is flexibility. Beautiful work bud keep it up.
Thanks very much Camkierhi and Captain Brown! I greatly appreciate you taking the time to look in and especially to leave a comment. To tell the truth, I've been having so much fun trying new models from the Nekomimi line that I didn't notice how many they were getting to be until I realized that- like the cuckoo bird chick in nature- they had displaced all the other models and figures from the shelf they used to 'share'. All the others are crowded in on different shelves now!
I've decided which project to take on next and hope to make a start at it later this evening and will post some pics (hopefully!) then.
This is an interesting little kit off Etsy but a reminder that my normal Skinflint nature (yes, I'm subscribed to his blog) comes with two edges: the price was certainly very good even for as long ago as I bought this, but it has some drawbacks.
The strengths are the sheer size of the thing- you get a sense of the scale in a couple of the pics below that include provisional posing for crew members. It also packs a lot of molded/cast in detail that only wants painting to add another dimension of 'life' for the model (y'ouns know my philosophy on armored vehicles- really, any vehicles- they don't truly come alive until Soldiers and their junk are liberally scattered about them). Finally, it has the potential to upgrade/up-gun a lot of the weapon pieces with other parts- the resin is the softer, drill-able kind that you can work with, not a brittle, shatter-in-your hand kind.
And that's the chief weakness of the model- the resin is tacky to the touch and remained so even after several months residing on my Pile of Shame. I don't know if this was because it wasn't cured long enough/properly, but I hit it with a UV light from work (we display fluorescent mineral samples for some of our projects) to try to help it 'dry up' and then primered it with two layers of Rust-o-leum and then two layers of the base color and its acceptable in its end state.
The other problem shows in the last picture: those random bits are the components for the side sponsons and they absolutely are too small and won't fit together- to try to use them would require massive amounts of greenstuff to hide the seam gaps and join them to the hull. I reckon to resolve that difficulty by simply scratch-building my own and up-gunning them to at least 40K-style autocannon or gatlings or something- I'll know when I get to that point. I'm thinking about making some other additions to the overall hull to enhance that anime look these figures naturally exude- and in the thinking have some ideas how to do a super-heavy artillery piece from scratch (which I'll then have to wrestle with whether to start it, add more Nekomimi Winterguard infantry or start the Idunni heavy infantry).
Anyways, we're off again. Thank you for looking in. More follows soonest.
Hi MeatShield! I gave US$25 for it back in February. That seller isn't active on Etsy at the moment, I checked just now, but sometimes they go inactive while they print more pieces or just to take a break- I'll check periodically to see if he comes back up.
Automatically Appended Next Post: Adding this pic for scale (Leman Russ, Smilodon, Baneblade):
Looking at it this way, maybe not a superheavy after all, more like a 'medium heavy'. If I need another one of these I'm betting that an M4 Sherman, M24 Chaffee or M48 Patton tank kit in 1/35 scale would provide a good base.
Sorry to hear that the tank is giving you some issues. Thanks for the scale shot also, the Smilodon looks absolutely massive, and I think it must be the same size as a Baneblade.
Thanks for looking in and commenting Syro and shaz!
I didn't mean to sound whiny describing the challenges to overcome with the model- I was just surprised as other pieces similar to it (Whirlwind tank, TomCat walkers) had been a very different proposition (different manufacturers in each case). In this case, Smilodon gave me experience working with new materials and especially trying to get more accurate in my styrene cutting and shaping as I build my own sponsons.
I'm kitbashing in some old Tehnolog/Robocorps heavy autocannon for the sponson-mounted armament, because- frankly- anythign else would be just too puny!
Work continues on Smilodon apace, just not last week- lots of competing tasks for my attention. Got some good work done yesterday and tonight though- much of the base coating and all of the decals and signage are done.
A bit more to go and then there is a metric crap-ton of weathering to do. Given that this model has so much stowage detail molded onto it, she can't be a 'parade ground' vehicle like the Whirlwind Tank- needs to be lots of 'usage' mark-ups. At the same time, I can't default to my standard 'slop earth color on everything and call it good'- Smilodon is too big, realistically, mud can't get thrown much higher than the lower part of the tread boxes (unless maybe another Smilodon went roaring by). So, mud up to the first third and then rust, corrosion and oxidation streaks (just another form of corrosion by another name) for the rest.
The sponsons are crudely built out by me (I may add some greenstuff shrouds around the gimbals) and the auto-cannon are from an old BroneCorps model similar to the SPAAG I built almost at the beginning of this blog. There are sockets also for two bow-mounted guns, the castings that came with look sort of like stubbers/heavy machineguns, but I don't like them. I have some extra Winterguard heavy weapons floating around and may use them or just leave guns off that part- the front part of the fighting compartment must be already a bit crowded, what with the driver, the hull mounted gatling, probably part of the loading/ejection system for the main gun and the cheerleader (all Winterguard vehicles have them). We'll see.
Thank you, Olthannon! Go big or go home, as they say.
I hope to have a bit of an update a little later tonight.
Automatically Appended Next Post: Did get some more work in tonight, by golly! Finished with base colors, got a first layer of grime down on everything and made another attempt to do lenses- best so far, but I may paint over and try again.
It's a good thing I make my own ersatz Nuln Oil, because Smilodon is big, and takes a lot of juice:
I was pleased to see that my attempt at applying it sparingly seems to have worked- I wanted something to take the gleam off, but not just smear a heavy coat of black over everything.
It's actually hard to see that I've really applied quite a lot of grime, unless you do side by side photos of the pre-grime and post-grime tanks; I actually will probably strategically apply a little bit more here and there to make it sand out a bit:
I've also learned something about painting lenses, after watching a ton of YouTube videos: 1) The amoeba is your friend- the colored section needs to be more paisley shaped, not half the circle and 2) use good quality paints for fine work like this. You can see the green (and red on lenses on the chassis not pictured here) are chalky, grainy- I need to use proper modelling paints that will apply smoothly, in a paisley shape, and I think I'm nearly there.
After this, it's heavy rust effects on the mufflers, mud/dirt/muck effects on the tracks, bogies and support rollers and perhaps a light dusting overall of snow: after all, the army is composed of Nekomimi Winterguard!
It's not too late to sponsor a Tonk- go see theCrowe's blog with Tonk in the title and let him know who you want to back! Sponsorship is free and really, provides an opportunity to show of some of your work, and all in good fun.
The first bout between Death from Above and Gobert the Tonk Engine can be found at the bottom of this page:
I've an idea in mind for a suitably anime over-the-top self-propelled artillery piece- hadn't thought about an airship yet, but close air support is something the Winterguard are lacking. There are some interesting designs in the opening of the Vincent Price movie Master of the World or- if I can be ambitious enough- the airship from the movie itself! I loves me a challenge!
Something that would be perfect for the cat-girls is the airship Athena that Klaus, Not Santa built- but I lack the skills, focus, resources and time!
More follows soonest- I'm hoping to break out the airbrush in a bit and add some more crud to the Smilodon.
I don't know what explosive fuel needs a placard to warn people about it, but storing it outside the hull armor seems like a good idea:
This is my second attempt at these lenses, I'm much better pleased with the result:
Bow shot:
Smilodon:
Panzer Pixies up next, and then either the Long Scratch Non-Line-of-Sight Self-propelled artillery piece or- dang it! Syro's got me thinking seriously about an airship and a new class of Winterguard: Sky Pixies.
Very nice work on the tanks. Airships are very addictive. And before you know it you have a 3ft long blimp to store somewhere. But I would love to see your efforts on one.
Despite having the concept pretty much mapped out for a Nekomimi Ludicrously Large Non-Line of Sight SPG, I've been toying with how I'd do the hull for a zeppelin all day- already have an idea of how I'd want to do the gondola. Plus there's all the new Idunni heavy infantry to get to.... these are good problems to have!
Yeah, I wasn't aiming for gimbaled weapons mounts when I started, was shooting for a more WH40K Leman Russ look. But as I never really plan ahead, it proved more effort than I anticipated adapting the big Robogear/Tehnolog autocannons, so opted for the look you see here. I'm still toying with the idea of adding a housing around the gun itself- would make the assembly look bulkier-stronger, although the current look is more like the vehicle in the Kurt Russell movie Soldier.
The nice thing abut not planning too far ahead is it's always a surprise when you finish; there are, of course, numerous downsides, as well.
I'm glad to see so many new and old friends from these pages back at it already- the output of some of you is prodigious! I get a lot of ideas to rip of... pay homage to by reading through your pages.
I've made a start at finishing off the Smilodon project with getting the crew into shape- the first three members anyway. These will occupy the hatches in the turret. I've got several more that I very much want to pose outside the hull in various places, but the company that produces the Nekomimi Winterguard don't make any seated figures and there's only so much altering I can do with the brittle resin, so, so far, no joy on adding more than these three. We'll see though, I'll keep poking at it.
Also, taking into account shazolenzabi's observation, I have an idea to add a very Nekomimi-esque gunshield to the side-mounted autocannon. Again, we'll see how that pans out.
Base colors mostly complete- the yellow piping around the edge of the banner needs going over at least once more (pale yellow on a strong color like red), possibly some touch ups here and there before highlighting, inking and washes:
Taking some gubbins back to the farm with me this weekend to drill out with the press- too finicky and small to try to do with the hand drill here at the apartment, then we'll add some gunshields to the autocannon in the near future. I say that, rather than 'next week' as my work is sending me out on the road next week, so will be a delay before I can paint again.
Also noticed that there are no pintle mounted heavy weapons on the turret, going to have to remedy that. Any turret crew that freakin' hand grenades on their belts ;just in case' (a la the movie Serenity: "Sure would be nice if we had some grenades right about now!") simply won't be happy without a plasma, pulse or autocannon to plink away with; at least a heavy stubber!
The project is finished tonight, Smilodon and her crew:
The lenses look a lot better with a somewhat greater stand-off:
Top views:
Crew shots:
Sponson Mantlets (too clean- I'm going to fog them with cyanoacrylite glue fumes and then lightly wash with Nuln Oil):
Army Shot (Doom Pixies, Snow Pixies, Panzer Pixies):
Next up: From the new Idunni line of figures I'm going to start a 'General of the Army and Her Personal Body Guard' (pics hopefully tomorrow) for soemthing to work on whilst I prowl the DIY store for the pieces to build the next big vehicle project.
Thank you for looking in, and for your tips and constructive criticism.
Next project: General of the Armies Sylvia Slipperfoot and her personal armskat Master Sergeant Angelique Pettyjohn (you older Dakkanauts and some Star Trek and Get Smart fans will get the reference):
The figure is from the latest Kickstarter for the new Idunni line of combat mining engineers. Given their heavier armor, I'm hearkening back to the RT days of yore when Imperial Guard could have powered armor (if you cared to spend the points) or maybe their Scion-equivalents, I don't really care. Heavy infantry, maybe like cataphracti in dismounted mode- I've got jet-cycle, jet-trike and mini-walker pieces to build at some point, so you have mounted versions too.
Given that this is a taller, heavier, tippier piece, I've mounted it on its permanent base and will try using one of those newfangled clampy-handle things to see if I like that.
Meanwhile, I've got to hie me hence to the DIY to get stuff for the next vehicle project.
Awesome Meer_Cat! Quite an accomplishment getting the full Smilodon and crew done. I also appreciated the group shot. Looking forward to your progress on the general.
Thanks very much Syro- this one is just for fun and maybe to try some new things and avoid the rut!
Hey shaz- yep, it's an interesting piece and one that I did not order during the Kickstarter! Thy went and offered 20% off at their store for folks who had supported the Kick, and I wound up spending as much more as I had on the original campaign! I'm hoping they carry on with adding more lines to the Nekomimi Winterguard and Idunni Mining Fighters- they're a lot of fun.
Have gotten some painting time in this week- results below. I think I'm going to go another shade darker for the blue on the power fist and the power tail. The tanks on the back (power cells? Liquid nitrogen? Nitrous oxide?) are a lighter yellow than I want, but I'm going to sand them a bit smoother, touch up the yellow where necessary and wash with Casandora Yellow and apply decals- I think they'll be alright.
No painting last week, but some tonight; this is more of a sign-of-life post than anything. Thunder Pixie bodyguard is complete for base colors, just washes and dry brushing left for Angelique Pettyjohn. I did go with the next shade darker blue on the power glove and tail and like it a lot better. Not sure I approve of the neon green hoses though- those may need to change. The General of Armies is started, with surprisingly little to actually basecoat. Will need to try to be better about skin tone washes though:
I'm actively fighting the urge to go to Lowe's/Home Depot/DIY for the couple of pieces I'll need for the next project; this one deserves to be finished and get my best effort doing so before I go haring off.
General of Armies Sylvia Slipperfoot and her personal armskat/bodyguard Sergeant Angelique Petty John are finished:
Contrary to appearances, Sylvia isn't wearing the typical space barbarian chainmail brassiere- her outfit consists mostly of beaded chains of what appear to be dogtags- and the power armored sergeant has some festooned on her gear as well. I may take a whack at trying to detail those a little better so that aspect shows. I see I need to add some grime to the plasma tanks on the back also.
This is the workshop on my family's farm- the things on the bench are (most of) the hardware for the next project. There's a fair bit that I'll need to do here because of tools required and the noise, but I'm hoping to get some time in tomorrow, enough to give the thing some shape and then announce what it is to be. For now, I'll just say (like Burt Gummer in Tremors 2- Aftershocks) "it's gonna be big!!!":
Those are great choices, Not Online!!! and I'm now intrigued by how I might work silos into the 'space colony' terrain pieces I've got going- back to the hardware store!
But for now, these are going to form the main body of a 41st Millenium (There is only war....) zeppelin for the Imperial Nekomimi Winterguard:
Second picture for a better view of the scale of the figures.
I was at a materials re-use shop (proceeds go to Habitat for Humanity) looking to see what interesting bits they had and came a cross a weird lot of assorted stove pipe pieces. Not enough for anyone to set a stove or anything, but all brand new. My immediate thought was "I can make something out of this." and I started looking for what might make a zep. The largest diameter pieces they had were 6", I was hoping for bigger, but it'll do.
So the zep's dimensions will be roughly 40" long, with a cross section diameter of 6", with a control gondola, a weapons/drop troops gondola and possibly a low-atmospheric fighter slung underneath for close air support for the grunts.
And we'll need some names! We have a whole new fighting Corps in the Nekomimi Armed Forces: Zoom Pixies (to go along with the Doom, Boom, Panzer and Thunder Pixies). And the ship herself with be (what else?) INS Kitty Hawk.
Next step is to scribe or cut panel lines into the hull pieces with either a metal scribe or a cut-off wheel for my Dremel (if the latter, will have to do the work at the farm- I tried a sample scratch down here in the apartment and the noise was horrendous). A buddy at work is going to lend me an off-cut of 6" diameter PVC pipe to use as a last, or form, so the long pipe section doesn't get bent or wrinkled as I make panel lines.
Then I can drill holes here and there to run wiring through, as I want running lights everywhere plus interior illumination. The gondolas will be detachable (probably magnetized) so that the interiors can be gamed (in case anyone wants a steam punk zeppelin to play Call of Cthulhu or something similar).
And rivets- that's what makes it 40k, amirite? Lots of 'em. Everywhere.
I also have to get a fine point Sharpie marker- nothing I've got in the apartment will stick to the metal pipe to mark where the panel lines go.
It took some doing, but I got the silly pipe section to hold still enough so I could mark out where I'm going to scribe my panel lines- and all without slicing open either of my hands!
Some index lines first:
Then a 3" square cardboard guide to start mixing up some overlapping panels:
And the final layout:
I've blocked in some squares and squiggled out lines in other areas to help keep track of which panels overlap on top of which; when complete if anything looks too squirrelly I'll cut some square 'patches' out of styrene to go overtop and that should fix things. Topmost panels get rivets along all visible edges too, not sure what the spacing is going to be, but I figure fairly close together. Although the panels themselves don't have to be gas-tight- whatever the lifting gas is it'll be in cells inside the skin of the zep.
Still need to mark out where the gondolas are going to attach, where I need to bore holes so that the dorsal ack-ack turrets are going to go and this piece is ready to scribe. I picked up some Dremel grinding wheels of different thicknesses today, I really don't think the prick awl is going to make a thick enough line even if I can bear down hard enough on it. And the nail I brought down didn't do very well either. As long as I don't get carried away, I think the grinding wheels will do the trick. And that work will have to be done t the farm, because the noise here would be too much to ask of my neighbors.
Man that pipe is huge, I hope it won't be too inconvenient preparing for tabletop use. It's so cool that you are making the Nekomimi a zeplin. Does that mean I need to make my orks a cyborg T-Rex?
Syro: Yes, the Nekomimi getting a zep definitely means your Orkz need a cyborg T-rex! Without a doubt!
Not Online!!!: Hopefully there will be a few things worth looking at over the next couple of weeks- I look forward to any feedback/input you may have. I'll have to warn yuo though, that my fancy is most engaged when I'm working with non-standard parts (Hey- I can make something out of that!) for a non-standard purpose (Zeppelins? Really? In the 41st Millenium where the is only war? Yes- rivets!). It should be fun, even if a gaming situation never comes for it.
I'm at the farm this weekend and will hopefully be able to chisel enough time out to scribe the panel lines with my Dremel; I have an alternative course of action if this doesn't work.
So, got my scribing done today, and I'm overall fairly well pleased at how it came out. There really wasn't a good way to fix a straight edge onto the unrolled pipe- as you'll see- so everything was freehand and often without the ability to even get a good two-handed brace to hold the Dremel steady. But I think the final effect, with paint, rivets, washes and weathering, will be good.
I first had to build up a 'last' or form, to help keep the metal from crimping or wrinkling as I leaned into it to apply the cut-off wheel:
I wore ear, eye and breathing protection, as I managed to throw off some sparks scribing the metal:
The effect of interlocking and overlapping panels or plates is going to be pretty good, I think:
And I almost forgot to get a pic of the pipe with the 6" to 4" reducer attached (this will lead to the rudder and aileron assemblies at the back end) and the 6" cap at the fore end- where the nose assembly will be and I have two ideas to try to for that- I remembered as I was stowing everything in the trunk for the run back down to Virginia tomorrow evening. I hope to get to work on the next step Monday night:
That's my paramedic bag in the background.
Next steps are to apply a light coat of primer (I didn't want to scribe too deep and maybe punch through the thin metal and I don't want to fill my scribe lines with paint, so light coats all around- I may use my airbrush rather than a rattle can) and maybe a first wash, to see how the lines stand out. I've cut access holes in strategic places for running the wiring for the running and gondola lights- so making up the wiring harness for the Kitty Hawk can also be done now at any time. And I can attach the engines- debating between just two located in the rear third of the hull or four, with two located at the front one third mark and the other pair at the rear two thirds mark. Have to think on that.
Then there's building out the nose cone, the flight gear at the back and the gondolas. I'm thinking also about converting a 1/48 scale F4F Grumman Wildcat (I think I remember the nomenclature correctly) into a carrier version (foldable wings) that will be stowed underneath the hull also- with a ladder for the intrepid pilot to climb down into the cockpit to conduct anti-air or ground close support operations.
And we'll need several Zoom Pixie crew, of course.
Very sorry for the delay in responding- I was hoping to have enough progress done on the hull to make it worth taking a picture and posting, but I'm not quite there yet. The stove pipe is taking a lot more light coats of spray primer to cover than I thought- the initial one literally slid off because I accidently put it on too heavily. It's been lots of light spot coats since Monday morning, but we're almost ready to try applying the wash.
I've got a bottle of Burnt Umber ink that I believe I can try thinning down 1:50 or even 1:100 (I'll experiment on a piece of primered styrene) that should do nicely.
For tonight, I've made a start on the 'payload' gondola and the propulsion pods- and have a brand new idea for the control cabin- I think it's going to look fab!
So, hopefully some pics of in progress things tomorrow, and thank you all for looking in.
Ah, you have advanced to the zeppelin stage I see! Every body does it. At some point they just have to make a airship, and yours is looking amazing right off the bat.
Love the tank, general looks amazing, but zeppelin wins. Fantastic stuff.
To help the primer you might want to sand the while thing. Èven a 600 grit once over will help the paint key to the surface.
Hey Cam! Yes, this is your fault- I've been thinking about how to go about it ever since you mentioned the zeppelin-phase in an earlier project.
I should have thought about creating a key for the primer, but the fault was really mine, as I knew to spray several light coats but got distracted by the fact that the initial coat wasn't hiding the Sharpie markings. It's pretty well covered now, but if any areas need touch up (paint flakes off to bare metal) I'll sand that before re-applying primer.
And a funny thing- I sprayed a scrap piece of styrene so I can see how my homemade Earthshade is going to look (to create that 'doped canvas' look, even though the hull is clearly metal) and it still isn't dry. The metal pipe dried in minutes, plastic not so much.
So I used the time to advance the work on the weapons gondola:
This is the 'bed' that will fit against the hull and have magnets hidden in it so that the gondolas can be detached (hey, I may come back later and build multiple gondolas, plus I want the wepps gondola to separate so the steampunkers can game in it)- I've got some putty filling to do and can then JB Weld it to the fuselage/hull.
And here is the bare bones of the wepps gondola itself:
Overall dimensions: 3.5 inches by 10.5 inches by 2.75 inches high- this thing will accommodate figures up to space marine size (up to real Space Hulk metal Terminators size). The side pieces are made from two of those things you buy with a bunch of plastic key fobs on that you can label- I needed the fobs for a different project and have had these things kicking around for a while. I think the slots for the fobs make for a decent gothic/steampunk look that I can enhance with minimal work, plus the hooks that the fobs hang from are going to come in very useful (yes, I will be converting some Doom Pixies into fast-roping/rappelling/abseiling Death from Above Practitioners). Plus other things I'm sure I haven't thought about yet.
Tomorrow I hope to have the results of the 'streak test' ready for your estimation: does the wash color suit the hull and does it pick out the panel lines properly? I think if the styrene looks good I'll wash the hull, then apply a billion rivets then spot wash the rivets.
I also hope to have more work done on the gondola and will have the dorsal anti-air turrets primered and ready to show.
Got some good work in tonight, but not what I expected!
First up- here are the turrets for the dorsal guns and I think one is going to be a ventral ball turret or possibly a chin turret, depending on how I do the nose:
They are from a great seller on Etsy, ran about US$7 each- DM me if you want the name.
I didn't get time to do the 'streak test' for how I'm going to wash/weather the hull; instead, I got interested in putting together the tail assembly with its associated ailerons and other control surfaces. I started with an electric light receptacle I had lying around for just such an occasion and some dollar store putty knives bought for the purpose:
Some cutting and shaping with my Dremel, a coping saw, an Xacto knife and a carpet knife and they were ready to epoxy in place:
I couldn't get enough JB Weld in the groove to keep them steady whilst it dried (and I was using JB Weld Quik, to boot) so I went with adding Green Stuff to smooth the edges and keep everything together:
I'm going to have to add the fourth vane on Monday when I get back- this assembly of the receptacle was right smack in the way, I'm going to have to cut it out:
As you can see, I tried to epoxy a spacer in and make it work, but it wasn't solid and I was feeling rushed- so drop back five yards and prepare to punt, I'll finish it on Monday when I have time to do it right- and that means cutting the bits out of the way that are causing the problem and then smoothing them over with Green Stuff.
I'm thinking about adding a stinger turret to the back of this- there is certainly room. Plus, there is space inside the receptacle for a batter box, so I'll wire a bunch of the running lights to feed from here- I'll magnetize the assembly so it can be accessed to change batteries or replace LEDs,
More good work done tonight- these are still the easy stages and really, I'm avoiding putting together the wiring harness for all the lights I want. I also have the parts (PVC pipe bits mostly) to put together the stand or cradle to hold the beast horizontally and I really have to get that done- I'm really getting past the point where I can work vertically.
First of all, no streak test. I decided to use a different color- more grey than white- for the base color of the hull. So I've started respraying that and we'll see what looks good when that is uniformly coated and dry.
Next, I cut the bit in the way on the light receptacle and epoxied (JB Weld Kwik) the final vane in place. Which means now I can see clearly that its opposite is off kilter. So I'll try bending/warping it slightly, or will have to cut it free and reattach:
As a product review- the new (to me) Dremel cut off/grinding disks are sweet- they're like inch and a half angle cutter cut off wheels and work very well. I like the very thin carbide wheels also-they're much better for fine work. But the Kitty Hawk isn't exactly fine work, at least not yet.
Next up was starting to shape and assemble the engine pods and struts. I figure to use these expended refrigerator filter canisters for the engine pods, and these cheap mop hangers from the dollar store for the struts:
I also bought these cheap computer case fans from the local Crazy Eddie's Used Computer Emporium to act as the 'pusher' propellers:
Altogether they will shape up pretty good engines and props, I reckon:
I'll need to take the mop hangers to the farm to drill some holes for screws using my midget drill press- I may try here tomorrow and see if the noise isn't too great and if I can hold a hand drill steady enough, we'll see- the metal isn't exactly battleship steel so I might can manage.
I've also ordered in some cheap three-bladed props to mount as verticle props for helping the control surfaces aim the bow up or down more quickly, but they haven't arrived yet.
I've set a budget of US$75 for parts for this thing and am still well under (not counting stuff I already had- that doesn't count). I think I'll be able to bring it in under contract ceiling and so far the most expensive individual part has been the spray paint!
And shortly I'll be breaking out my hot glue gun, which I now refer to as my Syro Adductor, for his great work with hot glue, to start sticking things to things.
1) Tail section: all vanes positioned correctly (as much as I'm agonna do) and started priming:
B) Nose/command deck section: nice start here and the 6 inch circle guide I cut out earlier to help position/shape the gondola sections when cut in half will be the deck sole; it's not glued in yet- for once I'm going to try to make things easier on myself and build it outside the plastic hemisphere and only install when it's finished. There will be crew figures permanently installed and the whole kit and kaboodle will (probably) be permanently epoxied in place once its wiring is run. Although it might be nice to be able to get at the wire leads from the nose end if the bulb ever goes out....dang it- decisions!
iii) Engine pods: I was able to drill the holes I needed easily with my hand drill- I'm glad I didn't wait and drag everything up to the farm, as I really must get the stand built and the rescue horses don't leave a lot of time for the hobby. I should have anticipated that these refrigerator water filters would be filled with charcoal, but I learned quickly and the screws that hold the filters to the struts actually plugged the holes enough that black powder isn't leaking every where. I won't paint the prop blades- they'll stay shiny black and labeled for Arctic:
IV) Streak Test: Not really a streak test, as I'm going to go with the Vallejo Grey Wash (I was thinking about thinning my Umber Ink, as you know, but then I thought, at my rate of consumption my washes will last approximately until the heat death of the universe, so why not splurge and use them now?) so I tried thinning and broad brushing Burnt Umber Wash, Sepia Wash and Grey Wash- given the hull color now being a pale grey, I believe the grey wash used as a thick 'panel lining' is the look I want. I may actually go over top later with a very thin line of rust or Sepia. On the left you see what using a wide soft brush yielded- it would have just washed the whole hull a dirty brown- not what I wanted.
I am very definitely interested in all y'alls opinion as to what you like- just bear in mind that the scribed metal lines on the pipe are deeper and wider than the scratches I made on this piece of styrene:
That's it for tonight. Next up, I'll be priming everything that's already done, building out the weapons gondola, starting the Generator Gondola (which is where one of the battery boxes and switches for lights will go), finishing the tail section, building out the bridge deck and starting to think about how I'm going to rig the compartment and running lights on this beast. This weekend at the farm I'll try to get the stand built- really getting to need that.
In looking for something else I found my sheet of laser-jet printable water transfer decal paper- I will be able to custom print the ship's name (Kitty Hawk, in Gothic Script? I'm rewatching The Hindenburg at the moment) plus more bigglier Hello Kitty decals for the tail fins.
Thank you for looking in and your constructive criticism. More follows soonest.
Wish I could have been working/posting more regularly, but life has most definitely gotten in the way. Two weeks back a number of events happened, that short of the loss of a human family member, have made for one of the most difficult weeks I can remember experiencing. I was going to write a list of everything but then realized that I come to Dakkadakka to get away from troubles, so refrained. I will limit myself to saying that we had to say good-bye to another of our rescue horses and that is never easy. I'll be showing you the shadow box for Chip Marshal down the road a piece.
So it isn't a loss of interest in the project that has kept me from showing more progress on the INAS Kitty Hawk, quite the opposite.
I have gotten the stand done (intermediate stage pics below, but it's done) and it is already making things easier for working on the hull:
The engine pods are primered and the next thing is to start adding a metric crap-ton of rivets to the hull. I was going to do the panel lines, but realized that the rivets aren't painted (I just used a leather hole punch to make a bagillion of them from an old yard sale sign) and I reckon it's going to be easier to spray another light coat on the whole hull with rivets than to try to spray them spread out in a box top or something. I hope to have photos showing something soon.
But probably not too soon. Another interference from real life is that the owner of the apartment that I've been renting for the past 9 years and 9 months is selling it and I have to move out by April 30th. To make this properly relevant to the spirit of these blog pages, my public service announcement is: our hobby is terrific- but put the time and energy into the things that must be dealt with first.
I've found a new place, arranged for utilities to be moved and started boxing things up in the current place. I'm blessed that I can afford to start the new place two weeks before I'm required to be out of the old place, so I can move myself (don't have too much of bulk in what is essentially a commuter apartment) and nothing gets broken (hopefully).
The biggest pain will be packing up the many figures, vehicles and terrain pieces we've built together for the past 8 years (I found Dakkadakka and stopped lurking in 2016).
Thanks very much, Josh! It's the kind of project that would be perfect for the League of Extraordinary Riveters, except that even without having to move apartments and other things going on it would take too long to get it done in time.
It'll be fun to have done an airship, though. I've rewatched The Hindenburg with George C. Scott for inspiration, next up is Jan Michael Vincent in Zeppelin.
I'm sorry to hear about what you've been going through, Meer. I'm glad to see that you have a little time to take your mind off things and work on the zeppelin.
Thanks very much all, for looking in and for your encouraging words.
No work tonight, but tomorrow I'm hoping to get an hour or so of boxing the completed miniatures and such up and then start in on the rivets. I'm actually looking forward to getting going- I think it will be very zen; just, instead of raking sand into perfect lines and patterns I'm gluing down tiny circlets of plastic, really- it's exactly the same thing!
After 'way more absence than I thought there'd be and far more than I wanted, I'm sticking a toe back in the water and getting myself going in the world of miniatures; in other words:
It's been quite a ride since March: moved into the new apartment, took in a new rescue horse at the farm, traveled for work to Texas, Colorado, New Mexico and Arizona for 2-3 weeks here and there to hang out in the desert and contribute my language skills and in between tried to get everything unpacked and set up as nicely in the old place (ain't there yet, but I can't let the perfect be the enemy of the good).
As a reminder (for me as much as you'ns!) here's roughly where things stood with INS Kitty Hawk when last we tuned in:
Now, I can't find everything I need, and some things got broken in the move, but I absolutely can't stand sitting around in our current 100 degree F heat and do nothing, so tonight I started the first step needed to finishing off the hull itself- and that's darkening the panel lines, preparatory to adding the rivets.
Looking at the hull with its off-white basecoat, I needed/wanted some contrast to make it more visually appealing- but didn't want to use a wash and maybe overdo the effect. So I bought a selection of 'paint pens' and Sharpie markers with an eye towards outlining all the hull panels, both to form a seam for the rivets to follow and to give the eye something to make sense of, instead of straining to see what the cryptic scratchings were all about.
Here's a somewhat close up of what things looked like before:
And here's with the (not pin lining, or even high-lighting- smudge-lining?):
I wanted to fill the engraved lines I made with my angle grinder and feather them out a bit, maybe to look like aircraft dope sealing the seams. I looked at a metric crap-ton of old zeppelin and dirigible pictures trying to come up with something and this is what I've got.
After the rivets are added, I reckon to wide brush a very thin wash of rust over them and the panel seams to blend everything together and provide a sort of weathering.
This is the paint pen I used:
I like it- the tip comes to a point, but is about 1/4 inch at the base and if you press down you can widen or lessen the thickness of the line. They come in almost 100 colors and for needing only one or two I found them affordable, and I'll certainly use them again for weathering on other projects- especially armor.
I want to get all the smudge lining done tonight, so that tomorrow I can stain/wash/color the rivers I already have punched out so we can gt going adding them and maybe get a feel for ho many more thousands I'll need.
So, thank you for looking in, as always I greatly appreciate your constructive criticism and especially encouragement. I've been keeping up with what many of you are doing and it is your example and imagination and enthusiasm that have me stirring my stumps again- many thanks.
Thanks, Syro! I see from your blog that you've been a little busy too! I'm hoping to get caught up and into the swing of things again to start leaving comments on all the great work I see everywhere.
Dropping this photo just to how what the riveting process looks like:
Basically, I drip a tiny drop of white glue at about 1 cm intervals (I use a wooden coffee stirrer that is about the right width) and then tweezers to set a 1/16th inch rivet (used an adjustable leather punch to make) onto each drop. I like the look- but noticing one spot where I made the drip but didn't drop the rivet- it almost looks like I could have just used drops of white glue as rivets and gone a lot faster.
Once done (or when the glue dries and my hands need a break- them tweezers is small for an old guy like me) I'll touch each rivet with a dab of brown or silverish paint (clan or rusty rivets) and get ready for the light rust wash. There just wasn't a better way to paint them: if I paint the sheet of plastic (yard sale sign) the paint flakes off when I punch them out; if I try to paint them afterwards, a shaker can is the only really feasible way and they blow all over. I suppose I could fasten down a piece of painter's tape upside down and stick them to that and then spay- but that sounds like work.
As is, I like the bulkier, more 'robustlier' rivets using the plastic punch outs, so will keep going with them- it'll just take longer and y'all are going to get tired of pics for the next few days of "look what progress I've made today"
But it's a start. It'll be fun to get through this stage so I can start wiring the running lights and bolting things on like engines, guns and recon plane.
More follows soonest (possibly a "look what more I got done today" when I hit the rack).
Thank you for looking in.
Automatically Appended Next Post: Added a few more tonight:
Thanks very much for looking in, Dr. H and Blockade! I have to admit, applying the rivets is going faster than I thought, maybe not 'weeks' of boring sitreps, but maybe only days....
Back from the farm- horses doing well with the heat: we rigged up a pool mister bar that they can activate themselves with a pressure switch from an old supermarket door so they get the benefit of evaporation's endothermic nature and all their shelters have fans. I took the cradle arms from the zeppelin stand with me and cut them to about 1/3 width on the radial arm saw.
For tonight, whilst paint was drying and two-part epoxy was setting, I punched out a couple hundred more rivets- just in case:
Spray painted the arms:
And fastened them back onto the stand with brass wood screws and JB Kwik Weld:
A few minutes more to let the epoxy set (JB Kwik Weld) and I can get back to pusshing rivets into place. I hope to update this post a little bit later.
Rivets looking great mate. One of those tedious things that will pay off in spades at the end. This has been a gorgeous build so far - really clever use of bits and bobs!
Thanks very much for looking in, tzurk! And it is taking awhile to get all of these bits in place, but I think you're right, that the overall effect in the end will be worth the effort!
Got a fair amount done tonight (watching The Wild Geese whilst I work) and figure I'm at the 25% complete mark:
I dab down my little blobs of white glue to stick the rivets to, and then overcoat each section with flat matte urethane to help hold everything in place. I'll try to stay focused, a I'd really like to be complete with this stage this week and then move on to:
- Tail section
- engines
- dorsal gun turrets
- Weapons gondolas
- Command bridge in the nose
- Crewcats (Aero Pixies)
Hopefully in that order.
I do thank you all for your interest and encouragement. More follows soonest.
More riveting news tonight, but no picture; frankly, it would look a lot like the previous picture, so I'll leave it that I think I'm around 60-65% complete with this stage of work nd may be able to get it finished tomorrow evening. If not, surely by Monday evening.
I just need to hit the new sections with matte urethane overcoat and Imma call it a day.
Rivet-zen nearly achieved, Doc! Thank you for looking in and the encouragement.
The main hull is 100% complete. I got a bit out over my skies when I thought I was 'done' though- there is the whole aft section that the tail fins connect to remaining to do! That will keep until Monday and should be finished that evening. I didn't count every rivet, but I counted a 2" by 2" section and multiplied by the dimensions of the hull and it comes to a fairly close estimate of about 1000 rivets in all.
Next will be to daub some paint on them and apply a bit of weathering wash and then on to finishing the tail section- including wiring its navigation lights!
Thank you for your kind attention, more follows soonest.
Yep, listened to a lot of music, watched Zeppelin, The Beekeeper and season one of the 1965 American TV series Honey West (which was actually quite good, I thought). I've got the Kittyhawk on a small table on its cradle where I can see my little television and it is indeed a very zen activity- as Doc H mentioned- you just put the little dabs of glue on and then use the tweezers to grab the rivets and the next thing you know, the little dish is empty and you have to dump out more rivets.
I am going to have to make more rivets after this is over, I'm almost out.
Thank you, Syro! Yep, tail section next, if for no other reason than a control fin got busted off in the move and I'm trying not to let 'repair jobs' linger any longer than necessary (I already have a Mountain of Plastic Shame, I don't want to add the Island of Misfit Minis to that). I'm thinking that the running lights aft will have their own battery box and switch in the tail cone, separate from the engine pod running lights and cabin/gondola lights.
Got about half of the rear hull riveted tonight- first pic is of the blank slate: I can tell I always meant to add rivets, as I scored the stovepipe with the angle grinder to make the seams:
Then added the contrast with the paint pen (I think it is more or less an umber color?):
And had enough time to add about half the rivets needed:
I may have to redo my estimate of 1000 rivets for the main hull; I counted tonight and so far I've used 373 rivets just getting about half done!
Finished watching Keanu Reeve in Constantine and started watching Denzel Washington in The Equalizer 3. It makes the time pass so quickly!
1) Given that the rivets were not part of my original vision for the Kittyhawk, I wasn't worried about them popping off every time I set the hull into the (hard, PVC plastic) cradle. To counter this, I pulled off some 'pluck out' foam from a pelican case we used at work (I grabbed it for 'daubing sponges' for weathering work) and added it to the points where the hull comes into contact with the cradle:
2) I finished adding rivets (at least for now, the engine nacelles may get some, but the hull is done). I dropped 283 more to finish the tail section, for a total of 656; this made me doubt my estimate for the main hull so I went back and did a bigger sample size area and recalc'd- now coming up with 1860; so about 2500 rivets all told:
I'm actually going to miss the riveting; it was picky work but within my talents and didn't require a lot of thought. I could half-watch a movie on YouTube and just zone out. Ah well, toujours en avant!
3) I've got all the parts I started with for the tail section; the one fin breaking off in moving (I moved it myself in my car, so nobody to blame but me! ) let me know that the whole thing is an accident waiting to happen; so I figure to run tiny machine bolts through the fins and the bit on the outlet box they stick to and glue them again. If I can't find little machine nuts and bolts small enough, I'll have to fabricate actual plastic rivets- drill a hole, push the solid plastic rod through, clip it off to length and peen over the end:
I think the aft running lights are going to have their own battery box to run a red portside light, a green starboard side light and blinking white topside light (if I can find the LEDs). I'm going to try and dig out a button battery clip tonight- I've seen at least one of my 'soldering stuff' boxes floating around recently.
Gotta admit, I'm taken with the idea of running a strip (or two strips) of LEDS along the underside of the hull, just because. We'll see. The advantage of going into a project with no complete plan is you get to exercise artistic initiative and flexibility; the disadvantage is not everything works well togehter and eventually you do have to 'finish' the project!
Hey Josh! I am so zen that I believe I must be at the fifth exit at least for the Nine-fold path! Thank you for looking in!
As the old Irish song proclaims "The fever is on me now, lads", got quite a bit accomplished so far tonight:
1) Re-attached the vertical stabilizer fins using some small machine screws and nuts I found in my tool kit (no idea where they came from):
Just drilled a hole, fed the little screw through, fumbled the nut on, tightened with a pair of mini-pliers and Bob's your uncle. They are attached so tightly I didn't need to use any additional glue, epoxy or otherwise. The lateral stabilizer were attached a bit more tightly as they sit into slots already molded into the junction box and there is nothing to drill through into to fasten them to, so they stay as is.
Drilled some more holes to mount the LED sockets into for the running lights and glued the sockets in:
Next started soldering things together- so far have attached the postive (red) leads to the micro-switch, the battery holder and the three LED bulbs (red, green and white). Did a test rig with the everything in one series circuit and everything works (it's a miracle!):
Tomorrow night, Higher Power willing, I'll solder on the negative (black) leads, apply greenstuff to the tail section proper to smooth out all the rough, re-base coat the tail section and maybe have time for it to dry and hit it with the top color and some weathering solution (accidently home made). It would be great to fit all the electric gewgaws in and call the tail done, but that may have to wait. I also want to apply some plastic gubbins and signage- 'Remove before flight', 'Danger' and chemical explosive warnings, that sort of thing.
Really pleased with how tonight went but man- two hours of work without lifting my head and where did the time go?!
Hey NotOnline!!! Thank you for looking in; "Whom the gods would make great they first make mad"
Was surprised to 'get in a little work' and look up and another two hours have gone by since I got home from (pay the bills) work.
Tonight:
1) Finished soldering the negative (black) leads onto everything, assembled the bundle and tested it again (it worked- yay!) and soldered everything together and made sure I had shrink tubing everywhere so no shorts when I cram everything into the tail section.
2) Used a relatively little greenstuff to patch gaps in the tail section and hit it with a layer of primer and then later what I thought was base coat. When I test fitted the assembly on the hull, it was beaucoup lighter/whiter, so hit it with another layer of base coat of the next darker/more tan shade and hopefully that matches well enough.
3) With that drying, I got a wild hair up my and decided to throw caution to the winds and attach the engine pods. These started life as refrigerator filter cartridges and I've got cheap computer tower fans to provide the propellers and am going to have to add some doodads to hide the sheet metal screws and other imperfections. The struts are dollar store broom closet hangers. I also want to add navigation/running lights to them once everything is in place. Placing these is turning out to be a bit of a bear, but I think they appear to be level to the Mark I Eyeball and that's all I really want:
I was disappointed at how easily the JB Weld that I used on the fins broke away, so went to my strongest known adhesive- Greenstuff- to really secure these to the hull, not just sheet metal screws; torquing the screws down compresses the greenstuff and the bond seems really solid:
So far, I've only got the starboard engine pods attached, it took more time than I thought. On the one hand, I'm on a roll and would like to add the portside engine pods and be done with that stage, on the other I'm fair knackered from work and everything already completed tonight. I'll micro-ka-zap some dinner and we'll see what mischief we get into after that.
Here's a WIP with starboard engine pods and tail assembly in place:
I can also see that the pods are 'way too white to match the hull, so will hit them with the more tan color after I get everybody attached. And, looking at the tail assembly, I hadn't planned to add any rivets, but I really think it needs some, not a lot. So maybe the remainder of the evening will be making rivets- I'm almost out.
Amazing work Meer! The number of rivets is mind boggling. And the reaching a Zen state is totally believable, when reading I felt like you handled the stand knocking off rivets much more calmly than I would have.
Thanks, Syro! Riveting actually went very smoothly- I had a movie or music going on my laptop and I'd just plug along and the next thing I knew, the little dish was empty and I had to pour out more rivets from the pill vial. It was almost a disappointment when the hull (and the aft section) were complete. Fortunately, the engine pods, bridge and gondolas will undoubtedly need at least a few rivets each, so that will keep me going for little while longer.
Some actually good work tonight, although much not in the direction I intended when I started- the advantages of not really planning anything and flying by the seat of my pants!
Firstly, all four engine pods are now attached. The broom-hanger struts have some flex in them (they are just pressed metal) so I can make some minor adjustment for cant and yaw to make everything look in alignment:
I also test fitted the 'pusher' props onto the pods- I think they look pretty good. Next on these will be the running lights and vertically oriented 'pitch props' that will help the horizontal stabilizer fins guide the zeppelin up and down:
Next, instead of starting the soldering of the wiring harness for the engine pod running lights, I started mounting the dorsal anti-aircraft gun mounts. This started by installing a 5mm magnet in the base of each turret:
Then installing a plastic 'collar' on the hull, with a metal sheet metal screw (the orange bit to the left hides a similar sheet metal screw that I had to add because the weight of the fin structure was pulling the tail section off!):
Finally yielding quad-barreled gun mounts that can elevate up to 90 degrees and rotate 360:
I was thinking of adding a rim around the base of the turret to hide the join between turret collar and hull, but seeing the photo, I'm thinking it may not need it, I welcome all y'alls thoughts on this.
Tomorrow, a start on running light harness, or a start on vertical prop mounts, or a start on the auxiliary gondola, which will hide the batteries for the weapons gondola and running lights. The bridge module I anticipate being the hardest to do and will leave for last. It will have its own battery pack for blue operational lights and red battle stations lights. I think I have a couple of book clip pen lights somewhere around (they clip onto the pages and shine directly down onto the page you're reading so tjhat you don't disturb others around on the bus or train, or something)- the light part is only about two inches long and I think I can mount them on the underside of the hull to act as searchlights.
My god the Kittyhawk is enormous. I already knew that, but the latest pictures make it even more obvious. It's looking great, you are getting a lot done.
Hiya mate, I hadn't checked in for a while, thought i'll look at the latest.... and err, wow, wtf! amazing. I'll have to skip back a page or two and find out whats going on XD
Thanks for looking in PaddyMick! I'm glad there's a thing or two here worth checking out!
I got home a bit late from work tonight, so didn't figure to get much done and planned to finish up punching out rivets and watching a movie, but "the fever is (still) on me now, lads".
First, tried something new for the base for the dorsal turrets. I think it looks slightly better and I'm not going to mess with it any longer. Bought a couple of cheap doodads at Wally World:
I tried laying down the nobbly side of a circular velcro patch to act as the base for the turret and it works pretty good- the sheet metal screw compresses the center of the velcro piece without flexing the edges up and makes the join to the hull look a little better:
Next, I assembled the vertical propellers for helping the ship up-angle and down-angle. These are just two three-bladed cheap RC aircraft props using a washer as a spacer assembled onto a pop rivet:
The not-so-funny story here is that I bought a lot of 20 of those little propellers on eBay for cheap- but with the move and everything could only find the four I had put with the zeppelin things thinking I would use them as the pusher props. Then I found the computer tower fans for cheap and wanted those for pusher props and figured to double up the three-bladed props for verticals and naturally can only find four when I need eight. So I had to order another set of 20 (about US$7, including shipping) and they'll be here this weekend, but man! I am gonna create project to use the other 32 three-bladed propellers!
Then I drilled a hole in the center of each pusher prop to accommodate the largest pop rivet in the box to act as a spindle and a means of gluing the props into the engine pods:
And the whole thing comes out looking like this:
I couldn't find my jewelry glue either, but did find this 527 glue that says it'll bond anything to anything; I'll test and see how brittle it is when it sets and if it won't work, switch over to greenstuff or JB Weld:
With all the unplanned additions and changes of plan, I'm going to have to overcoat everything again and re-do my panel seam lines, but I reckon I can manage that. Not sure how I want to weather the propellers, both pusher and vertical, have to think on that. Also, I want to fabricate tiny chain drives for the vertical props, to give some substance to those skinny rivet shafts. I have copper gears small enough, not sure how to do the chains- maybe artist tape, which has some texture. The finest chain that I have I think is going to be two clunky. We'll see.
Not so much getting done tonight, but every little bit is that much closer to completion.
1) I overcoated the whole hull, engine pods and props (acts as a basecoat for them- I used Rustoleum Prime & Paint all in one) so now the rivets at least blend in. Funny, looking at it now, I'm not sure I want to redo the paint over the seams- the rivet lines do a good job of delineating. I may do a lighter line, just to provide some contrast on the hull.
2) I actually started tonight looking for how to run navigation lights on the engine pods. The problem isn't the wiring: I don't mind literally gluing the wires down to the hull, if necessary. It's where to place the lights themselves, in a spot where they can actually be seen and look somewhat functional. I may stick them top middle of the pods just to do and have the lights, although really they would be visible from astern. Of course, my iron-plated, smaller lift bag than weight carried, heavily gunned zeppelin isn't exactly a one-to-one copy of a rel one, either, I can do what I want.
3) I did punch out three or five hundred rivers whilst watching the classic 1942 movie Mrs. Miniver with Greer Garson and Walter Pidgeon. I didn't think I'd need the last 2500, need for more is bound to come up.
4) I've talked myself into putting the running lights on the pods top middle center- probably get started on that on Monday.
I had the requisite number of rivets premade- must have had a wild hair up my a couple of years ago and made up more than I realized; if I sit down and punch out a 'reasonable number' per sitting, usually watching a show on my laptop, it never becomes a big chore. If I'd had to crank out a couple thousand on order to do a project- wouldn't have happened.
I'm building up my stock of 1/16" rivets now against the fever coming upon me, again.
Applying them was very relaxing, a few hours and done (over three nights) and almost didn't notice the time going by.
Thanks very much for looking in Dr H! I agree, waiting for the props to be added made the zep look like I intended it to be rocket propelled, which even for steampunk is a bit outrageous (although in the galaxy of the 41st Millenium, there is only war- and rivets and ridiculous vehicles on their face ).
Some significant progress tonight, but all of it hard-won. Some nights you can't put a brush, or screwdriver, or whatever you're working with, wrong; other nights even the simplest things seem to become very difficult. Tonight was one such.
First up, the extra 80mm propellers did, in fact, arrive on Saturday, so I had all the components to build the last two maneuvering props:
And assembled- waiting for the glue to dry so I can basecoat them:
I retrofitted styrene pipe to the existing maneuvering props- the transfer shafts look much more realistic now (these are part of the build you saw in the previous pic):
And I added the running lights to the tail section. Now, the fething magic here is that the bulbs would not fit through the sockets I installed- they would fit through the exact same socket easily that I got out of stores, but would not fit through the ones installed in the tail cone. I had to drill them out and finally got everything sandwiched in:
Nine volt battery and bulbs can (fairly) easily be replaced, as everything is held tight only with electrician's tape. And, the best part, all my monkeying around didn't break anything- everything still lights up:
I'd hoped to paint and install the last two maneuvering props, but it's late and I'm going to grab something to eat and then hit the rack, so I can get up and do it all again tomorrow.
Some good work tonight, first up, finished building and painting the last two maneuvering props:
And secondly, started the first of the last two parts that I consider more challenging (not least because I don't have a real plan for them, flying by the seat of my pants, here): the weapons and battery gondolas (the last section being the bow/bridge section for which I have an idea of how the final product will look, but not a detailed plan on how to achieve that).
I had actually started gluing up the weapons gondola before the move and in seeing the hull and fins and all, realized it looked too deep/high in proportion (see the discussion going on at Camkhieri's blog, I think, regarding true scale, and making things that look in proportion to the figures when scratchbuilding). Here's a pic showing how tall the sidewalls would have been compared to a Doom Pixies riflecat:
Here's all the materials to build the basic 'box' that will be the gondola (the sidewalls started life as sets of key fobs with a hanger):
That 'plate' with the curved ends is the piece that will fasten directly against the hull and hide magnets to attach the gondola (I have to cut a hole in the center so that the wires for the gondola lights can feed back to the battery gondola- which is where the Defense Fighter Plane will moor or two Hellstrike Bomb Missiles):
I cut the top rail off the key racks, cut a notch into the end so that the top piece would slot onto the bottom and Bob's your uncle- walls are now 3/8 inch lower:
Those holes you see in the sidewalls are the mounting screw holes for putting the rack up to hang the plastic fobs from- they are natural locations for side running lights. I'll do some cleaning up on the right angles and smooth the rough spots out and I think these'll work just fine.
This bit of gubbin is a parts tray from Cobalt Keep (I picked up a couple of sets during the Kickstarter a couple of years ago and use them as much for project components as for sorting parts). It will form the (completely enclosed) hexagonal box that will be the battery gondola. The yellow areas are the material that I have to grind out so it will fit snug against the hull. It will also have magnets to make it removable to change batteries and turn on lights.
Still a fair amount remaining, but I believe the end is coming into view- weapons gondola and lights, battery gondola, bridge and lights, Aero Pixie crew and weapons load out. We're gettin' there.
A bit more progress tonight, but a lot of fiddly work, so it won't look like much until it's done.
First, found some doodads (caps from Strongid paste tubes) that work perfectly to cover the sheet metal screws that attach the engine pods:
Then, started assembling the weapons pod:
Originally, the gondola was to fit flat against the hull plate and so would have the same length and width. As I started fiddling, it seemed like a better idea to fit the gondola more closely to the hull and have the edges lock around the hull plate- so cut everything down and started figuring how to keep the corners square. I need more bar magnets.
I also started shaping the curve of the battery gondola with my Dremel tool, but it needs some more carving to fit snugly and I'll get at that tomorrow. Also need to redraw the seams on the hull with the paint pen.
Yes, I would like the interior of the zep to be playable: the tail section doesn't really have any real catwalks are anything (it's where the aft running lights battery hides), but it comes off if needs be to simulate a move to disable the rudders or stabilizers. The weapons gondola will have a lot of room (for boardings or CQB, ship-to-ship main battery exchanges with calculated damages to weapons platforms and ship hull) and will attach by magnets to the hull for easy access. Unfortunately, the battery gondola won't really have any space in it- so even though removable (magnets again) to get at the actual hull running lights batteries, there doesn't seem to be much to game from. The wild card is the bridge/nose section. It will be removable, to get at the bridge lighting battery, but I can't see a way to get into the bridge itself to game. There won't be a lot of room anyway, but would be cool to effect a boarding in the wepps gondola, expend a certain number of movement points (a' la Space Hulk) to get to the bridge and then engage in desperate hand-to-hand to take control against determined Aero Pixies.
I haven't got to the bridge section yet, so will know better when I start fabrication. I may have to adapt a rules set just for my little Kittyhawk !
I hope to get some work in a bit later tonight. Hopefully, more follows!
Automatically Appended Next Post:
So, not so much more done tonight. The 527 glue I used yesterday to bond the footplate to the sidewalls peeled right off, so I'm gluing up again trying Aileen's Tacky glue tonight. I haven't used superglue (cyanoacrylate) yet, as I'm afraid that without a catalyst (baking soda) it would prove to be too brittle, and it's a long thin area to glue up- not easy to dribble baking soda onto. So hopefully the tacky glue works.
I did repaint the panel seams on the hull, won't include a photo as you've seen it before. I fiddled with the footplate and sidewalls and hull plate and everything fits togheter quite nicely, it'll be easy to magnetize when the glue sets up.
I also cranked out a few hundred more rivets, for 'next time' and here's what about two thousand 1/16th inch rivets look like:
When I get back from the farm on Monday, I hope to finish gluing up the weapons gondola and start installing the actual 'wepps'.
I do have to take a little time for a different project- awhile back I mentioned that we lost one of our rescue Standardbreds, Chip. He'll need a shadow box and the first item to complete is to braid a bracelet from some of his tail hair to put in. What with one thing and another I fell off my battle rhythm, but I'm getting back up to speed now and need to get that done.
Not as much progress tonight, but not surprising as the gondolas actually require a plan and some fiddly work to accomplish; this is where I envy those guys that can take an Xacto knife and an old cookie box and carve a frigate in an afternoon.
I performed a minor flex test and both seams of the deck sole and sidewalls seem to be holding okay- the Aileen's Tacky Glue and the original 527. I'll add some crosspieces and reinforce corners where I can and hope for the best.
I did trim some styrene to make the end cabin walls- just flexed them into place and then dripped superglue down the seam. When dry, I'll use the curved wall itself to draw outlines for deck and ceiling plates, glue 'em in and done:
I really wanted to cut some forward facing windows in, but just didn't have the time tonight and am worried I'm getting bogged down. I may borrow a trick from Clanmac and glue on black-painted squares, streak them with white to look like reflections on glass and apply trim around the edges. It's highly effective on his work and I've used it before on my own Lunar Mouse Armed Research Crawler.
Part of what's cutting into my time is I'm moving forward on completing a shadow box for our rescued Standardbred Chip Marshal. He came to use essentially for hospice- he was 22 years old and had been used very harshly for much of his life. Started out as a sulky racing horse, then agricultural animal. We gave him as good as we could for two years and had the consolation of knowing that when he passed he wasn't afraid, knew he was cared for and wasn't hungry.
As a start, I've braided some of his tail hair into a bracelet to install:
I'll trim the bits sticking out better- phots here are excellent for spotting your flaws. His shadow box will actually be a shared one with his barn mate Sammy; they loved to play tug-of-war with a rubber ball hung on a rope between their stalls and I'm going to reproduce that scene in the box. Chip and his bracelet and his best photos on one side, Sammy (when his time comes, he's 20 and has issues too, same background) to be added later.
I'm not going to electrify this shadow box, like I did little Ginger's awhile back.
I've tried to live by the rule 'one project at a time', but these are both on me now and must get done.
RIP horsey boy. Glad to hear he had a good life with you for his last few years.
Detail work is coming along nicely! I like the sound of doing a cheat's windows tbh - that's a lotta time & effort saved and probably end up looking just as good!
No work tonight, but I'm hoping to be able to sit down tomorrow and really get some scrim done on the gondola- bracing, ersatz windows, trim pieces (mostly to hide my egregious errors). I'm looking forward to doing some more soldering and getting the sidelights installed.

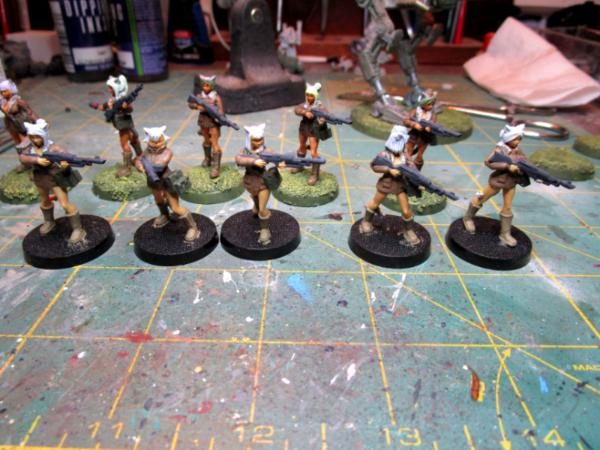

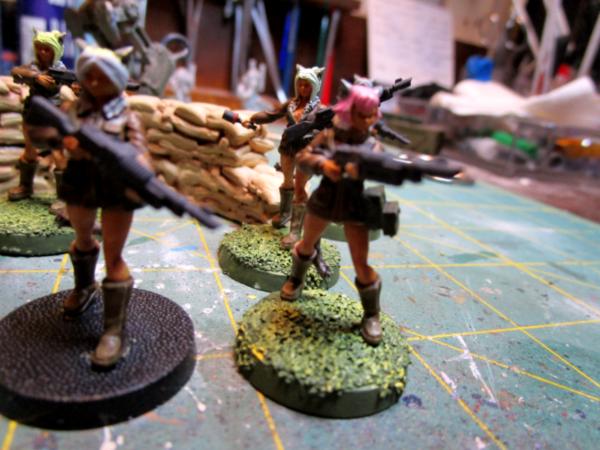

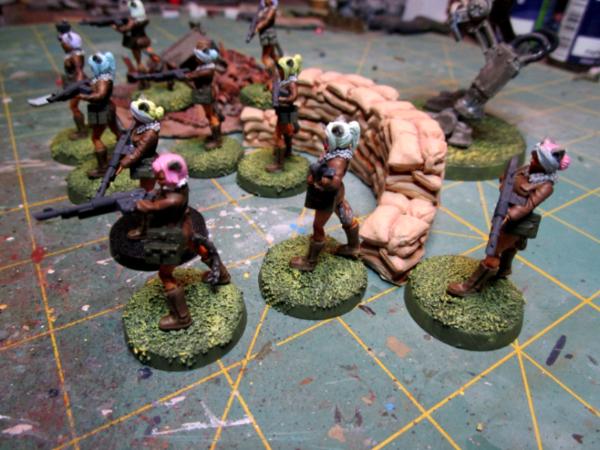
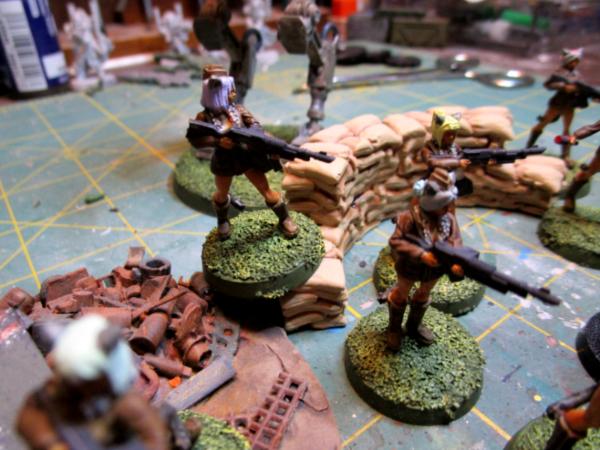
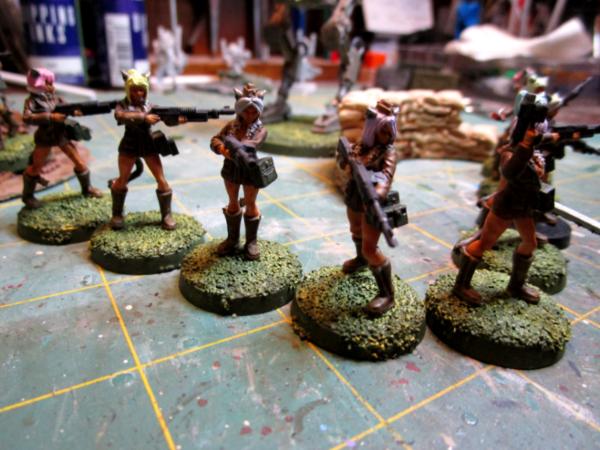
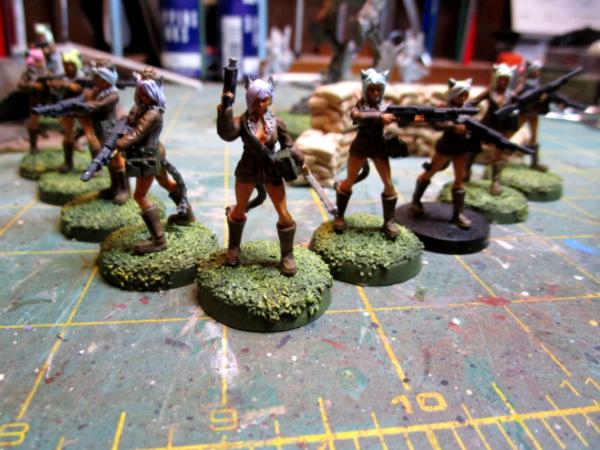
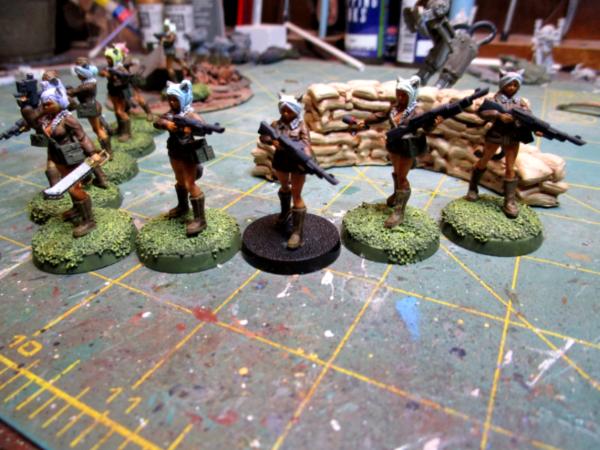

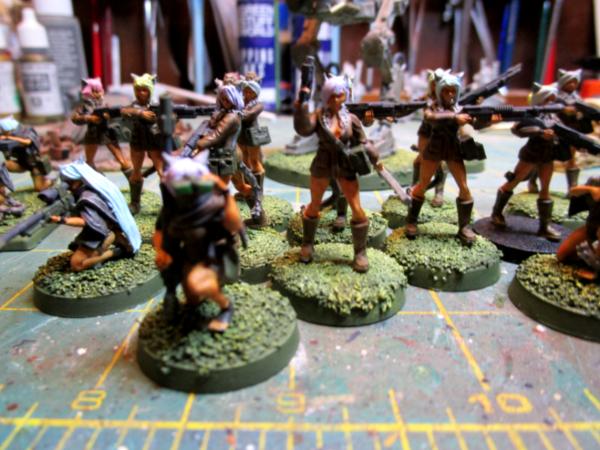


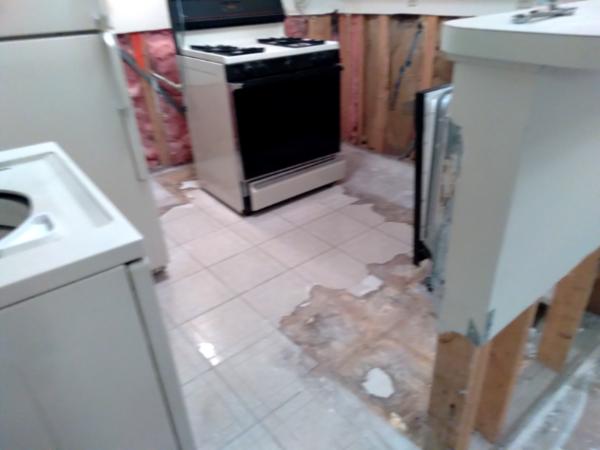
 . There are times when I would trade my life in a heartbeat...then I see stuff like this happen again.
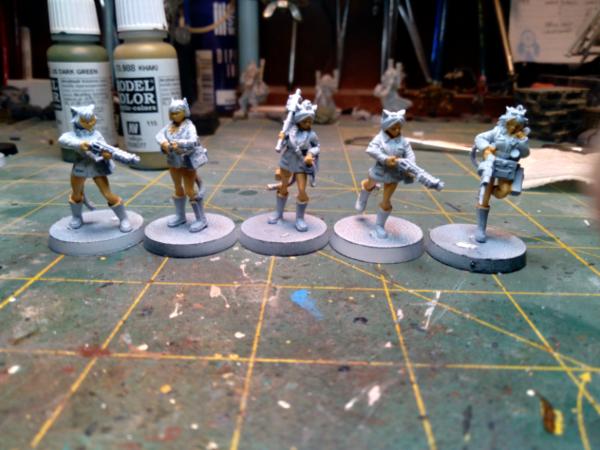
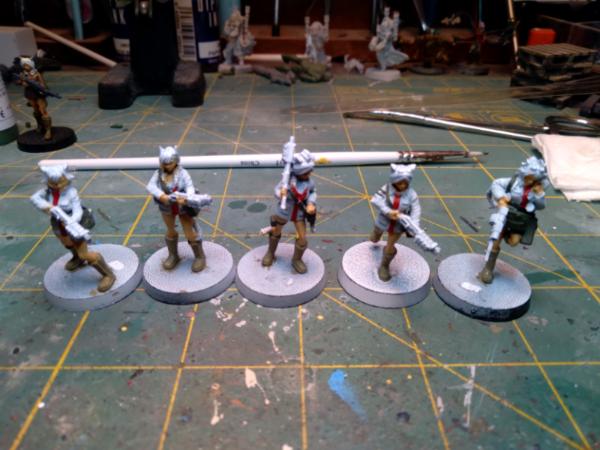


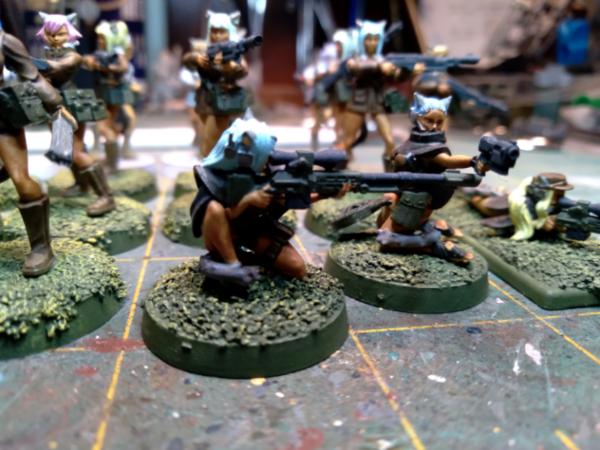


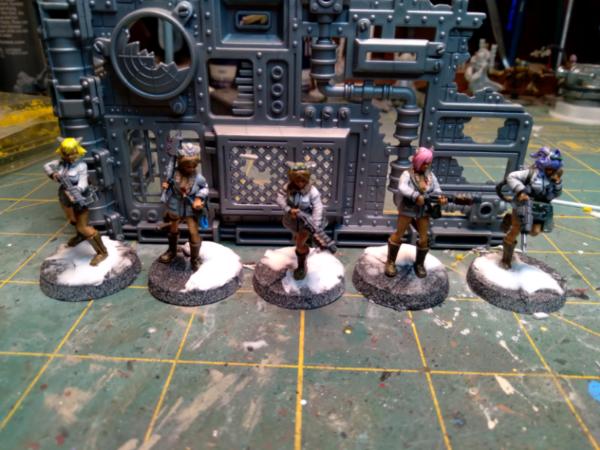

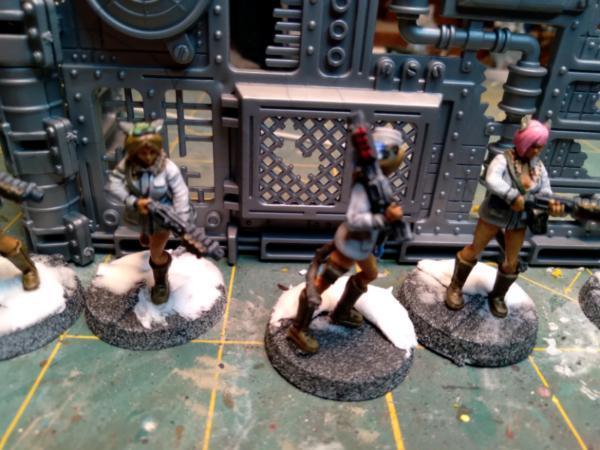

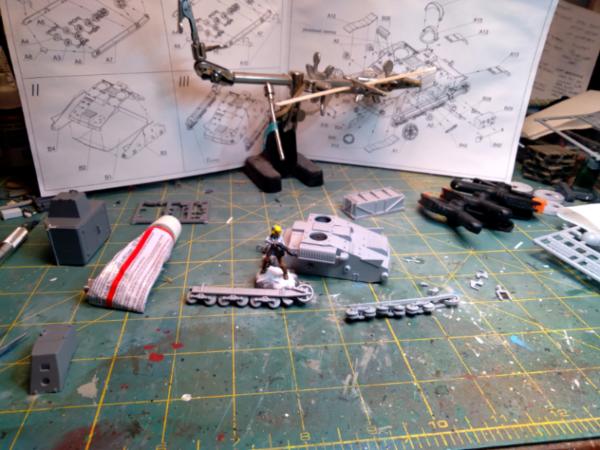
 The Doom Pixies are already somewhat smaller than their
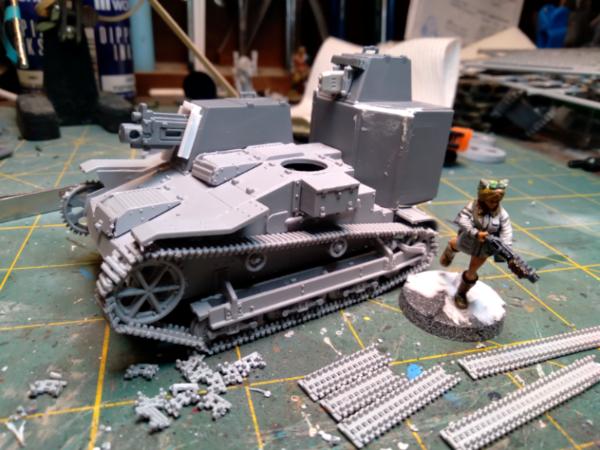

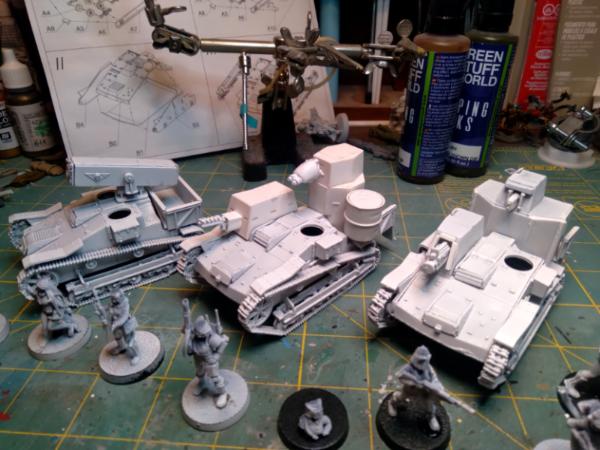
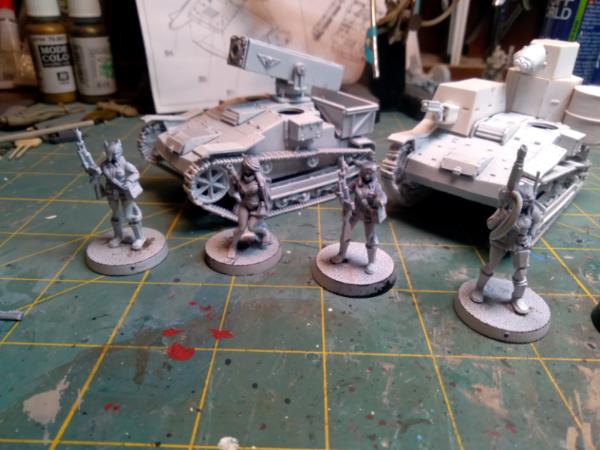

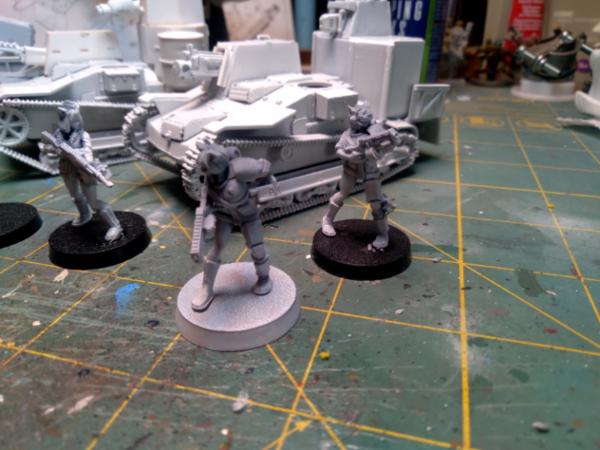
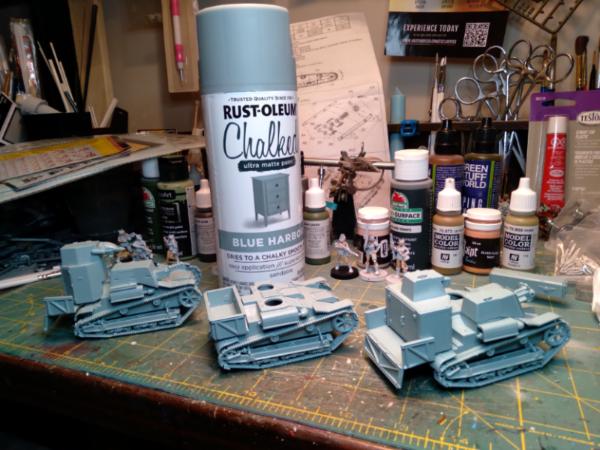
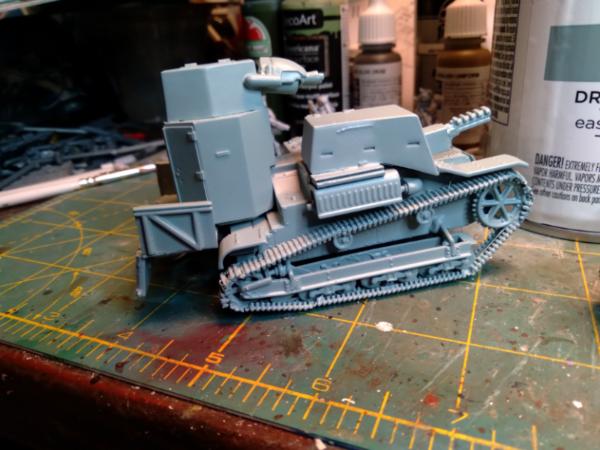


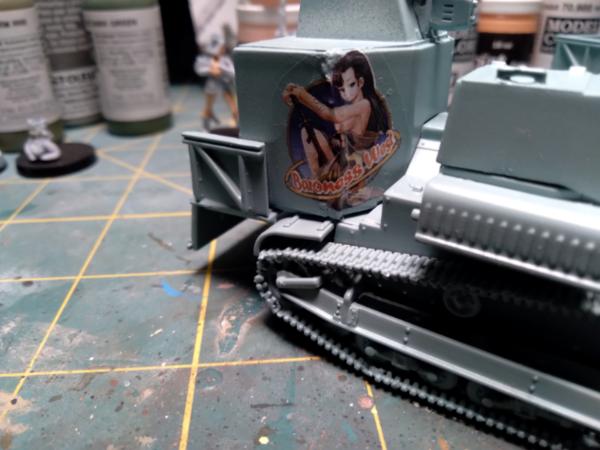
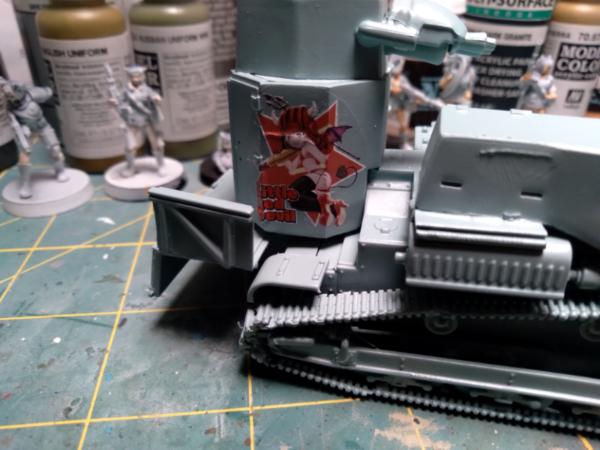

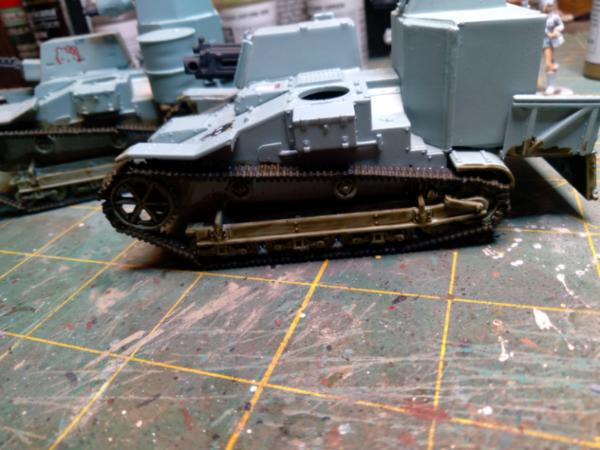

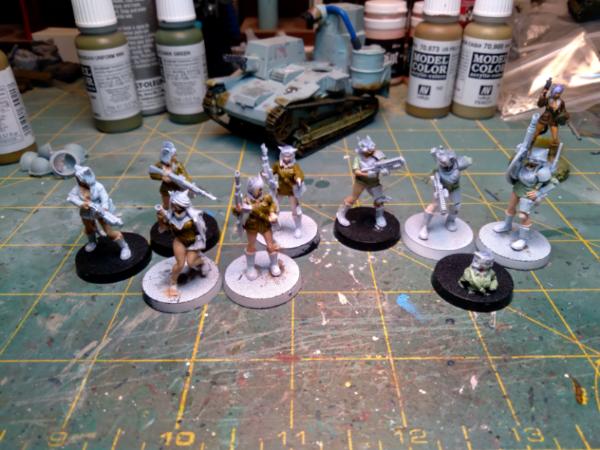
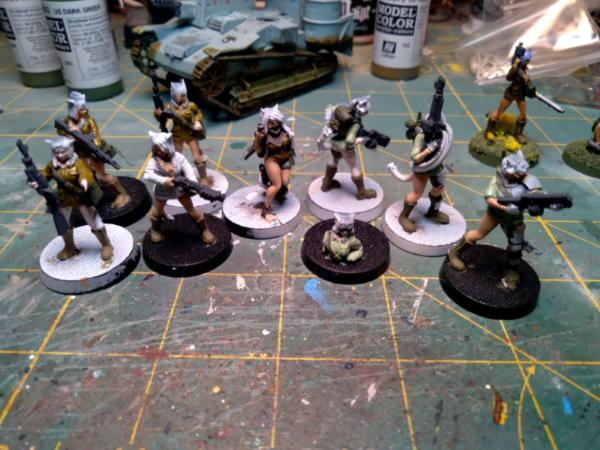

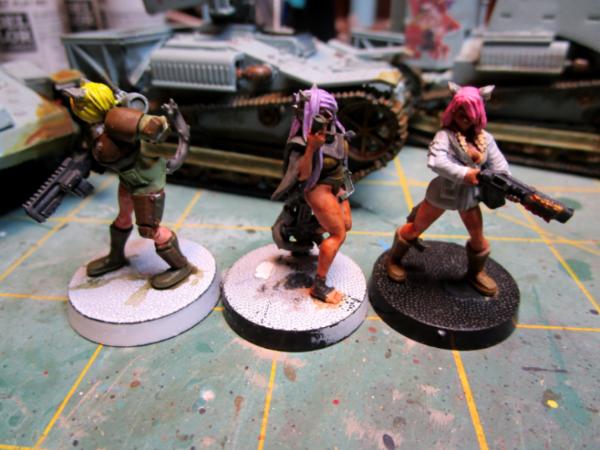

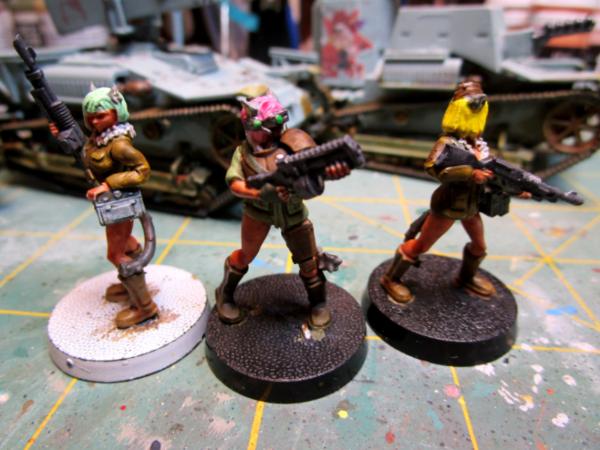
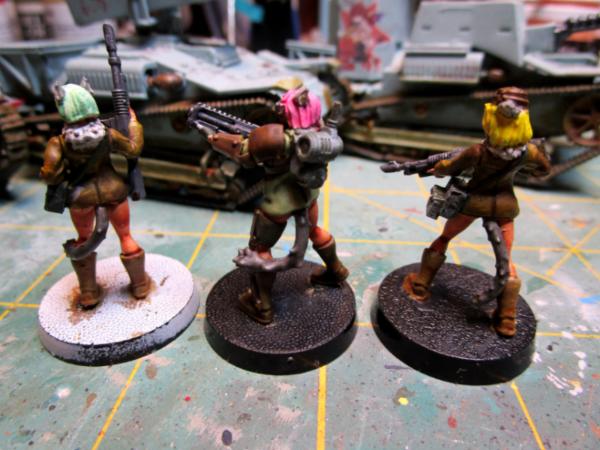
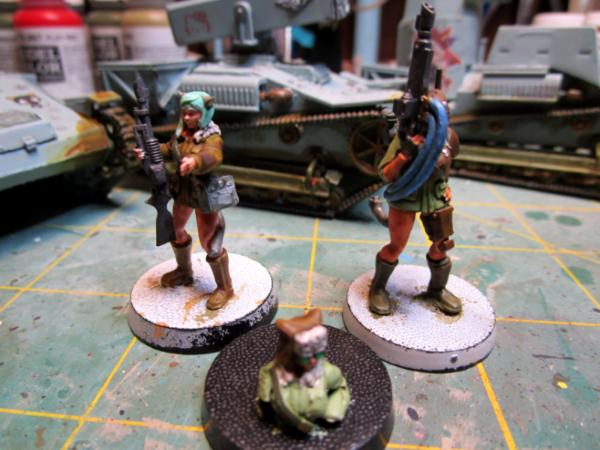
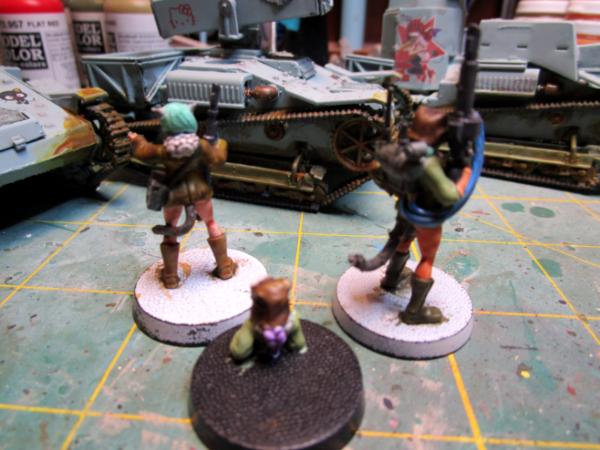
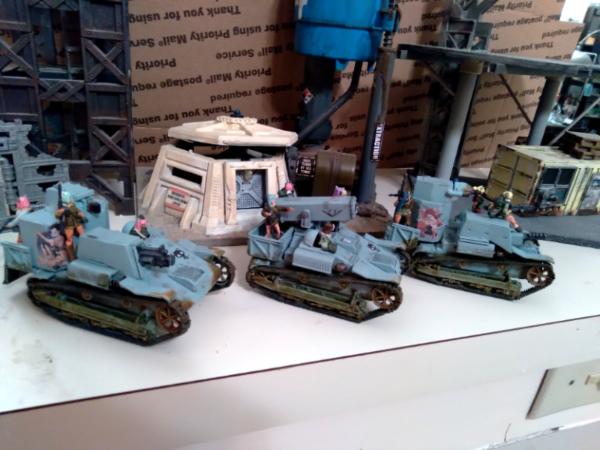
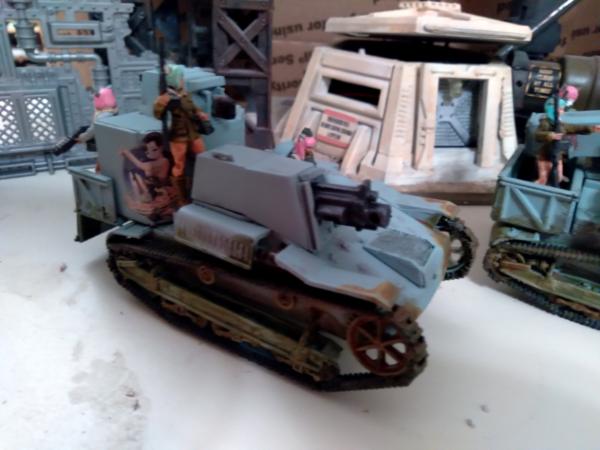
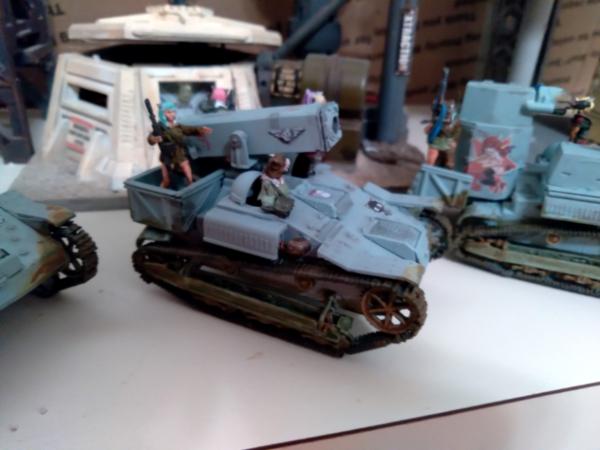
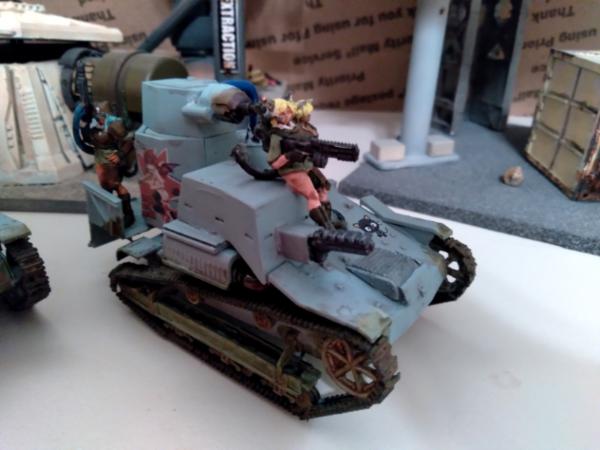
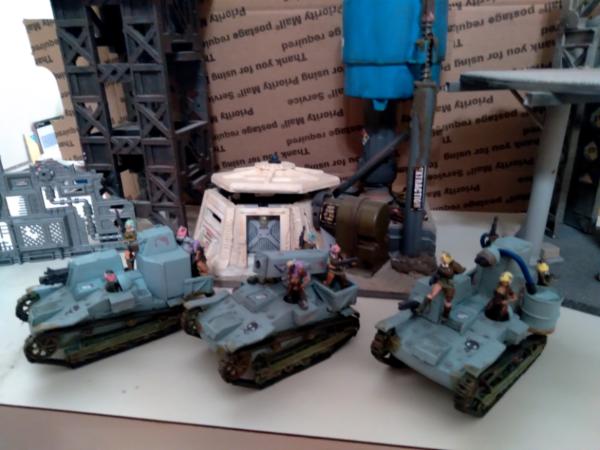
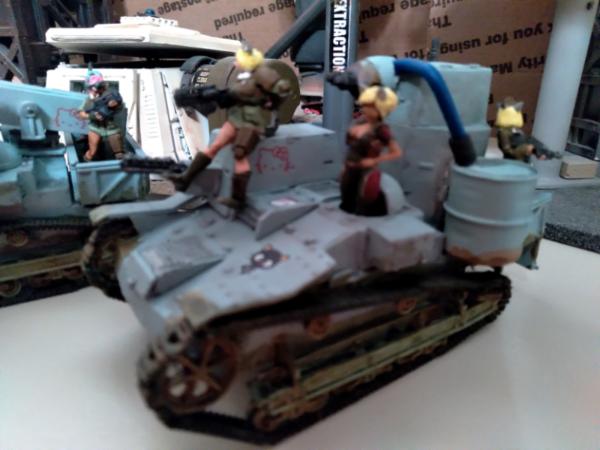
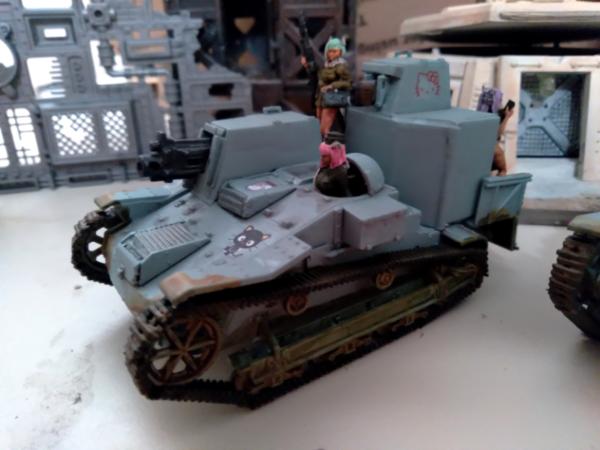
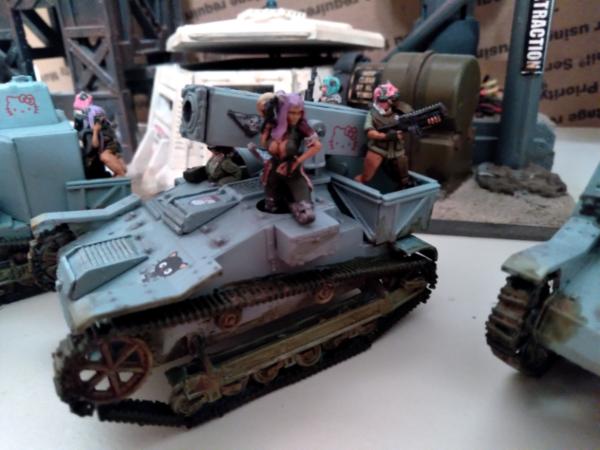
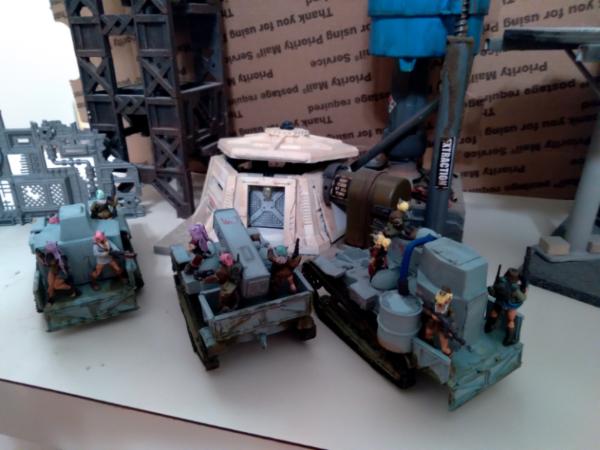
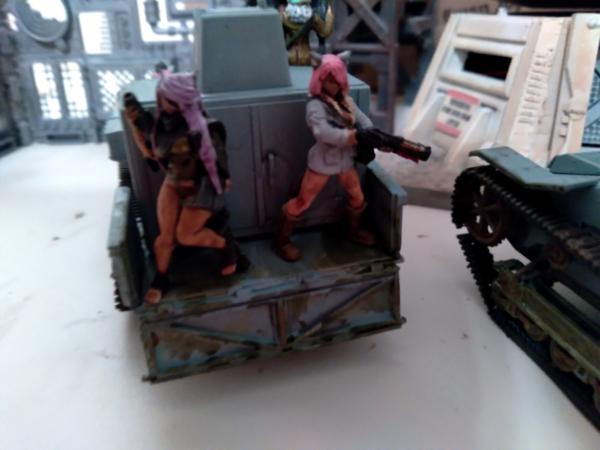
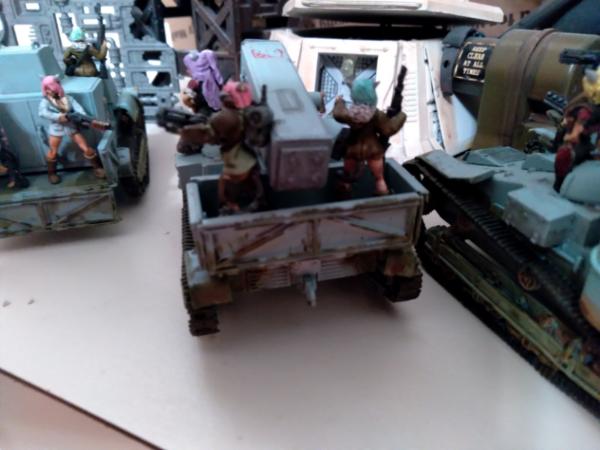
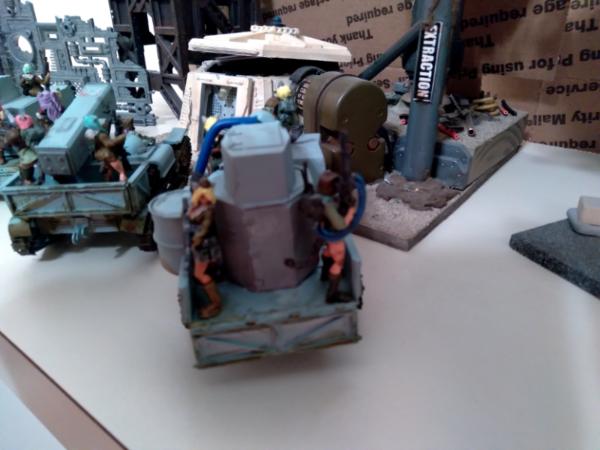
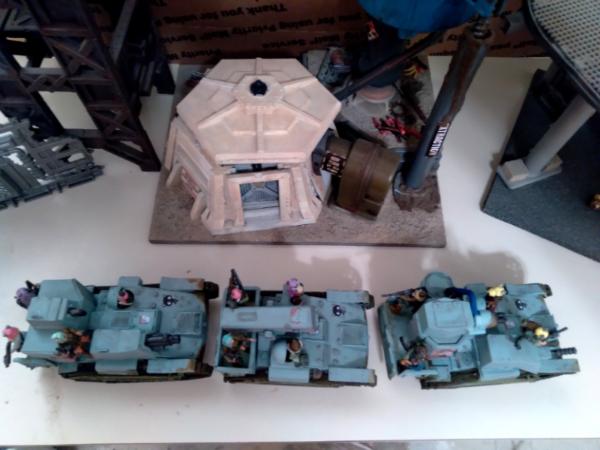
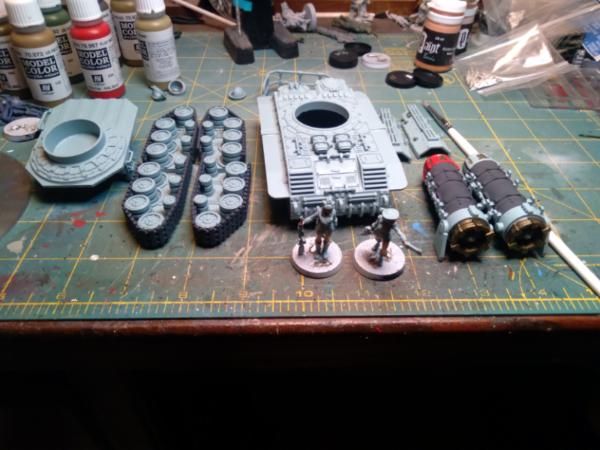
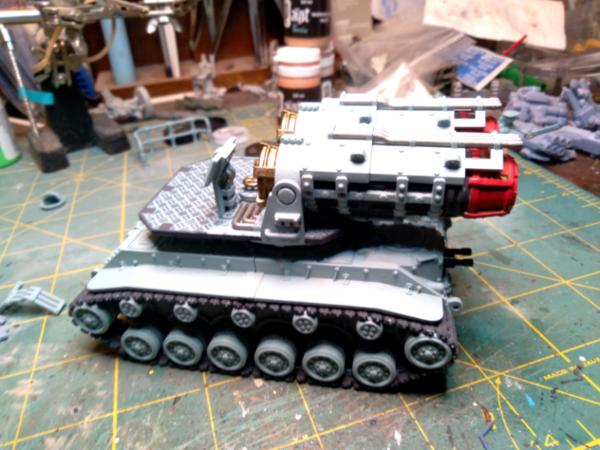
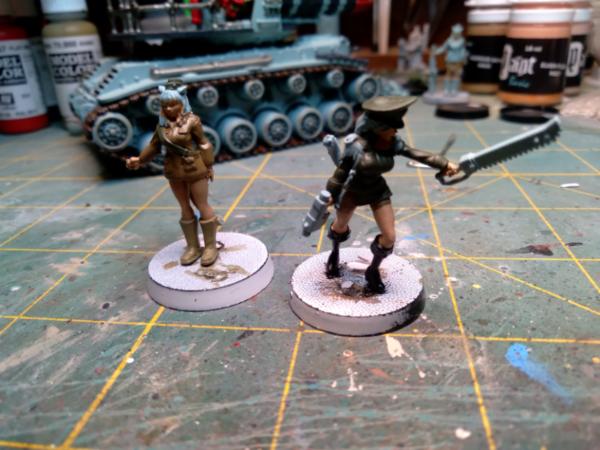
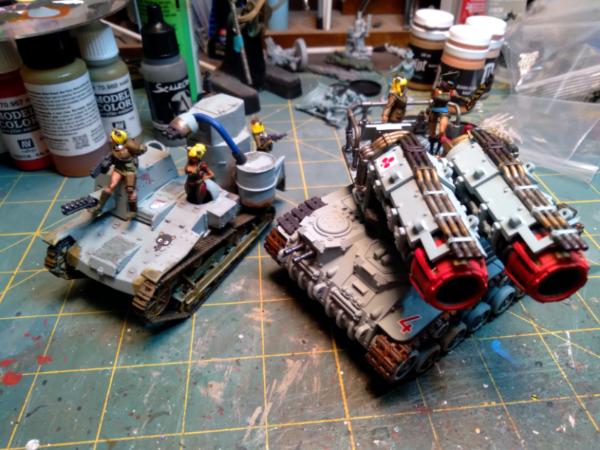
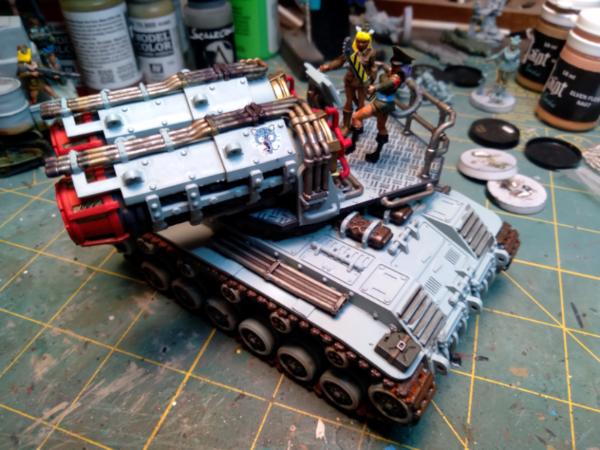
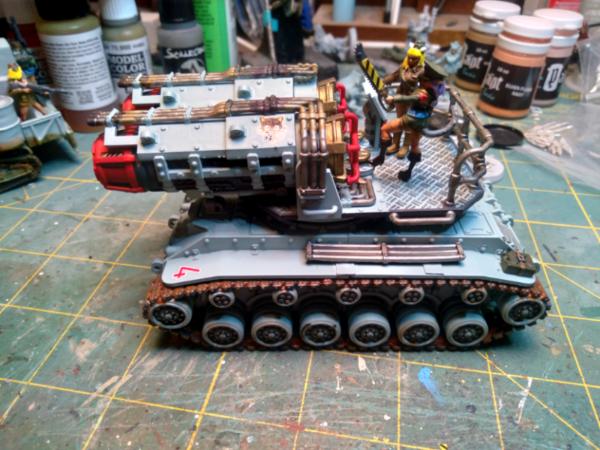
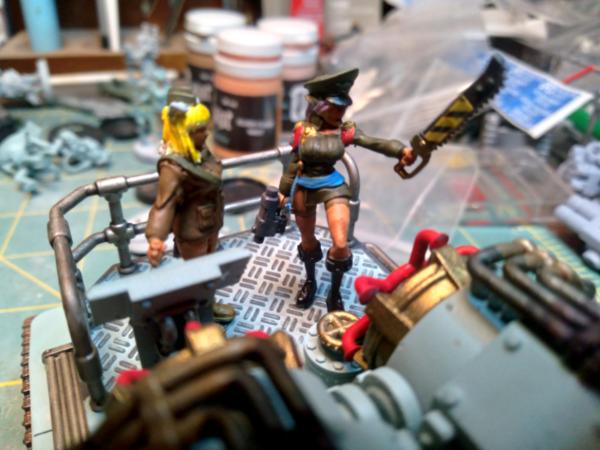

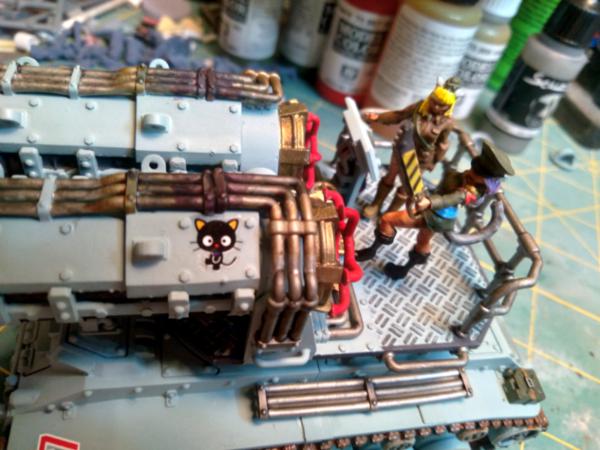
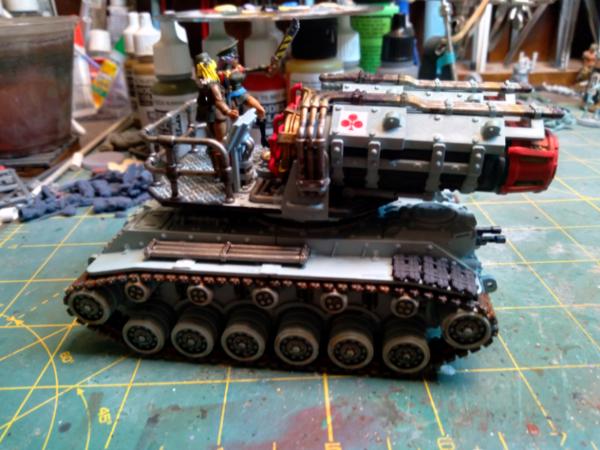
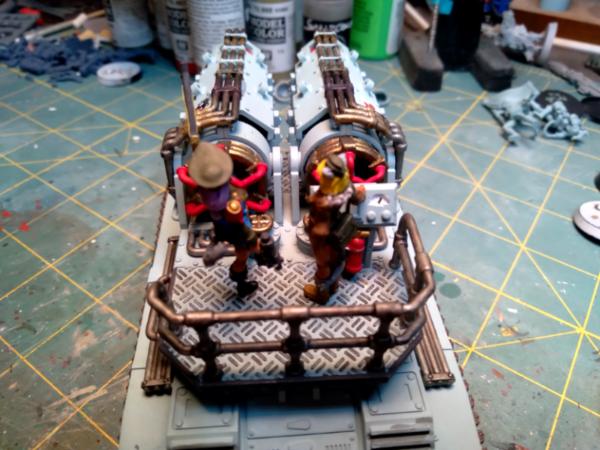
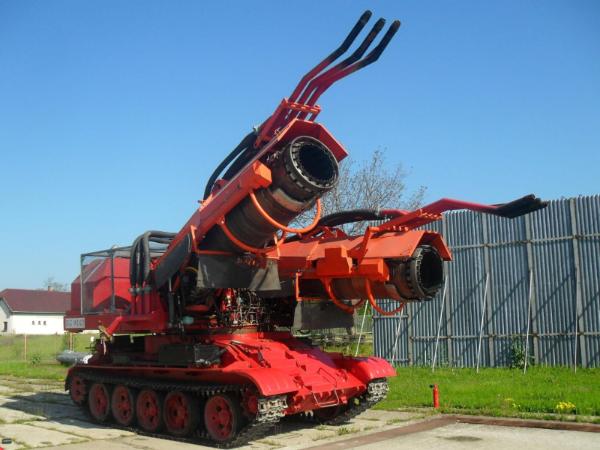
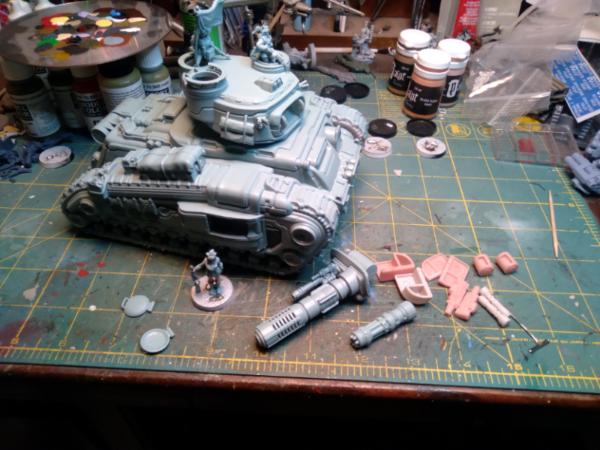
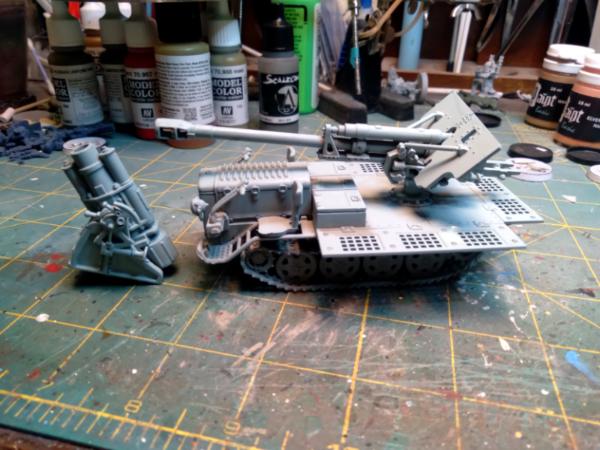
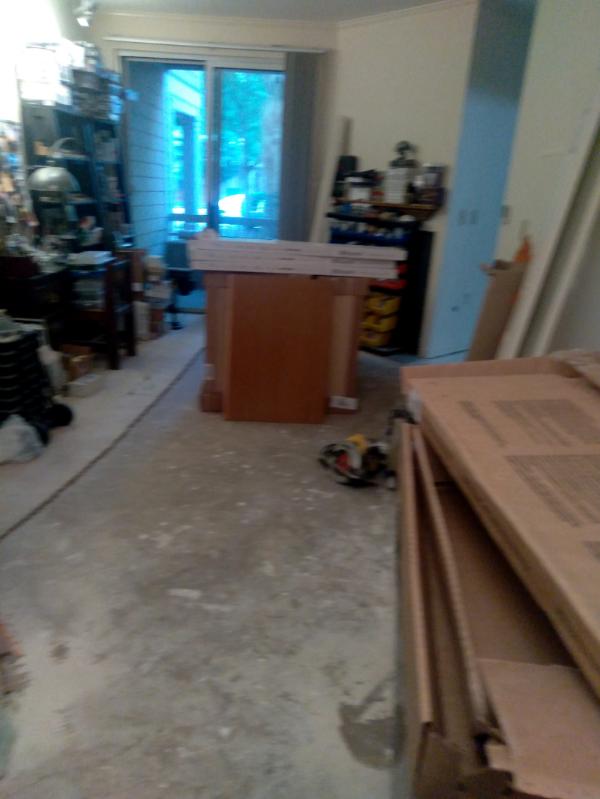
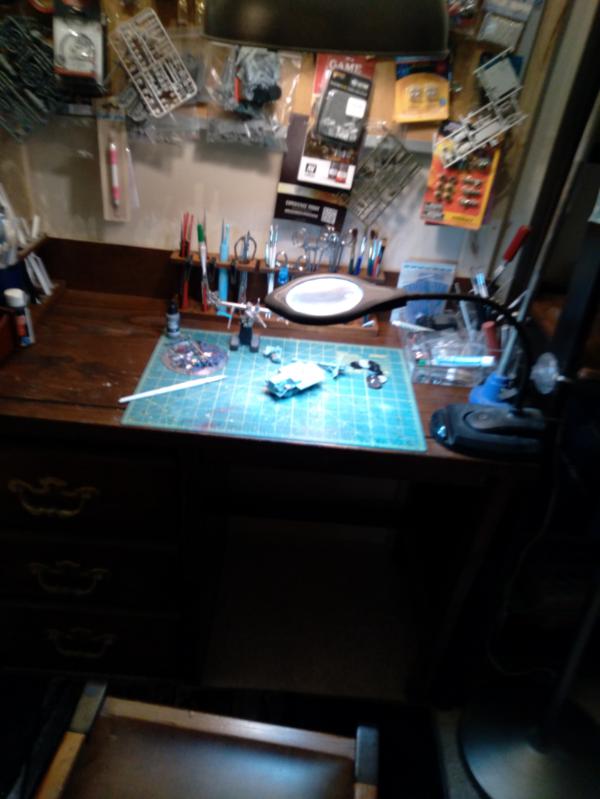
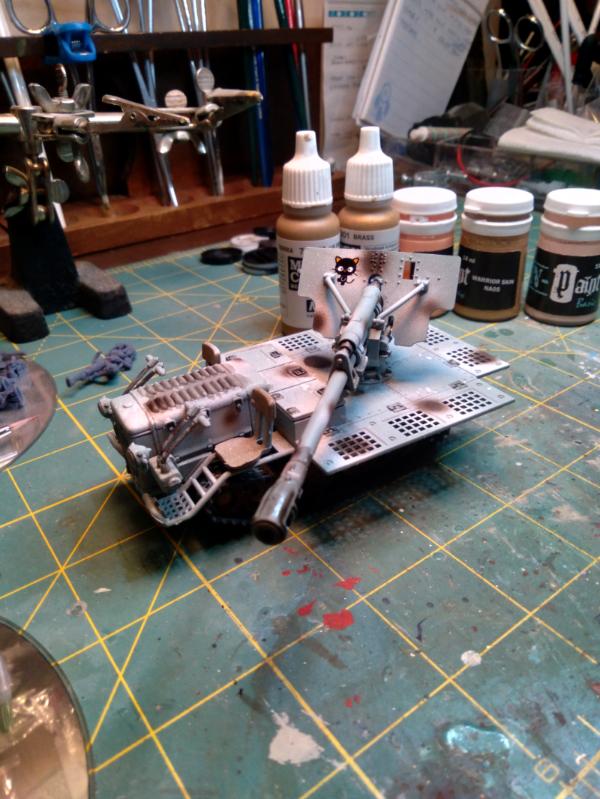
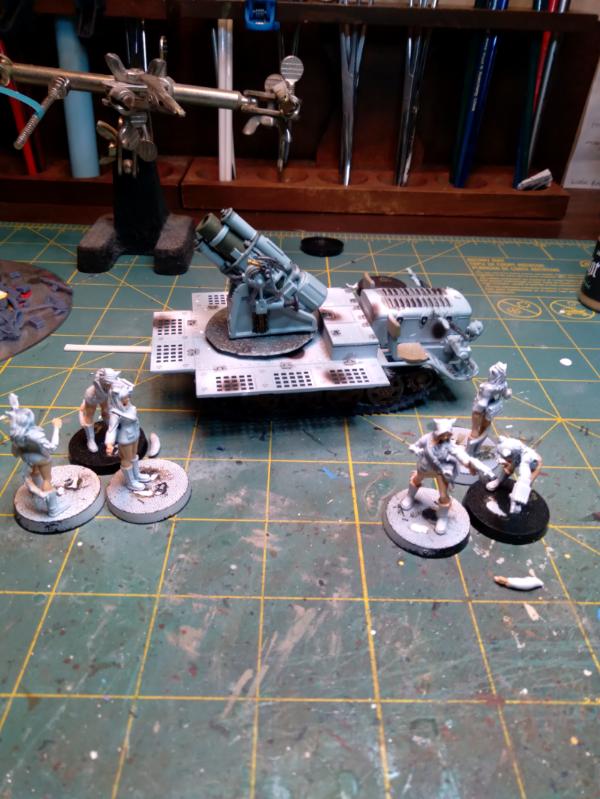
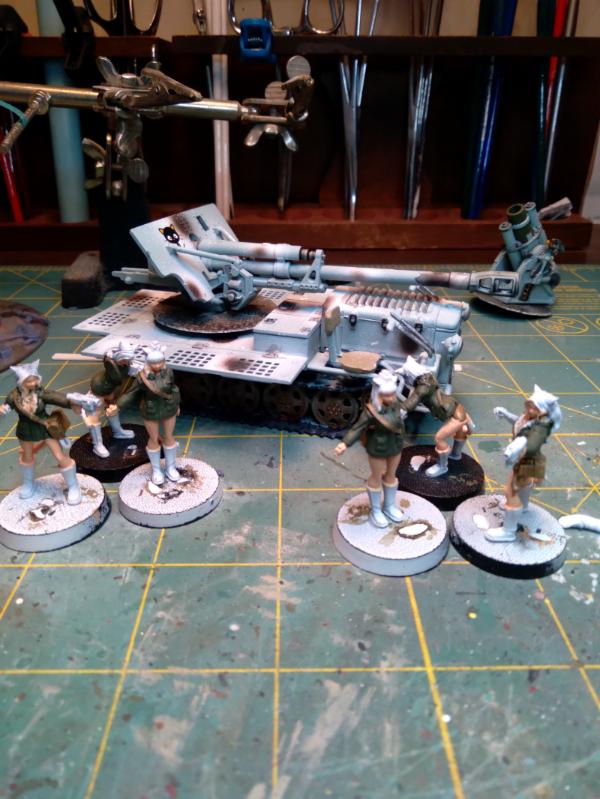
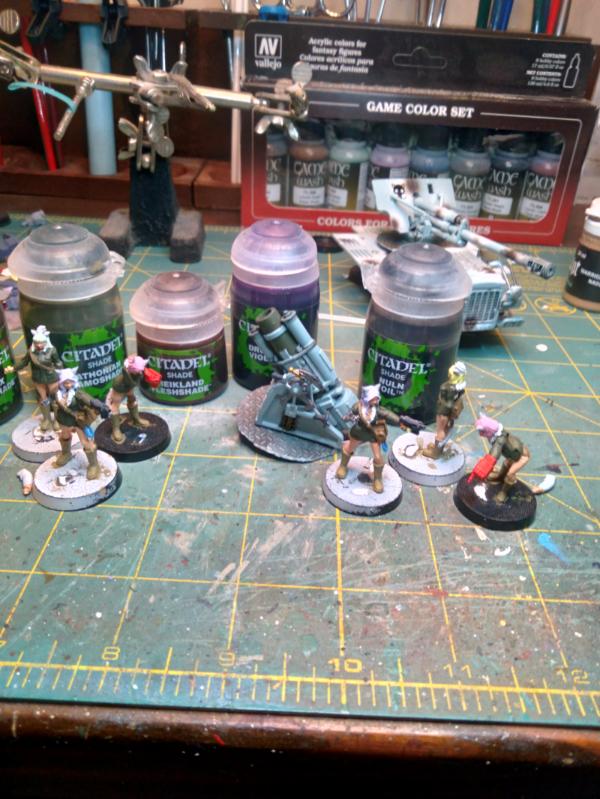
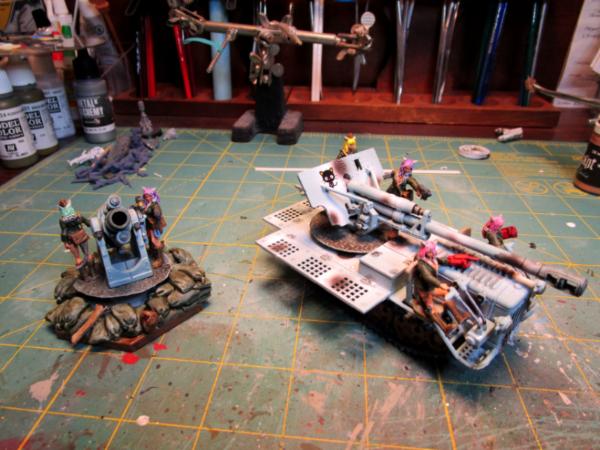
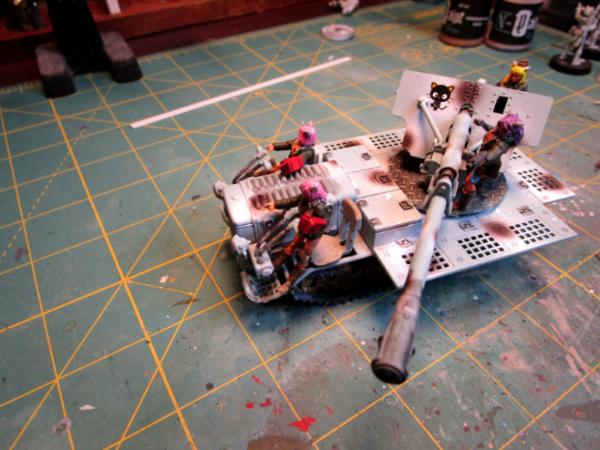
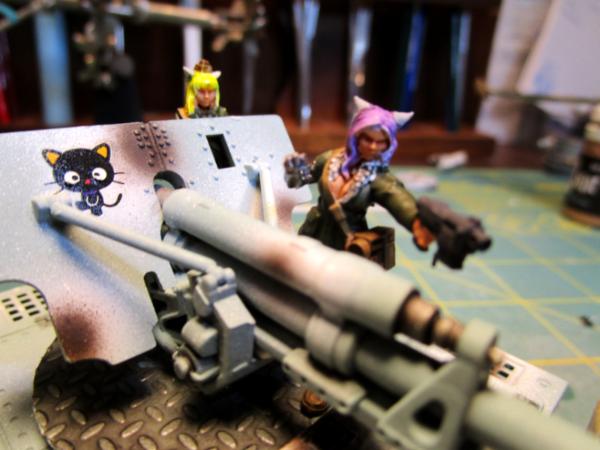
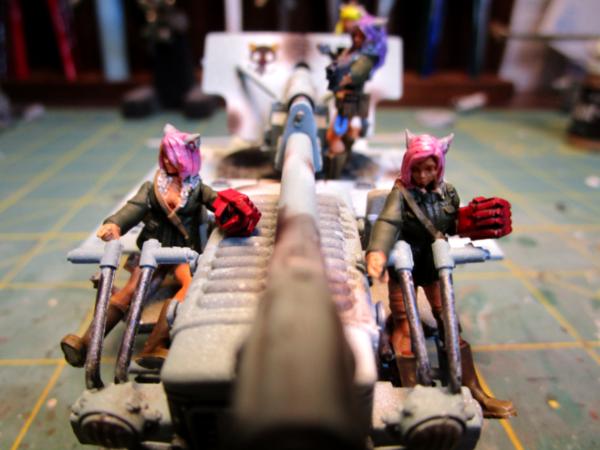
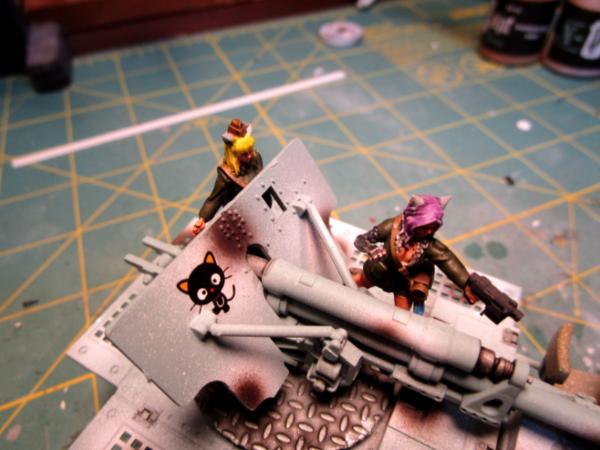
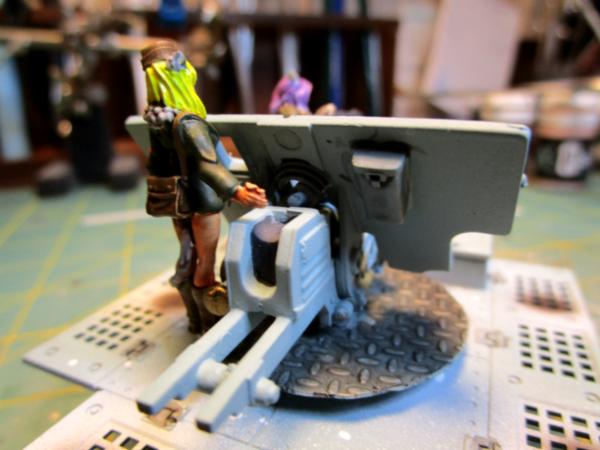
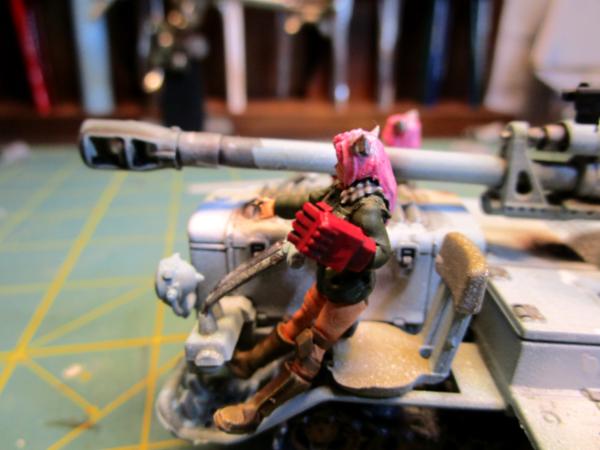
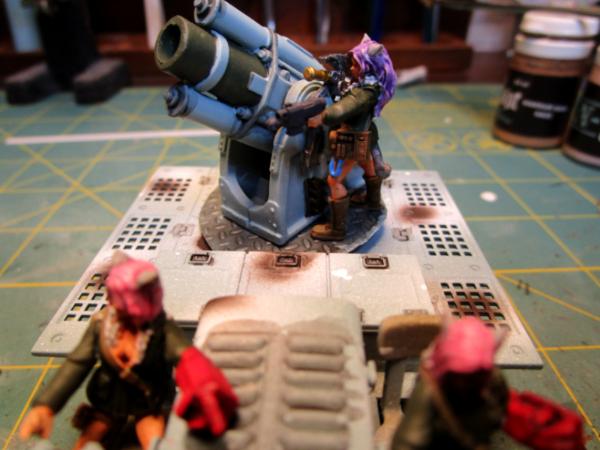
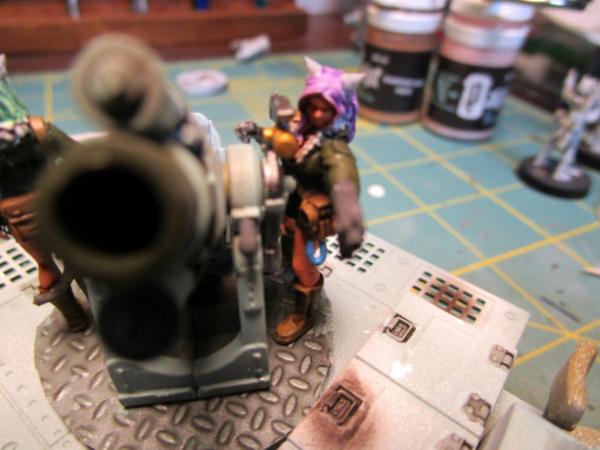
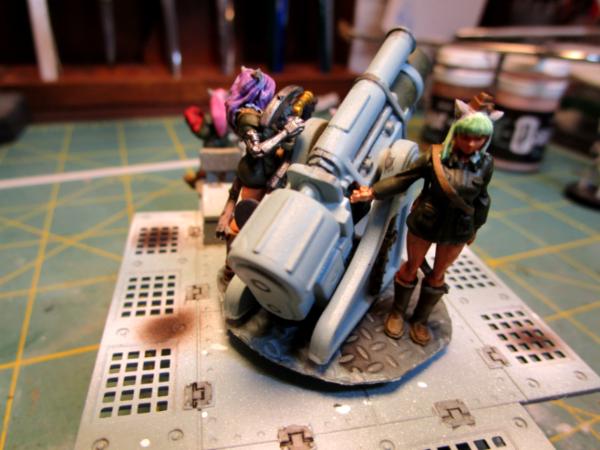
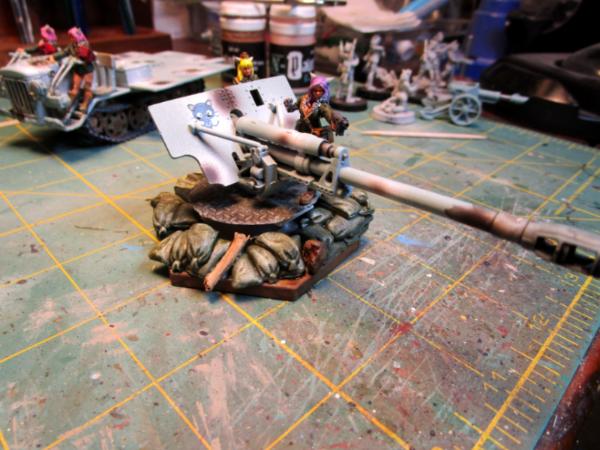
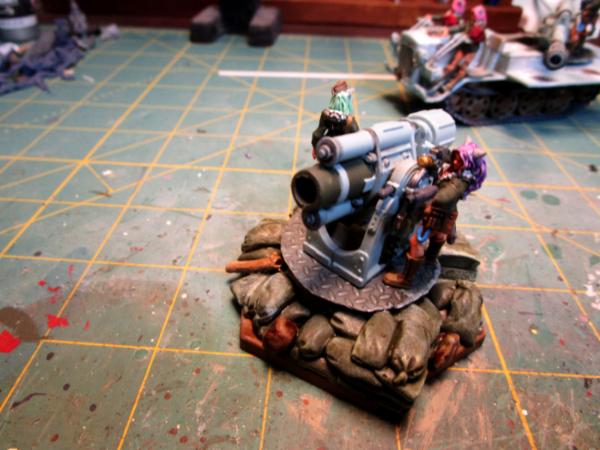
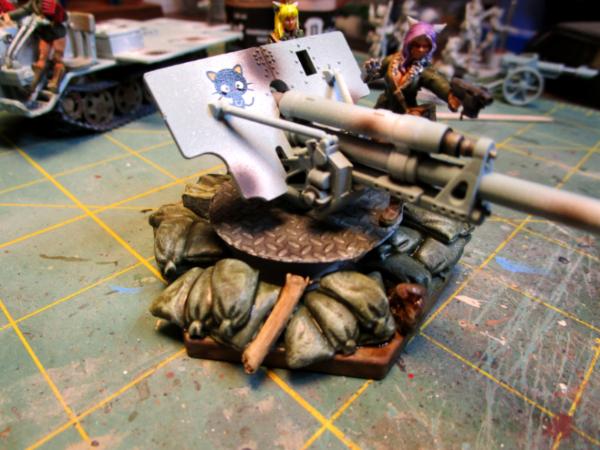
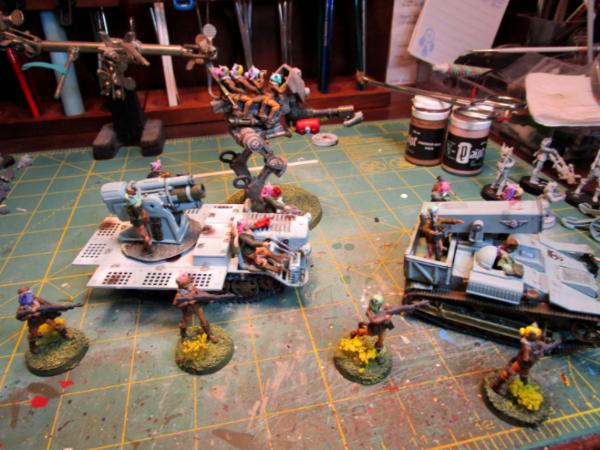
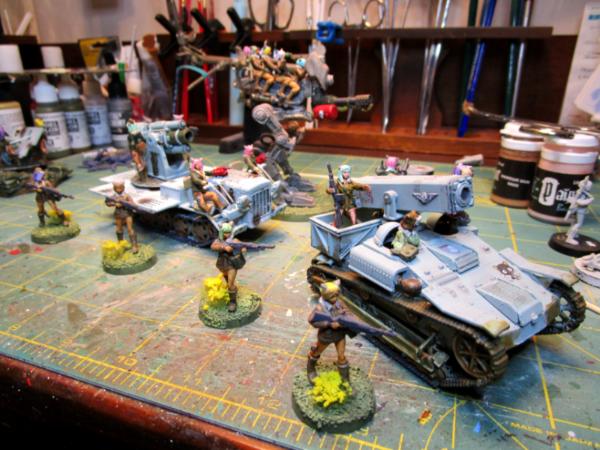
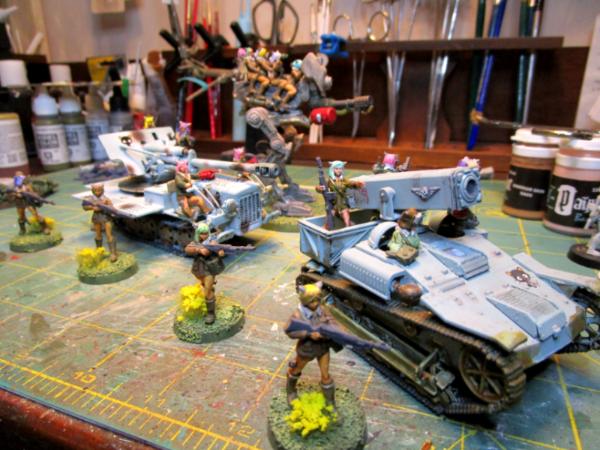
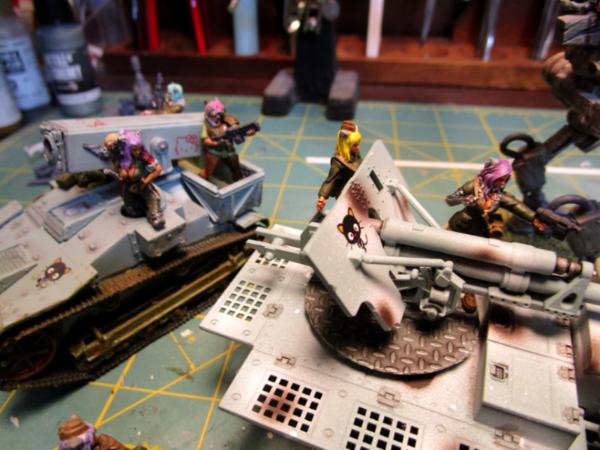

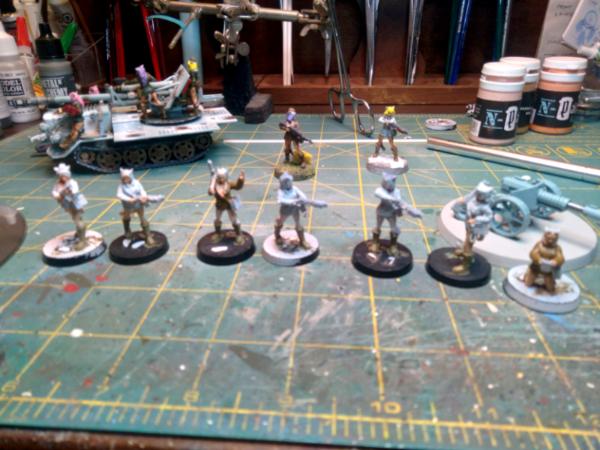
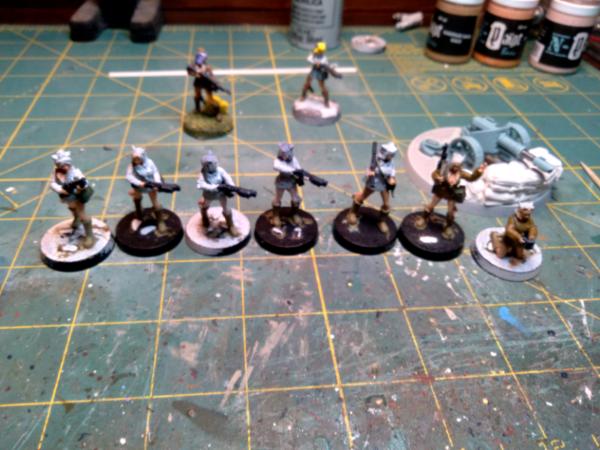
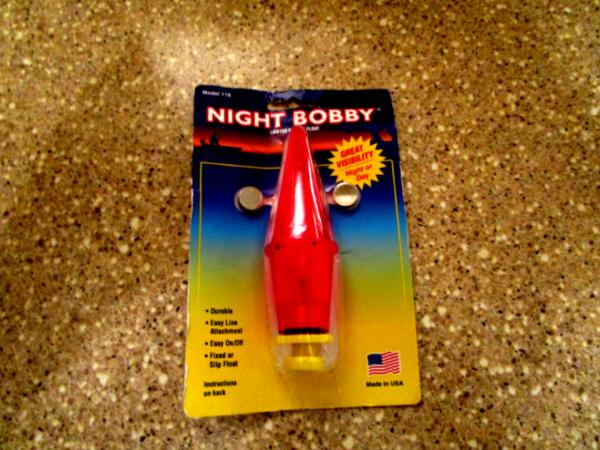
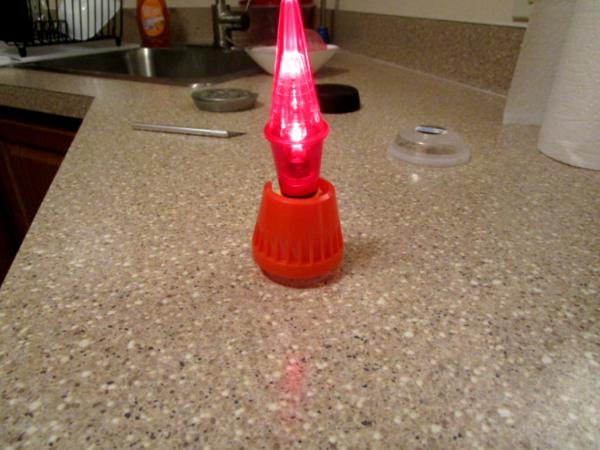
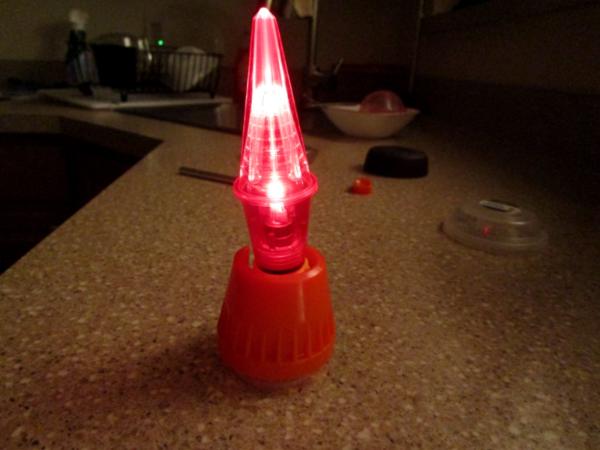
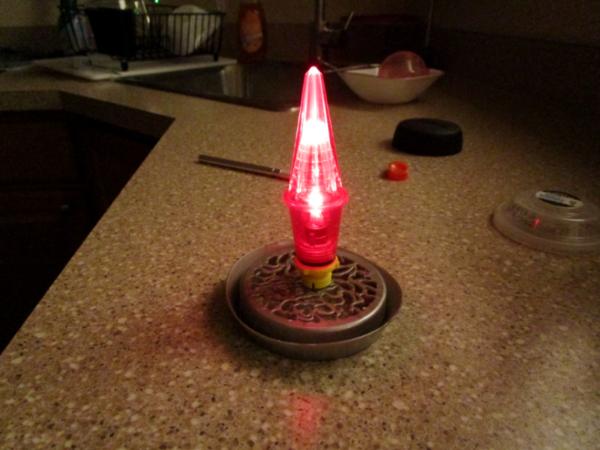
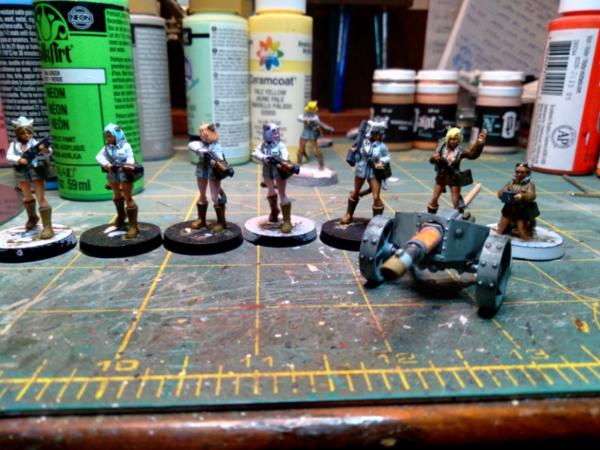
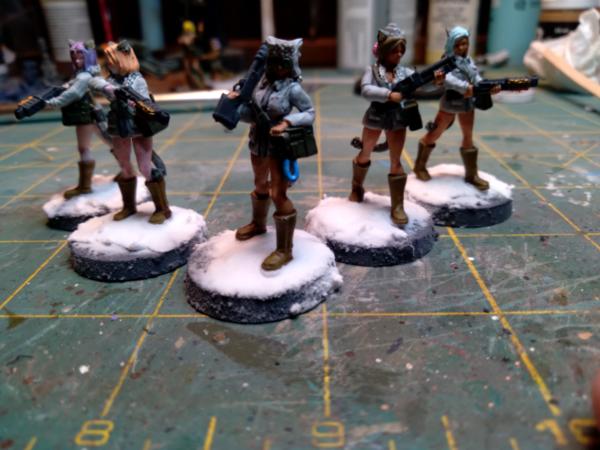
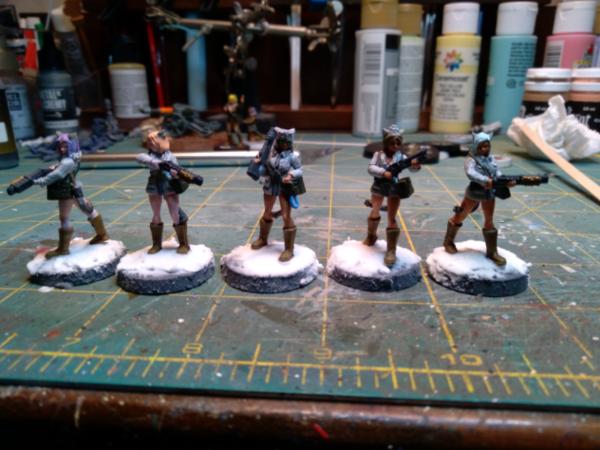
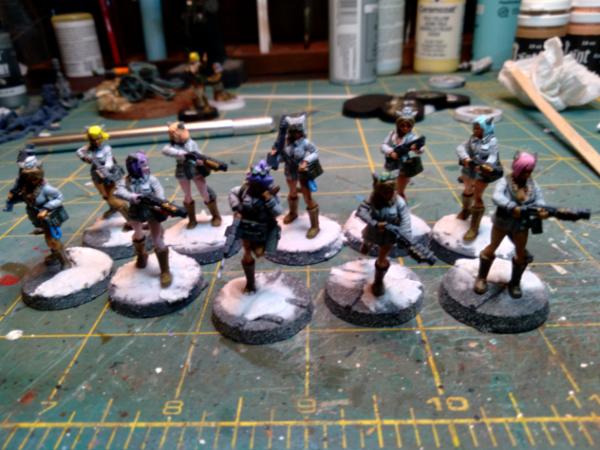
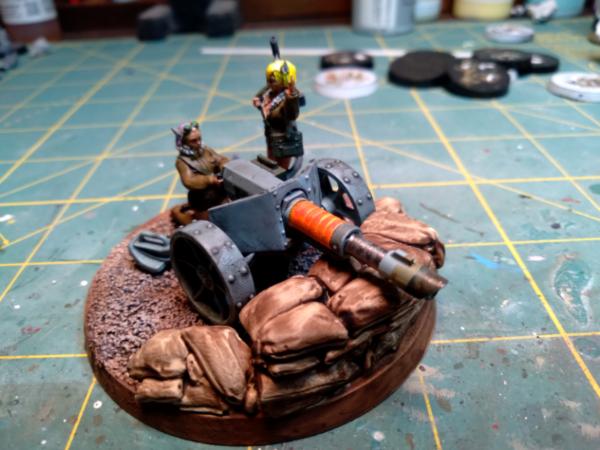
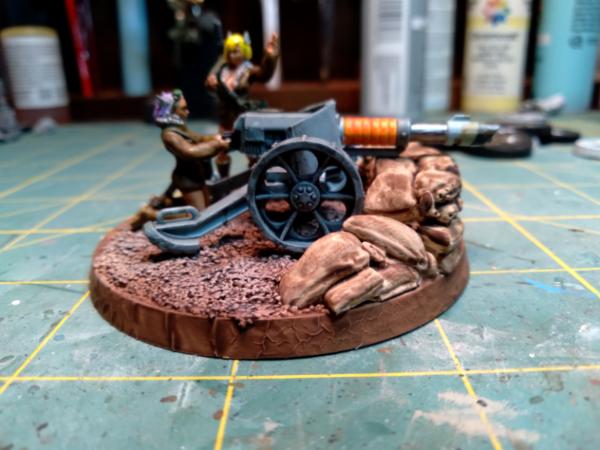
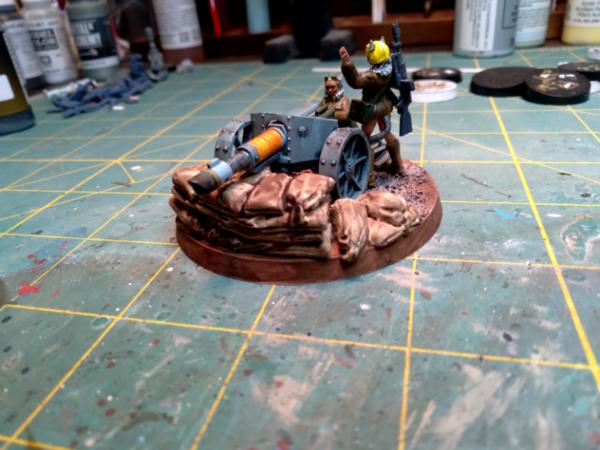
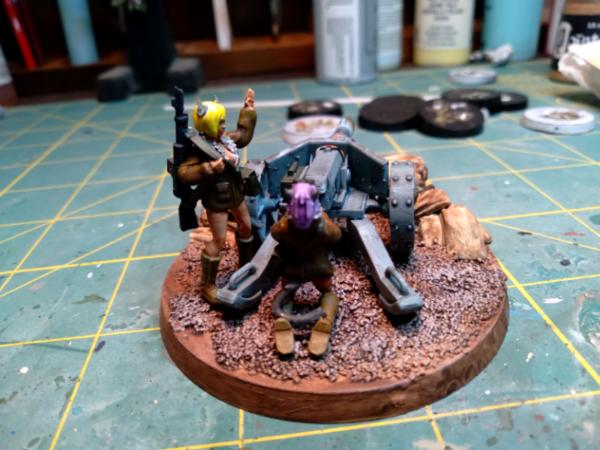
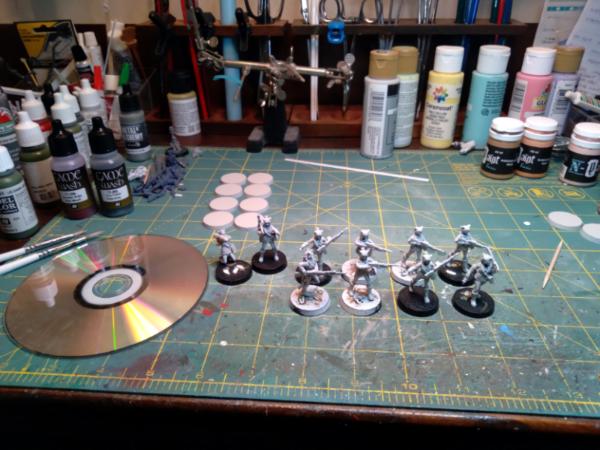
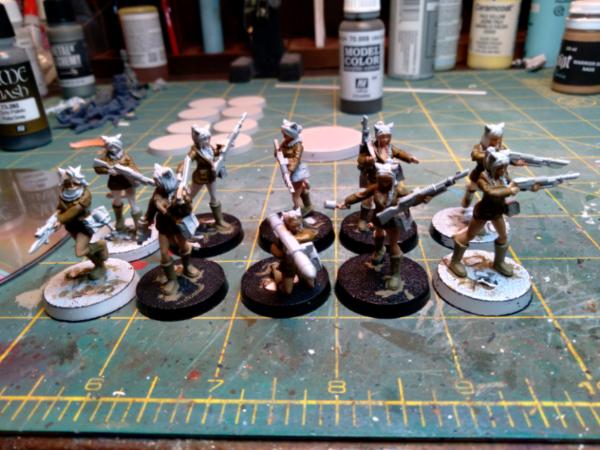
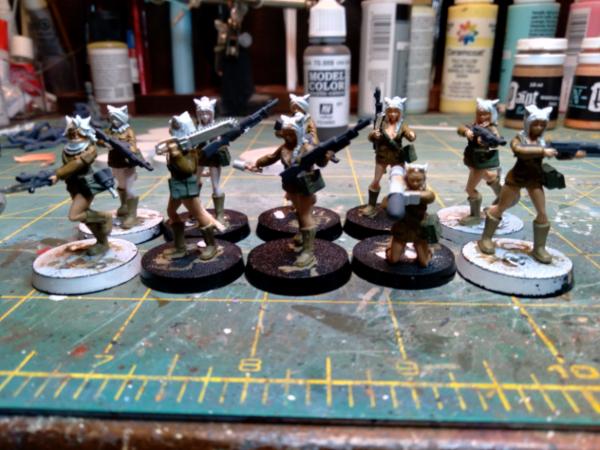
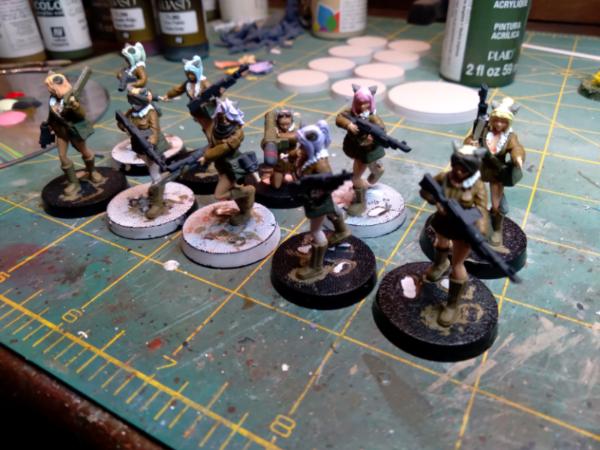
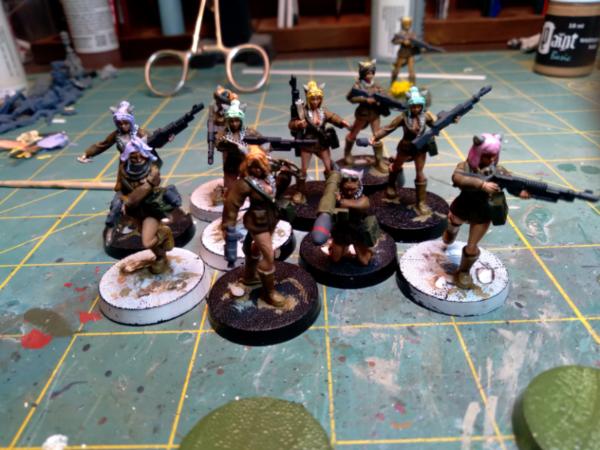
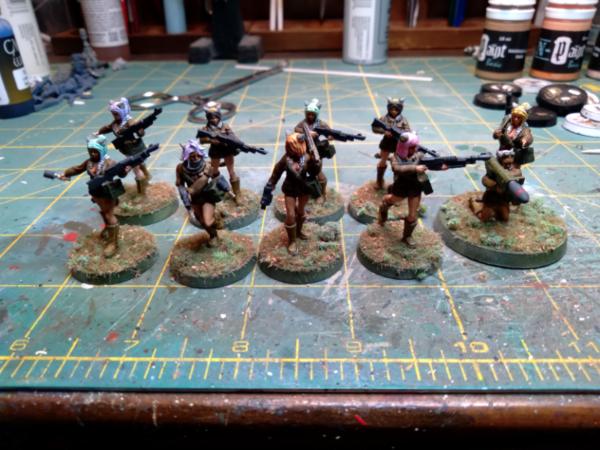
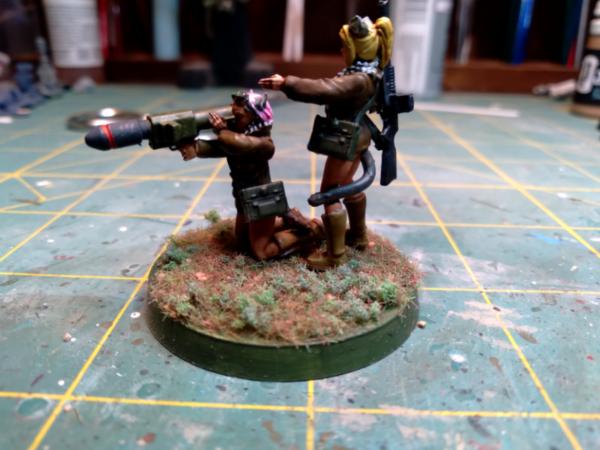
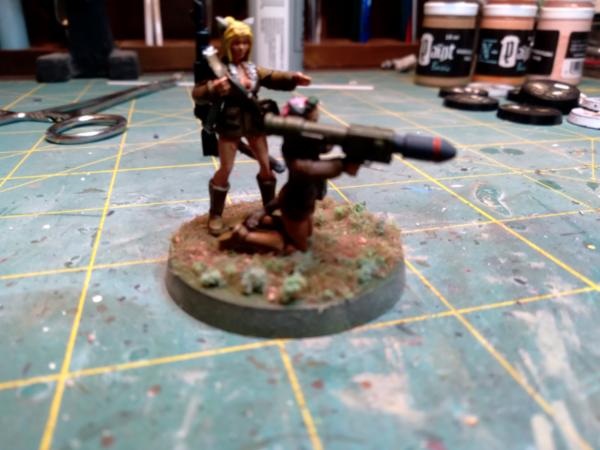
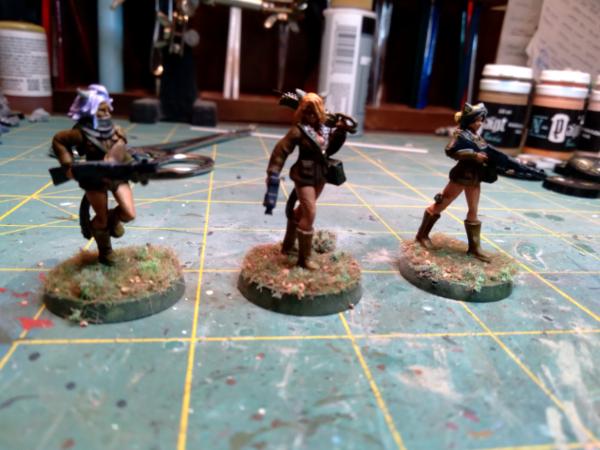

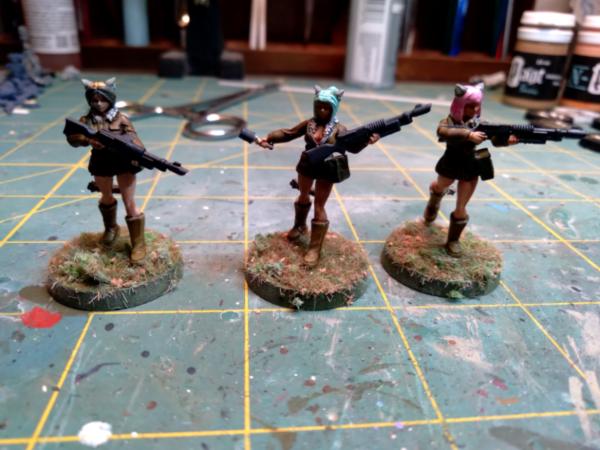
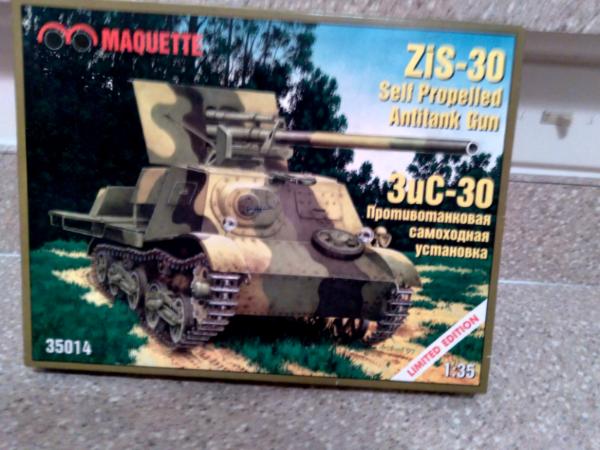
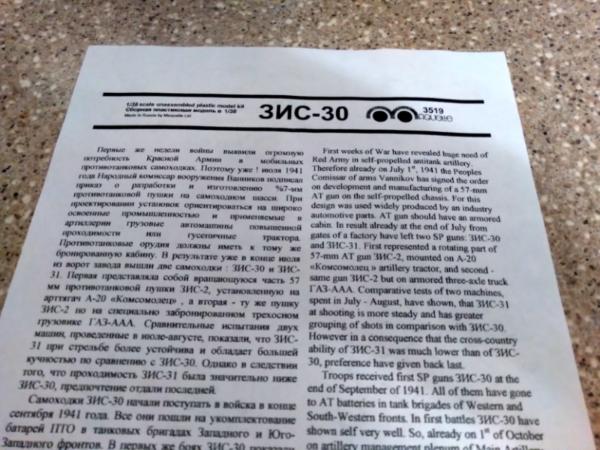
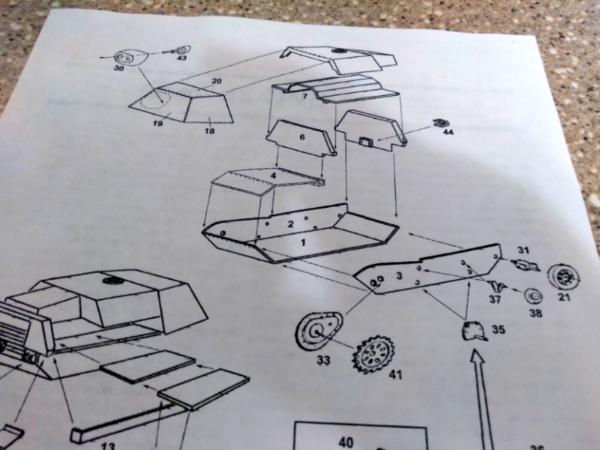
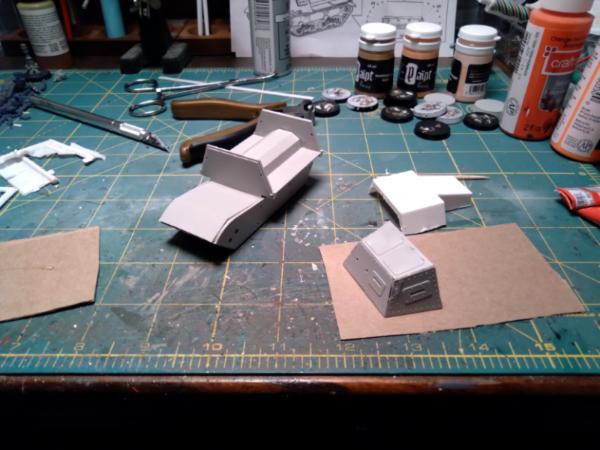
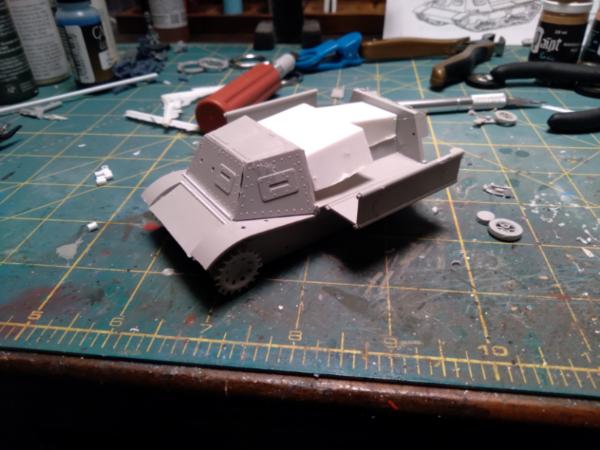
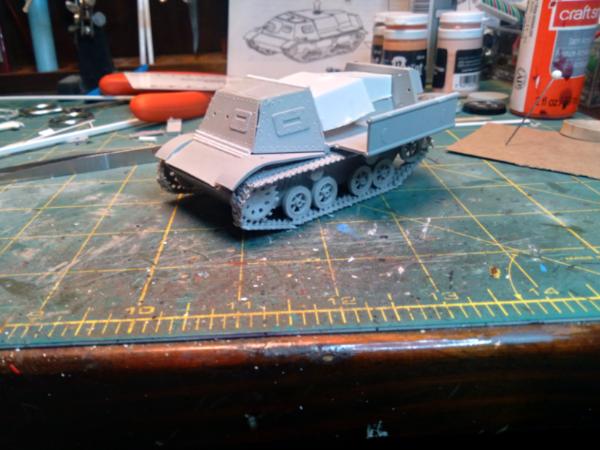
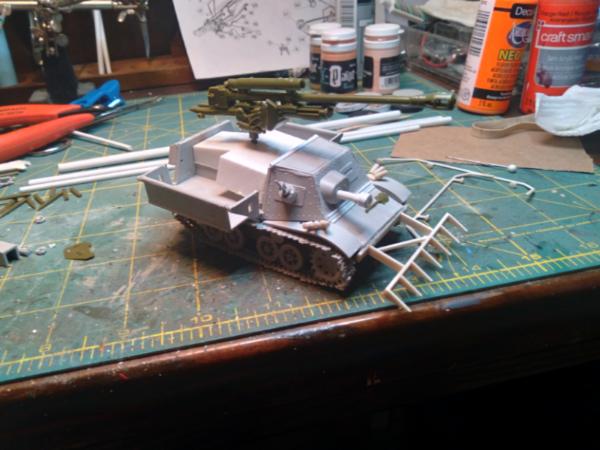
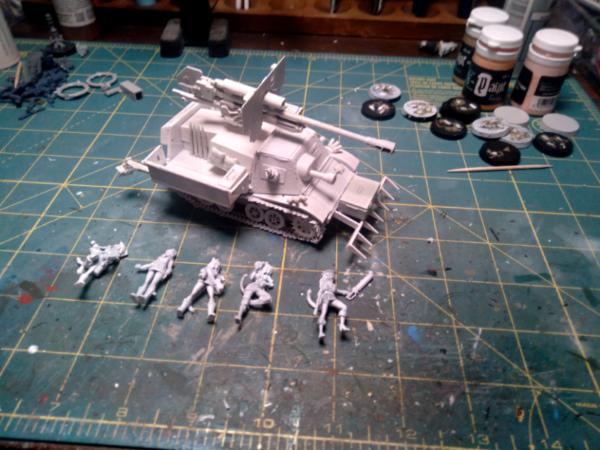
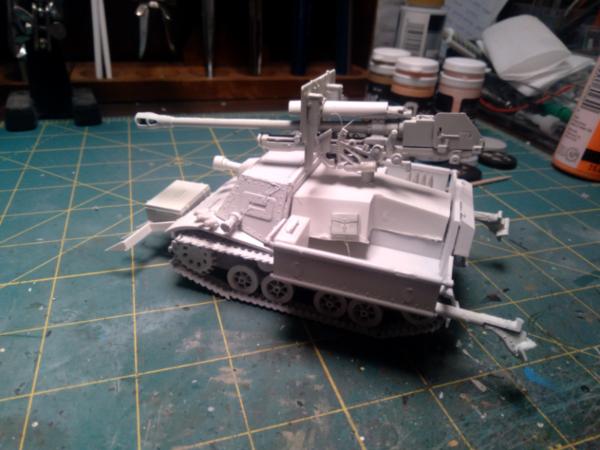
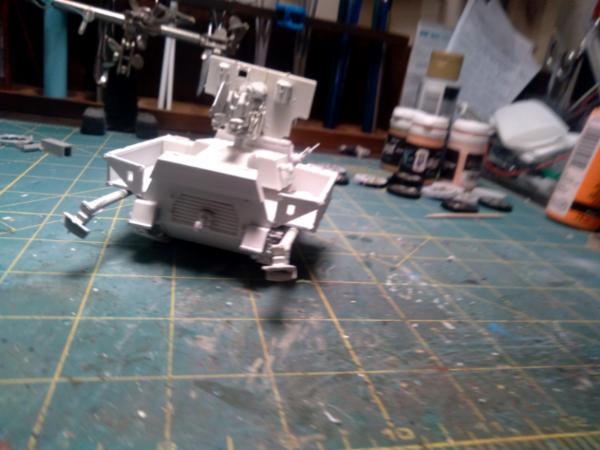
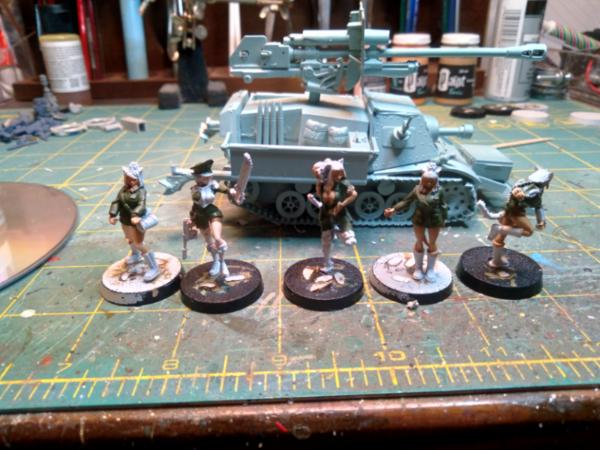
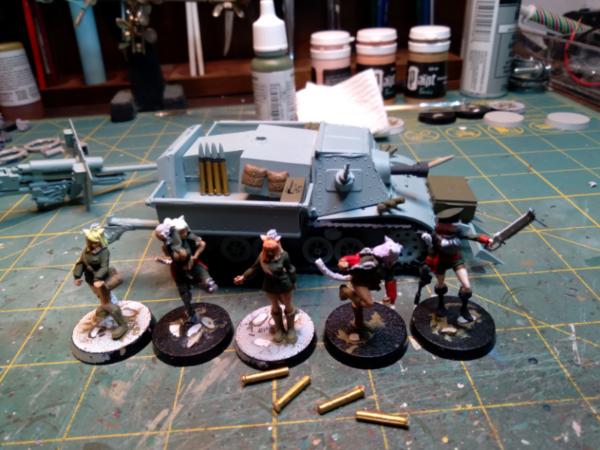
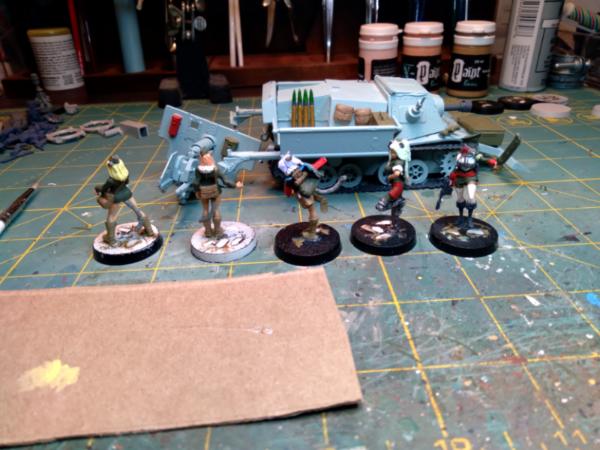
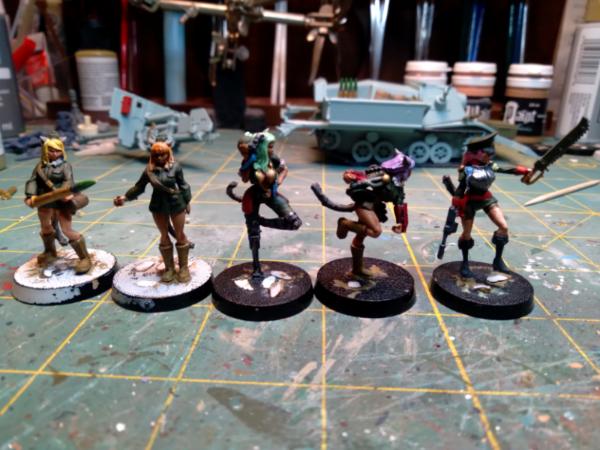
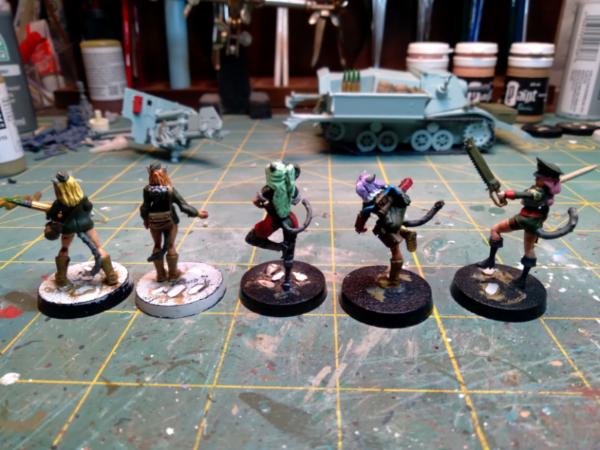
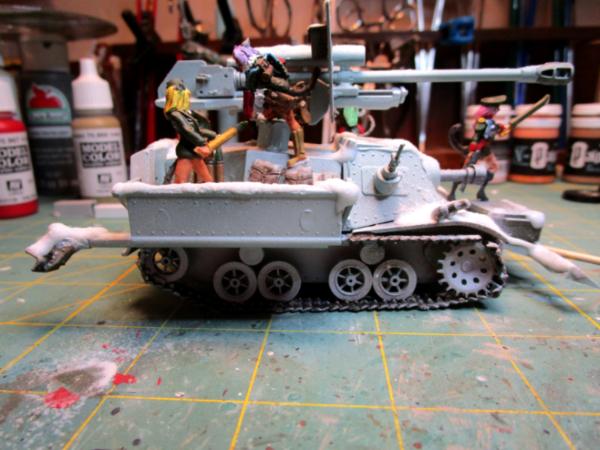
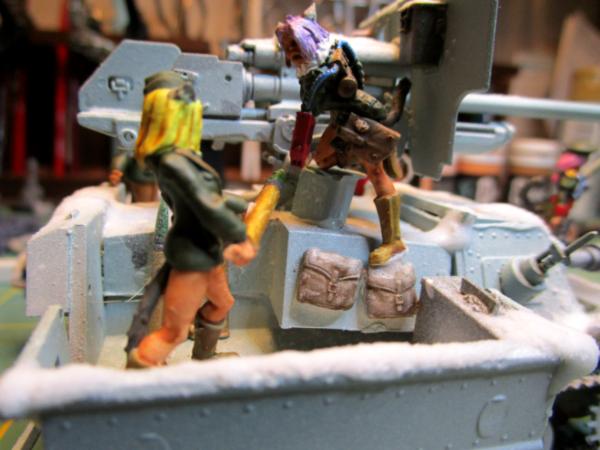
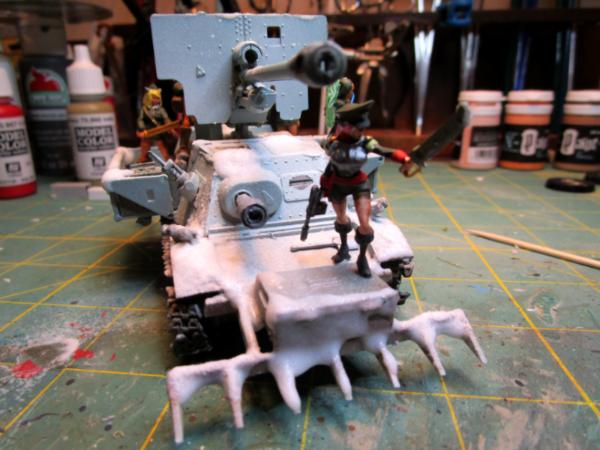
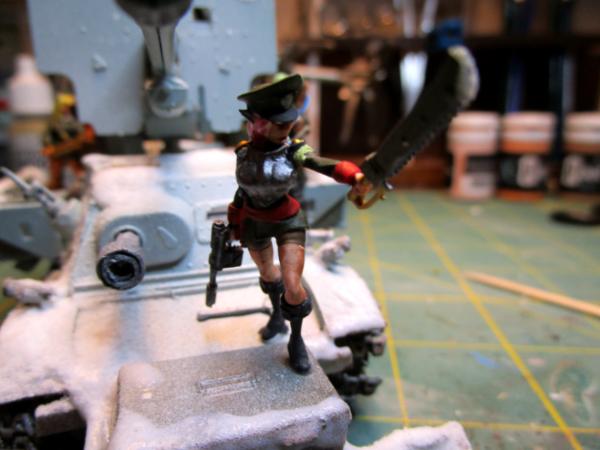
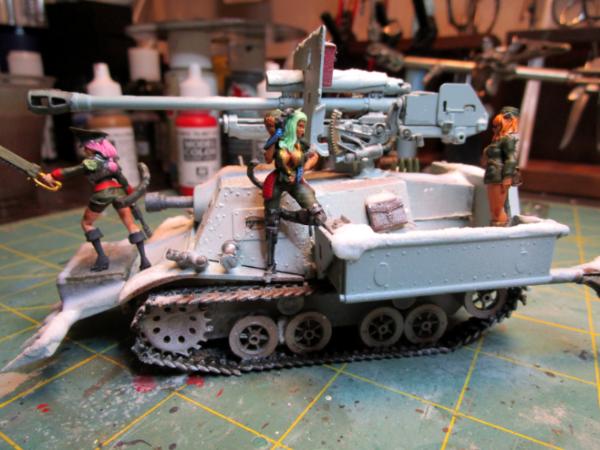
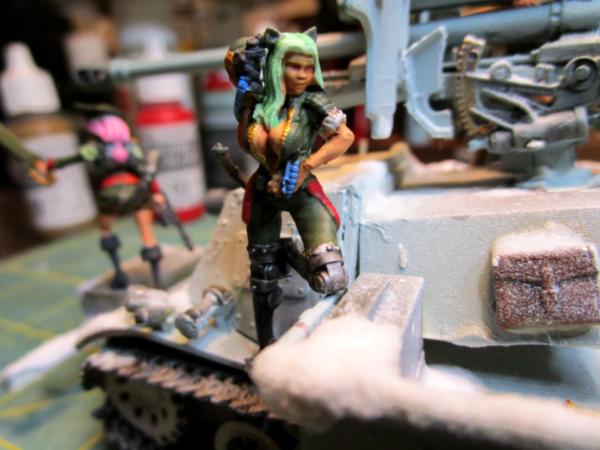
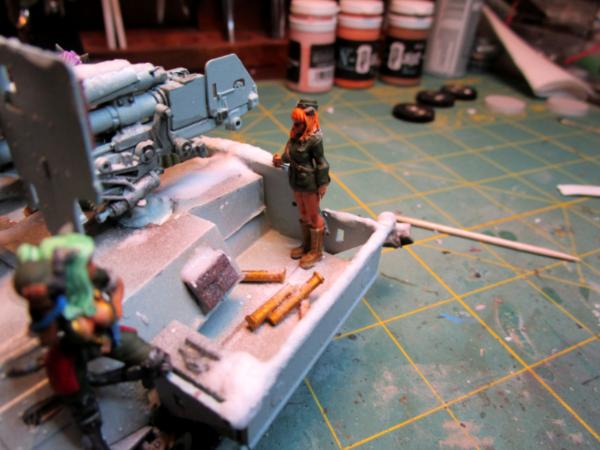
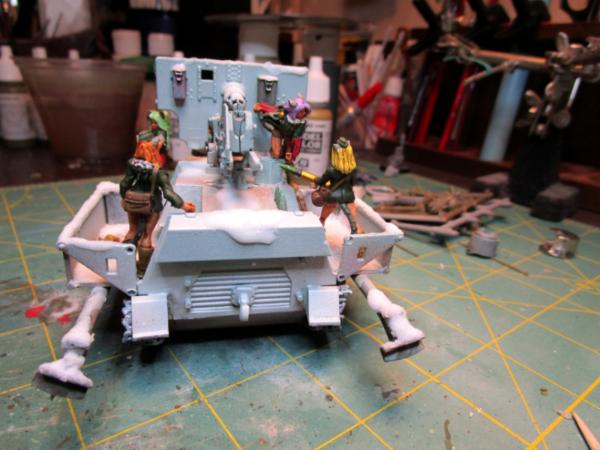
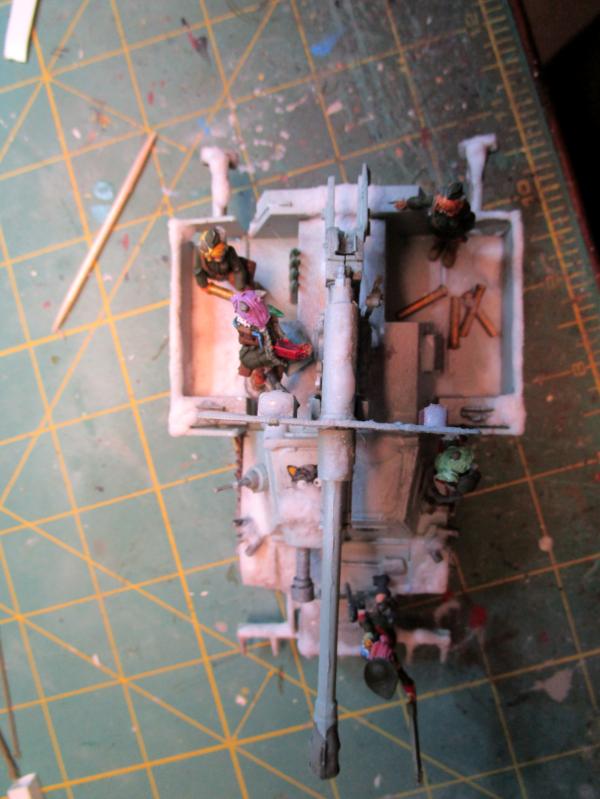
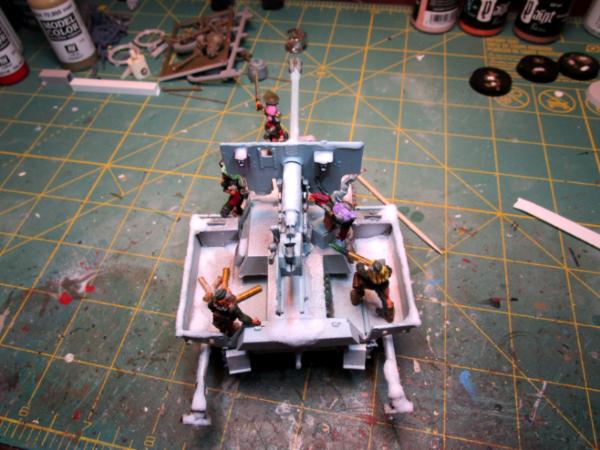

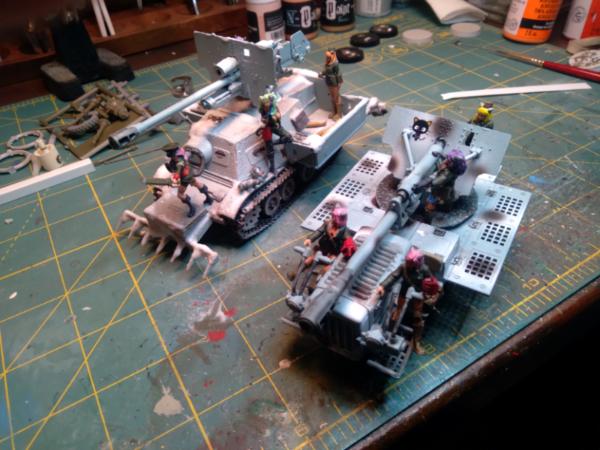
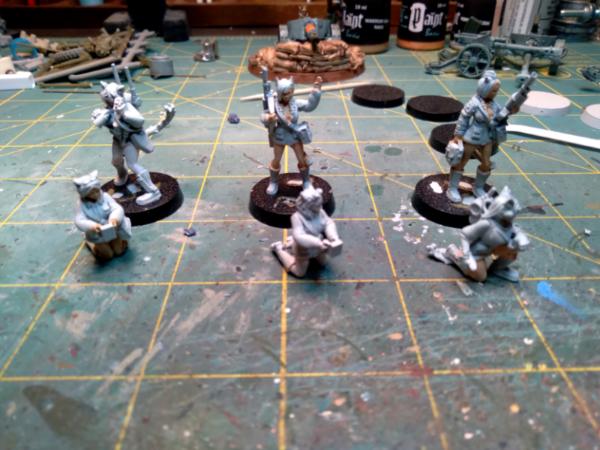
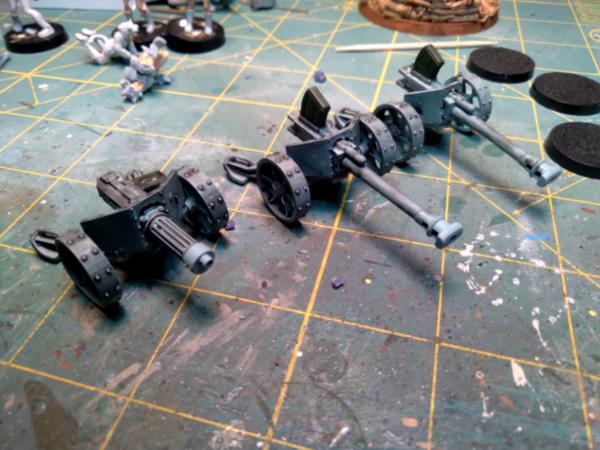
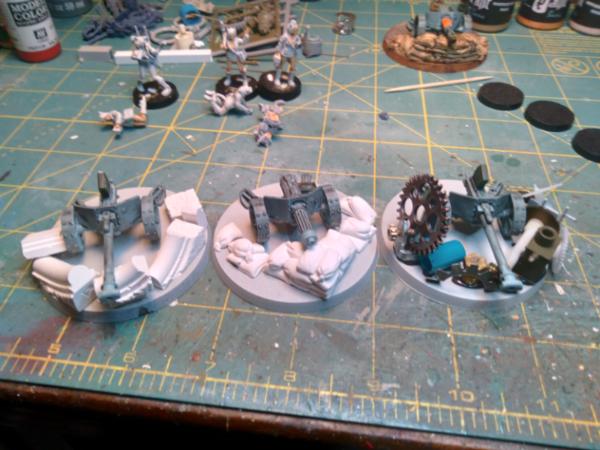
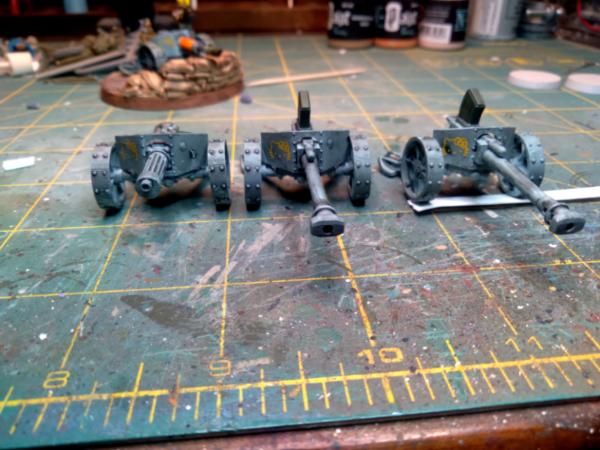
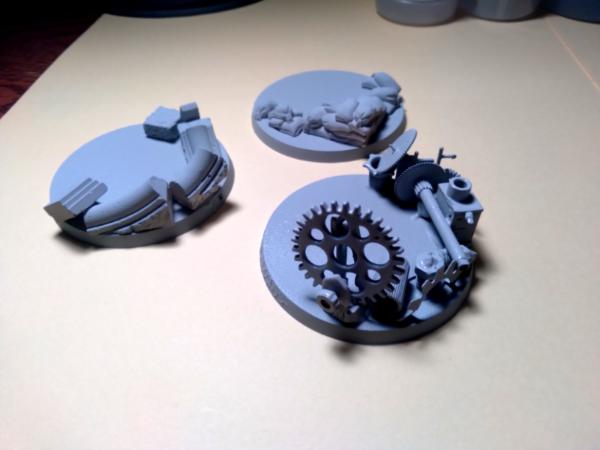
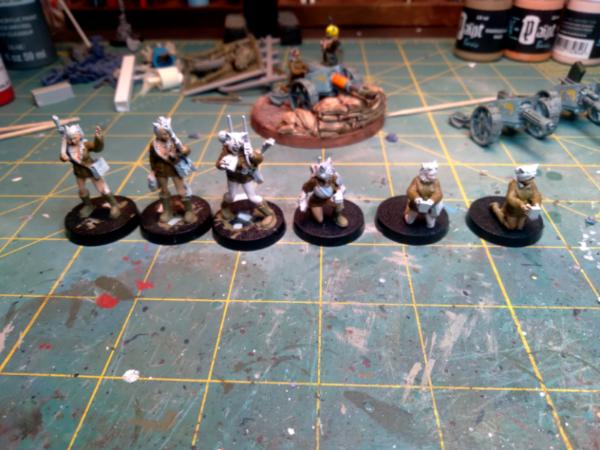
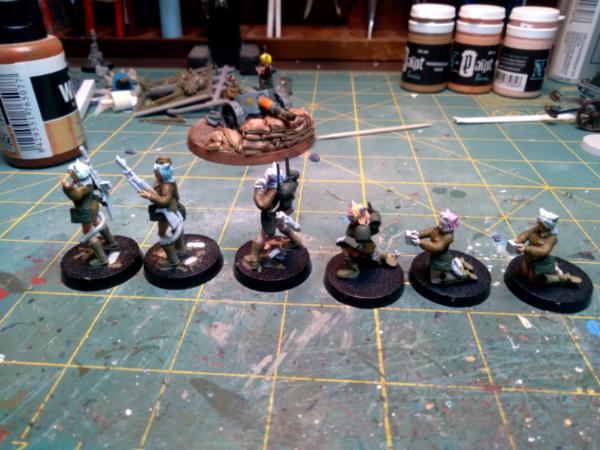
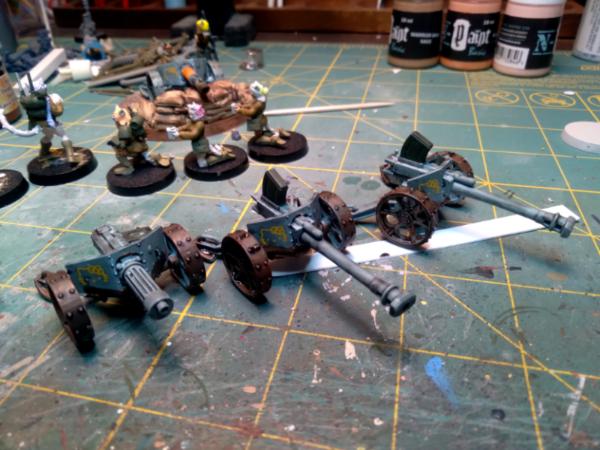
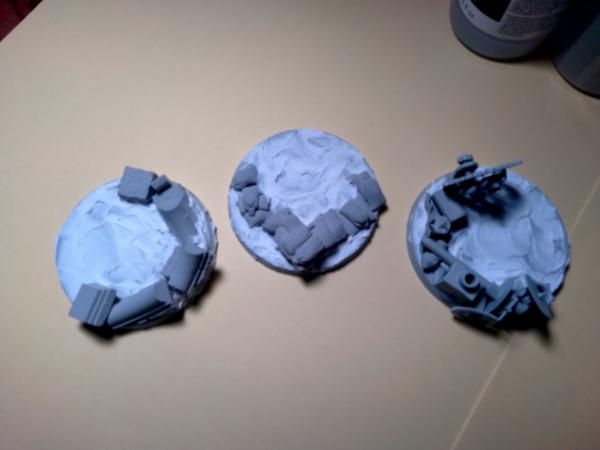
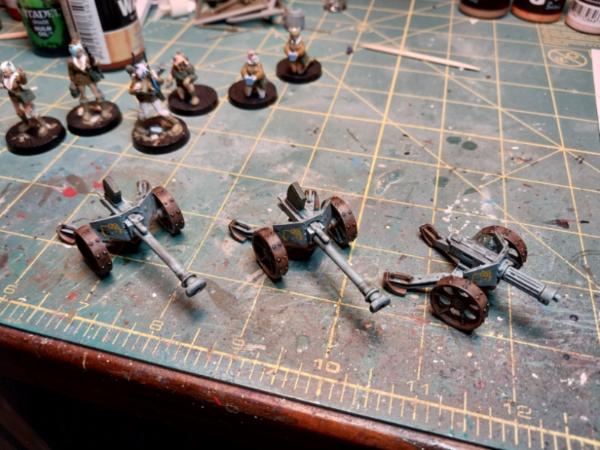
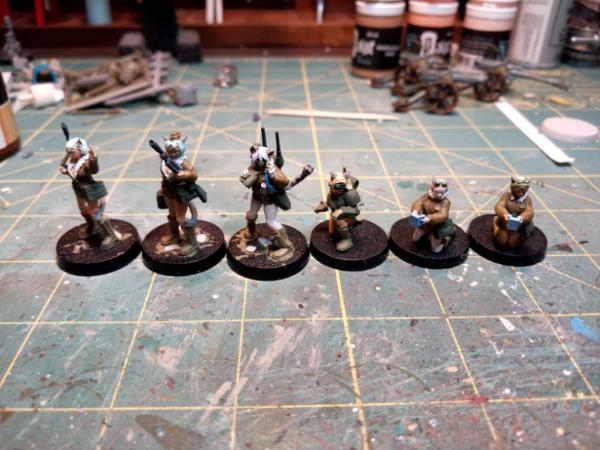
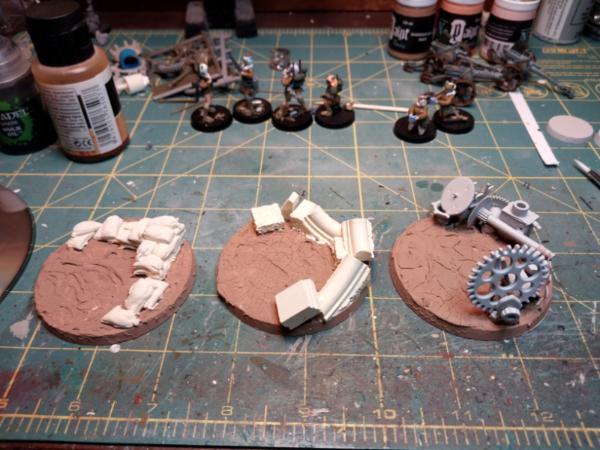
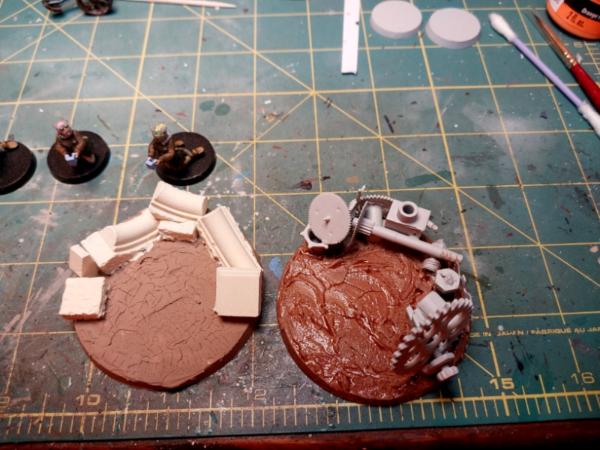
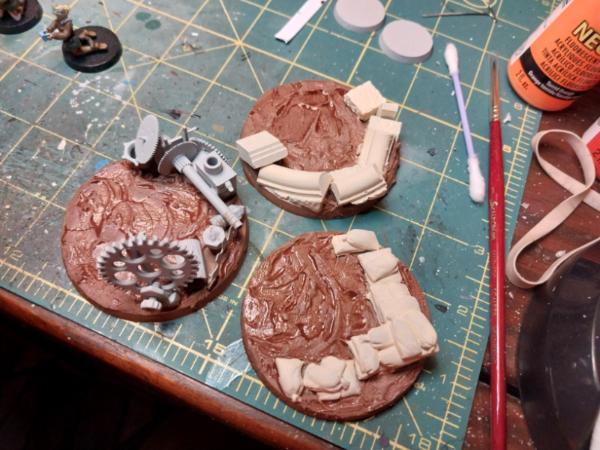
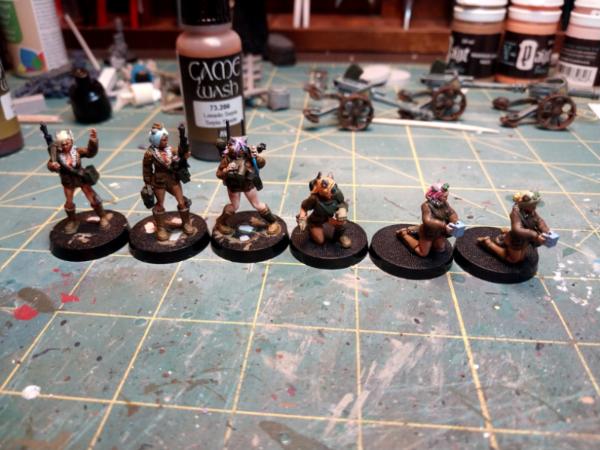
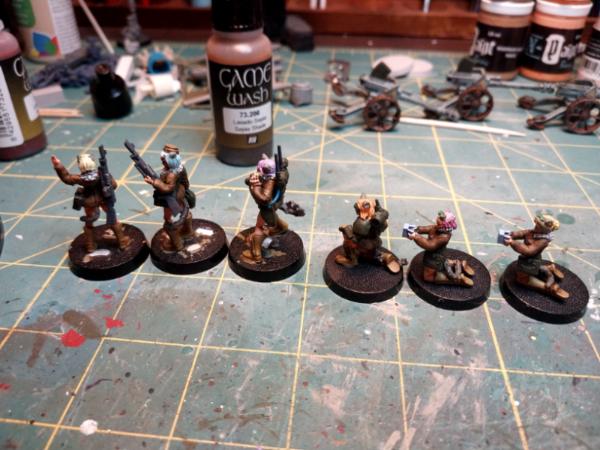
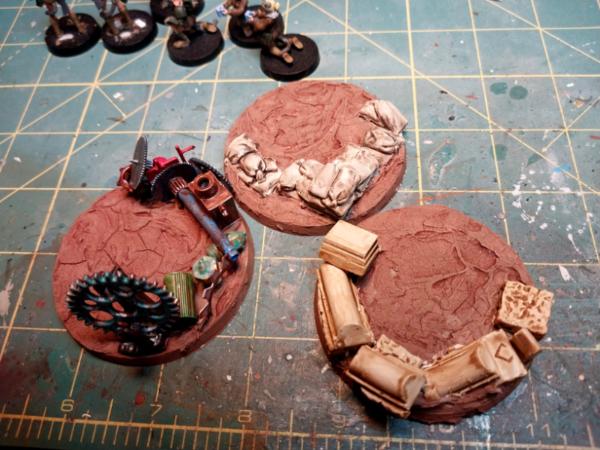
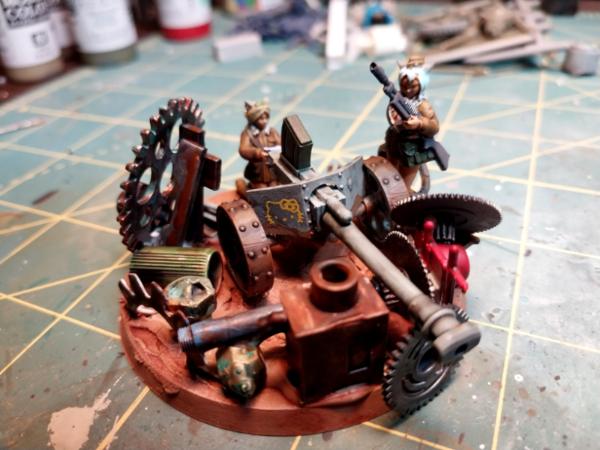
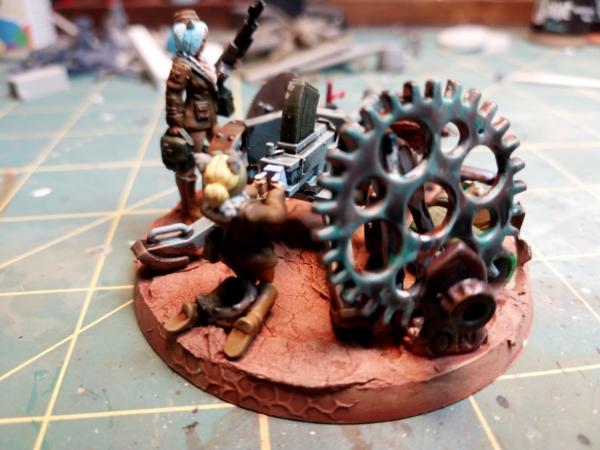
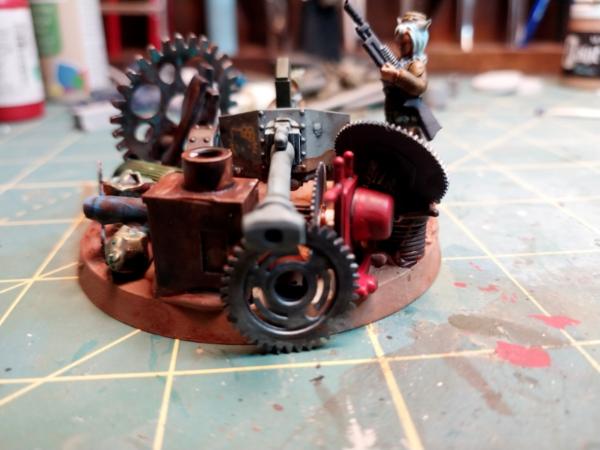
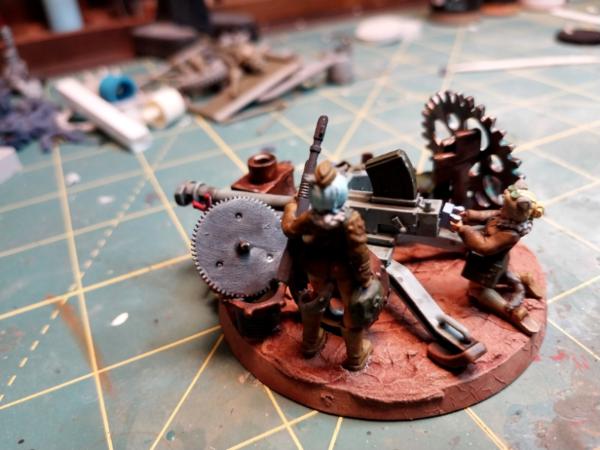

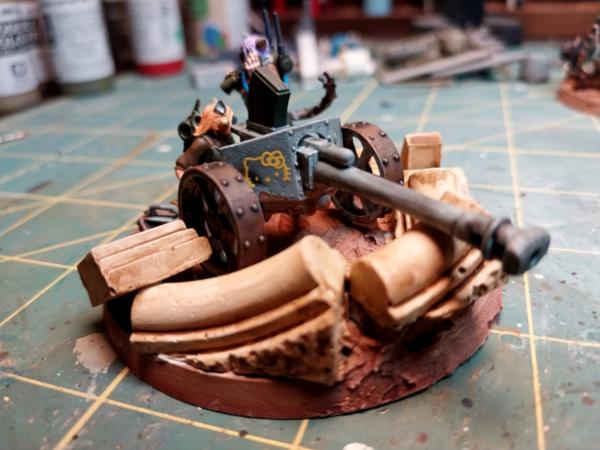
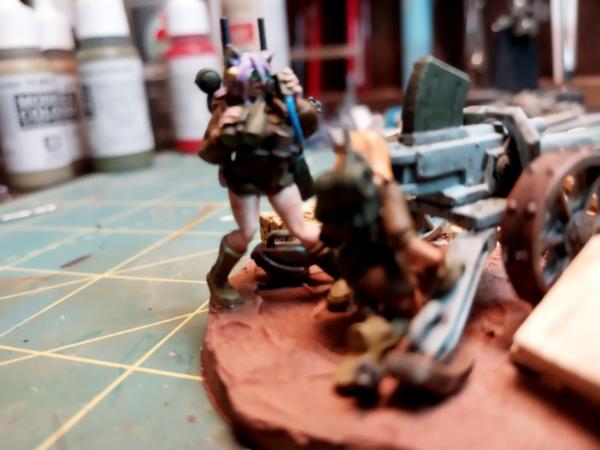
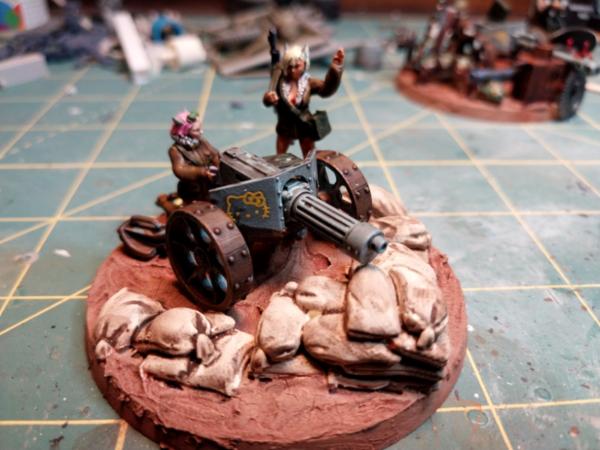
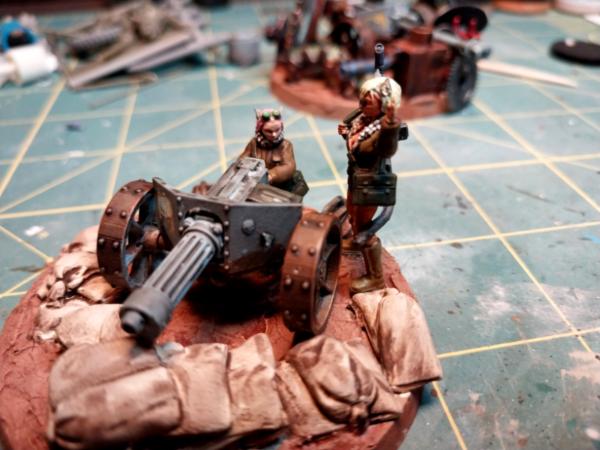
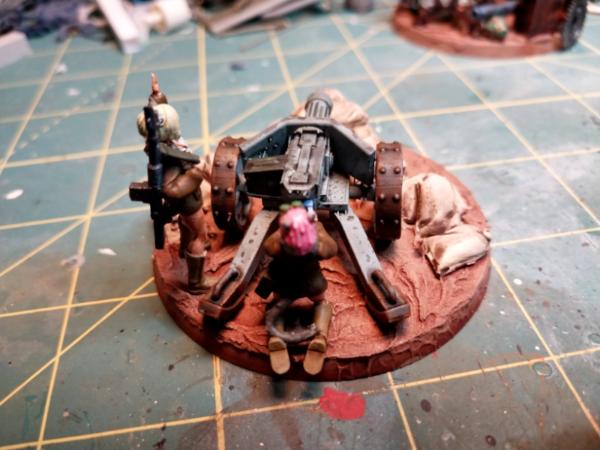
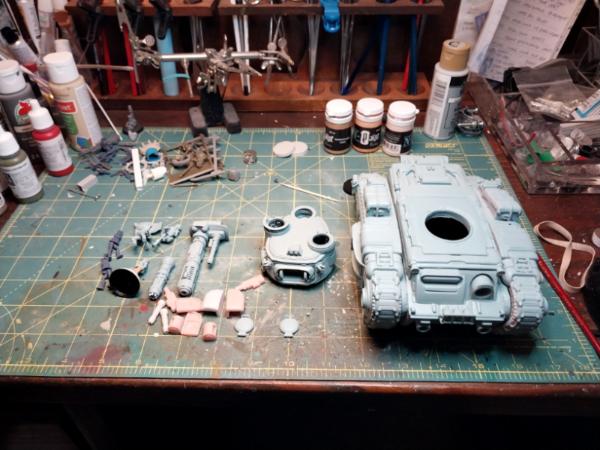
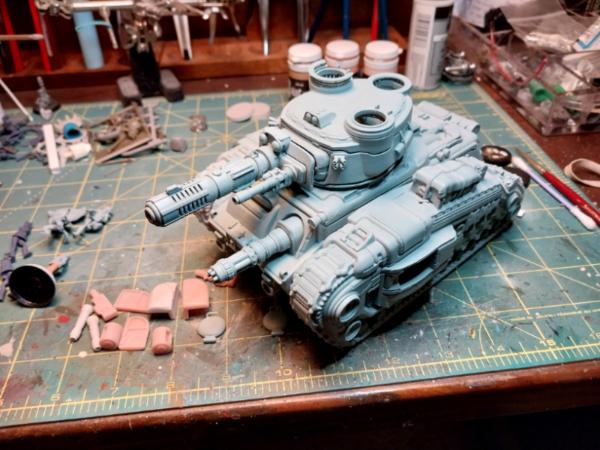

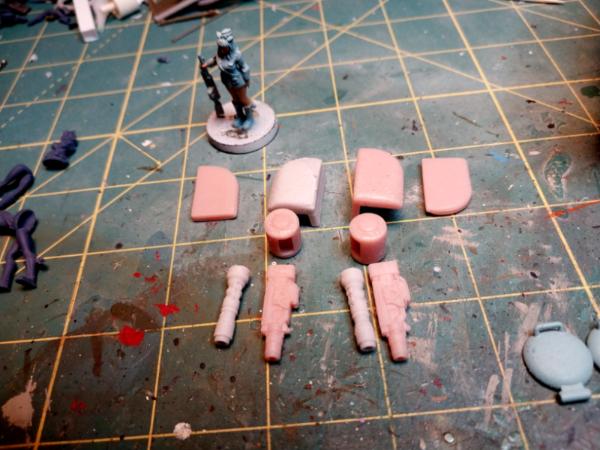
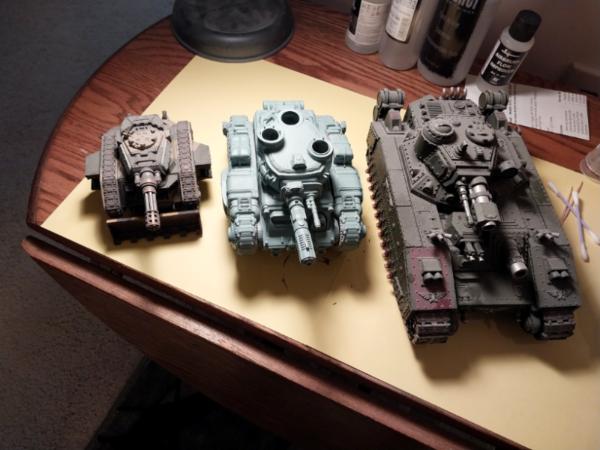
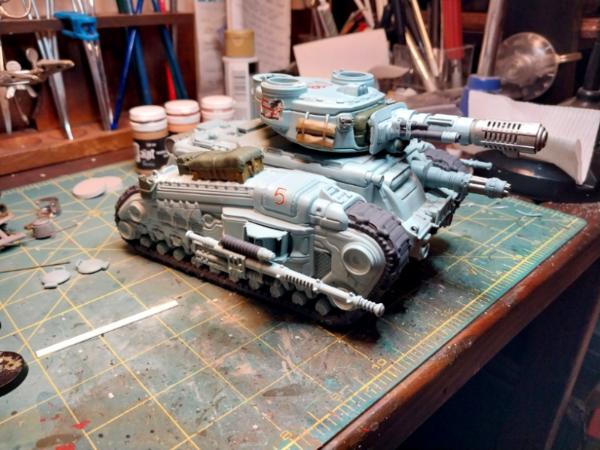
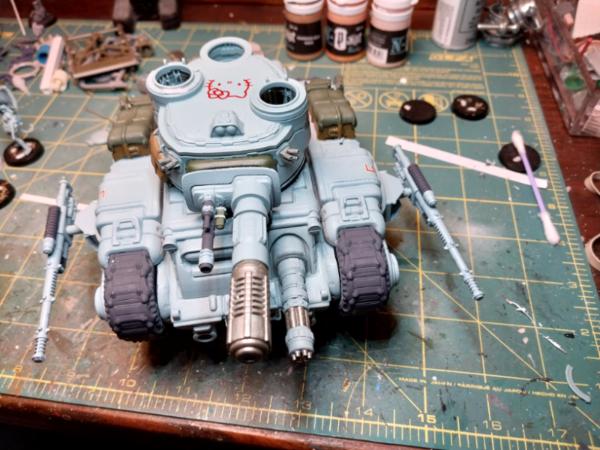


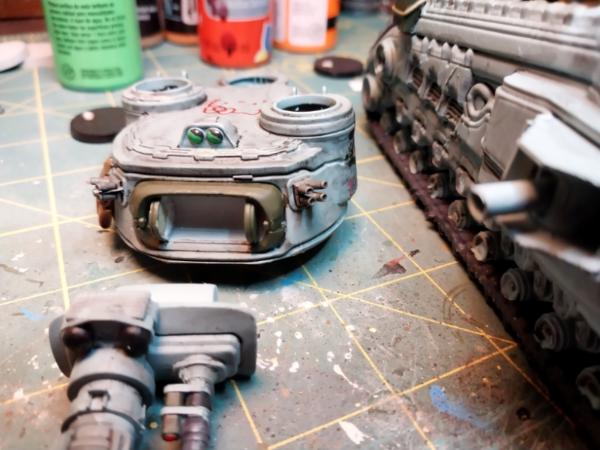
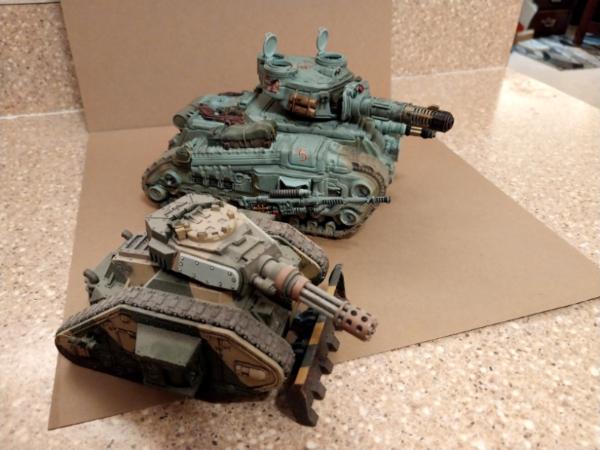
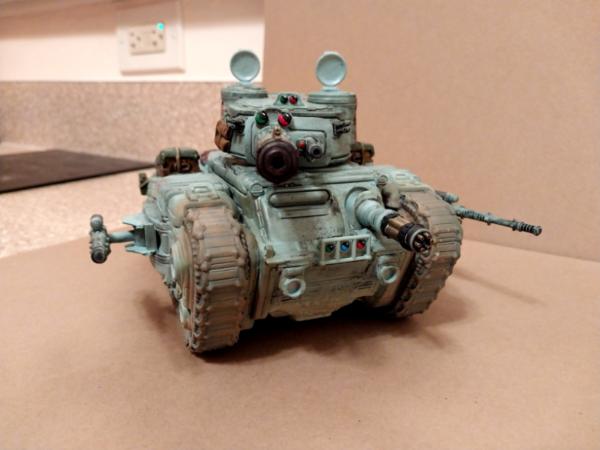
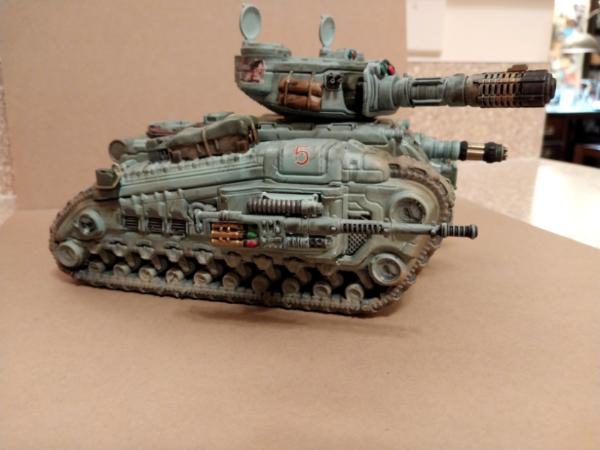
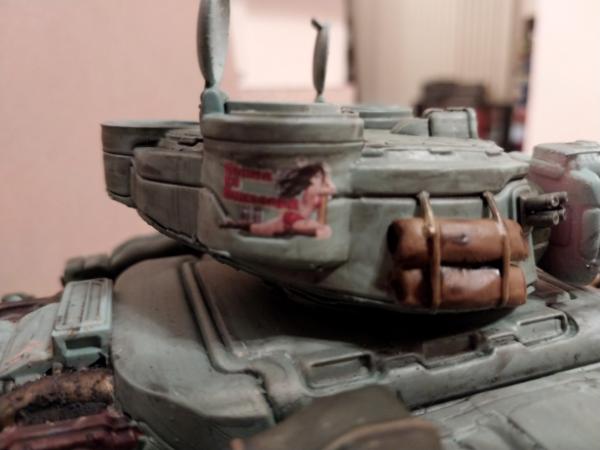
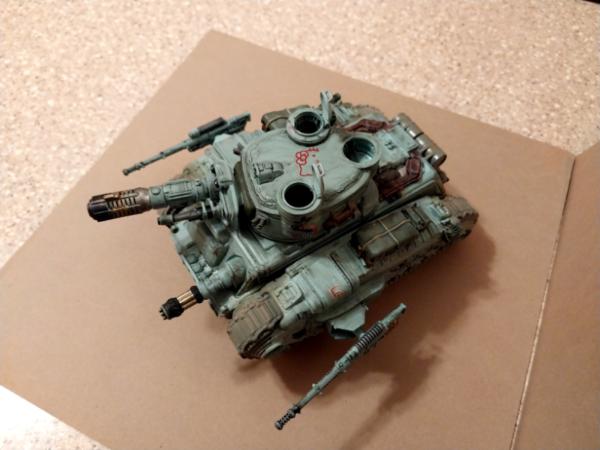
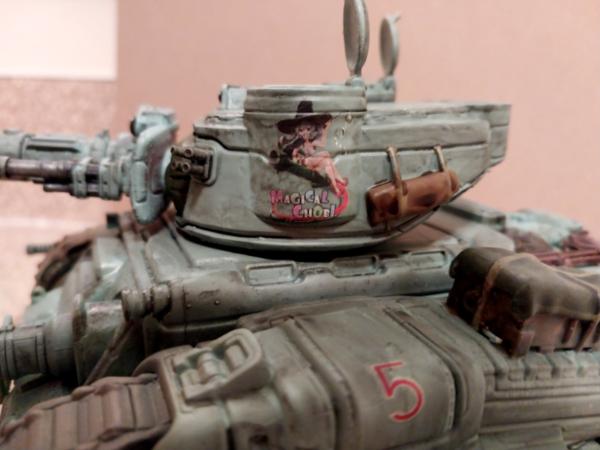
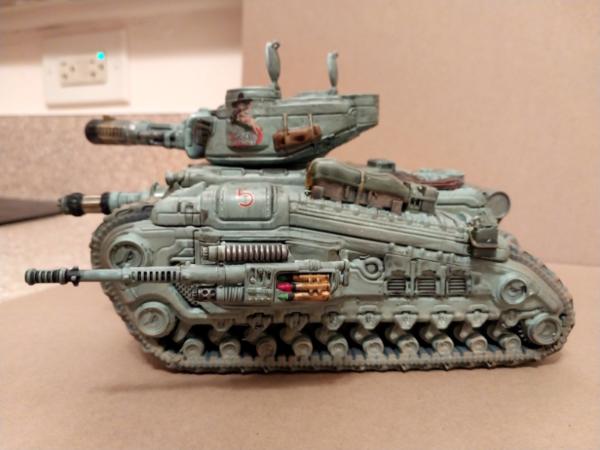
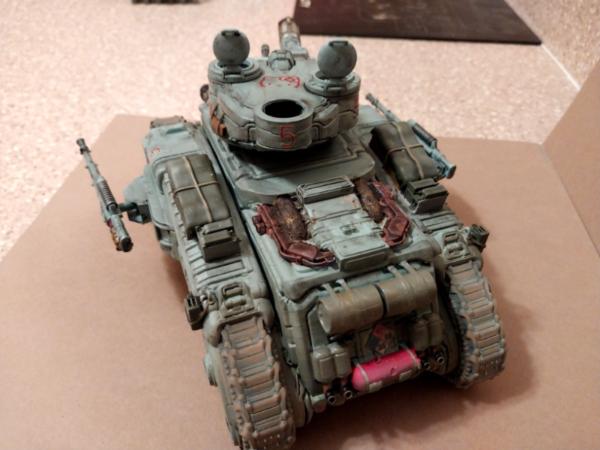
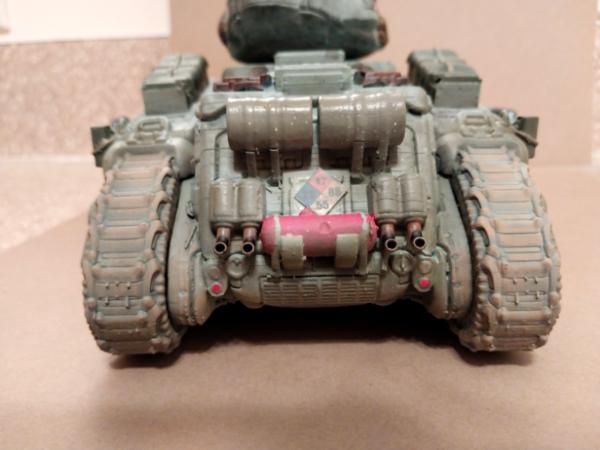

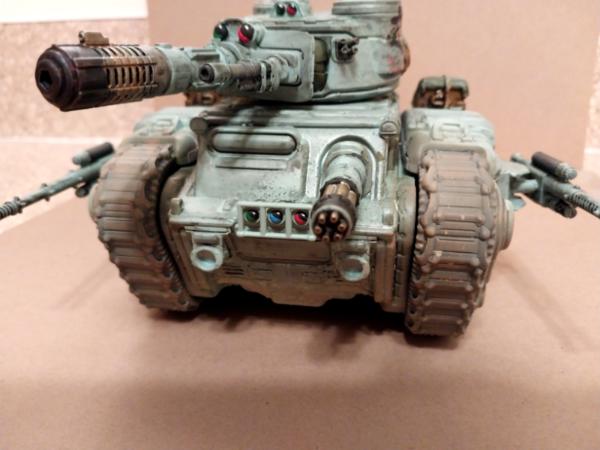
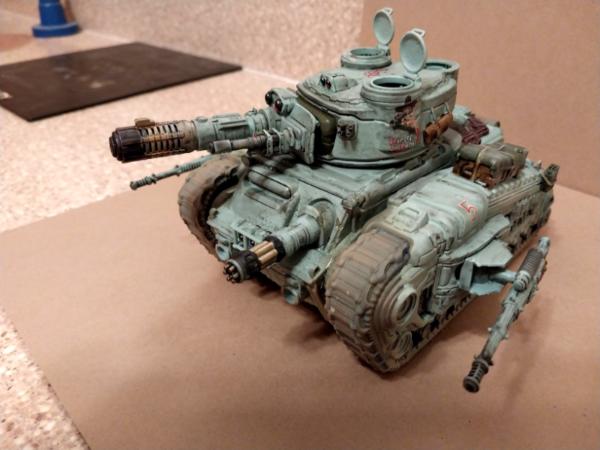

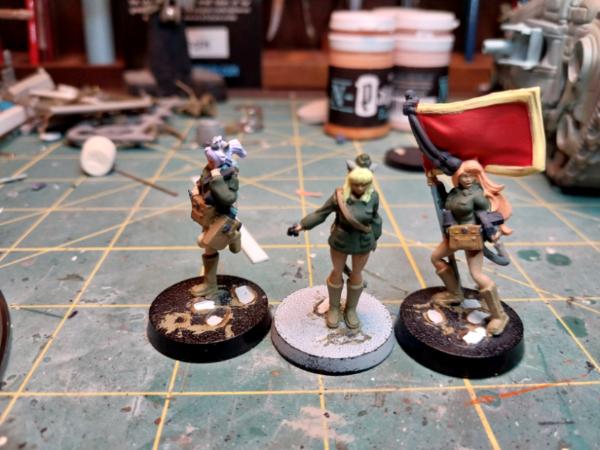
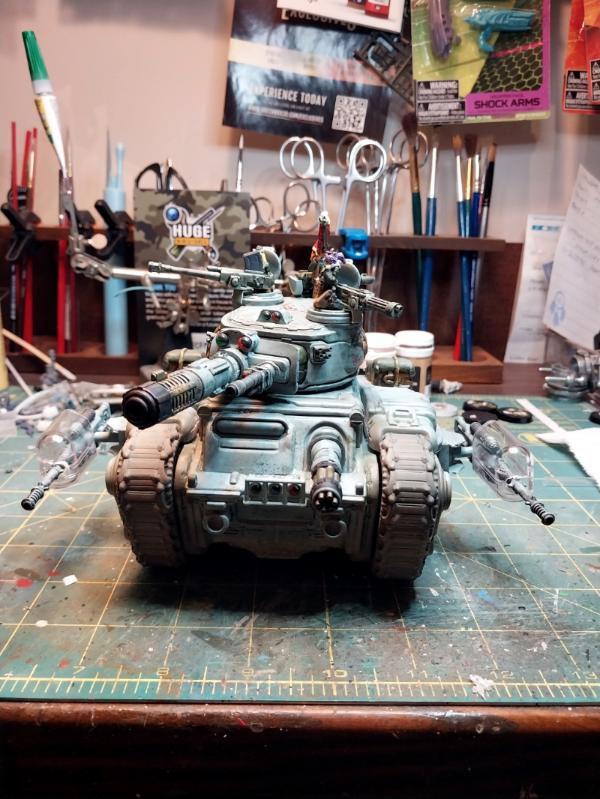
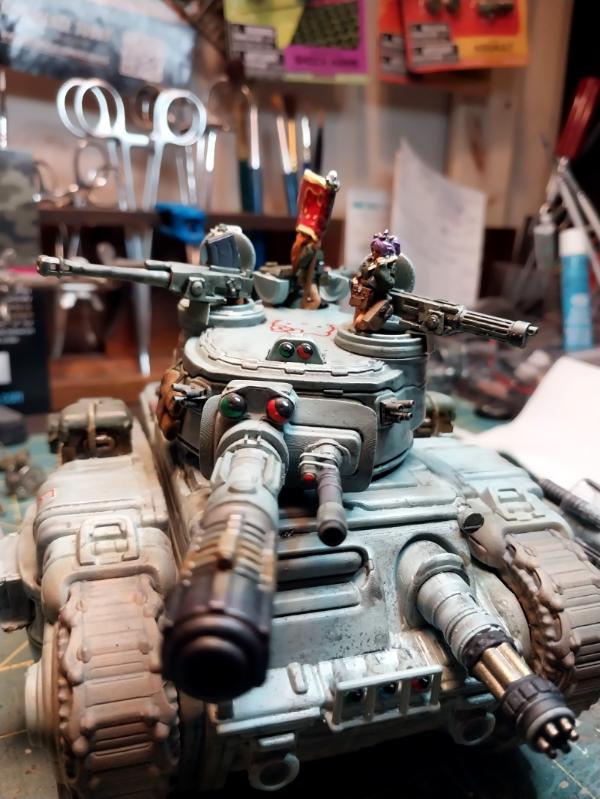
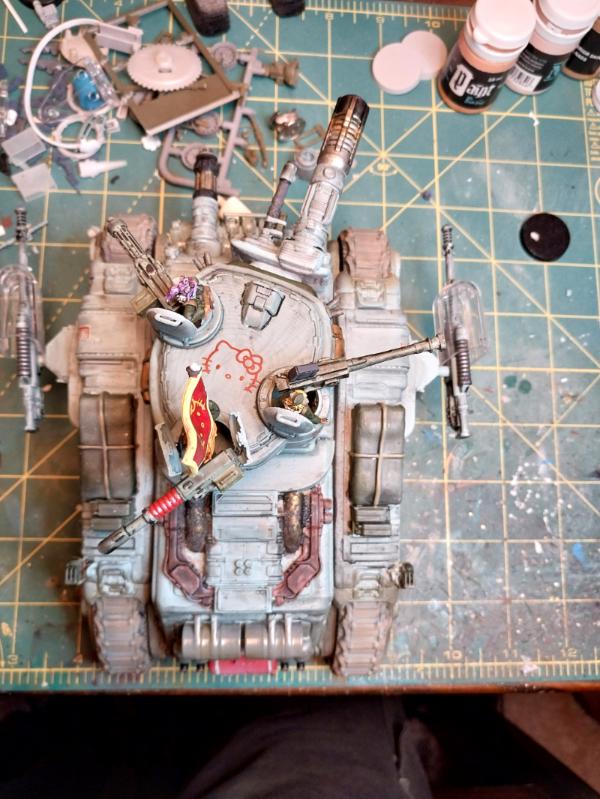
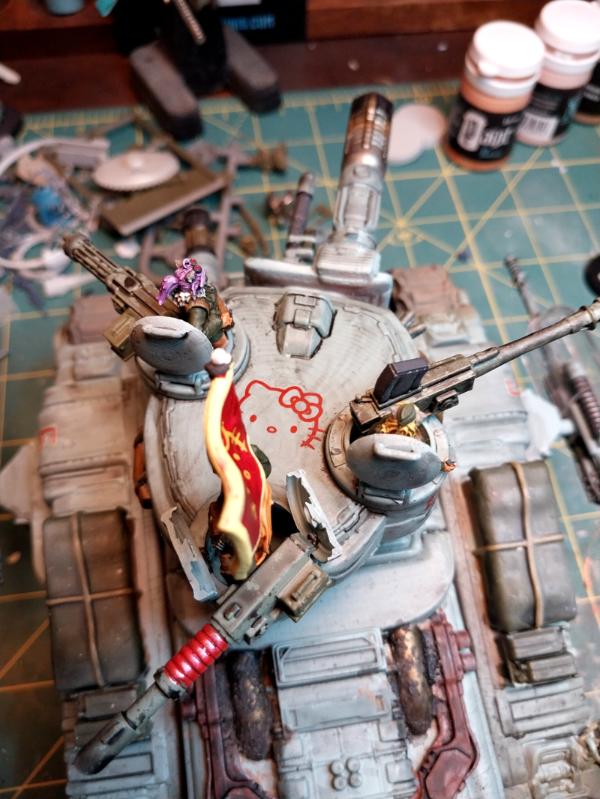
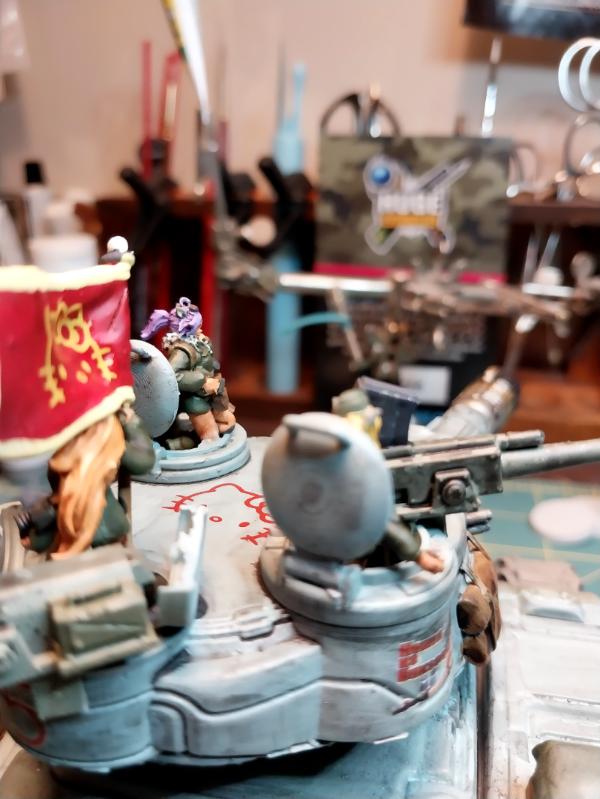
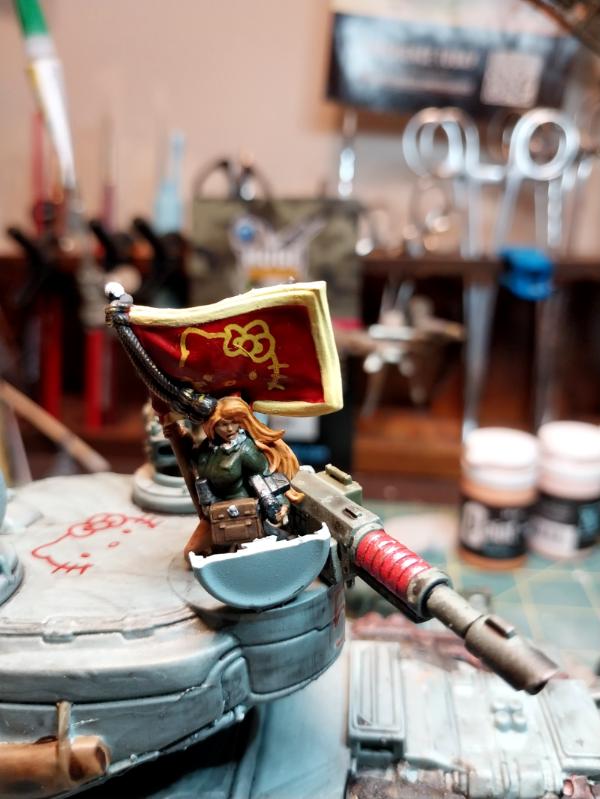
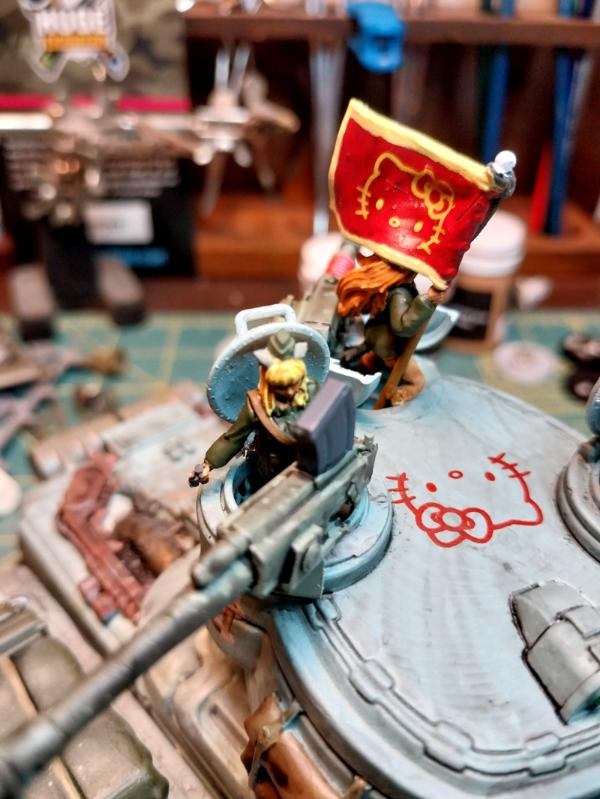
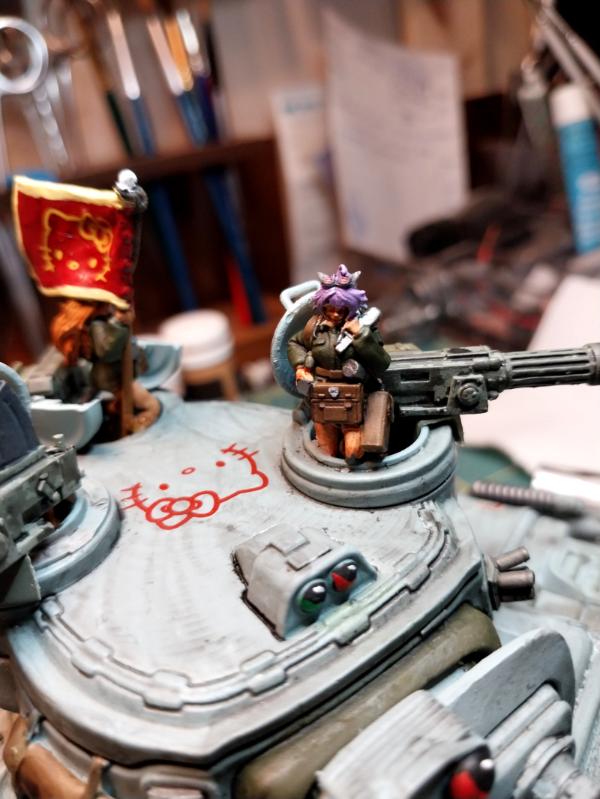
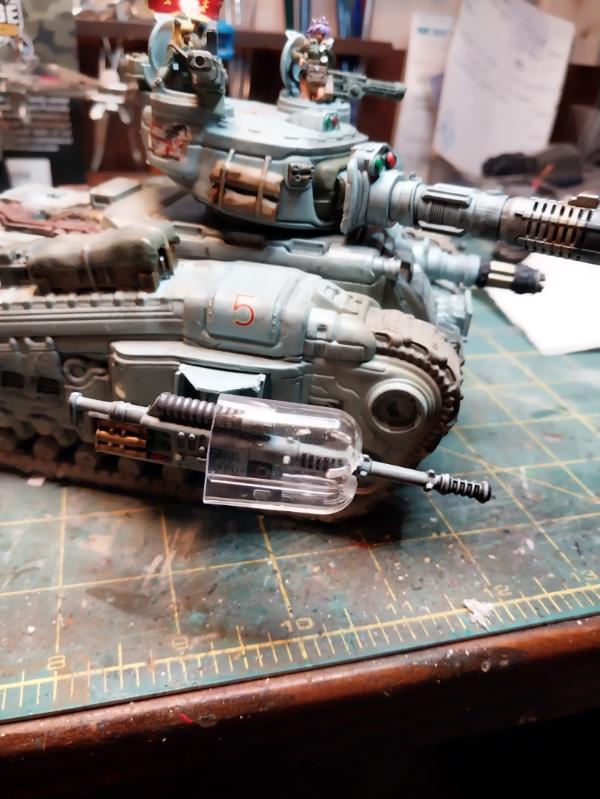
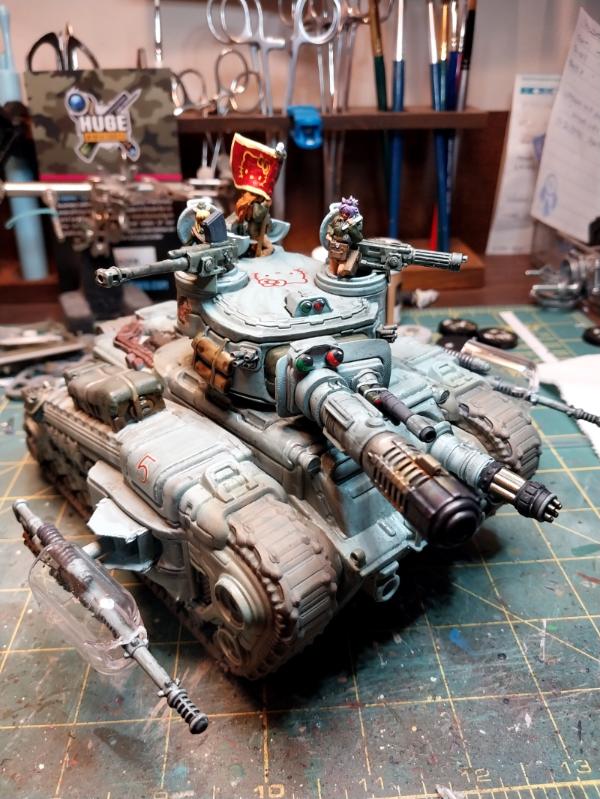
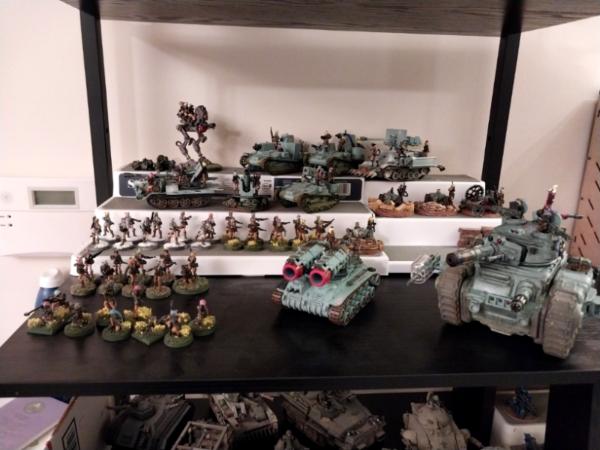
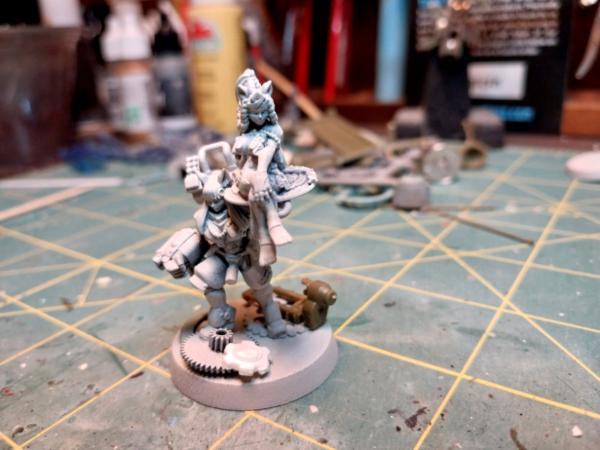
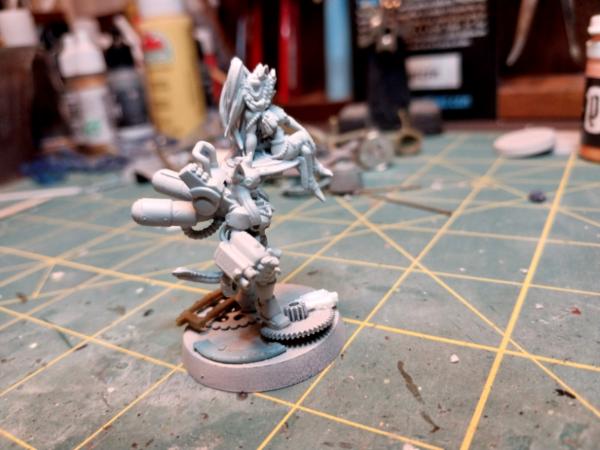
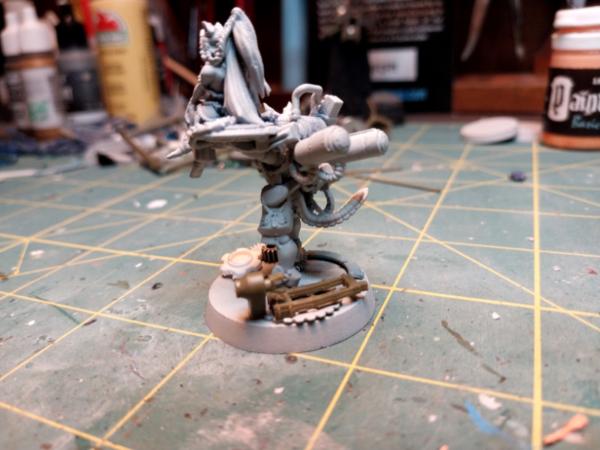
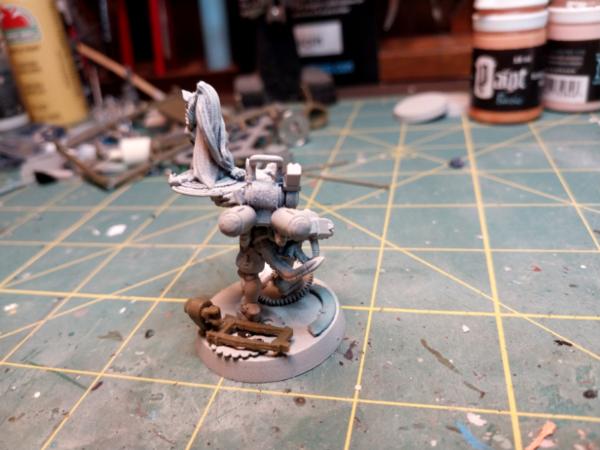
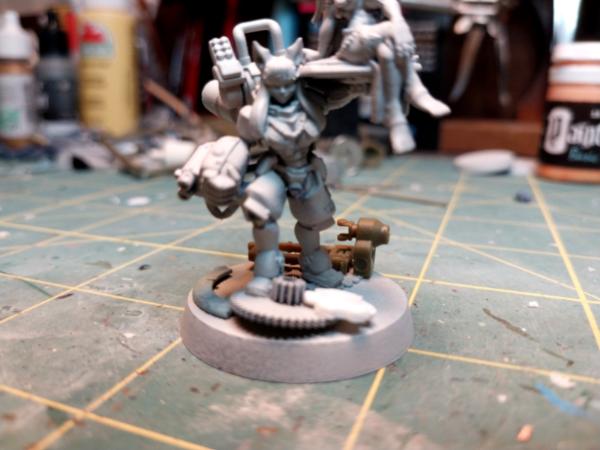

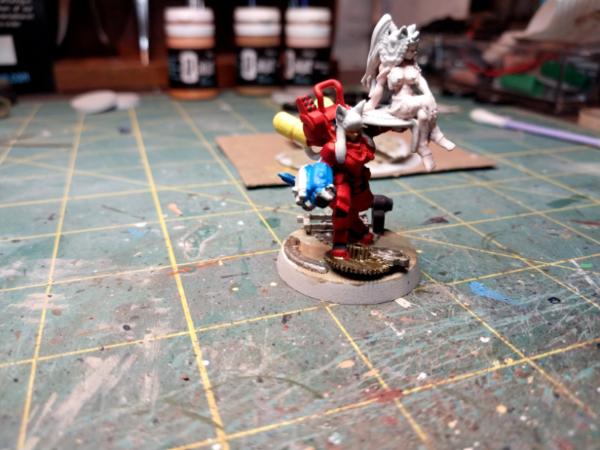
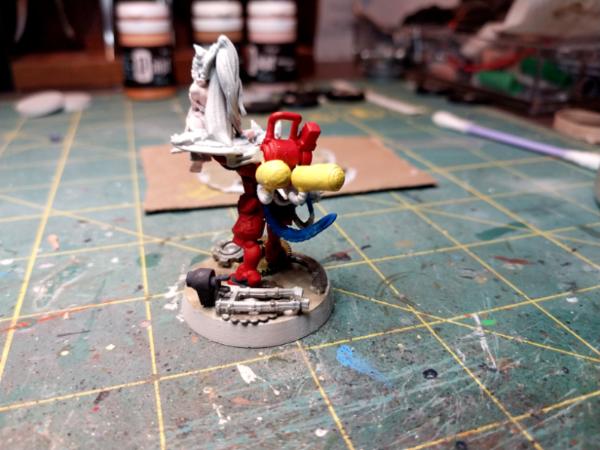
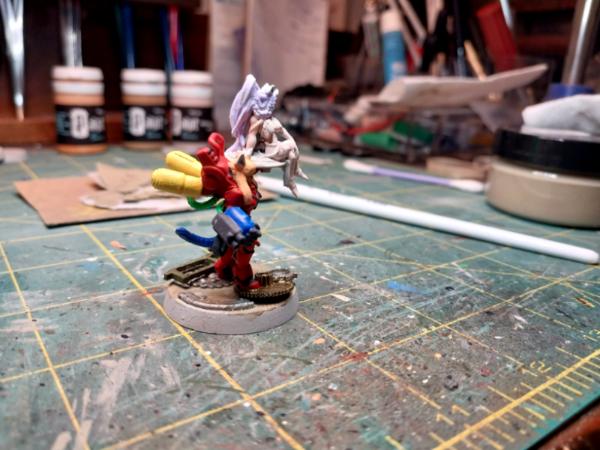

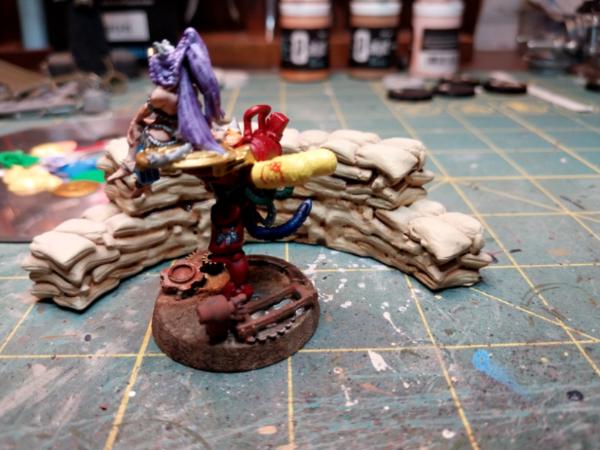
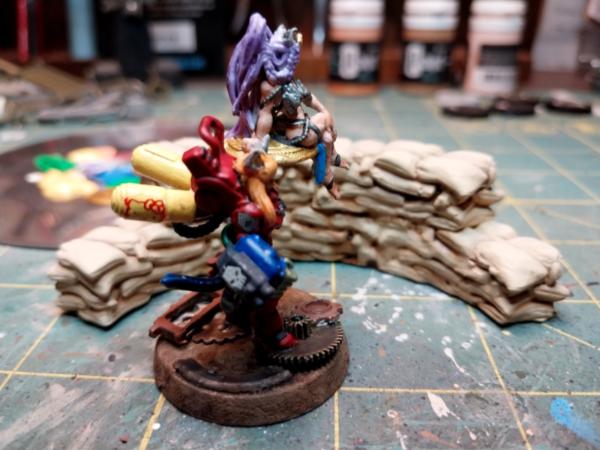
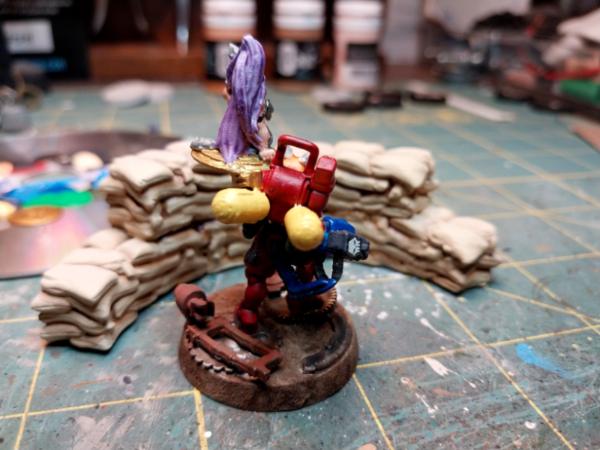
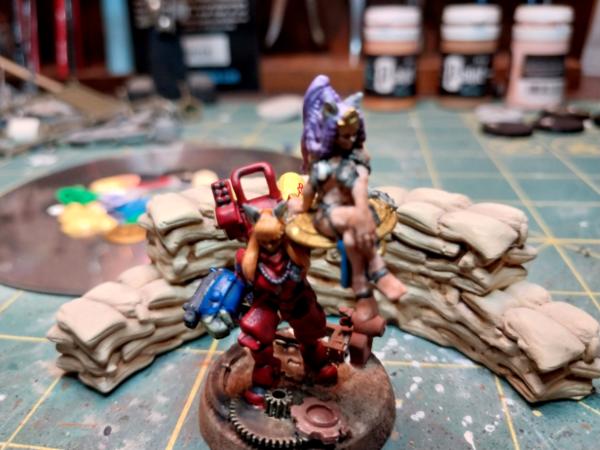
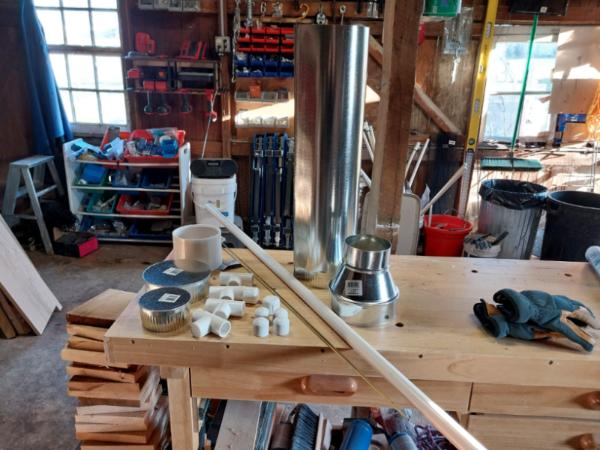
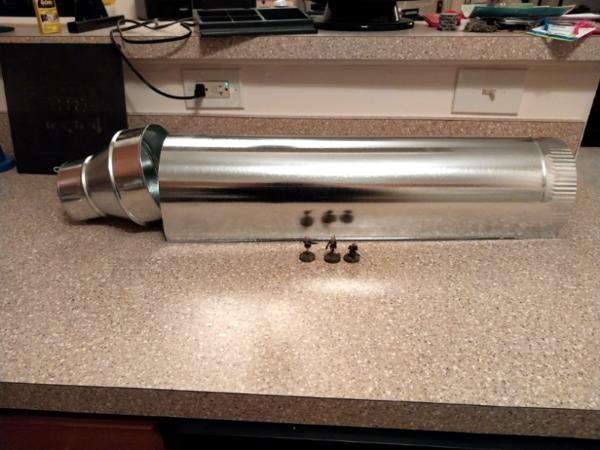
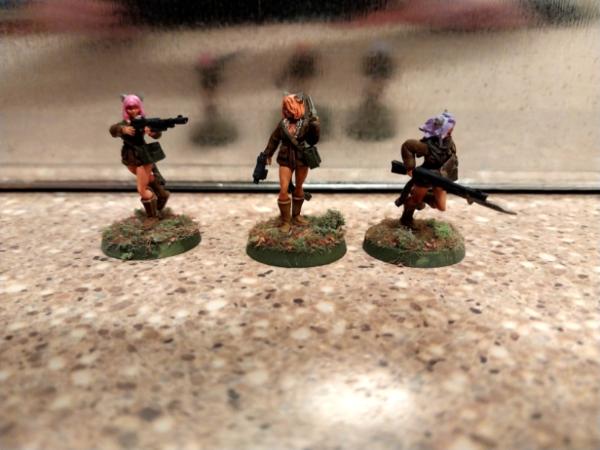
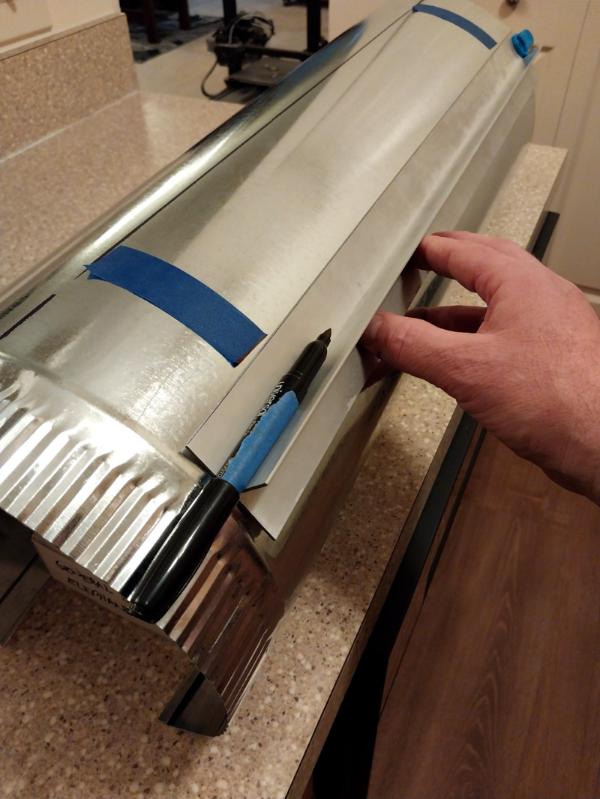
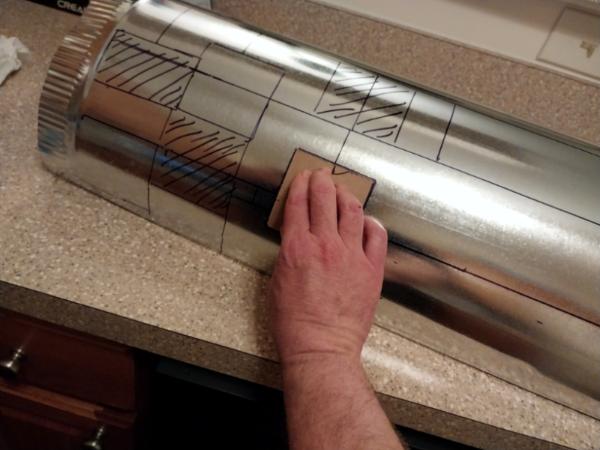
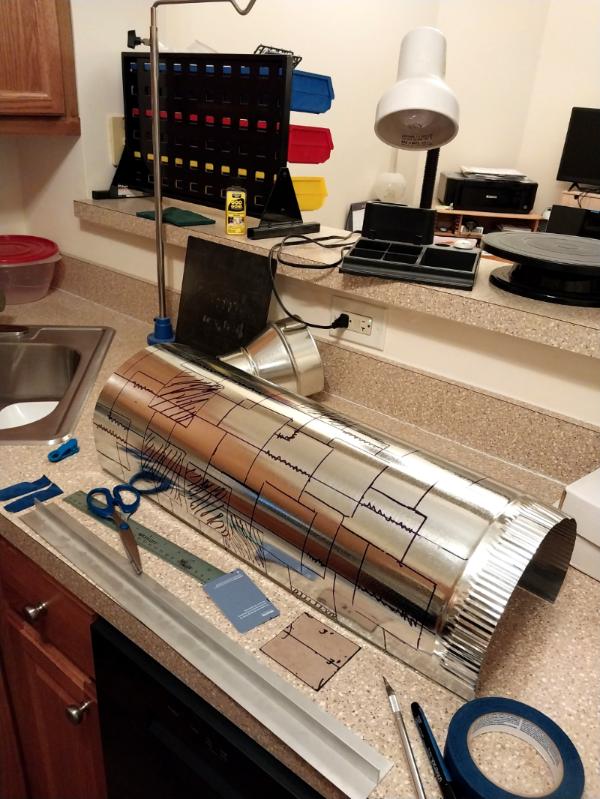
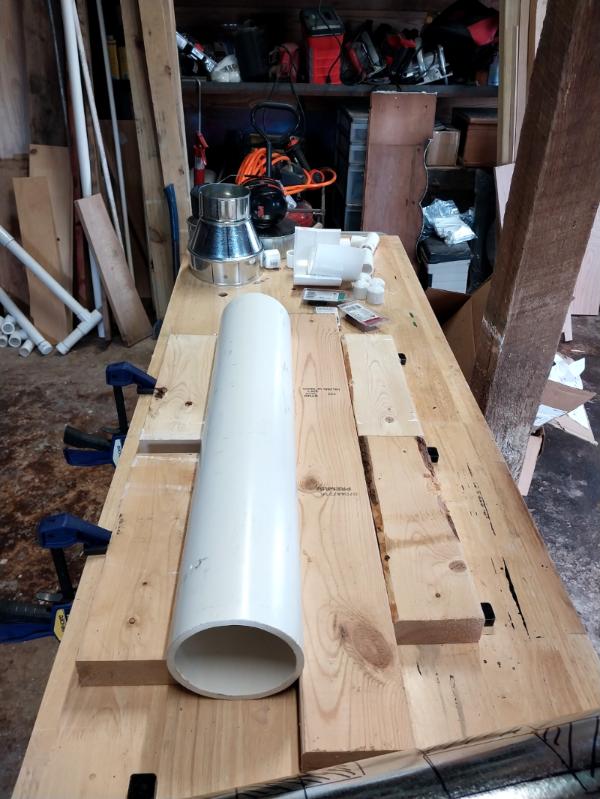
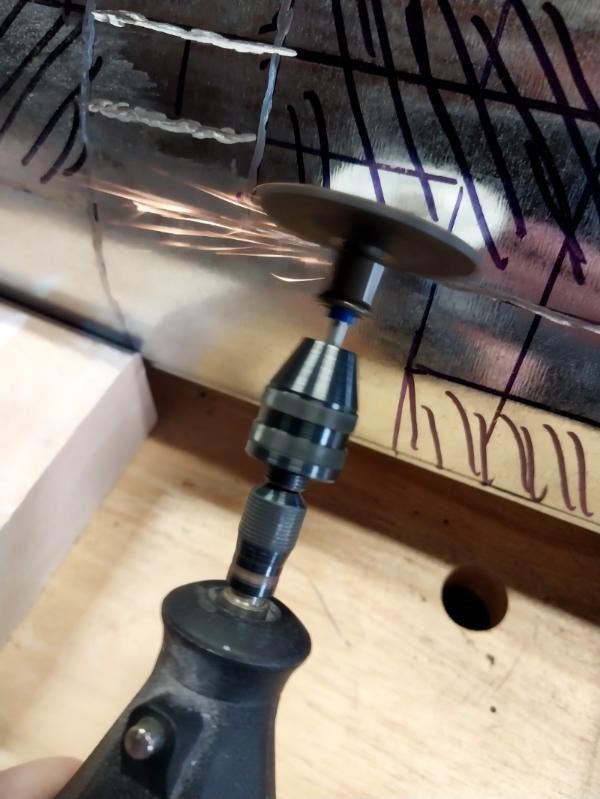
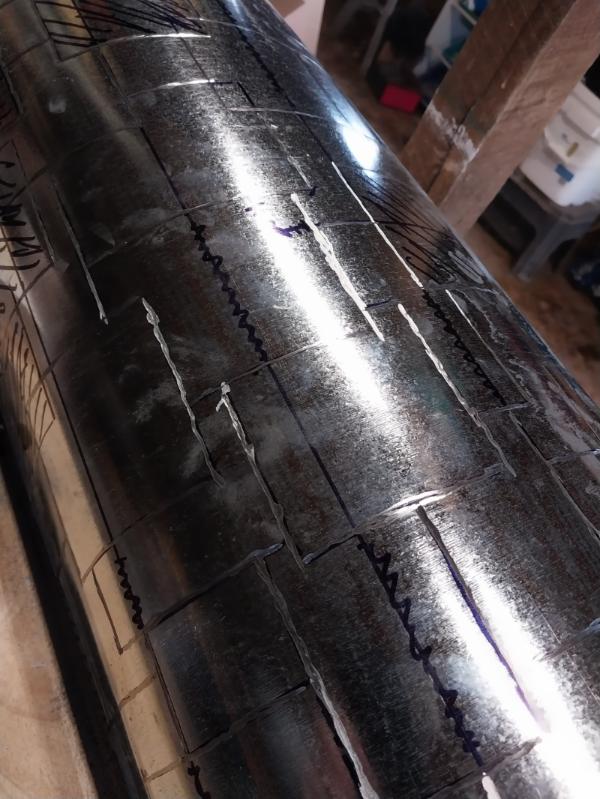
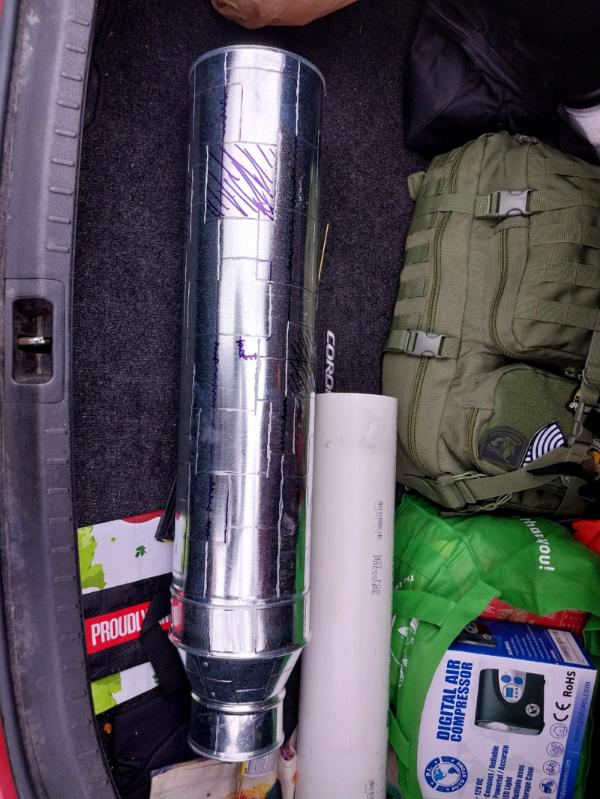
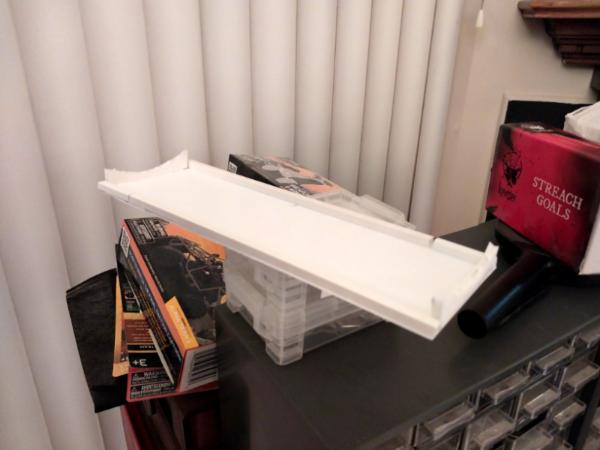
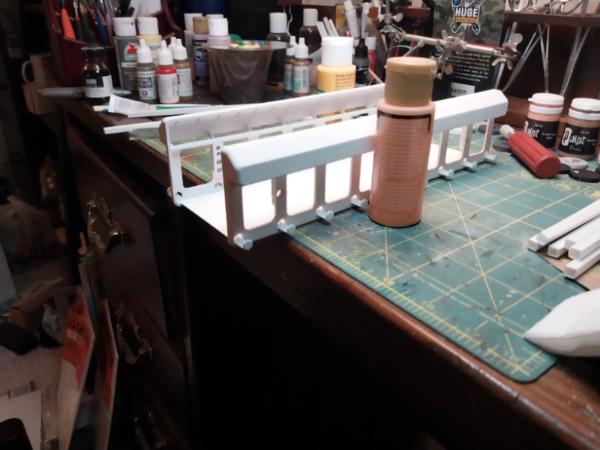
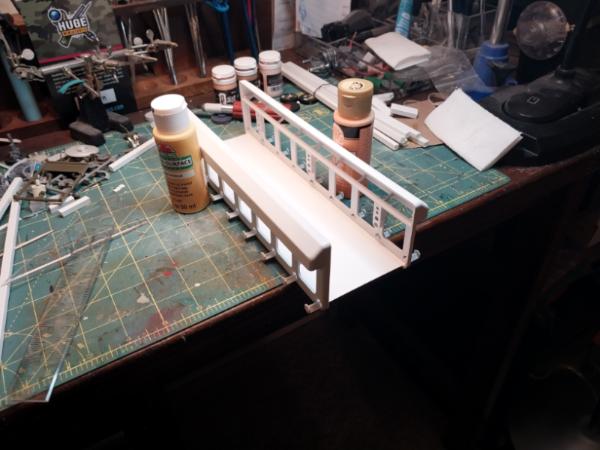
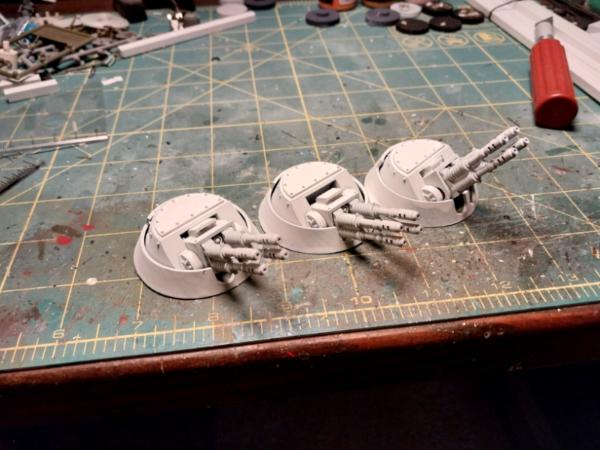
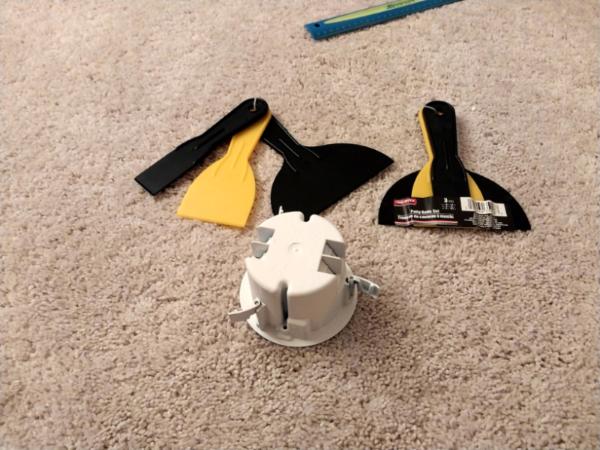
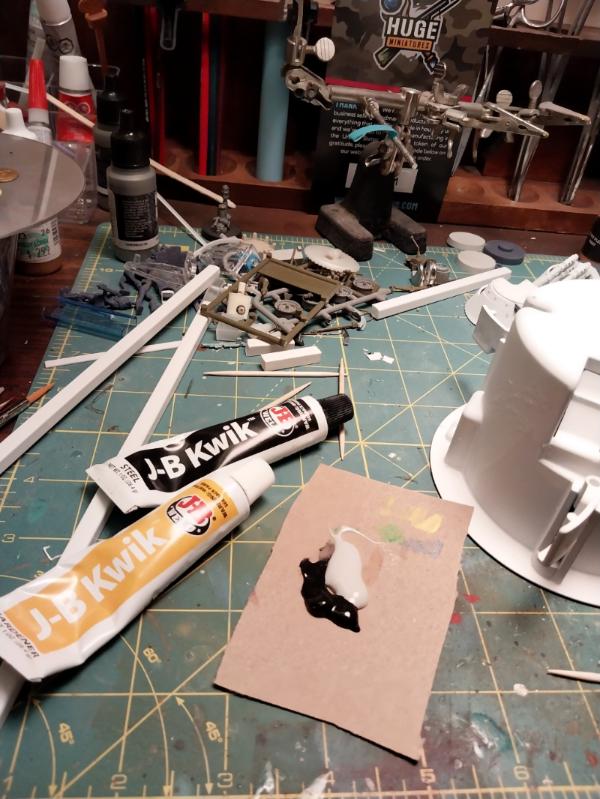
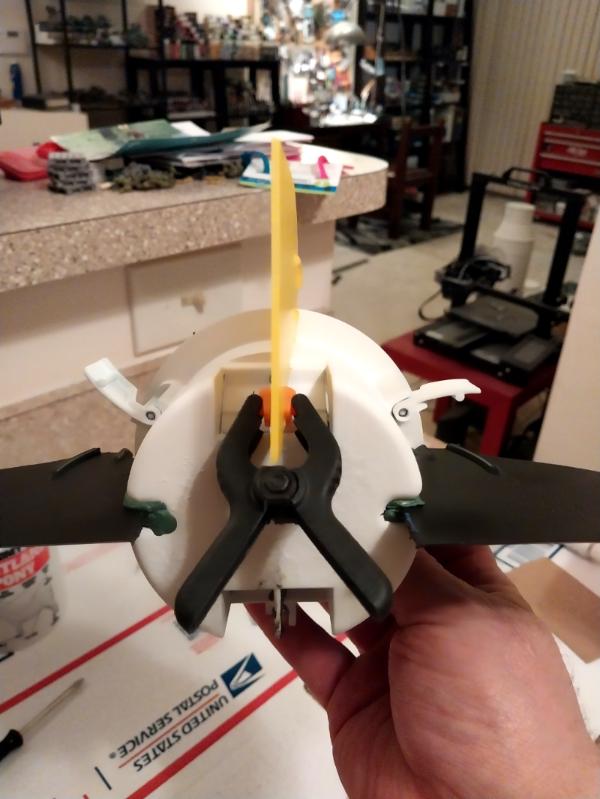
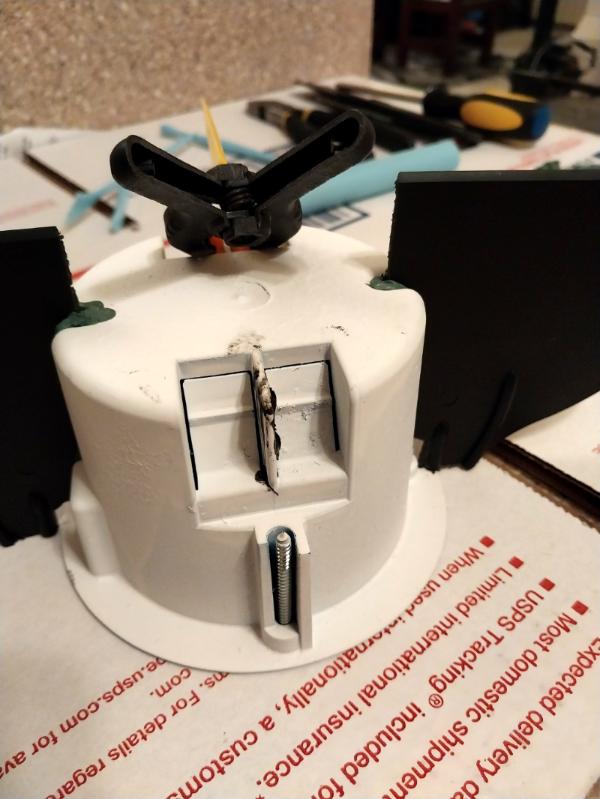
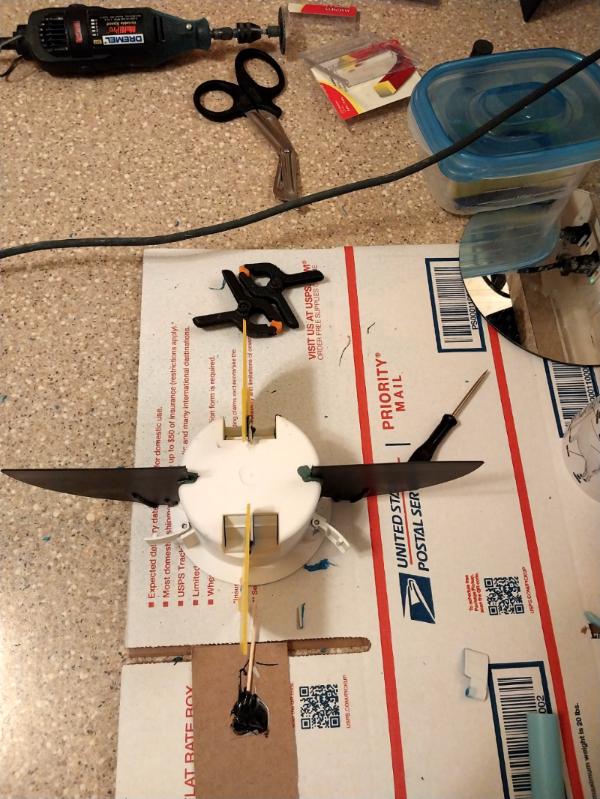

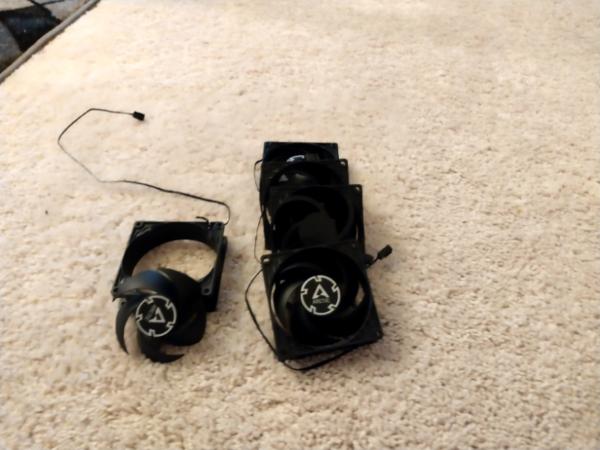

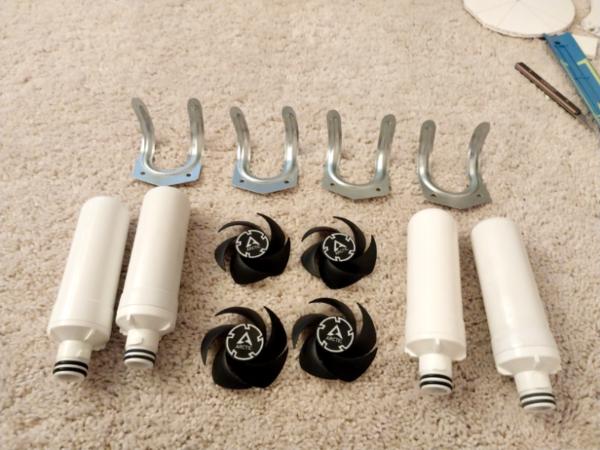
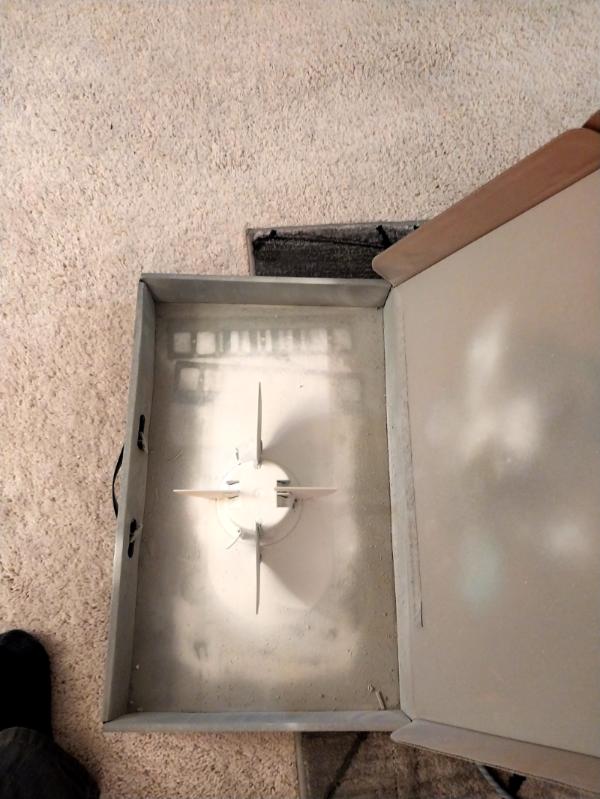


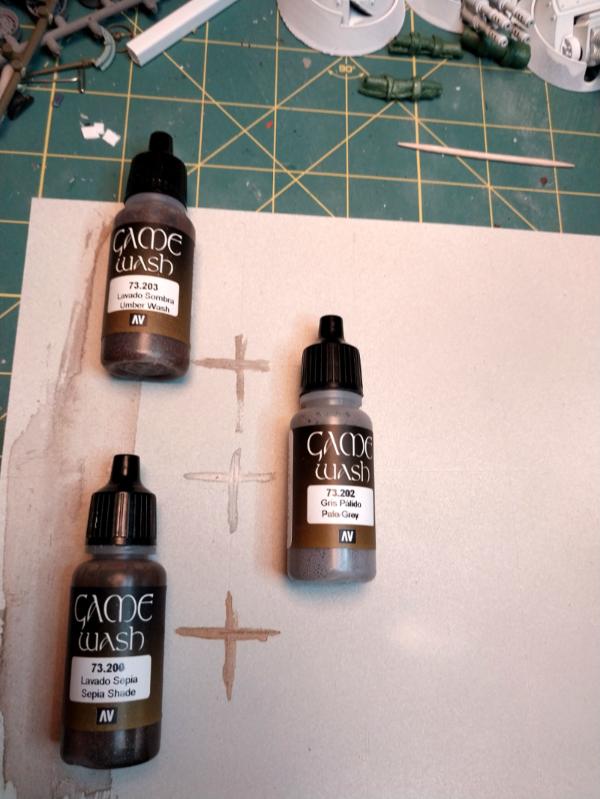


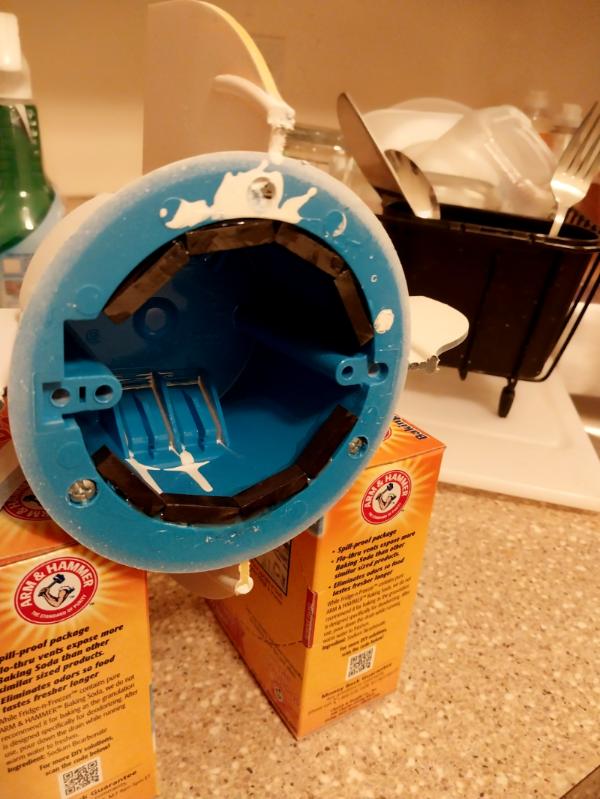
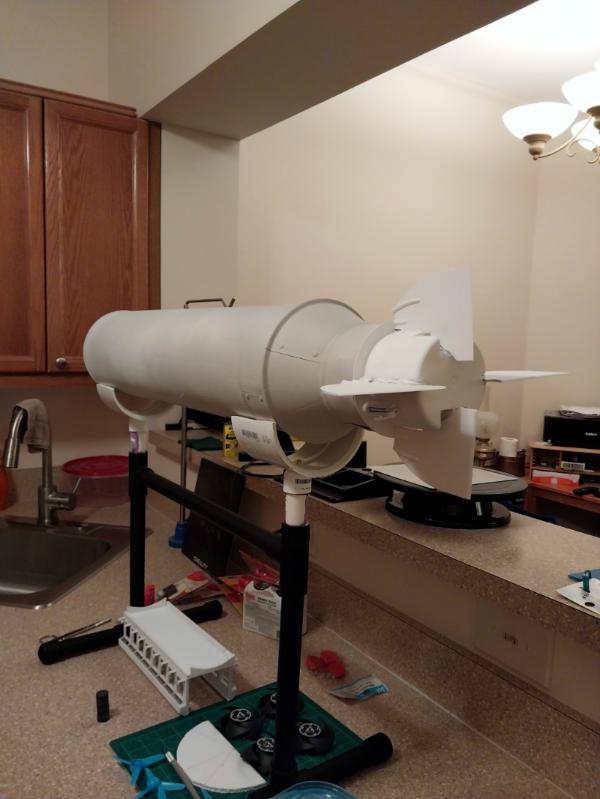
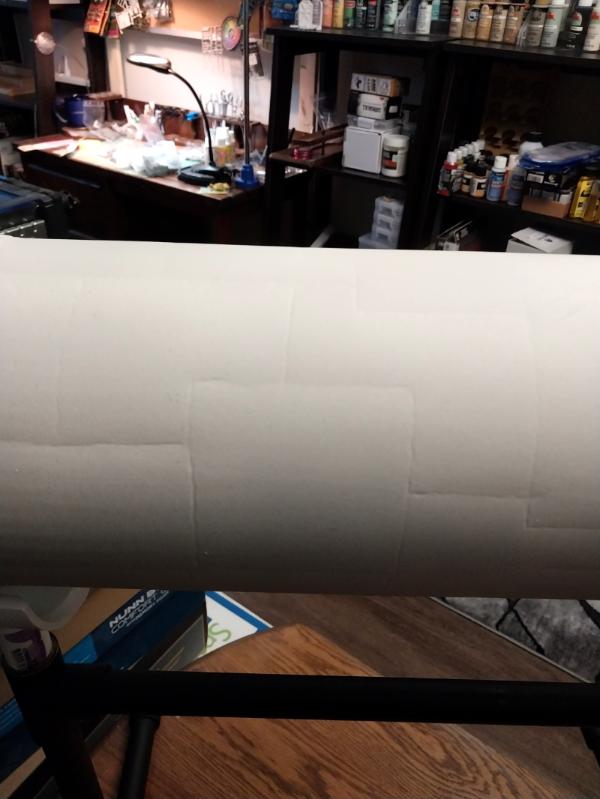
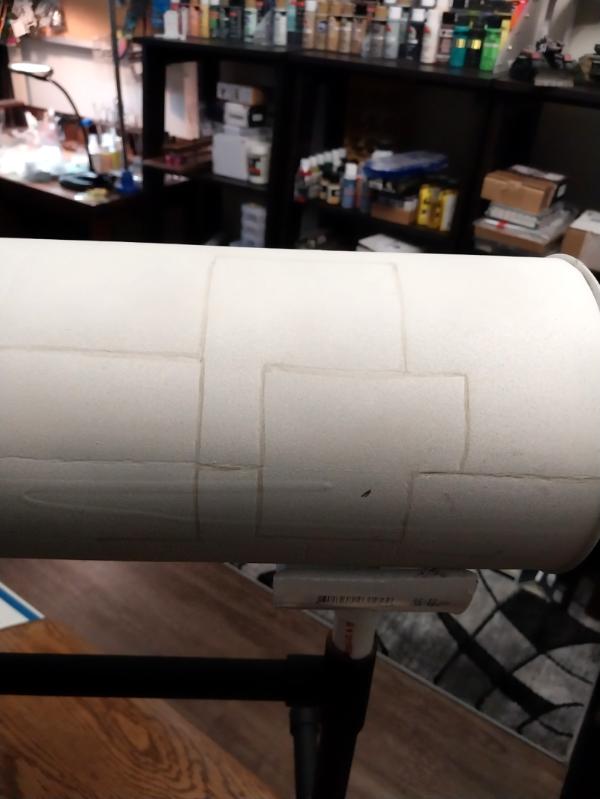
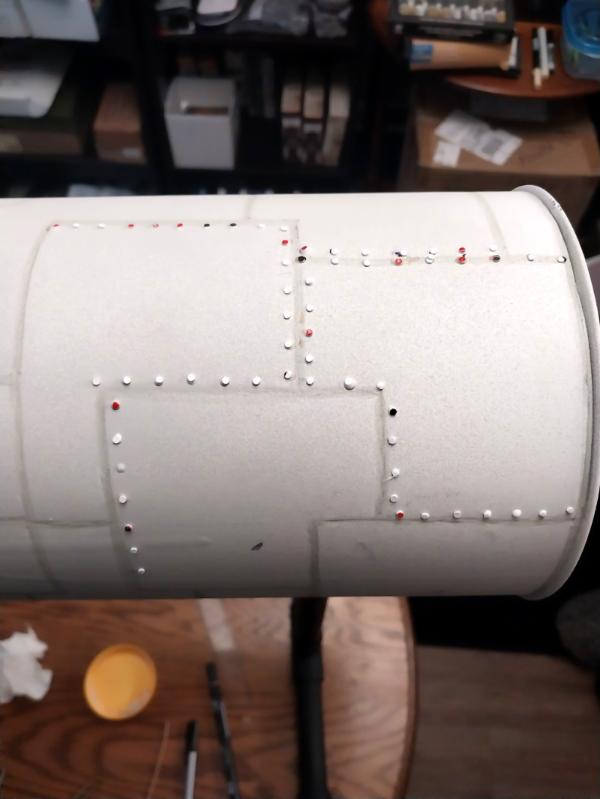
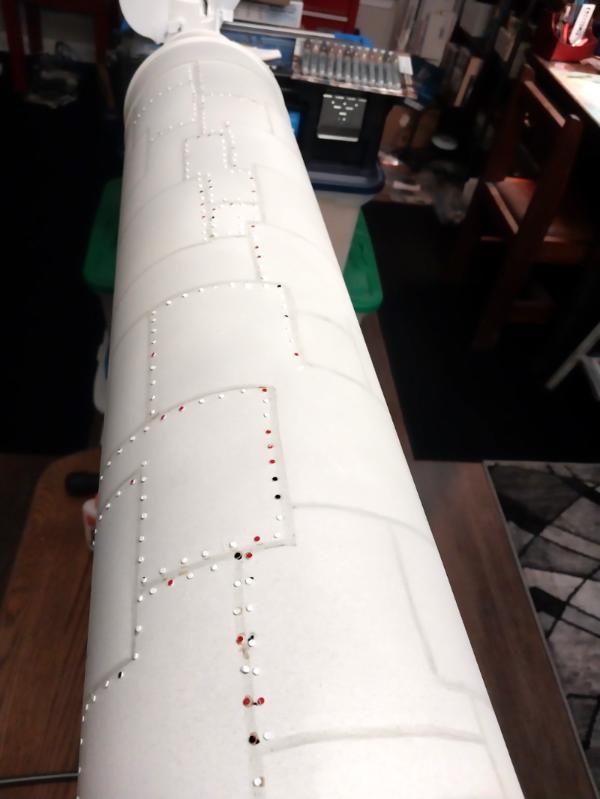
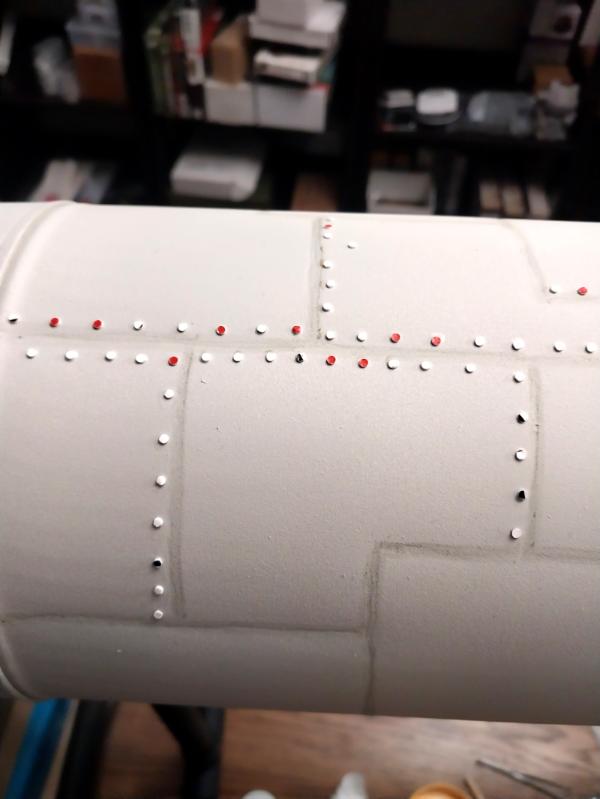

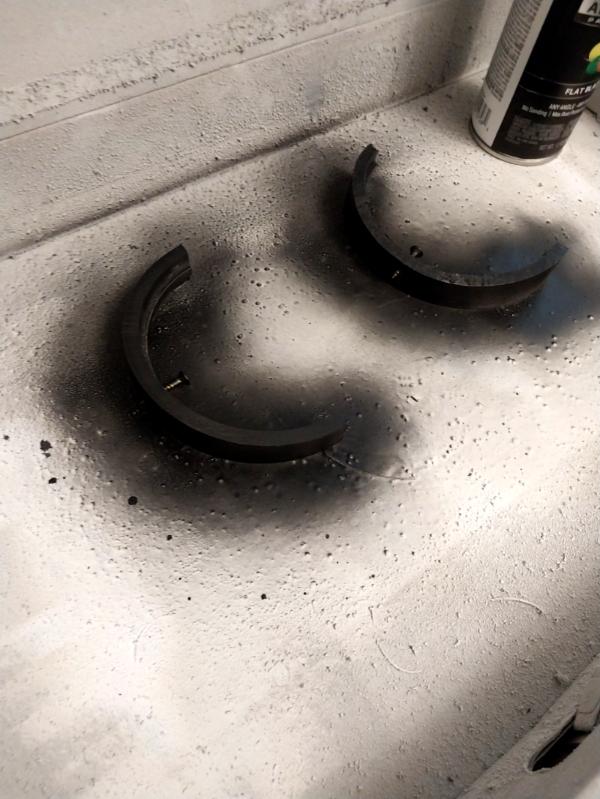
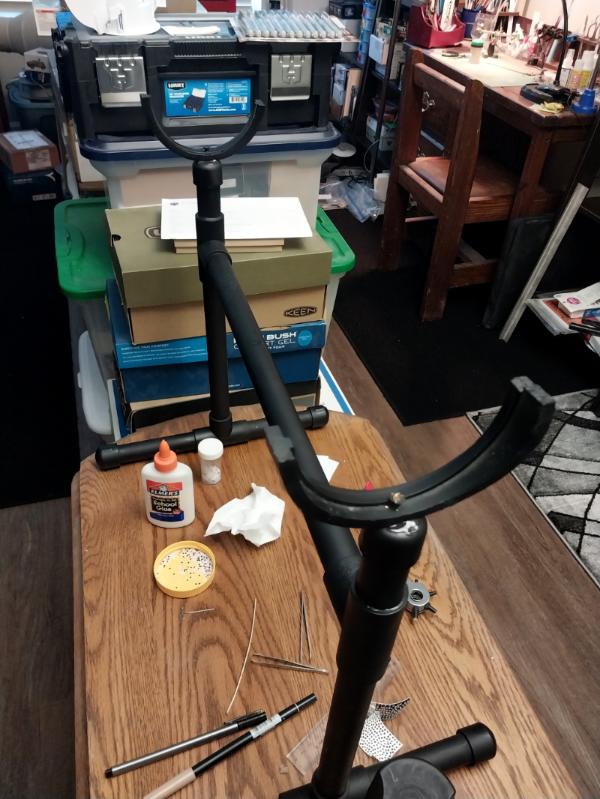
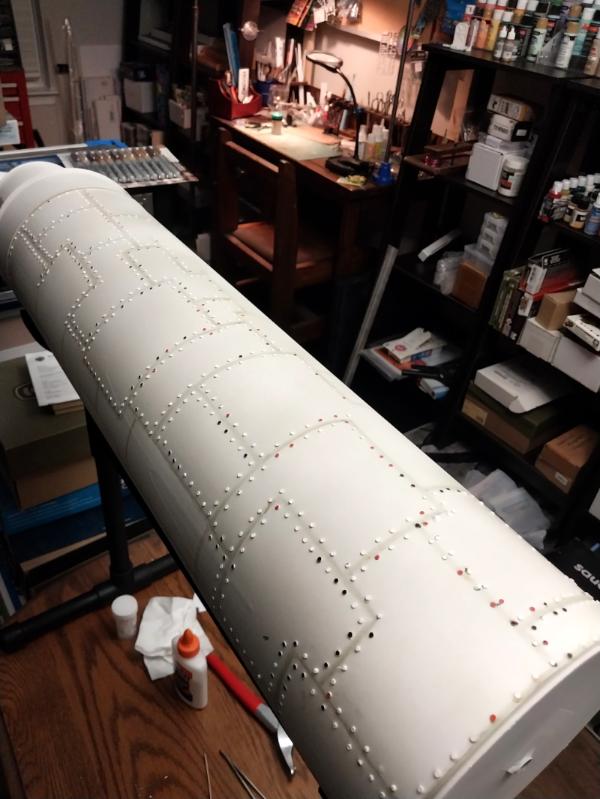
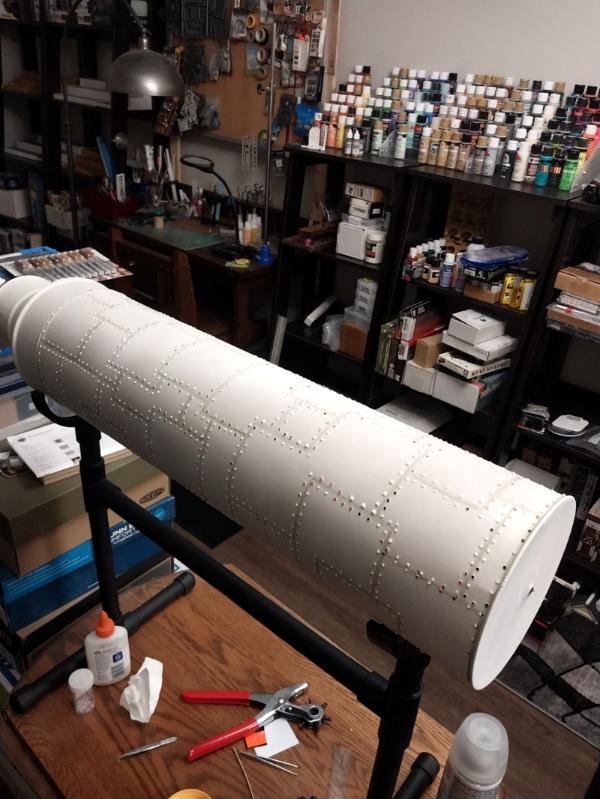
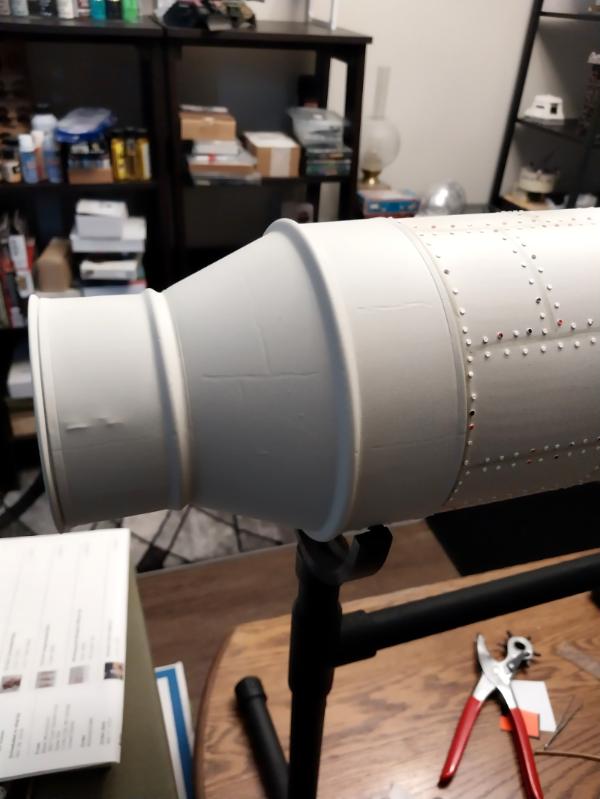
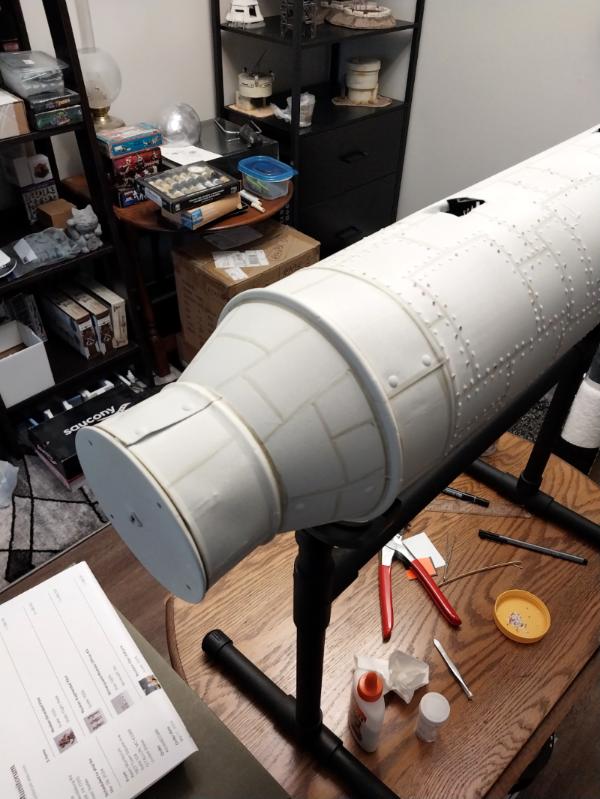
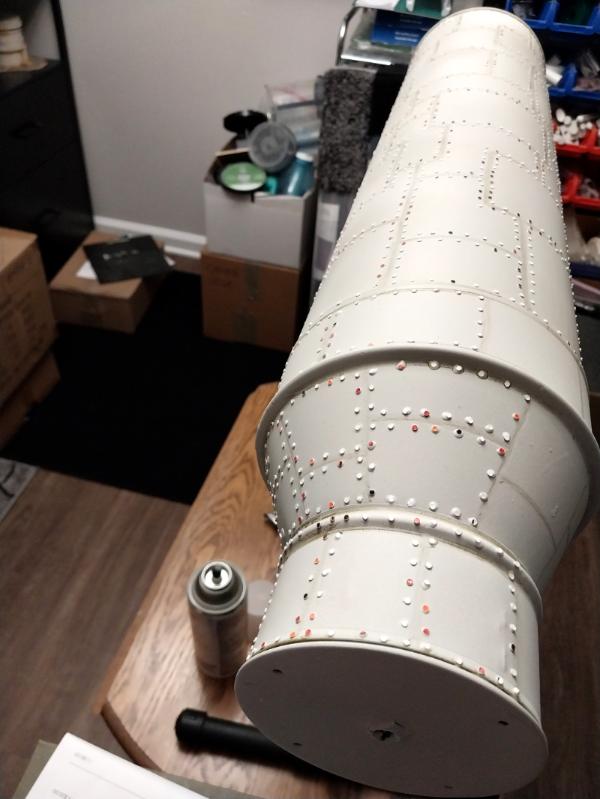
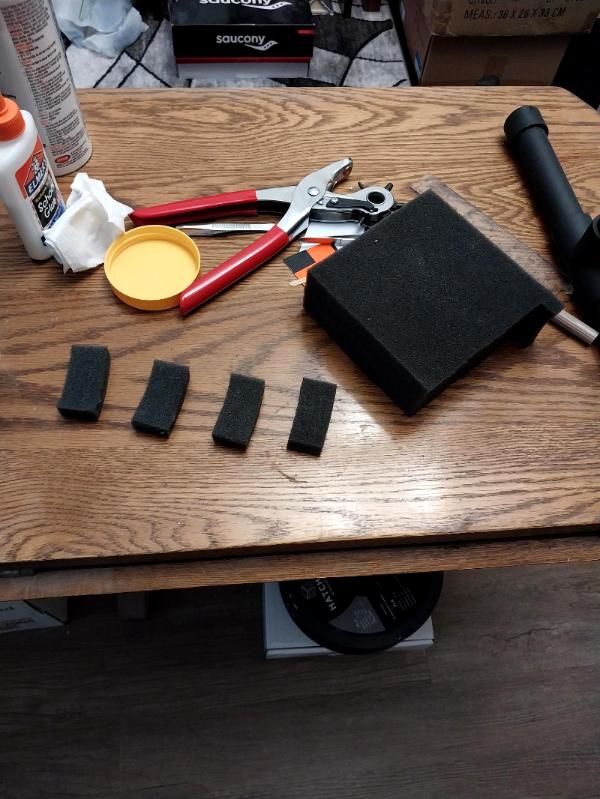
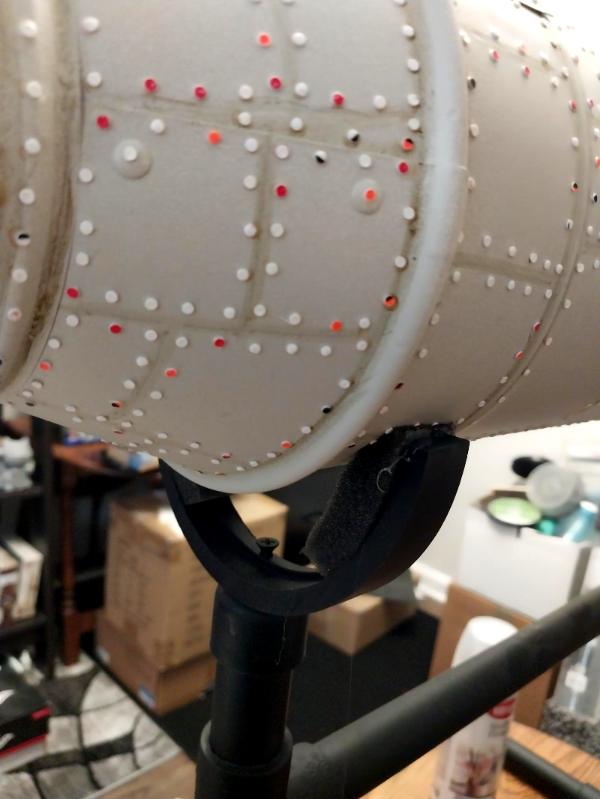
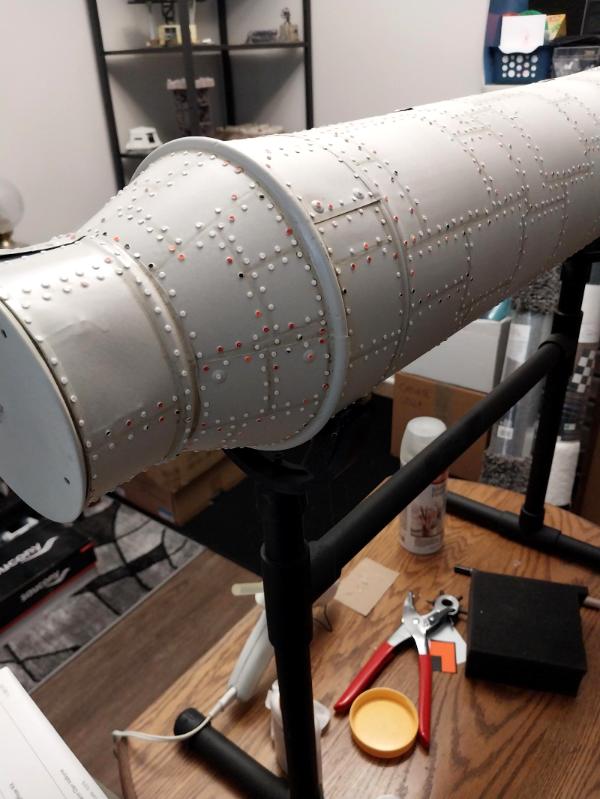
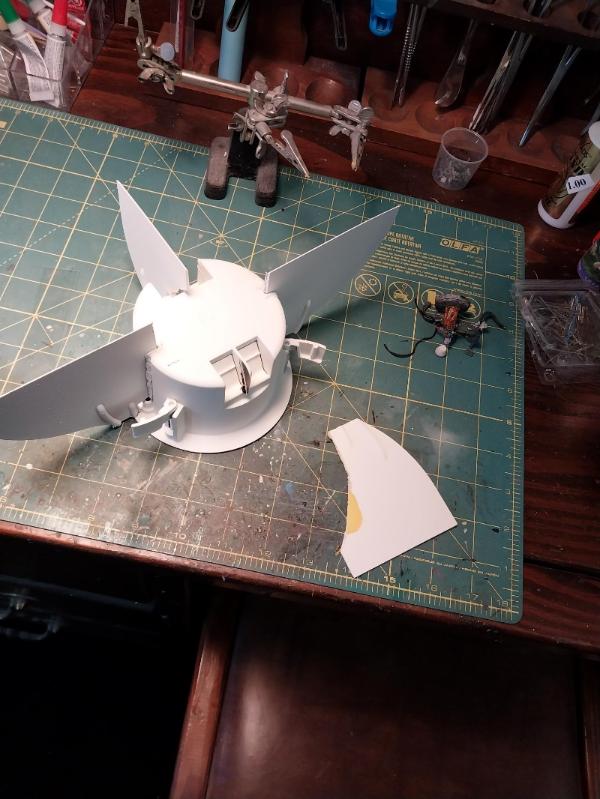

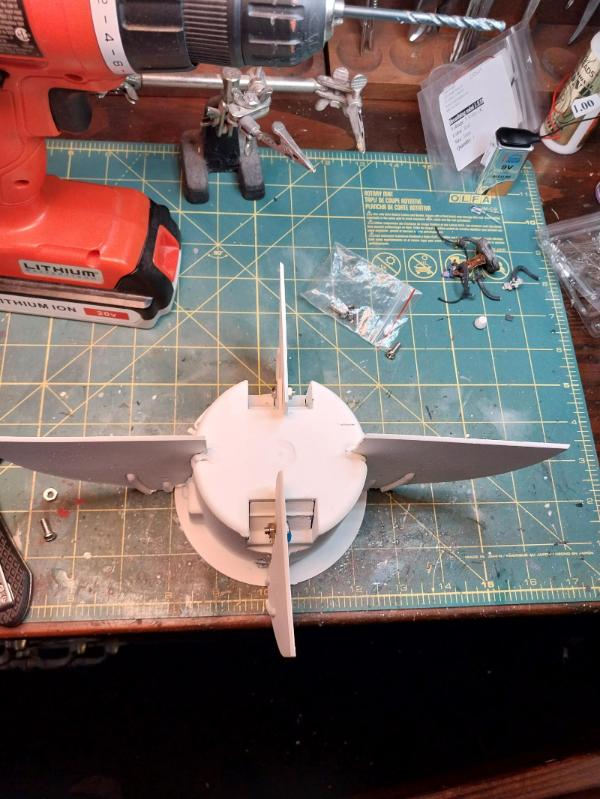
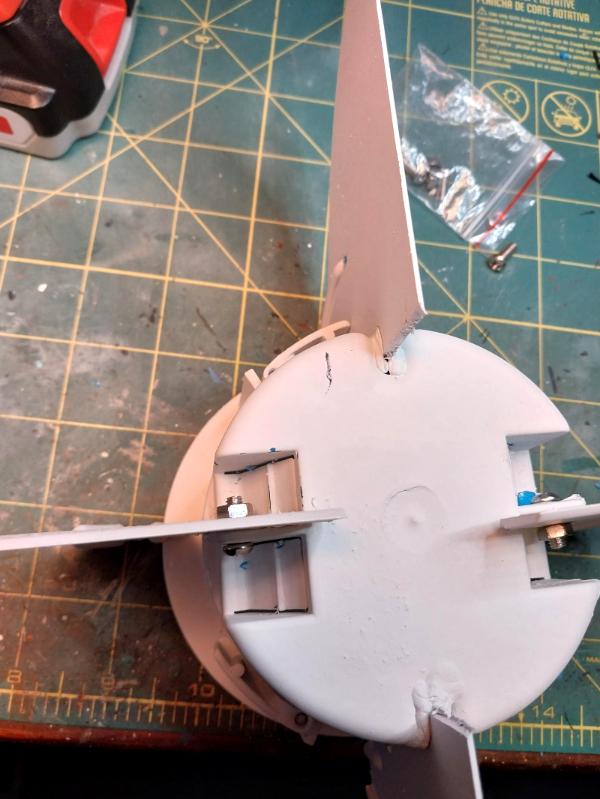
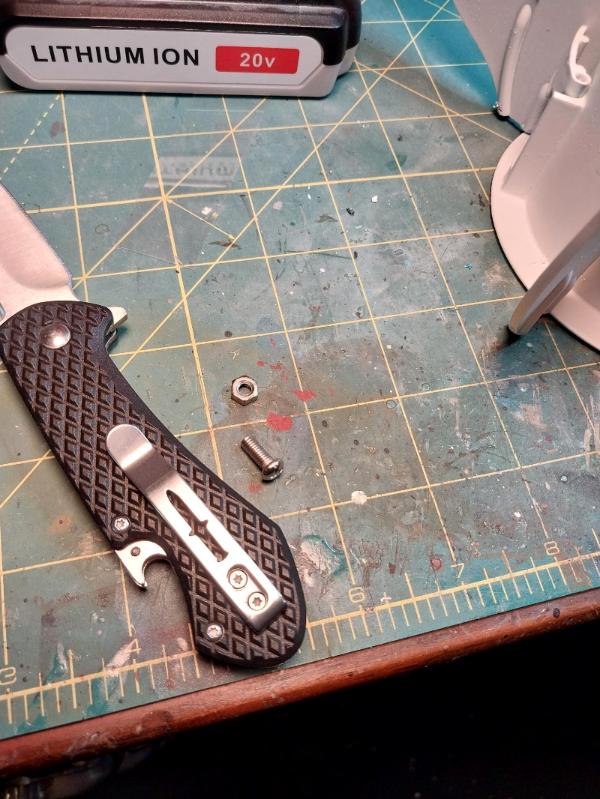
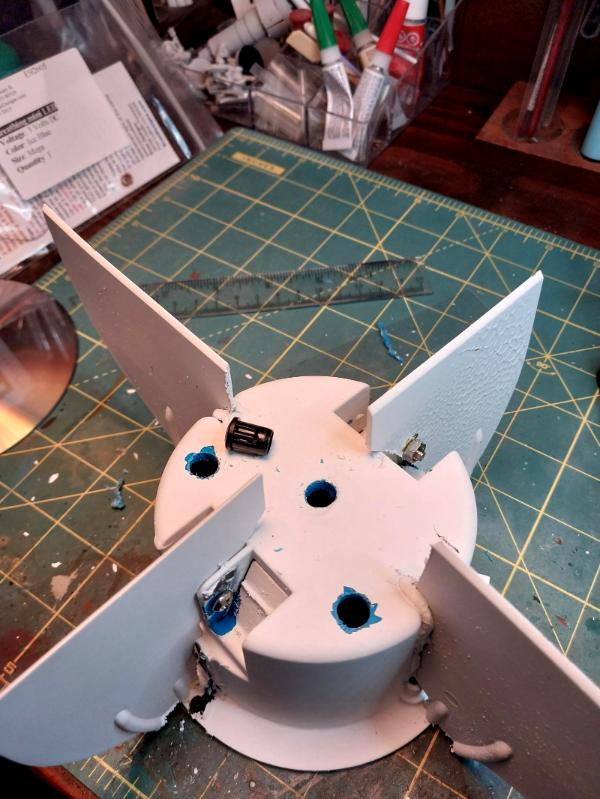
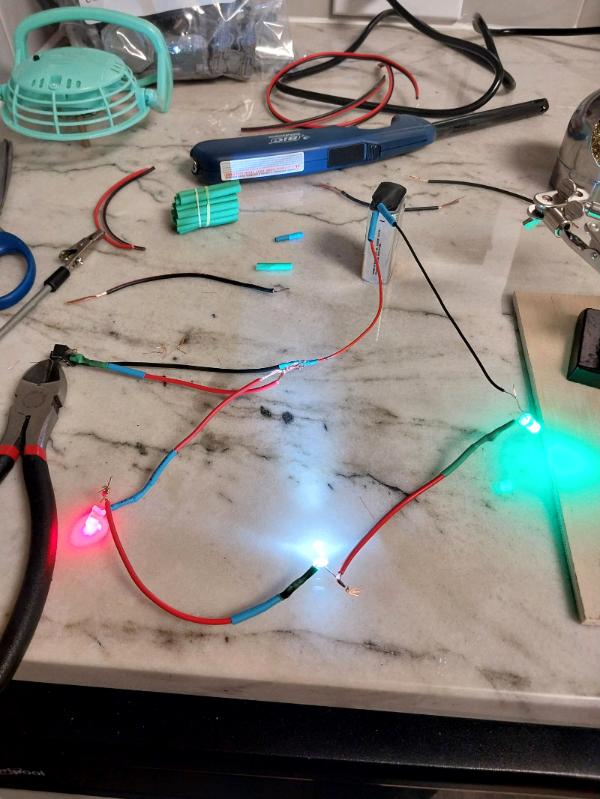
 and decided to throw caution to the winds and attach the engine pods. These started life as refrigerator filter cartridges and I've got cheap computer tower fans to provide the propellers and am going to have to add some doodads to hide the sheet metal screws and other imperfections. The struts are dollar store broom closet hangers. I also want to add navigation/running lights to them once everything is in place. Placing these is turning out to be a bit of a bear, but I think they appear to be level to the Mark I Eyeball and that's all I really want: