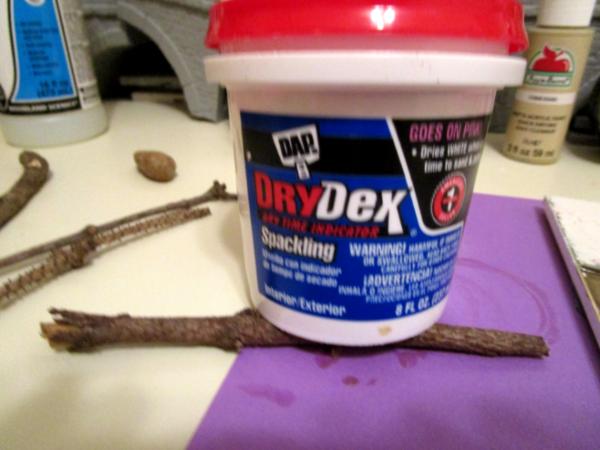
To be honest CK, I'm not terribly tech savvy myself. I truly wanted a printer that was pretty much 'plug and play' (or 'fire and forget') right out of the box and was willing to pay a bit more for that reliability.
I think I got into the game right was price point and product availability was swinging to make machines that met that expectation the norm- more and more machines are being offered today with filament run-out sensors, overheating sensors, self-leveling capability and more, at the same price or less that I gave for a relatively straightforward 'mechanical' printer just two years ago that needed to be manually calibrated for everything.
Having said that, I can learn, when I have to, and have gotten interested in understanding the mechanics of operation of a printer. My increasing number of machines is partly my quest for the utterly reliable, indestructible and totally eluctible perfect printer- but also a realization that printing one model or piece of a model at a time is very limiting. I've got a very extensive library of .stl (stereo-lithography) files just itching to get made into something. If I can ever get my Ender running, it'll be nice to have three going at once.
What I really want is even one machine that I can start on a job when I get home from work and then forget about- go off and paint other things and only look over that machine when I notice it isn't chugging away and start it on something else.
I also suspect that the 3d printer market is going to continue to changed rapidly: I don't thin the market is any near saturated with suppliers yet and the technology continues to evolve and add refinements at breakneck speed. Taking time to think things over, learn the lingo and talk with your friends should only see more choice at better price added to the selections available.
Of course, do keep the odd Grot curse words handy- no matter how good the tech you're bound to need them one day.
Interesting point! Interesting to hear how you experienced it. It also convinces me to wait just a wee bit longer, to be honest . My hobby time is limited, and spending half of it trying to get things to work is a recipe for disaster to me.
I'm Ok with the prices they're being sold right now, I just want them to be a bit more user friendly I guess.It's self-protection, really: if I want to relax after a bad/stressing/uninteresting day, the last thing I need is to spend time figuring out why stuff went wrong. I do that for a living, that's bad enough already
There's honestly not a lot of tech savvy needed with current FDM printing. Plus there's wonderful people here and on other forums that can help with any issue. I am considering a resin printer now as I want to do armies of small models. The Ender is doing great with larger models, but still the 28mm scale guns are just too fiddly. I think new innovations will just keep making 3d printing better and better for gamers.
So much to catch up on, it's been a while since last posting and I've been getting things done, just no time to post up. My job deals with both physical and cyber security, so we've been just a titch busy this last little while.
First up, some philosophy:
I fully agree with Theo's observation that there does not have to be a tremendous amount of tech understanding involved in running a 3d printer. I think originally, when one had to assemble the motherboards and invoke the dark spirits of the Resistors and the Capacitors, yes- being an electrical engineer who also helped put men on the moon definitely helped. Nowadays, printers come with some assembly required to make them easier, cheaper and sturdier to ship, not so much because the industry is still in its infancy. And new printers come with more and more bells and whistles as standard (see Kano's Model which states that what was once a 'delighter' when first introduced, rapidly becomes 'standard expectation' as the innovation gets adopted by more and more producers to stay competitive; things like easy to read touch screens and self-leveling.)
I would argue however, that there are so many variables that can affect why a print succeeds or fails that there is an element of the arcane involved. Is the bed level? Is the z offset right? Is the bed too hot, too cool? How about the filament- too cool, too stiff, to much dust? The variables are many but not infinite. In trouble shooting, I feel as much like a necromancer as I do a citizen of the 21st century. I still refer frequently to my two favorite quotes from actual sciency guys to explain my love/hate relationship with technology:
Robert Heinlein: "If you flip the light switch and you know why the light comes on, you're a scientist. If you don't, you're a sorcerer."
Arthur C. Clarke: "Any sufficiently advanced technology is indistinguishable from magic."
Theo is also right on the money when he states that there is a large and eager community of magic-users who are more than happy to share what they know and even more- what didn't work. It's a very good time to be getting into the hobby/industry: device prices are coming down, capabilities are going up, more functions are being automated and there is a growing community of practitioners to consult.
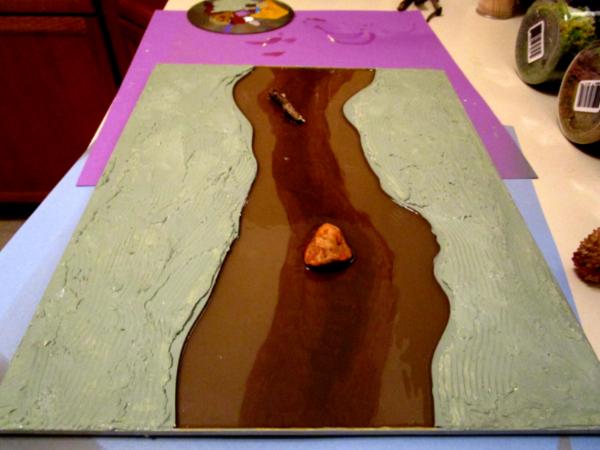
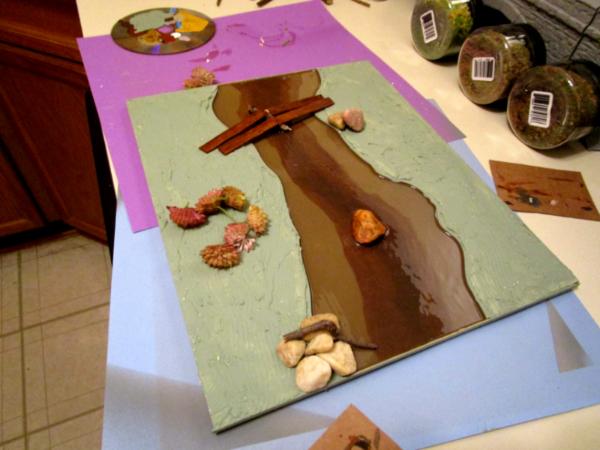
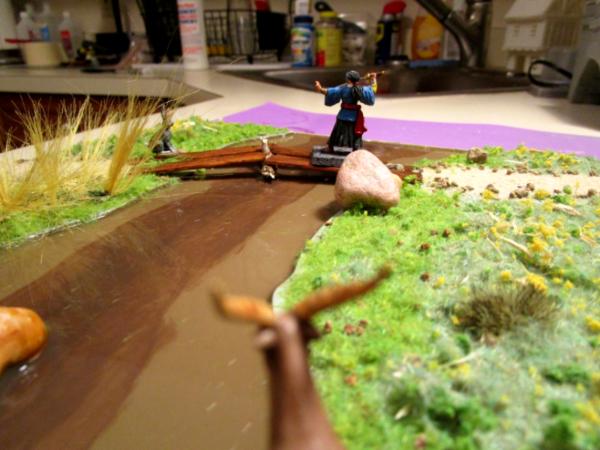
Next up: the Chinese Walled Villa:
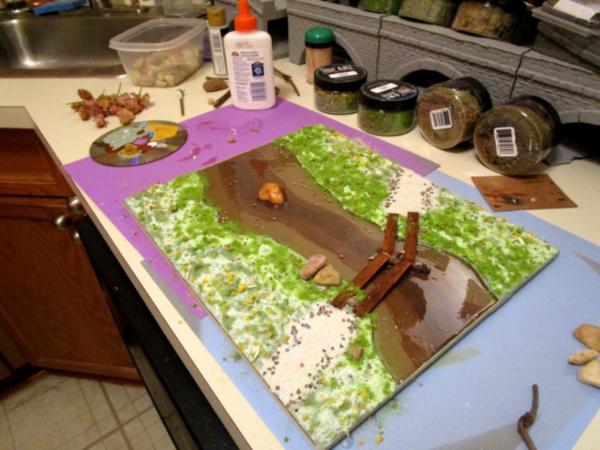
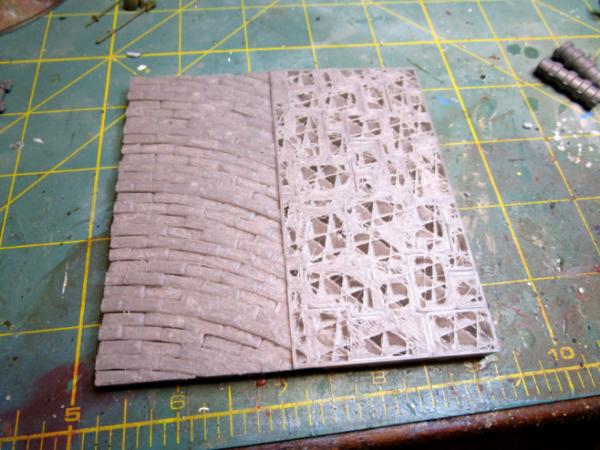
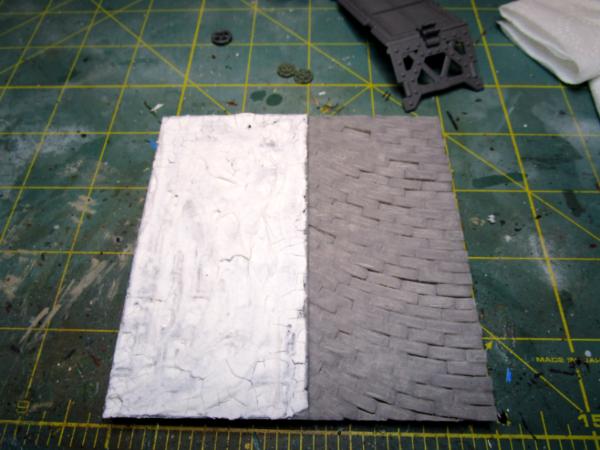
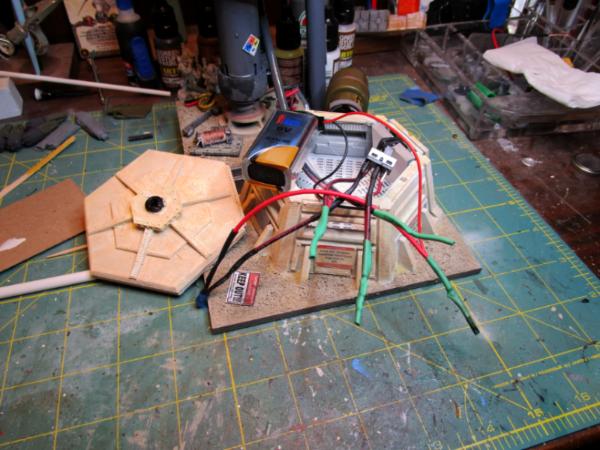
All the wall sections have their base coats of plaster color and stones, and all the tiles are done (except for a few along the front that will be earthen). I'm finishing painting the ones with barred portholes or trees on them tonight and hopefully gluing them down tomorrow. The large rectangular grey areas you see are the foundations for the houses/buildings. Everything else will rest on top of the courtyard tiles so that more variety can be obtained (stone gardens, statuary, temples, shrines, wells, etc) or can be left open for more playing/fighting space. I really like how the courtyard stones are shaping up, and this is without even a base wash to tie them together.
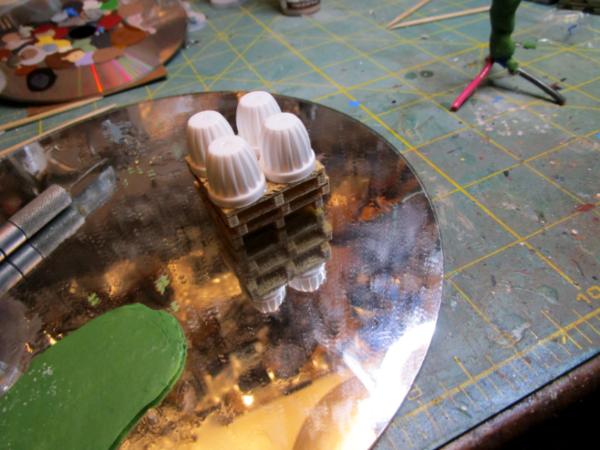
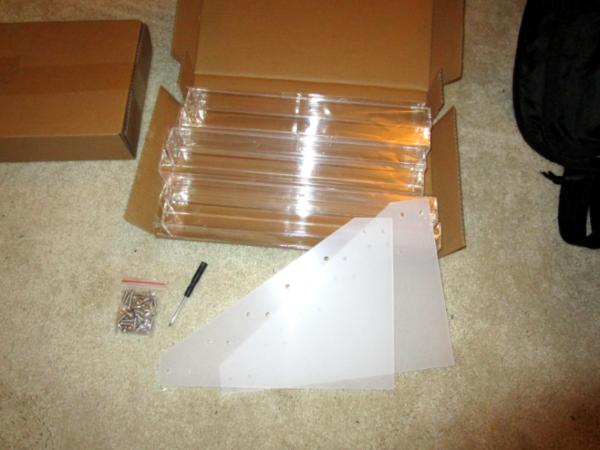
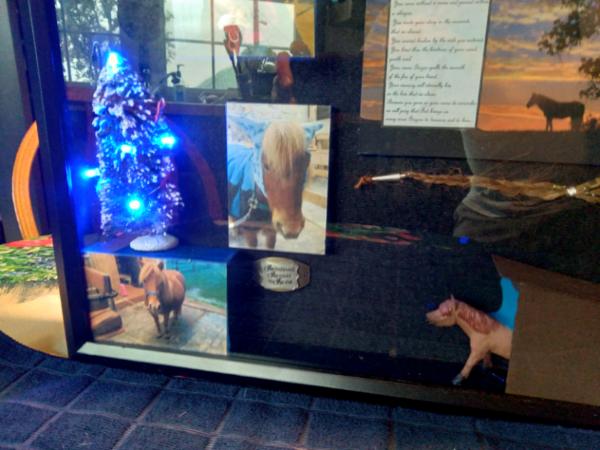
Next: I got tired of printing all this junk for the villa, so printed this Halfling Stable off from the Dark Realms Miniatures 'Shire' Kickstarter. It's actually to go with the chibi Shetland Ponies I painted for the wife some time ago and I'm actually printing off a couple of doo-dads to go with it (a shade tree and some hay bales).
You see it exactly as it came off the Monoprice MP10-Mini printer. I think with a little sanding it will fit very tightly together and look very good. The holes you see in the top front edge are for slipping wires down to act as hinge pins for the doors. I'm looking forward to getting it painted up and out of the way.
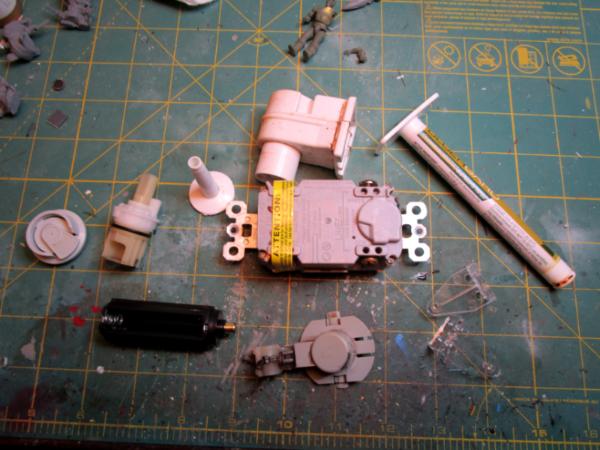
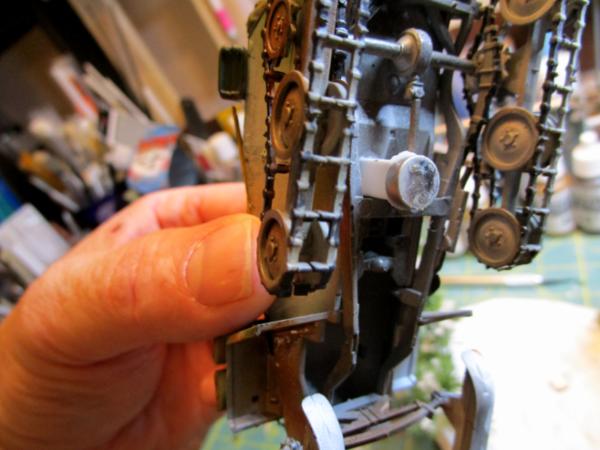
Finally: At the moment I have the Monoprice and the Creality CR-6 running fairly reliably and consistently. I lost a couple of weeks on the CR-6 because the main power switch died (me neither- never heard of those going bad) but it was an easy part to order from Amazon and even my Humanities Majoring ass was able to hook it up correctly.
I do still hope to get the Ender-3 Pro back in action, but as Napoleon said to Ney- rushing from Quatra Bras to Waterloo- "ask me for anything except time!" At the same time, Wellington, of course, was saying "Give me Blcuher or give me nightfall." It was 'a near run thing."
More follows soonest, thank you for your kind words of constructive criticism!
That courtyard looks magnificent all put together! Good luck on getting the rest of it done.
Hobbit stables are very cool, hope getting the doors on will be easy.
It's fun to see that big Chinese walled villa so complete, I'm looking forward to seeing when you add more of the internal buildings. How large is that complex?
Seeing your cute little stables and talking about chibi Shetland ponies reminded me that you were considering converting some of those ponies into a kill team or something. Am I remembering that right?
How are the repairs going on your poor collection?
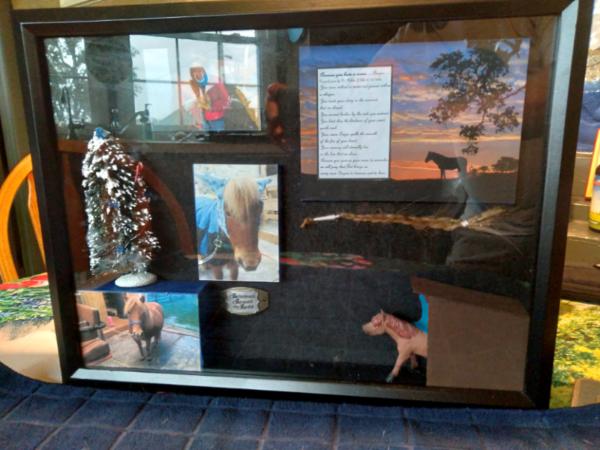
The villa comes along- lots more printing to do but having the courtyard done is a major load off (frankly, it was getting boring painting all those stones and rocks!). I think it is the most ambitious project since the firebase made from a multi-picture frame a few years back. It is mounted on 4 1' square birch panels, so measures 2' x 2' or 4 square feet of playing surface.
I've got three sets of the Shetland ponies done (pictures to follow): the first set of four that have the coloring and markings of our four, another set of four with the same coloring/markings but done up as superheroes (Superman, Spiderman, Wonder Woman and Black Widow) and a last set of eight that are rigged as a kill team. A lot of fun to paint up, but I have to go back and do the eyes over, as I saw how Dr. H did his on the Monoloke (sp?) diorama he built a bit ago. I'll get the stable painted up probably this coming week- I've put together a 'go bag' of painting stuff so that when I'm spending my Blue Team week working from the farm, I have materials to work with. In many ways, it is more liberating than working at my painting desk in the commuter apartment in Virginia- almost too much choice in terms of paints, bits and bobs and new projects. Planning ahead and taking with me the wherewithal to get something done at the farm makes me focus within manageable limits.
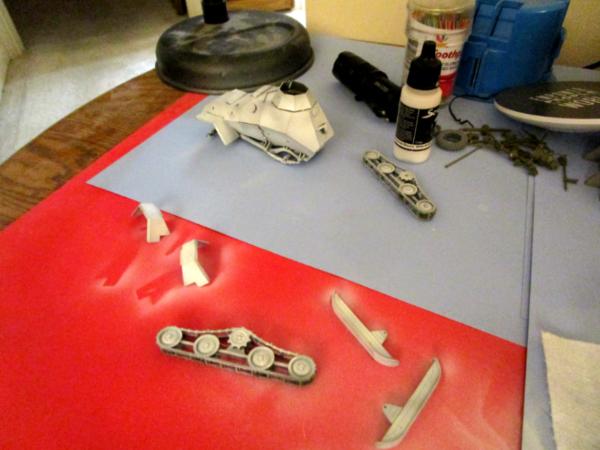
The collection of finished work is mostly complete- all the arms glued back on, the buildings repaired (and in some cases modified and improved) the vehicles rebased and terrained. Some things just weren't salvageable, but most everything is back to near normal. Unfortunately, the incident has left me with the idea that I can't have everything out on display down here, so I've been boxing things up and taking them to the farm, where they will languish in darkness until I have some shelves set up to put them out on again. Considering I have still about 40 boxes of boxes that need library shelves to put them on after 14 years since they were packed up three moves ago, it may take a while.
It's like they told us in Airborne School: "If you have a total malfunction with your main canopy, you have the rest of your life to deploy your reserve parachute." I have the rest of my life to get books and models set up on shelves, because I don't reckon to move again. I'm just too old, unless there is a darn good reason!
I'm learning more about the kind of adhesion to slice into the pieces I print, which varies depending on which machine I'm doing the file for. Recently, I was printing medieval roof sections for a village that had a pretty broad footprint, but were tall (steep pitched). For some reason, the corners curled up, even though I had the build plate temperature lower, and the height of the print and the friction of the nozzle extruding the higher layers was enough to knock it off the build plate twice- and my usual problem is chiseling something loose from the build plate. Next week I figure to try reprinting the piece, but using a full raft instead of a skirt- to give it more footprint to stick to the build plate- we'll see if that works on the MP-10 Mini. If not, I'll try the print on the Cr-6- that sucker I have to be really careful, really delicate and really patient to get things off, because I'm literally using a fine masonry chisel to get under the corners and pry things up; it sticks too well!
Thank you again for looking in and asking after- I'm very flattered that folks take the time to look at my work.
And interesting thoughts on the philosophy of 3d printing. The more I look at the results people get (e.g. your courtyard and the buildings) the more I feel tempted to try the magic. Just don't want to spend more time with computer than I do already.
Courtyard really came together nicely. It’s so tempting to try and take that project on because 2’ square is the Bushido board size, but since they just released playmats I think I’ll just use some of those walls and towers for terrain.
The ponies stable looks great, whoever designed it really did a good job if there was no clean up of supports for the parts.
I never saw myself as a wizard, I was always the thug .
I have, in fact, been up to something(s). As mentioned earlier, having to anticipate what I'll need when I'm working from the farm helps me focus on individual projects wonderfully. Working from a wooden folding TV tray with only a few colors, a couple of brushes and some bits of cardboard for palettes is, for me, very effective. I can't do everything I'd like and I won't trade my painting desk for anything. But I do enjoy getting a couple of things done here and there.
First up, Theo: I wouldn't have printed and painted all those courtyard tiles if I didn't have to. The walls, towers, gates and everything else are intended to be taken apart when the game is compete (the courtyard too, for that matter). I am trying out an idea to make a big diorama manageable for transport and set-up- sort of like the fortification I did a long time ago, but in pieces. I think a battle mat and the terrain bits you need for line of sight and sheltering, etc, is the way to go.
Next up: The Hobbit Stable. Printed extremely well on the Monoprice MP10-Mini with no supports and almost zero stringing or other defects and here's the end result:
I'm overall pretty pleased with the final product. I tried to sand a little bit to get the seam between the top and bottom pieces to line up better, but sanding and FDM printing aren't always highly compatible (the layers can separate and start 'unraveling' sometimes) but eliminating it entirely was not possible. I don't like how the hay inside came out and will probably redo that tonight when chores are done- but don't let the perfect be the enemy of the good; I wanted to get some pictures up. The doors are done, but I need a bit of wire or filament to hang them and will do that when I can find something to use.
The pony figurines are the next project- having seen how Doctor H painted the eyes on his chibi diorama I want to redo these and then give the whole set over to the spousal unit, who has been clamoring for them for her desk for some time now.
Finally, I'm very proud to have been asked by the creator of one of the Kickstarter campaigns I'm backing to test print one of the buildings. The set is titled 'Medieval Architecture' and is a very nice assemblage of Russian styled houses, walls, bell towers and shops, with a bit of added whimsy that makes them fun to print, paint and play. The are scaled fairly well for 28mm to 32mm figures, but you make the call when you see the pics. I don't want to break any DakkaDakka rules, so won't post a link to the campaign, but you can find it easily enough on the Kickstarter website by searching for the title or you can DM me and can provide it. I have the creator's permission to use these pics here.
Apologies for this picture, my little camera died and I'm using my phone for now (all the other pics are better). The building I was given to test is the Watch Tower. It prints out in three pieces and they all peg together very nicely. The top/roof was a 20 hour print (at my settings, there are probably better to be more efficient), the middle portion about 8 hours and the bottom was 12.
I primered it grey and undercoated it flat black. Here's with base colors applied:
And after some washing and drybrushing:
As always, I see things in the photos that are invisible to the naked eye and I'll do a bit of clean up under the eves and such places. The figure is a Games Workshop High Elf Mage at 28mm Heroic scale. And one of these days, I've really got to try to redo the eyes on that sorcerer.
I wanted to take a closer-up of the roof- I'm really chuffed at how the whole thing came out: between the detail in the .stl file and the natural fine lines of the print, it took the undercoat of black, then a heavy drybrush of Maple Syrup Brown (acrylic craft paint) and then a light drybrush of Peach really well, I think, very Russian-wooden-shakes-looking:
So that's it for now. I have started printing an older Evan Carothers file for a planetary defense/anti-ship laser and whilst that is printing I've got some non-OEM Sisters of battle that are cleaned, assembled and primed and have been waiting their turn for paint for awhile, plus there is the latest League of Extraordinary Riveters competition to try to catch up with, plus the older LOER projects I need to finish off and a ton of other things.
And here's after watching a couple of YouTube videos on different techniques for painting Chibi Eyes:
I'm quite pleased with this effort, as I'm working from the farm this past week and didn't have my illuminated magnifying lens- which I'm finding I need for more and more things. I may mess with these again, but I may leave well enough alone, and finish off the Chibi Pony Superheroes and let repetition become my Master in improving skill.
Thanks, Syro! I'm working the next set of chibi ponies, amongst everything else and hope to have some more pics up soon. Actually have two (of three) printers running at the moment, so have some new pieces to get primed and basecoated as well. Real ponies, weather and work have been bit of a challenge, leaving not much time for hobbies, but should settle out soon.
All those crazy snow storms must make caring for the real ponies a lot more work. Not to mention that long drive to the apartment for work each week. Hang in there!
Thanks Syro- we're luckier than many folks with the storms, but you know it's rough when your Shetland Pony rescues see you coming with halters in hand for their afternoon exercise and they run and hide from you! They're as tired of slogging through the snow as we are- and their legs are shorter!
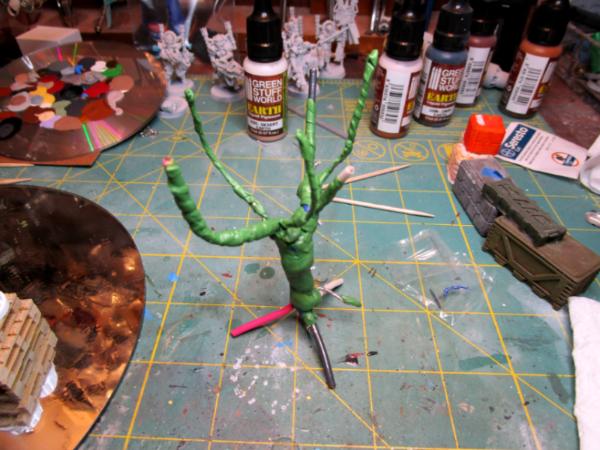
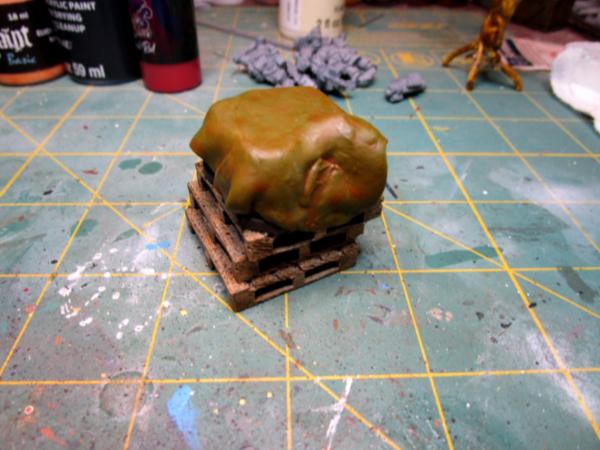
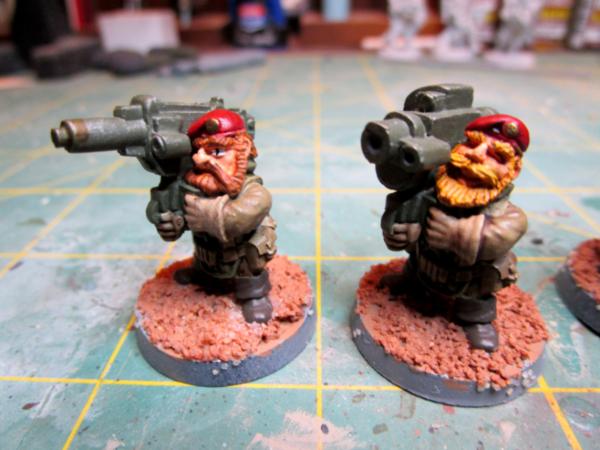
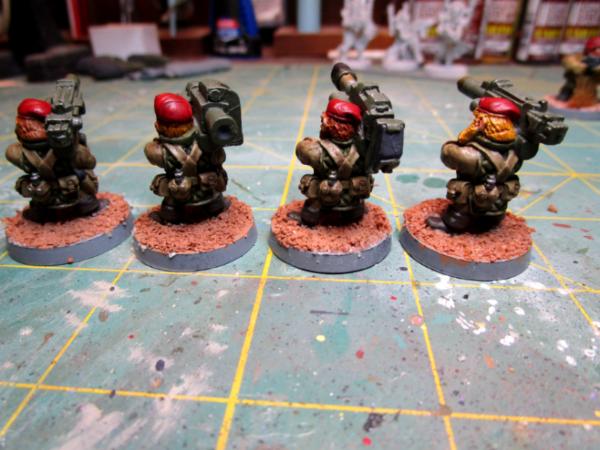
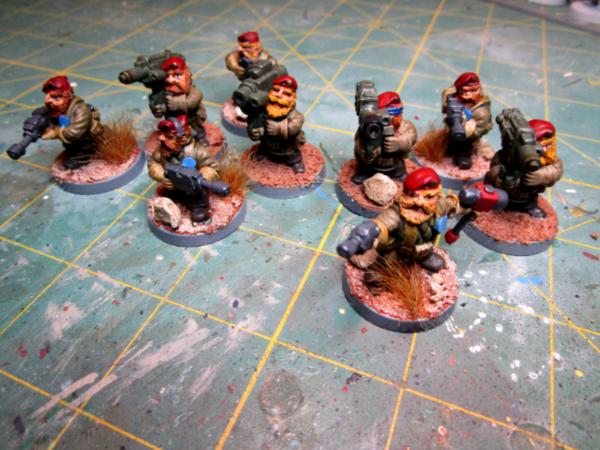
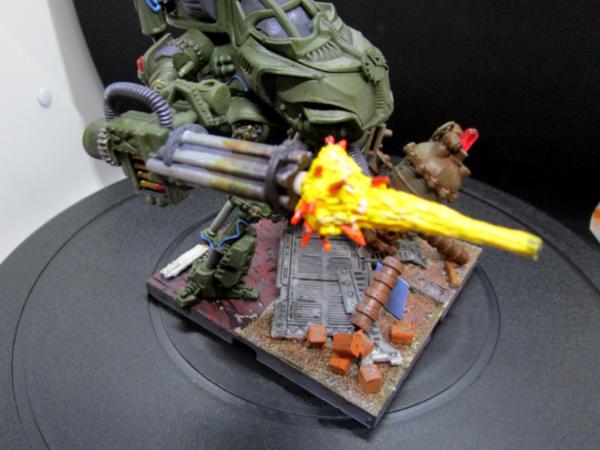
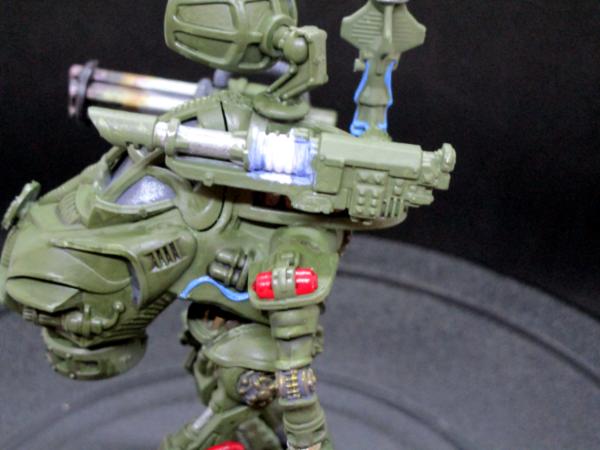
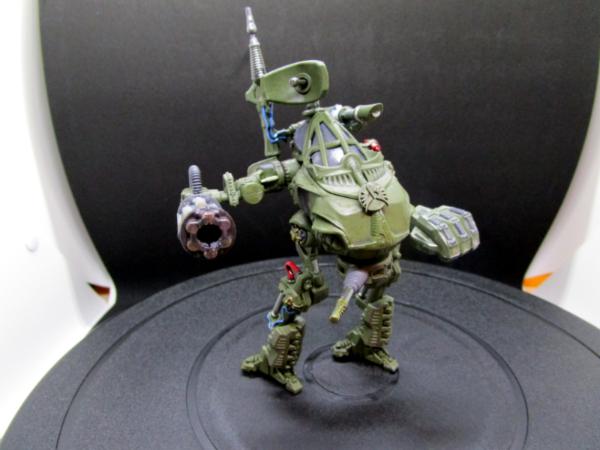
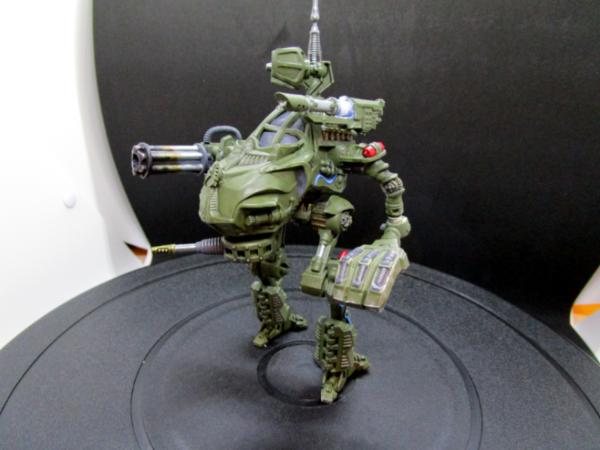
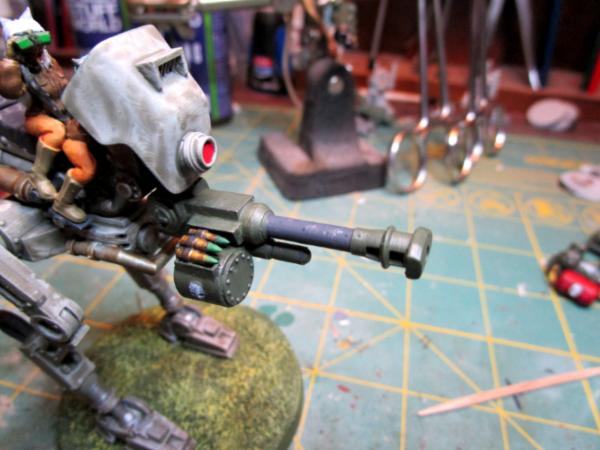
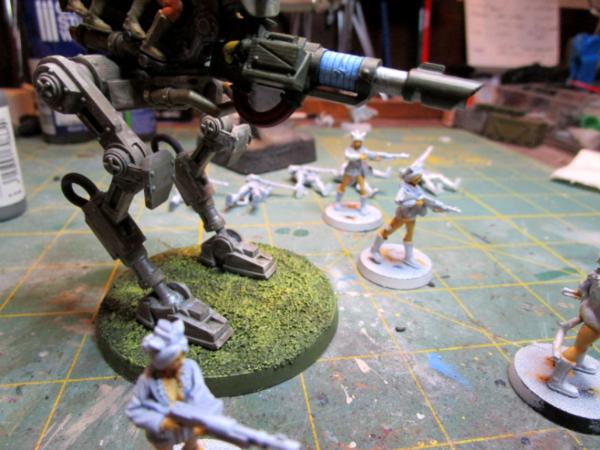
I'm still painting on pieces for the Chinese walled villa- working on the guard towers at the moment and hope to have good results to show soon, but here is a 3d print project I've had screeching in the back ground whilst I paint:
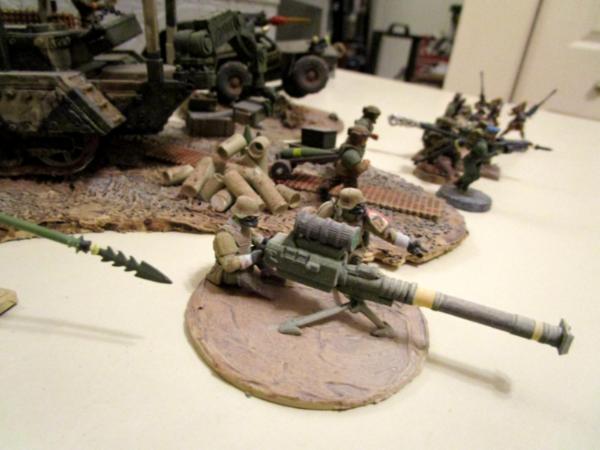
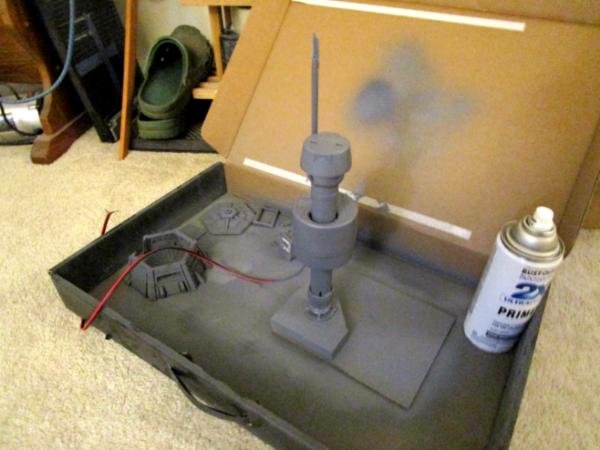
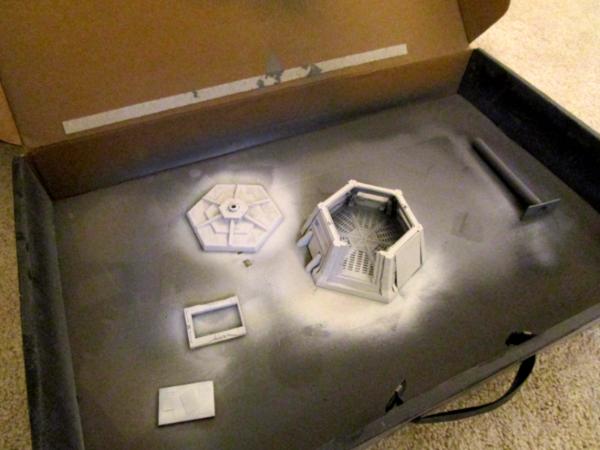
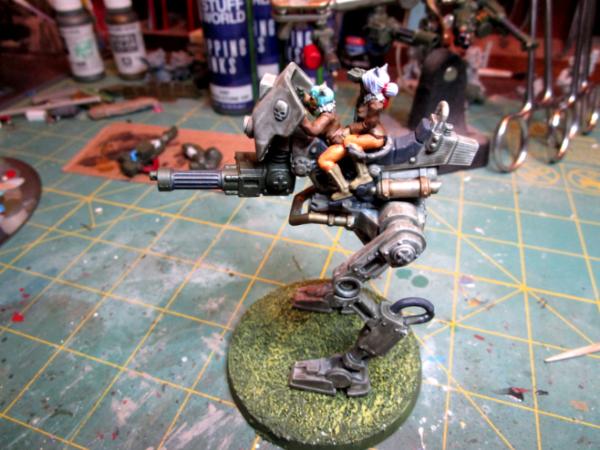
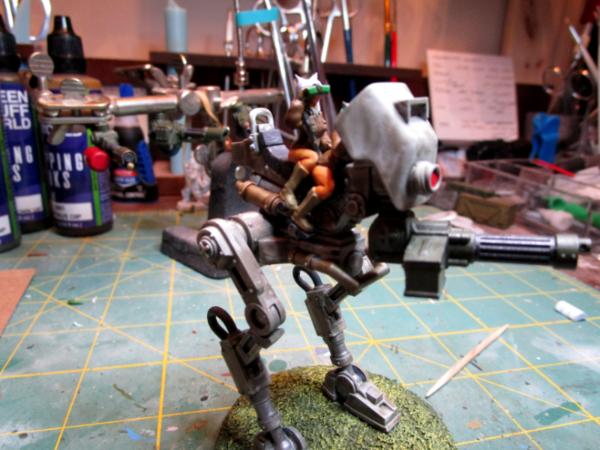
This is the Coil Gun Turret from Evan Carothers' kickstarter The Ignis Quadrant. It printed out in three pieces:
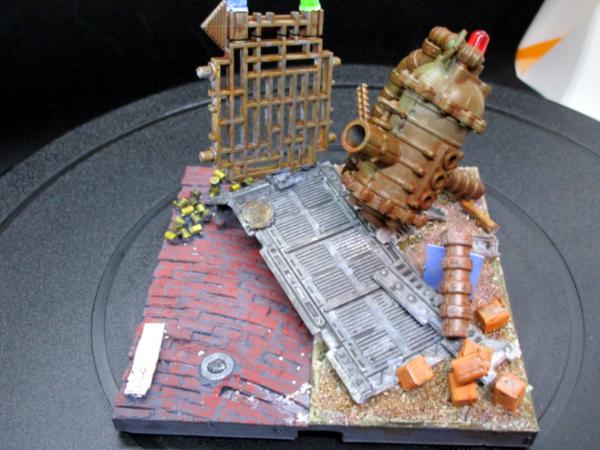
The base and riser in grey came off the MP10-Mini just as you see them- nice and clean, no stringing. The barrel extension is from the CR-6 and came out pretty well also.
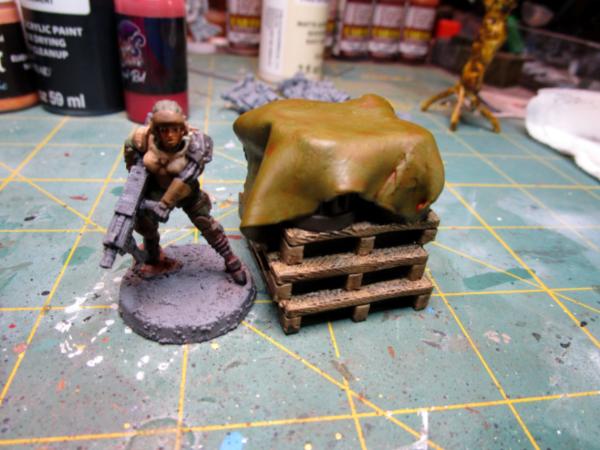
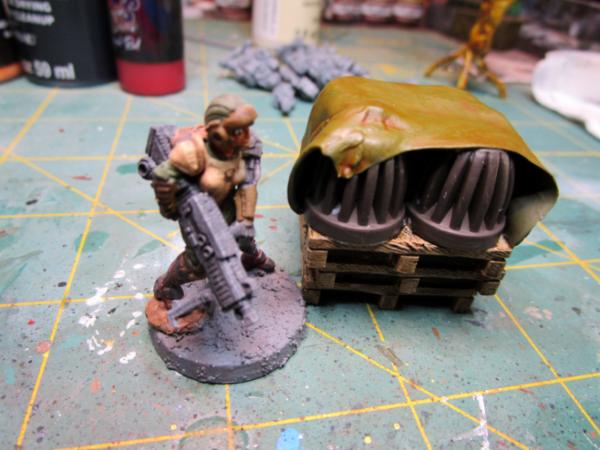
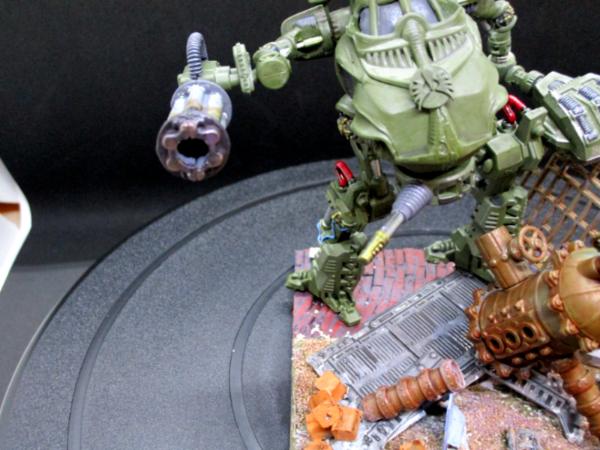
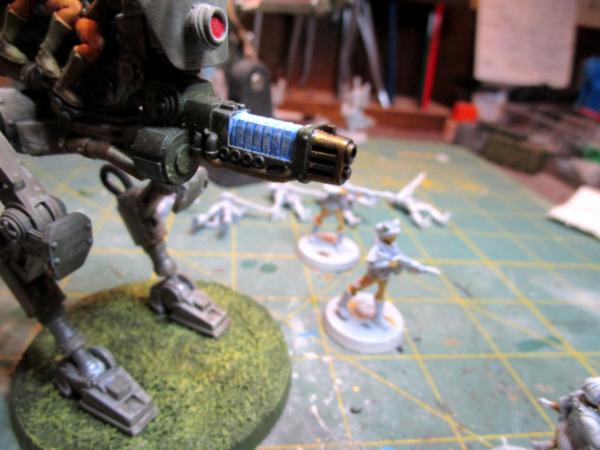
Assembled. The gun spins 360 degrees on its mount, but the barrel elevation is fixed. Seeing as it is a Planetary Defense Ship-killer though, shooting at line of sight to the horizon, maybe it doesn't really need to adjust for elevation (kidding!):
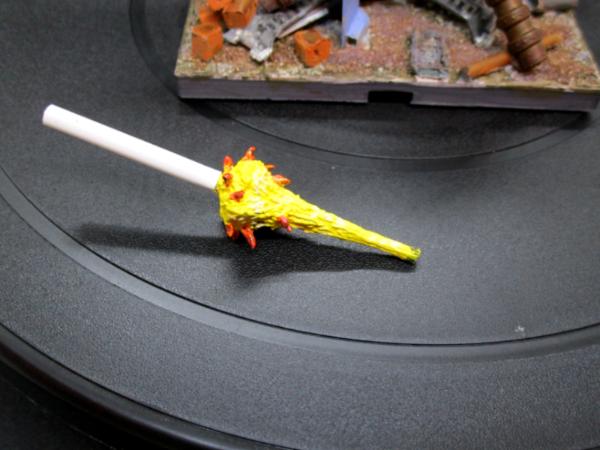
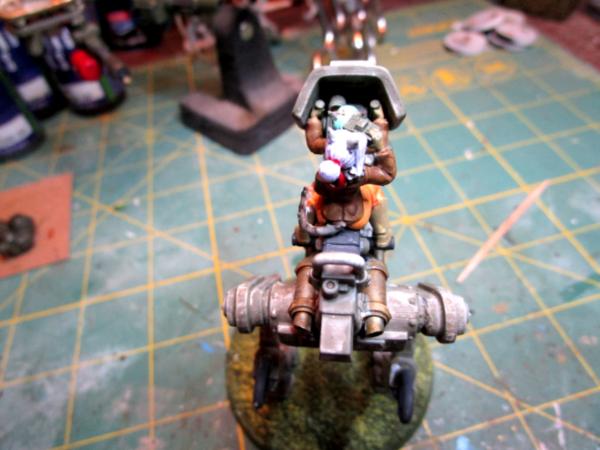
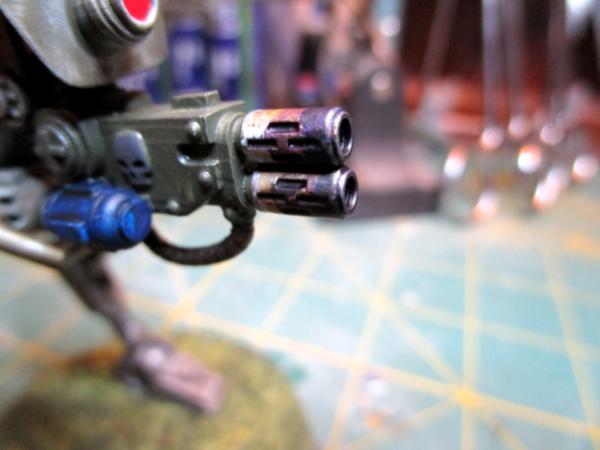
Closer up of the barrel:
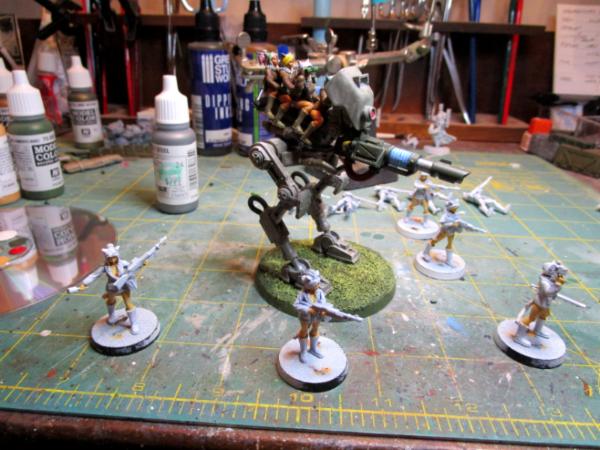
And basecoated:
Today was the Day of Not-quite Right, as- after printing the excellent results you see here, both printers have now decided to be obstinate and not print. I put in about an hour of troubleshooting, but haven't got them to liking me again yet. So, I worked on Chinese Villa parts, but also wanted to airbrush a basecoat onto the Coil Gun. Except the airbrush didn't want to work (air comes out, I disassembled and cleaned it twice, just no paint wants to come out). Fortunately, I had some WWII US Bomber Green in a spray can from an earlier project hanging around and was able to use that.
I'm hoping to get all my machines back in order shortly, as I need the airbrush for weathering and have tons more files to print.
Finished up the Hobbit Stable this afternoon. The hole that was printed into the front walls was exactly the right size to accept 1.75mm filament to serve as the hinge for each door half- hat tip to Theophany, I read on his thread that he had printed something that used filament in a similar way.
An interesting oddity is that the pair of doors on the right can't open fully, as the molded straw/hay on the floor gets in the way. Spousal Unit is very pleased and now wants more 'farm' type prints to go with; fortunately the set from Dark Realms has some more pieces that fill the bill.
I actually bought a book from (of all places) Green Stuff World that had a lot of step by step and tips and an awful lot of advanced material, things I may never get to.
For purposes of these little figures I relied heavily on these two videos:
They both advocate essentially the same theory- but are reversed on which edge of the eye to start on- painting from the top down or the bottom up.
I'm actually looking forward to an opportunity to try painting some more, I must admit I very much liked how this set came out (while acknowledging there are some touch ups I'd like to make- Callsign Household Six has forbidden any messing with them as they are).
More follows soonest!
Automatically Appended Next Post: Oh- something that the videos don't really address but I think is a valid observation on my part: where you place the small white fleck as the last step largely determines how the eye's "line of sight" appears; that is, by placing the white fleck low or high in the eye and even how you angle the little fleck will have a great impact on where the eye appears to be 'looking'.
On these four pieces, I never really did a "paint out, paint over" but I did move the little white fleck a couple of times to get the 'visage' that I wanted.
I actually had to stop and ask myself "at what distance do I intend these to be viewed?" because to paint them nicely for ultra-up-close viewing is beyond my talents- even with magnification. Someone (I forget who, but possibly Theo?) has in their sig file "I paint to the ten foot rule" and I employed something like that here. Not ten feet, but realistically about 1.5 to 2 feet. As I was painting the eyes, the different colors looked like unrelated blotches; when I backed my head off a bit to look again, they looked better. Frankly, I'm quite surprised at how good they look (in my own humble opinion ) in the photo!
I'm pleased at how they came out and want to try again although, as you say, some of the chibi projects freak _me_ out, too.
Thank you for the kind words, Viterbi! The stables particularly weren't just a lot of fun to paint- it was nice to actually finish something from A-Z, from printing to cleaning up to painting to assembling.
Nearly there on the walled villa, I got a fair amount of painting on some of the last pieces this past week and (fingers crossed) will be gluing down and finishing off this coming week.
Still not sure what major item to install in the fourth board- so many fun things to print, so little time!
Couple of fuzzy shots and then I'm going to start gluing things down:
These are the two watch towers and the steps up onto the wall/battlements/walkways for the walled villa. Ideally, I'd have used four towers- one at each corner- but given my very spotty luck getting things to print most of the time I'm happy to have the two.
It really is time to be getting on to some other project, but in addition to printing troubles, the other thing holding me back is the fear that as I apply silicon caulk to the boards and permanently stick things down I'll goof it up and literally months of work will be gone.
But, as the Bard informs us in Hamlet, screw your courage to the sticking place and let's see what happens.
Meer_Cat wrote: Spousal Unit is very pleased and now wants more 'farm' type prints to go with; fortunately the set from Dark Realms has some more pieces that fill the bill.
They look fantastic, Meer_Cat! I'm sure you'll be fine whether you do it perfectly or mess the whole thing up in the first go. Not the end of the world, no worries.
Thank you Captain! I realize I'm very fortunate to have a wife who will tolerate me playing with toys- this is the first time she's really paid attention to what I've been working on. Now, the ponies themselves are painted in the (somewhat cartoonish) colors of the members of our permanent herd and I added their specific markings (socks, blazes, stars and snowballs) so they are pretty accurate chibi representations of our little guys, so she had a hook to hold her interest. [The permanent herd are the ones we've rescued over the years that have such a combination of conditions as to be unlikely for a happy/successful adoption- so we're keeping them safe with us. We all need each other.] My wife is my greatest blessing. As we always toasted at our formal dinings-in: Gentlemen- to the Ladies!
Thank you Warboss! I am, unfortunately, a natural born hoarder. I'll buy a package of something-or-other (scale crates, flock for trees, anything) and then want to hang onto it for just the 'right' project. I'm slowly breaking myself of that habit as I now officially have more work (and components for customizing, kitbashing and scratchbuilding) than I will ever complete before I shuffle off this mortal coil. I'm actually just grabbing what looks good and gluing it onto whatever I'm working on at the moment. All these tiles and structures represent hundreds of hours of printing time- so I'm not loath to make a mistake gluing down, but am reading having to reprint a piece (or God helps us- many pieces!). I never know how finicky the printers are going to be whenever I start a new print- sometimes it's a snap, often it is fiddly and time consuming and I never know for sure how to fix the problem.
But on that note, everything I've got up to this point is glued down and I'm pretty satisfied with the result.
I used GE (I know, lightbulbs, right?) silicon caulk as the bonding agent, because it's strong, flexible and has a longer drying time than 2-part epoxy in which to adjust the pieces:
Applied in a spiral pattern:
And Bob's your uncle- just stick the pieces on and you're done. The Open Lock System bases to all the tiles allow for a lot of space for excess silicon to squirt up into- I had no problem with excess material squeezing out from under the tiles:
I had done two of the quadrants yesterday and so started the finishing work on one of these, the one with the vines or tress molded onto some of the wall sections. I base coated the tree trunk black and then used a really 'wet' dry brush to apply a dark brown (just black on the left, black and dark brown on the right):
Then a medium-wet drybrush of a sandy brown:
Add some flocking (gotten from Green Stuff World- love those guys):
And done:
That crevice between two tiles you see in this last picture I'm going to partially fill with some grasses. This quad will be for a variety of interchangeable pieces- the bell shrine you see here, the Taicho Drums, a Zen sand garden, other things from Iain Carothers' Hobgoblin City set.
I also got some turquois paint on the wall section with the portholes (for want of a better term):
Basecoat flat black, make a wash of the paint, I may still go back and do a light drybrush of white for highlights. I was going for an aged bronze-like finish on these.
I'm also eyeballing the gaps between the wall sections- I may go and fill those in the buff colored sections and then paint so they blend better. The gaps amongst the stonework aren't so noticeable. And I'm finally ready to mix up some black wash per the YouTube video I saw and slo that around on all the stones.
Actually almost to the point of being able to say it's definitely the end of the beginning, and maybe even the beginning of the end of this project.
I mean, honestly, most of us are natural born hoarders. The hobby attracts our type like fruit flies to apple cider vinegar. The assembly looks fantastic and I love that tree. Looking great.
Our formal dine-in toasts were not that friendly to our better halfs...so they were changed over a decade ago. Which only means that there was an excuse for another toast with the old sayings.
Thanks Warboss! I've met a lot of us in our hobby and the hoarding gene manifests itself frequently, for all that it is (having traced the genome structure using a sub-atomic particle accelerator) a double recessive. We do all seem to have it. I don't mind hoarding so much, as being willing to use pieces from the hoard- the question is always "Do I use this now or for when it will really be useful?". Having so much plastic on hand that someone will be very happy to be gifted everything I didn't get painted in this life is actually somewhat liberating- I'm more apt now to say 'screw it, I'll try using this and if it doesn't work, nothing lost".
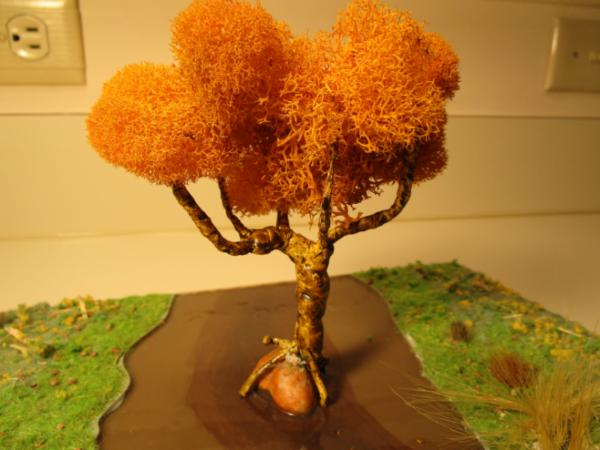
Thanks Josh! I hadn't really thought about trees growing up walls as defining age, but it surely does. Something must have been around awhile for a whole tress to mature on it. The red foliage was a happy accident: I had this box of stuff lying around and didn't have any more traditional colors (green) on hand, so used it. I like the look and am happy that others think it works also. Not being well-studied in Asian cultures (some 200-level classes in college) I'm really looking for a generic 'feel' that could be anything- although much of the architectural flourishes in the set are clearly Japanese. I backed the Reaper Bones V Kickstarter, so will have the Oni Add-on coming my way sometime this summer to paint up. I also have a couple of Midlam Miniatures Hobgoblins to use to populate the villa.
Thanks Captain! You make a good point: I did say dinings in, but meant dinings out! For the ins we had some colorful toasts as well (only members of the Mess present). For outs we had to be slightly more civilized. The most fun I ever had was being invited to a Dining In as a Guest of the Mess with the Amalgamated Highland Regiment. I loved the pageantry, ceremonial and traditions of all military customs and courtesies and the Scots had them all in spades. As the last formal Act of the Mess, the President called for the pipes to 'parade the Mess' and they did- by walking across the tops of the tables! Truly magnificent and easy to see how the bagpipes were used to whip up a frenzy in preparation for an assault. Now _there's_ an idea for a miniature diorama- or even a whole Imperial Guard Regiment!
I'm at the Farm this week and getting some painting done in the evenings, so should have some photos to add directly. Thank you all for looking in and for your comments.
I'm mixing up the black wash per the Black Magic Craft video nd will apply to ONE of the quadrants tonight if there is time, tomorrow if not. I'm as hesitant to apply the wash as I was to glue down the tiles, although the wash is not as final a commitment as the glue as the tiles can always be repainted if I mess it up! The first building is nearly done painting and several of the do-dads for Quad 3- still need to print the 'grand finale' piece for Quad 4.
I used the Black Magic Craft method for painting the stone courtyard pavers, which is where the idea for all the different colors comes from.
I should have new photos up for tomorrow. Thanks for looking in and the kind words!
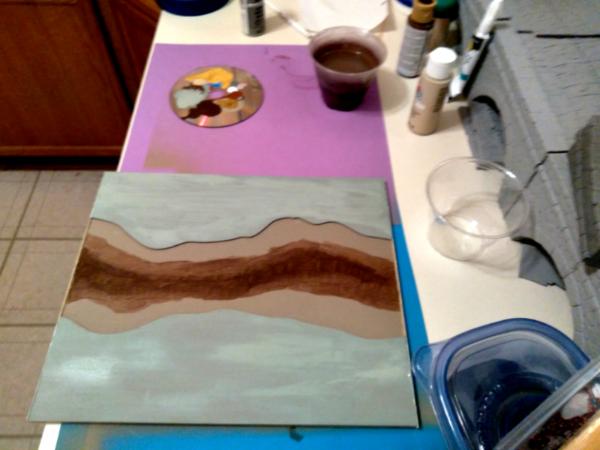
Made up some washes and slapped 'em on the first quadrant:
Followed Black Magic Craft's directions and made up a bottle each of black and brown wash:
50% water, 40% matte medium, 5% flow enhancer, a bunch of black ink and a little brown ink for the black wash and a _lot_ of brown ink and a few drops of black ink for the brown wash.
Applied them to an extra piece to see how it would look (black on left, brown on right):
Loved how the black wash clung to the edges of each stone and filled the pockmarks and such- it cleaned up the wavering edges between the colors and reblackened the mortar lines where I had gone over quite nicely, I think.
So here's the before:
And the after:
The difference is really easier to see just in this shot, because the wall foundations aren't washed yet, so the contrast is easier to see. I'm not sure but what I might go with a second application, to dull things down even a bit more.
I've got other things painted up too, the gong shrine, some Foo Dogs, the first house, the roofs for the watch towers; I'll try to get photos up tomorrow.
Looks good so far. And I get that struggle. If I have less than 100 of anything I can't use it for fear that I'll run out of the material before my project is done.
Yeah- the brown was to see how it made up; I put it side by side on the extra piece to see how it would look, the black is definitely better. I figure with as much as the bottles of stuff I bought will make, that first 4 ounce dropper bottle cost me maybe 90 cents to concoct.
I have high hopes for the brown to use on my science-fiction-y terrain pieces that are alot more primary browns and tans in color.
These boards are definitely blue-grey primary, for all that there is a surprsing amount of brown tossed into the stone variations.
Nearly done with this project- some touch up on the walls (I got the putty/filler applied yesterday as well as the wash), touch up on house#1. paint house#2 and finish off the scatter for Quad 4 and it's on to the next.
Next step, and I'm interested in all y'alls ideas:
I'm painting up the two houses that will feature in the villa. These are from Iain Lovecraft's original "Hobgoblin City" kickstarter, which were a combination of pan-Asian (heavily Japanese) architecture and fanciful (heavily Chinese) 'hobgoblin' variants. These files formed the basis for the follow-on 'Asian Adventures' kickstarter, which greatly expanded the range.
Here's a WIP of the two single story structures:
I like the look of the two, especially the contrasting rectangular theme to one and the circle motifs on the other. But I noticed that, even though clearly intended as single story structures, they stack pretty well and can be modified easily to obscure the 'stone' foundation on the one acting as the second story; I may have to either cover the sliding doors on the second story or add a balcony:
I'll have to print an additional house and that comes to my question:
Should the two story structure be:
- Two circle motif stories?
- Two rectangular motif stories?
- One of each, circles on top?
- One of each, rectangles on top?
Depending on y'alls consensus and my whim, the single story structure will be whatever is left over and will have the plain roof (as opposed to the fanciful 'hobgoblin' roof you see in these pictures).
1) Received no replies to my query about circles and squares, so went and printed off another house story with the easiest pattern to paint- squares (although the circles weren't terrible). It's printed and primered and I'll start painting hopefully tomorrow, certainly Friday when I'm back at the farm.
2) Finished some of the portable terrain/scatter and got some photos:
The Bell Shrine:
The Torii Gate:
The Gong:
The Foo Dogs:
I tried a different means of lighting, which clearly didn't work so well to bring out the colors (I'm actually quite pleased with the turquois wash to simulate verdigris/aged bronze) and will try to light it up better for final pics.
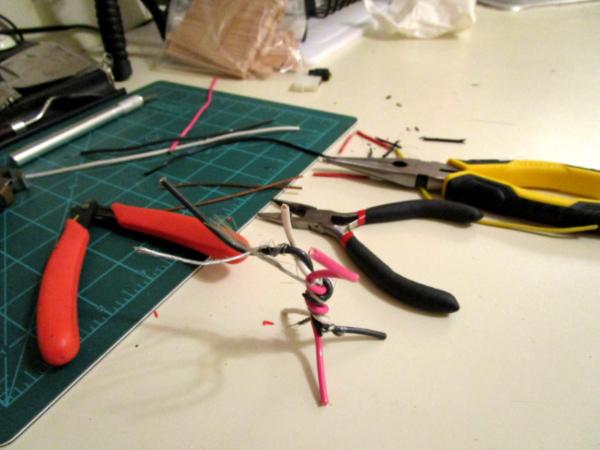
That darn gong was a bear to try to hang, I tried everything: fabricated my own hooks and set them into the gong and the arch, tried to attach swivels to the hooks, tried to make wire links, tried to tie the blasted thing together with thread; finally gave up, got rid of the two hooks and centered one and tied it on with thread. It is what it is, at least for now.
Need to drybrush wooden walkways for the walls, paint the little 'monk's house' and paint the second story of the 'big house' and I think I'm mostly done. I may print off some more scatter from the latest Iain Lovecraft set, and still want something grand for the empty fourth quarter, but will be happy to have this mostly done and able to move on to something new.
Circles and cubes look both good, so I wouldn't have been any help Love the black wash for the tiling, adds a lot of depth! And the scatter terrain looks great, love the gong!
Thanks very much, Viterbi! As it stands, I printed another house section featuring the 'square' pattern, as it seemed easier to paint. In the middle of finishing it, I'm not sure but they are equally easy/difficult. Time to get this project finished. As a change of pace, I have started prepping some of the white metal miniatures I've gotten from the Kensei line from Zenit Miniatures. It's been a _long_ while since I've painted any people and I need occupants for the villa. I also picked up the Oni collection from the Reaper Bones V campaign, so will have those guys also.
As the villa project is moving towards completion, I also had the 3d printers going on in the background and have this to show. This is a 'Celtic House' from Iain Lovecraft's collection of the same name. Everything printed with no supports and I needed to perform only very limited cleanup- came off the printer very much as you see here. The pegs built into the sections didn't fit at all (I think that has something to do with my printing, not the .stl files), but I wanted to magnetize anyway so cut them off, drilled out the spots where they had been located and inserted 5mm neodymium magnets. These are strong enough to avoid accidently knocking the roof or second floor off, but not so strong as to lift the whole structure up trying to get them apart. Painting will commence 'sometime'. I think it could be used for almost any Dark Age or even Medieval period and seems ready-purposed for WFB, Frostgrave and other games/rules systems like that. It does have wooden plank doors and half-doors for all the openings:
And to pass along the tip that I learned from you guys when working with magnets- especially the smaller, pesky rare-earth magnets: your suggestion was to keep them all together as a 'stick' and insert the whole stick into the cavity and 'break off' the last one. Then, keeping the orientation of the stick steady, insert the other magnet into the other cavity and break off. This ensures that the polarity of the magnets is always lined up correctly so they attract rather than repel.
That Celtic house is gorgeous. I’m so impressed by the 3D nowadays. If it doesn’t already exist, someone needs to start a business that prints on demand and ships to those of us without our own printers. More and more amazing models and bits are only available as STL files and I would love to get my hands on the models without having to purchase and learn 3D printing.
I agree with your magnet trick. For good measure, I also use a Sharpie to mark one side of the magnetic “stick” to keep track of which side goes up! Also, generally if I have a big enough magnet, I only use a magnet on one side and bare metal on the other. Eliminates the risk of gluing in a magnet upside down and the rare earth magnets hold plenty strong enough to metal for most applications such as weapon swaps. If a small magnet needs to hold a large object, I use two magnets with the marker to visually check polarity. For the bare metal, I often use pieces of old blades after they dull. The snap-off blades on the box cutter style knives and the X-acto replaceable blades provide a ready supply. I just snap them into pieces using two pairs od pliers and glue them on the model. They are thin enough to be easy to hide on a weapon’s interior panel.
Looking forward to seeing the houses get some paint.
I used only one magnet in each point on this building and the thinnest washer I could find as the bit of metal as the other side attachment. Using bits of worn Xacto blades is brilliant- they're even thinner and why waste anything?!
Ditto on using a sharpie or bit of paint to mark a side of the magnets- with care I can make one building line up, but having standardization across all magnets would be even better- perfect for projects like sponson guns or switch-out turrets where you have more than one thing that has to line up correctly. I'll start using that trick immediately.
Part of the reason why I'm printing everything from space bunkers to Chinese houses to Celtic huts is I'm assembling and testing a library of stl files from Kickstarters that I've backed for which I hold commercial licenses to print. Eventually, I hope to make this a side hustle after my next retirement and do exactly as you describe: offer a catalog of a wide variety of buildings, figures, dungeon components, you name it and print them on demand.
I'm learning more about 3d printing every day and still refining what I'm looking for in my 'perfect printer'. I'm also at the point to where I can start a print with a reasonable expectation that it will run okay without me hovering over it and can thus get back to painting and kitbashing and scratchbuilding- the things I really like about our hobby.
Although, having grown up watching Star Trek (the original series) when it came out on TV brand new, there is something wonderful about having a 'replicator' in my very own house.
I am (holds up thumb and forefinger very close together) this close to finishing the Chinese walled villa and have started some Zenit Miniatures from their Chinese range to populate it- I'm hoping to have pictures very soon.
And then paint on some of the many things I've printed!
Thank you Viterbi; I gots to admit, it has been a long time since I've done people figures, so having to 're-discover' a lot of techniques and practices. I do figure though that folks have seen enough pics of various pieces of courtyard for the villa, time to animate them with some people.
The Farm Project:
As some of you know, I work in Northern Virginia during the week and come home to our family's farm for the weekends (we rescue miniature horses and Shetlands and other smaller equines that the bigger rescues aren't equipped to handle). For the longest time I didn't have anything to work on at the Farm and kept pretty busy anyway with the chores and improvements and things like that.
Then Covid hit and I was extremely fortunate to be able to continue working from the Farm after they shut our buildings down. So I brought a bunch of projects and kept going after a fashion.
Now, as we build back up to the full office going full speed again, my wife suggested leaving a project here, to save lugging everything- model(s), paints, Xacto knives, brushes, etc back and forth every time. Seems simple, but it truly was an idea that never occurred too me, largely because I'm still trying to work on just one thing at a time.
Here's the first 'Farm Project' WIP picture: this is The Potion Shop from Oksana Klingell's Medieval Architecture set. She also designed the Watch Tower I put up here earlier.
A decent start at applying the base colors, I think, with more base coating and detailing to come.
So, here's the weekly accomplishment from the apartment in Virginia, before I trek up to the Farm tomorrow:
First up, a house from the Medieval Architecture set by Oksana Klingell. This printed in four parts (I used the CR-6 FDM printer) and required no supports for anything. I need to file the pegs a little bit so it fits together smoothly. It has interior space (more pics later when it is painted or least WIP) that could be played:
Next, here's a treehouse from Iain Lovecraft's Celtic Village set. Also used the CR-6 for this and required no supports. Other than a little fuzz around the door, needs no clean up- this is how it came off the printer:
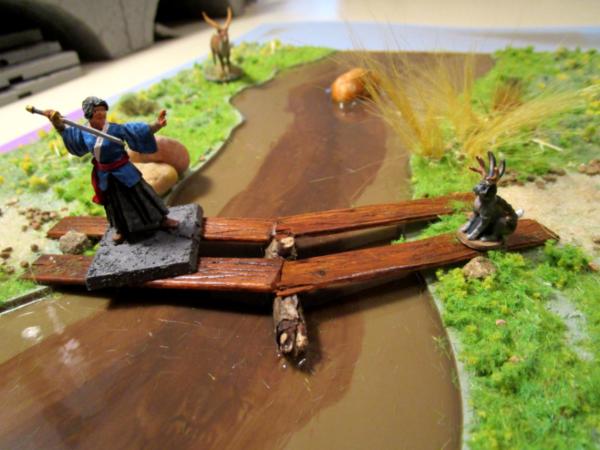
Here's a panoramic shot of the villa used linearly, rather than in square. I touched up all the putty I used between wall sections (helped a little, but not all the way) painted some red woodwork that I'd missed before and added some washes to the tile on top of the wall sections. I've a little more actual painting on the rest of the building sections and we're golden (got an interesting idea to try with them- making them interchangeably modular and having balconies that can be added for two story configurations- intriguing, yes?):
And finally, a start on the first wave of Kensei Rising miniatures by Zenit to ramble around this capacious villa:
And that's it for this week. As mentioned, tomorrow it's back to the farm and more work on the Potion Shop. I'm using a combination of inexpensive (spelled cheap) craft paints and excellent (and affordable!) hobby paints from Cephalopod Paints. Thy cover well, flow well and leave a bit of a texture paint effect- in a good way. You'll be the judge, as pics get put up.
Thank you for looking in and as always, you're constructive criticism is always welcome.
Lovely update, interesting to see the villa in a line instead of the square. Works well too. And the Lovecraftian treehouse looks so cool, excited to see it get some paint in the future!
Thank you Viterbi and Syro for looking in, and for the encouragement.
Wrapping up at the Farm now, threw paint at the potion shop last night for about an hour- hard to see anything because of bad lighting but getting all the base colors down, next week pavement and washes:
Again hard to see because of the angle, but behind the bottles on the shelf is a large window, which I have painted Dwarven Steel to make a reflective surface. I'm fixing to try to paint some shadowy, muted color reflections of the bottles in the glass (try, I say).
So, the main apartment project- the Celtic A-frame house- is finished. Next up will be to finish off the Chinese ensemble I've got going so I can show off the finished Walled Villa.
Front door shot:
The door is hinged (incredible how the printer can leave a hole through the bottom and top of the frame literally the diameter of a pin) and the stone walls are a black base, dark grey 'wet' dry brush followed by a 'dry' light grey drybrush.
Side:
I may add a little more black wash to the red thatch lashing- I made this red so there would be a little bit of color to make the very bland roof thatch pop a bit.
The other end:
I actually need to print the half-door that goes in this opening.
Chimney Side:
The Second Story:
Ground Floor:
Under the Eaves:
Tried to paint the interior a bit- it's very tight working through the opening at the top; I'll try to get in here and touch up the floor a bit and possibly color the grey with a cream wash, to look more like plastering/daubing.
Everything magnetized so it doesn't fall apart at a touch when used for gaming.
The thatch is a base coat of Khaki, homemade brown wash over that and then touched up with Ivory drybrush.
The reason this got done in a week is because I forgot my laptop at the Farm when I headed back down to VA last Sunday, so I spent a comfortable week back in 1985 with no distraction, just time to read, paint and build models and run the 3d printer.
Potion shop is looking great already, good luck with painting the reflection next time on the farm.
Celtic house is coming along great too, painting the interior seems like a pain, but worth it.
I like your Celtic A-frame. That must have been such a pain to paint the inside. I'm impressed with what you said about the printer being able to leave the perfect size holes to make the door hinge.
Thank you both for the encouragement- I'll take another whack at finishing off the interior. It's really as much because I'm CDO (OCD, except the letters are in the correct order ) as because it can be seen; I didn't realize how spotty the floor covering was until the pictures, because the camera can see in further than can the Mark I eyeball. Frankly, I'm impressed with myself that I got the rafters painted as well as they are, there really isn't lot of maneuver room in there!
Potion Shop (or should it be Shoppe?) should be finished this weekend and then next up is the treehouse. Callsign Lipstick-6 (CinC House, for you naval types) has already directed that this be compatible with the chibi Shetland Ponies and the Shire Stable, so I've thought of a couple of embellishments to carry on with that theme.
As I paint, the 3d printers are grinding out components for the next 'grand scale' project, but no pics on that until a) the Villa is completely done- including some people to run around in it and b) ALL (or at least most) of the pieces are printed. I lost a lot of time- and more importantly momentum- having to wait to finish printing pieces for the Villa, so lesson learned- have everything ready before hand that can be anticipated.
Thanks again for your comments and encouragement, more follows soonest.
Very impressive 3D prints! I'm torn on whether the tree house or the a-frame is my favorite. I'm also very excited to try Black Magic Craft's black wash recipe... I've been using Luke's recipe (from Luke's APS YouTube channel) and it's good, but not great. Thanks for the demo... those paving stones look fantastic!
Thanks very much, MacPhail! I do like how the pavers came out- without seeing the tute on YouTube I don't think I ever would have tried alternating so many colors throughout the pattern. In the end, I don't think it took significantly more time to do as opposed to other methods I've used over the years (and that employed fewer colors).
Lessons learned from the project:
1) Have a better idea of what the final outcome should look like, and track producing printed parts to meet that goal
2) Have everything printed before starting up painting
3) As each printer completes each piece- turn it off and let it 'reset' for awhile (I was getting some serious weirdness output when trying to run pieces back to back)
4) Be EXTREMELY careful prying pieces off the build plate when using a razor knife (stabbed myself a couple of times in the thumb)
5) If a print ends and I'm not around to pull it off the build plate before it cools, pre-heating the build plate again makes it easier to remove
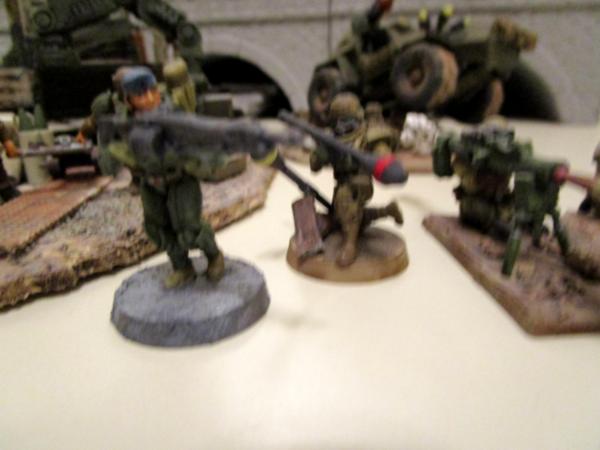
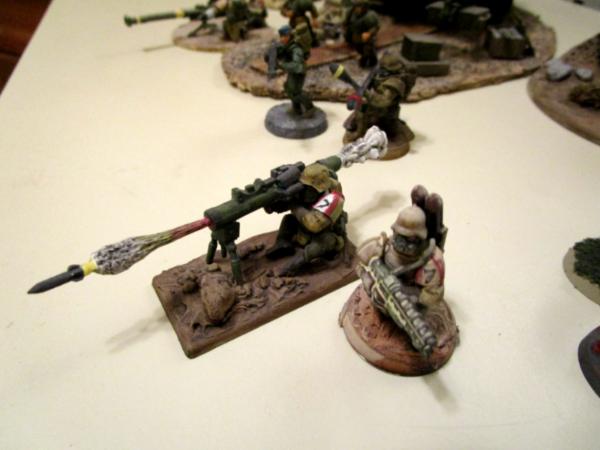
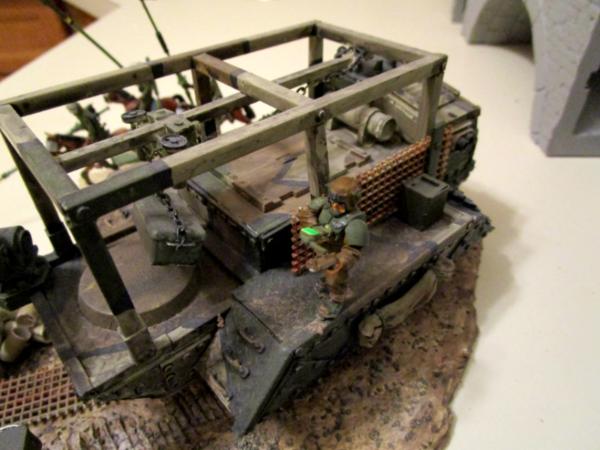
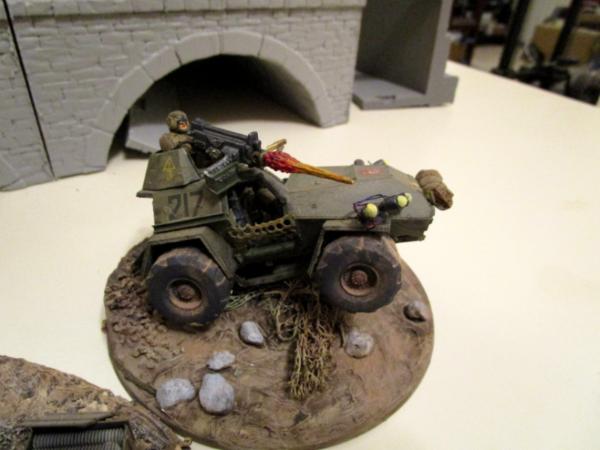
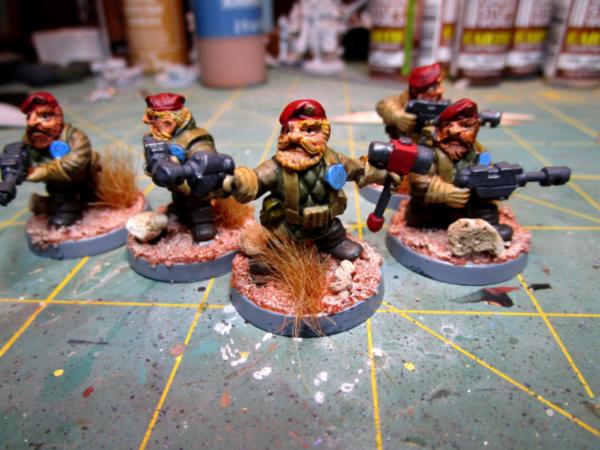
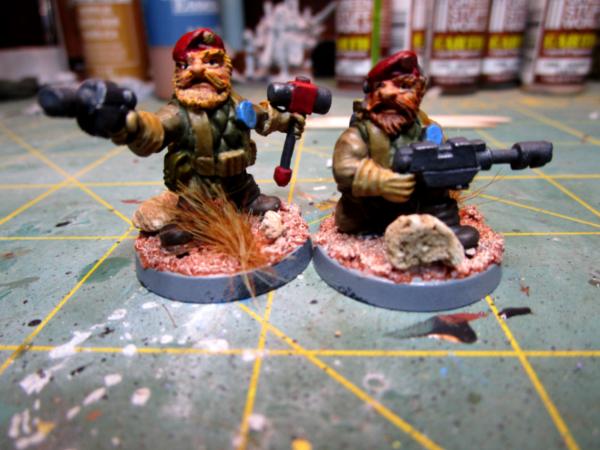
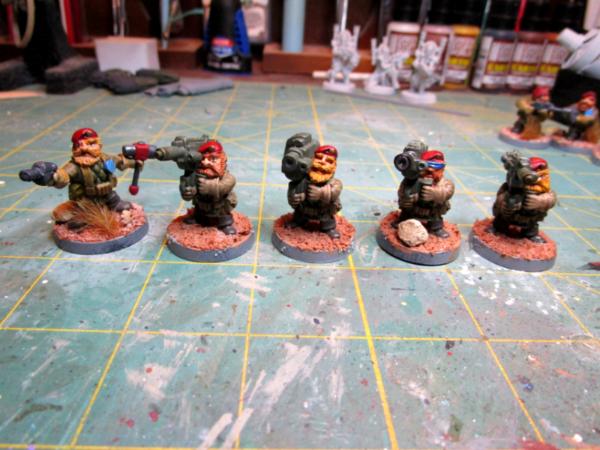
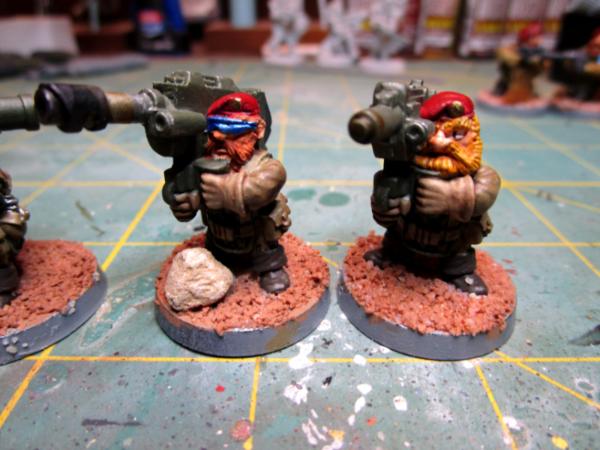
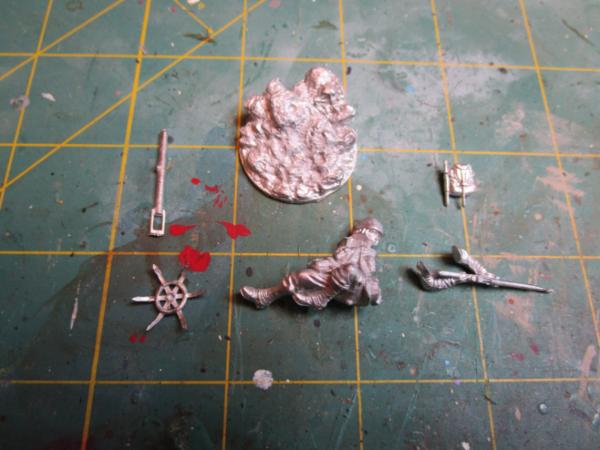
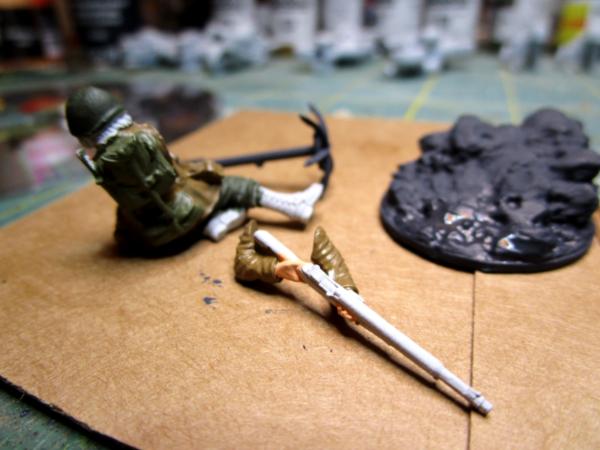
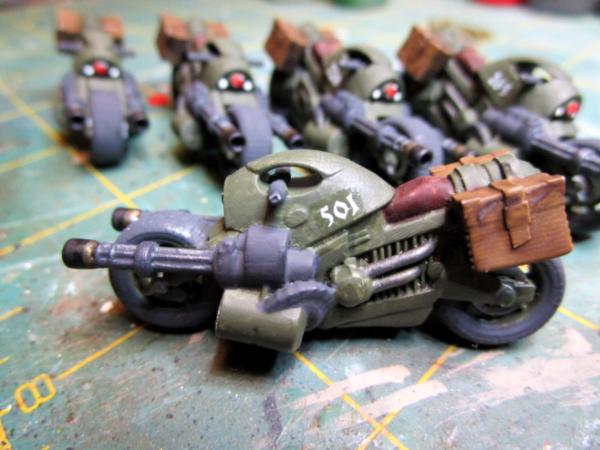
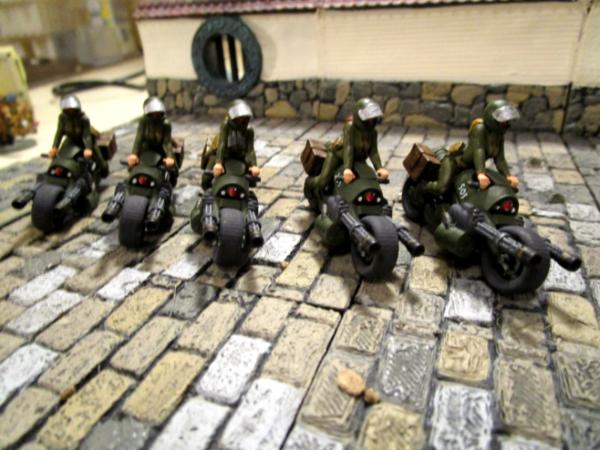
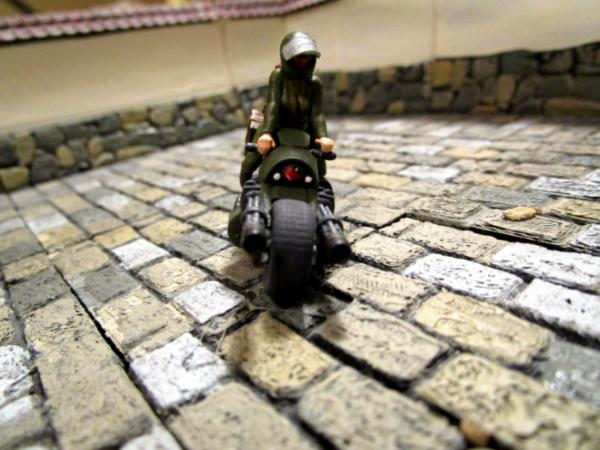
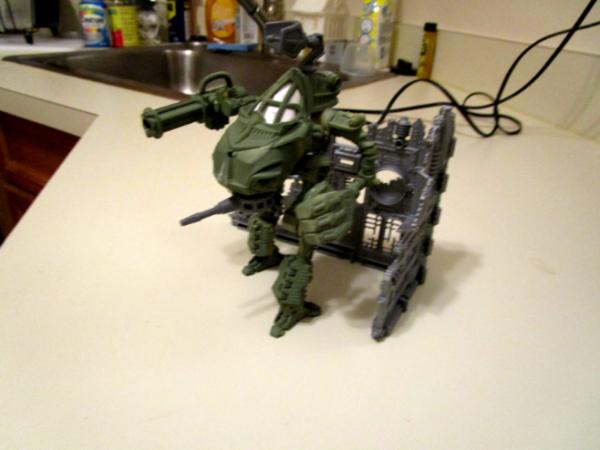
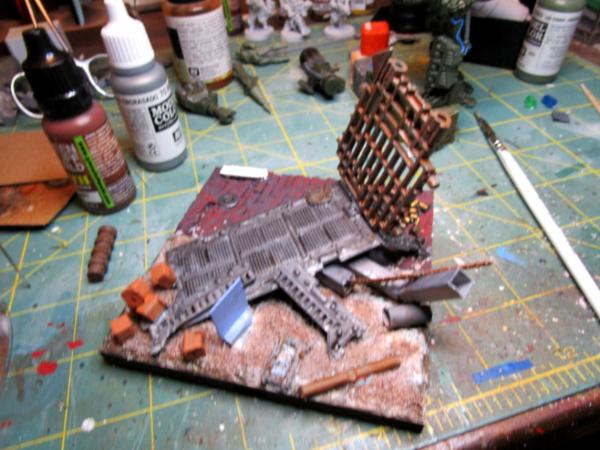
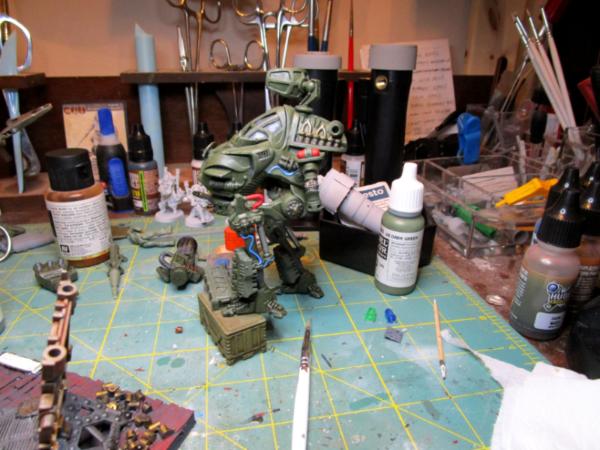
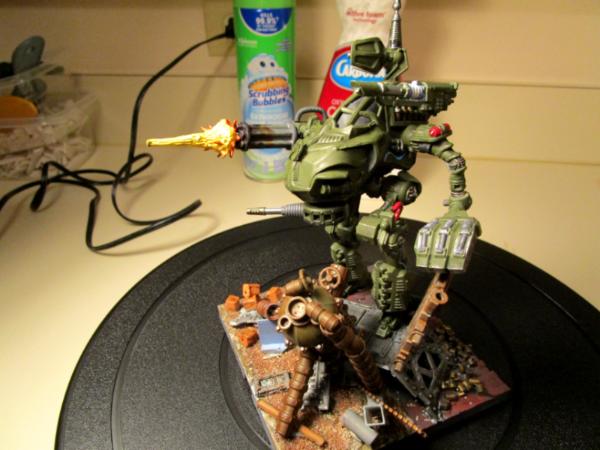
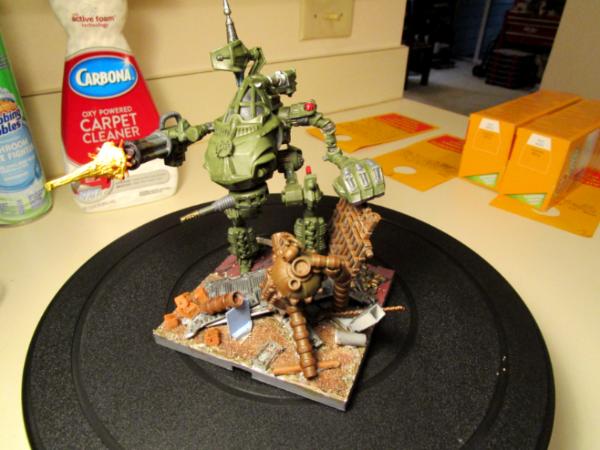
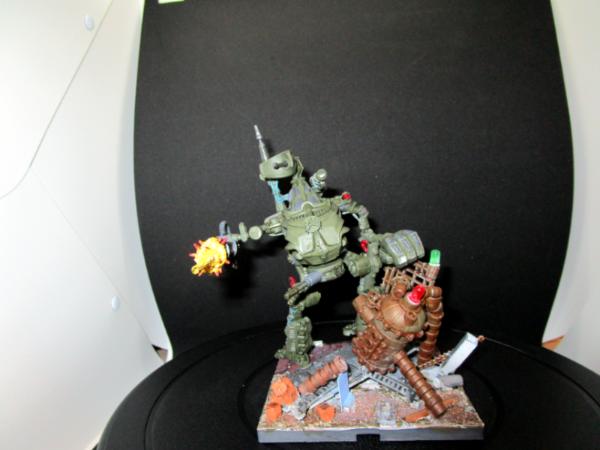
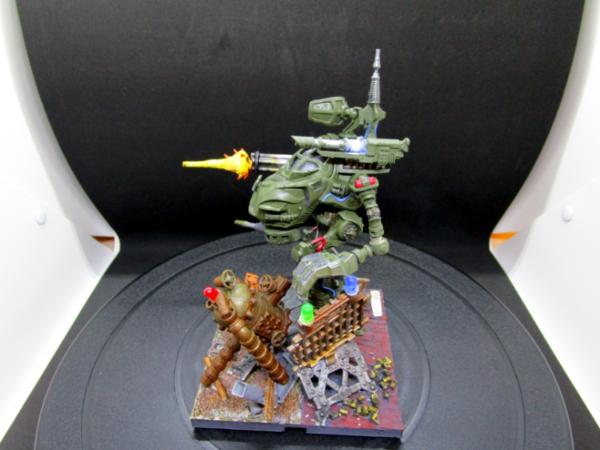
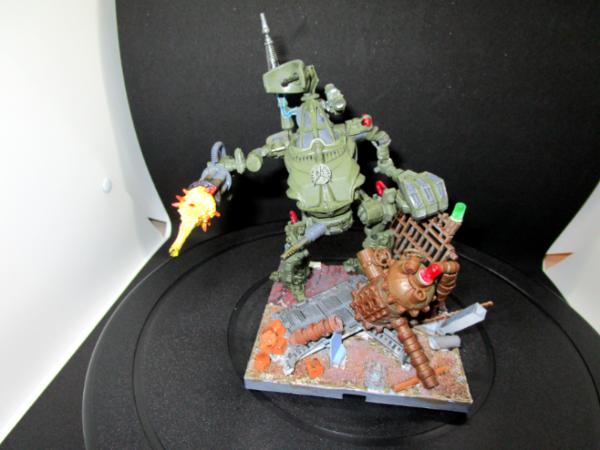
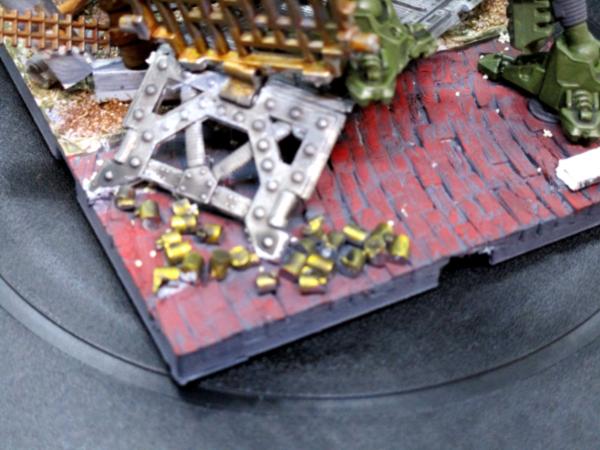
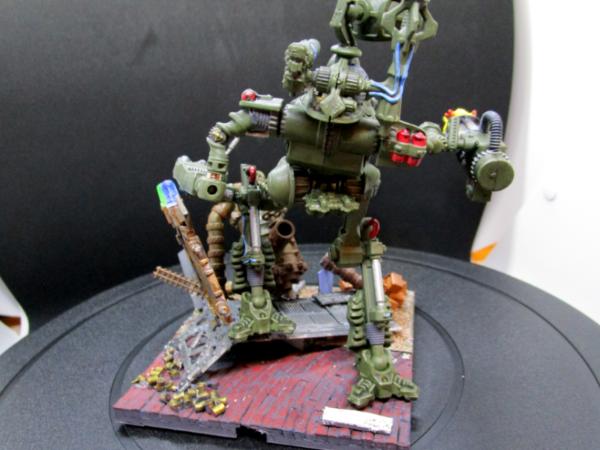
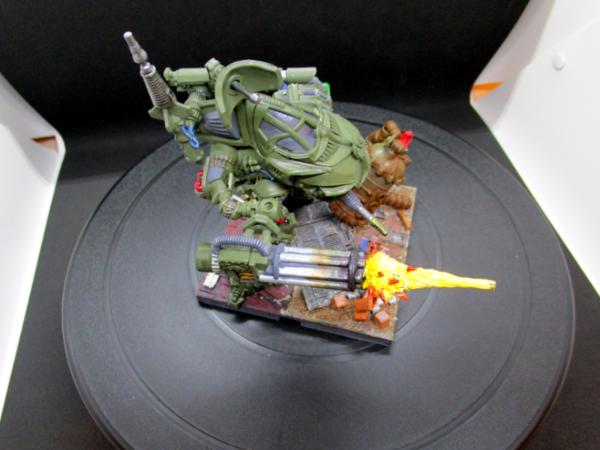
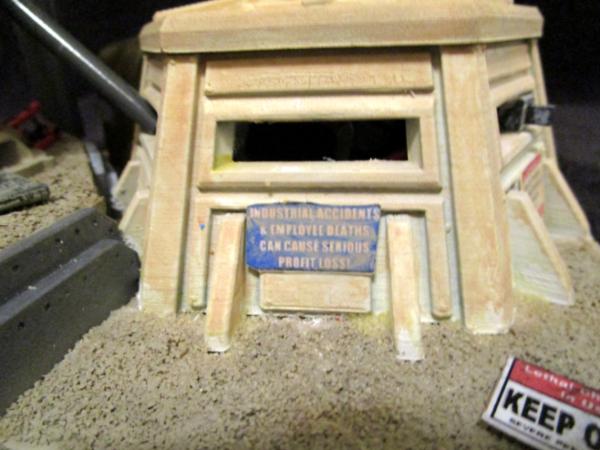
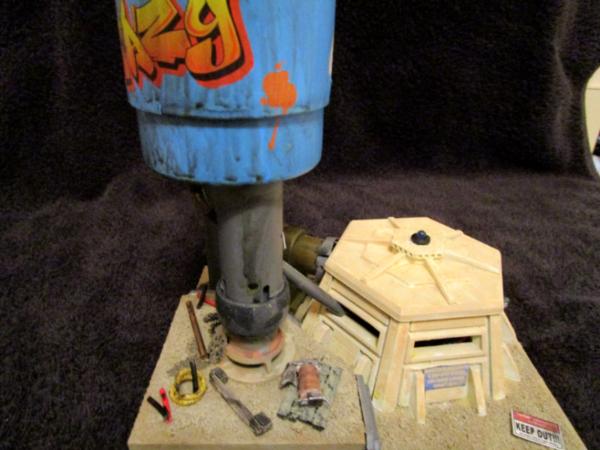
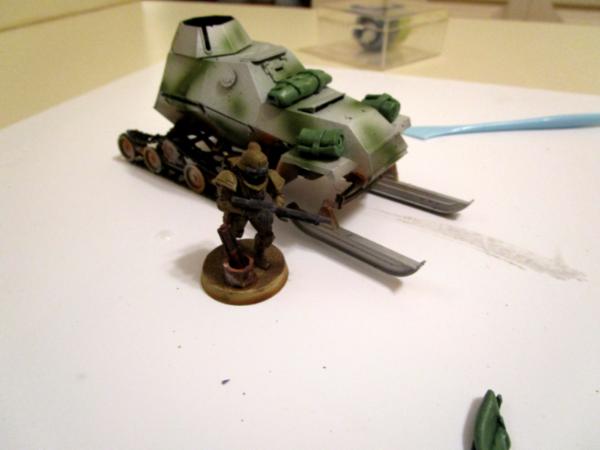
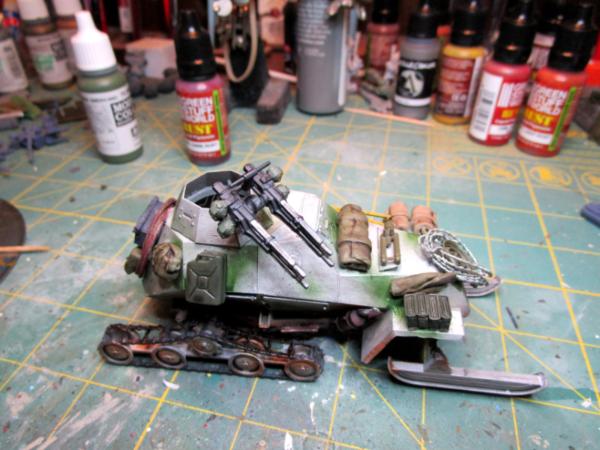
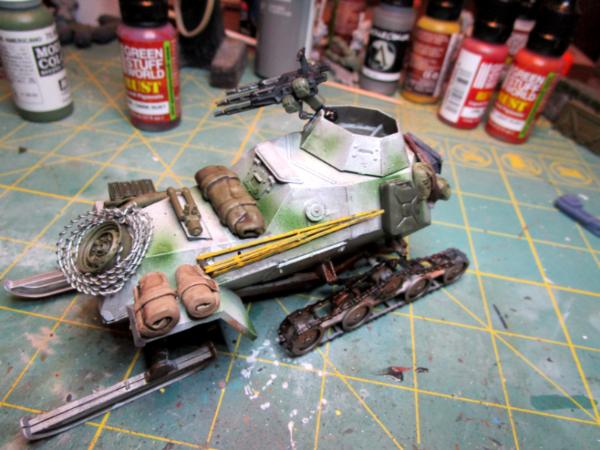
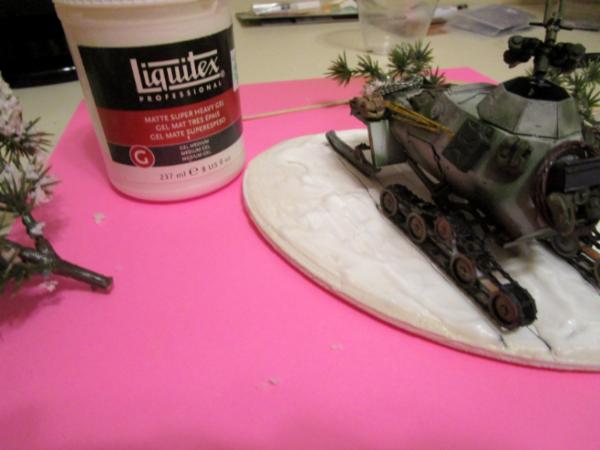
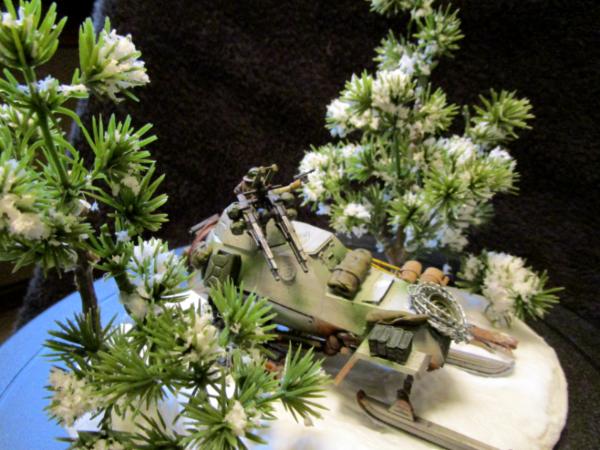
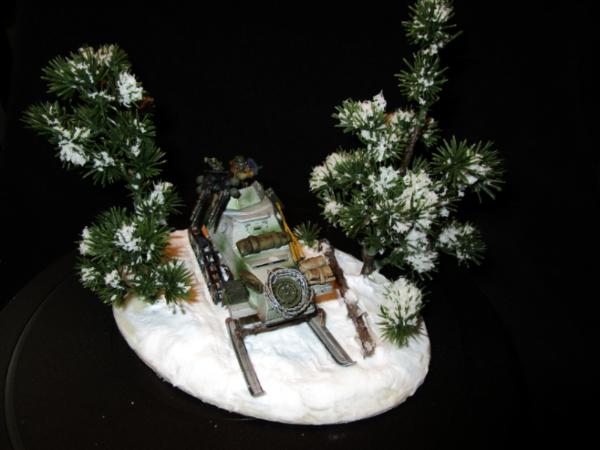
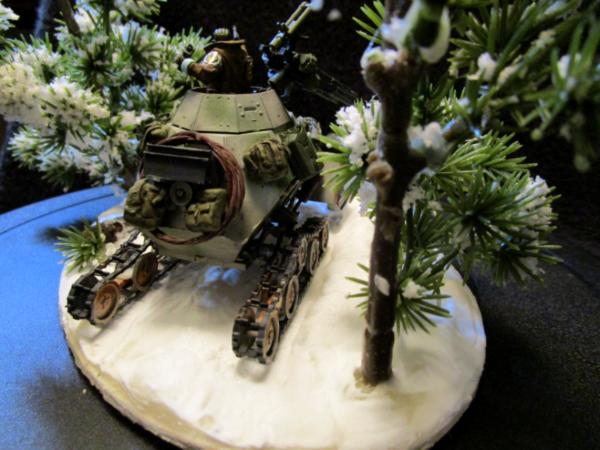
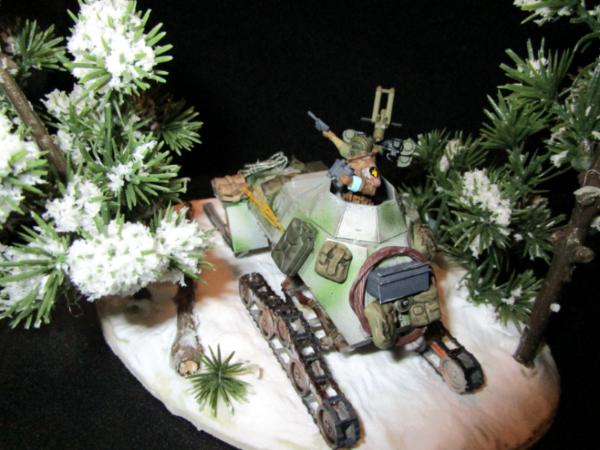
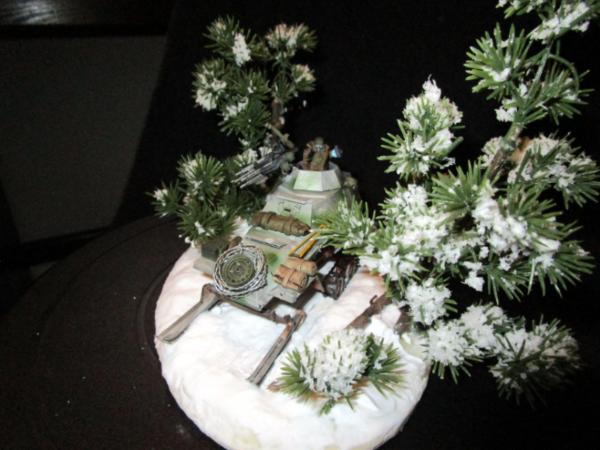
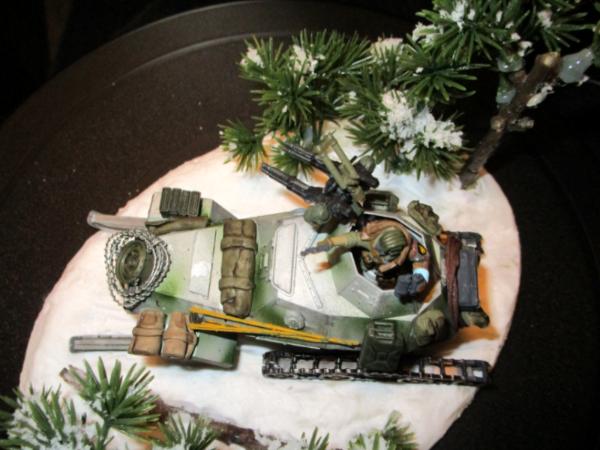
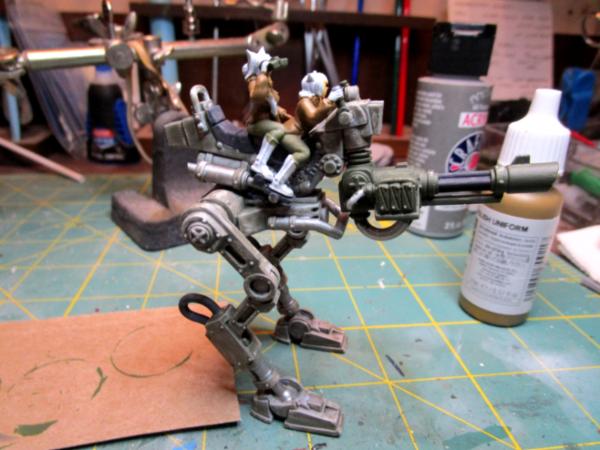
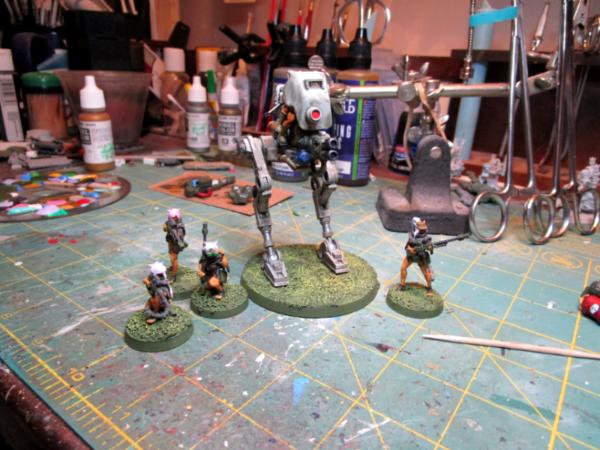
Fighter jet engines mounted on a Russian T-34 tank chassis, intended to snuff out oil field fires (wink wink, nudge nudge). If these guys aren't ready to die for the Emperor, I don't know Warhammer 40,000!
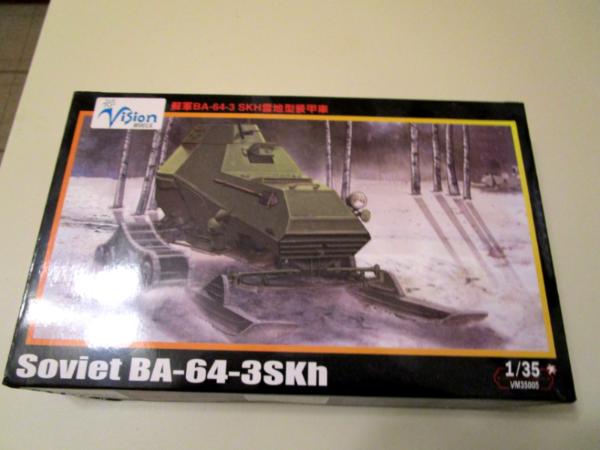
Supposedly a real vehicle (can't tell if it's a render from the pic resolution)
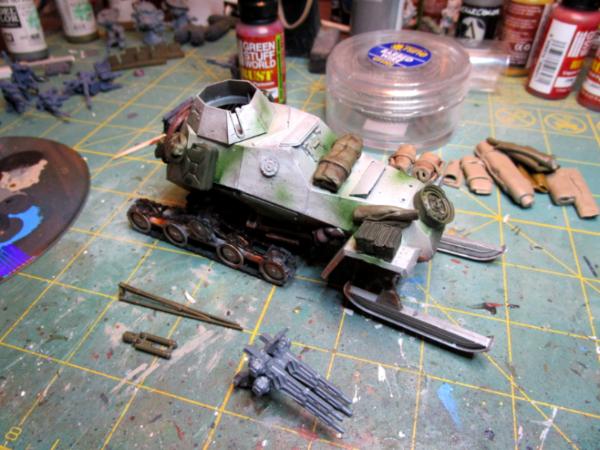
I'm feeling the urge to do a vehicle Syro- something I'm better at than figures or even buildings (mud hides a multitudes of defects in skill ). I just might try to make something logical (in the context of 41st millennium vehicles that still have rivets and bolts) that would be a Swiss Army tank for the Emperor.
Still working on some Kensei figures to display in my walled villa- and have some neat shots of buildings to show with them, so more follows soonest on that score.
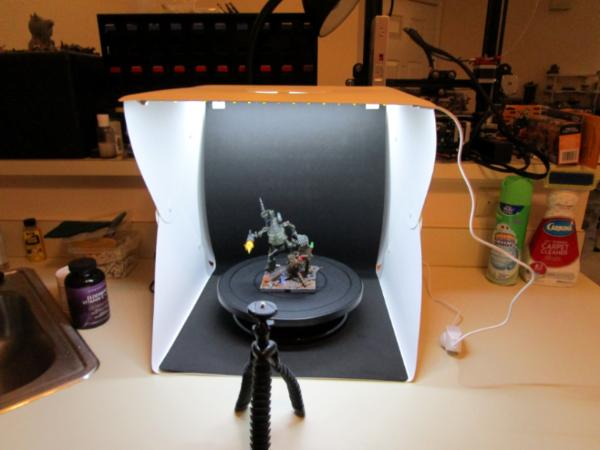
In the meantime, the Farm Project is done (or at least, I'm calling it done, as in, I'm not working on it any more). I'm a little disappointed in the pics, as I used my little Canon A360 camera, which is better than my phone and also used the (admittedly inexpensive) Shibusa Studio light box to take 'em, and they still didn't come out terribly well. I take this to mean that I must finish and photograph many more projects as quickly as possible so as to gain experience.
This is the Potion Shop, from Oksana Klingell's Kickstarter Medieval Architecture, with Raging Heroes Commander for scale:
All in all, I'm not unhappy with it and it was fun to paint- a chance to use and combine lots of colors I don't normally get to (Eldar Harlequins here I come!). I did try to get in and do reflections on the window/surface behind the bottles, but this proved not to be a do-able do, so left it steel grey as it shows.
The printers are humming (and growling and screeching) behind me even as I type churning out pieces for the next mega scene. Big enough that I'm going to have to rethink how I did the paving and wall stones for the villa with an eye towards doing something similar but on an even larger scale.
Hope you are at least somewhat amused by a whimsical piece- I look forward to your constructive criticism and advice!
Thanks, Warboss! It was fun to do something a little different. Many of Oksana's designs have integrated bases, which is convenient for gaming and makes them less tippy, to boot.
To begin, I assure you that I am an excellent neighbor: considerate of noise, no extremely pungent cookery, no vacuuming at 9 o'clock at night getting ready for hookers to come over. I print my little toys, I paint my little miniatures and I don't bother anyone. So having said that, I can't understand why the occupants of the units above mine continue to try to flood me out of my apartment.
Some of you who have been kind enough to look in on my work (and even kinder to leave your constructive criticism and encouragement) will remember that last March the occupants of the units above mine seemed determine to run an entire elk through their garbage disposal, choking it and the entire drain pipe from it clear out to the street solid. This caused a water column to form in the stand pipe, which found a point of pressure balance release by backwashing effluent into the front half of my apartment. The living room area, small dining area, bathroom and laundry cabinet flooded. This required extensive water mitigation, spraying antibacterial and antimicrobial disinfectants, replacing all the carpeting and the bottom third of the drywall and then new paint.
Welp, no good deed goes unpunished- something similar has happened again. This time, a pipe in the third floor apartment above mine broke in their utility/HVAC closet. The water ran down their wall, found where the pipe passed through the floor and followed it down into my utility closet. There it pooled in the void above the ceiling until it:
A) Collapsed the ceiling
B) Ran under the wall into the bedroom and soaked the carpet there
C) Soaked through the bedroom closet ceiling, ruining it and thoroughly wetting down most of my clothes
The photo is looking from the bedroom into the utility closet. With all that drywall and insulation removed, the air conditioning is less than effective and we've been having 95 degree Fahrenheit days because of course we are just now. I had to stay in a motel at my own expense whilst they sprayed deadly chemicals around.
I believe it qualifies as irony when I tell you that the foreman of the water damage mitigation team- very nice young man named Joe- was the same foreman who headed up the work just 15 months ago. He'd been wondering, he said, how I'd been getting along since they had done the work. Now he knows.
I had actually gotten to the point of pulling myself up out of a bit of slack period of non-motivation and getting back into regular production, but have had to work around conditions for the past few days. They start fixing all the damage on Friday morning and once complete I'm hoping to get back into it again. I can't right now because everything is topsy-turvy to get things out of the wet areas. At least this time I was here and moved everything myself- so other than what was ruined by getting soaked, no packing and moving damage.
The Chinese walled villa is complete and I have some final flourishes and innovations to show when I complete a couple of figures to roam around in it.
I have a massive new project printing that only needs a few more pieces knocked out so I can begin painting it.
And I have a couple of whimsical figures to finish up just for fun.
Meer_Cat, I am so sorry to hear that this nonsense is happening to you again. You really don't deserve to keep having to go through these kinds of things. They probably starting fixing things around the time I'm posting this. I hope everything goes well and that you can return to peaceful hobby time soon.
The saying when it rains it pours never felt so appropriate . Good luck with this time, hopefully it goes much smoother and faster than the last "Fix".
Thank you all for your concern and, frankly, sympathy. I have experienced more maintenance challenges in seven years of living part time here than in more than 30 living in other various apartments, rented houses and even military barracks. I'm very much afraid my patience has worn a bit thin.
I have to announce that I won't be able to paint or model until the repairs are complete. I thought I had forestalled the displacement of my property by moving everything away from the scene of the most recent flood; alas and alack, for naught. While my arrangements were good enough for the water mitigation techs, they were not enough for the drywallers and painters- who moved everything in the entire apartment (not just the affected bedroom) and didn't bother with silly boxes or anything this time- just piles of things.
There wasn't any real water damage or breakage until today.
Gotta tell ya- the sympathetic response all y'all have given me here has helped a wonder in me getting over feeling sorry for myself. While I wish the leak hadn't happened, or the repair company had let me know when they were ready to start drywalling and painting so I could move my things myself, I reckon I'm pretty lucky. If the worst thing in my day is some of my toys got broken, well- I guess I've had a pretty darn good day. Thank you all for your kind comments.
It doesn't hurt that while we were in the high 90's (F) again today, the humidity was much lower, what with Elsa moved well up the east coast of the US and away. Much easier to take the hot if it isn't so wet, until they can get in to see what's wrong with the AC (another great treat to have, that many don't).
It looks like they are done drywalling and almost done painting. The AC guy should be here Friday and the carpet guys next week sometime and we're back in business.
I hope all the work goes quickly and smoothly Meer_Cat. I saw you said the carpet guy is coming next week, what will he be doing? I'm wondering if you might want to remove all carpets and only have linoleum and tile with how enthusiastic this building is about leaking into your apartment
Too right Syro! Unfortunately, it has to be what the owner wants and not necessarily what the situation dictates. If it were up to me, I'd go with linoleum, ceramic tile, textured concrete or granite- you know, like the surrounds on a public pool!
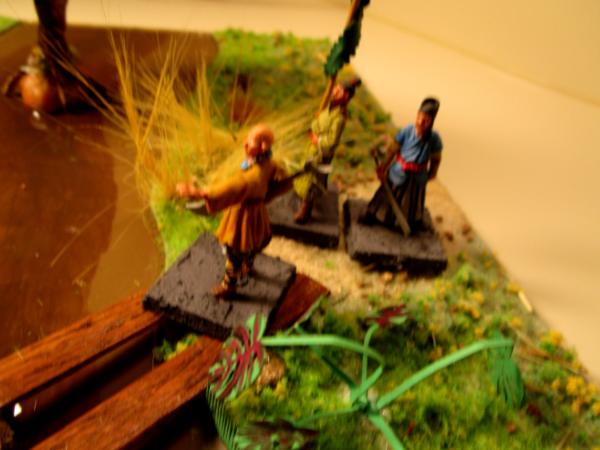
Here is the big wrap up for the Chinese Walled Villa project. It was just waiting for me to finish the last buildings and get at least a couple of figures painted to show it off. And that's what we have: two. There are more coming and probably more buildings, walled quarters to expand the arrangement options and scatter terrain to build out the set. But for now, it really is done. On and off, this project has been running for two years. In that time I've learned a fair bit about 3d printing, acquired some new types of paint and improved my ability to paint figures as opposed to vehicles and buildings- at least in my own not-so-humble-or-unbiased-opinion.
Your constructive criticism is heartily welcomed.
View through the main gate and torii arch:
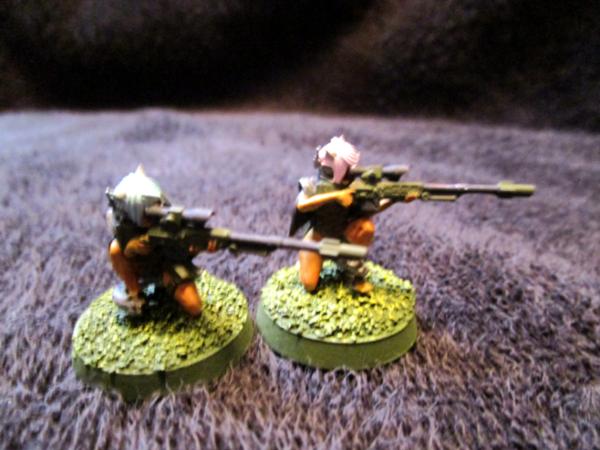
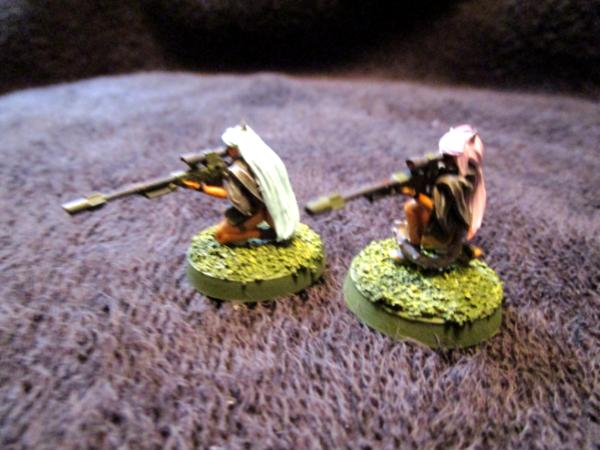
The figures are from Kensei (the first kickstarter for their new Khitai Rising army) and I used a combination of Cephalopod and Instant Colours paints. The Cephalopod make for good base paints and actually have a bit of color contrast affect to them as they dry. Instant Colours are nice for washes or thin glazing colors as a top coat, or you mix Artist's medium in and they also make good contrast paints or drybrush paints.
Two storey version of the main house/building:
Courtyard shot showing all three buildings:
Bell shrine in the garden:
Entrance to the main house guarded by Foo Dogs and Swordswoman:
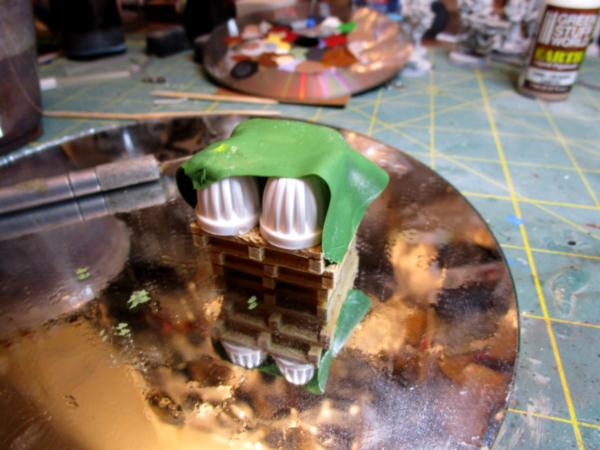
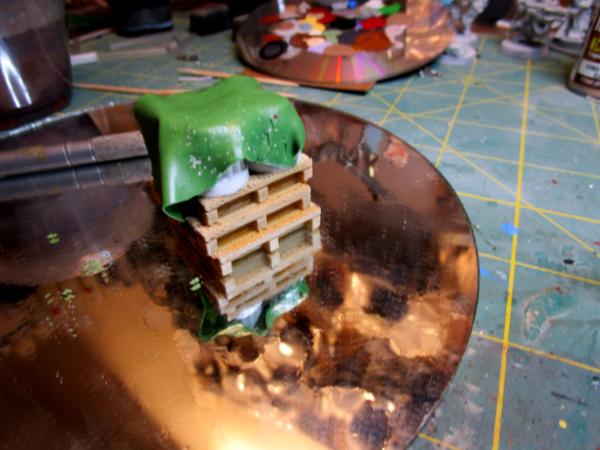
Two storey building made using the single room house as the base, adding the burlap screens at the sides and placing a full 2-room house on top:
Ceremonial gong in the garden:
Switched out roof types:
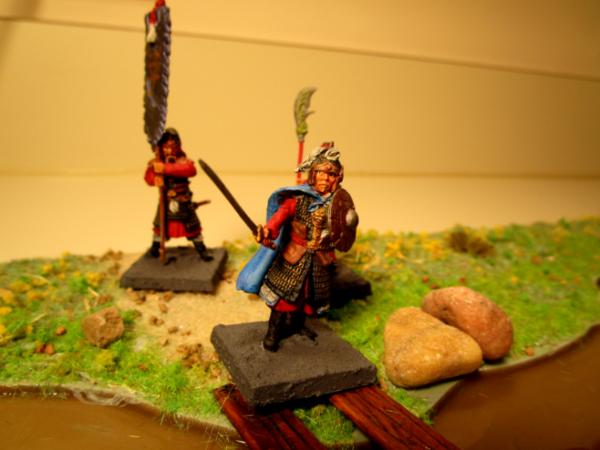
Swordswoman at steps to a watch tower:
Watch tower platforms can accommodate a single figure (I've already repainted the eye- the things the camera shows!):
Four different wall/house sections, two different roofs, a bunch of different scatter terrain:
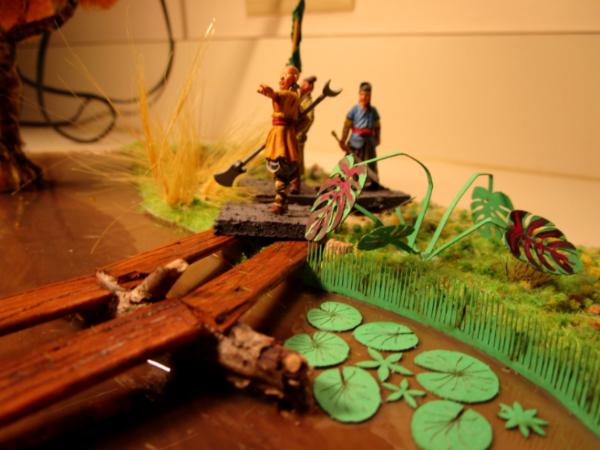
Warriors in the garden:
3-storey variant; one could easily add balconies by cutting a piece of card or styrene the right dimensions and slipping between storeys:
Warriors:
Everything uses magnets to hold together so roofs don't get knocked askew during game play and the interiors are all playble, I just haven't painted them yet and probably won't- unless the opportunity to join a gaming group actually arises.
I have several other figures for this set in progress, including the fellow who 'owns' this villa and gave me the chance to use Greenstuff World's Colorshift Metals paint set. I look forward to presenting them to you over the next few weeks.
And then a metric-crap-ton of other things to get back on track, now that the flood damage (third time in 14 months!) is finally almost complete in its remediation.
Congratulations on finishing! It's hard to believe that it's been two years since you started your walled villa. It has been fun following along and watching it grow and progress.
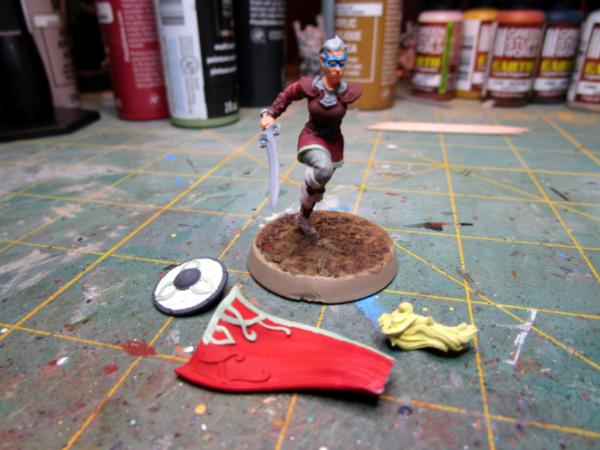
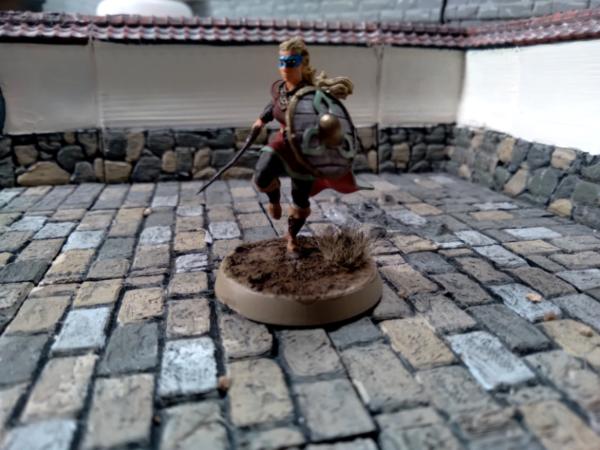
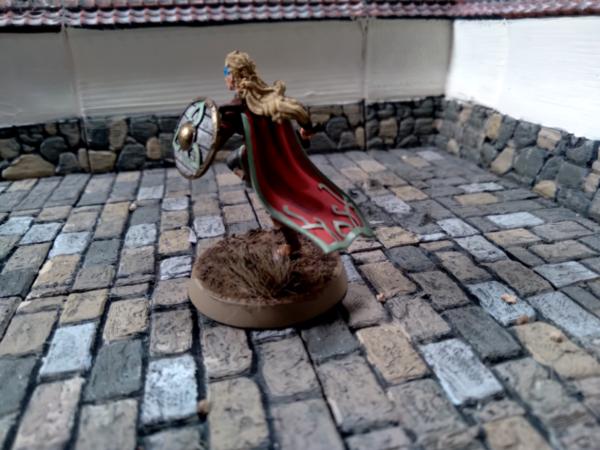
Finished up a bannerman from the Zenit Kensei Rising set:
The character on the banner means 'Courage'
Tried to take a closer and better shot of the banner to show the color better, but it just doesn't do it justice. I used Green Stuff World Colorshift Metal Cobalt Blue and it really looks good. You undercoat with black and then layer the colorshift onto that. In person, the effect is very striking, so you are all invited over to see and maybe we can get a quick game in of something whilst you're here. GSW offers two different sets for a total of 12 metallic, color-shifting options.
What an incredible display.
It took me far too long to get over to your blog. There is lots of excellent stuff in here. Still need to do some more work to catch all the way up, but the villa is epic.
Sounds like the flooding, etc. was epic, too, though not in the same way.
Good luck with it all.
Thanks for looking in Syro, DJ, and for your kind words.
Syro: Following the axiom of 'anything worth doing is worth overdoing', naturally I have a lot of Kensei Rising figures (to include war elephants!) in want of painting. These are white metal castings, so I don't count them as part of my Plastic Mountain of Shame. For the moment, I have 7 others in various stages of completion to add to the 3 currently done and then we'll shift fire to another project (possibly LOER Terrain, perhaps).
DJJazzyJeff: Getting parts of the apartment flooded three times in 14 months was a drag, but I think I'm finally getting back into the rhythm of painting and building now, with most ly everything put back the way it should be. A hidden upside to all this was the recognition of the need to box _some_things and to thin out the 'bits' that have been accumlating for years. Not spare Warhammer or other manufacturer things from kits, but interesting shaped pieces of plastic from the packaging of various items, milk bottle pulls, and other essential- but in the immediate useless- items. I have very strong packrat genes and need to be careful not to cross the line between thrifty/imaginative and 'hoarder'!
With a bit of luck will have the Celtic Treefort done at the Farm soon and another one or two soldiers for the villa in the next day or so.
Finished another figure to roam about the villa, this time a swordsman, possibly an officer:
Whilst building/painting this guy, I either misplaced, lost or the figure didn't come with a scabbard for his sword. I fabricated one by clipping the barrel from a 1/35 scale .30 calibre machinegun, squeezing it flat with pliers and painting it appropriately. I think it came out fairly well.
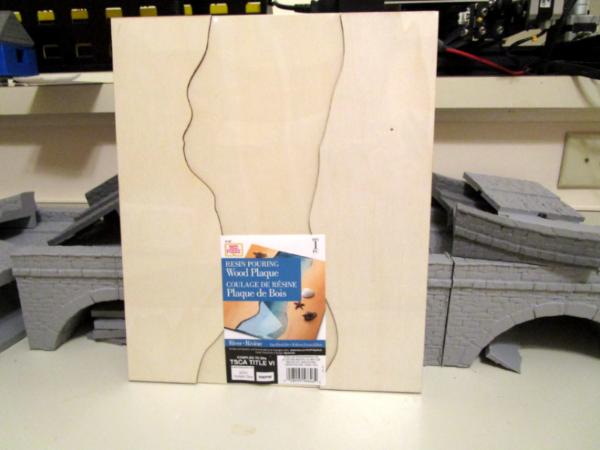
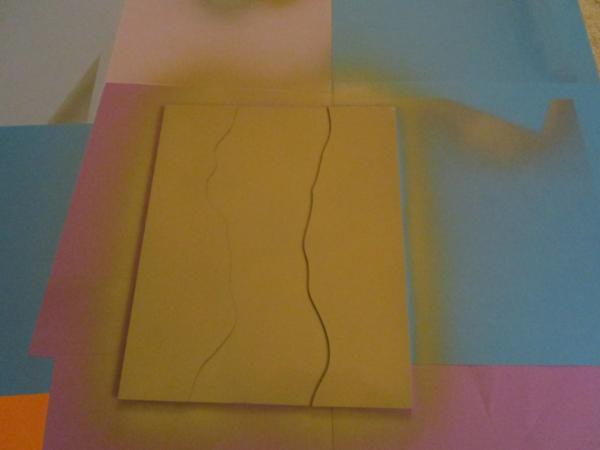
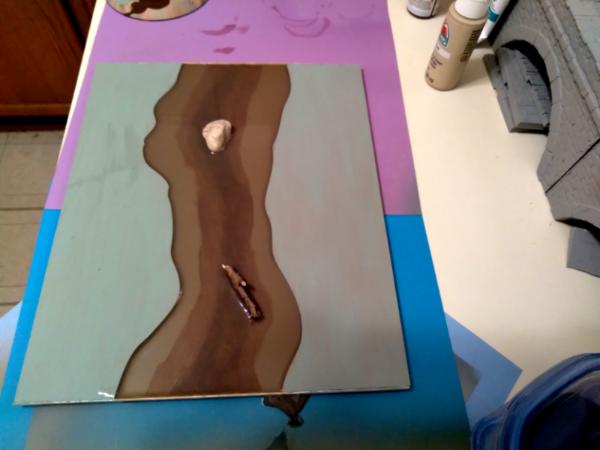
I also started the finishing process for the Celtic Tree Fort, using Dimensional Craft Paste by Testors to give some texture to the wooden oval plaque I'm using to base the project.
:
I've got my other basing materials out to hopefully get some more done tomorrow. Callsign Lipstick-6 (or CinC House, for you naval types) ie: my wife, has determined that the chibi ponies need a tree house to go with their stable. So I am directed to fabricate a tire swing to hang from one of the branches for the ponies to play on. I'm happy to oblige as she puts up with me painting and scrambling around in the dirt for treasures and things like that.
I like the new model Meer_Cat, I agree that he looks ornate enough to be an officer. I looked at the scabbard, liked it, and then saw that you made that piece yourself and added it, very nice
Finished another figure from the Kensei set, three more in the works then a change for something new (still lots more Chinese to paint, though):
Tried using some ink on the red robes for contrast, tried some shading other places, might should have mixed my own highlight colors and tried some drybrushing, but overall I'm pretty happy with him.
Thanks Theo! I'm looking through my stl's for tiles to see what I might have to print out and put together so I have something for WH40K type figures- I've been collecting a library for two years now, have lots of files and most that I have commercial rights for hard copies.
And, another figure done, this one a monkish type fighter:
Simpler color scheme here, but fun to paint up.
The reason these figures are coming in dribs and drabs is because I picked out nine to try to do as a 'unit'- production line painting style. I figured they had enough over-lapping, 'share-able' colors that this approach would work, but it didn't. So I got a little done a couple at a time, and this past week I've been focusing on just one to complete in an evening, usually getting a little more work on one or two others at the same time.
Only two more to go, then something new to finish up.
Your constructive criticism always welcome, more follows sooenst.
Another foot soldier completed, I like to think this one is from the north, or western, mountainous part of China from his dress:
I'll touch up the one eye, so he doesn't look quite so crazed and hit all the bases for this set with a drybrush of white on the Astrogranite. Next up will be the nobleman, the guy that owns the villa and then on to the Tree Fort.
Finished up the last of the Zenit Kensei Rising/Khitai figures I'm going to do for now (although these 'elites' were fun, and I want to see how I do painting up a regiment of Dong cavalry or Dhao swordsman). This is the noble who owns the villa:
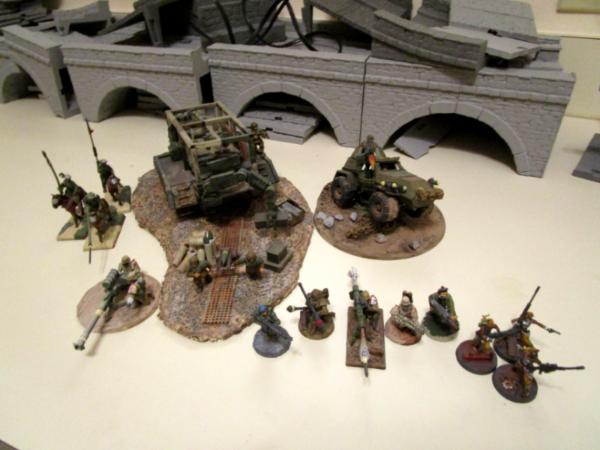
And a group shot (as my Napoleonic mentors said "in mass lies perfection" [I just need more 'mass' ]:
Already working on finishing up the Tree House/Fort and have started the base colors for the first of the Yokai from the Reaper Bones V campaign that I figure to paint up for now.
I like your new painted up noble, and it's especially fun seeing the whole group together. Looking forward to seeing the masses infantry units when you get to them.
Finished up the first Yokai from the Reaper Bones V campaign tongiht:
I have a feeling that this one is going to wind up joining the chibi ponies once Lipstick-6 gets a look, which is fine by me. I like being able to use the villa as a setting for photos, too.
Worked on other Yokai, the tree house/fort and a robot mechanic for a previous LOER project tonight as well, so should hopefully have more to show tomorrow.
The yokai is looking good, Meer I'm glad to see someone else painting Reaper Bones V. The yokai is suprisigly cute. Is it the "baku" yokai? It would fit well with the ponies
Thanks, Syro! Yes, I believe this one is the baku, and I'm pretty sure I know who is going to be on the tire swing at the treehouse once Lipstick-6 gets a look!
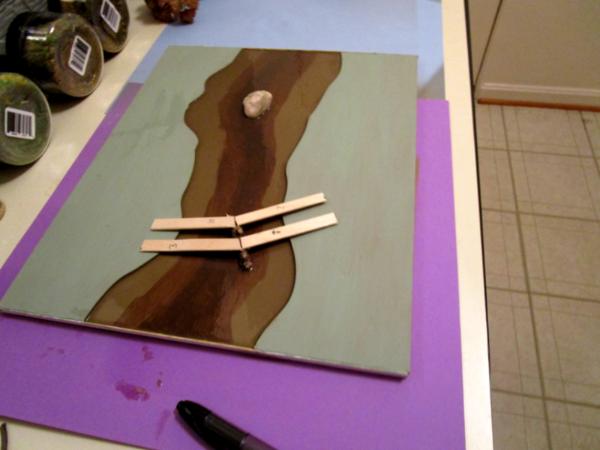
I finished up the Celtic Tree House/Fort from Iain Lovecraft's Celtic Village .stl set:
Had more fun doing up the base than I expected; the base itself is one of those wooden decoupage ovals you get from Walmart for a buck:
The little colored bits are candy sprinkles I haven't used since I built belted ammunition for the SPAAG tank a couple years ago; not sure if I'll pick some off or all off- maybe the colors at least and leave white, yellow- they were supposed to be flowers or mushrooms or something fairy-like:
28mm figures fit (this one is on a 30mm square base):
You're doing fine Theo- I appreciate you taking the time to drop even a quick note. I understand entirely- for a period I was mostly incommunicado dealing with various things (and not nearly the load you are right now). I know I have friends here and that's plenty more than I had before contributing to Dakka.
I like the tree house Meer, for a split second the thumbnail looked like Baba Yaga's hut to me until my brain caught up with my eyes I also like seeing the little baku at the base of the tree.
Thanks Syro! I used four different layers/washes of paint trying for a dark sycamore sort of effect, lots of fun trying new things but does add time. I have .stl files for a chicken legged hut, that may have to be the next print project!
Meer_Cat wrote: Thanks Syro! I used four different layers/washes of paint trying for a dark sycamore sort of effect, lots of fun trying new things but does add time. I have .stl files for a chicken legged hut, that may have to be the next print project!
I keep forgetting I picked up a boardgame called Okka a few weeks ago off the dinged and dented shelves at Miniature market. Obviously very Japanese/samurai oriented. I'll wind up posting pictures at some point. You might want to look into it as there is a comic series that the game is based on, might find additional items to help with creativity if you get bogged down like I do time to time.
That is very good advice, Theo- I'll look into it. Reaper didn't ID the Yokai in their set- there are eight different and no label on base, etc. I found a website: www.yokai.com that is actually quite literary in its treatment of the subject. The site owner is an author and translator of Japanese folklore and has a ton of information on everything folk tale related and especially yokai. There is a link index across the top of the page, if you hover the mouse over a letter, all the yokai with names that start with that letter show in a drop down box. There is also a 'Find Yokai' search engine to go through the database if you have a name or shape. Overall, I was impressed with the thoroughness and seriousness of the site. Lots of pictures, too.
I've two more yokai I'm working on to get the painting desk clear and then I'll have to really pick the next unfinished project to wrap up- I'm really thinking the junkyard/delivery service garage thing needs to get off my shelf.
Howdy Cam- thank you for dropping in; you were the first Dakka to ever comment on my thread and you're now the most current person! It is good to have you back on the P&M board.
I liked the look of the Asian themed buildings from Iain Lovecraft's kickstarter, but in typical fashion, my 'pilot excursion' into 3d printing got a little over-inflated and yielded the 2' x 2' walled villa. Which couldn't be allowed to remain empty, hence a nobleman, soldiers, warrior monks and yokai.
I'm actually entering a kick to wrap up a bunch of older projects, with an eye towards being able to participate in an upcoming LOER. I would really like to add the medallion of a full member- and not just a competitor- into my sig file. So, a couple of more sciency-fictiony pieces to knock out and then who knows?
Two more yokai from the Reaper Bones V kickstarter set:
Inugami (Dog Spirit)
Shogoro (Gong Spirit)
The whole gang (Baku, Shogoro, Inugami, Okka)
I'm finding the www.yokai.com site to be fascinating reading; the author has done quite a bit of research and includes origins of the different spirits, their natures and short folk tales about them. You can search the site by name, prefecture (in China, India or Japan) or by animal or object. I used this latter method as I had no idea what or where these yokai might be from, so looked up 'dog spirit and found that the picture and description of an Inugami was very close to my figure and likewise looked up objects, sure enough found gong listed and came to the Shogoro.
These are just my best guesses and I may not be right, so if there are others who are more knowledgeable of these spirits, I would be grateful for any edifying information.
The two new yokai look good Meer The inugami is very cute. I like the eyes especially. Did you paint on white dots for eye shine or is that actual light reflecting?
I don't know much about yokai,and I expect that whole area has similar mythological roots, but all the names so far sound very Japanese if that helps (Including the word yokai itself).
Syro: The glint in the inugami's eyes is reflected light. I tried painting a hentai-looking eye and could never get it to look right, so just painted the whole eyeball gloss black and it came out looking just like I wanted- go figure! I'm enjoying learning more about yokai on the website and will probably purchase some of the books of yokai stories and legends that the author offers. And you're right: it looks like the yokai and all their mythology is a strictly Japanese thing; certain of the yokai characters come from China and India, where they are very different types of spirits. The baku is one, the name comes from China but as a yokai is completely Japanese. I find it interesting that all peoples from around the globe have similar types of creatures at some point in their civilization: Japanese yokai, Russian damovoi, Native American (Huron) canoti (literally: wood elves).
Viterbi: Thank you for the kind words! Where else can you find 41st Millennium rivets, Celtic treehouses and Japanese sprites all in one place!
Next up is finishing off a LOER project from long ago (said in a Mad Max Beyond Thunderdome voice: 'I'm lookin' behind us now.').
I have declared "Flippin' Finish SOMETHING February' for myself and even given myself an extra week to make sure I got on the ball. Too many projects piling up, too many wasted recriminations in my head going "I really should get at that" or "Remember how much fun painting is- you should really sit down and just splash some paint around".
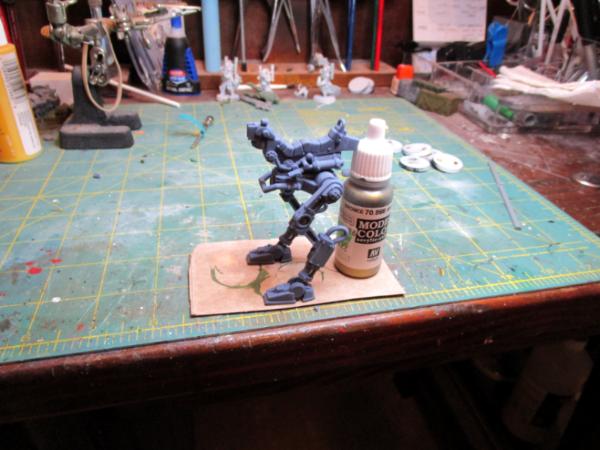
So I have. This little guy is a Robot Mechanic's Assistant from Critit Miniatures first kickstarter (ages ago now). He's been intended (see the use of the passive voice there? Not my fault he's just now getting done, nosirree) for the Aerial Delivery and Mechanic Garage that itself was a League of Extraordinary Riveters project literally years ago now. And he's been mostly basecoated for forever, just needed some pickout colors and some grubby washes and Bob's Your Uncle- done.
So here's done:
Pictures taken with my phone and I might do some more with better light and closer up, as the detail that Critit put into this figure is really good and my efforts at painting don't do them justice. However, comma, pregnant pause for emphasis, what this figure has that many, many other projects and figures don't is that it is done. Not "I'll come back one day and touch up", nope- toujours en avant! always out front, let's go and get some more done. There's a whole diorama/gaming terrain piece that needs finishing, let's get cracking.
Hopefully this spurt of energy becomes a wave and I get some more things done. Made some progress tonight on the actual mechanic, so that's encouraging.
Good to get back at it, your robot looks neat.
Regarding phone camera, most modern phones, I accidentally discovered recently, have a "pro" mode for the camera where you can manually adjust settings such as focus and shutter speed which can help with photos of minis
Thanks Guardling- that's good to know. I'm afraid I've fallen a bit behind the crest of the technological wave and have some learnin' to do! I'll take a look through settings and if all else fails, there is always YouTube to teach me.
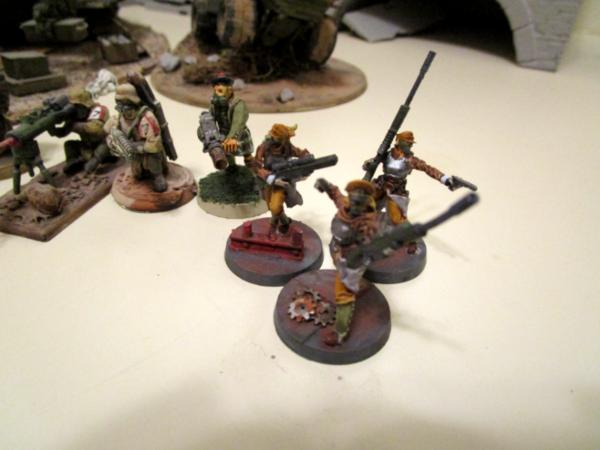
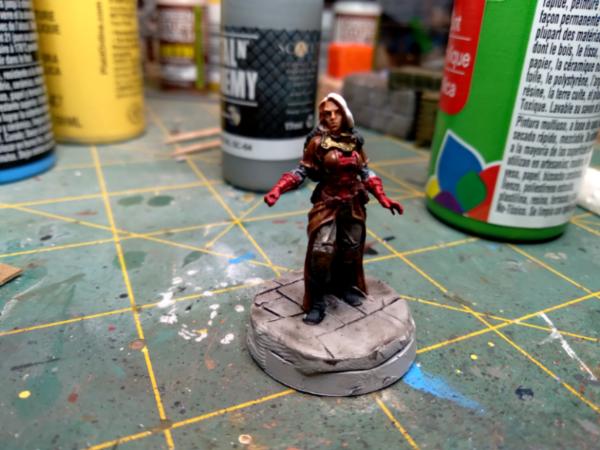
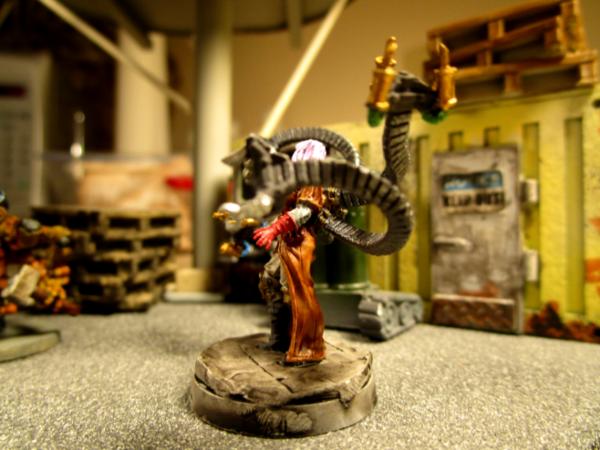
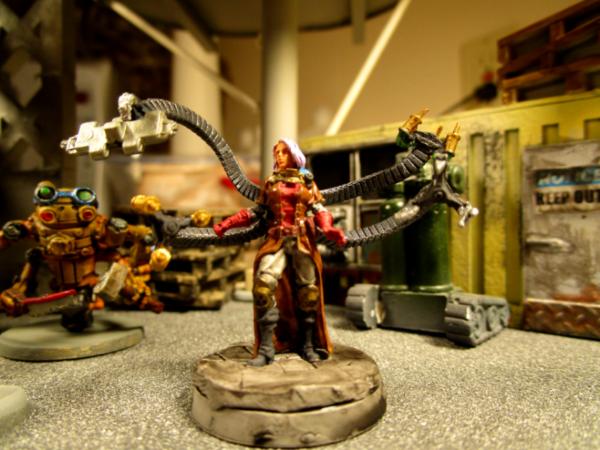
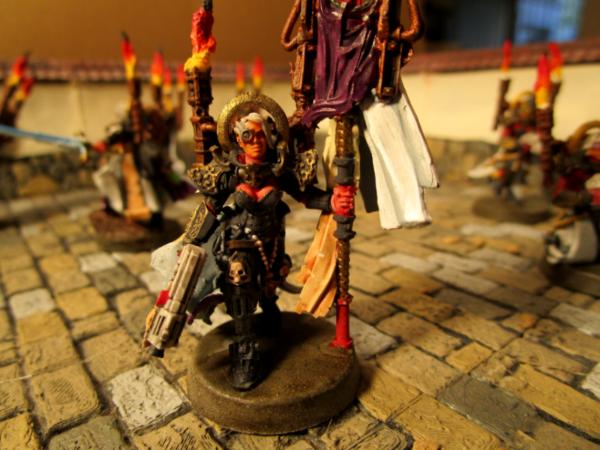
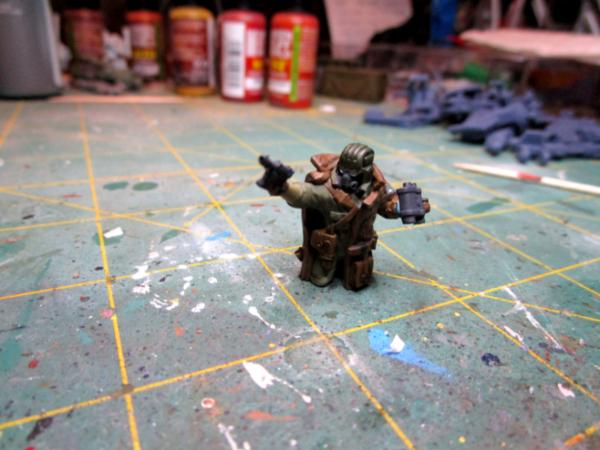
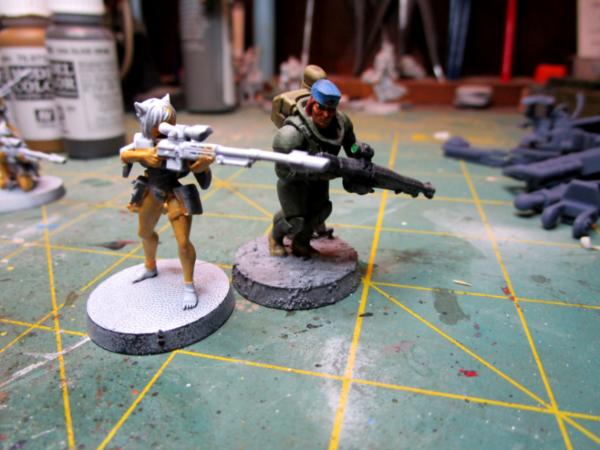
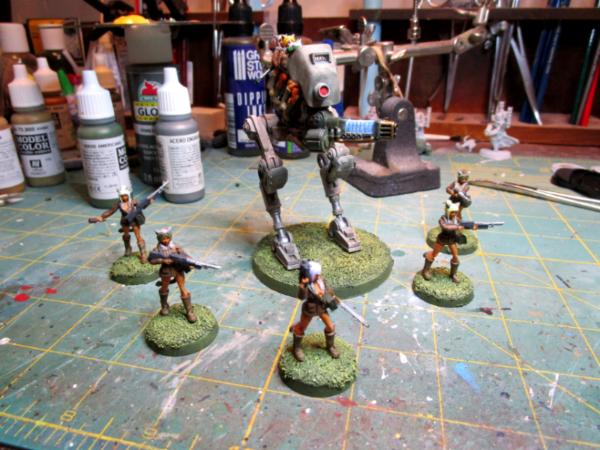
Another piece done, this one had only sat around partly base painted for about eight months. I needed a mechanic figure for the delivery service and this put me in mind of what I was looking for, although she really is more of a Tank Girl type, or a Jailbird from Raging Heroes.
Along with being complete, the other notable thing (for me, at least) is the attempt to try to use wash (Reikland Flesh) to shade and shape the face. While the figure is detailed enough to be worth it, I wasn't in the frame of mind to spend a lot of time trying to do the eyes- and my own are, sadly, starting to get past to where I can see well enough even with magnification to keep working at it. I've got a strong, illuminated magnifier and an extremely fine brush, but one of my problems is dipping the brush enough into black or other dark colored paint and telling if I got any on the brush. My hands are still rock steady, painting and competitive target shooting help keep the nerves in line, I think.
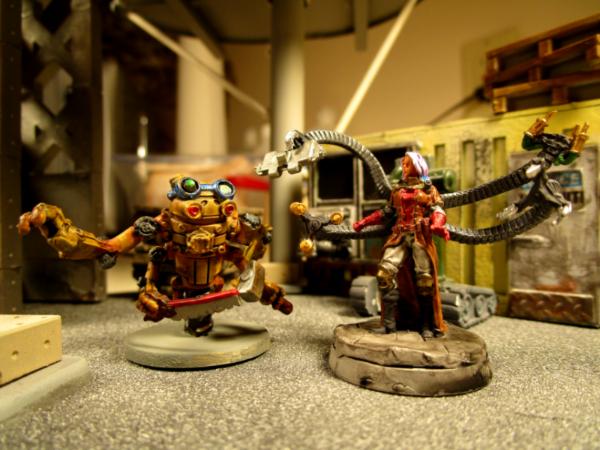
So, here is Magdelena, Head Mechanic for the (yet to be named) Aerial Delivery Service:
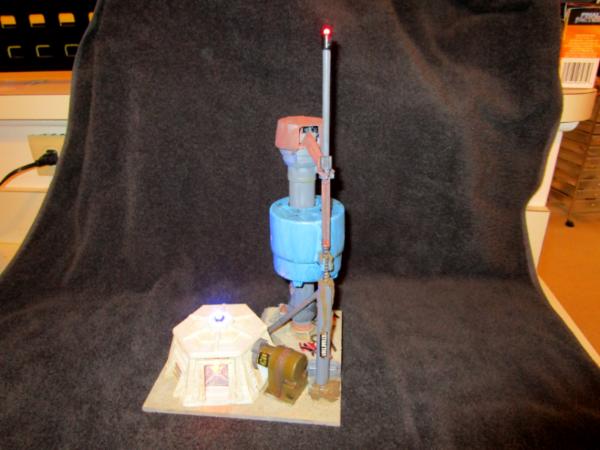
The building I'm using for a backdrop is part of the science-fiction-y terrain I built from plumbing parts and accidently wound up with enough to build a pretty good layout or battle board (pictures in the near future of the assemblage).
Getting some base coat colors on the next project, will share directly.
Thank you for your constructive criticism and suggestions.
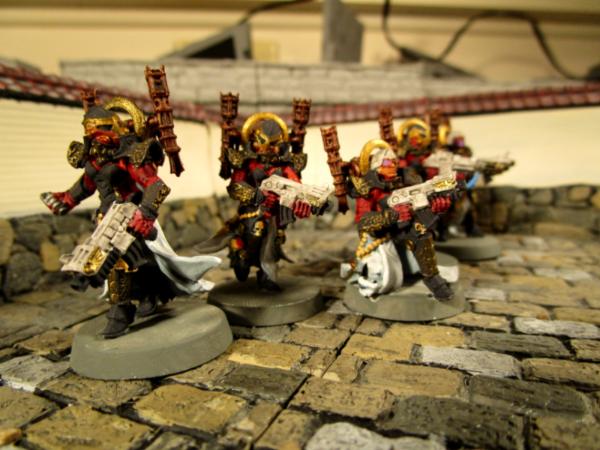
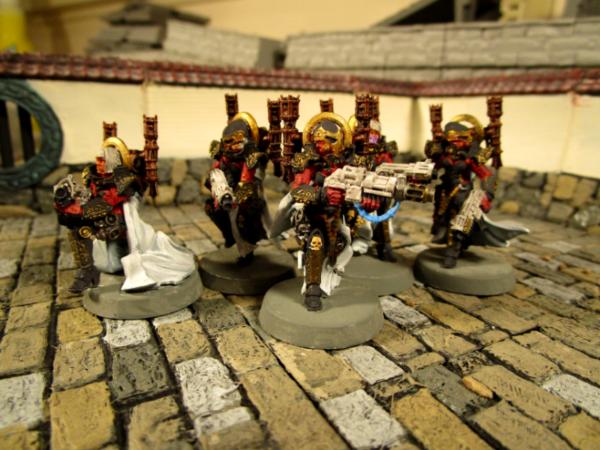
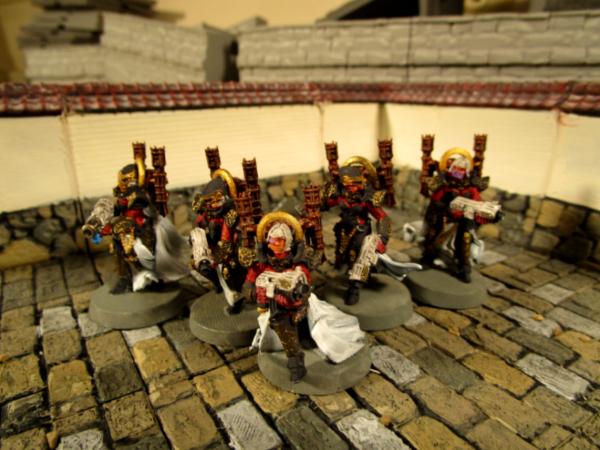
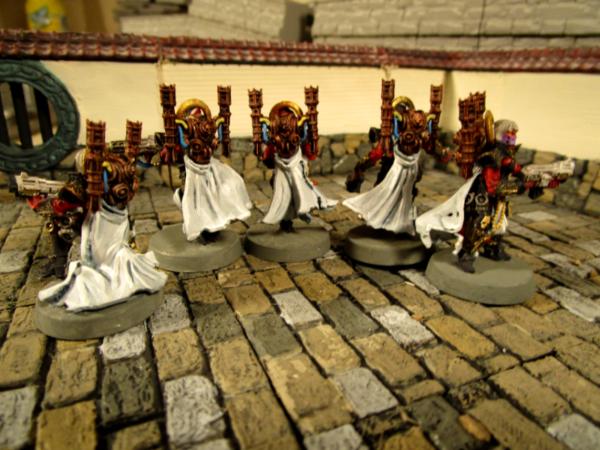
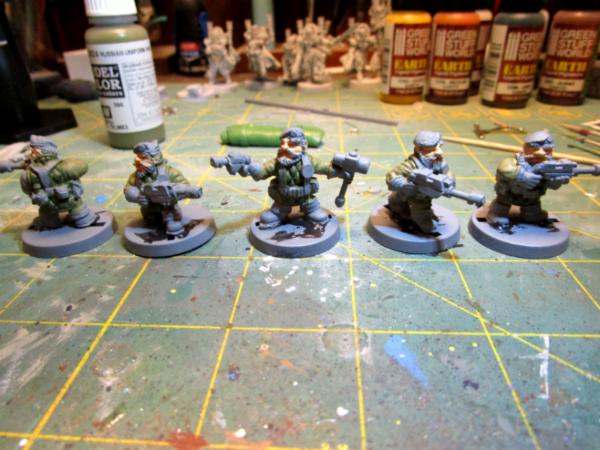
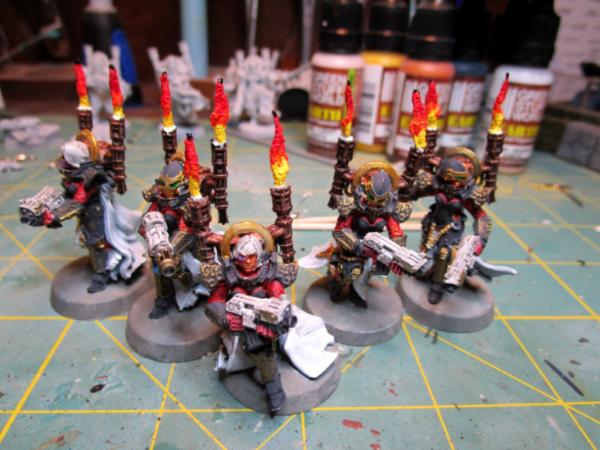
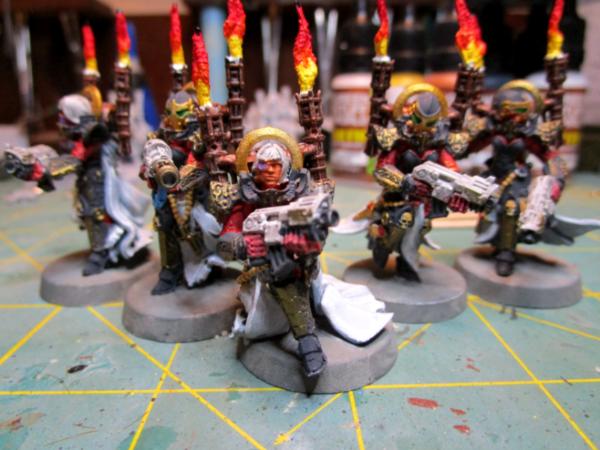
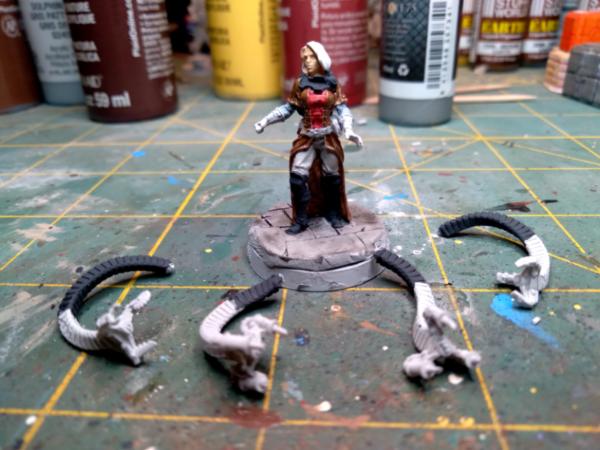
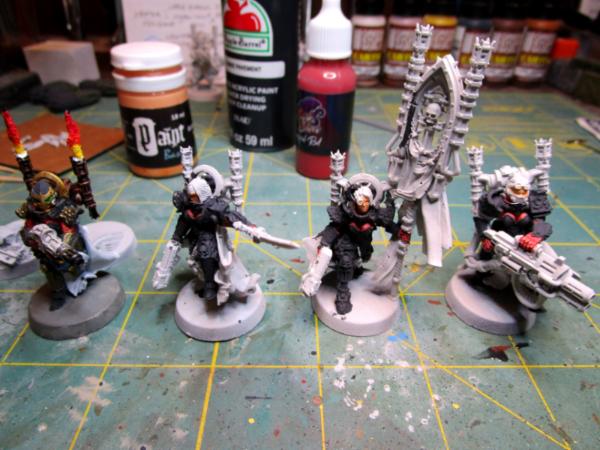
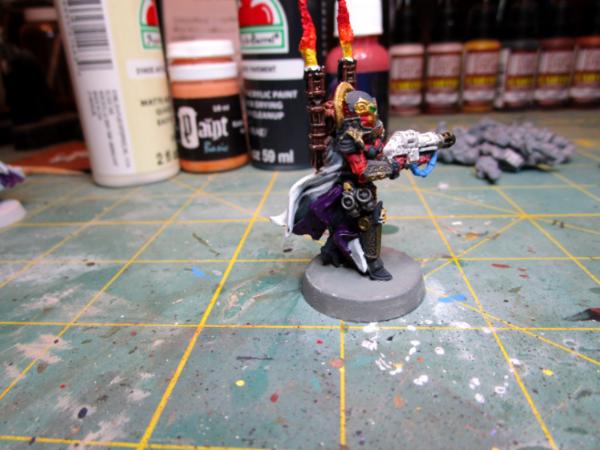
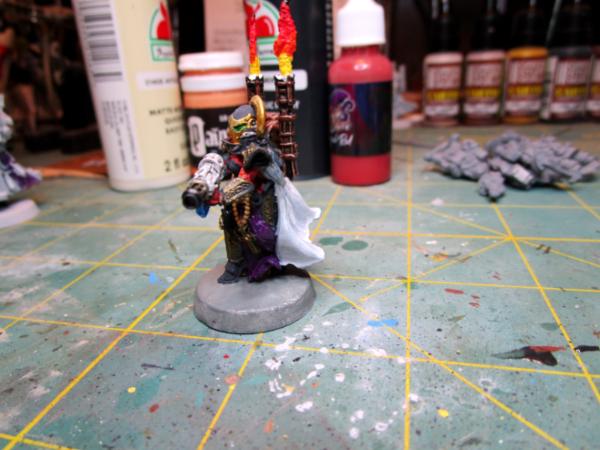
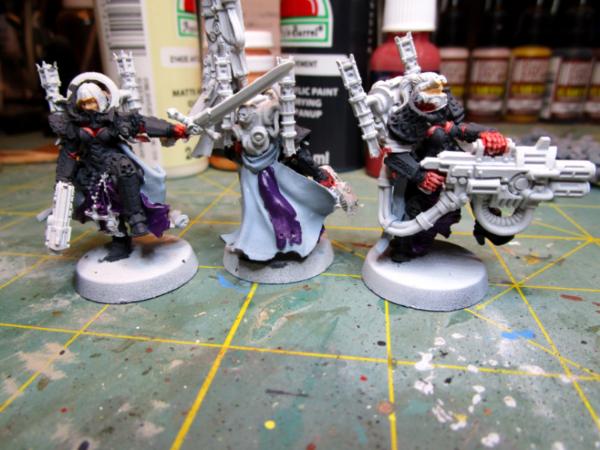
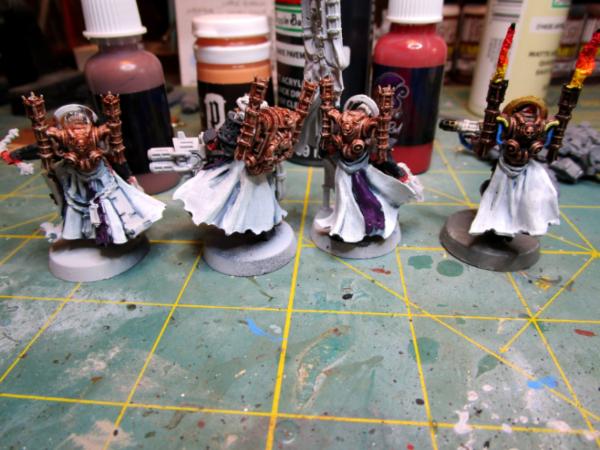
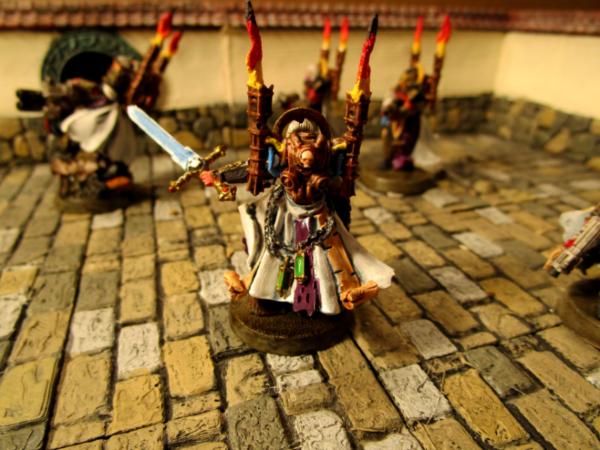
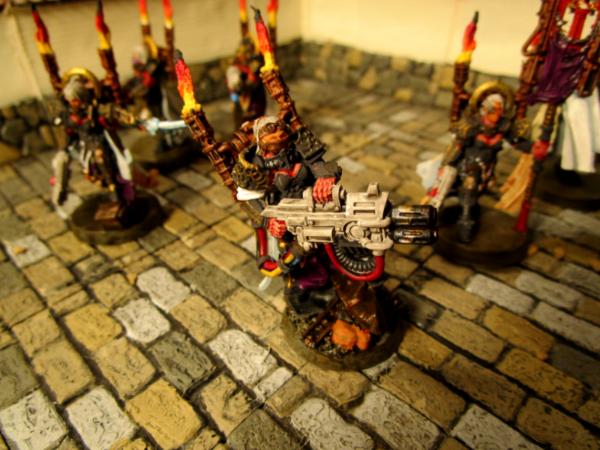
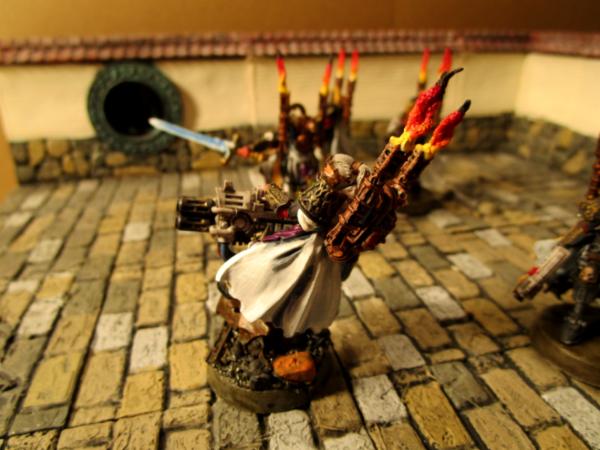
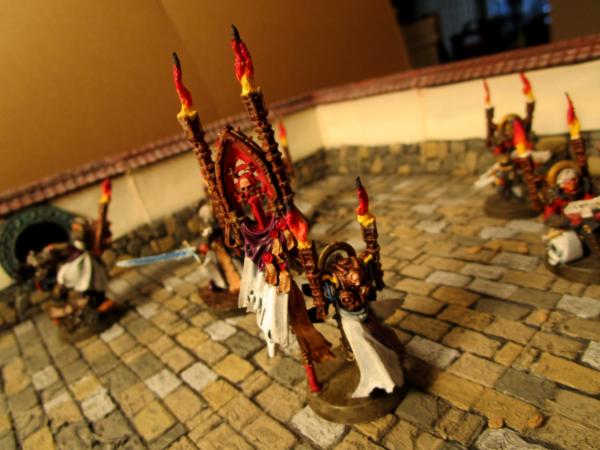
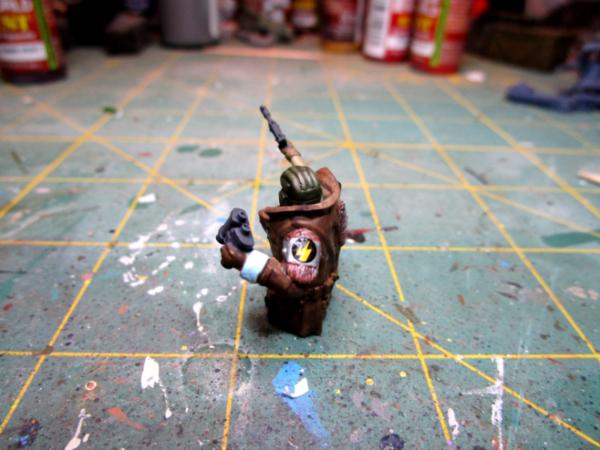
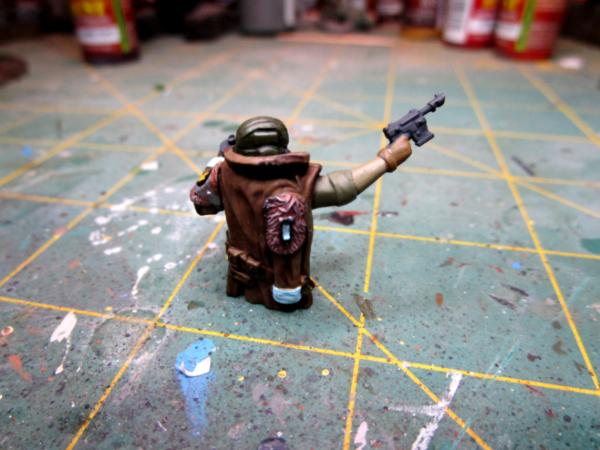
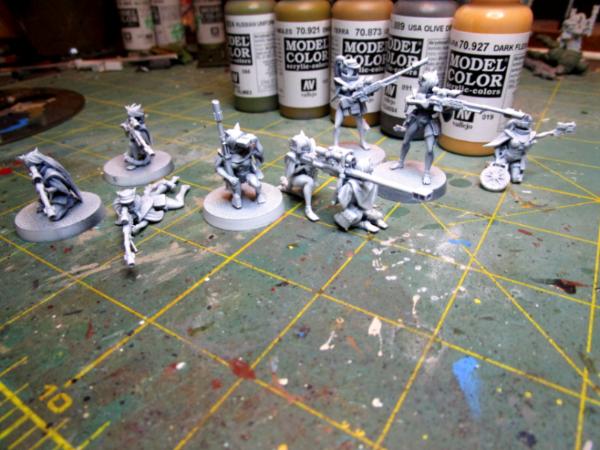
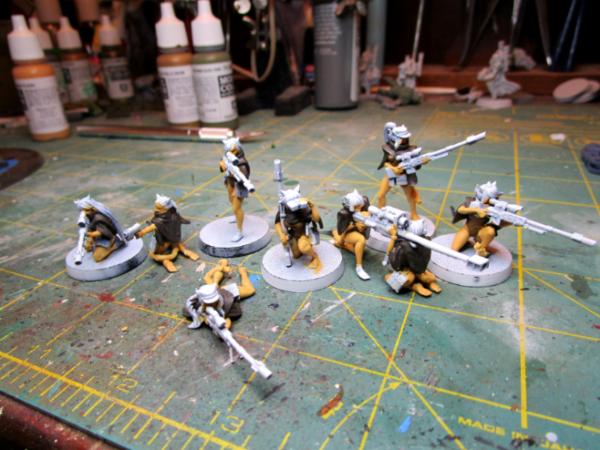
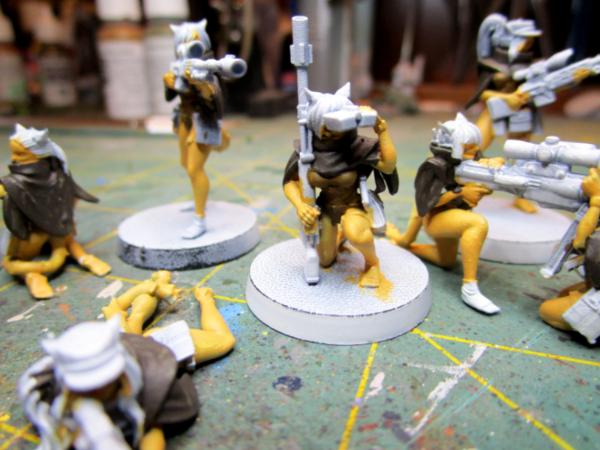
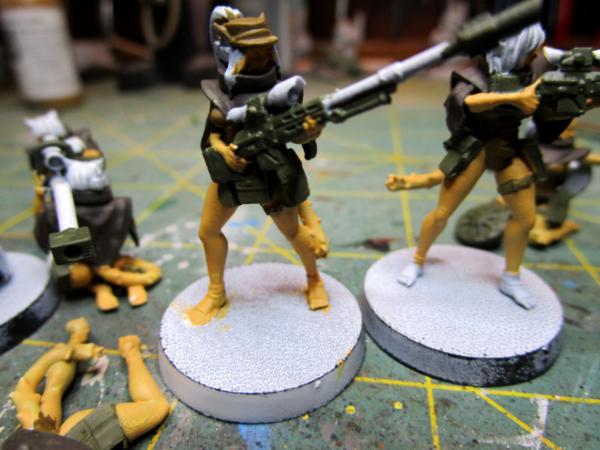
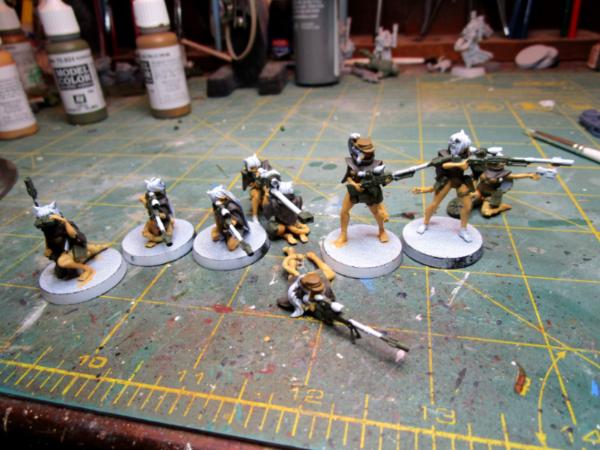
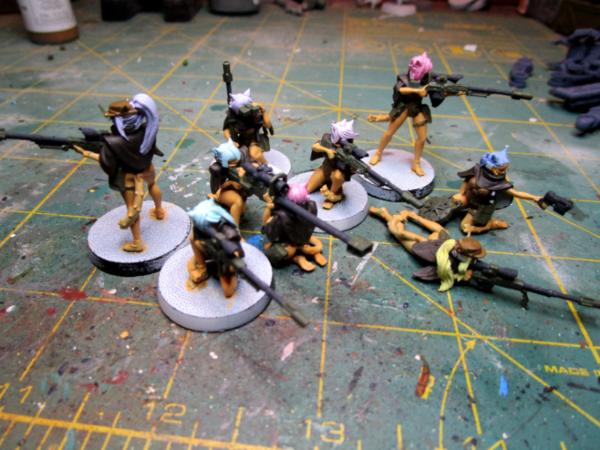
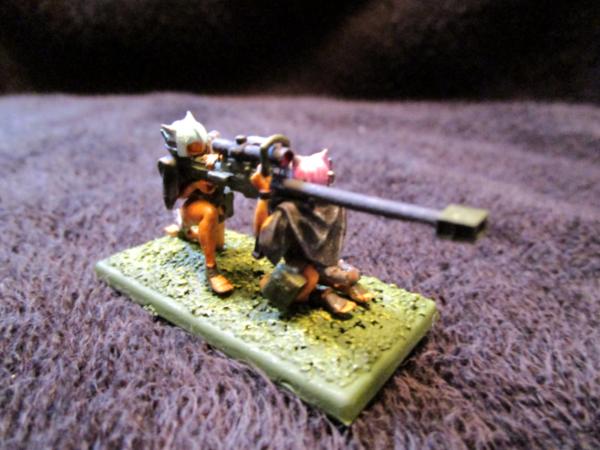
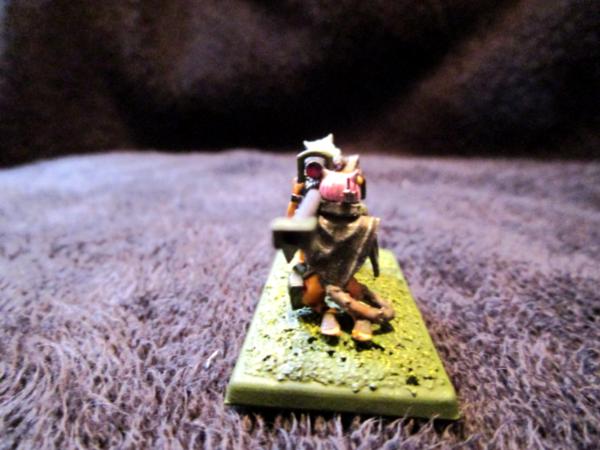
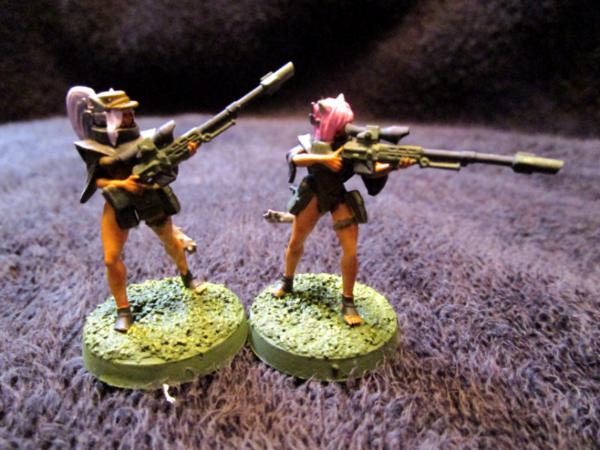
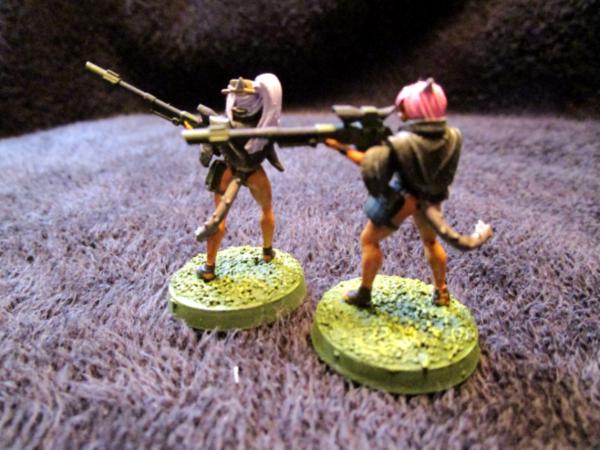
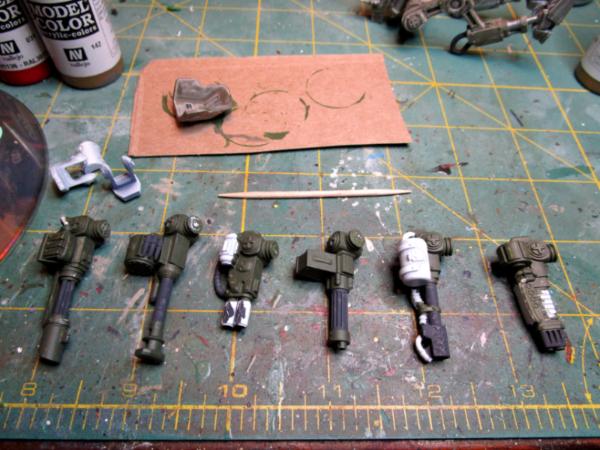
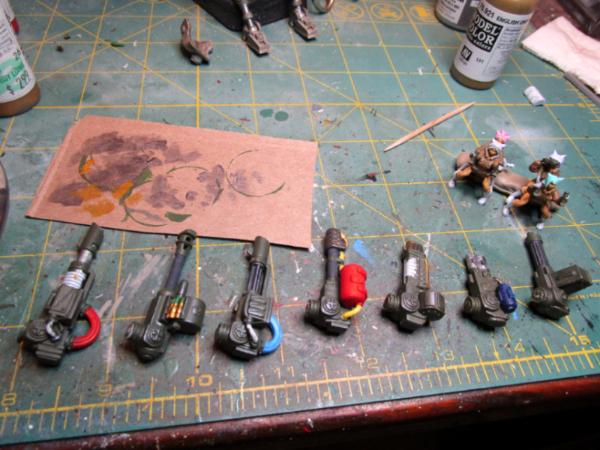
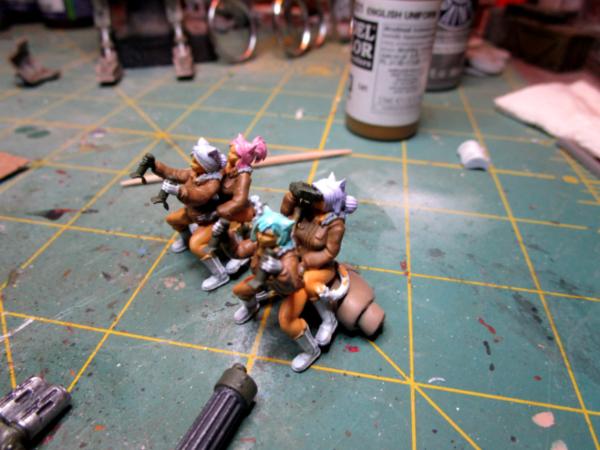
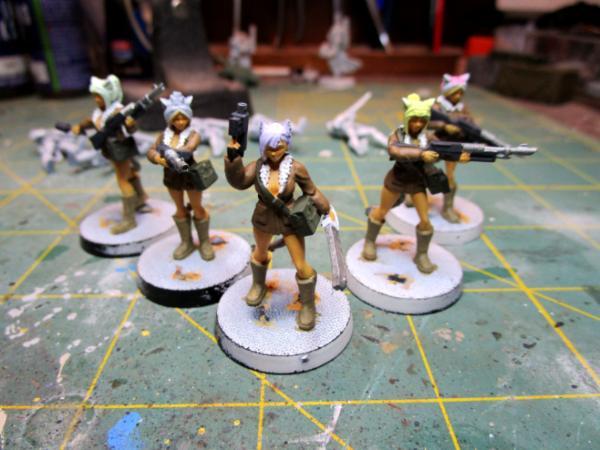
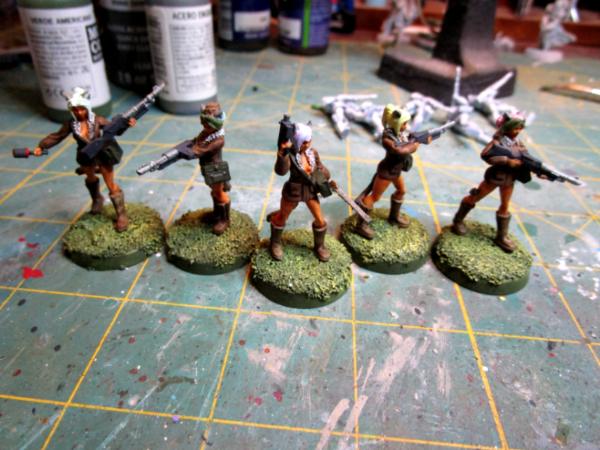
These (not) Sisters of Battle I got off Etsy- if I remember right they are by Artel W. They've been assembled and staring at me on my painting desk accusingly for about 18 months, maybe two years. I figured if I left them there eventually I'd get tired of moving them from one side to another and paint them up, just to get them out of the way. Well, today's that day.
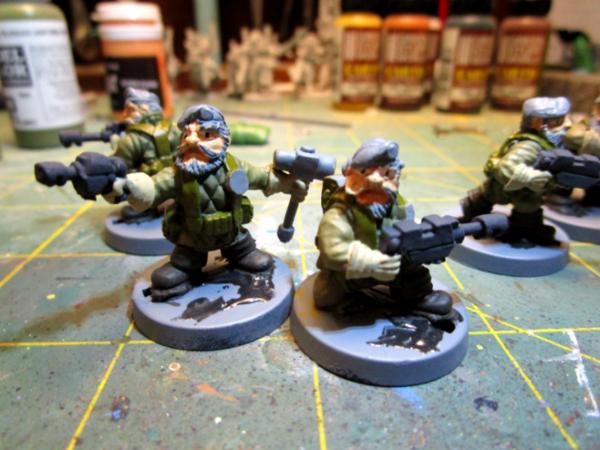
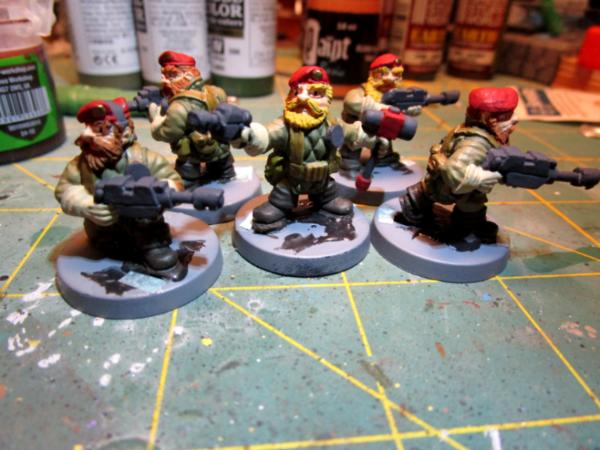
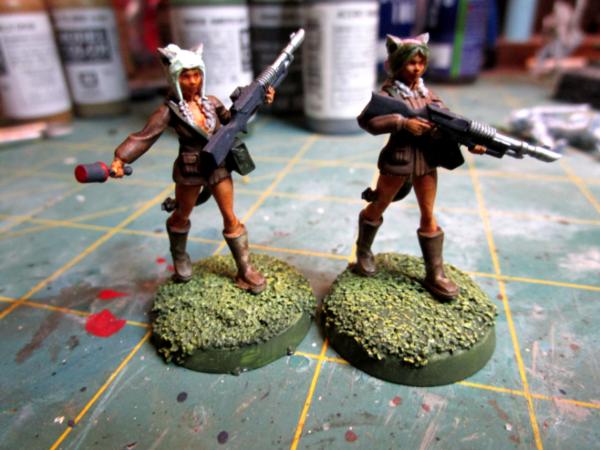
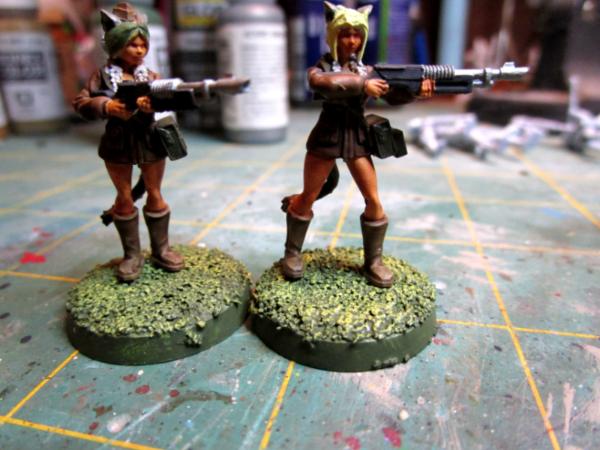
There is so much detail packed into these that part of not starting them sooner was the intimidating task of trying to capture all the folds of cloth, skulls, filigree and ornamentation. I figure to do these in layers- as you see here a 'base' layer of battlesuit and major armor pieces is done (in what I'm calling for now 'wannabe Deadpools'). Next will be cloaks and tasset-drapes (I'm thinking white, which I have never tried to paint in large chunks before, so- to the Innerwebz for tutorials!), then hardware like the grenades, chains and crosses. Then the filigree and lastly the skulls. Lastly lastly the bolters and flamer- they are the outermost 'layer' and I think easiest- and last- to paint.
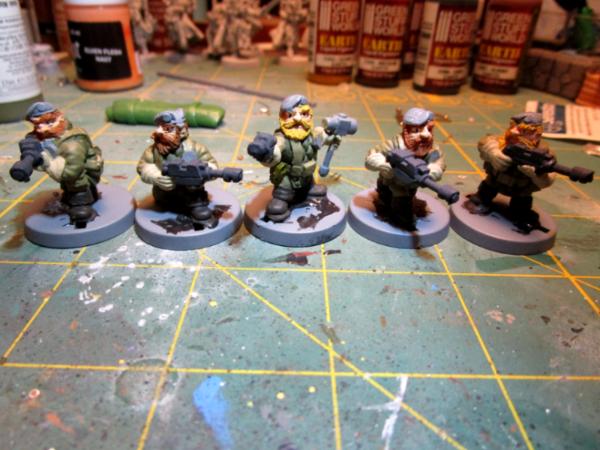
These are the first five- I bought 11 from Etsy, including a Reliquary Bearer, plus I've got actual GWs enough to do two squads of 10, but five is enough to start and get a feel for the colors and the pieces themselves to handle.
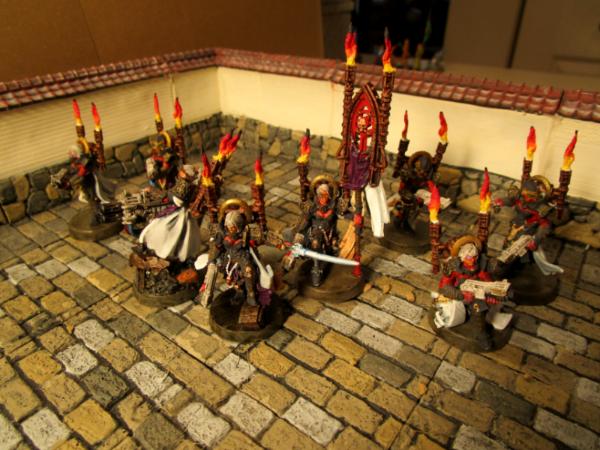
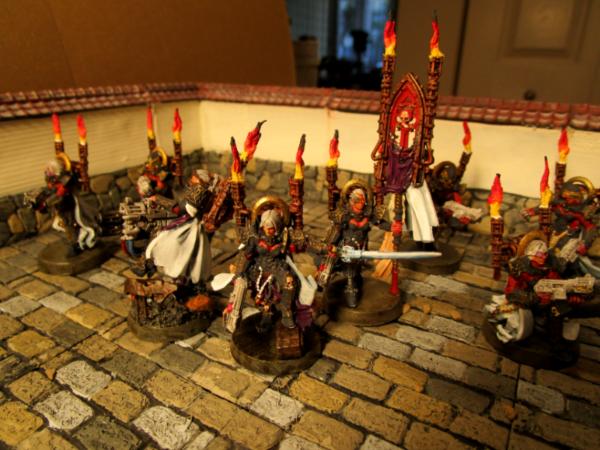
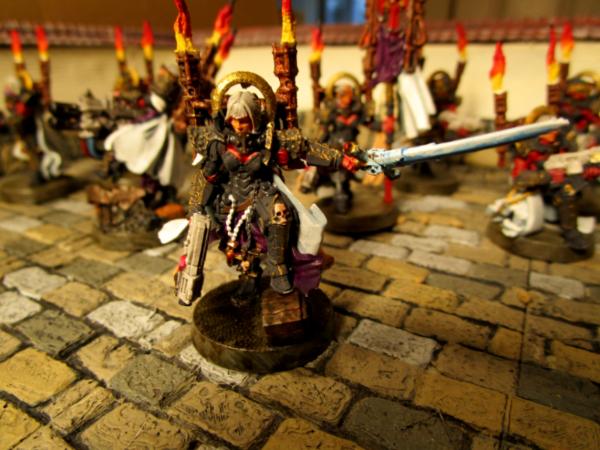
With a hat-tip to Robert Heinlein's Lysistrata Corps (The Moon is a Harsh Mistress) here are the Ladies from Hades:
Thank you Syro! A brief hiatus whilst I spend the weekend at our Farm (no time for painting as we have our hands full with a new rescued horse) and hopefully back into it tomorrow after work in VA.
I consulted the seers of the innerwebz for how to paint white cloaks and found a very good short video by the guy from Games Workshop on how he does the High Elf cloaks, which works for me. Base coat of light grey, wash the deep creases with Drakenhof Nightshade (which I had) or other darkish blue ink or wash (if I didn't have), followed by an even lighter grey for most flat areas then white for the highlights and edges.
Here's the first two steps done, plus the basecoat for the Eternal Flame Lunchbox Backpacks:
Looking at them under magnification, I think I was little sloppy even for me with the wash, but I'll be painting right up to the dark part of the creases with the lighter grey and will even out the edges and smooth the transitions.
Someone once asked Camkhieri how he got so much done- this was after a particularly productive session where he was cranking out some outstanding work. His answer was "when I paint, I paint. I don't watch TV or listen to music. I paint." That's what I've been doing these last few nights- I don't ask myself if I feel like painting, I sit down at my little desk. Once in the chair it's easy to lose track of time, it's so much fun. And I cheat a bit, I've got a pretty extensive digital music library and I set that sucker to 'shuffle all' and let 'er rip. Sofie Tukker followed by Mendelsohn followed by ELO by Duran Duran by Kate Ryan followed by.... 'eclectic' doesn't begin to describe it.
Thank you for looking in and for your constructive criticism.
Finished the four steps to painting the cloaks, and mine didn't have nearly the pleasing effect as the pro on YouTube, which is okay. Had to take this photo to see what it really looked like- very different here than through my magnifier.
Not sure about this look- I figure either I need to make a very thin white wash to pull the layers together or paint the base color again and try one more time. Part of the problem I think is I'm painting too thick a line for the final white highlights, so maybe blending it in a bit better will help.
It doesn't help that the light in the photo is not good.
I would reserve the final judgement until a better photo. Maybe too much of highlight color pooling? Did You use wet brush or dry brush/stippling to do highlights?
To me they look good. Painting white is hard, especially since there’s no good white wash that I have found. The second on the left looks the best to me.
Thank you for the feedback Theo! Of what my (biased) eye can see, I like the kneeling figure best myself.
I'm fixing to start some detail painting tonight, gold and brass and things that accentuate the armor detailing- we'll see how that sets off the cloaks and tabards.
And you're right- the only 'white wash' I've ever had any success at all with is thinning water paint and applying several layers, once the acrylic base colors have been sealed with matte varnish. Works on large, flat areas to a degree, but looks grainy.
I may leave these as they are, as I've at least six more to do. If I use the same technique with greater precision and the result is better, I may come back and re-do this first lot. If it comes out the same, at least they'll be uniform!
Thanks very much for looking in, Cam, and the words of encouragement.
Just a couple of WIP shots tonight, getting closer to wrapping up and still many half-finished projects to get to during Finish Something February.
In the front shot: grenades, grenade belt, crosses, armor decoration and filigree all painted:
In the back shot: Eternal Flame Lunch Boxes heavily washed in Nuln Oil and hoses painted blue and yellow (for something to break up the large metallic blob):
Next major areas to tackle: faces/helmets and the bolters and flamer. Given all the black armor bits, they won't be black. I'd really like to do them white, if I can do it in a way that doesn't lose them with all the white cloak material.
When they are done, I'll break out the light box, or at least some directional lighting, and terrain to pose them on and get some better shots than the WIPs.
The gals are coming along well. And always remember, painting white is just and may as well be forbidden. But we all try nevertheless and your cloaks look great
Thanks very much Viterbi, I appreciate the encouragement! I like 'em enough to leave them alone for now, because they are a) acceptable and b) done- and this is Finish Something February (at least for me ).
When I knock out the other 6 I may try the same technique but with a finer hand or try something different; if I like how it comes out I may go back and redo these. But the axiom "in mass lies perfection" also holds and even adequately painted cloaks, by the time you sling 11 (or more) of them together start to look good.
With two minor exceptions, these not-Sisters of Battle are done.
Exception #1 is, now that I can see even more closely than through my magnifier with the photo to post here, is to add some neon color (probably green) for the helmet eyes. Frankly, I'm pleased that I was able to paint as well as I did and I think the eyes will pop a bit (humor intended) with the 'targeting lens' color.
Exception #2 is a bit that I don't have that I want to add- looking at them it seems to me somewhat obvious what they are lacking. I tried fabricating my own from greenstuff, but they are too small and fiddly for me to manage, so I've ordered some from off eBay. I'll paint them and install them and shoot a couple more pics then to show.
I used my Chinese Walled Villa as backdrop, which I like, but it reminds me I really should get a proper sci-fi type backdrop painted up for figures like these. That may not be a proper subject for 'Finish Something February' but it fits right in with 'Make Something March'.
Here are the first five Ladies from Hades, the First Lysistrata Corps of the Amazons (thank you Robert Heinlein, for a wonderful adolescence growing up with your books):
Prepping the next lot to get finished off and decided that 'Finish Something February' could also be 'Fix Something February'. I found my stash of figures that had been broken in either the first flooding of the apartment three years ago or the second flooding two years ago; some were broken in both. With all the clutter (that is rapidly disappearing from my painting desk) I had forgotten that these last few needed a touch of glue or paint to put back right.
Group shot:
OOP Wargames Foundry Storm Trooper Heavy Weapons Team (conversion):
Archon Empire of Man Female Snipers (true scale 28mm) I may have to replace the rifle that got broken on the one:
(Now) Wargames Atlantic Female Panzerjaeger and Eisenkern Stormtrooper Missileer:
OOP Wargames Foundry Anti-tank Team (conversion with Armorcast special effects):
Kromlech Space Highlander Multi-melta Gunner:
Scratchbuilt ammunition hauler with GW Imperial Guard crew:
1/35 BA-64 Armored Car conversion (counts as Sentinel):
These got left until after other, more seriously damaged pieces got fixed first and then were 'overtaken by events' and only now just getting finished. Broken off arms, weapons, barrels, that sort of thing. The lance I fixed by cutting a piece of the thinnest tubing I have to act as a sleeve to join the two halves. Unless I get flooded out again, this should have everything ship-shape and Bristol fashion for awhile.
I'll be getting started shortly on figures that were based for quite some time now, but only tonight have they been de-flashed and primered.
Here are the new figures that I'm starting basecoating:
These are from the first (I think) kickstarter by Macrocosm- and designed and sculpted by Inso of this site. If you haven't taken a look at his blog "The Squats of Inso's Reach" you really should: there's a lot more in there than Squats and he is very talented.
I've been looking forward to painting some of these guys for a long time. Back in the late 80's, when we discovered Rogue Trader as it was transitioning into Warhammer 40k, four of us picked a different army to build so we could game- Orks, Eldar, Imperial Guard and Squats. I and another fellow argued for a long time as to who would get Squats and I ultimately went with Guard. Although Squats were slow in movement, give them heavy weapons and some Hearthguard on trikes and they were a lot of fun to play and rock solid- the hard core upon which the Guard formed in times of crisis, as it were.
So, long overdue for me. I've backed all three kickstarters and am in possession of two, so I have grunts, special weapons, heavy weapons, mortars and sentinels to paint. We'll start with these five and see where it goes.
After all, Aggregate April will need something to build upon!
Thank you for looking in, your interest and encouragement and your constructive criticism.
Thank you, Syro- it's good to be able to stay focused for a bit, rather than having some new excitement pop up every other day! Some of these things are _long_ overdue. Hoping to wrap up this squad quickly and get at least one more project- if not two- wrapped up before month's end.
Then on to 'Make Something March', which at the moment looks like wrapping up at least two terrain pieces and maybe, time permitting, completing a new one that has just suggested itself to me as I was clearing up old junk boxes at the Farm.
Thanks Viterbi- it has been an interesting few years in that apartment. Life, the universe and everything are finally lining up in the same direction enough to allow for some modeling time; that's a great benefit.
Ooh, squats! No one in my gaming group went all in on squats, but we each had a few. I wish I had kept mine. I'll just have to live vicariously through you.
Thanks for looking in, Josh! We were pretty naive back in the day- literally trying to learn the game by reading the original rulebook and then the Compendium. For all that Imperial Guard, Squats, Beastmen and Ratlings were all clearly Empire forces, it never occurred to us to combine them. As I recall, our guy that took Squats dropped out after only a few weeks. It's funny, but for all that Dwarves are associated with tanks and all things mechanical in Fantasy, Fantasy Battle, Age of Sigmar, and all that sort of thing, it never seemed to occur to GW to associate Squats with armor, where the vehicle mobility would make up for their abominable movement rate. As it was, before GW released its model kit for the Rhino around 1990/91 (in the States, at least) they cost 250 points to field (for basically a pair of bolters with some mobility and a slightly tougher armor class). When you're playing a 750 or even 1000 point game, that's a lot to give away, especially if you're playing IG whose motto is "Crunch all you like, we'll make more". Then of course, magically, immediately after GW released their kit, Rhinos cost dropped to 25 points each and they were everywhere.
Anyhoo- here's what's got done so far tonight. I may paint some more later, but wanted to get this up now. For me, as much as you'ns, looking at the pics always gives me a different perspective on how the pieces actually 'look'- even compared to looking at them through magnification.
Beards, badges and bases and these guys are mostly done, plus some washes and drybrushing. As you can see, I'm still pursuing the 'I wanna paint faces' dream, as these sculpts have excellent relief and are heroic scaled to boot. We'll see how they turn out with some more work; if nothing else, they get painted over and washed with Reikland Flesh like the last ones.
Comments and constructive criticism always welcome.
Not as much progress as I'd hoped, had a little less time to work than I thought.
Redid the webbing/TA-50 in Model Color khaki- the British Uniform Brown was too green for my taste and this strikes me as a bit more like the 1944 pattern gear colors that I'm using as a rough guide for these guys. The gloves are Apple Barrel (50 cents for two ounces from Walmart) khaki and it's an even lighter shade- I may go with that in the end for everything.
Just goes to show, taking pics and posting them here lets you see a lot of things.
I do like how the beards came out and will have to be careful of them and the eyes when applying the flesh-shade wash.
Progress tonight: all the basecoating is done and some of the washes are applied. Need to finish a wash on the faces, beards and flak jackets, some highlight drybrushing on the flak jackets, boots, gloves and weapons and then do the bases and we're calling these done.
As a side note- the little pieces of paper on the bases cover the gaps in the slotta-bases; I put a dab of fluid superglue (not the gel, which I usually prefer working with) and then use tweezers to put a little bit of post-it note or notecard over the gap. I don't have to be exact, so long as a corner of the paper touches the glue. It wicks right up and the whole piece conforms to the shape of whatever it's on (although, granted, that is usually flat). I prefer the slotta-bases for metal miniatures as they provide more of a key for the two-part epoxy to grip and keep base and figure permanently together.
It's amazing that I've got metal figures I painted in the early 90's and attached with superglue and they remain indestructible; others, you look at them cross-eyed and they shriek and fall off.
Thanks for looking in Cam! The encouragement is much appreciated.
Also thanks to you, Josh. Inso painted his original pieces in a similar fashion, it gave a good pallet to use as a starting point. I'm afraid I'm being highly imitative of the British Red Devils paratroopers from WWII- which is made easier by using Model Color's WWII Infantry paint set. It's easy to lose all the detail with drabs and greens though, so it's nice to be able to set things off with the unit and cap badges and the berets really make a focal point that pops, I think.
I figure to change the color of the berets based on branch of service, like the German uniform waffenfarbe- almost went with black for the line dogs, but it was just too dark a look overall, glad I kept the red. The mortars and other heavy weapons might end up being sky blue and the Sentinel drivers green or yellow. I won't know my mind until I'm there and I'm not there yet!
Hope to have this lot finished shortly and get one more 'finish something' in before I run out of February.
Okay, calling these guys done. A commander, radioman and three security riflemen for a Squat unit:
I'm not terribly happy with the bases and may still do something to them- the top coat of liquid pigment is still wet in these photos, but I may just repaint and do it better another time. And I may at some point add a whip antenna to the radioman- otherwise it just looks like a pack unless you notice the headset.
But overall I'm not disappointed: tried some new techniques, definitely a new subject for me and had some fun and most importantly- got them done during Finish Something February.
I've got one last embellishment for the Sisters of Battle to show on Monday (hopefully) and then I'll post a brief summary of February and roll into Make Something March.
Thank you for looking in and your constructive criticism.
Great job on those space dwarves. They look a bit scottish special forces, which is not a bad thing. looking forward to seeing other bits from the kickstarter.
Thank you Theo! I'm usually more competent at basing, not sure why nothing really 'clicked' with doing these. I'll give looking at them a rest and see how they appear later, maybe I'll like 'em better, maybe they get repainted.
Thank you also, PaddyMick! I used model Color's WWII Infantry paint set, which had the colors for Great Britain among them- let me come close to the Red Devils palette. I wasn't sure what emblem to paint on the disc on the chest armor, but you've given me the thought that it probably should be 5 Para. I jumped with them once (training in the mid-90's) and if I recall correctly their Regimental Headquarters and Billeting Station was Scotland (we actually boarded aircraft at Lakenheath RAFB and landed somewhere in Yorkshire near Foxmoor, I think). More definitely to follow as I want to add special weapons plasma gunners to the command squad and a medic and then build out at least one straight leg infantry squad.
So, the first annual Finish Something February comes to a close, and for myself- it has been very productive. I'm not sure which came first: the gimmicky "Month of" name that created enthusiasm to work (or at least the grudging idea that I should) or if I had the grit to actually sit down and _do_ something and then tacked a cutsy name onto it to help stay focused.
This is the before/after of the CD I used as my palette for this month:
Either way, it worked. This month I completed:
Repairs on 12 vehicles and figures
One mechanic/Jailbirds figure
One crazy assistant mechanic robot figure
One fire team of Squat Infantry
One fire team of Siblings of Confrontation with Lunch Boxes of Eternal Flame
On the subject of which, here they are with the 'final embellishment' I was hoping to have time (and enthusiasm) to finish today:
I mean, really- what are Siblings of Confrontation with Lunch Boxes of Eternal Flame without the flames? The flames are from Armorcast (small energy pulses) and I followed the advice of the Games Workshop guy on how to paint flames.
Oh, and the helmeted Siblings now have glowing green eyes. I'm adding muzzle burn to the Sibling with Flamer (really, just to the flamer, but the idea is intriguing) and then we're ready for MAKE SOMETHING MARCH
Towards _that_ end, I've found a jewelry glue that actually seems to stick slick plastic and resin together. If it forms a strong enough bond, there's a huge help.
So that's it. Thank you for looking in and to those who offered advice, suggestions and encouragement.
Welp, time to transition into Make Something March. My selection criteria for this month is something that's been either lying about completely untouched (ie: a kit) or pieces of junk for which the Good Idea Fairy brained me with her club but I hadn't got 'round to beginning yet (although the pieces remain out and in the way because 'any day now I'll get started').
Without getting too far ahead of myself, here's the first two things I want to tackle (I reckon I can work these concurrently because the terrain pieces will mostly be drying after applying one thing or another and I can put most of my time in on the figure):
The miniature:
This is Astrid, a Maiden of the Shield from Signum Games for their game Legends of Signum. I backed the original Kickstarter and they continue to add new figures and even whole new factions to the game, plus more scenarios and quests and the like. Great animation and she's a full 28mm, so I will get a chance to try doing the face better than some of my past efforts. Signum also make about the fanciest bases I've come across with ornate styling on the underside so you don't forget where it came from:
As you can see, I've assembled as far as I'm going to until the nearly final stages of painting.
The terrain:
I literally stumbled across these birch panels looking for something else on Amazon. They are 12 x 10 inches and the 'river' down the middle is recessed about 1/8 of an inch. They are intended for resin pouring and I've got Woodland Scenics Realistc Water and some Murky dye left over from making the castle gatehouse a fair while back. I also need photography display terrain so here's a chance to knock out three things at once: build a piece of terrain for fun, use up the water effects materials and have something better than my kitchen counter to pose my figures on when they're done (the Siblings of Confrontation I just finished could be walking along a river, they could not be hanging out in a Chinese walled villa).
So this is the start. I have other terrain pieces- including a brand new one that I'm very excited about starting and completing- for this month but we'll try to keep expectations manageable.
Your suggestions, observations and constructive criticism always welcome.
Looking forward to progress. The mini looks really interesting. Your miniature game has come on leaps and bounds bud, I am sure we are in for a treat here.
Interesting! Wishing You good luck and steady hand (and well ventilated space for working with resin of any kind, even though transparent acrylics are some of the more friendly ones).
Camkierhi wrote: Looking forward to progress. The mini looks really interesting. Your miniature game has come on leaps and bounds bud, I am sure we are in for a treat here.
Thanks for looking in, Cam, and the kind words- they mean a lot to me. You were the first Dakkanaut to ever comment on my blog!
Wirecat wrote: Interesting! Wishing You good luck and steady hand (and well ventilated space for working with resin of any kind, even though transparent acrylics are some of the more friendly ones).
Thank you also, Wirecat! It's funny, once I got switched over from doing vehicles and larger terrain pieces, the hand steadied down remarkably. I'm better pleased with how the faces came out, but I'd like to push that level up a bit more. And am surely being careful about fumes (and do work mostly with acrylics): I'm a child of the 60's, but there is a limit!
I have learned and continue to learn a lot from both of you.
For tonight, I still don't have WIP photos of Astrid- that has been an interesting learning experience as Signum Games make their minis from a material less slick than Raging Heroes but not as paint-forgiving as Games Workshop hard plastics. She's coming along but all the component pieces are drying just now. Hopefully some photos soon.
I do have something to show for the river terrain piece though:
I primed the board grey (spray paint I had lying about) but a lot soaked in so I hit it with spray polyurethane and then another coat of grey. Then a spry painted the basecoat of tan/khaki:
Then rewatched the Woodland Scenic videos and used Burnt Umber, Raw Sienna and Yellow Ochre to do the riverbed, trying for the illusion of depth. I must admit, it isn't terribly reassuring at this stage, but this is the same stuff I used for the castle moat from the Hirst Arts project awhile back, so fingers crossed:
And of course, because I usually don't plan very far ahead, changed my mind and want a greener riverside, rather than the desert I had first thought of:
That's the first of two or three coats of craft paint "Italian Sage" and then all the flocking, weeds, chinks of stick and rocks go on top of that.
So, not much to show for a fairly good amount of work put in tonight.
Firstly, the colors were too disparate on the riverbed and the depth not nearly enough. I'm looking for my notes to see what colors I used on the castle moat, because that turned out okay, I think. I chucked that panel out and have prepped another this evening to try again tomorrow. I wanted an algae looking greenish murky water with a little bit of current to it, so we'll go for less apparent depth and more the color I want. You learn more from your mistakes than your successes, eh? If I'd had more than 1/8th inch of depth, and/or tinted the Realistic Water more strongly, I think I'd have gotten away with it. In retrospect, I should have saved the unsuccessful panel, flipped it over and used it for the base of something else, but it was pretty gooey with the water product, so not really that fashed about it.
On the more positive side, got a lot done on Astrid, who now I think is Fiona as she has a blue woad stripe across her eyes which I believe is more scotti and less viking. Almost to the point of final assembly and a few washes and done.
I'm pleased with how the eyes are shaping up and am going to take more care in applying wash to the face. It's been awhile since I've built a figure in sections, but it seems to be working well. I was worried too about the dynamic, running pose she's in- the only part of her foot that is in contact with the ground is the ball of one foot, an area about 3/32 of an inch square. But this jeweler's glue I found- Aleene's Jewelry and Metal Glue- it comes in a tube- seems to be the bomb. I prepped the base separately (and my, wasn't that a nice, easy treat! compared to painting around boots and trying not to splash on coats and things) and the glue seems to have set up very strong.
I also hit a sort of milestone with 1200 photos uploaded to the Dakkadakka Gallery.
Anyhoo- I hope to finish Fiona tomorrow and get past the water phase of the river tile and then more makings for March.
Those aren't the colors I usually think of when I hear "river." It's a shame your first attempt didn't live up to your standards, but live and learn, as they say.
Have you had much success with Realistic Water? I poured some on some Battlefield In A Box swamps, and the stuff is still pretty fluid-- resting anything on the water for any length leaves divots, even 2-3 years after the pour...
"River" may be too grand a term, Josh, I'm thinking murky/greenish because those are the materials I have, the tint at least, the water is just clear. I reckon I could paint the bottom differently or maybe try tinting the water a bit differently with one of the washes I have. Things should work out all right and for a wonder, my Make Something March project matches the newly announced League of Extraordinary Riveters them for the contest ending in April (biomes). So for the first time in a long time I might be able to get something completed in time to be considered.
I'll dig out the castle and see what the moat surface is like; I've never worked with Realistic Water before and hadn't heard that it stayed pliable- especially after so long a time as you describe. I didn't add a hardener or anything and I doubt the formula has changed between when you used it and now, so we'll see. The castle project got boxed up by the contractors when I was away during the first flooding of the apartment. There's no reason for it to stay in the box, just haven't had a reason to get it out yet!
I didn't get any work done on the water body (? ) tonight but have almost finished Fiona, so maybe some final pics a bit later. I wanted to get this out now though, in case there's no time later.
Thanks very much for looking in, Viterbi! I hadn't tried painting (not) Sisters of Battle since the late 90's, it was fun to try something new for a change.
Astrid-Fiona is done, and naturally I left my little Canon camera at our place in Pennsylvania (I work in Northern Virginia during the week). These photos are with my phone and setting up the best light I could. Next weekend I may try to shoot them again with the camera, but I might try again with the phone- I like the 'textured shading' it got as opposed to the starker lighting that the camera flash obtains although I still need to fiddle with the settings to get better detail for the up-close shots. Unfortunately, most of what I shot tonight (10 in all) aren't usable.
Anyway, here's Astrid (or Fiona, if the woad stripe doesn't work for Vikings):
I just couldn't get the sword straightened out- even tried careful application of heat. I figure she must have really wrapped it around somebody's head to get it looking like that.
Next up is Ursula, who was originally intended to be the mechanic for the air-freight delivery service (the diorama for which is hopefully going to get done this Make Something March. The pieces of her model have been lying about on my desk for almost two years now (she qualified for Finish Something February, but I'm working on her now because she wasn't assembled). I like the other mechanic I painted last month pretty well, but she is 32mm and Ursula is true-scale 28mm. So, now Ursula is Ricki's kid sister and will probably be handling cargo on the top deck of the installation to create a sense of forced perspective.
Here's the beginning of the second attempt at a river terrain board. I used much darker colors and more blending rather than more distinct colors to get some shading that will hopefully give the impression of depth. Board prep was about the same: sprayed on polyurethane to seal, then khaki/tan sprayed on to primer and act as a partial basecoat and next brushed on inexpensive craft paint for the river bottom shading and base color for the banks:
I'll add another layer of Italian Sage Green to the riverbanks and then try tinting and pouring the Woodland Scenics Realistic Water material.
Also have gotten the base colors done on Ursula (with all those mechanical arms I couldn't help but think of the Sea Witch from Disney's The Little Mermaid):
There will be a better picture later, but I used greenstuff pressed into a Basius pad from their second Kickstarter and hit it with a black wash to show the texture. If I can get better at wetting the pad enough, I can see me using it a lot more- the effect is simple, infinitely customizable and relatively simple to execute.
Things going well: Ursula is well along and will be done relatively shortly- just her hair and the mechanical arms to finish up, really:
Things going not as well: I don't like this riverbed coloring either. The water material pour- even tinted- is too shallow to get away with coloring the bottom this much, I think an even, greenish-brown would probably have been better instead of trying for the depth illusion. Having said that, I'll bull through on this as I don't want to throw out more reasonably usable terrain to no purpose:
I saw a technique on YouTube whereby you pour out some of the water resin onto wax paper in circular pools to make 'ripples'- I want to try that upstream of the boulder, with a bit of whitewater/foam downstream. And it is now time to get scenicking on the banks themselves.
Nice work. I saw a technique for straightening sword that called for alternating almost boiling water and ice water. I don't know that I would try it with a painted mini, though . . . disastrous results could ensue. Especially one that looks as nice as Astrid.
Good luck with the resin river. I used realistic water on my skaven bases and haven't noticed a problem. But, it's a relatively small application. I now want to set something on a base and see what happens to the resin.
For Science!
@Captain Brown: Thanks much for looking in, Captain! Certainly, something a bit off the beaten track for me.
@DJJazzy Jeff: Agreed, I'd be a little reluctant to mess around with Astrid at this stage, but I'll remember that for future projects- I've got a metric crap-ton of Ragin Heroes and Signum miniatures modeled in that softer, engineering-type plastic, some are bound to need adjustment. I hadn't considered trying to use smaller amounts of the Realistic Water on figure bases, now of course am mad to try it. There was no problem with the water material per se, the problem was operator headspace & timing in that I wasn't painting the bottom correctly and then tinting it right to get the effect I wanted. At the end of it, I think it'll definitely do for gaming and I'll probably like it just fine. I'm thinking about trying a wash on top of the water: I'd lose the 'glistening effect' a bit but smudge the bottom colors coming through the water medium. It'll be fun to see. Or I'll leave it alone and do a quick browser search for pictures of muddy rivers and exclaim 'See? It looks just like real life!"
For the riverbed gameboard, I got the idea in my head to include an improvised bridge and cut some pieces of popsicle stick for that:
And used this stuff to texture the otherwise flat as a board (literally) grassy areas:
I highly recommend it: it goes on pink, when it's beigey-white it's dry enough to sand, sculpt or paint, it sticks to anything and this pot has been open for more than a year (I can't remember exactly when I used it last) and it's still perfectly usable.
And Ursula is done:
She's a got a track link in the one set of grippers- I'll swap that out for a piece of engine or computer board or something when I know what she's going to be repairing. I'm glad I tried the Basius for texture on her base, she's from the Archon Empire of Men release and is true-scale 28mm, so very small. The augmented base gives her a bit of height. She, Tank Girl and Oggie the Robot will populate the Air Freight terrain piece which is soon to get it's turn back on the work desk.
Thank you for looking in and your constructive criticism.
The spackle has dried and received a(nother) base coat:
Here's a floral pick I got for 50 cents that looks all alien-y already- I'll cut it up and find a way to add it as shrubbery:
The foot bridge the way it's more or less going to look. I trimmed the popsicle sticks, scored them with a gribbler (for working greenstuff and clay), base painted them chestnut and hit 'em with Huge Miniature's Dark Wash. The wood 'grain' ain't rivets, but it is finer detail, to help out with LOER philosophy. They're still drying in this picture:
And a preliminary look at how things might get arranged. I've got flocking, reeds, stick-down grass tufts and flowers to spread over the blank green spaces:
I'll add some brown wash and pigment where a footpath would naturally occur going to and from the bridge once I know where everything else is going to sit. Hot glue gun time- need to borrow Syro for an evening!
I've got a couple of critters from the Signum Games Heroes & Animals kickstarter that are nearly done also.
Thanks very much for looking in, Viterbi! I also saw the Doc Ock resemblance, but what a great rig for a mechanic, eh? Glad you like the river terrain piece, I'm liking it a bit more as it gets more towards 'finished' status.
Such as with the progress tonight:
This pic is definitely WIP- what you're seeing is the boards for the footbridge glued down, the couple of stones on the riverbank also, and the pathway sand and flock laid down. I used a three stage technique for this, based on the directions on the MicroMark Ballast Cement bottle and my own experience messing about with track ballast in model railroading many years ago:
- I painted the ballast cement (very thin white/PVA glue) on relatively small sections at a time to drop the flock onto so it wouldn't blow all over the place
- Dropped the flock and hit it with a light mist of 70% isopropyl alcohol
- Used an eye dropper to 'flood' more ballast cement amongst the flock
That's what you're seeing here: the flock liberally saturated with drying white glue. Past experience suggests that when dry, the cement will be invisible and the flocking will still look vibrant and 'springy'.
I used two mixes of flock from Huge Miniatures (I really like their product): Marsh and Meadow. I wanted to show a transition from the wetter riverbank itself into a drier meadow ecology. It's hard to see here, with the wet glue, but the meadow areas at the very edges of the board have more yellow in them (darn dandelions!).
And a 'biome' is defined as an "area of diverse and interconnected lifeforms contributing to a whole and unique ecology", or something close to that, so I needed critters. These are from the Monsters of Solan Heroes and Animals set and I give you Roger's Antelope and the fully armored Battle Jackalope:
They're nearly finished and need a much better picture.
Like I mentioned to Viterbi, I'm liking this terrain board better as it gets some color, texture and character, but it was lacking something. I like height differentials in the pieces I try to build; if I were to try to model a section of the Bonneville Salt Flats I'd have to try to give it some elevation relief. So even though I'm modeling a (flat) river based on a (very flat) arts and crafts board intended to be actually gamed on (not a diorama where I could cut loose with some sculpted pink foam board) I didn't like how (flat) it all was, even with flock, rocks, bridge and logs.
So we're building a tree:
I've always wanted to try to fashion a tree from intertwined wires but never had success covering/texturing the trunk with masking tape or other materials until I saw all of the work here using hot glue (thanks for the inspiration, Syro!) and greenstuff. My plan is to build the tree and use the 'root' wires sticking out at the bottom to form it agains tthe rock in midstream and look all old and kung-fu-ey.
We'll see how that works out.
Meanwhile, as we come to the end of Make Something March, there isn't a high count of output- but I've tried more new techniques and materials in this month than in the last year, possibly two, so I'm counting it a win. The river terrain board will be 'done' for purposes of MSM although I don't think The Tree will be complete. I'll finish that in Augment Something April and take my pictures of the finished river board to submit for the League of Extraordinary Riveters Terrain Competition closing out at the end of April.
More follows soonest. Thank you for looking in and for your constructive criticism, encouragement, tips and suggestions.
So, the river tile Part One is finished- the part that counts towards my self-imposed "Make Something March". Here's a couple of shots:
The whole thing in Panavision!:
Yoshi versus the Fully Armored (and very dangerous) Battle Jackalope:
Robert's Antelope watches with disinterest:
Really, the only things different from the last WIP shot are the addition of the rushes at the one point on the bank and a second round of adding flock to spots here and there where it was thin. I swept the water surface with a soft brush but see I'll need to do that again. To add the rushes, I had to drill a hole into the spackle and the board, fold the 'rushes' fibers in half and push them in with a small screwdriver. I tried to hide the residue from drilling the holes with green wash, but it's too dark and shows too much (I was hoping that capillary action would draw it off and thin it out, but no) so I'll thin some acrylic paint and cover it up once it dries, or maybe tuck some more flock in there.
And per JoshinJapan's observation: yes if you rest things on the water material, it will gradually sink in and leave marks. It isn't sticky, but it will press down on the softer plastic-y stuff. I'm going to do some research and see if there is a hardener or additive that can rectify that (probably too late for an accomplished pour, but for next time).
The part of the river tile that isn't complete for the League of Extraordinary Riveters is the addition of The Tree, as described earlier. Here's most of the rest of the greenstuff applied:
Since this pic, I've covered the rest of the trunk and branches, smoothed out my fingerprints and shaped and cut the 'roots' to length to fit exactly over the rock in the middle of the stream. Once it dries, I'll primer, paint and add the foliage flocking. The suspense for submissions for the Biome competition are the end of April, I believe.
Each time I worked on adding the greenstuff, I had material left over and I hate to waste it. So here's what I made from the left over bits- they just need paint to be ready to add to some future project:
Overall, I'm pleased with what I got done during Make Something March. The raw totals aren't that impressive, perhaps: Ursula, built, based and painted, one river tile completed and some odd bits of greenstuff formed into tarps, but there's so much more for me than that:
- tried forming a tree from wire for the first time
- practiced using wash to shape the facial features of true-scale figures too small for me to even think about trying to paint
- used my Basius molds for the second time to do Ursula's base
- practice using Woodland Scenics Realistic Water
- proof of concept using the arts-n-crafts resin boards from Walmart Online (interesting, but I'd rather use flat birch and texture it with pink foam)
- proof of concept using Huge Miniatures' flocking and scenicking materials
- first time painting any animal other than cavalry mounts
- proof of concept for Aleene's Jewelry Adhesive (big thumbs up!)
A very positive month for me.
Finally, tomorrow begins Augment Something April, the goal of which is to paint some more of a unit that I've started already. I have candidates from over the span of my almost 50 year career of taking perfectly good models and messing them up, from the Elf Sea Guard Regiment featured earlier in the thread to more Squats or Siblings of Confrontation completed much more recently. I even have the last stand of four figures for the 33rd West Riding (Yorkshire) Infantry from the Peninsular Campaign (Napoleonic Wars) to complete that Regiment- only sitting around since 2004 to get done.
I'm TDY to another work site the last week in April, so won't get much, if any painting done then. The last time I had to go there I took all those tiles for the courtyard of the walled villa to do- it made for a relaxing evening that didn't call for too much squinting or a million bottles of paint to do, so I'll try to find things like that to take with me again.
More follows soonest. Your observations, constructive criticism, suggestions and encouragement always welcome.
I wonder if Yoshi can be given any additional armament to aid in his battle, perhaps something that requires the removal of a pin and counting that proceeds to no more or less than three before lobbing said armament?
Welp, first unit up to augment is the Siblings of Confrontation and their Eternal Flame lunch boxes. It was either them or the special weapons section for the Squats, and the Siblings were already primed.
These are also Artel W figures, I got enough from whenever I ordered to make a full squad (11 total figures actually, but I can always mix in some old school GW metals to make up two full squads if needs be). And whenever I assembled them, I wish I hadn't; the regular gun bunnies were tough enough to paint getting into all the tight spaces- these, with their special weapons and reliquary standards are very tight in places. Of course, if they weren't built and based, I'd be painting Squats right now, so there is that.
The Commander and the Heavy Flamer Gunner are mounted on temporary bases, just for painting. They came with fancy, shaped bases with broken bricks and things for them to stand on, posed heroically. I'll cut them loose and glue them onto their proper bases when they're done.
Got some work done over the past couple of (several) days:
As I started painting the cloaks on the special Siblings of Confrontation, I didn't like how everything was coming out the same between folds of cloak, tabards and protective parchment scrolls, so I tried painting the tabards imperial purple. Here's a previously completed Sister:
I like this better, but am unsure of the next step:
- Do I add another thin layer of purple, then drybrush with white to hit the highlights?
- Leave it as is?
- Try that Druchii Violet wash (I think the original purple is too dark)?
It needs something, I think.
I did get the first thin layer of purple on the specials:
Towards the current League of Extraordinary Riveters, finally got the tree primered and started the basecoating. This is going to be a sycamore (my Huron cousins call them Ghost Trees) or birch kind of look:
I've got some ideas for mosses, vines and tufts of flowers and/or grasses, so we'll see. But running out of month to get the thing finished and submitted.
And finally have been having some fun with a piece of scatter tyerrain and got started painting. Just need paint on the drums under the tarp, the tarp itself and then some washes and weathering powder and she's done:
Thank you for looking in and your ideas on how to proceed with the tabards on the Sisters. Meanwhile, work continues on them apace, as the white part of the cloak requires four colors and I've only gotten the first one on so far.
The scatter piece is done (pallets, canisters and tarp):
I'm really impressed with Huge Miniatures line of washes- I used the 'dark wash' on the wooden pallets. The canisters are toothpaste caps. I painted the tarp Model Colors Russian Infantry Green and then washed it with Citadel Casandora Yellow- easily my fullest pot as I never use it.
The tree has its bark color (don't ask me which tree species). Some drybrush highlighting and we'll glue that sucker down to the rock in the stream and think about getting some foliage on it:
And the cloaks are done on the Siblings of Confrontation and their Lunchboxes of Eternal Flame basecoated:
I saw Insaniak's latest pieces and liked the brown wash he used on his Epirians' white(ish) unfiroms and thought I try that for that 'singed' look that ladies who consider a flamethrower the ultimate evening accessory strive for so hit the finished Sister with some ligh brown wash in a discrete corner. Horrible, in this usage. I painted it out and tried a different techniue, which I will call 'slobber dry brushing'. This is where you (if you're like me and have the bad habit) shape your brush tip by licking it and blend the top white color into the light grey and grey underneath it. It's still not what I'm looking for, but I like it better than how the first five came out, so will redo the remaining four and all others henceforward or until I find another technique to try.
Looking forward to finishing the tree and the Sisters so I can get onto some more Squats and I have my theme for May already picked out.
The LOER River gameboard piece is nearly done, I'm waiting on just one more item to arrive in the post; if it isn't in by Monday I'll get my final pics and submit towards this month's "Biomes" competition:
That little footbridge is just made for confrontations, first the epic Yoshi versus Battle Jackalope, now the okka and inugamiyokai. I'm pretty sure in my final pics there are going to be a lot more (in the six shots we provide) confrontations. I'm overall pleased with how the tree came out- I just started gluing tufts to the ends of the branches and then to each other to build up the 'loft' and left the little bits of twig in the lichen to represent more, smaller branches where it looked good. I had two colors of deer moss on hand, this orangy color and a nice green- which looked almost exactly the same shade as the grass on the river bank and was just too much of one color. So, wen with the orange.
In other projects: I should be getting some more painting time in tonight so the Siblings of Confrontation should complete or nearly so this evening. Next will be the special weapons Squats most excellently sculpted by Inso. That might run me to the end of Augment Something April, but I already have in mind what I'm going to be working on next month. We'll see.
The augmentation for the Siblings of Confrontation squad I did in Finish Something Fevruary (for Augment Something April) is done- a commander, reliquary bearer and heavy flamer gunner:
All eight figures:
Commander:
Gunner:
Reliquary Bearer:
New things tried:
* First time gluing figures to 'painting bases', then cutting them free and gluing them to scenicked bases
* First time trying to paint a simple 'power glow' to a sword
* First time trying to blend colors (in the cloaks)
* Heaviest use of washes to date- almost everything on these ladies has a base coat, a wash and a dry brush
Things to do more gooder:
* Better photography: these were (for me) expensive figures and I spent a lot of time trying to get them as good as I can- they deserve better lighting and photographing to try to bring out the details to show off
* Eyes- seeing the photos, I may go back and try to touch up the eyes- the heavy flamer gunner, particularly, has a great sculpt and needs that brought out with good detail
* Flames: tried to glue them so that they were physics-ly correct and flaming straight UP, but had a hard time getting things to stick. So, these flames are emitted under pressure from the Lunchboxes of Eternal Flame and that's why they go off at unrealistic angles
Overall, I'm very pleased with them and as always, the Napoleonics painters have it right: "In mass lies perfection", the more pieces that get added, the better the unit as a whole looks. Three more of these Artel W SOBs to do, and I may look around eBay and Etsy to see if there are any more at a price I can (am willing) to afford.
I think there is enough time left in April to augment the Squats squad I did in March.
I'd never painted Sisters of Battle before and enjoyed how these came out. I have some Games Workshop metals hanging about, and even some Urban Mammoth VASA flight troops that I was once upon a time going to use as the SOB equivalent, but the Artel W sculpts are so unique, I figured to just get more of them to build out a larger unit.
What I have on hand at the moment is a basic squad of ten plus the heavy flamer. In looking around on eBay and Etsy I was shocked to see what the pieces cost now, the ones I could find- they seem to be out of print. For what I spent about three years ago for 11, you can now get 2. I have so much else to paint and don't really have opportunity to game that I just can't afford that kind of money, so when the last three Siblings of Confrontation are done that will probably be that. Or, go back to the original idea of mixing and matching again. Or or, get highly sculptive and modify some newer, affordable close-to-SOB pieces into matching the Artel-W's. We'll see.
For now, it's enough that 8 of them are done, I had some fun and learned a couple of things along the way.
Oh, and my packet from Greenstuff World came in, so I will add my final bits on Tuesday and hopefully submit final pictures to the LOER competition and can put that terrain piece on the 'finished' shelf!
Making progress on the Squat Heavy Weapons guys- really leaning in to get them done as part of Augment Something April.
And here are the final pics of my River Game Board section for the League of Extraordinary Riveters competition. The additions are the lily pads and the elephant ear plant growing by a slow eddy in the stream:
So, all told- the board was from Walmart Online, the plants are from Greenstuff World, the ground flocking is from Huge Miniatures, the rock I stole from the parking lot, the bridge is popsicle sticks (they were delicious) and I made the tree from scrap wire. Other pictures are over on the LOER blog in Painting & Modeling, same angles, really, just no figures in the way.
Surged a bit last night and was able to (mostly) finish the bases on the Squat Heavy Weapons section tonight, so calling these done in time to be counted as part of Augment Something April. I'll add some little doodads to the bases probably and definitely hit a dry brush lighter color on the painted sand, but pretty much done:
All of 'em in one spot:
The numbers aren't high, but I'm satisfied with everything that got done:
- Command section (Commander, Heavy Flamer, Reliquary Bearer) for the Siblings of Confrontation
- Heavy Weapons section for the Squat Force (I have the banner bearer and general officer, so can make a proper command team squad when ready)
- Completed my LOER terrain piece River Gaming board, which included the Battle Jackalope and the deer
Which clears the way for the next themed month: May Kit May = Make It (in) May. The purpose being to get models assembled and ready for painting to include infantry, character pieces, buildings and vehicles. I'm hoping to get some painting completed while gluing things up, but getting pieces assembled is the goal.
Thanks for looking in, PaddyMick! I would be interested in trying the new rules- I'm a bit remote from any FLGS or other venues to play, so lining up a game is always a challenge. Frankly, for me, the painting and modeling side of the hobby has always held the greatest attraction. I've been a Guard player since about 1989 and I'm not sure I've played a rules set beyond Second Edition! I purchased the most recent one to study, but really learn better by playing with/against someone who can explain the strategies along with the rules. I'm interested to see what the new figs look like: how much respect will they pay to the originals and what new flair will they introduce?
Thanks also for looking in, MeatShield! Truly, nothing says 'attitude like a short guy with a BFC on his shoulder! I'm short, just need to get the Big Fething Cannon....
Thank you for the kind words, Viterbi! Have to admit, I had the same ear-worm going through my head whilst I was painting these guys. Fortunately, I onl yhave aobut thirty more of them to paint, so that song should pass from my memory in about six or seven years!
I looked at the Macrocosm webpage and saw everything else in their Space Dwarves line of which I had previously been unaware; there will probably be a lot more figures to paint in the near future- as soon as my order arrives.
I sorted out several projects to undertake for May-Kit- more than I'll probably get done. One that I want to not only assemble but get painted is this figure from the Wargamer "Hot and Dangerous" kickstarter I backed some time ago:
This is as close to a flash-free white metal miniature as I've ever seen. Hopefully you can see on the picture, the only flash/moldlines I had to deal with were a little bit on the arms holding the rifle- and on the left arm, what look like additional mold lines are actually the edge of the rifle sling; the figure is using the 'sling assisted, modified seated firing position, off-hand' as we were taught in Basic many moons ago. Fantastic detailing!
I hope to have some additional project photos tomorrow and maybe even some WIP photos of Betty.
Most of the base coat colors for Betty the Pointe Du Hoc Ranger are on (one drab brown, three greens, couple more to go- then a metric crap-ton of shades and washes):
A true kit to assemble for May-Kit, this is a Vision Models BA-64 prototype for deep winter conditions in WWII- it never went into production:
I've given over my little bookseller table/airbrush station (such grand terms for the corner of a studio apartment!) for assembly, because I' going to try airbrushing a winter camo scheme on this when done:
This little kit is very well detailed and it seemed a shame to waste all the engine and transmission parts and everything else that goes inside the model, since I'm going to button it up when finished. So I'm saving those bits out and they're going into my Air Service business/mechanics vignette (which has a theme month all its own coming up soon).
The new things I'd like to try just with these two projects:
- Some coloring of the Betty's face beyond Flesh tone paint and Reikland Fleshtone wash
- I've base painted the model base for Betty flat black and now I want to layer earth tone washes by Green Stuff World from dark to light, all 6 of 'em
- Salt method of rusting/weathering on the BA64
I may or may not do up a commander for the little armored snow car- this piece is too perfect for Valhallans of which I have some first edition metal minis, but may get some of the new releases from GW or from Brother Vinni on eBay to do up a platoon, we'll see.
As John Wayne says "Good Lord willin' and the river don't rise" I'll get some more work done on both of these tomorrow and have started the assembly on another set of pieces that will hopefull be in shape to show you'ns tomorrow.
Three projects running now for May-Kit, but finished up the first today- Wargamer "Hot & Dangerous" line Ranger Betty:
I'm a little disappointed in the eyes- with my glasses on and through the magnifying glass they looked better, but the closeup from the camera shows a different picture- ha! I'm pleased with how the rest came out. I notice a bit of slop on the entrenching tool handle- I'll take a dab of paint and fix that. It comes from trying seven different colors trying to get the right contrast- a little bit of pop- when in reality the handle would have been painted almost the same color as the pack and other canvas webbing.
And I have to laugh a bit because the bits that look like crushed grasses or maybe roots of some kind on the base are toilet tissue fibres from accidently spilling more wash onto the base than I wanted and trying to dab it up. I like the effect, so it's staying.
In other news, the SnowCat BA64 is nearly assembled and will get its base coat of primer and then ready for the airbrush- probably tomorrow.
And here's the next kits (albeit fairly simple, straightforward assemblies, like Betty) that will hopefully get slightly modified into a Rough Rider squadron:
My first question to our listening audience is whether to mount the exploding lance across the steering bar, alongside the engine cowling on the left side, or replacing one of the miniguns forward of the engine fairing?
Very small update tonight- might get some more painting in later but will post now to get it done. We've got an unscheduled procedure for one of our rescued horses and the next few days will be a little hectic. I'm heading back up to the farm tomorrow after work.
Got two base colors on the bikes- going for a WWII theme and using the Model Color set again, same as for the Space Dwarves:
Need to go through my water slide transfers to see if I've got enough small font white or yellow lettering to give each one a serial number and also add some unit markings- those big gas tanks are too nice a billboard to waste. Still haven't decided where to position the lance yet, either.
Did get some gluing up done on the SnowCat and- contrary to the assembly instructions- will leave the treads and skis off until the underside is painted.
Also got the pieces sorted out for a large mech-walker/Sentinel piece, much inspired by several of you who have displayed RoboGear based models lately. I've got a bunch of Tehnolog and RoboGear lying about, time to use some up.
Possibly appending to this post later, but at least something for now. More follows soonest.
Thanks Olthannon! It is a nice kit- assembled very easily but a remarkable depth of detail. It has a complete engine with shifter, for instance, if you want to make it so the top half lifts off to reveal the interior. I'm actually going to use it for another League of Extraordinary Riveters project, as I'm gluing the top armor down and making it a closed kit. I think it would do very well for Admech!
The Squats were fun and I have many more to do, and I've visited Macrocosm's website and they have even more that I didn't know I couldn't live without until I saw them; lots to do there.
In fact, the main line of Squats they produce are in greatcoats and would go very well with the SnowCat. Maybe it won't be for the Valhallans!
First up, the motorcycles for the new Rough Rider Squadron are nearly done, so no picture tonight as I hope to complete them tomorrow and get a 'final' pic up- at least until their riders are done. Still not sure how/where to mount the lance or if I'll mount one; I rather like the look of them with the GAU-7's forward. I do still need to go through my water slide transfers and find emblems or serial numbers or both to put on the tanks.
Second, the BA-64 Snow Cat is assembled and primered. Once the bikes and bikettes are done it's next up for painting. I've a new airbrush to try, as the old reliable one will push air all the way through but won't take any paint from the cup. I've run a cleaning wire all the way through and there is no obstruction, so it must be FM (fething magic). All those extra bits and bobs are going on the Air Delivery Service and Repair Shop.
Thirdly, next up is this Robogear T-Rex assault walker, which has been primered olive drab for a couple of years and just needs assembling, which is what May-Kit is all about. I may customize a little, depending on how time shapes up:
Fourthly, I got my oil changed the other day and the Jiffy-Lube is right across the street from the Dollar Tree and I snagged these kits for a buck apiece:
I got two of each, all that were left intact. I thought the kit on the right was just the roll bar cage, but it is the whole assault buggy. Too big for my Imperial Guard, but perfect size for an Ork Trukk and I've never painted Orks before. In any event there were 'way too many interesting bits to let them pass by, so the bits box gains new fodder.
Curious to hear your thoughts on where to mount the lances.
I like Your ranger. A very... traditional choice of colors, although the base could be more grey-dusty rather than muddy. Eyes... yes, they could be done better, but they are a difficult subject. With a helmet brow this low I am sure they wouldn't ruin the model unless brought out with a very bright light - or camera lens. I would worry about her rifle, though. It should have more metal showing than that. This sort of long gun have most of its barrel exposed, usually gunmetal grey, black or a sort of dull dark metal (tin or similar work well). You have painted most of the gun body in wood colors, which is unusual. And bright. In fact, after her hair the gun is the brightest spot of color under most viewing angles.
And what an interesting bunch of kits have You got! I for sure am interested!
Thanks very much for your candid and constructive feedback, Wirecat- and very good to see you back on the pages again! I hope your sculpting and painting continue as imaginatively and productively as always.
I'm seriously thinking of redoing the eyes as just a wash, rather than attempt the coloring as I did, it really distracts/detracts from what I feel is otherwise a fairly credible job with this kit.
World War II themed figure = Model Color's World War II palette paint set! I got this years ago to do armored vehicles- I just like the greens and khakis for that purpose and it was kind of ironic to actually finally use them on a World War II piece.
I used Greenstuff World's washes for the base, but looking at it in light of your observation may go back and hit it with some weathering powders for that grey-dusty appearance you're describing.
Her rifle is an M-1 Garand and its furniture was entirely wood with the exception of 4 inches of barrel, the butt plate, the trigger & guard and the bolt carrier and rear sight group at the rear. I own a real one and enjoy shooting it immensely and yes- have suffered 'M-1 Thumb' that afflicts the careless. It is awfully brightly colored considering someone has just come ashore after several hundred yards' ride in a landing craft, run across a beach and scaled several hundred feet of cliff; we'll get some wash on that also to dull it down!
A detail that I particularly like in this kit is that she is using the sling-supported steady hold firing position, and one of the photos shows it fairly well. You can see where the sling wraps around her arm to take tension up in her firing stance. Even at regular price, which is still fairly affordable even with the economies going crazy just now, there's an awful lot of detail crammed into these 28mm figures (although I think they're more like 32mm, which is why I had the delusion that I should try painting the eyes).
I'm glad you're interested in the variety of pieces I'm able to crank through, after a very long fallow period I've hit my stride again and am having great fun- I even got a piece submitted for the last League of Extraordinary Riveters! I've got a monstrous big 'pile of plastic shame' to work through so that variety and non sequitur order can continue for some time to come.
More follows soonest!
Automatically Appended Next Post: Bikes are done except for overcoating with a matte varnish:
First time trying to do the lenses on the firing lights. And, now that I look at them, I have to dry bush the brass onto the ammo belts to the twin GAU-7's.
I've started the biker babe riders and they're comparatively simple compared to the bikes, should be done directly. And T-Rex war walker awaits. Make-It May progressing nicely.
Want to have a second laugh on that? OK? here it goes. Half of my brain (more sensible) "That's a Garland. It is fat all around and wooden." Another half of my brain (more senseless) "You have seen it in museum. It is black all around. This looks like a Brown Bess!" 1st half "But wood comes in lots of colors..." 2nd half "You want to see "Private Ryan" again for reference?" Both halves in unison "NO!" :^)
Point taken, this is M1 and You are totally right!
Ha Wirecat! I have a second of these 'Betty the Ponte du Hoc Ranger' figures- now I reckon to arm her with an all-metal Brown Bess with internal magazine! I was looking over a sprue of 1/48 scale extra weapons and bits and did some reference on-line as well to look at other common shoulder arms for WWII- the US Springfield, German K98 and Soviet Mosin-Nagant all had full-run metal barrels exposed, with wood (under) forestocks. The Garand and the British Lee-Enfield Mk3's and '4's were full wood. I never noticed that before.
Ran into a 'soup from a stone' situation working tonight, as the Bright Idea Fairy was much in evidence. I was getting ready to do some more painting on the figures for the motorcycles and thought "hey, I have a metric crap-ton of extra canteens, pouches, bayonets, etc, why not add some bits to jazz up the figures and make them look a little more militant?" Because, frankly, as they are they appear to be dressed in some sort of skin-tight lycra body suit with a hood with dingle balls on and really they're cheesecake, for all they're riding hogs with dual GAU-7's on 'em.
So I got out some bits and found more than enough to jazz the riders up and thought "These look really weird just stuck on, what these figures need is an equipment belt to break up the catsuit look and make it more like a military coverall and form a logical place from which to hang accoutrements." So I started rooting around for suitable belt-making material. I considered greenstuff (too small and too sticky to work easily for me), electrical tape (ditto), paper (couldn't get it thin enough and held in place to glue down)- other items, all no good.
Finally used some whiteboard outlining tape I had from a project at work- it's really very much like blue masking/painter's tape and starts out at 1/4 inch thick. I stuck some to my cutting mat, sliced it with an x-acto knife to maybe 3/32 inch, wrapped it around the figure's waist (had to cut the dingle balls off the hood to make it fit- I may glue those back on) and added a dab of superglue at the tape join to make sure it stays on.
All to be able to add a pouch, a knife and a compass case.
So much hobbying, little painting tonight. But a better look I think.
Welp, my motorcycle Rough Riders are (nearly) done. These are final pics and the only additions I plan are to add are a blanket roll on top of the saddle bags- I made those tonight out of greenstuff and they probably won't be dry enough to primer and paint before tomorrow, when I won't have much- if any- time to hobby, so going with these tonight. The other addition will be a cross-piece glued under the center of the bike to act as a 'base'- They came with an excellent 50 or 60mm base, but I like the look of them in close riding formation so am going with something much lower profile/footprint so I can display them like that (I'm not sure they will ever get gamed). The pouches are from my bits box, the decals are WH40K I got on eBay, otherwise everything is from the kit.
What they aren't waiting for is the lance. I'm not going to mess up the nice clean look they have now to add a feature that is only important if I actually game them. The muzzles of the miniguns are drilled out, however, and I've cut a piece of styrene tubing for each bike that is 2.5 inches long, to be fitted into the bore and bring the total length to the 4 inches I believe the Codex calls for- if it's different I can just cut new inserts to be the right length.
I took close ups of this rider because they were the dickens to fit onto their bikes and the legs broke off this one before I got the hang of it. I recovered one and glued it back on in position, but the other is wherever my odd socks go when they disappear from the dryer- couldn't find it. So I fabricated a 'cyborg leg' by snipping the leg off an old Marauder Miniatures skeleton, filing the bones flat, priming black and highlighting silver. I think it came out pretty good.
I like the effect I got on her hair- that's a cheap chestnut craft paint (50 cents a bottle at Walmart) with Seraphim Sepia wash- and it came out a great auburn/red.
A number of firsts for this project:
-First time trying to paint lens highlights- followed the Warhammer short video on YouTube and like 'em for a first try
-First time building and painting motorcycles
-First time trying to kitbash a cyborg
-First time deliberately sculpting something from greenstuff to fit a certain way on the model- in this case, I rolled the blanket rolls and them pressed them ontot he bike to get the right shape
These were a lot of fun and I'm glad I purchased them. I highly recommend Patrick Miniatures on Etsy- he delivers really clean resin castings with incredibly fine detail, is extremely responsive to customer enquiries (I contacted him about getting a replacement rider before I thought to turn tragedy into triumph with the cyborg leg) and the pricing is fantastic- one of these bikes with rider was US$5.
He makes police with riot shields forming a testudo formation, so I may be making some more purchases to finally put together a space age version.
Hope you find these pieces interesting. More follows soonest.
I only dipped two pages back in my "catch up on peoples' plogs" effort and I'm thrilled. Inso's Squats look awesome... I've been waiting to see someone paint some up! You Sisters unit looks great too... the flame effect is a really nice visual unifier, and the occasional contrasting color picks out some cool details on the models. I love the Banner Bearer's pose... I'm already wondering how I could replicate that.
Viterbi wrote: Great work on the stand-in rough riders. They look amazing and hopefully see the field of battle one day!
Thanks Viterbi! I really would like to game again, would even buy and play 'standard figures' to accommodate a group that preferred not to allow substitutions, it's just that we're kind of out in the sticks and it would be a bit of a drive to get someplace that had a FLGS or other location with players. They were fun to build anyway, and Patryk (in Germany I believe) an excellent seller on Etsy and great to work with. My descendants can argue over who gets stuck with....I mean- lucky enough to get to keep them!
MacPhail wrote: I only dipped two pages back in my "catch up on peoples' plogs" effort and I'm thrilled. Inso's Squats look awesome... I've been waiting to see someone paint some up! You Sisters unit looks great too... the flame effect is a really nice visual unifier, and the occasional contrasting color picks out some cool details on the models. I love the Banner Bearer's pose... I'm already wondering how I could replicate that.
Great progress!
Thanks MacPhail! I know how busy everyone is and especially you just now with LOER duties; I'm flattered you took some time to see my work. Lots more of Inso's Squats to come. I wish the Artel W figures were still available and at a price I was willing to pay, but I can be happy with the 12 I have. I do like the articulation on the standardbearer: in looking around for more SOB-substitutes I saw a line of figures on Etsy that have an advancing figure with arms that are either close or could be modified fairly easily to assume a similar position. Now that you mention it, I might order one in to see a) how well they would go along with the Artel W figures and b) what a flag bearer would look like alongside the reliquary ensign I've got.
Coming tonight or tomorrow: a summary for May-Kit (Make It!) May and an introduction to my personal motivating theme for June.
Welp, first day of the new month, so a wrap up of the last and an introduction of the new:
Make-It (May Kit) May got a lot done- got the biker/rough riders done from Patryk Miniatures, assembled and primered the BA-64 SnowCat variant and did- just last night- finish gluing up the Robogear T-rex walker.
It's actually a bit of a kitbash between Robogear and Tehnolog bits and you can see I've glazed the cockpit windscreen with black out panels- it's designed for a 40mm driver figure and is just too big- although thinking about it now, I bet I could've modified the cockpit to be crewed by two. No worries, I've got another of these kits floating around.
On the subject of Robogear, the Robogear Starter set is available again on eBay for around or less than US$50. It contains 8 vehicle kits plus the modular components to build a huge sci-fi/Necromunda fortress. I bought one of these sets years ago and have been using the kits and bits all this time.
I did add the blanket rolls and stands to the biker chicks, so they're done now for real- nope, not gonna add a pieces of olive drab thread to simulate tie downs, nope, not at all:
This month's killer theme is Re-JUNE-venate and the first project is the T-rex walker. How can this be, I hear you ask, it just got glued together last night, how can it need rejuvenation when it's never been finished?
Easy: That model has been primered and basecoated for at least four years now and I foolishly thought it just needed basing and posing and it would be done. In reality, it has a lot of detail and potential for so much more, so the old, flat green 'stand around and look tough' model just won't do. It's going to be posed more dynamically on a custom mini-diorama base and be magnetized so it can be removed for gaming. Plus I've up-gunned its armaments load-out considerably from what it had originally. I reckon that makes a good rejuvenation plan.
For the custom base, I had a failed print from doing up pieces for a massive bridge project (not featured here yet, but it's coming). The street tiles came out well, but the printer ran out of filament or the print came loose as it started to print the height of the curbing. It's the perfect size for what I have in mind. Here's the bare piece:
And here it is with crackle spackle used to fill in the rough side. I figure to cut some paving stones to glue down in a couple of places, but most of it (and the street pavers) will be covered with debris and enraged combat walker, so all good:
So, Make-It May is done and Re-JUNE-venate has begun.
Thanks, Syro! No pics, but the base is now well along and the magnets fit right up inside the feet of the walker like it was made for them; I glued small washers down on the base and it works like a charm. The walker joints are stiff enough that you can re-pose the miniature once off or when putting back on the base. We're making hay at the farm this weekend, but once I'm back to the apartment in Virginia I should be able to get everything primed and then some good pictures up to show better what I'm trying for.
Thanks very much for looking in Camkieri and Wirecat- it is much appreciated.
I regret that I don't have any progress to show tonight- I didn't get any work done after coming home Sunday night from the farm. I arrived to find that the kitchen sink in the apartment had backed up again flooding the kitchen with effluent and leaving dirty standing water in the dishwasher (shares the same drain as the sink) and the sink itself. The property management company responded very quickly in getting a plumber out to survey yesterday (Monday) to survey and make an assessment for repairs but nothing has got done as of 1600 today. Water continues to backflow periodically and the water trapped in the dishwasher has been standing since at least Sunday and is getting pretty ripe. This makes five times in eight years in this place that backflow or leaks have resulted in enough damage that just snaking out the lines wasn't enough to put things right- two times required major demolition and repair. Plus other major breakages of systems and other repairs.
So far none of my personal property has been damaged. There is a 2'x2' section of carpet where the kitchenette meets the living area that has been soaked pretty much constantly since Sunday that may need replacing, though. I'm fixin' to bust somebody upside the head with a ball bat if they come in to 'mitigate' water damage and touch one thing of mine.
I truly think I'm going to have to move out, which is a hard thing to contemplate given the horrendous economy and very high cost of everything at the moment. Not to mention the reason I picked this dump in the first place- its excellent location to be easy driving to everywhere I need to be. In an area where 45-75 minute commutes one-way is common, mine are generally 15 minutes.
Sorry to bend all y'alls ears like this, but I needed to vent to somebody, so I can continue to be polite to the property management people and the plumber guys, who in their own ways are just doing their jobs.
Thanks for the forum to bleed off some internal pressure. I'm airing the joint out now and if I can get the smell under control will try to sit myself down and get some work done. The base for the T-rex walker is built up very nicely and is nearly ready for primer and some paint. Ditto the walker itself- the magnets are installed (and they work with the washers I glued down to the base!) and it too is ready for a 'lick of paint' as Cam often says.
Hi Jehan-reznor, and thanks for looking in- glad I've got some things here you find interesting.
The T-rex walker is from a miniatures wargame from Russia called Robogear- the kits can be found individually and in sets on eBay and other sites- they still tend to run around US$10 each. They have good detail, are made of a fairly hard engineering plastic and take paint well. They are scaled for a 40mm figure game though- but I've seen lots of conversions based on Robogear here on Dakkadakka and some folks have done amazing things with them.
I think it must be one of our Scottish poets that wrote "the best laid plans of mice and men are oft gang (gone) awry".
Had the dual whammies of new flooding in the apartment and the start of teaching again for the program I support. The teaching includes both platform (classroom) instruction and field and 'on the streets' practica. The property manager for the unit I rent says they can't do anything beyond snake the lines unique to the unit; the condo association says that they can only snake the common lines until they run into the city sewage lines and after that it's on the city. I've already heard ominous gurglings from the kitchen sink (Cthulu, is that you?) and soap suds from somebody's dishwasher have filled the basin twice, so I reckon it's only a matter of time before it all happens again. I'm fixin' to challenge the lease directly; if successful I'm moving. A pity really, the place is very nice otherwise and very well located.
But I was able to flog myself to sit down and actually get some painting done tonight. One obstacle to overcome, as Bugs Bunny is wont to say, is that I am a little 'Fat-ee-guu-ed' and I have to overcome my desire to just veg out once I'm back to the apartment. The other is that I prefer to show pictures of finished product before posting anything. The problem there is that I tend to work so slow that I don't get to post much, which means I don't get the boost from all y'alls comments and motivational support. I don't want to overdo things the other way and post such small incremental changes that everyone stops looking in because it's boring.
So here's a couple of WIP shots of what should have been the June 'elevation' project and now is just one more half-finished piece hopefully awaiting completion. It's the Robogear T-Rex walker with some heavy modification and its custom base. The base has steel washers and the walker has magnets set into the feet so that the walker can be played separately in a better scale footprint or mounted on its base for display. The base can be played separately as 'moderately difficult' terrain for infantry and act as a vehicle and line of sight block.
I'm very pleased with how the street bricks are turning out- they are just flat pavement base coat and one somewhat heavy drybrush of flamenco red. I think they need another, lighter shade of red drybrushed lightly and then some black wash, maybe brown. The sand you see is me adding some texture to the other half- I'll brush away the loose grains you see and then start dripping wash into them and then drybrush a highlight color on.
The walker is actually nearly complete, just need to pick out the last of the power cables and then attach the fighting hand and the chain gun and some other doo-dads. I like how I've kept the colors fairly simple for the overall machine so far, but I feel that the carapace of the fighting compartment hull needs something to make it pop. In reality, any military vehicle is as nondescript and bland as possible, to _avoid_ drawing attention. Naturally, that's not how we hobbyists look at the equation, so the thought remains 'what can I do to add a bit of a splash to the cockpit?'.
To end with a John Wayne quote "the good Lord willin' and the river don't rise" I'll get some more done tonight and keep going tomorrow.
Sorry to hear about the flooding. It's bad enough to go through that, without your complex going back and forth over who's fault it is.
Hobby progress looks good. Timely is not always an accomplishable goal. I've still got my project from "Crossings", "Biomes", and "Elevation" unfinished. Any time I can work a little bit on something is time well spent.
Good luck teaching, and hopefully the creek don't rise too far.
I appreciate the commiseration D3J! It takes a bit of wind out of my sails to mop every night to try to control the flooding, clean every day and try to rescue what's been damaged whilst the Powers that Be sort things out. At the end of the day there are many who have things much harder than me, and it's good for me to remember that.
As you say, any time at all that can be spent on the hobby is well spent. Hopefully I can get the momentum back I had in early June!
Very much appreciate your looking in and the kind words.
If the comments boost your motivation for the hobby please post the progress. Many of us love commenting on w.i.p. let alone leaned on them to learn from this web site.
Thanks very much, MeatShield. I do want to have enough progress to post, though, and not bore people. Most of my long and undistinguished painting career I haven't had anyone to show my work off to, so having the review it gets here on Dakka is a treat.
Just like letters (ya gotta write 'em to get 'em) to get critiques of work you have to work. Having the apartment mostly back to rights and getting into the swing of being back on the platform instructing, I need to buckle back down and crank some things out.
It never fails- no matter how dogged out I am at the end of the work day, if I can just get myself to sit in the chair and pick up a brush it never fails but I am energized to paint or model or sculpt or whatever. It's getting to the chair some days that's tough!
That really sucks that your apartment is flooding again, I was hoping that was behind you. I hope you are able to make that move if they won't do anything to get stuff working for you.
Thanks Syro, Cam! The worst of it is, based on what they say the pipes look like, they believe there is nothing more they can do- anything next is on the city and they ain't digging up the mains over one affected unit!
Fighting a bit of summer cold or allergy yesterday and today (NOT Covid- I got tested- if the test is accurate) but already feeling better this evening. Tomorrow- painting, unless I'm immobile!
Thanks very much for your kind thoughts, Syro! All I can do is keep the kitchen area rigged for the next event and deal with it when it happens. The search for a new (affordable) place is tough at the moment: the housing/rental boom is slowing/declining, but prices/rents haven't filtered down to the market level just yet- at least not in my area. Que sera, sera.
Here's the first of what I hope will be two posts tonight: I saw these nail varnish holders on-line and thought they might be the trick towards getting my paints in some sort of order. I've seen several genius solutions implemented by Dakkanauts here ranging from PVC pipe of the right diameter cut to length and glued together in bundles, to drawer organizers to store them upside down. My requirements were that whatever it was had to be out in the open (I need to see them all to pick the right one) and preferably something that wouldn't let them tip over if I got klutzy handed.
Up to now I've done fairly well with a challenge coin holder and an extra 'step' by putting a piece of pink foam insulation under that. I've used stepped kitchen shelving for both paints and figures before and have some here, but the steps are measured for spice jars which doesn't make them the best size for paints. The only drawback to the coin holder is that it wasn't big enough. Here's the 'before':
The nail varnish holders came flat packed and included the end pieces, six acrylic lucite trays, machine screws and nuts and a little screwdriver. They assembled easily- about ten minutes and are surprisingly sturdy. They came with three extra pairs of machine screws and nuts each. These have to rest on something- there is no provision to hang them directly from the wall (something I am hesitant to do in a rented apartment anyway).
And here they are loaded up. They managed everything from the three levels of shelving in the first picture with the exception of half a dozen 'chalk' flat color paints, but all the rest of the two ounce craft paint bottles fit: regular colors, color shifts, metallics, neons, all of 'em (including the extra space in front of the racks, like with the former coin holder). If the shelf top was even slightly wider, I could raise a rear rack on something and have 12 steps worth of paints. I could always cut a board and lay on top of the shelves to accommodate the width I need and use a box or something to raise the back rack.
What there wasn't room for were the odds and sods of other paints (old Citadel, etc) nor any of my 'dropper bottle' paints, mostly Model Color. I'm debating getting another of these racks and moving most of the finished models onto lower shelves or starting selling them to make room, we'll see.
I hope more follows soonest tonight, this time some painting.
Got a really good painting session in tonight- been awhile and a welcome change. If I can get some good time in the rest of this week, even an evening or two, I think this project will be finished.
A WIP shot each of the terrain/base and the T-rex walker. The base is drying from a second solution of ballast fixing agent (thinned white glue) and I've started adding some earth wash, because I'm impatient. Some more wash tomorrow, a lot of black wash on all the metal bits, some doodads glued on and the base is nearly complete. The walker has some of its electrical cabling harness picked out in blue to complement the red wiring and has three weapons systems plus its muzzle flash special effect to be added.
(Fingers crossed) More follows soonest.
Automatically Appended Next Post: Syro: I thought I remembered you mentioning using a rack like this. The problem is that as fast as I put paints in order on the racks, more materialize from some unknown dimension! And out fo 50 some paints stashed, so far I've only found six 'back up' spare bottles of the same hue. Go figure!
Syro: I thought I remembered you mentioning using a rack like this. The problem is that as fast as I put paints in order on the racks, more materialize from some unknown dimension! And out fo 50 some paints stashed, so far I've only found six 'back up' spare bottles of the same hue. Go figure!
I know the feeling, I bought two racks because I have a lot, but figured I would have space to spare. My paints are standing in a zig-zag because they are so crowded, and this is after all my craft paints were kicked out and now live in two boxes and a crowd on the floor
The T-rex walker is finished- unless I go back and try to do plasma glow better on the lascannon. For tonight, just these couple of pictures to show the overall finished look; I've put a fair amount of effort into this project and will take the time to dig out the folding light box tomorrow and try to photo properly.
I picked up an inexpensive cake server turntable for use with the airbrush, but it should be good for camera work too.
The walker is essentially a Robogear T-Rex kit with some extra pieces from a couple of BronoCorps tank kits.
The walker itself is magnetized (feet) so that it can be played separately from the display terrain base to meet rules requirements. The base itself can be played as 'difficult terrain'.
The fighting hand is magnetized so that it can be adjusted between being in the display terrain base or used independently.
The chain gun muzzle flash is attached to a short length of plastic tubing so it can be slid and out. The muzzle flash piece is a cannon shot from ArmorCast with the cannonball clipped off.
From the photos so far, everything needs more weathering, not sure how I'm going to accomplish that. And I noticed that I still have a couple of doodads to glue on.
Thanks, Syro! It was similar to the endings for several of the projects I've shown here- it seems like there is everything to do and it will never get done and then you look around and there is nothing left. The weapon attachments were being worked concurrently with the walker and base, but it really seemed like it would never be finished. And then it was.
Drugged (Drigged?) the light box out and tried to get better pictures than I'm usually able and I think the results are keep-able. Funny though, to my old eyes when the light was set 'right' in the box there was 'way too much glare. Dimmed down to only about 30%, it came out much better. Thank goodness I'm not using a light meter, gauging by eye, shooting wet film, sending it off and seeing the results weeks later, only to (maybe) shoot some more and try again. I could develop and print my own B&W photos, but not color.
A bunch of photos next, some with captions:
The spent 'casings' are some of those nubs that come on the parts on sprues in model kits; these are from the Artic variant BA-64 armoered car that is up for painting once I sort my airbrush out.
Seeing this angle, I almost wish I had cut the weapon arm shorter and brought the GAU-7 in closer to the body. Not bad as is though, for me.
Off-cut tabs from 3D print buildings (that didn't fit into their assigned holes) as building blocks.
The muzzle flash effect is not magnetized.
Yup, gotta watch the vid on how to do plasma glow again.
I will probably add another magnetic joint at the 'wrist' so the hand can be adjusted in two positions (elbow and wrist) to better present when separate from the base or in it.
So, A couple touch ups, one addition and one redo and on to the next.
Thanks very much for looking in, PaddyMick- and for the kind words! Took longer than I expected, but had some fun, tried some new things, all good. Must admit, the base got more elaborate as it got worked on- one of the blessings and perils of not planning a project out 'all the way through'.
Thanks very much for looking in Cam! Too true, if I can just make it to the painting chair and desk I'm set for the evening. I've actually made some progress getting old projects finished, paints straightened up, odd plastic bits stowed away properly in their collection boxes and random junk cleared away from the working surface; the place was really starting to look like a fellmonger's parlor, needed some work.
Airbrush painting is next, I think. Want to see how the ski-equipped BA-64 comes out.
This is what I have been up to the last few weeks, as time permitted. I'm going to divide the post into two parts: the first being the 'hobby' aspect of the project, and the second being the 'why' of the project, as it will be obvious that it isn't directly related to tabletop wargaming but does fit squarely in the wheelhouse of improvisation and alternative use of materials to make interesting things that I like to believe has informed most or all of what I have posted in this blog.
Pictures first:
This is a 12" x 16" shadowbox that required some new techniques to put together.
* I had to plan which elements would be glued to the back panel and which to the inside bottom and sides of the box frame- it fitted together like a puzzle when completed.
* I had to trim the back side of the Christmas tree off so it would fit and saved some of the trimmings to piece in at the front to hide some of the wires.
* I had to play with paints, stains and washes to get the color of the horse shelter the way I wanted. The 'canvas tarp' is a piece of tshirt that was fortuitously the right color blue to match the real world prototype.
* I had to relearn how to solder. I had messed about with soldering some in my teens when I was crazy about model trains. My father taught me (he had been an interior communications electrician in the Navy) but I hadn't tried to solder anything since around 1977. I'm including the video I watched to get going again below, it was very useful.
* I had to relearn how to wire LED bulbs in two parallel circuits. Turned out not to be as hard as I remembered.
In conclusion, I think that there is a lot of potential for me to use shadowboxes in future for some of the wargaming diorama projects I have in mind. I remember a picture of an early Warhammer 40k diorama of Orks using a Gretchin to sniff out the entrance to an underground, multi-level Squat stronghold, and all the Squats were busy aiming weapons at the point of entry. A shadowbox would have been perfect for that.
This is the end of the strictly modeling part of this entry. Thank you for looking in.
========= Break Break==============
So, the 'why' behind the 'what'. I may have mentioned in this blog- or alluded to- the fact that my wife and I rescue ponies and more recently full-sized horses. We both work fulltime at 'paying' jobs and most of our money after living expenses goes to equines (with a fair allowance for miniatures and hobby-related expenses. Selling off what I make- especially vehicles and terrain- helps with the self-sustaining nuclear reaction that is modeling for me). We'll generally have one or two that are undergoing rehabilitation with end goal of putting them up for fostering/adoption via the various horse rescue agencies that we are members of. Some though, have such a terrible list of problems both physical and mental to try to balance, that they are unlikely to ever be adopted or fostered out. They can't ride or drive and require more work than most people can or will put into a 'recreational' animal- so they become part of the 'permanent home herd'. We have three Shetland Ponies and two Standardbred ex-harness racers/ex-Amish farm horses that currently form the Home Herd. Ginger was our fourth Shetland and last winter her conditions got to the point where she had no quality of life any longer. She was in too much pain to walk, her digestion was so bad that she couldn't eat. After extensive efforts by our veterinarian plus other specialists by consultation, she had to be put to sleep and released from all her pain.
Ginger had her own paddock and shelter from which she could see across the road to the neighbors' yard and every Christmas season they strung blue colored lights on this one little evergreen tree. She would stand at her fence and stare at that tree for hours. We believe that it gave her great comfort to be able to see it. Just like in the shadowbox, she would stand sometimes on the stoop of her shelter with the tarp half on her back and just look at her little Christmas tree. So that's the way we want to remember her.
Thank you for looking in. If you've read this far, thank you for your patience in letting me express all this.
Thanks for looking in Kid, it's nice to have this project completed.
I guess I should mention that the lights on the tree illuminate- it's not really that clear from the (admittedly poor) pictures. I used one picture as the face of an open-backed box by gluing it to 3/16" foam board and then gluing edges to that- the whole thing got glued into the shadow box and forms the base that the Christmas tree sits on. It also forms a place to stash the 9V battery, which is accessed through a hole I cut in the back panel of the shadow box. I drilled a hole through the frame of the shadow box to accommodate the on/off switch, which is merely slid in and then fastened in place with greenstuff. I had a paint- burnt umber- that almost perfectly matches the stain of the frame to hide the greenstuff.
Here's the video I used to get back into practice soldering and figuring out circuits:
You are amazing bud, on many levels. Wonderful example to us all.
The shadowbox looks brilliant. Love the whole idea, and look forward to seeing more. Like the sound of the squat one. But many options available, I can see it being very useful. Might have a go myself.
Thanks for the link. Soldering is one of those things we're as much info as possible helps.
Beautiful story sir, you are an amazing human being, wish more of the world were like you.
I'm sorry to hear about the loss of Ginger, but I agree it was her time. What you have made in her honor is touching (and skillful). I remember the rescue ponies and horses mentioned in the past, but I think these are the first pictures I have seen of any of them. That was nice for me. The recreation of the blue lighted evergreen is especially touching.
As is so often the case my wife is the civilizing influence on me and for certain the brains behind our little operation. She began riding at 3 and driving at 5; I started at considerably greater age and while I have learned to be fairly competent at driving (I don't bounce so well as I used to, so avoid riding for the most part nowadays) my chief contributions are building things, grooming critters (the art of transferring all the dirt from your horse and carefully applying it to yourself) and maintaining things. I'm quite happy to continue along for the ride.
I get to slip my hobby things in occasionally: she very much enjoys the Chibi Ponies from awhile back in this blog, who also now have their own tree fort and Chibi Shetland-scaled stables (both also covered here).
I wish I had better pictures of the build and the final result, but my style is kind of 'fly by the seat of my pants' which means you almost never know what the next step will look like, which makes it hard to know when to take pictures!
Ginger had six good years with us that she wouldn't have had otherwise. The Shadowbox helps us remember the important things.
Automatically Appended Next Post: (Cross posted from my entry over on Painting & Modeling)
The principle structural component is a new toilet tank float (I needed the flapper valve cover from the repair kit, the float has been lying around begging to be used for something for months) and a wooden block base. I used a Forstner drill bit to carve a recess that the plastic locking nut on the float stand could fit into (had to shave the locking nut down a bit to fit) and Bob's your uncle:
Here are some of the bits I'll try to use to fill out the design including the ballast from an old fluorescent light, the push button from a bug bomb aerosol can, a AAA battery holder, a burned out GFCI receptacle and a washer/connector from a sink:
Also, having enjoyed working with LEDs in the Shadowbox project, I want to include some for this one too. If I can figure out what I want (in time to actually sumbit the project) I'll stash the battery and switch in this 3d printed sci-fi bunker, that will act as the control room for the automated mining apparatus:
I'm hoping to strictly adhere to both a strong regimen of actually working on the project and also of sticking to the KISS principles of construction (Keep It Simple, Stupid!) so as to make the deadline- which was always more than reasonable, I'm just late wrapping up the Shadowbox and getting in to this one.
I figure, glue everything down, spray paint it all grey, dump some home-made Nuln Oil on everything and throw some sand at it for basing and I'm done.
=================
The entry above is from the League of Extraordinary Riveters competition thread over on Painting & Modeling and is from yesterday when I decided I might just have time to get an entry in for the current theme ('Elements').
Tonight, so far, I've gotten the aircraft hazard light soldered onto the wire that will run down through its aerial and primered everything and made some customizations (ie: hacking with a hobby knife) to the control building/bunker. I wrapped blue tape around the LED to keep paint off it. Might get some things glued down later if the primer/basecoat dries in time:
Trying to get the structural part done and the wiring so I can focus on the weathering: in addition to being an Unobtainium Extraction Facility (that being an 'element') a definition of the competition rules for this go-round can be to show weathering (as a result of the 'elements'). So a desert world type mining rig is a natural for both aspects.
Hopefully more follows soonest. Thank you for looking in.
I spray basecoated the fluorescent light ballast- which I have decided is some sort of generator for the control building/bunker. Good old Dubya Dubya Eye Eye (WWII) USAAF bomber green. All this needs before gluing down is some rivets (this is the 41st Millenium, after all), some Nuln Oil wash and some rust spray painted on. Maybe some dusty pigment powder.
On the subject of spray painting, I've replaced my good and faithful airbrush that held up for nearly six years of on again/off again use. Air still flows all the way through from hose attaching point to needle cup, but it won't draw paint. I've disassembled it several times and can't find a blockage. Oh well. The new one doesn't want to be disassembled for cleaning- run cleaner through the cup, block the needle cup recess and backflow cleaner through that, repeat until no more paint. Marvelous. I used Rustoleum 2x (primer and paint) white to base coat the control building and then hit it with Thrash Metal white to dull it down. It will need some yellow ochre airbrushing to weather it and a little bit of detail painting. When complete, this building will fit in with the several other 'mining/desert planet' projects I've done- I'll post a pic of them all when finished, I really think it's enough for a decent board.
And whilst the airbrush and Thrash Metal White were out, I finally basecoated the little BA-64 treads and skis variant I built awhile back. It needs a lot of detail paint (there's a lot of non-white details), some dirt/grub and a bunch of rust- especially the muffler. Ad a couple of wannabe Valhallans and it's done also.
I'm hoping to maybe get the wire leads soldered onto the last two LEDs that will be on this project, but we'll see. I'm at the farm as of tomorrow so, while work will continue, I won't be able to post pics probably until Monday.
I hadn't thought about the Wacky Races in years- and yes, that Artic Cat/BA-64 hybrid looks like it came right out of the cartoon. Truth is stranger than fiction!
That shadowbox is amazing and the accompanying explanation is beautiful. So glad the horse had some good years with you and the neighbor's Christmas tree.
Some progress: a couple of WIP shots showing things roughly/loosely positioned and with colors other than primer. Also, a few of the several placards, warning signs, postage and graffiti that I want to put on:
Hopefully more work gets done tomorrow, too. In any event, more follows soonest.
Applied the last thin coat of bright, base color to the extraction centrifuge tank, and stenciled on the mining unit number- used the airbrush for tighter control than a rattle can and it seems to have worked out nicely; you can see the start of basing material on the shaft platform:
Also added some graffiti, because what remote, automated mining facility wouldn't have some?
I used the airbrush to apply Vallejo Rust Wash to the generator housing:
And soldered leads onto the last two LED bulbs and soldered in the switch to turn everything on and off:
I actually remembered to position the shrink tubing before soldering on the lead or the switch, so all the connections should be nicely isolated from each other when everything gets stuffed into the control bunker. All that's left wiring-wise is to start gluing major diorama components down so I can see where/how to run the leads from the aircraft warning light on top of the drill rig and the yard light underneath the centrifuge tank.
Then the real weathering and detailing can begin, for as long as I have time. Frankly, for me, this is where I add the most 'rivets' towards showing that attention to detail that might make my piece worthy of consideration for the LOER. Everything gets a two thin sprays of flat matte varnish, then some 'dusting' with yellow ochre from the airbrush, then homemade Nuln Oil wash for all the moving parts. And a ton of litter in the form of pipe sections, coils of cable, shipping packing , etc.
I may get some work in tomorrow, we'll see. More follows soonest.
Last update for the Unobtainium Automated Extraction Facility #4, as I just need to splash some more weathering goop on and I'm ready to take final photos for the League of Extraordinary Riveters competition. This one deliberately doesn't show much of the whole she-bang, just the last soldering and what I had to stuff into the bunker looked like.
I cheated a little, in that I didn't do 'linear' soldering of wire connections, but pig-tailed the ends together, soldered them and then applied shrink tubing over top to isolate the join. Is it professional? Feth no! Is it pretty? Double feth no! Does it work! Heck yes! And I had the space to store all the extra wire and somewhat bulky soldered joins, so no problem:
I'm giving myself the rest of tonight to put away all the tools and materials from this project and clean up my little desk to get ready for the next- and man, I've got a ton of things I want to do! Tomorrow will be reserved for just photographing the diorama and getting the pics sent off to the LOER and then posting them also here.
Here are final pictures of my entry for the LOER competition. This is Automated Extraction Facility #4; its programed mission is to extract ore containing the rare element Unobtainium (which cancels the negative effects of governmentium- atomic weight 1,867), centrifuge the ore to separate the element and store the refined element until remotely piloted drones carry it away. Field mechanical teams visit once per year for routine maintenance or more frequently when something breaks down.
This unit is located on the desert moon #4 of the planet Sturgeon (thank you for everything, Theodore!).
The theme of this LOER comp was 'elements'. I believe my entry meets this theme in two ways: it has as the subject of the vignette extracting an element (albeit an imaginary one) and it has itself been weathered by the harsh elements of its environment.
The main part of the rig- the extraction bore, tower, centrifuge and storage tank, are the unused float stand for a toilet repair kit (I needed to replace the float arm and chain, but never needed the stand. It is wired with three LED lights (the red aircraft warning beacon, amber door entry illuminator and the blue recall beacon set in the roof of the bunker) powered by one 9v battery all hidden in the bunker. The switch is set in one of the vision slits for convenience.
The wiring for the red aircraft warning beacon runs down through a piece of PVC tubing, through the storage tank and out through a flexible drinking straw and into the bunker through a vision slit. The green generator unit is the ballast from an old fluorescent light. The vertical bore drill guide is the cut off barrel of a Strongium Paste syringe (a medication for our rescue horses). The junk around the base of the centrifuge tower is everything from the windings from an old electric motor I took apart (its pallet is actually a 3d printed 'birch' door from a Celtic house model) to off-cuts from the wire I used for the LEDs to Nuln Oil stains to some gear-looking bits and bobs from a bag of 50 I got at Michaels, once.
Things I learned/practiced:
* Got better at soldering through adding the lights, need to plan out better running my wiring harness
* Started off using my airbrush quite a lot until it died, then had to find a way to duplicate the appearance with brushes and washes
* Made great use of Greenstuff as a fixing agent, as opposed to relying on 2-part epoxy
* 3d printed the bunker and improved my print settings a bit, but need to go a bit finer, I think
* I tried some new weathering techniques- liquid pigments especially- and like how some came out (the storage tank really needed the salt method- a missed chance, there)
Biggest thing I learned: Get it done! Don't let the perfect (or different) be the enemy of the good.
Thank you very much, Meat Shield! I obviously don't paint/build for realism, but do try to make a good, interesting piece that someone might want to game with. That you so so, means a lot.
This BA-64 variant rigged for snow/winter ops seemed like it would be a fairly quick finish: I've got my new (extremely inexpensive- so naturally it's working like champ, at the moment) airbrush, I hadn't planned to 'base' it and it seemed to only want a few licks of brush paint here and there.
Out the window with that plan: now it needs a base, it's had a new base coat of off-white, camo green splotches per the Red Army 1942, and a dulling coat of 'Oily Discharge' (per the label on the paint- frankly, that sounds like some sort of venereal disease) all from the airbrush. I've got a few store-bought bits to put on- ammo and fuel cans mostly, but had no good tarps and packs so had to try my hand at carving and sculpting greenstuff.
Note: my hat is off to you cats that have made amazing things with greenstuff; my kindergarten attempts still called for the patience of a saint (which I ain't) and I still stabbed at it with my X-acto knife before all was through. I want to try some more though; previously I'd done the simple 'roll a flat piece up and drop a couple of straps on it'. This time I tried carving pocket edges, flaps, adding straps and pockets and squishing the packs the direction they need to go to hang naturally when glued in place on the SnowCat.
Thanks very much, Syro! When I bought the repair kit and used only the couple pieces, I saved the float and stand because 'you never know when you'll need it'. It kept getting in the way and was going under the other debris in the workshop for the third time when I reminded myself that I have never had to replace a float and float stand in a toilet tank in my life (past 60 years now).
That's when the Dakka Demon popped up on my shoulder and whispered in my ear "you know you can make something out of that".
I have painted and attached most of the stowage for the vehicle itself- the last couple of bits are the Eisenkern Quad 20mm anti-aircraft gun (and anti-infantry, Orks, small yappy dogs, tax collectors......) and the Wehrmacht WWII artillery range finder, because why not? I also was thinking how to dull down the hull paint job and what finally worked was just a thin wash of Nuln Oil.
And the next phase of the project is the commander, by Grim Skull:
I also have done my research on making fake snow, so I can commence basing operations 'concurrently'.
Frankly, you cranked out an entire village worth of buildings- all of which had been weathered (subjected to the 'elements') and documented their progress photographically during the SEP-OCT window: you could enter any or all of 'em!
Assembling the materials to make the base- I'm testing out AK Interactive's Snow, Snow Sprinkles and Snow Microballoons to see how they do making a very cold looking environment, from the YouTube vids they'll do pretty well:
And the BA-64 SnowCat is finished (except for maybe some Nuln Oil on the range finder); I needed a lot of stowage because the kit sat around half-finished for so long I can't find the headlamps and other hull pieces that otherwise would have taken up a lot of the space I've covered with packs and things. Vehicle crewman are always looking for new and interesting ways to carry more things, but there are a couple of rules of thumb that always govern what goes where:
1) Personal gear is always inside if possible and if not, where it is easy to get at and sheltered as much as possible from the weather and road splash
2) Access to things that break frequently- especially the engine compartment- is impeded as little as possible; it saves having to move a bunch of crap to get at whatever needs fixing, oiling, adjusting, cursing, praying over, etc.
Looking at the photos, I don't like where the range finder is- it would never be carried in an exposed position like that anyway- but I wanted to use it since I used the tripod legs for it. I believe I'll move it up and add it to the anti-aircraft quad guns as some sort of crazy aerial engagement aiming device. Hey- my 41st Millenium vehicles have rivets, my anti-air can have WWI aiming devices!
More follows soonest. And thank you to so many who have dropped in to take a look, it's what makes posting here worth the effort to try and share what I'm working on.
Vehicle commander is done- lighting is poor in these pics, I hope to get better coverage when I do the final shots:
Got a good start in on the base; using Artists Matte Super Heavy Gel and will build up at least three coats- I want deep snow before adding the AK pastes. Also glued a magnet underneath the SnowCat and another to the mini-diorama base so that the vehicle can be separated and gamed (hey, it could happen!) as possibly a counts-as Sentinel or maybe a Salamander:
I hope to finish the base this week and get good, final photos Thursday or next Monday, but life can happen. It partly depends on drying times for all the Gel and snow pastes.
Excellent this BA-64 ! The stuff added add live and doesn't desequilibrate the model, perfect !
I'm going to take inspiration, I wanted to use the same model for my soviet orks.
Did you use an 1/35 model ? Or an 1/48 ?
Thanks very much for looking in, Meatshield, and the kind words. I hope to wrap the diorama base up tomorrow and get some decent pics posted before I bug out for the weekend.
Hello, RaoulDuke- thank you also for looking in and the kind words! This is the Vision Models BA-64-3SKh 1/35 kit. I actually tried a 1/48 kit first, but it is much too small- I'm saving it for a comic Gretchen piece to go chasing after an Ork Battlewagon, one day. I look forward to seeing your project here on Dakkadakka soon!
Here's the other (wheeled) BA-64 I did some time ago:
So, done with the vehicle, done with the commander, almost finished with the base, I'll hold off pics until the finals, perhaps as early as tomorrow. I've applied the second (and final) layer of Matte Heavy Gel and frankly, I probably didn't need to invest in snow pastes and textures- with a bit of paint I think the gel will harden fine into the fluffy, settled snow I want. I'll use them, to see what they bring to the table and will have a better idea how to employ them in future. I drilled holes into the wooden oval plaque base and through the first layer of gel, used dollar store two-part epoxy to fix the evergreen trees in place and added the second gel coat. I'm really excited because this project is actually coming out mostly like I was planning.
And on to the next:
These are resin-cast Winterguard I picked up from Resin Munitorum on Etsy. They are at a very affordable price (especially compared to some other castings), there is zero clean up required and the details are extremely fine. I got a whole (small) army worth of the different units. This one is the Ranger/Sniper/Anti-tank (the one with the large mine) squad and I absolutely love the two-critter heavy sniper team, definitely my favorite out of a unit full of great poses. All the other Winterguard (close combat specialists, regular infantry, stormguard, mounted) have more or less standard looking uniforms, but these are wearing some kind of aerobics unitard. So I'm going to do them as stripped-down Scout-Snipers- extremely light infantry that rely on their ability to blend into the terrain rather than bulkier uniforms, weapons and armor to sustain action. Read Robert Heinlein's Tunnel in the Sky where he describes the hero's big sister, who is a captain in the Corps of the Amazons, describe how she selects and equips a scout to go out on a sneak. Even in my own experience, we ditched everything we could before going out patrolling, and wore soft caps rather than helmets. That was forty years ago, though- times seem to have changed.
Here's the squad with the base coat of skin tone applied:
Oh yes: if you hadn't noticed before, they have tails. I don't like the look of them with the same color as the skin, so they're going to get a cheetah-like buff/tan color, same as what the ears will be.
Here's one (I ordered mine at 105% size, the seller offers both 100% and 105%) compared to an Eisenkern Panzerjaeger. Even despite the armor the Jaeger is wearing, she's much bigger. I figure- I'm 5'6" and served with a bunch of 6 foot plus guys, the universe is a big place and these Winterguard are just smaller and more delicate than some others. Hence their being so good at sneaking.
I hope to get a little more painting in tonight, we'll see. Thank you all for looking in.
I've wrapped up what I'm going to do with the base, so without further ado here is the completed BA-64 SnowCat variant completed:
I used a $1 wooden plaque from Walmart for the base itself, covered that with the Artist's Matte Heavy Gel and used AK Interactive's AK8011 Snow and AK8010 Snow Microballoons on top of that. The Snow spreads very nicely with a wet stippling brush (5 for a dollar at the local dollar store) and the Microballoons give that powdery/crusty/cold look to the fresh top layer of snow that hasn't been driven over yet (better photo below).
Side views:
I used one Christmas Village tree from Walmart cut up into the pieces you see on the base- any extra tufts of needles I glued onto the other trunks/branches.
I mentioned gluing a magnet to the underside of the vehicle and to the base so that the SnowCat can be removed and gamed if wanted (these are strong enough that I can turn the whole thing upside down and the vehicle won't fall off):
And the commander close up:
And an attempt to show the snow in a bit closer detail:
The log is a twig from the holly bush outside my apartment.
So that's it. My first really 'winter' project with snow, so got to try a bunch of new things:
- Used the airbrush to try a Soviet Winter camo pattern
- Used Artist's Matte Heavy Gel as a base cover- and will use again with mixing the color I want into the Gel itself
- Used snow pastes for the first time- and like the different shades of white that the Gel, Snow and Microballoons present
- Used the magnet trick from the Robogear armored walker to make the vehicle easily detached from the base
- Used greenstuff extensively to make the gubbins and packs and such that I needed to fill out the stowage
Thank you for looking in and for your constructive criticism. More follows soonest.
Very interested in the Winterguard, they look awesome, though I think I would go with Puma colouring ( mountain lion to you I guess) or maybe bobcat. Something snowy looking rather than a cheetah.
As to scale, it always gets me how people get hung up on scale. All the figures being the same height exactly. We are not bloody clones. I am looking into using 1/35 scale humans as ogryn stand in for an army idea I have. Now I suppose they have to look big and dumb, but do they. Supposedly gravity affected their size, not necessarily their intelligence. Billions of humans spread across hundreds if not thousands of planets, bound to be a mixture of things.
Anyways all looking great bud.
Thank you Cam! I think you are right about Puma/greys for the Winterguard- the tan/buffs would still blend in a bit too much and leave them looking flat, whilst the grey will contrast a bit. Something for me to remember also, their hair in what pictures I can find on the innerwebz is all kinds of bright colors- pink, purple, blues, etc. The hair will present a natural focal and contrast point, so having the grey tail and ears will help tone that down, while still pointing up the green/khaki uniforms and cloaks that I figure to do.
Thank you also, Olthannon! First time for me trying to do winter at all, let alone snow, so I'm glad it worked out. A very fun project that went 'way out of the original scope I had imagined (this is typical behavior for me- someone once accused me of finding a brick on the walk home and having planned the Taj Majal by the time I got there. I'm still trying to see how that is a bad thing.... )
A little progress on the Winterguard Scout-Snipers tonight, it doesn't go easily because the detail is so fine on these figures that sections can be very painstaking. As it is, I'll have to do several 'go-backs' to fix "oops'es", But base colors for the singlet and cloak are on. In some ways, these figures could be Aiel from the Wheel of Time books, what with their shemagh face veils (if the Aiel had .50 calibre sniper rifles).
Meer_Cat wrote: A little progress on the Winterguard Scout-Snipers tonight, it doesn't go easily because the detail is so fine on these figures that sections can be very painstaking. As it is, I'll have to do several 'go-backs' to fix "oops'es",
This is why I always prime in black rather than white. If I miss any little details, no one can tell.
Too true, Josh! I thought about primering in black, but it does make the base colors darker, and I wanted to lighten things up a bit with all the browns, drabs and greens I planned to use.
I may try black primer for the close assault troops- and give them a lighter base color green to help balance.
A little bit of get ahead tonight- load-bearing equipment (LBE) and rifles base colored:
That's two different greens between the belts/pouches and the rifles, and they look a fair bit different to the Mark I Eyeball, but not to the camera, so I may re-do the LBE in a different green or brown.
I've been using a different figure each time as a focal point to show them off; they really are exquisite figures and deserve a better modeler than me- but I'll give it my best shot. Getting base colors on is always tough, messy and fiddly- moving on to dry-brushing highlights and adding inks and washes for lowlights is what seems to really bring the piece together for me.
Some progress tonight: detail work on the rifles and optics, a lot of "oops" touch up and most visibly- the hair. The few pictures I could find of Winterguard in color showed them with anime colored hair, so I dug out all my colors for Eldar "one day" and had fun.
Why would elite scout-snipers have brightly colored hair in contrast with their highly effective camouflage colors you ask? "Rivets in the 41st Millenium" I sez.
Hopefully tomorrow night I can complete the grey areas (ears and tails), touch up the cloaks and do the foot wraps in the same color, do the ear pieces/communicators in a nice metallic and get some very controlled washes done. The figure with the yellow hair will need another thin coat to reduce the translucency. Also every one of them is wearing a wristwatch, so I'm debating whether to do a mundane brown or green strap or give every one of them a Swatch in a different color. Depends on how much I get done, I suppose.
I'd like to be basing them on Wednesday and finish up no later than Thursday- got lots more projects I really want to see how come out!
Thanks Cam! Frankly, in just about everything I try to paint- vehicle, infantry or animals- I try for one spot of brighter, contrasting color, even when it isn't all that realistic. Even just the lenses on the optics being picked out in neon green or red or orange is enough- something to make the piece 'pop'.
In this case, what self-respecting warrior of any tribe, race or nation is going to admit to the receptionist at whatever passes for Valhalla in the grim future of the 41st Millenium that they got their ticket punched by Kool-Aid haired centerfold Death Pixie?
I wish I could take credit for that graffitum, but it's actually a water slide transfer/decal from Greenstuff World (I think).
Something that I've only started doing in the last couple of years is using Decal-Fix or similar product to help the water slide 'sink onto' whatever surface its on- it must be a mild solvent that affects the plastic matrix the design is on. Now that I think of it, another product I've heard of for the same purpose is 'Solvaset'.
Another use for the fluid is to mix with powdered pigments and make very thin washes or thin liquid pigment for weathering.
Ah Decal Fix, that must be a godsend for space marine pauldron decals. I hated applying those back in the days I played space werepuppies. Thanks for the Tip.
I bought the piwders from forgeworld over a decade ago but I can't recall ever useing them.
The paint job is great! I cannot get behind cats with guns though, We now have 6 cats, arming them would mean our death as they are never fed on time.....according to them.
Hi Wyomingfox- yep, DecalFix is a real help- especially on very large or very small waterslides, and especially on a lumpy or curved surface. I believe that the solution can get a livery decal for a railroad/industry to snug right down on the sides of a hopper or gondola car, and no indication that it isn't painted directly to the metal/plastic. Weathering powders I found baffling- if I put them on dry, the look was great, but they fell off with handling or got mixed with dust and the look was ruined. If I overcoated with matte varnish, they disappeared. YouTube has several good videos on using them properly and I'm starting to make a lot of my own blends, specific to the color scheme of the piece I'm working on.
Hey Theo- long time no see! Our cats are the same: never fed on time, intolerable grievances, a plan to conquer mankind and we'll get started on that right after this nap.... Glad you like the Scout-Snipers!
Who are finished, as of tonight. Got the many washes done last night, sanded and primered the bases this morning and got those painted up tonight. Here's final pictures:
Gotta add some filler so this prone sniper-cat isn't doing yoga whilst engaging targets at long range.
Sorry that many of the close-ups are a bit fuzzy- I just can't get the light and focus right to get close enough to show off the detail on some of these figures. Very frustrating.
The next project is a Winterguard "TomCat"- counts-as Sentinel:
Assembly is almost complete and many of the other parts, weapons and crew are primered already- this thing comes with eight weapons variants (heavy flamer, stubber, lascannon, etc) with molded in depressions for magnets- another really impressive (and highly affordable) kit from this line.
The Tom-Cat looks interesting, especially in an Anime sort of way.
I'm having a heck of a time with photos right now too. I haven't taken many over the last year, so I may just be out of practice, but the new workspace also has terrible lighting.
Yeah, I thought I had cracked the code with a lightbox- but I can never get the light level down enough- they come out too harsh. Then I thought I had good luck just plopping the piece(s) on the seat of a chair and swinging my gooseneck stand lamp over top: nice, even illumination and decent results on large items like the SnowCat recently completed.
So far, the best results I get for figures is right on my desk top, it's just there's all the other bits floating around and paint stains, etc. I guess I need to paint up a terrain base for infantry and just use the desk!
A bright light can sometimes be the issue. Try defusing the light with a sheet of paper. Also Macro is your friend. Find the Macro setting. You probably know all this anyway. The best solution I have found over the years is a backdrop. Make a scenic backdrop for you models to be photo'd against.
Thanks Syro! I'm going to try to get some better shots on my work desk (I seem to be able to get the best frontal lighting there at the moment) with some smaller terrain pieces to try to give some oomph. I got some results on these that I'm quite pleased with and would like to share and you can't see the good effects in the current pics.
The Tom Cat and crew are started nicely, but too late tonight to get some WIP pictures, will get something up tomorrow. Also have two new products to show- look at me, being all productive and stuff!
The TomCat and crew are almost completely basecoated and I've started picking out the other parts that need dedicated colors (exhausts, lights/lenses, etc):
I got lucky and the walker balances perfectly with any of the weapons attached, although I am prepping a base that it will be permanently mounted to. For everything you get, this kit is extremely well priced.
The kit came with one crew where the 'passenger' is just hanging on to the driver and I purchased an extra where she is looking through binoculars (there is a third option to have a passenger shouldering an anti-tank missile launcher that you can get):
I'll probably use the binocular crew for the TomCat itself, but want to scratchbuild another walker or cycle (jet or motor- don't care) to do something with the other crew.
And here's the weapons load-out that comes standard as part of the kit:
Thy come already cast with magnet recesses, as does the TomCat itself, so you can double magnet.
I used Green Stuff World's new dipping inks on the TomCat and I'm very impressed. I've never used contrast paints of any kind and was skeptical that this stuff would look good on mostly smooth surfaces (the demos on YouTube showed the painter using them on very heavily textured pieces) but you see the results- and it was so fast! I'll hit some spots with ersatz Nuln Oil and Camoshade Green washes and the lower legs are going to get dusted with earthy weathering powders and we'll call it good.
I'm going to try to get some more painting in tonight, as I'm prepping for a new class that I have to teach on Monday and tomorrow, Thursday and Friday may be severely 'time constrained' as everybody freaks out about being ready except me (okay, I'll be freaking too but on the inside, where it doesn't show).
Did you actually dip the model or apply the contrast with a brush. With the GW contrasts, I've been happier with the results when the models are heavily textured than when they are more flat.
wyomingfox wrote: Did you actually dip the model or apply the contrast with a brush. With the GW contrasts, I've been happier with the results when the models are heavily textured than when they are more flat.
Same here, the texture just helps all around, I think that's why I didn't like contrast on GW vehicles.
I like the binocular pair of riders for the Tom-Cat , Make the second person look important and not just a add on.
Wyomingfox: I brushed the 'dipping ink' on with a pretty heavy hand- which is hard for an obsessive compulsive like me. It pooled on the flat surfaces and gave a decent weathered effect, I think. I'll use the real inks and washes to get the low parts and create a greater sense of contrast- but I don't think I'll need to do any drybrushing- the high points are pretty faded already. My guess is that GSW named them as they did to avoid copyright disputes with a particular other manufacturer. These do flow very well, though, and would do better on things with more texture. And on large, smooth, flat pieces I believe it's only going to give a mottled effect, at best- probably better to use a conventional paint on a surface like that anyway. But anywhere with highs and lows of any kind, or a curve- looks good.
Theo: Agreed- the passenger on the second team needs a job beyond looking cute. When I rig up a vehicle for them I think I'll strap a heavy sniper rifle across her back- that makes her a highly mobile scout-sniper and she'll fall in with the Rangers.
Pics from tonight- got a fair amount of work (about half) on all the weapons and a little bit on the crews:
I had some time to look for more photos of Nyorkin Winterguard Nekkomimi and I found none where they are wearing pants. So even though these guys have fur-collared winter coats, short skirts and bare legs it is.
Short Skirts and bare legs because the Tom-Cat runs hot .
You could always add on a bag of grenades onto the side or across her back. Speed through the enemy lines with the Tom-Cat dropping grenades in their wake.
Hey Theo- I found the big boom sticks I had left over from another project and added one to the passenger- but I like the idea of the grenade bag and I'm going to add that too: stick grenades, I think. I'll also add a sling for the boom stick and attach a couple of grenades to her belt.
The TomCat, both crews and all but two of the primary armament are done- just need to finish the plasma cannon and lascannon and will need to watch the videos on how to do plasma glow again before I try those.
But here's the rest of the ensemble, finished:
Heavy Flamer:
Gatling:
Autocannon:
Multi-Melta:
Sniper Transport:
With Infantry Support:
Doom Pixie Clown Car:
Gotta tell ya: I did this last photo as a joke, but looking at the enlarged picture- I bet I could modify the two crews so that all four figures would fit and look pretty darn natural. It's jus tthat the rear pair would have to watch their calves on the hot exhausts on both sides! Tempting, tempting.....
On to the next project. Thank you for looking in and for your constructive feedback.
The best fleshtone I've found for awhile now (my little camera doesn't do it justice, although it _is_ a little bit orange) is a based of Model Color Dark Flesh and a wash of GW Reikland Fleshshade.
I'm still trying to improve my technique- I see some really impressive shading on 28mm miniatures here on Dakkadakka, but unfortunately I'm still at the "base paint and the cover everything with wash and hope some collects in the low spots" stage- still very hit or miss with the results.
Didn't have a lot of time tonight, but did some fiddling and made good on the threat to convert the TomCat so that both crews could fit and all four cat girls ride along. I shaved the back of the seat off with an emery cut-off wheel on the Dremel tool, snipped the arms off the driver of the pair that now become the rear passengers, filled the gap with a tiny amount of modelling putty, repositioned them, a dab or paint and bob's your uncle- almost half a squad striding merrily into battle:
I see I have to dust some more resin residue off.
I also got a rifle squad of Winterguard primered- they've been a lot of fun so far and want to get some more done. I still need to review the technique for painting plasma glow on YouTube so I can finish the last two weapons for the TomCat.
Thanks Wyomingfox and Theo! I'm a little chuffed about the final result- the resin is extremely brittle, and I was very much afraid that more would shatter off than I intended as I was making the adjustments to the walker and the arms of the one driver. I'm sure you've felt the same thing when you have a very nice piece nearly done, and you undertake a major renovation that might ruin an otherwise perfectly acceptable project. I'm glad this one worked out.
For tonight, I finished the last dabs of paint on the final weapons for the TomCat and started bas coloring the first half of a squad of Doom Pixie Riflecats:
Lascannon:
Plasma Cannon:
Doom Pixie Rifles:
You may notice that I remembered to add on the 'knee joint' armor on the TomCat; I'd clamped those onto hemostats to paint and then forgotten them, now they're done.
I did a much more controlled paint job on the plasma glow and it's okay- but I'd still like to get better at object source lighting and get that really good effect. We'll keep plugging at it. I'd be very happy to field these on a gaming table- if for no other reason than to see the purists reaction to them!
Ah, feel for you regarding the resin. I purchased a set of lovely goblin sculpts only to have a number of them break while handling or dropping them onto the desk due to brittle resin.
Thanks for looking in, Olthannon! My dad taught photography as an elective in high school and he read some famous photographer say once that the secret to taking a great photo is to take a thousand. I figure the same for OSL- just got to practice enough, keep looking at examples and tutorials.
Heya, Wyomingfox! Yup- got lucky with the resin castings this time, no doubt. Sorry to hear about your difficulties with the goblins. A few projects back, I did five motorcycles with hot chick riders to act as counts-as Rough Riders (motorcycles armed with dual GAU-7's, baby!) The riders fit so snugly onto the bikes that I accidently snapped one (resin-cast) leg off and it is still somewhere unknown in my little living room. So I snipped the leg off an old GW white metal skeleton and made a cyborg leg. But man, resin, crazy stuff!
For tonight, all the basecoating is done:
Tomorrow, if I get time to paint, I'll get to work on washes and dry brushing. The sand is more or less glued to their bases, so those are ready for a top coat of matte varnish to make sure everything stays down. Then those can be painted too. It's remarkable how much faster a project goes when you know what the color palette is, and you're not making it up as you go.
The only real difference in paint scheme between the Rifles and the TomCat Cav Scouts is that I washed the Rifles boots (Model Color Khaki) with Agrax Earthshade. I hadn't done that with the Scouts because I was afraid it would make the color too close to the jacket, but I like the look and will retroactively weather the Scouts Ugh boots.
I've the other five to do to fill out the squad and then am not sure what to go on with next- I have heavy and special weapons for the Winterguard, plus a command section or I can change gears and work on something different. We'll see.
Thank you for looking in and more follows soonest.


 . My hobby time is limited, and spending half of it trying to get things to work is a recipe for disaster to me.
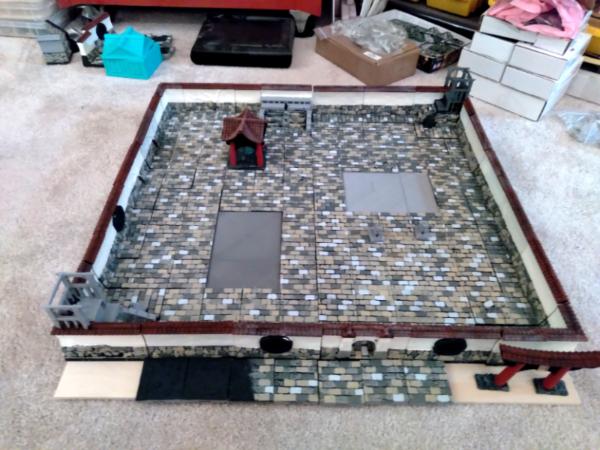
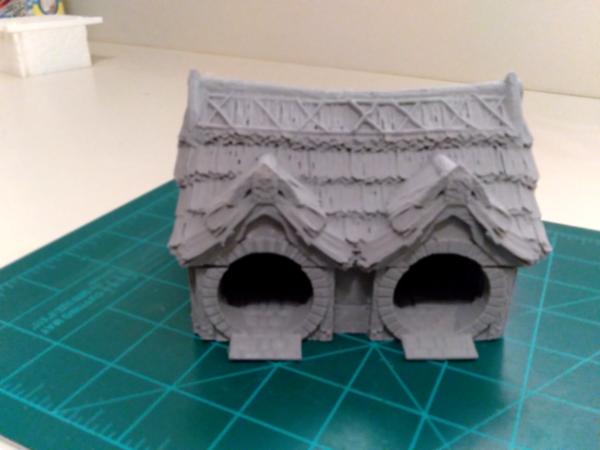
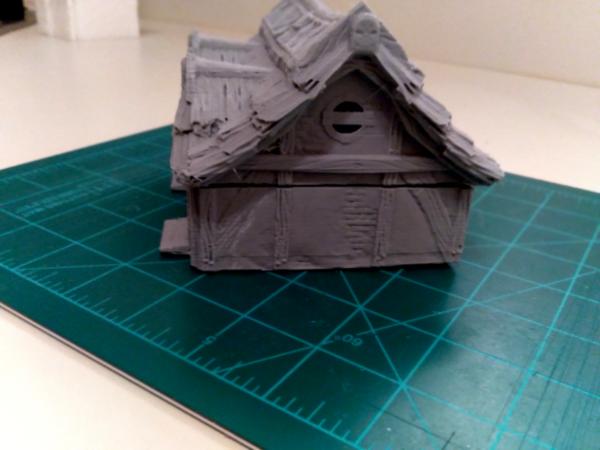
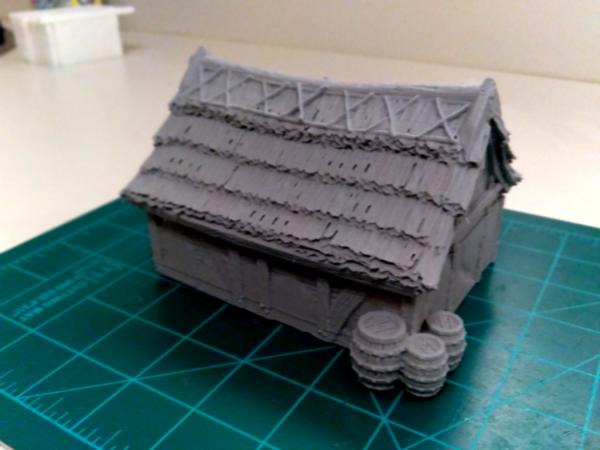
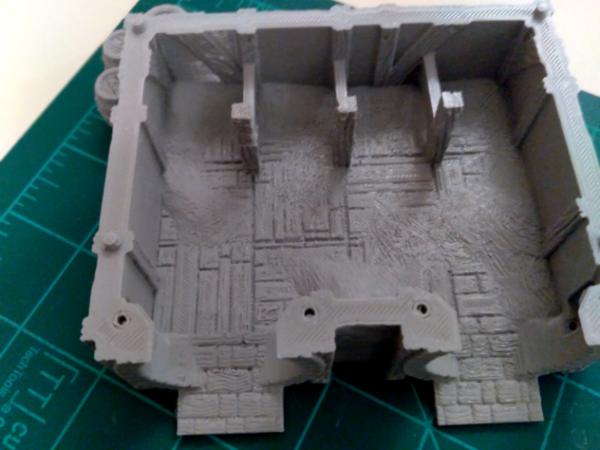
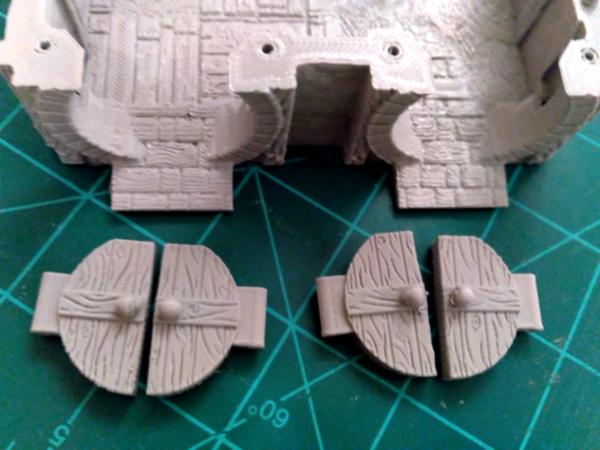


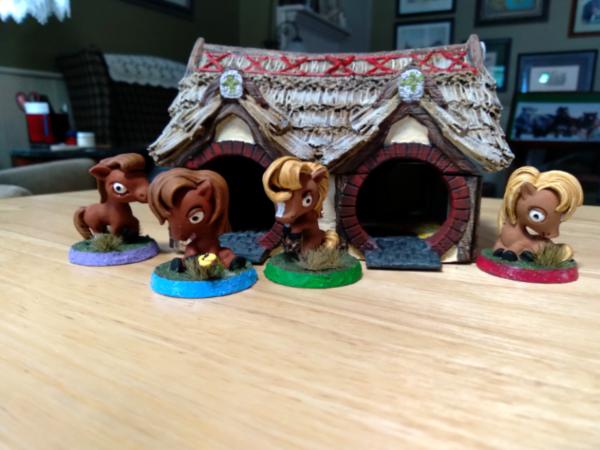
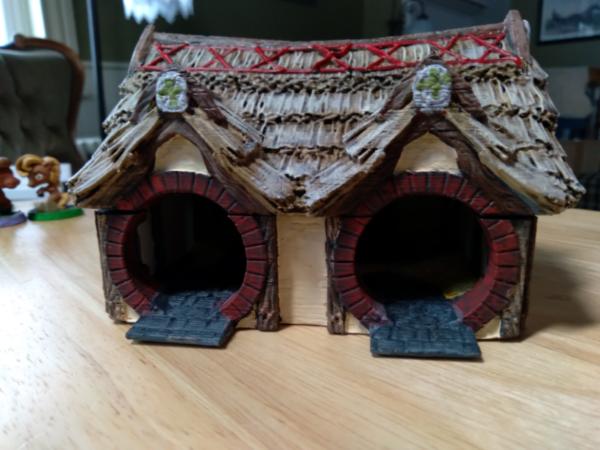
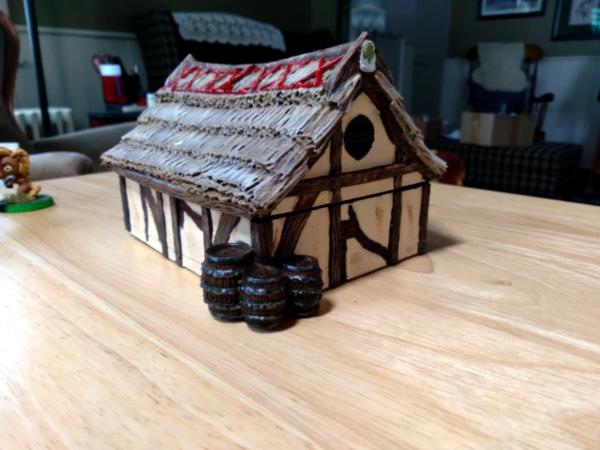
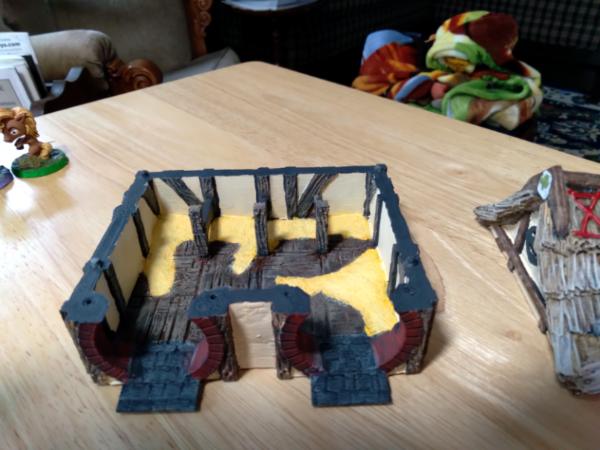
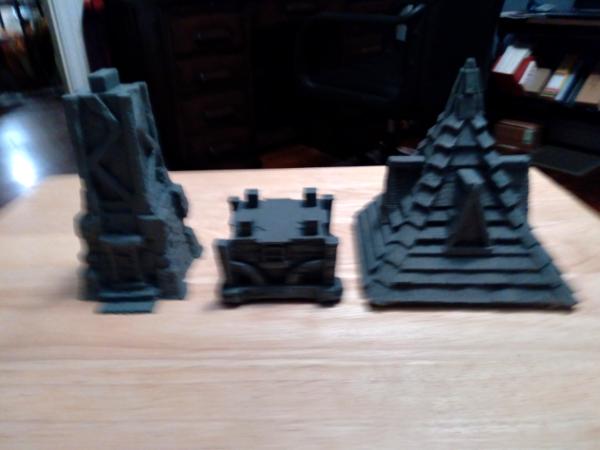
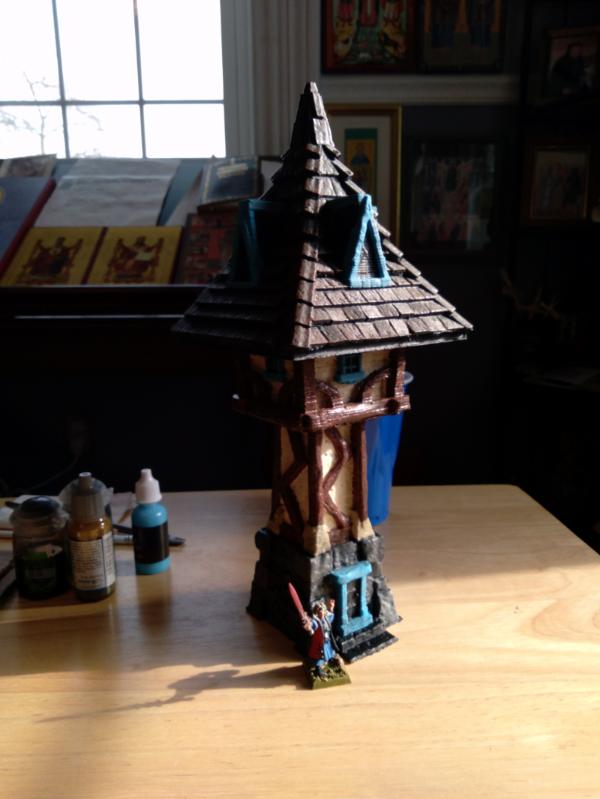
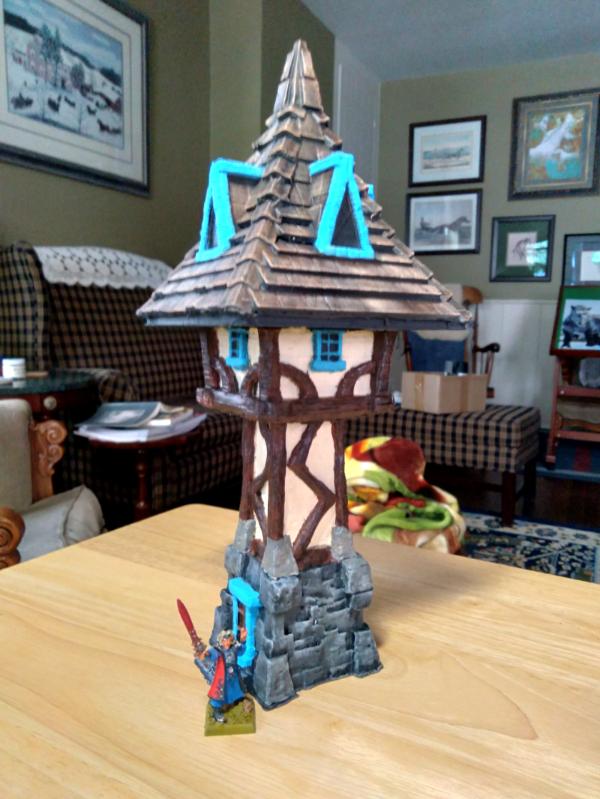
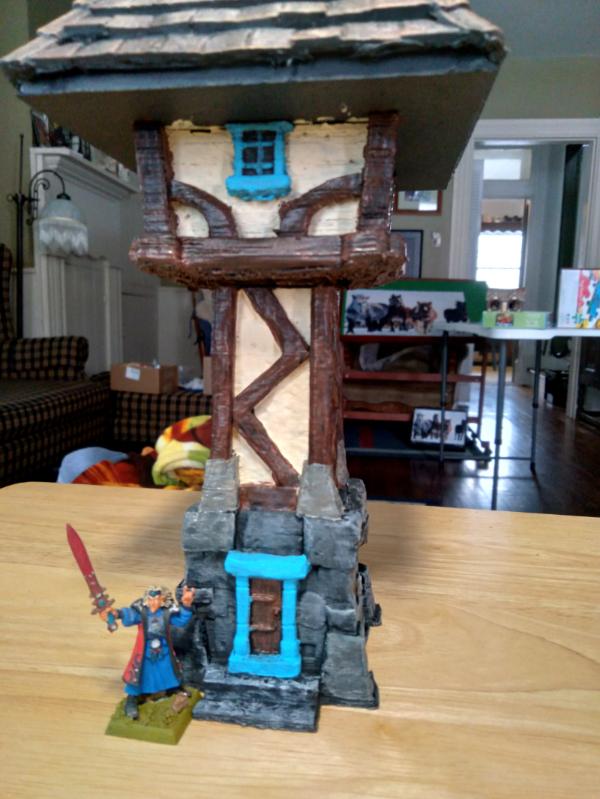
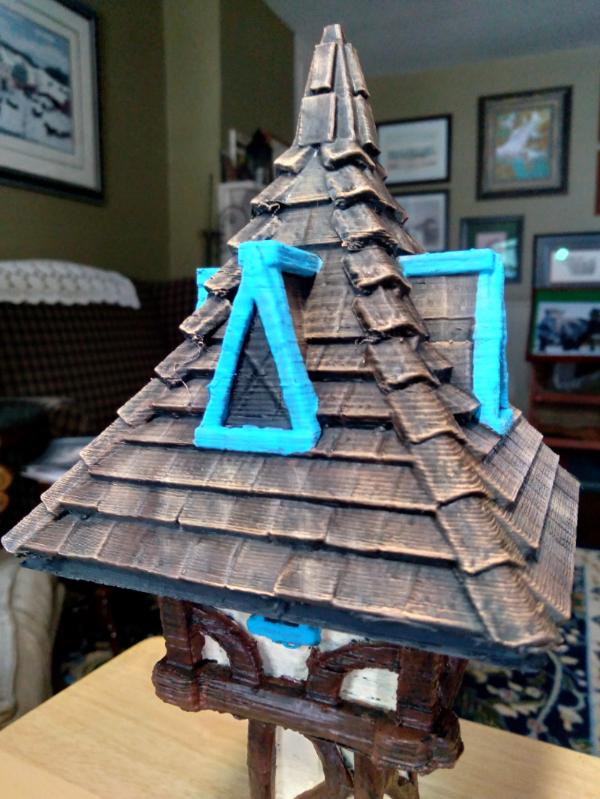

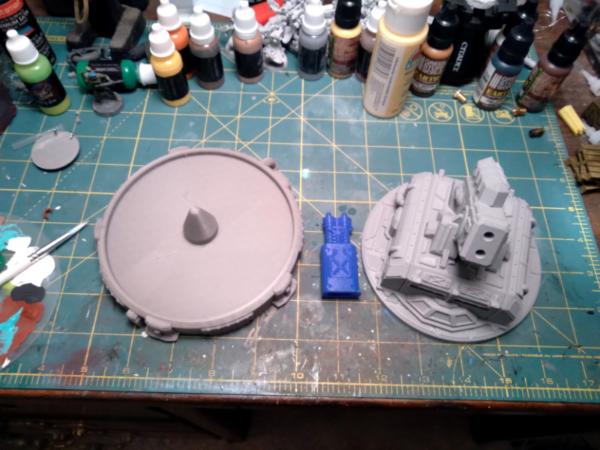
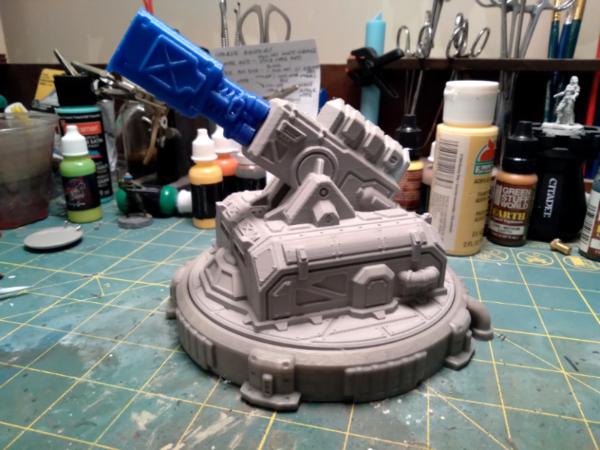
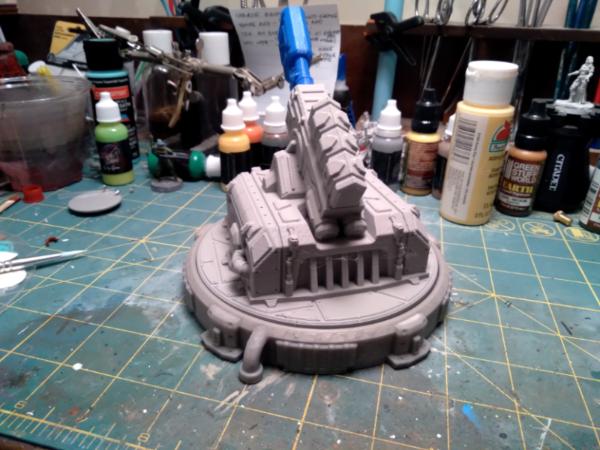
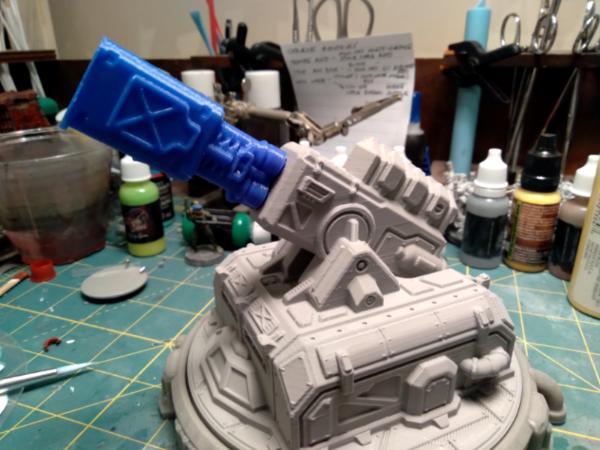
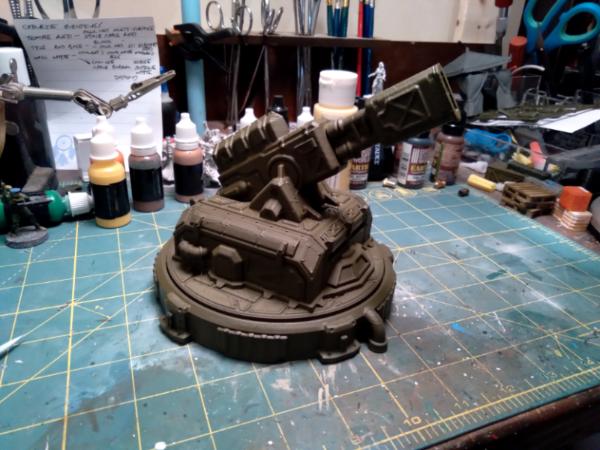
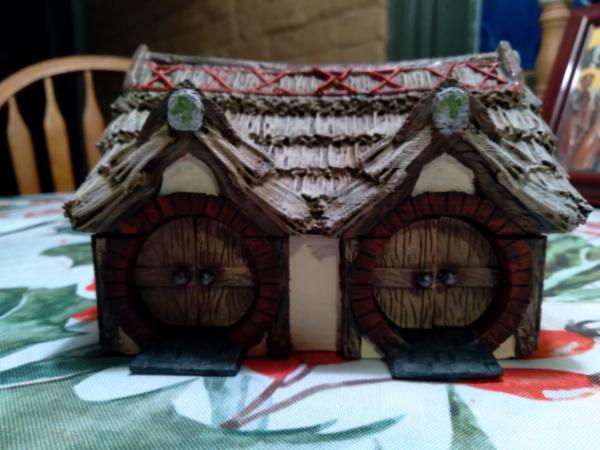
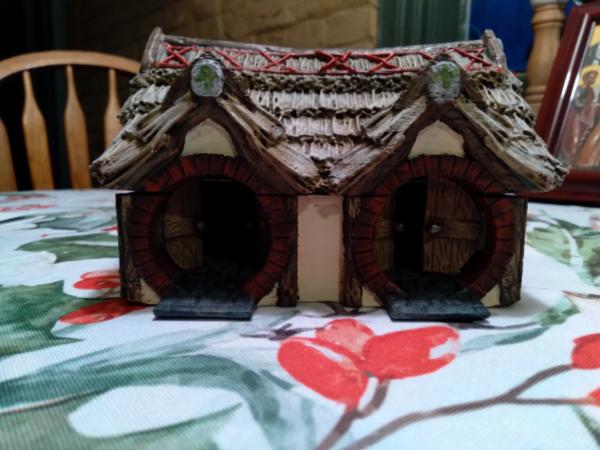
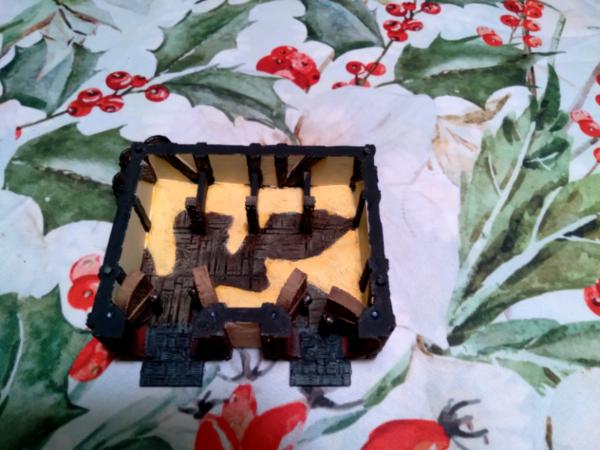
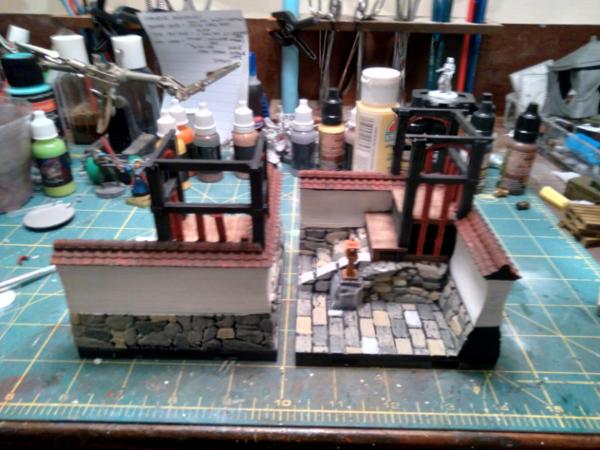

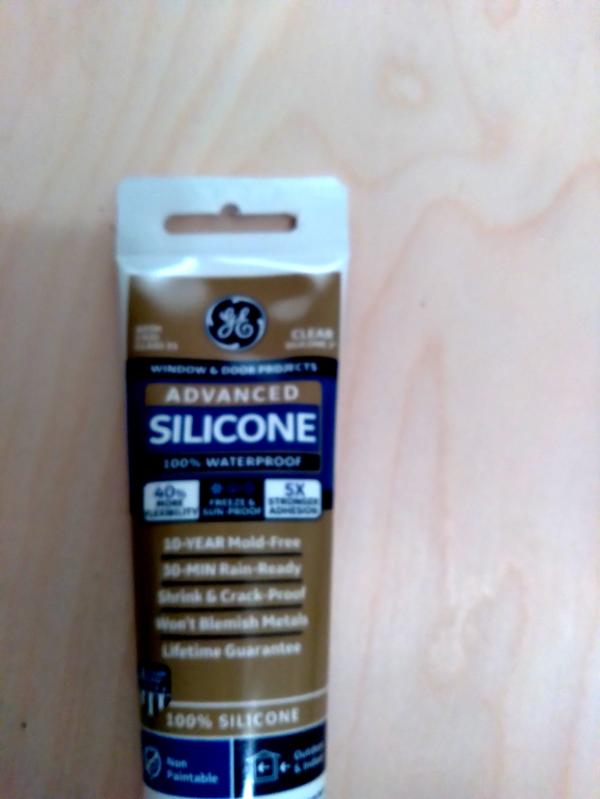
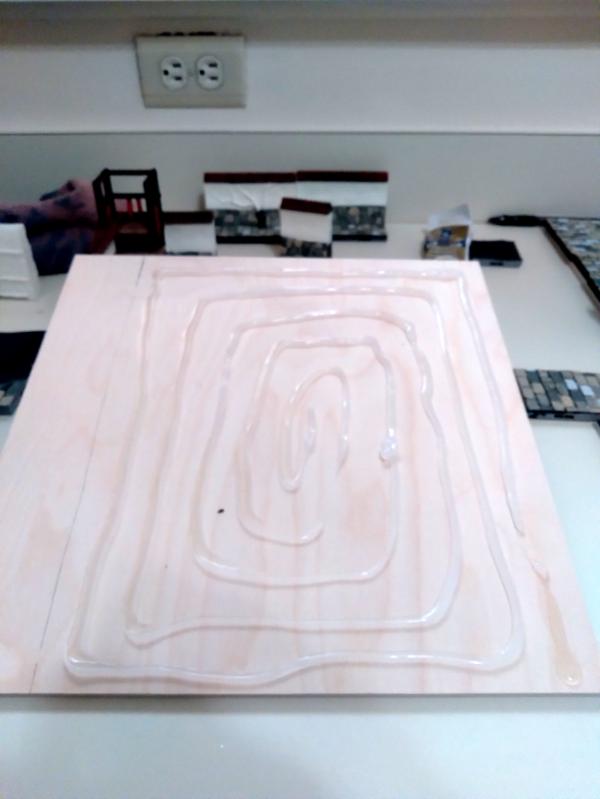
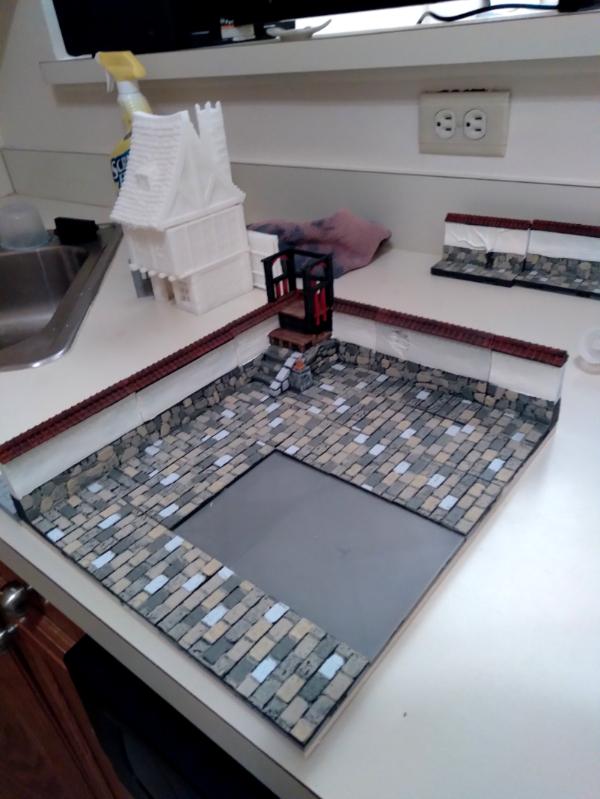
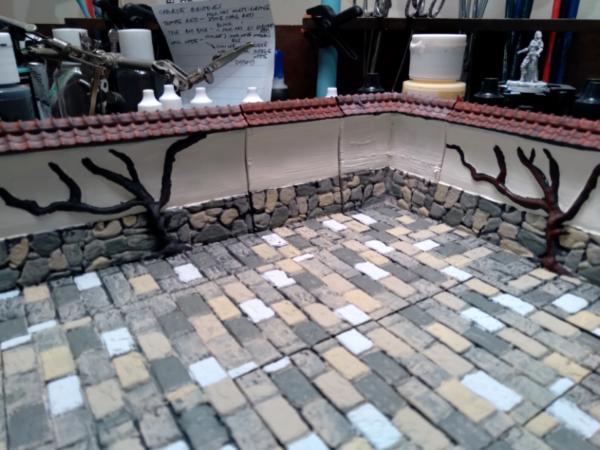
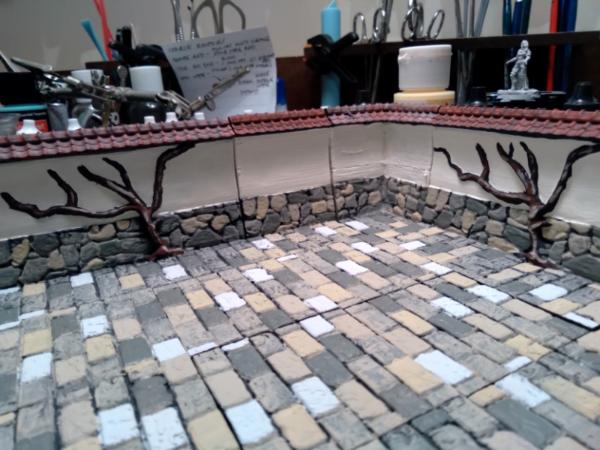
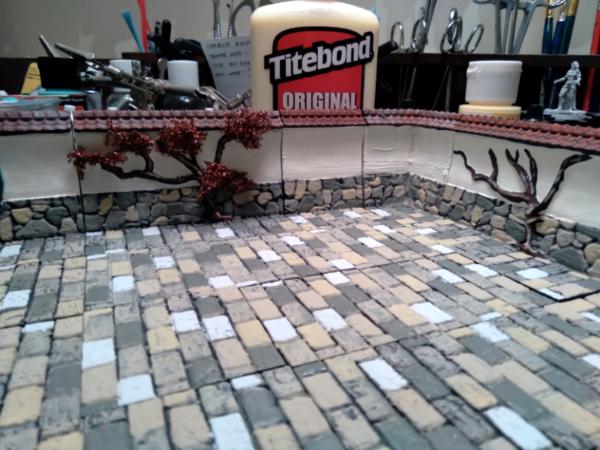
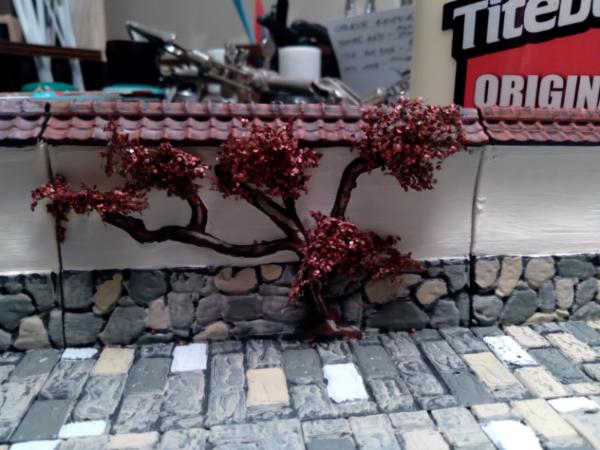
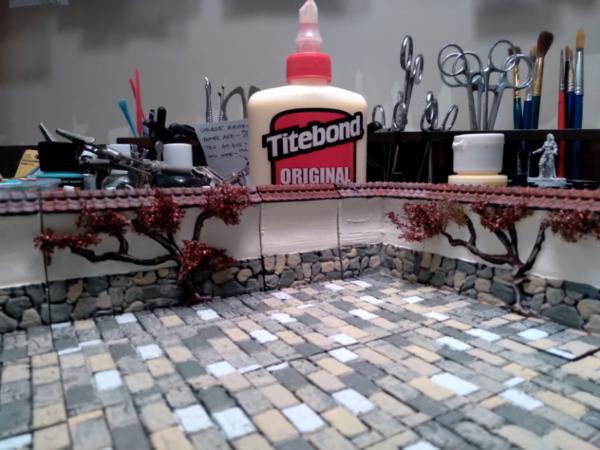
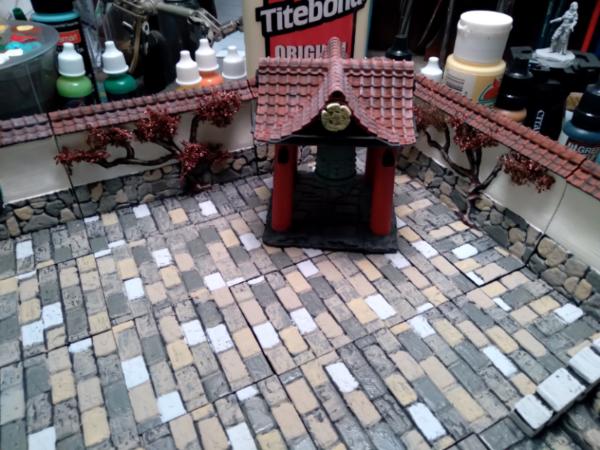
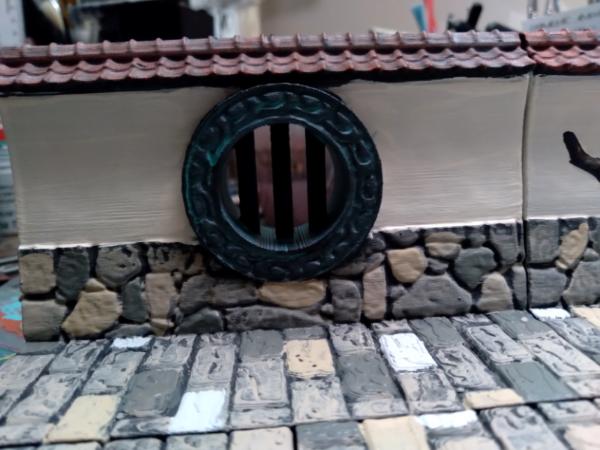
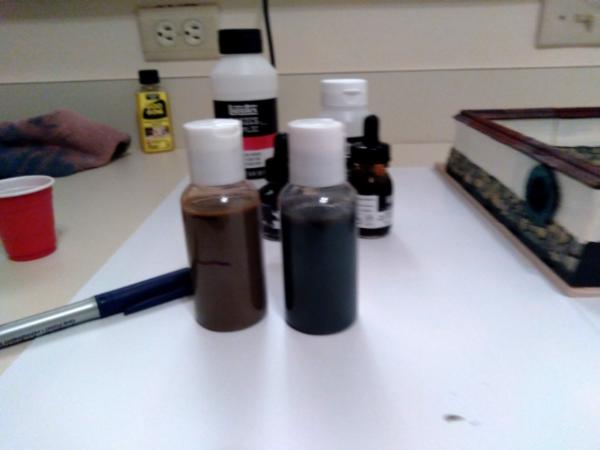
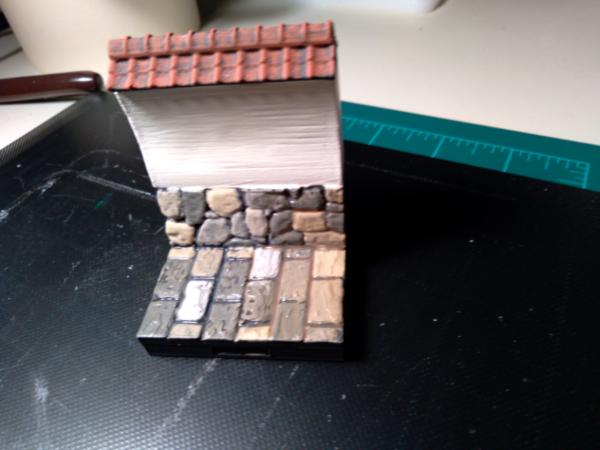
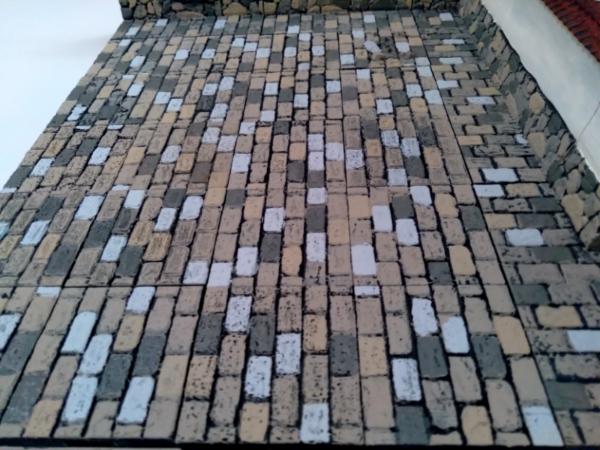

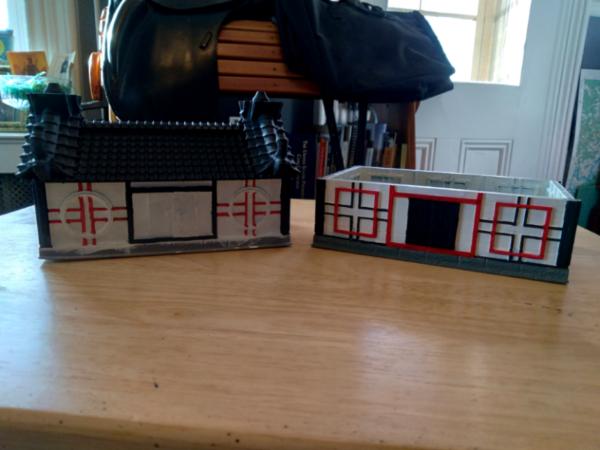
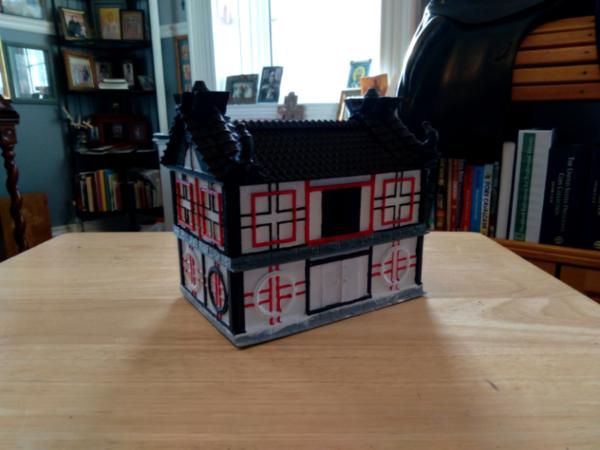
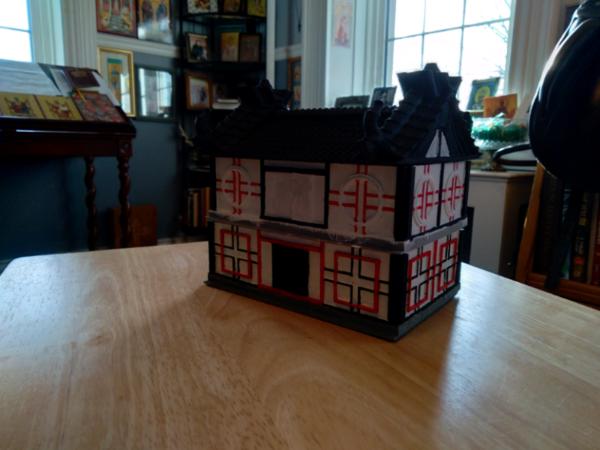
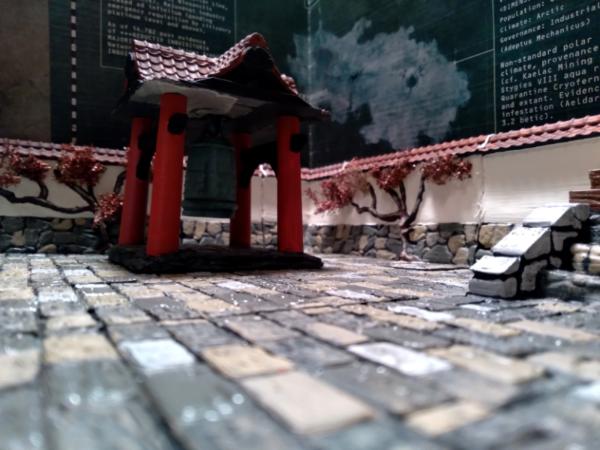


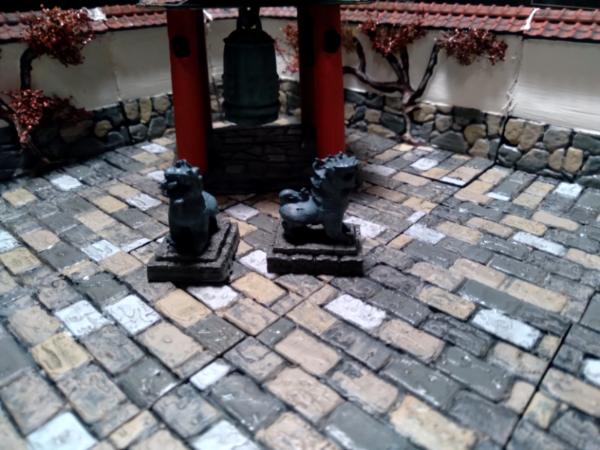
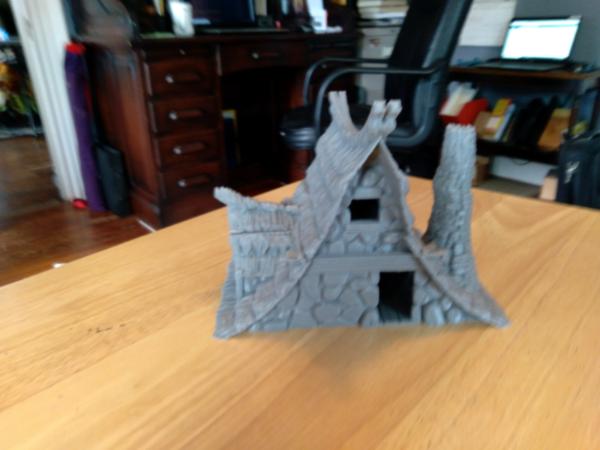
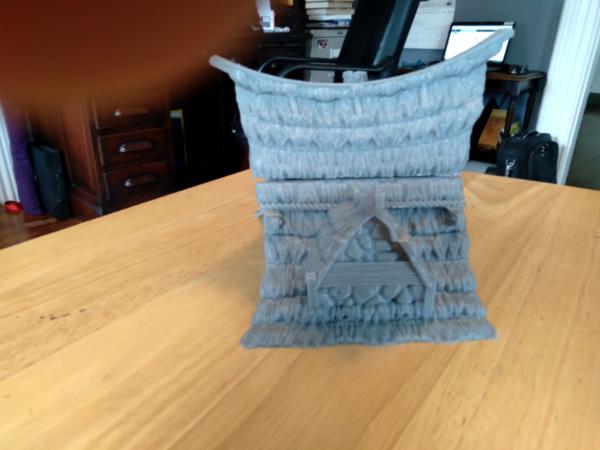
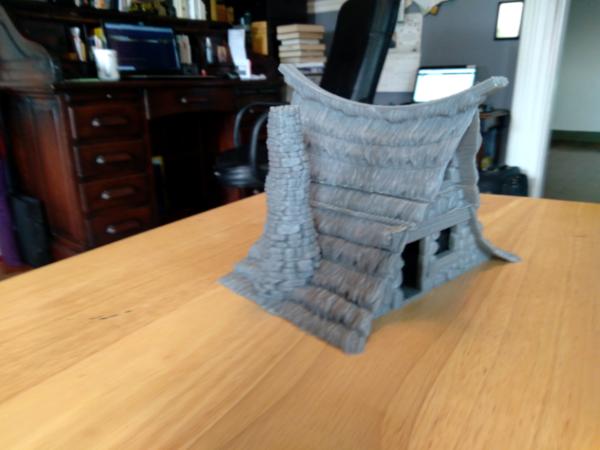
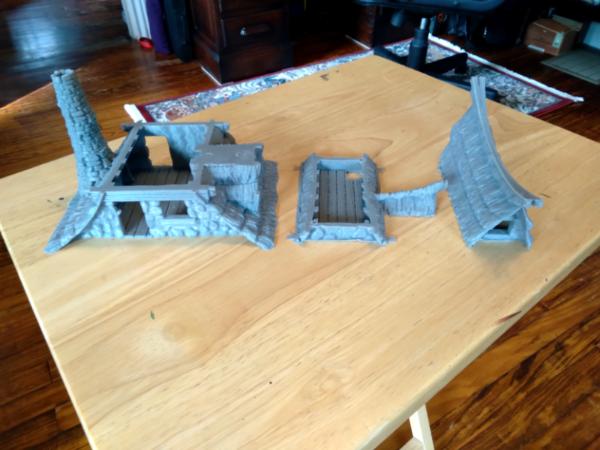
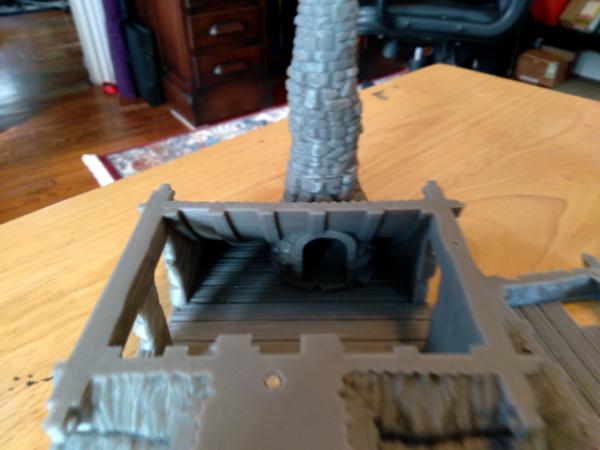

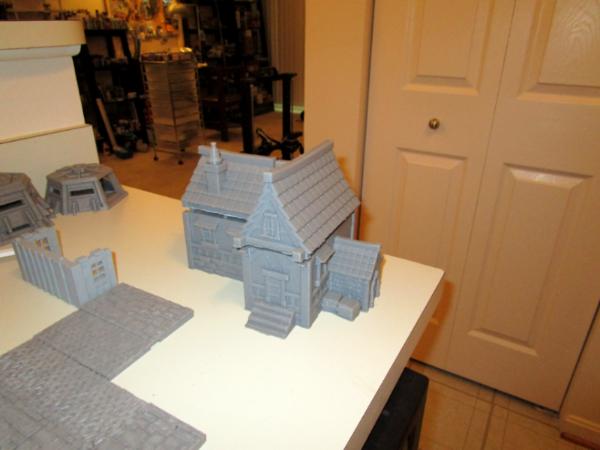
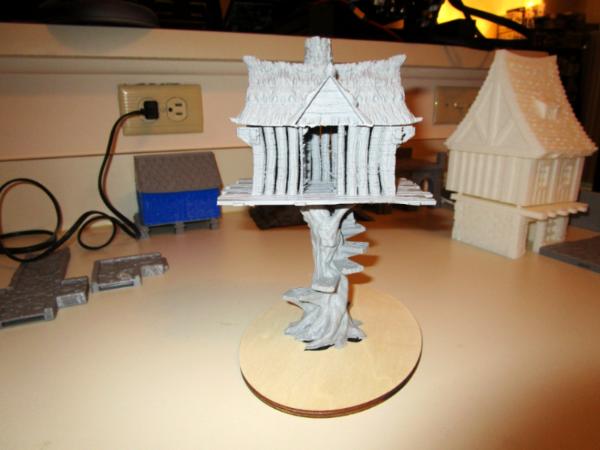

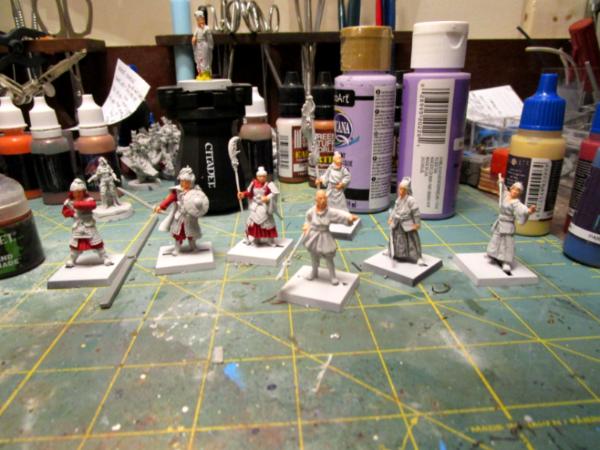
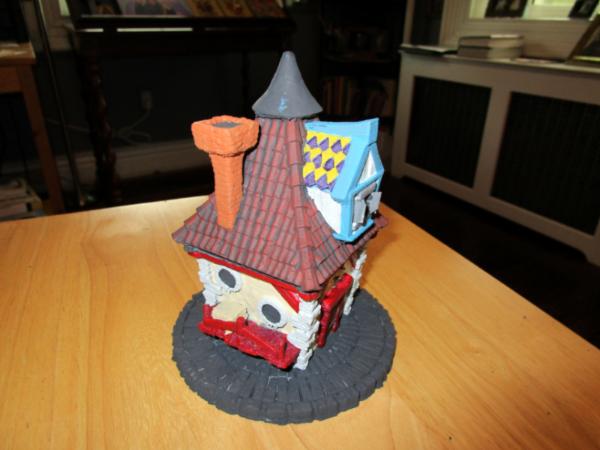

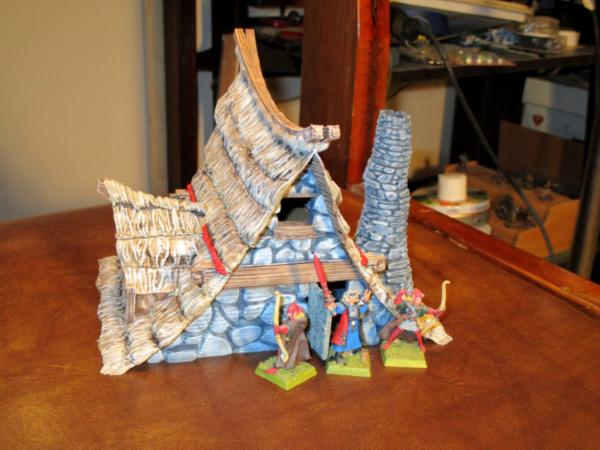

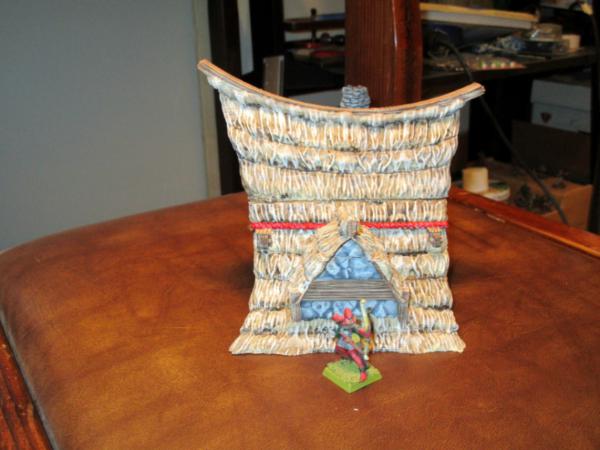
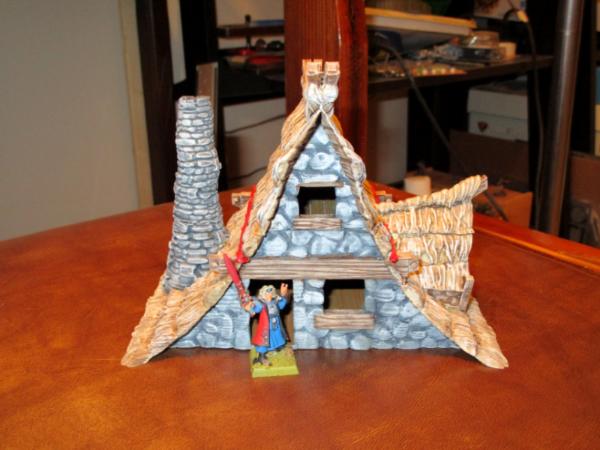
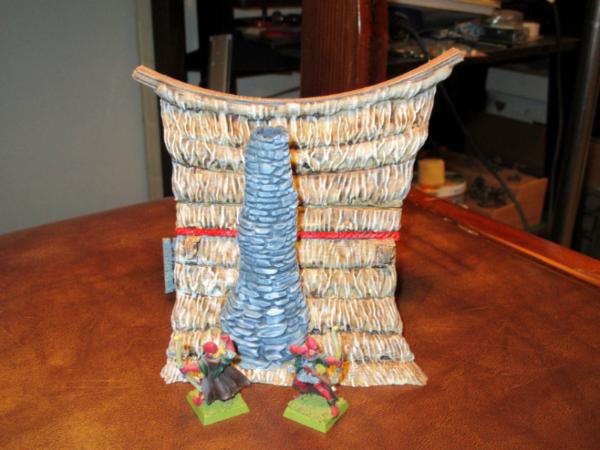
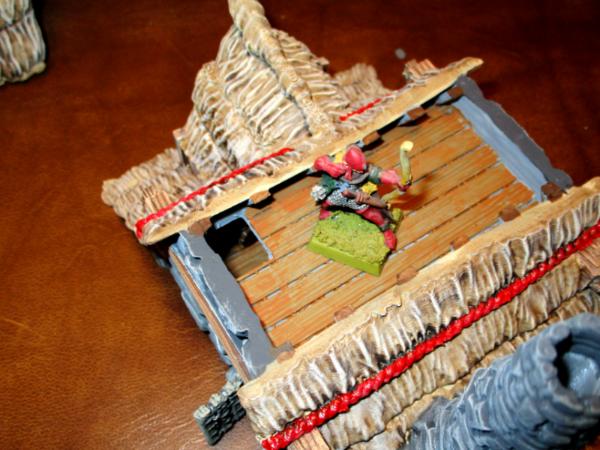
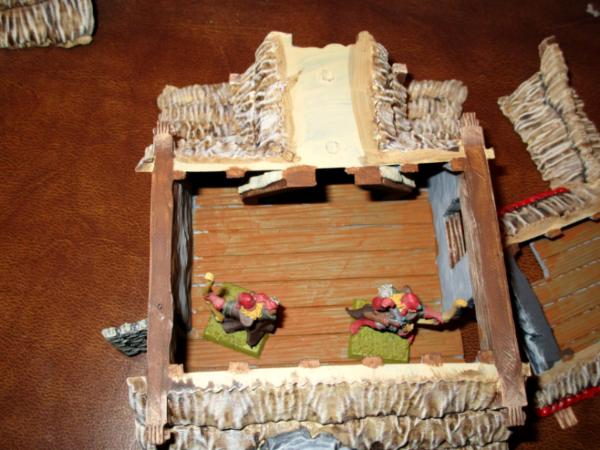

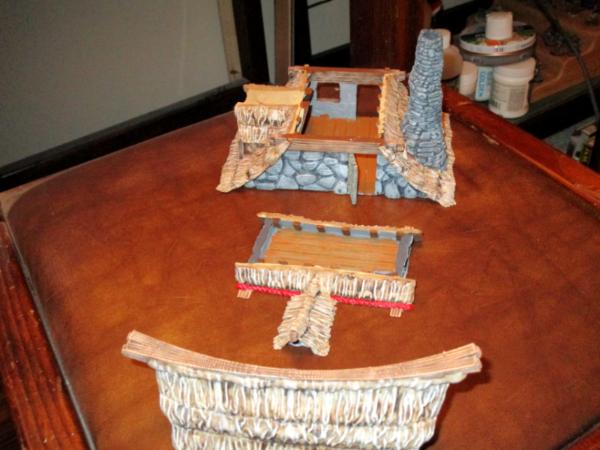

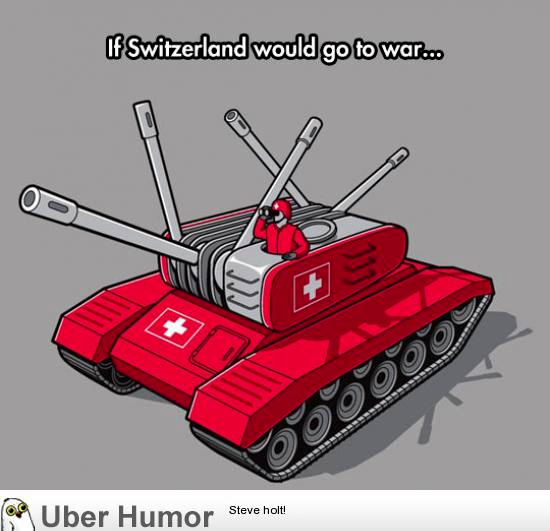
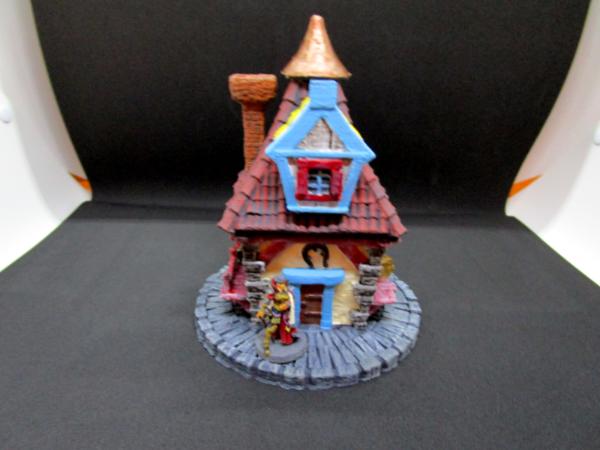
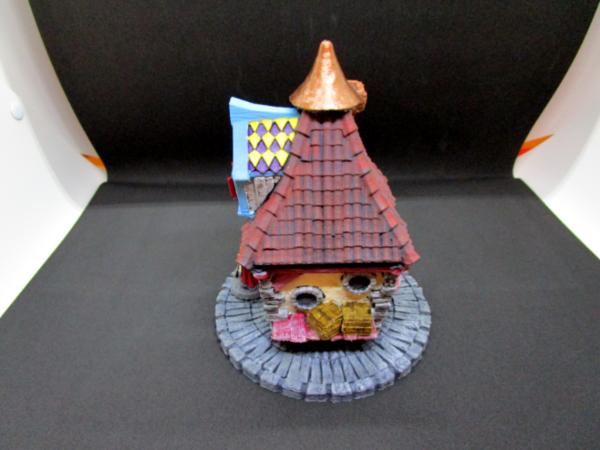
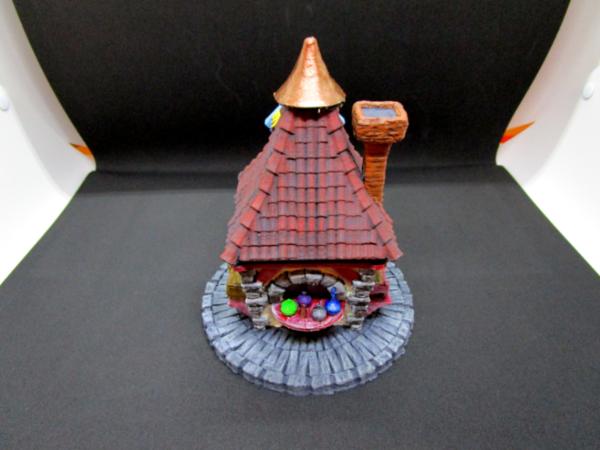
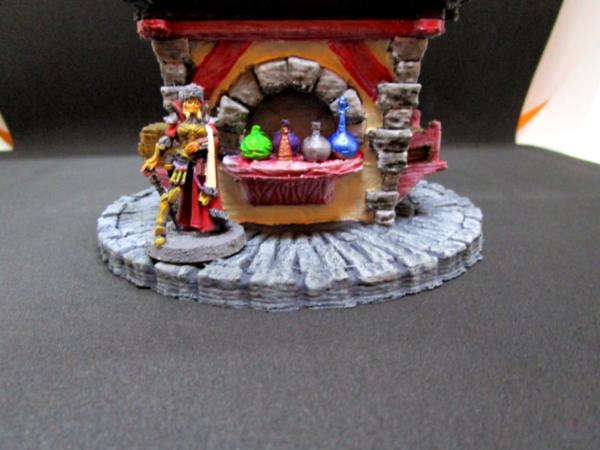

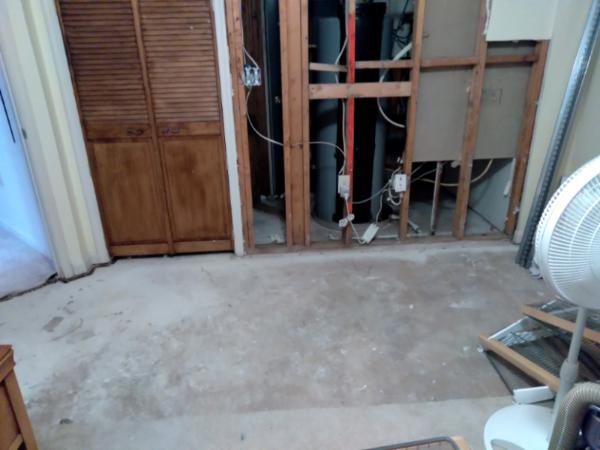
 . Good luck with this time, hopefully it goes much smoother and faster than the last "Fix".

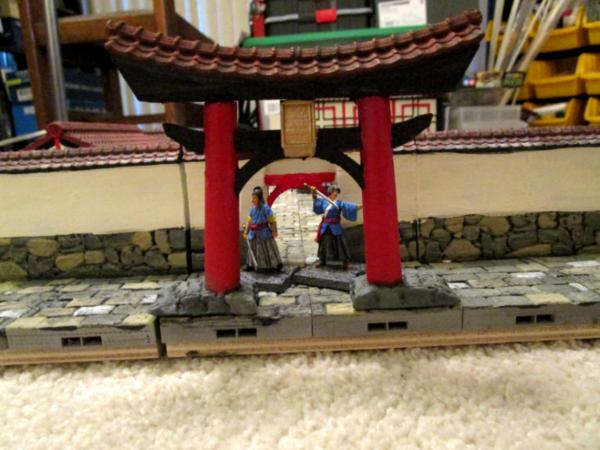
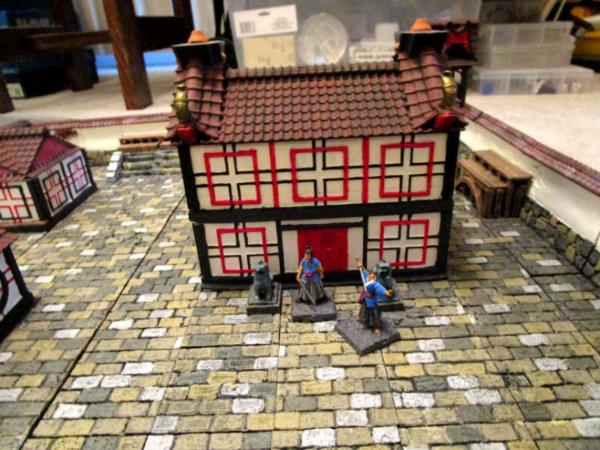
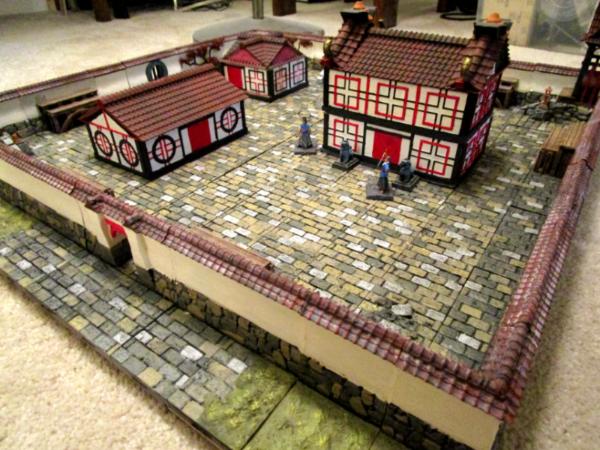
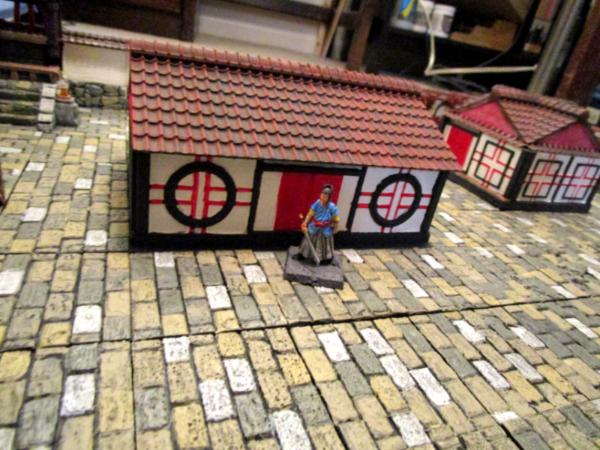
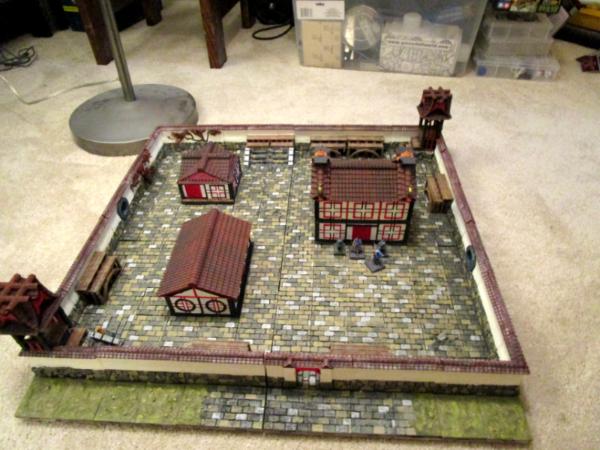
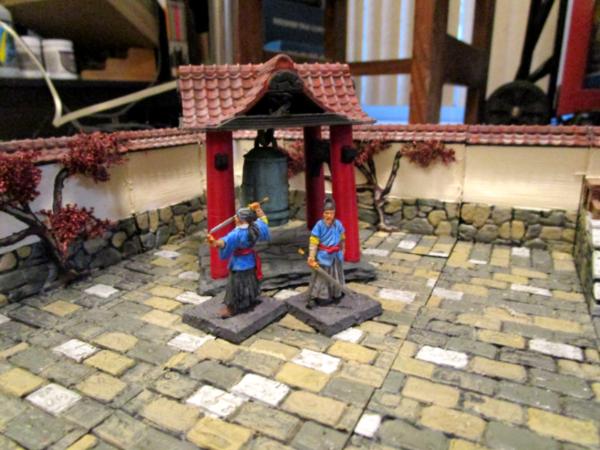

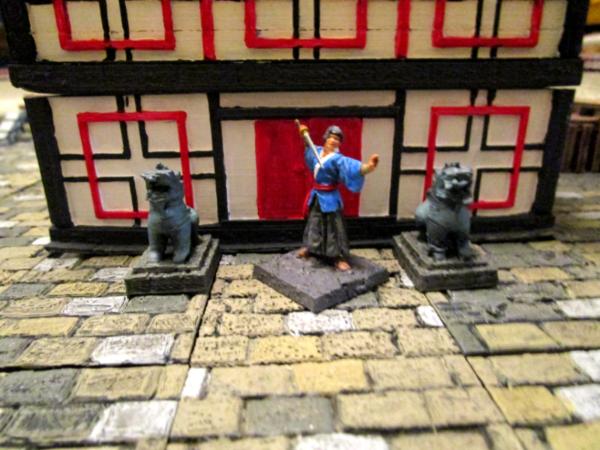
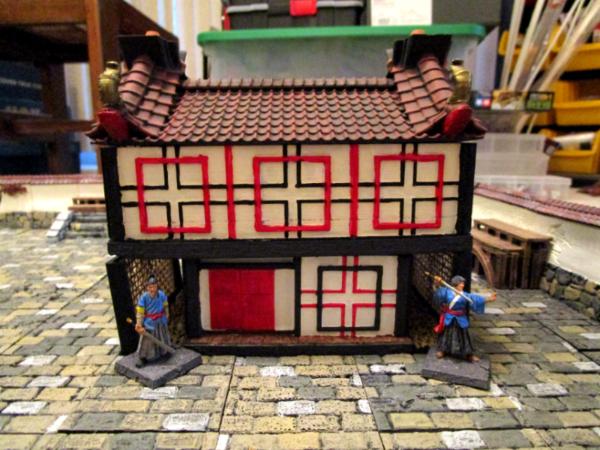
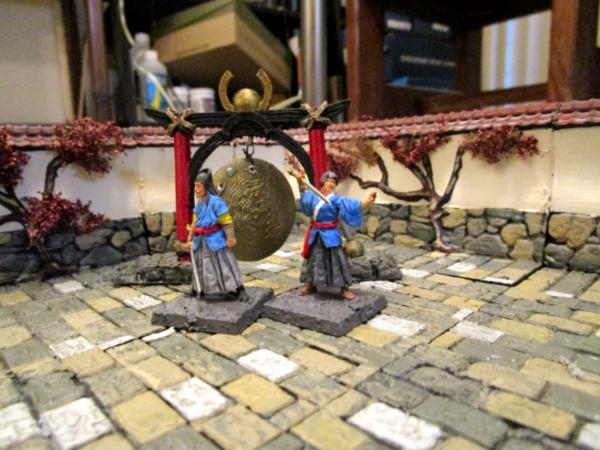
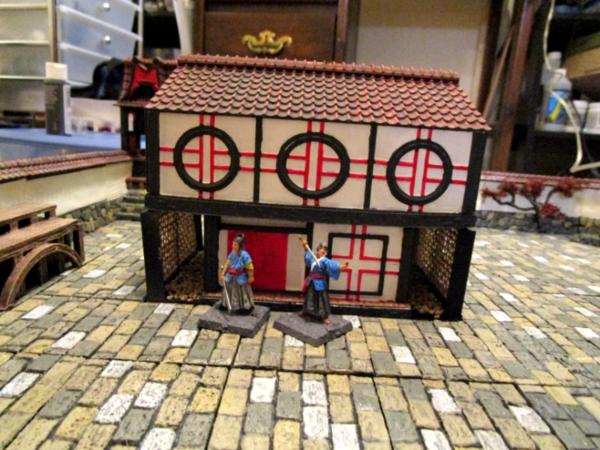
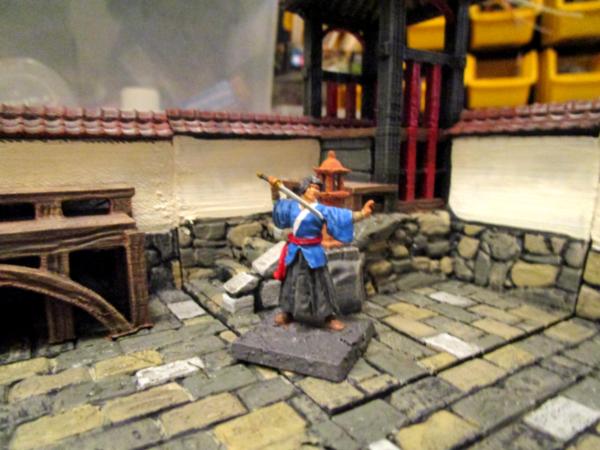
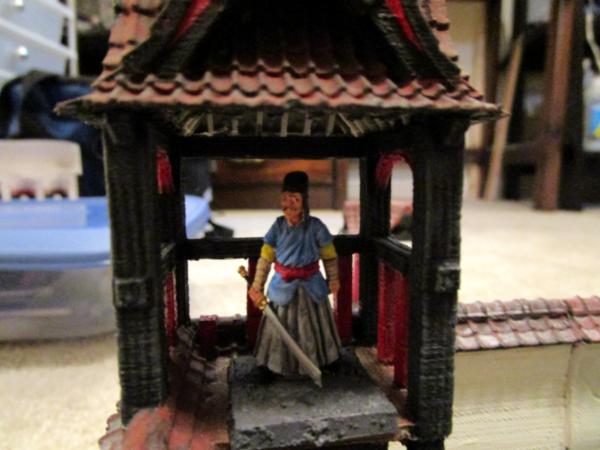
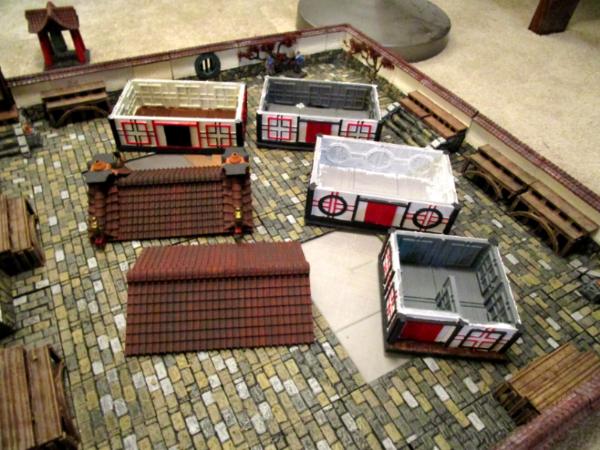
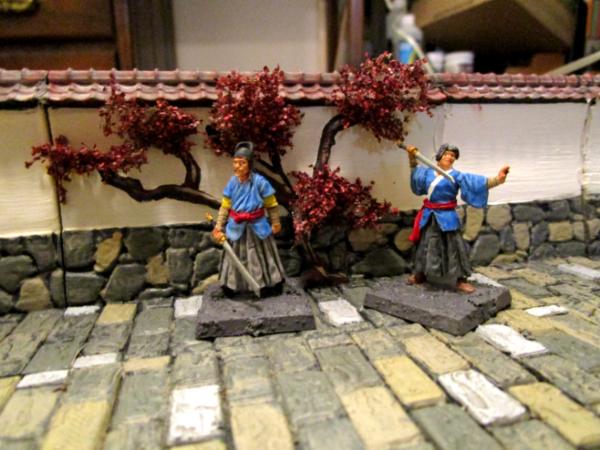
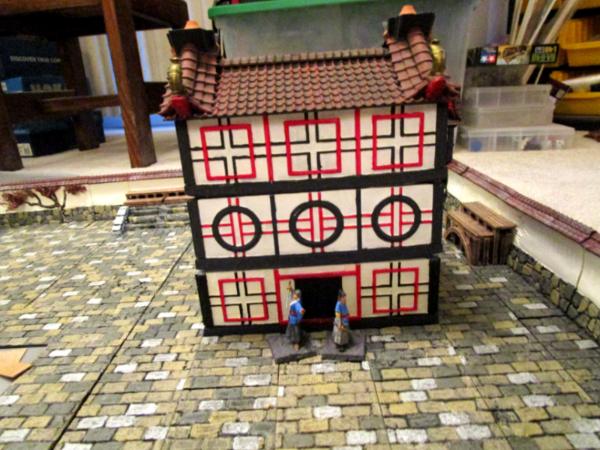
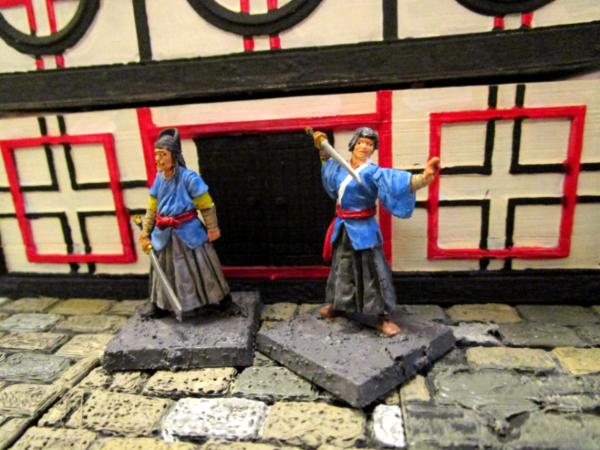
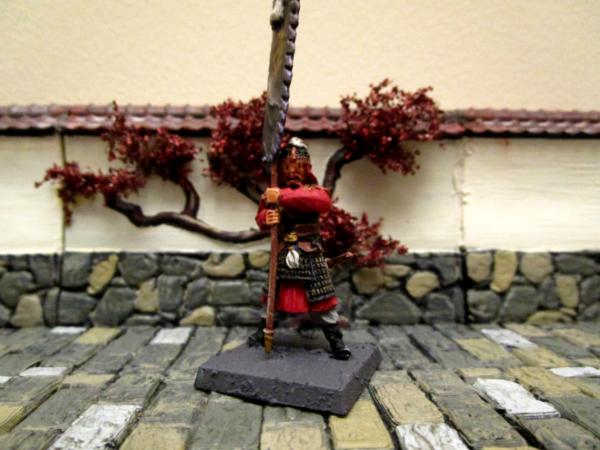
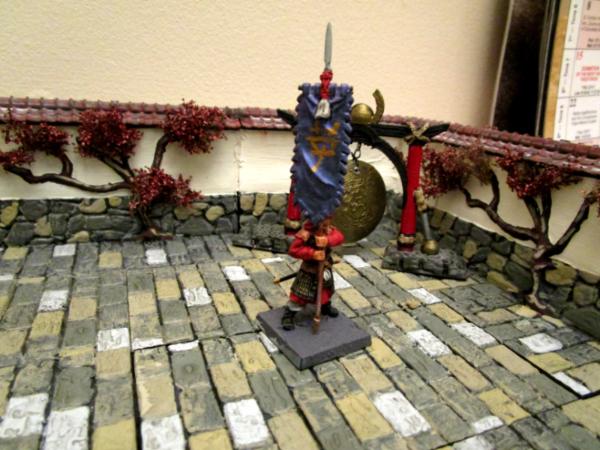

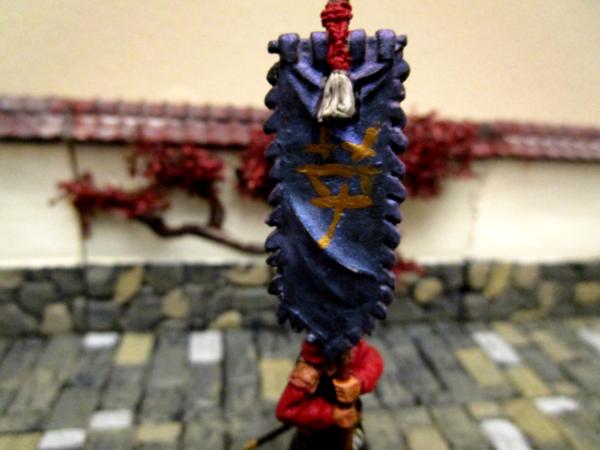
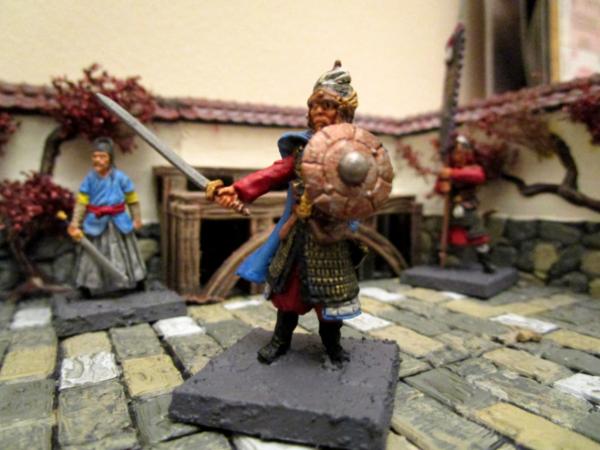
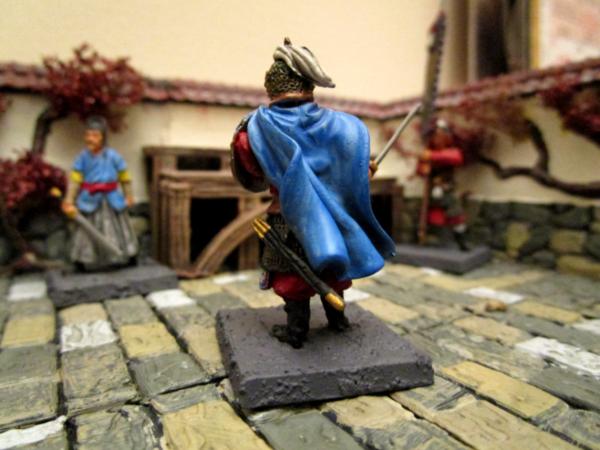
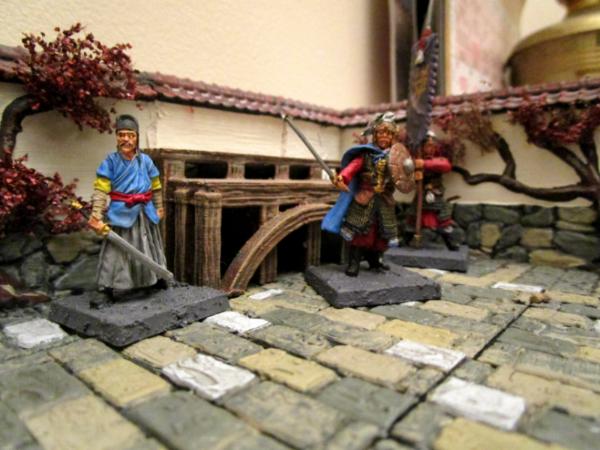
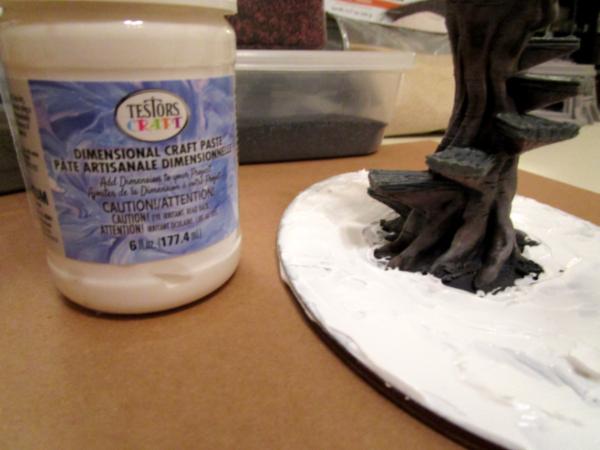
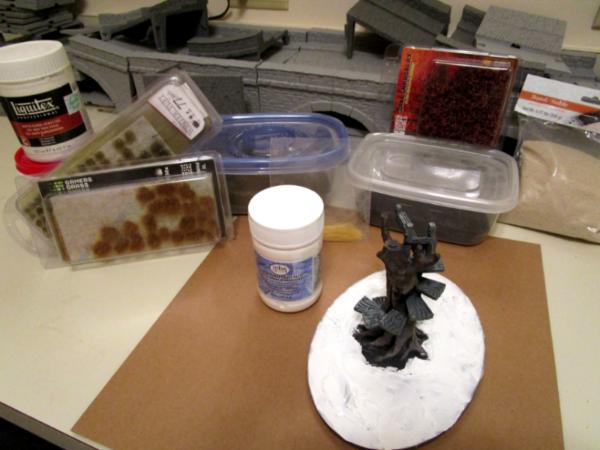
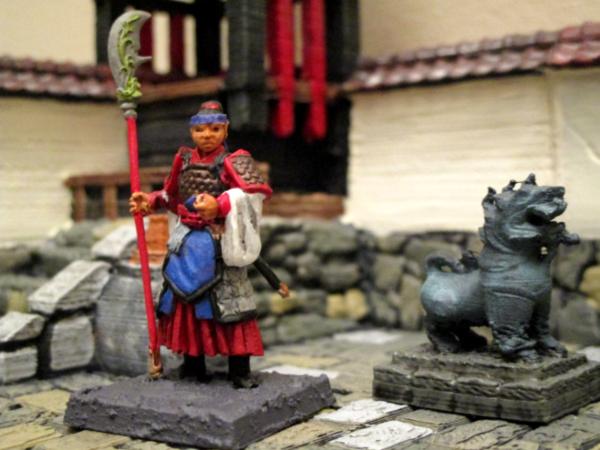
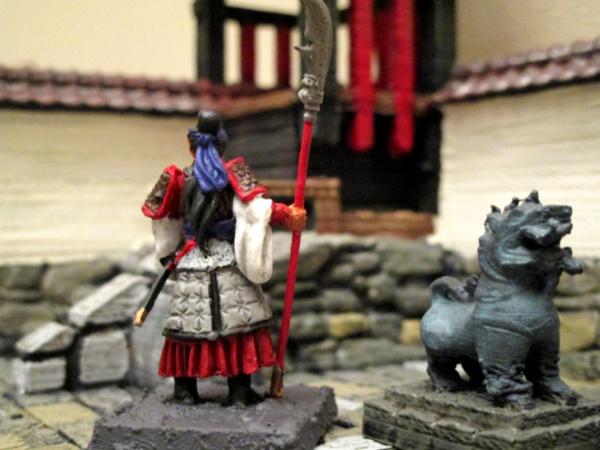
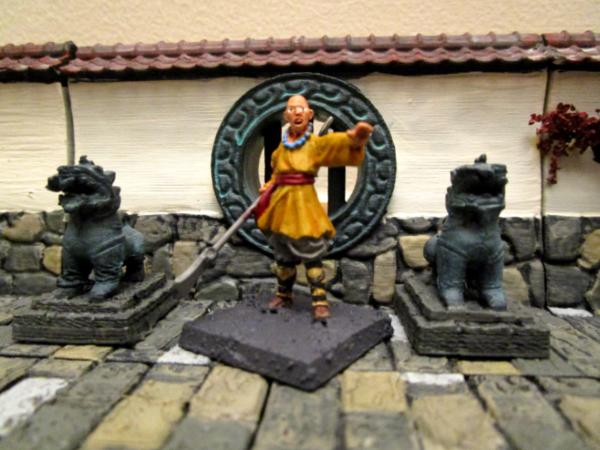
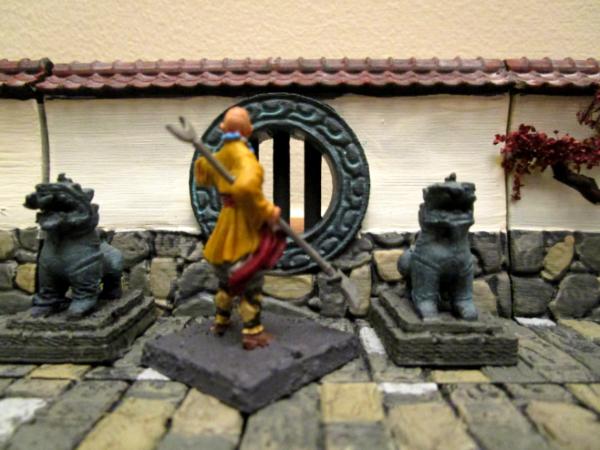
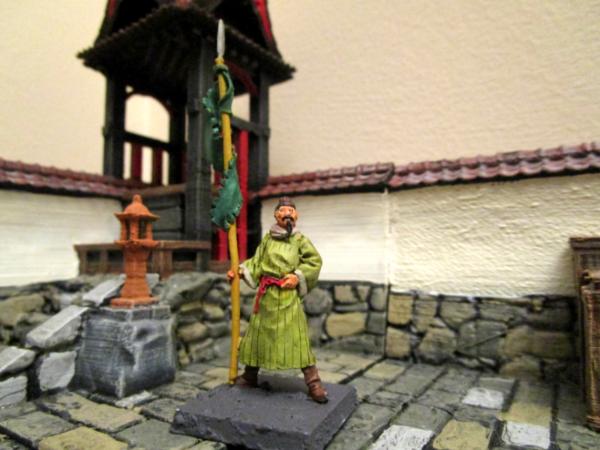
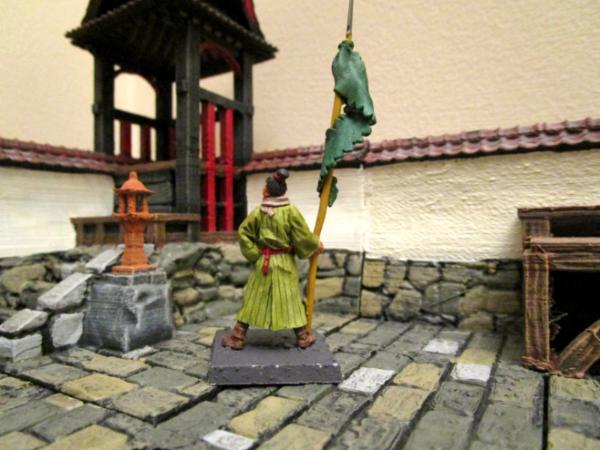
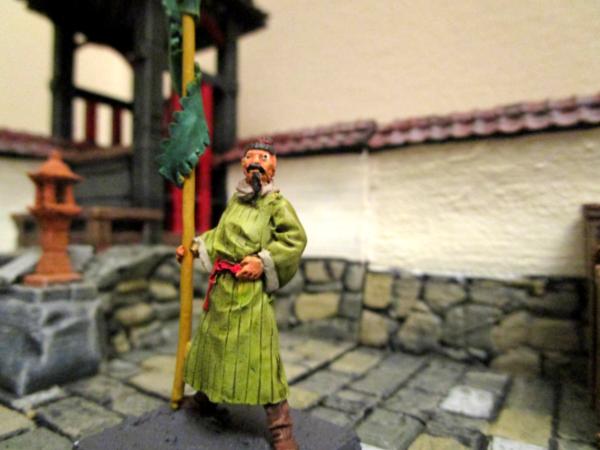
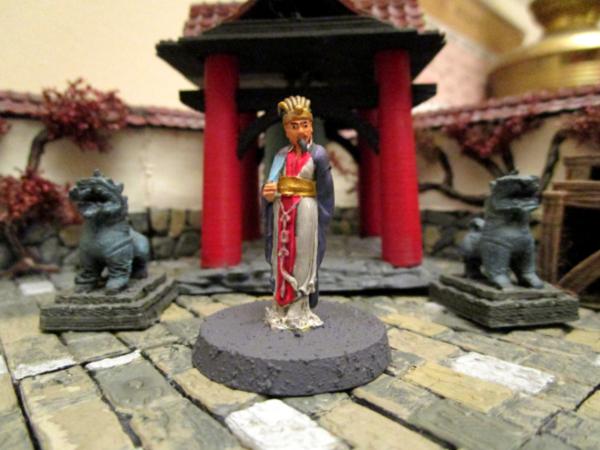
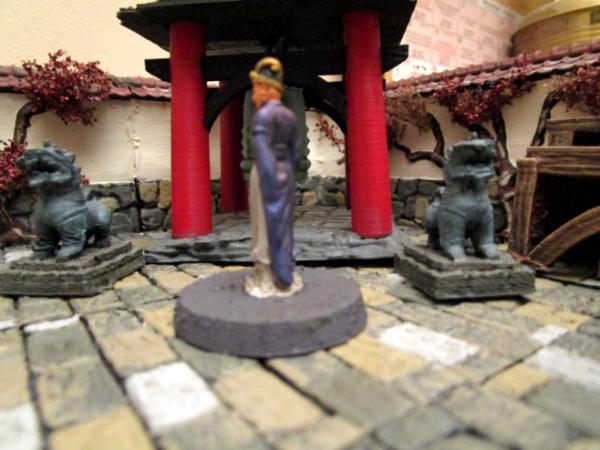
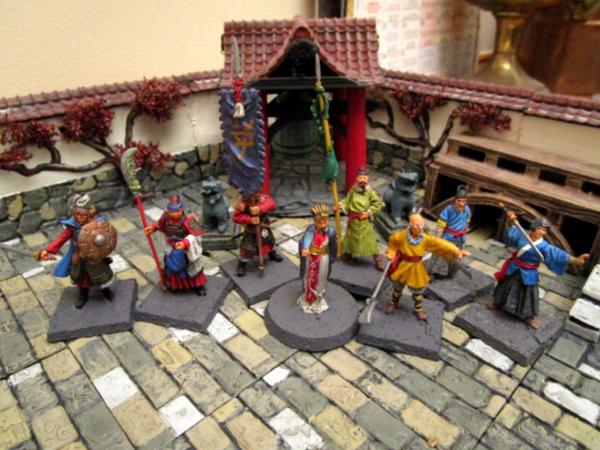

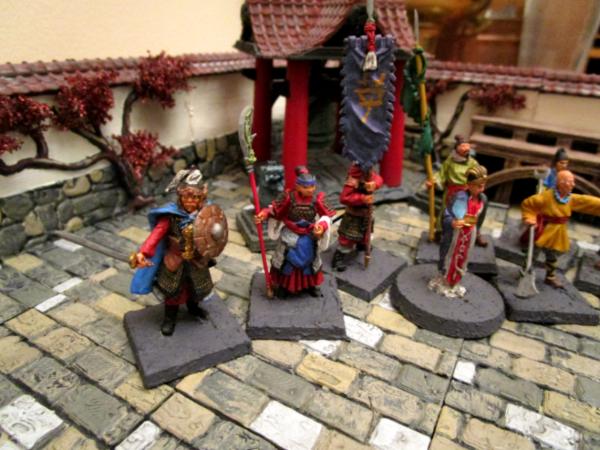
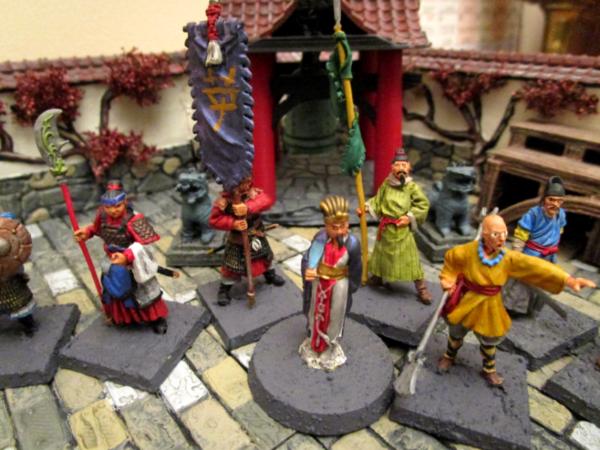
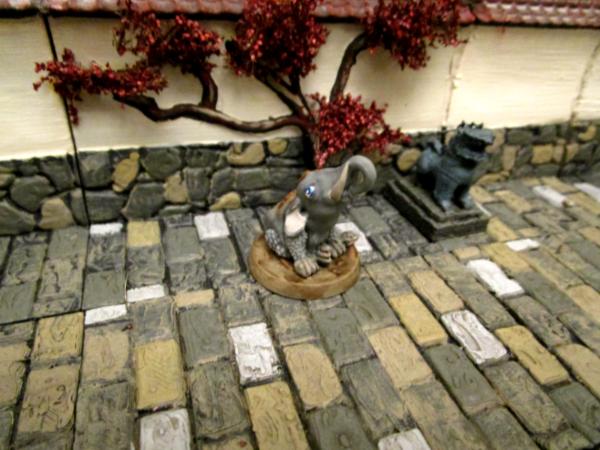
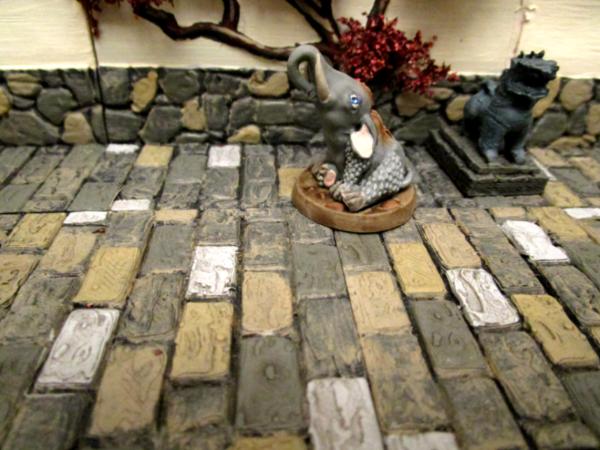
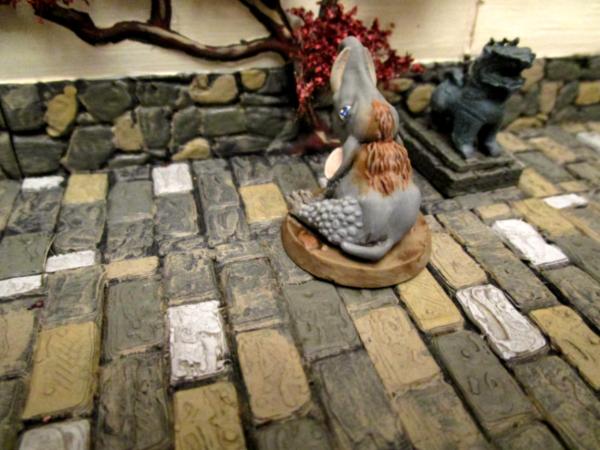
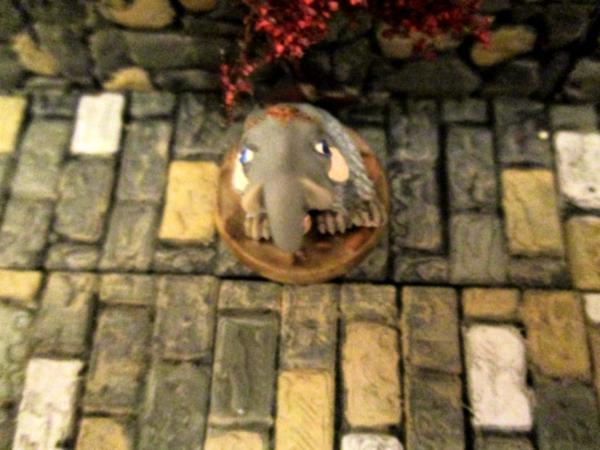
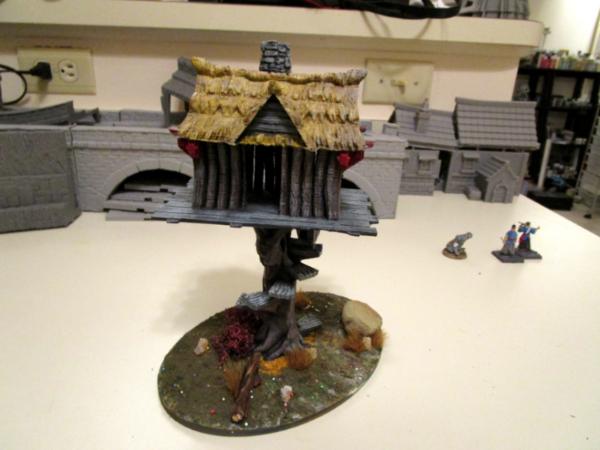


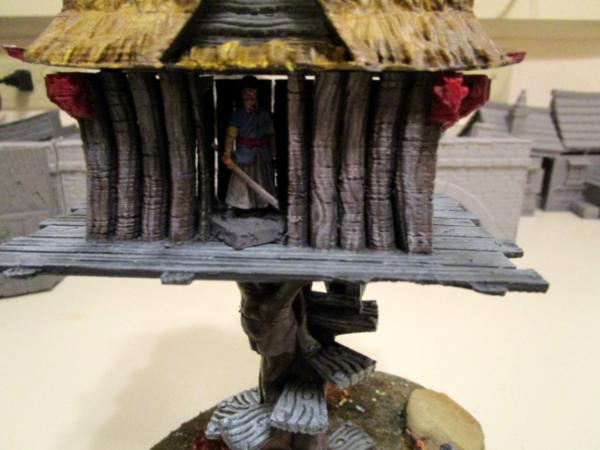
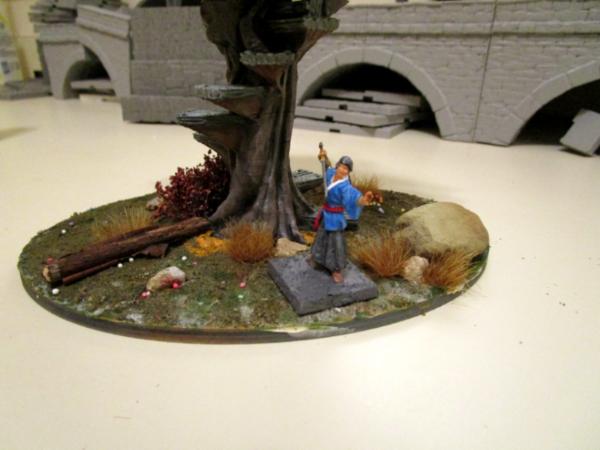
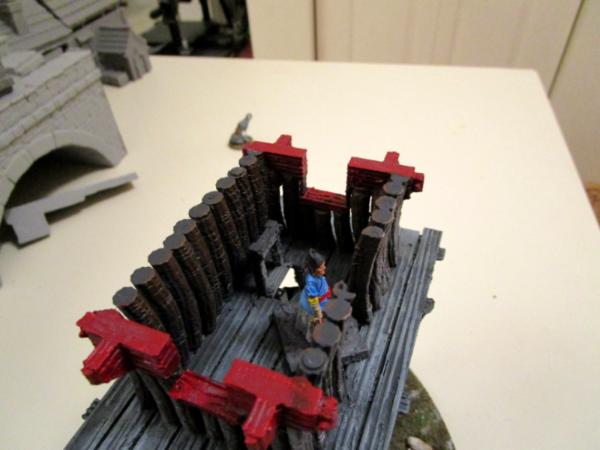

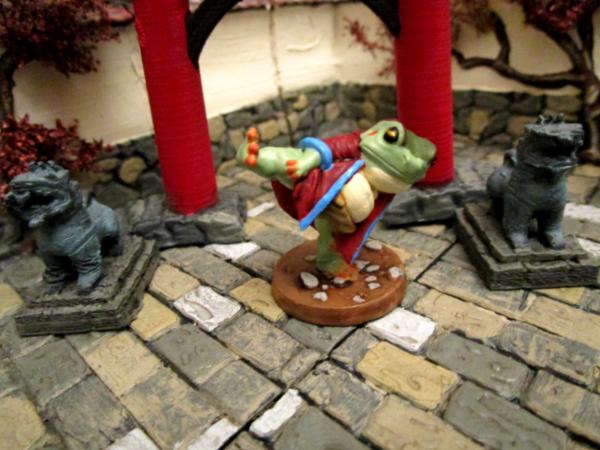
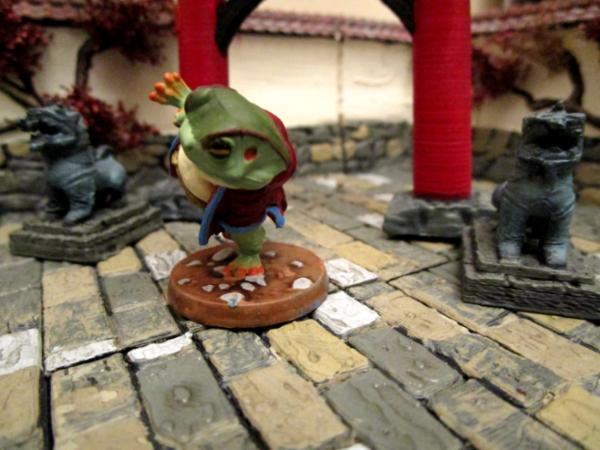
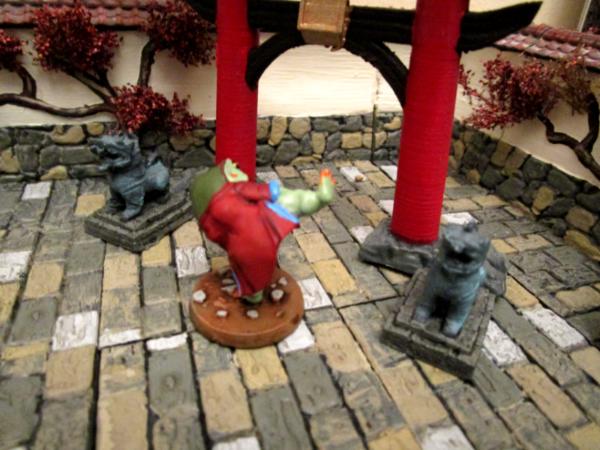
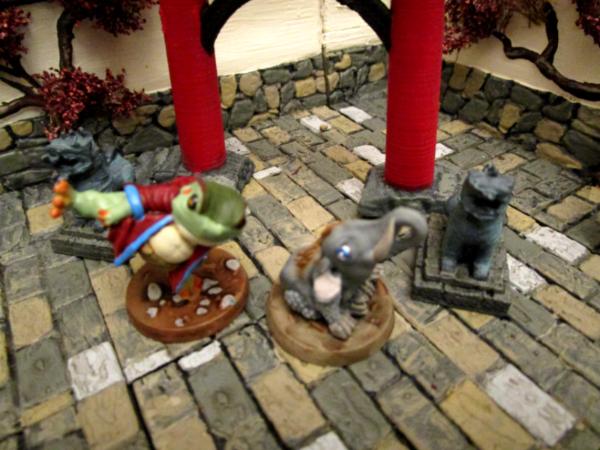

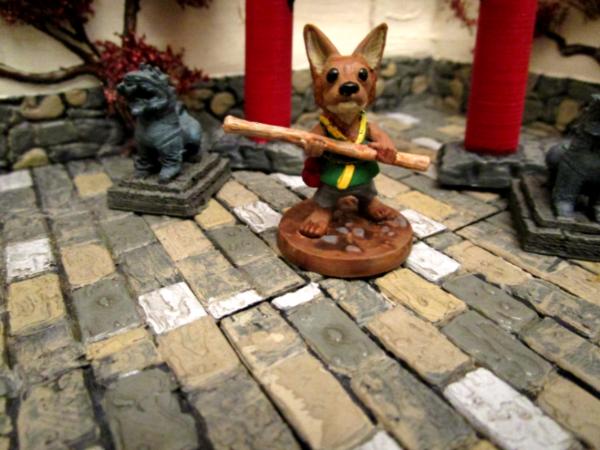
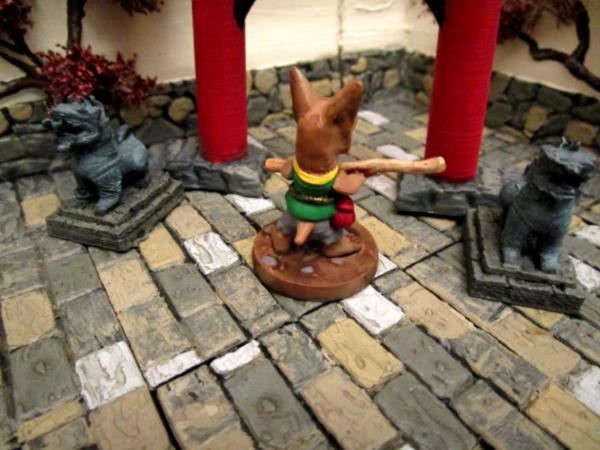


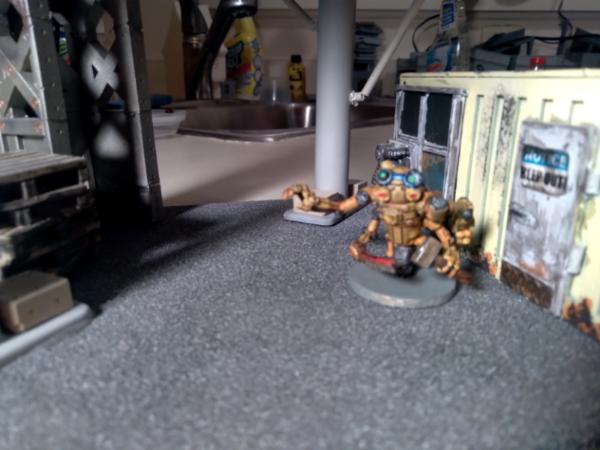
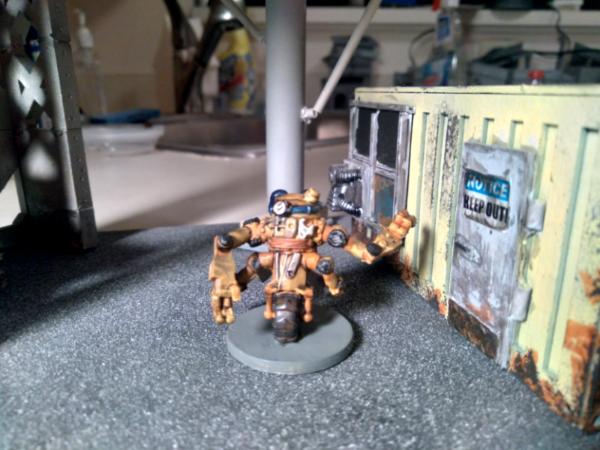
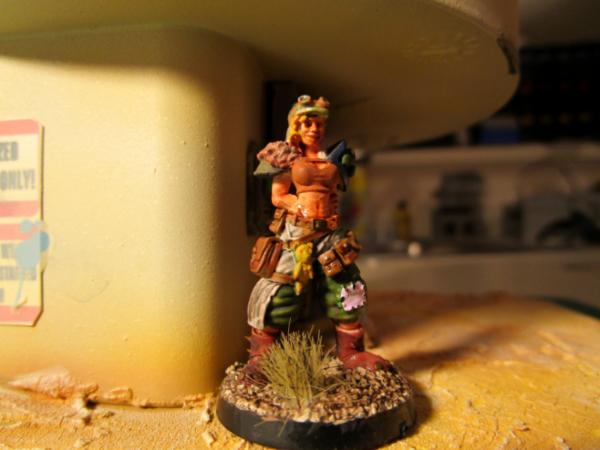
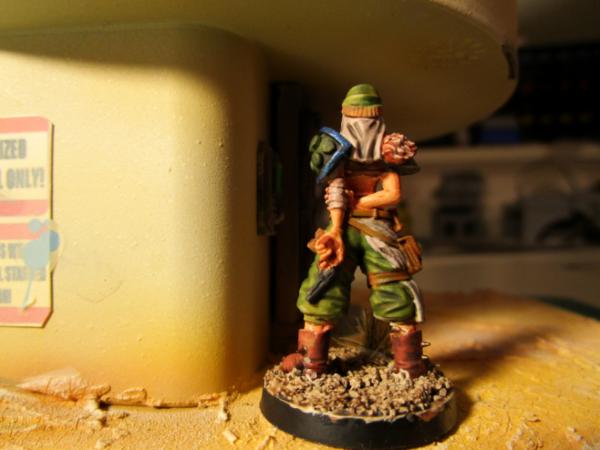

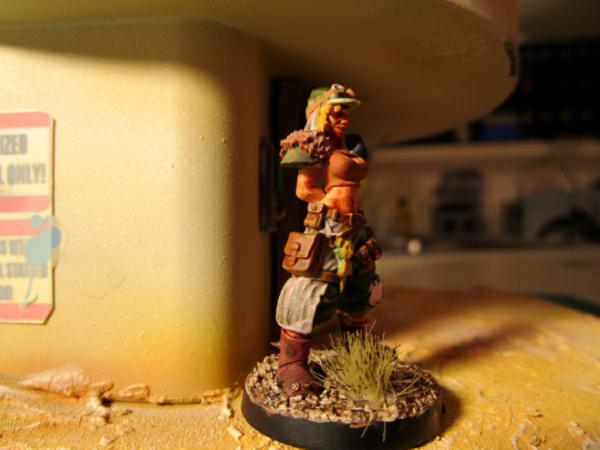


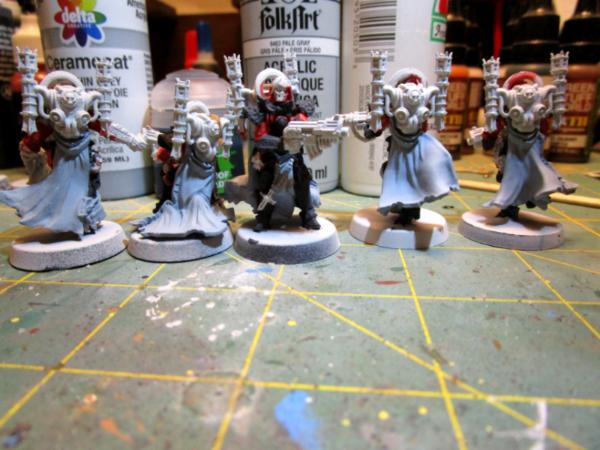
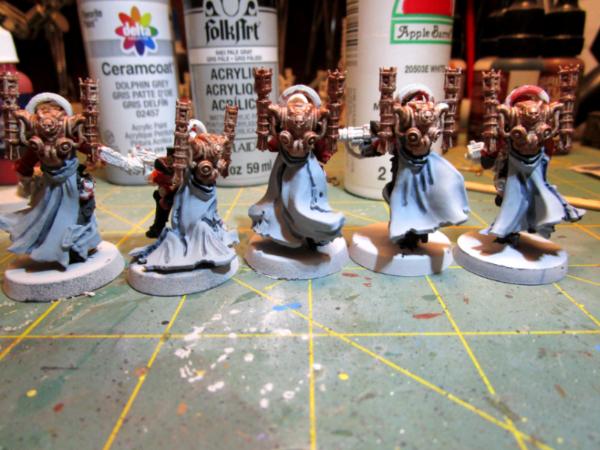
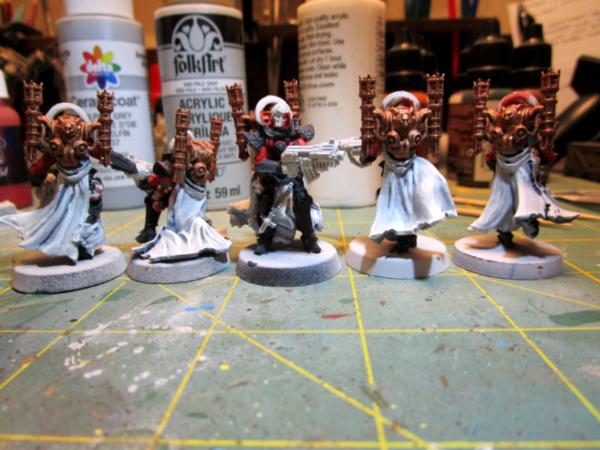
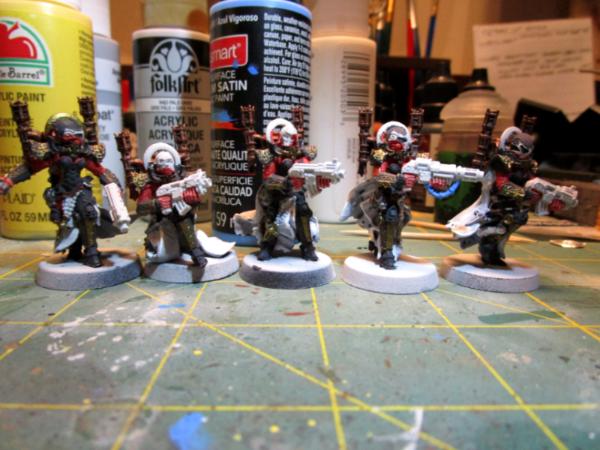
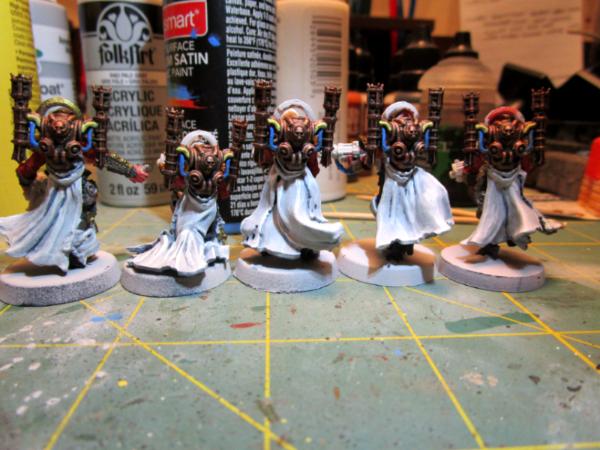
 and may as well be forbidden. But we all try nevertheless and your cloaks look great