Thanks for looking in Theo- I think the first quarter to a new year is catch up time for everyone. I do appreciate your comments.
Tehnolog is very much a variable- some of their stuff looks as if it should be for pre-toddlers, then other is very sophisticated and highly detailed. I can't tell if the company is actually that peripatetic, or if the scattershot appearance of such varied items is the natural result of the West being very much a secondary market, and we see just the tail end of various production runs, long after they are out of fashion in Russia.
I found the videos on YouTube for Robogear quite interesting. My Russian isn't enough to follow everything, but I think I was getting the gist. Lots of DakkaDakka action anyway, universal language!
Unfortunately, there is not much of catching up on my side. I barely find 15 minutes to stick together a few bits of plastic, much less to browse forum, even my favorite threads here. Sorry. :(
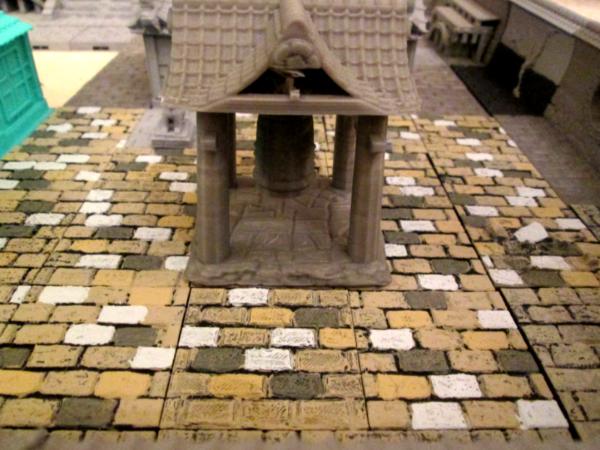
Yeah, activity on DDakka comes and goes from day to day and month to month. But it has seemed particularly quiet recently.
I put it down to myself being a bit slower with updates than how I was when I first joined. Less regular updates always leads to less comments.
And I've noted some of my "regulars" from the early years taking long breaks from DDakka from time to time, which also leads to less comments, especially when they coincide.
I personally have less time to interact on DDakka regularly, as commenting can take a long time for me. Catching up on all the blogs I follow and just leaving a simple comment can eat up hours where I "should" be "working".
Therefore I tend to go through and comment on all the "recent" blog progress in one session, every now and then.
I do read everyone's posts as they come in though, and occasionally I'll chip in advice if I have it at that time.
We just have to plod along at our own pace, keep broadcasting our endeavours when we can and comment on other's when possible.
Thanks for looking in Wirecat, Doc- fully agree and understand. And didn't mean to sound like whinging. Case in point, after a spectacular burst of energy and motivation to weeks ago, I'm now just getting back into the swing of things after illness for mother, wife then self (overlapping, but not concurrent), work changes and 'technical difficulties' with the hot water heater. I am hoping to get some real progress tonight though. And you're right- if you don't post, folks have nothing to comment on.
When I made the remark about how quiet it was here on DakkaDakka though, what I really had in mind was the gallery pages. I always go through the 'This Week' gallery- run through the first two pages to make sure nothing new has come up for me to vote on and then head to the last page and work forward until I'm in familiar territory again. At peak creativity, we'll have 50-60 pages every day; Lately, we're lucky to break into the high 30's, some days.
While some are as productive as ever, or moreso (looking at _you_ philmorgan!) it seems generally that much of Dakka is catching its breath. Probably indicative of a new Renaissance preparing to come bursting over us all!
Thank you both for taking the time to leave comments.
I think Shadowspear?Shadespear? Whatever the new main box set, will bring people out soon enough. Also a lot of big push for getting things done for adepticon. Spring breaks are starting as well, so it might be a couple weeks/ post Easter when things get rolling again.
I'm sure you're right Theo- and I may be gauging the Dakka-verse by my own (limited) productivity. Which is fixin' to change.
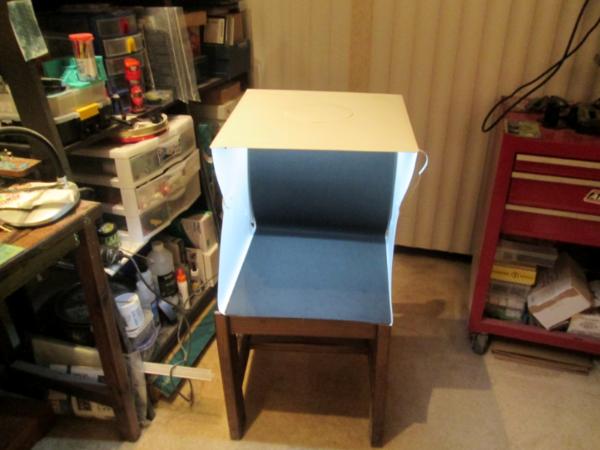
Finished up the counts-as ganger heavy weapon gal. Here's pics, and I think I did a bit better with the lighting (Aziz- LIGHT!) although it still isn't ideal. And I really need to build a board for fancy picture taking.
This is "Lust Xenia" from the Heresy Labs Heresy Girls 1.0 kickstarter campaign. I really like these figures: they are a very glue-able resin, the detail is extraordinarily fine, the articulation is excellent and they are smokin' hot (shades of Pygmalion washing over me). And through the Kickstarter, I got them at an awesome price. He's got another coming out on 26 March- Imperial Assassin types amongst other things.
New things:
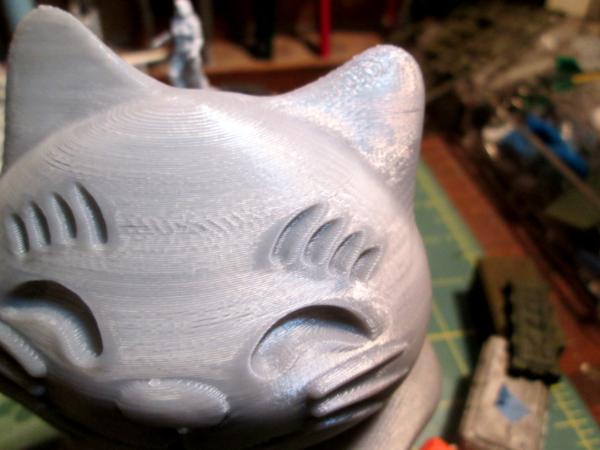
* Had another whack at doing eyes and more broadly, the face. I think this one is better, but more practice needed, in my own opinion
* I've never tried an Escher-type figure before, so getting to play with colors other than Standard Army was fun
* I've never tried to do a figure with so much skin flashing; fortunately, had White Dwarf Issue November 2017 as a guide
*Never tried to put so much detail into a weapon
So there it is. I'm excited to go on to other figures from the Heresy Girls 1.0 Kickstarter, but I've got a couple (okay, three) projects all underway at once first:
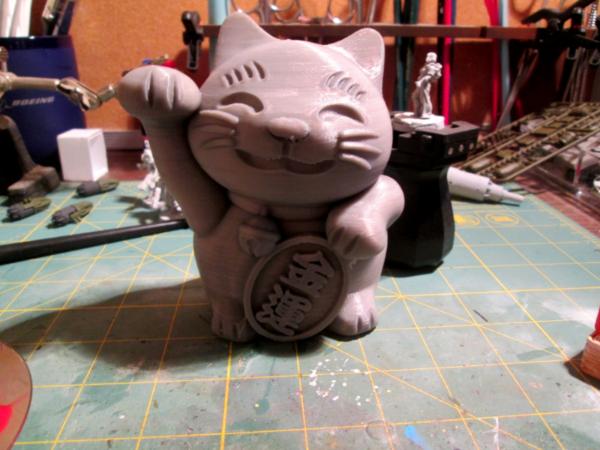
*The giant killer robot of death from Tehnolog
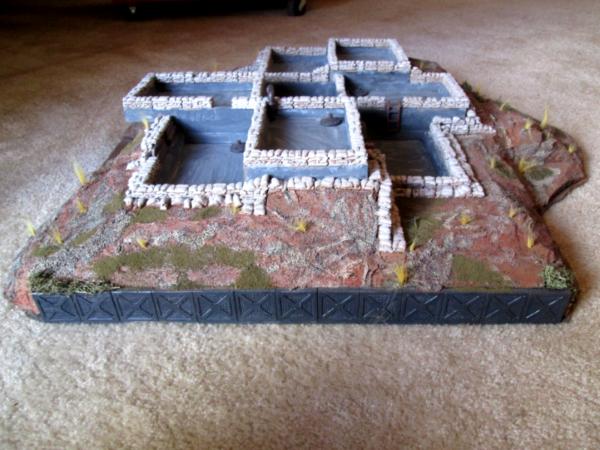
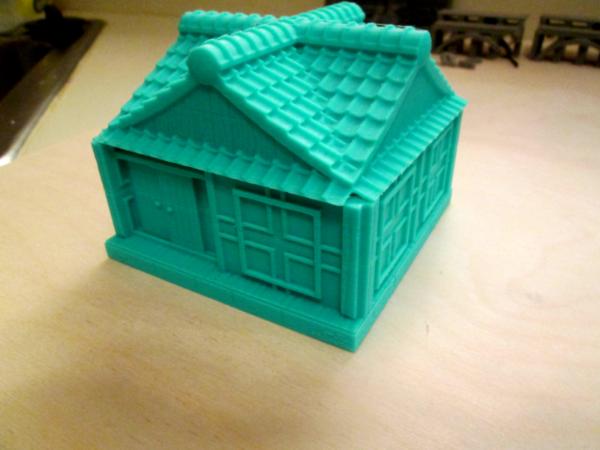
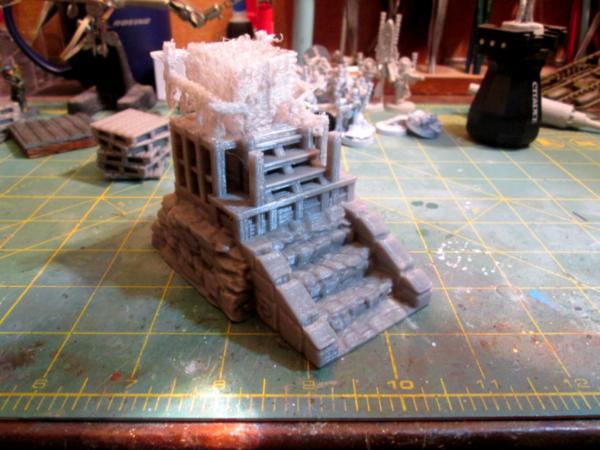
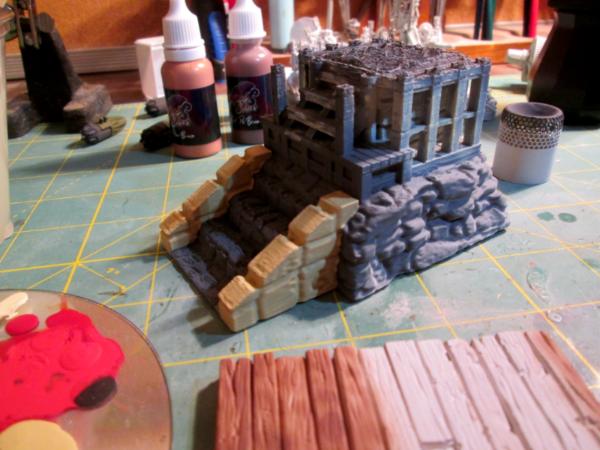
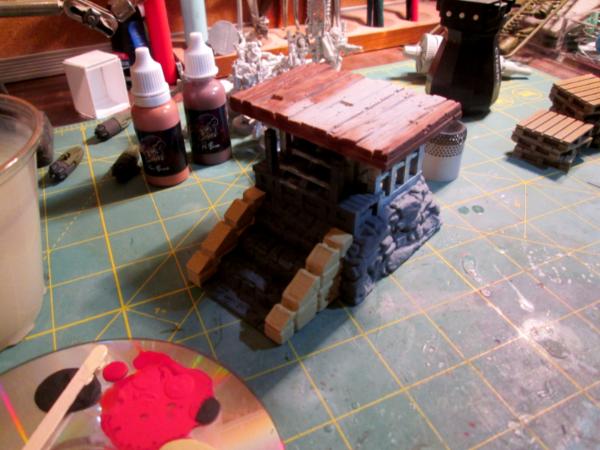
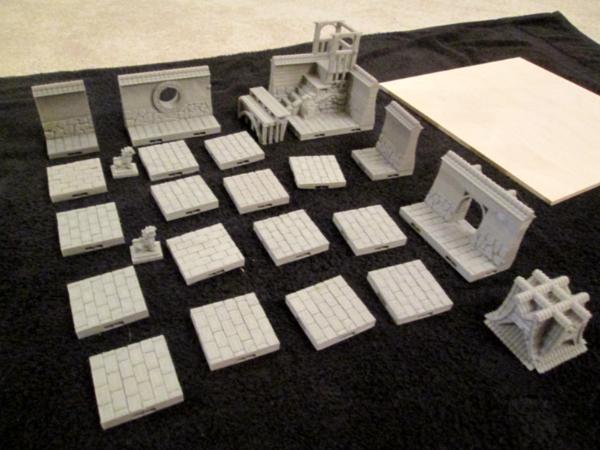
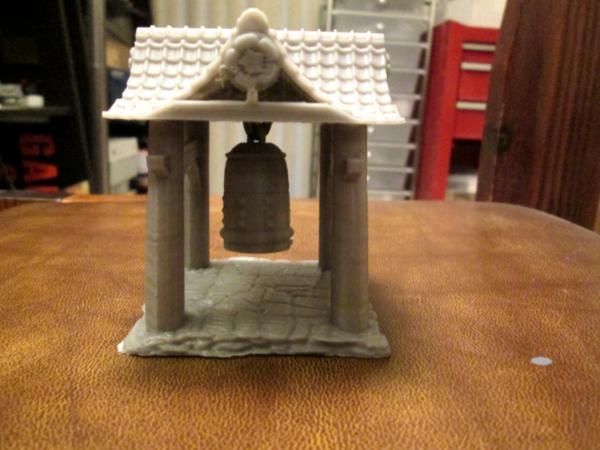
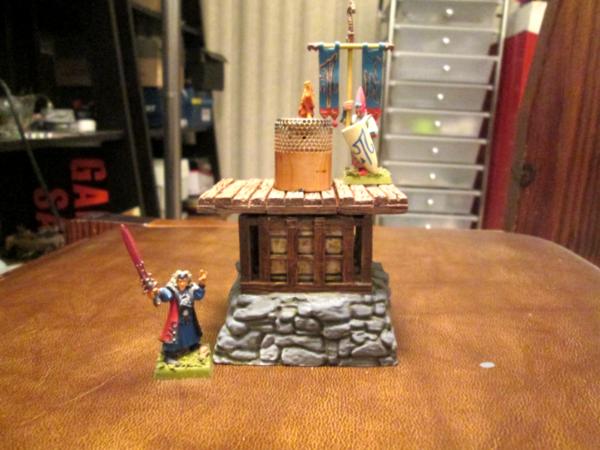
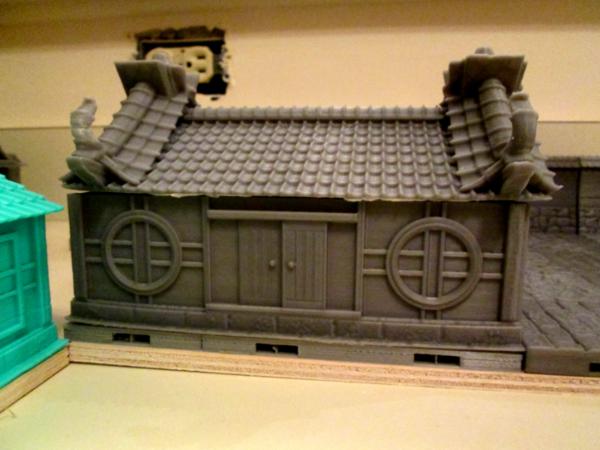
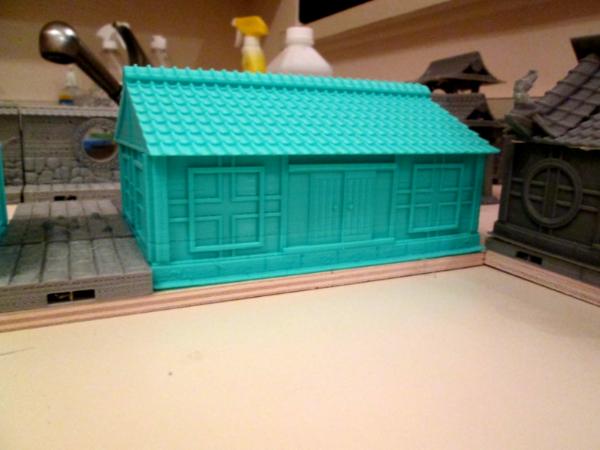
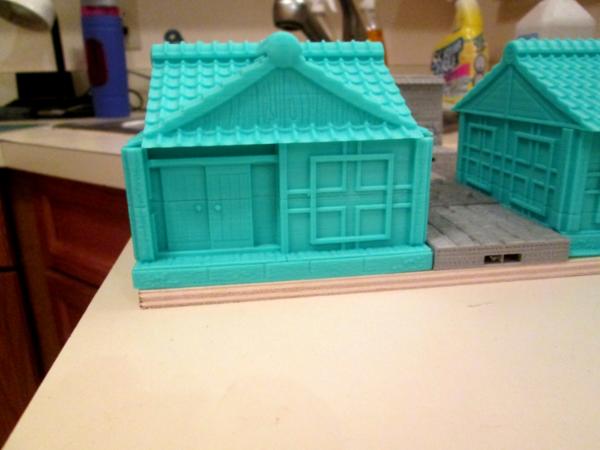
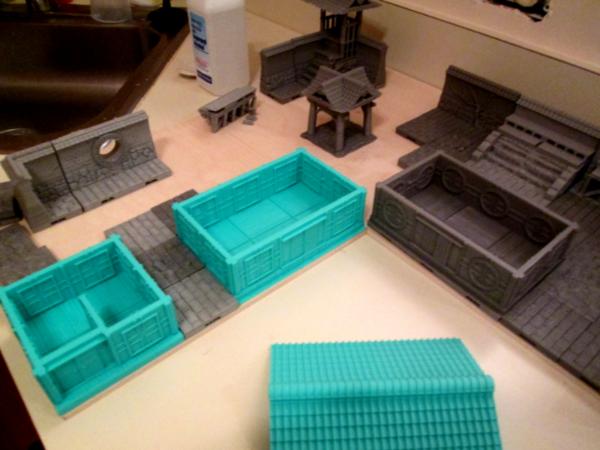
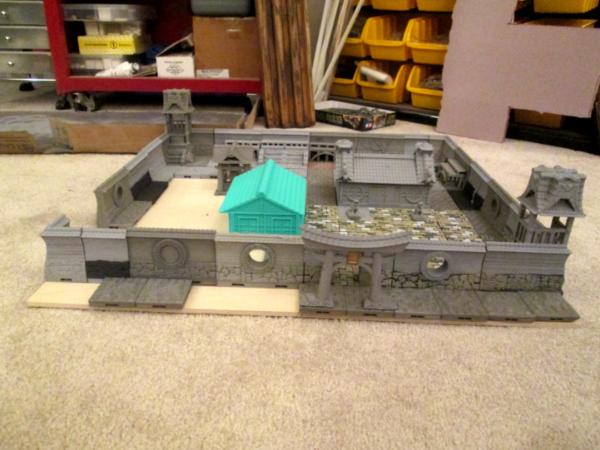
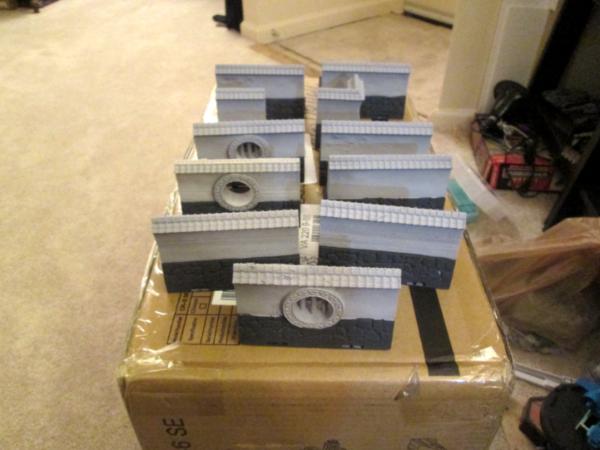
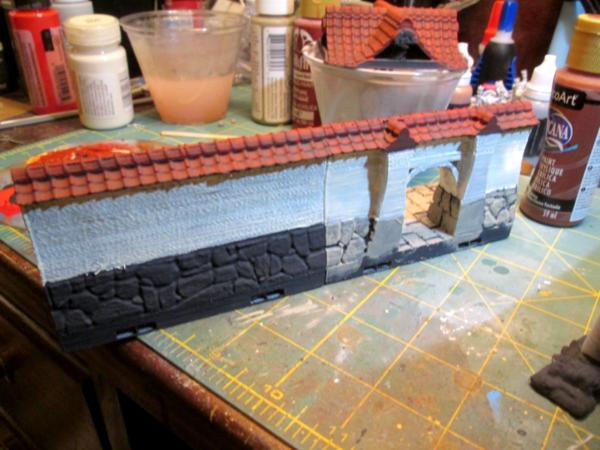
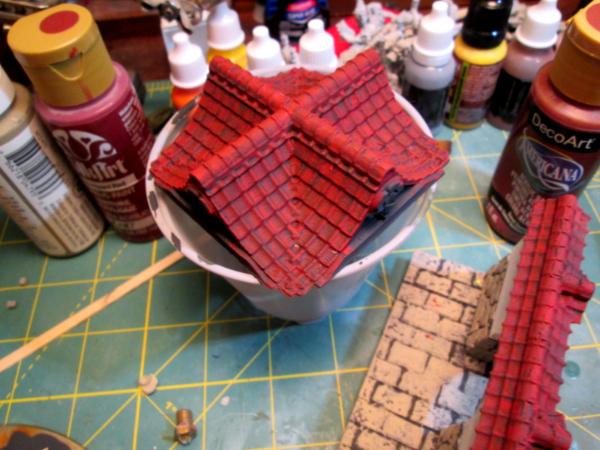
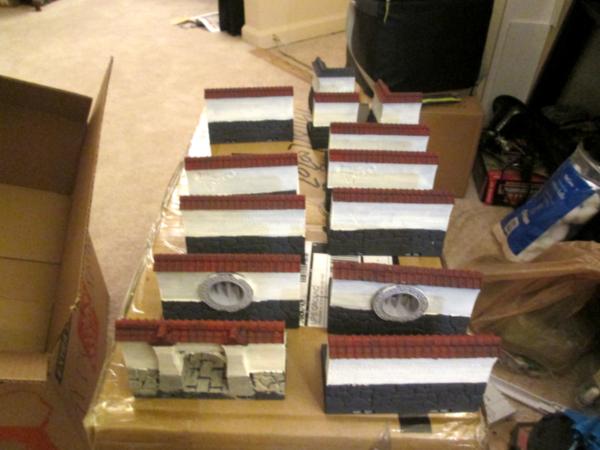
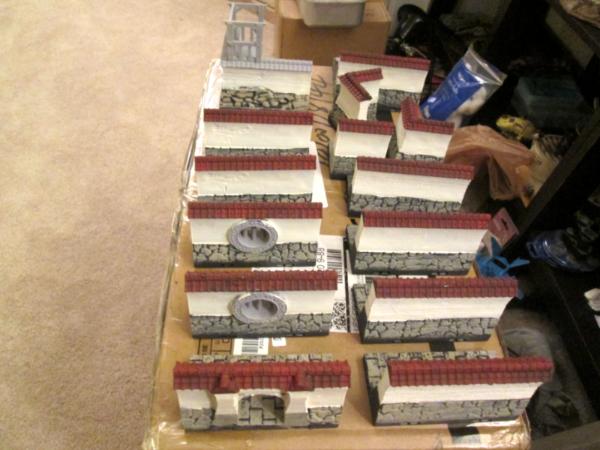
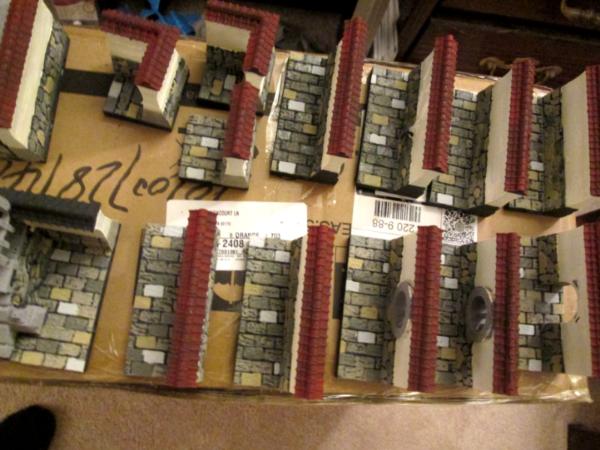
*The Hirst Arts Molds hillside fortified house with tower project
*My own personal 'contest' type project to build an AA gun out of nothing but non-kit bits and bobs floating around
Yes, all three are started. Yes, I've broken my standing rule about one thing at a time. And yes, the AA Gun is almost done!
That's some nice work on a nifty model. Kudos to you for using such bright colors--something I can't seem to do these days. Where did you get the police tape?
Hey Josh, Kid- thank you for looking in! The tape is 1/24 scale for model railroading, but as you can see seems to be well in scale for a 30mm figure. It's from a shop called HobbyLinc at this address: http://www.hobbylinc.com/cgi-bin/s8.cgi?str_s=police&p=2
And it's even on sale now for US$3.39 per 120 inch roll!
Insaniak found this stuff and I've finally had a chance to use a little bit!
Very cool , I used some of the plastic Easter basket liner rafia for police tape years ago. I know I have some in a box somewhere, then just used a fine point sharpie for the words.
Holy cow, Theo- that's a lot of precision work! I don't know if my hand was ever steady enough to write on something as thin as a piece of basket raffia. It's amazing what we can do when necessity dictates though- I had some fairly elaborate workarounds (I guess today they would be called 'hacks') when I was young and starting out because I was a) living in barracks and couldn't leave my stuff all spread out and b) had almost no money. I've gotten older and now I have a better modelling budget, but may be exercising it at the expense of the imagination I displayed earlier from pauper necessity!
Nice work on that model Meer_Cat, are you expecting to get some games of Necromunda in, or like many of use just enjoying working on models? Also those three projects in the works sounds enjoyable, Im looking forward to your future posts.
Hi Syro! I'd love to get a game of Necromunda in, but for right now it's mostly to enjoy doing up a figure that is so different from what I usually work on. And I've got all these great Heresy Girl figures from the 1.0 and 1.2 campaigns that need doing up- I can easily put together a 'squad level skirmish group' to meet the Necromunda requirements, and I'm interested in researching the stats for a Kill Team- got a lot of half-Gothic/half-Viking girls (think: Raging Heroes Commissars meet Viking Berserker Shield Maiden Girl) that might make a good squad for that.
Mostly I want to get paint on plastic!
The Good Idea Fairy hit me over the head again tonight with an idea to take the divider from a double DVD case and make it into a small/light flyer landing pad....
Here's the next project- this one was a wild hair and not one of the three I had started simultaneously. I wanted to get rid of some of the good junk I've got piling up on my work desk, and always wanted to build a fixed mount, autonomous anti-aircraft gun system. So here is one with linked autocannon synchronized to produce inter-locking streams of fire at five kilometers.
The first thing was to find a nice, x-shaped piece of sprue the right diamter to form the base:
Clipped and trimmed neatly:
The rest of the base is made from the caps from some oral supplements we give our ponies (they come in a plunger type syringe, it tastes like apple and they love it) and some extra gear pieces from the defensive position competition:
The guns themselves are made from some scrap styrene tube and channel, the locking lip from a can of Old Bay spice, some expended glue tube caps and the disposable locking clip from something or other:
And here's how it looks glued up (the targeting radar dish is the cap from an old bottle of Citadel Wash and the traversing housing is the push button from a can of bug spray):
I'll primer it tonight and tomorrow I'll slap some paint on it. I'm debating whether to base it or not, probably will.
Wow, that looks great! The pics make it look like it magically cam together really fast. In my experience that's never true, how long would you say that took you?
Thanks, Syro! Along with trying to use up junk on my desk, I also wanted to try to get this slapped together fairly quickly (especially for me- I tend to over-work things sometimes). For this, counting on my fingers and toes, I think I spent about two hours total so far. And, of course, it does still need to be painted. And for now, everything is pinned and superglued- I may have to use greenstuff if the glue doesn't hold.
Lot of fun so far though!
Thanks Kestrel! Sometimes the Bright Idea Fairy hits you, and the project just comes together. What truly was a serendipitous moment is when I found that cutting the spice tin plastic thingy in half made it fit exactly on both sides of the receiver of the gun, almost like it had been intended to go there all along.
Wirecat wrote: Ability to see whole in a seemingly unrelated heap of parts - colden! Congratulations!
Theophony wrote: Nice work on using up some of the acquired pile . A primer coat will make it look just like a kit from a box.
Thank you Dr H, Cam, Theo and Wirecat! I'm having quite a lot of fun just playing with the bits (which my wife scornfully refers to as 'junk') on my work desk/bench. I already have another idea I want to try using a DVD divider as the platform for an aircraft pad along with some other gubbins. The Ganger Gunner was actually the first of three planned projects I got going at the same time, the killer robot is the second and it gets worked on as paint and things are drying on the AAA gun. I have to get serious about learning my airbrush, as I itnend to use a stencil similar to th work Big H did on his Tau to create a pattern on the robot's 'shroud/cowl/thingy'.
The gun has a spray coat of tan Rustoleum, some ersatz Agrax Earthshade wash and a couple of bits highlighted with gun metal grey (like Bolt Gun Metal) and just wants basing and a couple other dabs of paint and I'm calling it done.
And then the aircraft platform is no good without an aircraft, and I've got a Robogear Sprut lying about someplace here, and then there is still the wizard's cottage from the Hirst Arts molds, and more Heresy Girls to paint, and....
Hey shas- great to her from you! And thanks for the kind words. This pile of junk was very fun to make, and I'm looking forward to thinning my desktop even more in the near future. This piece is nearly complete in its painting (not in these pictures, more coming shortly) and then just needs to be based. Thanks for looking in!
I didn't have a lot of time tonight, but wanted to get something done on the AAA gun towards finishing it off, so broke out a product I've had on hand for a while, waiting for a chance to use.
Here are the materials I used to make a custom base for the gun: A door knob wall protector (the circular disc that is to be the base itself- $2 at Walmart), some greenstuff, my mirror greenstuff rolling surface, some shaping tools and LOTS of water:
And a Basius Max pad:
These pads are two-sided- one usually shows the theme intact, the other in a ruined state. They are a hard resin and quite solid. The idea is you roll up some greenstuff, put it on the top of the base, press it hard against whatever section of the pad you want to use and presto- instant textured custom base for your figure. Naturally, I should have started by trying this on a 25mm or 30mm base, but I needed the gun system _tonight_, so learned how on it. The wall protector is 80mm in diameter, so it was a handful for a newbie to learn on. For one thing, I couldn't squash a ball of greenstuff down under it evenly- I had to roll the greenstuff out into a pancake and fit it under the base and then press. It was also a bear to get back off again, without stretching and distorting the pattern pressed into the greenstuff. However, anything worth doing is worth over-doing. So, several attempts and a lot of water later, I think it came out not too bad:
I've already smoothed out most of the creases you see in the last two pictures- it's amazing how much detail I catch in a photo that I don't see looking directly at the piece, even under magnification! And I used my standard go-to for excess greenstuff: made a bundled tarp and a small bedroll:
So, things learned:
I think the Basius pads are pretty good- I have two, the Sanctuary that I used here and the Urban one (I might purchase a couple more- they've got a couple dozen styles out)
Smaller bases are easier to cover than larger, I think
These should paint up pretty nicely when cured, and no need for additional sand, pebbles or flocking (unless I want to or I need to hide my mistakes)
I'm not used to the concept of a hard resin mold, sorry to hear it was kind of a pain to work with. Sounds like you have to remove the greenstuff before it cures? Will it ruin the mold if it sets in there? I like the way the base turned out, and I always love the tarps and bed rolls you make from greenstuff.
I didn't mean to leave the impression I wasn't happy with the Basius Max mold- I think they're great and offer a lot of potential for different uses. But I surely set myself a steep learning curve using an 80mm disc as my first attempt to use one! Here's the link to the 'how to' on the kickstarter page- kind of clever how they did it, really:
I keep using the term 'mold', but really it's more like a press form, like kids have for Play-do and things. The intent is to remove the pressed greenstuff with the base, so that the greenstuff can be trimmed to exactly match the base circumference and when it dries, sticks.
Something you said though made me think and then prick up my ears- I'm wondering if instead of lubricating the mold with water, if I used light oil, like when we make molds out of greenstuff itself (take an impression) and when hardened press greenstuff in and let it cure, and then pop it out. I may try that. I know something that may have made things a bit harder last night was that I got water on the surface of the base, which made the greenstuff not stick as well, so there's that.
I just need to try more bases (maybe a 30mm, this time)!
Cool, I hope trying new ways with the mold goes well for you. But I like you're idea of a light oil. I've always been tempted to spray a mold with WD40, what works very well for me (When not using silicone molds) is using petroleum jelly on the mold, I have a dedicated paint brush for getting in the tiny areas of a mold. I think it's really great that you think of any setback or difficulty as just a learning experience. Keep up the great work
Instead of greenstuff I use a 2 part gray putty called Apoxie-sculpt with for my bases. I find it doesn't stick to the Basius pads as well (though I use some water too).
Thanks ScarletRose! I actually have some of that on hand- almost used it as well, but decided my greenstuff was closer to drying out. I do like these pads though, and have a lot of figures to base to get better at using them.
After using the Basius Max press mold to form the custom textured cover for the base, I hit it with primer:
A base coat of cheap acrylic craft store tan paint:
A wash of ersatz Agrax Earthshade:
Painted the places where the pavers had broken and soil was pushing through cheap acrylic Yellow Ochre, washed in genuine Reikland Fleshshade and then drybrushed a teeny bit of Yellow Ochre back on top (needed a touch of color, everything else is desert-y, which- don't get me wrong- is very accurate, but very boring):
Added some grass tufts and what are supposed to be water bottles, or beers cans (they're resistors off that sound card I chopped up for the Athena a couple of years ago):
Added the gun:
And some expended brass (these are the same glass cylinder beads from the tracked SPAAG I did awhile ago):
And there you go- the finished gun and base:
This sticker is about 3/8 inch square and I found it in the pocket of a new pair of trousers of mine- it's the guys that quality control checked them leaving the factory. I wanted a decal or something to break up the tan of the maneuver housing, so I glued it on. The joke is, the Q36 used to be the designator for a counter-battery artillery radar- it was designed to track incoming artillery shells, reverse plot their trajectory and almost instantly provide data to a battery of guns just waiting to fire a mission to suppress or destroy the enemy guns that had just fired (I don't think it's in service any longer). So, this must be the Pan Atmospheric Aviation Suppression System, complete with on-board QC-36 target acquisition radar!
And that's all she wrote, folks:
I had a ton of fun putting this together- from the bits scrounge for the parts, to using the Basius Max molds for the first time, to using a lot more colors than I usually do on the base, a hoot the whole time.
I also got a fair amount done on the killer robot of death- pics of that are going to show up next, and I have to get cracking learning my air brush so I can use the stencil I bought and finish this gizmo up. I still have one other project started (the wizard's cottage) and ideas for two more already!
That's quite a fancy and well thought out base. Both it and the AA gun are beautiful, nice work. I'm still blown away by how great you made that gun from all the random stuff it started as.
Thank you Theo, Brian and Syro- it means a lot having people not just look in, but take the time to comment as well; it is much appreciated. I got to try some new things, learned a lot and have new things I want to try (if I can just remember them when the right time comes!).
It's funny you mention drones, Brian- as an oversized drone or undersized flyer does feature in the next 'get rid of stuff lying on my desk' project. Which will come immediately following the completion of the Killer Robot of Death and the Wizard's cottage- maybe. If I don't get impatient first.
Great job, well done. Really effective base and the guns look spot on.
There is a joy and pride in making something for your self. Not just a kit, a made from scratch kit, with odds and ends that don't fit until you work your magic. Brilliant bud.
Thanks very much Cam- that means a lot from a guy who is noted for building things from component atoms and moving forward from there. It is nice to be able to say sometimes that from the ground up- "it's mine". I did cheat on one item though (the original rule to myself being 'no gubbins or parts from kits') and that is the radio pack on the pack of the traversing housing from Robogear! Other than that, I stayed fairly true to the original intent. And in the 1st Ranger Battalion, the motto was 'if you ain't cheatin', you ain't tryin'. And if you get caught, you ain't tryin' hard enough.
Actually, skin-tone pink makes a very good base for many kinds of stone and sand. Plus, being a light color it can be made more varied with a lot of browns and yellows without them looking really out of place. Even whites... Since You are planning so much ahead, You can paint on some shadows where static grass tufts will be placed. Just make them deeper than Agrax. Smoke diluted with water?
Thanks for the tips, Wirecat- I'm definitely trying them on the project after the killer robot (going for metallic chromatics on that one)! But either the wizard's cottage or the landing pad or both are going to be set in a desert-y terrain, and have good broad bases to play with, so I'm in.
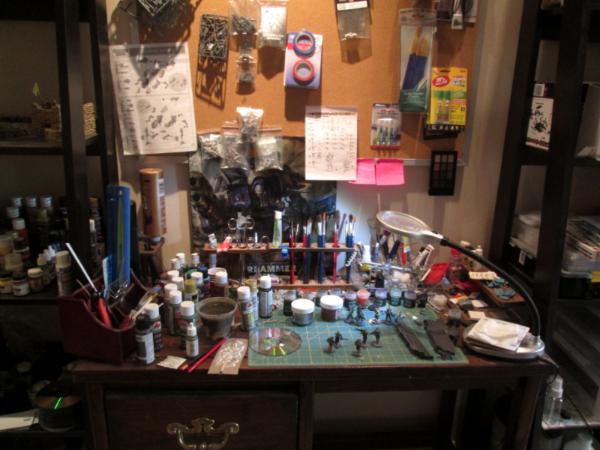
Brian- that camera is the best goad to getting work done I know of!
Here's a WIP pic of the "Defender" (aka: the Killer Robot of Death):
I know I said this was next, and work _is_ getting done along with the other projects, but I feel another itch to scratch coming on, this time something along the lines of a coastal defense artillery piece in a disappearing gun mount, but set up along the lines of a low-planetary orbit defense gun- to be named The Cyclobs.
We'll see what really gets finished next- more follows soonest.
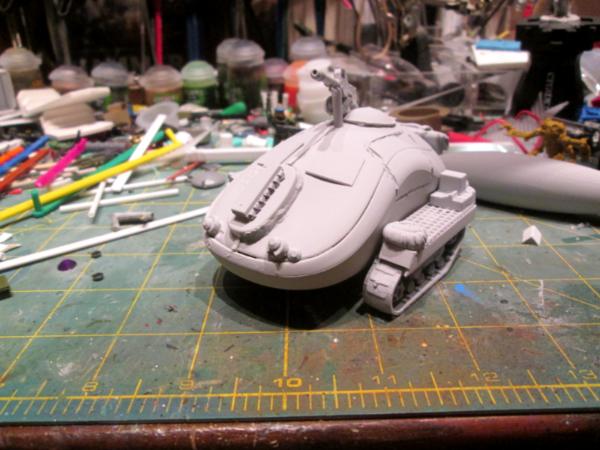
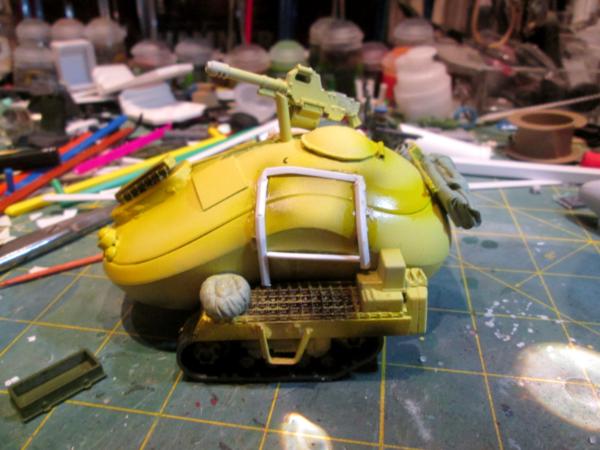
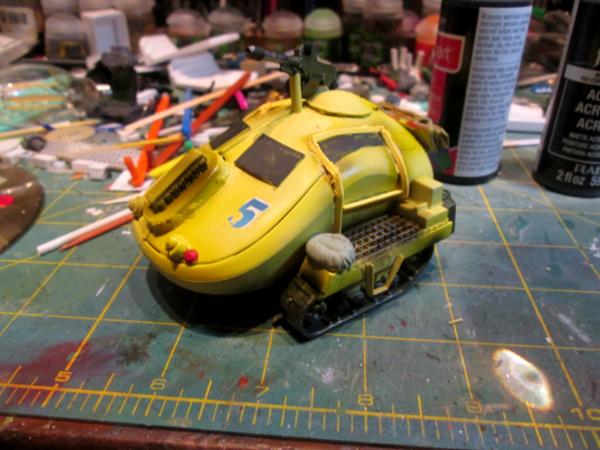
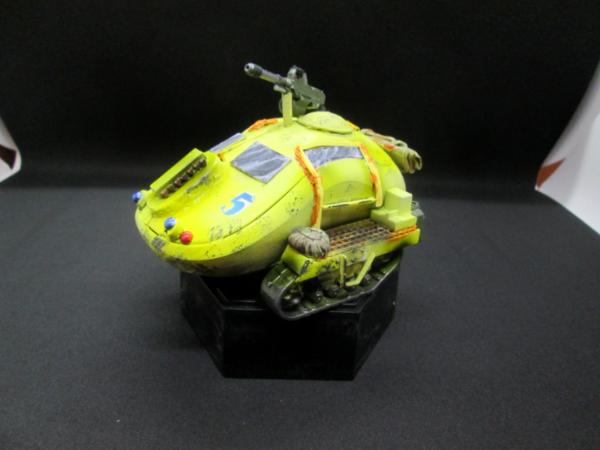
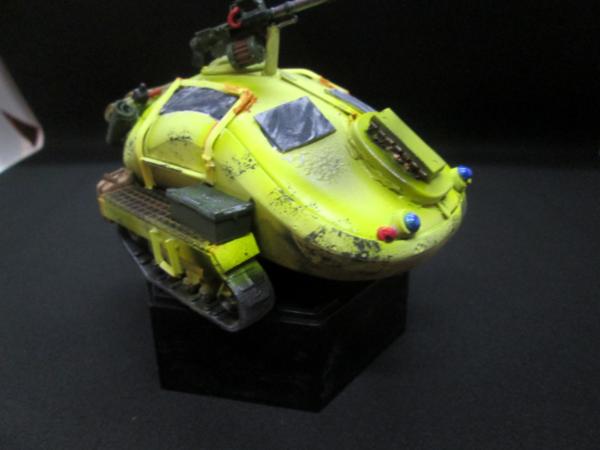
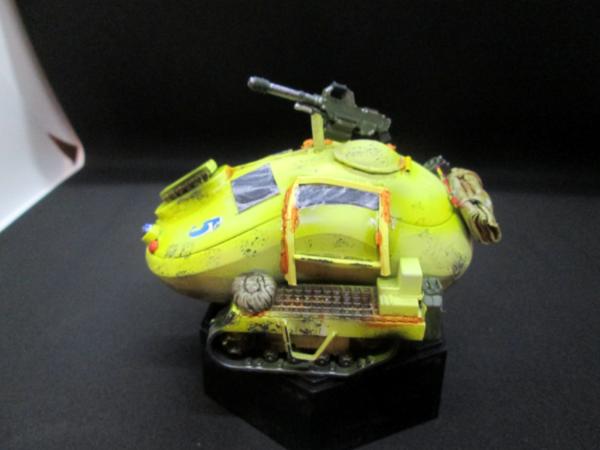
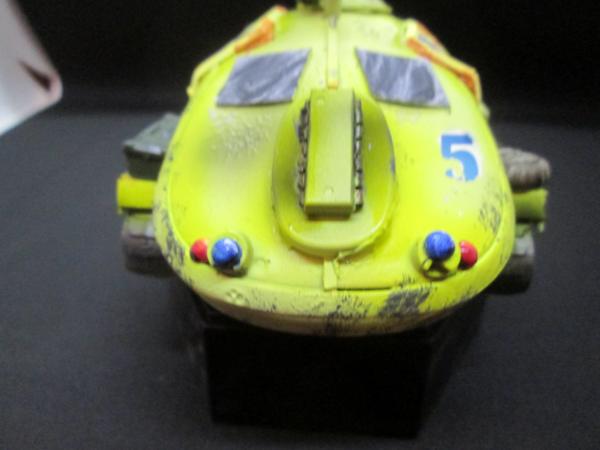
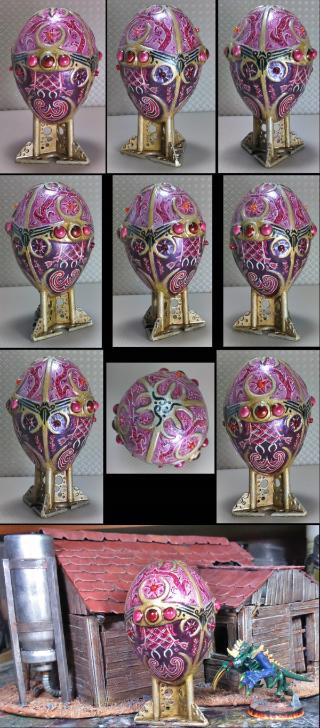
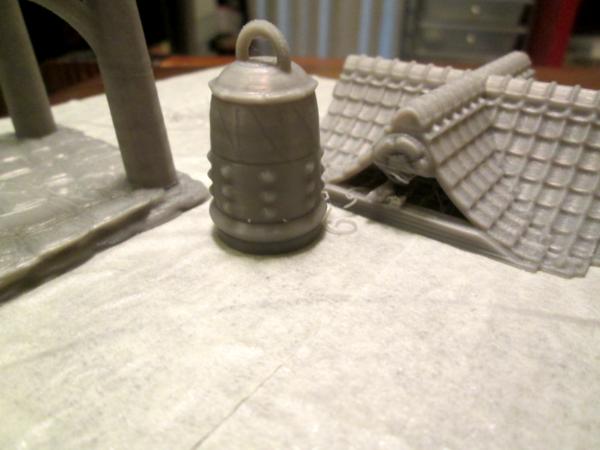
OK, the killer robot of death (aka: The Guardian) is done, here's pics:
This is a Tehnolog kit, I think I gave US$6 each for two of them a few months back (or years, at the rate I work). The whole thing press fitted together so well it didn't need any glue. I added some to the shroud, just in case, but it really was okay without. New things tried/learned:
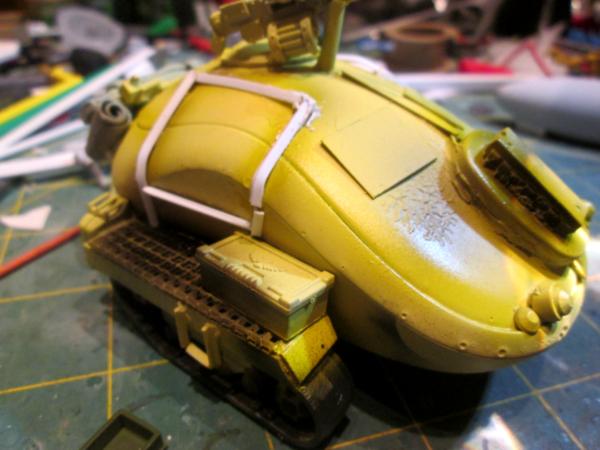
* Used my airbrush and a stencil to try to do the hexagon outline 'street-fighting' camo pattern (the model really wasn't well suited to it, but ya gotta start somewhere)
* Used pre-thinned, metallic inks to do the camo (mixed feelings here, it actually came out how I wanted- just not sure what I wanted is what I want, y'know?)
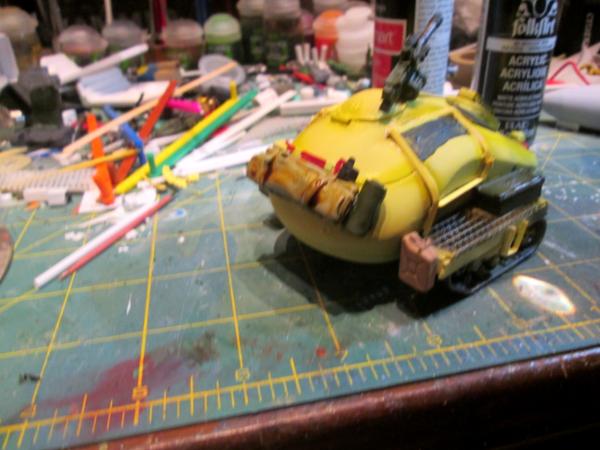
* The heat-distortion on the muzzles of the blasters/lasers/BFGs needs to be applied in more uniform bands to be realistic, and is better applied to a longer,barrel
* I tried to use more 'mechanicus' metallic colors, fewer of my strengths which are 'infantry hidin' colors' like browns, greens and greys
* Tried to avoid just slopping washes around- it's very effective for reallly grubby grunt-types (hey- I R1 !) but not so good for 'mechnicus'
* Having said that, I _really_ like how the treads came out
Here are some size comparison shots, starting with a Leman Russ:
And with some Oldhammer Imperial Guard metal figures:
And finally- just for fun- with an assemblage of various figures from different manufacturers including Games Workshop, Wargames Factory, Heresy Labs, Dreamforge Games Raging Heroes and Kromlech. I figure they're like some Rod Serling Twilight Zone epsiode- all drawn to this one place, at this one time, for some unknown purpose. Really, this mob might make a Rogue Trader explorer team- you've got a leader, a medic, couple of heavy weapons, heavy assualt infantry, scout, etc, even a bagpiper:
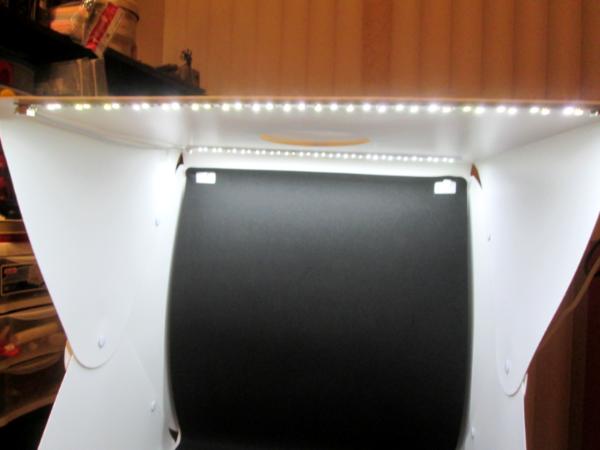
Tried to do better with the lighting- still have to build a light box.
Thank you, Johnny! I learned a lot trying things on this project, and already have ideas for trying out on the second one. The Robogear/Tehnolog stuff is amazing- they really offer a lot of different things. In looking at the pics though, I see that I did the 'heat distortion' colors in reverse order- the sepia should be closest to the muzzle, then the purple wash and then the blue (I think, I'll have to watch the Warhammer TV video again!)
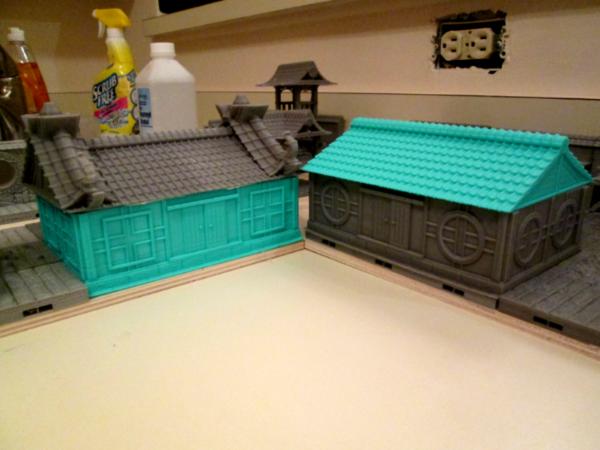
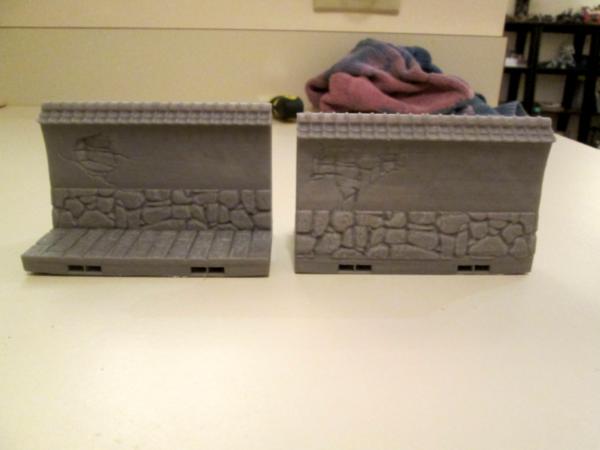
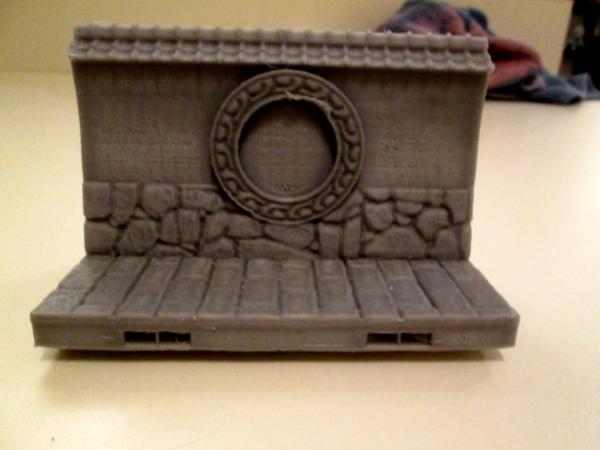
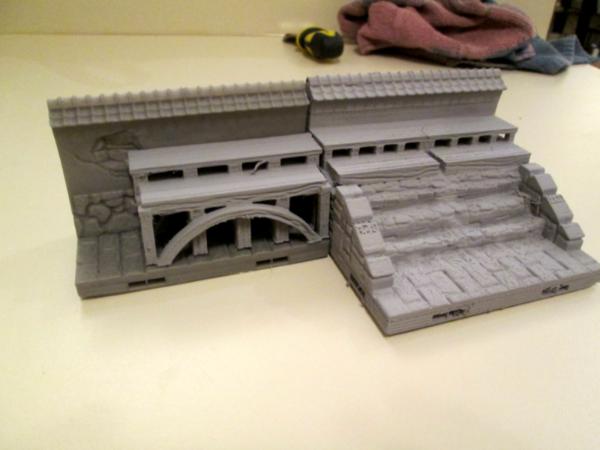
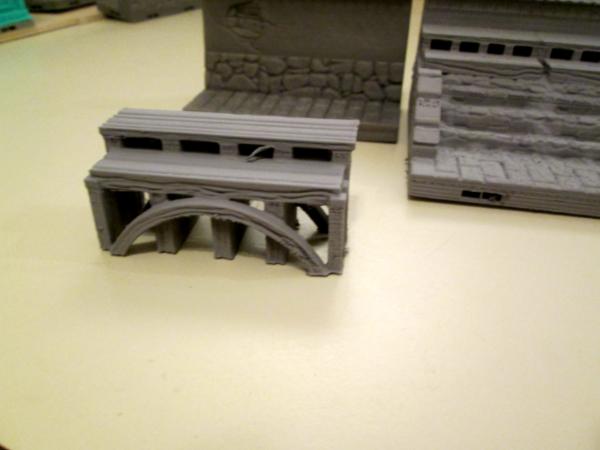
Thank you, Captain- the landing pad it is! I may be working on the wizard's cottage a bit as I go, since I'm going to be casting some parts from my Hirst Arts pipeline and small robot molds, might as well also cast some parts for the cottage. Besides, the pieces have been hogging the best spot on my kitchen counter for almost a month now- time to do something with them or pack them out of the way.
The landing pad would be nothing without a flyer, so here are the pieces for a Robogear Condor kit cleaned up:
Here they are partially assembled and primered:
I'll do it with the canopy closed and blacked out- it'll give me a chance to try some of the techniques I've seen here on DakkaDakka for painting the canopy panels using blacks, blues and silver-greys. I'm going to have to fabricate my own landing gear as well- wheels, skids or struts, as the kit doesn't have any- it came with a very nice flying stand which I'm going to repurpose for a Chibi Pony Superhero project for my wife
Here are some of the components I'll be using for the landing platform itself:
You can see the double DVD holder, the white plastic is the drywall corner stuff I used on my LOER project for decking and the syringes are for an oral supplement for our Shetland pony rescues (it tastes like apple and they love it).
I'll also have the chance to try my hand at illuminating the structure with LEDs- for street lights and landing lights both. I have some components and just have to settle on a battery pack and then do the math so I get the number of bulbs and resistors right for the volts I'm going to push.
I may even get really motivated and do a couple of ground crew servicing the Condor to complete the scene! (Gotta get on ebay though, and get some more Cadian bits- I'm running out).
Thank you all for looking in, and more follows soonest!
Briancj wrote: What Cadian bits do you need? I have a small pile.
Hi briancj! Thank you for looking in. I don't have any specific needs- just like having a variety of legs, torsos, arms and heads on hand to throw something together when needed. In the past, I've cobbled up basically straight from the box type figures for things like the ammo handlers on the Phaethon. Now that I'm starting to experiment with greenstuff, the basic Cadian body parts will form the basic figure, while I'll start trying to modify the kit and armor some with putty. I've still some bits on hand myself, enough for a bit, but I'll start scoping the el cheapo auctions on eBay for a score!
Theophony wrote: Love the killer robot, thanks for the scale shot as it’s much bigger than I thought it would be.
The condor looks very promising.
Good work stretching yourself with new skills, I need to do that too.
Thanks, Theo! Yep, the Tehnolog robot is a big beast- even I didn't realize how bulky (I knew it was tall) until I took the comparison shot. It reminds me of the machine Skynet took over in the third Terminator movie, only even a little bigger, I think. I don't really like the look of the blue and gold face- may redo those in more metallic grey colors, and dim the eyes a bit. And definitely must redo the gun muzzles!
Flinty wrote: I really like the killer robot. The group.shots also look neat.
On the other hand... Where do you rescue Shetland ponies from? And why do they need rescuing?
Thanks, Flinty! I wanted a shot with infantry to show the height of the robot- it was really a bit of whimsy to grab one of each of the several manufacturers I've painted up and stick them together- I didn't realize I had so many.
In a nutshell, my wife has always had horses- started to ride when she was three, I think. As we're getting older we've deliberately moved more into taking care of ponies- the equipment is lighter, the cost of feed is significantly less and they are darn smart. We got into rescuing Shetlands primarily because where we are there are a lot of horse facilities (farms, breeders, trainers) but almost no one who is set up for smaller equines. You really can't mix them together with full-size horses in open pastures and paddocks- the little ones think they are just as big as everyone else and they won't back down. And ponies shouldn't have too much grass graze- if any- as it is, it's too rich for them and they can easily founder and/or colic.
The sources for our rescues are usually word of mouth- people see a little guy out in a huge pasture with big guys, often limping from preliminary founder. We'll visit and offer to take the animal away and try to recover them or humanely put them down if it is too advanced. Usually the pony belonged to a kid, the kid grew up and now there is no one to give ti all the care it needs- and they can't just be turned out like a big horse- their instincts are very different.
Unfortunately, some people shouldn't be allowed to have goldfish. Some of our rescues get referred to us by the SPCA or the police; they've been forcibly remved from homes where there just aren't any facilities and they're suffering badly. We literally got one handed to us by the State Troopers that had been gotten as a birthday present for a kid, but the family lived in a development with a backyard that was about five yards deep and ten yards wide. The pony had no little shed, no shelter at all. There was a scraggly tree, and the family figured the little pony could eat the grass, and hide under the tree when it rained or snowed. It didn't take long for the yard to turn to mud, they didn't know what to feed it, they had no way of removing the manure, the teeth hadn't been floated in so long that it cold barely chew and the hooves were so long untrimmed that they had grown into a condition called 'Persian Slipper', where the toes have grown out so much it curls up in front and they have difficulty walking.
I believe that animals should live more or less domestically as they do in the wild- our base herd of four live outside year round, for instance. But on stone dust paddock that gets policed twice a day for manure and they each have their own little shelter. That's the permanent herd, the ones no one else will ever want because of their physical and mental quirks and special needs. The others that come through have stalls in the barn and when we get a new one in we feed it back up to normal weight and work on restoring its trust in people. We do a lot of in-hand work, leading it arund and getting it to want to work with people again. Some few never do, but most come around in a few weeks or months. They naturally want to work with people and be part of a herd. When they're ready, we teach them how to pull a cart, to give them sense of purpose, make it easier to keep up with exercising them and to make them more attractive to fostering or adoption by other homes. We work quite closely with three big horse rescues in the area that have the means of vetting potential adopters, and we take ponies from them all the time to rehabilitate.
Our base herd pull carts, carriages and agricultural implements. We can cut our own hay, windrow it and make it into miniature bales- all with pony power! They fight for the chanc eto go out when they see us with the harness.
We are also accredited with our State Board of Medicine and the Veteran Affairs Bureau to help with equine therapy for PTSD sufferers- combat vets, abused children and spouses. They respond very well to horses and especially our little guys. At the end of the day, no matter how powerful a horse may appear, they need to be part of a herd, they're lost without a partner, and people who have themselves had a very rough time can sense that need and respond strongly to it.
All in all, we've helped rehabilitate and place around 17 horses and ponies. A big advantage to ponies is, when they step on your foot- it only hurts, it doesn't splinter!
Thanks all for looking in and listening to my spiel. More follows soonest.
Wow, very cool. As a child we had horses and a pasture, but due to finances they went to our cousins when I was about 9 or 10. They had herds and fields. Never had any little Shetland ponies though.
People in a development buying a Shetland?.......it’s like the stories you here of people with exotic cats like tigers, too bad the pony couldn’t eat them .
It's not for lack of trying- our little guys are quite determined in using their chompers. The tie-in for modeling, is our little guys are the models for the Chibi Ponies that I did earlier, and will be the platform for the next lot, which are going to be superheroes (Super-Pony, Spider, Pony, Wonder-Pony and probably Electric-Pony (Electra). I'm already doing requests for folks who would like a Chibi of their horse or pony- they send a photo to my wife, who nags me. It is a lot of fun, but I'm running out of Tehnolog Chibi Ponies. I bought up what I could find when the missus liked the first lot so well, but they're getting hard to find on eBay now. I still have a dozen or so, and that may be enough.
Update for today (not sure when I'll get more pics up):
I've been busy the last couple of days, getting a lot done on several different things. First up, the actual flying/landing pad part of the project. I've decided that the vignette is going to be a 'rapid delivery service' diorama, with a small air freight delivery service that has seen more prosperous days and an aging Condor light-fighter adapted for small but valuable cargo delivery. The office will be a cobbled together shack under the pad itself, and repair/maintenance gear will be spotted about.
Here's the CD case that will form the basis of the landing pad, I've trimmed out part of the knobbly bits that hold a CD in place as they stick up to high:
But I've saved the bits for some other project because they are arrowhead shaped- you never know when you'll need something like that:
Here's the underside girders in place:
And the underlayment for the top side landing pad mesh (the knobbly bits that remain were making the mesh lumpy, so I had to raise it up a bit):
In related news, here's some more work done on the Condor:
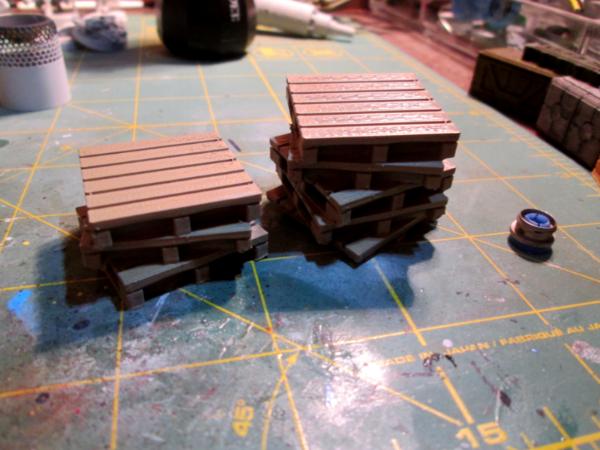
And a crate barricade that came free from the store on Etsy where I got the laser cannons and such- this will be stacked outside the door to the office, forlornly waiting its turn to be delivered:
And I'm also casting up more pieces for the wizard's cottage, plus some pipe sections for this diorama (I'd forgotten I had the Hiirst Arts 5/8 inch pipe mold):
I'm gluing the landing pad mesh (which is made from plastic canvas left over from the Phaethon project) to the landing pad frame, which in retrospect is a mistake- I should have painted the frame and the mesh up separately, it would have been a lot easier. Live and learn.
Still rolling hot, Wirecat- here's an update for the last couple of days:
Missile pods for the Condor are assembled and basecoated (because delivery flyers have missile pods, you know):
These will get dinged up and weathered some, the rockets will get detailed and one pod will have a hot cable wired to the hard point, because the integral arming circuit is bad....
The undelivered cargo crates are base coated and the canopy 'Perspex' is fitted and glued in:
The big bit, completed just tonight, is the landing carriage for the Condor. This was built out a piece at a time (too many weird angles for me to calculate and measure and get it right) and built up into the rack and then the skids were added:
I didn't plan to add the skids at first- but the darn thing was too heavy towards the tail. I tried adding weight (dime coins) into the cockpit itself, but couldn't fit enough weight. So, I added the skids and it worked fine- no extra counter-weight needed. And I like the look better with them.
Because the landing pad is so small, it's clearly intended for VTOL aircraft, which means I need to add a ducted fan under the fuselage aft of the engine housing, to simulate a vertical take off capability. Once at altitude, the jet stream is ducted out the back of the jet pods, instead of down, and the turbofans in front must act as compressors to supercharge the airflow- or something.
Thanks for looking in, your comments, observations and suggestions are always welcome.
Thanks for looking in Cam, Theo, Syro- and for the kind words!
Got a lot of puttering done tonight, little things that lead to bigger things worth showing in pictures. One thing I will share tonight is this:
I used plastic canvas for the 'no-slip' surface on the landing pad, and these are some of the off-cuts/trimmings. I read somewhere here on Dakka about one of you guys (maybe JohnnyHell?) trimming the stubs from plastic canvas to make rivets. I couldn't find my tiny sequins, so I tried it- you can see the addition on the trim strip on the nose of the Condor on the right. Not gorgeous, but actually looks pretty good at a distance of a foot or more. I need to trim them smaller, thinner, so they look more realistic.
Also, it's hard to see, but I left one of the 'rivet strips' intact- didn't cut the stubs off. To me, that looks a fair impression of a belt of bolter or stubber ammunition. I may mess around with something, another scratch-built machine gun, and see what I can do with it.
Started another project tonight- it'll be a 'middle of nowhere' water pumping station when finished. It's a proof-of-concept terrain piece for the pipe sections I've been casting, and lets me use up some more 'precious junk' floating around on my shelves.
Thanks, Captain! I'm following your HMCS Chilliwack project with great avidity.
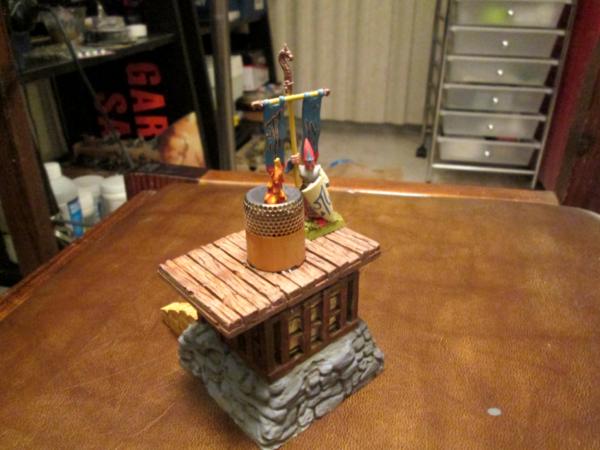
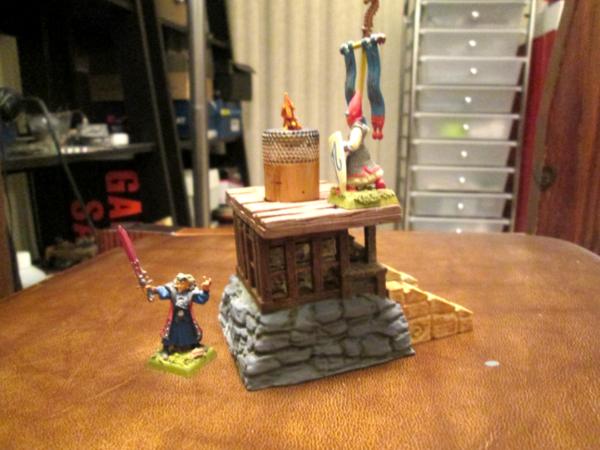
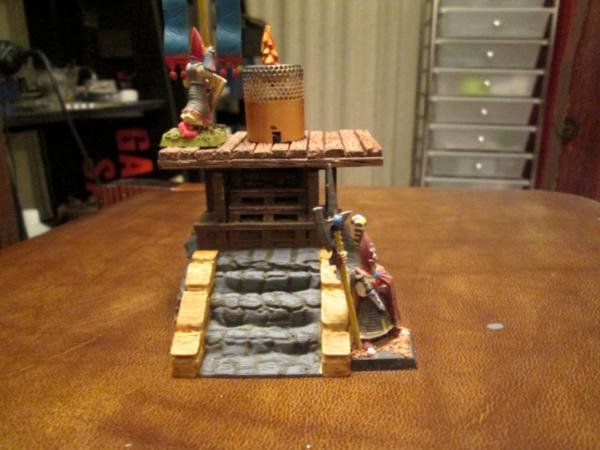
Just one quick pic tonight- I've gotten a lot of detail work done over the last couple days and pretty soon will be close enough to final assembly that intermediate pics won't have much point other than to spoil the grand reveal, so here's a general idea of what the finished project will look like:
I do still intend to have a white beacon light mounted on a high mast, an elevator (lift, for my cousins across the sea) for moving personnel and cargo up and down from the pad and red and green landing lights- plus a metric crap-ton of additional detail. Because, as I frequently say, if it's worth doing, IT'S WORTH OVERDOING!
Oh, also finished gluing up the pipes for the desert pumping station and detailing the pump house itself. Found an older Bitspudlo Eldar wannabe Farseer on a jetbike, so I started deflashing that- although it is a fairly clean kit. Other than that, nothing much.
Yep, I'm picturing a small, square personnel lift at one end (for those hoighty-toighty pilot types) and a broader, 'shelf' lift on one side (picture the elevator on the side of an aircraft carrier) for cargo. Work ran long today (will all week- I'm on the platform teaching) but I'm hoping to get some work in tonight that will advance the project some.
I've got some definite ideas on ho the lifts are going to fit on- I need some time to get the platform supports fixed onto the base, so that everything is sturdy first. This has been a tough week, but I should get some time in soon and get this project moving again. I'm only on the platform teaching one day next week- but for two different classes.
Still going to try to have working LED landing lights, too.
I often think about adding lights then think they will barely get used in reality so why bother, just do a little OSL painting and that will do.
I did a lift on a piece a while back and did it by sticking a strip of magnetic stuff up the wall and put some magnets in the platform, performed well and meant you could easily move the platform.
All looking great bud, you really are making some great stuff, lots of inspiration.
With the landing lights, it more to try it out, than I think I will ever use it. But if I learn a bit of soldering (I used to do some, need to re-acquire the skill) and wiring and work the formulas for voltage, resistors and LEDs- I might use them on something else that _does_ need them.
I think I remember your project involving a lift- I may have to rethink my approach to incorporate the magnets so they are more useful for gaming.
The wedding I cleaned up from last night had some strings of micro LED lights that are battery powered. I’ve seen them at HobbyLobby, I think they’d be a great use for scale models.
I'd read an article on using old Christmas light strings for the same effect, and considered going that route. But my Dad was an Interior Communications Electrician in the Navy during the Korean War, I was soldering things together at age 11. So for this one, at least, I'm going to solder my own circuits and see what happens.
Besides, you get 8 billion resistors for a buck, and if you cut the wire leads off, they look remarkably like energy drink cans, Red Bull and the like!
"Let no bit go wasted" The Monks of Eternal Scavenge
More follows soonest. I have another class this week coming, but it is only two days and is mostly office briefs to new chums- very little actual instruction or facilitation from me, so I hope to have some time to get some real work done. I'm at the point where a lot of the sub-assemblies are finished, and the whole big thing is getting ready to emerge from the chaos of my work bench.
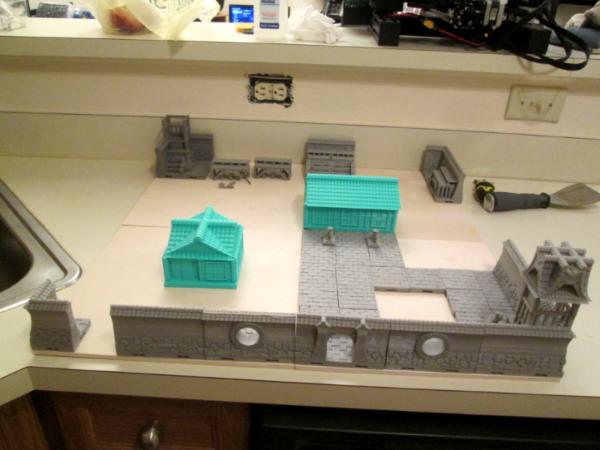
Sheesh! Lots of little steps getting done, but not up to major assembly yet. Here's a couple of pics:
This will be the 'office' for the delivery company- obviously inspired by Clanmac's Junktown. Insaniak gave out the company website for the mdf containers and I made the front windows and door from styrene strip. The 'air conditioner' is a casting from Hirst Arts Robot molds. The louvers on the back are Lego shutters purchased on ebay (saw that trick somewhere here on Dakka too):
These next pieces have been fun so far. The mobile welding rig is another kitbash from Hirst Arts Robots mold. The 'jet turbine engine' will be hanging from a chain hoist and is made from:
- the 'squirter' part of a shampoo mechanism (a' la Flinty)
- a water bottle cap
- the trigger safeties from aerosol bug bombs
- styrene cut to be the turbine vanes (as like Klaus, Alaricuk and JohnnyHell, just not as precise)
- a pony supplement paste syringe cap
I'll arrange for some internal integuments to be visible through open maintenance hatch, probably some wires spilling out.
The fun step coming up is breaking out the airbrush to get some base colors on the container office, the Condor flyer and jet engine. Then it's assembly and lots of washes to get the shine off the spray painted grey supports and platform. Going to have to cut a stencil so I can get a landing number painted (and then weathered) onto the platform. I've got elevators to build also. Plus a lot more scatter around to (as Doc H informs us) 'help tell the story'.
I've been collaterally building a piping test piece too- that is now all cast and partly glued up and base painted. Needs Bolt Gun washes and some other weathering and is mostly done. Pictures shortly.
I got a first layer of paint on the shipping container last night, using the new airbrush. I'm still getting used to it, and how to thin the paint properly, etc, so want to have another go tonight. I'm still puzzling the best way to fasten the 'support pillars' (made from the supplement syringes) to the wooden base- I'm thinking that I'll roughout where everything goes, drill a hole and insert a flathead drywall screw through the bottom, so it sticks up through the base and work a blob of greenstuff around the screw and fit the tube down over it- that should dry out nice and steady! It has to be a strong bond, because there will be a fair amount of superstructure stuck on top....
Good evening all and thank you for looking in- I'm sorry I haven't been as active here lately as I would have liked to have been!
Wirecat wrote: Wonderful mix-n-match recipe here, Meer_Cat. Should be good after paint has brought it all together!
Thank you Wirecat! I've added some more gewgaws to the turbine engine and it and several other pieces (to include the servitor/mechanic that will be tinkering with it) are lined up ready to spray paint- I just need an unoccupied minute to do so! As Napoleon messaged to Ney- marching away from the battlefield at Quatre Bras to support the Emperor at Waterloo- "ask me for anything except time!"
Dr H wrote: Good work. Nice little container-shack.
Meer_Cat wrote: ... Plus a lot more scatter around to (as Doc H informs us) 'help tell the story'...
As your doctor I advise you to tell a story.
Thanks Doc! And I _always_ follow doctor's orders!
Thanks Shas! It's good to have you stop in and comment, and good to see you back on the boards generally- you've got some great stuff going on.
Here is a shot (using my phone, I forgot my little camera at the farm this past weekend) of a project that I've been running concurrently with the flying pad/delivery service build. I'd normally have waited to post anything until I had more to show of the whole project, but I am _very_ pleased with how these pipes came out, so wanted to share with you all.
The pipes themselves are cast from dental plaster using Hirst Arts mold #320. They are for a small project that I think I've mentioned here before of a 'desert pumping station'. The project is a platform for learning things about using my airbrush, and wow! what a difference from the techniques I regularly use with brushes!
I primered these white and then basecoated them with copper (the same craft store, $1 a bottle copper I used in the LOER competition a few months ago- just needed liberal amounts of flow-enhancer). The airbrush applied the coat much more smoothly, thinner and more sparingly of paint than I could have done with a brush. I then airbrushed on a very dark grey (craft paint again) at all the joins and flanges to form the base of the corrosion/oxidation look I wanted. I then airbrushed the dark turqouis-ish green-blue onto the dark flat grey, but lighter and lesser. Last, I drybrushed an even lighter shade of blue-green base turquois to act as highlights. Like I said, I'm extremely pleased with how it came out, but it is well known that I am a) biased and b) half-blind. What do you guys think?
More follows soonest- the desert pumping station is almost ready to start gluing things down to the base board!
Those are sweet looking pipes, some light colored like a green/gray for verdigris may be called for depending on how old the pipes are supposed to be in your terrain. Just an idea is all.
I think you're right Shas- too much bright, shiny copper showing through.
I hit the main pipe lengths with another coat of dark grey, then a coat of the turquois using the airbrush, to tone down the shine some. I didn't airbrush on the lightest color turquois so that the oxidation at the joints would stand out more.
Here's new pics (apologies for the lighting):
The pipes are tacked into place on their base, which is granite flecked grey with weathering dirt rubbed in on top and they are in pretty much the final layout arrangment. Really, the only piece I plan to add is the pump shed itself, with its satellite uplink.
New pipes are better at being old. But - copper, if You really want them to be copper, is one of the most colorful metals around. It gets brown and green with age, white with corroding elements, blue and red when repeatedly heated. Dusting things down is a good all-round recipe, but... You could try many things pretending them to be coppery.
True, copper gotta copperate- the chameleon of the metallic world. I've had to clean enough of it in my life to have a better idea of al the colors it can display as it oxidizes, but it's amazing how tunnel-visioned I can get with the 'I saw it this way in some Dakka photo, and that's the way I'm going to try to get it to look!'.
I think part of it at the moment are is the limits on my painting time- it's hard to want to try to experiment- and potentially re-prime and start over- when it takes forever to finish something.
On the other hand, my skills with the airbrush- the original point of the exercise- are an order of magnitude better than they were (anything added to 'zero' is an order of magnitude, right?) when I started. My understanding of thinning/flow enhancing, flow and pressure balance and precision painting versus 'fogging' is much greater. I'm not up to doing the belt buckles on my IG guys yet, but working towards it!
So, airbrush learning project is wrapped up. I added some more 'patina' to the pipes, got everything glued down and am putting this aside as 'done', so I can get back to the delivery service flight pad. But what I've learned from this side project will help me achieve some of the effects that I want for the pad, so all good. Here's pics:
If the question comes up, the blue chalked arrow in the little enclosure is simply because I thought the base was too bland and I wanted something to break up the color that was quick and easy. The uplink antenna is one of the Russian toys that the eBay guys that carry Tehnolog and Robogear also carry. The pump house itself is a printer ink cartridge case- Cam did something similar last year or so. I've got a stack of them hanging around- finally got to use one. Overall, I thikk it is a nice 'gaming quality' bit of scatter or line of sight blocking terrain or small defensive position. Had some fun, learned some things-
On to the next (or back to the previous, in this case).
More on the flight pad, wizard's cottage and a new project (a High Elf Tower based on a brand _new_ bit of flotsom I found) follows soonest!
Murphy's Law (of Combat): Never, share a foxhole with anyone crazier than you, tracers work both ways, if you make it too hard for the enemy to get in, you may find it hard to get out, ALWAYS have an exit strategy.
In this case, detonate the pipes carrying liquid Vaporarium
That is a really excellent piece bud, brilliant use of parts, I have been messing about with pipe ideas for ages and have nothing to show for it. You have nailed it bud. Really spot on.
Late suggestion to a nice finished piece. Maybe, after applying the solid base layer it is worth it to stop and add a heavy black wash or something, to add darkness on all these bends and fittings? They usually are the first places to collect dust too...
Those came out really nice! I've always looked at the Hirst stuff with a sense of ambition, but it seems like such a big commitment to casting that I'd want to go all in... but here you've done something really cool with just a few molds. The color palette and airbrushing are spot on. Nice work!
Thanks Cam, Wirecat and Mac! This project was fun and I learned a lot. I really think the pumping house was the weak point- or possibly the antenna- a little too toy-like (but hey, it _is_ a toy). I have enough extra castings though, to undertake another project to carry on the theme. This time, I think I'll start with the copper base, hit it with a heavier dark grey coat from the airbrush and possibly a Nuln Oil wash as well, then the turquois and finally a very light top coat of white. I also want to try the salt weathering technique- Mac has re-awakened my interest there. I'll paint the joints and/or elbows in 'color codes' for hot, or dangerous, or something and try the technique there.
I'm on the road in New York this week, and the wifi is hit or miss, so it's harder to keep up with everything going on. But thank you for your interest, comments and inspiration- more follows soonest!
Hi LG- sorry for the delay in posting up a response. I've been up in New York helping my mother prepare her house for sale and it made for some busy (and long!) days. I actually got some painting in tonight on both the improvised container office and the Condor itself, plus got the Adeptus Mechanicus mechanic primered. I hope to have pictures up tomorrow evening, all things being equal.
Also want to get going on the Wizard's Cottage, another whack at a pipe terrain piece, an old Kromlech jetbike-mounted Farseer and the High Elf terrain piece that suggested itself when I was cleaning out the tractor bay of our barn- you never know what good stuff you're going to find there!
Plus all the neat things I see you guys doing. There just aren't enough hours in the day!
So, got some real work done over the past two evenings- I'm calling the little office done, or nearly so. But first, here's the silver that came with a set of metallic thinned paints for the airbrush- I can't believe a) how easy it was to spray it and get good coverage, b) how little paint it used and c) how unbelievably bright this sucker is now. I'm going to paint the top half blue, slather Nuln Oil over everything and then get started really weathering:
But here's the container office. I used the airbrush to apply the yellow basecoat, the white oxide and the black and orange parts of the graffito (my very first _ever_ in my life), sponge chipping for the black scrapes, a little bit of Erie Lackawana Engine Sooty Black Weathering Powder, brushed rust from Vallejo and three different layers of wash in strategic places- Seraphim Sepia, Nuln Oil and thinned rust:
Next, I think I can stick this sucker to the diorama base and get really into mounting the flight pad. I drilled out the support columns to take the pins for the support braces tonight and also got the taken-apart engine and some other bits primed, as well as a start on the mechanic's face.
I'm not entirely happy with how I slopped the rust around, but I think the overall effect is still better than many of my previous efforts. Who knows- one day I may even paint something to look like new, just to see what it's like!
Thanks Shas! I think what will help around the louvers is some more Erie Lackawana Grime in a Bottle- make it look more like grime and less like badly applied siding stain!
Interesting... I like the dirt and rust on the corners, quite alrighty! That door with the "keep out" sign sure asks for a spray of shotgun lead. Very good work overall, congratulations on another nice terrain piece!
I think the rusting and chipping looking great , personally not a fan of the color of louvers, but then again I’m not a color expert as my wife and youngest daughter always remind me when I dress myself .
Overall I am pleased with how the rust combined with the sponge chipping came out- but Theo is right- those louvers gotta change. I think I'd batter re-prime them a base color and try griming them again. I may even pry one off, cut out the wall behind it and then re-attach with a stick propping it part-way open for ventilation (because the AC unit on the front works so poorly, you see- Olivia the Mechanic has been meaning to fix that, but keeping the Condor in the air is a full time job all by itself).
I've airbrushed the flight pad and the support columns now, I'm ready to start sticking things to the base using my new favorite 'holds everything'- greenstuff. Then the _real_ detailing can begin.
Meer_Cat wrote: So, got some real work done over the past two evenings- I'm calling the little office done, or nearly so. But first, here's the silver that came with a set of metallic thinned paints for the airbrush- I can't believe a) how easy it was to spray it and get good coverage, b) how little paint it used and c) how unbelievably bright this sucker is now. I'm going to paint the top half blue, slather Nuln Oil over everything and then get started really weathering:
But here's the container office. I used the airbrush to apply the yellow basecoat, the white oxide and the black and orange parts of the graffito (my very first _ever_ in my life), sponge chipping for the black scrapes, a little bit of Erie Lackawana Engine Sooty Black Weathering Powder, brushed rust from Vallejo and three different layers of wash in strategic places- Seraphim Sepia, Nuln Oil and thinned rust:
Next, I think I can stick this sucker to the diorama base and get really into mounting the flight pad. I drilled out the support columns to take the pins for the support braces tonight and also got the taken-apart engine and some other bits primed, as well as a start on the mechanic's face.
I'm not entirely happy with how I slopped the rust around, but I think the overall effect is still better than many of my previous efforts. Who knows- one day I may even paint something to look like new, just to see what it's like!
Hey ORM- long time no see and thank you for looking in! The office is a neat little learning project for me and will be a major sub-component of the flight pad terrain piece I'm working on (I was getting some good progress in tonight until a family phone call took more time than I expected, but all is good). Tomorrow should see some more pics of the whole thing starting to come together.
Hi Captain! The little pumping station was fun, and my first project ever trying to use an airbrush. I learned a lot and had some fun. Game-ability was a design requirement from the get-go, It had to be able to accommodate at least a few individual figures, or one heavy weapons team. I also fulfilled a longtime ambition to use one of the 10,000 printer cartridge packages I've saved for an actual project, so I met that goal too.
More follows soonest, and thank you all for your encouragement and comments!
Thank you for dropping in Syro, and for the encouraging words.
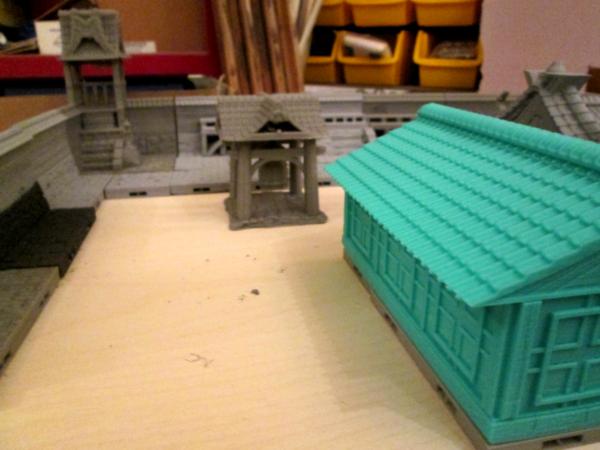
Here are some WIP pics to show how things are going to start coming together. Obviously, I owe a lot to Clanmac's inspiring work in his post-apocalyptic Junktown. There's still a ton of things to add- pilot elevator, freight elevator, the mechanic working on an engine (the one I've already built might be too big for this platform, may have to make another) and a bunch of smaller detailing, not to mention the Condor (which got the start of its flight livery colors tonight), but here's a start to the basic structure:
Everything you see here (blurry and badly lit, I know) still needs paint except for maybe the little office (and the louvers are now yellow but need some grunge, so, scratch that last). Nut I'm excited to be seeing some actual progress that you can measure, and wanted to share.
Incidentally, the pillar caps that you see at the top of the support poles ar etoothpaste caps with the lids cut away. I'm right chuffed with that utilization!
I am not a fan (snicker) of office _under_ the landing pad that is not as thick as a carrier deck. You may survive the down blast, but will You get out when someone screws the approach protocol or an engine gives up?
A thousand ways for things to go wrong even before the local gangs start getting twitchy? Sounds 40k Imperium to me!
Looks good overall, only thing making me twitchy is the lack of a brace to keep the edges of the landing pad from flopping/tilting when the craft don’t land dead center over or between the pillars. A couple I beams from the edge to the pillars would be sufficient.
shasolenzabi wrote: Looking good! so the landing pad has an actual office now!
Hi Shas! Yup, the container office was always a planned part of this project build, ever since I saw Insaniak messing around with them on his blog awhiles back. It also made a good starter subject for the airbrush- too big for me to miss, too cheap to worry about ruining. Having done one, I'm now highly desirous of doing more, more realistically. Believe it or not, I tried to replicate the weathering on a real, dingy yellow shipping container in my neighborhood- I took a photo on my phone (I'm old enough that saying that still sounds odd, or at least very 'Get Smart-ish') to use as a guide.
Wirecat wrote: I am not a fan (snicker) of office _under_ the landing pad that is not as thick as a carrier deck. You may survive the down blast, but will You get out when someone screws the approach protocol or an engine gives up?
Nah, it is good! Serviceable.
Nope, you are right on this snicker, Wirecat. Among my many self-defeating and conflicting 'musts' for this project was a need to use up a piece of plywood I had already cut for a base, get the storage container office worked in there and use up the double DvD holder I had lying around. I also wanted to do something 'deliberately' not regular- in other words, not on a perfectly square, right angle alignment. If you look at my promethium refinery from the LOER contest, it is _very_ regimented in its alignment. So, I arranged things off right angles, more free-flow, and everything was fine. Until I realized that my landing skid equipped Condor couldn't possibly land on such a tiny landing pad. So it had to be VTOL to make 'sense'. And now the office (at a minimum, really, the whole blinking site) gets bathed in noxious jet fumes every tme the Condor lands or takes off. Making the bird a VTOL was a duex-ex-machina for the short landing pad- now I need another duex-et-machina to handle the exhaust fumes! I must hie myself hence to cogitate upon this conundrum!
ChaoticMind wrote: A thousand ways for things to go wrong even before the local gangs start getting twitchy? Sounds 40k Imperium to me!
Looks good overall, only thing making me twitchy is the lack of a brace to keep the edges of the landing pad from flopping/tilting when the craft don’t land dead center over or between the pillars. A couple I beams from the edge to the pillars would be sufficient.
Agreed, CM- many things in the Imperium are deliberately made to be dangerous to the user- plasma guns and multi-meltas come to mind. I may fix a piece of 'blast shielding under the deck to bear the brunt. But struts I had envisioned from get go; in a couple fo the pics earlier you can see where I drilled the pilot holes to use to affix them to the main poles. They'll run up to the edge of the landing pad. Theoretically.
I may also scale back my plans for two elevators, I'm running out of room on the small footprint I've decreed for myself. Ditton the LED lighting- that may have to wait for a simpler, more straightforward project to play with. Or, knowing me, I'll tackle my Reaver Titan next and light that up for a first time go. I do still want to include my little mechanic, but she may have to be working on something up on the landing pad itself, rather than on an engine hoist down in the yard. We'll see. A lot I won't know until things get stuck down and I see what I have left.
Thank you all again for the interest and the feedback. I'm having a ball with this project and remember: it's not done until it's OVERDONE!
The next big piece that the diorama needed was one of the elevators up to the landing pad. (Given the space limitations on the base I'm using, it may be the _only_ elevator- although I plan an enclosed ladder up one of the columns.)
I used Hirst Arts Mold #294 for the pieces and glued them up:
Used the airbrush to basecoat (a color called 'Thrash Metal' by Scalecolor)- didn't primer or anything, just straight on:
Used the airbrush again to put a 'dusting' of Pavement Dark Grey (almost black) over just about everything, to dull it down,and heavier in places where the rust was going to go:
And finally used a brush to (for me) carefully apply rust in strategic and limited places. I didn't want the elevator to look like new, but I didn't want it to be a towering pile of crepescance, either:
And here's how it looks tacked into position:
I'm thinking about making the bit at the top a sort of control tower- glass enclosed and with antennae and such like, since it is too tall. We'll see. And I need to throw together an elevator car, of course.
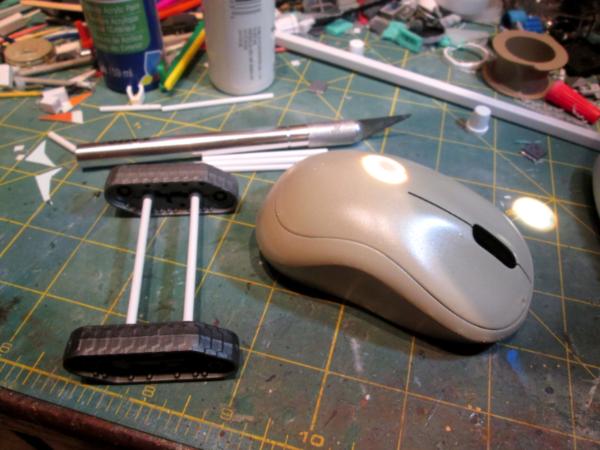
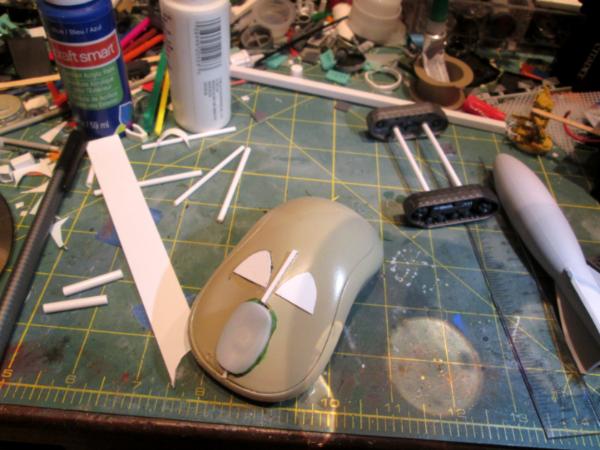
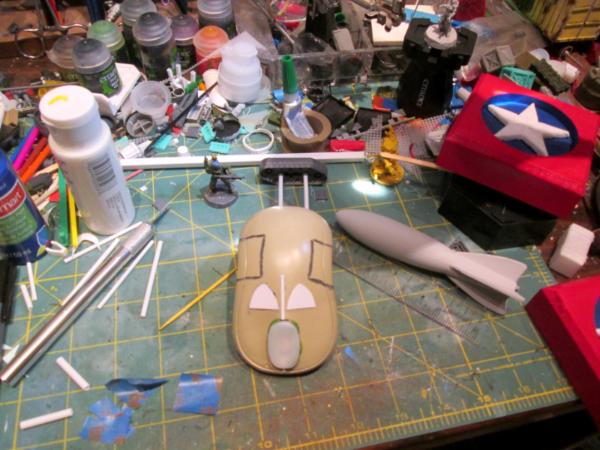
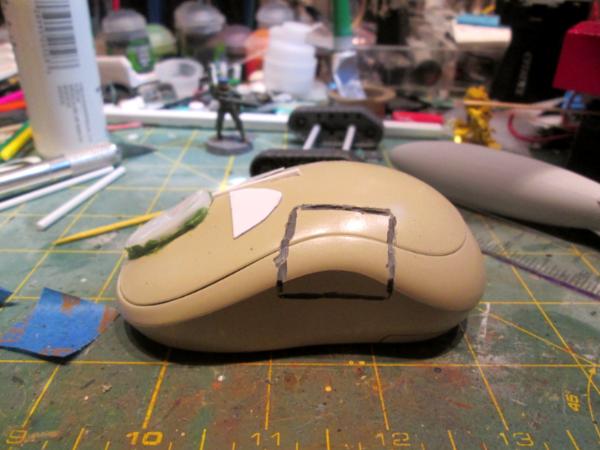
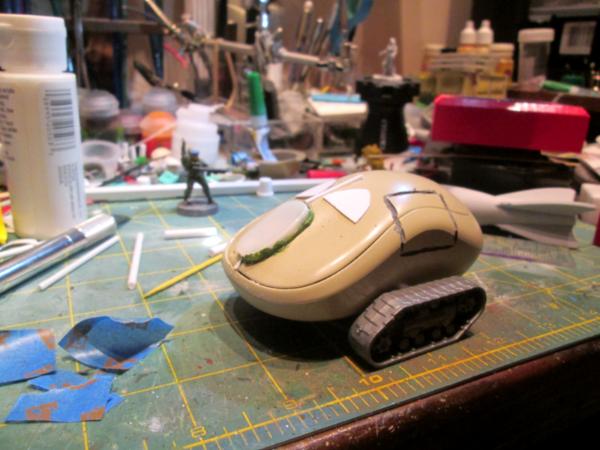
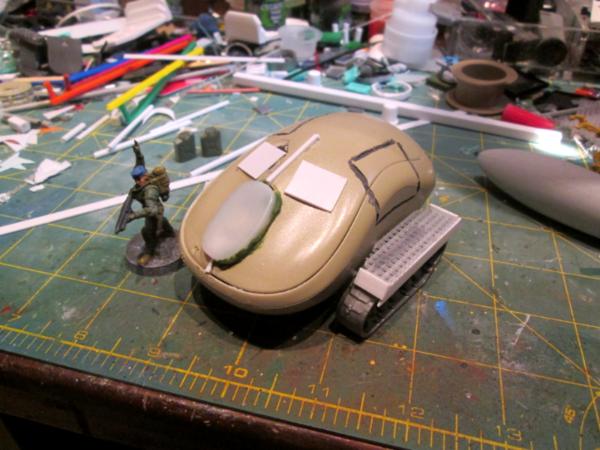
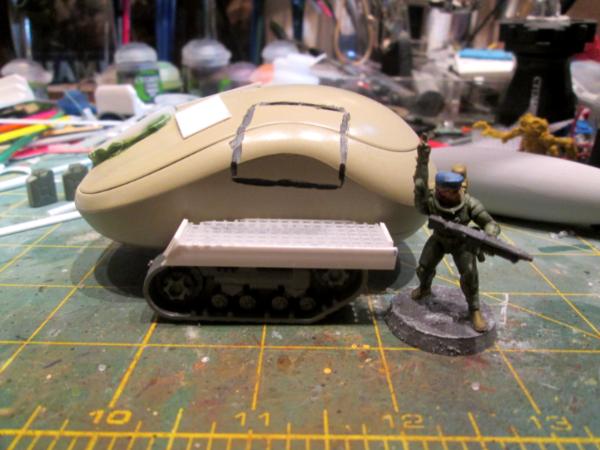
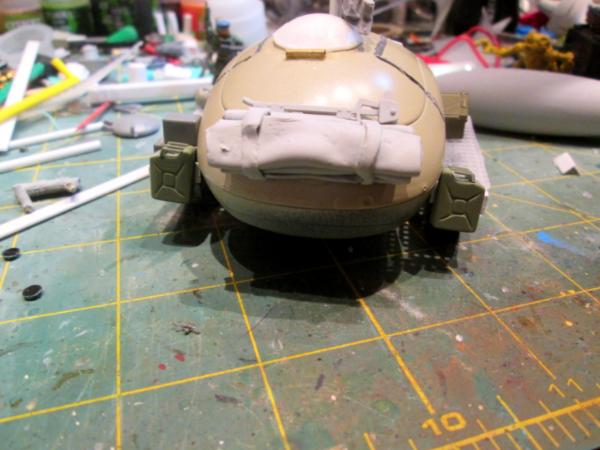
On a different note, who knew there was so much usable stuff in a simple mouse?
And yup, the mouse carcass is for a project in which I rip off all of kestral's recent terrain modeling goodness. It's already underway and half built!
Thank you for looking in, constructive criticism always welcome.
Thanks Doc! I've notched out the landing pad a bit so the elevator tower/frame fits snugly on the base- it was bugging me that it was hanging off, and I'd already epoxied the pillars down! This is what happens when you 'build first, design later'.
Thanks Theo! I'm running a little bit of everything through the airbrush at the moment, from ScaleColor (the best of the pre-thinned paints I've used so far) to Walmart 50 cents a bottle craft paints (with heavy use of flow improver). The metal set I got from ScaleColor is almost too subtle in some of its shades (Aluminum, Steel and Thrash Metal are almost indistinguishable from each other- which might make them good candidates for very subtle shading, now that I mention it) but the other metallic- Emerald, White and Plasma (electric, pulsing, virulent Blue) are very distinct. I am finding that I like working with pre-thinned paints more, sometimes the pigment in the cheap craft paints is just not ground very finely, and you can't get a smooth coat no matter what you do. But sometimes you get surprisingly good results (the copper I used on the pipes project, for instance). I'm keeping a notebook.
I have my project inspired by kestral's Tau scenery underway, and will be trying some layering techniques with the airbrush to simulate a building's basecoat paint overlaid with desert scoring and dust- we'll see how that works out. Very glad I got the airbrush though, lots of new possibilities (although there are many things I can still only do with a brush ).
So here's an update on a lot of subcomponents of more than one project. I wanted to keep things under wraps until more nearly finished, but I'm not advancing quickly enough so will throw some WIP shots out.
First, borrowing kestral's excellent use of a watch display, here's an antenna for on top of the other idea I ripped off from kestrel (but am not showing yet). Frankly, seeing it here, it could also be an anti-ship laser:
Basic components:
Refined:
Assembled:
Some pieces of another project that goes along with:
The Condor with the top basecoated (love that airbrush!):
Hey Captain Brown- now my guys can sing "She's gone so long" around a burn barrel like the group Chilliwack!
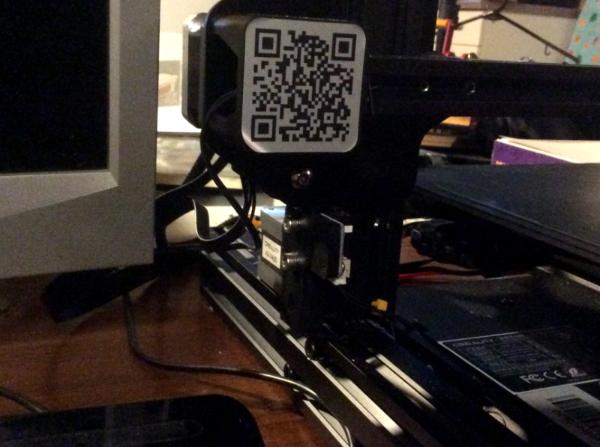
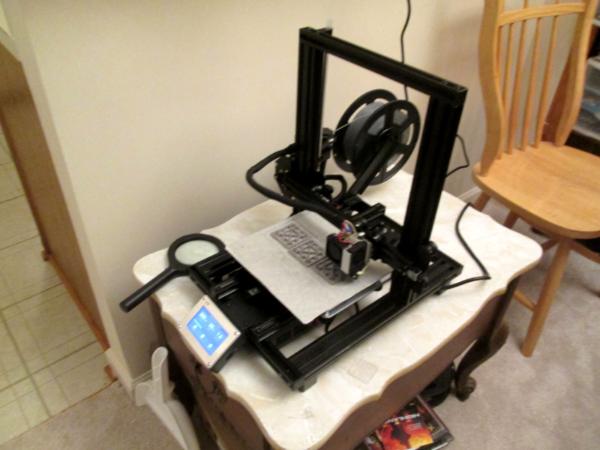
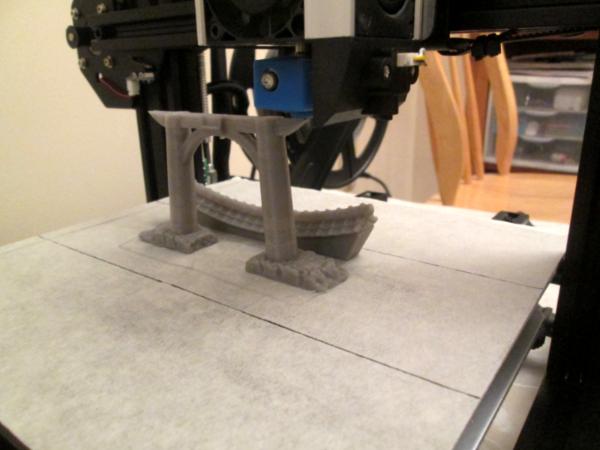
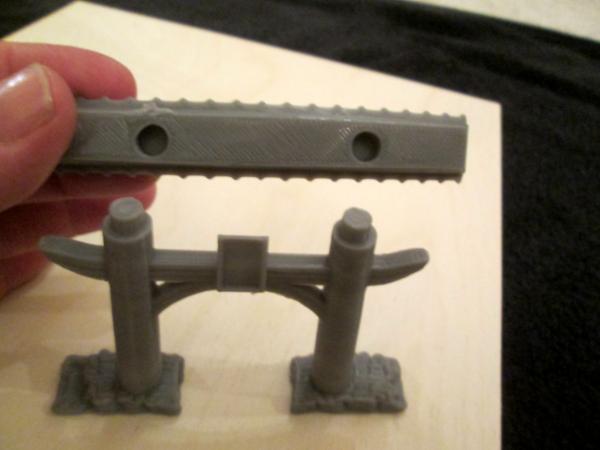
And finally, this is part of the suck on what little time I do have to paint/build/create- I've been messing with it for more than a week trying to get a decent print off it:
The piece looks fuzzy because I'm not doing something right, somewhere. But I will persevere- this is my side-hustle when I retire in a couple of years!
3D printing... Watching intensifies.Have a good extrusion, Meer-Cat.
The dish is neat, although with such big axial assembly it is going off the way to somewhere. I wander how such a diverse assembly of parts will prime and hold the paint....
Thanks ORM, Theo! I should name this project 'Stuff I stole from kestrel', because everything I've got going (with one exception) is an idea he used on his Tau table! I've had that watch thingy hanging around forever- I was thinking about using it as a gun or missle mount for a Manticore counts-as, or equivalent, but when I saw his solar panel array I was hooked. Didn't have anything good around to make the solar panel though, so cheated and made the yuuuge antenna.
Wirecat wrote: 3D printing... Watching intensifies. Have a good extrusion, Meer-Cat.
The dish is neat, although with such big axial assembly it is going off the way to somewhere. I wander how such a diverse assembly of parts will prime and hold the paint....
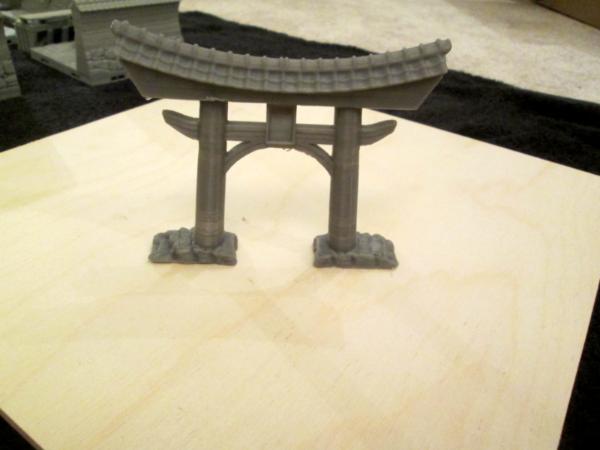
Thanks Wirecat! I'm doing some 3d printing things right- I also get good adhesion (so far) because I re-level/check level the bed almost every print and certainly for every one that's going to take more than a couple of hours. There's just something about how the layers are laid down that isn't right- but I've got a lot of advice coming in, plus what I see on YouTube and the blogs online. BrianCJ is sending me some pointers as well.
I'm not worried about priming the antenna- a hefty dose of Rustoleum 2x (Primer and Paint in one) as the undercoat, that stuff sticks to anything. Then hit it with the airbrush to take the shine off, weather, salt, pepper to taste and Bob's your uncle- you're done!
Still working on the aerial delivery company- that's further along that it seems, got the wizard's house to do, a Kromlech version of a jet-bike mounted Eldar seer, a High Elf building idea that came to me after I found a bit of flotsam that's just screaming out to made into a project, I've infantry that need painting up and of course, more fiddling with the 3d printer.
A lot of cool projects going on Meer_cat. I would not have visualized those pieces into becoming a cool radar dish the way you did. I especially curious what the shell of the computer mouse will become. Also good luck with the 3D printing fun
Thanks Syro! Eventually I'll settle back down into taking on one thing at a time- it's my nature. But every once in awhole it's nice to throw caution to the winds and actually open two boxes at once!
Ok, finished a side trip from the aerial delivery company, one less distraction before finishing it, and getting started on my LOER project.
Here are some very poorly lighted shots of a desert outpost, with uplink antenna. Or, also known as "everything kestrel showed how to do in his blog a little while back".
You saw the antenna earlier- made from a piece of cheap personal fan from the dollar store, a toothpaste cap and a watch display stand from my cheap Timex and a couple of other bits and bobs. It's magnetized to the roof so it can removed for easier travel packing, display at ground level as another piece of scatter or used separately. I'm not entirely happy with the weathering and may hit it with some different colors, to look more like aluminum oxidation and less like ferrous rust.
The numbers are dry transfers for Pinewood Derby wooden race cars and they were surprisingly easy to apply- easier than water-slide transfers/decals. I got them cheap on sale at Hobby Lobby.
The pipe is made up of more castings from my Hirst Arts mold and airbrushed pretty much the same way as the earlier pipe project. I did use two more lighter shades of turquois and white to try to enhance the 'desert-y' look. I also used some of my grass clump bits, with greener ones close to the pipe (itself either a source of water or acting as a condenser in the early morning) and drier, dead clumps further away.
The door is another Hirst Arts casting. The main body of the outpost is a 3 inch to 4 inch PVC pipe connector (free from Home Depot because it was cracked) topped by an old smoke detector (thank you kestrel!). Using my airbrush, I base coated the whle thing metallic white, splotched it with burnt sienna dust patches and then dusted it all over with khaki.
The hatch is yet another Hirst Arts piece, from the robots mold. I covered the two indicator lightbulbs over with Blu-tac during painting, so they would look like navigation lights or something- if I'd been thinking, I'd have drilled them out from underneath and installed LEDs, oh well, maybe next time! You can also see the magnet glued on and looking like a bit of roof clutter (hopefully).
And a last couple of shots of the antenna, showing the weathering. On the radial elements I'm happier with the weathering, but the central radiator needs to be re-done and that's a fact. Still, overall, I'm pleased with the look and learned a lot more about using the airbrush. I'm still messing about with the 3d printer, so that took time away from actual modeling also.
I'm counting this one as done until I break out the weathering paints for the next project, I'll touch this one up at the same time.
And along about Christmas, holiday, I want to try speed painting these armies:
I backed the Forgotten Realms Norse versus Undead Kickstarter a long while ago- they've finally come in. I've never speed painted an army before, so this will be another interesting learning experience. I'll probably fit in a couple of one-offs of the character figures to get an idea of what paint scheme(s) I want, and then plan the production for when I've got some sit down and paint time- like Cam says, he gets so much done in a sitting because that's all he does- no TV, no music, no distractions.
The desert outpost looks good Meer_Cat I'm curious about those minis from the kickstarter, good luck with the speed paint. I don't know why I always miss knowing about kickstarters
Undead are really forgiving for speed painting - I did my entire lot of Mantic Undead in about a month total.
But for norse, the shields could be a big challenge! I saw someone using printed shields with the middle cut out with a hole punch as time saver, and I have to say it looked really good.
This is for the current League of Extraordinary Riveters competition. It's the beginning of an Engagement and Targeting Multiple Environment (E.A.T.M.E.) platform for hasty spaceport defense during orbital and airborne insertions.
The main platform itself will be fabricated from some leftover ceiling fan parts and bits of CD/DVD boxes:
Conveniently, the central spindle simply unthreads from the base:
I need to fasten two of these together to form the fighting platform, once complete all of the weapons and other systems will be mounted on old CDs (mostly came in the mail as advertisements, I use them for painting palettes) and can be swapped in and out based on what you want/need- thus fulfilling the Double Entendre requirement for the contest- a piece of terrain that can be converted over by design to fill more than one function:
The posts are for the two halves to line up and make it easier on the glue and/or greenstuff to hold things.
Thank you for the kind words, Gordy! It has been a lot of fun over the past couple of years and more so because Dakka provides a place to share everything.
Thanks very much, Captain! I want to take another crack at the weathering- I'm not happy with the rust streaking I tried for and want to go over it with sponge-dab darker greys, with just a little bit of rust in. Insaniak's new vehicle (I can't believe that it is made from MDF) is exactly almost what I want for the antenna and the building door.
Thanks for looking in, Syro! Yep, the Imperial Guard would be lost without a few good acronyms.
Here's tonight's work:
The plastic 'pegs' made from styrene channel and fixed in place with superglue broke off, so I cut strips from an AARP advertisement card and fixed them in place with JB Weld:
I've since added the top plate to it, also fixed in place with JB Weld, but it's drying and has a ton of books on it to keep the seam closed tight, so a picture of that tomorrow, I think.
I used machine screws to fasten the ceiling light sem to its base:
And countersunk the screw heads so that if I ever get to go someplace to game, they won't scratch up someone's nice table. I have some felt lying around, I'l probably cover the bottom of the base with that, just to be fussy:
Here's the central column that holds the fighting platform up, fitted into place but not glued/epoxied/welded/etc yet:
And, this is the League of Extraordinary Riveters, so here's some riveting; black 1mm sequins on flat black metal- please just shoot me now. Actually, I think they came out kind of okay, and there are many more to emplace. I found that I couldn't pick them up and put them down so that the faceted side showed, I had to flip them and put them down so that the flat side was up- it was the only way I could grab them with tweezers:
And through the magic of close-up photography, I see at least one rivet that needs to be re-stuck down!
There's just no time to paint/model lately and my stupid 3d printer is sucking up a lot of the oxygen in the room- it may have to go.
First, here's a new gizmo I found on Etsy from Mack the Maker- he calls it a 'shark fin paint pot holder' and it keeps the lid back on Citadel-type paint bottles (it holds both sizes):
As for the E.A.T.M.E., the tower base is mostly done(needs some gubbins attached) and the base of what will be a spiral metal stair up to the fighting platform is done.
The 'ship-killer' laser cannon is starting to come together too. We have a lady at church who can paint the inside of a Christmas ornament by working the brush through the small hole where the hanger attaches at the neck of the ball- it's amazing. I have a _much_ larger opening to work with and want to paint some 'lightning in the bottle' if I can manage to represent that titanic forces waiting to be aimed an unleashed on a low-orbit warship:
These bits and bobs are to make the stairway and two of the inter-changeable platforms to allow the tower to provide a multitude of functions, depending on what the game calls for:
I’ve only had one hiccup with the GW paint pots and that was from me being tired. Then again I’m not a prolific painter and I do a lot wrong , but the shark fin looks neat.
First world problems with having a 3D printer . One day I’ll get one, till then I’m letting all of you smart young’unz figure out all the problems so mine doesn’t flash 12:00 for two years after I buy it .
I'm loving your creativity as usual Meer_Cat. That paint pot holder is pretty cool also, I would find that useful, I have some old paint pots from before they had that weird little nub on the back to hold the lid open (plus those don't always work well).
I'm actually old enough that I wanted to avoid the whole 'learning curve as art becomes science' thing, so I went with an inexpensive (comparatively) but proven model in the Ender-3 Pro. Almost three months of trying different print profiles and almost two months now of working with Creality to figure out what's wrong. I've seen pictures of peoples' prints using the Ender-3 and -3 Pro and they are great. Some of the designers I back on Kickstarter use the same printer themselves, so I know the printer itself is probably not the problem, unless I have a defective component, like the temperature sensor, or something. I'll keep at it- this is too close to the Star Trek (Original Series) replicator for me to give up on it!
And the way to fix any device with 12:00 blinking on it is to cover it with electrician's tape.
Syro- I have a lot of trouble with these stinkin' paint pots- especially the washes which are what I use of Citadel's the most. Much of my current cutting mat/desk blotter is covered with Carroberg Crimson from a mishap- I grabbed these as soon as I saw them to avoid repetitions in future. I may actually glue the plastic base to a broader foam board base to make it even harder to knock over!
I'm hoping to get one of the weapons platforms done tonight on the E.A.T.M.E., but there is a lot going on, we'll see.
Thanks, Brian- I'll one or two to try, but I really need help from something that holds the lid back; not in opening or fitting the little nub to hold them open, to get the nub out of the way to close the blamed thing again! I'm not very clever with my hands at some things, I reckon. These holders look interesting though, I'll give them a try.
Okay, end of an era- I've got five separate project builds going and have more new Kickstarter infantry to paint plus I'm finally getting successful results from my 3d FDM printer (more on that in a separate entry- three months of empirical troubleshooting to find a factory fault).
Here's the start of another PVC Desert Outpost build, originally inspired by kestrel and his use of an old smoke detector. Just a bit ago, I posted my own Desert Command Post with Mega-satellite uplink antenna; this new piece will be some sort of courier rocket launch facility. It starts with US$7 worth of PVC pipe fittings:
In this next shot, you can see the wire nuts added to the perimeter to house the guidance lasers, but I wanted to show off the 'scorch marks' from hot take-offs and landings:
This starts with Warhammer TV's recommended washes (applied through my air brush) for doing muzzle burn: Drakenhof Nightshade in the center, Druchii Violet next out and then Seraphim Sepia outermost. The whole thing then dulled down with Minitaire's Ghost Tint Oil Discharge. I like the look for a start, but want to add more Violet and Nightshade and make the whole thing more darkly grubby. It's amazing what you can see in a WIP photo of your work that you can't see looking directly at the piece.
The PVC pieces are glued together and primed with Rustoleum 2x Ultracover Tan and then basecoated with Scalecolor's Metal 'n' Alchemy White.
I've already added and basecoated a bunch of Maelstrom's Edge kitbashing parts from their first sprue (need to buy some of the new ones), with those and some base scenicking, this will be done,and I can move on and finish up the Desert Outpost Defense Turret Position.
Thank you for the encouragement. I should have recognized the colors of the flag symbol by your avatar pic earlier- but didn't put two and too together until I saw another comment you had made in a different thread- my wife is a countrywoman of yours, from Bas Wavre, near Bastogne. So, you're almost like a cousin-thrice removed, or something !
This was pretty much a case of "I didn't know enough not to try" it never occurred to me until _after_ I loaded the airbrush that maybe washes were a bit off for it, then I thought about how thin the tints I've been using are, so fired away. I'm glad it worked!
I was constantly finding people discussing the subject of spraying washes through airbrush like a kind of color filter, or ink, to tint the base color or even freehand below it. Never tried it myself, but some examples were quite thrilling. Obviously, it must have been the difference in experience, but still...
Thank you Wirecat- will do! I noticed that the violet and the blue 'puddled' like a wanted, but the sepia really did enhance the light metallic white underneath it- a very interesting color came out. Now that I know this is a thing, I'll have to mess around with it some more (once I recover the horizontal surfaces in my little apartment from all the half-finished terrain projects going on- I want to paint some more infantry, by golly!)
So, I managed to complete one more terrain project before the holiday period really starts getting busy- here's the (as) final (as it's going to get) Desert Outpost Deathstrike Missile Launching Facility:
Learned a lot, tried a lot of new things, some worked, some didn't. Here's a close up of the main entrance; I wanted to try OSL from the light in the upper right hand corner. I could have done easily when the door was loose, I'd have hit it with the air brush. Glued in place, a much more difficult proposition, so it didn't get done this time:
I did try something different for the basing material and paint: the 'board' is a chunk carved off a Doller Store clipboard, per Warboss Wazaagh, I used crackle finish for the base material and then hit it with Burnt Sienna in the flat spots, Yellow Ochre in the crackly spots and then a very light overbrush with Antique White, all through the airbrush, all were $1 a bottle craft paints. The lighting in these pictures doesn't do them justice, they actually came out better than I had hoped.
Used some interesting bits that you can see in this next pic: in addition to the highly recognizable Maelstrom's Edge Original Sprue components, you see a wire nut that acts as the housing for an LED socket and real LED bulb plus the female connector from an old 25 pin computer plug:
Now here's a view of the launch rail for the missile (had trouble priming the first one, so I'm putting this out and will finish the missile later to go with). I used all bits from the trash pile on my painting bench, the rails themselves are an old 3d print ladder. I still like using the violet, blue and sepia washes from GW for blast wash- where the blue and the violet overlap becomes very sooty black:
Here's the back wall, the decal 'graffito' is from Greenstuff World:
Now here's the left side with it's appropriately officious warning signs (that the local gangbangers clearly do not respect):
Close up of the signs, I need to add some Decal-Fix to the paint blob on the right (those are also part of the graffiti decal sheets from Greenstuff World):
Another shot of the base of the launch rail- I'll need to add just a scooch more blast-wash-effect behind the base of the platform to look a little more realistic. I was meant to put some of my many extra gears under three points of the round base (which is the formerly adhesive base of one of those pens attached by a chain to a counter top) to make it look like the rails could be rotated to change the launch azimuth of the rocket, but oh well:
And a last look at the facility:
Total cost was under US$15. Had a lot of fun, and now I've got four urban/Necromunda/Desert Outpost terrain pieces. Without even meaning too, I've accidently started completing a gaming board!
Every other horizontal surface is still covered with a partially completed terrain project, but I'm glad to have gotten this one wrapped up before I head off to the farm for Christmas. Your constructive criticism is always welcome.
This looks great. I agree that there should be a bit more exhaust blast behind the missile ramp where it would be concentrated. The base turned out well.
Thanks very much for your feedback- it helps a great deal! The nice thing about adding the burn marks is that, with the airbrush, it can be done easily without disturbing anything else. I may add some rust weathering to the beacon light housings as well. I like working with the PVC pipe, electrical and guttering components because there is so much that can be done, for relatively cheap investment.
Now, if I can just get the darn Deathstrike built, we're cooking with gas!
Very good! Grating is slightly out of scale, but nothing that cannot be handwaved away, Your efforts clearly paid off - that is the real investment here! Congratulations, and be careful - airbrush blasts don't cause a lot of disturbance but they can cause addiction.
Thanks Wirecat- and you're too right! When I first started messing around with the airbrush, I never thought it would become other than a specialty tool for me- there are some things you just can't do with a brush, but the maintenance, clean-up, etc with an airbrush seemed such a chore. Plus, I had invested a lot of time learning workarounds for techniques that simulated the effects created with airbrushes, and was quite satisfied with (most) of them.
Now, I can field strip that sucker in the dark, blind-folded, with my eyes closed, hanging upside down from a bar and wearing mittens in less than 3 seconds. I find myself using it more and more frequently, especially for basecoating and especially for vehicles and larger terrain.
I'm anxious to get my three (for the moment) remaining terrain projects done so I can take a crack at air-brush-applied camouflage and weathering on a proper tank- a Soviet WWII-era T-35 (the one with five turrets). That's going to be quite the project, I think!
I always appreciate you're stopping by and dropping the kind word for my meagre efforts; as when I started posting on Dakkadakka, it is wonderful to be able to share a bit of one's efforts in the hobby even though busy, far from FLGS, etc. Haven't had that ability since the mid-90's.
Wow, I just went back through some earlier pages and there is a lot of great stuff buried here. Those old Rouge Trader marines with the cat-camo schemes (I guess you have always been a fan of felines). And those Dream Forge dudes also look really nice. I have had an eye on them for a long time and it seems I might have missed my chance to get one of those awesome vehicles they make. Lesson learned: when you see a great kit, you better get it because they don't stick around forever. And those rough riders with the guns strapped to their backs are quite interesting miniatures. So many great conversions and useful ideas for "found" bitz and whatnot. I'll have to read through the rest when I get time.
Thank you very much for the kind words, Riddle of Steel! I've had a lot of fun for a lot of years just painting and converting- one of these days I'm going to have to give these games a try!
I also like the Dream Forge vehicles- I backed the sturmgeschutz/hover tank one (both times!) but we just couldn't hit the funding goal. Hopefully, he'll give it another go- many of us backers had suggestions on how to make the campaign more attractive, it remains for someone smarter than me to make 'enthusiast backer dreams' marry up with 'financial reality'.
I've always enjoyed converting and using found bits- I get a ton of inspiration from all of you'ns here on Dakka on both.
I've enjoyed perusing your blog as well- the drop troops are very good and you've got enough of them done that there now is 'perfection through mass'- so, double whammy: individually and collectively well-executed pieces that are fun to see and play.
Dreamforge... this brings so much sadness. Offers were great, but the shipping has killed it for me in all his projects. Having followed the author and creator here and in other places I do wish him well with new enterprises.
But enough of that - Meer_Cat, Thank You for Your entertaining and inspirational blog! Happy New Year, may it bring more happy kit bashing and painting!
Thank you for the kind words, Wirecat. I've related in this blog before how much it means to me to have a place to share my efforts. I'm a bit remote and often 'temporally challenged' (got no time ) and so can't get as involved with a group as I might like- I'm not kidding when I say I would love to actually game using my own pieces! When I started with Warhammer 40k- late 80's- I was a single soldier in barracks: I could spend all my paycheck (such as it was) on gaming things and still have a place to sleep and enough to eat, plus plenty of mates who were into the same games to get some great events going, right there in the dayroom. We never had enough time to get things painted properly, so a lot of 'ghost' troops showed up- white primer and the type of weapon written in Sharpie marker on the equally white base. The rules were all first edition, and we were all trying to learn them. Now, I have massive amounts of painted troops, vehicles, artillery and support- plus 'eye-candy', and no time to play. I've purchased the most recent edition of rules for Imperial Guard, but must admit I need an interpreter to help understand how everything works together. They're written fine, as far as I can tell, but you can't skip six editions and just plunk back into Ed. 7 (or is it 8?) without a brief, but steep, learning curve.
If you gain some amusement looking over my modest attempts, then you are my target audience. The opportunity to create something, share it, receive feedback and then try something new based on that feedback is a treasure beyond measure.
Many thanks to you for all that you do to keep me hacking away and trying new things. Sooner or later, I will give sculpting a try as well- your pages are full of inspiration!
Your blog is a lot of fun to keep up to date on Meer_Cat. You are very creative with your ideas and make cool scratch builds. Thanks for sharing what you do with all of us. (Sorry you have no one to play with, a lot of us are in that boat).
Thank you for dropping in Syro- it means a lot to me. Your recent adventures with Beholders has me wanting to get into DnD figures for a bit; I think I'm a little too sui generis for my own good!
I'm glad to hear that Meer_Cat. I say go for it with D&D It can be a fun change of pace from wargaming figures, for D&D figures are expected to be more crazy, homemade, and less detailed. Something we all struggle with as wargamers is finding enough people to play with, I've been able to start three different groups playing or returning to D&D in the last three years. During that time I haven't managed to get a single game of 40k in. So if you're looking for people to play with, my personal experience is it's easier to find with D&D.
Appreciate the tips and will look around to see what's available in my area. It's funny, I got my first boxed Dungeons and Dragons set from Walden Book Store sometime in 1978, I think. We played HeroQuest at the Coast Guard Academy, mostly because that was the games system that the guy who was willing to be the DM used. I never really kept up with RPG type games after that, because in the enlisted Marine Corps and Army, there was a definite pre-conception as to the type of 'guy' that played those sorts of games- they even looked askance at people who knew how to play chess!
What I particularly like about doing miniatures for RPGs (I've painted many for friends, and even did a whole chess set up in pieces suggestive of the John Carter of Mars stories by Edgar Rice Burroughs) is that they can be handmade or heavily converted and they are expected to be one-off- you don't need twenty of the same type to form a unit (usually, town guards get that way sometimes, but that tends to be for larger games, in my limited experience). Each piece can be unique and get a higher level of detail.
I most particularly like using 'found' items for our hobby- n any capacity. I get a ton of ideas on new things to try here on DakkaDakka, but especially from you and Fifty. It helps me break the paradigm of "when you're young, you have no resources but all the time in the world; when you're older- you have the resources but no time". Here I am older, with the resources, but still getting excited over the newest thing to use a milk pull for!
Meer_Cat wrote: Appreciate the tips and will look around to see what's available in my area. It's funny, I got my first boxed Dungeons and Dragons set from Walden Book Store sometime in 1978, I think. We played HeroQuest at the Coast Guard Academy, mostly because that was the games system that the guy who was willing to be the DM used. I never really kept up with RPG type games after that, because in the enlisted Marine Corps and Army, there was a definite pre-conception as to the type of 'guy' that played those sorts of games- they even looked askance at people who knew how to play chess!
What I particularly like about doing miniatures for RPGs (I've painted many for friends, and even did a whole chess set up in pieces suggestive of the John Carter of Mars stories by Edgar Rice Burroughs) is that they can be handmade or heavily converted and they are expected to be one-off- you don't need twenty of the same type to form a unit (usually, town guards get that way sometimes, but that tends to be for larger games, in my limited experience). Each piece can be unique and get a higher level of detail.
I most particularly like using 'found' items for our hobby- n any capacity. I get a ton of ideas on new things to try here on DakkaDakka, but especially from you and Fifty. It helps me break the paradigm of "when you're young, you have no resources but all the time in the world; when you're older- you have the resources but no time". Here I am older, with the resources, but still getting excited over the newest thing to use a milk pull for!
Toujours en avant!
You and I began DND around the same time, same year at least. Walden’s was where we got our set too. I remember the lecture I got from the old lady clerk about being a devil worshipper .
RPGs do have their draw. Wish. Had a decent schedule to be in a group again.
Got the same look from the clerk when I checked out- like she expected me to pull a small farm animal out of my coat to sacrifice right then and there. Hard to believe how much of a culture change that game was. I still have the original box and manuals that came with, not to mention the cardboard cut-out numbers for people that didn't have dice- you used an egg carton and sorted them out by what odds you needed (six sided, eight sided, etc). Plus first editions (we called them 'new', back in the day) of the Monster Manual, DM's manual and Player's guide.
My introduction to D&D was in the 90s. Luckily, the "satanic panic" nonsense was long gone, but D&D and other RPGs had a different bad reputation of being for people so nerdy that they can't function in society. I miss Walden books, that was a good store. That's really cool that you have all that original D&D stuff, it might be fun to play that with some people. Or, if you chose to sell it you could probably afford any amount of RPG stuff you could want
Never too late for Happy New Year, Cam- thank you for looking in! Great to have another gamer in the family- is this the daughter who is also an accomplished designer and figure painter as well? Too much fun. I've been lurking over on your Tatooine site, watching the Jawa crawler emerge- I'll leave some feedback as soon as I can; work is exciting at the moment and I'm desperately trying to keep up with that, wrap up all my unfinished terrain projects, learn 3d printing and get on to all my nifty new infantry that need painting.
Very good to hear from you, hope all is well with you and yours.
You know, to me, it's strange to use miniatures for RPGs. Or at least it used to be. I've always run games and honestly I prefer it (weaving desparate stories together into a single thread, giving each player their spotlight in ways that enrich the greater game). But it's always been theater-of-the-mind for me until recently. I've been running a game of Fantasy Flight's OOP Deathwatch game for some friends for about 2 years now and they recently had an encounter with some Black Legion Chaos marines guarding a gate in the ruins of a city. I built the gate, built the chaos marines, someone else had made their characters in 40k scale, and I used some of the city ruins I had made. It was a blast - like the most enjoyable encounter they had experienced in the game to date. And these players are not 40k players. They're diehard roleplayers. So I see the appeal.
I had much the same thoughts- started out as a DnDer and it was exactly 'theatre of the mind'. I wasn't interested in using miniatures for gaming at all- minis were for Napoleonic tabletop gaming or chess. Then found one (a Ral Partha elf bard) that 'spoke' to me- and now I understand why companies like Hero Forge are so popular.
Players can invest heavily in a character that is exactly how they picture themselves, right down to which side the scroll of Beer Plentitude is carried, or having a bow and a spear slung across the back (-1 for Dexterity to deploy, if you do that).
Even with minis, there is a heavy requirement for imagination, but I think the arguments over sight lines and spatial relationships are fewer!
Very close to finishing another project, but a vehicle, not one of the several terrain pieces cluttering up every horizontal surface in my commuter apartment. Here's the build cycle to date for The Lunar Mouse Scout Car:
It starts with an actual computer mouse carcass, some styrene tube and a pair of tread units from the Russian company Tehnolog (I get a ton of great bits from those guys):
Next, some styrene strip to fill that pesky slot down the middle, a travel size shampoo bottle cap (swiped from a motel) for a 'grill' and some styrene for windows (they get changed out later):
Then using a slow speed Dremel drill bit to scribe the door outlines- I wanted this vehicle to go with 'Tatooine-style" buildings I've been making from smoke detectors and PVC pipe, so smooth bodywork with desert/prospector/military scout doodads (that's 'gubbins' to our British cousins) breaking up the curves:
Attach the track units:
And build some tread boxes out of plastic canvas (to look like steel grating) and some styrene strip:
Doodad-age front: headlamps made from a bit of sprue and some cheap plastic 'gems', ammo crate from somewhere and the pintle mounted heavy stubber (some sort of Space Marine gun, I think, I have ten of them lying about waiting to get used, now only nine left), the pintle is just a piece of styrene tube; note that the rounded windows are now replaced with square and a component from a circuit board added to the 'grill'- this is either a turbo-charger, a water condenser unit or a mysterious new death ray never before fielded by the Imperium, you decide:
And doodad-age rear: A heavy tarp made from leftover greenstuff from another project (I always make extra tarps and packs and straps from whatever greenstuff is left, for just these occasions) and a high-lift jack made from an extra piece leftover from a WWII Russian B203 tracked carriage howitzer kit, Tamiya fuel cans (actually, one fuel, one will be water and painted accordingly) and even in this poor quality picture you can see a trimmed down milk pull acting as the gunner's hatch up top:
And the whole kit and caboodle with a first coat of primer:
I can now get started painting and may add some more doodads like a tow chain, some additional trim on the top hatch and maybe a couple more ration boxes, but mostly I like how it has shaped up.
As always, your constructive criticism is always welcome. More follows soonest.
This little scout car is awesome! Cant wait to see it with paint. I'm definitely stealing your spontaneous green stuff tarps idea. I'm also going to check out your Russian bitz supplier. Nice work!
Syro_ wrote: When I saw lunar mouse scout car, all i could think was lunar new year of the mouse scout car
This is a creative idea, and I like how it's turning out. Kind of cute with all the rounded edges. I always love your greenstuff tarps.
I'm in full agreement Syro- when this mouse died months ago and I said to myself "I know I can make something out of that" I knew I wanted 'mouse' in the name. I even thought about naming it just 'Mus', after the German super=heavy tank of WWII. But I almost immediately got in my head 'Lunar Year of the Mouse' too, and now I can't think of the buggy in any way except in relationship to the Chinese calendar.
MegaDave wrote: I never would have thought of using a mouse as a tank. Shows how much I still have to learn! Now get that thing painted so we can drool over it
Thanks MegaDave! This will be the first vehicle scratchbuild I will have used an airbrush for all the basecoating (nothing against airbrushing, this is just the first vehicle project I've completed since I got one). The temptation to do a flecktarn pattern camo scheme is great- but that takes away from the 'desert-y' theme and the science fiction rounded body styling both, so I'll try to go with suitable desert colors. I may do the tarp on the back in flecktarn- just to provide a contrasting color that makes sense in context so the whole thing pops a bit. For comparison, when I first deployed to Desert Shield, most of the vehicles were desert tan, but most personnel were wearing Woodland Pattern battle dress uniforms- the suppy chain hadn't yet caught up with issuing half a million men and women desert pattern uniforms yet!
MacPhail wrote: This little scout car is awesome! Cant wait to see it with paint. I'm definitely stealing your spontaneous green stuff tarps idea. I'm also going to check out your Russian bitz supplier. Nice work!
Thank you for looking in MacPhail! The extra tarps and things is strictly from my parsimonious Scottish and Yankee ancestry- waste nothing, refuse nothing except blows. I'm getting better at guess-timating how much putty I need to do things nowadays, but initially (I've only been messing about with greenstuff for about a year) there was always too much left over- I hated to waste it, it's a little pricey. So, with the help of a couple YouTube vidoes, I make extra bits and save buying someone else's castings for things I can make myself (unless it's a really, REALLY good deal, in which case my Scots/Yankee avariciousness screams 'go for it!' ). As Briancj notes below, Tehnolog offer a lot of different things- I keep an eye on eBay to see what is being offered up at any given time. Mostly it seems like third parties buy up remnants and sell them until they are gone- there are things I would like to get more of that aren't available (at least, through eBay) anymore. But there's always something new- everything from the Robogear tanks to the Bronecorps armor, buidlings walls and sets to freeform towers and platforms to the chibi ponies and mortars that I've shown here in earlier pages. Something for the whole family!
Briancj wrote: Tehnolog is really a hella fun company, I wish there was a good source for them here. You just have to wait for the shipping to eventually arrive.
Great work on the mousecar, it really harkens back to the original Imperial Deodorant scout skimmer.
--B.
Long time no chat, briancj- thanks for looking in! Until you mentioned it, it never occurred to me that this build was very much like the First Edition deodorant stick scout car- but it is! Now I'll never be able to say 'Lunar Mouse Scout Car' again- it will always be 'Chinese Year of the Mouse Deodorant Stick Scout Car'! I'll get some paint on it as soon as I can!
Thanks again all for your visits and your comments- it means a lot. While it's nice to get moving on this particular build again, I've got three other terrain pieces that need finishing up (including the one I started for the last LOER competition) before I can allow myself to do another squad of infantry- and boy do I have a lot of projects _there_ I want to get into! I'll photo some for another post. Plus a whole, separate, rant post about my lemon of a 3D printer and steps to rectify that.
Reminds me of the story of the guy who lost the (magnetized) turret of his 1:35 "Abrams" in an accident at the show. Since he has already won a second prize with it, he wasn't _that_ much down, and soon came up with an alternate turret like You car. Lots and lots of styrene card as reactive armor, a barrel and a mask at the front (they survived from original turret, being turned brass and so). With a handy basket at the rear and mouse keys moved to the top to represent hatches, it looked like a very weird cross between M1A1 and something Russian with rounded turret.
But Yours "smells" more like a weird pre-star-wars fiction film, with all these easily recognized things like a Jerry-cans. Shelves over tracks are nice. Is it too late to add some staples or just a bent wire to them for an easy step up for infantry and crew to disembark? The placement of a side hatch is good, probably - are You going to scratch its perimeter for an easy washing border, maybe oil-dirt spots?
(And thanks for not forgetting the building steps photos - they make the magic come less easy!)
Thanks very much for the comments, Wirecat! As I was monkeying with this, I did have in my mind the sci-fi RV from the TV adaptation of Roger Zalazny's Damnation Alley and the vehicle from Cherry 2000
I'm going to have to keep the 'tank turret option' in mind for another terrain build- I want to add a defense tower to my 'desert sci-fi buildings collection' and need a gun platform of some kind to sit on top of the PVC pipe fittings I've already assembled to be the tower structure; if I've got another mouse lying about (or can find one cheap at Goodwill) that might be the answer.
The stirrups for ease of entry are a great idea- I'm working them in now. They make perfect sense and are a detail that I think will help lend verisimilitude to the build and help make it easier for viewers to suspend disbelief and imagine it as a three- or four-man scout car. Or maybe a prospector's movable claim site- complete with heavy stubber to keep claim jumpers at bay!
I'm hoping to get some paint on tonight as a start and will post some pics if I have time.
Thanks Theo! I mean, it's no Family Truckster, but still......
Automatically Appended Next Post: Just a couple of painting WIP shots- managed to flog up the enthusiasm to break out the airbrush and then after get some old fashioned brush painting in:
The base coat is a cheap craft paint 'Apple Barrel' Sunny Day Yellow thinned for the airbrush, then some crease inking with Minitaire's Ghost Tint Yellow, also through the airbrush. The track units are hit with Scalecolor's Metal 'n Alchemy 'Black Metal'. The tarps are another cheap craft paint 'Italian Sage' (which is a _great_ army green to work with).
I was going to just rust up the edges of the doors/hatches, but the whole vehicle is so rounded except for the obviously tacked on survival equipment that it just didn't feel right, so I framed them in. I've used some putty to smooth the joins and once dry, will use some more, but I like the look better already.
I ordered a portable light booth from American Science Surplus (they were having a sale, we'll see how good it works) so my picture taking may improve. Right now, the difference in yellows is pretty hard to see, but the whole thing is fixin' to get dusty directly anyway, so it's all good.
Couple more WIP shots for tonight's work- mostly basecoating but starting in on washes and then later of course drybrush highlights. One thing I'm glad I remembered was to clip away two of the prongs on the carry handle for the water can: in the US Army, at least (may be NATO-wide) fuel cans have three prong carry handles, water cans have one prong (of course the photo is blurry and you can't see it, I was a bit rushed). This is so that a dogface can tell them apart in the dark by touch and grab the correct one without showing any light. Occasionally, irritable neighbors with guns express their displeasure when you shine a light to find the water jog amidst the diesel cans:
I did sop up some of the extra sepia wash that didn't look nearly so bad until I saw the picture. The black on the windows/viewports is the first layer of basecoat, the paint I'm using is for crap and needs a lot of thinning and I want a nice, smooth finish before I use a top coat of a glossier black- lots more work there to do.
Thank you all for looking in- this has been a fun build so far and I'm getting the chance to try a couple of new things!
Viterbi wrote: Mouse car is coming along nicely, has a little Fifth Element vibe for me, reminds me colorwise of Bruce's taxi.
Thanks Viterbi! I'm torn now in finding a 28mm (or 30 or 32mm or 1/56 scale) kit of a 56 Chevy Bel Air to convert into Dallas' taxi, or just going for broke and scratchbuilding the flying noodle sampan!
Warboss_Waaazag wrote: Cool little vehicle, Cat. It barely looks like the mouse it was made of.
I appreciate the kind words, Warboss! From the beginning of this blog my motto has been "It's not done until it's OVERDONE!"
Theophony wrote: Nice work on the paint, really like the pop the blue number gives to the vehicle.
Thank you for the observation, Theo- I was hoping that would be the effect. A reality of vehicles in the field is that they get dusty to the point that everything blends in eventually with everything else- and that's boring. The Athena Command and Control vehicle I built awhile back is probably one of the best weathering jobs I've ever done- and it's very hard to pick out any detail at range because the weathering is so realistic (or sort of, anyway ). The Lunar Mouse needed something, so it got the dry transfer number in front, and the high-lift jack in the back to add just a little bit of color.
Kid_Kyoto wrote: Awesome, harkens back to the days of deodorant hover tanks and packing foam terrain!
Thanks Kid- and to paraphrase the late, great Rowdy Roddy Piper in that classic of science fiction They Live "I came here to kick ass or (chew gum) use deodorant- and I'm all out of deodorant...."
I appreciate you all looking in and taking the time to comment- it means a lot.
Way too orky... but instead of integrated circuit at the front a good and proper mekboy would go for a corkscrew. Ram damage!!! That - and yellow always go together with checkers.
That's a nice nosy mouse You've got, congratulations! I've liked the idea all the way from the beginning, and result didn't disappoint either! Thumbs up!
Thanks very much, Wirecat- I hope I can complete the paint to the level that I had in mind when I started!
I hadn't thought of this one for the Orks, although looking at it now it seems a natural, but I still have a Russian B64 armored car in 1/48th scale and some grots that needs building! We'll see what comes next but I still got three other terrain pieces to finish and get out of the way, and possibly a LOER side trip to make.
Right then, the Lunar Mouse is (as) finished (as it's going to get), tried some new things, learned a bit, now want to try to put that learnin' into practice.
First, a quick product review: This is the Shibusa Studio, an affordable light box with some interesting features. As you see, it folds flat for storage and is made of stiff vinyl with large snaps to hold its shape when open:
It measures 16 inches on a side and comes with two foam backgrounds- white and black:
It comes with two LED light strips, powered by a USB cable. It has a rheostat so you can adjust the brightness:
I gave US$25 for it from American Science & Surplus (at this link, if you're interested- https://www.sciplus.com/) I also get most of my rare earth magnets from these guys, although they don't always have the sizes I want ins tock, you have to check back sometimes.
I tried photographing the Lunar Mouse in it for a test- I finished up some touch up paint and weathering and am done with it for now, at least. In the first pic I still had the light too high, the others are better but maybe still too bright. Those little LEDs kick it!
New things tried:
a) I (tried to) swiped Clanmac's effect for windshields by painting the base black and then 'streaking' white over it to look like a combination of light reflection and dust. I'm actually not entirely disappointed with how this came out, although I want to play around with it a lot more to get the great look he does.
b) I tried to paint the lenses with light reflection effects- this came out terribly. I need to watch some more videos and would be grateful for any tips all y'all might have. The last picture shows them closest (note: not 'best'- they suck). I think what really ruined what little good I might have done with the color layering was ruined by adding a drop of gloss polyurethane on top, to try to enhance the effect. No worries, I know what not to try next time, and lenses plus OSL is something I really want to get better at.
c) I used the sponge method of adding a chipping effect. Next I need to scratch, chip and rust a spot to combine all the techniques to better effect. As it happens, I have an idea for a scratchbuilt tank that gives me some canvas to practice on.
All in all, I'm fairly pleased with how it came out- not too shabby for an old mouse carcass. One can't ace everything the first time out, but I'm also pleased with the bit I've been able to progress my painting skills. I've been at it for more than 40 years at this point; 40 more and I might just start getting good!
And I'm pleased that I tried pushing the edge. It's easy to get into the habit of not trying something new because we don't want to ruin the otherwise good work we've put in on a model. But hey, if you aren't living on the edge, you're taking up too much space.
Couple more terrain pieces to finish off and then I can switch over and hit some infantry. More follows soonest.
Thanks Josh! One of the videos on YouTube started with a black base, but it seemed awfully counterintuitive! I may spend another lick of paint on this vehicle to see how that works out.
Meer_Cat wrote: Thanks Josh! One of the videos on YouTube started with a black base, but it seemed awfully counterintuitive! I may spend another lick of paint on this vehicle to see how that works out.
I think this image from my gallery shows my most successful use of this technique.
I’m gonna echo the Lens advice, I think you need to go darker in the dark areas to get more contrast between the dark shadows “inside” the lens and where the light catches it to show colour on the “surface” of the lens.
Also, light on lenses is the opposite of how you normally look at it. We normally paint with light coming from above. But the colour on the light comes from internal reflection and refraction: it doesn’t “shine” off the side closest to the light source, it reflects off the inside to bring brighter colour to the side FARTHER from the light source! Light that DOES reflect from closest to the source (aka the upper corner) does so as a single dot, not as a broad swath of colour.
So when you have the lighter side be on the TOP of the lense, and the bottom of the lens still being fairly bright colours, it looks more like a glossy opaque surface rather than a transparent and reflective lens.
Gwyn chan 'r Gwyll wrote: I’m gonna echo the Lens advice, I think you need to go darker in the dark areas to get more contrast between the dark shadows “inside” the lens and where the light catches it to show colour on the “surface” of the lens.
Also, light on lenses is the opposite of how you normally look at it. We normally paint with light coming from above. But the colour on the light comes from internal reflection and refraction: it doesn’t “shine” off the side closest to the light source, it reflects off the inside to bring brighter colour to the side FARTHER from the light source! Light that DOES reflect from closest to the source (aka the upper corner) does so as a single dot, not as a broad swath of colour.
So when you have the lighter side be on the TOP of the lense, and the bottom of the lens still being fairly bright colours, it looks more like a glossy opaque surface rather than a transparent and reflective lens.
Thanks very much for the suggestion- and the optics lesson! You're quite right- I was painting what I 'thought' looked natural, instead of really 'seeing' things in life around for me what really _is_ natural. I've already repainted the whole lenses gloss black, and hope to have some time tonight to try again- I just can't leave them looking like they are, and I'd like to put these ideas into practice. Hopefully a quick pic later tonight!
I like the mouse car. An interesting scratch build idea for a truly unique shape for a vehicle. And thanks for the review on the light box. That is an interesting concept. What did you think of the quality of photos using it compared to your other photos?
I agree that getting the light effect on lenses takes some practice and I see plenty of folks have given good advice already so I won't repeat it. But I will add my own bit: Once the lenses are painted and the model has been given a matte/dull coat, I then go back and apply 'Ard Coat on the lenses to make them shiny again, next to the dull finish on the rest of the model. A little cheat to help give the light glaring effect with real light.
Ja, if you still need examples for your lenses look up the "black gem technique" or something similar.
black basecoat,
Blend to the colour of your choice in a crescent shape (to match the shape of the lens/gem) at the lower edge, but not at the edge (should blend back to black at the very edge). As said, opposite where the light source would be.
The crescent should be lightest at it's centre, both length and width-wise. Can often go right up to white.
Then a white dot positioned at the point nearest the light source.
Most of the lens/gem should be black or almost black. Can use a dark grey if black is too harsh for the model/lighting conditions.
I've painted many examples of this, and you can browse my galleries if you like, but I can't remember if I've ever done a step-by-step.
Best example I can remember with black and non-black gems:
Thank you all for your interest and good advice- I'm looking forward to trying these ideas out! Work has been disrupted lately (as has everyone) so not a lot of progress to report painting-wise, but soon!
The Riddle of Steel wrote: I like the mouse car. An interesting scratch build idea for a truly unique shape for a vehicle. And thanks for the review on the light box. That is an interesting concept. What did you think of the quality of photos using it compared to your other photos?
I agree that getting the light effect on lenses takes some practice and I see plenty of folks have given good advice already so I won't repeat it. But I will add my own bit: Once the lenses are painted and the model has been given a matte/dull coat, I then go back and apply 'Ard Coat on the lenses to make them shiny again, next to the dull finish on the rest of the model. A little cheat to help give the light glaring effect with real light.
Thanks, Steel! I have some actual, by-gosh brush on gloss polyurethane in a craft paint-size bottle and I'll try doing just that. Originally, I wasn't going to overcoat the piece at all, because I was planning to use weathering powders for the final 'dusty prospector finish' and the overcoat would wash them away. I used chipping paint instead, so when I'm done messing/learning with the headlights, I'll hit it with overcoat and then touch up the lights. I may still add some weathering powders because it isn't done until it's overdone!
Ja, if you still need examples for your lenses look up the "black gem technique" or something similar.
black basecoat,
Blend to the colour of your choice in a crescent shape (to match the shape of the lens/gem) at the lower edge, but not at the edge (should blend back to black at the very edge). As said, opposite where the light source would be.
The crescent should be lightest at it's centre, both length and width-wise. Can often go right up to white.
Then a white dot positioned at the point nearest the light source.
Most of the lens/gem should be black or almost black. Can use a dark grey if black is too harsh for the model/lighting conditions.
I've painted many examples of this, and you can browse my galleries if you like, but I can't remember if I've ever done a step-by-step.
Best example I can remember with black and non-black gems:
Spoiler:
click for a good look.
Great Jeepers Doc- that egg is extraordinary! I can see exactly what you're describing in the gems on it though. And I always like browsing through your galleries, so nice to have another look-through with the idea of gleaning examples of lenses, gems and reflections. (I've got an Eldar Wraith Knight floating about somewhere around here someplace- once I get a handle on painting up shiny things, that's a project I want to tackle.)
monkeytroll wrote: Good job on the mouse-mobile, nice idea and execution.
"Mouse-mobile"- I like that monkeytroll, and thank you for looking in! When Disney goes into space, this is the sort of scout vehicle I imagine they'll be taking with them (undoubtedly with two parabolic reflectors/antennae that can be deployed at need to look like mouse ears...... I may have to modify my build to include those!)
Thanks all, again. I will finish up my larnin' on the lenses and continue with the aerial delivery service terrain piece (although the Tehnolog Condor is too big for the flight platform, so- darn it (not)- I may have to scratchbuild a little gyro-copter thing to make the deliveries).
You had also asked about photo quality using the new, inexpensive light booth, and I have to say it is definitely better- a lot better. Before, I was shooting pics on my kitchen counter (which is a nice, neutral color) and using two desk lamps to try to illuminate the focal subject uniformly. It worked sort of okay usually, but sometimes was just terrible. And always the light effect was either too dark in places or very harsh.
With the light booth, for all that the light comes from two LED strips mounted at the top front and back, the light is very uniform and diffuse- much better than anything I was able to achieve before (I think). My only problem is even after a couple of test shots, I still needed to dim the LEDs down another scooch- it was still just a little too bright, I think (we're talking the Lunar Mouse-mobile pictures, here). Even though it looked somewhat dim in the booth, the pictures came out very brightly lit, indeed.
And with the booth, the colors in the pictures finally started to approximate the real colors on the model- at least to how my eyes perceive color.
I'm very glad I got it, and want to build a couple of terrain inserts for it (desert, city, woods, road, etc) to slide in the bottom. I'll still use the white or black backgrounds, I think, but might even build 'L' shaped inserts so that the field of view has terraining at bottom and behind (ha- maybe a complete box insert, lacking only a top, to let the light in!).
I've experienced some challenges and am just now getting to a point where I can post here again. It will be a couple of weeks more yet before I can get any work done, but even being able to make an entry here is progress forward.
I'm a contractor, and the customer my company supports kicked us all out in mid-March, due to restrictions because of the COVID-19 virus. I maintain a small commuter apartment in Northern Virginia, but my wife and I actually live on a small hobby farm in Pennsylvania, about two hours away (she is there full-time). We had no guidance or details as to how long we'd be out, or what- if anything- we would be doing if we couldn't go back into customer spaces. After the first week I went back to the apartment to more permanently arrange things for the long term. I found that the kitchen sink had explosively backed up (this has been an on-going problem for the last five years, but never this bad) and soaked not just the kitchen area, but part of the dining/living area carpet as well. I reported it to both the property management company I rent through as well as the condominium management office that actually represents the owners of the units.
Two days later I was asked to come back down to coordinate what of my belongings might have to be moved to facilitate mold mitigation and repair. At the time I thought I was very fortunate that, while the kitchen and dining areas had to be emptied, and the right side of the living room, the left side- where the wall-to-wall, floor-to-ceiling work area was (note the past tense) could be left in place. Skip forward two months and I'm asked to come back down to survey the repair work and make sure everything is all right. When I first entered, I found a completely empty kitchen, dining area and living room- everything was gone. It had been boxed and crammed into the one bedroom to facilitate installing new sheetrock, carpeting and painting. I was extremely distressed, as I had given my contact information to everyone involved and indicated my great willingness to come down within two hours of notification if it proved necessary to move anything else. I understand they had a lot of work to do and I'm grateful they did it- but I want to stress I was never contacted and never gave permission for them to handle my things and pack them away.
I'm still unpacking boxes. Part of the slow going is because- after being out of the office for three months and a bit, we're scrambling to catch back up with everything that needs to be done. My 3d printer is broken. Every figure that I've unwrapped so far- infantry, dioramas, vehicles, everything- has been broken, some extensively. This is because they just grabbed up handsful and wrapped a wad of packing paper around them and stuffed them into extra-large packing boxes. I'm still unpacking kits, but some of the boxes have burst, spilling their parts out. Some of the paints leaked from being placed at the bottom of boxes with the weight of everything else sagging down on top. This has caused less damage than you might imagine, because they wrapped them four to a package and the packing paper contained most of the leakage. It is disheartening to see six years of work pretty much totally ruined.
I have to be careful, or my Gaelic nature will grow setback into melancholy. The upsides, as I see them are: I have new carpet and painted walls. I can fix much of what is broken. I can go through the mounds of 'interesting bits of junk' and thin that out some (it was getting a little bit much, but you never know when you'll need that one really interesting piece). And I have Dakkadakka to vent my frustration and get on with my life.
At the end of the day, I still have a job, my wife and I are both still healthy, our rescued horses and ponies are safe and healthy and I still have some modest talents to use again for the fun of the hobby (once I can get my workbench set up again).
Thank you for your encouragement and kind words in the past and for providing a place where I can show off my work today and in future.
Thanks for the offer, BrianCJ- I'll holler if I find myself in need. Mostly I just have to get things sorted out- most of us 'build up' or working areas on little thing at a time, and then we know just where it is when we need it again. Like stalactites forming- calcium drip by calcium drip- over the centuries. It'll just take awhile, but I'll get there.
I'm disappointed in the whole affair, because I tried to be an active part of the solution so everyone- me, the property management company, the condominium company and the insurance company- got what they wanted.
I do know that things could have some out worse, and many others have had a tougher time than me recently, so I'm lucky, I reckon.
This behaviour is unacceptable. Hope you can get your Marksmen repaired or that they are unharmed, but I guess the thin barrels were pretty vulnerable to the mindless forces applied. Also hope you can get some compensation.
Time to rise from ruins, greater than before of course.
Thanks Max. I can't emphasize enough how valuable it is to me to have this venue as a place to have blown off some steam.
As I get everything unpacked, the attitude that I'm trying to maintain is this: Anyone/everyone can build and paint a nice model with pristine, new materials. But a true fanatic of the hobby can repair and restore anything and everything- and make it better by doing so.
Many of you here know that my great ambition at the moment (along with painting the mountain of plastic shame that eye me accusingly from around the apartment) is to learn to paint faces more gooder and more realistically. So, as I run through and repair or convert what needs fixing, I'm going to try to upgrade all my infantry with better done face paint jobs. I have new paints to try (backed a couple of kickstarters plus bought some Scale 75 retail), I've got some new tools to work with and new techniques to try.
Plus, I've got projects from two past LOER competitions that need finishing, and I've got .stl files to do it with, if I can ever get my recalcitrant and sub-standard Ender-3 Pro to cooperate (more on that Odyssey in a separate post- enough whining for now).
Thank you again for looking in- I hope to have actually hobbying to show soon!
Sorry to hear about the damage done by careless people, but glad you and the misses are okay. Have you checked your renters insurance to see if that covers damage done by “movers”, might get you some pocket cash to replace damaged items or redo your space.
I just got a Ender3 (regular), what sorts of issues are you having? If you want to post them I need my 3D printing thread, there are a few of us with Enders and we might be able to sort out the issue together. It’s why I made the thread: to grow the community .
Thanks for both ideas, Theo, I'll check into the renter's insurance.
I'll post on your thread, but the bottom line is that my unit had a horrible under-extrusion problem from the beginning: I never got anything other than 'open basket weave' prints until I started replacing stock parts with better, other manufacturer parts. And even then had poor results. I'll put pics up as well.
I'll restate my thesis: I believe Creality and the Ender-3 to be a good product (so many people use them and have good results); MY Ender-3 Pro was a piece of junk.
Meer_Cat wrote: Thanks for both ideas, Theo, I'll check into the renter's insurance.
I'll post on your thread, but the bottom line is that my unit had a horrible under-extrusion problem from the beginning: I never got anything other than 'open basket weave' prints until I started replacing stock parts with better, other manufacturer parts. And even then had poor results. I'll put pics up as well.
I'll restate my thesis: I believe Creality and the Ender-3 to be a good product (so many people use them and have good results); MY Ender-3 Pro was a piece of junk.
More follows on your thread.
The under extrusion issues I had were primarily the PLA I used. Definitely sucks when a $200+ item doesn’t start working right off the bat. The other primary issue I had off the bat was a common issue others had (physically not much difference between Ender 3 and Ender 3 Pro) is the sensor on the z axis that attaches to the side of the machine.
Terrible picture, but I’m in the middle of a print and won’t move the machine during it.
The sensor is the piece under the QR code that senses when the z axis rail is all the way down. There is a nub that is supposed to rest on the bottom rail to give proper height for deck leveling and such, but this piece was just not right which causes the leveling to be an issue. I first combated it by loosening the two screws that held it in place and placing it lower than it should be. This got me actual prints, though not good ones. The next and biggest fix I did was to print the z axis levelers (two parts on the same print).
Link in video to the download at about the 5 minute mark. I linked this for Bobtheinquisitor in the printer thread, the video shows off some great prints to fix/make the Ender series better. Once those spacers were in I put the sensor back to the suggested spot and have been getting great results since.
I'm really sorry to hear about how so much of your creations were broken. That must be a very crushing feeling, especially since so much was original kit-bashes and crafted, so not easily replaceable. I think I speak for everyone when I say, we will be happy to follow along as you repair and resurrect your collection, so if you have time keep us posted on the repairs.
Never seen the first video, but that was awesome .
The second one is a timeless classic too me.
either way, be thankful that you at least had the fairly quick results of new walls, carpet and the like to give you some joy. For years I struggled with my job and choices feeling that i wasn't getting anywhere but further behind. It wasn't until about 6 months ago when Insurance changes at work, an overdue raise and a change of management brought the benefits i'd been struggling for. Lots of instant changes after a long struggle where you had a major change after a quick battle. I'm not trying to minimize the loss of the models in any way . Just trying to get you to look on the bright side . We had an issue when we first got married where the condo above us had the waterline to their refridgerator break in the middle of the night. I woke up at 4a.m. to the sound of water coming through our light fixture and into the metal sink, sounded like a steel drum. it took nearly a month of the three insurance companies fighting to get the work started, with a newborn in the house it was a pain to see the ceiling every day.
I hope the insurance does something, money won't fix the damage to handcrafted materials, but it might give you a new project.
The first vid is from the movie version of Chitty Chitty Bang Bang, starring Dick Van Dyke and Sally Anne Howes and also Gert Frobe (aka: Goldfinger) and Lionel Jeffries. The novel was by Ian Fleming and Desmond Llewellyn (Q, in the Bond movies) has a small role in CCBB also. That's Lionel Jeffries in this musical number, right after he has been mistakenly kidnapped by the evil Baron Bomburst to build a flying, amphibious car for him. An interesting side-fact I only recently became acquainted with is that Jeffries- who plays the father of Dick Van Dyck's character- is actually younger than Van Dyke; apparently they got quite a kick out that during filming. I highly recommend the movie.
Although I've never been arrears in rent, or been any trouble or even had an accident that resulted in damage that I was responsible for, I'm uncomfortable renting and living in someone else's house or apartment (I lived in barracks from the age of 17 until 35 during my time in the military, and the type of landlords you deal with after you are 'allowed' to live out on the economy are not usually the nicest people). So when I walked into what appeared to be a completely empty apartment, it was quite a shock to the system. My first panicked thought was that I had been evited and all my things had been confiscated or thrown away, even though I had nothing to do with all the kerfuffle.
But the bright side here is- new experiences fixing things, trying new techniques to maybe make them better. And, as you say Theo, if there is some compensation from insurance, oh the places I'll go!
The good thing is, repairs are possible, if I look at modelling like some musicians look at music: there are no mistakes, just variations on a theme. The further I get from the moment I walked in and found an empty apartment, the better I'm able to contemplate the idea of fixing everything. Especially with the support of all you folks.
Now, I'm quite certain I am the only hobbyist who ever bought far more than he can ever paint in a lifetime but I have some seriously cool things to paint up, and ideas to try out, and projects to finish; so I have to find a way to balance repairing the old, finishing the current and undertaking the new.
Now, I'm quite certain I am the only hobbyist who ever bought far more than he can ever paint in a lifetime
Yes, I'm sure you are. I have never heard of it being a very common occurrence
Good luck finding that new balance, maybe just look through everything and just picking out things that would give you the msot enjoyment to paint or repair?
Sorry to hear of the careless damage. But, as you say, it could be worse. You have all the parts and the glue and paint required.
Part of owning models is repairing them. Usually it's just the odd one that has fallen (possibly due to one's mother while dusting..*). So many at once is painful, but you seem to have a good plan to proceed.
I would suggest to have at least one new project on the go. So that it is not just a matter of repair, repair, repair... While glue/paint dries, repair the next model, then back to progress.
*Some of my oldest scale models have had more time spent on them repairing things that have fallen off or complete rebuilds, than was spent building them in the first place.
Crap happens,,, but this doesn't make it happening less discouraging and painful. Please, don't despair. Damage is easier to repair on a model than in ones mind. Good luck and steady hand! And less unforeseen moves by careless workers...
Thanks Doc, and thanks Wirecat! I've made a good start on getting everything out of the boxes and paper and semi-sorted to go back on the shelves and desk. On the one hand it is a bummer, because- like sediment accreting on the ocean floor- each little piece of plastic and semi-finished component and entire box of something-or-other found its place one thing at a time over a period of nearly six years. Finding everything and returning it more-or-less to where it was is an impossibly daunting task.
But it occurs to me that I can conduct two operations at once in the recovery phase: for one, I get to accrue all new junk; my wife even saves out interesting bits of rubbish for me. For a second, I can winnow out some of the old stuff- if it's a weird bottle cap and I haven't used it in the last three years, it can probably go (naturally, anything I throw out will immediately become crucial to the next build). It's all good.
I hope to have things sorted enough next week to start on a 'fun project reward' and just build and paint something for the fun of it. I only have a 'closet of shame' the size of a Mack Truck, so finding something to paint one off shouldn't be hard.
Thank you for the comments and the encouragement- more follows soonest!
Meer_Cat wrote:
I can winnow out some of the old stuff- if it's a weird bottle cap and I haven't used it in the last three years, it can probably go (naturally, anything I throw out will immediately become crucial to the next build). It's all good.
That is so true! Happens to me all the time.
I hope the cleaning and organizing can bring back some good memories while you work, and maybe a few "Hey, I forgot I had that" moments. I'm looking forward to seeing your great creations again as you repair, and create new alike.
Hi MeerCat, sorry to hear of your misfortune - having just discovered this thread though, there's a gold mine of great stuff here to admire and take ideas from! Looking forward to seeing what you build next
Thank you all very much for your comments and kind sympathies. I've almost got enough things unpacked/restored to be able to get a start on things. But, per advice received here, I'm going to pick out a new project to undertake just for fun. It's funny really, the things that were smashed all to flinders and then the most unusual things that remained absolutely intact. Weird, man.
Okay, first post in a very long time, lots to cover, but not everything at once. I can see my floor again, having got most everything unpacked and somewhat sorted out so I can find what I need to carry on finishing old projects or get a wild hair and start new ones.
I still need to go completely through Theo's blog on his Ender-3; I had invested almost a year into trying to get mine to work properly, but I still see so many people not only using them but designing prints with the Ender-3 in mind (Black Magic Pixels has a set of Elf Terrain I backed on Kickstarter that is expressly intended for the Ender-3/3 Pro- the dimensions of some of the buildings are exactly the measure of the build plate in either the x or y axis, or both. So I believe that good and even great results can be gotten with it- just not with mine yet. I very much want to get mine running properly, if only to have a second printer to crank pieces out- I have a metric crap-ton of files that need to be made real.
So, for less than the cost of the 'improvements' I sank into the Ender-3 Pro, I bought a Monoprice MP10 Mini:
It is roughly the same footprint as the Ender-3 Pro, although it has a slightly smaller build plate. It was very easy to assemble and run the first print using the included g-code for the 'lucky Chinese Cat':
You never know when you might need one of these around, so I'm glad I printed it. There were zero problems with bed adhesion- in fact, the opposite problem is the case: things stick too well (more on that later). Here's a close up showing that there are some layering issues in places, possibly extrusion problems due to the filament sitting out soaking up moisture for too long, or gcode needing to be tweaked. Even as is, I believe that with a coat of matt urethane, then light primer and paint, the details (especially on something this big) will remain but the layering lines erased:
So right out of the box, using an un-tuned printer and foreign gcode, I got better results than months of playing around with the other ever gave.
My first planned project is a walled Chinese compound (I think could be used for Shogun gaming also) using files created by the Excellent Ian Lovecraft. I learned my lesson building the Imperial Guard outpost out of a multiple picture frame all in one piece:
(That sucker is 30 inches on a side.) So for this I ordered in some 12 inch square pieces of Russian birch panels, intended for CNC milling and carving, or wood-burning with a laser, to divide the compound into four quadrants. Each will have an item of focus (house, shrine, drums, etc) and could be used separately, I guess. But I really intend for them to be joined together to form a large gaming space:
The two blue pieces I actually managed to get off the Ender-3 Pro, after replacing the feeder mechanism. Unfortunately, the spool ran out after the smaller house and I found I had a whole new range of problems when I tried to run the next one doing everything as much the same as I could. Everything in grey is off the MP10 Mini and none of it has been cleaned up yet (the odd stringing tags and what have you). The Foo Dogs you see in the one shot measure about 1.25 inches long- not bad for an FDM printer, I think.
More photos to follow, especially as I get more pieces printed, enough to finish off a quadrant and start priming and painting. I did want to get back into the posting game ad have also voted on anumber of pics in the Gallery and left some comments on the great work all y'all are doing.
Congrats on the new printer and the repair of the Ender. To my with regard to 3d printing uneducated eye the results look really great and tempting!
Looking forward to seeing the painted board. There are quite some nice Asia themed minis from historical to scifi on the market, that would likely be a lot of fun playing on such an adequate board. Any plans?
Thank you for looking in Max and Gwyn! I've backed two kickstarter by Zenit Miniatures for their Kitai Warlord forces and received the first some time ago (a fair amount of Gong and Terrcotta Dun infantry, some cavalry). The second is for War Elephants and some Qiang Cavalry- so a lot of figures to be painted 'one day'. I have .stl files from a last year for some Chibi style 'warrior critters' from Heresy Labs as well- if the printer continues to hold up, printing some of those out is definitely in the books as well.
Great to see a post from you Meer_Cat! I was wondering how you were. Glad to hear about the progress on sorting all your old stuff. Congrats on the new printer, I'm glad it's better behaved than your old one. The boards are looking good so far.
It is such a different experience to set up and run a print with the fairly reasonable expectation that it will be at least moderately successful, and to know what variables to control for. I'm finally in a position to start doing this 'tweaking' thing that all the cool kids talk about, to get the best prints out of the machine, instead of just getting it to work at all.
I'll be posting some to Theo's blog- he's a got a lot of good material there and it's acting as a nexus for us techno-geeks (in the case of the resin 3d print guys, it is literally a blue light bug zapper lamp that they all swarm around ).
I'm focusing all my printing on the pieces I need for the boards, but have an incomplete print (2/3 went fine, but some residue built up in the Bowden tube, so the top third was just strings, I control for that now by removing and re-inserting the filament every third print or so, that seems to keep it under control) that I'm working up as a separate 'for fun' project- pics follow shortly.
Thanks again for your comments and encouragement- it means a lot!
So, here's an update- a little bit scatterbrained and peripatetic- but an update:
I'm having great fun cranking out a variety of things, so far the MP-Mini-10 shows no sign of resenting almost constant use. First up, some piles of pallets with their basecoat from the 'Guido's Shipping Yard' Kickstarter:
You'll note that the taller pile appears to tilt; this was a lucky accident. I mentioned in an earlier post that adhesion to the build plate was not a problem with the MP-Mini-10, in fact, the opposite was the case- things stick entirely too well. I printed these before I knew I had to put down masking tape on the plate so that I could get things off; the bottom actually tore away and left an angled base. I like the look and will be using this in the junkyard/repair shop/aerial delivery service piece that is still in the queue to get done 'some time'.
Here's a not so happy accident, but when life hands you lemons, give them back and make margueritas:
This is the bottom 3/4 of a Chinese shrine from the set by Ian Lovecraft. As you can see, the top quarter under-extruded (because of a build up of dust/debris in the PTFE tube; to mitigate, I now draw the filament out about every fourth print to make sure there is no build up). But, a little shaping, a little scraping:
Add a wooden platform:
And Bob's your uncle- you have a lookout platform or, in this case, the base for a signal fire. I've got the flame diffuser from an old oil lamp that will make a great bronze fire basket. Which is kind of ironic, since it is made of brass, but to look right, I have to primer it, paint it brass/bronze, then smoke it and weather it. Go figure.
And here are the pieces to do the first quadrant of the walled Chinese compound (this represents about 36 hours total of print time):
This is the gate entrance to the compound and a kind of courtyard that will be fronted on two sides by houses. The next steps for these is to undercoat them with flat matt, then prime them with Rustoleum. There is excellent relief on these pieces, really good depth, so I can layer some coats on them to help smooth out the layer lines from the printing to make them smoother and more natural. Later, most everything get painted and then glued/epoxied down to the square of birch paneling you see in the background.
Outside the wall, in front of the gate, will be this torii gate, which is nearly finished printing:
The MP-Mini-10 is an FDM printer, but this gate printed out with no supports- I'm pretty happy with it. There is another torii gate (a Moon Gate) in the set, very elaborate, as my confidence grows I'll work up the nerve to give it a go.
That's it for now, more follows soonest. Your comments and criticism always welcome.
Automatically Appended Next Post: The torii gate just finished; it prints with pins and sockets to fit together so tightly it doesn't actually need glue:
Absolutely Theo! I consider myself lucky to have survived the date that SkyNet became self-aware; now all I have to do is survive the robots waking up and realizing they don't need us anymore!
Daleks: Exterminte!
Nomad: This system is less than perfect and must be neutralized...
Borg: Resistance is futile, prepare to be assimilated.
I'm glad to see you are having a lot of fun with your new 3D printer I enjoy seeing your various projects and builds, but an added benefit of frequenting your blog is that I am often exposed to new vocabulary (even though I consider myself to already have a good vocabulary), so thank you for that as well.
I do thank you Syro, and am glad you find things here that you enjoy. I don't recall using any particularly nifty vocab here, but I do learn a lot from all the rest of you, that's for sure! (I did have one of my students give me the RCA Dog look when I told her to "move with alacrity", had to explain what alacrity was.)
Hit a snag with the MP10-Mini in the form of a clogged nozzle and no back up. So, mandatory (mental sanity) safety stand-down until a new one arrives next Monday (more than one, I ordered two of a bunch of different makes/models/materials to see what works best; when getting the printer, I forgot the basic axiom of the military, carpenters and mechanics: two (of something) equals having one, and having only one means none if it breaks or you lose it).
In the meantime, I got half the pieces for the first quadrant of the Chinese project undercoated with matte varnish (and am dancing around the little apartment singing "Incense and Peppermints" by Strawberry Alarm Clock from the fumes) and messed about with a new liquid pigment product from Greenstuff World.
Every time I think I have everything I need from those guys I get another email showcasing some new thing because shut up and take my money. This time, it was liquid, air-brush-deliverable pigments for rust, dust and earth:
These are terrific- already thin enough to use in the airbrush, or to apply as inks or washes. And really, how often do you see colors like Zinc Oxide, Verdigris and Turquois Flake, anyway?
I mentioned previously basecoating the two pallet gubbins with Rustoleum 2 coat in One (turns out, this one is called 'Fossil', which looks like clay, to me). Tonight I hit them up with some new liquid pigment- brushing it on and then rubbing away the excess with a bit of tshirt material:
This one I used Medium Earth on, and will probably go back and flood some darker color into the cracks with a smaller tip brush:
This taller stack (that leans) I used black soot. I figure to leave it pretty much as is:
Originally, I was thinking these would need three coats to finish off- a base wash, a darker low lights ink and a highlights drybrush. Silly me, all that extra work! I like how they came out with one application of these pigments and am looking forward to trying more of them on more types of surfaces to see how they do. I've become quite a fan of the air brush, so anything I can deliver via that means is already achieving favored nation status for me (although there is lots that only the right good brush can do). I do want to see how these work layered on each other- like on a vehicle muffler with heavy rust at the exhaust welds with lighter rust moving down the pipes and then white oxide highlights here and there. Should be fun. And, with enough fumes, I'm sure I can remember all the words to every Fat Mattress song ever written....
It's great to see You have such a good start with Your printer Meer_Cat. I am more than a bit jealous here. And these pigments do look very realistic. May have to look for these specific ones to try. Thumbs up!
Thank you for looking in, Wirecat! And thank you for the kind words. I've been messing about a bit more with the 'weathering washes'/liquid pigments and they are quite fun to work with. If applied over one another wet, they will blend; if I let one layer dry and then add the next, they will layer- it creates a number of interesting looks. Pics follow when I can catch up.
The saga of the 3d printer continues- because apparently nothing is to be easy for me. But hey, the strongest steel comes from the hottest fire (or so they say).
This time, it's replacement V6 nozzles. Mine clogged and just refused to unclog, so I ordered new ones (should have done so earlier). Monoprice themselves don't have any on hand and gave no date when they expected to have more, so I ordered aftermarket ones- from three different manufacturers, thinking at least one would be a suitable replacement for my machine. Nope, every single one was about 3mm longer than the original.
No problem, sez I, I haz a self-leveling 3d printer, I shall let it level itself and it will allow for the 3mm different that the tip of the nozzle sticks out. Much frustration later, nope, it won't.
So, I did what any red-blooded hobbyist would do and attacked the offending nozzle with a razer saw to reduce it's length. One busted razer saw and chewed up nozzle later (it will make a nice bit on some future diorama) and it occurred to me that my Dremel tool and some cut off discs might be the answer.
It was, worked like a charm. Then a half hour fooling around with the z-offset and leveling and self-leveling the build plate and I've got a print running that seems (fingers crossed) to be going smoothly. I'm printing more stone pavement sections for my Chinese village project.
I didn't get much else done tonight, given the attention the printer demanded, but tomorrow I hope to primer the quadrant that is undercoated with matt varnish and maybe even start basecoating the walls. And there is also the signal fire structure to work on as well- I really need to get that 27 hour day perfected, to fit everything in. Our get someone to pay me a ridiculous salary to play with my toys and paint figures for them, that's always a winner.
Thanks for looking in, Viterbi and for the kind wishes. I'm fooling around with these washes now looking for the 'easy' way to mass produce stone paving tiles for all the courtyard pieces. I may wind up cheating a bit and going with the liquid shoe polish dipping technique, but want to try a simple base, wash and drybrush and see how fast I can knock them out. Also not sure if it will prove easier to glue them down first to the birchwood panel or paint them up separately and then wash the seams between them later. Still fiddling. I like the ideas I'm getting from your thread as well.
Hi Big H and nice to see you back! I've been lurking on your thread and need to leave some comments- most excellent work. I can pass along some things that I run into here, but you might also drop in on Theophany's 'Gather 'round the printer, kids" thread: lots of people contribute to that one and you get a lot of information all in one place (not that I don't want you to come here and check things out as well, mind you!).
At the moment, of the four quadrants of what will be the Chinese walled compound game boards, I'm basecoating quadrant one, priming quadrant two and printing pieces for quadrant three. Quadrant four is merely a gleam in my eye at the moment.
I hope to have pics soon, possibly Monday. And in the meantime, I'm still learning a ton from all of you'ns.
Hey Syro- unfortunately, the gleam in my eye isn't because I have a definite idea of what to do there, but because I'm spoiled for choice and haven't committed to anything yet!
Still painting (courtyard tiles) for quad one, but have printed the 'bell shrine' that will go in quad 3:
I arranged the three pieces to print as one print job using Cura 4.6.2 (and will upgrade to 4.7 when I have some time). You can see in the first pic the masking tape I have to use because the print adhesion is actually too strong- I tore up the magnetic layer on the metal build plate printing directly to it. Now I have to lay down tape (smooths over the torn pits on the magnetic cover) and still need to use a paint scraper to pry the pieces up off the bed- and then use a little acetone to get the tape off the bottom.
In the second pic you can see how well the bell itself came out. Base coat of bronze, some verdigris airbrushed weathering and then some black wash and I think it will look really nice. The pieces you see here haven't been cleaned up yet- this is exactly how they came off the printer.
In the second and third pics you can see the only hiccup in printing I've encountered with the Monoprice MP-10 Mini in the for of the chrysanthemum greebles that were supposed to be under each of the four roof peaks (one did print, the other three only managed half- the teeny support didn't hold up and the strung out a bit). This is not a showstopper problem: the file set came with greebles to print separately to hang from buildings or walls; I reckon to saw/cut the damaged ones off, print new and glue them in place.
The assembled shrine is quite nice, I think. The roof pillars show a bit of layering and I learned _not_ to use just any old urethane to undercoat and smooth them out- some urethanes will eat away at the PLA filament. But I figure to do two basecoats of paint, or a really good primer, maybe another undercoat with paint and then basecoat. That should smooth out the layer lines. If I do several thin wet layers of red, I might be able to simulate the beautiful lacquer effect of Chinese and other Asian culture buildings.
I'm actually painting tonight too, working on the signal tower, so I hope to edit this post in a little bit with WIP photos of that.
unfortunately, the gleam in my eye isn't because I have a definite idea of what to do there, but because I'm spoiled for choice and haven't committed to anything yet!
Heh heh, nothing wrong with that, I'm used to what you craft so I am still looking forward to it. Those prints look very clean, I am surprised that it is without cleaning them up first. But,I am sorry to hear how tough it have been getting them off the build plate.
Syro: I'm very happy to have the problem of prying the pieces off the build plate, compared to the hairpulling frustration of watching a thirty hour print pull loose from the plate at hour 26 and become ruined, or having to run five or six starts to get the first layer to adhere properly, as with my other printer. Too much sticking is a good problem to have, for me. Also, I'm thinking of maybe just a simple well fo quadrant four, but there is so much to choose from in that particular set.
Theo: In your thread I think you mentioned something about building up to multiple printers so as to be able to produce entire buildings, vehicles, etc faster and I'm in full agreement. I've got .stl sets for entire space- and sailing ships that when complete are over two feet long- mos' def need several printers or I'll die of old age before I ever get anything finished!
On the subject of which, I got the bottom half of the 'hobgoblin barracks' from Iain's first kickstarter printed and am printing the roof now. In the new Asian Adventures set, this is referred to as 'House 2', I think. When the roof is complete I'll post pics of both large houses and the smaller one with one roof variation (it has four) that I've got finished.
Also wrapping up the signal tower for paint and hoping to post pics tonight.
More follows soonest.
Automatically Appended Next Post: Still need to do a couple things to this signal fire tower, but nearly done (close enough to post here and move along):
The structure itself is the bottom 3/4 of the Chinese Temple Shrine that failed to complete its print properly because of the clogged nozzle. The wooden deck is a plaster casting using Hirst Arts molds. The brazier is a flame diffuser from an Aladdin oil lamp. I actually primered the brass flame diffuser, basecoated it brown, washed it in several coats of bronze and it came out looking like the original brass color. I need to hit it with some verdigris wash and then black, I think. It's too shiny. Used some Cuttlefish Colors kickstarter paints plus some Nocturna kickstarter washes to get everything painted up. I like 'em, but am just as happy with my $1.00 Walmart craft paints, for the terrain at least.
Still working on the courtyard tiles for the walled estate, more follows soonest.
Nice work on the tower and it is really fun to see so much 3D printing pop up. It simultaneously makes me want to have one to, but also holds the urge back, by living vicariously through you guys.
Also, came back here to read in the older parts of this thread searching for Athena, which you mentioned in my P&M thread. Fantastic apc conversion indeed. Should have seen her earlier. Lot's of good ideas, especially like the interior! Also love the armoured car based on the BA.
It's funny- the whole time I was knocking the signal tower out, I had the animated version of Mulan in mind; Lord of the Rings trilogy is a much better milieu!
Thank you both for the kind words. The Hanomag and BA64 conversions were both projects that felt right; couldn't wait to get home from work to put some time in on them and almost never put a saw or a brush wrong. This is not to say that the plan didn't evolve as the project went along; I envy those guys that can plan the work out and then work the plan. I have a hazy, general idea of what I want the final product to look like and maybe plan as far ahead as the fist step. Then things change as ideas do or don't work, materials are or are not available or I see something shiny on one of all y'all's threads and have to try to work it in.
Kind of a quick update- I'm still painting Quad-1, cleaning and priming Quad-2, printing Quad-3 and thinking about what goes in Quad-4.
Here's the three different houses from Iain Lovecraft's first Asian Kickstarter (Hobgoblin City) that I've got completed (the roof for the second style of house- in grey PLA) wasn't quite done before I had to leave last Friday morning):
Some quick notes:
The roofs of the larger houses are interchangeable, as you can see- I actually like the ornate roof on the square pattern decoration house base, but they both look good, I think.
All three have playable interiors.
I think it would be easy to cut out the doorways and build simple sliding doors, to be able to represent locked/unlocked houses.
Even with the printed 'base' for the houses to sit on, they're a bit lower than the courtyard tiles around them. I think a piece of poster/foam core board cut to shape would be the perfect spacer to get them to the right height.
I tells ya, after this walled estate project is printed, I'm half tempted to try printing out the pagoda- all seven stories of it! Fingers crossed that the printer holds up!
After printing out my lighthouse I look forward to someone else printing a huge structure . Wish we lived close enough to get a game against each other on that table once its done.
That would be awesome! The Imperial Armies of the Emperor Shi Huang-di versus the hardy New Englanders under the command of Captain Everett- late of the whaling fields! And then the aliens come and .....
Automatically Appended Next Post: Huh- got two things done in one night- the Apocalypses must be upon us.
Did a lot of searching around on YouTube for methods to paint stone, and especially stone pavers or courtyards. I wanted something easy, because I have like 8 million of these buggers to do, but that looked somewhat realistic and good, because-frankly- I'm putting a lot of time in to print everything, so it really needs to be painted well to keep up the investment.
The fellow I found got really good results but used a lot more layers than I'm used to putting in, but we'll give it a whirl.
Tiles primered grey, but then basecoated flat black:
Then a heavy drybrush of tan:
You can see easily that some of these printed more loosely than others- some are really going to need some 'body putty' in the form of extra layers of paint (unless everything is actually made of pumice, or pahoehoe lava, in which case we're okay) but yet to come are the stages of: picking out 50% of the stones in grey or golden brown (and I'll pick out the other half with a touch more tan) then drybrush suede (light) then white (lighter) then a wash of brown and finally a spot wash of green here and there for the lichen that grows on ever rock.
That's enough layers that I think even the roughest stones will come out nicely, and the washes will re-darken the mortar lines between where I've accidently slopped some paint with this first heavy drybrush.
In addition to all the courtyard tiles, I have to do the base of every wall section- they are fitted stone too! More follows soonest.
Here's the next step in painting these courtyard tiles- I picked out about 3-5 stones each in three new primary colors:
I'll go back tomorrow (hopefully) and touch everything up again with one more coat of paint, including the basecoat of tan; this should help even the rough spots out where the lines form the FDM printer show too much. Next time, I think I might try spraying them with a dilute white glue and water solution and see if that fills the gaps without eating away the PLA like the matte varnish did- or just see what two primer coats does.
I think before I hit them with the washes they are going to want to be glued down (and sorted to help keep the too-regular square edges from showing); the wash should help 'regularize' all the mortar lines- including the tile edges!
Meer_Cat wrote: Next time, I think I might try spraying them with a dilute white glue and water solution and see if that fills the gaps without eating away the PLA like the matte varnish did- or just see what two primer coats does.
Crap. Excuse me. Please.
The best filler for PLA would be Cyacrine (Cyanoacrylate, super-glue) mixed with wooden powder or baking soda or talc. PVA (white glue) usually does not adhere too well and, being affected by water or just humidity, can expand and thus lift itself and any paint coat in the vicinity off the plastic. UHU Hart and other "hard plastic" glues should work as well, but be careful not to apply too much, or it will be the same "eating away" story. Also - any two-component resin, like the 5-minute stuff sometimes sold for car body repairs, it can be applied thick and then excess can be wiped off before final curing.
Thanks for the heads up, Wirecat! Hadn't really thought about white glue and plastic that's slippery, like PLA. Not sure I fancy trying to mess around with superglue and fillers on rough texture prints, though- for major gaps, sure, but smoothing print lines I suspect the emergency services would have to come get me unstuck from my chair!
Two component resins, maybe. Or just a second coat of primer and call it good. FDM is great for terrain, for finer things I can get away with some, but for figures resin printer will definitely be dedicated.
Automatically Appended Next Post: A little more progress tonight:
1) All the wall sections for Quad-1 are basecoated.
2) All the courtyard tiles for Quad-1 have a second (in some cases third) coat of primary color.
3) All the pieces for Quad-2 are printed and all the wall sections are primered.
4) About half the pieces for Quad-3 are printed (including the bear- the corner guard tower- 15 hour print, that).
More follows soonest. I'm excited to get all the pieces for Quad-1 primary color painted so I can glue them down and start messing about with washes, to see if/how those are going to tie things together.
Syro_ wrote: I'm digging the quads Meer_Cat. I like the ornate roof too. That pagoda sounds intense, good luck printing it if you go ahead with it.
Thanks Syro! In the original kickstarter, all the ornate roofs and walls and things were for the hobgoblins- in the new Asian Adventures that just ended both styles are for humans. I saw no reason not to mix and match- the fancy roof here is for the important guy, and the step'n'fetchits live in the plain house, maybe. For sure, I'd like to print up a whole compound using the ornate walls and tower tops and everything. Seriously thinking about adding another MP10-Mini.....
The pagoda is definitely happening soon, though- it's too nice not to print. And the Asian castle- wow! Lot of hours, but a gorgeous structure.
Theophony wrote: Nice start on the courtyard stones. A dry brush and a wash will blend them nicely.
Thanks Theo! The same guy that did the video I'm following to paint the courtyard and wall foundation stones does one on making your own black wash. I'm going to need so much, I'm going to give it a try for once. His video is here:
Viterbi wrote: Nice work on the tiles and good to see you go the extra mile with some other colors thrown in. I probably would've been too lazy for that myself
Thanks Viterbi! It isn't so much having the patience, as something to do during the interminable printing process. It's amazing (back me on this Theo!) how easy it is to just sit and watch the print head moving back and forth. What are we watching for? The print head to do a trick? A mistake to happen? What, what, wat?! I'm actually getting to the point of working on other projects again, whilst the silly machine does its thing. I have to admit though, it is fething magic to someone my age- push some buttons, and presto! Out comes a thing! I've always suspected that McDonald's fast food is made this way- gallons of grey paste going in the back of the store, hamburgers, french fries and milkshakes coming out the front (I can't take credit for that idea, actually, that's from one of the Stainless Steel Rat books as voiced by Slippery Jim Digriz- great stories).
I have gotten a few things printed since Sunday night, when I got back and found my package from GigDigit waiting for me with new bowden tube couplers. First up, the 'chipped' wall section- it shows damage/weathering on both the front and the back:
Next another 'porthole' wall section, this time with the 'hole' filled in (there's one more, with bars across the port, I'll print that soon):
And finally two shots (these pieces I printed some time ago) of the wall steps and fighting platforms to go around your city or compound or whatever:
All of the pieces here are as they came of the printer, no cleaning yet or anything. And none of them required supports. You can see on the porthole wall section especially that the toe of the base is curled up slightly; this might mean my bed temperature is too high, I may need to try lowering it to 60 or even 55 degrees C. We'll see. For now, I don't mind a little curl because I'm going to be gluing everything down, probably with two part epoxy and it won't be seen and won't matter. But for stand alone pieces with their own bases, may need to try lower temp.
Ilove the black magic craft videos, it’s a saved link on my bookmark home page. Prints are coming out great, even a bit of a curl isn’t terrible, especially as you said if it’s for terrain.
Actually, for terrain bottom curl is worse than for an occasional base. You get used to shaky-rocky people, but when Your entire city develops cracks and bends like a "Titanic"...
Cool stuff, as always, Meer_Cat, it was a great idea at Kickstarter and You'll do it right!
Wirecat wrote: Actually, for terrain bottom curl is worse than for an occasional base. You get used to shaky-rocky people, but when Your entire city develops cracks and bends like a "Titanic"...
Cool stuff, as always, Meer_Cat, it was a great idea at Kickstarter and You'll do it right!
Too true Wirecat! In this case, I'm planning to glue everything down to a base as a permanent gaming terrain, even though the pieces use the OpenLock system so you can rearrange them whenever you want. With the rounded feet on some of the base pieces, I'm going to use a light silicon caulk, so that hopefully it acts as a bit of a leveler, maintains some flexibility (doesn't get brittle and crack off) and continues to adhere.
Here are some collective shots of what I have printed so far, and the little bit of paint that I've thrown at it and somehow it stuck:
I'm also trying Wirecat's idea of using cyano-acrylate glue (superglue) to smooth out the rough prints from trying to make the Ender-3 Pro work. I must admit, I generally use the gel form, and that's why I couldn't see initially how to spread it without making a massive mess. But I was at the dollar store today getting some dropper bottles for the wash I'll mix up and apply once I have the compound pieces glued down and saw a six pack of liquid superglue for a buck, so grabbed several and am trying them tonight. It might take several applications, as some of the printed pieces are more like honeycomb than smooth covered 20% infil applications, so it seems to be soaking in a fair bit. But, it saves seven hours of print time for each wall section I don't have to replace! (There are four pieces I need to fix.)
Tonight was just straight grunt work painting- I had a solid hour and a bit and I got some things done. It's been a while since I've just been able to sit and paint and listen to my eclectic music play in the background (everything from Tom Petty, Rick Astleey, Animotion, Kate Ryan, Dio, Hank Williams [Jr and Sr], Go Gos, Joan Jett, a bunch of others).
Got a bunch of wall stone bottoms primered/basecoated:
And then later the tile tops:
And I got started adding other basecoat colors on my 'experimental pieces' to see how the main wall color and the tile colors are going to go. Here's the walls with a craft Tole Paint called 'Egg' and another (50 cents a bottle) called Barnyard Red for the base color of the tiles:
The 'Egg' areas will get one or two or three more coats to smooth the rough layer lines (these are the best pieces I could get off the Ender-3 Pro) but I think they'll do alright in the end. Unfortunately, using superglue as a filler didn't work too well- the pieces are so porous that the glue woud up running out of the bottoms. The paint should clog it up pretty good, though. There is more black showing through than the picture shows, it's a little better in the bell shrine roof:
If the 'Egg' color will cover black, then I can just spray primer all the pieces black and be done with them faster. Have to try that out.
I think I'll try a heavy dry brush of orange on the tiles, then a wash of black/brown and see what happens.
Wow, that's a lot of progress on your tiles, nice Meer_Cat I also think it's great to have a playlist of only songs you like playing even if it seems unusual to a different listener. I'm the same way. Crazy about the super glue leaking right through the prints.
Bit more painting tonight- messing about with reds and blacks for the torii gate and the bell shrine, and trying to develop a speed painting technique to do all the tile roofs and wall tops and things that need to be done. So far, the best seems to be to use a1/4 inch flat brush about half loaded and draw it perpendicularly to the tile ridges. Three long strokes (reloading between each) from left to right along each row of tiles and the ridge cap, then reverse the piece and three long strokes from the other direction. A little dabbing to make sure there isn't too much black showing, and I think I'm good for this stage. Next will be using a dark orange, a light red or even a greyish white for light drybrush highlight color and then a wash.
Pics or it didn't happen!
And the group of walls is my thousand and first photo uploaded into my gallery (1001).
Thank you Syro! I've really focused on getting even a little painting time in each day this week- "Sculptember" motivated me even if I didn't sculpt anything!
Got some more basecoating in tonight- last chance I'll have until probably Monday. I'm getting close enough to getting the base colors done and being at the stage of gluing things down that I'm getting a bit excited- and that is what the hobby is all about, for me.
Here's the progress shot:
Did some touch up work on the torii gate and bell shrine- I'm just about at the stage to where the bell is the only big thing left to do. I'm going to poach shamelessly on the techniques I've seen you all use to do the green, glowing ghosts- I think it will make for an excellent verdigris patina for a bronze bell.
Meer_Cat wrote: Unfortunately, using superglue as a filler didn't work too well- the pieces are so porous that the glue woud up running out of the bottoms. The paint should clog it up pretty good, though.
This... was unforeseen and unfortunate. :( Never heard about this problem/feature, but then my eperience with 3D prints is limited to just one device that produced pretty solid stuff. Sorry for causing You problems, Meer_Cat. :(
It didn't cause any problems at all, Wirecat- no worries! I anticipated there might be some leakage, so I had the piece tilted a little to keep the glue as much on the surface to be sealed as possible- very little mess, when all was said and done. It did make the piece smell a bit like poorly fried chicken, though- not sure what's up with that!
The largest flat sections I have are the off-white color of the middle section of the walls, and the latex wall paint sampler I'm trying is doing a very good job of sticking to the PLA and filling in the pores. Some pieces needed a couple of coats, one needed three. All of these 'defective' pieces were produced on the Ender-3 Pro printer, the MP10-Mini produced very solid, very smooth pieces, so no problem there. I just couldn't afford to toss out the ten or so wall sections I had that were 'sort of almost' good enough to use- 3d printing can be a really big time hog.
If I have to do something like this again, it occurs to me that good strategy might be to brush on powdered bicarbonate of soda- really work it into the interstices, and _then_ pour on the superglue. It sets up so fast, it's amazing. And especially if the pieces need to have some texture.
The point is largely moot, though, since I wasted a year on the Ender have since moved over to the Monoprice. When I get really tired of mostly printing what I set out to and having it work, I may try to debug the Ender again, but that won't be for awhile, as much as I'd love to have two machines running at once.
Thanks for the advice Wirecat- and keep it coming, I need all the help I can get!
Been awhile, had a number of things to take care of in addition to the really important work of painting!
Couple of WIP shots to show I'm still in the game:
The bell shrine is nearly done- I've added some very light white drybrush to the roof tiles (since this picture) and the bell may get a little more white also. Not sure how to weather the red pillars though- they are awfully bright. I'd like to give them a more realistic look, without making them look 'dirty'- as undoubtedly the monks that are responsible for the shrine would never allow that.
These are all the wall sections for Quadrant 1, nearly ready to glue down and see how the wash will tie them together. I used the same colors for the courtyard stones as the wall stones- but didn't use the lightest grey that is in the courtyard stones- to try to give a little bit of difference between the two (harmony without lockstep unity). The other thing I will do is add a light drybrush of white to the wall stones and hopefully with those two differences that will provide a very subtle contrast between the two.
Looking good Meer! That is something tricky to figure out about weathering the pillars. You said the monks would be cleaning it regularly, but would they have access to paint? Maybe you could make some cracked paint to "age" them. Something that might work even better is to see if you can tint the pillar a lighter version of the main paint where they would be exposed to the sunlight regularly? You have an air brush, right? maybe cover the rest of the piece of and mix a lighter tint of the color you used and lightly spray onto areas of the pillars? Good luck with your build. I'm still curious how the 4th quadrant will look.
That's going to be quite an impressive setup. For the pillars, Japanese temples tend to be a little more orange, so you might think about fading the color a bit on the outward facing surfaces to indicate age.
Thank you for the feedback Viterbi and Josh! Sorry I'm so late getting back, I do value and appreciate all of you who take the time to stop in, look things over and especially provide your thoughts on proceeding forward.
Viterbi: Appreciate the comments, and a promise: I think I've shown enough WIP pics of roof tiles and stones, no more until I get things glued down and hit with a wash- something really progressed!
Josh: Excellent observation about the color of the pillars. I had more 'generic Chinese' in mind, but torii gates (and possibly this style of bell shrine, for all I know- I must do some research) are definitely Japanese. I'm thinking a may try to wash them in an orange color (I may try to make an actual glaze!) and then 'mist' them with a brownish-white to try to show aging and see what that does.
The nice thing about having a 3d printer (when I get the blasted thing running again- nothing serious, just need time) is I can print a single pillar to experiment on.
I hope to have some tangible results to show tomorrow. Here's hoping!
This topic may have been covered earlier in this thread; if so- I apologize.
This topic may already be well-known to the printing community; in which case- why didn't you tell me?
BLUF: Some printers behave/print erratically if the SD card inserted has too much data stored on it, or if the SD card's storage capacity is beyond what the printer's micro-processor can handle.
Background: After many hours of successful prints on my Monoprice MP10-Mini, it began to behave erratically: the print head would move outside the perimeter of the object that it had- up until that point- been printing successfully (coloring outside the lines, as it were); it stopped extruding filament at a certain point (about 20mm up from the print bed); it shut off the bed heater and nozzle heater block at about the same time. And all this using gcode that had worked perfectly well before, many times.
Solution: I contacted the Monoprice help team by email as a start. They also offer online chat on their website, but I prefer to do some preliminary diagnostics first, to better shape my observations and questions if I have to go to the next level. I got a response within an hour with links to articles about filament grinding and other common 'failure to extrude' problems but also the observation that the MP10-Mini is designed to accept up to an 8Gb micro-SD card- and I had mentioned that I had purchased a new 64Gb card as part of my efforts to eliminate possible causes before asking for help (I had also resliced the original .stl file).
So I hied me hence to yon local store of electronic flummery and got a new 16Gb card- they didn't have anything as small as an 8, on the chance that the card that had shipped with the printer had gotten corrupted somehow (it came with a 16Gb card). I saved the newly resliced file onto the new card and ran it- and everything came out fine (a slight curling up of the corners, but I think that is because I have my print bed too hot- 65 degrees C- I'm going to try turning it down to 55 or even 50).
Apparently, I had been slicing various files and saving them all to the card and the amount of memory that the microprocessor for the printer could handle was exceeded and it went mad. I had tried SD cards that came with the other printers, but they were too big (64k), to full of files or both.
So, the MP10-Mini can handle a 16Gb card, just not one that exceeds 8Gb of stored files. Other printers may have similar limitations.
Something as simple as this took my printer out of action for two days. I'm going to have to rethink how I organize files I have sliced- probably store the gcode on my laptop and transfer over to the SD card just the files needed for the current project- or start an SD card for each project and keep an eye on how many files are building up. I suspect I'll use the former. For one thing, I'm frequently re-slicing .stl files because Cura keeps evolving, so there's no sense in getting a whole bunch of files in Cura 4.8 when 4.9 and 5.0 are really just around the corner.
I'm still printing and painting- will post an update with pics when there is some real change to show. Frankly, I'll be happy when this Walled Estate project is done; it's turned into a bigger bear than I first thought. As the printer(s) work more reliably, it is getting easier to start a print run and then paint, and ZZ Top covers the sound of the printer.
Interesting point. I've been considering 3D-printer, but all my friends that have them seem to send as much time cursing as using them - and they're more tech-savvy than me.


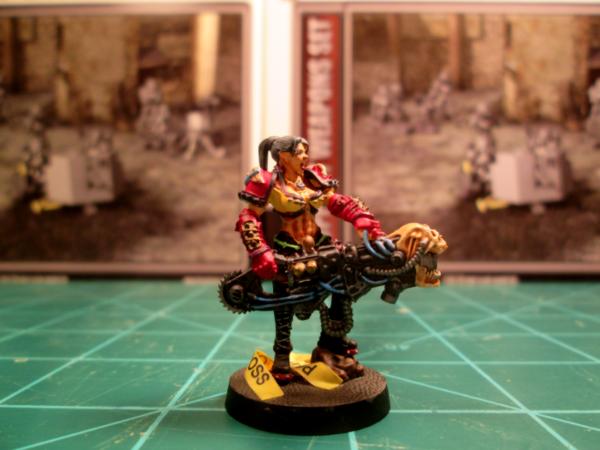
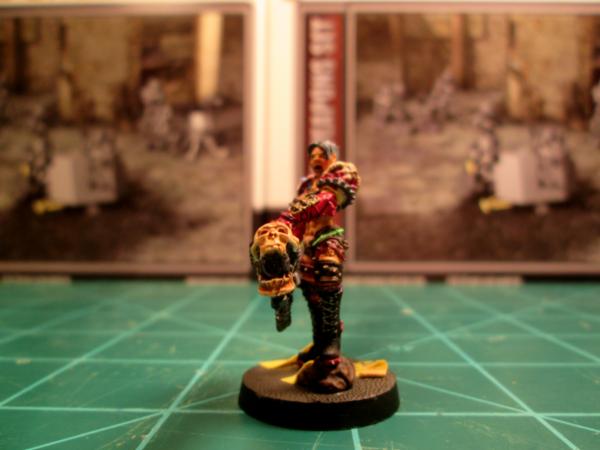
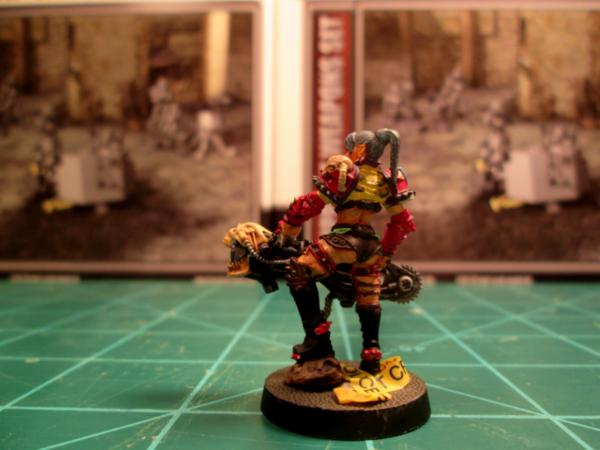

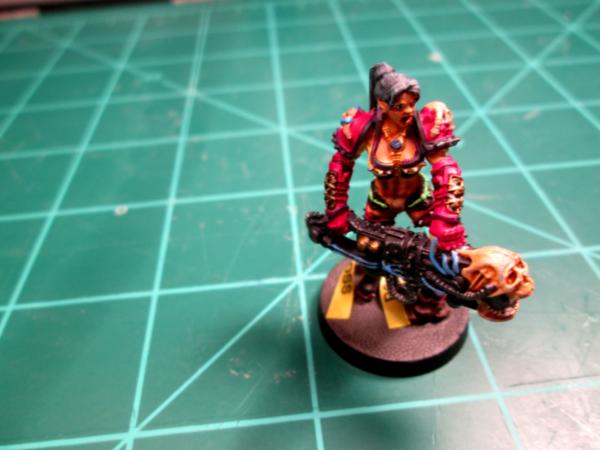
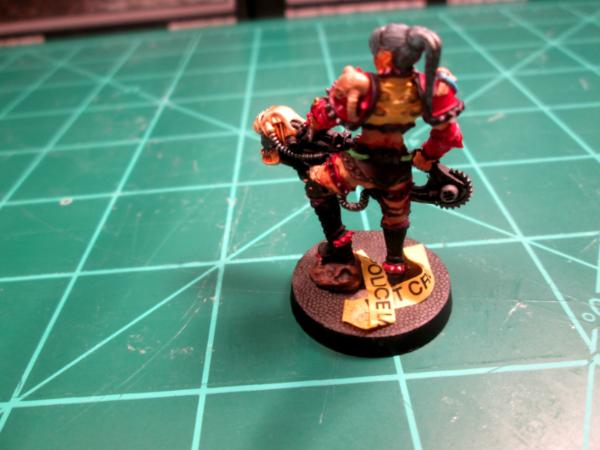


 It's amazing what we can do when necessity dictates though- I had some fairly elaborate workarounds (I guess today they would be called 'hacks') when I was young and starting out because I was a) living in barracks and couldn't leave my stuff all spread out and b) had almost no money. I've gotten older and now I have a better modelling budget, but may be exercising it at the expense of the imagination I displayed earlier from pauper necessity!
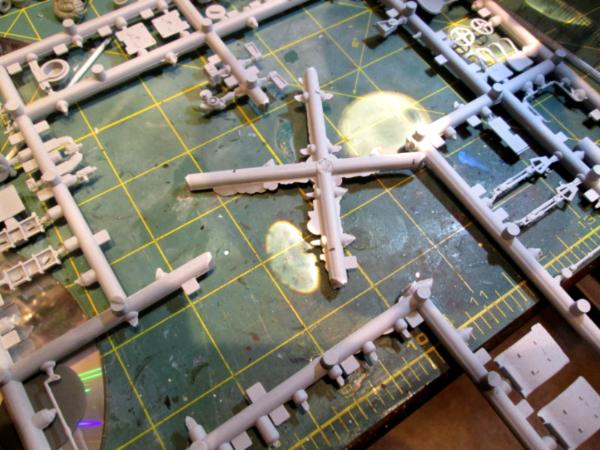
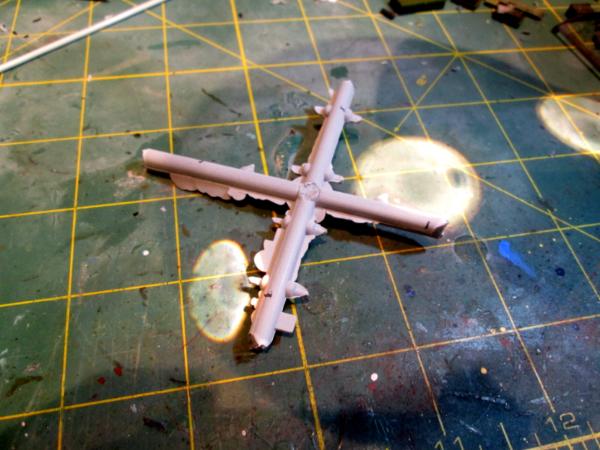
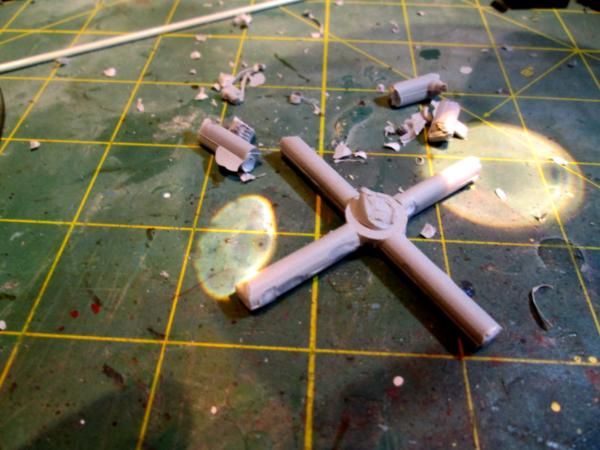

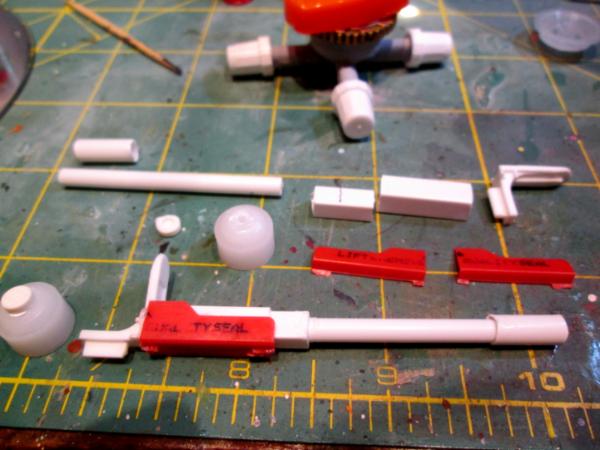

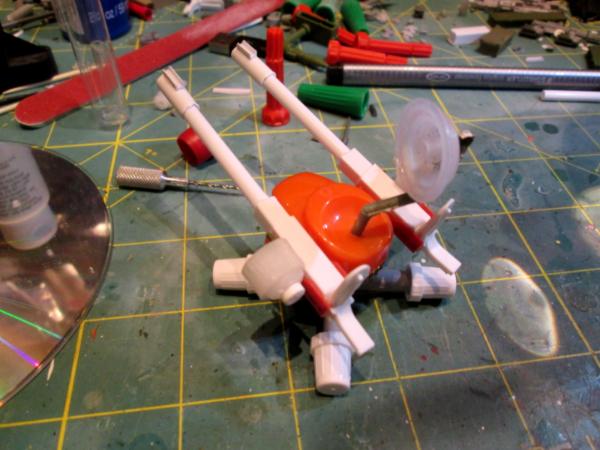
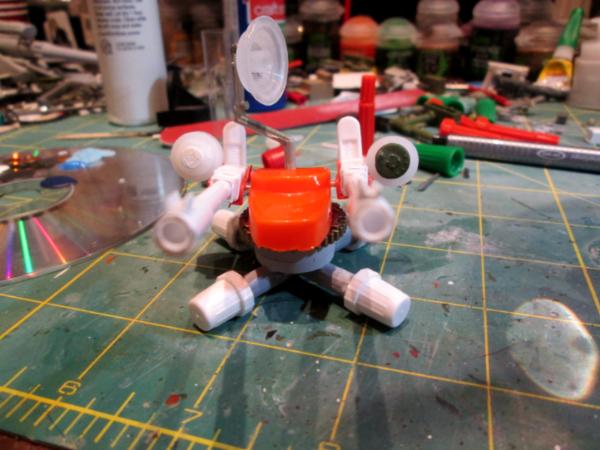
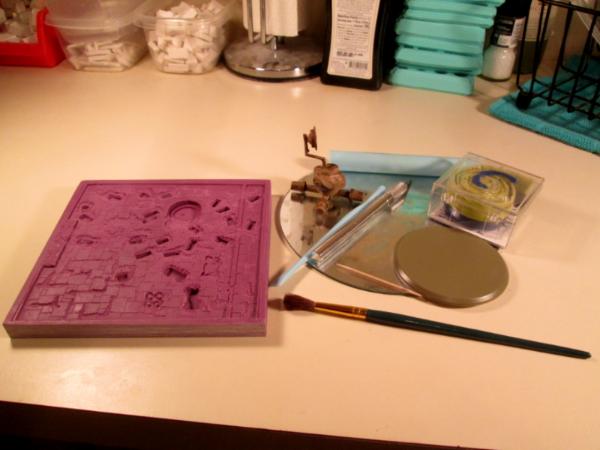
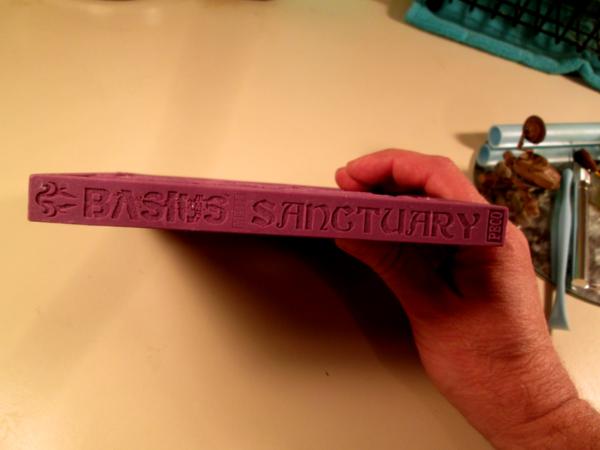
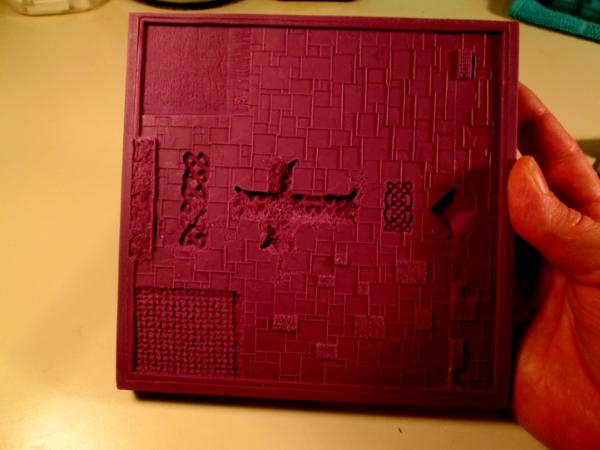
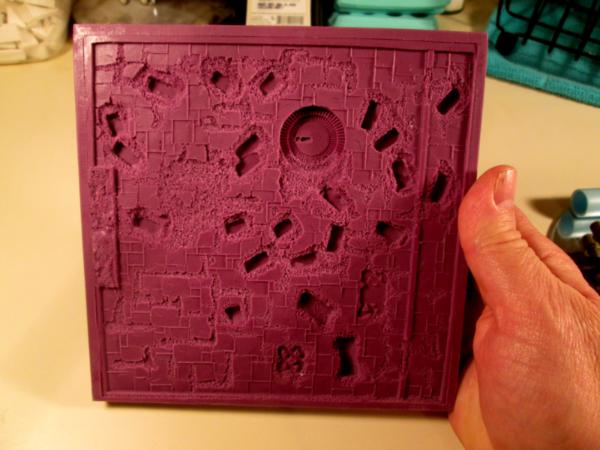
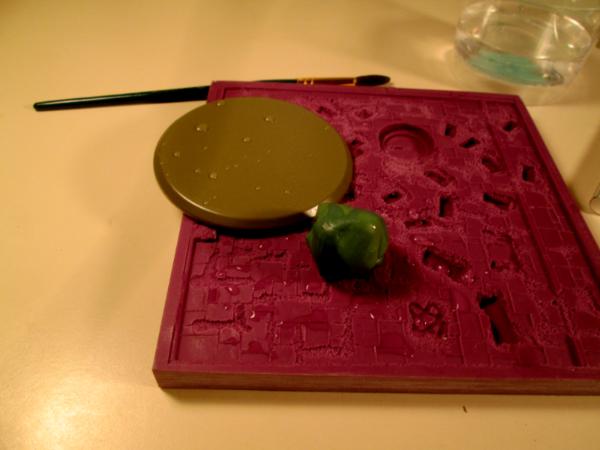
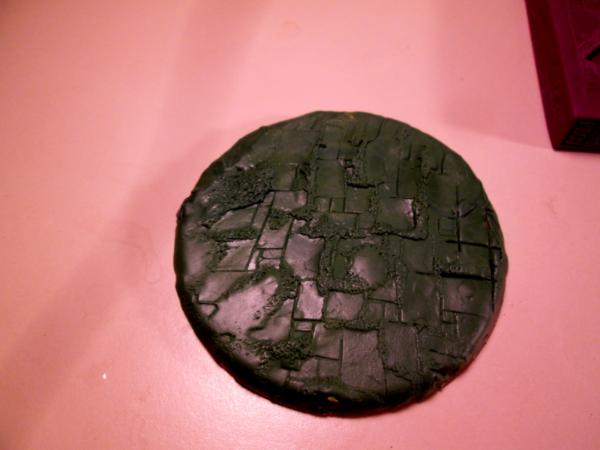
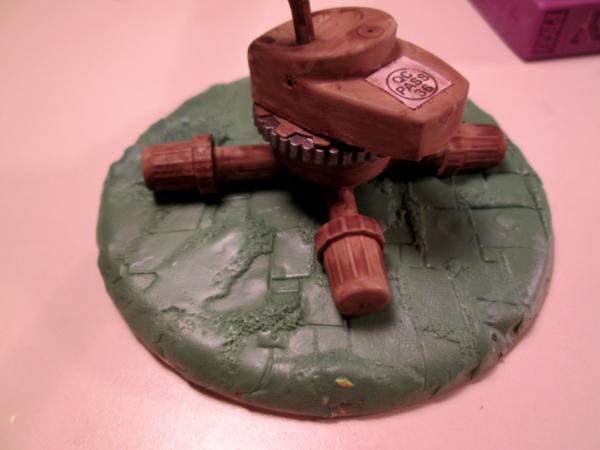
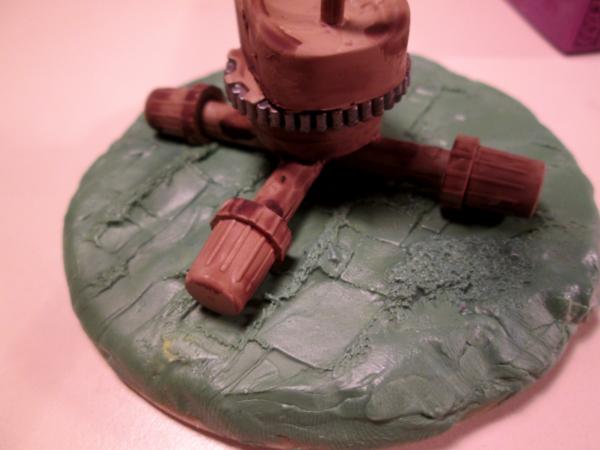
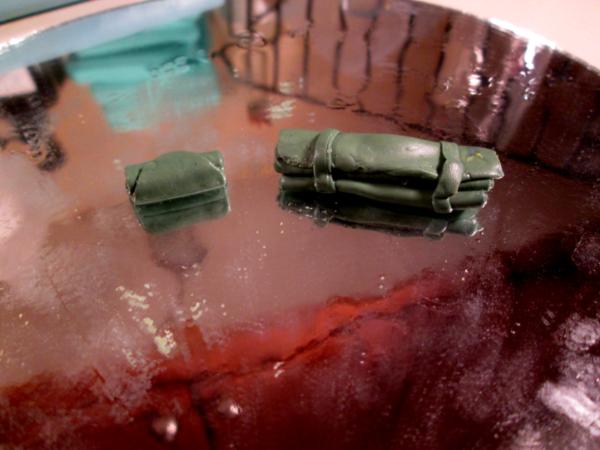
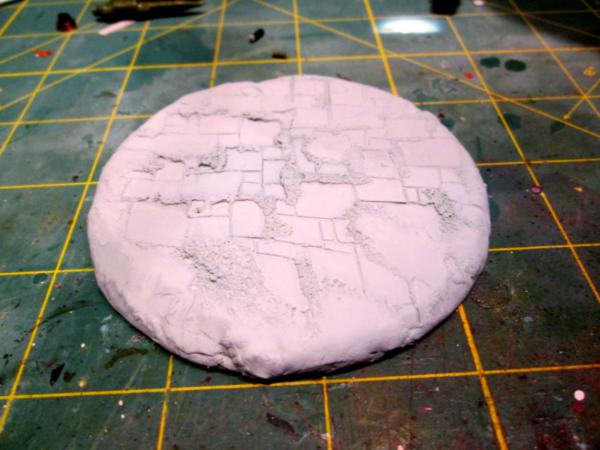
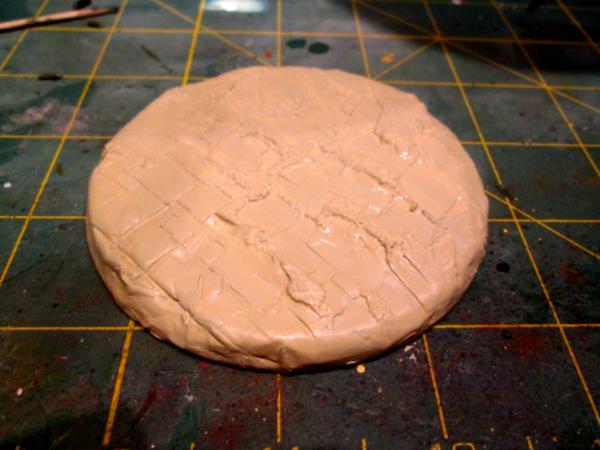
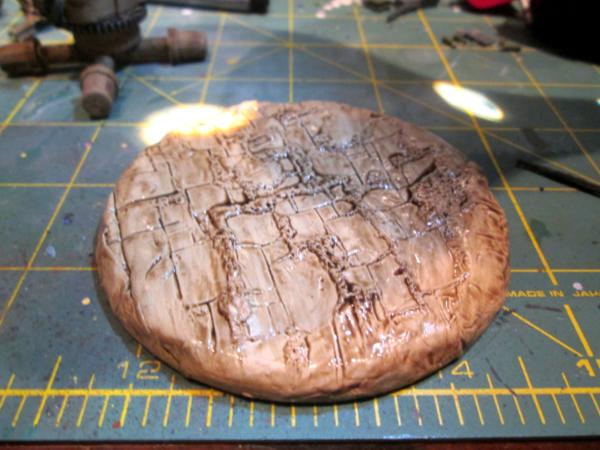

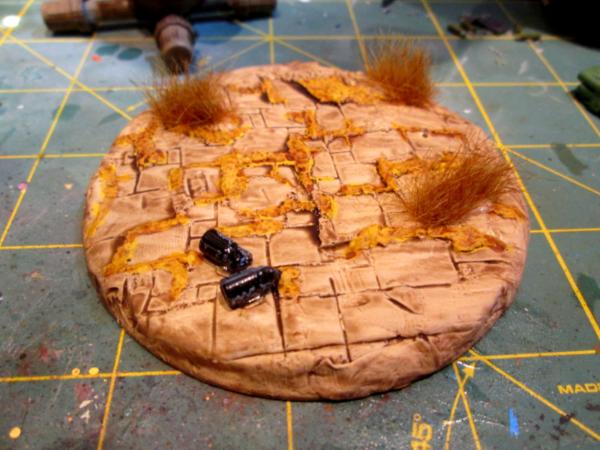
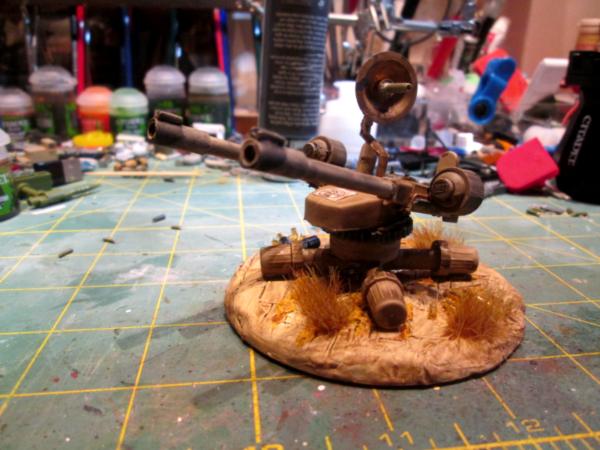
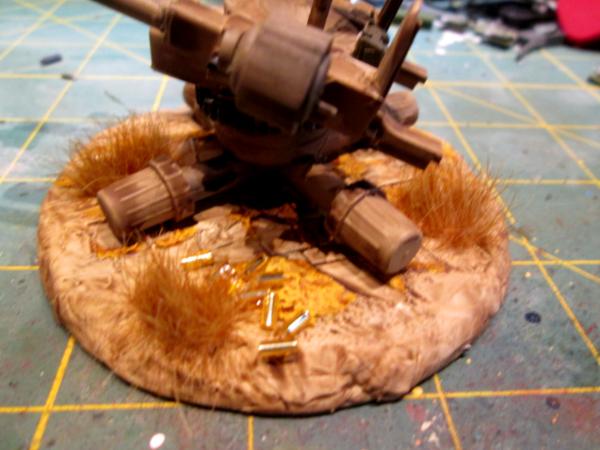

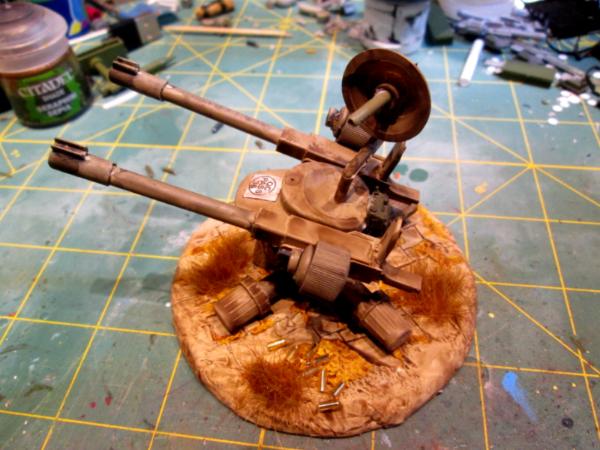
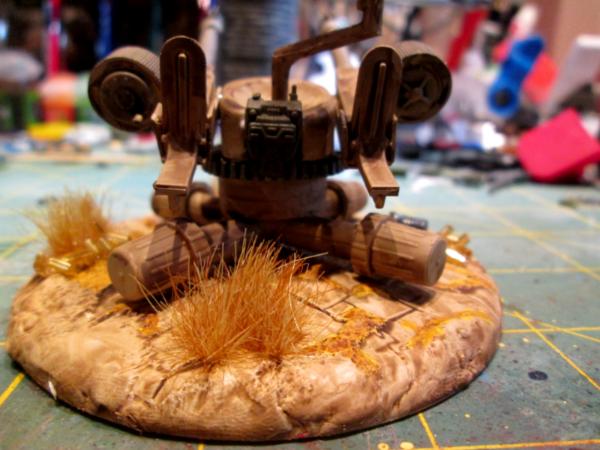
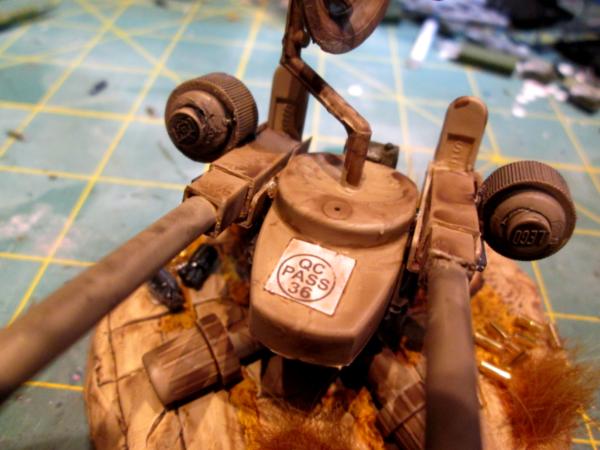
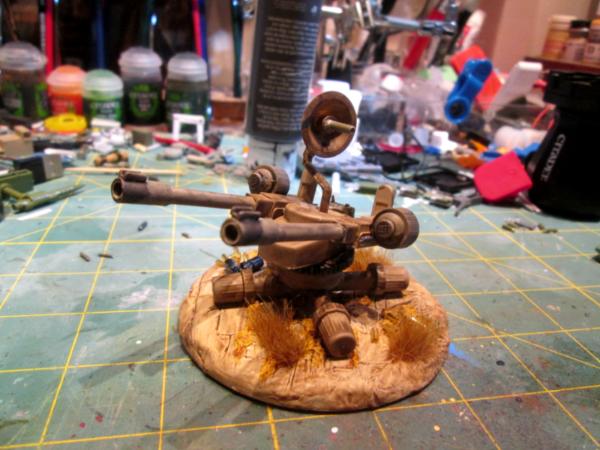


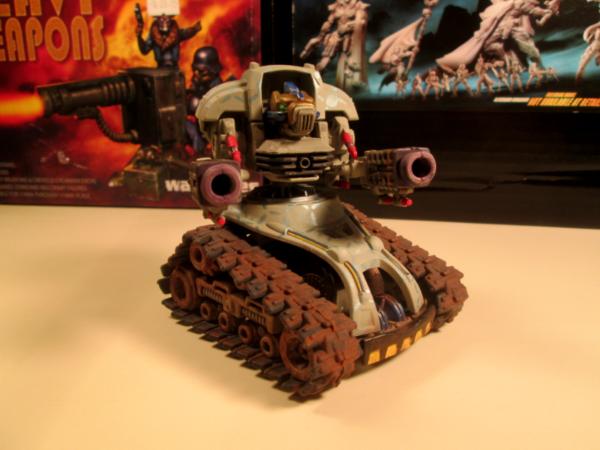
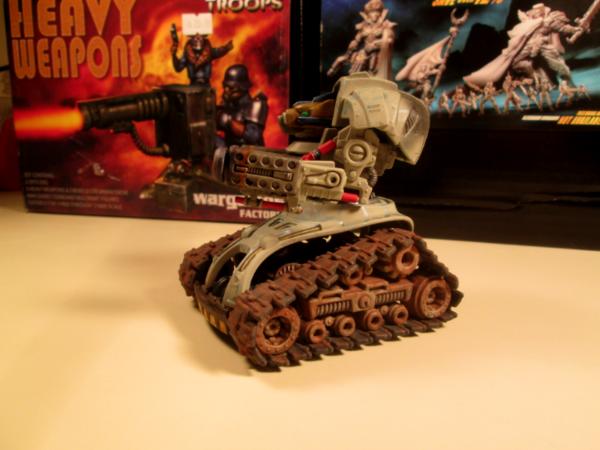
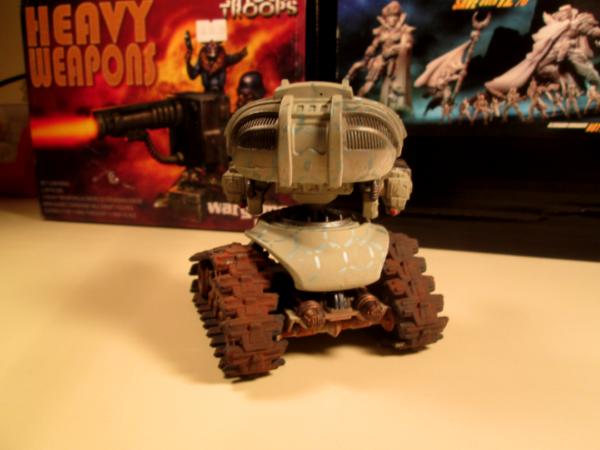
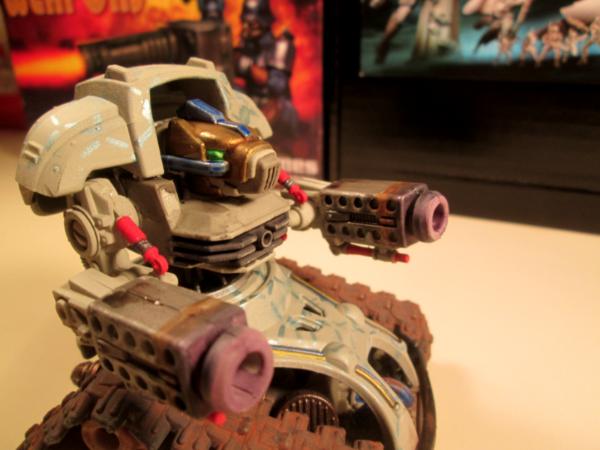
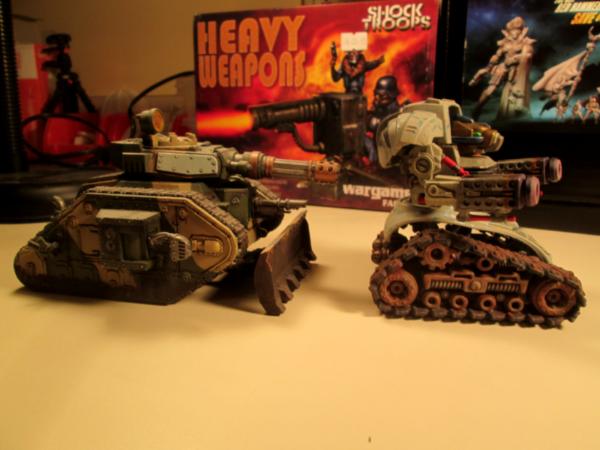
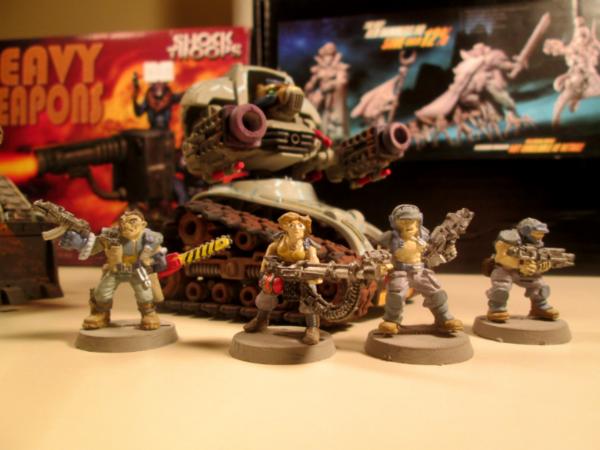
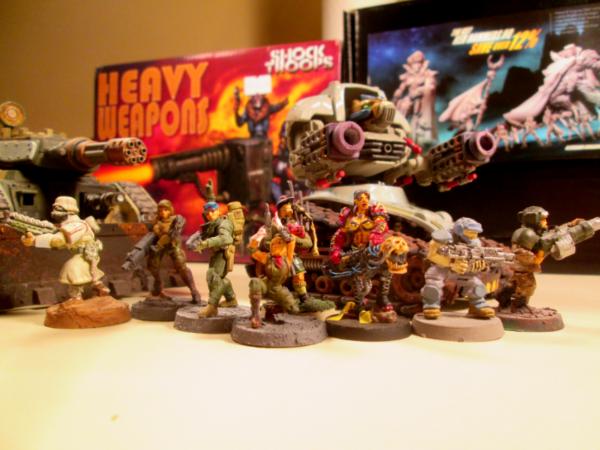

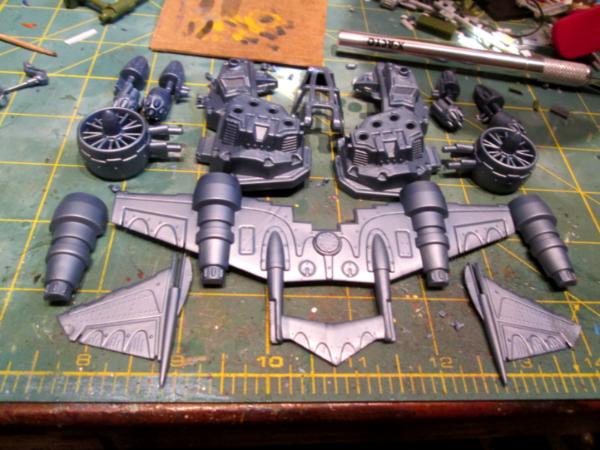
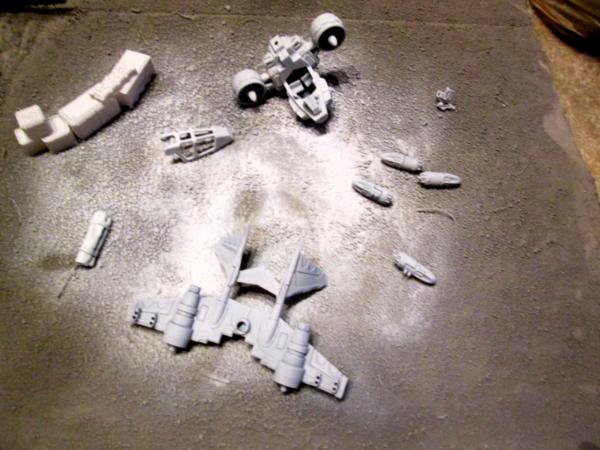

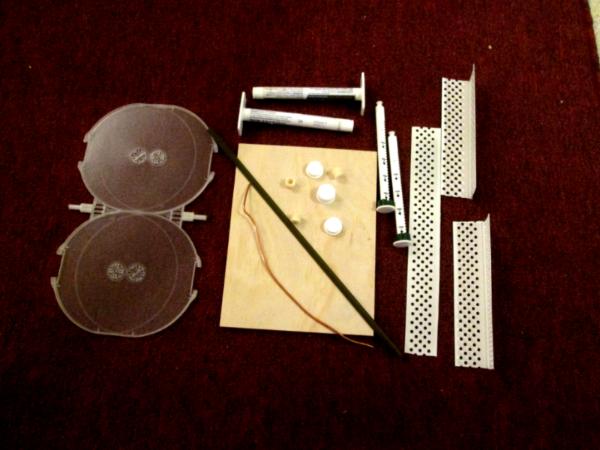


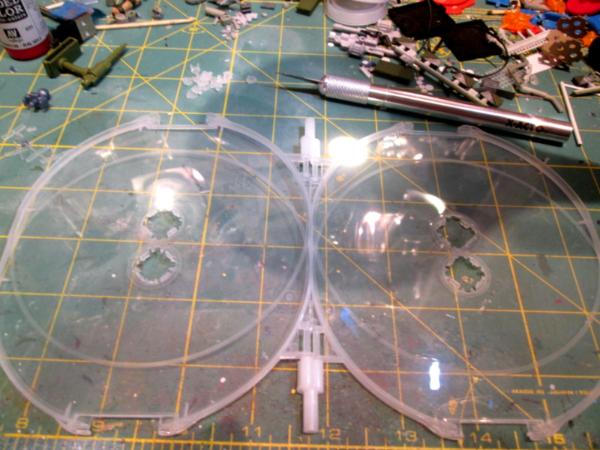
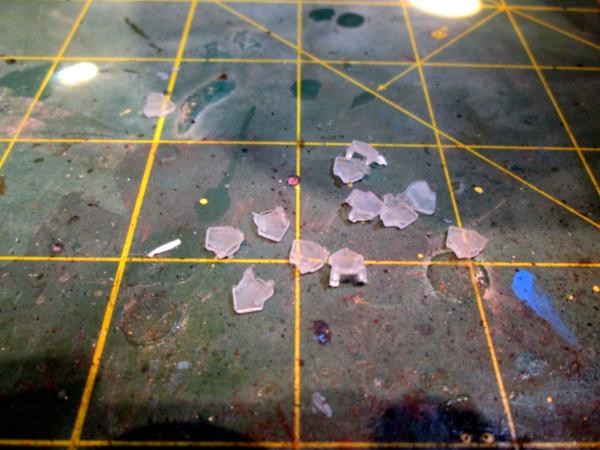
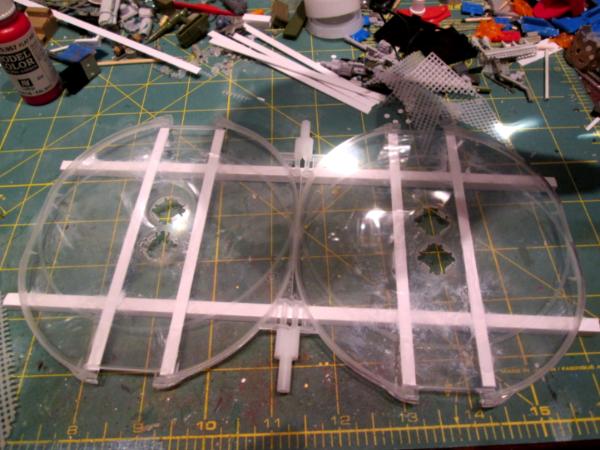
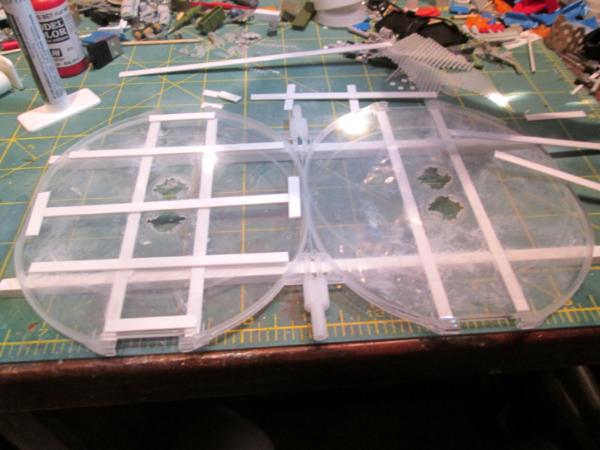
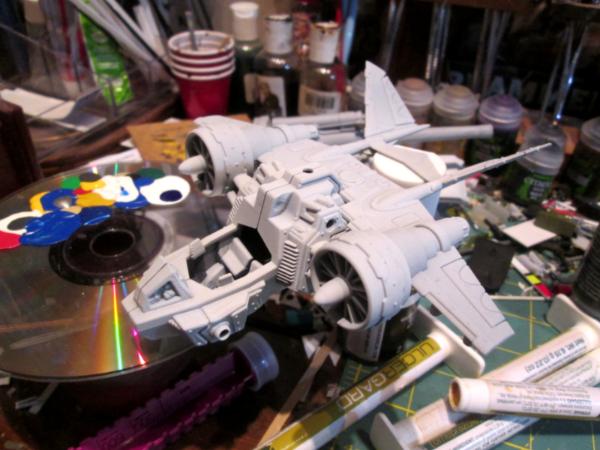
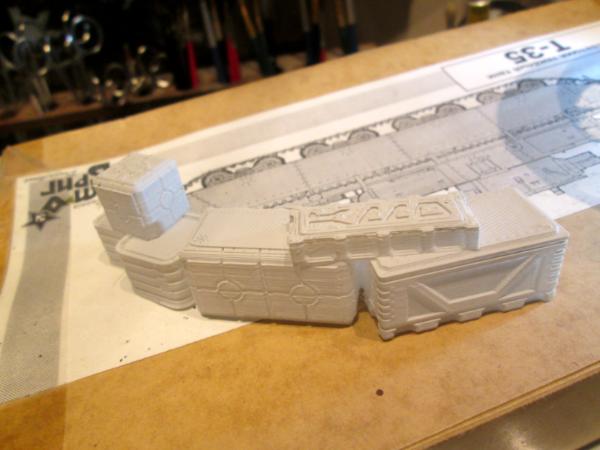
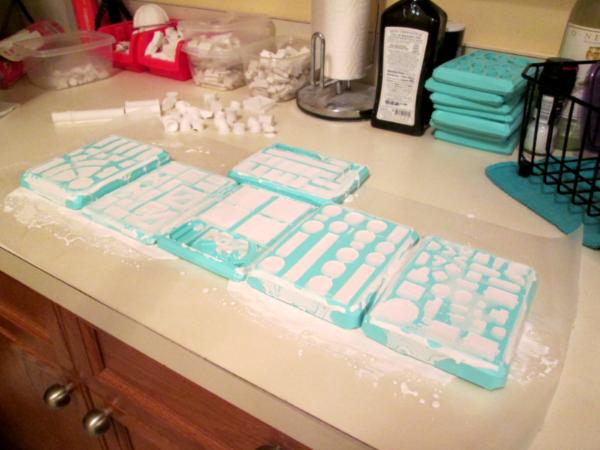


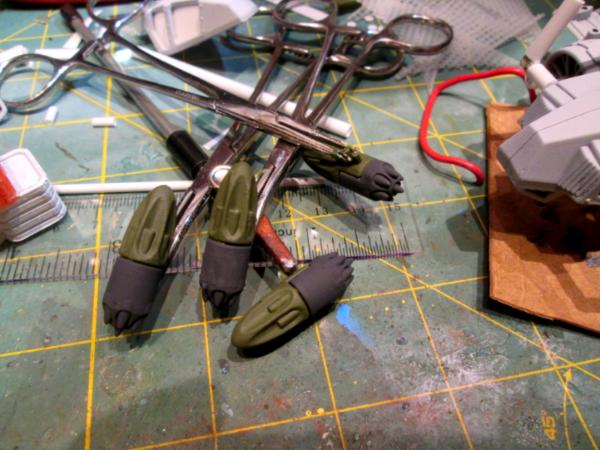
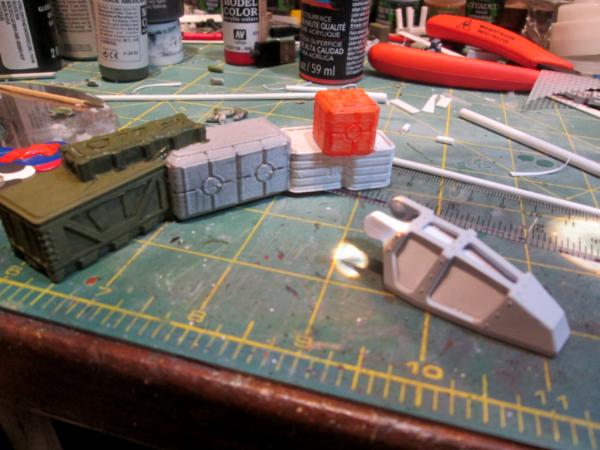
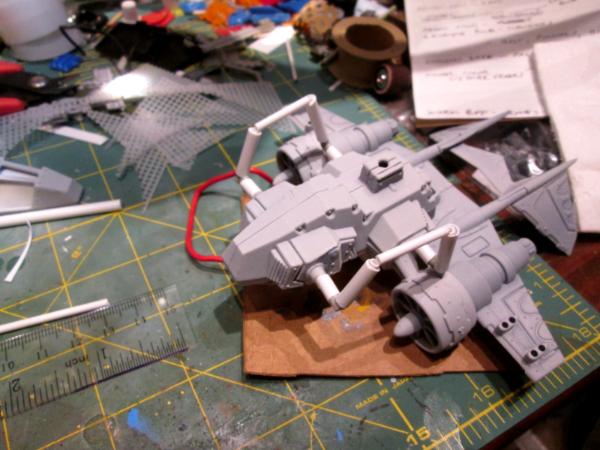
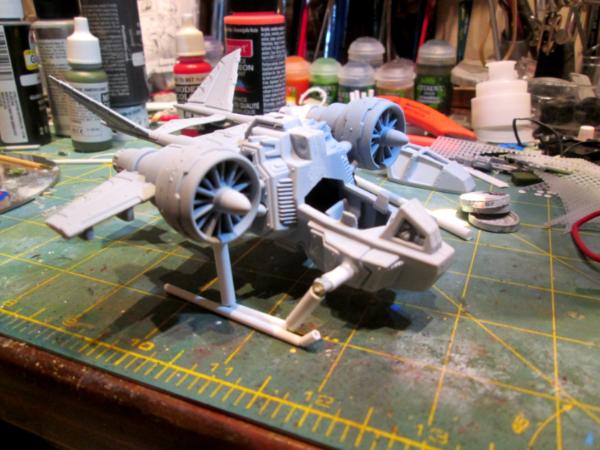
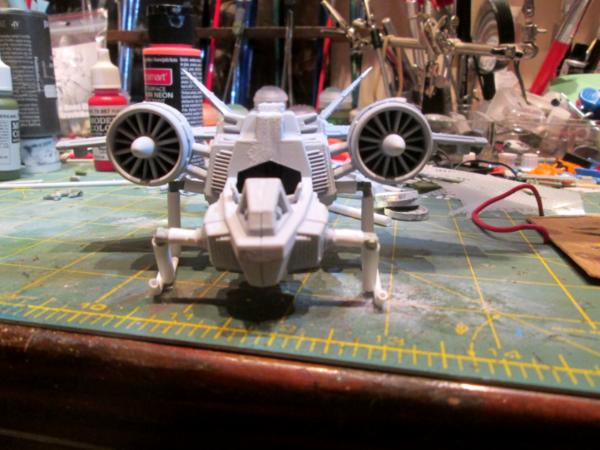
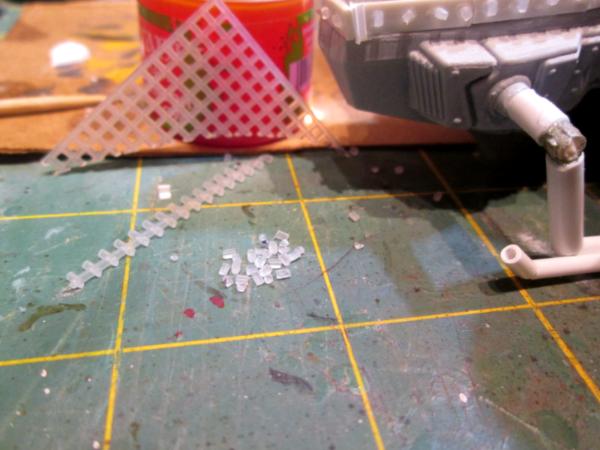
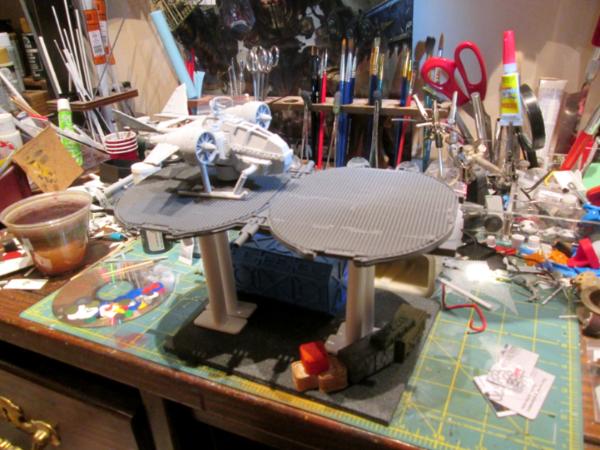
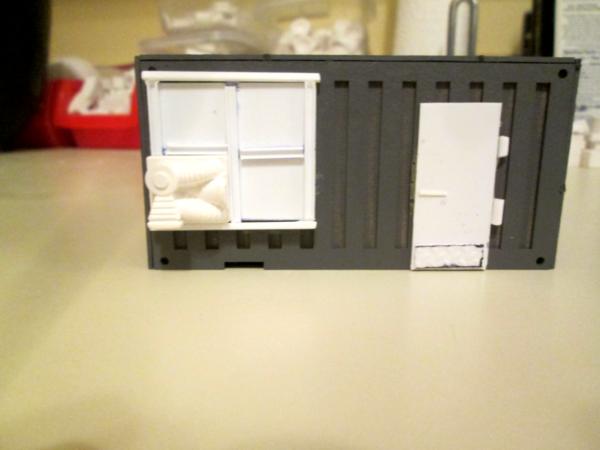
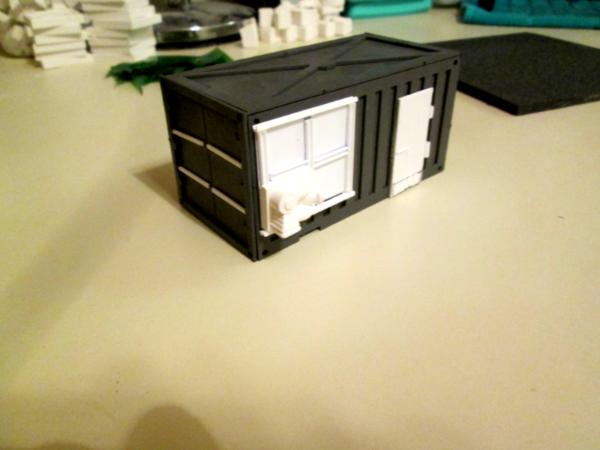
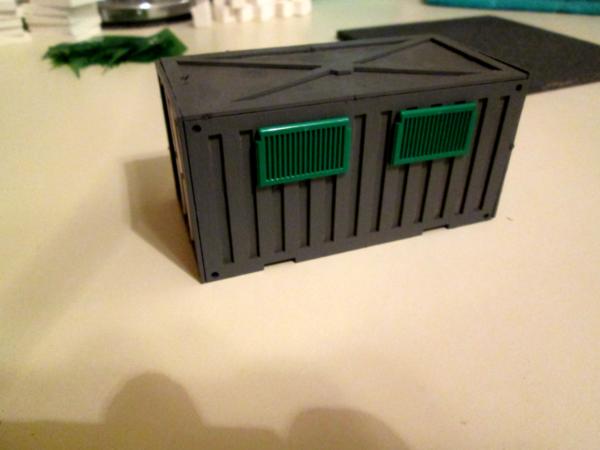
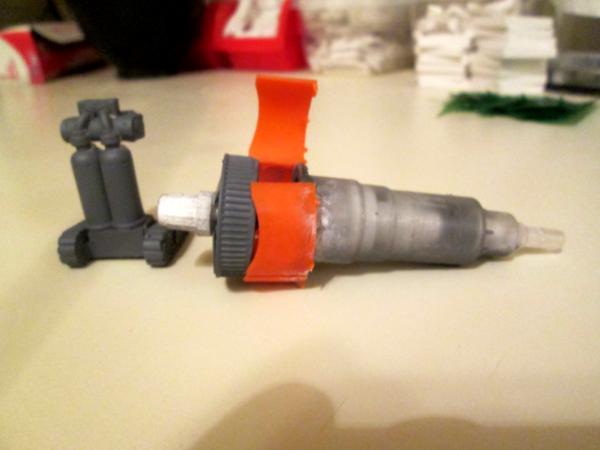
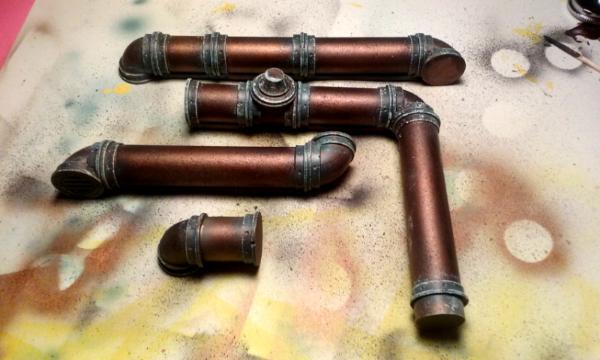
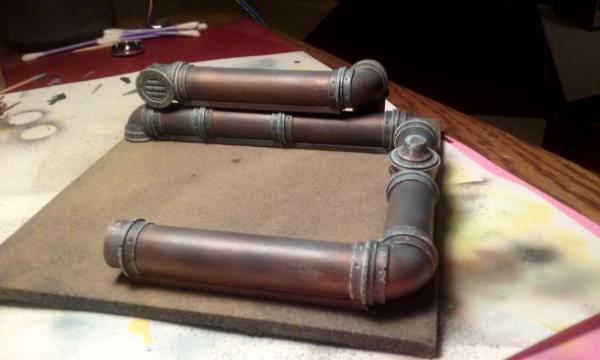
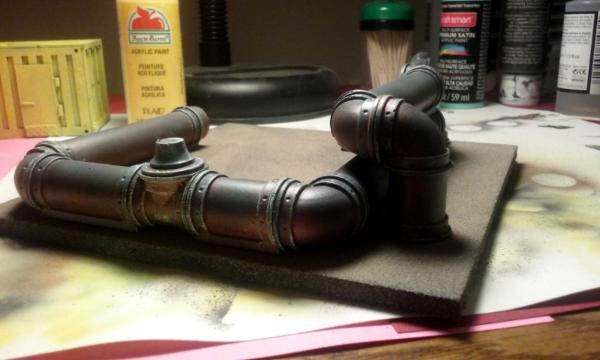
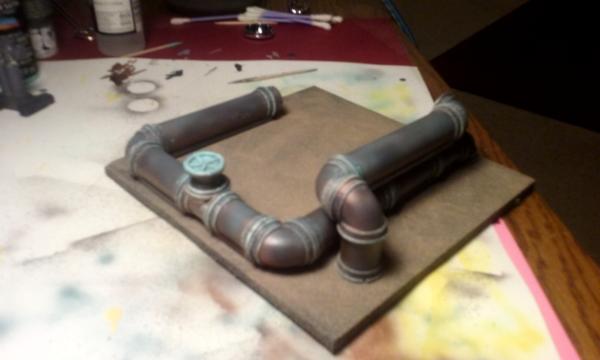
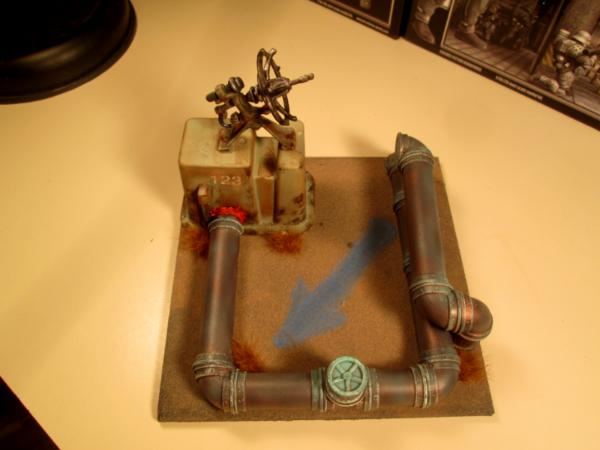
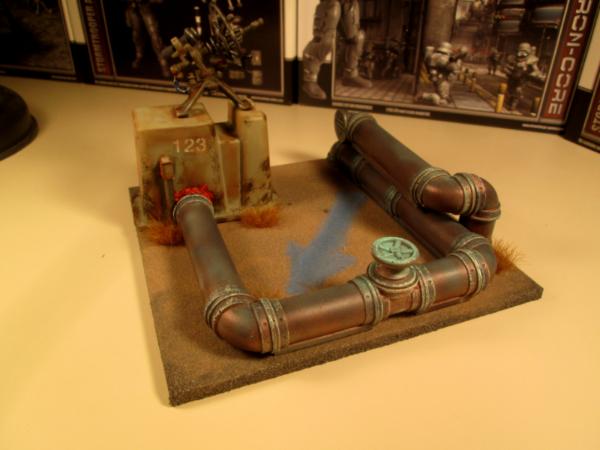
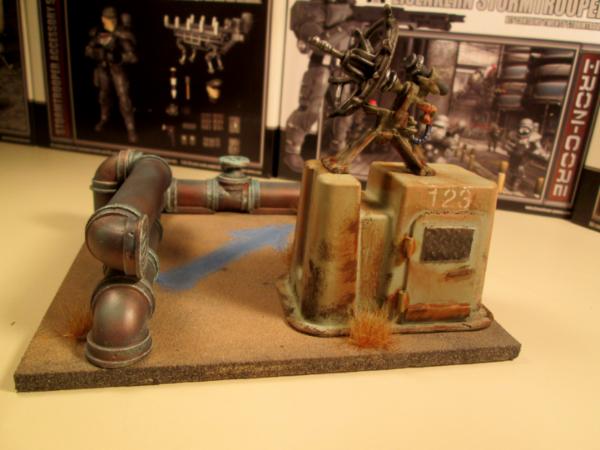
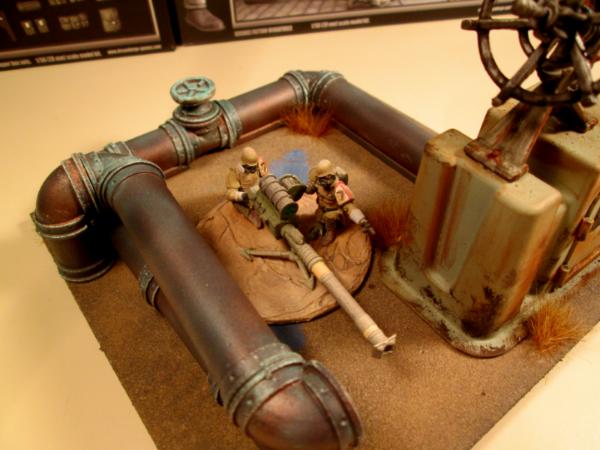
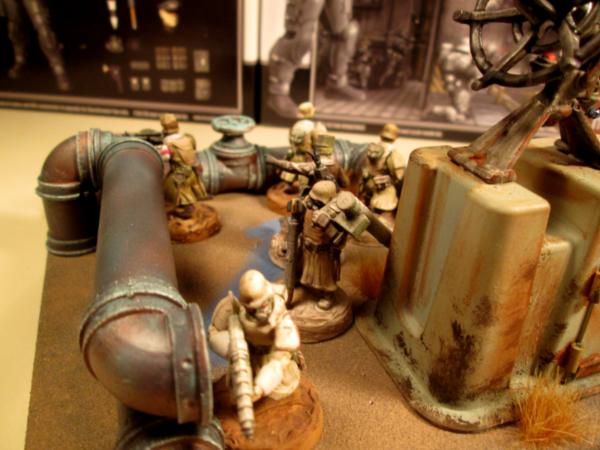
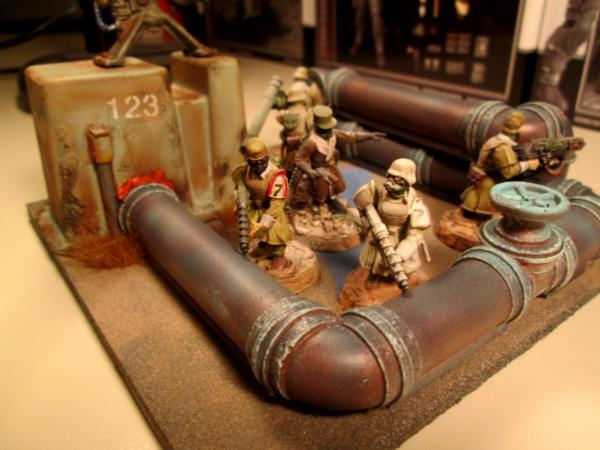
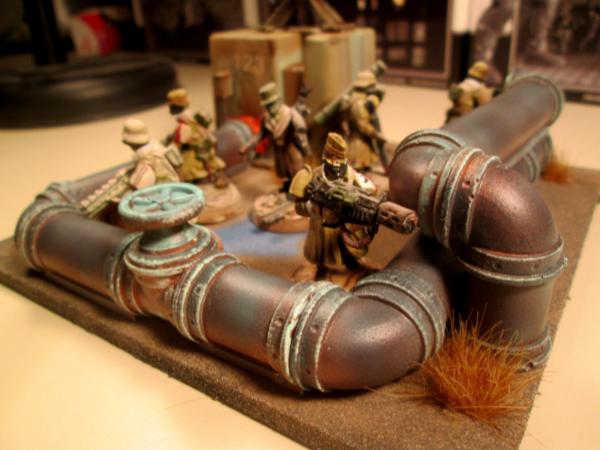
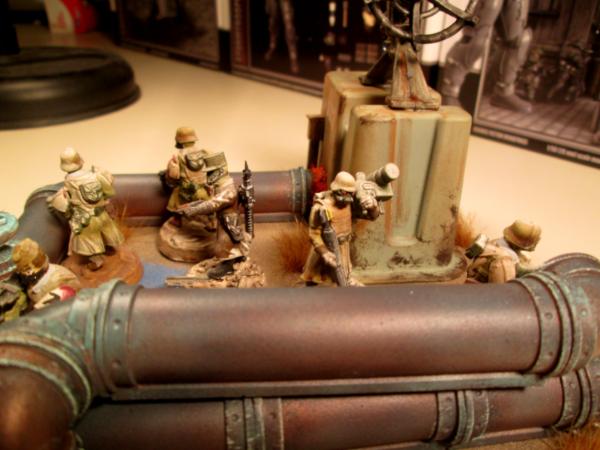

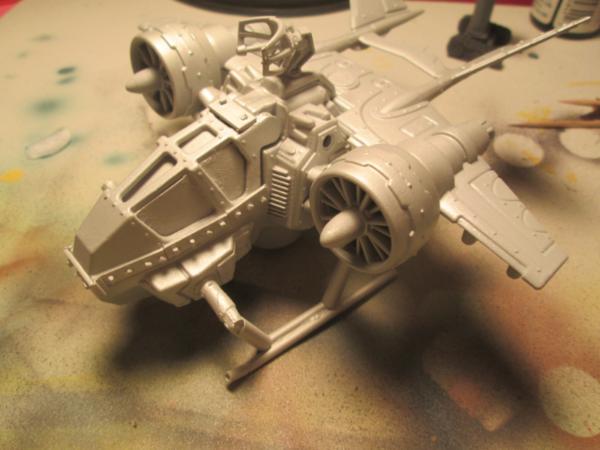

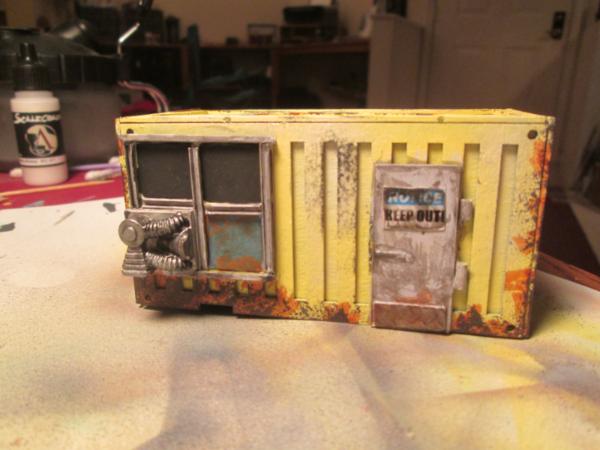
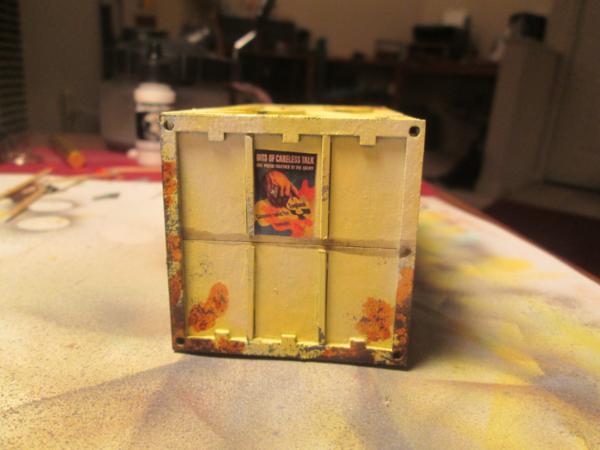
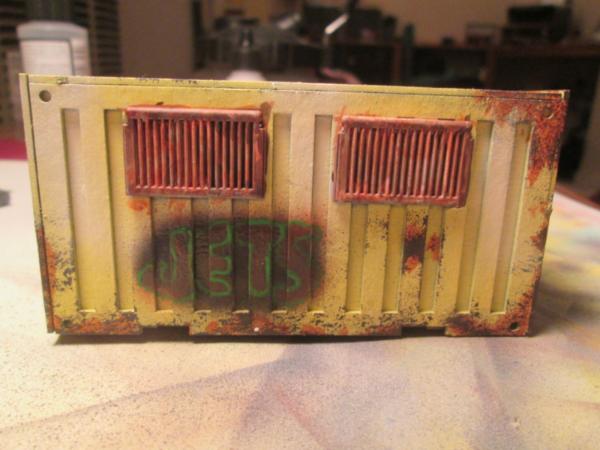
 .
.
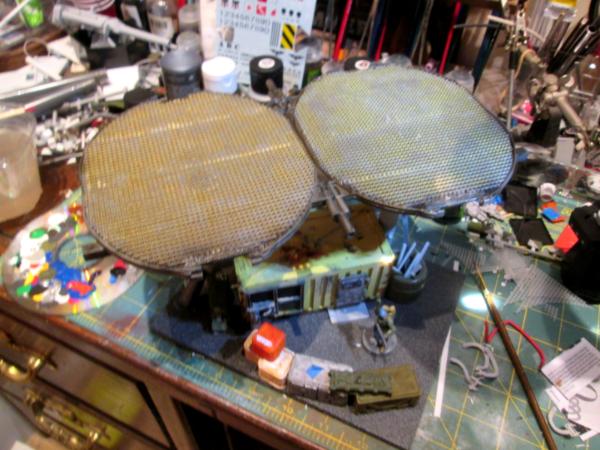

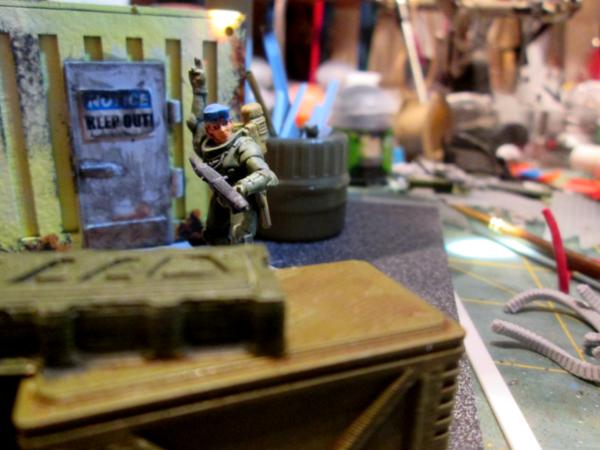
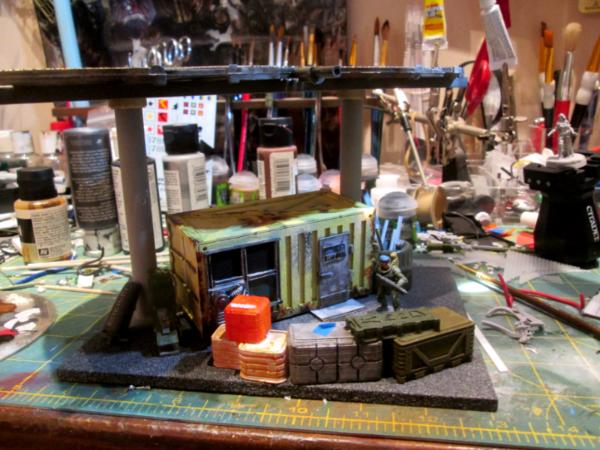

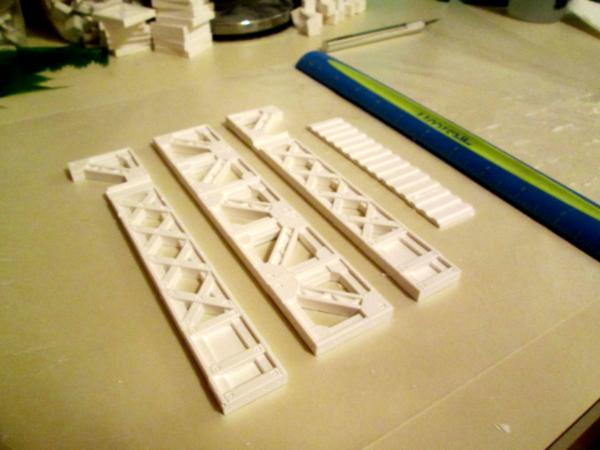
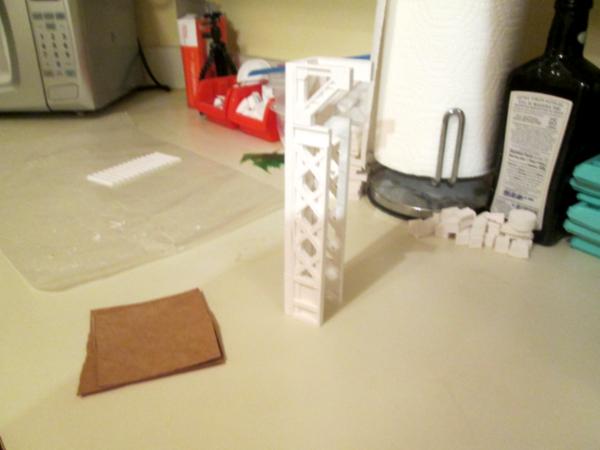
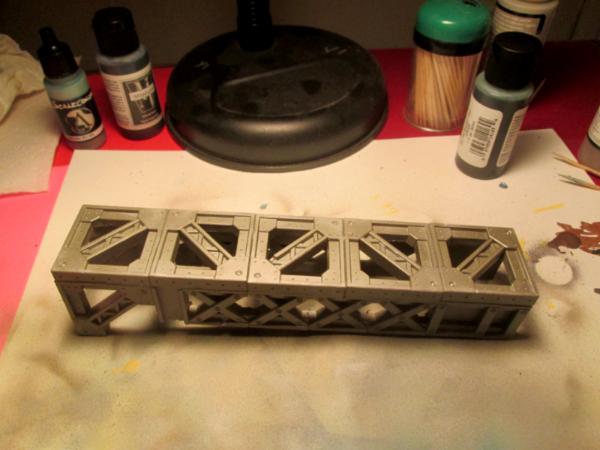
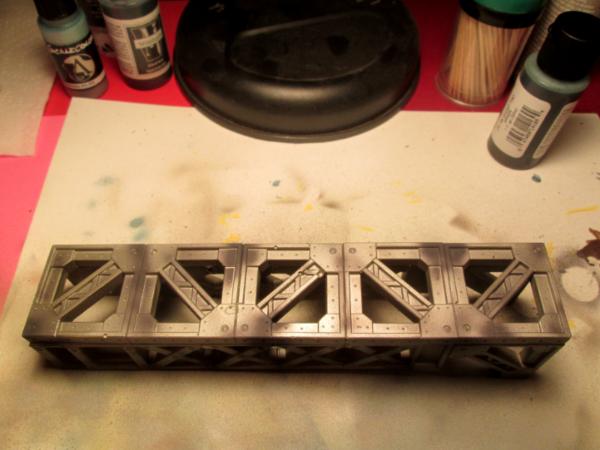
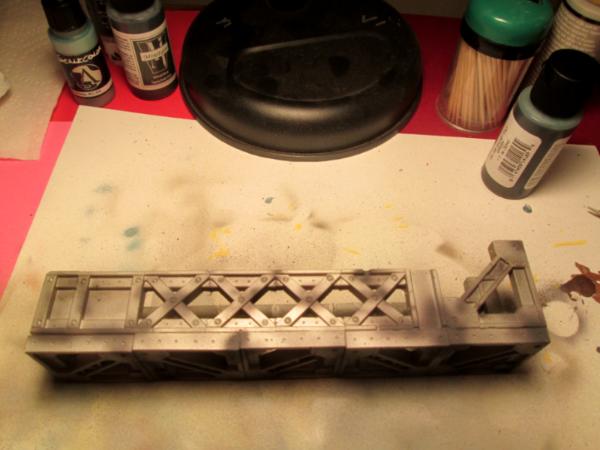
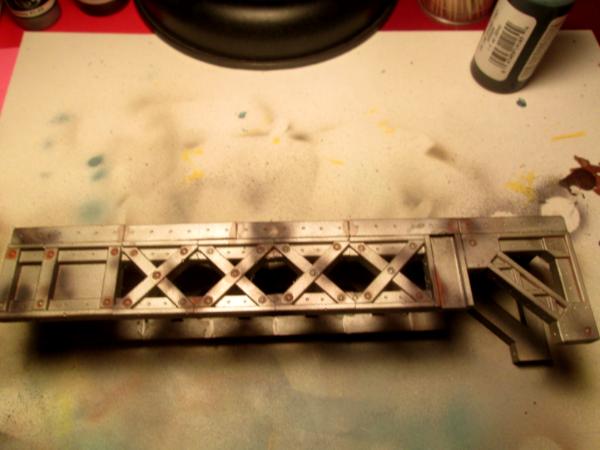
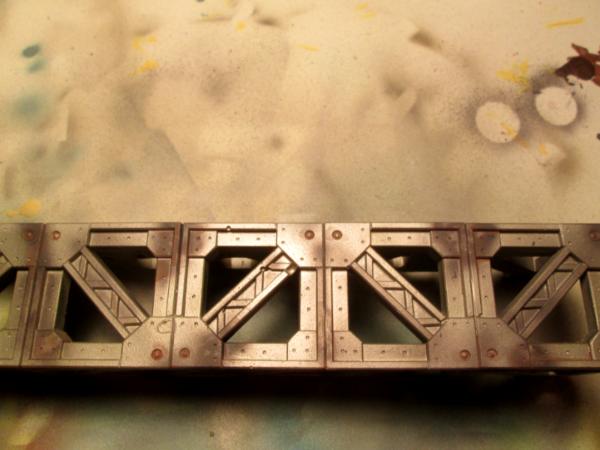
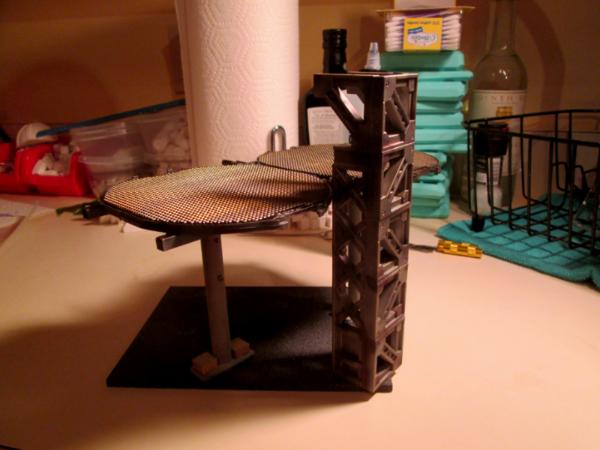
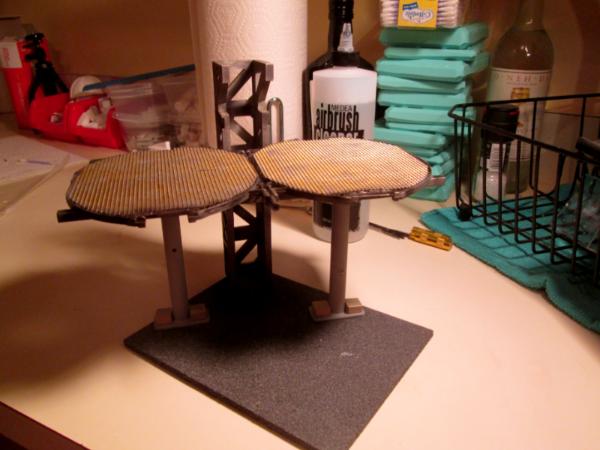
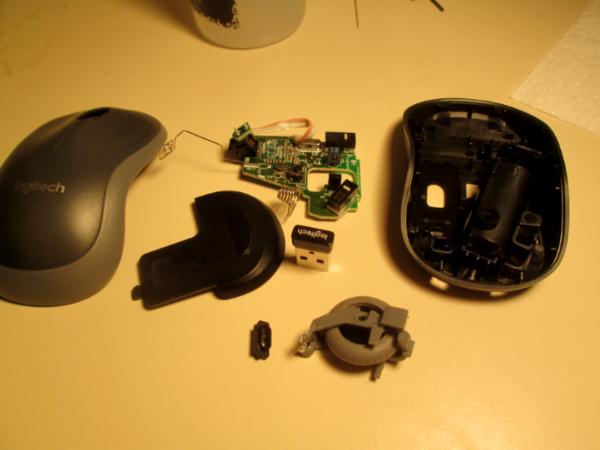
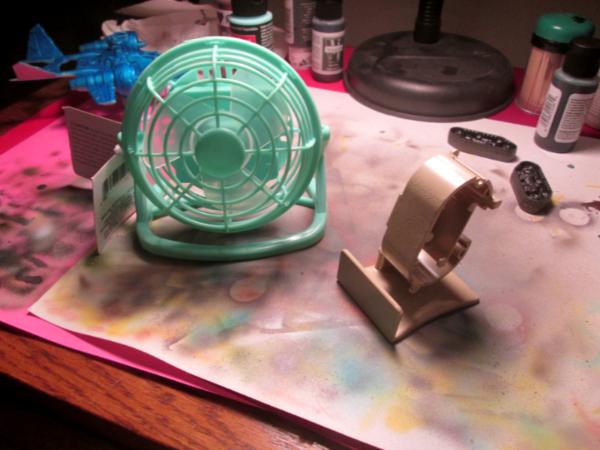
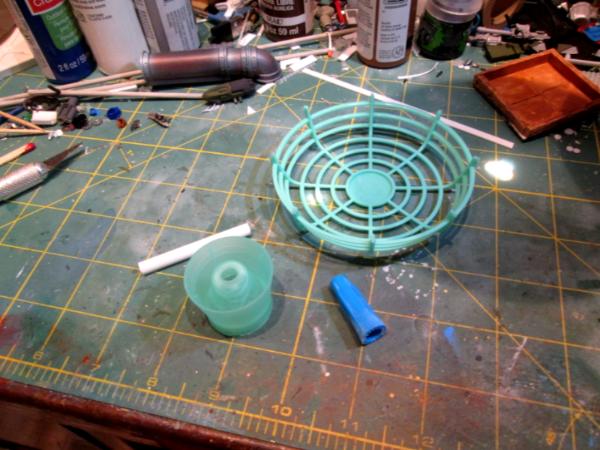
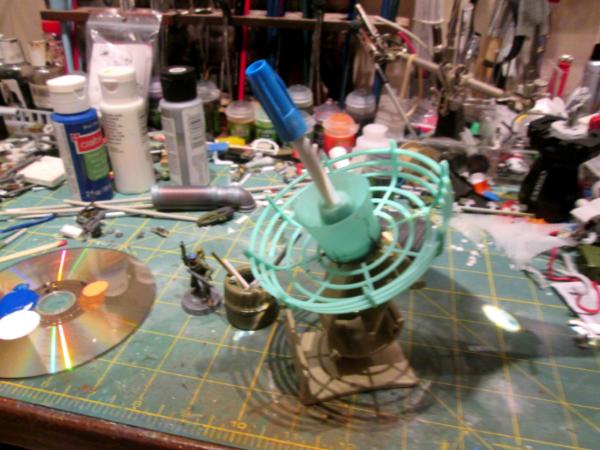

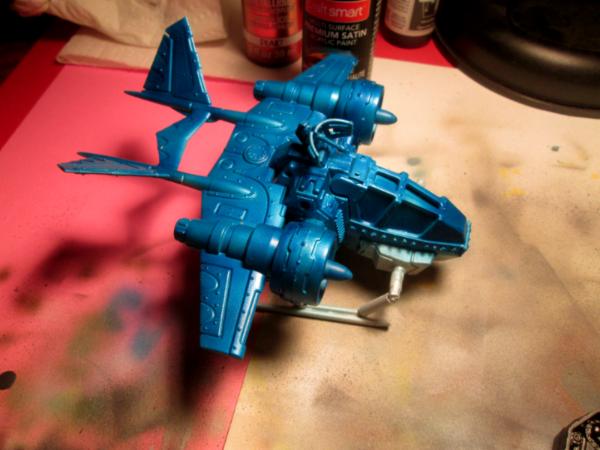
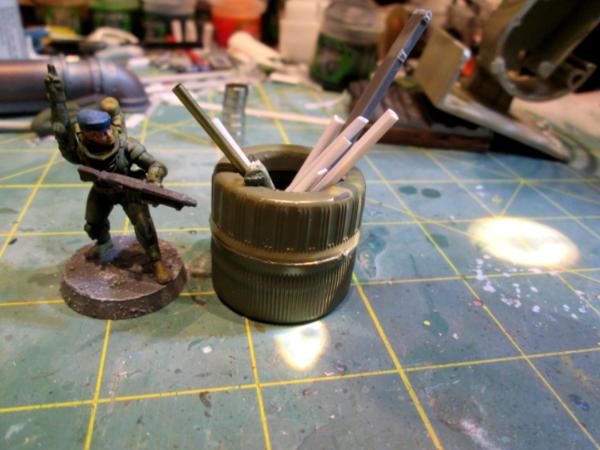
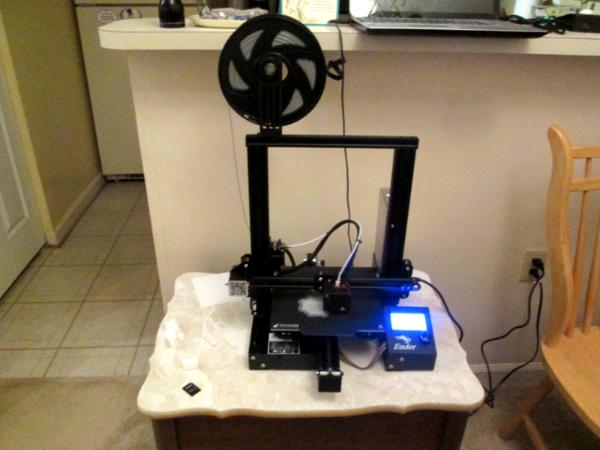
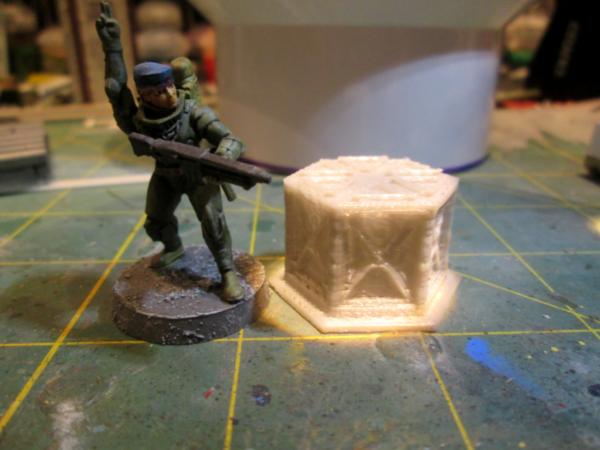
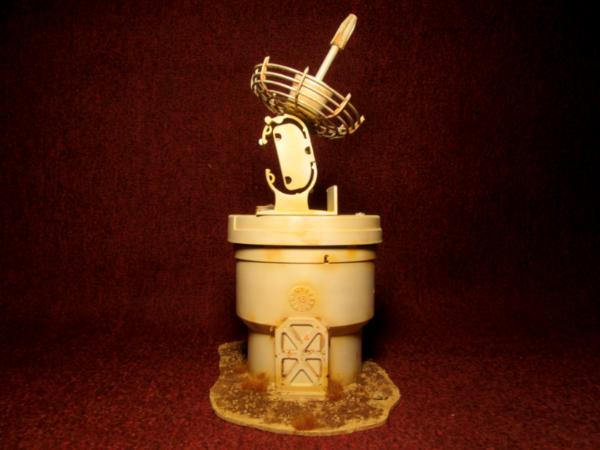
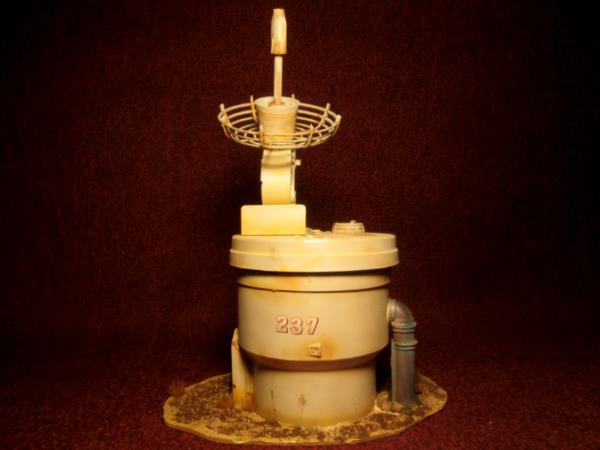
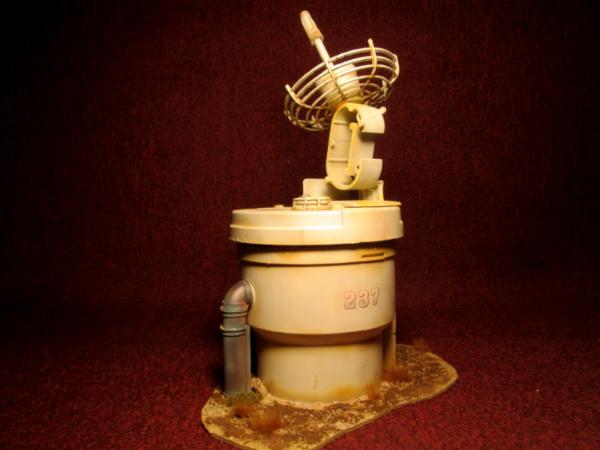
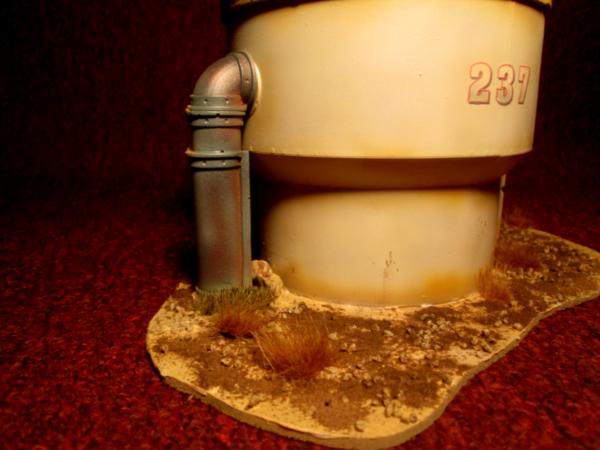
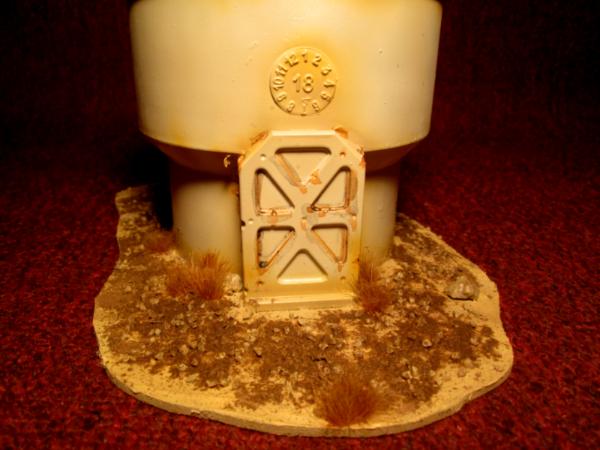
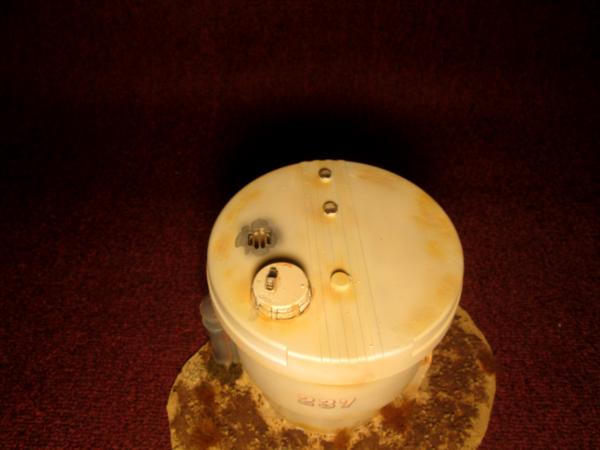

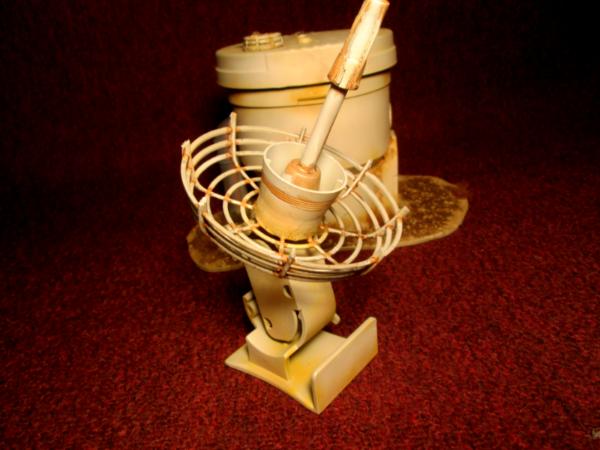
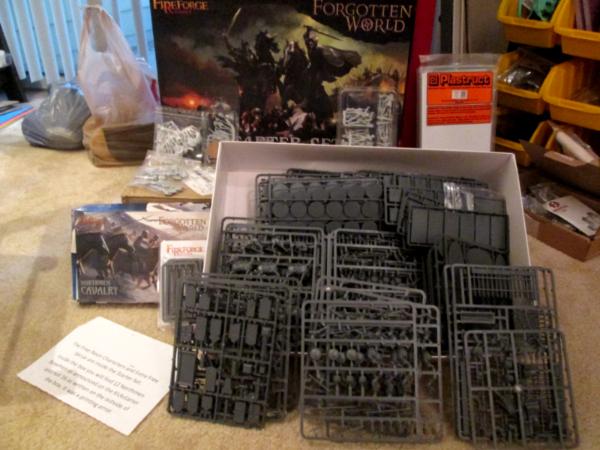

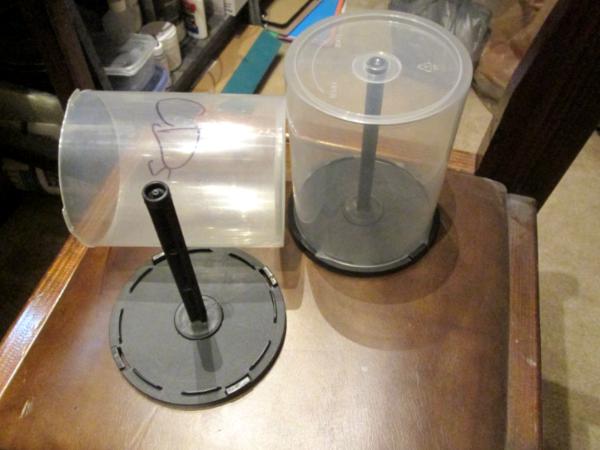
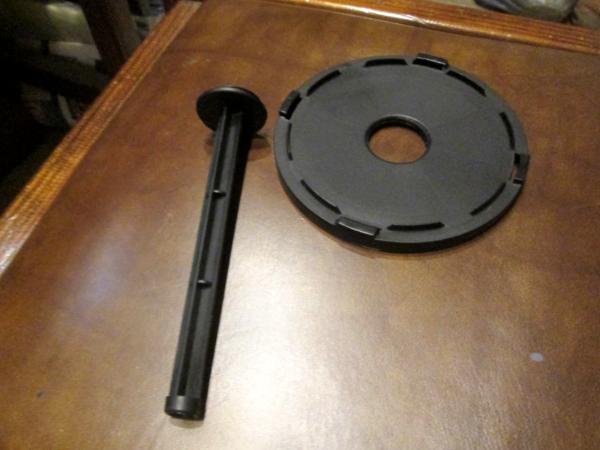
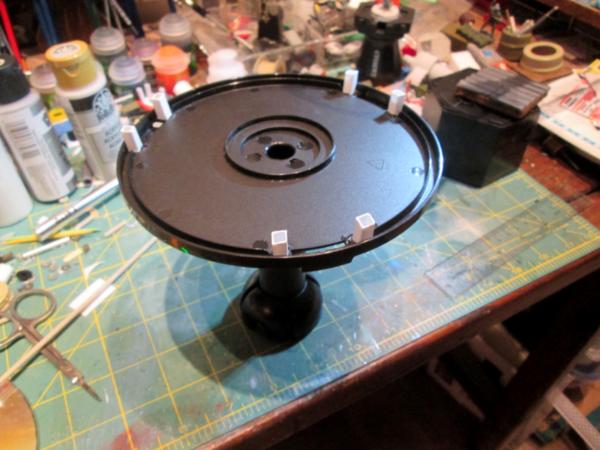
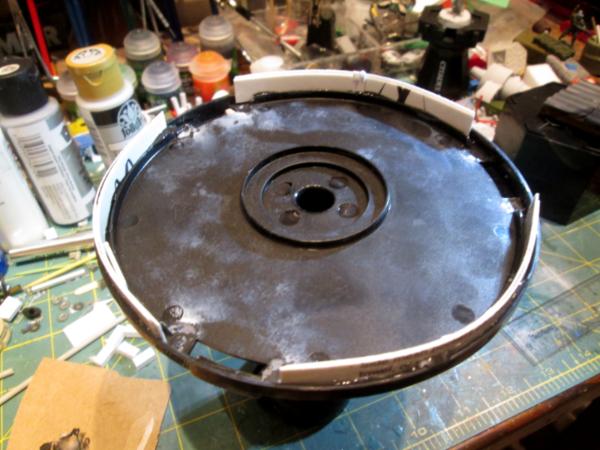
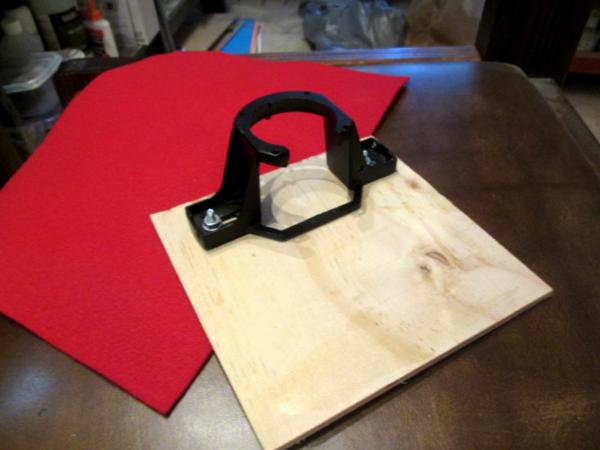
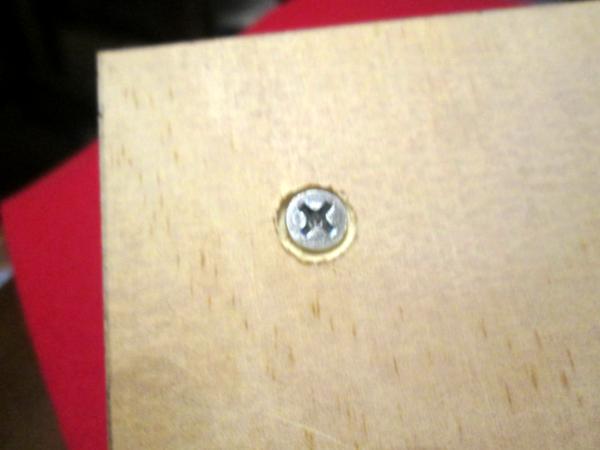
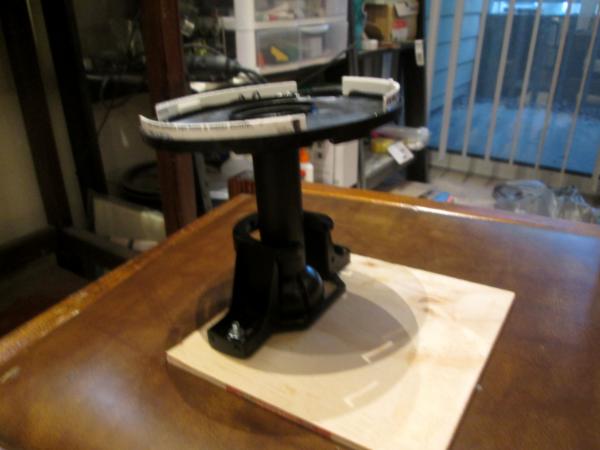
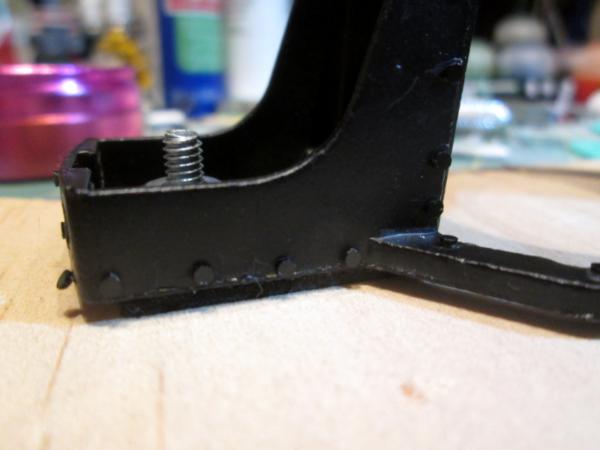
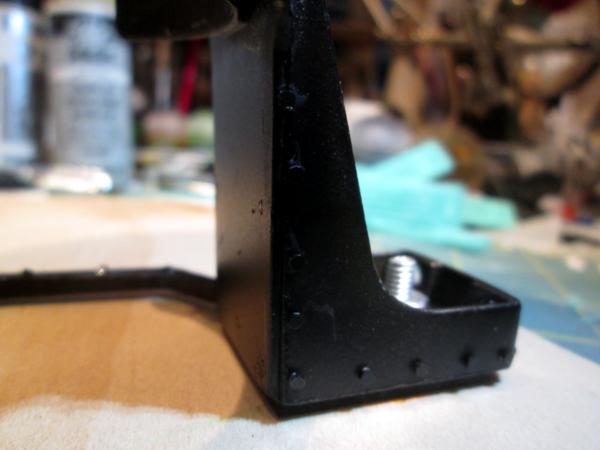
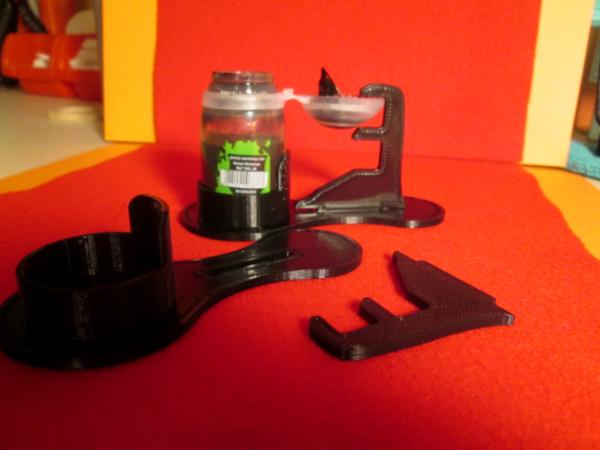
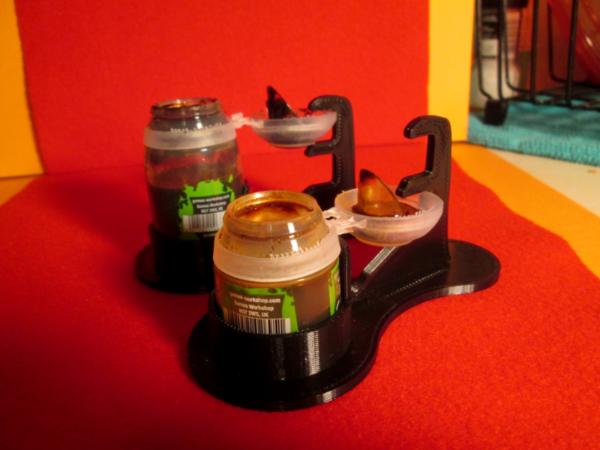
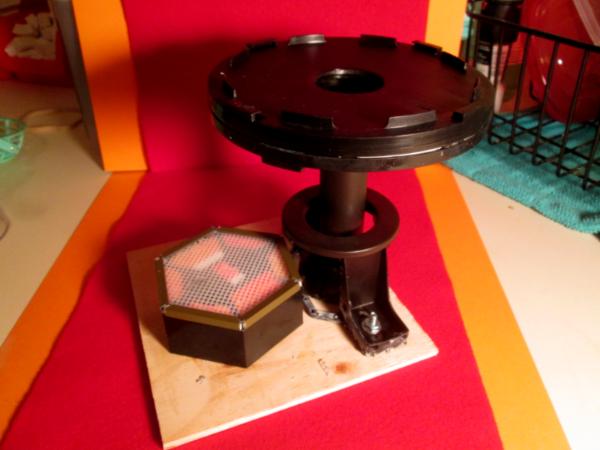
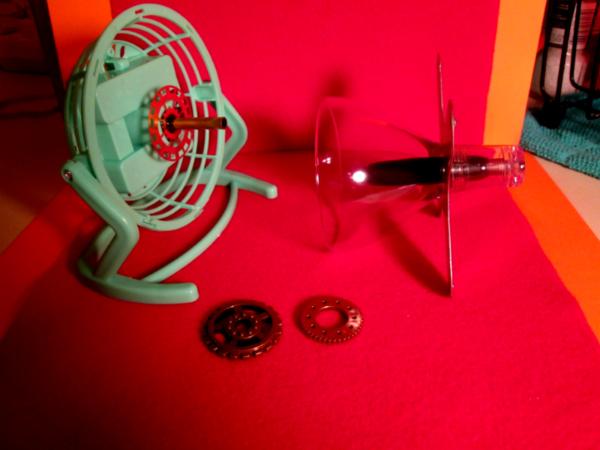
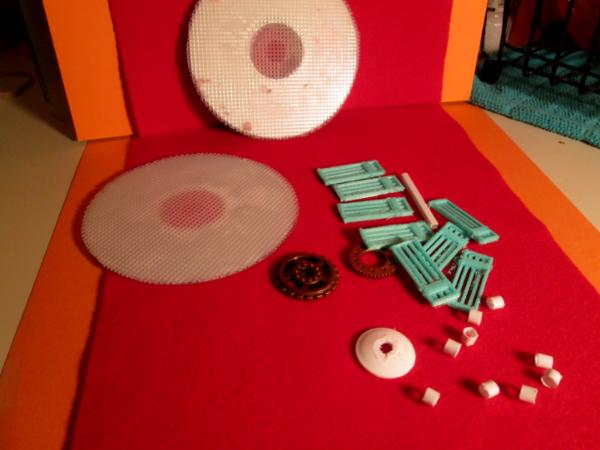
 Then again I’m not a prolific painter and I do a lot wrong
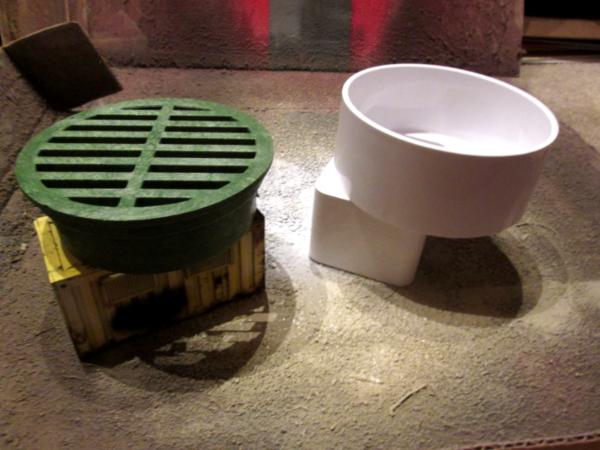
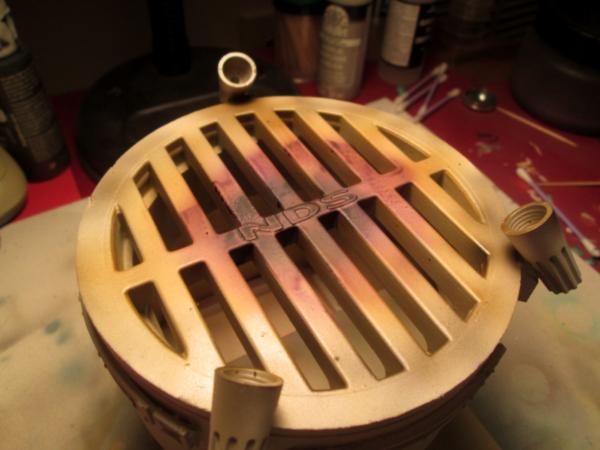
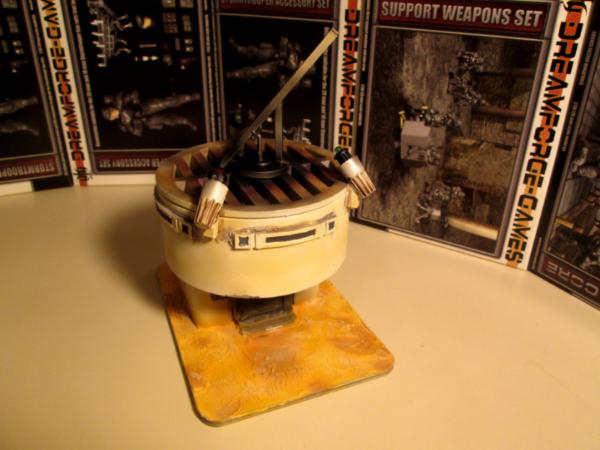
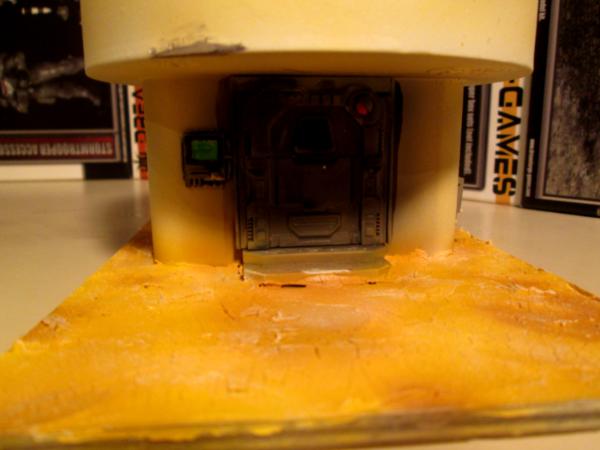
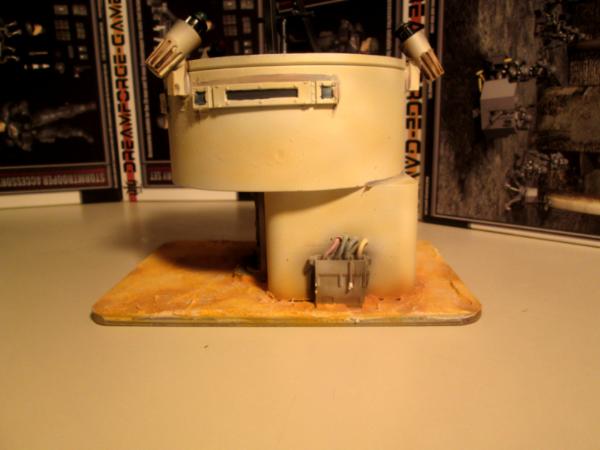
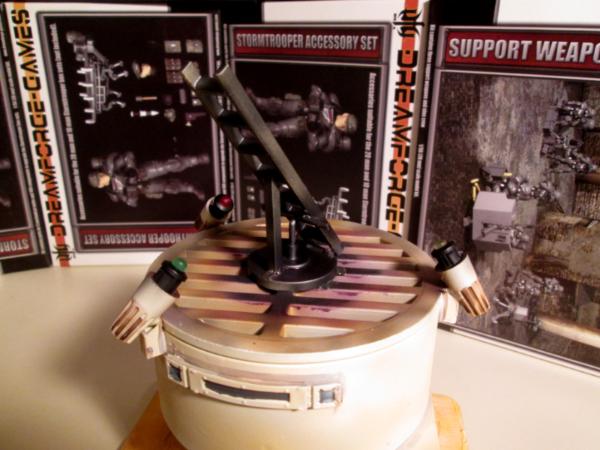
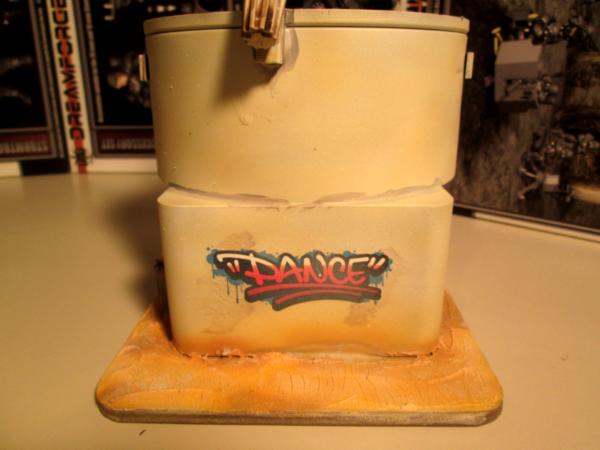
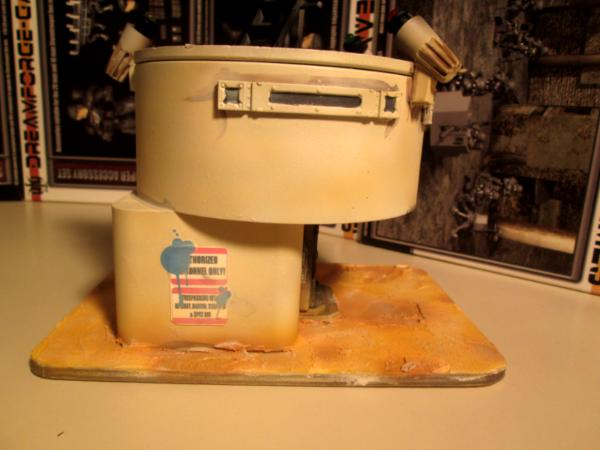
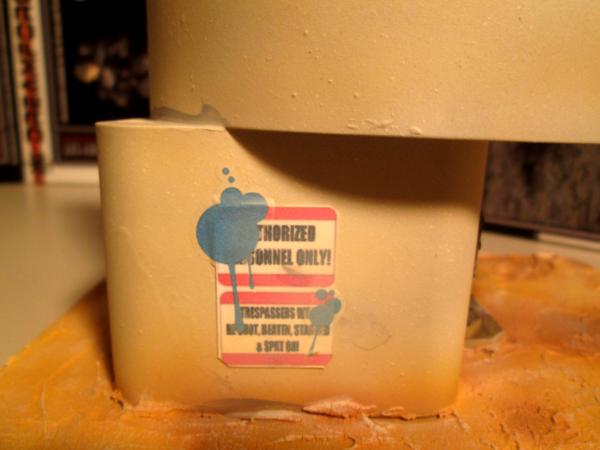
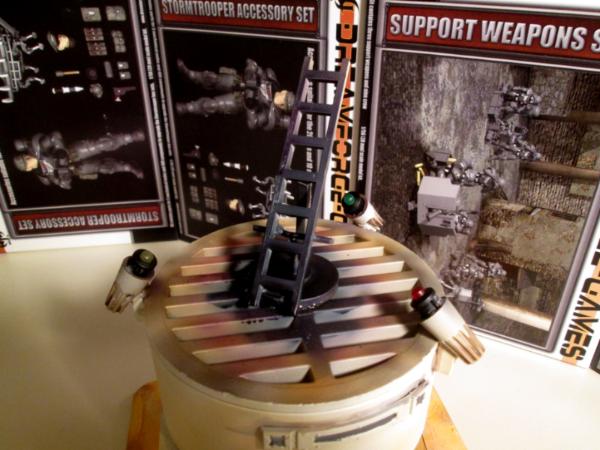
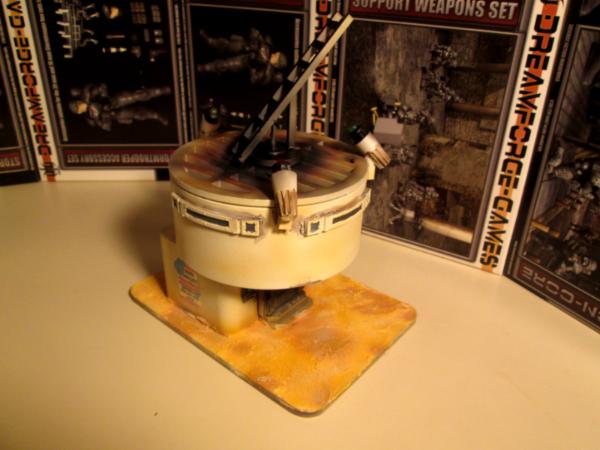
 . Where are the Arbites when one needs them.