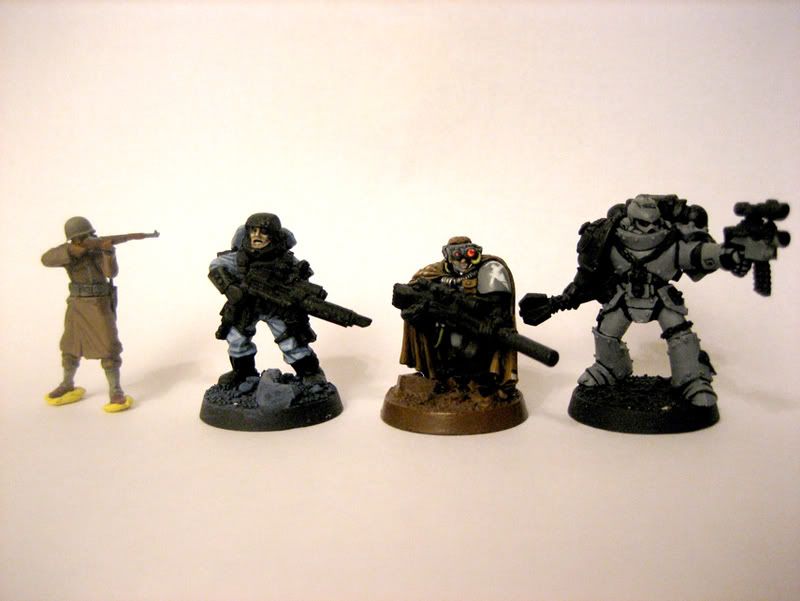
372
Post by: grey_death
Heya folks,
Taking one from the pages of Warseer, I've decided to start my own little "kitchen sink" thread to have a spot for all of my random projects and models.
My goals for this thread are simple:
1. Get to all of those models I have laying around the house that I had so much ambition to work on, but never actually got around to doing anything with!
2. Learn new techniques, painting styles, and modeling tricks of the trade while I'm doing each project.
A bunch of years back I found that doing One Off models was a hell of a way to try your hand and really LEARN while you painted. I could have continued to paint every model the same way I did way back when, but it wasn't until I really sat down saying "What if I did this?" while I painted that I really started to see serious improvement with each model.
You will see goals with each model I get around to starting in this thread as I start a new piece. These will be rough ideas about the direction the paint and modeling will go before/when I start a model.
Now this is where you the readers will come in. I love compliments just as much as the next guy, but this thread is really all about making myself better as a painter. I really want to see the critiques and ideas from the painters around here start to flow more freely. We're all in it to get better right? So please help me get better. If you see something that doesn't quite feel right, let me know! If my palette is off, let me know! If the technique isn't being applied correctly or in a manner that works, let me know! Also to anyone who might have questions about anything I'm doing with a model, please feel free to ask questions here. I'll be more than happy to let you know how I did something, and how you might get similar results. Some of the folks out there already know I'm more than happy to help a fellow modeler out with advice, I hope that this WIP thread will help even more.
end mission statement
372
Post by: grey_death
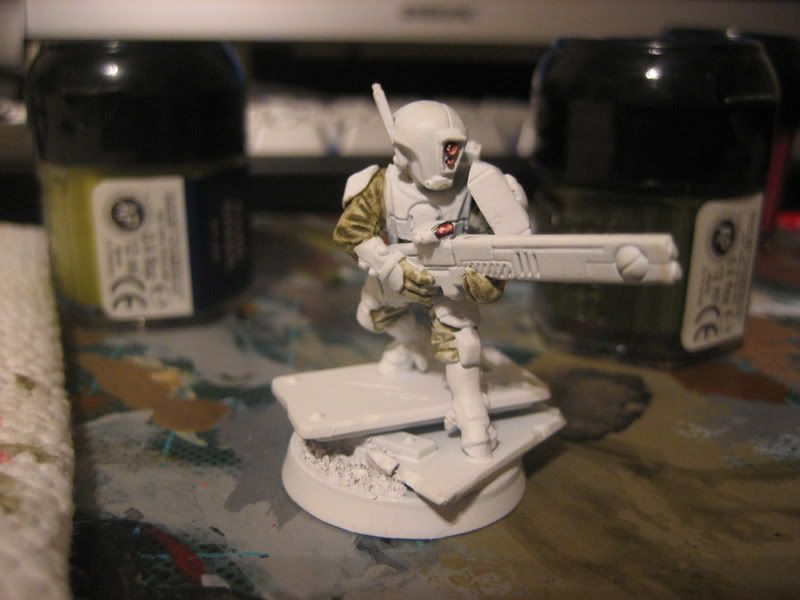
And so it begins...
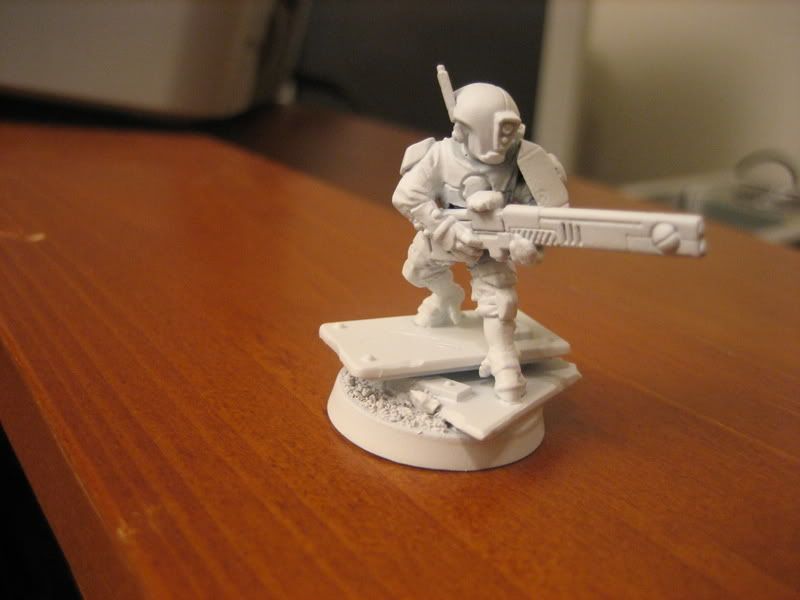
I was driving around town today and started to think about a set of Tau I did for commission a couple years back. They were a pretty good group of models and I actually enjoyed doing them. This all came back because the owner of said models is returning home from his first tour in Iraq this month. I'm really looking forward to seein him and the rest of the guys home finally.
The inspiration:
But it got me thinking of doing a one off Tau model though. And when I got home I hit the boxes in search of the few Tau models I have around the house, as well as to the internets in search of ideas.
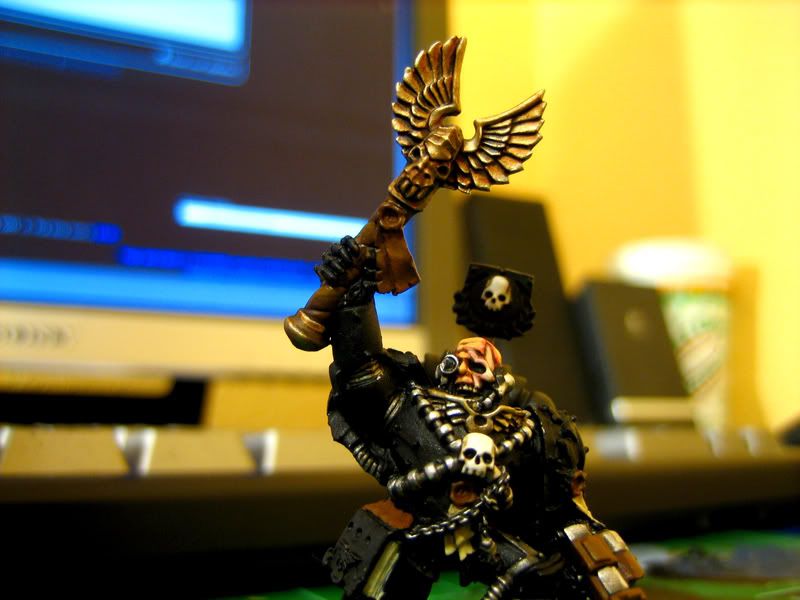
My plan is to base differently, making the model more dynamic without serious conversion. To use white primer again (my first real white primer mini being my God Bless the Infantry entry), but this time since white will be the armor color, I'm using the spikyjames approach to the whites which I believe will give me the effect I want. I am thinking, note: just thinking!, about doing battle damage/scrapes and cuts painted on the model as well a la migs style, but I haven't made my mind up yet. I'm planning on doing multiple glazing for all other parts past armor plating for my other colors.
Here is the model so far:
4670
Post by: Wehrkind
I really like the idea for this blog. I hope it will turn into a good reference for those of us who are a few years behind in our skills.
To that end, you mention pallette a lot. Since I just paint things the colors I would like them to be, would you be so kind as to give an elucidation of just what that is and how it works, as well as how to bend it to the will of the Emperor?
Off to a good start!
372
Post by: grey_death
Wehrkind wrote:I really like the idea for this blog. I hope it will turn into a good reference for those of us who are a few years behind in our skills.
To that end, you mention pallette a lot. Since I just paint things the colors I would like them to be, would you be so kind as to give an elucidation of just what that is and how it works, as well as how to bend it to the will of the Emperor?
Off to a good start!
I use the term palette in a broad manner. It is originally the thing you put your paints on while you are working on a painting/model. It can also mean the colors you have available to you and what colors you plan to use on a piece. You'll often see me reference a 'limited palette', this is simply me choosing to use only the smallest amount of colors possible to get the effect I want. When using a limited palette on a piece I normally try and use colors that are already worked into a model for details. For example, my veteran:
Originally, I was going to use a blue frosted effect on his sword. But when it wasn't working out well, I realized it was because the added color wasn't going to fit in well with what colors were already on the model. When I moved to a red/black fade, the model came together and gave me a much more solid piece. Had I went with blue, it would have felt like a different model entirely, making it seem disjointed in the execution.
When I approach a new color scheme, I really take this all into effect. I hope that answered your question ^_^. Sorry if it's long winded x.x
116
Post by: Waaagh_Gonads
Come on Grey_Death, more of the tau. I love the white scheme and want to see how you pull it off.
372
Post by: grey_death
Waaagh_Gonads wrote:Come on Grey_Death, more of the tau. I love the white scheme and want to see how you pull it off.
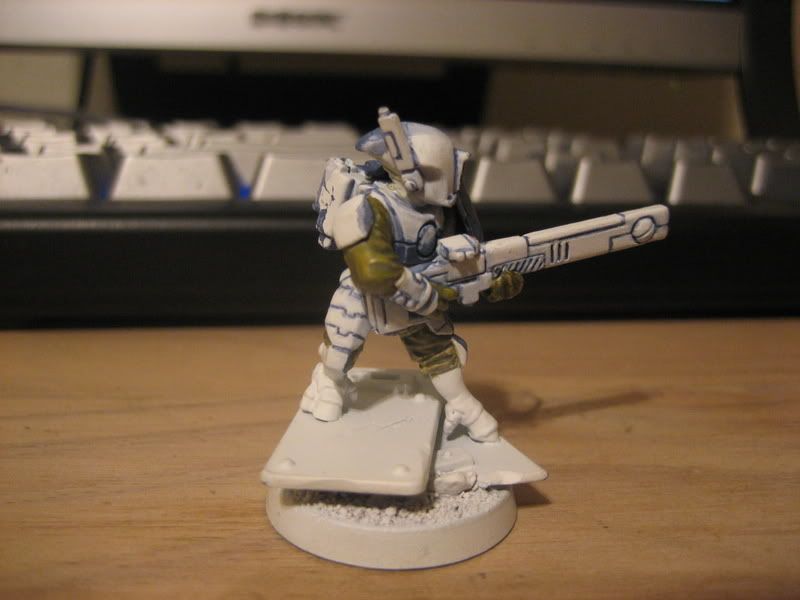
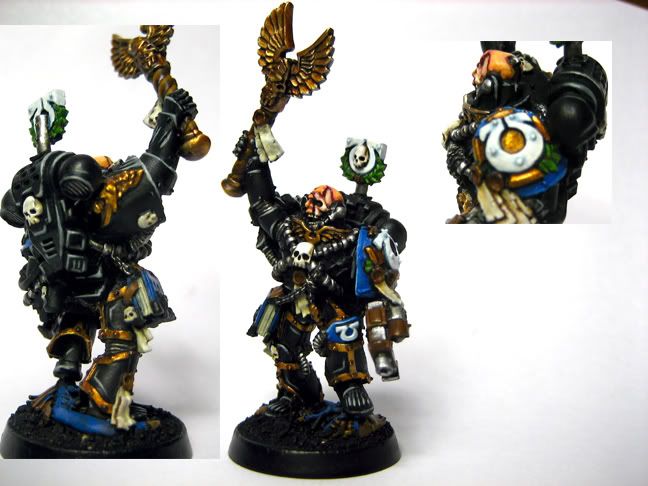
Hehe, Well the white scheme above is mine too ^_^. It was just a commission I did for a friend.
I'm in the middle of working on the cloth for this guy now ^_-. More by the end of the night.
116
Post by: Waaagh_Gonads
Thanks muchly. 
Are you using the foundation paints?
I've been giving them a try and they make life so much easier.
372
Post by: grey_death
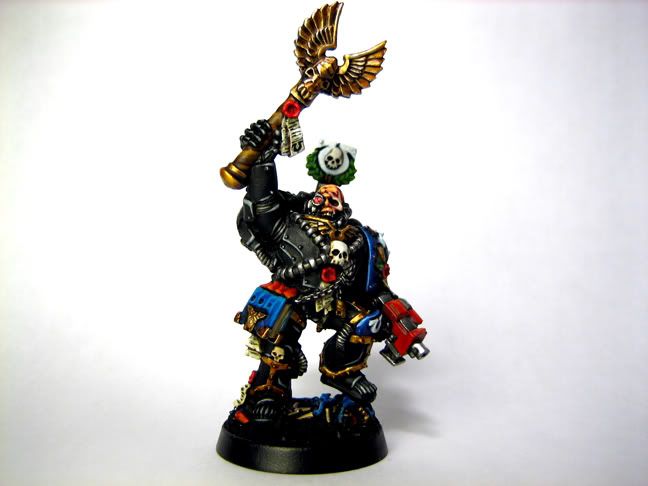
Well, this piece is going nowhere quick >.> I really have lost direction on where I'm going with this one so far x.x...
I spent most of the night toying with light sourcing. I'd never tried it before and I thought I would see if I could pick out the lights and darks for this model. I did an alright job I think at actually picking out the light sides vs. the dark sides of the model. Unfortunately I really don't want that to be the final direction of the model.
The big problem with that is that the white is now pretty much ruined unless I go back and reprime the piece. Which I'm not really in the mood to do. So I'm thinking the models new base color will be shadow grey ^_^...Highlighted extensively of course.
Here are the pictures from tonights fiasco:
As you can see, I didn't get around to midtones at all yet. But like I said that really wasn't my goal going into this one, just something I thought I would try out some. I really need to start with smaller objects for light sourcing before I make the jump to complete models.
It's messy, and it doesn't look great, but it was definitely a good experiment for me. Now to get back to basics ^_^.
372
Post by: grey_death
Waaagh_Gonads wrote:Thanks muchly.
Are you using the foundation paints?
I've been giving them a try and they make life so much easier.
Oh and I haven't given foundation paints a go yet. I definitely would like to see how they work for me on something in the future. I'd probably base a scheme around the colors available for something like that. Maybe even a dipping project >.>...
372
Post by: grey_death
some stuff I'm workin on
3
372
Post by: grey_death
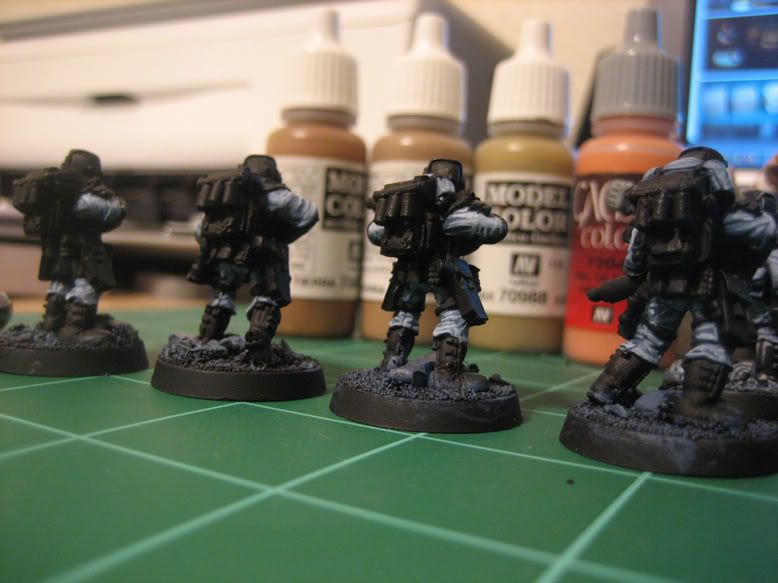
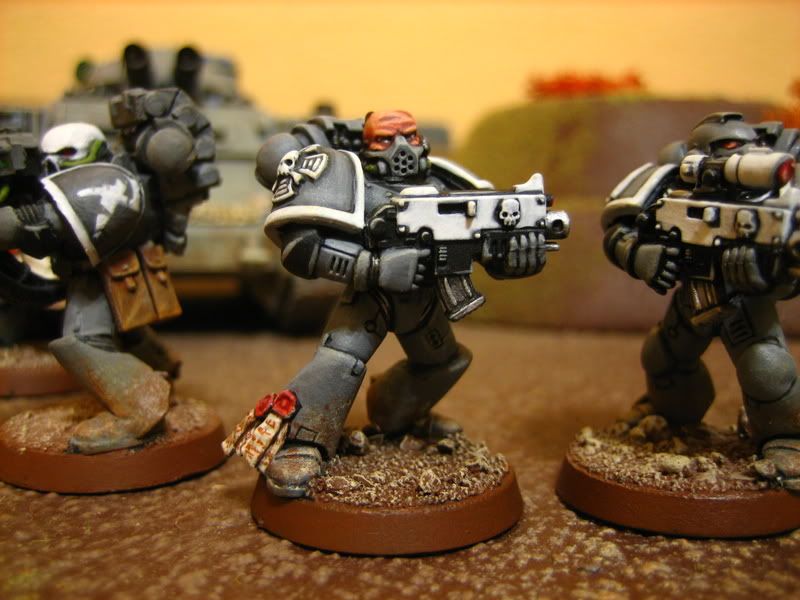
Some progress on the stormtrooper. His armor is highlighted and finished. Next up is pouches and other cloth. Then final details like grenades and magazines.
This color scheme is rather easy to replicate and I came up with it a good 6 years ago. Only differences now are the small things (lenses are nicer, highlights sharper). These guys will be a nice tabletop quality fun skirmish team.
1
5206
Post by: snorkle
Good looking Storm Troopers. They would fit right in with my BT scouts(except your's are much better painted). Where did you get the old models?
4670
Post by: Wehrkind
That's eerie. No gak, last night I decided I just wanted to paint -something-, so I picked up the Kasrkin Sgt. I had been using for scale in my Redemptor project and started slapping some color on him. Black armor plates and grey clothes.
Just make certain you take off your shoes when you get in my head.
Thanks for the pallette explanation too.
320
Post by: Platuan4th
Kinda creepy that my LatD color scheme is reverse that, Wehrkind(Black cloth, grey armour).
5421
Post by: JohnHwangDD
Heh. My Stormies are full camo.
372
Post by: grey_death
snorkle wrote:Good looking Storm Troopers. They would fit right in with my BT scouts(except your's are much better painted). Where did you get the old models?
I've had them since they were first released. The models you see around the new guy were painted around that same time frame (except one that was painted last year). I've always loved these guys, and it's about time I finished them I think. The paint scheme is easy enough ^_-...
Wehrkind wrote:That's eerie. No gak, last night I decided I just wanted to paint -something-, so I picked up the Kasrkin Sgt. I had been using for scale in my Redemptor project and started slapping some color on him. Black armor plates and grey clothes.
Just make certain you take off your shoes when you get in my head.
Thanks for the pallette explanation too.
Haha, Kasrkin came out soon after I purchased these guys ^_^. I've always meant to pick up a squad of them myself, but never got around to it. Another project someday ^_-. Oh and no prob on the explanation ^_^, it's what I'm here for!
4670
Post by: Wehrkind
I just picked up the Sgt one day on a whim. He was on sale, and I needed a henchman for my Inq. He has sat in pretty much the same state as the pics for some 13 months. Lucky for him, he happened to be the closest model while I was eating dinner and watching tv :-P
5206
Post by: snorkle
Do any of you guys know where I could purchase the old stormtroopers? other than ebay?
5421
Post by: JohnHwangDD
Bartertown is your friend.
372
Post by: grey_death
Some more done on the troopah.
1
5206
Post by: snorkle
Me likes. I really like your simple paint scheme for the stormtroopers. It gives the models a really nice look, but without seeming crowded.
372
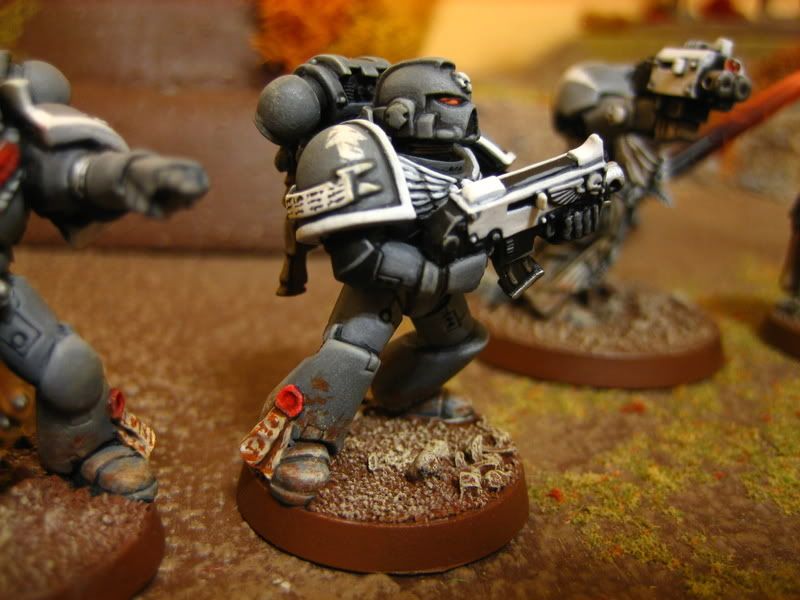
Post by: grey_death
Some more work done over the weekend on the stormtrooper. Finished him during the first half of the Super Bowl. I've already started in on the next one. I've got 6 (maybe 7, I can't remember...) more to do to include touching up the older models a bit. The nice part is that they're so simple it's hardly much work.
3
372
Post by: grey_death
And something completely out of left field: Historical Minis!
I was recently at the good ol' Hobby Lobby picking up some super glue (my dogs punctured my other bottle x.x ), and noticed they had some 1/48 scale US Infantry for 5 bucks. I was intrigued and decided to snag them on a whim.
Some thoughts after putting one of these little bugga's together:
1/48 weapons should come already attached to the models...That was a PAIN to get glued on. I'm really not looking forward to doing the same for the rest...but I will. Eventually...
It's definitely too small to proxy much of anything in most wargames. The scale is off because of the heroic scale most companies produce.
They don't come with bases, which makes sense since they're not meant to be used for wargaming, so I'll have to end up either using generic rounds or making a mini-diorama for them. Not sure what direction I'll end up going with it.
Expect glue on your hands.
The detail is great, I'm hoping to get to painting the one I've got glued together in the near future to help show it off some.
Anyways, On with the pics.
6
4786
Post by: legoburner
What are the mould lines like on the tamiya infantry kit? The height and thickness of the infantry model makes me think of tau air caste
6091
Post by: Apone
Looks good to me. I'm using a Tamiya 1/35 Tiger 1 tank and a lot of converting for my Ork Battlewagon project atm. Remembered how good tamiya were at making kits.
372
Post by: grey_death
legoburner wrote:What are the mould lines like on the tamiya infantry kit? The height and thickness of the infantry model makes me think of tau air caste
They're very easily handled. Most I had to do was a few quick passes with the edge of my hobby knife. I meant to include the mold lines in my thoughts on the kit...
5206
Post by: snorkle
They're really skinny. It just shows you how much offscale GW is. But I must say I prefer heroic for the more robust look. And the military guys look like they would snap quite easily. You could possibly use the machine gun as a wierd bolter weapon. If you don't use it for the other models.
4670
Post by: Wehrkind
It would be a cool project to make an IG army of "true scale" historic minis. By true scale, I mean a scale that would make SM minis actually be some 8-9 feet tall by comparison. Then mix in some Grey Knights or the like for that "And here are the elite... they can crush your skull like an egg" feel.
It does surprise me a bit that Tamiya makes such nice kits for so much less money than GW. While I think the Tamita plastic might be a little less durable than GW's stuff, the detail and sheer number of parts, not to mention raw size, makes GW's kits seem really expensive for what you get.
5421
Post by: JohnHwangDD
The heroic proportions are to keep plastic from snapping and metal from bending.
372
Post by: grey_death
JohnHwangDD wrote:The heroic proportions are to keep plastic from snapping and metal from bending.
That is definitely part of the reason for sure. When I showed the sprue's to my wife, she immediately commented on how you could nearly see through some of the weapons, as they are so thin.
Making models that are durable enough to be handled by the greasy sausage fingers they're bound to come across on the wargaming table is a necessity when it comes to usable/playable wargaming minis.
Models like the above, that are in a more realistic scale are definitely not durable enough to hold up for very long. And special transport considerations should be made as well.
I do enjoy the scaled feel of these but I wouldn't consider them tabletop ready by any means.
4670
Post by: Wehrkind
I am thinking of the tanks mostly. I got a Merkava kit from Tamiya for a Shadowsword conversion, and I am almost loathe to cut it up, it is so pretty.
Perhaps another good solution is to carry a thin metal rod to snap any sausage fingers that get near your models uninvited! Perhaps a few raps for coming to game uncleaned would also be in order.
372
Post by: grey_death
Wehrkind wrote:I am thinking of the tanks mostly. I got a Merkava kit from Tamiya for a Shadowsword conversion, and I am almost loathe to cut it up, it is so pretty.
Perhaps another good solution is to carry a thin metal rod to snap any sausage fingers that get near your models uninvited! Perhaps a few raps for coming to game uncleaned would also be in order.
I've seen some really great armies with the tanks built straight from historical scale kits. I've also seen some really nice kit bashes with major pieces taken from both and put together with great results (tracks from a scale kit put together with chimera hull for example).
273
Post by: Foda_Bett
If you like the 1/48 infantry check out the newer "Type 2" 1/35 infantry sets. $12-$20 gets you 5 or so figures.
Often times the stock and bolt are separate pieces, and the barrels are rifled. They're absolutely beautiful kits.
I can't wait to see the US Infantry men painted up with your smooth blending style. I'm sure with some converting they'd make a great commissar or other commander figure.
994
Post by: Heavygear
Forgeworld Death Korp are slimmer then the GW IG. The Tamiya 1/48 would probably not look that out of place next to them. They are of course WAY more expensive than the Tamiya minis. Nice find.
372
Post by: grey_death
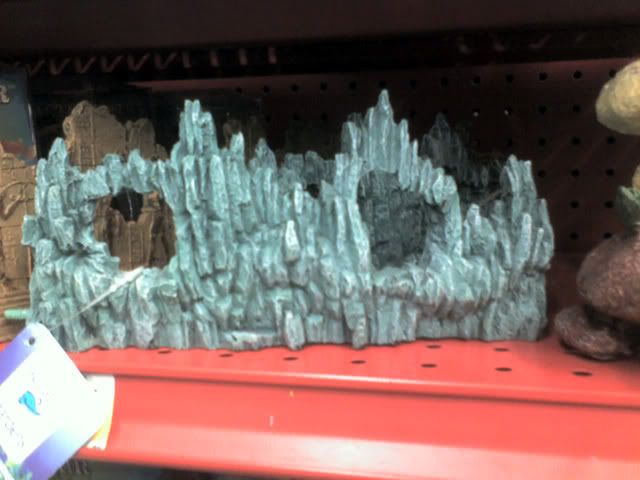
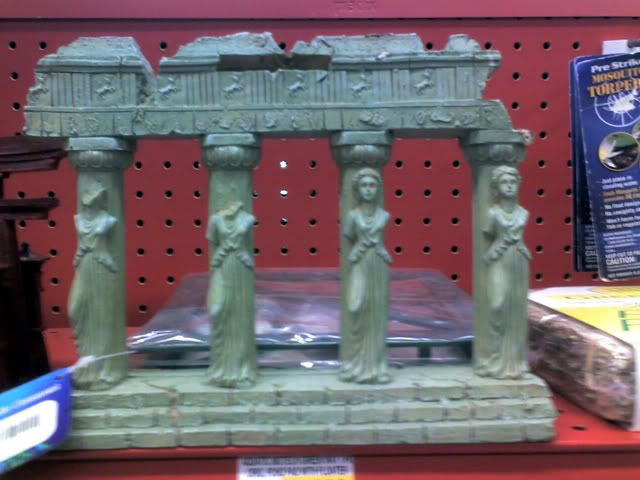
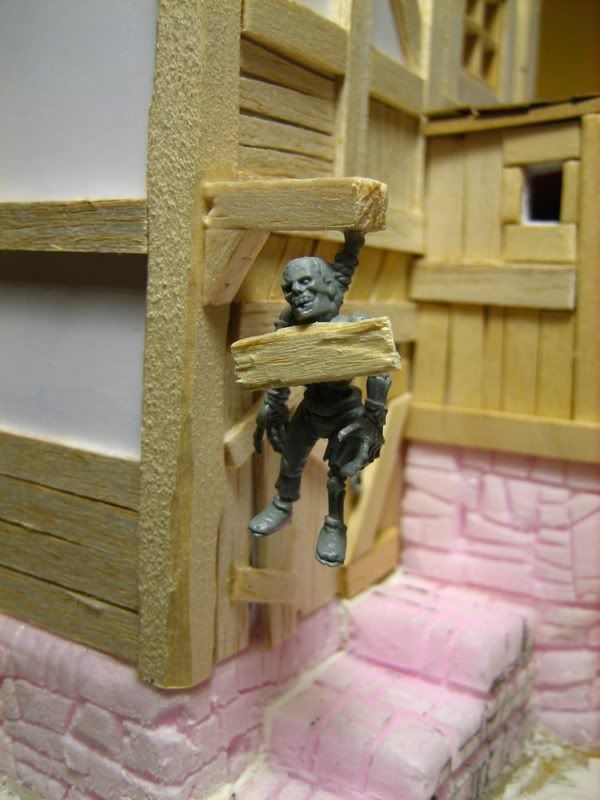
So, I went to the hobby store today (Hobby Lobby for those who've see one). I just went in order to get some inspiration really, to look at all the neat little things they have floating around that store that you wouldn't normally think of when you think wargaming. Luckily I had my trusty camera phone with me to help capture some of the great products I found on the shelves. I didn't pick up anything major really just a small tube of Testors Contour Putty to give it a go. Anyways on with some pictures:
This could be a really neat project for those of you who want something different for your home tables. I think it would be hella cool to see something like these on a table to give it that realistic feel for those alien worlds you might be creating out there. Not certain how sturdy these things are, but the idea struck me and I thought I'd share it here!
The following products are something I'm just in love with. These little kits are absolutely awesome little terrain starter kits. I haven't seen a better pack for such a cheap price anywhere. Snag one or two of these, a 4x8 of pink foam and some paint and I'd say you have a table people. I can't speak as to how much stuff is in each one, but they're nicely varied and give you lots of great stuff to work with. There are different region types to help you really keep your tables unique too. The only issue I see is making it durable for wargaming. Most of the stuff is meant to just be sprinkled onto a surface without much of an adhesive. I'd suggest doing everything in layers with some watered down pva to help keep the stuff on your board. Anyways check em out:
The next bit of product I found was in the dollhouse section. I've always known the dollhouse area of the store was a gold mine for terrain. They have lots of great pieces that, if you put a little thought into it, can be easily converted to work for your tables. Here are just a few things I found that easily translate to the table top:
Carpet:
I haven't seen it done yet. But I WANT to see it done. I might even make it happen.
Hardwood flooring:
It's held together by a small piece of plastic sheeting on the back of the wood. Cut to fit and you've got hardwood floors in your buildings.
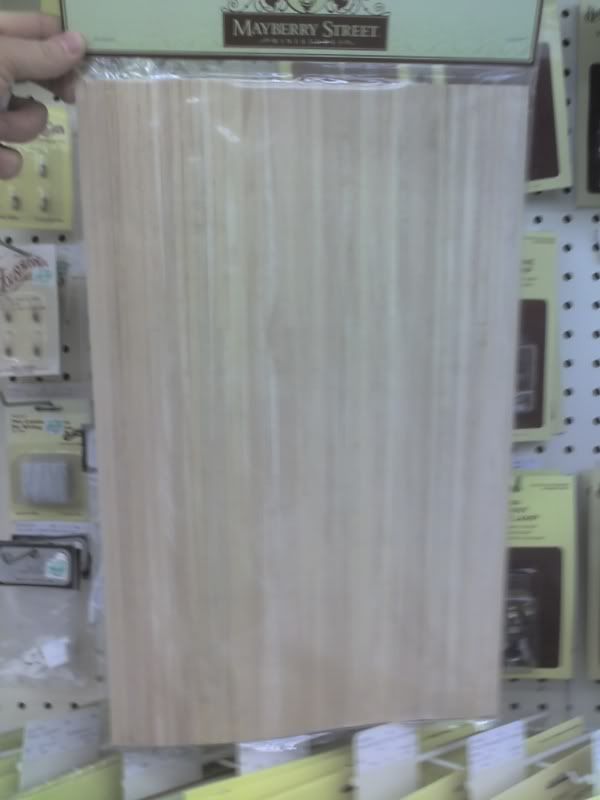
Bricks:
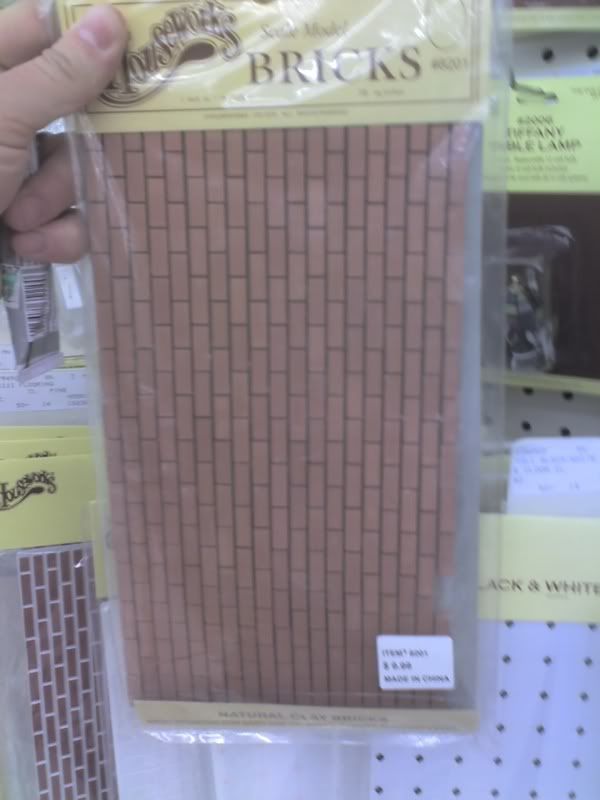
Held together in much the same manner as the hardwood floors. These are actual clay bricks (in miniature!). So cut to fit and use the rest as rubble!
Hope this stuff helps inspire some folks like it did me ^_^.
372
Post by: grey_death
Got some paint down on my first US Infantryman. White primer, solid colors painted then washed it all with black to add some quick and easy depth. Going to go back over with solid color again and hit it with a stage of highlighting or two. I still haven't figured out what I want to do for a base. Anyways, here are the pics
2
5206
Post by: snorkle
They look great!
They look much more realistic than any of GW's stuff
372
Post by: grey_death
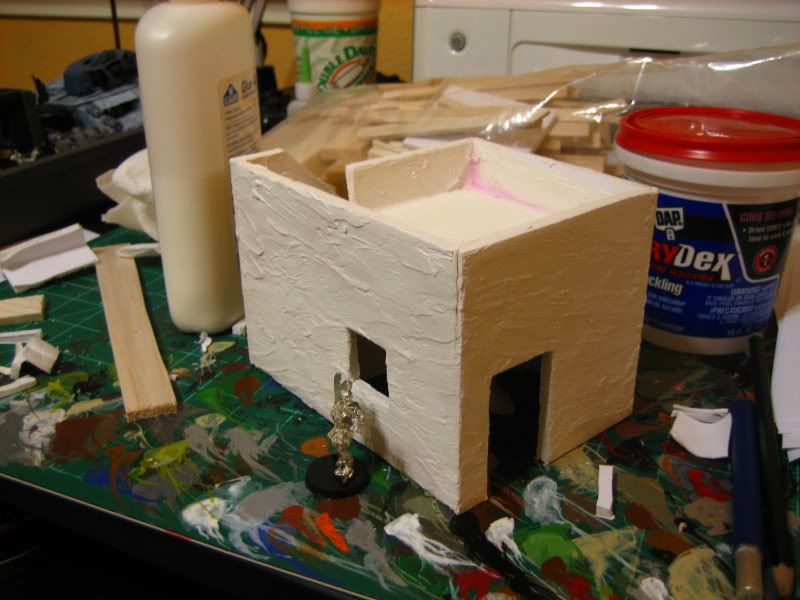
In recent weeks, I've been more and more inspired to get hands on and do some creating of my own. With the recent releases by Ultraforge and Lemmingspawns ridiculous mastery of the scratch build, it's hard not to be inspired.
Well today I went to go pick up magnets from one of the hobby shops, unfortunately they were out. But, this led to me walking around the store and finally deciding enough is enough, I want to sculpt. I picked up a pack of sculpty in green (for easier contrast while sculpting) and quickly got to it.
I'm not completely new to sculpting in general mind you. I just haven't gone past what was required of me during High School way back when. A few things here and there but never stuck with it. Those few projects have given me a step up in starting this project though.
I settled upon just getting used to working with the stuff right now. Not exactly going all out on a free sculpt of my own ideas. So I hit the Ultraforge site and settled upon trying to mimic a piece of theirs. Here are my results so far
3
372
Post by: grey_death
Some progress as the night has gone on.
1
5744
Post by: Stormtrooper X
Looks awesome so far. The little crater marks on the torso came out great. 
The face looks like it could use a bit more detail though. Possibly a skull? Can never have too many skulls on your minis. 
6157
Post by: Krom&krog
Sweet! keep up the good work!
4670
Post by: Wehrkind
I apparently need to take a few highschool scuplting classes.
Maybe I can sneak in a few classes at the local community college without my wife noticing I am not studying for my APICS cert. or my GMATs...
Looks great though, I am really jealous of your skills. I can handle purity seals and hair, and that's been the extent so far.
372
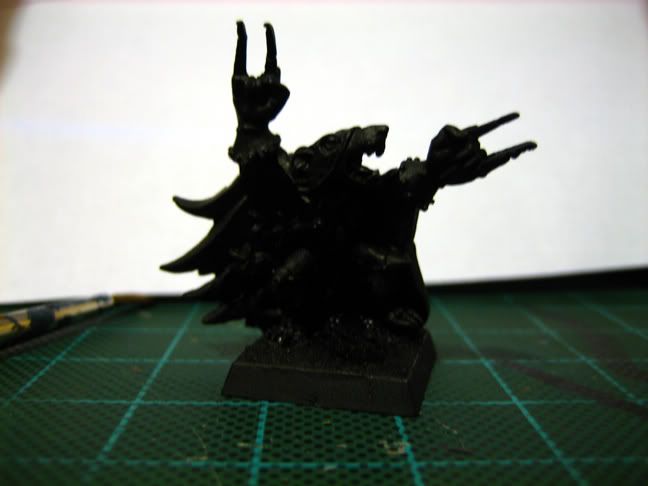
Post by: grey_death
Well, I came to the realization that doing an entire figure with sculpey is sort of a waste of effort. The second you touch the spots you've finished, you go back and have to re-do them. So I have settled for a simple bust for this go around. I'm very happy with my results so far and this definitely gives me confidence to move to the green stuff in the future. A great learning experience all around. Just gotta bake this bad boy to cure him and I'm possibly going to put paint on em.
4
4431
Post by: kid_happy
The Prince looks great.
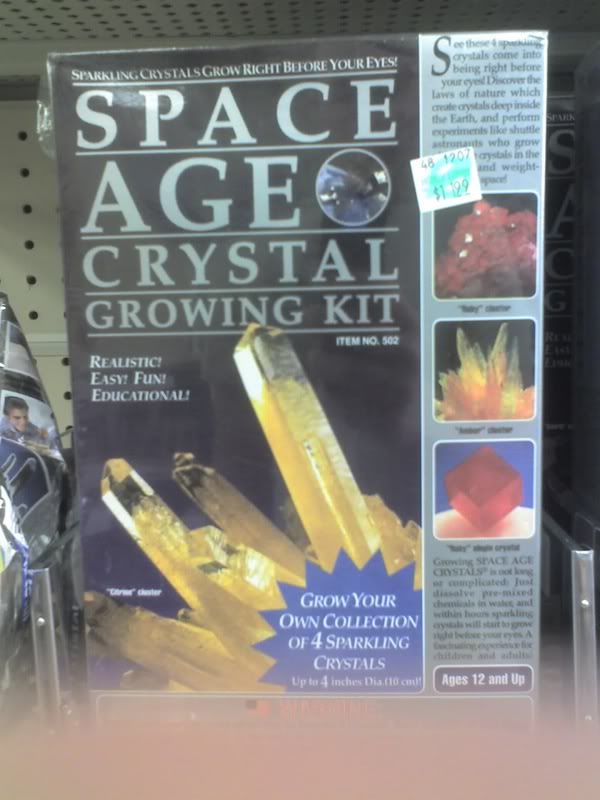
I actually packed a box of those Space crystals around for about 10 years and never got around to creating them. thought they'd be great for Tzeencth terrain. I can't say for sure but I'd expect them to be pretty brittle. In the end they just ended up getting tossed during a move.
6157
Post by: Krom&krog
That turned out Kool!!! Nice work grey_death keep it up!
358
Post by: DonkeyCannon
you should cast that and reproduce it.
2153
Post by: widgren
nice. i think ill have to pick up the sculpting to. again..
4670
Post by: Wehrkind
What's the "sculpty" of which you speak? Sort of a demi-clay that is bakable in an oven? Very curious, especially after seeing your great work.
372
Post by: grey_death
It's called Sculpey. You can find it in craft stores normally (Michaels, HobbyLobby, etc.). It stays soft and workable until you bake it. It gets softer the more you work the clay, so you need to kneed the stuff for a bit when you get ready to work a piece.
Definitely a started medium. I like it for what it can do.
I'm considering it as a new terrain medium in the future.
5206
Post by: snorkle
Did you spell Scupley wrong? I'm guessing it's Sculpey.
372
Post by: grey_death
yep. Spelled it wrong. Fixed ^_^;
372
Post by: grey_death
Was inspired by this thread to come up with my own take on the Leman Russ. I don't have any plans to build it, I just felt like designing it ^_^. Check it out
1
5206
Post by: snorkle
Looks cool.
Is it based on a chimera hull?
5744
Post by: Stormtrooper X
Cool sketch. I have a buddy who took a Leman Russ chassi and then used Predator turret and side sponsens. It looks much sharper than a standard Russ.
372
Post by: grey_death
Yeah, I based it around the chimera hull. I was trying to give it a lower profile (standard practice with modern tanks).
I took the basic shapes from the M1 Abrams, and added a Leopard II type exhaust system to the back end. I figure this tank would seat 5 to work all of the weapon systems.
372
Post by: grey_death
I want this just for terrain. The in game use of it is just a bonus. ^_^.

::waits impatiently for July::
306
Post by: Boss Salvage
Nice find GD. $24.99 is a bit steep, but battlin' it out across a shrine world with my CSM would be sweeeet 
- Salvage
372
Post by: grey_death
Boss_Salvage wrote:Nice find GD. $24.99 is a bit steep, but battlin' it out across a shrine world with my CSM would be sweeeet
- Salvage
Actually I think that was for something else. If you read it that price tag is for an Egyptian column ruins.
5744
Post by: Stormtrooper X
Those are some great finds in the aquarium section. It seems like every time I look at fish tank items most of them are painted with colors that would make a Slaanesh marine cry.
372
Post by: grey_death
Holy Crap! A painting update!!
Base coats of shadow grey has gone down for my Stormtrooper squad.
3
372
Post by: grey_death
My website has been relaunched. Should be able to keep it updated rather easily now that I've decided to stop building my own site in favor of an easy to use program ^_^. Link is in my sig!
The stormtroopers will be getting faces sometime today btw. ^_-.
Stay tuned!
372
Post by: grey_death
Faces finished. Took a while since I wanted variation. Here's a quick collage of them all ^_^.
1
4670
Post by: Wehrkind
They all have expressions like they are witnessing the horrors of 4Chan made flesh. Not really what I expected from Storm Troopers... hmmm.
Props on making them varied though. I like seeing the small variations in armies. Even though you don't notice it en masse, when you peak closer it adds a nice "Real people/hideous monsters, not assembly line robots." touch.
372
Post by: grey_death
Wehrkind wrote:They all have expressions like they are witnessing the horrors of 4Chan made flesh. Not really what I expected from Storm Troopers... hmmm.
For the record, these are quite possibly the worst face sculpts I've had the dis-pleasure of painting.
6005
Post by: Death By Monkeys
I was wondering about that - I've seen a variety of your other models and know that faces are not generally a weakness of yours. Too bad they're kludgy sculpts.
372
Post by: grey_death
Some slower progress. Been working on another...special...model a bit ^_-.
But some progress has been made. Only 2 more troopers to finish the cloth bits on which really doesn't take long so I think I'll knock that out tomorrow. Anyways, here's where they sit right now.
6356
Post by: Ghidorah
ARRRRGGGGHHH!!!
Enough of the poor face sculpts! Where's the rest of that Nurgle Demon Prince? You horrible, horrible tease!
Ghidorah
372
Post by: grey_death
Demon prince is on the shelf for now! He will see light some day, just not soon! As for horrible face sculpts, here's my first face sculpt ever that I worked up today in about 45 minutes. 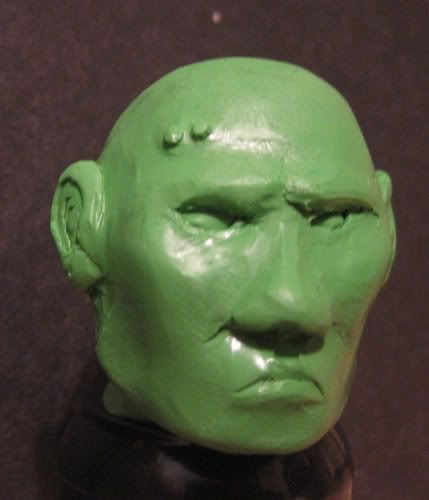 the neck is connected to a paint pot to give you some scale. It's big, but it was just an exercise for me. Nothing serious or even permanent really, this probably will get smashed into it's original sculpey to be used for something else ^_-. It was fun to try my hand at a face for the first time though. Some issue I have with it: The eyes - I'm definitely not happy with how they came out but it's going to take some effort on my part to really learn to sculpt them. The ears - they look like cinnamon buns. which makes me hungry. but doesn't make me happy with how I sculpted them. that was mainly because I was too lazy to go looking for a bit of reference.
372
Post by: grey_death
Alrighty people, I'm at a crossroads. I'm stuck on what models to get back to work on since finishing my challenge entry.
I need your help!!
Here's what we're looking at:
So? What do you think?? What's first!?!
4936
Post by: VermGho5t
Hey GD, great to see you flexing your artistic side!
As far as completing models, I would suggest the space marine as you already have a sizable grouping of them done already. Couldn't hurt to add to them by any means.
A bit of constructive criticism on the head (even though it pertains to 2 dimensions):
Try to remember to keep everything in proportion. The easiest way I have found is to break a face down into sections. what I mean by this is, take the eyes for instance. both eyes are more or less the same size (depending on your perspective!) and when viewed from head on they will be spaced apart by 1 full eye width. When I do draw faces I use eye widths and heights to measure the overall width and height of a face.
Hope that helps, it might seem over complicated but it's pretty simple.
6776
Post by: DaMaGe
The marines!! I love them, esp that veteran. Plus they don't have screwey faces and your great simple scheme is a real inspiration for me for planning a marine force soon.
Yeah, i agree with vermgost, from my days studying art faces are all about proportion, just google it and there will be useful guides on dimensions.
nice blog btw
372
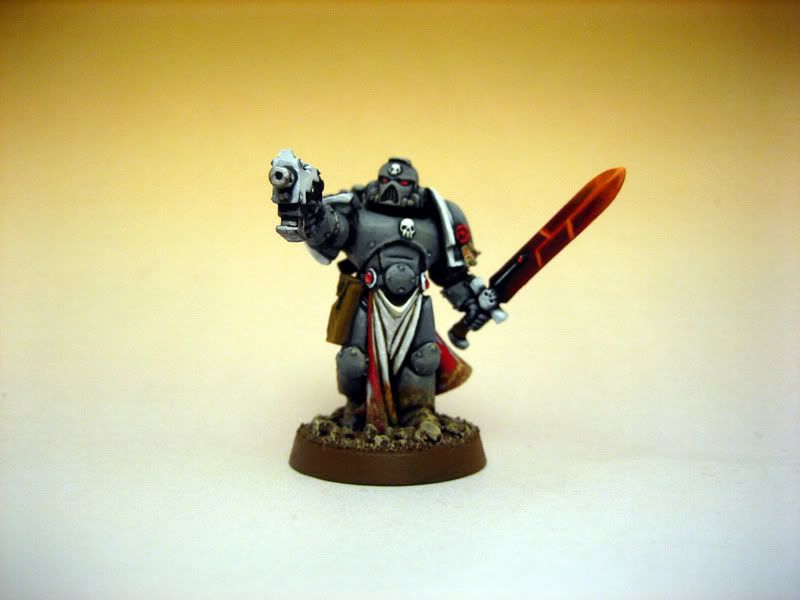
Post by: grey_death
Finished.
1
5420
Post by: nemissary
That sniper looks ace! Great work there!
5164
Post by: Stelek
Got anything that isn't Imperial Trashcans?
4431
Post by: kid_happy
Agreed, love the camo pattern you've gone with.
Good job
6776
Post by: DaMaGe
Great job, the digital camo has worked out really well, as has the beard. Gnarly
372
Post by: grey_death
Spaze Mareenz HURR!!!
>.>...
Was cleaning out a case to bring to work tomorrow so I can get some painting done in my downtime and as I was putting them on the table I started to wonder just how many GDL models I had >.>. I've got a lot of marines (another armies worth of Space Pups), but these were specifically designated for the GDL (painted or not).
didn't think it was that many...
372
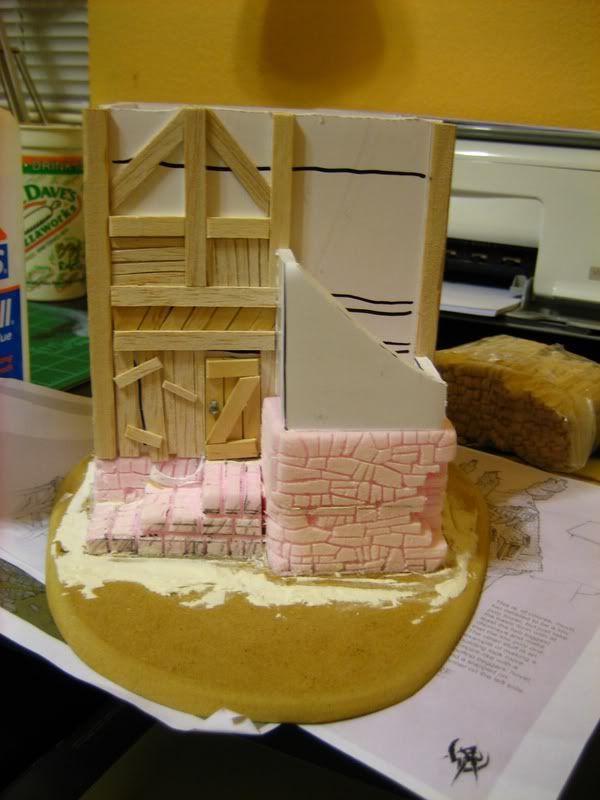
Post by: grey_death
Some of you might know this terrain. Some might not. Anyways, I got some more work done on my Cityfight mini-table. I got a wild hair last night while drinking to start painting it up again. So I pulled everything out and got to it. So far, all I've gotten done is the exterior of the 3 story building. And even then it's not 100% complete just yet. Still more detail to go, but it's a hell of a good start.
Check it out
2
4936
Post by: VermGho5t
That is a GREAT building GD! I like the addition of the posters as well! I'm not familiar with the building though, did you scratch build it? It looks ace though!
4786
Post by: legoburner
The building looks very cool, still clearly 40k universe but not the same old cities of death stuff so good job. I have not got around to doing any city terrain since using the collapsed buildings cardboard cutouts from the 2nd edition box set, but one thing I always thought would be quite cool would be to do some painting with light and rig up some coloured LEDs inside to represent interior lights / creepy underground tunnels leaking through / external lighting shining up the side of a building / etc.
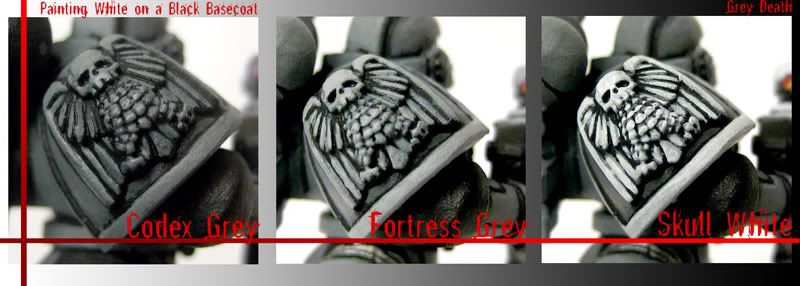
Also your marine scouts are identical in colour scheme to the marine scouts I am painting at the moment :S must be a dakka mod thing he he. Do you highlight with skull white or do you stop at fortress grey when highlighting the codex grey? I stop at a very light, watered down edging of fortress grey but am not sure it gives it enough impact.
372
Post by: grey_death
VermGho5t wrote:That is a GREAT building GD! I like the addition of the posters as well! I'm not familiar with the building though, did you scratch build it? It looks ace though!
It is indeed scratch built. And thank you ^_^
legoburner wrote:The building looks very cool, still clearly 40k universe but not the same old cities of death stuff so good job. I have not got around to doing any city terrain since using the collapsed buildings cardboard cutouts from the 2nd edition box set, but one thing I always thought would be quite cool would be to do some painting with light and rig up some coloured LEDs inside to represent interior lights / creepy underground tunnels leaking through / external lighting shining up the side of a building / etc.
Also your marine scouts are identical in colour scheme to the marine scouts I am painting at the moment :S must be a dakka mod thing he he. Do you highlight with skull white or do you stop at fortress grey when highlighting the codex grey? I stop at a very light, watered down edging of fortress grey but am not sure it gives it enough impact.
I think actual lighting would be a lot of fun for a city board. I just don't think I'll ever get around to it for a gaming board ^_-.
As for my scout, I stop at fortress grey highlights. But it's not a very watered down highlight when I do finish the highlighting. I start watered down though, and build up the color from there.
6776
Post by: DaMaGe
Awesome stuff grey_death! How did you make that building then? I once set about making a cityfight (as it was) board, but after constructing about 10 buildings from cardboard I got depressed with the crapiness of corrugated cardboard and gave up 
I'd love to see some shots of the marine sniper in a window of the new building ... hint hint
Onward!
- DMG-
372
Post by: grey_death
More Progress Shots. Btw, if anyone has ideas for interior room colors, let me know ^_^
7
372
Post by: grey_death
Oh and I'm doing a Hill Tutorial >.>. Should be uploaded tomorrow ^_^.
6776
Post by: DaMaGe
Ideas for the walls.
Colours, muted greens, off-white (grimy), miserable prison greys.
Also, i thought you could go for that sort of prison corridor half and half look. A little like this...
edit: image removed from being too large -g_d
I love the removable sections and the detail inside, extremely impressive.
What materials do you use for the buildings, and are they based on any articles you've found online/elsewhere?
-DMG-
131
Post by: malfred
That's a big freakin' picture.
372
Post by: grey_death
DaMaGe wrote:Ideas for the walls.
Colours, muted greens, off-white (grimy), miserable prison greys.
Also, i thought you could go for that sort of prison corridor half and half look. A little like this...
I love the removable sections and the detail inside, extremely impressive.
What materials do you use for the buildings, and are they based on any articles you've found online/elsewhere?
-DMG-
Diggin the half and half idea. I'll definitely use that for a corridor/hallway for sure.
For materials: Foamcore and Balsa wood for basic structure. For the floors, I used pre-textured plasticard sheets I found in the Dollhouse section of my hobby store. Works like a charm.
I didn't use any real articles for them, I just sort of designed them on the fly and had a base understanding of what I wanted to create. You definitely want to go into them with a plan before you even start cutting. Especially when creating interiors like I've done here.
4670
Post by: Wehrkind
What sort of building is it? If it isn't a prison or similar sort of thing (school) but rather a fairly nice admin type building, make sure to put a chair rail of some sort between the two colors on the wall.
Looks great though man. Your buildings are certainly dead sexy.
6776
Post by: DaMaGe
malfred wrote:That's a big freakin' picture.
True, but I was in a rush and it was the first good one I found. Maybe I'll make it my wallpaper... hmm...
- DMG-
372
Post by: grey_death
Wehrkind - I was definitely thinking along the lines of an admin/office/professional type building. As for the chair rail, would this just be some sort of molding? It's a bit late to be gluing more strips in I think, but would I be able to get away with painting one in you think? Just a darker strip between the two colors?
6209
Post by: odinsgrandson
You know, I like the work, but it seems someone can't concentrate on one project at a time...
Yeah, that's not uncommon really...
372
Post by: grey_death
Ok so uh...I didn't realize how many steps I take when creating something as simple as a Hill >.>...
Check out the start to a soon to be Hill Tutorial
Should take me a while to type everything up. But I'd expect it should be about finished by the end of next week.
I'll be posting it here on Dakka as well as my blogsite in my sig.
4936
Post by: VermGho5t
Nice Tutorial GD. I would give up half my finished terrain for 2 sheets of the EPF insulation boards like you have! 
372
Post by: grey_death
Go Go Modeling ADD!!!
372
Post by: grey_death
Oh and this epic basing style is 100% Stolen from Ramshackle_Curtis' amazing ork army. You should definitely check out his army.
6776
Post by: DaMaGe
Haha, cute. I managed to trace the original post on your citifight board. Would you say a 2x2 board is too small for gaming? I've never played on a board where every gun is pretty much in range from turn 1.
-DMG-
372
Post by: grey_death
DaMaGe wrote:Haha, cute. I managed to trace the original post on your citifight board. Would you say a 2x2 board is too small for gaming? I've never played on a board where every gun is pretty much in range from turn 1.
-DMG-
I haven't played many games on the table. But the key to making a small table is to have lots of intervening terrain elements. In this case, I've got a 2 story and a 3 story building will full interiors for models to hide in, as well as three other smaller buildings along one of the table edges (just building fronts really). It does create a lot of great fire lanes for oh say, a heavy bolter >.>. And you're not going to want to play large games. Honestly, if you're playing more than 300 points on a 2x2, something is wrong with you! Initially I built it as a way to play skirmish scale 40k (rule 1: take a single squad rule 2: have at it). It's fun, and it gives me a chance to focus more on the details instead of trying to finished a giant table with hardly any.
6776
Post by: DaMaGe
Good thinking... personally I prefer smaller points games to large ones. 40K was always a skirmish game. When apocalypse came out I groaned. I think I'll go for 4x4 table for ~1000pts.
I did have ambitions for the table to be multilayered - like levels of a hive. But that would be a massive project. Still, I just got kicked out of university - so all the time in the world now
372
Post by: grey_death
Just finished my hills tutorial today. Check it out.
5351
Post by: Jazz is for Losers
grey_death wrote:Go Go Modeling ADD!!!
Nice. Far more appealing than the usual stands of infantry.
372
Post by: grey_death
Some more orks modeled. Paint started on the first base. I'm going red and yellow for them. Haven't gotten that far just yet though. Need to pick up a few paints. Let me know what you think.
2
372
Post by: grey_death
So inspiration hits yesterday. And I used jamsessionein's awesome stompa as the basis of an Epic Stompa conversion. I'm very pleased with the results ^_^:
1963
Post by: Aduro
Are they mounted on nickles?! You can't do that! Stop stealing my ideas!
372
Post by: grey_death
Aduro wrote:Are they mounted on nickles?! You can't do that! Stop stealing my ideas!
Indeed they are ^_^. And they work out wonderfully. The only issue I am running into is what to base larger things on.
1963
Post by: Aduro
grey_death wrote:Aduro wrote:Are they mounted on nickles?! You can't do that! Stop stealing my ideas!
Indeed they are ^_^. And they work out wonderfully. The only issue I am running into is what to base larger things on.
Quarters?
234
Post by: DFo
Aduro wrote:grey_death wrote:Aduro wrote:Are they mounted on nickles?! You can't do that! Stop stealing my ideas!
Indeed they are ^_^. And they work out wonderfully. The only issue I am running into is what to base larger things on.
Quarters?
Toonies?
(says the one-upping Canadian jerk...)
372
Post by: grey_death
Aduro wrote:
Quarters?
Quarters don't have the flat edge like nickles do unfortunately, so they wouldn't work.
And there's no way I'm using a 2 dollar coin for a base x.x....
1963
Post by: Aduro
You could grind the rough edge off, or fill it in with Green Stuff?
234
Post by: DFo
To be somewhat more helpful, what about a simple metal washer of the Home Depot variety? Should be available in any size you need and smooth-edged to boot.
372
Post by: grey_death
DFo wrote:To be somewhat more helpful, what about a simple metal washer of the Home Depot variety? Should be available in any size you need and smooth-edged to boot.
I was actually considering washers for this. At the very least hitting up both the hobby store and the home depot to see what my options for basing would be. We'll see if I can swing by tomorrow find something. It definitely won't be expensive either way.
1709
Post by: The Power Cosmic
The bases look like they have lips on the edge, so that corroborates the coin suspicion. Now all we need is the nationality and denomination.
Oh, cool epic Orks too.
306
Post by: Boss Salvage
DFo wrote:To be somewhat more helpful, what about a simple metal washer of the Home Depot variety? Should be available in any size you need and smooth-edged to boot.
Ironically, more expensive than nickels for the same size, though perhaps in bulk you could get them at $0.05 or less. Also, the hole in the center ... which I was going to ask how you got around cause I figured you had used washers but NO they are indeed nickels!
But personally I would have used washers with some thin card to cover the hole and glue sand all over. Big ones for the big stuff too.
- Salvage
372
Post by: grey_death
Boss_Salvage wrote:DFo wrote:To be somewhat more helpful, what about a simple metal washer of the Home Depot variety? Should be available in any size you need and smooth-edged to boot.
Ironically, more expensive than nickels for the same size, though perhaps in bulk you could get them at $0.05 or less. Also, the hole in the center ... which I was going to ask how you got around cause I figured you had used washers but NO they are indeed nickels!
But personally I would have used washers with some thin card to cover the hole and glue sand all over. Big ones for the big stuff too.
- Salvage
Yep, they are indeed nickels.
The thin card over the center is what I'm planning for the larger bases though. I still have to hit the store.
4362
Post by: Ozymandias
You can use masking or scotch tape to cover the hole. I use scotch tape to cover the gaps in slotta-bases and it works great.
Ozymandias, King of Kings
372
Post by: grey_death
Ozymandias wrote:You can use masking or scotch tape to cover the hole. I use scotch tape to cover the gaps in slotta-bases and it works great.
Ozymandias, King of Kings
I've used this method myself on slotta bases in the past. Works like a charm for sure. I was sort of worried about the size of gap I would have in the washers though and was thinking card would be a bit more sturdy. After picking up the washers today, I'm much less worried about the gap and I think masking tape will work out just fine.
372
Post by: grey_death
Fin.
On a Specialist Games kick lately. More to come!
1
4786
Post by: legoburner
Out of curiosity, how many hours a week do you paint on average grey_death? The Skaven looks cool btw, and I like the image presentation too.
372
Post by: grey_death
legoburner wrote:Out of curiosity, how many hours a week do you paint on average grey_death? The Skaven looks cool btw, and I like the image presentation too.
Honestly, I don't paint as much as I would like. I probably get a solid 10 max a week (less depending on what the wife would have me doing). And most of that is at work between calls (I <3 being a firefighter!). This guy was about 90-95% by the end of the night yesterday at work. And he was black primer when I got there.
372
Post by: grey_death
More Mordheim. This time it's wyrdstone counters! A nice simple fun little project.
Tomorrow I start work on my third skaven, on shift ^_-. Here's to hoping they don't have Rock Band going to distract me x.x....
1
6776
Post by: DaMaGe
Sweet! Just wondering why ur skaven have snow and the wyrdstone doesn't? Very tidy painting... the darker skaven in particular has great highlighting on the cloak.
-DMG-
372
Post by: grey_death
Damage - I wanted to keep the Wyrdstone sort of neutral with it's basing.
Thanks for the compliments.
I hope to have another model finished sometime soon. Didn't get quite as much done yesterday at work as I would have liked.
3488
Post by: jah-joshua
nice ratmen!!!
it looks like you've taken a leap with the skills...
the nmm gold bracelet on the first skaven looks really good, but those blades look way too clean...one advantage of nmm is the ability to paint a much more visible tone of weatherin'without havin' to go over the top)...even just some orangey brown washes along the hilt and up the blade a bit will lend more atmosphere to the minis...
keep up the good work...
cheers
jah
372
Post by: grey_death
jah-joshua wrote:nice ratmen!!!
it looks like you've taken a leap with the skills...
the nmm gold bracelet on the first skaven looks really good, but those blades look way too clean...one advantage of nmm is the ability to paint a much more visible tone of weatherin'without havin' to go over the top)...even just some orangey brown washes along the hilt and up the blade a bit will lend more atmosphere to the minis...
keep up the good work...
cheers
jah
I've been thinking about how I would want to go about weathering these guys if I did. Thanks for the advice on the washes, I was thinking that would work out well, but I didn't want to experiment just yet with it. Right now it's all about getting them painted up for the campaign and learning a a few techniques along the way ^_-. I'll keep your advice in mind as I get some more time to go back and do a little bit more detailing later.
372
Post by: grey_death
Ok, so I buckled down and finished this bad boy. I have to say, he was not easy to paint at all. Lots of little detail, some of which doesn't take paint very well at all. But I got him finished to a pretty good standard, and I'm just sick of messing with him at this point x.x.
You can see I used the Adept to help tie the other two together more. While each model will be different, the colors will tie them together quite nicely. Go Go Limited Color Palette!
Comments and crits much appreciated.
2
372
Post by: grey_death
Some more progress with my warband. They're coming along a bit slower than I'd like them to, but these models are friggin detailed as hell. It's hard to rush something like that when they're so important to making the model have some real character and stand out in a band of 10 or so models.
I also got my first few games in for the campaign (I played with a half silver warband...). You can see my thoughts on those here in my Skirmish Scale Games thread.
A small disclaimer about the pictures: I just moved into a new place, and don't have the same set up as before, so while I'm figuring all of the lighting out, I apologize for the quality.
Anyways, On with the photos.
3704
Post by: BDJV
Those are some great lookin' Skaven!
5420
Post by: nemissary
Beautiful little Skaven. They Look wonderful. The limited colors does make them look great together.
372
Post by: grey_death
Thanks for the compliments guys ^_^. I'm really hoping they'll look just as good across the board as I finish more of them along the way. Hopefully I can at least have the base warband completely painted by the end of the campaign.
For my next model, I've gone with my fighting claws black skaven (The Black skaven that's painted without the weeping blade has become a henchman!).
The funny part is that he's probably about 45%-50% completed right now >.>...I'm sure you know where I'm going with this guy. Stay tuned.
As always, C&C welcome and appreciated!
306
Post by: Boss Salvage
Nice as always Grey. On the newest painted pics, are those metal models? Or plastic just done very well?
Either way, the crew is shaping up nicely.
- Salvage
372
Post by: grey_death
Boss_Salvage wrote:Nice as always Grey. On the newest painted pics, are those metal models? Or plastic just done very well?
Either way, the crew is shaping up nicely.
- Salvage
Thanks man. The newest guys are metal gutterrunners. For some reason I can't stand the plastics with their huge chunky arms and weapons...Maybe with enough GS work they could look nice...but as is, I just couldn't bring myself to pick them up. Running out of options for different models though since the metal line is somewhat limited for what I want/need.
5256
Post by: NAVARRO
I havent been here for a while, and imagine my surprise, when i get back to check your stuff and see that, your already achieved painting tecnique, has developed a LOT in this time... great evolution mate!
224
Post by: migsula
Nice work Grey!!! My comments stand and I am enjoying the trip
372
Post by: grey_death
I really appreciate the compliments guys.
I've been talking with migs about the direction my painting is going in.
I've been really just focusing 100% on my technical painting ability as of late. I've been pouring all of my effort into learning with each piece.
With that though, I've come to realize (thanks to migs!) that I've really been letting my own style and influence flounder some. That's not to say that I haven't put myself into each piece, it's just that I have put technical ability above personal 'flair' on my priority list while I go about painting each new model.
For the folks out there that enjoy watching me grow as a painter, I'd expect to see more of 'me' in new projects in the future.
7291
Post by: Ebullient
And with your words, there is much rejoycing!
I always love looking over models to see the individual... I want to say flaws, but there's nothing wrong with them. The individual... personality! That's the word, personality. You can see it resonate from the pieces that the painters truly pour themselves into. I think your already amazing work will become so much better with your new painting personality!
372
Post by: grey_death
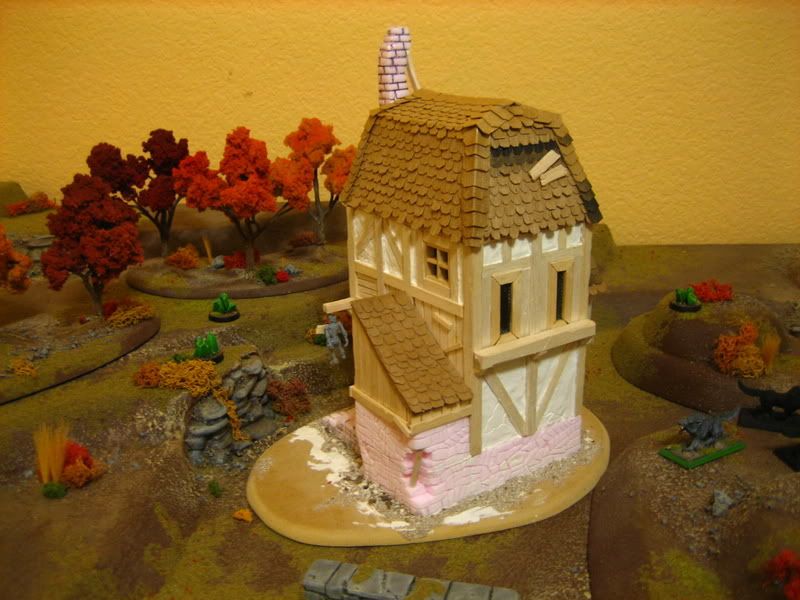
New project piece started. I've decided to try my hand at creating a fantasy based building. This is all influenced by how much fun I'm having digging into Mordheim. This piece is going to be a complete building, much unlike what most people come to associate with Mordheim. It's all in an effort to try out some things in the construction of the building and see how well I can emulate some of the concept work I've come to admire from Warhammer Online on the tabletop.
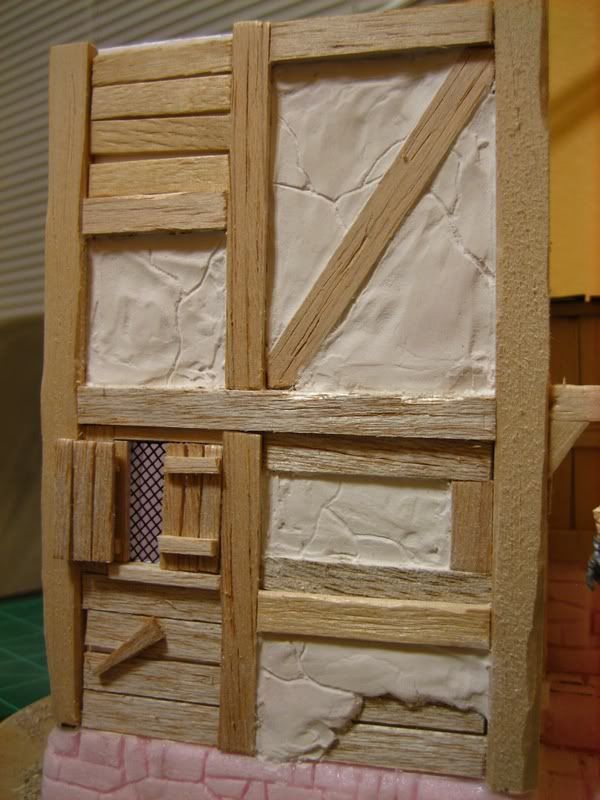
To start me off, I've used a piece of precut and beveled MDF I had laying about. It was originally going to be used for a tree/shack template. But I didn't feel like cutting and sanding down another piece, so it was hijacked.
I measured out some pink insulation foam (1" thick) to the dimensions I wanted and got to cutting them out. After dry-fitting them, I sanded the edges a bit to make them fit a slight better.
I then glued the pieces together using small pieces of wood pushed into the joining edges of the foam to help lock them more firmly in place. At this time I also glued everything to the base.
At them moment I'm just waiting for the glue to dry before I continue the construction.
I'm planning on the first section being 5" tall, followed by a smaller, yet wider, section on top of that in standard half timber design.
All the pink foam will be stone work. I'm still undecided on just HOW I'll go about working the stone. I could very well just press directely into the foam. Or I could go about it in much the same way that I had done my rock faces on my Autumn foothills table.
I'll also need to hit up the hobby shop in search of some plastic tubing and possibly get my hands on some plasticard sheets as well.
The following are my inspiration for this project:
Click me to see where the basic shape of this project came from.
Click me to see some detailing that will be incorporated.
Click me to be inspired to do something ridiculously large.
Click me to see roof detailing that will be incorporated.
I'm really excited to be doing something like this. While the playability may suffer for the piece being a complete structure, I'm really not interested in ruining detail for the sake of playability for this one. It's all about the detail and composition.
I'd love to hear peoples thoughts.
7291
Post by: Ebullient
I'm tingling from anticipation! I'd like to make a suggestion for this. Even if you make it as creepy as the pics, I'd like to see you attempt to make some Ivy crawling its way up the side of the building that would be really cool! Good luck and good sculpting!
372
Post by: grey_death
Ok, so I screwed the rock sides up a bit by trying to go with the spackle sculpted sides. I got into it and hated what was happening and ripped that crap off. In the process I really dinged up the sides of the foam.
The whole ordeal inspired me to go pick up a new tool. It's a wand like styrofoam cutter called The Styrocutter Plus. It's a really really neat little tool that makes foam shaping a snap. I've only had the thing for a few minutes and I'm already in love with the results you can get out of it. The end is a bit thick though and I think that's my only complaint with it. It won't replace your wire foam cutter for accuracy, but for shaping and detailing, it's hard to beat.
More as I get used to using it and as I make more progress with my project ^_^!
372
Post by: grey_death
I am just using the method I've used before with my stone walls, cutting into the foam with a hobby knife at angles to get a stacked stones look. Only this is way more detailed than that ^_-.
Anyways, here's where we're at right now
6473
Post by: Mephistoles1
I just discoverd that styro cutter as well. Makes cutting out basic shapes and large shapes the regualr wire cutter just couldnt reach very easy.
This is an ambitious project, but judging by your works so far i think we will all be eager to see the results!
Meph
6098
Post by: ghostmaker
Your more ADD then me.
There great like them though.
372
Post by: grey_death
Another skaven done. I'm thinking the sorcerer is next up. C&C welcome and appreciated as always.
1
7122
Post by: model collector
So far all your work is amazing I would like to see more non GW stuff though 
4669
Post by: HuzzFivvNivv
Very very nice
Black is not so easy to pull off, Cloak looks great
HFN
4786
Post by: legoburner
hey grey_death; on this mini of yours:
is the right (gun) arm plastic? If so what kit does it come in? I have been trying to track it down for a few days without success now.
Thanks
372
Post by: grey_death
Hey lego,
The arm is actually the Emp Champs arm with the black sword. I cut the hand at the wrist and replaced it with a plastic hand to grip the bolt pistol.
The left arm is much the same, chopped at the wrist with plastic bits replacing metal.
The head, once again, chopped off and replaced with plastic.
7177
Post by: xedric
That mini with bolt pistol and sword is beautiful. Is it a power sword? How did you do it?!? If you could describe your method itd be much appreciated. Id love to give it a try on the termies Im working on.
372
Post by: grey_death
I used a technique called glazing. Basically you take very watered down paint and get just enough in your brush so that it leaves an extremely thin coat of paint on the surface of the mini. This is done by dipping your brush into the watered down paint and using a paper towel to help soak up all of the excess. This keeps it from becoming a wash and gives you control over where your 'glaze' goes.
I worked my way up from a black undercoat/basecoat for the sword using scab red glazes (lots and lots and lots of layers of glaze). The glazes give you a smoother transition than you would get by simply layer painting. With each glaze you want to start slightly further up the sword so the last layer is slightly exposed. Do this until you get a fully scab red tip for your sword.
Next up I used blood red in much the same manner, only more directed to the edges of the sword, as well as the 'hatch' marks along the blade. Again, work your way slowly up to solid blood red.
I then mixed blood red with fiery orange about 50/50 and picked out some edges with a slightly less watered down paint.
Finally I used fiery orange at the very tip and some of the edges to really bring it to life.
Hope that helps x.x...
372
Post by: grey_death
I picked up one of the wash colors from GeeDub this week. I just really wanted to give it an initial test and see what I could come up with for a quick effect with it. So I snagged a model and went to it.
note: the colors are a bit off, I'm still getting used to my new photo set up.
This was a heavy sepia wash, cleaned up with a highlight of bleached bone and final highlight along the edges of skull white.
Have to say, very impressed with what I've been able to do with it so far. More tests in the future of course. But Bone colored armor is a cinch with this stuff.
372
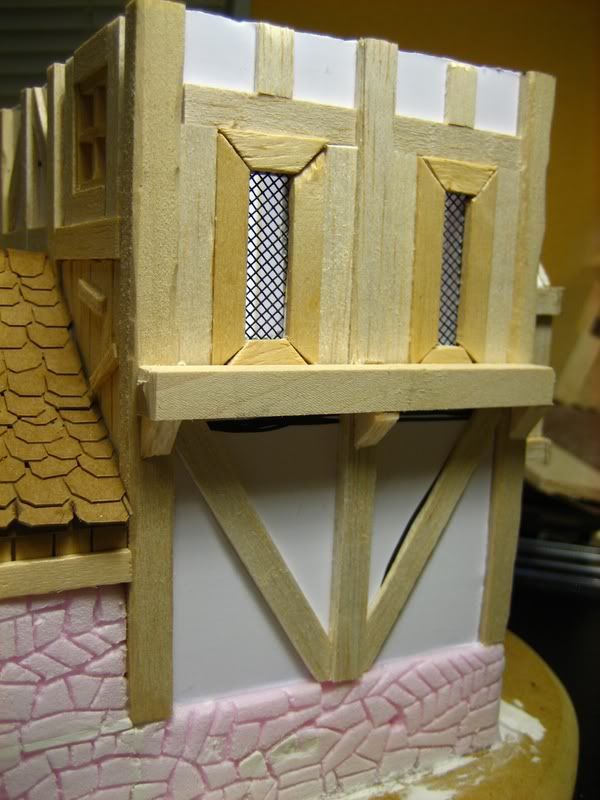
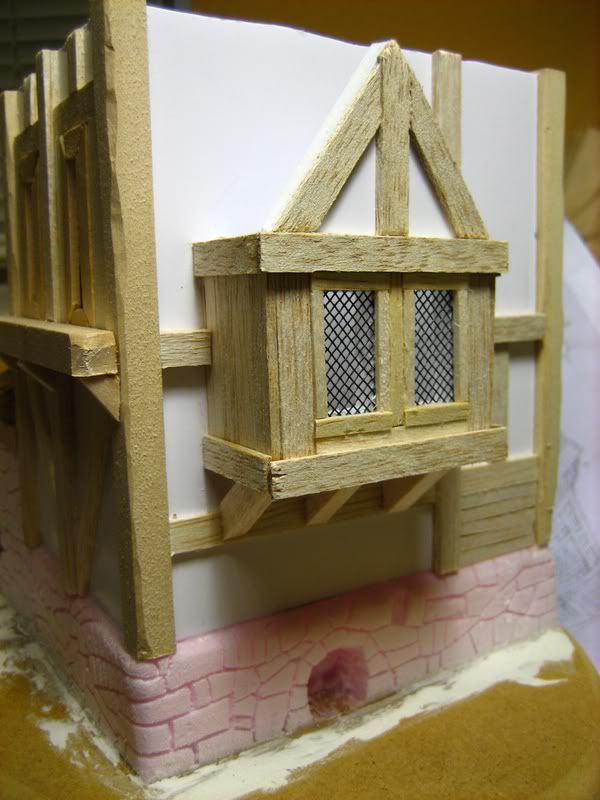
Post by: grey_death
A little more work done on my building project ^_^. I know it's coming along really really really slow. It's just hard to find time for all of the stuff I want to do!
4936
Post by: VermGho5t
Oh man, that is coming along great gd! Is that balsa wood on the frame and such? How does the detail come out when painted? Do you have to texture it at all (carve grain into it, etc.) ?
I wish, for the love of god the home depot near here sold Owens Corning Foamular 150 hi density foam like that! Will probably have to order it over the phone and then a six hour drive just for a few sheets
372
Post by: grey_death
Verm - It is a mix of balsa wood and craft sticks. I'm honestly not too sure how the detail will come out for the craft sticks. I think they'll have a smoother look to them compared to the balsa wood. But that variation will give the piece some character that would otherwise be missing.
<3 my home depots.
6098
Post by: ghostmaker
Your really good. BTW
372
Post by: grey_death
Some more work done on my building:
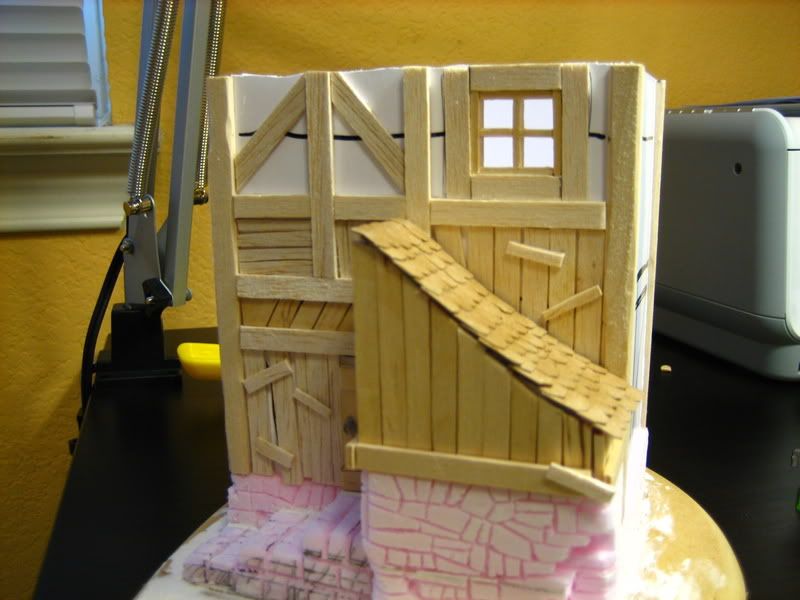
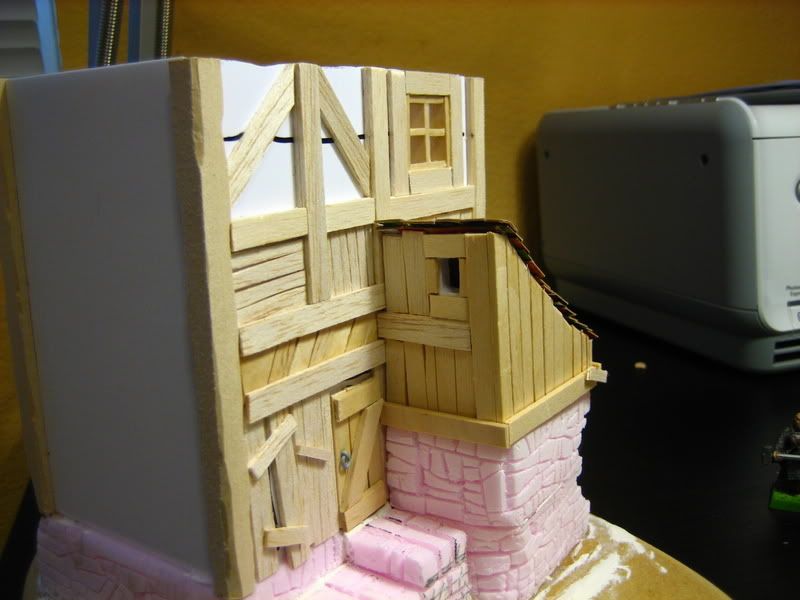
Still some more little stuff to add to the front. But it's pretty much finished. I'll probably move on to the sides next.
372
Post by: grey_death
Final side balsa detailed. Also added spackle (filler) to all of the open spaces between the wood framing. Some is smoothed out and detailed already some is still drying.
Here is a shot of final details on the newly finished side:
Added some basing material as well.
Next up: Roof >.>...
6005
Post by: Death By Monkeys
Nice - I like the detailing on the spackling. It's spack-tacular!
372
Post by: grey_death
More WIP for the building:

And just for some fun:
The roof is going to be a pain. Lots of tiles to cut. But it's really capping everything off nicely so far.
4669
Post by: HuzzFivvNivv
Great Work GD
The crooked chimney rocks
HFN
4786
Post by: legoburner
Looking fantastic - I'm not usually a big fan of fantasy buildings but that one is looking great. I really must start trying to get you seriously into necromunda!
131
Post by: malfred
grey_death wrote:I picked up one of the wash colors from GeeDub this week. I just really wanted to give it an initial test and see what I could come up with for a quick effect with it. So I snagged a model and went to it.
note: the colors are a bit off, I'm still getting used to my new photo set up.
This was a heavy sepia wash, cleaned up with a highlight of bleached bone and final highlight along the edges of skull white.
Have to say, very impressed with what I've been able to do with it so far. More tests in the future of course. But Bone colored armor is a cinch with this stuff.
Yeah. The Vallejo sepia is really dark, and I don't like how it goes onto bone
armor. However, I still DO like using one of the lighter VGC browns to wash my
bone armor with something light-ish. I use the VGC sepia ink for everything
else, though. Have you used it? How does it compare to GW?
372
Post by: grey_death
Thanks for the praise ^_^. I hope to keep this thing on track to it's completion. It's going to be a sort of 'centerpiece' for my table.
Lego - I need people to play necro against first >.>
malfred wrote:Yeah. The Vallejo sepia is really dark, and I don't like how it goes onto bone
armor. However, I still DO like using one of the lighter VGC browns to wash my
bone armor with something light-ish. I use the VGC sepia ink for everything
else, though. Have you used it? How does it compare to GW?
I have not actually used the VGC ink. I really want to get my grubby hands on some more vallejo stuff though. Namely model color >.>...
372
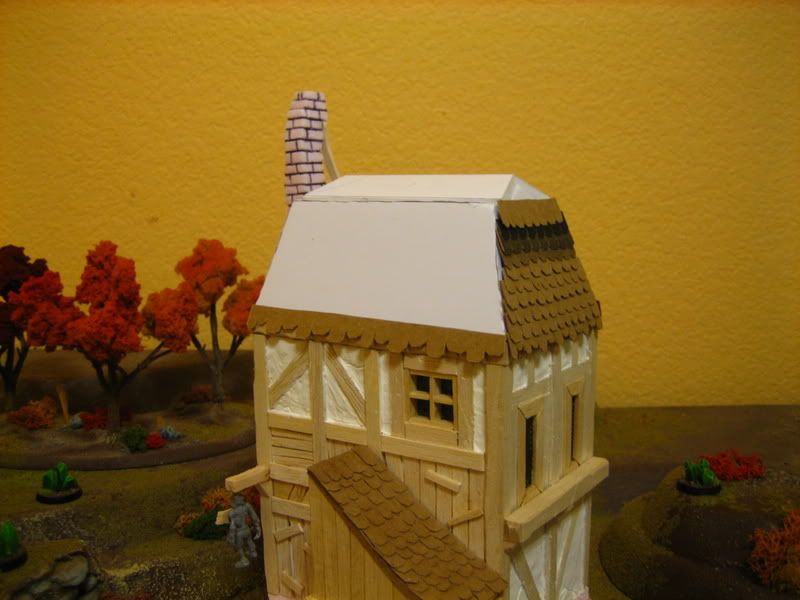
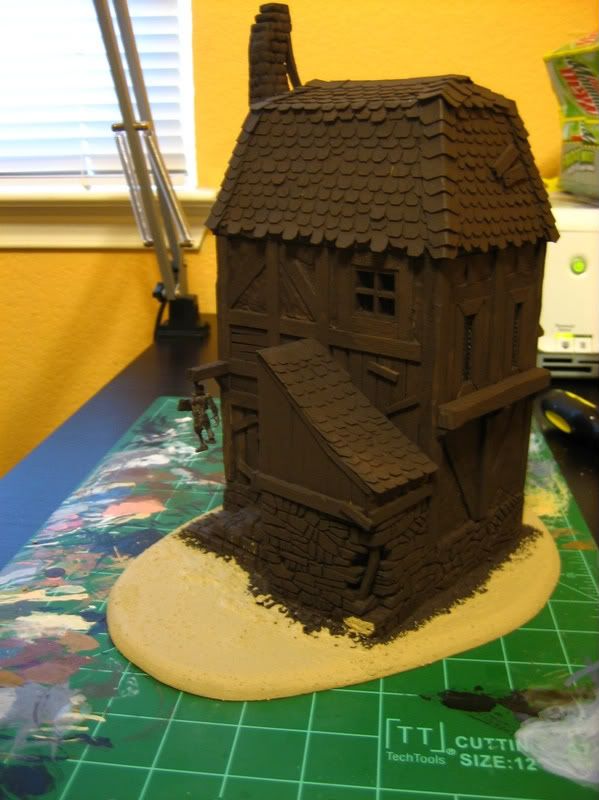
Post by: grey_death
Construction is FINALLY finished!
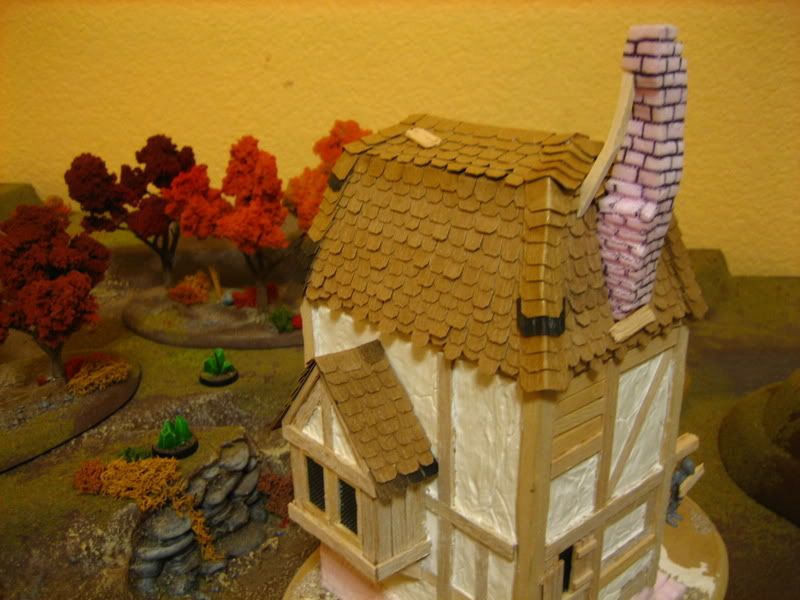
Paint will go down sometime this week ^_^! So happy!
My hand is killing me from cutting out all of those tiles.....
1347
Post by: Selestine
The tiles look *really* good. Can't wait to see it painted.
372
Post by: grey_death
Selestine wrote:The tiles look *really* good. Can't wait to see it painted.
When I started the tiles and roof I didn't really think too much about it. I knew the style of tile I wanted to use, and I knew the style of roof I was going to go with (it was one of the concept images).
As I was finishing things up last night I realized how much the roof resembled my grandmothers roof. And that's when the whole thing became that much more special to me. I think that was the final little piece of inspiration that I needed to finish it off last night.
Still some scoring left to do on the tile, but a few quick swipes with the hobby knife will do the trick and she'll be ready to go to paint.
Anyways, off to work! Lives to save and such ^_-.
6005
Post by: Death By Monkeys
Wow, GD. That's a really incredible set piece. As you were first putting it together, it looked like a pretty standard (albeit well-constructed) WHFB building, but the details like the chimney, the cracked plaster walls, and the scored tiles all make it really distinctive!
372
Post by: grey_death
Some in progress work to post. Painting has started!
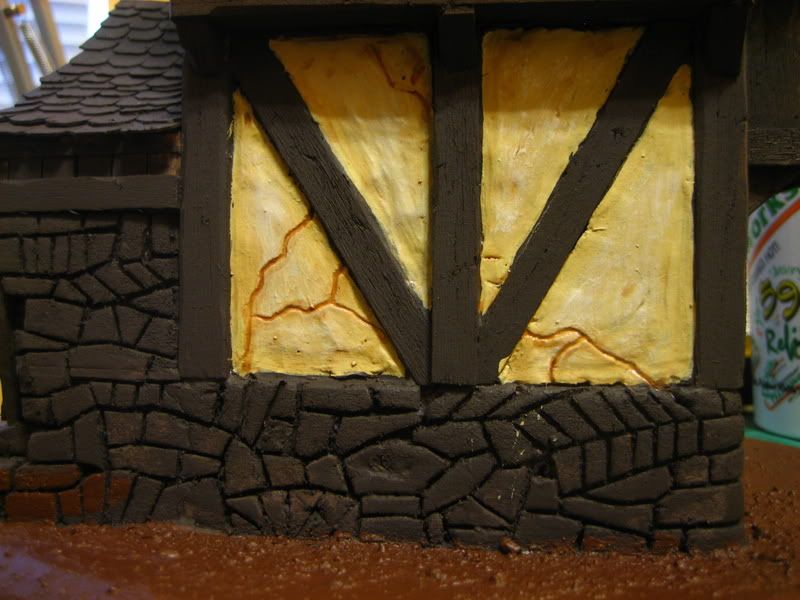
All of the plaster panels are fully painted now. Chimney has been base coated and the base is ready for variations and drybrushing.
More as I finish more!
4669
Post by: HuzzFivvNivv
looking good
HFN
372
Post by: grey_death
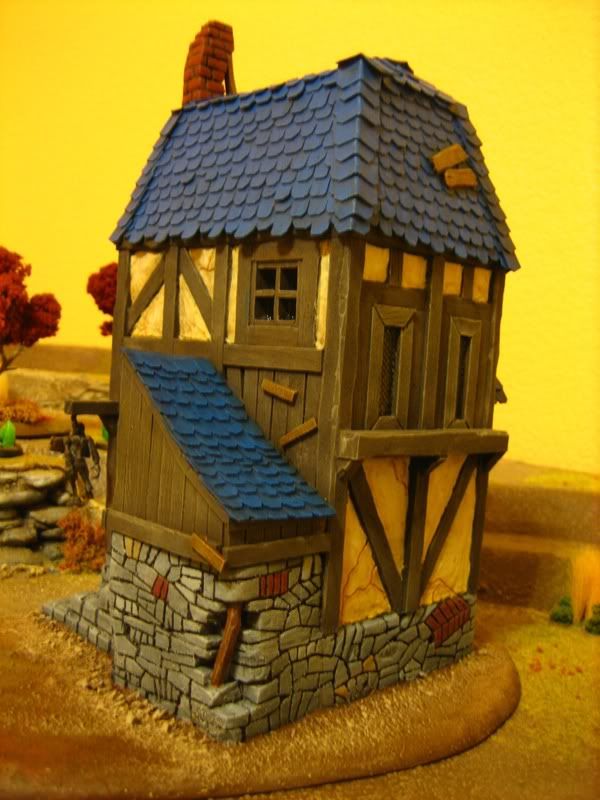
Still more to do, but it's coming along much faster and nicer than I could have hoped ^_^. At the end of the day, here's where we sit:
1
372
Post by: grey_death
Far from finished right now.
Chimney - Tone down and highlights
Stonework - highlight and variations (adding reds to carved brickwork in base)
Dark Woods - Possibly one more stage of highlights, we'll see how I feel about it.
Brown Woods - Highlights and washing
Roof - haven't touched the roofing yet. How do folks feel about blue?
Base - Add grasses and bushes, possibly some additional drybrushing if it doesn't match up with my board right
Hanging Man - Needs painted still
So I guess the only thing that is really finished is the plasterwork.
372
Post by: grey_death
We're getting closer to a finished piece:
1347
Post by: Selestine
Digging the blue roof -- although the big roof and the little roof look like different colors to me. Perhaps just the lighting? Anyway, it is looking very nice so far!
7653
Post by: Corpsesarefun
the big roof and the same roof are the same colour, its jus the lighting making them seem different shades
6005
Post by: Death By Monkeys
Nice. It just keeps looking better and better.
2661
Post by: Tacobake
that building is awesome. Great work.
7994
Post by: Arran235
Great work
372
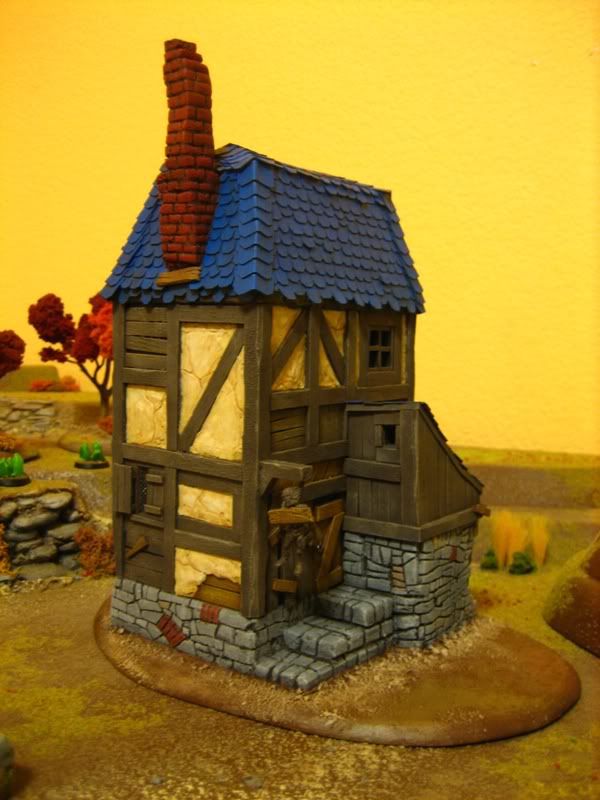
Post by: grey_death
A bit of painting progress!
I present "The Hanging Man"
2
6005
Post by: Death By Monkeys
So, is "The Hanging Man" the name of the tavern?
372
Post by: grey_death
Death By Monkeys wrote:So, is "The Hanging Man" the name of the tavern?
I think of it as an informal name for the place ^_^. Something folks have started calling it since they seem to hang those who stiff em!
6927
Post by: Lagduf
I don't want to know what the bartender gives you at the hanging man when you order a "stiff" drink
I really like that hanging guy touch, really adds a lot of character to the piece.
372
Post by: grey_death
I stripped my old termie captain the other day. For some reason I wanted to repaint him.
He's still very WIP of course but his face is finished:
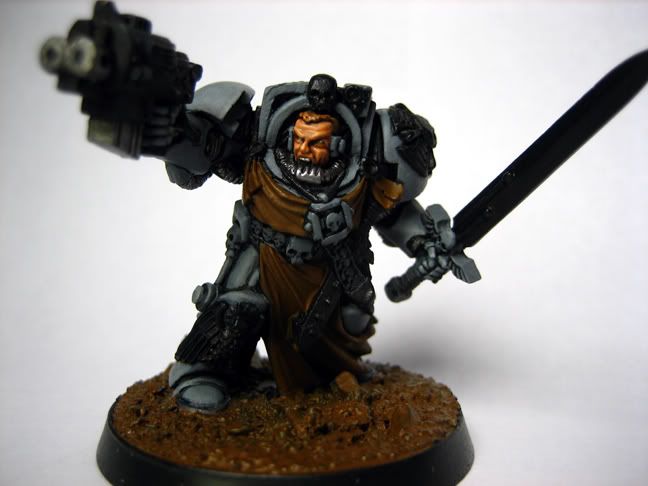
I have used termies in recent games and am really falling in love with what they can do for me in terms of disruption and tactical advantage. I might have to invest in some new plastics sometime soon so my guys don't look outdated and terrible.
513
Post by: Symbio Joe
The reason could be because he is a pretty cool model  . "Aim for their Jetbikes!"
8016
Post by: ChaosDave
grey_death wrote:Demon prince is on the shelf for now! He will see light some day, just not soon!
As for horrible face sculpts, here's my first face sculpt ever that I worked up today in about 45 minutes.
the neck is connected to a paint pot to give you some scale. It's big, but it was just an exercise for me. Nothing serious or even permanent really, this probably will get smashed into it's original sculpey to be used for something else ^_-. It was fun to try my hand at a face for the first time though.
Some issue I have with it:
The eyes - I'm definitely not happy with how they came out but it's going to take some effort on my part to really learn to sculpt them.
The ears - they look like cinnamon buns. which makes me hungry. but doesn't make me happy with how I sculpted them. that was mainly because I was too lazy to go looking for a bit of reference.
This may help a bit, the face is actually a bit too large for the head. You have a bit of a Neanderthal thing going there. Move the eyes down slightly, reduce the size of the cheeks, nose and brow ridge. Move the ear forward slightly and the mouth up just a tad.
372
Post by: grey_death
Well, finished my termie captain. I had a marathon paint session at work the other day to finish him before a tournie. Got him done and varnished so I could at least have a few nice minis on the battlefield. The rest were just old models and unpainted minis. Hopefully some day I'll have a fully painted army like this x.x...someday.
Click for a full view. C&C Welcome.
1
8094
Post by: Sure
Whoa GD that rocks!
372
Post by: grey_death
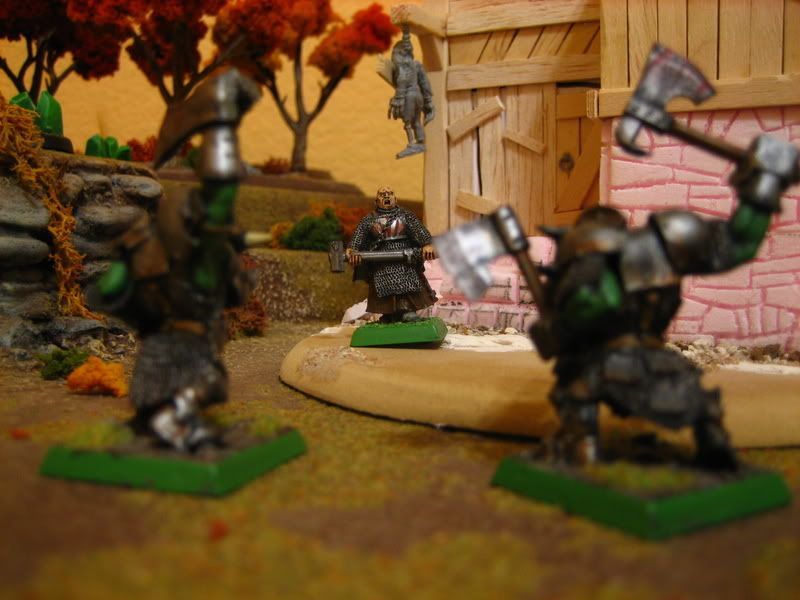
No rest for the completely bored mind. I present to you, Objective Markers!
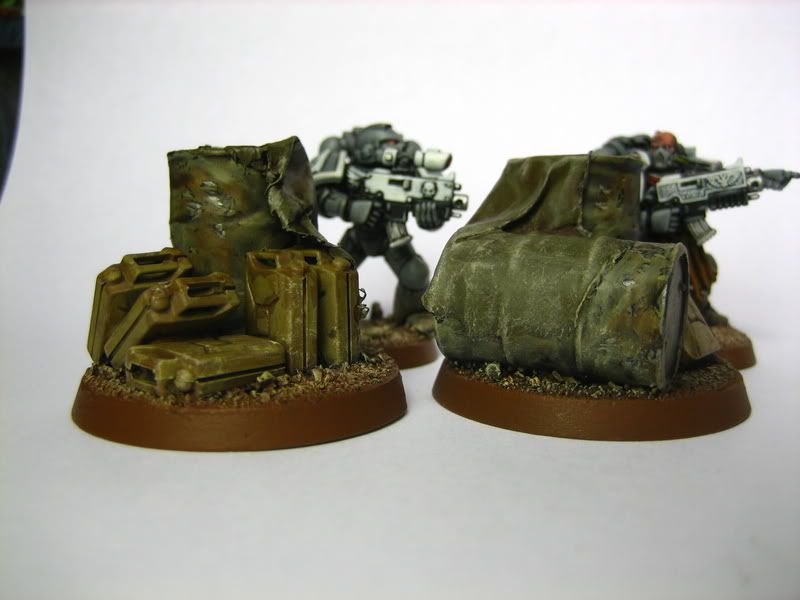
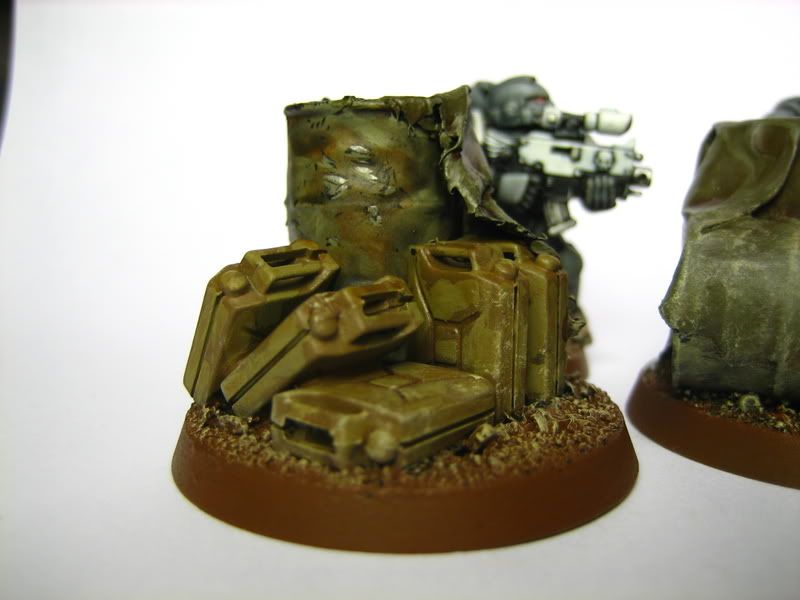
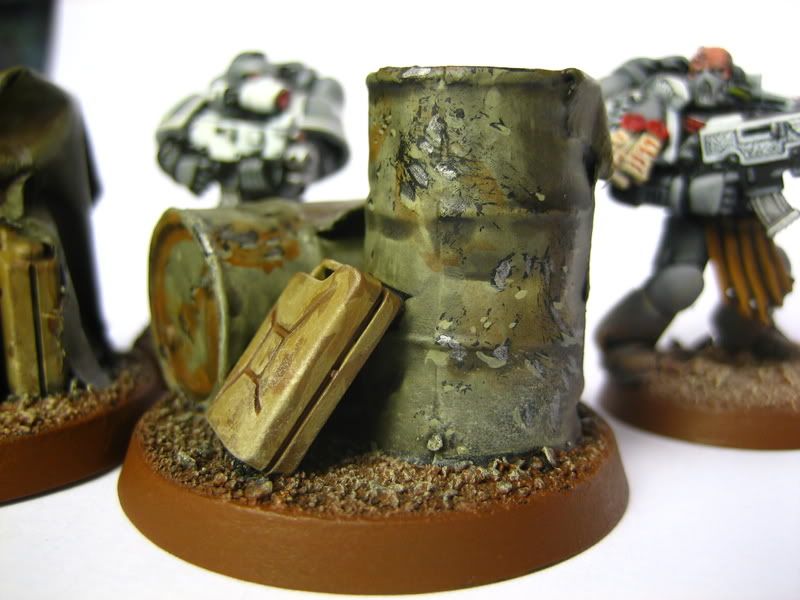
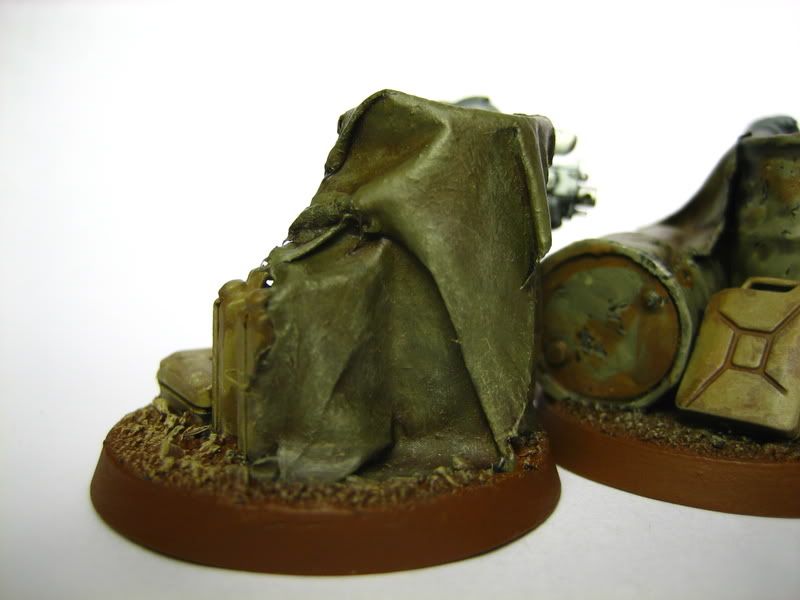
These were a lot of fun to put together. And hella quick from start to finish.
The drums and gas cans are from the Tamiya Jerry Cans Set (1/35 scale). The tarps are a ripped up McDonalds bag dipped in 50/50 PVA Glue/Water and draped/pressed into place and let dry.
A nice lesson in paint chip weathering as well. Something I'll have to take into consideration as my marines move forward slowly.
1340
Post by: Northen
Realy like the termie cap, and how it came together. Good job.
And nice work on the markers.
4669
Post by: HuzzFivvNivv
The Term Capt. is impressive. Good work also on the markers.
HFN
372
Post by: grey_death
Some progress ^_^!
And some photos.
The painted army thus far:
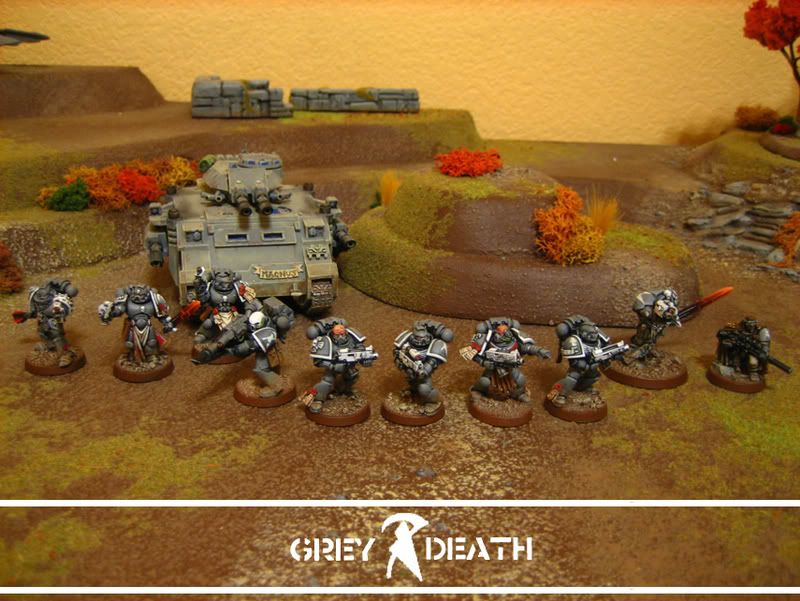
The two new additions:
6609
Post by: Fresh
always been a fan of your painting skills, very sharp and interesting to look at..
keep up the good work!!!
Cheers,
Gutteridge 
+ how do you do your white? been trying to find a suitable technique with no luck :(
372
Post by: grey_death
Gutteridge wrote:
+ how do you do your white? been trying to find a suitable technique with no luck :(
4669
Post by: HuzzFivvNivv
Ah ha your secrets of sexy white have been revealed!
When you get to the white do you apply several coats of thined down white?
Thanks,
HFN
372
Post by: grey_death
HuzzFivvNivv wrote:Ah ha your secrets of sexy white have been revealed!
When you get to the white do you apply several coats of thined down white?
Thanks,
HFN
Yeah, white is a fickle color so you have to do multiple thinned coats of it to make sure the coverage is just right. But honestly, you should really be doing thinned coats of just about every color to keep things looking smooth.
6200
Post by: manowar2
Man I love all of your stuff! But What I really like the most is your power weapons. How on earth you do achieve that very amazing look on those power weapons?
8021
Post by: JD21290
manowar, i got the same question, love the way he's done them, just no clue how lol
and since ive started an iron hands army ill be paiting alot of power weps.
372
Post by: grey_death
A buddy of mine tapped me to paint up a piece for him. I've been compensated well enough though ^_-, Eldar Viper Jetbikes make for good incentive!
So far not too much finished with him. Just some basecoats and the like. The face is pretty much finished, maybe some glazes to bring some additional colors in.
C&C Welcome as always.
More as I finish details ^_^.
372
Post by: grey_death
To Man and JD, grey_death wrote:I used a technique called glazing. Basically you take very watered down paint and get just enough in your brush so that it leaves an extremely thin coat of paint on the surface of the mini. This is done by dipping your brush into the watered down paint and using a paper towel to help soak up all of the excess. This keeps it from becoming a wash and gives you control over where your 'glaze' goes.
I worked my way up from a black undercoat/basecoat for the sword using scab red glazes (lots and lots and lots of layers of glaze). The glazes give you a smoother transition than you would get by simply layer painting. With each glaze you want to start slightly further up the sword so the last layer is slightly exposed. Do this until you get a fully scab red tip for your sword.
Next up I used blood red in much the same manner, only more directed to the edges of the sword, as well as the 'hatch' marks along the blade. Again, work your way slowly up to solid blood red.
I then mixed blood red with fiery orange about 50/50 and picked out some edges with a slightly less watered down paint.
Finally I used fiery orange at the very tip and some of the edges to really bring it to life.
Hope that helps x.x...
From earlier in the thread ^_-...
7366
Post by: quietus86
how thid you o the skin transition on the face ave that moddel to and wood like to doe someting like that ( like hell thats evergoing to look that good but oke )
372
Post by: grey_death
quietus - there really isn't much of a 'transition' to be made. The model has clear breaks where the skin stops and the bone begins.
++++++++++++++++++++++++++++
Cassius' progress is slow. Not nearly as much done as I would like. But some progress from the other night.
I would have more done, but work has proven busier than expected as of late. Hopefully I can find some time each night to put an hour or two in to get this guy done soon x.x...
7366
Post by: quietus86
thx haven't realy begun the moddel
372
Post by: grey_death
still a bit to go, but progress has been made ^_^;
2889
Post by: Jin
God I wish I could paint like that. Stupid shaky hands...
Cassius is coming out beautiful.
131
Post by: malfred
HFJor wrote:God I wish I could paint like that. Stupid shaky hands...
Cassius is coming out beautiful.
Just cut off his hands and yours and arrange the swap.
372
Post by: grey_death
I actually have to work my way through a shaky hand sometimes >.>....it's all about bracing your hands and holding your breath a bit. I joked with my wife about how I use marksmanship training in my painting ^_^;...
2889
Post by: Jin
That sounds suspiciously like "making an effort"....I like malfred's idea better
I've been doing that (bracing of hands and holding of breath); it's helped a bit. Granted, on occasion there's a random twitch that makes my models looking a bit like that lady in "Airplane!" who tries to put on make-up as the plane lands.
372
Post by: grey_death
Some progress! I know I have HUGE lapses between updates. I get easily sidetracked o.o...s'why I don't do commission work very often x.x....
Anyways:
He's just about finished. Still some extra detail work to go, possibly some clean up, and then the base needs to be painted. All in all, I hate this model because it's FAR too detailed for such a small figure x.x....It's hard to keep it from feeling cluttered. I think I've done a good attempt with this paint job though.
As always comments and criticism welcome!
BTW, a cookie for those of you who can identify the Hivefleet ^_-...
1963
Post by: Aduro
You... Got a little something on your face there. What? Ooooohhh.... Sorry.
8021
Post by: JD21290
Hive Fleet Tryton?
onl fleet i can think of that uses those colours.
372
Post by: grey_death
JD21290 wrote:Hive Fleet Tryton?
onl fleet i can think of that uses those colours.
The answer lies within the hallowed pages of Dakka!
9092
Post by: Blackbone
Chaplain is fantastic. It really pops. I have made this suggestion to someone else on this model, but I recommend doing up some blue and/or red and purple washes on the skin, especially around his bionics.
- Blackbone
6887
Post by: Greebynog
How do you do your brass/gold on the crozius? I've been looking for a good method for years, and that looks ace.
372
Post by: grey_death
He is finished!
Greebynog - I used boltgun metal heavily washed with gryphonne sepia. It might take a few coats to get the right color, but it does all of the shading and work for you!
6887
Post by: Greebynog
That's genius, I really need to get me some washes it seems. I'm just about to start a dwarf army, so I'm going to be using that a *lot*, cheers!
8021
Post by: JD21290
The answer lies within the hallowed pages of Dakka!
i hate you grey
spent ages wandering through pages of pics, and finally found the closest match on warpshadow (never thought to look there 1st)
and now ill spend longer trying to find the right one :(
372
Post by: grey_death
JD21290 wrote:The answer lies within the hallowed pages of Dakka!
i hate you grey
spent ages wandering through pages of pics, and finally found the closest match on warpshadow (never thought to look there 1st)
and now ill spend longer trying to find the right one :(
Hint: Dakka Articles.....
6745
Post by: Sok
That would be hive fleet Yakface wouldn't it?
I accept cash substitutes for cookies y'no...
372
Post by: grey_death
Sok wins ^_^!
I HAD to taunt the Overlord just a little with the mini.
9395
Post by: CMDante
Top notch job you've done there mate, defo one of the best Cassius paint jobs I've seen. What have you got planned for the base?
Cheers,
Dante
372
Post by: grey_death
I guess I should link to the final product ^_^!
Finished Cassius!
Feel free to comment here or over in the final thread!
9395
Post by: CMDante
Cool, great job mate. Got him bang on!
Cheers,
Dante
372
Post by: grey_death
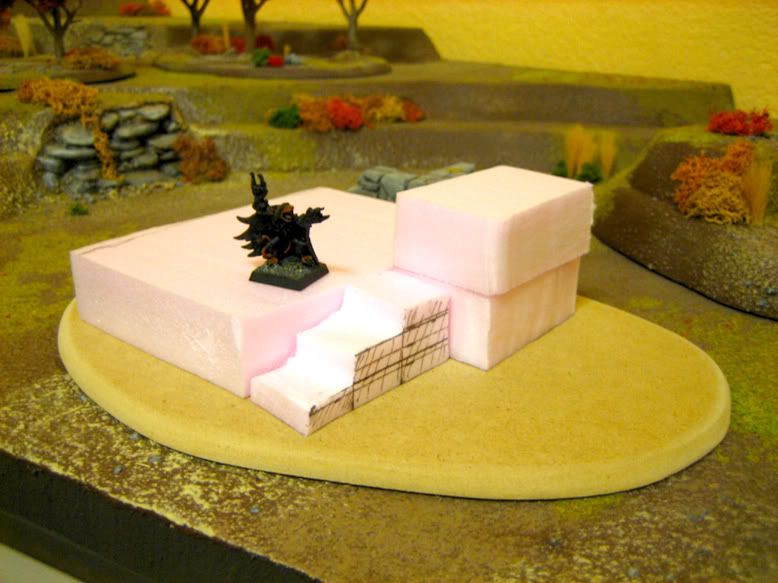
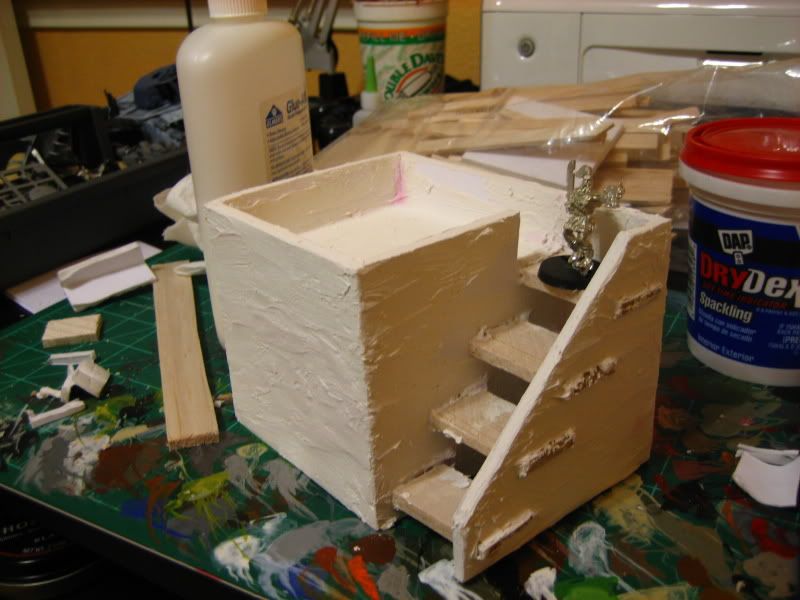
Got the terrain itch today and made this:
99
Post by: insaniak
Yup, that's a building alright
The stairs are perhaps a little odd, with being so widely spaced. I realise that's for practical reasons, to fit models on there, but with a bit of careful positioning, you can actually get stairs reasonably close together while still allowing bases to slide between them.
That, or have every second stair broken
372
Post by: grey_death
I think the next go around that has stairs, I'll definitely put them closer together.
This was a test piece for techniques mainly (hence the super small size). It was originally only 4"x4", I added the extra 2" and stairway after to put some additional problems into the equation.
2889
Post by: Jin
What materials did you use? Balsa strips covered in spackle?
372
Post by: grey_death
HFJor wrote:What materials did you use? Balsa strips covered in spackle?
The building itself was made of foam core posterboard. The stairs are made of balsa wood.
2263
Post by: ZamboniKnight
insaniak wrote:The stairs are perhaps a little odd, with being so widely spaced. I realise that's for practical reasons, to fit models on there, but with a bit of careful positioning, you can actually get stairs reasonably close together while still allowing bases to slide between them.
There's no baby steps in grey_death's world... Go big or go home
Looks good, will you be more similar buildings?
111
Post by: stormtitan
You can talk to Flying Tricycle to get buildings nearly identical to that...literally...
http://s346.photobucket.com/albums/p420/mearleycf/CAGO-Ween%202008/
111
Post by: stormtitan
Very cool blog by the way. I love your work.
372
Post by: grey_death
All done for now.
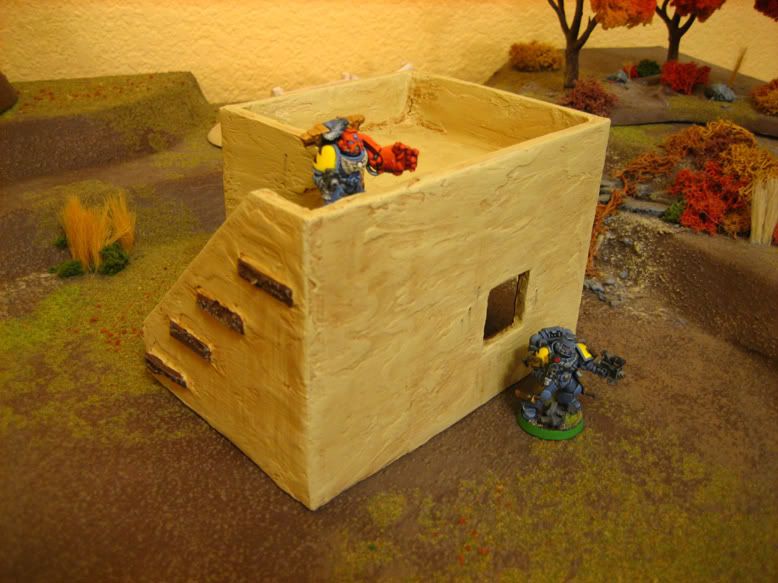
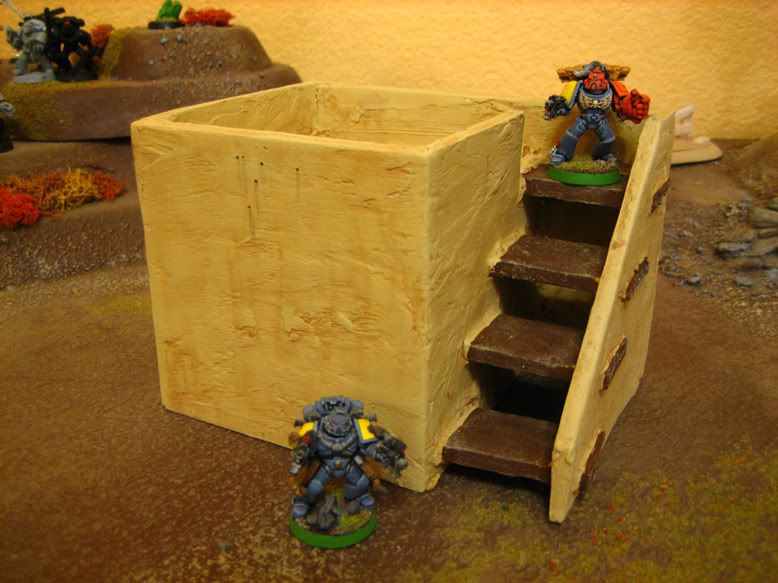
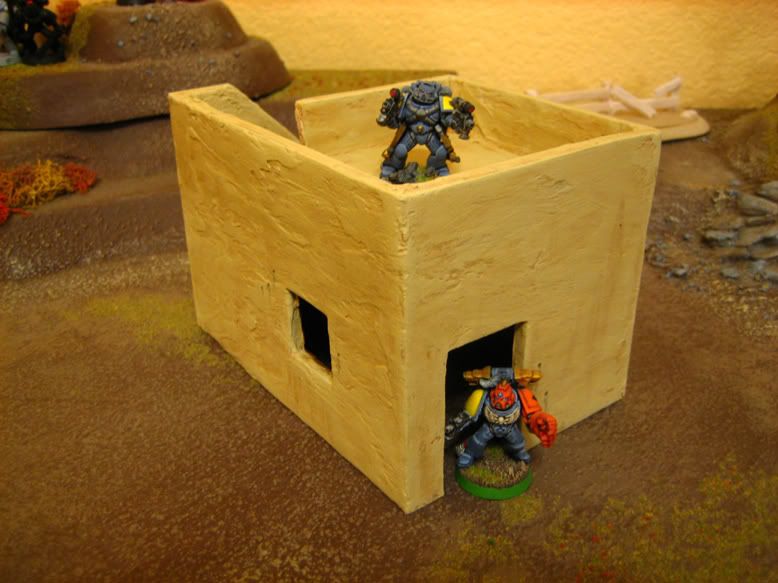
I'm pretty pleased with how simple the building was to construct. Doing up a small village of these would take no time at all, and I'm half inclined to make that happen. A few bigger, a few smaller, and bam! Instant village. Varying complexity would of course be par the course.
I've left it bare because I wanted it to be viable for multiple games (not that I play multiple games, but you never know!).
Nice, quick, fun, and not too shabby looking if I say so myself!
As for buying stuff, I have too much free time and too many materials on hand to buy terrain ^_^.
7743
Post by: Chrysaor686
Grey Death, I just have to say that this thread is a great inspiration. I thought I had a huge problem with my inability to focus on just one Warhammer Army. Somehow you find the time to pull off all of this stuff. It's greatly humbling.
I need to start work on something now.
372
Post by: grey_death
Back with some more terrain pieces!
These are just some modular ruined wall sections I made from scrap foamcore I had laying about. Quick and easy.
1
6005
Post by: Death By Monkeys
Heh. It looks like a Space Marine lasertag arena.
2263
Post by: ZamboniKnight
These buildings remind me of the ones they used to feature in WD. Y'know... before they decided to go absolutely NUTS and started adding all kinds of absurd details to them.
10254
Post by: Golden Eyed Scout
All your stuff is looking good. You make me want to paint better, but im to lazy to do that.
8452
Post by: sphynx
yay custard buildings!
3468
Post by: Xanthos
I was thinking the same thing, these totally look like the old school stuff that used to be in WD. I seem to remember a ton of them in Ork settlements, and things like that.
Nice stuff Grey_Death.
10681
Post by: barttie217
Hello grey_death
i got a question about your tau,
but i cant upload pictures.
you show a picture with a fire warrior which was painted shadow grey or something like that,
the ones who were finished were white, did you used shadow grey as the shadow of the white colour?
372
Post by: grey_death
barttie, the white tau I painted (WAYYY back in the day) were done with codex grey as a base of shading.
++++++++++++++++++++++++++++++++++
Hopefully this will be completed tomorrow sometime.
In progress:
2
6633
Post by: smiling Assassin
Wow, nice.
<3 Ruins.
~sA
372
Post by: grey_death
Well, that was quick! ^_^ The ruins for the shop are finished! A lot faster when you've worked all of the colors and everything out before hand ^_^;;.
Overall I'm very pleased. It's a very functional and nice looking piece. Hope to do a few more to get the ball rolling with Mordheim at the store ^_^.
C&C welcome as always!
3
3144
Post by: SonofGuilliman
That's a nice looking ruined building. I look forward to seeing more of these (and some SoM ).
SoG
3468
Post by: Xanthos
Woo, that´s a damn nice building Grey_Death!
Loving the fact that it´s tall enough to really provide a view, while the fact that it´s open in the back makes sure it doesn´t become too uber.
Excellent paint scheme too.
10694
Post by: jamunition
i love the back pic
glad that people still like Mordheim
372
Post by: grey_death
Alrighty, new building is in the works.
Note: I didn't build this one. I'm just painting it for the store ^_^. A local, El Gordo (webhandle ^_-) built this one, and I'm painting it to help it along.
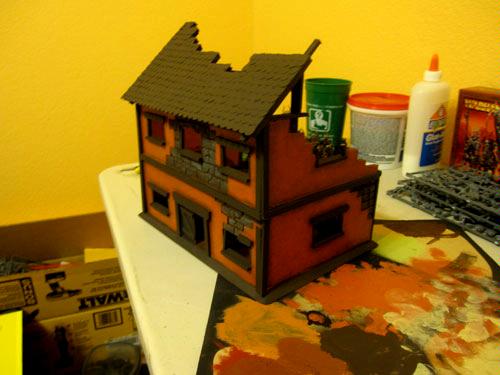
More as I finish painting ^_^.
Expect another GD_Creation after I get this one out the door. Might even poll you all to see what to work on next.
4786
Post by: legoburner
grey_death wrote:Might even poll you all to see what to work on next.
Skaven Brothel! Skaven Brothel! Skaven Brothel!
3468
Post by: Xanthos
Seconded!
Good job so far on this one. What are these buildings made from by the way, are they premade, scratch built or in between?
372
Post by: grey_death
All things will be taken into consideration ^_-......
As for what they are made of, it's all scratch built from foamcore and balsa wood. The bases are made from MDF.
3468
Post by: Xanthos
In that case, color me impressed! They look so good I was thinking this had to be premade or something. Excellent work Grey Death.
4657
Post by: Metsuri
Good looking ruins, and they seem to have the correct combination of looks and playability too. It's too easy to get carried away in adding rubble and details to the ruins and turn them hard to play with.
Can't wait what's appearing next to your ruined city.
7632
Post by: Ghost in the Darkness
I really like all your stuff. Keep up the good work.
372
Post by: grey_death
New building is finished. I just wanted to get this one out the door in a relatively fast manner, so it's not super detailed but very playable ^_^.
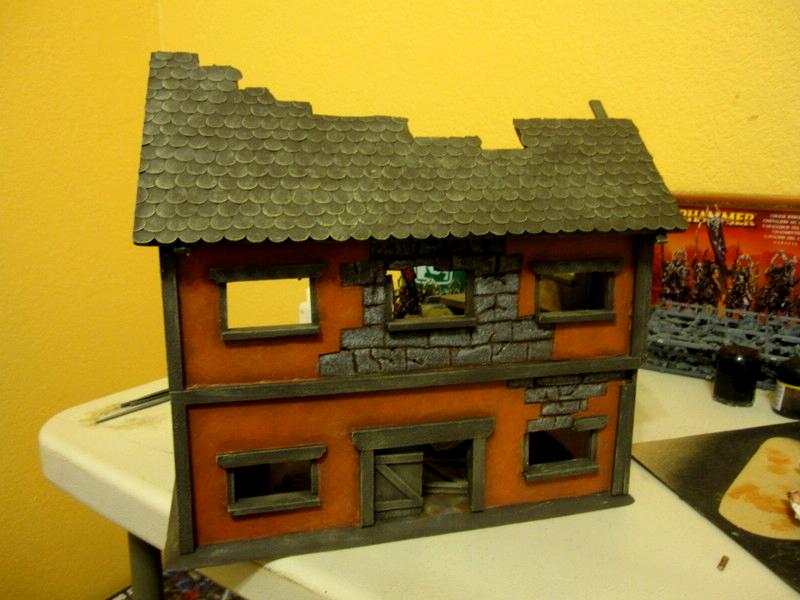
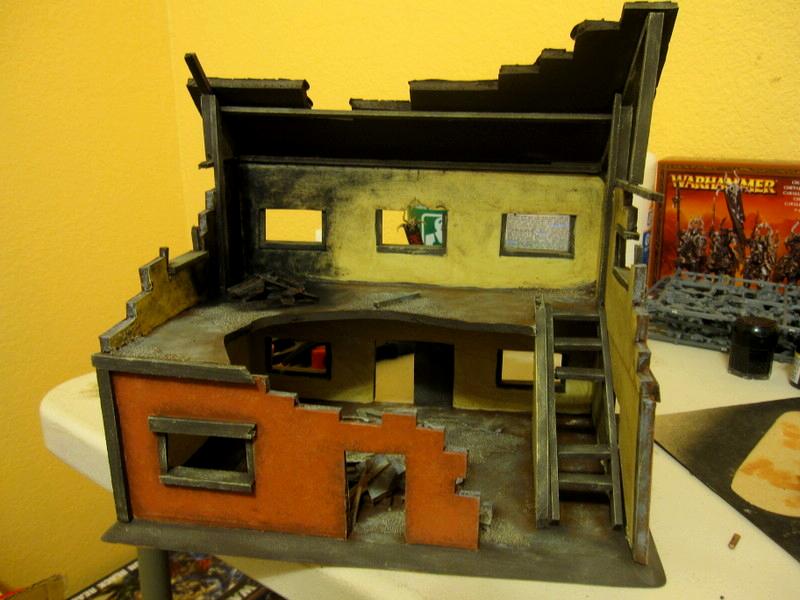
Hope to do another soon ^_^!
3468
Post by: Xanthos
Excellent stuff there G_D. As you say, highly playable. And custom terrain like that really makes a difference in games like Mordheim and Necromunda.
The fact that there are so few models on the field automatically transfers part of the focus to the terrain. And these buildings can take the attention no problem.
Will keep eyes peeled for what you do next.
372
Post by: grey_death
Hola! Welcome to yet another random model project.
+++Project Telion+++
This one is for the same person I did Chaplain Cassius for. I've been all about helping him get his character models painted up and on the battlefield. And this time around, he really needs this guy x.x...With scouts being miserable excuses compared to what they used to be (at least in my eyes, I'm sure someone out there actually still likes them!), Telion is a much needed boost to the scout squad!
I'm pretty much painting him directly codex colors. Nothing fancy, just copy and paste of the colors, with a little bit of added depth and detailing (but when have you seen a project of mine skimp on that anyways?).
I've got some work done on him. Still a little bit to go yet, but I thought I would share my progress:
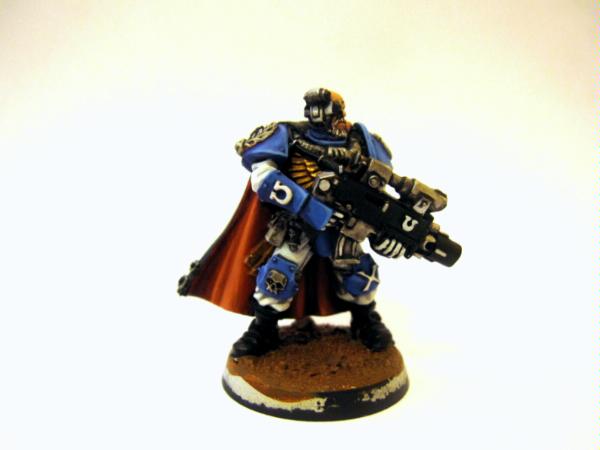
More as I finish more. C&C Welcome as always.
8551
Post by: captain.gordino
Looks swell.
11123
Post by: wiggles
Your work is great. You're quite prolific in between pulling cats out of trees and saving lives aren't you?
I have a question for you. If I was painting models like those white Tau, I don't think I would be neat enough to leave the armour recesses black, so how could I get the contrast you get? Blacklining those tiny cracks in armour also seems impossible to me, and washes would darken the white so I'd have to start all over again. What do you do?
This is why I abandonned my white space marines.
9395
Post by: CMDante
Great job on Telion mate, could we get some pics of the face?
The armour and inner cape look top notch.
Cheers,
Dante
9813
Post by: LBursley
+++Project Telion+++
Awesome dude! Like CMD said the armor looks fantastic and your red on the cloak inner lining is flawless in its high contrast state. Just wow man.
9504
Post by: sonofruss
Watch that middle step its a doosie.
Not to steal the thead but fine line pens can line between armor plates wiggles
372
Post by: grey_death
Hey all, Thanks for the comments as always.
Wiggles, I try ^_-. As for the blacklining, you can find Micron pens with VERY fine points that work nicely for doing armor plates. I personally just dodge the armor joins, but realgenius has a write up on The Painting Corps you can find here with more info.
CMD, I've taken an extra pic just for you. The face is also still WIP, needs a bit more contrast and color still. But it's a good base to work on so far.
11018
Post by: V0ldem0r7
Great work as always. One question: where are you going with the base? What's it going to be like?
10345
Post by: LunaHound
wiggles wrote:Your work is great. You're quite prolific in between pulling cats out of trees and saving lives aren't you?
I have a question for you. If I was painting models like those white Tau, I don't think I would be neat enough to leave the armour recesses black, so how could I get the contrast you get? Blacklining those tiny cracks in armour also seems impossible to me, and washes would darken the white so I'd have to start all over again. What do you do?
This is why I abandonned my white space marines.
http://www.sakuraofamerica.com/Pen-Archival .
available in most arty supply , office supply places. makes your white tau a breeze to paint.
9813
Post by: LBursley
Grey I think the face is perfect as is IMO. Very realistic.
10942
Post by: !?
Yea, there's nothing wrong with it. It's done.
11123
Post by: wiggles
Thanks for the advice grey_death and lunahound. I'll have a look for those.
11018
Post by: V0ldem0r7
I agree with LB and !?, the face is done. How did you paint it?
11038
Post by: G. Whitenbeard
Great work! keep the pics coming
372
Post by: grey_death
The face definitely isn't finished just yet ^_-, But thank you for the kind words!
As for painting it, I'm not 100% on what colors from my vallejo set I used, but it was a dark brown worked up with a lighter brown, then dwarf flesh was applied and a highlight of dwarf flesh/bleached bone.
372
Post by: grey_death
New building in the works:
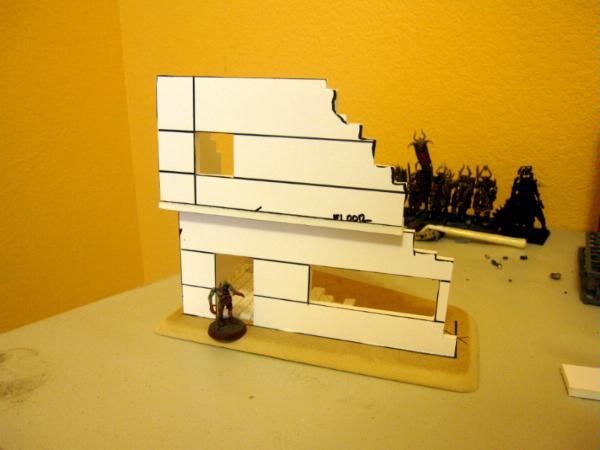
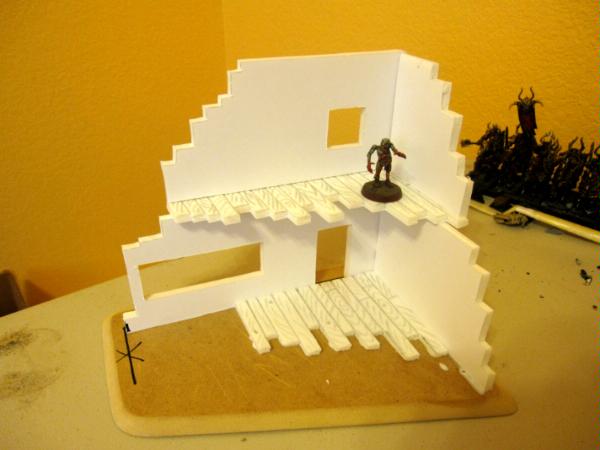
More foamcore work will happen when this set dries. I'll be peeling back some of the walls and doing stonework on the foam. Then it's the usual balsa work, with a light spackle in between for texture. A small bit of roof overhanging just for that added detail element as well. Nice easy piece this one is turning out to be.
9388
Post by: Stretch
Work looks great as always. How do you do your black highlights? ie: on the bolter, mine always look silly.
5644
Post by: P4NC4K3
Telion's face is fantastic! On a side note, those modular wall sections on page 8, I do something similar with bits of scrap wood I 'borrow' from woodwork lessons at school!
372
Post by: grey_death
Got bored tonight ^_^:
8551
Post by: captain.gordino
What is that?
3144
Post by: SonofGuilliman
Space, the final frontier.
The board looks pretty good. All it needs now are some planets.
SoG
4786
Post by: legoburner
I can see playing 40k on that new board...
'ok, my leman russ shoots it battlecannon, unfortunately due to gravity it scatters 300D6" behind the unit. The leman russ is then propelled 80" backwards per turn thanks to the lack of gravity and air resistance.'
2889
Post by: Jin
How the heck are you getting such clean cuts on the foam-core? Even with a nice sharp knife I'm having difficulty not mucking up the foam (maybe the foamcore I have just sucks...).
10694
Post by: jamunition
Tellions face is... im lost for words(good)
372
Post by: grey_death
My local shop ran a Speed Painting competition on Jan 31st. Here's my entry:
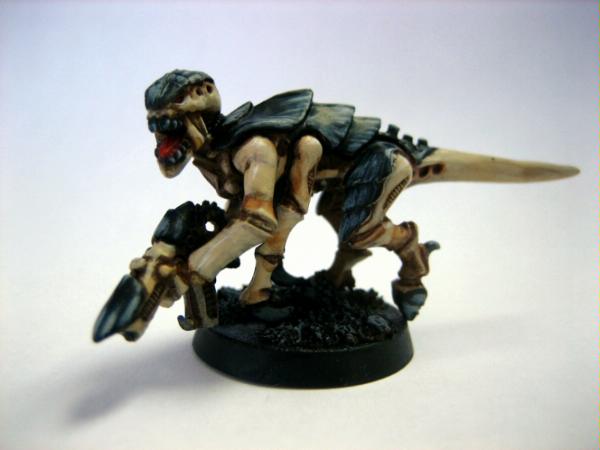
I ended up winning it in the end after one hell of an hour of painting. And for my efforts got a $15 gift certificate for the shop. Which helped pay for my Sterguard unit for my Sons of Medusa! Can't wait to get them together ^_-...
4657
Post by: Metsuri
Thats pretty good looking gaunt, you've managed to get decent looking bone in such a short time.
Now get those sternguard on the web for us.
372
Post by: grey_death
Coming along slowly. But at least there is some progress!
131
Post by: malfred
Answer the question: how do you get clean cuts on foam core?
Do you just replace blades constantly, use a metal edge and make multiple cuts? Or
do you have a secret?
372
Post by: grey_death
Heh, my bad, I totally missed that one x.x...
You have to do multiple cuts with a clean (see: new/newer) blade. First cut the top card layer then cut the foam in many light cuts and finally cut through the card on the other side, and TADA! Clean foamcore cuts ^_-.
131
Post by: malfred
grey_death wrote:Heh, my bad, I totally missed that one x.x...
You have to do multiple cuts with a clean (see: new/newer) blade. First cut the top card layer then cut the foam in many light cuts and finally cut through the card on the other side, and TADA! Clean foamcore cuts ^_-.
Ah. So the secret is patience, effort and new blades.
372
Post by: grey_death
Finally got some more work done on the neew building:
Paint to come soon!
372
Post by: grey_death
Finished!
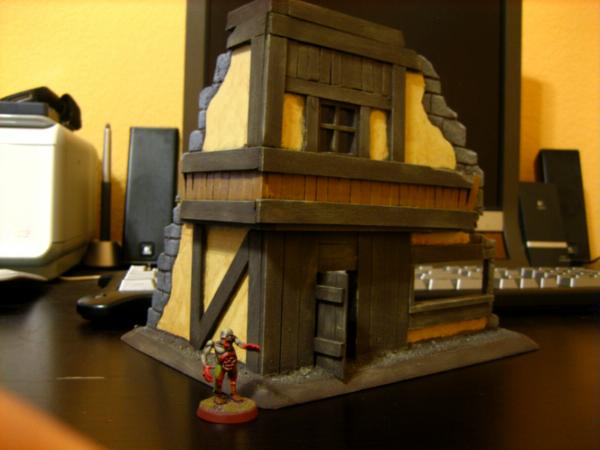
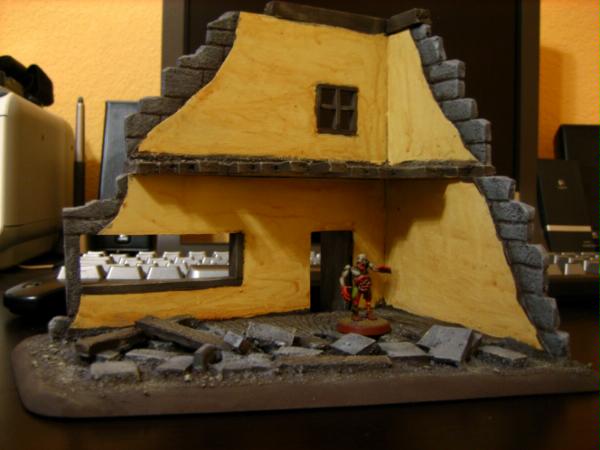
131
Post by: malfred
Very cool building. Again, you cut very straight, a skill I most definitely lack (file
under: attention to detail)
5647
Post by: D3str0y3r
it would appear the zombies 'keen' sence of direction has only led him to SOME FREAKIN' AWESOME ARCHITECTURE!!! looks great as always
regards,
-Jason
372
Post by: grey_death
Finished.
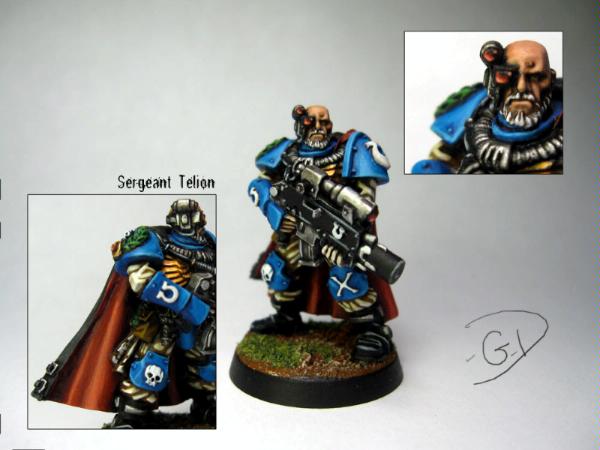
Apparently Sicarius and Chronos are on the menu as well >.>...
Building my portfolio I guess! I'm considering taking on more commission work in the future. We'll see how that pans out.
C&C welcome as always.
9154
Post by: littlewood93
The building looks great and sergeant telion looks absolutley brilliant.
11038
Post by: G. Whitenbeard
Absolutely stunning work, especially on the building!
6292
Post by: Valhallan42nd
Where's his eye?
(I realize he's not finished yet, but it's the only fault I could find. I'm incredibly jealous.)
372
Post by: grey_death
Actually he is finished. But the image of a grizzled vet who's eyes you can't make out from the squint, ala clint, I felt really played well.
So style choice here. But one I stand by.
6292
Post by: Valhallan42nd
Eye or no eye, your execution is astounding. ++
372
Post by: grey_death
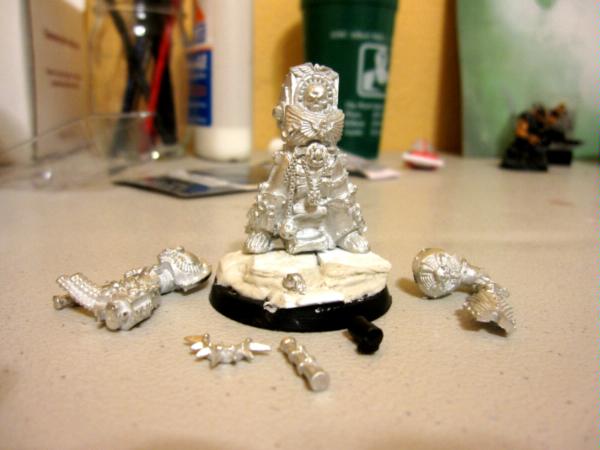
New project for a painting contest at the local store. I've got like a month or two for this guy, so I'm trying a few new things out.
4936
Post by: VermGho5t
Is he going to be a member of your SoM force you've been building up GD?
10942
Post by: !?
Eeek! Your Telion kicks butt!
372
Post by: grey_death
VermGho5t wrote:Is he going to be a member of your SoM force you've been building up GD?
He could be, but most likely will not be. He's just a one off that I am actually considering selling off once he's finished. A test of the waters if you will.
I'll also be trying to keep up with how I paint him more for an article to be posted on The Painting Corps. Those who follow my blogs however will be privy to much of the info as I finish it!
But really it's all about the local painting contest, and painting this guy to a standard that will win ^_-.
12166
Post by: Crisis_Saint
grey_death i admire your painting skills (godly). I have just started a tau army and i was wondering how you get that smoothness on your models paint schemes?
372
Post by: grey_death
Crisis_Saint, Thank you for the compliment. Smoothness mostly comes from keeping your paint thinned and using multiple thin layers for each color to build up to a nice opaque finish. Using water or actual thinner medium mixed into your paint on a palette is a good place to start.
++++++++++++++++++++++++
Some progress on the Chaplain:
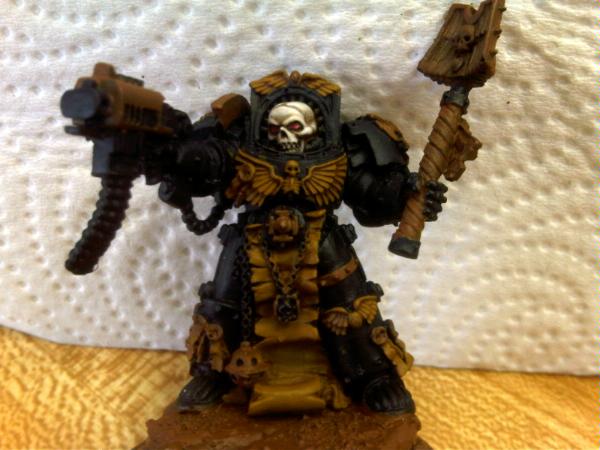
The head is finished, but that's it. I've gotten some more work since this photo done, but just more of the bone color. Nothing super exciting, and my ambient light faded on me when the sun went down.
C&C welcome as always, and more photos will be inbound as I finish more on the model!
11310
Post by: Shortbus
Gorgeous!
Thanks for sharing.
|
|