And here I was, as happy as a clam because I'd built a turning turret. Turning, meh!
Sponsons project looks ace in itself, not to mention the rest of the tank
As for the build, I think, considering the scale under discussion, maybe an outer cilinder, turnable for horizontal movement, with an inner sphere inserted inside for the vertical swivel?
(The double cilinder concept, though more realistic, would be far more complex, and probably larger, the inside tube should be smaller in diam than the outer one to fit, and rounded at both ends to fit on the inner wall to allow for the vertical motion).
Or a single ball joint, for free movement on both axis on one step.
Just my two cents anyway, your magnificent build, your call.
It's proving a challenge at the moment (I'm up to plan C so far).
The main problem I'm seeing (other than cutting curved holes in a curved surface; for which I may move on to finding a suitable drill bit), is that I'm trying to fit a large, multi-barrelled weapon into a situation designed for relatively small arms...
This means a hole in a cylinder in a hole in another cylinder is approaching the size of the cylinder.
Got a few more things to try and then I may move on to mounting methods that better fit the size of the gun.
Dr H wrote: Is it the flatness of that piece that causes the problem, or the gap under that?
The gap is no higher than the raised hatch area in front of it.
If I was to carve away the upper part of that piece of sprue to make it angled, but left the gap under it, would that solve the issue?
Or does it really need to reach all the way down to the hull?
While we're on the subject, I've always wondered about the angled underside of turrets, they always look like they'll focus any shells into the ring. Surely that's not good for keeping a turret that can rotate...
For all shots that dont come straight at it is more likely to deflect. Also the angled shot will force down into the hull, away from the internal motors of the turret.
Angled slopes to armor does actually make it deflect at 90degrees away from the sloped surface, so yeah, like Comrade said, it would hit the deck armor after being bounced off the turret slope, still risky, but hey, no one likes their turret jammed and have to swivel the tank to aim the main guns!
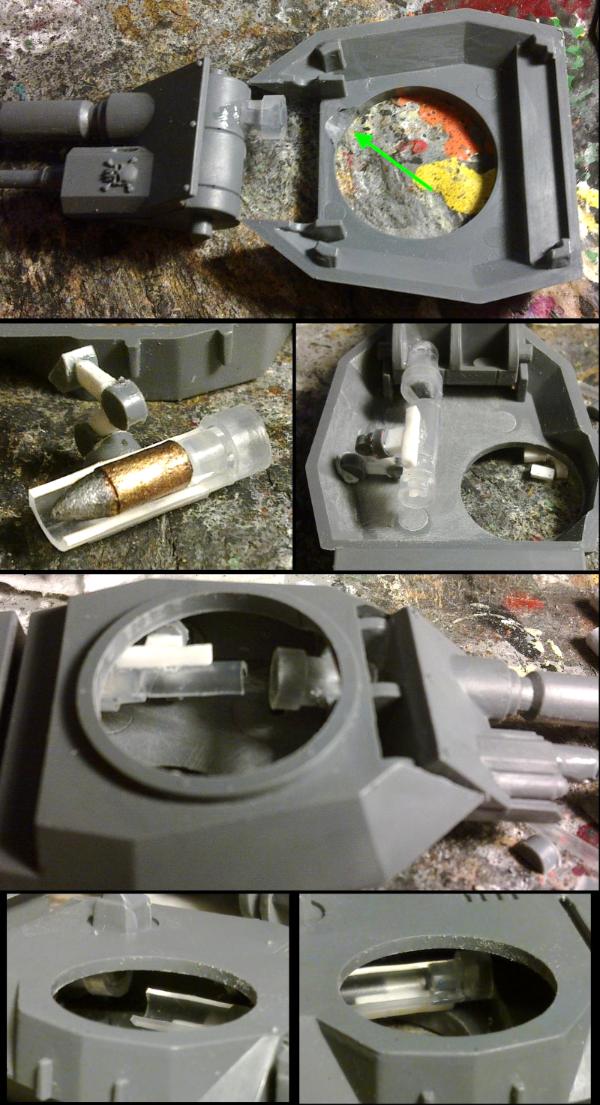
I've kept thinking about the sponson mount and the double axis problem, mind if I toss my hat into the ring?
Spoiler:
I held to the idea of the sphere and cylinder combined build over the double cylinder, mainly because the ball would allow for a smaller outer body.
And gave it a shot.
a) 2,5 cm long, 16 mm Ø PVC pipe, just under 14 mm inner diameter.
b) Drilled and cut 6 mm wide, 15 mm tall window, and perpendicular to that, opposing openings for the axle.
c) Inner joint, 13+ mm Ø sphere. Not exactly matching the inside space of the pipe, but fitting enough.
Axle hole already bored (Formerly, from a broken fantasy jewlery piece), flat grinded one face up to 1/4 of the diameter, parallel to the axle shaft, and drilled a pinning hole.
d) Ball mounted inside the outer cylinder, with metal rod traversing axle. Flat face facing the front opening.
e) As the sphere is smaller than the pipe, there's not enough friction to hold the mounted gun in position, so added a simplified styrene friction brake (ChezThe_Blackadder. His, of course, are highly evolved)
f) Mounted the outer cylinder in the holding rings (Top ring is just dry fitted for looks, bottom one temporally fixed to a provisional base for functionality check). In use, both rings would be fixed to the roof and base of the sponson.
Added a (test only) IG sentinel plasma canon, grin-thinned to allow for larger motion angle (A flatter gun - round-barrelled, for example - would fit better), and pinned for addional strengh.
g) & h) Vertical traverse.
As for drilling on curved surfaces, a basic jig might be of help:
Spoiler:
Two angled rods, nailed opposing each other on a wood sacrificial board.
To drill, just lay the tube/pipe on the cradle formed by the angled faces (Pictured on a bench drill press, but usable with a hand held drill as well).
For drilling spheres, drill/route a shallow concavity on the wood board, enough to settle the ball into; using a bit of the same diameter, aprox half a radius deep. If using a hand held drill, I'd suggest hot gluing the piece to the board to hold it in place.
shasolenzabi wrote:Tha flatness, plus that notch under is the danger. best to be sloped all the way to the deck
Aye aye, Cap'n. To be honest, I was being a little lazy just sticking a bit of sprue on. Thanks.
cormadepanda wrote:For all shots that dont come straight at it is more likely to deflect. Also the angled shot will force down into the hull, away from the internal motors of the turret.
shasolenzabi wrote:Angled slopes to armor does actually make it deflect at 90degrees away from the sloped surface, so yeah, like Comrade said, it would hit the deck armor after being bounced off the turret slope, still risky, but hey, no one likes their turret jammed and have to swivel the tank to aim the main guns!
Cool. Understood. Ta.
dsteingass wrote:I'm shedding a tear of joy at seeing the absolutely wonderful geekery of your scale elevation drawings of your weapon systems
Glad to have brought you a little bit of happiness. I do do sketches for a lot of my modelling ideas, but they are usually very rough and not made for sharing. This one, however, I needed to do to actual scale (it's actually drawn double size) to get a feeling of the sizes I could get away with.
hk1x1 wrote:I love the attention to detail you've lavished on the interior, and the concept itself is great, very original,
looking forward to seeing more .
Thanks hk.
Littletower wrote:I've kept thinking about the sponson mount and the double axis problem, mind if I toss my hat into the ring?
Not at all, LT. All ideas are welcome and holy cow, top marks for effort. Not just suggesting an idea, but actually doing it. Much appreciated.
Not had a chance to do much myself yet, but I'll be back. Thanks again dudes.
And that is why I listen to you. My modelling history involves many models, most of them aircraft and zero tanks. This is my first "proper" tank.
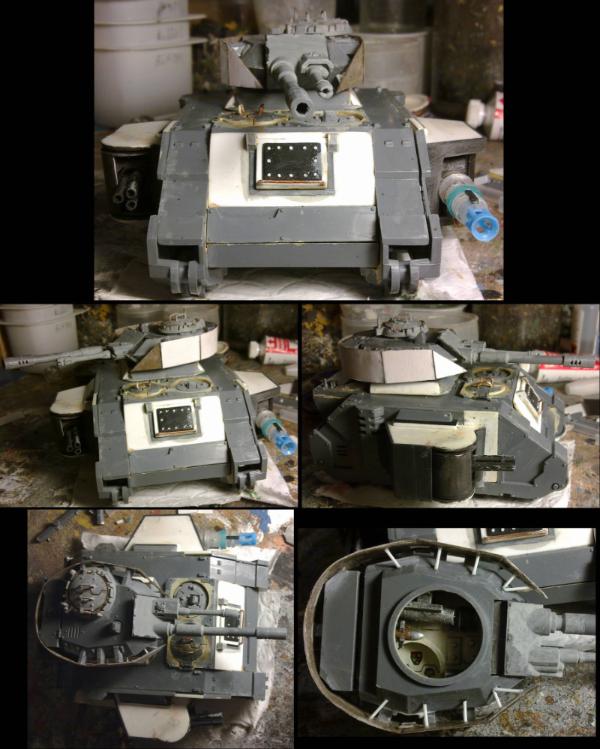
Here's a quick shot of the new front:
The corners will be filled in when I come to the putty-ing.
As far as the sponson is concerned;
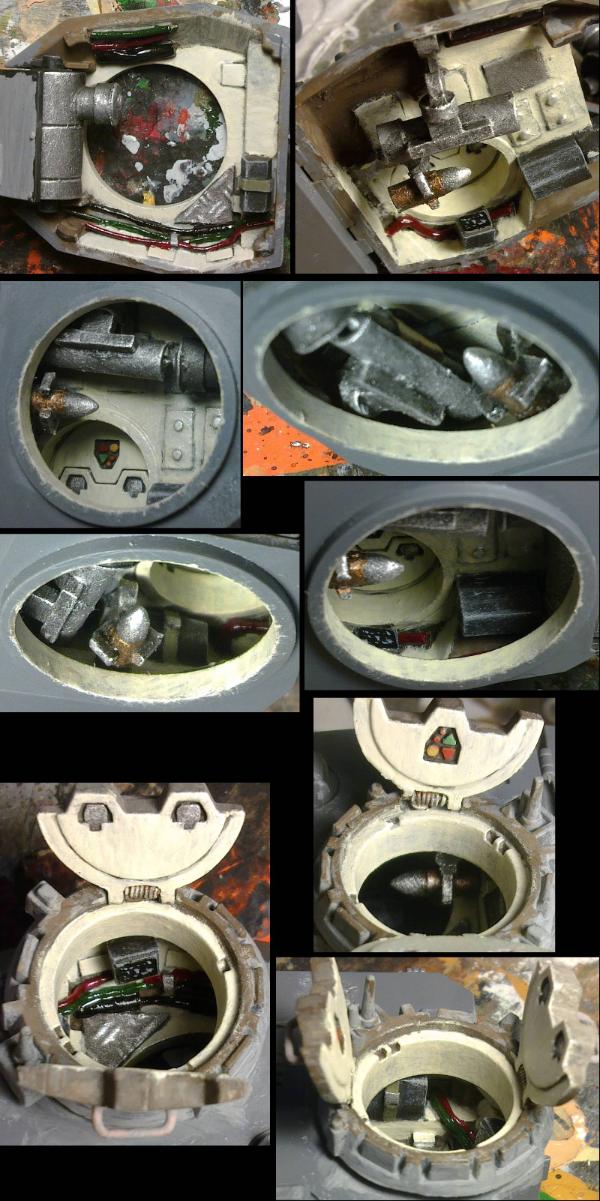
I know I'm just making things all the more difficult, but I am going to be constructing the inside of the sponson to a certain degree. Why would I do such a thing? because I removed the doors so I could see into the sponsons...
This involves the rear of the gun (basically an ammo drum) and some flooring and wires. I won't get too carried away as it's not going to be very visible.
It has added a whole level of complexity to the build, and I'm on to plan F now (I think.. I've lost track). but it is coming together.
How it will look when it has come together is yet to be seen. A couple of additions, let the glue dry and I'll share it with you here...
'til then...
There is nothing a little sprue, a sharp exacto knife an a lot of cussing can't fix . I like the land raider mark IIB turrets, only problem is they not have the 180 degree firing arc.
Camkierhi wrote:Kudos for making it hard on yourself, really complex, but go for it, I know you can do it.
Thanks for the faith.
Theophony wrote:There is nothing a little sprue, a sharp exacto knife an a lot of cussing can't fix . I like the land raider mark IIB turrets, only problem is they not have the 180 degree firing arc.
Yep.
and I'm aware that these won't be firing backwards like the normal Predator sponsons. I had planned to fit rear-facing machine guns to each sponson to account for this, but there really isn't going to be room. I may add a co-axial MG to the turret for anti-infantry to the rear (why not make the turret even more complex to build anyway...)
shasolenzabi wrote:There ya go, and looking forwards to seeing the end results!
Here you go then...
Before I show you what I've ended up with, I'll run you through the trials and tribulations that led to it:
Now you all saw the picture I was trying to replicate, and I received many good suggestions for producing the outward appearance of something similar. But me being me had already decided that the sponson would be visible from the inside when I removed the doors early in the build.
This meant that I didn't think I should do a sealed back to the gun...
This, in turn, meant that the cylinders that I wanted to fit the gun into had to have holes in the front AND back, and these had to line up perfectly for the gun the fit all the way through. This is difficult to achieve.
Also, in my current recycling (not spending when I can use available, free, materials) phase, I chose to use tubes that are the housing for soap pump dispensers as I have plenty and they are roughly the right size.
This however, led to two issues:
1) the smallest, when cut to a length that was wide enough for a hole for the gun to fit through, was too wide to fit into the largest tube to create the two-axis gun mount. However, I have a lipstick cover that is wide enough. 2) The material that the small tube (soap pump) is made from is not good for drilling. So that didn't turn out well. I did manage to salvage enough of it to be useful (see below).
The outer cylinder, while it would have been nice to have an oval hole, and maybe I could have made one (the lipstick cover being made of a better material), I decided to have straight sides and hide the top and bottom with the sponson housing, so I didn't need to worry about getting more curves right. I did, however, have to cut it straight and (thankfully) managed that without issue.
But how to mount the vertical axis inside this...
I noticed that in the reference picture, the inside of the large cylinder there are straight walls that the internal cylinder sits up against. So I added flat plates of plasticard inside the remaining semi-circles of the outer cylinder.
Much, dry-fitting and carving and sanding and I managed to get the gun sitting between the two sides. Then I drilled the holes for the axis bar (paperclip) through each flat wall and through the gun (which I didn't get straight on the first attempt ).
I then used the remnants of the small cylinder to glue on the top and bottom of the gun so that it "looks" like the gun passes through the cylinder.
So, in short, if you are considering making a mount like this:
use easily workable plastic,
use a thin weapon,
Just stick the front of the weapon on the cylinder (or do like Shas or LT said),
Or, just use the sponsons that you can buy and therefore don't have to worry about cutting holes in curved surfaces and making things fit in things that have to fit in something else...
This is not glued together completely yet, as I will paint the (rather messy) inside of the small "cylinder" black, while it is accessible. It will look slightly neater on the outside once the outer surfaces are glued up to the edges of the card circles. The top and bottom will be hidden inside the sponson armour and there won't be such a large gap around the gun.
It's probably not worth all this effort just to fit an ammo' box to the back, but done now.
What do we think?
It's as small as I could make it for this style. It can be made shorter though (another reason it's not all glued together).
ammo on the back makes me wonder how this will affect the swiveling?
I will mount it next to the door so that it swivels into the doorway (this will also minimise how far the whole sponson sticks out). It's only going to go 90deg.
The added benefit of this sponson ending up further back on the tank is that there should be more room for tank-art in front of it on that nice flat area I created.
I'm also considering the other sponson not being a mirror image of this one and making the tank slightly asymmetric (it will be anyway with the differing weapons). Will see when I get there...
I really liked your new piece of fluff... this stirred one question in me tho... will we ...after this recent on going mega project of a tank in the making...see the true doc? will you make one future day the chaotic presence in metal and plastic for good?... would love to see how you picture the mad doc himself...
as for the tank as it is... amazing... all that wiring will make you probably insane...but I guess this will only provide us with more of such eye candy stuff^^
at first I was overwhelmed by the ork, but he comes at an unfair second place when it comes to pure deviously reposed models when we look no further than the bug... man... you really outdone yourself... his workplace and the pose of that nid is so stunningly matched at both ends...wonderful work!
Viktor von Domm wrote: I really liked your new piece of fluff... this stirred one question in me tho... will we ...after this recent on going mega project of a tank in the making...see the true doc? will you make one future day the chaotic presence in metal and plastic for good?... would love to see how you picture the mad doc himself...
Thanks. I'm glad people enjoy my (often silly) fluff. I do intend to make The Scientist at some point. He has been described in some of my fluff, and I see him as a kind of from the Doc Brown mould of mad scientist, Y'know...
Spoiler:
...That one. Wild, unprofessional look, always carrying an array of useful things, total conviction in his ideas and yet a genius that does actually know what he's talking about... even if others don't understand him...
However, I really want him to be a perfect model and, unless I find the perfect base model, I'm going to have to sculpt him and I'm not as good as sculpting as I want to be to attempt that yet.
So, at the moment, he will remain an enigma...
as for the tank as it is... amazing... all that wiring will make you probably insane...but I guess this will only provide us with more of such eye candy stuff^^
Thanks. Yeah, I keep doing this to myself with my models. Coming from a background of paint-before-assembly, you'd have thought I would be more sensible with my own. But with the modifications I find myself doing, I can't paint things before I know where they go (or even what they will be) and can see the whole model and judge what to make stand out and what to blend in.
It should be fine. I have given thought, as I've added things, to how I will get in to paint them. So, unless I've done something silly with the layout, all will be ok to paint.
at first I was overwhelmed by the ork, but he comes at an unfair second place when it comes to pure deviously reposed models when we look no further than the bug... man... you really outdone yourself... his workplace and the pose of that nid is so stunningly matched at both ends...wonderful work!
wow...leaves me breathless...
Thanks. I'm glad he works so well. The modifications were quite simple really (lots of minor changes to the tail, one small arm, one main arm, the waist and the neck and one major change to one leg). The good thing with 'nids is that they have very distinct joins at all their joints that go all the way round, making it easy to cut and re-pose.
Actually, I think of all the races, the Tyranids get the least "characterful" poses, compared to how much potential there is. The options you're presented with are aggressive or aggressive. Whereas the other races get things like, heroic, commanding, aggressive, thoughtful, humorous, etc...
But getting that thoughtful, intelligent, look to a 'nid is not that hard, even without major chopping.
Automatically Appended Next Post: Oh yeah. I also added some black to the gun and here's some pictures of where it will roughly sit next to the tank. Imagine it boxed in.
It's quite big... but... should be ok... I think...
Hey doc how about making some pivoting arms that come out of the side of the tank to hold the turret. That way they could extend a little more which would allow it to get the full 180? I know your not to worried about it, but it would be more contraptions on the frame that would disguise it as less than STC.
Theophony wrote: Hey doc how about making some pivoting arms that come out of the side of the tank to hold the turret. That way they could extend a little more which would allow it to get the full 180? I know your not to worried about it, but it would be more contraptions on the frame that would disguise it as less than STC.
It's a thought (I'll add it to the list...). I'll see how this turns out and if it ends up ugly and ungainly then I'll try alternatives...
Actually, Shas, I need to add something like that to my list of things to do, and I have two immediate ideas for it...
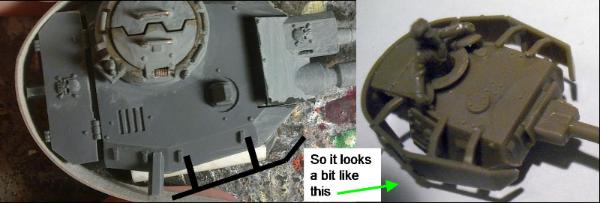
Plan F, above has hit a problem. You can actually see it in the top image of the picture I posted above.
While the ammo' box can rotate through the door, miss the frame and allow the gun to reach 90deg... With the gun straight ahead, it stretches so far back that building a box to surround it, with angled sides, means it's going to cover the exhaust to the rear.
So, plan G:
Dismantle the gun mount.
Remove the ammo' box and rear of the gun.
Make a whole new gun mount and build the inside of the sponson separately.
I have taken this opportunity to shorten the height of the main cylinder too.
Most of my own sponsons you never see the back of the gun. I just have the guns coming off the cylinder that allows the swivel to happen. the idea is you will not see the ammo feed anyway, just assume a belt feed or other method. I would put a wall inside the tank and not worry about showing inside the sponson from the guts of the tank. Make it a separate attached system self contained and ammo supplied separately at base.
and not worry about showing inside the sponson from the guts of the tank
So this is how the sponson is shaping up now.
Without the back of the gun I can position is further forward, closer to the tank hull and it is a more solid (dyslexia fail ) structure.
You can also see the possible footprint shape for the whole sponson.
Thoughts?
I like it, only suggestion I can come up with is make a hatch cover on the main cylinder near the back so Klawsy can clear jams! It adds detail that isn't there. If you know what I mean.
Camkierhi wrote: I like it, only suggestion I can come up with is make a hatch cover on the main cylinder near the back so Klawsy can clear jams! It adds detail that isn't there. If you know what I mean.
Thanks. Yes, it will look like there is access and a way for the ammo' to get in from the inside, I have a plan.
I've been watching this daily for what seems like an age now! ....Ah.... the memories! and now i gotta chime in and just reiterate how great it's all working together! :-) looks suitably bada$$ and the sponsons are very well thought out, i'm really looking forward to seeing it finished now with all the superb hard work you've put in! it's shaping up to be another DrH special!
Yes, this is all getting more fantastic by the day..but you are creating painting problems for yourself by the day also, but I'm sure you'll amaze us all in that department as well though
Sageheart wrote:Really awesome tank, will keep tabs on it.
Thank you and welcome to my little corner of madness.
nerdfest09 wrote:I've been watching this daily for what seems like an age now! ....Ah.... the memories!
Yeah, I like to take my time. Every little bit of every model is as important as the whole. That's why I don't enter many competitions, I know I wouldn't finish in time or I'd have to rush.
and now i gotta chime in and just reiterate how great it's all working together! :-) looks suitably bada$$ and the sponsons are very well thought out, i'm really looking forward to seeing it finished now with all the superb hard work you've put in! it's shaping up to be another DrH special!
Thanks Nerdy. I am aiming at making this tank look like it means business and that that business is mean...
Little by little this tank is moving towards completion. Once I have the sponsons built, I will finish off the interior, give it a lick of paint and then the whole will start to come together (literally). I should start thinking about what colour to do the inside and it's occupants (I have an idea for the driver and a folder full of inspiration for the gunner).
Always good to get feedback of any kind.
dsteingass wrote:Yes, this is all getting more fantastic by the day..but you are creating painting problems for yourself by the day also, but I'm sure you'll amaze us all in that department as well though
Thanks Dave. I have always enjoyed problem solving... Yeah, it's approaching the time in the model build that I start worrying if my painting will live up to the modelling. I'm sure it'll be fine, the WS turned out ok...
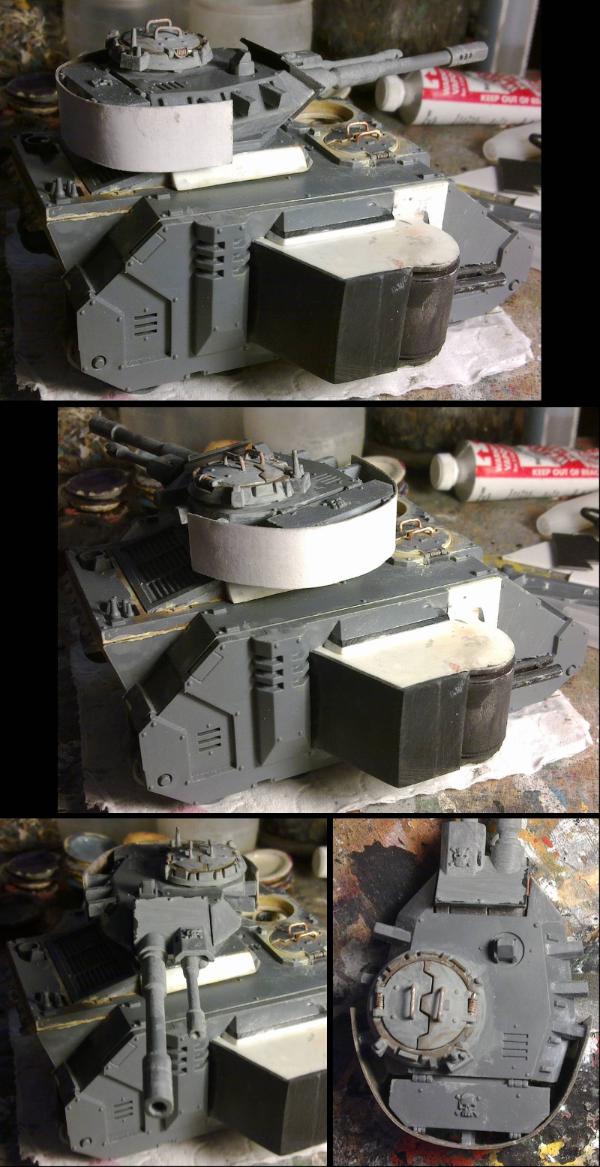
So, construction of the sponson structure has begun... This should give you an idea of the shape and size of it. I'm a little concerned that it looks a bit big, but then looking at other GW tanks with various sponsons on has eased my mind a little. I think it's just that GW tanks are quite short and tend to look high and wide. Hopefully, clever painting and the planned "dozer blade" will ease this issue.
I plan on building out at the top and bottom to meet the doorway with the gun sitting roughly where it is here. I'll build the main structure of it, mount the gun, fill the interior and paint it, before attaching it to the tank (where I also need to remember to fill the edges of the door).
Thanks Dave. The gunner will, at least, be able to get in for maintenance and reloading.
And progress:
Using card washers (as you may find in electrical goods) that have a hole that is just the right size for the smaller diameter cylinders you will have saved from pieces of sprue. Find the centre of your circles, glue the sprue pegs to the plasticard top and bottom (because they are both polystyrene) and the washers to the top and bottom of the gun mount (because neither are polystyrene).
A bit of sanding to get the right length of the pegs and to ensure the washers are flat. Job done.
The friction is enough that it will even hold the gun up against gravity. But is also easy to move.
shasolenzabi wrote: Ah, and then the closing and adding on. cvloser to done. be interesting to see the paint scheme.
Indeed. Even I don't know what the scheme will be at this stage...
And even more progress:
This shows you the cunning plan I had for the inside once I had disposed of the rear half of the gun.
Lots of dry-fitting of things to be done and careful sanding to get all the plates to fit. The internal walls are glued in, but nothing else yet.
I think I'll need to break out the hair-dryer to bend some bits for above and below the gun opening in the near future, will get the rest together first though.
cormadepanda wrote: Neat Sponson. Really like the trip barrel any ideas for a camera or something?
Thanks comrade. You mean for targeting? I do intend to add some. I haven't settled on a design yet, but I think they will be fixed (with overlapping fields of view) rather than the moving ones you get with the stock sponsons.
The body of the sponson for the TFG gun is complete-ish. There's a few more less structural additions to do and I need to adorn the inside with the ammo drum/feed and the hatch.
Still many rough edges too.
You can now see it fully in scale with the rest of the tank, the range of movement (from forward and up to out and down), the inside space and what is visible of it when attached to the tank.
I'm thinking a light colour for the interior of the tank, like I used for the inside of the WS (it may even become a common thing for my vehicles). This will make the dark corners, like the sponson interior, more visible and will allow me to "highlight" features by making them dark or boldly coloured.
whoa, this sponson would make a landraider envious...
I recently got some of these rare earth magnets from theo in a lil parcel....once of these days I would like to make a movable sponson for a nice tank too...
lol. I take it that means I have managed a suitable level of rugged and take-no-prisoners with it.
I'll just have to do something better when I come to make a landraider...
I recently got some of these rare earth magnets from theo in a lil parcel....once of these days I would like to make a movable sponson for a nice tank too...
What a nice man. Do it, go on, go on, go on, ...
I have shown that it is possible without magnets and the amount of sanding I had to do to the washers to make it all fit together nicely wouldn't have been possible with magnets (although, had I built it better, I wouldn't have needed to sand them... damn sub-millimetre tolerances).
shaso has done greatly with moveable sponsons with just PC on his tanks too... it is doable...friction and a good thought through guidance is what is needed... so many different roads to roma^^
Excellent work, looks very realistic, which is totally not in keeping with GW, but fits your work perfectly.
And I very much admire your methods, although they are tough going the results speak for them selves. I personally use a lot of styrene tube to get my fit's nice and tight, and very occasionally magnets. You manufacture from what you have (mostly sprue) and produce some of the most accurate work around. My hat is off to you sir.
Viktor von Domm wrote:shaso has done greatly with moveable sponsons with just PC on his tanks too... it is doable...friction and a good thought through guidance is what is needed... so many different roads to roma^^
Indeed, and LT knocked one out in PVC pipe. The possibilities are endless.
Camkierhi wrote:Excellent work, looks very realistic, which is totally not in keeping with GW, but fits your work perfectly.
lol. Yeah, I'm on a mission to show that it is possible to model believable realism into GW designs and scale.
And I very much admire your methods, although they are tough going the results speak for them selves. I personally use a lot of styrene tube to get my fit's nice and tight, and very occasionally magnets. You manufacture from what you have (mostly sprue) and produce some of the most accurate work around. My hat is off to you sir.
Thanks.
At the moment My time is cheap and plentiful and why spend money when I have a plentiful supply of free things (and "free" is my favourite word). I am considering splashing out on some varied shapes of polystyrene (as you will have noticed the inclusion of plasticard in this model) to supplement my junk collection.
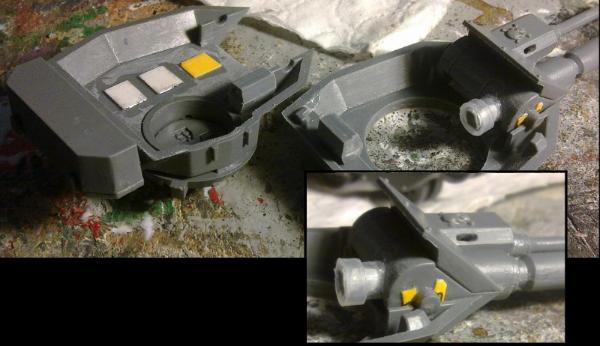
Oh, and here's what the inside now looks like with ammo drum (bit of pen lid with some conveniently sized plastic discs and a bit of sprue), ammo feed (a strange sandwich bag tie thing that I think came off a bought loaf) and the access hatch (plastic rectangle, putty rivets and a copper handle).
I think that should do...
yeah....almost....probably... the guy that makes wonders happen for interior design from scratch and is sounding as if not fully satisfied....
looks super!!!
Ha Ha, well I could have added some wires and cables... and maybe a control panel... but considering that you're really not going to see much of anything in there, I shouldn't get too carried away and should focus on things that will be visible...
Thanks
Automatically Appended Next Post: Oh, and the sandwich tie thing is off coffee refills not a loaf.
Theophony wrote: All the attention to detail is fantastic. I envy your patience with this project.
Thanks Theo.
With all the attention to detail and the difficulties I create for myself, finishing just this piece of the whole model feels as good as a fully completed model.
I'm quite chuffed with how it's worked out (even if it is a little large).
I've been filling the gap in the doorways today and therefore determining the positioning of the sponson.
This means that there isn't much exciting to show.
However, in other news, I have something that I hope will stir some interest if not excitement:
I am planning (it's not going to happen soon type of planning) the production of a wooden hut kit.
This will be highly customisable and you will be supplied with the bare skeleton parts of the construction (sections of wall etc...) and enough planks of "wood" to cover it. You will be able to make your hut any way you like, be it in good repair or damaged and rotten etc...
Thing is, I've come to the roof, I've got the shape and skeleton structure... but I don't know what to cover it with (tiles, metal sheet, whatever...).
So what do you out there think is the best type of roofing that can be cast-able (as a sheet or two, or as sections), that people will want on a hut?
I'm a purist by heart... so I vote for pure wooden hut... if someone wants something else as roof...he can add whatever he want... but for any game system a pure wooden hut would always be a fitting building...
Now, the tank has a few outstanding jobs that can be done in pretty much any order before moving on to painting the interior. The outside of the built sponson needs details, some of the minor ones can be done later, but others (such as the strips to cover the top and bottom of the mount) need doing.
The hatch above the driver needs it's hinges.
The gaps in the doorways need finishing with a little putty work. (this'll be next once some glue has dried).
And, the other sponson needs building...
...and that means...
...fluff... and research... The Electron Cannon: The science bit (the individual bits of this are real science, but the combination is not possible IRL, possibly):
Spoiler:
The electrons are produced by cold field electron emission from a large array of nano-scale carbon field emitters in a specially made dielectric solution. The electrons are focussed and accelerated to 99.99999999% of 'c' (the speed of light) by several room-temperature superconducting magnets.
The electron cannon does not suffer from heat issues and damage through use, like a Las Cannon does, due to the use of cold emission (which does not require the heating of the emitters, like Cathode Ray Tube emitters) and the Superconducting magnets (instead of the lenses used in Las weapons which are damaged by the laser beam), meaning a more efficient weapon.
When fired, the beam of electrons transfer a great deal of energy to whatever it comes into contact with, which heats the material to extreme temperatures leading to melting, vaporization, ionisation, ignition and/or explosive decomposition, depending on the substance involved. If fired in an atmosphere, the beam will induce the formation of plasma along the length of the beam, and the rapid heating of the ionised gasses create a shockwave (which is capable of injuring those nearby) and this means the cannon produces a sound like thunder when fired under these conditions.
I need to decide upon a design for the cannon (and while I'm at it, consider how to build the sponson around it, rather than shoehorn an already made gun into it). I was originally going to use the Las Cannon that comes in the kit with a few alterations, but I may as well scratch-build it and be free in the design.
I'm off to have a google, feel free to pop in with ideas for the design. The only limitation I can think of at the moment is that the barrel will be a thin, hollow tube (as well as it having to fit in a sponson )
Time for a wee update on the Electron Cannon.
Here's what it's looking like at the moment:
I might shorten the barrel a bit now I can see it next to the tank, don't really want it reaching the front.
I also have a little surprise built in to this, but I won't show just yet...
the muzzle looks fitting...I agree, for a sponson weapon the length of the barrel should never be too long ... otherwise the tank looks like it is spreading it´s wings to be ready to fly as for the barrel itself... hmmm.... I think there needs to be something that says special weapon some more... dunno how tho... as it loks like it is a complete pen ball set so I assume you still have the spring... maybe use that around the barrel as some means for cooling the barrel from the outside... from the fluff I expect this a kinda plasma effect and risk related weapon system... so cooling is always nice^^
from the fluff description I have/ want to add it sounds a bit as if you are creating yourself a deathstar unit here...fluffwise it will be interesting... gameplay would need to sooth the effects probably a bit ?
Oh yeah, there is more details to add to it. This is just the basic structure so far. But I was thinking that it was beginning to get quite long while I built it, so didn't want to add the details if I had to chop the barrel down. A plasma effect is well in hand... (insert evil laugh here)
Yep, game-wise this will just be played as a Las Cannon, and the TFG gun as a Heavy Bolter. Sounds impressive in the fluff, but no over-powered things in this army...
Ho Ho. If only I could make working weapons like those. However, I would likely spend more time looking for the bits of the weapon every time it explodes, then actually building.
Getting warmer... There is light involved, but no batteries...
I have removed over a cm from the length of the barrel. But I've had to re-glue the mounting of the barrel to the turret as I broke it off in the process.
Theophony wrote: Knowing the mad scientist there is probably some chemical bioluminescence about to be opened up on us.
Ah, you know me well. Technically, if the source is biological in nature, then it's bioluminescence. If it's chemical in nature, then it's chemiluminescence.
However, yes, I have some phosphorescence to show you. Having studied and worked in chemistry for a while, and having a liking of "free" things, I have accumulated a few free pens from the Royal Society of Chemistry. The pens they give out are phosphorescent (that is, glow in the dark!!!). I've been saving them for just such an occasion:
Viktor von Domm wrote:nice...the glow in the dark effect melikes...but more important is the look in light...the shape of the barrel looks way better now...
Cool. Glad you like it. I painted the inside of the glowing bits with silver to improve their look (by reflecting the incoming and outgoing light). Next job is to make it look more tech-y, and that means wires/cables etc... Then build the sponson to hold it (which will have lots more tech-y things). I'm planning of making it slightly smaller than the other sponson, which is why I used a smaller cylinder the house the weapon.
One step at a time.
Vik, maybe Squig milk is lactose free... like almonds...
Yes indeed. Although not all that original in name (as an inspirational search of the internet told me), mine is backed up with much science.
In other terminology, also known as a Tesla Cannon, Electro Beam, or Ray, Orks use Zzapp kannon, LOL. But an idea used in 1930's sci fi serials at the weekly cinema
shasolenzabi wrote:Looking forward to seeing it all done
I also have a nice update for you to check out as well.
Me too, but the fun is in the making. And checked.
nerdfest09 wrote:Oh you ARE good man! that is pure brilliant insanity!
Thanks NF. I aim to please.
So, I have added cables and wires.
I didn't want to go too overboard with the details, but just enough to show that the magnetic lenses are powered.
I still have to add a few clips to "hold down" the wires, but that will be all. Then I can start on the sponson...
In other news: After the conversation earlier about plastic rods, I had a poke of ebay and bought 3 flavours of rod (1.2, 0.75 and 0.5 mm) for variety, and two flavours of tread-plate plastikard (single and double), and a bottle of Microsol and Microset (that I've been on the lookout for, for quite a while).
shasolenzabi wrote:"Fire the Electro-cannon!" ZZZZZzzzZZZZZzzzzZZZZZTTTTTT!!!
Target: BOOM!
I'm thinking along these lines, but horizontal from a cannon...
That's how to get someone's attention...
Camkierhi wrote:Nice detailing on the gun, and love the concept, typical MadDoc.
Thanks Cam. I've added the last of the details below...
You should be able to see the clips holding the wires in place:
They were a pain to do in plastic, should have used card...
And this is the shape of the sponson with rough estimate of the position and comparison to the other sponson:
I like that it will have the brute force, blunt, mechanical gatling gun and the slim (relatively), technological, intricate electron cannon.
With the autocannon turret in-between, this tank has a tool for every job.
monkeytroll wrote:Flamethrower, water cannon, freeze ray?
Each have their uses and do have the potential to look similar... probably as they are all dealing with fluids of one form or another... This is for electrons and it will be made apparent later.
Theophony wrote:Swiss army assault ram???.....oh wait we don't do Swiss in these parts.
lol Bad Theo.
shasolenzabi wrote:if not a grabber arm, then maybe a simpler apparatus is needed? a simple grab pincher in place of a ram.
I have an idea for a dozer blade equivalent and it will be mean looking. But I'm not sure yet how it will be done. Other ideas will be kept in mind as alternatives...
monkeytroll wrote:Surely everyone knows tentacles are far better than grabber arms...a writhing mass of mechadendrites is what's really required
Ahh, how I've missed you MT and how most of our conversations involve tentacles. I don't think it'll happen on this tank, as they don't fit the persona I have in mind for it. I have many ideas for spectacular tentacles in the future and that involves possibly the largest thing I will build for this army... but that is some way off yet...
Co'tor Shas wrote:I think I know were this is going...
It happens often around here and MT's threads...
I have started to construct the sponson... and you know how I said I was aiming on making this the smaller of the two...
...well:
Apart from width (from the body of the tank), where it's only the bulge for the Gatling gun that makes it larger, this new sponson is slightly larger... But only by enough that you would have to have them side-by-side (like here) or actually measure them to tell.
Still a work in progress, but here's how it looks up against the tank:
It was built in much the same way as the previous one, with interior walls, and you may be able to see the cut-out in the side for the gun to fit through (although it is difficult to see a hole in a black object with a black background, containing a black object, but...)
Much more work to do on both of them and they will look distinct in the end.
Ahh, no you misunderstand I was wondering where the water cannon, the flamethrower and the freeze ray were? You have big shells, lots of little shells, and zappy lightning stuff granted, but I fear that is a long way from covering all eventualities
Looking good with the sponsons in place
If you could just put a black circle around that hole it would be much easier to spot
monkeytroll wrote: Ahh, no you misunderstand I was wondering where the water cannon, the flamethrower and the freeze ray were? You have big shells, lots of little shells, and zappy lightning stuff granted, but I fear that is a long way from covering all eventualities
Oh, I see. Well if you throw enough energy at something flammable it will catch fire. Can't think of a use for a water cannon that just running over it in a tank won't fix... and... no, you've probably got me there with the freeze ray. I'll just have to settle with blowing it up or running it over instead then...
Looking good with the sponsons in place
Thanks.
If you could just put a black circle around that hole it would be much easier to spot
lol. and maybe a black arrow .gif that flashes black...
That could work for the maw of the beast. It could crash into things(it's going to happen with an Ork behind the wheel and a gaunt as a backseat driver) and bite down on it, then throw it into reverse to take a bite.
As I had it all laying about, here's the front view with the sponsons roughly in place: So it's not going to be driving down narrow roads (at least not without causing damage to the buildings on each side...) It is, with these attached, about as wide as it is long... not my fault that GW makes short tanks... The dozer blade (or whatever ends up at the pointy end) should add enough length to readdress the balance. It's going to have to, because I can't make the sponsons any smaller... *shrugs*
I'll be back when I've finished this second sponson's details.
monkeytroll wrote: Water cannon works well when faced with ravening hordes of hydrophobes, eldar avatars and lavamen
As wide as it's long hey? Square tanks...they're the future. Worked for the Borg.......
I'm not intending to make the 3rd dimension equal though...
And means it can make narrow streets wider to allow more infantry to get wherever it goes.....
Absolutely, this is a tank that goes in first and clears a path, be it through buildings, rubble, trees, people...
Here's the interior of the sponson:
Again, fairly simple as you won't see much of it (in fact the pen top at the top probably won't ever be seen and will probably haunt me in the future when it comes loose and rattles about, but for now it fills a gap).
This means (once the glue is dry and I've sanded those rivets flat) that the interior of the tank is pretty much complete ...
...apart from a spare ammo box for the Gatling gun and anything else I find "needs" adding when I give it a going over.
Hopefully the next thing you'll see is primer... (I also have some commission pieces to prime, so painting may be delayed)
Camkierhi wrote: Moving along brilliantly. Love the sponsons, never understood why people limit their selves, I am sure in the future, you can have a choice.
Thanks Cam. Each to themselves, I suppose.
I just realised that I had some fluff to share and haven't shared it yet...
This is for the gunner, you remember him? Skinny lad, toothy grin...
Spoiler:
From The Scientist's scientific notes:
SN-Tyr 616: The aim of the following sequence of experiments is to produce a small Tyranid creature with proficient tool handling capabilities.
The initial zygote is for what is referred to as a Termagant.
Additional genes have been added from another Tyranid species. Note: I find it amusing to steal a gene from something named a gene-stealer, Ha Ha.
The added gene sequences will lead the embryo to produce dextrous hands instead of the rather simple appendages that are usual for that species.
There will be no addition of any parasitic organisms to this creature, but I will add an electronic interface into the brain once it has fully formed.
Implanted training will be for the operation of control panels and mechanical duties such as; computer terminals, re-loading weapons, repairing mechanisms, and handling tools.
Additional training will be for increased intelligence, especially for mathematical skill.
SN-Tyr 667: Complete success. The Gunner Tyranid has passed all tests it was presented with and can operate the required equipment for the Predator tank. I have had to make it a "slave" in the system though, as it's rather insistent thinking often overwhelmed the Driver at times.
And for the tank's engines and weapon systems:
Spoiler:
SN-Pred 002: Well, My goodness me. Ha Ha. The engines in this thing are hideously inefficient. No wonder they insist on cramming four of the useless things into each tank. This just won't do, no no. I shall replace them with two small power-units of my own design that will do a far better job of turning ordered fuel molecules into lots and lots of high-energy, smaller, molecules and well as lots of lovely heat and sound. This tank will epitomise the very nature of increasing entropy.
SN-Pred 342: Weapons test. The main gun installed in the turret works as expected, no surprises there. The Gatling gun, works amazingly well and can fire a minimum of 10000 rounds with no ill effects... well no ill effects to itself, there's plenty of ill effects to the targets, Ha Ha.
Then we come to the Electron cannon. How do I put this? Impressive just doesn't cover it... I shall attach the recording of the test as it speaks for itself quite well.
The video starts with a hand-held view of the ground which then pans up to reveal a Hormagaunt straining at a leash around it's neck. It has a muzzle on and all it's claws have been removed. A voice-over begins as the camera moves closer to the beast: "This hormagaunt has been bred to run, and run fast. You will notice that the hind legs are much thicker than those of the standard animal, and the forelimbs have been adapted to aid it's running. It has been implanted with the instincts and memories of a running dog."
A pale hand reaches out from behind the camera and strokes the beasts head, it clearly nuzzles the hand and appears as friendly as a family pet.
VO: "It has been trained to run this track as fast as is possible..."
The camera pans left to reveal a corridor of fencing stretching off into the distance out of a doorway and into a dry, dusty wasteland.
VO: "...and it has managed to reach speeds in excess of 85 miles an hour. But these experiments have come to an end. I have learnt all that is possible. So I have one final test..."
An Ork appears in view and attaches an electronic device to the gaunt's back.
VO: "This device measures both current and temperature and will hopefully yield some useful data."
The camera moves past the Ork that is now petting the gaunt and moves in to view a thick tube, covered in wires.
VO: "This is the test weapon, and will be better packaged for the tank, but it functions identically in every way to the final cannon..."
The camera reveals that the weapon is aimed directly down the corridor that the gaunt is clearly about to run down.
VO: "...This is the first test on a live being though and it will be interesting to see the results."
The camera is placed on top of the weapon and directed along the length of the corridor. The gaunt is visible in the foreground straining on the lead again, eager to run into the distance. The Ork has retired into the shadows and The Scientist now walks into view and approaches the gaunt. He bends down next to the beast and it appears to be in two minds as to continue to pull against the leash or to nuzzle the man.
The camera vibrates and the sound of an engine starting can be heard.
VO: "The vehicle's engines charge the capacitors and these are used to produce the electrons and power the magnetic lenses."
The Scientist reaches over and removes the collar from the gaunt and can be heard to shout "Go now, you are free!". The gaunt, needing no encouragement, bounds off into the corridor looking much like a greyhound. It is beyond the doorway and off into the wild in seconds. The camera's picture becomes slightly distorted for a short period and comes back into focus to show the gaunt disappearing into the distance, barely a dark speck heading towards the horizon. There is a bright flash, the entire picture becomes white and the loud clap much like thunder is too loud for the camera's microphone and the rest of the video is in silence. The picture slowly fades and shapes become visible again, the doorway, the fencing (which is now bowed outwards), and a bright while streak extending from the end of the cannon at the bottom of the screen into the distance where a fire appears to be burning.
VO: "The cannon performed perfectly, however, the recording device was partially vaporised along with the target and little data was recovered."
I'd think about something similar to the forgeworld mine plough, it sticks out pretty far and could help with the length issue. It could also help with the snorting fumes coming from the maw of the beast.
Yeah, you can see how it makes a tank look longer:
But it's a bit tame when compared to some IRL ones:
I'm aiming for the sort of plough that you really don't want to see coming your way.
I'm thinking multi-bladed, razor sharp edges, very evil looking. Looks like it could drive through a forest and leave a pile of nicely chopped firewood behind.
It's a long way off yet, I have to build the rest of the tank first...
cormadepanda wrote:Well nice sponson. I dont got much to say other than waiting for the next step in the conversion.
Always nice to hear that people like what I'm doing. It means that I'm heading in the right direction. Thanks Comrade.
shasolenzabi wrote:I may have to make a inspired "dossier" on what the Khadrovians have on the good and insane mad scientist
lol. Thanks.
Littletower wrote:The sponsons came out well, even if ending up larger than originally thought.
Will be waiting for the next stage, would surely enjoy seeing your take on the front plough/blade idea
Thanks LT. They were hard work and slowed me down for a little while, but they are done now. And now...
...I've slapped on some primer (and when I say "slapped" I mean it. I know it's all streaky and there's hairs and rough patches, these will be cleaned up before the next layer and you won't see them again...):
I also worked on the hatch... it all started so well... Take your hatch pieces and drill a hole through the hinge. Make sure it's big enough to take the pin you intend to use (a paperclip in this case). Remove the middle of the hinge and make sure the pin still fits. Wrap some wire around the pin until it is wide enough to fill the gap you just made in the hinge. Twist the ends together to make it a nice tight fit, cut off the excess and slide it off the pin. Push the pin though the hinge and the wrapped wire (you may need to remove some more of the hatch to make it fit well). Drill a hole in the hull and insert the twisted wire peg (not shown)...
...at this point you may want to glue the peg in place so your hatch doesn't fall off. Don't use runny superglue, even on the far side of the hull. It will wick through the hole you drilled and stick the hinge. So when you try to open the hatch... you snap the hinge...
...Then you have to remove the hatch and cut a piece of plastic to match the (now mangled) hinge that the hatch came with. Shave it to size and re-do all the drilling and cutting and wire twisting, etc...
Once you've done all that, you have a working hatch: You will also notice that I added a small piece of plastic to hide the hinge on the outside and I'll be adding card to hide the rough edges of the hinges on top of the hull.
Thanks Cam.
I've not had a lot of luck with hinges so far (with one breaking on the WS too). I nearly left it with the one remaining hinge piece, but I could see that breaking with the added strain so decided to fix it.
As they say: "If it's not broke, don't fix it". Well it was broke, so I fixed it...
No progress to report today. I am considering painting options while I paint some commission pieces (I'm hoping to do them quick, so I'll be back soon...ish).
So, after far more layers than really was necessary, this is the colour of the interior walls of the Predator. Complete with shading and highlights. Although some of the pieces are likely to change colour at a later date, this gives you the idea of the main colour of the walls.
The floor will be largely metal in colour, you'll have to imagine that part for now...
Yes, it is a little rough in places. Those will either not be seen in the finished tank or will be tidied as I go...
Or steel, or titanium, or adamantium, or aluminium, or iron, or copper, or brass, or silver, or gold or.............................................................
MMMMmmm
Also nice colour, is that for it's calming effects on the Nid and Ork? Utilitarian cream! Don't suppose red would be a good idea. JK looks brilliant, definitely waiting for the Nid pinup though!
Littletower wrote:Great to see the Tank back on the move! And even better to already have some paint on it, too!
Is it later yet?
Thanks. Yeah, I had a little break and painted something to sell while I considered options for painting this. Things should move quickly now I have a plan of attack (well relatively quickly for me.. )
Not quite that quickly though...
monkeytroll wrote:No..sorry, can't imagine what metal looks like
Well, you'll just have to wait in keen antici.....pation.
Camkierhi wrote:Well it could be holy rusty metal......man.
Or steel, or titanium, or adamantium, or aluminium, or iron, or copper, or brass, or silver, or gold or.............................................................
MMMMmmm
to you too. There won't be a lot of rust involved, as The Scientist likes to keep things relatively well serviced. Scratches, chips and little bits of rust/dirt in forgotten corners are all possible though.
Will see how things go as to what flavour of metal I end up with, I like to let my paint colours find themselves on the models. Perfect example is the walls, they were originally aimed at being lighter, but I reached this tone and liked it.
Also nice colour, is that for it's calming effects on the Nid and Ork? Utilitarian cream! Don't suppose red would be a good idea. JK looks brilliant,
I decided to go with a similar colour to that inside the WS. The colour is to keep with the colours used in real military vehicles, which are usually fairly ...can't find the word... plain, like grey and cream and good Ol' military green. (cue Shas to come in and tell us that real military vehicles don't use these colours...) I nearly did the front half, with the ork, in a military green for that cockpit feeling. But I didn't for a couple of reasons; 1) with the Ork being green, he wouldn't show up well in a green environment 2) it would likely be a fairly dark green and this would make the interior of the tank quite dark and therefore difficult to see anything inside. The light cream colour with make the inside brighter from reflected/scattered light.
Also the fairly neutral cream keeps my options open as to what scheme I'll do on the gunner.
definitely waiting for the Nid pinup though!
Not sure what a 'nid would want in a pin-up. But this time the pin-up is going on the outside, so you will have to wait a little longer to see it...her...whatever I end up doing... (I do actually have a good idea of what I'm going to paint, but will have to see what space is available before deciding)
Here I thought the cream color was to show the eldar influence in the design, maybe using a modified wraithbone design which is integrating into the hull of the tank and will eventually overgrow the systems there and net grate the crew.
But good old government issued drab paint is good too.
shasolenzabi wrote:It is the problem with some paint colors, more layers to make the color work than others
Yep. This is also a new pot of that paint, so it's not as "concentrated" as I had got used to with that colour.
Theophony wrote:Here I thought the cream color was to show the eldar influence in the design, maybe using a modified wraithbone design which is integrating into the hull of the tank and will eventually overgrow the systems there and net grate the crew.
But good old government issued drab paint is good too.
Yeah, that colour was chosen for the interior of the WS due to it's bone-like qualities. But I've now decided that it's going to be a "thing" with all my vehicle interiors.
Standard issue, cheap, why clean it if you can slap on another layer of paint, kind of paint...
shasolenzabi wrote:Yeah, I myself have used "rotting flesh" to imitate the army interior of tanks "Puke apple green"
Yeah, that would work too.
And for all you, patiently waiting ( ), folk out there... progress:
This is the completed sponson interiors.
I didn't get too carried away with details as they are unlikely to be seen without a mirror-on-a-stick. So I only painted on the markings rather than waste transfers. A few warnings, some information labels, the "open" arrow on the ammo drum and rating markings on the capacitors (that I ended up painting the same colour as they came ).
These can now be mounted on the tank and I can fill the holes and check what is visible and needs paint and what isn't.
I also need to make the front hatch before I get carried away and stick the tank together...
Also, in celebration ( ) of reaching page 75, I'm going to start going over the early models of this army and touch up the rough edges, adding more/better shading and just generally bring them in to line with my current work. I'm only aiming for one a week or something like that. Some will need more work than others, but we will have to see when I get there...
So you will be getting better pictures of (hopefully) better looking models on a regular(ish) basis, until I catch up with myself...
monkeytroll wrote:Oh man - so I still have to wait to see what a metal floor would be like?
Nicely detailed dude...I'll remeber to pack my selecton of stick mirrors if I'm ever going anywhere near your models
Early wip of the metal floor below.
Thanks.
Thanks Cam. Thanks Shas
The sponsons are now attached, so no more changes. Onwards and upwards only...
Here's what you can see of the details with unobstructed views and through the top hatch.
It is possible to see most of what I've added by eye, it's just tricky to photograph.
I've managed to hide the gap at the bottom of the doorways with the hazard-striped bits of sprue. The gaps at the top won't be visible, but I'll give them a quick lick of paint once filled (next job) for those of you with mirrors on sticks...
Just filling the gaps at the top of the doors (you'll see them later) and thinking about this hatch... So many jobs to do, need to maintain discipline and finish one before starting the next...
Littletower wrote: Warning signs and hazard stripes for the brainwashed, reprogrammed and hardwired crew? I just love the (Mad) Scientist and his sense of irony...
Spot on. (also notice the "well serviced/cleaned" vehicles for an army that is supposed to represent an army devoted to increasing chaos/entropy). He is Mad, y'know
Not a lot of progress today. I'm planning a complete wipe and re-install of everything on my computer, so I've been moving files around and backing things up. If I go quiet for a while, you know why now...
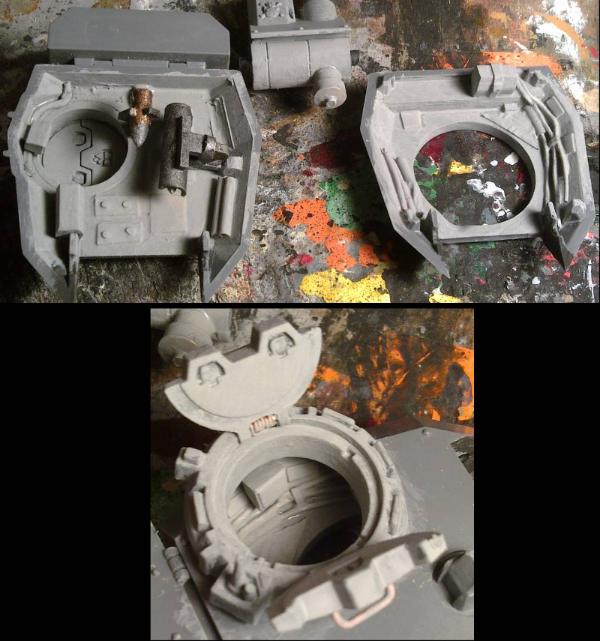
I have, however, got the start of the front hatch done.
I spent a long time trying to find something or a combination of somethings that I could use to make a working hatch on the front, but could find nothing...
So I looked at what the actual front piece of the Predator/Rhino/other kit used (and have you ever noticed that the hinge blocks on the piece are exactly the same shape and size of a piece of sprue? Probably not... just me then) and decided to use pieces of sprue for the "hole" side of the hinge and as I was cutting the piece of plastic for the actual hatch, I removed a long thin strip of that plastic... looking at it, I knew I could make that work and glued that to the top of the hatch piece and sanded it down to a round shape at the top and ends. I made holes in the sprue pieces to match and...
You can also see the gap filling of the top of the doorways for the sponsons. More detail will be added to the sponsons, so they won't look so plain as they do now. The hole in one of the pieces was a bubble in the sprue and will be made use of some how...
whenever i get back after some days you sure well are up to surprise me...
the cream interior looks very cool...very efficient modern looking...and all those warning signs and lots of other cool details...
what never ceases to puzzle me tho is that you went for an asymetrical look of the weaponsloadout... the two different sponsons is something i hae never seen on any predator tank...tho it of course fully swings with the whole mad doc vibe^^
Automatically Appended Next Post: oh...and i will have to remember some day how you did those hinges....
Viktor von Domm wrote:whenever i get back after some days you sure well are up to surprise me...
the cream interior looks very cool...very efficient modern looking...and all those warning signs and lots of other cool details...
Thanks Vik.
what never ceases to puzzle me tho is that you went for an asymetrical look of the weaponsloadout... the two different sponsons is something i hae never seen on any predator tank...tho it of course fully swings with the whole mad doc vibe^^
I think that's because it's illegal as per the rule book. I did it for variety, and it adds an extra level of complexity to the tactics for using it (and attacking it).
oh...and i will have to remember some day how you did those hinges....
Thanks again. Remember to be careful with the glue.
monkeytroll wrote:Nice job on the front hatch - hate to bring it up now, but wouldn't a view slit in the hatch have been a nice idea too?
Thanks MT.
No. No view slit, doesn't need it as he can see through the headlights or the other optics. A view slit is only a weak-spot. The hatch is only for fresh air.
Moltar wrote: This just keeps continuing to be amazing.
Thanks Moltar.
I'm partway through re-installing the computer and I'm having to use my phone for this. Normal service will be resumed once I get Bob working again (currently, connecting to the internet is a challenge).
I have added extra detail to the front hatch to make it look reinforced. More to do and I'll show when I can.
Bob-Mhd-VI is dead, Long live Bob-Mhd-VII. In other words the computer has been wiped and re-installed. There's still a few things to arrange, settings to set and programs to install, but that will all come together eventually. Bob is running a little quicker now and I've freed up lots of space. Yet to see if it has solved the various windows related issues he had, but the continuing bsod appearances have proven that there is definitely a problem with the hardware (motherboard most likely)
nerdfest09 wrote:That is just growing awesome in spades! it's looking very tanky and brutal, very 40k-ish with that unmistakable DrH flair and creativity!
Thanks NF. That's what I'm aiming for, so I'm glad it's coming across.
shasolenzabi wrote:Can't wait to see the exterior scheme paint wise!
I haven't put much thought into what the colour of the outside will be. but that's a little way off yet...
So I've got quite a few blogs to catch up on (I've lurked a bit, but I will be popping in to say "good job" soon), but here's the front hatch to welcome you back:
Basically made it look reinforced,
added strips on the outside to show that it seals against the elements and toxic gasses,
added a couple of latches for the Driver to lock it shut (these will be painted as metal),
rivets (just to show that there will be more in the future ),
and the handle on the outside that was added, not to show that someone can open it from the outside (if it's unlocked on the inside) but so that I can actually open it to look inside...
I may add a photo/postcard or something similar tucked into the triangle inside. Don't know what yet and may not make much difference on this scale.
Your permanent attention to detail and the bizarre mix of fantasy and functionality - latches and sealing strips on a working hatch that opens to a spore spawned green space monster - makes this a great journey to follow.
Your permanent attention to detail and the bizarre mix of fantasy and functionality - latches and sealing strips on a working hatch that opens to a spore spawned green space monster - makes this a great journey to follow.
dsteingass wrote:^^What he said!
Thanks guys. I've always been interested in how things work and "just because it does" has never been good enough for me. This has permeated everything I do and, not least, my modelling. So every addition needs to look like it has a function and that it could work in reality.
Also, model making to me, has always been more about the making than the final result and that journey makes the final piece all the better for the extra effort. The scratch-building and modifications to my models is the side of the hobby that I never knew I was missing out on until I started on this army project. I used to buy models based on the number of pieces (the higher the better), and I was always looking for a greater challenge than the last model. I could knock out a 300 piece model in under a week and then be looking for the next... Now I spend a week or two adding scratch-built components to a piece of a model that won't see much or any of the light of day, but it's much more fulfilling than any model that has come before.
And it's nice to share my work with people that not only understand, but are as enthusiastic about model making as I am. Thanks.
monkeytroll wrote:Great job on the hatch Doc
Thanks MT.
I've been adding a little more paint to the inside, starting to pick out more things in different colours to break up the sea of beige. You will notice how the mass of wires/cables next to the Driver appear to disappear into darkness in the corners/shade. Some of them will be picked out in different colours (as will a few other bits) to break up the sea of metal... The two computer terminals have been based in aluminium and are awaiting panels and dials and screens and buttons being picked out in other colours. You can also see (I don't think I've shown before) how close the Driver is to the front of the tank and why that reinforcement bar is bent (to get over his toes).
Still to do are the aforementioned screens (including the large rectangle to the Driver's left) and buttons and dials, and the various labels/warnings, and the cables, the ammo dispenser, and any other details that I find along the way, and then ... the Driver and the Gunner...
...Then I can glue it together and start on the outside properly...
And..............so thats metal flooring, ah got it now.
So here's progress on the interior.
Various switches, buttons, lights and labels. A little messy in places now I see it on the screen. Still more to do and I'll tidy things up as well.
I think Shatner puts it best...
Spoiler:
Also, I got fed up with the continuing bsod appearances and have bought a few new bits for the computer.
For those of you interested, these include; A new motherboard, A 3.1GHz Core i5 processor and 8GB of 1600 DDR3 RAM. Which will be a great improvement over the current 2.4GHz Core 2 duo and 6GB of 800 DDR2 RAM, with added bsod's.
They should arrive tomorrow, so I may disappear again for a little while...
Camkierhi wrote:Now thats just showing off, oh and I hate to be the one to tell you, but Nids are colour blind!!!
Astonishing work, absolutely brilliant.
Thanks Cam.
Are they now, I didn't know that. But The Scientist did and while genetically engineering this Nid to be a Mathematical Genius, he also fixed the colour blindness.
Co'tor Shas wrote:Airplane 2, I just watched that again recently.
I do like the control panel. Keep up the good work .
I suppose I could say "spot the differences" between this and the previous updates... I've added a few bits, tidied a few bits, painted the ammo dispenser (still needs a warning label), painted the cables from the Driver (although not the 2 that go to his head), added a cleaner/worn patch to the metal floor around the Gunner, and various other little things...
Not much left to do and then I'll start on the occupants...
Yeah, I had been stuck for what to have on that screen and then with the recent/ongoing bsod issues I've been having I thought it would be good.
Also, speaking of small additions to add character...
How's that for a postcard, holiday snap, or photo of the "war-boss" back home... It's vague enough for you to make up your own mind of what the Driver has stuck in there.
Maybe that's why it's a little blurry... nothing to do with my painting, it's intentional...
weetyskemian44 wrote:That's mad, totally mad. If you offered me a lift in this I would walk. I love the wired in random aliens. SCIENCE!!!
You're lucky that it's not a transport vehicle then. Maybe I'd have more luck if I pulled up in the WS, yes? Thanks Weety.
Not a lot to show today (I have touched up a few bits, but nothing worth showing).
I've installed the new hardware into the computer, so I now have MORE POWER (as JC would say). I'll give it a good test in a mo (once Skyrim has finished installing... ), just enough time to catch up on my sub'd list...
Theophony wrote:I was ordering why Gumby was on the photo?
I should have given him a hanky on his head. I'll save that for a future Gumby.
weetyskemian44 wrote:My mother taught me never to get into a car with a stranger... and genestealers are pretty strange!
Sound advice indeed.
Strange and very friendly. Probably best to avoid beings that want to stick their tongue down your throat and leave you with a blank memory in the morning...
shasolenzabi wrote:LOL! Looking good!
Thanks Shas.
OneManNoodles wrote:Love the interior, really cool so far.
That postcard, at first I thought it was an Ewok, then I zoomed in and saw an ork in a bikini, luckily I wasn't drinking at the time.
on the memory dump screen, serves them right for using windows , really nice work on the lines of text.
Thanks OMN. lol. And it's a red bikini too (we all know what Orks think of that...)
Sageheart wrote:I was drinking, it was a scary image I assure you.
Love the detail work you have done, the postcard is fantastic, and I can't wait to see you paint up the figures. Any color ideas for the alien?
Sorry to have mentally scarred you. Hopefully more drink will erase it.
Thanks. No concrete ideas yet. I'm thinking of making them look like they don't get much sun, but beyond that I haven't decided.
monkeytroll wrote:So the driver likes to take selfies wearing women's underwear...Is that so wrong
lol Monkey. Nothing to say he's not still wearing women's underwear... Are you going to argue with him about his personal choices...
Right, I'm back and I think I've finished the interior details. I keep seeing bits that need a touch up, but you have to stop at some point...
I've added scratches in various places because the Gunner has claws, so he's going to scratch the paintwork every now and then.
Other that a few more touch ups and the odd label, I've done the two radar screens and the three view screens for the Gunner (I see them as one per weapon and have made the views slightly different to show this).
So, it's now time to really think about painting the occupants.
As I said, I want them to look as if they don't get much sun...
So for the Driver, I'm thinking of looking at plants that haven't got much sunlight (I'm expecting a pale green).
The Gunner, I'm going to have a look at my inspiration folder and possibly search for creatures of the dark (from memory this will be pale, translucent or deep reds...). I don't want to make him look like an albino, as I want one of them somewhere else in the army...
Time for a google...
Love the detail work on the interior, you really get the feeling that everything in there has a purpose,
and is there for a reason, very nice work. Looking forward to seeing what you do with the crew .
monkeytroll wrote:Fantastic work on the consoles - the view-screens are ace
Thanks MT. Glad you like them. A little messy in places, but they will do.
hk1x1 wrote:Love the detail work on the interior, you really get the feeling that everything in there has a purpose,
and is there for a reason, very nice work. Looking forward to seeing what you do with the crew .
Thanks hk. That's exactly what I'm going for, so I'm very pleased that that is what comes across.
Now, seriously, that level of detailing - both on the model itself and on the justification and explanation of its for's and how's, with each piece having a purpose - is amazing (Speaking this time of the scratches on the board, or the different screens for the different weapons, p.e) and inspiring.
Waiting to see your take at the undergroundnized crew.
Thanks very much LT.
Would you like to see a wip for the Driver?
You would... Well I was taking pictures to see my own progress, so I suppose I could share them...
Before you go and get over-excited, he's only part done.
The browns are pretty much done,
The blue jeans are pretty much done,
The red shirt could do with some highlights,
The metals haven't been touched yet,
and the skin is only half done;
The thinking behind the skin tone is that, as he doesn't get much sunlight, the fungi has taken a back seat to the animal part. So the green colour has faded and he's taken on a more "natural" skin colour.
He will get more green . As he can open the front hatch to get fresh air and some light, he will retain the green as someone might a tan. I got this idea when I saw NF's sunburnt Snikrot. Although taken in a slightly different direction, it has the same idea behind it (that Ork skin is affected by the amount of light falling on it).
So I'm going to introduce the green colour in the highlights of the skin. I just need to decide on a method and which green I'm going to use.
Sorry for my absence dr h. Things have been nutso. Incredible craftsmanship youve been up to this last month. This interior has taken on a life of its own! It looks incredibly detailed. Great updates
bebopdrums2424 wrote:Sorry for my absence dr h. Things have been nutso. Incredible craftsmanship youve been up to this last month. This interior has taken on a life of its own! It looks incredibly detailed. Great updates
BB
Thanks BB. No worries.
Camkierhi wrote:Excellent work, and I like the skin tone. Gives him that un-natural look you are after.
Thanks, good to hear that from an Ork. As my first Ork, it was tricky to think of how to make him less green as I had nothing for him to be less green than...
The Driver is done (although a couple of little touch-ups are required that I've noticed...).
Here he is at all possible angles(it's even votable... ):
What do you think?
Now I have to think about the Gunner...
I've decided not to do a translucent colour, as he won't show up very well. So he may be a dark colour... don't know yet... Thoughts are welcome.
Camkierhi wrote:Does look brilliant. I think go really dark on the Nid, not sure though.
Thanks. That is the direction I'm leaning at the moment.
monkeytroll wrote:Nice work on the driver....maybe the nid should be a spooky, glowy, radioactive nid
Thanks to you too. I did (briefly) think about doing it bio-luminescent, but that would require osl, and I haven't got the hang of that yet and would rather not practice on this model...
You should totally try he cockroach colored nids like black_adder is doing for the gunner . It might be hard since he's mounted inside already, but you can do it!
Theophony wrote: You should totally try he cockroach colored nids like black_adder is doing for the gunner . It might be hard since he's mounted inside already, but you can do it!
It's an interesting thought. Cockroaches like the dark and it is a nice scheme. But, thinking about it, I don't think it will contrast that much with the interior... hmm...
Tricky...
Moltar wrote:Driver looks astonishing with paint on him. Great job, doc!
Thanks Moltar.
OneManNoodles wrote:Really nice skin on the driver, more how orks should look (if there was anything to compare a fictional bi-pedal fungus with a penchant for axes to).
Thanks Noodles. Yeah, I do want to go down a "more realistic" (less cartoony) route for the Ork skin tones (and all the other models really), much like I do with the modelling.
I was very much impressed by Nerdy's Ork skin (I know you're out there NF), that's why I was so interested in the tutorial of how it was done. Although I didn't exactly use it here, I will be.
I'm sure you'll think of something cool, 'nid schemes are nearly limitless.
And, weirdly, therein lies the problem. Too much freedom can also be a problem.
For all of you that has painted a Tyranid army, think of this; Imagine how difficult it is to think of one original scheme for your army. Completely original, not a variation of the "official" schemes. You can do pretty much any scheme you like, almost any colour combination is possible (so long as you stick to colour theory).
Then... imagine picking an original colour scheme for EACH individual tyranid model... The brain hurts after a while...
Anyway, something will appear eventually. In the mean time, while I consider the (endless) possibilities, I've started the first re-paint model.
First, AArgh, missed mould lines!!!
and then, Aargh, thick paint!!
then, the expected wavy highlights!
So, some sanding and then a re-basecoat. I'll update when he looks prettier (or I have a good idea for the Gunner).
Base the 'nid on a real world insect of some sort. Any really, a moth, for example, and there are plenty of others.
The 'jaundiced' orc looks much nicer than the goofy greens. Sorry orc lovers, but the current green for orcs is a bit 'disney-esque' to my eyes. Only suggestion I would have is some deeper shadings to contrast the orc from the interior somehow.
Red Harvest wrote: Base the 'nid on a real world insect of some sort. Any really, a moth, for example, and there are plenty of others.
The 'jaundiced' orc looks much nicer than the goofy greens. Sorry orc lovers, but the current green for orcs is a bit 'disney-esque' to my eyes. Only suggestion I would have is some deeper shadings to contrast the orc from the interior somehow.
Lo Red. Thanks.
Yeah, I have a whole folder full of potential 'nid schemes. I'm very much in favour of using real-life bugs etc. for the Tyranids. It's just a matter of finding one that fits...
Thanks, yeah I did notice that he was approaching the walls in colour. That's why I'm trying to avoid that for the Gunner as well.
Looks fantastic! I love that driver, his skin is wickedly done! :-) the muted skin tone really adds to the whole model, almost as if he's paler due to lack of sunlight if he's wired into the rhino?
nerdfest09 wrote:Looks fantastic! I love that driver, his skin is wickedly done! :-) the muted skin tone really adds to the whole model, almost as if he's paler due to lack of sunlight if he's wired into the rhino?
Thanks NF. High praise from the one I stole borrowed the skin tone ideas from. That is exactly the idea behind it.
dsteingass wrote:Haha In the grim darkness of the far future, there is only Windows Looks fantastic!
Thanks Dave.
The future just wouldn't be as grim or dark without windows...
Camkierhi wrote:No Mac, no linux too!
Not in the Imperium. Those at the top don't want the average nobody tinkering with the equipment (let windows do all the work/thinking for you).
The Eldar are probably the Apple users; Pretty looking and no way to change the batteries.
and the Tau (being the most tech' savvy) are probably the Linux users...
No update yet, been busy elsewhere.
Tidying the garage shaped space on the side of the house, which is mostly filled with my stuff that won't cram into my room inside the house .
I only went in looking for a box... Found a few useful things thought.
Lol, Red. I skipped Vista and went from xp to 7 and I'm not interested in 8.
I've always thought that, one day, I would install at least a dual boot with Linux, but have never got round to it.
Well Doc, you can run most Linux distributions from USB flash drives. If you have a USB 3.0 it can be as speedy as any windows set-up from the hard drive. No need to partition and dual boot. And surf the web without fear of malware, most of it anyway. It's less than 1/2 an hour to get up and running.
Red Harvest wrote: Well Doc, you can run most Linux distributions from USB flash drives. If you have a USB 3.0 it can be as speedy as any windows set-up from the hard drive. No need to partition and dual boot. And surf the web without fear of malware, most of it anyway. It's less than 1/2 an hour to get up and running.
Thanks. My new motherboard does actually have USB 3.0. I may look into it.
So, the first of the re-paints has been done. There was more work required than I expected and I could have done more (could have even completely stripped him and re-painted from scratch) but this will do... for now...
Tactical marine number 1 (he now even has his number on his knee):
Before and after shots (I got pretty close to the same angle)
Other than general tidying, I've made the shading and highlighting on the armour more subtle,
The scrolls were all redone with a layer of "bone" and a wash of brown, then a dry-brush of white and re-squiggled.
The transfers were all re-done (and I got to try out my new micro-sol/micro-set, still need some practice with this).
The added transfer on the backpack is from an AH-64 Apache kit.
The gold had a wash of brown and was re-highlighted.
and the mould lines between his legs and over the top of the backpack were removed.
and here's all the angles:
Not quite up to my best standard, but let me know what you think.
I think I have an idea for the Gunner. I will look into this tomorrow.
No love for number 1? Oh well, here's the gunner, need thoughts...
So, his base colour is a dark purple. He's actually had three layers of progressively lighter purple (and it's more apparent in the photo than in real life ).
But I can't leave him monotone, but what to use...
I'm thinking a dark red (as indicated by the blue arrows), either as a feathering on the edges of the carapace, or just as edge highlights. Both will be partially blended in to the base purple.
Also, the soft parts (indicated by green arrows), I think could do with being a different colour. But what? Dark blue? (I'm trying to keep him largely dark, so no bright colours...)
And the claws etc... Probably the same as the carapace...
Oh, and yellow eyes. (The one thing that will be bright)
Good restoration work - a definite improvement, as I'm sure you can see yourself
Red feathered into the carapace works for me....and claws a similar shade, maybe with a bit more( or slightly brighter) red on them than the carapace?
I know you want to keep it dark, but if you use dark blue for the soft tissue I'd be worried that it wouldn't be all that visible a difference considering his position inside a vehicle....
Maybe switch it over, blue on carapace and red tissue...although red soft tissue is maybe a bit too 'standard' for your tastes
Good restoration work - a definite improvement, as I'm sure you can see yourself
Smurfs need love too.
Thanks. I was quite surprised at how shoddy it was before. I almost don't want to look closely at any of the others for fear of what I might find under the magnifying glass...
Red feathered into the carapace works for me....and claws a similar shade, maybe with a bit more( or slightly brighter) red on them than the carapace?
Yeah, makes sense.
I know you want to keep it dark, but if you use dark blue for the soft tissue I'd be worried that it wouldn't be all that visible a difference considering his position inside a vehicle....
Yeah, that was my thought too, and that's why I haven't just gone ahead and done it. I could make it lighter, but then would it look odd with the little bits lighter than the large areas (they are usually darker)?
Maybe switch it over, blue on carapace and red tissue...although red soft tissue is maybe a bit too 'standard' for your tastes
Also makes sense. Would avoid the claws looking "bloody" by making them blue, and makes the soft parts look more vulnerable my making them red...
Well SM1 looks better. We have seen your commission work so you up against it, you set a high standard recently.
Gunny, well I personally would go OTT on the highlights because when finished he will be in a dark hole, but only hint at colours generally. I like the idea of red fleshy bits and blue hard bits, but that is very standard fair. However, if you hint at it being red, but have extreme contrast on your highlights, in the end he will stand out enough. I hope that makes sense.
TBH we know it will look amazing anyway, so go for it.
I like the red feathering, but don't forget that th Orc will probably help him with some chalk kill marks on top of the carapace, maybe in a yellow chalk color , or different chalk colors denoting different kills. Yellow for infantry, white for tanks etc. as for the claws how about fading to green. Took the kids to the zoo yesterday and saw some lovely colors on animals where the blue green fade was nice.
Camkierhi wrote:Well SM1 looks better. We have seen your commission work so you up against it, you set a high standard recently.
Thanks. Yeah, he has shown how far I have come with painting these models from when I started mid-2012. Also how much slower; originally, Tac #1 was painted over the course of a day. Now, just the touching up took 2 days...
Gunny, well I personally would go OTT on the highlights because when finished he will be in a dark hole, but only hint at colours generally. I like the idea of red fleshy bits and blue hard bits, but that is very standard fair. However, if you hint at it being red, but have extreme contrast on your highlights, in the end he will stand out enough. I hope that makes sense.
TBH we know it will look amazing anyway, so go for it.
Yeah, maybe I'll do the highlights with the same sort of contrast you use on gems; mostly dark and then bright only where the light really catches it. I'll give it a go later.
Theophony wrote:I like the red feathering, but don't forget that th Orc will probably help him with some chalk kill marks on top of the carapace, maybe in a yellow chalk color , or different chalk colors denoting different kills. Yellow for infantry, white for tanks etc. as for the claws how about fading to green. Took the kids to the zoo yesterday and saw some lovely colors on animals where the blue green fade was nice.
Ha. That's assuming the Driver is not in competition with the Gunner to see if he can run the target over before it can be shot... Will see how it looks. Thanks Theo.
Would the good "mad" scientist want them competing or working together as a well oiled team? I can see friendly competition, but I would think he would have them in better control than the driver jinking just so he gets to run over an opponent while causing the. Gunner to miss wide. I would think that they get carrots if they cooperate, or the stick if they don't play nice.
Ha. I'll leave the claws 'til last and see what works for them best.
I've added red to the soft parts with quite a dilute paint to get it to go into the grooves and leave the raised parts darker. Still needs some more work. I will add some blue to the edges and see how it looks... Watch this space.
Theophony wrote:Would the good "mad" scientist want them competing or working together as a well oiled team? I can see friendly competition, but I would think he would have them in better control than the driver jinking just so he gets to run over an opponent while causing the. Gunner to miss wide. I would think that they get carrots if they cooperate, or the stick if they don't play nice.
Well it's all about causing as much destruction as possible. The Scientist's aim is to reverse the trend of civilisations creating too much order (by building things, for example). Whether by working together or by competing, the pairing will be "optimised" to remove order and replace it with as much chaos (destruction = smaller pieces = more permutations in their arrangement = higher entropy = more chaos).
What's most likely is that the gunner will focus on targets far away and anything nearby will be run over... I was thinking more "competing" for targets, rather than points/carrots(squigs/biomass).
Maybe I'll give it a rule that if something is close enough, the Driver will try to run it over... That could be fun.
So maybe the wires give good sensations to the one doing the killing and a gentle(not so much) jolt to the one not doing the killing to get them to hustle more.
Theophony wrote: So maybe the wires give good sensations to the one doing the killing and a gentle(not so much) jolt to the one not doing the killing to get them to hustle more.
Not that either of them really need encouragement to attack things, but that is likely after the bit of fluff I wrote for the WS pilot (the one that is only a head, but is wired up to feel happiness/pleasure).
Right... Gunner. I was ready to say that I wasn't too pleased with how the paint-job has come out at present... But... looking at the photos, I quite like the effect on the carapace; The soft recesses have had a couple of washes of reds and a highlight of pink. The blues were done in three stages; Dark blue over most edges, a medium blue to start adding the details (covering less area than the dark blue), and then a light blue to pick out the fine detail. Also, just because, I added small flecks of pink to the blue areas and I think this really helps the look.
I like the "blue flame" look of the carapace so much, that I think I'll add it to the other areas that I just highlighted...
It's a go then! So, I'm calling the Gunner done. I added the flecks to the arms and legs, the teeth are done and the claws were gloss black with flecks of crimson (just for you RH ).
Many angles in the hope that all the details are shown somewhere.
In celebration of the crew being completed, here's some music (bonus points for spotting the film reference)
And with that, the interior of the Predator is complete. Here's many photos of all the angles I could think of (as this will be the last opportunity to photograph most of this).
Thanks for all your help and suggestions and baring with me as I obsess over tiny details that probably won't be seen. I hope you will stick with me as I progress to the exterior of the tank. Much more work to do.
Co'tor Shas: Thank you, and I enjoyed adding all those little details.
Thanks Moltar. But what film was that music used in? It's a very relevant scene.
Littletower: Thanks. Well the hatch on top of the turret will also be hinged, but that whole piece will be left removable so doesn't really help.
I think the turret may well be the next thing to do. I think I may do the next commission piece before moving on though, so keep an eye out for updates over in that blog.
Also digging Dr Octagon....not sure as I still haven't seen it, but I believe some of his tracks appeared in Buffalo Soldier, and I remember a scene in the book which involved a tank joyride.....so I'd guess that would make sense....
Also digging Dr Octagon....not sure as I still haven't seen it, but I believe some of his tracks appeared in Buffalo Soldier, and I remember a scene in the book which involved a tank joyride.....so I'd guess that would make sense....
Many internet points to you good sir. That is what I was thinking about. It's worth watching for that scene in itself... or you could just take a moment below;
This build and now the resulting painting is really quite nice. I wish I had something more constructive to contribute, but I'm just so amazed at how good it looks. The hinge tutorial is really helpful, too.
Warboss_Waaazag wrote: This build and now the resulting painting is really quite nice. I wish I had something more constructive to contribute, but I'm just so amazed at how good it looks. The hinge tutorial is really helpful, too.
Thanks Waaazag. It's nice to know that people like what they see and it's good to know that I've not missed something that should/could be added.
While I can't take credit for the technique, I find it useful to share (and read) experiences with techniques. Many times, what doesn't work is more useful to know, than what does.
In other news: I've just cleaned up some cultists ready to start painting them tomorrow. Although the mould lines on the DV kit are minimal, I still have to eradicate all traces...
I've also been sucked back into making test chambers for Portal 2... My problem-solving heaven... Excuse me if I go quiet for a bit.
Warboss_Waaazag wrote: This build and now the resulting painting is really quite nice. I wish I had something more constructive to contribute, but I'm just so amazed at how good it looks. The hinge tutorial is really helpful, too.
Sometimes, it is enough just to say, "great work". So, great work!
Thanks Shas.
I was concerned about the Gunner's scheme for quite a while, but I just relaxed into it and let it take it's own path to completion. He is unique in my army and that is all that is necessary.
Dr H wrote: Thanks Shas.
I was concerned about the Gunner's scheme for quite a while, but I just relaxed into it and let it take it's own path to completion. He is unique in my army and that is all that is necessary.
Now that the Cultists are finished and ready to go up on ebay, it's time to return here and continue the tank.
Next job I have decided is going to be the turret. This is technically the last of the interior jobs as I intend to build the inside of the turret. This will involve a few little details (boxes, dials, surface details), and the rear of the main gun and it's ammo feed...
Due to the construction of the models turret; where the pivot for the gun is, the height of the turret (not a lot) and the stated elevation for this tank (-15 to 28deg, which I intend to get close to but probably not to the exact degree), this looks like it will be tricky. But I'm not one for backing away from tricky problems (more often quite the opposite).
So, the working parts of the gun (breach, recoil dampers, etc..) will have to be miniaturized using The Scientists best technology.
I'm not sure how I will do the ammo feed yet. It will have to look functional, but probably won't move with the gun.
I'm also considering adding a co-axial machine-gun alike in place of the usual pintle-mounted storm bolter.
And I'm also intending on adding spaced armour around the sides and back of the turret, just to give it a unique look and will also bulk up the turret so it doesn't look tiny on top of the (quite wide) tank with my (quite large) sponsons.
monkeytroll wrote: Are you using the stock pred turret or one of the IG ones as the base?
The stock turret. Don't want confusion of whether this is a Predator or an IG tank (the sponsons are quite close as it is). Also, I have a Predator turret and don't have any IG (or any others for that matter) turrets.
for the genestealer, the touches of red are a really nice subtle addition.
Thanks on both counts.
Really interested to see you try and pull all that off within the tiny predator tank turret, or are you going to enlarge it a bit?
cool stuff
I'm also interested in how I'm going to do this... Still planning an angle of attack. Need to find a way of fixing the droop issue the turret has with the gun (will probably involve washers), so it stays at the angle I put it at. I'm going to try and keep it with the original dimensions. I'll only expand it if I have to.
Most of the details will have to be just around the edges as there needs to be enough space for the hatch to be accessible. Some of the interior walls of the turret will need to be made to look like interior walls and not like a bit of model that weren't designed to be seen... But doing this on the two halves of the turret in a way that looks natural when they are stuck together is the biggest problem I can see at the moment.
Good luck with the turret. And get some good tweezers. You'll need them. I'd try making everything as panels and them just gluing them in, rather than fiddle about with the inside of the thing.
Turrets on the vehicles in this game are way too small really. In tank design, you want a big turret. Look at the MBTs these days. (except the Soviet stuff)
Red Harvest wrote: Good luck with the turret. And get some good tweezers. You'll need them. I'd try making everything as panels and them just gluing them in, rather than fiddle about with the inside of the thing.
Turrets on the vehicles in this game are way too small really. In tank design, you want a big turret. Look at the MBTs these days. (except the Soviet stuff)
Ta. Yes, I have plenty of tweezers of all kinds of shapes and sizes. Yeah, that's not a bad idea for some of the details. It's still all open at the moment and I'll try and do most of the work like this (and the painting...).
You're not wrong about the turret size too. In the future, things will either be bigger (current trend in phones) or smaller (previous trend in phones)...
I'm just making some more shells (like those in the ammo dispenser) for the auto-loader that I've yet to design...
Also, I've added the co-axial machine-gun to the turret:
I've found some tubes of the right diameter for the gun and will see what happens with them as I start to throw glue about...
So, even with a minimal addition to the rear of the gun piece inside the turret, I can only manage a -10deg elevation instead of -15deg, but with a little modification (I'll show next time) I have kept the +30deg elevation. That's the important one really.
I've selected a few bits to make the loading mechanism. I'm aiming for a kind of cradle and plunger with robot arms affair... Will have to see how it turns out...
Indeed it is. A Wave Serpent bit. I used the more sensor-looking one for the WS and then saved this one for use as unusual looking weapons. This is the short bit of the two on that part with the gems removed.
I nearly used an Ork big shoota, but looked a bit too thick for the purpose.
Dr H wrote: Ta. Yes, I have plenty of tweezers of all kinds of shapes and sizes. ...
Don't we all? And still want more. My philosophy is spend all my hobby money on the tools to build things, rather than on the things themselves. Twice as much fun that way.
No...Marines can't use Heavy Stubbers..sorry, their armored fingers won't fit on the triggers. You use the Guard Baneblades, but you can't use our stubbers The line must be drawn HERE
Just chiming in with the notation on tools. With the right tools (and skill, obviously), you don't even need to waste time or money with kits. My thoughts on the turret is that it looks small. I realize it's still WIP, but my initial reaction is "weedy". Just my opinion, but I think it could use some bulking up. Even if it just gets some extra armor plating. Overall your build and paint job is fantastic.
Dr H wrote: Sounds like a good philosophy, Red. Most of the tools I have, I've been using for the past 25 years or so...
Oh, so they're practically new
I managed to get a hold of my father's dissection kit from college many years ago. It contained several excellent sets of tweezers, some odd looking probes and retractors (great for green stuff shaping, and burnishing too) and 3 different types of scalpels. I reckon they're about 60 years old. I still use them. Good tools should last several lifetimes.
Camkierhi wrote:Love the look and vibe this thing has.
I am with Red too. Materials are all around us, if we just have the tools to turn junk into art.
Thanks Cam. Good to hear you are feeling it.
shasolenzabi wrote:Tank is looking good!
Thanks Shas.
OneManNoodles wrote:Couldn't agree more with the tools.
Sounds like your thinking on building it on the same lines I would. It may just work
Well see what you think below...
dsteingass wrote:No...Marines can't use Heavy Stubbers..sorry, their armored fingers won't fit on the triggers. You use the Guard Baneblades, but you can't use our stubbers The line must be drawn HERE
What marines No marines involved with this tank... I may just add that to the list of things to do, just for you...
Warboss_Waaazag wrote:Just chiming in with the notation on tools. With the right tools (and skill, obviously), you don't even need to waste time or money with kits. My thoughts on the turret is that it looks small. I realize it's still WIP, but my initial reaction is "weedy". Just my opinion, but I think it could use some bulking up. Even if it just gets some extra armor plating. Overall your build and paint job is fantastic.
Thanks for the thoughts. I am hoping the spaced armour will make it look larger, but will have to see when I get there. Thanks.
Red Harvest wrote:
Dr H wrote: Sounds like a good philosophy, Red. Most of the tools I have, I've been using for the past 25 years or so...
Oh, so they're practically new
I managed to get a hold of my father's dissection kit from college many years ago. It contained several excellent sets of tweezers, some odd looking probes and retractors (great for green stuff shaping, and burnishing too) and 3 different types of scalpels. I reckon they're about 60 years old. I still use them. Good tools should last several lifetimes.
Well none of my tools were new back when I started using them. One of the advantages of having older brothers is that you occasionally get useful things handed down (instead of just clothes). Some may be (and some look) old enough to be from a grandparent or my Dad too.
Progress on the reloading mechanism:
In theory this is designed to be able to move up and down with the gun to reload it at any angle. The observant amongst you will see that it can't really move down due to the turret ring... Can't really do a lot about that.
I was also going to add a second arm that placed the shells in the cradle from the ammo box on the back of the turret. But the limited space means I probably won't. Will see what I can do though.
The top picture shows the "modification" that was required to maintain the +30deg elevation (green arrow).
As you can tell, there won't be much visible anyway. But it's good practice for later projects and it fills a gap.
Thoughts?
What else is going in there that the second servo arm would have to fit around if it goes in?
Thanks. It's more that, as you can see, this arm is pretty close to the hatch opening and the second arm has to fit between the two, leaving room for access.
I'll see what I can do. If I get the right "limb" length and find a good place to anchor it, it could fit...
Co'tor Shas wrote:Looking good, can't wait until it's finished.
Thanks. Much more work left to do yet. Stay tuned for the next exciting instalment...
Red Harvest wrote:Nicely done. Have you done any research? A quick googling of 'interior of tank turret' turns up some interesting stuff.
And good to hear about some of the tools too. I'm in good company I see.
Thanks. Oh yes, much research. There's a crazy amount of stuff crammed in some tanks...
inmygravenimage wrote:Been lurking; got to say, that's some crazy interior detailing there mate. Great job!
Hey Graven, nice of you to pop in a say hello, rather than peeking though the keyhole. Thanks.
Mini-update on the turret: This shows my solution for getting the gun to stay where I put it; some pieces of card stuck to the sides. Doesn't really need a full, neat washer surrounding the pegs as it only has limited movement.
I've also added a few panels to break up the flat surface (there will be more), and the ammo boxes for the co-axial gun (I may put a strap around the spare one). I've also prep'ed the arms for painting and once they are done and installed then I'll add the remaining details ... also need to make a couple of monitors too and then, finally a sprinkling of wires/cables.
Oh yeah, and I've also made the hatch. Using the same technique as the other one (and like the other one, breaking a piece in the process. But it may have been fixed with a bit of glue and not a complete re-build).
The hatch appears to be holding up well now that the glue has fully set.
Here's a few pictures to show the gun elevation, the hatch and what you can see (currently) inside the turret through the top and bottom.
Here's a little more... Well, done actually... and primed...
You can see that:
I've added some trailing cables. Why do they just suddenly stop in seemingly random places? I'm glad you asked that, it's because they go out of sight from either the bottom or the hatch, so there was no point in trailing them further.
I added a little monitor next to the hatch (a bit of sprue with a square of card stuck on it).
I also added a piece of treadplate under the hatch, as that seemed a place where people are likely to... tread.
I added a "cap" to the end of the breach, so that it looks nice a neat... and I also filled the underside of the gun piece there so that is also neat.
There's a couple of rough patched where I stuck something down and then noticed that it wasn't visible, so moved it (and as it wasn't visible there's no point cleaning it up).
Once the primer is dry I can give this a lick of paint and then stick it together.
monkeytroll wrote:Dammit, you're a doctor, not a captain.....
Looking good, always approve of wires
Thanks. Can't go wrong if you add wires or tentacles.
hk1x1 wrote:I love all the extra little details you've added, looking forward to seeing this painted .
Have you decided on a color scheme yet?
Thanks hk.
No, not yet. I think I will have to see what grips me when I have it ready to paint.
Unless inspiration hits me in the mean time. I've done a little searching, but nothing yet...
Thanks. If only I didn't keep breaking them in the process...
The Predator looks very 'happy' to see you
Bad Ruglud.
It's not as pretty as it could be, it may not be the best design, but I'm calling the interior of the turret DONE. You can see the rough edges, unfinished paintwork etc. in the open shots, but when enclosed, these don't show.
I hope it was worth the wait.
That now concludes the inside of the tank. It's all done. So now, I'm going to look at gluing the hull together and looking at what the next job will be...
inmygravenimage wrote:Gosh, that's ever so pretty! btw, is the plog title a reference to Thermodynamics, Muse, or what?
Thanks Graven. It's a reference to the second law of thermodynamics. That explains Entropy as a measure of disorder. Which, as a chemist, is what I think of when I think of Chaos. Although I do like Muse, that was not in my mind at the time.
It's all explained in the fluff and, conveniently, I've recently sorted out a thread in Dakka Fiction (as I ran out of space in the article area) with all the bits of fluff that are spread throughout this thread compiled together. The link is in my sig' should you or anyone else fancy a long, amusing, read. It's really not meant to be taken seriously.
Theophony wrote: Poor little gaunt, its so dark n there now bzzztt, okay he's feeling better now
He likes the dark. Look at his little cheeky grin.
I've been quiet recently (more Portal), but the hull is glued together with minimal gaps (that still need filling ), but I decided that I should start at the top and work down. This means... more turret action...
Namely, the (much hinted at) spaced armour.
I've been researching and have now started adding the support struts. I took a picture to check the look so I thought I'd share it here.
Notice that the struts on the example turret are fairly thin. While that makes sense, I didn't think they would be very durable so opted for thicker pieces of sprue (obviously).
The curve will only be around the rear of the turret (the ammo box is quite nicely shaped I thought), but will be a little flatter at the back.
I'm going to get all the struts on first and then see about attaching the armour (and whether it will be the card used here or resort to using plastic).
Camkierhi wrote: Spot on DR, looking great. I have a feeling this thing is going to be a brute.
Thanks Cam. That is the look/feeling I am aiming for with the Predator.
The rear piece is on. I nearly glued myself to the turret in several places in the process, but it is on.
I think it both bulks up the turret (will be more apparent when the front pieces are on) and looks pretty symmetrical (considering it's done by eye).
I had to take off 1.5mm from the bottom of the plate after attaching it because it was catching on the tank.
Next to do is the front pieces and then add some lower supports (will be much thinner than the main struts) and rivets (obviously).
I'm a fan of schurzen as well. I made a panzer-blade but I straight up used a panzer 4 J turret with the schurzen. I agree that the turrets look more beefy with the armor.
Here's mine (old photo, it's a little more complete nowadays)
monkeytroll wrote:Nice start to the armour, that'll bulk up the turret a fair bit
Thanks MT.
It does however raise the question of whether the scientist decided only the turret needed spaced armour............
Well I decided to do the turret as (much like the original sponsons) it looked a bit weedy. With my "modest" sponsons added on, it only made the turret look smaller, but also made the body of the tank bulkier and so I probably won't do the hull as I don't want to make it even bigger... I may save that for something like a Razorback.
Boblogik wrote:I'm a fan of schurzen as well. I made a panzer-blade but I straight up used a panzer 4 J turret with the schurzen. I agree that the turrets look more beefy with the armor.
Thanks, Boblogik and welcome.
I was flicking through a book I have on WWII tanks looking for things to add to this tank, came across a Panzer (if you've got a moment... a PzKpfw III Ausf N) with one and thought "yeah, that'll do the job".
It's a good look.
Looking awesome mate! REALLY cool..... That spaced armour islookin sweet..... i tried out something similar on my ESTOC Assault carrier...... so i know how tricky it could be... but yours is looking awesome!
MagosBiff90 wrote:Looking awesome mate! REALLY cool..... That spaced armour islookin sweet..... i tried out something similar on my ESTOC Assault carrier...... so i know how tricky it could be... but yours is looking awesome!
Thanks. I'm pleased with how it turned out. One slightly wonky plate is already sorted and the last one still needs a little work (but may get some battle damage to excuse it's wonkyness ).
OneManNoodles wrote:Awesome, just spent the last 10 min catching up with what i've missed. I love what you've done with the interior.


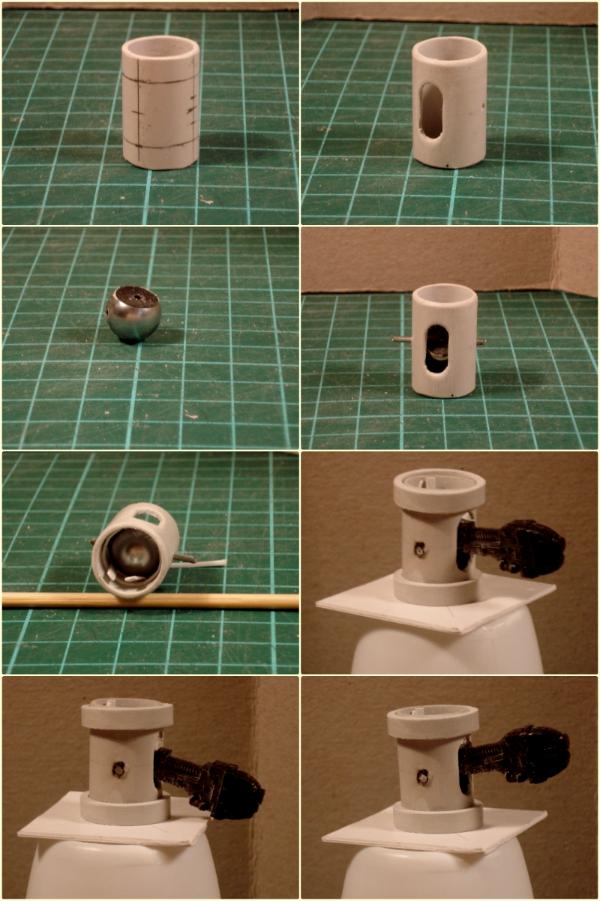
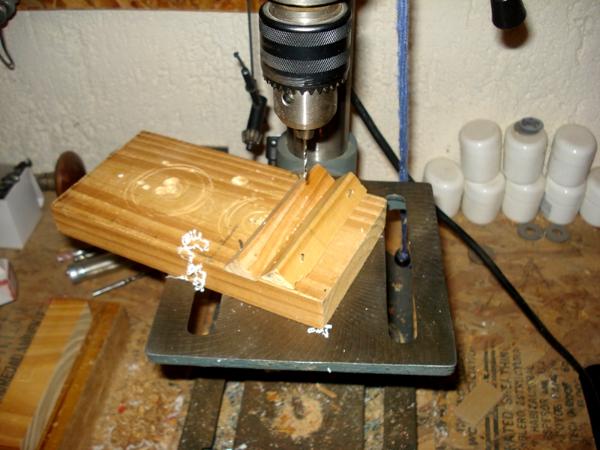

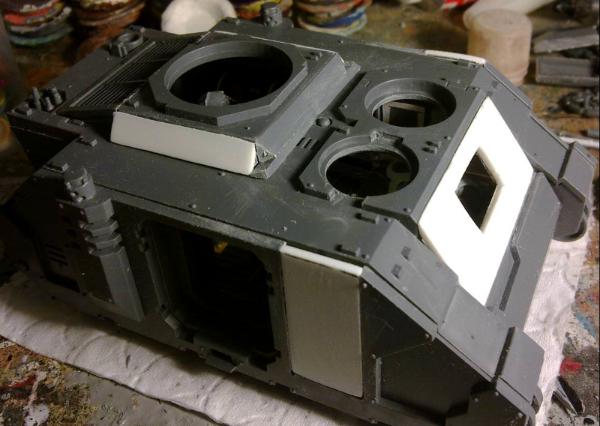

 I did manage to salvage enough of it to be useful (see below).
  ).
).
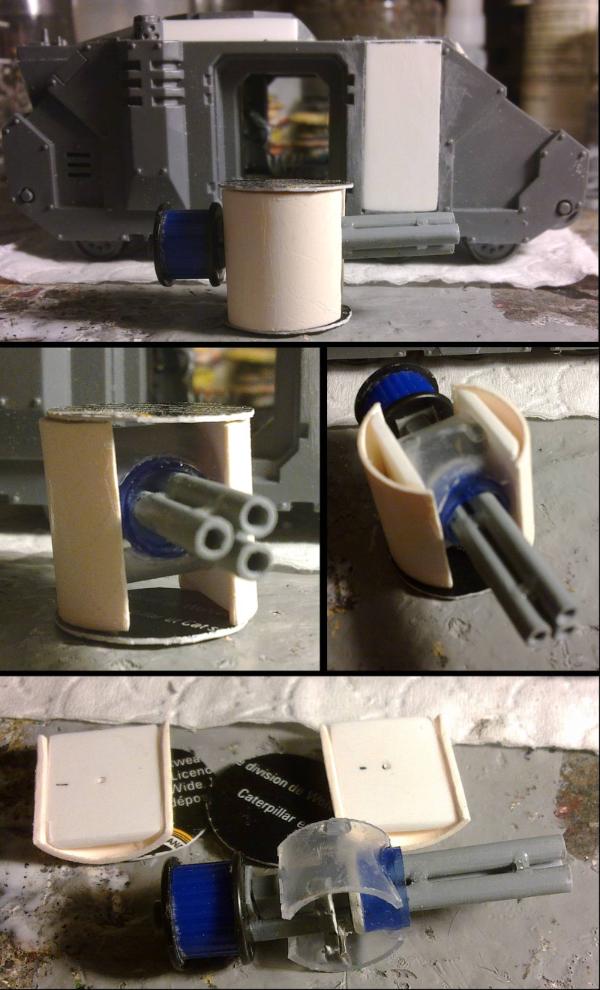


 The modifications were quite simple really (lots of minor changes to the tail, one small arm, one main arm, the waist and the neck and one major change to one leg). The good thing with 'nids is that they have very distinct joins at all their joints that go all the way round, making it easy to cut and re-pose.
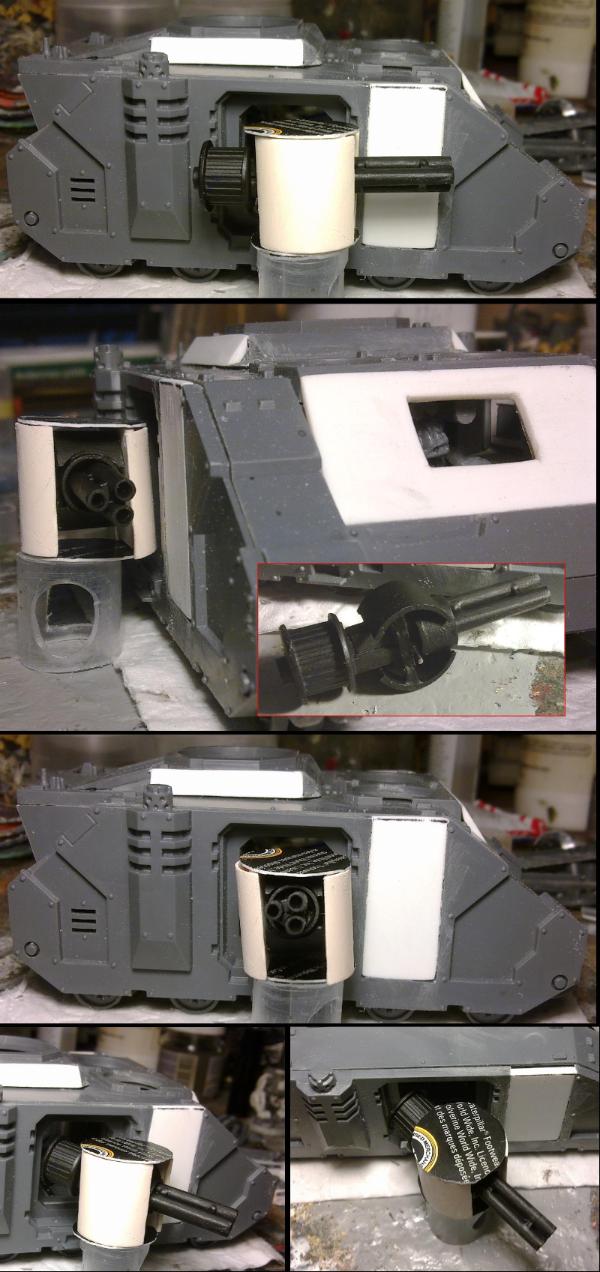


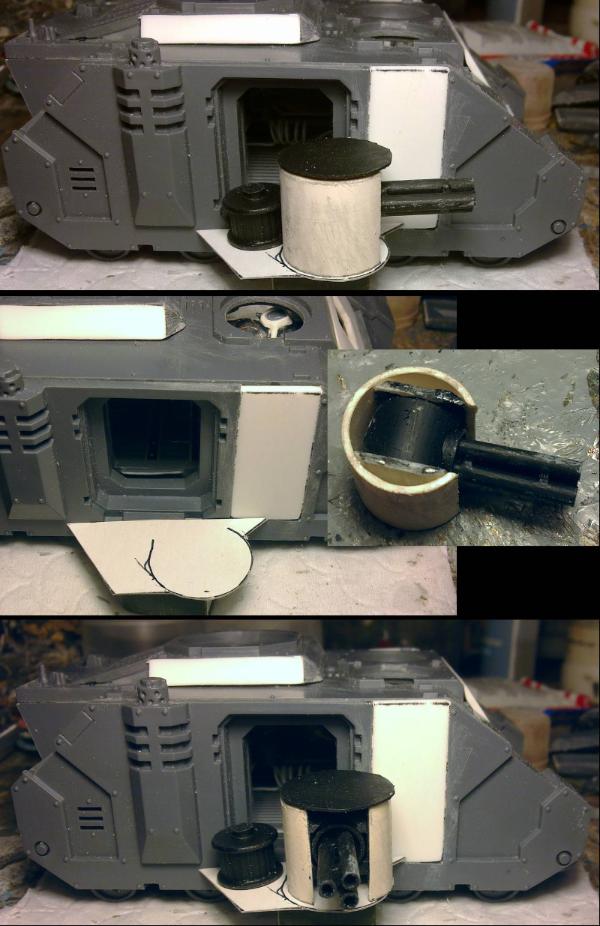
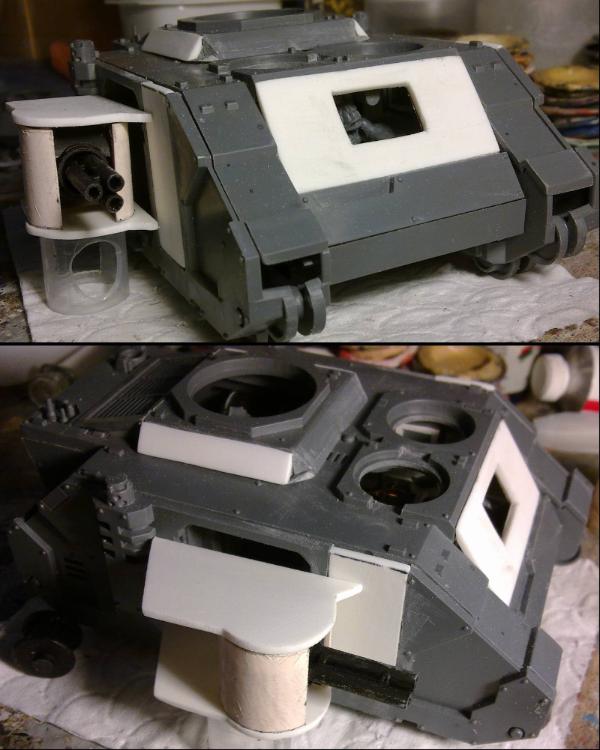
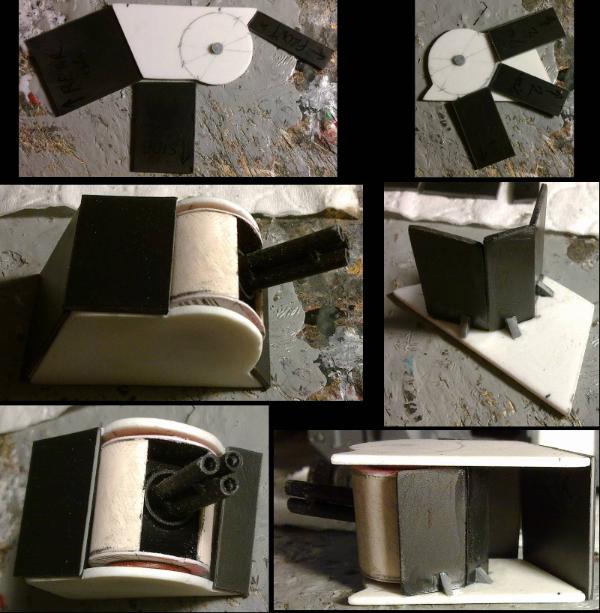
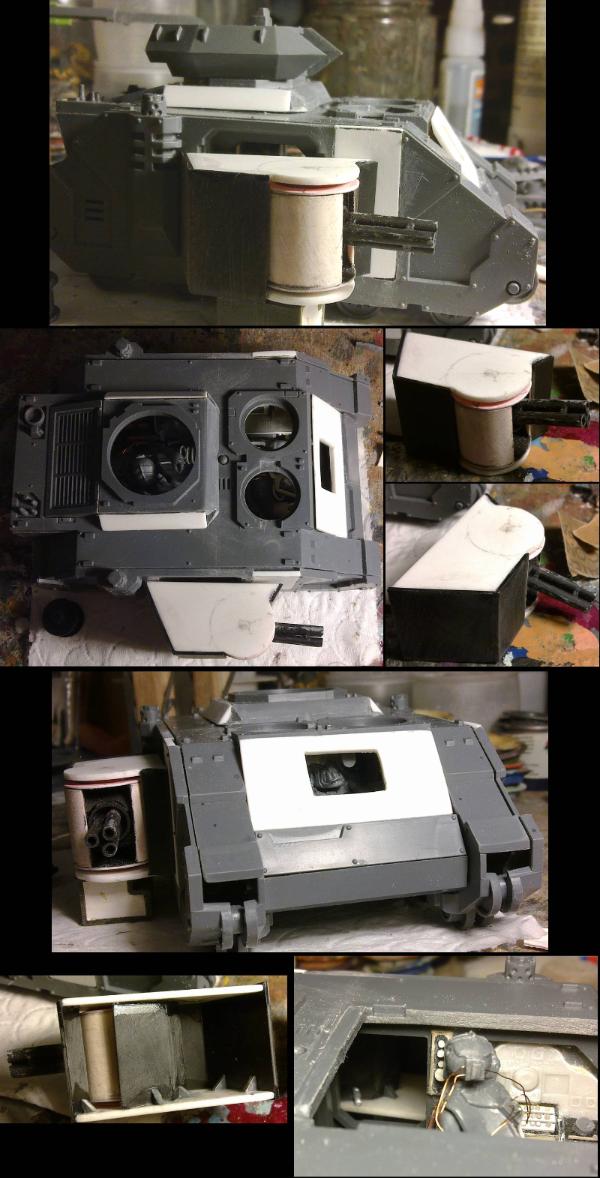

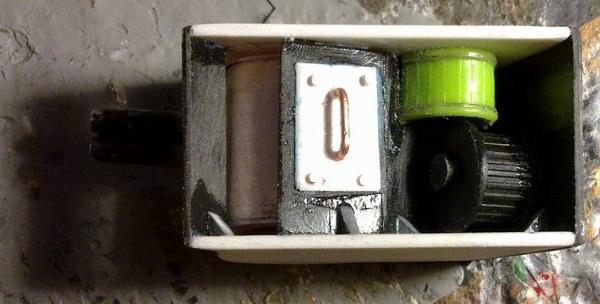
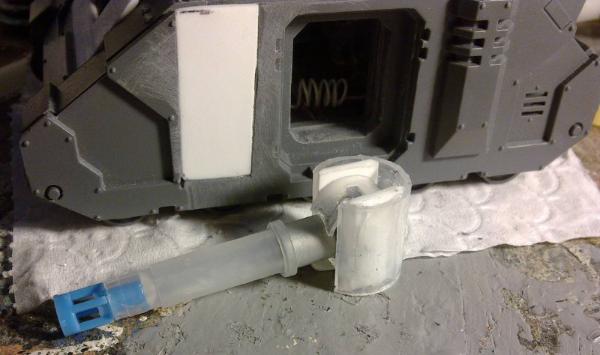

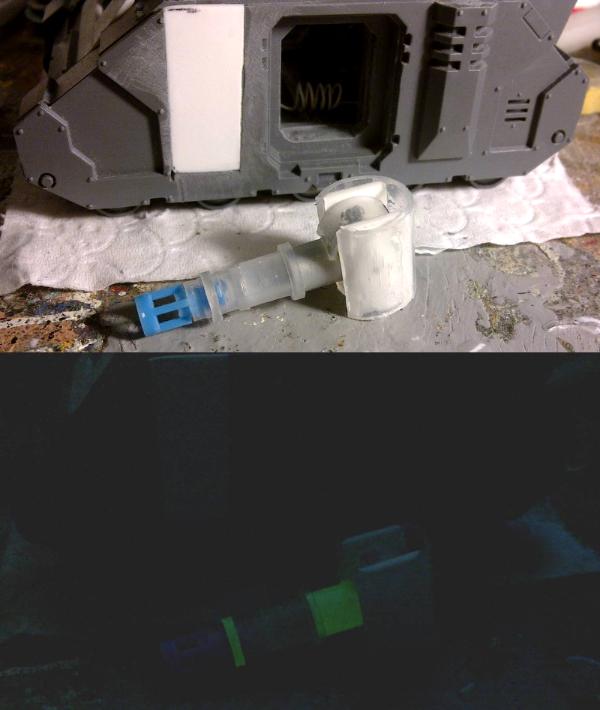


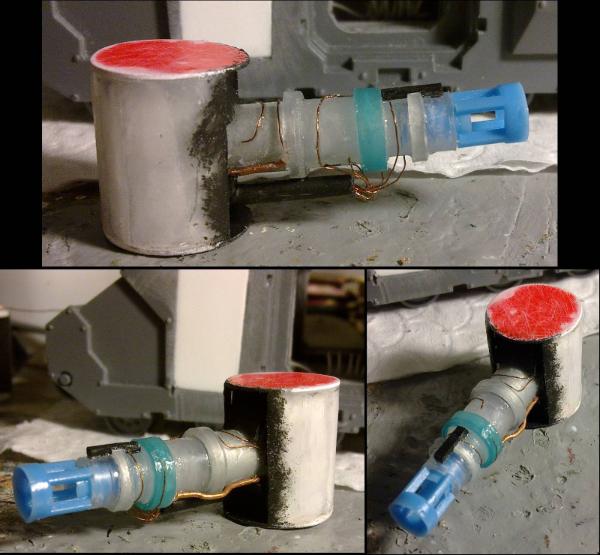
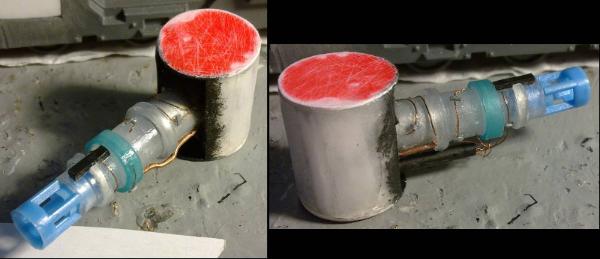
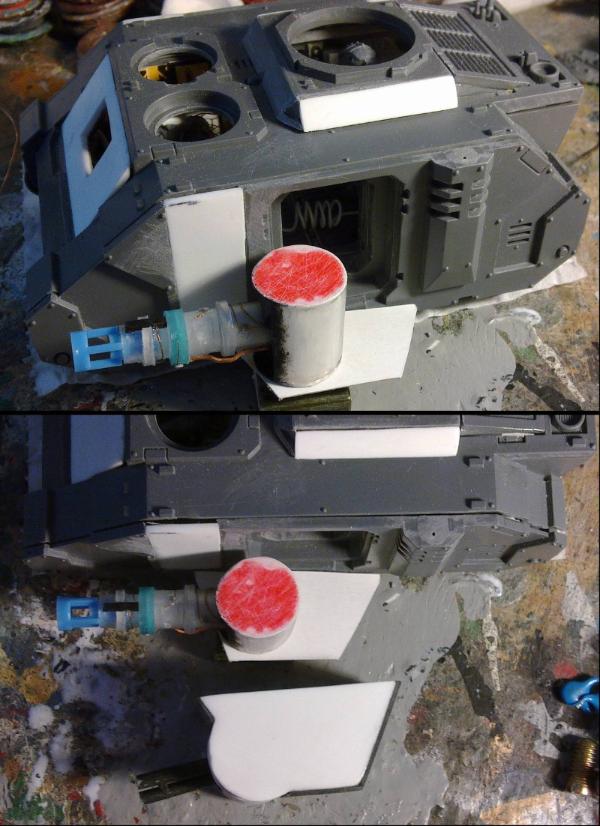

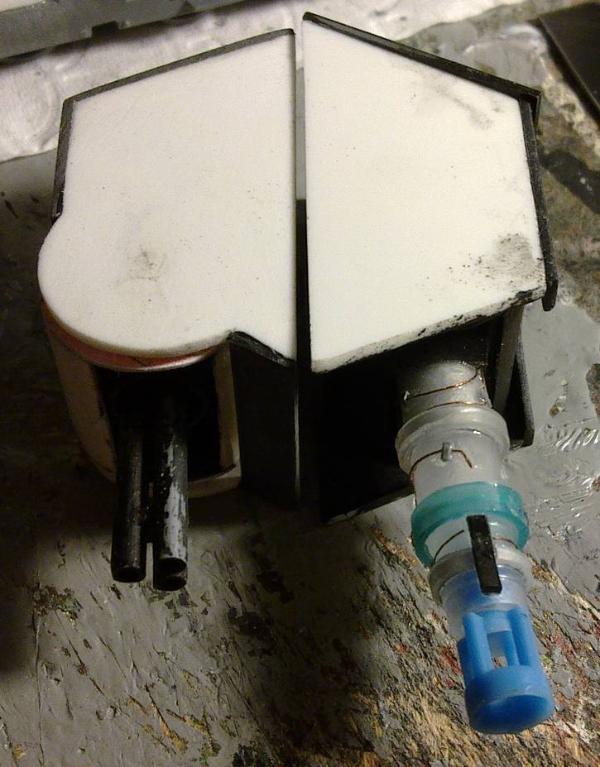
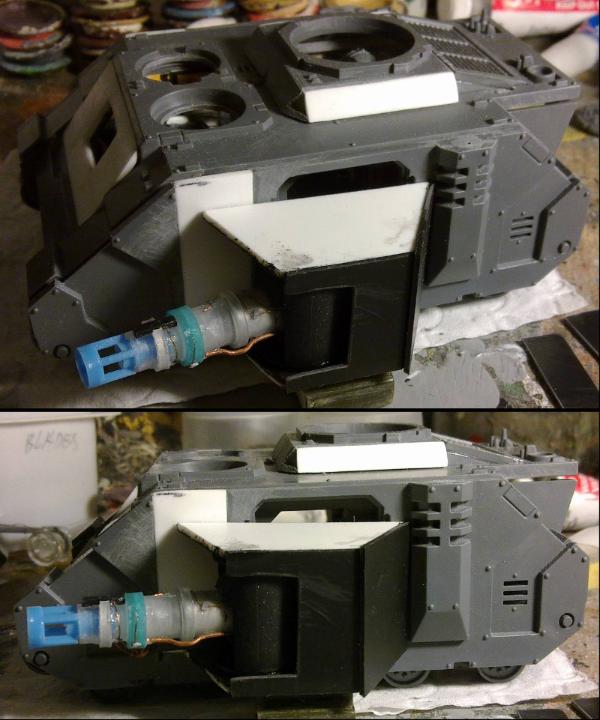
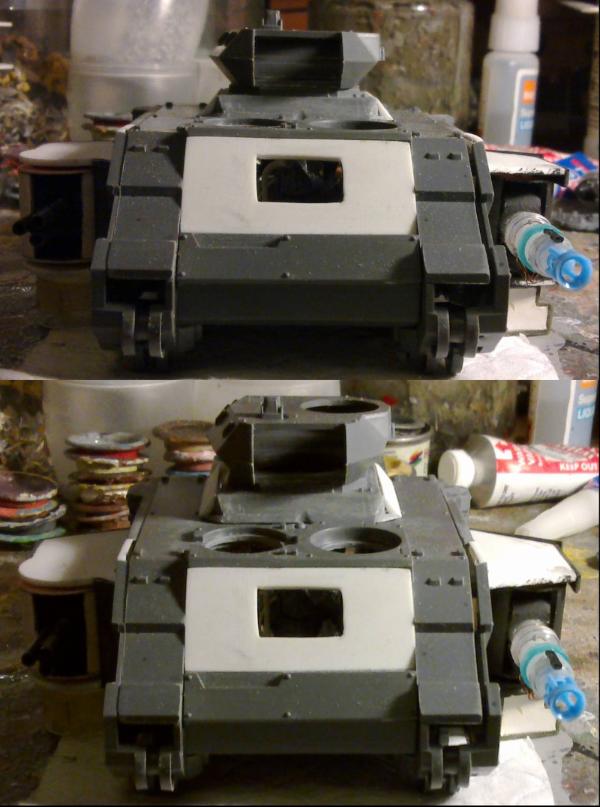

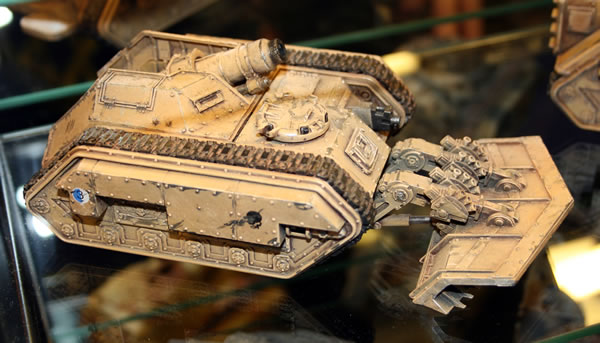
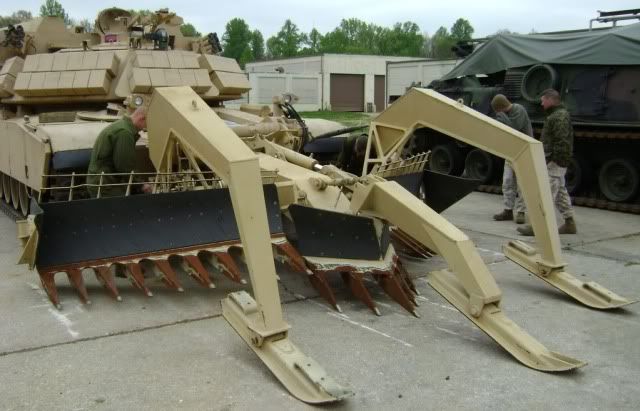


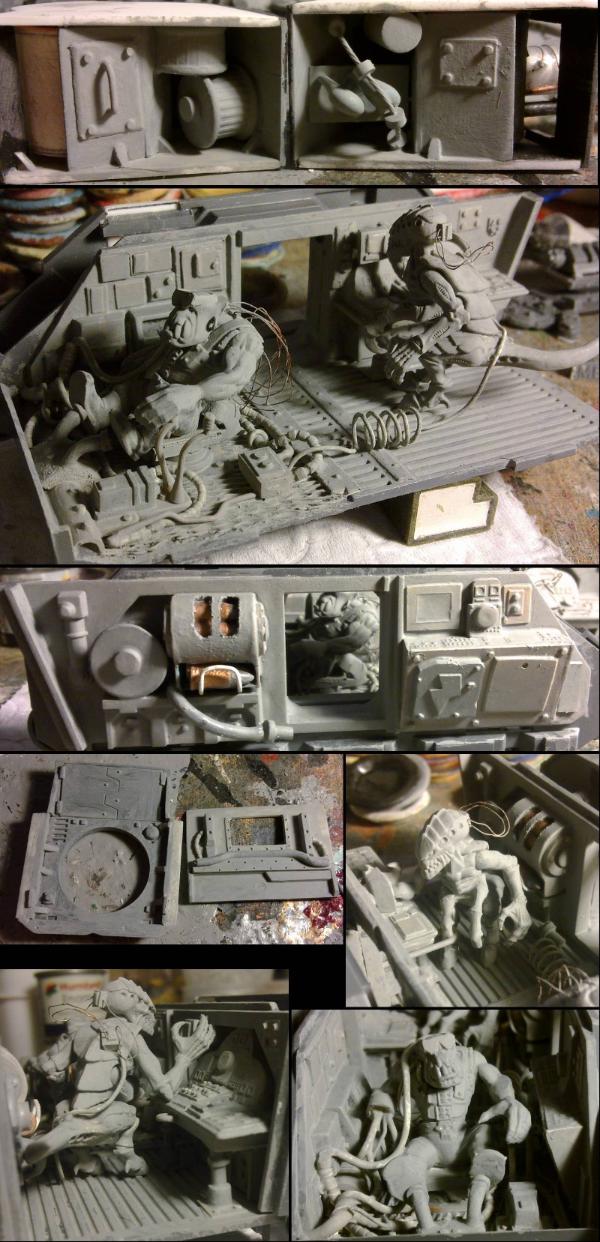
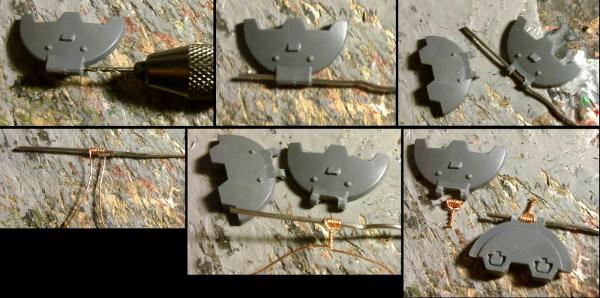
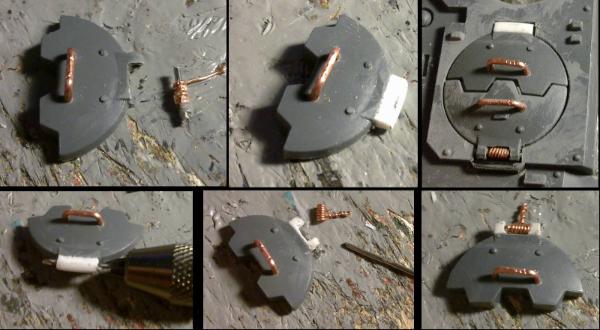
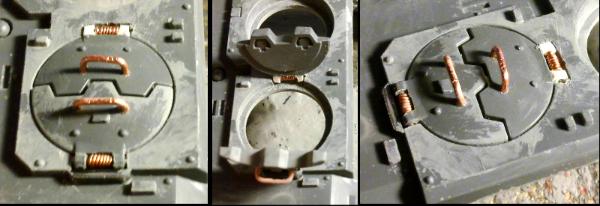
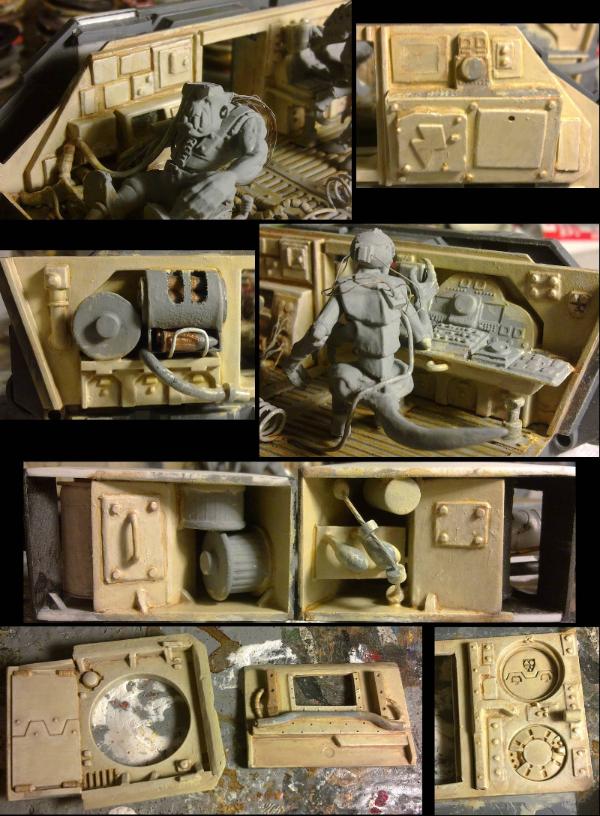

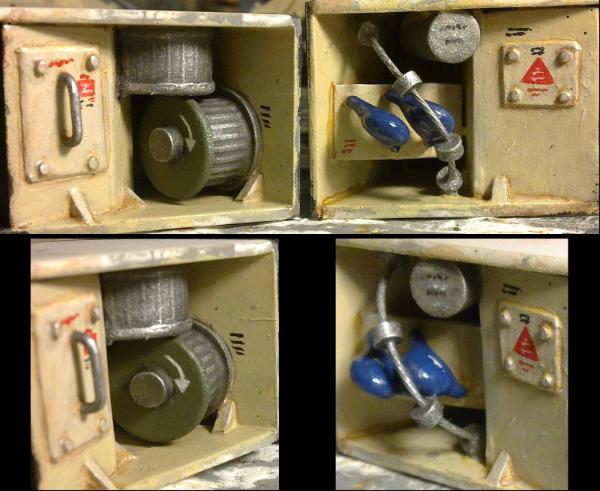
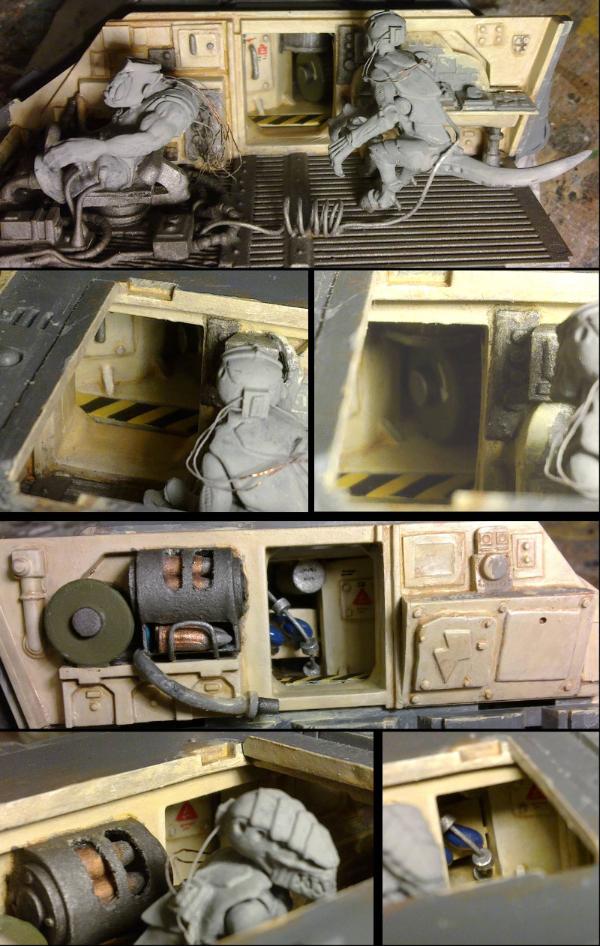


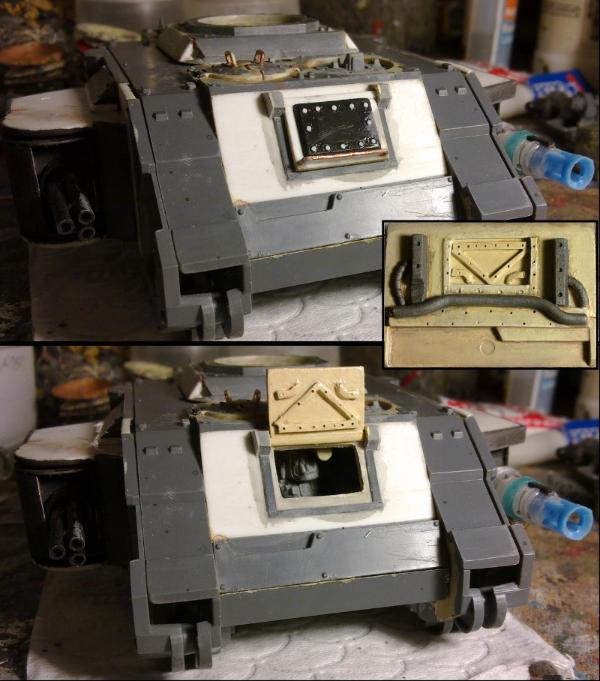
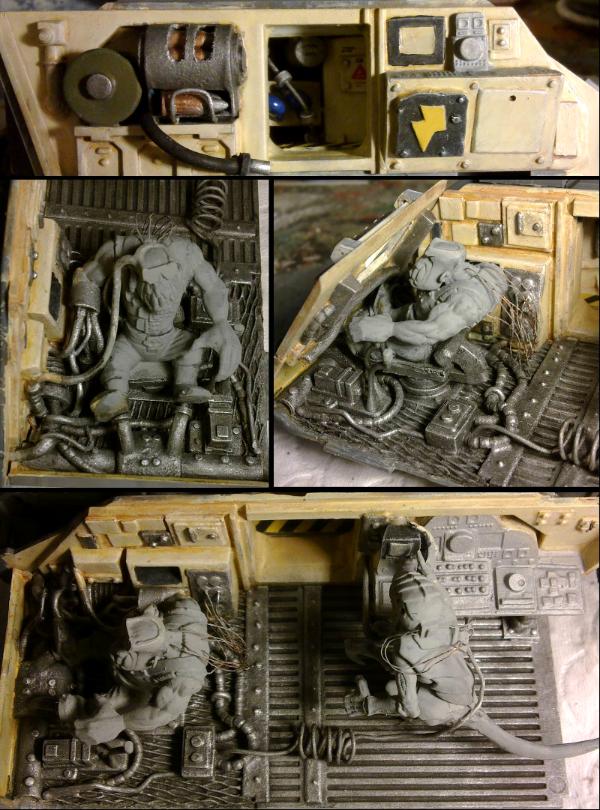

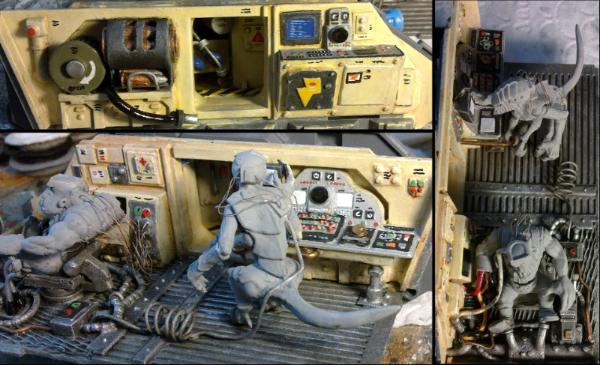
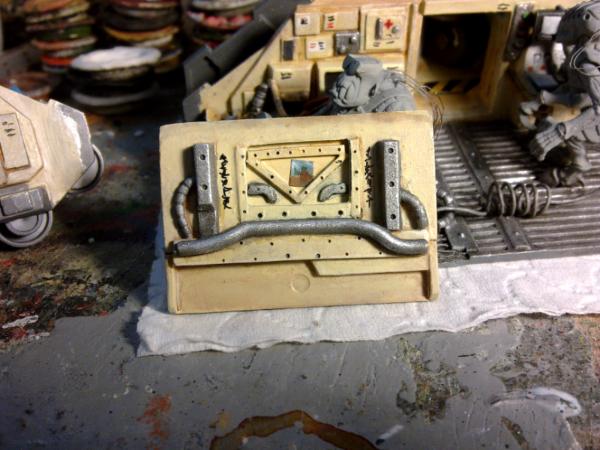
 ), just enough time to catch up on my sub'd list...
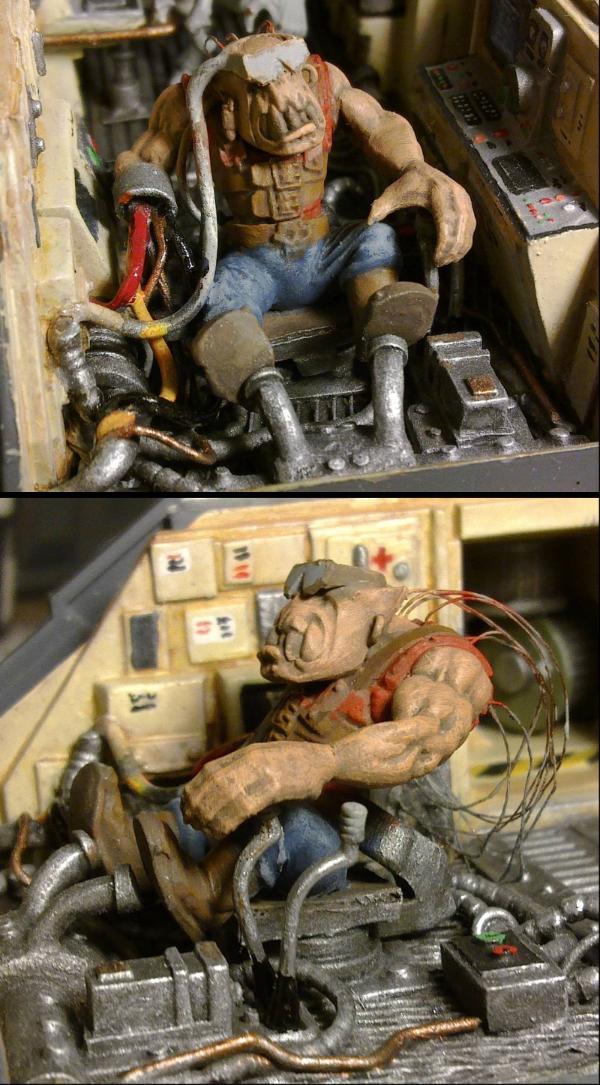

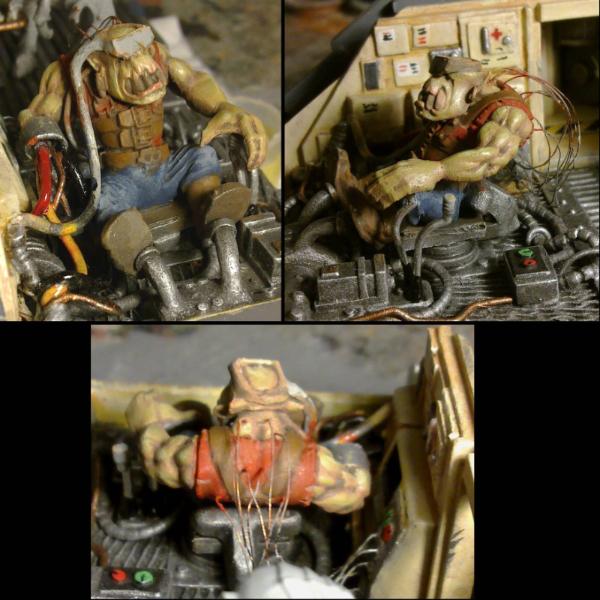


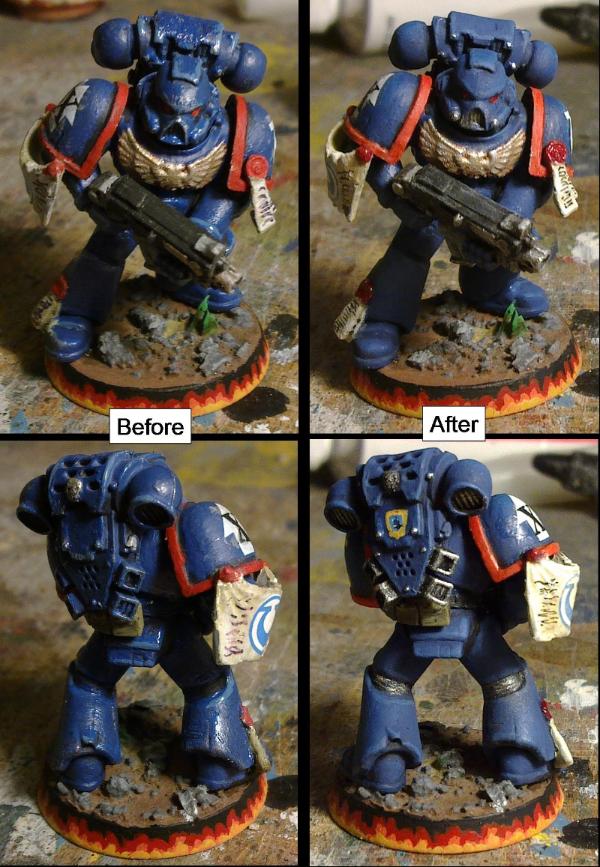
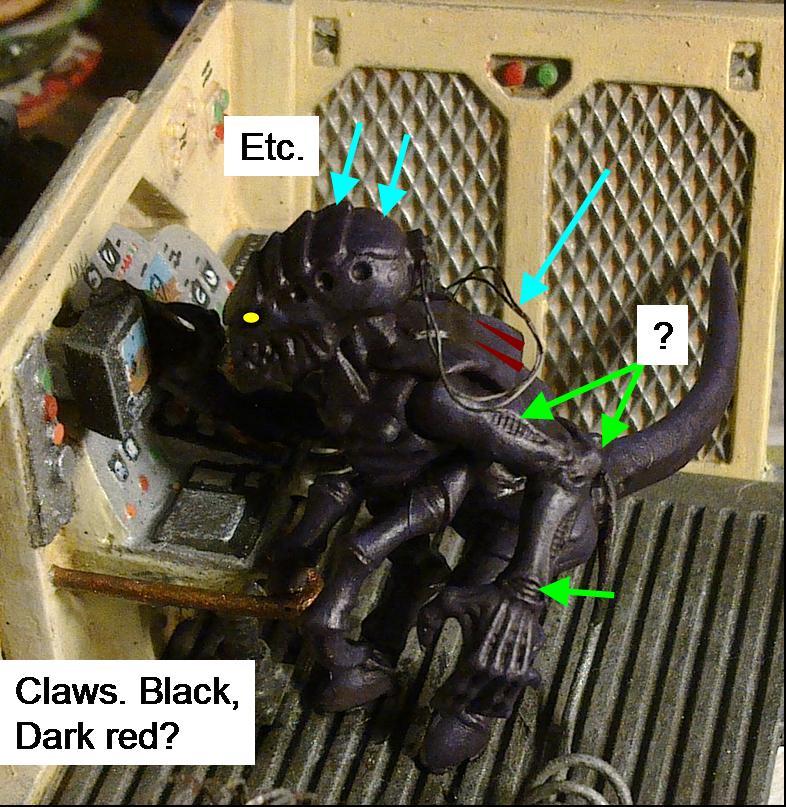

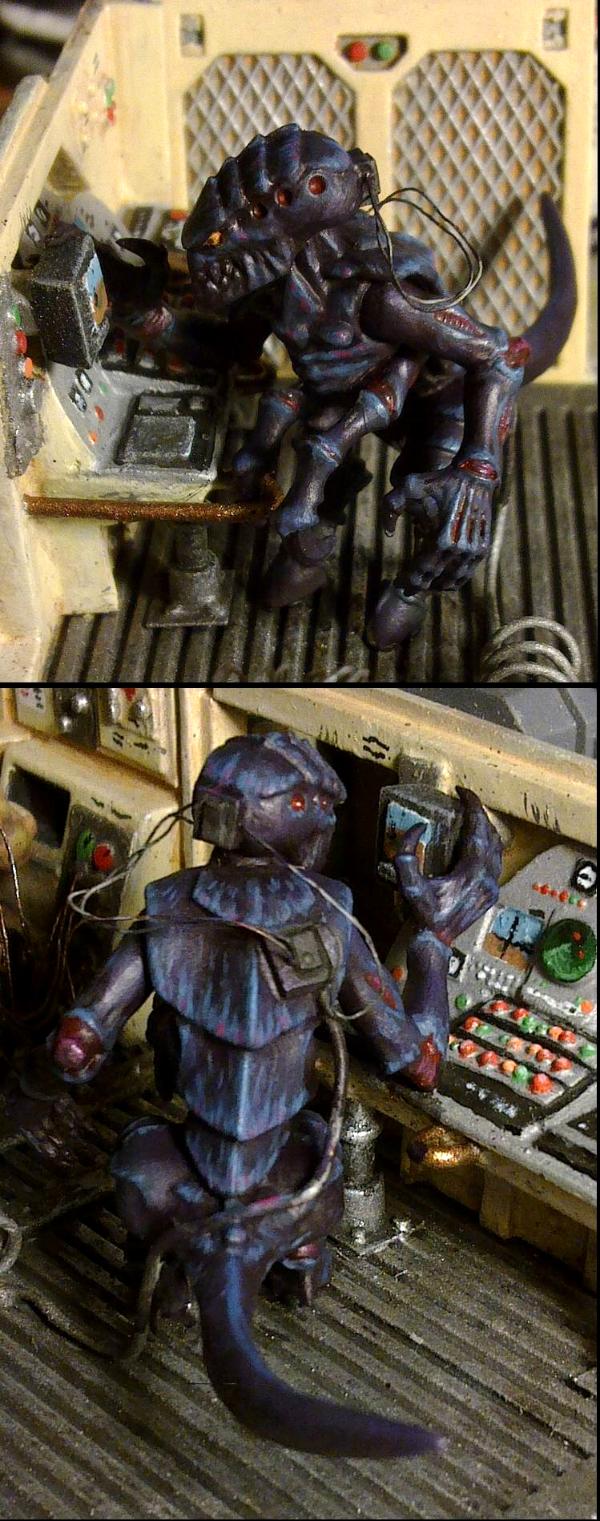
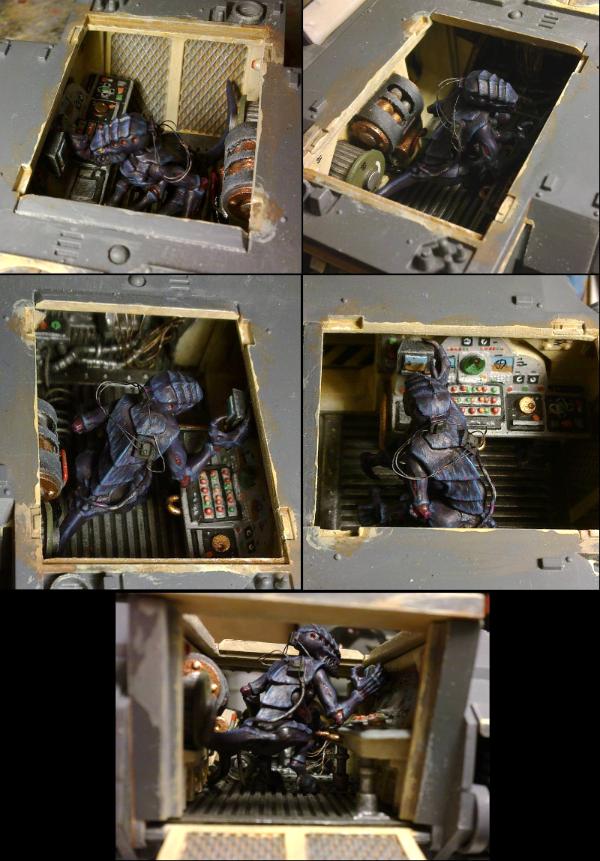
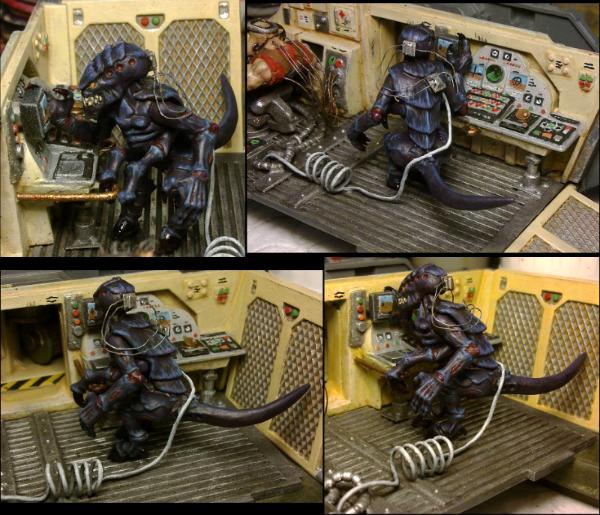

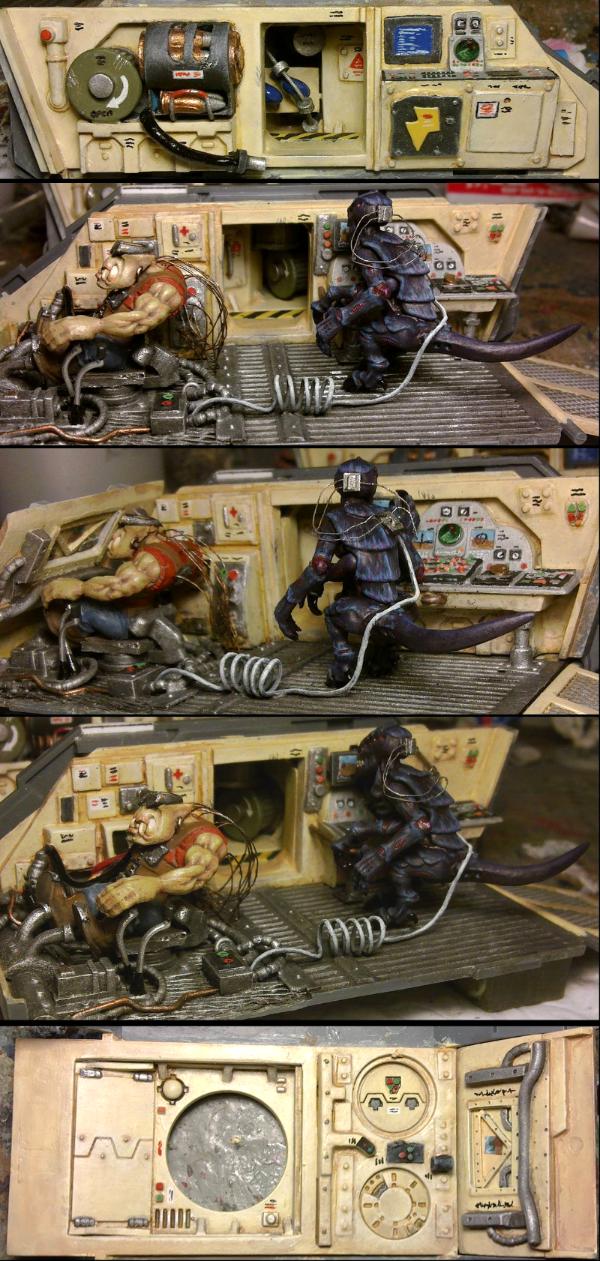
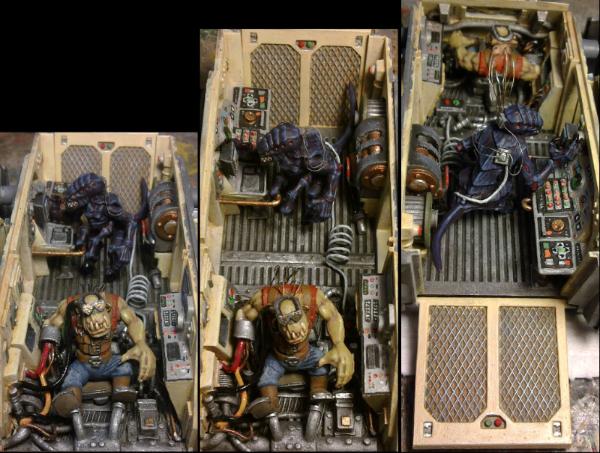


 No marines involved with this tank...