Alpharius- Thanks! The walls are all vacu-formed. Some of the solid walls are re-used through various kits, so yes, I think the idea is interchangability. Having said that, vacu-formed walls are a lot of work modeling-wise. Heavy putty work should be expected. Their Injection-molded styrene sprues are top quality though. I took the workshop kit and built a 2 story building by using only 1/2 of the walls.
http://www.dakkadakka.com/gallery/images-48594-30603_Miniart%20Workshop.html
dsteingass wrote: Alpharius- Thanks! The walls are all vacu-formed. Some of the solid walls are re-used through various kits, so yes, I think the idea is interchangability. Having said that, vacu-formed walls are a lot of work modeling-wise. Heavy putty work should be expected. Their Injection-molded styrene sprues are top quality though. I took the workshop kit and built a 2 story building by using only 1/2 of the walls.
http://www.dakkadakka.com/gallery/images-48594-30603_Miniart%20Workshop.html
Hmmmm...
I admit to needing a bit more here!
Why will all the putty work be necessary - what is the putty covering up/fixing/improving?
I want to get a bunch of these kits - but now...maybe not so much?
Yeah, I thought you deserved a fair warning!
See this piece of ductwork, vacu-molded, you glue two halves together, then trim the excess away and suffer big gaps that need filled with putty, usually twice, then sanded smooth. These kits aren't like GW panels where you just clip them off the sprue and they fit together. Each wall is hollow unless you reinforce it with something inside too.
I will note that the 1/35th scale models are actually OUT of scale for GW. Much larger, doorways too large, etc. But, with a bit of work, you can scale the openings down.
If you look at old American architecture, or at least historical sites here in Missouri, the sizes are ginormous. Touring the governors mansion a few weeks ago with my daughter the first floor is almost 17' high, and the doors went floor to almost ceiling. With these style kits I think it would be safe to use them in 40k, especially in the "nicer" areas of the hive.
dsteingass wrote: Yes, I keep trying to tell these guys that we are all brainwashed by GW scale, but I just sound like the homeless, crazy doomsday guy in the park
Thanks guys!
Better that than the dyslexic insomniac atheist philosipher who stayed up all night pondering if there really was a dog
With careful planning, it's possible to use the scale issues to the modeller's advantage though. Usually with the line "of course it's scaled correctly, just look at the size of [insert other model piece that's also obviously out of scale]"
dsteingass wrote: You have to remove the scalebusters, usually by replacing details with scratchbuilt options, or by adding instantly recognizable GW bits
Yeah QFT.
That's what I meant by "careful planning".
Great scenery but a hell of a lot of cleaning work needed and yes GW scale means over scaled definitely but you have done a cool job tying it in with the scale using the door
Not sure what you mean the problem with the gothic windows though Dave I have no problem with them ( if you mean being ready casted ) I just though you might prefer the mould itself to cast what you wanted.
I think what I said earlier may have been taking wrongly I though Storag had a cool find but I was just offering an alternative.
I need to spend several hours casting more blocks. I have two cafeteria-size trays piled high with them, but it's still not enough! Someday. It's a rainy day today. I'd like to finish the painting on this diorama thing and finish that up today.
Automatically Appended Next Post: Ok, let's call this one finished!
I could spend another week doing rust and weathering, but this is good enough for a deadline now, what's next?
Next?... you help me again! :-) after I tel you how wonderful and awesome that looks to puff up your modeling ego! .....
..... Dave, that looks wonderful and awesome! well done on the pale bricks mate, works really nicely all together and reminds me of the home i grew up in (the colour of the bricks, I didn't grow up in a ruined warehouse with barred windows!)
any chance you or anyone else can think of a way to make a whole bunch of little lights that resemble the search light front on a speeder? I want to add them along the bottom of each walled section on my Mortalis boards to airbrush a light glow from them for some evocative feeling and cinematics!
What do you mean delete if it offends? have you been on MY thread lately! :-) and that would work! what size tube/pellet do i need? and it sounds relatively cheap too which is good as i need a bunch!
That's a great idea Cam! I could form 1/4" chicken wire into a cage, but it would be too big. let me think of this. I am currently sweaty from building a steel shelving unit in the garage and will ponder this dilemma. I'm going to the store later on, maybe I can find some smaller mesh/chicken wire. Hang on Damo!
I made mine with a 6mm BB (plastic ball) , 6mm styrene tube and a 7.6mm tube. Then used a square tube with one side cut off to form the holder. Just add rivets. I hope that Dave can convert that for you into usable language. And hopefully come up with a way of putting a grill on it.
I will put some pics on my ork blog to show how it was made. Its also on my latest adventure a demolisher.
Really sorry for plugging my stuff but just trying to help.
Don't apologize dude! that was a great help! and it may not even need a grill over ir if i can get it to sit right on my boards!
so I need to look for 6mm plastic balls *hehe* and 6mm styrene rod *hehe* and my balls go in the rod? *snicker* or do my balls only fit in the larger tube *Pffft *
I think for ease of painting, the cage needs to be a separately attachable bit. Cam may be onto something talking about square tubing, or rectangular tubing in this case. I'll set my Chopper up later and slice some shape rivets and see what I can come up with. All I have for 1/2 spheres are those plastic sequin gems like Vik used on his Eldar egg thing.
also... for the cage bit i would suggest fly mesh? the stuff you keep flys from flying in your house?... it is basically just loose cloth ... i think i have seen some using it here as a means to add texture to walkways and such...
dave... looks brilliant... when will you show us a look around via vid of your ´munda/ fallout table?... oh... by the way... will this one stay mint weathered or will you wreck it some more with grafitti?
and cam... that looks lovley! and it is a great help for all of us... you are sharing treasures... no need to apologize one inch!
also... dave... nice review... a good read! and i like how you explained the grim dark take on this model!...by the way...do you ever get feedback from the site or some other readers?
ah... i now can sit back and enjoy the benefits of fatherhood... these lil airsoft balls i get for free... as my kids like to collect them for me... it is their very own treasure hunting in sandboxes... you wouldn´t believe how much my kids collected of these...
they used to "cook" with them in their wooden kitchen...
and too bad really that there is no further exchange through the IPMS-USA articles... but then... you get much more output/input and throughputhere on dakka anyways^^
on a totally not related note...
i killed off house...killed of the legions fort and destroyed all bots... and started anew... i felt it were the wrong decisions... now i am again a noob... hunting for pellets to throw at the baddies again^^
well... i shoove a big amount of night time into the mojave^^
also... that game is way less grim dark than the original... very much to my liking...the desert also gives me more oprtunities for sniper action and this helps me save my bum^^
oh and i really like the gunrunners arsenal...it took me a bit to realie that all the ADW updates tho only seem to work on the ADW guns... but once you understand that it is very cool to hunt for new guns...when i took out the tops...(yup... i am a killer^^) i came to love the silenced gun... do all the other silenced addons also work as hidden guns then? so if i silence a 5,56 gun... will this work too?
I didn't have time to build it to scale or paint it.....
6mm bb in 7mm tube
This cross-connector may be hard to find
Because of the rarity, we only make thin rivets of it
Carefully file the corners down, and you've got the basic searchlight shape.
It was just a concept for Damo It's Cam's brilliant idea. The BBs were essential for my stockpiling needs I think the origial purpose of it is to slot plasticard sheets into the grooves.
Well, I guess you can now say that you've glued everything together including your balls. Great review, but needed a few more in it to describe how much putty you had to use.
Aye, discussing one man's balls in one thread and another man's egg in the other thread... Oh, well, now I have to get out and join LDD under the rain too
Aye, discussing one man's balls in one thread and another man's egg in the other thread... Oh, well, now I have to get out and join LDD under the rain too
Aye, discussing one man's balls in one thread and another man's egg in the other thread... Oh, well, now I have to get out and join LDD under the rain too
Still raining here come on in its wet …………… I really need to stop writing
Dave wallpaper thats your next task every Apoc building has that falling of the walls, now your next challenge if your man enough to dot it ( we know you have the balls as we seen them in the jar ) is to build some shack / crumbling dwelling with wallpaper think you can do it.
I've done wallpaper inside of Wild West buildings. It's pretty easy to do with a color printer,you can scale down real wallpaper patterns. The peeling would be achieved just like the Corvega Billboard.
I've been wanting to do this for awhile, I'm just not done digging through my bits yet. I may not have all the stuff I need to finish it, but you get the idea hopefully.
Marines can take Guard Tanks??, well they can bite me The Catachan 11th Armored Cavalry is taking Landspeeders
Bulkhead lights! that's the name i've been thinking of lol! :-) but for the number I need i'll be out of pocket a bit! I think I'll League it up this time!
this will probably more count as a scratchbuilt kitbashed valk in my view...
and dave...
ho jo to ho
!!!
totally cool....at first i was shocked to tell a truth... you going marines and all... but then i see you stay true to your roots...oh those of little faith!!!
needs lotsa rockets and a guy on a big machine gun of course... but that goes without saying
Dave how long is it now? THE LANDSPEEDER....you guys have been on damos page too much lately. Was wondering how much bigger you've made it? Will it fit 10 guardsmen, or is it like the rhino fits 10marines?
Theophony wrote: Dave how long is it now? THE LANDSPEEDER....you guys have been on damos page too much lately. Was wondering how much bigger you've made it? Will it fit 10 guardsmen, or is it like the rhino fits 10marines?
*snicker....*
Automatically Appended Next Post:
Casey's Law wrote: The diorama and landspeeder are both astounding! You never fail toraise the bar!
@JW Thanks! Those are planned, but getting to the point where I can add them is trickier..
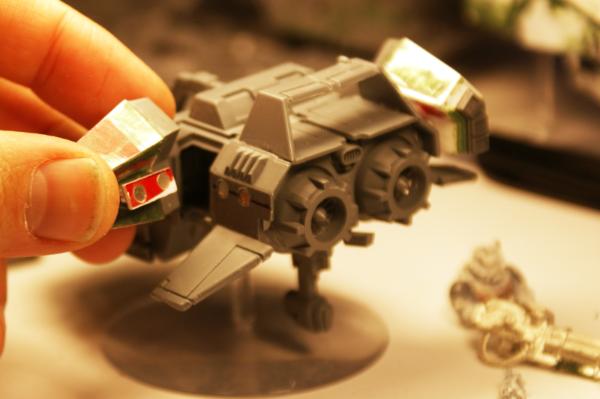
The thing is still in two parts.
I'm nearing the point where I need to paint the cockpit, then mask it all off to protect it while I glue the two halves together, which is when I need to twist the whole model slightly as there is a bit of warping that needs fixed. Then do the final putty and sanding on the hull.
oh mate... that crew just tops the whole thing!!!... love the poses... love the bitz you used... very classy!... one of my favorite gestures inside one of the helis was a marine that sorted his bullets in his clip by banging the clip to his helmet... i remember doing this when i did service too... always thinking while doing on that scene ...
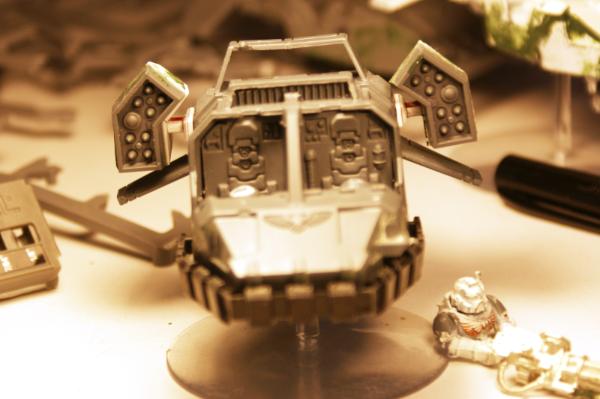
by the way... i have to tell you... it always amazes me that you get to build something so flush glued together... there seems to be no difference in the landspeeder cockpit and the PC parts you added... it is all a very streamlined combo! we so easily tend to overlook these details... it is still a feat i have my problems with... so i have to give credit where credit is more than due
also... i am eager to see how you will cope with the engine... will it be some kind of hover vehicle or will you go the full way and make it a true helicopter?
Now that is one nifty conversion great use for it as well (hell this is one I am going to copy) I have been eyeing up this kit just for the scout leg poses.
But now I am thinking the whole kit has potential, I might be hassling you for details at a later date so take notes
As for the garden provisions nice haul wish we had room to do that, o and the weather
Well Vik, I pretty much think that repulsorlift tech or whatever it's called in 40k would've made propellers and such obsolete don't you? Besides, it has three boosters on the rear to go fasta
Thanks Cam! I'm painting the interior bits so I can continue work on the body.
Automatically Appended Next Post: Besides, the minis are all posed as if they are waiting, not attacking.
They could be speed waiting while vectoring in for attack, and there's at least three going on and vik has one in the cue and I think one more waiting as well.
Sweet. Looking good. Looks "natural" if you know what I mean, and that is very difficult to balance when doing these conversions. People have called it a limo. Well to me limo's don't look natural.
@Alpharius- I like it because it contrasts with grey and white styrene and I can see it when I am sanding. Here, Squadron/MMD white putty would've been idea over the green primer, but I didn't have any. Personal preference really.
Also it thins very well with acetone fingernail polish remover.
Toulene does smell nice..used with proper ventilation of course
dsteingass wrote: @Alpharius- I like it because it contrasts with grey and white styrene and I can see it when I am sanding. Here, Squadron/MMD white putty would've been idea over the green primer, but I didn't have any. Personal preference really.
Also it thins very well with acetone fingernail polish remover.
I hear you there!
I prime in either white or grey - and not black! - so I can see what I'm doing a bit better!
Be careful with the squadron green mate, the Toluene in the fumes will (like most volatile organics) kill brain cells quicker than trying to use ones forehead as a hammer
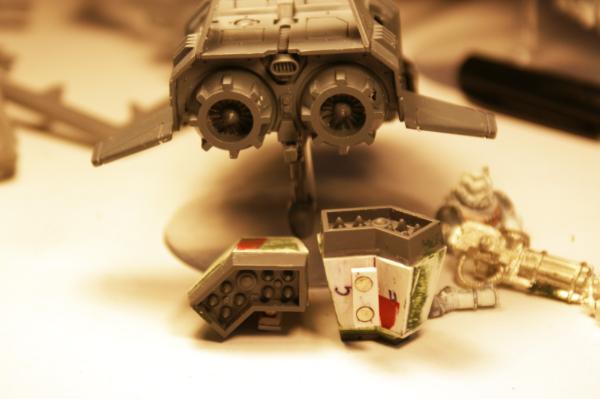
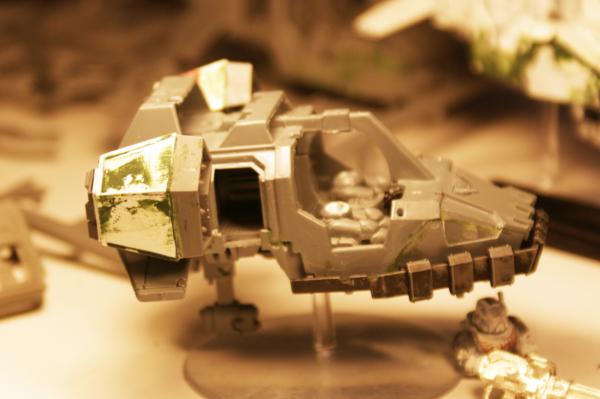
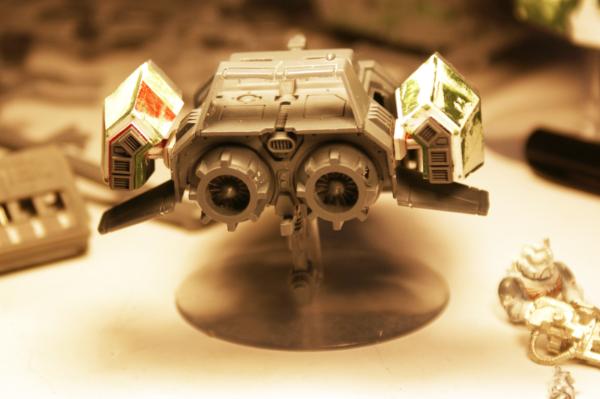
Great use of he old dozer blade bars , I like the new angle to the rappelling support arms as well. Are tose rocket pods in th background, or ammo hoppers???
Thanks, I'm not sure if there should be stowage on top or just more tech/engine/systems gubbinz?
ThouShallNotHeal wrote:That's a lot of paints...
Yes, that's a LONG time collecting and painting Welcome to the show!
Theophony wrote:Great use of he old dozer blade bars , I like the new angle to the rappelling support arms as well. Are tose rocket pods in th background, or ammo hoppers???
Thanks! Good eye! Yes those are Valk rocket pods. I may use them, but I really need to redesign the landing skids first- you see I've torn them off. An ammo hopper for the door heavy stubber needs integrated into that skid redesign too. Catachan flight crews would strap as much stuff to every available surface as possible
Bloody hell Dave that is looking like a 40k Huey Great use of bits I just cant wait to see this kitted out to the hilt and stuffed full of crew and don't forget the BBQ this time
I especially like how rappelling down fits the catachan character so well (both because they are jungle fighters, and because they are badass enough to rappel down, but not bat-guano crazy enough to use grav-chutes). Also, dust seems pretty awesome- I have been thinking about getting into it for a while. any recommendations?
dsteingass wrote: Thanks, I'm not sure if there should be stowage on top or just more tech/engine/systems gubbinz?
I suppose if it's going to have stowage then It has to be on top. May have to add a ladder so that they can reach it though.
But more techno-gubbinz would look suitably suitable...
ThouShallNotHeal wrote:Those are some really great ideas
Thanks!
lone dirty dog wrote:Bloody hell Dave that is looking like a 40k Huey Great use of bits I just cant wait to see this kitted out to the hilt and stuffed full of crew and don't forget the BBQ this time
TY LDD! I'm afraid this bunch of guys will have to wait until they get back to the firebase for steaks and beers
ThouShallNotHeal wrote:Are those FW Parts?
Nope, no resin parts..so far...The Rappelling rig is an original part of the landspeeder storm kit, I just sawed it in half ( ripped it) lengthwise with my jeweler's saw. The rest are GW plastic and styrene.
glomscient wrote:I especially like how rappelling down fits the catachan character so well (both because they are jungle fighters, and because they are badass enough to rappel down, but not bat-guano crazy enough to use grav-chutes). Also, dust seems pretty awesome- I have been thinking about getting into it for a while. any recommendations?
Yep! I used the SM Scout legs on the figs, their boots have a large rivet on the sides. I figured these were some sort of fall-retarding gizmo to protect their ankles
Dr H wrote:
dsteingass wrote: Thanks, I'm not sure if there should be stowage on top or just more tech/engine/systems gubbinz?
I suppose if it's going to have stowage then It has to be on top. May have to add a ladder so that they can reach it though.
But more techno-gubbinz would look suitably suitable...
Stowage can be packed on anywhere, but that top rail system almost looks as if I designed it for that..not intentionally I swear, I had no plan, Just started gluing bits on
Catachans distrust Tech-preists slightly less than Commissars They stay at the Firebase in relative isolation from the common soldiery Commissars often end up mysteriously killed in Battle
@Thou...The secret is really having lots of sizes and shapes of styrene in-stock
And I'd recommend learning to enjoy sanding..you're gonna spend a LOT of hobby time doing it @Cam & Dr. H.....help me with the roof rack idea...give me details please!
Sure you do..everyone does..but everyone has a point where they stop trying. You only need to push past that. Think in shapes. and break down things into their basic shapes..which is conveniently what stock styrene comes in..basic shapes! The beauty of styrene is that you can always fix your mistakes with putty, or layers of thin detail. I can certainly help you there, any questions, feel free to ask!
glomscient wrote: I especially like how rappelling down fits the catachan character so well (both because they are jungle fighters, and because they are badass enough to rappel down, but not bat-guano crazy enough to use grav-chutes). Also, dust seems pretty awesome- I have been thinking about getting into it for a while. any recommendations?
Hey Glom! Good to see you man! Sorry I missed your quote somehow.
As for Dust, get the Dust Warfare hardcover book first. I also bought the Dust: Tactics board game starter set. It's packed full with troops, walkers, and accessories. I've just been buying and building the models that I like really. (see the Bomba-Dear a ways back) .I have not played the game though, I'm just getting started myself. Of course, from a modeling standpoint, they are all absolutely great, the story is also great.
Camkierhi wrote:May I humbly suggest you improve on this.....
I think you can work out how to do this. Maybe a tarp to cover the kit a bit, leaving some stuff visible, like a couple backpacks etc.
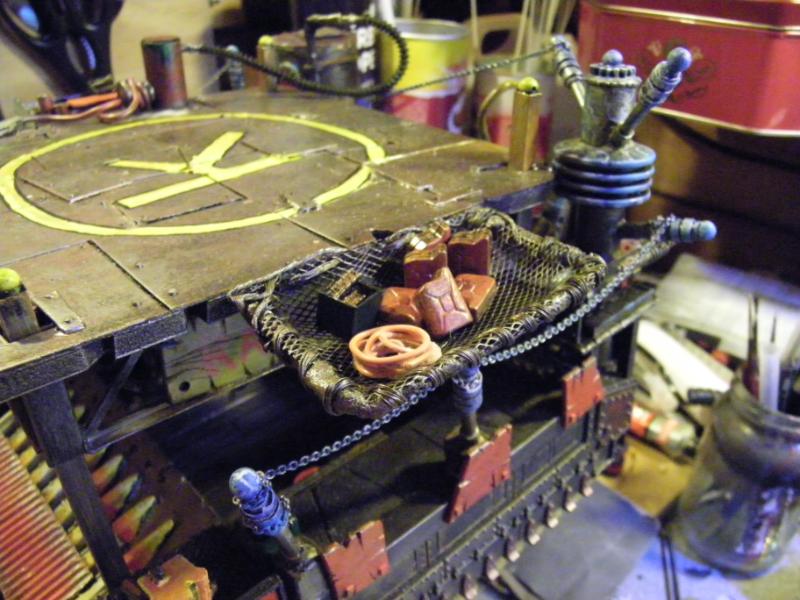
That's amazing! Do you know what was used for the net? It looks like vinyl fly mesh perhaps??
ThouShallNotHeal wrote:You should do commissions.
I've done some stuff for people in the past, no one has asked recently.
I used aluminium mesh, the same you used for the flooring. Made a frame, then cut a bit oversized for the frame, then shaped it to look loose hanging. Ran a cable around to look like a rope tie.
Automatically Appended Next Post: That stuff would work well too though. more Imperial looking.
I have similar stuff to that (same company) but different designs you could check them out as they do some that looks more like the fly netting you mentioned.
I cant believe how well you matched up the parts with the PC rod and shapes this is going to look epic, but cant at least one guy have a beer
Thanks for the reply! I couldn't find the rulebook on the site, and is this the boxed set you meant? http://www.dustgame.com/products_d.php?sid=41&id=198 Edit: Also, screen door mesh can work, if you find a way to keep it from fraying.
Yep Glom! That site is direct from Hong Kong, it's where I got the decals and books. But they don't carry the Dust Warfare book. That and Dust tactics are licensed through Fantasy Flight.
http://www.fantasyflightgames.com/edge_minisite.asp?eidm=123
Remember: Dust: Tactics is a boardgame, Dust: Warfare is tabletop rules for using Dust: Tactics miniatures. The Miniatures are universal, the rules are separate.
Can you really not get aluminium (aluminum) mesh in the States - that surprises me... It's also sometimes called 'expanded' aluminium as it's made from a sheet of the stuff, with small slits cut at regular intervals, then the sheet is stretched out to make the holes... as Cam says, it's a mainstay for car bodywork repairs (great for patching up rusty old holes )
I don't think so. I just searched NAPA's site (one of the biggest Auto Parts chains in the US..not a thing. Is it for repairing Aluminum, or steel car bodies?
Not sure if you have it there, but look for ISOPON - that's one of the main companies who make the body filler (P38) and the mesh - I used tons of it on my first car (1976 Honda Civic) and a fair amount on my second car (1974 MGB GT)
It is used on all body types, with fibreglass to bridge gaps in the bodywork. Can be moulded into just about any shape, and is brilliant. If you can't get it, I will ship you some.
dsteingass wrote: I don't think so. I just searched NAPA's site (one of the biggest Auto Parts chains in the US..not a thing. Is it for repairing Aluminum, or steel car bodies?
I guarantee its in the US but I'm not sure where I got mine (when I was actually repairing my truck body).
I'll try and find it and update you.
Wonderful. I just found out I've been selected for Jury Duty..the same day we were planning on leaving for GenCon!!!
See if I can't get out of this...
Automatically Appended Next Post: Woot! I called and chatted up the lady, told her of my dilemma, and she got me onto the mid-September queue instead!
I'm on a successful roll already today, and it's only 8:15 AM!
For an ammo hopper you could attach a drum to the flat surface right behind both doors, it would ruin aerodynamics, but be fun to paint a target on for the opponents.
Thanks! I was thinking about it, but I first need to decide if the front will be supporting any sort of weaponry or not. I tried the Valk Rocket Pods, they fit, but look way to oversized, even for GW. I'm thinking a "Grunt Taxi" as Ash put it, would probably only really have defensive weapons eh?
Dave, if you're still looking for rocket pod ideas, I took the small missile front plate from the stormtalon and built a more angular housing for it to stand in as typhoon launchers for my land speeders. They're definitely not very 'Nam-esque, but I think they fit the design of the land speeder pretty well.
Still unpainted, but they look like this: (the joys of styrene 'For Sale' signs from the hardware store)
Spoiler:
Both built:
magnet attachment:
Front view:
Side View: I'm rebuilding this land speeder anyway, so don't mind the missing doors.
That's really cool JW! Nice creativity! The only problem is that the rockets would have to fire past the open door, which might be an issue I need something smaller to go in front of the doors. Probably will need to scratchbuild a tube system.
dsteingass wrote: That's really cool JW! Nice creativity! The only problem is that the rockets would have to fire past the open door, which might be an issue I need something smaller to go in front of the doors. Probably will need to scratchbuild a tube system.
It's a new deployment mechanism... rocket fired Catachans!
How about using the existing (Dave improved) rappelling bars to support rocket pods, kind of like.
To me it would be very catchan to use what was already there to help build up a weapon mount.
Problem with rockets up there is the backblast into a very open cargo area... charred Catachan is tasty to Nids, but not desirable for Catachan commanders...
oh dave... i see that catachan lovechild of yours and i go *sigh* like when you had a delicious meal and are full of awesome meat and veggies and a tasty sauce... and now your round belly is making all happy noises...
these grapling devices... i am totaly happy to see that done in scratchbuilding... and the skids... amazing... i specially liked how you got rid of the excess of the tubes and it now looks even better because of these angles....
Yes, with styrene rod (tubing gets squished) the secret is to line up the inside edges of the bends, then snip off the rest on the outside edges. A round file is necessary to smooth out the other bumps but it works pretty well. I sort of learned the technique when building the bumper bar for the Stinger/VAMP/Jeep/Thing
seeing this i get reminded of my old playmobil helikopter... the medic one... i wanted to have an army one so i used permant markers to give it camo... brown, green and black... looked quite nice back then... i even had matching soldiers... and there was this rappeling winch...
ah... yes... back then my mum didn´t allow me those toy soldiers... and comics... she was a bit paranoid about some "violent" stuff... well... my first earned money went directly into comic books... so much for strict upbringing
and a medic heli was allowed... but a military not... good deal she wasn´t that interested what became of my toys
Just saw this online! I really need to get out more eh! but there's some really great ideas and inspirational images on this site, really creepy and oozing suspense! http://cghub.com/images/view/423637/
Automatically Appended Next Post: I also need to slightly derail dave's thread for a sec if you don't mind? I need some scratch build advice and the depth of interested and skilled persons is at it's peak on here!
The basic premise is this: I am making a Zone Mortalis board and originally i was going space hulk style but the flooring on ZM is larger expanses of space and not confined to narrow corridors, so my original idea involved a slightly raised walkway covered with grating, this won't work now as the boards need to be butted against each other and it needs to flow across to the next one. What do i do? do I cover all the surface of each board in grating and then lay strips of card across it to simulate metal bands to add some detail? i've been googling my little heart out and can't seem to find anything to help so far!
soz Dave for hijacking! I'll send you flowers.....
Mesh everywhere wouldn't look right. I don't think any cheap way will look right. You are trying to mimic expensive purpose-built resin terrain after all...
I'm going to have to do a mock up of a bare tile aren't I? something we can play around with and see what suits? I've days off in a few hours so I may try to get some stuff sorted to show you for appraisal?
I know, it's a tricky one to get right, the feel of the board needs to be there with enough free room to move yet enough detail to be exciting, I have a few ideas for it but it depends on my modeling skills if i can do it or not, perhaps after my birthday in Sept I can move forward as I've requested a Chopper II from my folks ;-)
A chopper II is a great help, I got one a while back when they were on sale along with a duplicate it. The chopper is speeding up the work and making builds easier.
Have you thought about using rolled cork for the floor? Paint it grey and it looks like cracked aged concrete. You could also make wall sections out of it and attach plastic for pipes, grills and doors.
Interesting that you guys are talking about this...I have aspirations of making my own ZM boards...using the new-ish Space Hulk floor tile art as inspiration...Basically my plan is to come up with a grid size that suits the scale. Would be nice to have the exact measurements of the ZM tile grid and go with that. From there, I will design a few different square tiles that are super detailed...then make molds of each and cast multiples in resin. Lay them out on a 12x12" square of MDF. I dont like how the ZM boards have static walls...so I will be designing the walls to fit that grid (ultimately the walls max width would be the width of a 'square' in the grid) , not unlike the ZM boards...except my walls wont be attached, and can be re-positioned for infinite layout possibilities...this is all down the road though, as I still need to acquire a pressure pot, pressure gauge, fittings and hose to get my resin casting operation up and running. I would love to see what you guys come up with though!
Hey guys, yep needs to be modular so I can use it lots, i've been hoarding parts for the build but haven't shown any yet so when the next lot arrives I'll whip up some pics so you know exactly what i'm thinking about trying :-) I have for the tiles 20 300x300 PVC foam squares (obviously!) they're light and stiff and should work well I hope.
and now back to Dave's regular scheduled awesomeness :-)
Well, and I'm still undecided on parts of it too, not really sure where to go.
To be fair, I also spent a couple of days shampooing the carpet and giving the house a serious cleaning and all the rain we've had gave me lots of stuff in the yard that needed cut, so I haven't just been sitting on my ass Although I'm finding myself quite bored this morning......looking at the thing on my bench, but not quite committing energy to working on it.
Automatically Appended Next Post: There..I did something
That awesomeness needs some love dude, Upper stowage. Possibly some hard point action. Definitely some feeds for the weaponry. I think I am going to put my ammo up top, gravity fed.
i can only speak for myself... but i prefer to sit on my bum... i have tried to sit on someone leses bum... but to be honest... it didn´t felt right... it was just not me...
niveau...or standards if you like are a way of looking at facts from different positions... so... hwo is to say that this here degrades now to something less... or other... we are just spicing up the atmosphere^^
Well, it carries men in an open compartment, which means it needs to fly relatively level whenever possible. If you put guns on the top, then the craft has to nose down to aim, spilling guardsmen all over the forest canopy. An Ideal greenskin tactic maybe, but not for Catachans
I know the feeling, I've even begun painting because I lost building motivation. You just need a recharge. "Dust" of an older project to see what might happen. You might find an old "hobbit" bites you and gets your mojo going again. Failing tha o on a shooting spree in one of your video games.
For those that don't know...
In the GI Joe cartoon, Detro invents a machine that makes Heavy Metal Music, and fills it with subliminal messages. The Dreadnoks Become the band "Cold Slither" to brainwash people
http://songcrafters.org/community/index.php?topic=11050.0
I don like h new articulation, I guess the Kung fu action grip was good enough for me, why improve on it? Kids need extra stuff today that's Why their imagination is garbage. More old person rant
If I had a spare grand sitting around,which I don't. He said it has everything except the microphone. I didn't see the admiral, but as you can see it has a lot sitting on top of it.
I love the Catachan air support. And who's the say there isn't some articulation in that weapon that would allow it to fly level and still fire at the enemy. Just because it's not modeled doesn't mean it doesn't exist.
I too long for the end of the hobbit hole, though. I want to see it in all it's wonderful glory.
I saw it there too, I love them, even considering painting my servo skulls yellow so I can quote the minions if I ever play them in a game. We have watched the extra movies from the first despicable me a few times this week and I keep laughing even though I know the ends already. I just wish there was a "John" minion, I'd be all over it. They also have packs of random guys including ninja minion and I think a golfer minion .
I love the Catachan air cav, but the crew's proportions look all screwy and not the regular Catachan screwy: I swear the door gunner's hands would go past his knees.
I keep checking this every time I see you post hoping it's actual progress - and it is this time! Fantastic work so far, really looking forward to seeing how this looks completed.
Heh..well, around here, you have to wade through posts like this to get actual progress Pekel
Big Supply Drop!
There was a great clearance sale! Lots of Bag End supplies:
Flower plants, Tulips, Flower Trees, Petunias, Tomato plants, and flower bushes
Rock Molds
and tank treads designed and cast by our very own OneManNoodles!
But what else did Dave find on his shopping trip?
These 12" Ghostbusters retail for $200 online http://www.bigbadtoystore.com/bbts/product.aspx?product=MAT13649&mode=retail , Big Lots had them for $30!
I HAD to!
I'll have to check the other stores in town for Peter and Winston
in the 6" scale, I found a Vinze Clortho!! One of my favorite characters of the movies He has a slice of Pizza, the popcorn jar, and a dog head. He doesn't come with coffee, but he'll have some. I intend on scratchbuilding a salad bowl hat for him
Our Brother Nerdfest requested a tutorial on plaster casting...
First, clean up a good-sized workspace
Especially..clean up any dog hairs - you don't want them in your castings
Second, Gather materials
Ortho stone (10,000 PSI strength is what I use), plastic cups, paper cups, a kitchen scale with a tare button (if you decide to mix by weight), wooden stirrers, a spray bottle of "wet water" for mold release (1 cup water, 2 drops dish soap), and a putty knife (not pictured here b/c I hadn't found it yet)
Third, spread plastic
I used a garbage bag
Fourth, wash your molds
Here I'm using the rock molds, which don't sit level- Hirst molds sit level, rocks don't really matter, it's the face cast that's important
Fifth, Lay everything out close
I've pre-measured my water into 1/3 cup paper cups because I do bigger pours
Now, pour the pre-measured cups into the bigger cups
I've crimped the plastic cups to have pour spouts
Spray the "wet water" onto the molds
Then gently mix your plaster into the water per the instructions, let it bubble in the cup for a minute or so and pour, tapping the mold periodically to release any stubborn bubbles
it's important to scrape the buildup off the sides and bottom of the cup, you want it the consistency of very heavy cream, almost melted ice cream.
Again, these aren't level, but I don't care for rocks. With the Hist Molds, I care about slightly overfilling
So after a few minutes I can scrape the top of the molds with the putty knife
Let excess drip onto the plastic, it'll dry and peel off easily
Now it says 10-15 minute cure, but I wait at least 30 minutes before de-molding.
About 20 minutes into the curing, the chemical reaction causes the plaster to get warm, then it cools. During the cooling process, all the excess water gets drawn to the top of the mold.
I just cover them with paper towels to help the drying process, at this point it's cured enough that the paper towel won't stick to the plaster.
Thanks Dave! I do love me a good tute with pics! especially one that i can follow so easily! it may be a few weeks before i get casting but I'll always have you in my heart!...... wait?....No, that's not right....... I'll always have your tute online!....... yeah better! :-)
oh... and it looks your catachan gunner is painted by washes only? nice idea... weety always had great success with that methode!
by the way...when i told my kids about your new avatar they really enjoyed the news!!!
Sorry Vik..missed replying here:
Not really, I just used the Schmincke Flesh tint right out of the bottle with a brush. It's nice and thin. I've had my best skin results to date with thinner paint. Thought I'd try it again.
oh yeah... there are atm totaly hyped on these lil fethers... my wife found two minions... one purple and one dave and they play with these the whole day atm... talking in their heathen lingo all day... the voice capabilities of my kids is very impressive...
I have the hardest time with skin. When I do it, I try to follow advice from various people whose technique I admire online, but it almost never works for me. It either does barely work, or looks horrible.
Valhalla130 wrote: I have the hardest time with skin. When I do it, I try to follow advice from various people whose technique I admire online, but it almost never works for me. It either does barely work, or looks horrible.
It's why I build marines, and all my guys believe in wearing helmets, one of the chapter masters was met by a sniper....and lost, now it's mandatory to wear helmets always.
Well, you could go with these...
This is the stupidest looking thing yet. Not only is it more fething marines, but they look stupid. GW really jumped the shark this time. I suppose they are unstoppably Overpowered too.
Automatically Appended Next Post: They look MUCH better as Meganobz
I've been watching hat blo all day, good times , they look terrible, but the Ork conversions are halfway decent. I really believe that gw is making models to be chopped up by the buyers to be converted. Because I haven't seen many new kits worth a from them lately that are stand alone.
Also found a local plastic supplier hat sells individual sheets of .040" styrene. The only drawback is they're 4' x 8' sheets, but at $30.00 for 32 sq. ft, and not having to pay for shipping they also have .080" and other sizes. The guy on the phone told me to ask when I show up if they have busted pieces for a discount. If I get 12 sheets its less than $20.00 a sheet.
Can they cut it down into smaller sheets for you? 1x1' would be ideal...I think the Meganobz are just photoshopped.
Automatically Appended Next Post: I don't EVEN want to play 40k anymore.....not in the least..especially when every little 12 year old will be fielding armies of these, unpainted, and even a bad roll would probably wipe out ANY Guard opposition.
The meganobz are definitely shopped, the listed in the thread where it was done and who did it. Also to sho gw control over thei product line, someone actually has the vanguard veterans. They bought them off the shelf when I was accidentally sent more than a month early to the store.
They "can cut them down at a $1.00 a straight cut, but I'm willing to cut the sheet myself at home with a t-square to save $$$.
Minivans are useful for hauling more Than kids , or my SUV and roll the plastic. I might just rough cut the sheet in the parking lot as well with a utility knife. My necromunda table has a 4'x6' flat area that I can lay a full sheet on and then clamp and cut. I might have them cut the sheets into 2'x8' to make hauling easier though.


 I have no problem with them ( if you mean being ready casted ) I just though you might prefer the mould itself to cast what you wanted.
 I though Storag had a cool find but I was just offering an alternative.


 in it to describe how much putty you had to use.
 dakka just gets weirder and weirder


 Great use of bits I just cant wait to see this kitted out to the hilt and stuffed full of crew and don't forget the BBQ this time

 this is going to look epic, but cant at least one guy have a beer