Thanks Shas'. Like many hobbies, there is a tendency for a technique of the month.
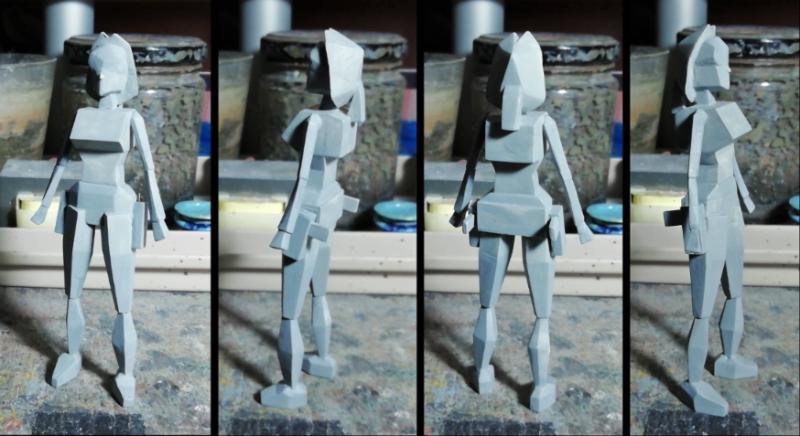
You will have noticed in the previous photos that I left the eyebrows pretty sharp and distinct, and that they are not so much on the original.
This I left to dry / harden before adding more clay and sculpting the eyes up to the hard edge. This gives a defined guide to sculpt up to without problems of pressing in and distorting the position of the eyebrows.
I then used the same tactic for the mouth area.
I also added a start to the hair, with a comb no less, but it's only rough at the moment. Varying consistencies of the clay resulted in the inconsistencies in the lines. .
These details are now to be left to dry, I'll add ears in Milliput and clean up and sharpen details later.
This is really coming together beautifully. Probably a stupid question, but what approach are you going to go with the paint? Regular metals? NMM? True metallics?...
I was planning on normal, boring, metallic paint, and a little weathering to make it look old (as in the film).
While it would be an ideal candidate for gold leaf, I don't think that'd be fair on the recipient of the Falcon, that just got black paint.
Camkierhi wrote:...I find fine detail in clay very difficult. Should do better with Milliput.
I've found that if you leave it to cool to room temp' (assuming you are massaging it in your warm hands to soften it for sticking on things) it firms up a little. Also, if you let it dry a little bit that also firms it up more.
Firmer clay makes finer details easier.
All that said, I still did what I always do with sculpting; go back in later and carve away to do the sharper details.
And Milliput is firmer and cures faster, so "easier" for these things.
Heretic Tom wrote:...your approach to the eyes and mouth is genius and speaks to your experience (and probably past frustrations)...
Yeah, even when working with epoxy putties, it's good for large shapes to have a firm base to work on for the finer details.
e.g. don't try to sculpt an entire head in one piece of putty. Make a 50% sized ball first, let that cure, and then cover that with putty to do the details in that. You won't distort the head shape as much as if you had one whole piece of soft putty.
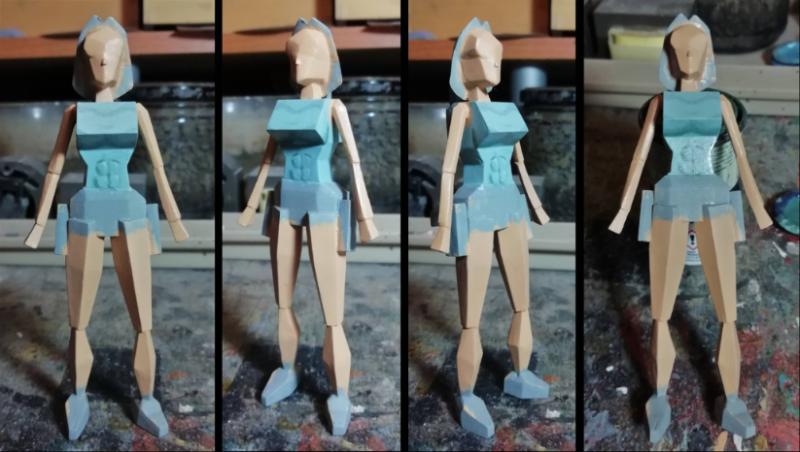
Progress:
So much small but important work, with minimal obvious changes to the appearance.
Smoothing surfaces, sharpening details, correcting shapes, filling gaps, sculpting additional things.
I think the sculpting is done, so on to painting soon.
In other news:
I've finished my Fallout 4 settlement build at County Crossing.
Tour video recorded, edited and uploaded to YouTube. Give it a look.
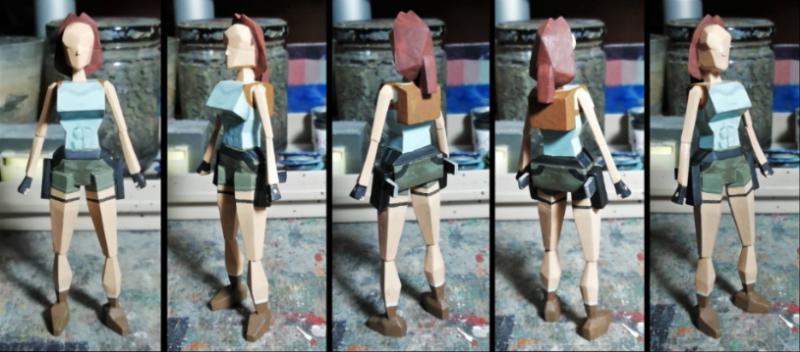
It's a shame I didn't get the head at quite the right angle (should be slightly more front-facing), but that was set from how I built the interior structure and didn't realise until I'd got past the nose and it was too late to do anything by then as most of it had dried.
I forgot to take most of the painting-in-progress photos I intended, so here's a comparison from bare clay (and milliput) to primer, to basecoat, to gold (about 5 layers including the base).
There's mixtures of bronze/brown (the basecoat),
bronze/brown + gold/cream/yellow,
Gold/cream/yellow,
Gold/silver/yellow,
Gold,silver.
All over-brushed / dry-brushed.
I think it's now gold enough, just the eyes and a gloss coat to do.
Good thing too as it needs to be ready for mid-next-week.
I could see some royal society of Archeologists modify that thing by hollowing out the mouth and turning it into one of those parking validation machines . “We lost Sir William and three Sherpa during the climb to get to the temple of Xhositquatsit, and young Stephen lost his left leg in that awful spike trap, but now we no longer have to wait for Suzanne to validate our parking. Anyway God save the Queen.” And then everyone in the room (especially those not paying attention) say “God save the Queen” and takes a drink.
Now that it's been handed over I can show you lot the finished piece.
Didn't get the time to do the weathering I intended, but it has a nice aged gold look anyway.
Eye progress first (I remembered to take photos of each stage this time).
Paint white.
Blend black into edges to give 3D effect.
Measure out and position dots for the centre of the eyes. *check that it appears to be looking forwards
Paint in brown for the iris
Shade, colour and detail the iris, resize the pupil to match.
Gloss coat.
With that all done varnish the whole thing.
And I can relax for a while with no presents to get done for months.
Normal service will resume soon (I have actually started the flesh on the tripod).
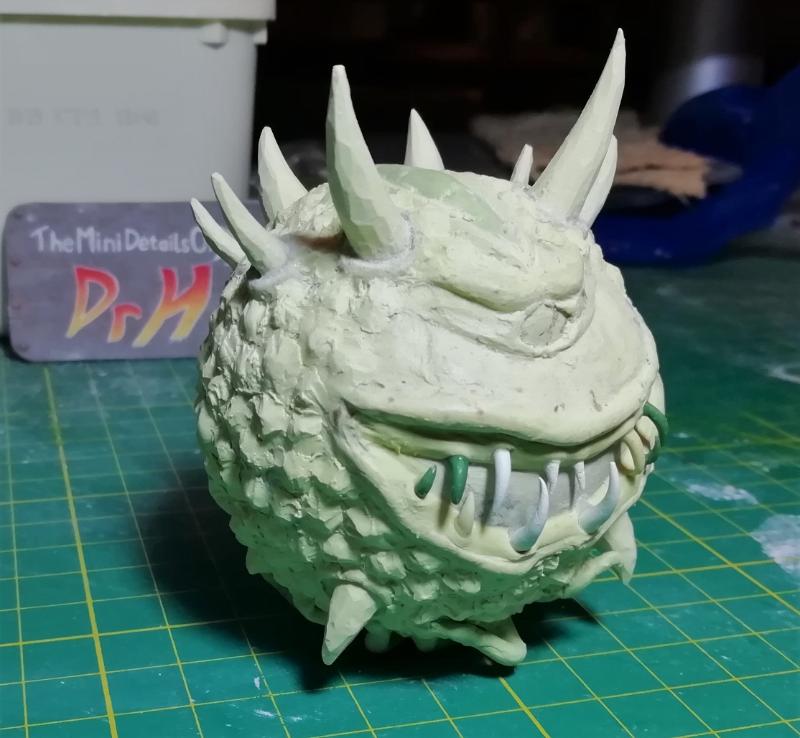
And now back to the bloat drone.
Fleshy bits done.
Looks a bit flat in the photos, but has a bit more colour to it IRL. That should stand out more once the contrasting armour colour is on.
Not sure what will be next on the building desk, this should be the point where I start job searching more seriously. We will have to see.
I love the more human-like tones to the flesh. I always thought it was so much more disgusting to have the flesh look almost recognizable, compared to the more traditional fantasy green flesh that GW puts on their Nurgle models.
Thanks Gwyn'. Yeah, I prefer a more realistic look to things. There is green as well as blue, red and yellow in with the flesh tones.
I spent a long time researching dead skin tones from photos on Google for the pox walkers, so I'm going to put that "experience" to use as often as possible.
Thanks youwashock.
Thanks Theo'.
Thanks shas'. I do too.
Been blocking in the base colours for the other parts of the drone:
Steel (with a touch of orange) for metallic parts. Will get rustier.
Brass bits. Will get verdigris-ier.
And purple for the armour plates. Will get faded and weathered to the point of not much of this left showing... is the plan.
In other news;
I put up a couple of mobile device wallpapers on my ko-fi page. Nothing exciting, just my painting board surface.
While many of you may be able to take your own photos of your own boards, I though someone here may appreciate them.
Example screenshots (quite large pictures):
Spoiler:
Link to my ko-fi page to get the "plain" pictures: https://ko-fi.com/theminidetailsofdrh They are free for anyone. But I wouldn't say no to a coffee while you are there.
Thanks Graven'. Good way of thinking about the purple.
Thanks Theo'. Different is good in my books.
My desk gets no paint on it , I have a wooden board that has been in use as a modelling and painting surface for...a long time... it was in use before I started modelling ~3 decades ago. It's had so much build-up of glue and paint I now have no qualms about using it as a pallet for small quantities of paint while blending etc.
Progress... It's not had as much attention as it could have the past week or so, but enough has changed now that it's work showing.
Still a lot more weathering to do: Streaks, Verdigris, orange rust, silver highlights (rubbed off metal edges), etc.
Black washes about the metals and streaks from various damaged points, and verdigris on the brass.
That's the bulk of the colours done. Now to add all the little details and spots of colour. And I should get around to painting the base before I get to the "messy" stage.
Edit: that picture looks horribly blurry to me in here. Click on it to see full size and (more importantly) clearer.
Thanks Graven'. True icky-ness will be achieved when I get around to the goo stage...
Thanks Theo'. That's the fun of wip/pip shots; leaves you all wanting more, and something for me to show in the final photos.
More progress:
Adding some colour with the cables,
Painted the bony / claw-y / teeth-y bits (although forgot the ones on the gun ),
And painted the base, gave it a white line to add some interest to the mass of grey, but blood and goo will also aid this.
Thanks tinfoil, good to hear. And that is my aim; bring the vision I have had in my head from the start to reality.
Thanks Graven'. I see what you did there.
Thanks Shas'.
It is done. I can't see anything I want to change in the photos, so job's a good'un.
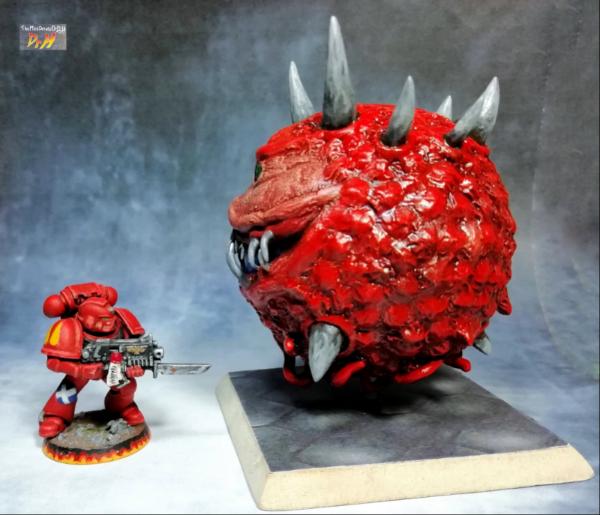
May I present to you the Foetid bloat-drone tripod in all it's glory.
Which config' would you rather face?
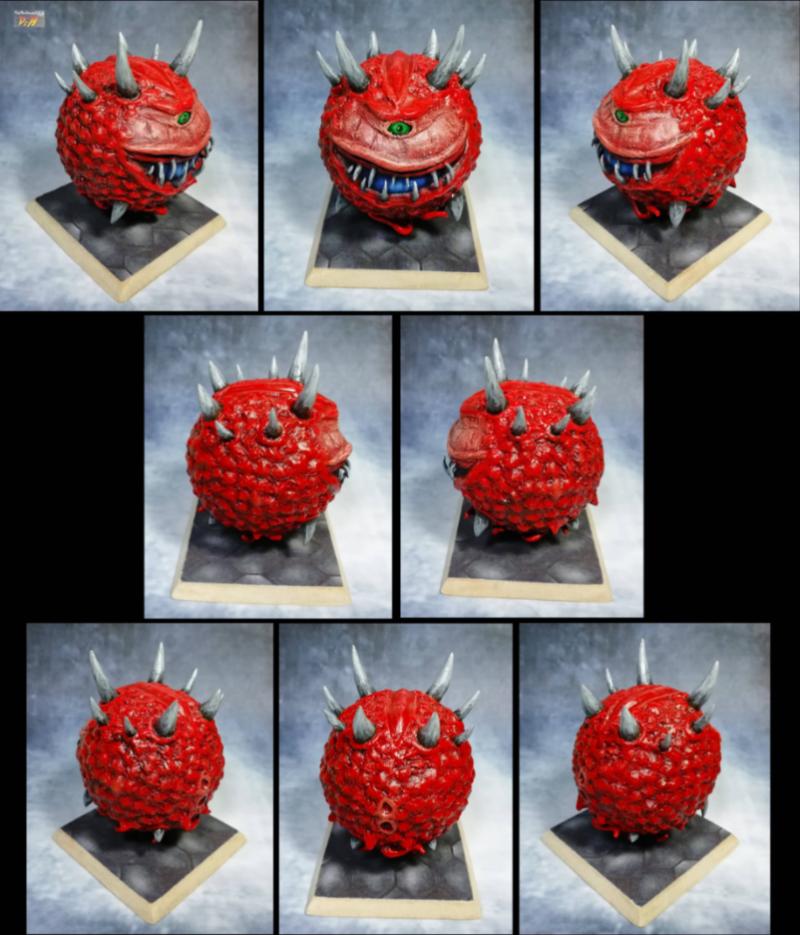
All the angles:
Close-ups of the bio-mechanical workings and the base:
And the magnetised weapon options:
And' that's it for the Dark Imperium box set.
This chap will be up in my Etsy shop soon...ish. Need to look at how long this took and decide on a price, and arrange the photos, and write the description...
What will I do next?
I don't know. I've left the building desk empty so that I don't get tempted to just flow into another project and avoid finding a proper job.
So I'm going to give that a push first (got a plan to write to the RSC for careers advice) and then I'll pull out some of the junk I have laying about and start using that up when I get stressed out with the job searching... so probably tomorrow...
Thanks for sticking around and watching my random projects.
In other news;
The plague marines have been "lost in the post" in New Zealand.
Apparently, it's standard practice for NZpost, when delivering to a business address, for their postie to deliver to a PObox and then a courier to take it from the PObox and deliver it to the business address.
Part of this process involves the courier signing for a package that is intended to be signed for upon delivery... let that sink in...
...the package was signed for, and the people at the address have not seen the package.
Luckily, my customer has laid the blame firmly on the postal service. I still get to keep the money (as I couldn't afford to loose that amount from my business), but I doubt I'll get any future custom from them (which was a possibility).
Say a prayer to Nurgle for the lost plague marines, "lost" but not forgotten.
Indeed. That's why everything I post is tracked and requires a signature (international tracked and signed comes with £250 of lost/damage insurance).
However, I have literally just got a message from the buyer to say that the package has just arrived!
Severely battered box (probably been in the back of a van for ~2 weeks), but all seem to be intact.
Thank you for your prayers in facilitating their arrival. Grandfather Nurgle is sure to bless you all.
Always a massive worry when you send something away. If you mark it fragile it will probably be a football for some brainless idiot. I have had issues with just about every courier I have ever used. For some reason they insist on trying to damage every box they have. The extreme lengths I go to to package up stuff to try and make sure it arrives in some semblance of order is quite ridiculous.
But it got there eventually so guess it worked out in the end. Good luck with your current sales.
Yeah, I always get anxious while a package is in transit: Part of the reason I used tracked and signed, so I know where it is and when it gets there.
I always aim for over-doing the packaging.
Mini's get individually wrapped in bubbles, the box is lined with packing paper / tissue / bubblewrap, and the wrapped mini's are nested within.
Good, stiff cardboard box material is used for the box and I make sure the finished box has very little flex to it in any direction.
The result is often twice the necessary size to fit the contents in, but that gives plenty of "crumple zone".
I give the final package a good shake to make sure nothing is moving inside and then tape it up (with red and white FRAGILE tape).
I feel it's best to over-do it. The box can look like it's been used like a football, but the interior hasn't been touched.
Still, a glowing 5/5 star review for that one, and this week someone bought the Forklift.
Things are happening again, normal service will resume shortly.
First, check out my interview with Jenn over on her blog Tragic Fangirl.
Read my ramblings about my adventures in this hobby here: https://tragicfangirl.com/2019/10/06/fangirl-feature-the-mini-details-of-dr-h/ I even give a shout out to the LoER, and big-up my sprue hut tutorial (in a rare break from modesty)...
It's time for the October birthdays, so I'm making more presents.
Here's the start of a larger display base for N-gauge trains.
Still to add some trees and shrubbery.
I'll try and catch up with what you've all been doing this week.
Progress on display:
Trees and foliage.
Repaired the shack and inserted it (ground was not flat enough).
Added telephone poles. I did try to add wires but they didn't look right so will be left without.
And closed in the outer base edges.
More to do, including some static grass and painting (current colourfulness may confuse you, painting hasn't really happened yet).
That is true, Brian. But this is me, I will at least try and add ridiculous realism to all my models regardless of scale. I tried with a really thin wire I have, but just trying to get 2 lines to play nicely was a pain and these technically required 12 lines... I wasn't about to loose years off my life to get them all together even on a single piece like this. Thanks.
Thanks Gits'.
Lo York'. Thanks.
Thanks 'Tom. Glad you liked the interview too.
Lo Graven'. hmm... I'm not terribly up on what's available. I'm just working with what I have available here; all the train stuff I've been using used to be my Grandfather's, it's all decades old. Other than keeping an eye out with things in the right scale. According to this site (http://theminiaturespage.com/ref/scales.html) you'll be looking for S-gauge for the typical 28mm. Tools and toys (smoke-machines and lights, etc.) are pretty universal, but what's available? I don't know.
Maybe Brian and Gits' have some input.
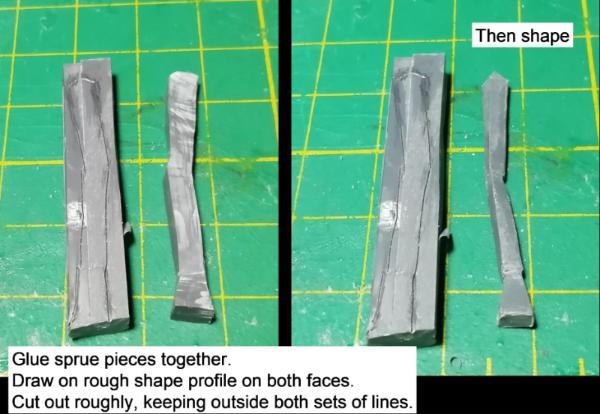
I don't like to post without something to show, so here's something... really, I don't know where this is going... What to do with leftover scraps and a cloth #102
You will remember me making a couple of prop replicas in clay recently. While doing these I used polystyrene foam to bulk out the shape to save on weight and clay. This left me with a pile of foam off-cuts. I also was using an old tea-towel to wipe things down. This became soaked in clay. I noticed that when the clay dried the cloth became set in a shape. This gave me an idea.
I piled up the loose foam lumps (all shapes and sizes, no larger than an inch cube) into the centre of the damp cloth and then folded in the sides of the cloth to the centre. I then turned this over and formed it into a shape and let it dry. I then further coated this with leftover clay sludge and a layer of PVA to seal it all in. This is the top two pictures below.
I have then mounted this to a sheet of card, cut that to shape, and then filled in the edges with a bit more clay. The edges will get a bit more tidying later. This is where we are in the bottom two pictures. With the usual basing treatment this will serve as a good base for something.
I'm not sure what I'm going to build on this, some kind of structure, likely ruined, and plenty of platforms / ramps / steps for tabletop gaming use. It's taking up a lot of desk space, so this is the next project.
The train display is nearly done, so no need for wip photos.
Thanks Brian. Will have to see where I can get it in the UK for a good price (and doesn't have a postage cost that's more than the item). One found so far, not sure what their postage is yet.
I found some of this stretch rigging line from a competitor that was a) cheaper and b) longer, so got that.
Just turned up this morning and I'm thinking I maybe should have got the thicker version.. this is really fine.
you see that trailing end there?
Space Marine for scale.
Now to try and glue it on.
It's stretchy, it's clingy, and I can barely see it without a white background... just my sort of thing.
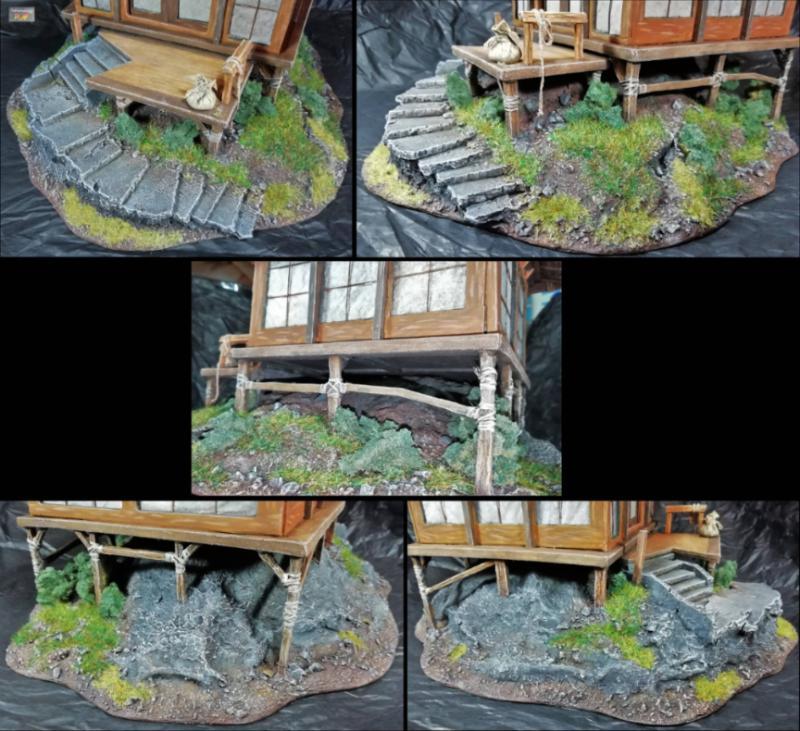
The mound continues with some stone steps.
I toyed about with thinking of some neat concrete steps, but decided upon rough stone steps instead.
This will lead up to a wooden platform on stilts and I'll build a hut of some kind on top. May try and keep the setting fairly neutral.
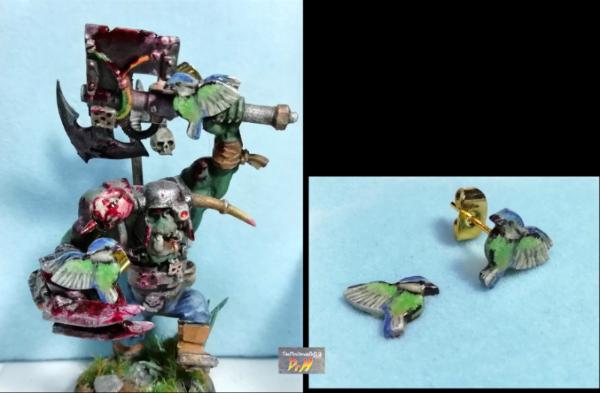
Also, another finished project; some crystal / precious stone earrings.
Check out the beautiful assistant showing them off too... (that's an old model, so don't actually judge it)
The blue is inspired by lapis lazuli and has some golden flecks in it.
Well it's not thinner because it's cheaper.
It's thinner because I chose the thinner option (recommended for N-gauge, which is what I'm building at). I could have got thicker for the same price.
I only ran 8 of the possible 12 lines as they have a tendency to wrap around their neighbours and another layer would make it really difficult to untangle them.
The line does the job, but I'd probably recommend the thicker line as it's easier to see on the finished model, and while you're using it. But I do have plans to use it for floating items in the future...
In other news:
I've been trying to set up Pi-hole for the house as a random side project after seeing a video about it.
It works as a DNS for your network and can block domains from receiving your data and from showing you unwanted things.
It doesn't outright block all ads, but it blocks the tracking and malicious ones, and you can add/remove domains as you like.
But, as with all technology, we've been having problems with getting one device to work with it. Time will tell if I find a solution.
This has kept me busy this week though.
I will have some progress on the mound piece soon though.
Finished off the stone steps and filled in around them with just some tissue/PVA (to save on some weight on that side of the model compared to using clay or plaster), and then created the platforms (all in card stock), gave them some structure underneath and textured the top.
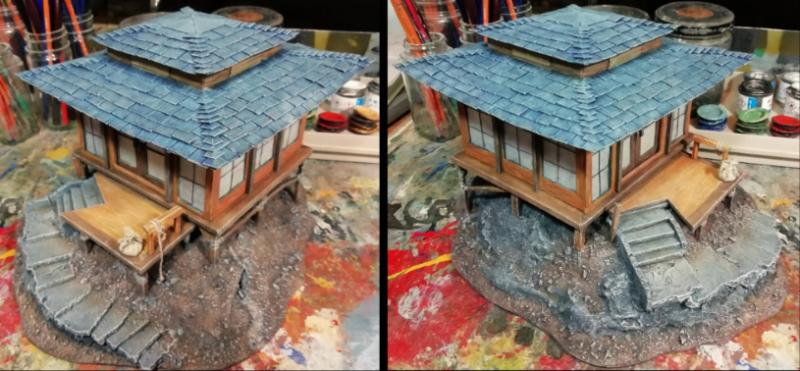
Add some stilts etc. and then build something on top... I am leaning towards a Japanese-style, wooden structure, paper windows, fancy roof... I just get that feeling from it.
Looks great to me. Now do one in a winter theme with kids sledding down the hill and a train running them over . Or at least the sled tracks to a bloody smear on the tracks and parts in the trees......man I’m being really gruesome right now for some reason .
Cool! so what function can the platform serve? Observation? sacrificial? oratory for the masses? landing pad? all the possibilities! (Looks just big enough for an Argus lander)
Thanks York'.
Ah he's a re-painted early member of my personal army.
Spoiler:
He don't hold a candle to the more recent Hellblasters
Spoiler:
Thanks Gits'.
Thanks Azalle. Welcome back. I've been fairly quiet recently, but should be more busy in the coming months.
Thanks CK. I am too. We may have to wait a bit to find out though, see below.
Thanks Theo'.
Thanks Shas'.
First, progress on the mound.
I've textured the ground.
The less rough areas will be rock and the rest will be muddy / grass-covered.
I've also attached the smaller platform, but the larger platform is left loose for now as I may need access to the underside when building the building on top.
Long time followers may be aware that I create presents for the family for their birthdays and Christmas. Usually, I start Christmas preparations in December. but this year I decided to start early to avoid the rush I end up in the week before Christmas. This means the current project is being put aside for now and will return once the presents are done.
Prepare yourselves for a handful of random projects again.
One is in physical planning stage, one is in reference collecting stage...
After much wood chopping and sanding I have the start of present 1 of 4.
Based on a thing I found on the internet and can be described as a bookcase diorama.
Vis'
Spoiler:
But mine will have a Lord of the Rings vibe as I have 2 miniatures to make use of; Elrond and Thranduil.
Here's the plan:
The right hand side is going to be an elven structure, a bit like:
Spoiler:
Thranduil will be stood on an upper floor of the structure (see arrow).
The rest of those circles on the base will be trees, twisty, Mirkwood trees.
I plan on a rope-bridge from the upper floor into the wood on the left, Will have to see if this fits in.
And there is a path snaking off into the back left.
The top half-ish will be branches and foliage.
And finally, I plan some lights in the top left, hidden by the foliage, as if light filtering through the trees from wherever the path is going.
Thanks Graven'. I've had this on my to-do list a long time, but it popped up on twitter just as I was planning what to do for Christmas and here we are.
Thanks CK. Lots of unique challenges are involved with this kind of build.
And progress.
Filling in the shape of the Elven construction. Much putty work to do to fill all those gaps. That central pillar is 2 hexagonal cross-section pens,
The near one will have a tree out of the top of that spindle, and will be painted as if sculpted from stone to match the structure.
The far pillar will be a "real" tree.
And this is what I did with the conductive paint:
I used magnets for the battery contacts, but it's not quite strong enough to hold it in place so I'll have to fashion a clip of some kind to hold it firm.
The top and front will be enclosed and hidden by foliage.
Sneak peek of a tree in progress, more on that later but I wanted to play with this paint.
Dr H wrote:...I used magnets for the battery contacts, but it's not quite strong enough to hold it in place so I'll have to fashion a clip of some kind to hold it firm...
I have found a battery that does stick, so no clip required.
Tip for the day, find a battery that is more magnetic for this purpose.
Thanks Red'. If you want to use Blancmange, you can. Or at least the mould for one...
inmygravenimage wrote:That's exciting, the conductive paint, interesting to see what comes next!
Yeah, the paint holds many useful possibilities for running electrics without visible wires. Something I've wished existed for quite a while, and it turns out it does (I could have searched earlier for such a thing, but had no immediate call to do so).
Thanks Theo'. It's not too much more difficult than any normal terrain build. The world, and your bookcase, needs more of these.
I said there was a sneak peek at the tree-in-progress above. Here's where this half of the diorama has gone.
I've started planning out the other half now, and how it fits together with this half.
Thanks York'. I like to keep myself entertained with a variety of things.
Thanks CK. Go ahead, I stole the idea off the internet; just look for "bookcase diorama" and you'll get the same inspiration that I started with.
Thanks aku'.
Progress.
Of note to you all, especially those considering their own, you have to build these things in two halves, and paint them, before joining it all together. That means you have to have a join somewhere. Plan ahead to how you will hide it.
I've now built up the other side and the ground (leaving space for the first half to slot into) Blank wall space will be taken up with dark paint or foliage, hopefully showing this one path through an overgrown forest to the light at the back, as I envision.
Thanks Tom. It's just careful planning before committing, and much of this kind of work is easily corrected.
Thannnk you Gits'.
Thanks Graven'. Ah yes, I hadn't included a scale shot (one below). Dimensions are 80 x 120 x 197mm (was aiming for 200, but had to straighten things). That's the outside of the wood structure though, with 6mm mdf you soon lose space the manoeuvre inside.
Thanks CK. Good luck, look forward to it.
Lots of small progress amongst the larger changes.
The foliage added so far is for the "sculpted tree" and will be more stone-coloured (or whatever colour the structure ends up).
Railings added and some tidying up and gap filling about the place.
I may add some paint at this stage to get an idea of where they may be problems before adding the rest of the foliage.
We are getting there...
I had seen those pictures of the bookshelf diorama online, looked like a fun project. I also thought a more natural setting would look great, even in the WIP stage it looks incredible.
And now with a layer of paint, no major issues spotted, and the rest of the foliage on this may be at the painting stage.
Some of that foliage will need snipping back as it holds the two halves apart. I just have to try and find where they are clashing.
The grey is just primer at the mo' (except the foliage which has had a few layers of grey to cover the green, which is covering the multicoloured foam). I hope to match the stonework to the "stone" foliage.
The green is just the foam soaked in PVA and green acrylic,
And the brown is just cheap brown poster paint.
Will probably start with the stone...
and I can start building present #2... should get planning on that...
Thanks CK. It won't be opened once I've finished so I don't need to worry about things being seen.
This is designed to only be seen from the front, so a lot of what is at the back is low detail. It's just to give the impression that the forest continues deeper, and is also why the figures are at the front, facing forward.
You could create one with a hinge at the back to be opened, but you would need more detail further back that will only be seen if it is ever opened more than once.
You may also want to hide the light/battery/switch more carefully for when it's open.
And you'll want to make the trees, in this example, smaller. With thinner branches (you'll notice mine are all thick and just end with a bunch of foliage) and keep the canopy of the left and right separate from each other so that they can look more realistic when open. My trees just look odd when it's open like this, but once closed you don't see the sins.
Thanks 'boss.
I have done a bit of painting, but none worth showing yet.
I have also started project #2.
Based on the robo-dinos of Horizon zero dawn.
Just the framework to start with. This will get bulked out quite a bit with gubbins and armour.
I'm using a few of the bots from HZDawn and some art and a skeleton of a Deinonychus for inspiration.
The bots in the game are really heavily detailed, with hundreds of bits, and would take months to create a scale model of one, so I decided to create my own where I don't have to worry about being "correct" about any details and can therefore be done quickly.
I'm away for a drink or two over the weekend, so no updates until next week.
I think it's just the figures to do now on the diorama.
And here's some angles to show what you don't see, and therefore how much more work you would have to do if this was to open.
Notice the difference in details between that which is at the front compared to that at the back, not to mention the painting.
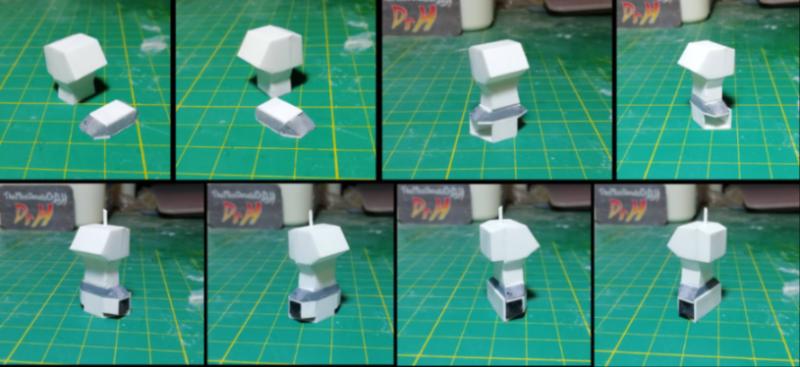
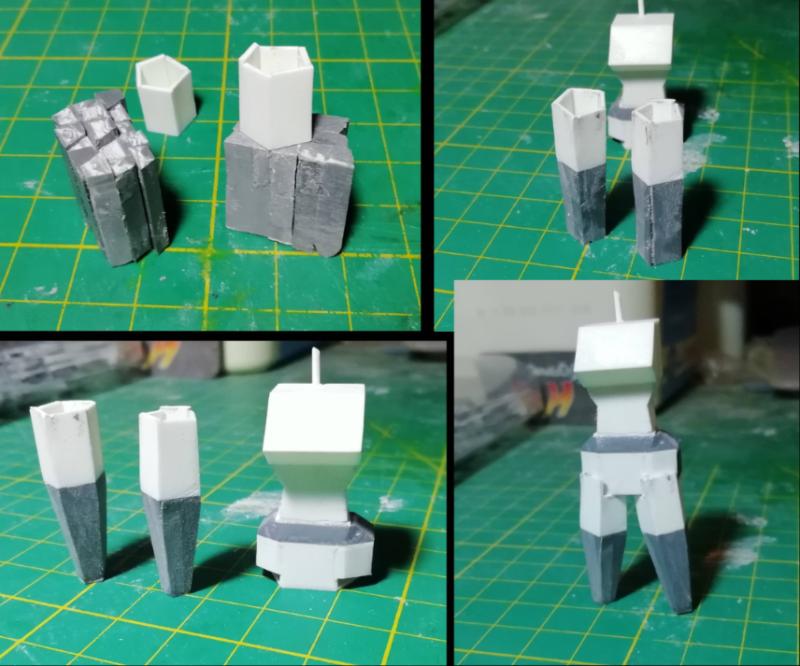
And the armature progresses with the robo-dino.
Time is feeling very short, and I've got 2 more things to get done before Christmas...
Thanks Gits', and handy as I've just finished painting the miniatures... so, update...
I also painted a grey line in the black doorways, next to the frame on one side, to give it some 3D-ness.
This should be the last wip of this project. It's just a bit of a tidy up, glue it together (add a lid to the battery/switch compartment), and sand / paint / varnish? the outside to make that neat.
Time to add junk to the internals of the dino... and probably build a head...
A lot of short, positive, comments = must be doing something right there then.
Thanks Chaps.
The diorama is done now. You'll need to wait until after Christmas to see the finished photos though.
Planning for present #3 is underway.
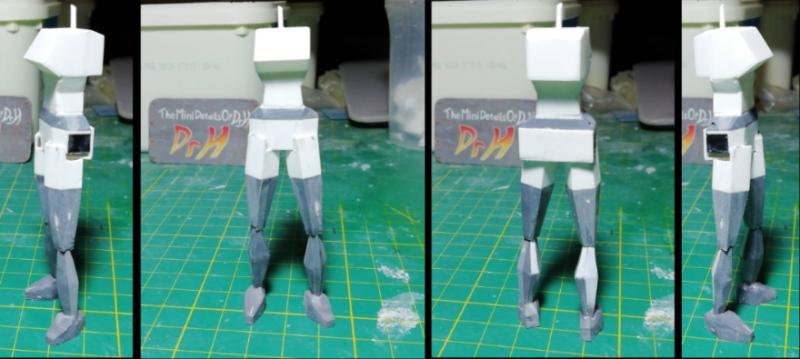
And progress on the robo-dino:
Trying to keep the upper body and head as light as possible due to leverage at the single point of contact. But once the upper body is done I'll know how much weight to add to the tail to keep it balanced.
As this is based on Deinonychus, it's all about slashing claws, so for the head I decided to go for a beak-like chopper (think of the things the fire department use to chop a car roof off).
I even managed to keep it hinged.
There will be many cables before armour.
I'll try and check in on your blogs soon; busy busy...
Thanks York'. Yes, and a bit of a Rhino/Predator, some pen bits, a bit of a Lynx helicopter and a load of plasticard. The 3D printed parts are casts from Dakkas own OneManNoodles. And sequins...
Thanks Riddle', welcome. This is how we do around here.
Thanks Cask'. Welcome too. No rider. This is inspired by the robots in Horizon Zero dawn; some of which can be ridden, I believe (I haven't played it). Therefore I have made some elements of this model look like it can be ridden. At the scale it's ended up at (not planned at all) I'd have to sculpt a rider from scratch and a) my sculpting is not that good, b) that would add another month to the project, c) I'd have had to make it actually ride-able and not just look like it can be ridden. Plus there is so much more I'd have liked to have done to just the dino model that I could add another month or 2 to this build... but I only have a week left and it needs painting!!!
Thanks Tom'. As Christmas draws ever nearer, my pace accelerates as I become more and more paranoid about not finishing in time... ONE WEEK TO GO!!!
Thanks Gits'.
Robo-dino build done... as much as it can be. I need to get it painted and time is short and paranoia is high. I have also cut a base/plinth for it to stand on, just going to be plain wood, no time to muck about with a scenic base on this scale. Did I mention that this is over 4 inches high (at the head) and about 7 inches long. I'll remember a scale shot when it's done.
Current Christmas progress: #1 done #2 ready for paint #3 painting #4 planning stage / building ONE WEEK TO GO...!
Airbrush to the rescue. Painting time cut by days.
Managed to get a good coat of dark and mid-tones on the dino in a couple of hours rather than a couple of days. It was then just a matter of picking out certain armour pieces and other details, and we're done.
The last of the 4 projects went really quick too as I kept it simple (as you can for an N-gauge house).
Here's the primed photos of the dino to keep you going until after Christmas.
Now just to check all the final photos and get these wrapped.
I got some new paints to play with (GSW colourshift), so expect everything in the future to be painted with them.
I also got a few CDs (Olafur Arnalds, Chase&Status, Stealing sheep, 808 state) and The Outer Worlds (so there's something else to keep me away from models).
And, at last, I can share with you all the finished presents for this year.
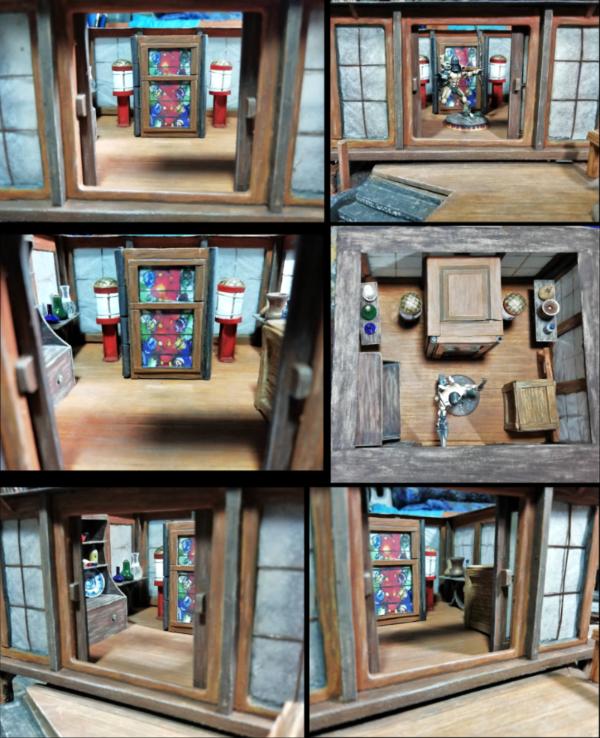
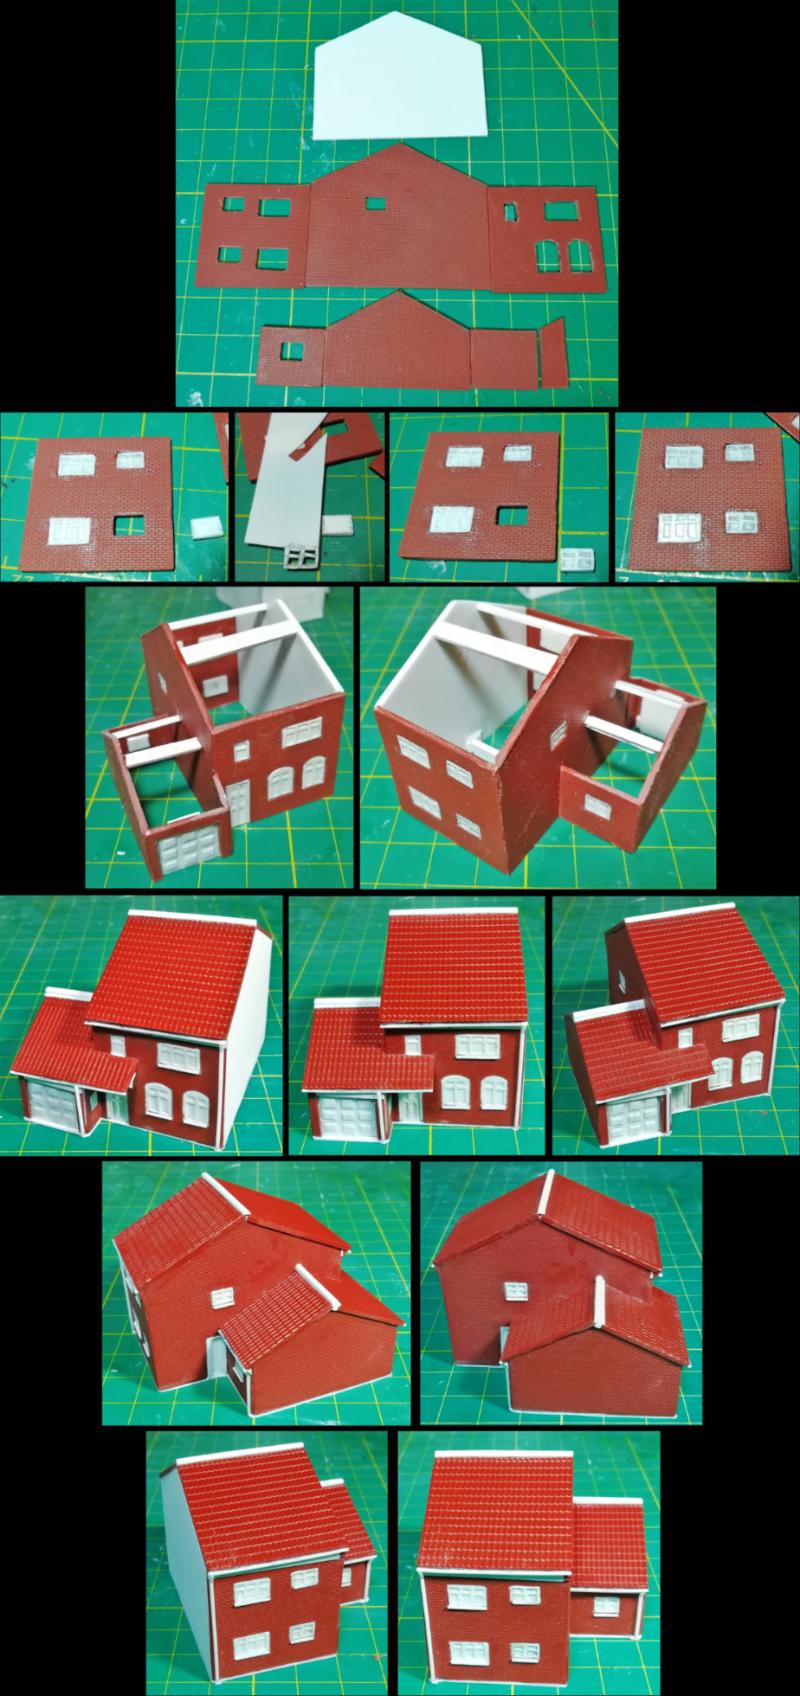
To start with, this is another N-gauge house.
Minimal internal furnishings (compared to the previous house) as only 2 of the windows you can actually see through.
I did add a small pond out front (with water effects), some fencing and a gate, and a small garden/growing patch out back.
Next, we have a set of chameleon earrings (there's an in-joke that involves a video of a chameleon).
'Nid for scale.
Then there is the Robo-dino.
Based on a Deinonychus (larger relative of the real, and quite small, Velociraptor) and on the theme of the Horizon Zero Dawn game.
And with a scale shot. This model is at about 1:14th scale if you consider a real Deinonychus.
And finally, the Bookcase diorama.
I found out recently that these things have become quite popular and are known as "Book Nooks". So there's another search phrase for you to look up.
Based on the Lord of the Rings, with Elrond and Thranduil figures, and a small light at the rear to show where the path through the trees is leading.
Not on a shelf
Closer look
Elrond
Thranduil (king of the Elves)
So this is Christmas...
Thank you all for following along.
Normal service will be resumed shortly... Outer Worlds not withstanding ... And I'll have a tour of my latest Fallout 4 settlement up on YouTube soon (it's currently rendering).
Predictably, I have been playing a lot of the Outer Worlds.
But I did finish my latest Fallout 4 settlement build before Christmas, and I've now uploaded the tour video to YouTube.
Give it a look, I put as much care and attention to these builds and tours as I do on my models.
Stick on some music and watch me walk about and look at things.
Amongst the other things I got for Christmas there was a cold...
That and The Outer Worlds has kept me busy.
But the blessing of Nurgle has passed on and I'm now on the second playthrough of TOWorlds, normal service may soon return.
Speaking of Christmas presents I have tried out the paints I got, to see what's what.
Thoughts:
These are all 5 coats, hairy-brush (airbrush recommended), over gloss black (as recommended).
A) Psychotic Illusion - the reason I wanted this pack, Purple with a green highlight. Works well, covers pretty good.
B) Nebula Copper - Orange/copper with Magenta highlight. Reasonable result, will need a few more coats.
C) Burning Gold - Orange/brown with Yellow highlight. Needs many more coats, might be nice over a gold base.
D) Celestial Azure - Purple with Turquoise highlight. Nice surprise; paint looks white in the pot but immediately pops once on the surface.
E) Cobalt Blue - Purple with Blue highlight. As D) but subtle effect; minimal difference in colour. More coats will help.
F) Toxic Purple - Blue/Green with Purple highlight. As D) Works well too.
In general, these paints will be wasted on a flat surface with sharp edges. You want a complex curved surface to really see any effect; see photos above, colour change is only at the corner, once flat they are a single colour.
Lighting can make a big difference. I had to take these photos with my "painting lights" off, as the bright, all-round, lighting just left a photo with no effect visible.
Many many coats. Yes, any paint will take a few to cover black, but these more so to even see the effect. Some more than others.
Will be interesting to see the subtle effect of these over other colours to enhance shading/lighting effects.
Need good mixing before use, and regular re-mixing during use; the particles fall out of suspension quickly. But a small drop will cover quite a lot of surface (but then you do need multiple coats). Dispense when needed, rather than pool on a palette.
In other news.
I took some more photos of my Malignant Plaguecaster. I wasn't entirely happy with the previous photos and have finally got around to taking more that include things in focus for a change.
Click through to the gallery to see.
I may return to work on the hut on a mound soon...ish.
Thanks for sticking around.
Good to hear your on the mend and that’s a nice batch of Christmas gifts. Your plague caster is a ghastly thing of nightmares, I mean that in only the nicest of ways. ;-)
Wow Doc, that LotR diorama is beautiful. I'm sorry I missed the build, as it was an interesting one, reading back over it.
LotR is my favourite book and i'd love to have something like that on my shelf with them.
Interesting look at the colourshift paints from GSW. Have you got any specific uses planned for them?
Interesting paints. Can't say I'm likely to use them, but it's still useful info to know, in case I change my mind...or have a project for which they would perfect - shut up, brain! The caster looks really cool in focus. Nice job.
Thanks Snrub. I had someone ask, over on FB, if I would make a Hobbit-themed book-nook for them. I guess they didn't like the price estimate and list of talking points (rather than call them "problems") I gave them; didn't hear back.
No immediate or actual plans for the colourshift paints. But I'll be sure to find a use for them now I have some.
Thanks Graven', no problem. I had some thoughts and thought I'd share.
Thanks 'boss.
Yeah, sometimes a miniature can be a pain to get a good photo of. The first time I'd just had enough of taking photos of him, and it took this long before I could bring myself to attempt it again.
Things are happening again...
Take some card shapes,
glue to a sheet of tissue paper and cut around them,
Cut some wires to length and glue to tissue,
Sandwich the wires and tissue with second card shape.
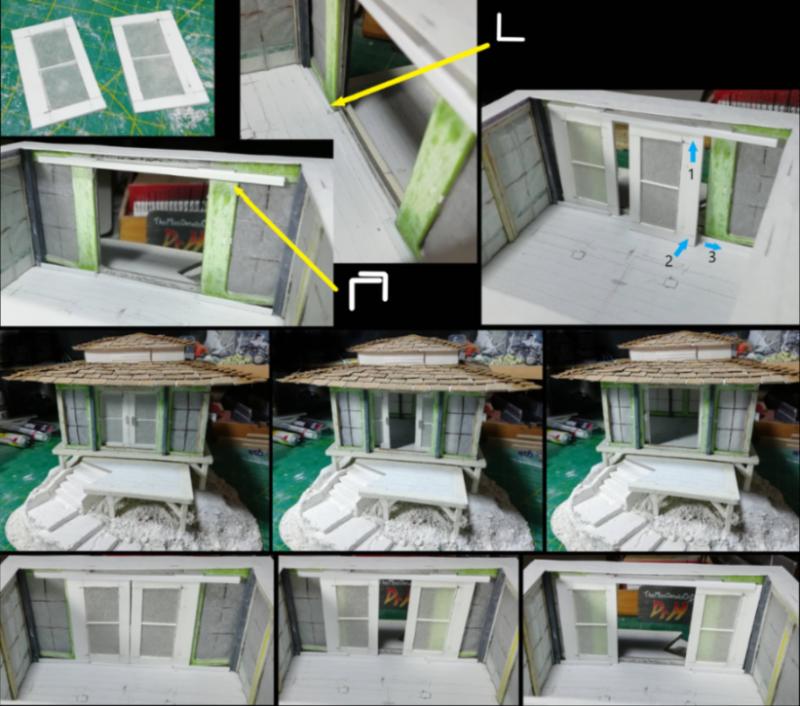
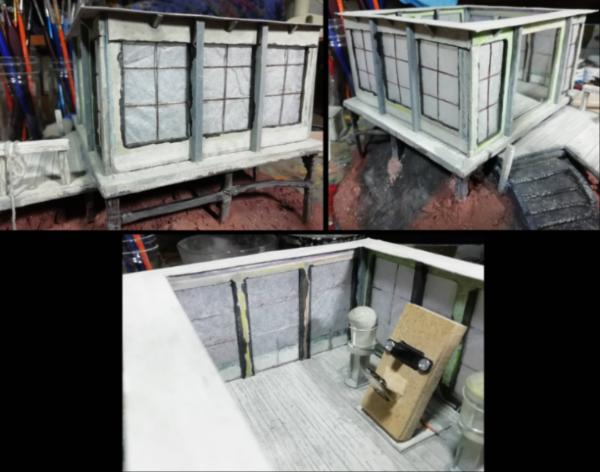
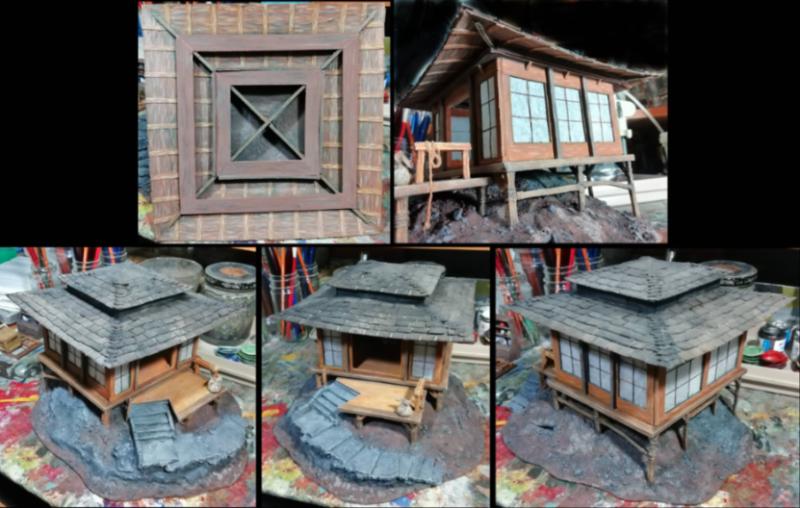
Japanese paper windows, the "easy" way.
Now to fit these together in a square (I have some posts... made from sprue... that will help) and set on the base.
Then build a roof piece that will sit on top and be removable.
And build and detail the interior.
Etc...
I'll try and catch up with all your blogs at the weekend.
No doubt they do, Red'.
Yeah, I'm using what I have on hand. It'll be relatively fragile, but should handle careful handling... hence the wires on the outside of the tissue, spaced enough that a finger should find a wire or part of the frame before finding tissue.
Thanks. Yes, I decided to do the plaguecaster in a "different" scheme for a change; make him stand out a bit. But he wasn't getting much attention on Etsy, so new photos were required to give him the best chance.
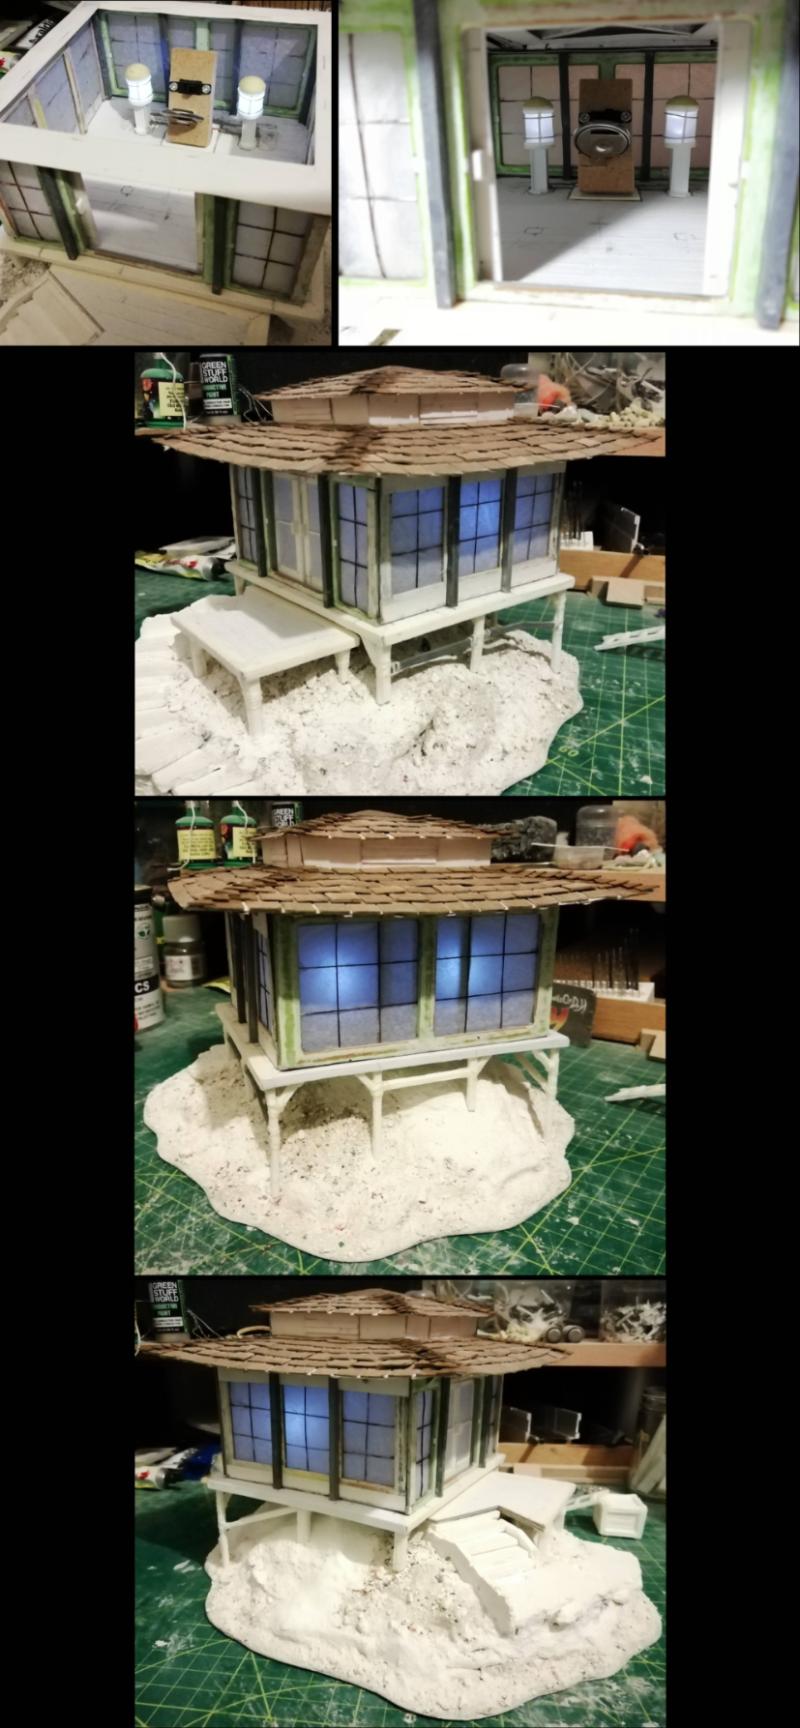
The walls are now together:
And an example of the future plans... yes, there will be some lighting.
The tissue should show it off better than clear windows would have.
Thanks Graven'. I didn't know when I started with the mound, but once it started heading in that direction I have had Bushido in the back of my mind. Though, all I've seen of it is from the blogs here that I follow; such as Gits' and Theo'. I may have to do some research before final detailing.
Speaking of Bushido... Thanks Gits'.
Thanks Riddle'. Keeping my options open for how I will realise the final lighting for the time being.
Thanks 'boss.
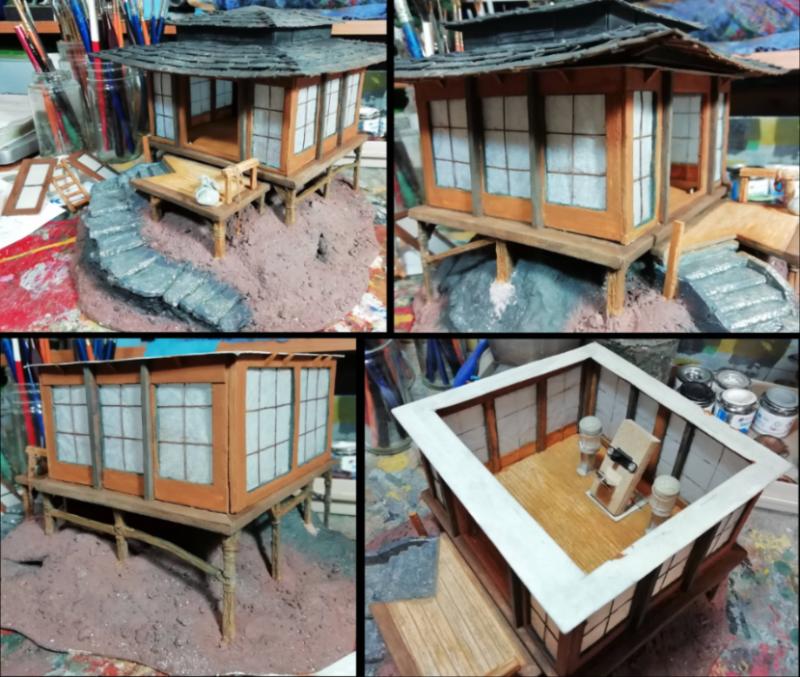
Roof in progress. Just the basic structure so far. Once strong and flat-ish, these will get tiled. Small roof should work nicely as a handle for roof removal.
That is a grouse little Japanese house, Doc. You're grasp of miniature architecture is superb. The base for it though, did you make that or is it available for purchase somewhere?
Snrub wrote:That is a grouse little Japanese house, Doc. You're grasp of miniature architecture is superb. The base for it though, did you make that or is it available for purchase somewhere?
Thanks Snrub. I just make it up as I go, and use whatever I have to hand. The shapes just follow that.
The base is made, see below from quite a few pages back:
Dr H wrote: ...You will remember me making a couple of prop replicas in clay recently. While doing these I used polystyrene foam to bulk out the shape to save on weight and clay. This left me with a pile of foam off-cuts. I also was using an old tea-towel to wipe things down. This became soaked in clay. I noticed that when the clay dried the cloth became set in a shape. This gave me an idea.
I piled up the loose foam lumps (all shapes and sizes, no larger than an inch cube) into the centre of the damp cloth and then folded in the sides of the cloth to the centre.
I then turned this over and formed it into a shape and let it dry.
I then further coated this with leftover clay sludge and a layer of PVA to seal it all in.
This is the top two pictures below.
I have then mounted this to a sheet of card, cut that to shape, and then filled in the edges with a bit more clay.
The edges will get a bit more tidying later.
This is where we are in the bottom two pictures.
With the usual basing treatment this will serve as a good base for something.
I'm not sure what I'm going to build on this, some kind of structure, likely ruined, and plenty of platforms / ramps / steps for tabletop gaming use.
It's taking up a lot of desk space, so this is the next project...
Thanks aku-chan.
Thanks Gits'. Not sure if it'll be a shrine, it's not quite "fancy" enough for that But maybe some vaguely important hut that can be used for whatever is necessary in-game.
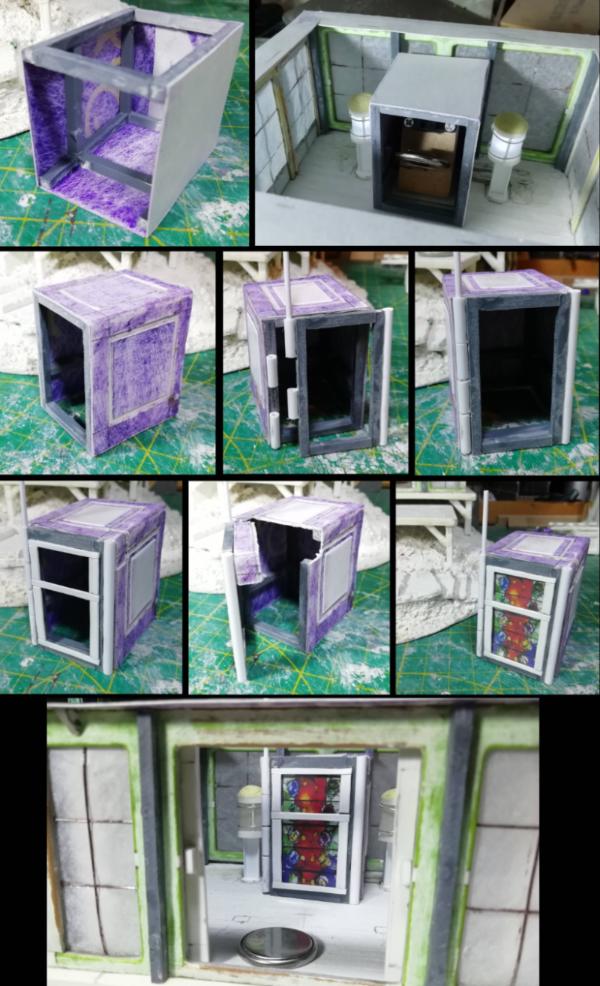
Speaking of not being quite "fancy", the tiling is now done.
Since last time;
The smaller roof section got small tabs inside to aid in attachment to the larger roof.
That was then glued on and vents/slats were added to the little walls (it has to serve some purpose after all).
The underside of the roof got detailing.
Then tiles... many tiles...
And that's the structure done, I think.
Now to look at what I might want to put inside and plan how these lighting possibilities are going to be realised...
Any thoughts on what you might like to see inside a vaguely important hut on a mound?
Thanks Gits'. I know what you mean, but it doesn't feel fancy enough to me to be "a shrine". However, it might well get a little (personal?) shrine inside to hide the battery/switch. The rest of the furnishings will be fairly simple to keep it open for gameplay. If you want your roof done with card and PVA, then by all means...
Lo Graven'. The eventual owner will have to add their own (in universe) Ronin. A bowl of rice is likely (you know how I like a lived-in look to my builds)... I don't get the full reference to be able to give a smart reply to the baby cart though...
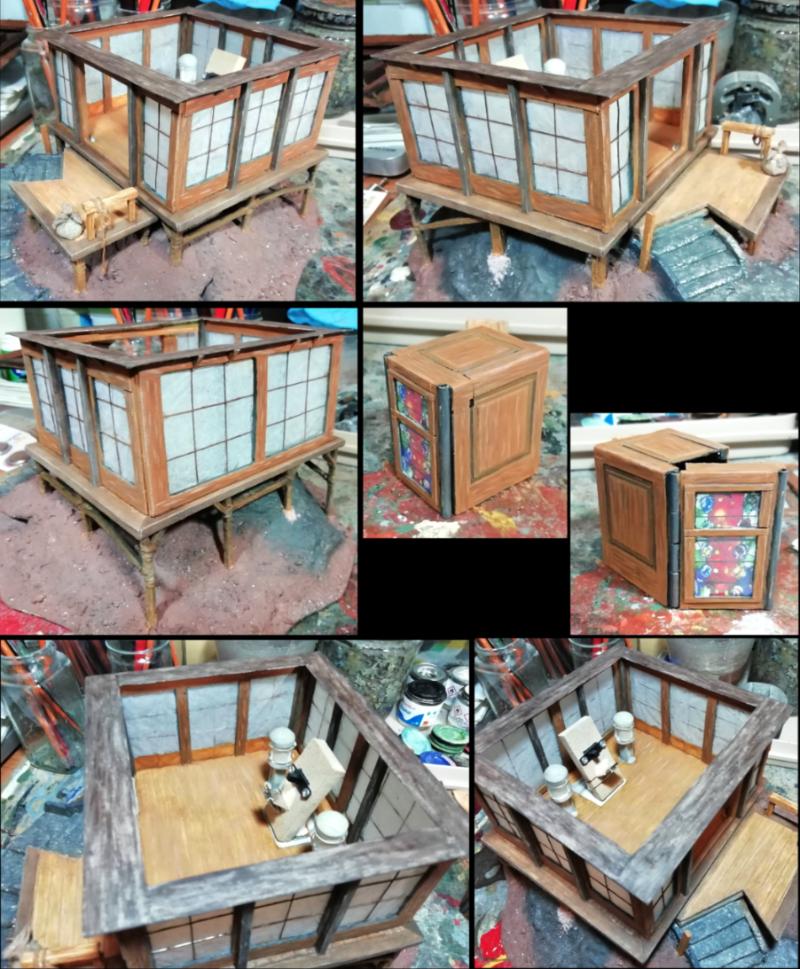
Doors! Took a bit of planning for these and the furnishings, and I've bought some batteries and switches for the lighting.
The doors were made a similar way to the walls/windows were, but use plasticard and tracing paper so that they are a bit more resistant to handling. To create the sliding "mechanism" I used L-shaped plastic-strip: One strip each side of the door, on the floor, and a flat strip in front of the door to keep the doors level when closed but not introduce a lip for "people" to trip over when entering. Used the doors to position these correctly; did not rely on the walls being straight. The doors are wide enough to meet in the middle and remain within their respective slots.
The top door-guide is one long L-strip with 2 additional pieces to create an n-shape and attach to the walls. These short pieces are outside the guide so that the doors can't catch on them. Again the doors were used to position this piece correctly.
Because of the gap in the middle, and that the doors can open wide enough to allow it, each door can be removed and replaced from the frame. All should become clear with pictures:
Thanks Gits'.
Thanks Graven'. Curious, that one seems to have passed me by, I don't recognise any images.
Thanks posermcbogus.
inmygravenimage wrote:
posermcbogus wrote:建物はヤバいカッコいい!
Way to make me break out my old textbooks and I absolutely agree, it is
I just used Google... and then checked that with another source because the big G put in "dangerous" rather than "crazy". I won't risk Google for a reply.
Gitsplitta wrote:What's the footprint of the base?
As an odd shape there's a fair bit of leeway with the measurements, but roughly 20x24cm (8x9.5").
Photos for ease of seeing...
That's a centimetre scale on the board there.
And a slightly smaller metal-bodied space marine, with an Eldar wraithblade sword.
Total height of the peak of the roof is about 6" too.
Could it dominate a small board or a corner of a larger table? Maybe if the rest of the terrain is small and/or not on mounds.
Interesting and varied line-of-sight blocking possibilities.
The eagle-eyed amongst you will be happy to know that I've fixed the relative heights of the door handles.
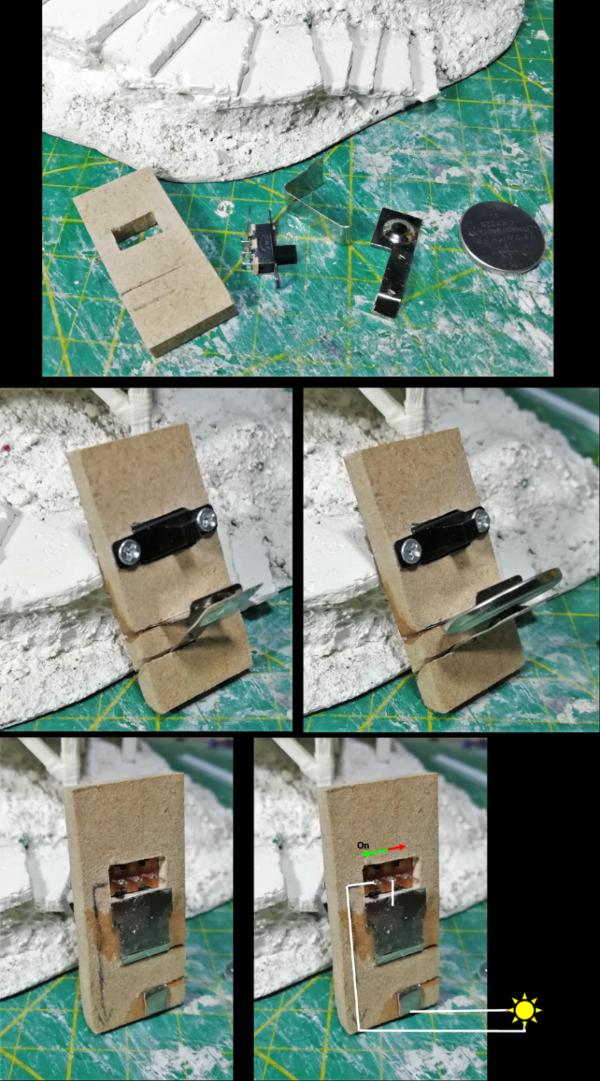
And I've created the battery/switch housing that is to be hidden in the shrine-thing (this means I now know how big to make it).
I used a piece of wood as the base because I wanted it firm to allow a spring-like battery holder.
I also used a couple of pieces of metal formally used as battery contacts. What better to use for battery contacts?!
Slots were cut into the wood to position the metal pieces so that they just touched at the mid-point of an inserted battery (2025 in this case).
Around the back, the metal pieces were bent away from each other; one towards the "floor" and one up to the switch.
A hole was cut for the switch and that was screwed in to look professional.
The upper metal piece will be connected to the switch with a short wire and solder and another wire will run from one side of the switch to the "floor". A circuit will then be made on the floor of the hut to the two lamps (as yet to be made).
So, I did a little investigating and think that structure is actually called a minka or "small house". Of course I'm sure you knew that and just refrained from mentioning it to be nice.
The electrical bit is really cool. Something else you do I couldn't hope to replicate!
Oh yeah, of course Gits', I knew that... definitely... just, as you say, refrained... Good to know. Although, good luck using "minka" as a search term in Google. Dunno who she is, but she's more popular than traditional Japanese houses.
Bah, anyone with 2 brain-cells to rub together could do this for one light. Just think of electrons as water and the wires as pipes. But a circuit (especially one that includes diodes) is only one-way (it's not, but think of it that way, unless you have diodes... which is the "D" in LEDs, they are definitely one-way).
Two lights, and the circuit becomes more complex and needs a bit more electrical knowledge. See below, because of course I'd do something in the more complex way.
Hey MT. Good to see you. Thanks. I dunno, there is precious little space on my bookshelf (I literally had to clear shelves to take the photos). But the recipient did have quite a bit of space. And you could always buy a new bookshelf to make space... That's why you build these the size of one large book, you can just keep the deposed book on your side table or something. Thanks again on the things.
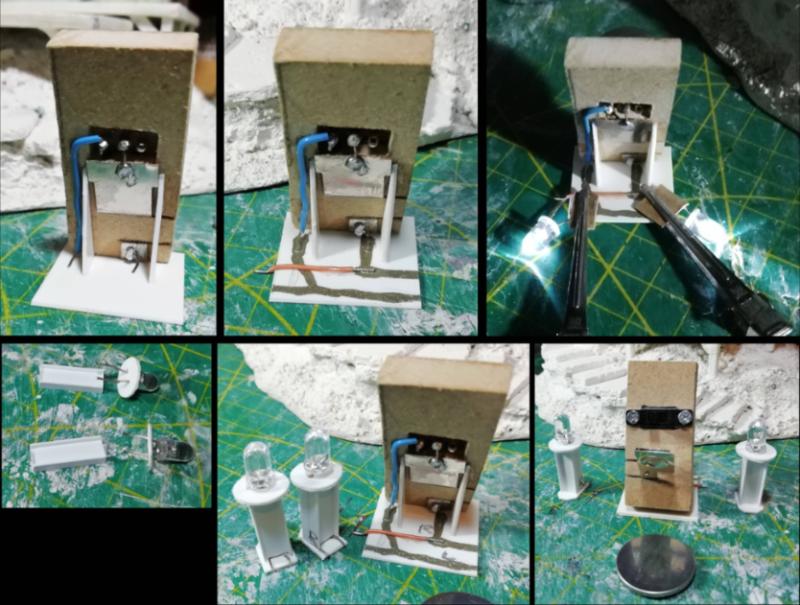
Had a few distractions, but have some progress to show. Starting top left you can see my ugly soldering. It won't be seen (other than here) so I wasn't bothered to make it pretty.
Then there is the important bit (for dual lights): skip for those not interested in the electrics
Spoiler:
I found when doing the lights for the BookNook that 2 LEDs wouldn't work, I thought at the time that the battery just didn't have enough power to light both, but I was only partly right. Those 2 were wired in Series; where one follows the other in the circuit. You can look this up yourself for more details. This meant that the Voltage was shared between the LEDs, 1.5V from a 3V battery, but they got the full current (amps). But I have found that if wired in Parallel (look it up), they then get the full Voltage (half the current) and both can be lit. So they need a circuit each, only meeting at the battery...
This meant I needed a crossover of one circuit over the other. This isn't so easy to do with conductive paint (it's like laying a bare wire on another). Rather than mess about with layers of varnish as insulation and being a pain to fault-check, I used a length of wire for the crossover. You can now see the 2 circuits exiting the base left and right.
I've been checking and re-checking this circuit all the time, but here's one for you; 2 LEDs off one battery, though my circuit. Card for insulation as those are metal clips and would short-circuit the LEDs without it.
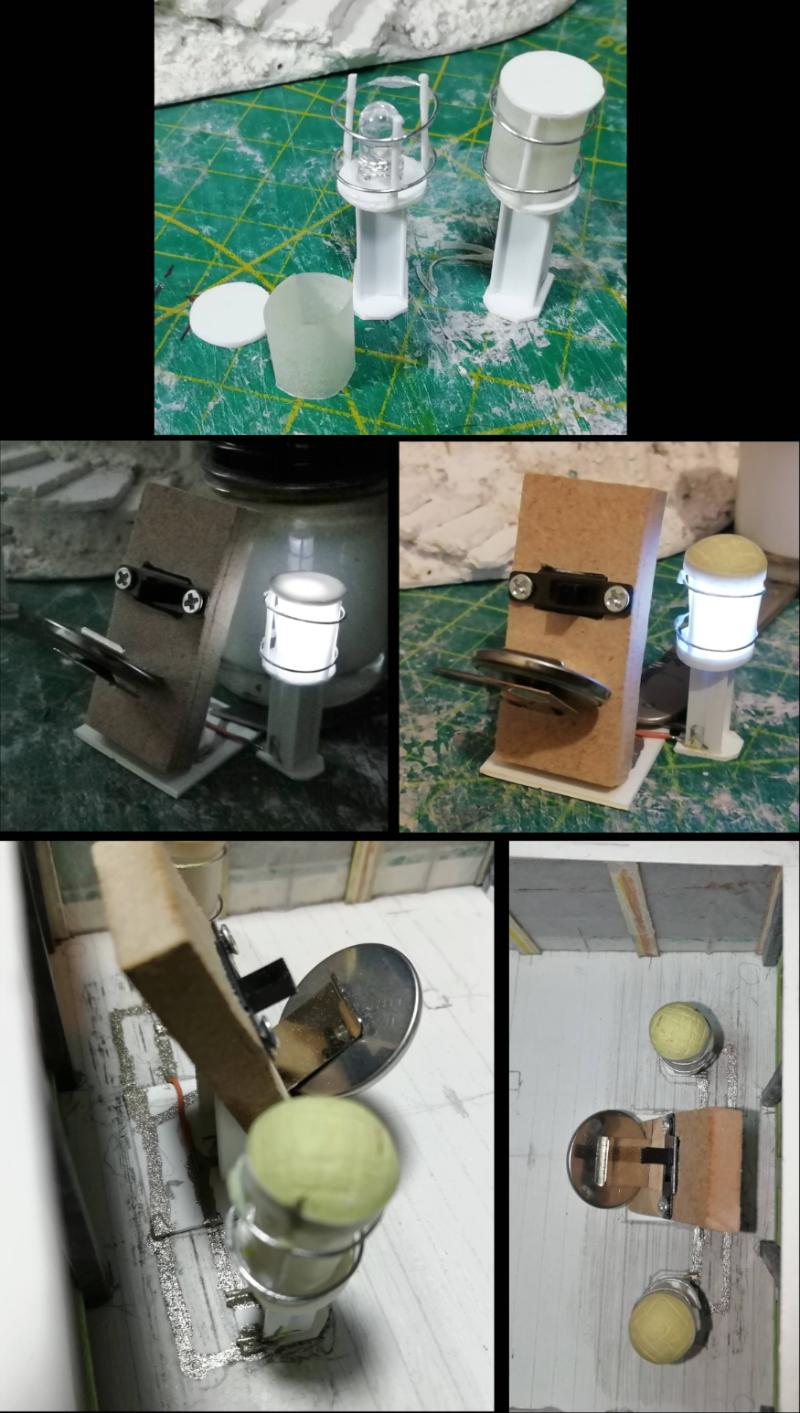
Bottom row: The lamps are made from a disk of plasticard with holes for the LEDs legs. The uprights are going to be 2 lengths of I-beam, placed so that there is a channel down the middle for the wires. Wires were soldered to the LED legs (not shown) and these protrude from the bottom of the lamps.
You should see an "R" on one side of one of the lamps, and this corresponds to one of the circuit's "wires". Just join "R" to "R" and "L" to "L". The lamps ended up as mirror images with the L and R reversed, by accident (or neglect, I didn't check or care), which conveniently will make the circuit painting much easier later (you will see later).
Final photo to show all that you will see of the circuit once complete.
Now to create the tops of the lamps (no they are not going to be bare LEDs). and then install it all in the hut.
Getting your electrician's license soon eh, or at least studying for it? Have you done a test lighting yet, to see how it would look? Like with those self-contained LEDs, tea lights and such?
It looks pretty good so far. Plenty of room for details...
I did do the first year of an electrical engineering degree, and only ultimately failed one prerequisite module.
I did show a test of sorts on the previous page, just to show my intentions with the tissue windows. a better example is below... Thanks, Red'.
Progress.
The tops of the lamps took 3 attempts at construction, with 2 methods. This is how they've ended up.
They're not particularly neat or pretty, but they are together and I'll just make the rest of the furniture a bit "rustic" to match them.
The roughest parts are, of course, hidden around the back. Some is visible from above, but I don't think anyone will notice once it's all together and there are pretties to look at.
The metal rings were made first and the uprights were glued into them.
That construction was then glued onto the lamp base, and the top disk was then glued to that after a cylinder of tracing paper was inserted.
The first lighting test of this construction showed that there needed to be more material on the tops of the lamps to hide the light bleed. Bit of putty... Now you remember how I said the 2 LEDs were installed opposite ways to each other and that this would help with the circuit? This shows what I meant; If they were identical, one trace would have had to run around the front of the lamp to avoid crossing the second trace to that lamp. This way they are short and straight.
This positioning was the result of the 4th attempt to install the lighting. Involving the removal of the lamps and battery housing each time.
Getting the electrical connection over the edge of each plastic base piece to complete both circuits proved tricky.
The main problem, I think, was seepage of the conductive paint under the plastic and the 2 connections joining and shorting the circuit.
I needed to put enough of the paint on to make a connection, but not too much that these shorts occurred.
As I said, 4 attempts.
But...
...Success.
They don't look blue at all in person.
I have a brief side-project to get done this week, and then we'll be back to this asap.
In other news:
I'll be temporarily closing my Etsy shop for April and May. Re-opening in June.
This is the quietest time of year for my shop's views anyway, and the human malware is not going to help with that. Plus it'll avoid me needing to go to the post office (I am living with two 70+ year olds), and taking a chance on whether the postal service will be running anyway.
Plus Etsy is starting up a questionable new money-making scheme in April, so this will help me miss the introduction of random +15% fees for sales, and I can opt out without a surprise loss in profit (total fees possible; 5% + 3% +15% +VAT from the total price I set, including postage cost).
So if you have been thinking of buying something from my shop, get it now or you'll have to wait at least 2 months.
The build is terrific and the lighting effect is simply perfect! The detail is extraordinary.
I've messed around with LEDs a bit over the past year and also had to (re) learn the basics of wiring that I used to use so casually as a teenage model railroader (flashlight incandescent bulbs, back in the day). Lots of fun. I'm hoping one day to build a vehicle with the lighting integral to the design, instead of retro'd on.
Here's the link to the basic article I used to re-remember how to wire things so they don't blow up:
It explains all of the things to be able to match batteries to bulbs to resisters; I was able to make something light up, so it's darn near idiot-proof!
Can't wait to see the small house of Ichi-buro painted, Doc. And perhaps set in the Glade of 100 Poets.
Beautiful little hut Doc! The wiring works a treat.
Thanks for the recap on the base too. I'm guessing I glossed over that when I was catchingup. Rather clever use of remnant materials!
Bit of a shame about Etsy. I know of a few people who have pulled listings, or in one case, their business from Etsy because they don't like new thing.
Hello again, how are we all doing with your respective isolations?
Very little has changed for me (the "advantage" of unemployment), but there has been some minor interruptions of plans.
Thanks Meer_Cat.
Seems like a good article.
I have no way of knowing the ratings of the LEDs I'm using (liberated from something electrical in the past), and the painted circuit probably has a fair amount of resistance built in, which again I can't know without a multimeter. But they seem to work for now and I've only lit them for testing to keep whatever lifetime they have left to a maximum. If there was a major problem with the relative voltage requirements, I'd have probably killed one of the LEDs already.
It's quick (wasn't that quick), it's dirty (but will be hidden), but it works... for now.
Thanks Gits'.
Thanks Snrub.
Yep, I'm all about making use of scrap and junk.
Yeah, a lot of what I'm seeing in the Etsy forum is that most shops are seeing a large drop in sales and only certain things are still doing well (e.g. knitting patterns).
Anyway, progress...
Building the box to hide the battery/switch and it's been tricky.
It started off too big and has been cut down as far as possible, and is still quite big. But it is what it is, we'll all have to deal with that.
From a framework of sprue, it was covered in card and then made a bit prettier with more layers. Think "wood panelling"
Then I made the door for the front to access the battery compartment. I'm aiming to make it not look too like a door, hence the "fake" hinge on the right.
Even as small as I could make it, it can prove difficult to install the battery, not impossible but could be easier. So I attached some of the box structure to the door.
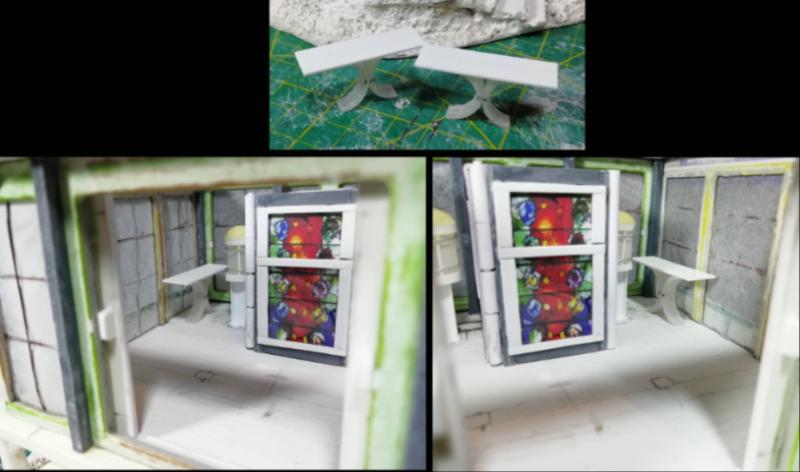
I had intended to install shelving for vases and candles into the door, but with the battery's position they would be in an odd position; very low or very high.
So I hit upon the idea of a stained glass window that could have candles placed on the "shelves" within.
Therefore, frame, clear plastic and a printed out picture of some stained glass were installed.
I'll need to install a magnet to hold the door shut, but that's it.
Now to create some more furnishings to fit the rest of the hut.
Right, quick blast through the blogs and a quick update here.
Thanks MT.
I did think that once I had the idea about stained glass, but too late to be attempting to add another LED.
Some little side tables I knocked out today.
Fairly simple;
Find a cylinder of sufficient diameter,
Cut rings of desired thickness,
Cut in half,
*If material not thick enough cut twice the number of rings and glue 2 halves together to increase thickness.
Glue back to back to get an X-like shape,
Add flat top.
These should add nice shadows to the windows once populated with vases and things.
While the rest of the world is going crazy for this viral lung infection, I thought I'd be different and pick up a bacterial eye infection.
Video nurse suggested rinsing my eye 4 times a day and see if it helps. So this week I've been waterboarding myself and not made much progress with anything.
It's mostly better now, so I can focus on things like typing.
So, update of where I was before the pink-eye took hold.
monkeytroll wrote:Nice, simple, effective. Good little tables, and an interesting shape for shadowplay.
Thanks. Yep, my thoughts exactly.
Could always thread a few strings of fibre-optics down the 'back' of the lamps through the floor and back into the cupboard.
It's going to be tricky painting behind those lights, nevermind stringing fibre-optics, and they'll be even harder to hide than wires due to light-bleed, and without getting good, direct, light you won't get very bright light at the other end of them. I know, I know, excuses, excuses....
Thanks Gits'.
There's always more to come, Graven'. Thanks to you and all, for sticking around.
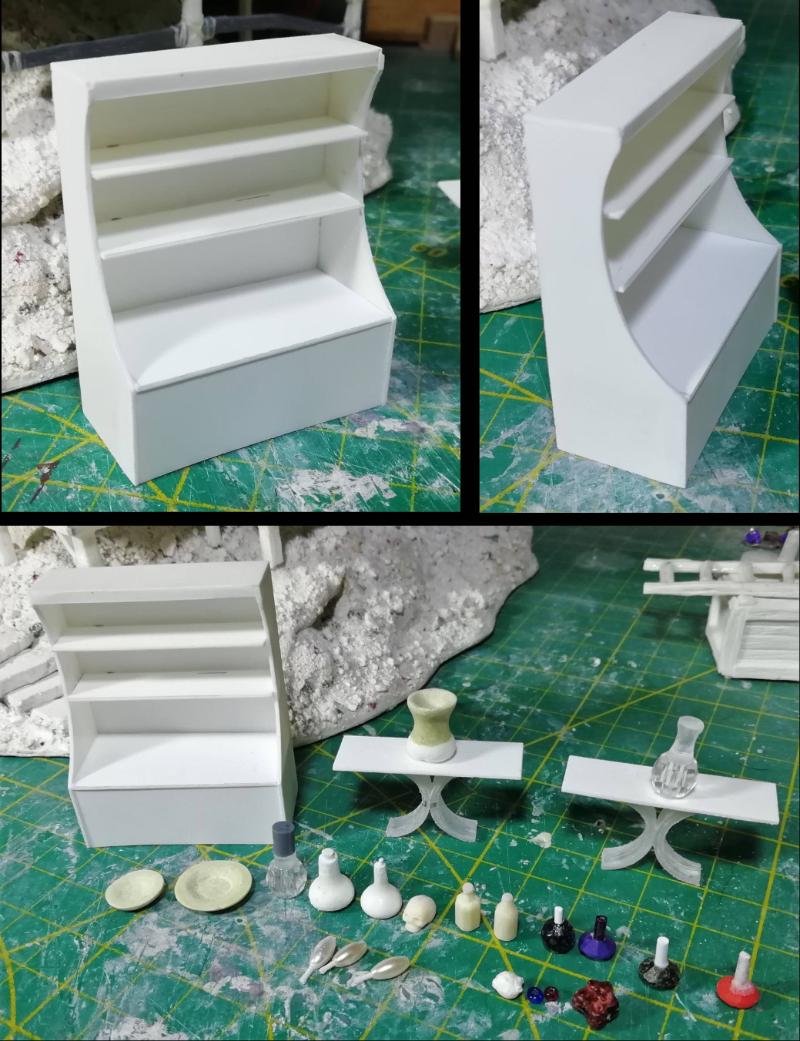
In addition to the tables I've also made a shelf unit.
And I made / found various things to put on this and the tables.
Bottles, vials, phials, vases, and plates.
Using some milliput, "spare" resin blobs, plastic rod, and beads (nice to find that the large clear ones even work with plastic cement to glue to clear sprue for the necks). A couple of OMN bottles and a skull from Heroquest.
The shelf unit is quite large once inserted into the hut, being pretty much half a wall in width. So I think I'll leave it free to be removed rather than glue it in.
Some painting will be required of all the hut's various pieces now before installing the tables at least.
There's a few other additions about the place, but not much more is going to fit within this, then we'll be full on painting.
Dr H wrote: It's going to be tricky painting behind those lights, nevermind stringing fibre-optics, and they'll be even harder to hide than wires due to light-bleed, and without getting good, direct, light you won't get very bright light at the other end of them. I know, I know, excuses, excuses....
H for half-job is it?
Great little collection of knick-knacks, and definitely a bonus with being able to glue the beads to clear sprue. Got to be some potential there....
Got to be different, even with your infections. Glad it's clearing up, eye infections can be nasty.
Glad you're getting better Dr H. Those shelf nick-nacks are uber-awesome! You never cease to amaze and astound. Please keep up all the fantastic work and keep sharing! It's very inspirational.
Thank you MT. Yeah, you don't know until you try. The rest of the beads in my collection are glass/ceramic, but was pleased that those worked.
Bah, the eye was more of an inconvenience than anything else. But still, it's worth having these things looked at as it can always get worse.
Thanks Graven'.
inmygravenimage wrote:... furnishing ...
Now don't start that again... No Lamas.
Too kind, Gits'. Just find a blob and stick a rod on it.
Although the plates were not so simple. Basic shape made on a flat surface, but the dip in the centre had to be carved out after curing, and then lots of sanding to get a smooth shape. I made about 5 and 2 turned out good (I knew I only needed 2).
There is, no doubt, a better way.
Before I can populate the tables and shelves a certain amount of painting is required as painting around these small items while on the shelf will be difficult.
Tables and shelf are painted "wooden", and the knick-knacks are ready for more intricate work.
While I had the paint out I painted the underside of the hut and gave the mound a layer or 2.
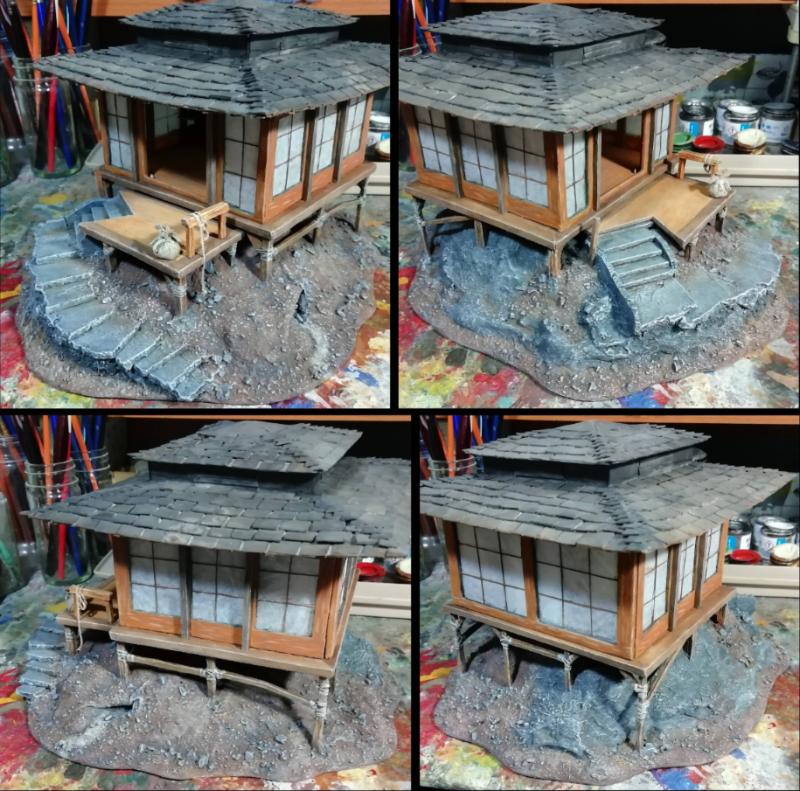
With a basic dark paint job I could mount the hut on to the mound.
Pleased to see that, once attached, it is level... enough, the back is slightly high, but within tolerance. I had cut those legs a long time ago and had to find the particular position that I had planned for the hut again.
You will also notice a couple of details added to the top of the stair and platform. Didn't want them getting in the way earlier.
This might be it, the transition from wip to pip...
Hmm, some sort of press mould from a button maybe for the plates? I'm sure there's something the right shape at that sort of size, but it's eluding me at present. Could use a variable hole punch - a ring for the upper level and a disc slightly larger than the ring-hole for the base. I mean, it's done now, and good job on them, but just thinking it through I honestly thought you'd found something that fitted, rather than having carved them until you mentioned it.
Base looks good, like the horse ties, not convinced on the necron artifact...
monkeytroll wrote:... I mean, it's done now, and good job on them, but just thinking it through ...
Good thoughts.
I had intended to sculpt them fully but had the putty mixed and ready when I realised that getting a good shape AND sculpting the internal dip at once wasn't going to happen. I decided to get them flat and round first and then worry about the dip later.
Base looks good, like the horse ties, not convinced on the necron artifact...
Thank you MT. You are a silly person...
Thanks Graven'. More wip below...
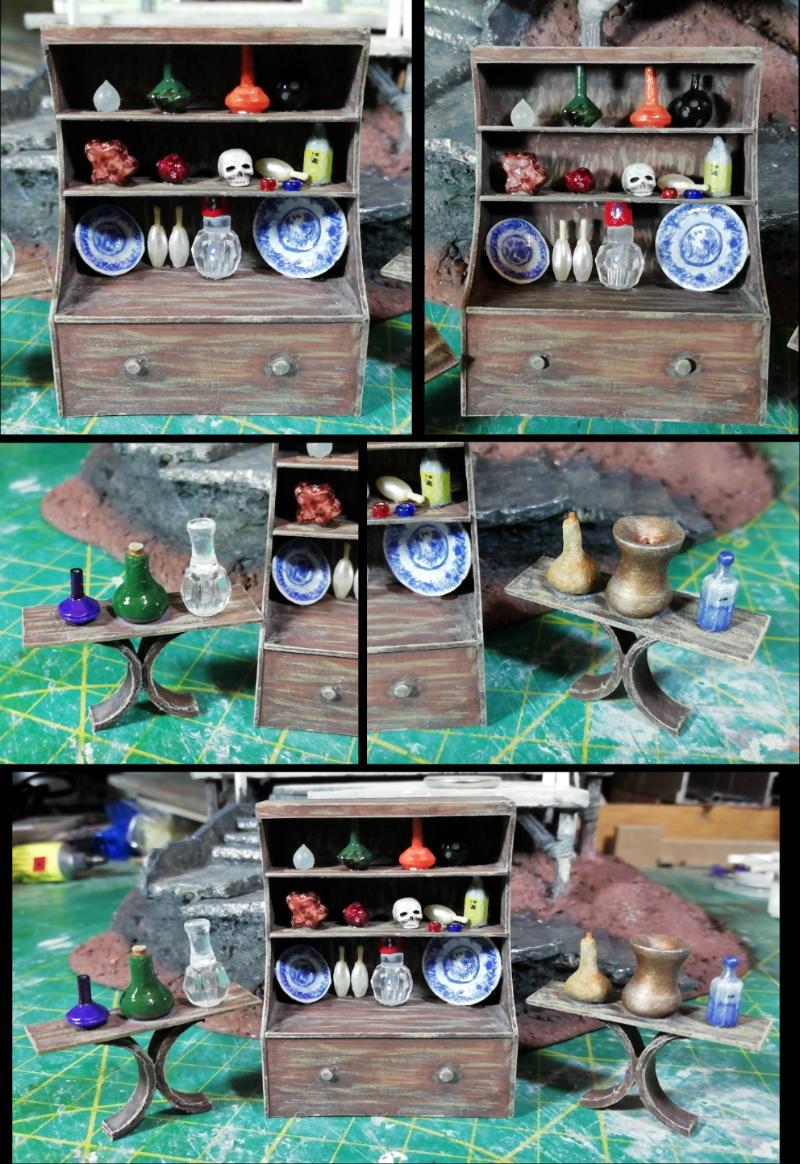
Shelves and tables populated with painted things.
And the populated parts of pretty painted things positioned within the premises.
And a look at how the lighting works.
Thanks Gwyn'. If you zoom right in you may see the strokes.
Google "Willow pattern plates", you'll see that they tend to have a familiar layout with a house on one side and trees on the other, with space up the middle for birds and the like. From a distance they just look like multi-layer blobs in 2 stacks; so that's what I painted. Plus fill in the rest of the white space with a few dots and squiggles and that's the centre done.
You then have a ring around that.
The outside of the plate is also a "cheat". The real plates have a very intricate pattern that is more dense towards the outside and "spiky" towards the inside.
I painted diagonal lines around the edge, angled one way and then the other to give many overlapped X's, I made sure the paint was more dense towards the outside of the plate and the ends of the lines meeting like ^ than x. I then added a few larger blobs at intervals to give the impression of larger features and break up the regular crosshatched pattern.
I used my smallest brush (5/0) and tried to keep the markings as small and as sharp as possible (minimal paint on the brush each time), going over some features, with smaller and smaller brush"strokes" to make them darker and more distinct.
Gloss coat and the illusion is complete.
Something of note I noticed while painting the black edges of the windows of the hut.
As with all things I paint, there's always the odd slip here and there. No problem, says I, a moist brush of white spirit works well as an eraser for the enamel paint I use, even when touch-dry.
I thought nothing of it and continued to do this on the tissue windows, and it works fine.
I then thought of the rest of you, using water-based acrylic paints and how this tissue usually reacts to water. Even neatly painting around the window would lead to you effectively "cutting" the rectangle out.
Something to keep in mind for those of you likely to do something similar. Maybe use tracing paper, like I did for the doors, to avoid paint issues.
Not decided on the colour for the tiles on the roof yet. Will see how the hut turns out and see what matches best.
Other than that it looks like it's mostly going to be brown. May find some more ways to throw in some colour depending on how it looks with the furniture in.
Basic colour on first... decide later.
Progress involves the painting of the wood to look more wood-like.
The floor still needs a wash or 2 to bring out the texture.
Can't do that until I get the box in.
Can't put the box in until the lamps are painted.
You can guess what I'm doing next...
Thank you MT. You were close, really close, but not quite. No, not the roof.
Thanks Shas'.
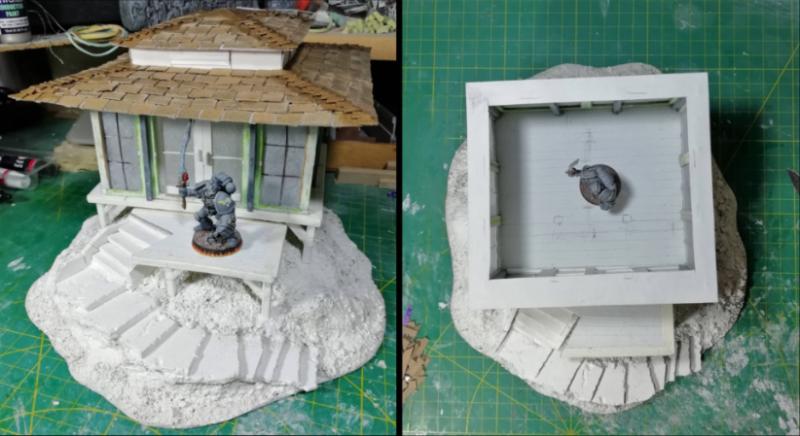
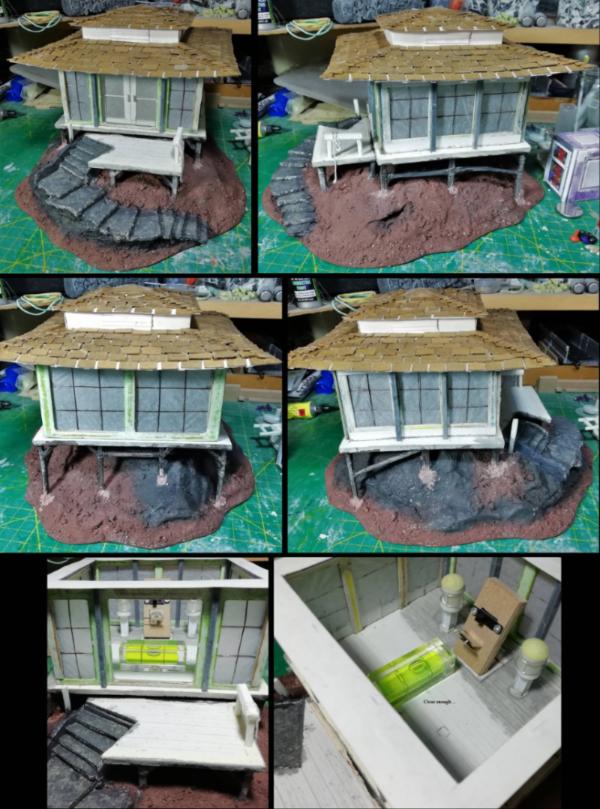
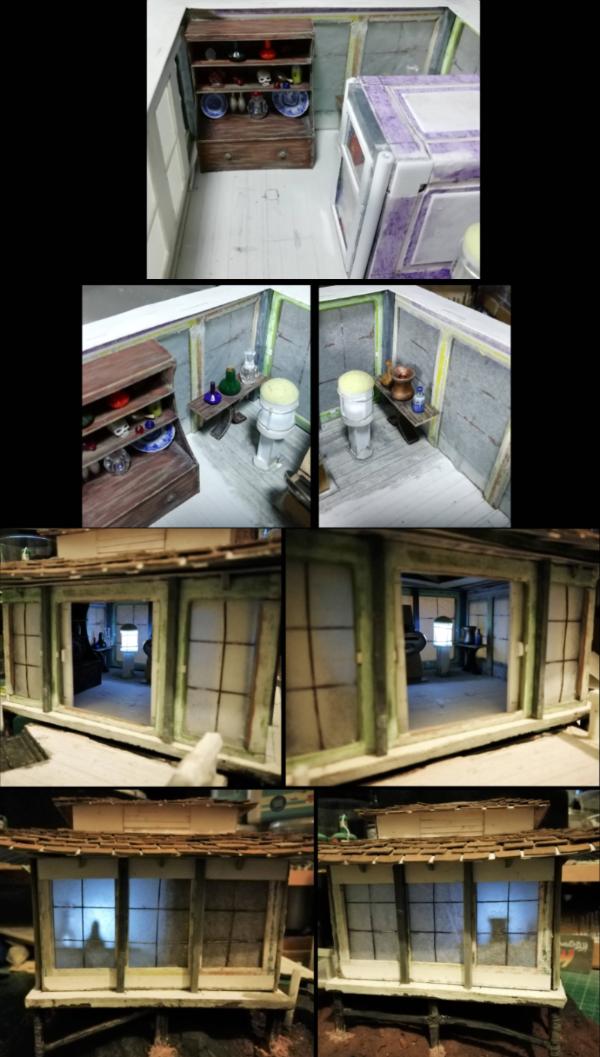
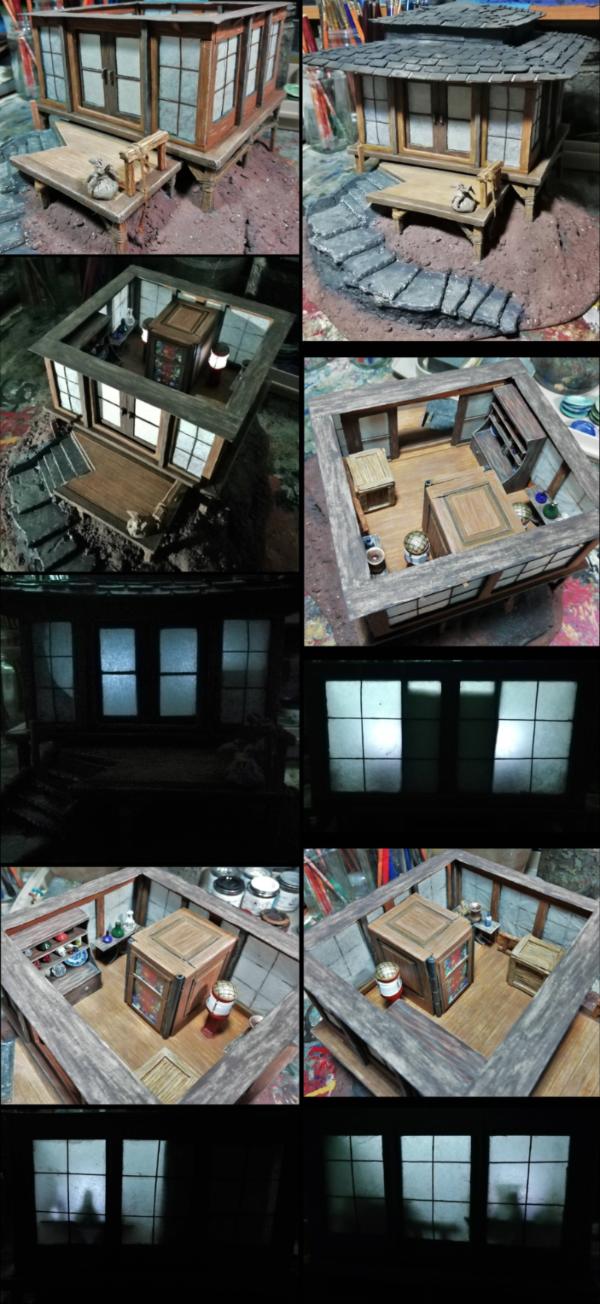
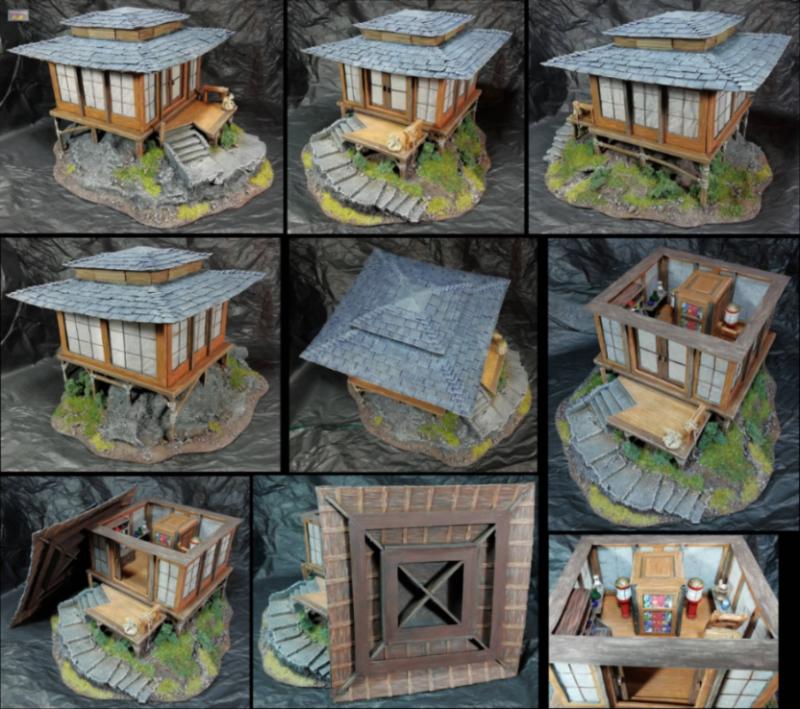
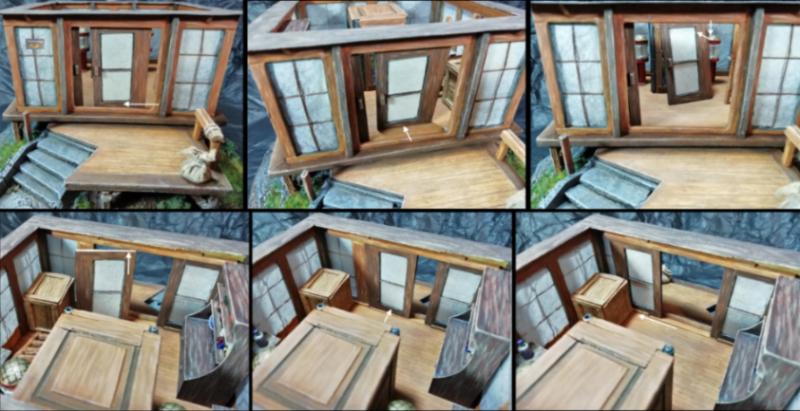
Progress. The interior and main body of the hut is done.
Overview and lighting effect:
View through the doorway:
Battery compartment:
As you can see, with it all in there's not a terrible amount of room for miniatures in there, so the shelf unit and the box are going to be left removable.
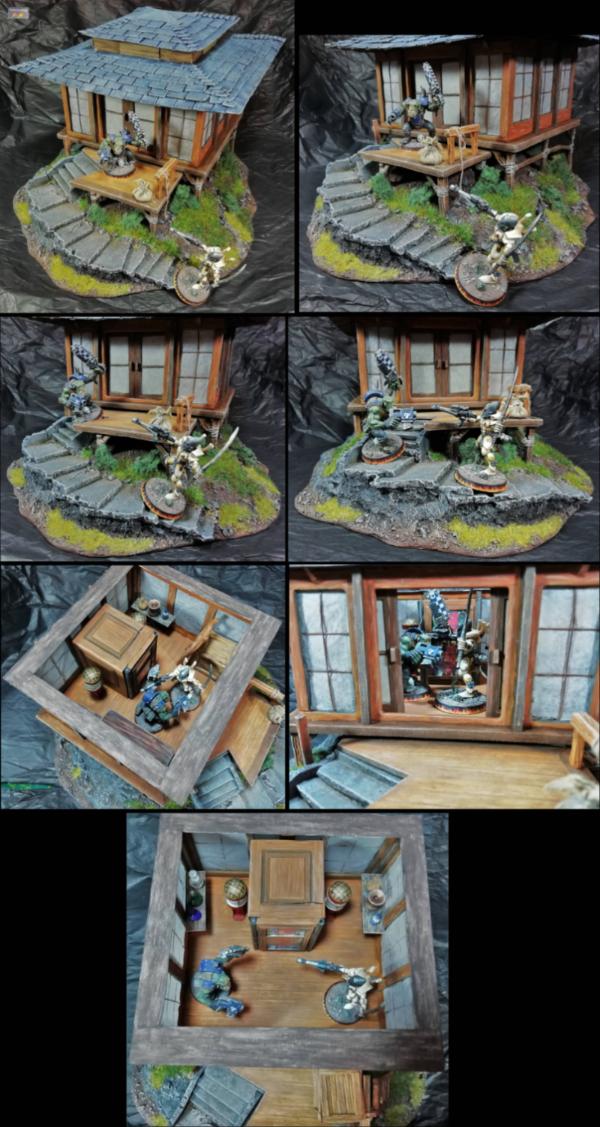
Even with the battery compartment and the tables there should be enough room for objective markers and/or a small fight with a few mini's.
Now to work on the roof and the base.
And, fellow Dakka-member, the LoER terrain contest is back up and running. If you haven't seen it yet or are unaware of such a thing, it's a friendly terrain contest that anyone on DDakka can join. Build terrain, learn tips and tricks, be rewarded with a piece of terrain. If nothing else, follow along here: https://www.dakkadakka.com/dakkaforum/posts/list/787913.page#10785587
Thanks MT. Ja, with the way I built the battery/switch piece, the box couldn't be made smaller. I could have cut almost a centimetre off the height if I really wanted to, but that wouldn't actually take up any less space in the hut. As it is the installed battery is right up against the inside of the "door", and while I might have been able to cut 5mm off the width if I did away with the base of the internal piece that would have meant creating the "complex" bit of the circuit on the floor of the hut without an easy way to test it as I did.
And width isn't really the "problem". I needed the space behind the switch for the crossover circuit, so I can't push it all back as far as it might look. Rearranging the whole battery/switch layout so that it was accessed from above and then creating the circuit underneath that would be the best way to save space. This is what you get from learning as you go. Next time, it'll be smaller.
Thanks Gits'.
Progress... The underside of the roof is painted and I've started on the base.
Now to think about what colour to do the tiles. I'm thinking a pale colour so that it doesn't jump out at you or overpower the whole piece. Maybe a pale blue / slate grey.
Painting on the base is done. Needs some plantlife added after a bit of varnish.
Just the roof tiles to do? Quite possibly. It's been so long I don't really recognise the finishing of a project. I tell a lie, I have finished numerous presents in the intervening time.
And a small side-project inspired from some things that have popped up in my online circles.
Look up tensegrity "tensile integrity". The "strings" don't have to be hidden, but I wanted to use my thinnest to heighten the illusion.
If you pop over to my Twitter page you'll even find a video. https://twitter.com/Dr_Steve_H I have a larger, different version of this sort of thing planned, stay tuned.
Thanks Graven'. Yeah, they've been doing the rounds of the internet recently, although it's been about for ages it seems. I had to make a tiny one though.
Next, will be something for my personal army, back over in my other (original) blog. There's no point making more things to sell if nobody's buying and my shop is shut.
I do have a couple of presents to get done over the next month, so those will show up here.
Thanks Gits'.
The roof is now done.
Not as pale as I originally intended, but I'm happy with where it's at so not going to make it any paler.
It's a darker, more navy blue than the photos show, I've tried adjusting them as this is as close as I can get. Hopefully this will be easier when I take the final photos.
Now to stick some green on it and take final photos... coming soon...
That's so natural looking... peaceful looking too! All it needs is a little cascade of water from the rocks on the left side there and some greenery and you'll have the perfect retreat!
Thanks Tom, Gits'. No water, but the greenery has taken it to the next level.
Click through to the gallery for a better look at it (and maybe give it a vote while you're there).
Closer look at the internals:
Closer look at the base:
Lighting:
Scale shots and model balancing:
Removing and inserting the doors:
And that is the hut done.
As my Etsy shop is closed and I'm not venturing out of the house, there's no telling when this will be available to buy. But I'll be sure to let you know.
And, as I mentioned earlier, next up will be something for my personal army over in my other blog.
But I have a couple of presents to make that will be shown in here.
Stay tuned.
Love the look of it in a dusky environment with the lighting on, very atmospheric.
I had been thinking the roof needed colour, but it doesn't, and looking at the finished piece as a whole think it works better with your choice - trust the doc
Nicely done sir, and looking forward to the mad scientist getting some love again.
Thanks MT.
Yeah, I had to turn off all my painting/photo lights and just use the room light, hence the warmer tone to the general light. With the painting lights on you can't see the LEDs.
At least the colour of the roof came out more like real-life in these photos. If you look closely at the top-down view you may even see that some of the underlying brown shows through the blue in patches. This was intentional, with mainly dry-to-moist-brushing used.
Ta. I'll need to reacquaint myself with my plans before deciding on what to build. Expect (mad)ness.
Thanks Graven'. Well I had to have something for scale and multiple mini's for playable reference. I just so happened to grab 'im...
Thanks aku', nice to hear.
And the side projects are done.
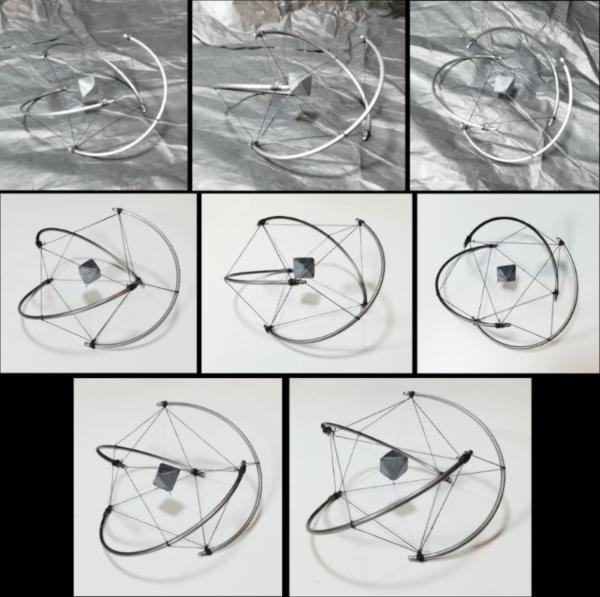
First some lessons from my creation of one of them. You'll remember the tensegrity thing I built a little while ago. That led me to have a look at what else is possible. A table led me to try a 3-bar style version: 3 solid pieces connected by triangles of string. But straight lines are too easy, and like the table, I wanted to use curved pieces.
I also wanted metal, actual metal, real metal, for the solid pieces. So I searched through my metal bits collection and came up with a large spring (roughly 65mm in diameter). A few cuts with my dremel and I had 3 curved pieces of metal that were strong and identical.
The table I had seen as an example was a mess of wires holding it all together and the photos didn't do it justice for me to work out what was connected to what. So I had to practice. With my original tensegrity piece labelled as Mk.1, the first attempt was Mk.2.
I started connecting the pieces together at one end, in a triangle with one length of thread. I then joined the other ends with another length of thread. A few wraps around and a blob of superglue, and I tried to keep each length of thread the same between the metal pieces. First tip: you have to keep your wits about you to keep track of which piece to connect to next so the finished piece is not tied in knots in the wrong way.
Then you need lengths of thread that run from the "top" of one metal piece to the bottom of the next metal piece. So that one end is attached to both ends of another piece. The whole structure is loose and chaotic until you attach the very last thread. Once that pulls tight, the whole thing stands up...
...and you learn that more care is needed with choice of thread length and attachment to the metal pieces. Mk.2 was a mess (see below).
For Mk.3, I followed the same procedure but made each length of thread 50mm. For these particular metal pieces, that was too long and the thread was not taught everywhere at once.
Also, for these curved metal pieces, they require another thread to hold their middles equidistant from the ends of their neighbours. Or they just flop down unpleasingly.
However, it was possible to just tighten up these lengths and therefore fix the structure, giving Mk.4
A little tidying of the thread ends and the addition of a floating tetrahedron and Mk.4 was done.
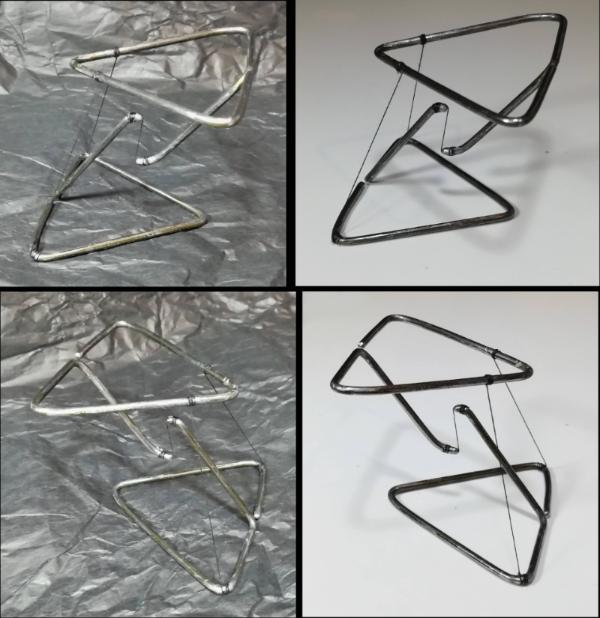
And then I revisited the "classic" style of tensegrity sculpture, but I really wanted to only use 3 lengths of thread (the bare minimum). Connect the middle thread first and then careful balancing while attaching the other lengths and you're good. Keep the weight of the upper piece over to one side and you don't need a length of thread on that side, gravity does it for you.
I used a wire coathanger for the metal pieces. I was pleasantly surprised to get the triangles so even. I was however, aiming for pointy ones...
Mk.5 It's quite stable, and the upper piece will even rock back and forth a fair bit without falling. push it too far and it will fall though.
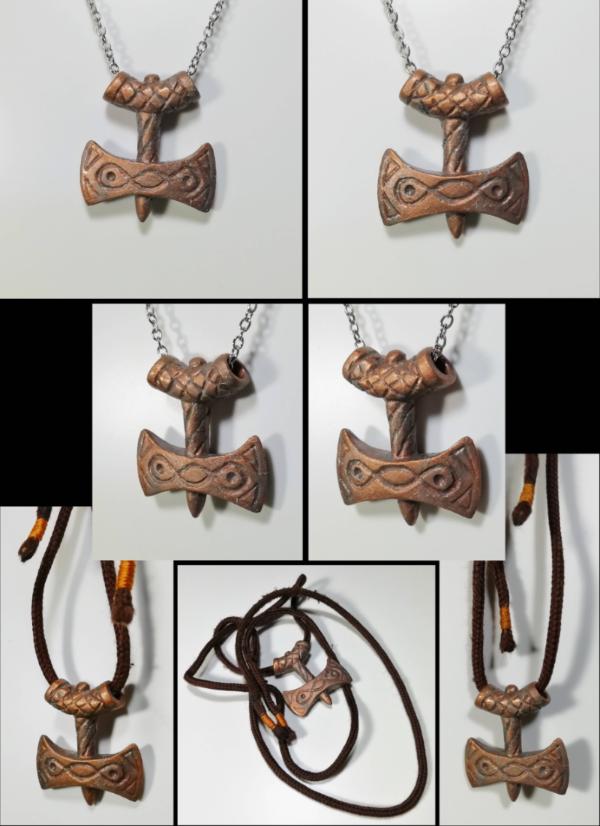
AND, and... I also made an amulet of Talos. Y'know, from that game... The one with the dragons... and the shouting... Available on seemingly anything vaguely electronic...
Brief excursion to my other blog became a break from everything (explanation over in the other blog).
But Christmas approaches and presents need making. So I'm back over here to show a quick wip shot of present #1 (of 4).
Nothing too complex, so no other in-progress shots.
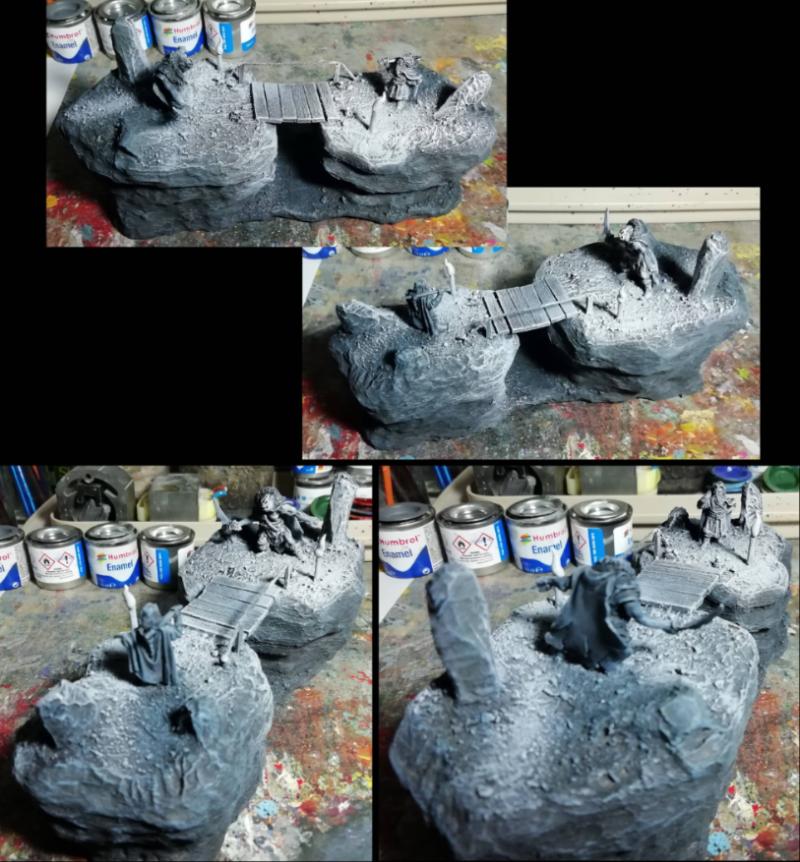
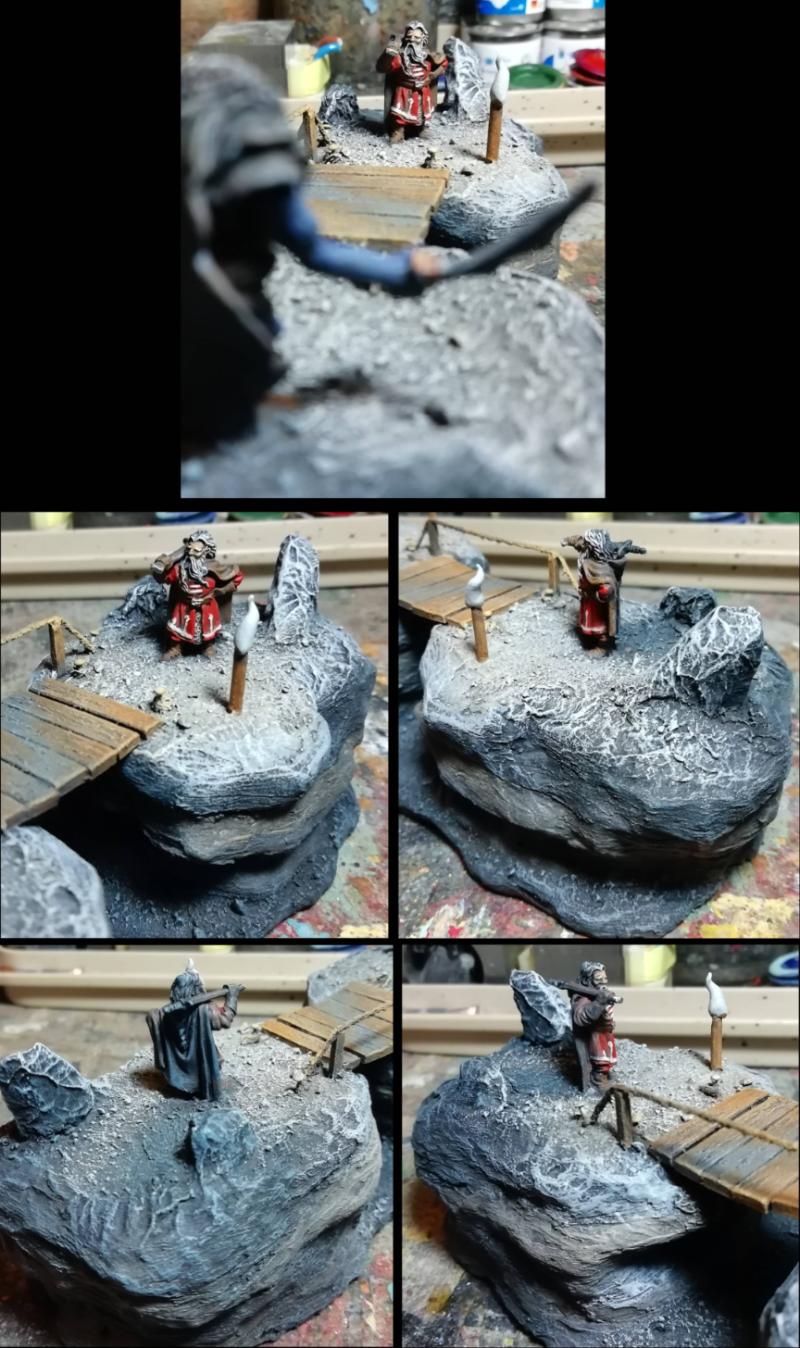
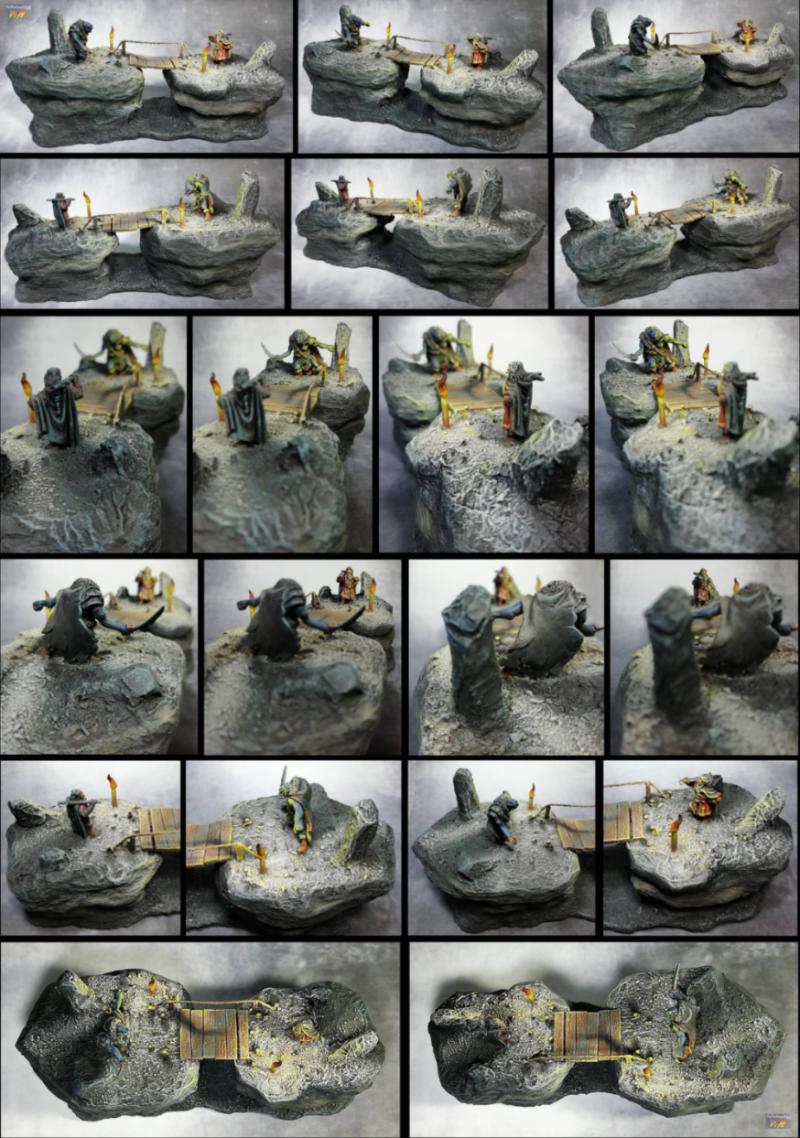
More Hobbit figures; this time the dwarf meets the goblin king...
*This is not going to be book accurate. I'm working with the figures I have and this leads to a few minor inconsistencies:
1) I only have 1 Dwarf figure, not the many that are involved.
2) The figure is not tied up as in the book.
2.5) The figure still has his sword which was taken from him during the capture.
2.75) He looks awfully calm.
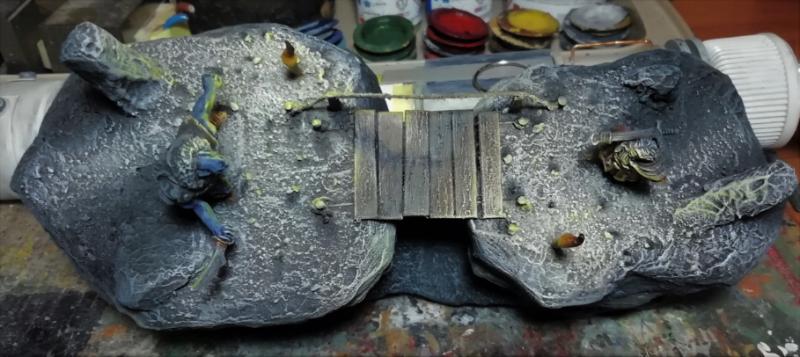
3) The Goblin king is not being cut in half by Gandalf, who then proceeds to free the dwarves.
4) Bilbo and Gandalf figures have been used elsewhere already, so not present.
5) There's no mention of plinths, bridges, or a stream at the meeting in the book.
Other than that, perfectly book accurate...
Can I remember how DDakka works now...
Yes?
Built from layers of cardboard, polystyrene foam and foamcore,
covered with tissue/PVA,
covered with plaster,
Couple of torches using some leftover putty in the right shape,
Bridge from 2 lengths of wire and strips of card,
Plus "rope" handhold,
Some pins for stakes,
Sprinkling of my usual mud 'n' rocks mix.
Aim to paint it lit only by the torches, harsh lighting and shadows.
This now moves to painting with present #2 (not shown), and I can start planning present #3.
I will try and get around to catching up with what you have been doing, but I have months to catch up on.
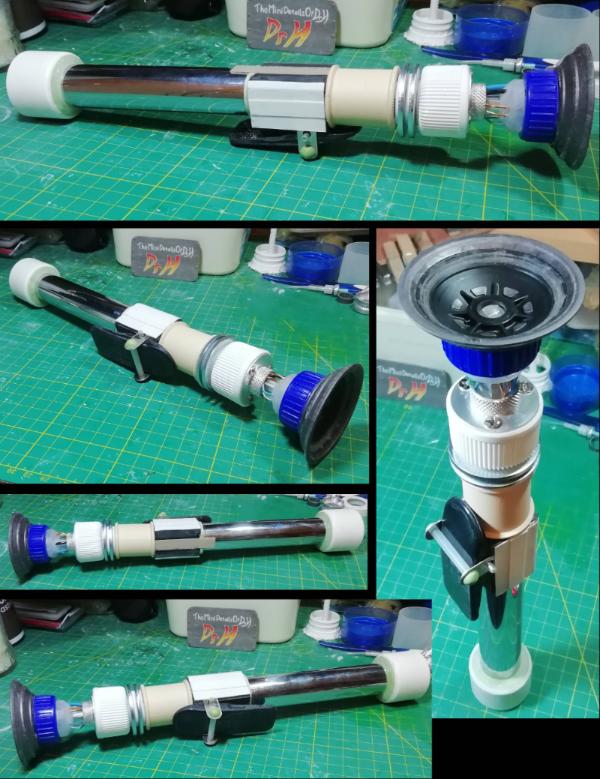
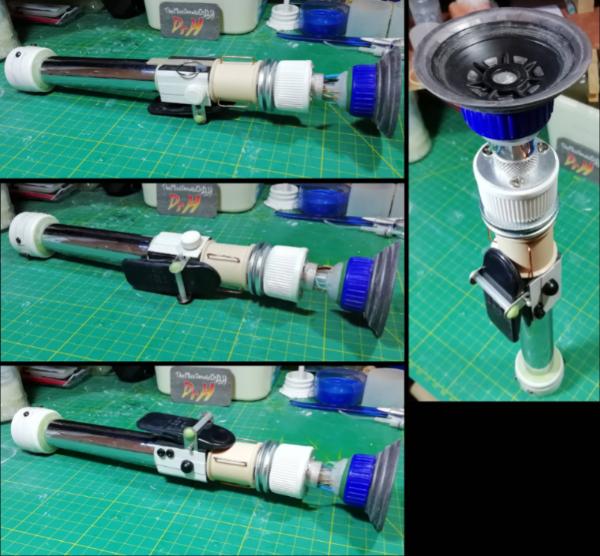
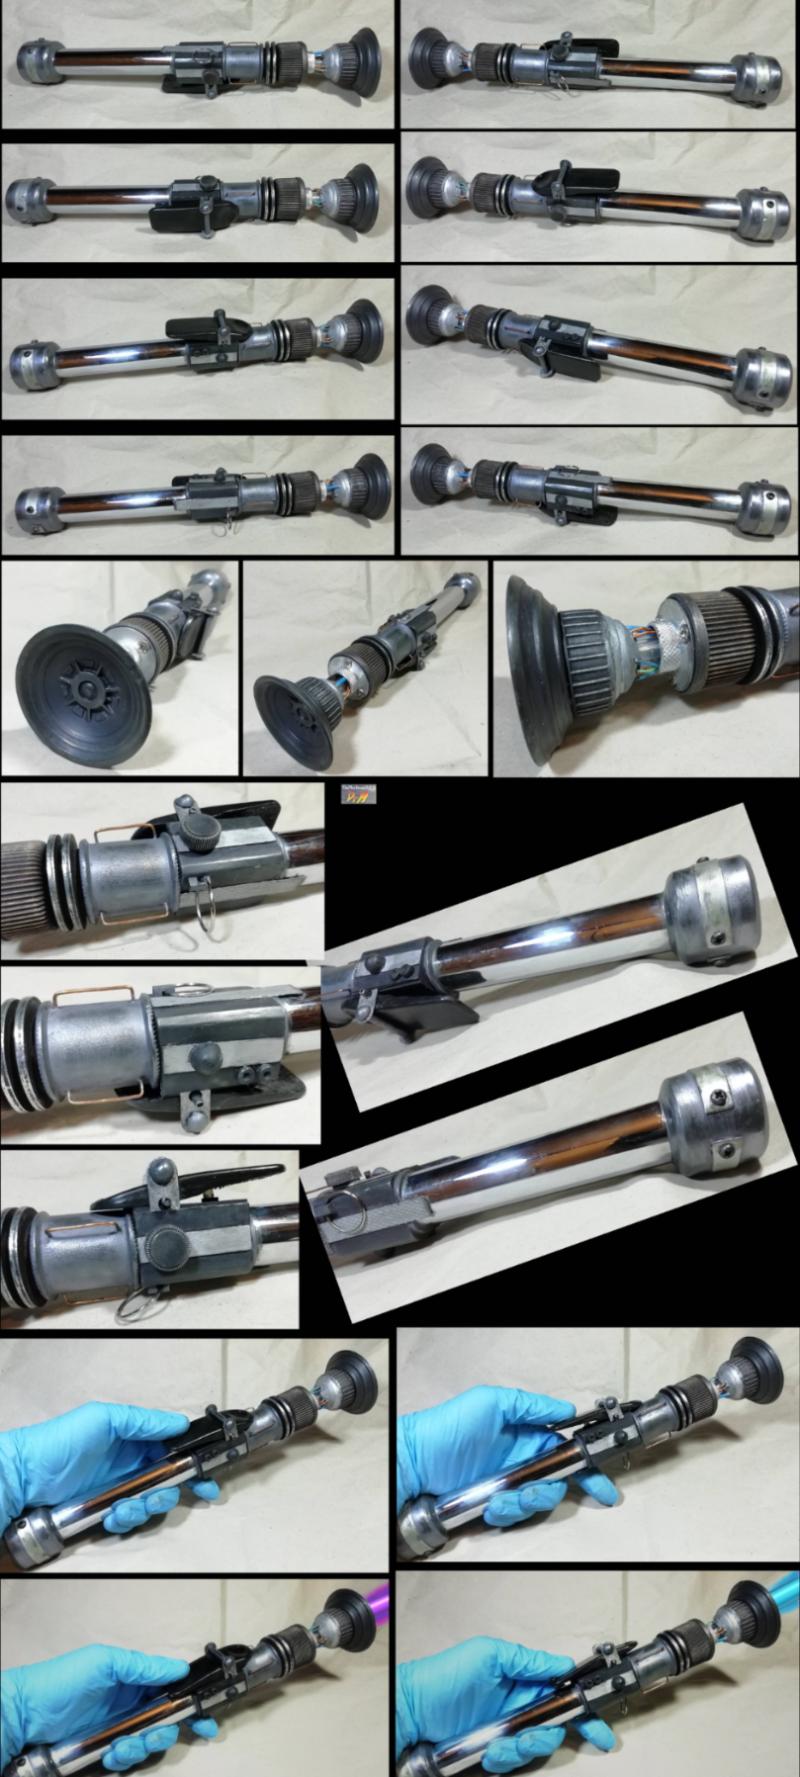
Yes / No (delete as applicable) it is a lightsabre 1:1 prop.
Not a replica, this is a unique design, as replicating a "real" one would require a lathe or hours and hours with clay or moulds or whatever... rather than bash out a design from what I have laying about (and taking up so much room, I've got to start using this stuff sometime...).
It does have a "working" trigger though; spring and plunger type under the black flap-like thing.
Plus the extended hinge pieces serve as a stand the prevent rolling on a surface and the trigger touching said surface. (by chance rather than design)
Still have small details to add, this is just the basic shape/structure.
Speaking of...
The meeting of the Goblin King and the Dwarf is done. You'll have to wait until after Christmas to see it all, as usual.
But here's a peek:
And progress on the Lightsabre.
Details added.
It's now on the painting desk, primed and blacked, awaiting metallics.
Probably time to start on #4...
In other news:
Picked up a fancy NVME M.2 SSD for my PC, taking total storage to a perfectly rational 5.25TB on 5 drives (2xSSDs, 1x 2TB HDD + 2x 1TB enterprise HDD).
I have been transferring my games over to the new SSD which should help with faster load times (previously on the HDD).
I may use the opportunity to transfer my mod organisation over to vortex, as moving NMM seems to be a lot of work. May as well start fresh.
3 down and 1 to go. Yes, the lightsabre is painted. No, you won't see it just yet.
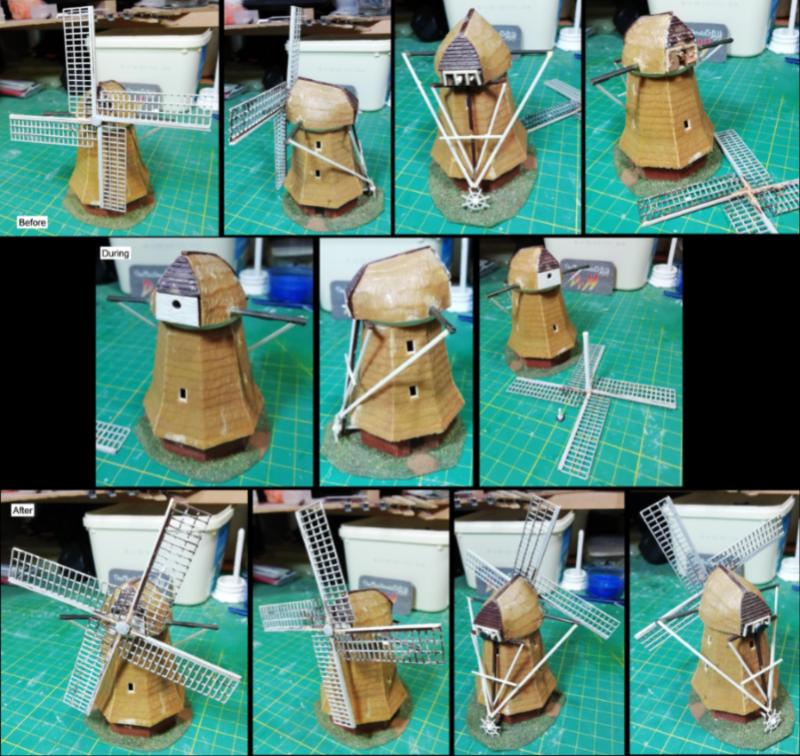
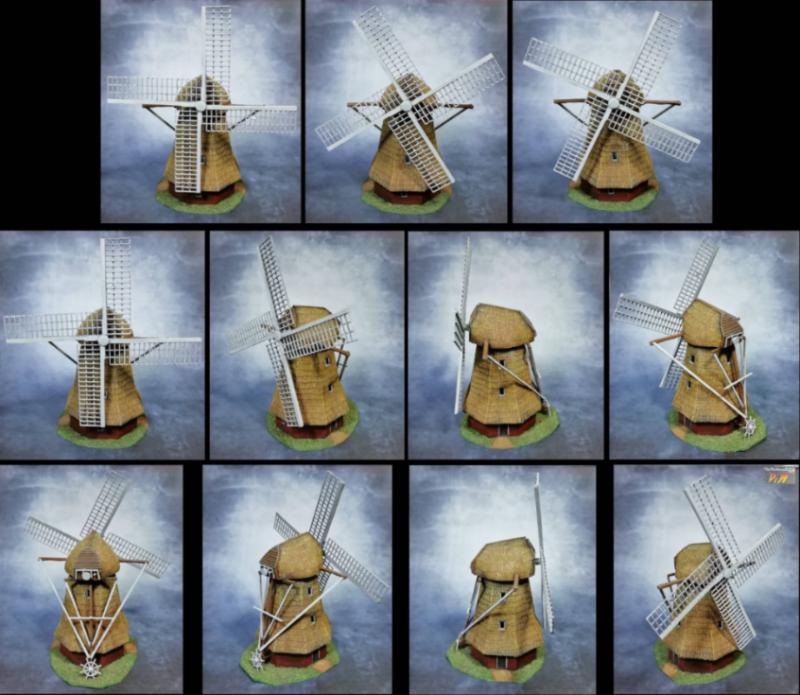
Present #4 is another N-gauge building rescue. This time, a windmill. As you will see below, it comes to me unpainted and with the sails glued in place.
The plan was to make the sails rotate and leave the ability to motorise them (It would need to be installed into a layout for motorising and lighting). But why were they glued on in the first place anyway? A look inside revealed an axle that is even free to move (not rotate?) at the rear of the mill, but there is clearly a lot of glue behind the hub and more at the tip of the sail where it meets the mill's body.
Removing the sails reveals that the axle has snapped right where it would meet the sails. Must have snapped off in the past and rather than fix it, my Granddad had just glued the whole thing on solid, and moved on.
But I have the time and patience he didn't.
Before, during and after photos below. I had to saw off the whole front of the mill where the sails were glued on, to get a flat face, and then I replaced the material with plasticard. The holes (and the front end of the axle) were drilled out to accept some 3.2mm plastic-tube. The tube was glued to the sails and I created a plug for the rear end that can push-fit to hold it on, but allow it to be removed for motorising later. The sails were straightened and re-glued where they snapped in the process. I added strips of plasticard to the front of each main beam of each sail, for strength (after the photos). And I re-scribed details onto the various glue spills across the mill (see the lighter patches).
Thanks chaps. Sorry for the tardy reply.
Glad to hear you liked them.
Sadly, I don't return with good news.
Recently, my parents were scammed out of the contents of their bank account.
In short, it started with a leaking gutter,
That led to "oh, this needs doing, that needs doing" and a bloated bill.
But that's not the scam...
That happens when they draw up a new bill for all the work and say that they will refund what you have already paid.
You have to pay the bill first.
Then when Dad cancels the extra, unnecessary work. They draw up another new bill, for the work that has been done (fixing the gutter, twice), and they'll refund all the money paid so far.
You have to pay the bill first.
They basically hold your money hostage to get you the pay more and more.
There's a bit more detail on my GoFundMe page, here: https://gofund.me/3d316651 I'm hoping to raise the money to "refund" my parents the money that was stolen from them for the mistake of trusting someone.
Dr H wrote:...
Recently, my parents were scammed out of the contents of their bank account.
Spoiler:
In short, it started with a leaking gutter,
That led to "oh, this needs doing, that needs doing" and a bloated bill.
But that's not the scam...
That happens when they draw up a new bill for all the work and say that they will refund what you have already paid.
You have to pay the bill first.
Then when Dad cancels the extra, unnecessary work. They draw up another new bill, for the work that has been done (fixing the gutter, twice), and they'll refund all the money paid so far.
You have to pay the bill first.
They basically hold your money hostage to get you the pay more and more.
There's a bit more detail on my GoFundMe page, here: https://gofund.me/3d316651 I'm hoping to raise the money to "refund" my parents the money that was stolen from them for the mistake of trusting someone.
Please share/RT my story as a warning for your friends and family.
And if you can, please help with my gofundme...
Thanks Gits'. Sorry to hear you've been in a similar situation.
Thanks Graven'.
Modelling.
I've been building a scale model of our home for my parents wedding anniversary.
I hope that the scam doesn't taint it in the end.
After looking at the various scales I could build this at, I decided on N-gauge (1:160), as larger scales (that I could buy brickwork plastic for) would make the final house just a bit too large.
Found the right brick layout, and a roofing that looks close enough.
Estimated the size of the house and calculated scale dimensions.
Carefully cut out the pieces,
Very carefully cut out the holes for the windows and doors (and forgot the back door and had to do that right at the end),
Window and door inserts were created from 0.5mm plasticard on 1.5mm plasticard with some gap filling with more plasticard,
Mitre-d the corners (bricks go all the way to the edge) and stuck it all together with some braces.
Roof on and filled the interior with plaster to give it some weight.
Detailed the outside.
Stuck the bottom on.
Added the missing door.
And now it should be ready to paint.
It's a semi-detached, hence the one plain wall.
This is how the house looked when my parents first moved in, not as it is now.
That is terrible news about your parents. My mom just recently had her checking account hacked. At 84 years old she doesn't get out much so it was easy to track down the culprit, but it will take a long time to bleed that rock. My parents had their house taken out from under them about a decade ago, it was a harsh battle and lesson to be learned, but I believe it was for the better in the end.
Hello again. Been slow going, but the N-gauge home is now finished.
There wasn't much to really show as for painting-in-progress, so straight to the finished photos.
After late replies...
Thanks Graven. Too kind.
Thanks Theo'. Sorry to hear about your parents past problems.
The police are still looking into our scam, no major news or updates though.
...
And back to models.
Not a lot to say about it, it is what it is: Not far from what it should be.
Thanks for sticking around and being patient with my minimal output of late.
Still distracted with running about Night City in 2077, and now with solving a murder on Eridanos.
But some model work may happen again before we all die of old age.
And I will ask again, if you can share my scam story around to make as many people aware of how these things happen, I would appreciate it.
Directly from the link below, or from either my FB or Twitter pages.
https://www.gofundme.com/f/replacing-my-parents-stolen-money Thanks.
Sorry to hear about the scam on your parents. As a former railway modeller with my dad, who was a perfectionist, I am so impressed with your work at such a small scale! I thought 00 was fiddly! I must say the house looks great.
Just had a quick look through the last few pages of your blog, and the quality is amazing.
Thanks RobertsMinis, welcome.
I too have perfectionist leanings. High praise.
Cool to hear that. I have links in the OP of this thread to each post with the finished photos in for each project, if you or anyone else would like to quickly view all my work (in lieu of anything new to look at). And the same is true for my other blog that houses my personal 40k collection.
Still no pictures to share with you. Been building in FO4, but not in RL.
There is good news and bad news though. Which do you want first?
Bad news it is.
Not content with "only" overcharging for materials and labour for a basic job and planning on emptying my parents bank account, they were also common thieves:
We found out earlier this week that they have also stolen a hedge-trimmer and it's charger from the garage.
While most of the "workmen" were off "buying materials" for the planned work, the youngest member of their gang stayed behind.
We allowed him to shelter in the garage from the weather.
He borrowed my dad's phone to check in on the rest of them...
What he probably was really doing was reporting back on the contents of our garage and what might be worth stealing.
As far as I know it's only the hedge-trimmer that's gone. Most of what's in the garage isn't worth taking really, but who knows if we find something else is missing when we come to use it.
So that's adding insult to injury.
However, the good news:
The bank has completed their investigation and concluded that we were a victim of an Authorised Push Payment Scam. (something for you to google and tell your friends and family about)
As a result we have been reimbursed the full amount of £25,700.
So less of an expensive mistake on our part, but it doesn't take away from the stress and hurt of the past months.
No news on the police investigation.
Thanks for sticking around, I hope to return at some point.
I have cleared the desk of the past few months of junk build-up, and there are a couple of birthdays coming up, so that may be the push needed to restart.
In the mean time (and also a reason for getting back to models), I've finished my latest build in Fallout 4.
Tour video of my Warwick homestead settlement here:
I even had to create a small mod for this one as the broken bridge over one of the pools is in the way of anyone wanting to build there.
The mod and the settlement blueprint are both up on the Nexus too: https://www.nexusmods.com/fallout4/mods/51890
Thanks for sticking around Gits' and Graven'.
I hadn't thought about it (or remembered noticing 100 coming up).
On my other blog I did army shots at 50, and "latest recruits" shots at 112 (was in the middle of the Predator tank at 100).
Can't really do that for this blog as 90% of the things I've built here have been spread out across the world, so I have no access.
We're already half-way down this page, so there's little time to plan something.
Maybe just a return to modelling as a celebration.
Or you can tell me about your favourite model that I've built? Might help bring back my motivation.
Anyway, I said birthdays were coming up and I've made a start on the first present.
Starting from a lump of polystyrene foam,
Covered in foil,
Made into a rough sphere shape with a layer of clay,
And detailed with milliput.
I'm sure some of you will know what this is...
I'm in the process of basing this and then it'll be painted ready for the end of the month.
inmygravenimage wrote:... Beauty is in the eye of the... anyway ...
I won't hold you to that. Maybe think more digitally, than table-top-y with your games.
All three of you for the CD City. I shall have to repeat that feat some day, if I find the right object and the time. Maybe I'll try and find some words of something about that for page 100. No promises, I can't think of anything off the top of my head hence not putting any here now.
Thanks Graven', Gits' and Gwyn'.
I mean, people without a "G" can also comment here, if you want.
Your anime walker/pilot, CD City and first converted Kroot leap to mind
Ah yes, the HAW206 walking tank. An interesting kit build with minor modifications. I do still like the paint-scheme I chose for that. And the be-winged Kroot, jumping in at the end. Was an old idea from my list. Was a good exercise in sculpting the wings. Thanks.
And some painting-in-progress as something to show. The base you can also see there, is a piece of wood and a printed off floor texture from the game in question: so it keeps the pixelated and flat look to it that was in all games back in the '90s.
You have had a ton of brilliant builds over the years, even the non gaming gifts have been neat to see the outcome. Really like the CD city, but you've made some nice earrings as well.
Seriously though, that Cacodemon is cool, is it for display or gaming?
Just seems a little large compared to 28mm minis
Thanks. It's just a display piece, for a present.
It's about this big:
Theophony wrote:Your one-eyed monster is enourmous
"That's what she Said"
That's what Theo said.
You have had a ton of brilliant builds over the years, even the non gaming gifts have been neat to see the outcome. Really like the CD city, but you've made some nice earrings as well.
I'll hopefully be back to posting more soonish,
Thanks. Yeah the non-gaming things have helped me expand my techniques and creativity over the years. Which feeds back into the gaming things.
Mm, one of these days I'll find the time to visit everyone's blogs again and comment more on what you are all doing.
Photos are done of the finished Cacodemon, but the above is all you're going to get until the present is delivered at the weekend.
I'll have also had my first Vaccine dose by then, but won't get the 2nd until August. Just have to hang on just a little longer...
Guardling wrote:My money is on PS1 era Lara Croft... Nice work on the Cacodemon as well!
Your money would be bang on the money, Guardling. You must have studied Lara's curves angles closely, to spot that so quick. Thanks.
inmygravenimage wrote:Cacodemon looks bloody brilliant. Very intrigued to see what's up your sleeve next?
Thanks Graven'. Here's another peek at some progress.
Creating the hips here; I stuck some sprue lengths together to form a block for the upper hips and cut it to shape, as it's a complicated shape from relatively small polygons. I'll likely do similar with the arms and feet (legs?). The rest is pieces of plasticard to replicate the polygons.
The rod you see from the top is also plastic and runs all the way down into the hips (glued to the rear of the upper body too) to help keep it all together and give a solid attachment for the head.
Where the legs meet the hips is the complicated part. In-game the leg pieces just "clip" into the hip part. I have to replicate this IRL in such a way that is actually solid. This will require some thinking and maybe some testing. I'm also avoiding thinking about the head for now, as that is also a complicated shape. I'll have to get the putty out soon.
It can be tricky to tell the shape of the polygons from the textures on Lara, but it's quite amusing to see what they did with the textures to make the angular shape appear to have curves.
I'm using OpenLara for references. I could dig out a copy of Tomb Raider and a PS1 or 2 and then take photos of the screen, but this should be close enough; it seems faithful to the original to my memory.
Go play tomb raider in your browser while you wait.
Haha yes I did actually, I Was kinda interested in 3d modeling about that time, spent a lot of time with the half-life editor trying to figure out making characters
As for the legs try making them "whole" and file the contact point to the angle you want?
Ta Guardling. I did approach it in a similar way, see below.
The shape of Lara's thighs is made up of 2 pentagonal polygons: The upper thigh is straight, while the lower thigh tapers towards the knee.
So I made the upper thigh from plasticard; gluing rectangles around a pentagon (108o for symmetrical pentagons, if you want to know). This gave me a hollow section that's easier to carve to shape for the join.
The lower thigh was made from sprue, glued together in a block and carved down to shape.
There's always going to be gaps with this technique (between mis-matched pieces and bubbles within the sprue), but they are easily filled and it is far easier than trying to create a tapering pentagonal prism shape from pieces of plasticard.
I then cut away the top of the thighs to match the shape of the hips.
I then removed them and cut away more and attached them "into" the hips and not under the hips.
They are neither straight or regular, nor really attached in the best place, but should do the job once I have some putty on everything and done some more sanding (sanding fixes a multitude of sins).
I'm also in the process of creating the calves from sprue and figuring out a solid way to attach them to the thighs via the two 4mm square surfaces. Will likely involve a pin as they are both solid plastic.
I then have to do the feet in the same way and attach them in a way to make her stand straight.
Things of note;
Both the lower legs and boots were made from sprue, as expected.
The white sections are added plasticard to bulk-out and sharpen them.
White ovals on the thighs are the ends of "pins" that were drilled through the knee into the lower legs; there's 2 in the left leg as the first attempt missed the lower leg.
The pins are plastic-rod (0.75mm), all glued with plastic cement so that it's all solid.
I've done the same for the feet, up through the soles.
She's not quite in the default standing pose (that I was aiming for), but what we've ended up with looks pretty natural as a standing pose. So we'll go with that.
While she balances for now, that may not be the case when I come to add the head (you should do the feet/ankles last if you want that), but as she'll be pinned to a base I'm not worried about it.
Arms and gun holsters next as I'm still putting off thinking about the head...
Nice to see the Cacodemon get up on both the main page and the gallery page, been a while since anything I've made has done that.
I can't put off the head anymore.
Guns and arms are on.
The arms were carved from sprue again.
As gluing the separate pieces together may result in fragile arms, I elected to carve them in one piece; this is more complicated than a simple shape as you can't just cut off straight lines until you get to the final shape.
To do a complex shape from a block of material it's good to draw on the faces the profile shape of the object you want left behind.
You can then cut away any material that is not within either set of lines to get a rough shape.
Then carve that down to your eventual shape.
Thanks Guardling. The head was hard work (see below). All models (unless made from all the same colour material) look odd until at least the primer is on. I still can't unsee her thigh-length stockings with how I built the legs half from plasticard and half sprue.
Thanks Shas'. Well, you know me and my methods...
Thanks Graven'.
As I mentioned, the head has been a really difficult build. I wanted to keep it light to avoid the model being top-heavy. Ideally, I wanted it hollow plastic. The first attempt was aborted with only the chin/jaw area built, The second attempt (see below) ended up too tall and just generally the wrong shape, So for the 3rd attempt I resorted to carving a block of sprue, but did return to plasticard for the hair.
Even the 3rd attempt didn't go smoothly, the jaw area did not carve well and had to be replaced with plasticard.
Here's a comparison of the 2nd (at point of abandonment) and 3rd (at the start of the hair) attempts: Yes, the hair is build upon the block of sprue so isn't entirely hollow, but it is a solid construction as a consequence. Plasticard was glued on and then cut to shape for most of the pieces, you should be able to see many of them below.
And here she is all together: I still have the gap-filling and final sanding to do. Then I'll get some primer on her and show you all again before painting. Painting is going to be interesting, I'll discuss that then.
And now to think about painting.
This will be different from the usual model/mini' painting:
No edge highlighting, the edges of the computer Lara model are hidden by the textures, she's not meant to look blocky.
Flat colours, She does have a fairly basic colour scheme.
Womanly shapes are implied from the texture shading.
That shading is layered, not blended.
... Although, there does appear to be some blended shading along flat surfaces, this may be lighting effects rather than textures, I need to investigate this more and/or see how it looks without blending with real lighting, or fake it with paint if the model doesn't look like the computer model (and this is the main aim).
Painting curves on to and around flat surfaces/edges is going to be mind-bending.
I just have to remember to stick to the references.
Guardling wrote:Are you painting it pixelated?
That'll be "fun" to do...
Thanks Guardling. Not deliberately, but I can use that as an excuse for any shoddy paintwork. The pixilation is not too apparent in my reference shots from OpenLara on a 1080p fullscreen shot. How close they stuck to the original PS1 textures? I don't know (but it looks good enough to me). It's far easier and quicker to use that, then to wade through all the modern Lara pictures on Google to find the right angle, pose and lighting (not to mention the fan-art), or to dig out my copy of PS1 Tomb Raider (which is in a box at the bottom of a pile of boxes, behind my building desk).
I at least stuck to layering the shading without blending it too much.
Here she is so far.
Lara has one hell of a six-pack, now that I actually pay attention to the textures.
Skin is 3 coats of paint: 2 of plain "flesh" and 1 of that lightened with "cream" to match her skin-tone...ish. No shading; I'm leaning towards leaving it like this, but still waiting until I see it all together.
Her top is "aircraft blue" and the shading is done with a variety of dark grey, blue and greens to get something that looks about right.
Thanks Graven'. Once you start just thinking of the "painting shape onto another shape" as "this bit is coloured this... like a camouflage scheme", the act of painting it become less mind-bending. I can't help you as the observer though.
All areas are blocked in and those that need it, have had the shading added.
Y'know how Lara's hair is brown, and her backpack is brown, and her shorts are brown, and her boots are brown...
...well they are all different browns. Her hair has quite a bit of red in it, and her shorts are more khaki.
Not something I'd ever thought about before, so thought I'd share the revelation.
Final small details still to do,
But a varnish first (so that errors can be erased easier, and handling for basing doesn't wear off paint),
And I'm going to stick her on the base (which will make handling easier for the small details),
Then the final small details.
As with the crafting, the painting of the face was hard and didn't turn out as well as I would like in terms of her likeness.
If you want to see how far off I was with the model, see below:
Spoiler:
I will now try to find the time to return to the Raider build for my other blog.
I do also have a build going in Fallout 4, to celebrate 100 sub's to my YT channel.
October brings a time of more presents to be made.
First, another pair of earrings.
Based on a Blue Tit, but without the yellow as the recipient is not keen on that colour (or orange).
Rather than go with the common white of many birds, we have green.
Therefore, who better to model them for you than the big green himself; One Toof!
And secondly, a Geisha sculpture; presenting a sword.
Red is the colour, and so a Blood Angel for scale.
Won't be long before I'll begin on Christmas presents.
Who knows what that will involve...


 .
.
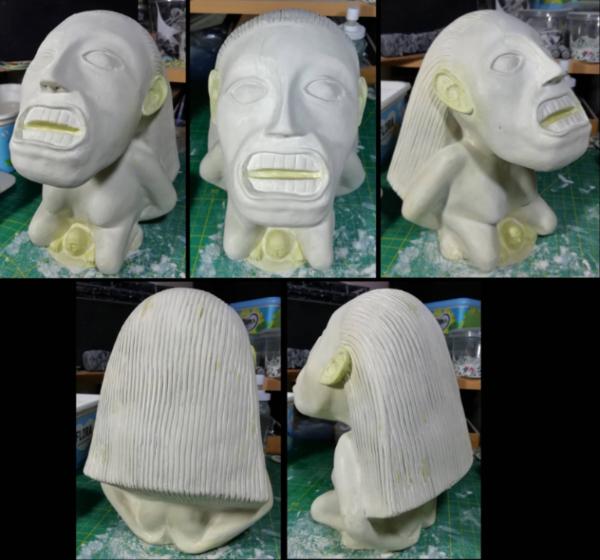
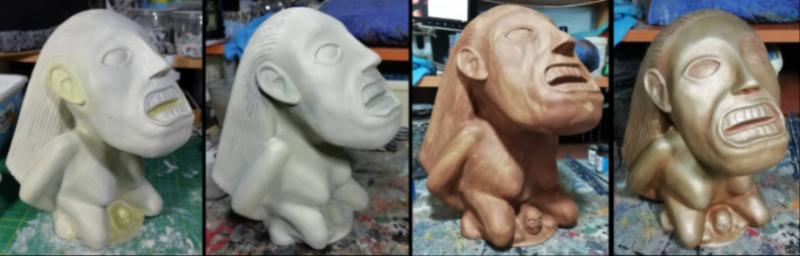
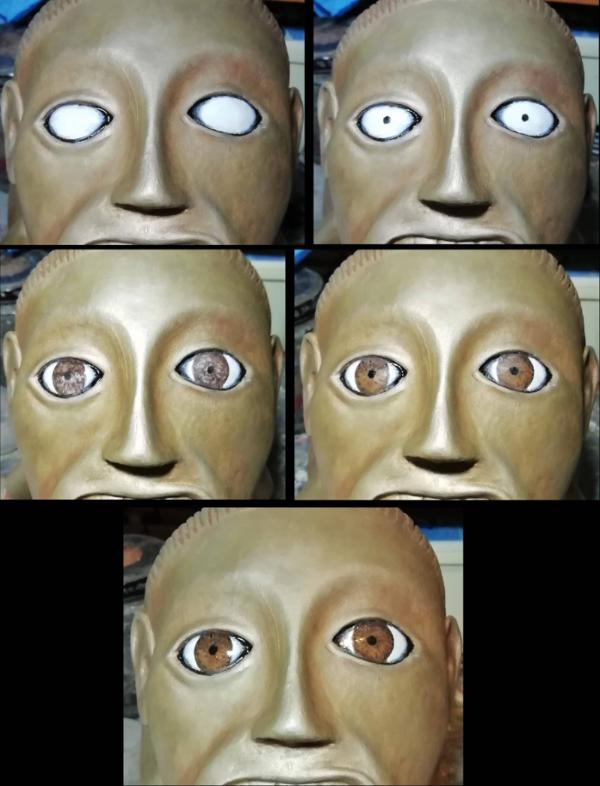
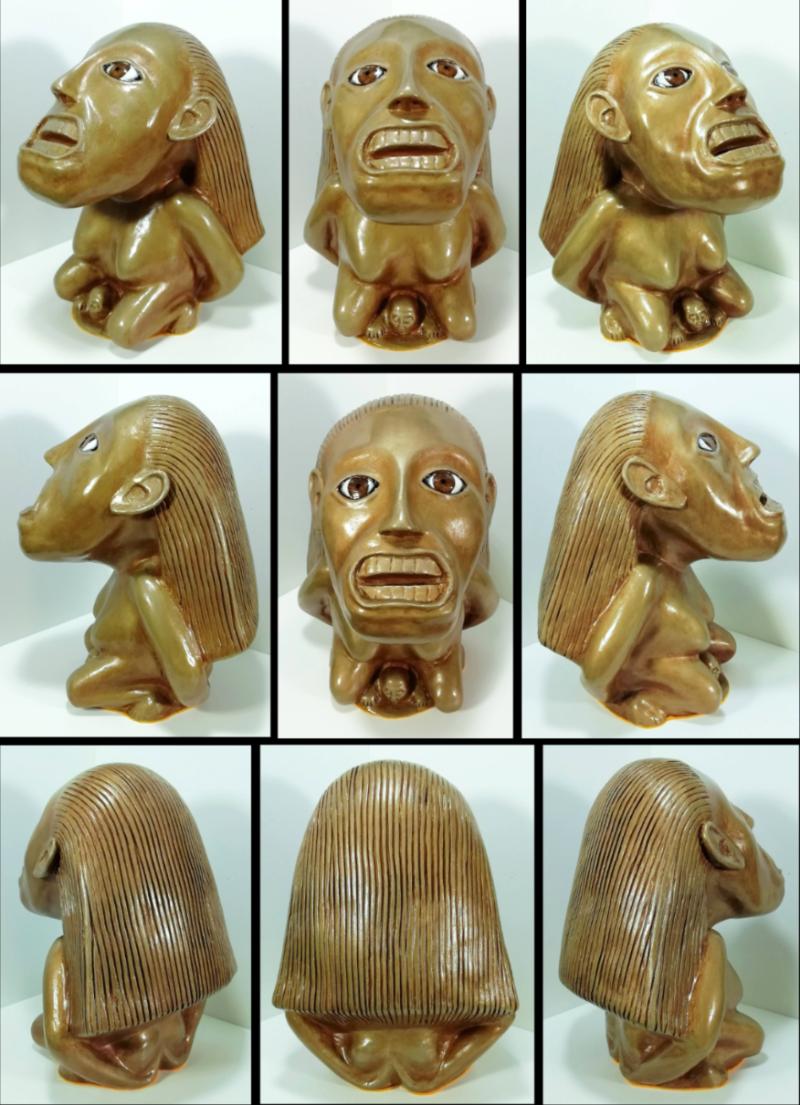
 excellent indeed


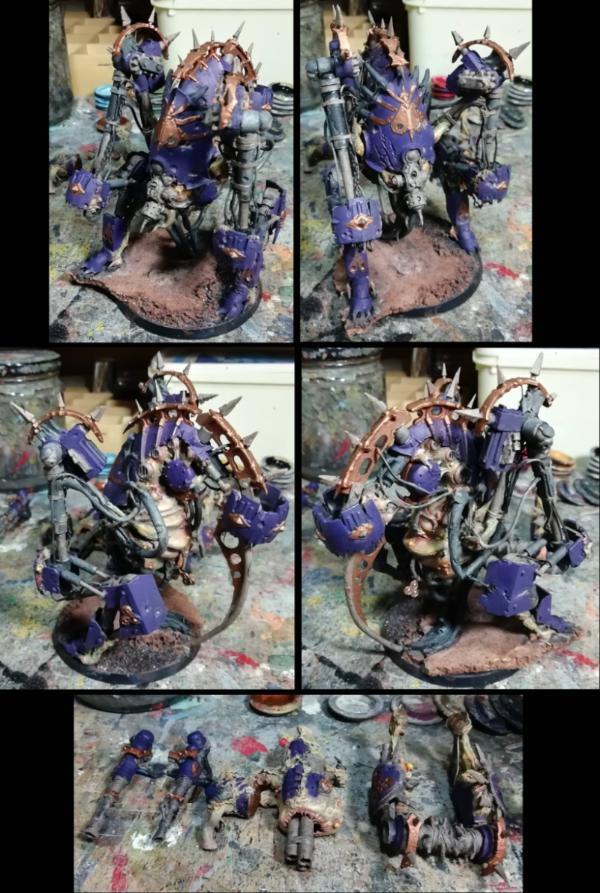


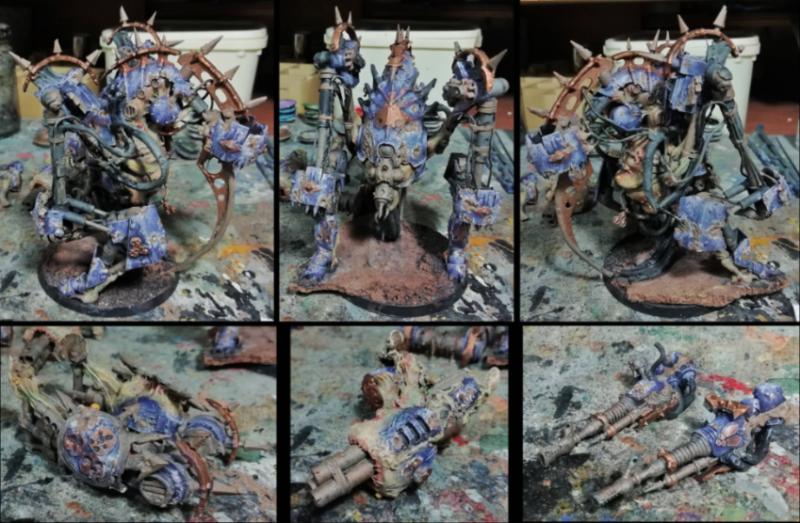

 ),
),
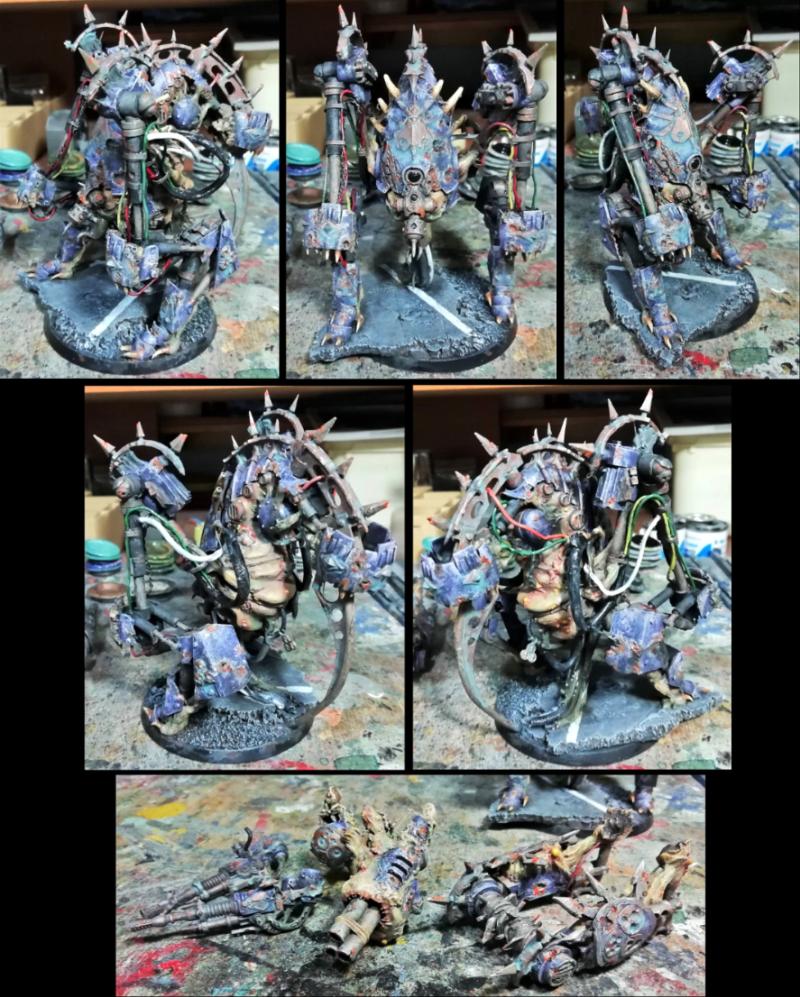
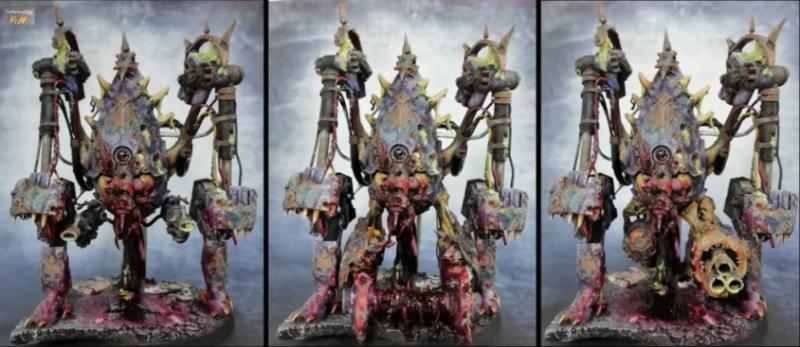


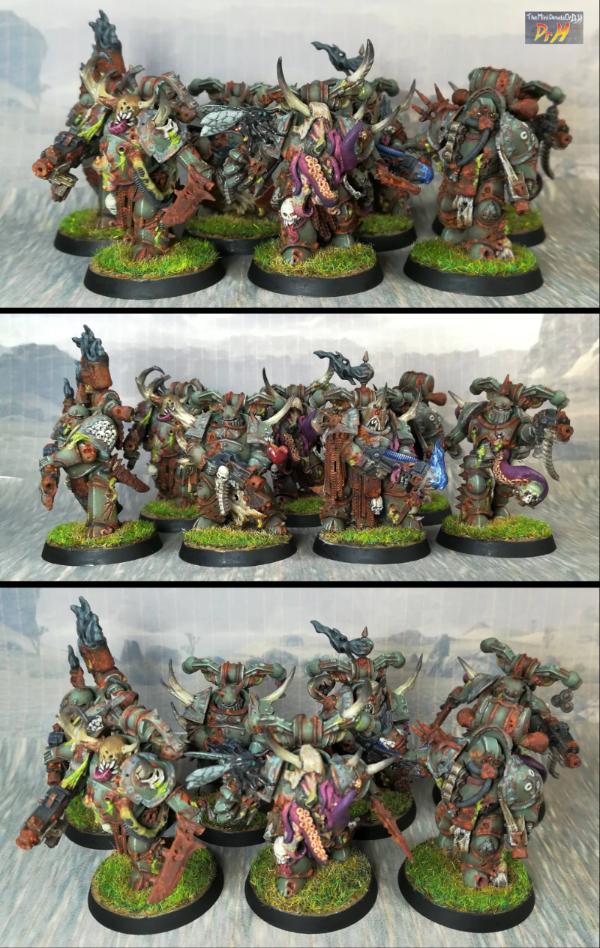
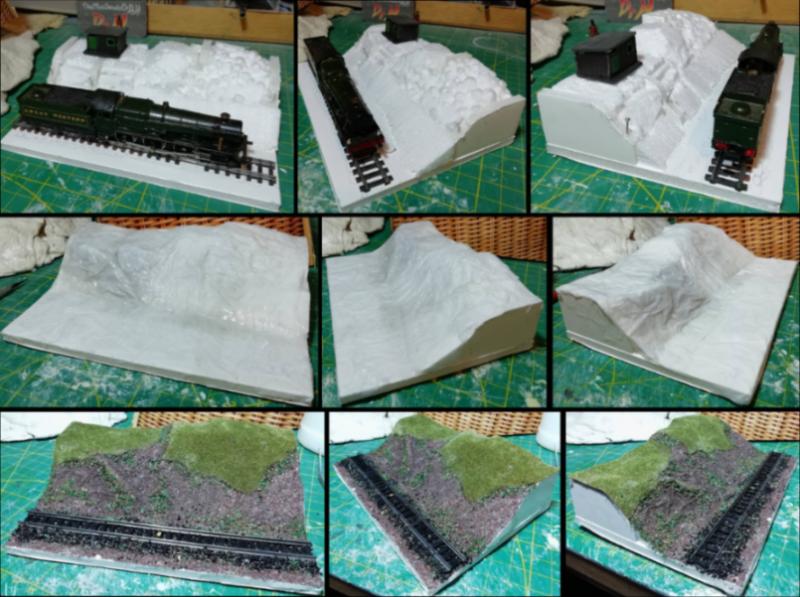
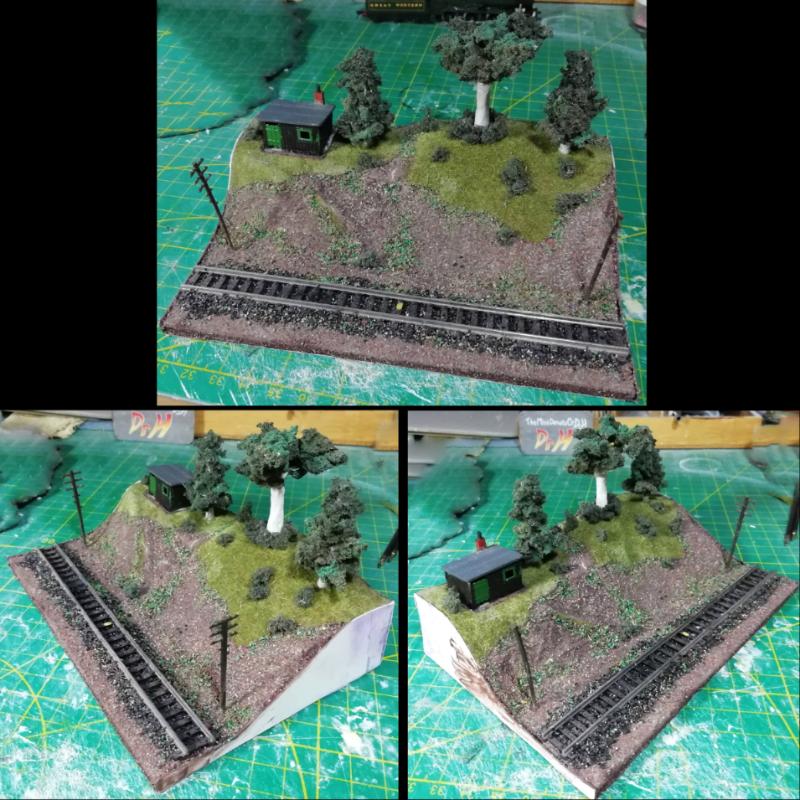
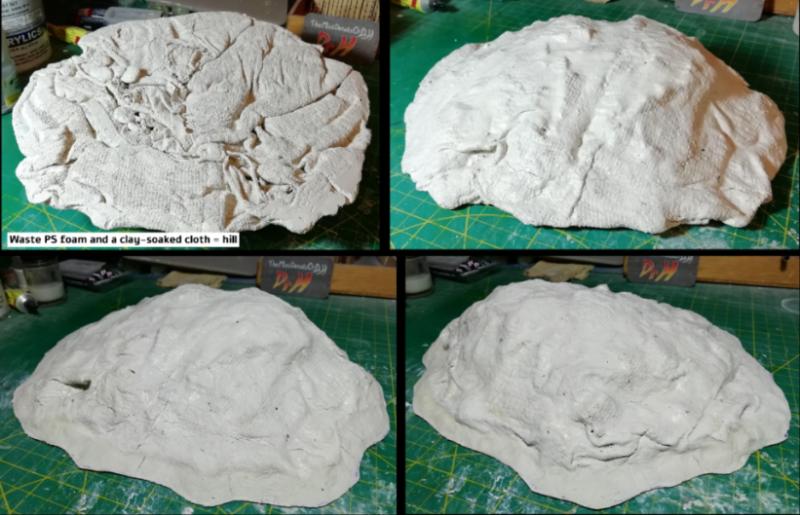
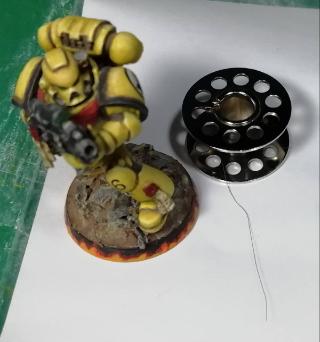
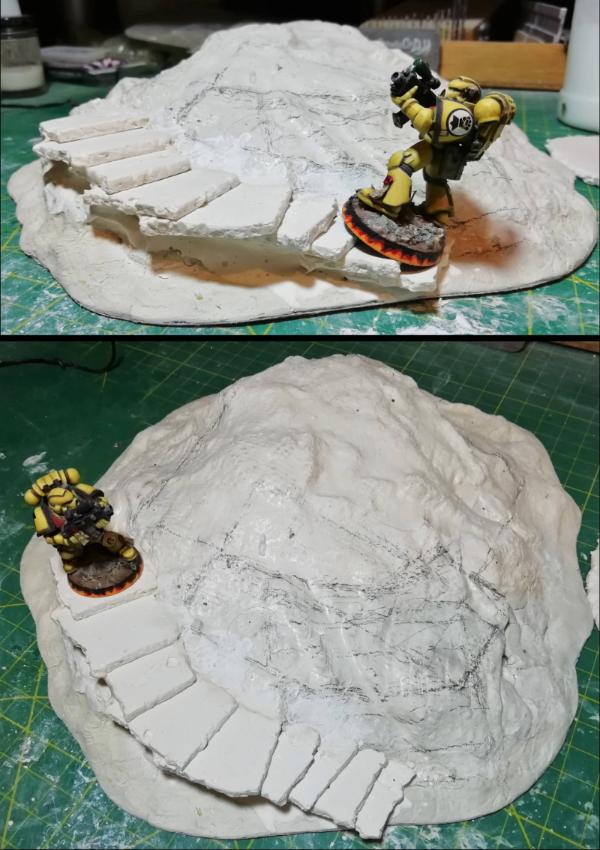
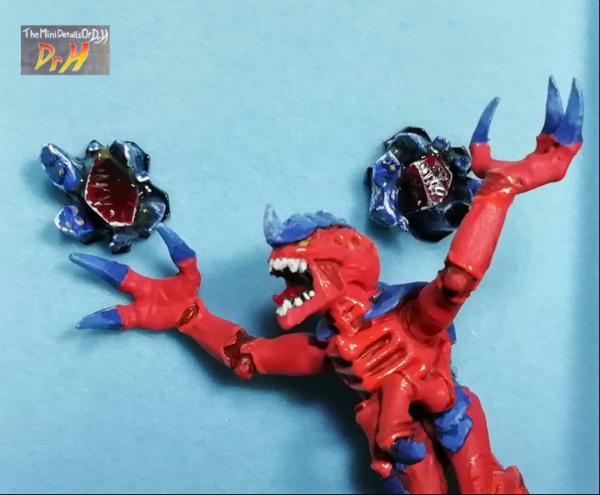
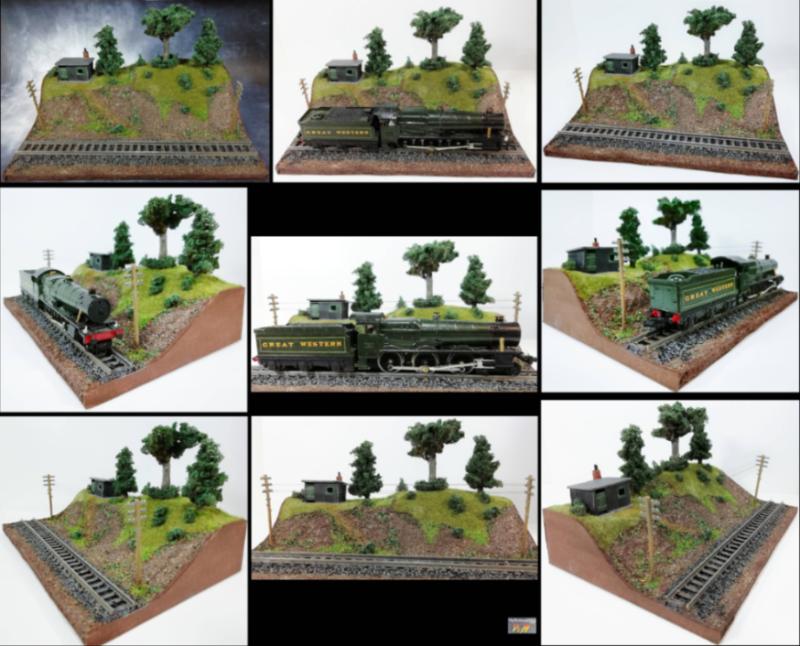
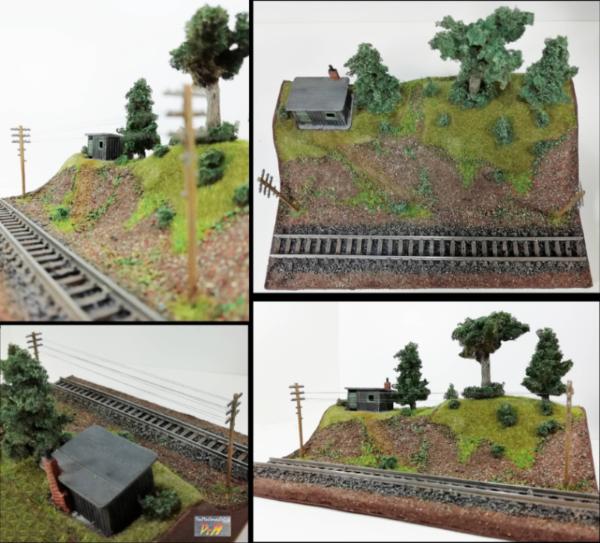
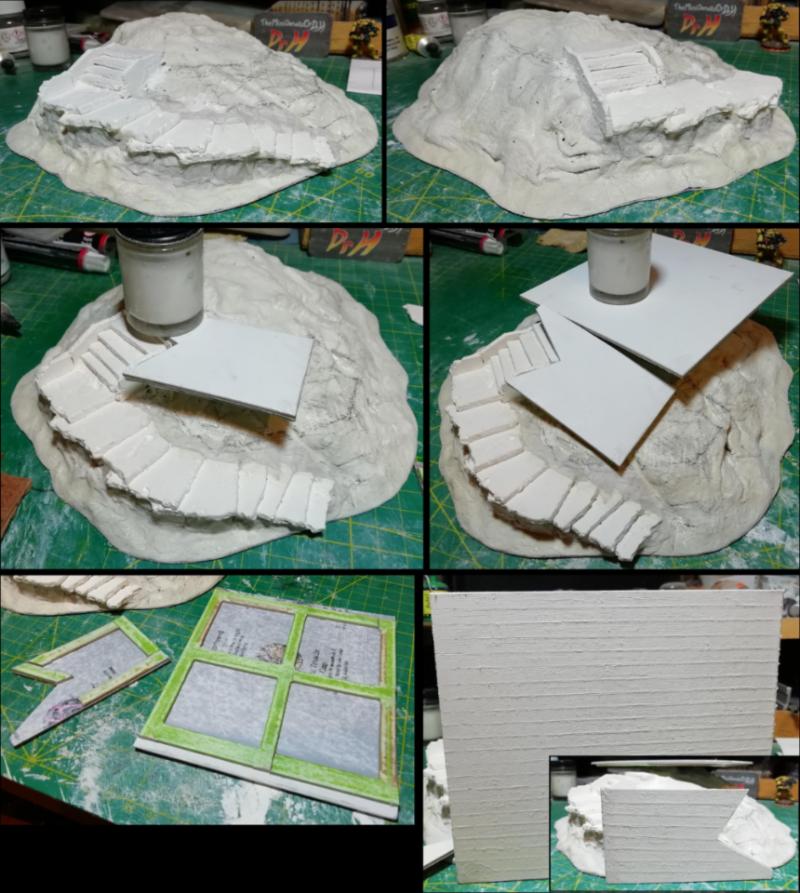
 .
.
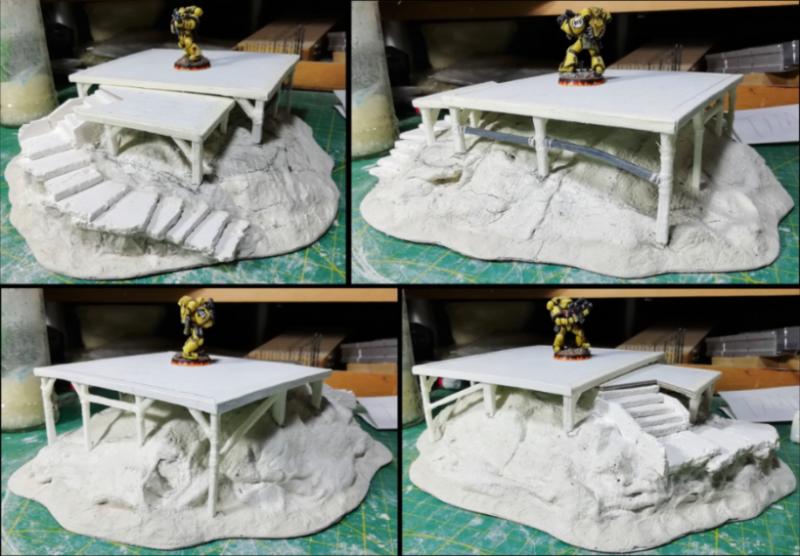
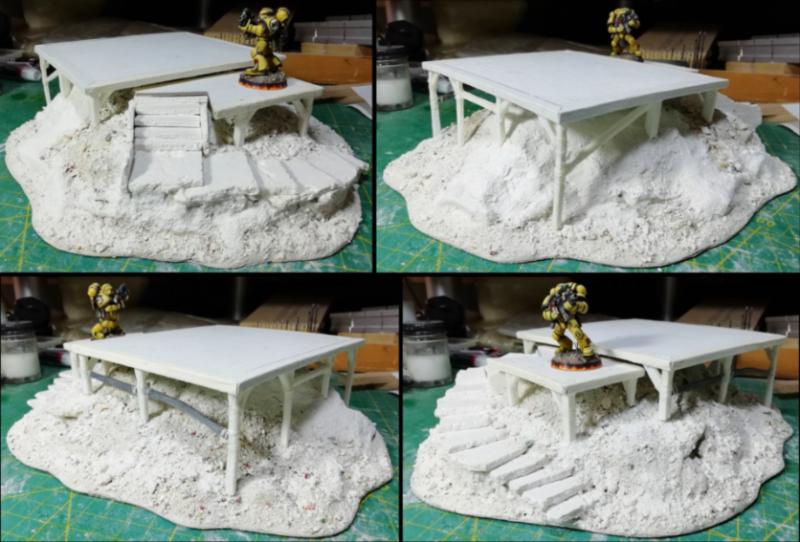
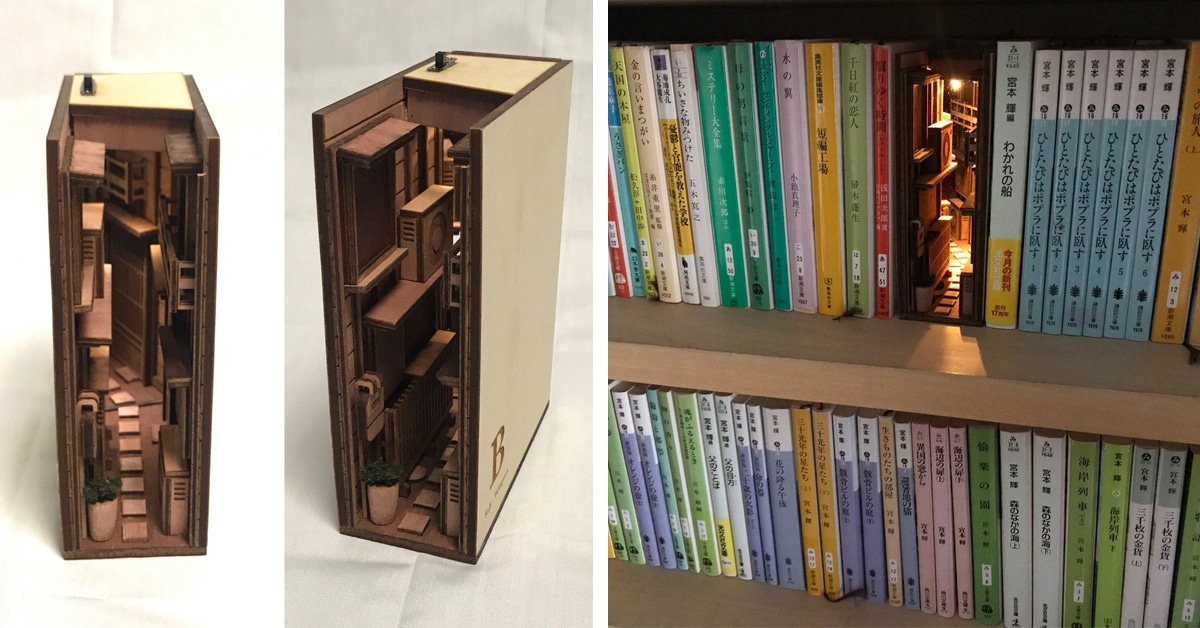
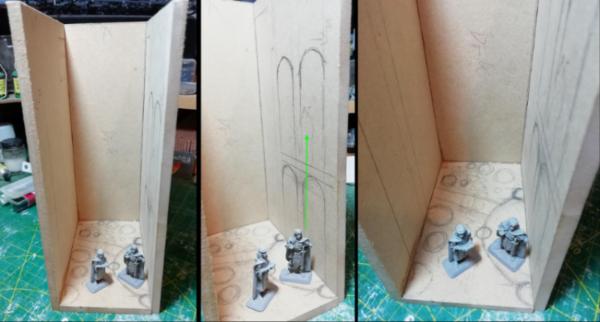


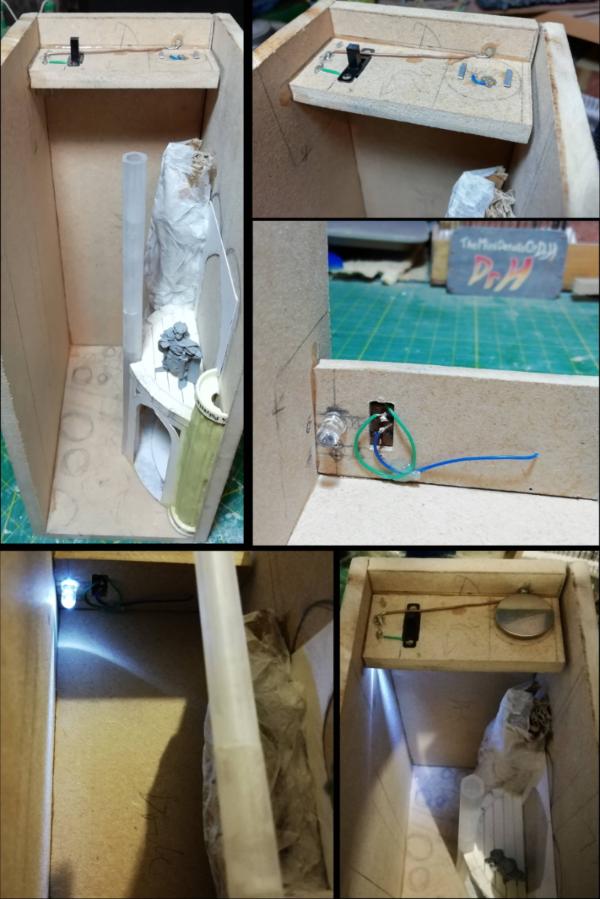

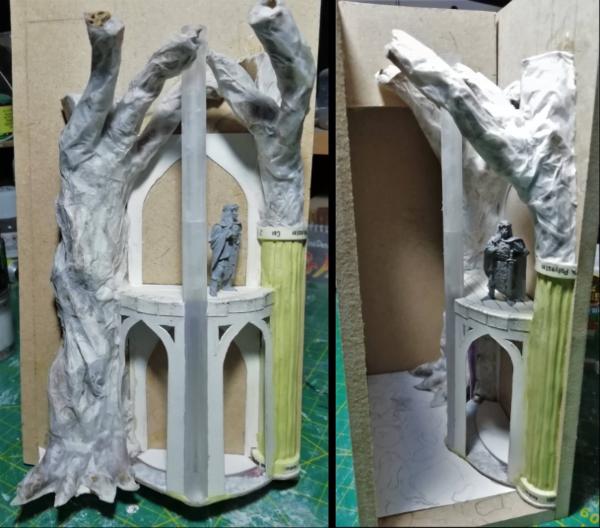
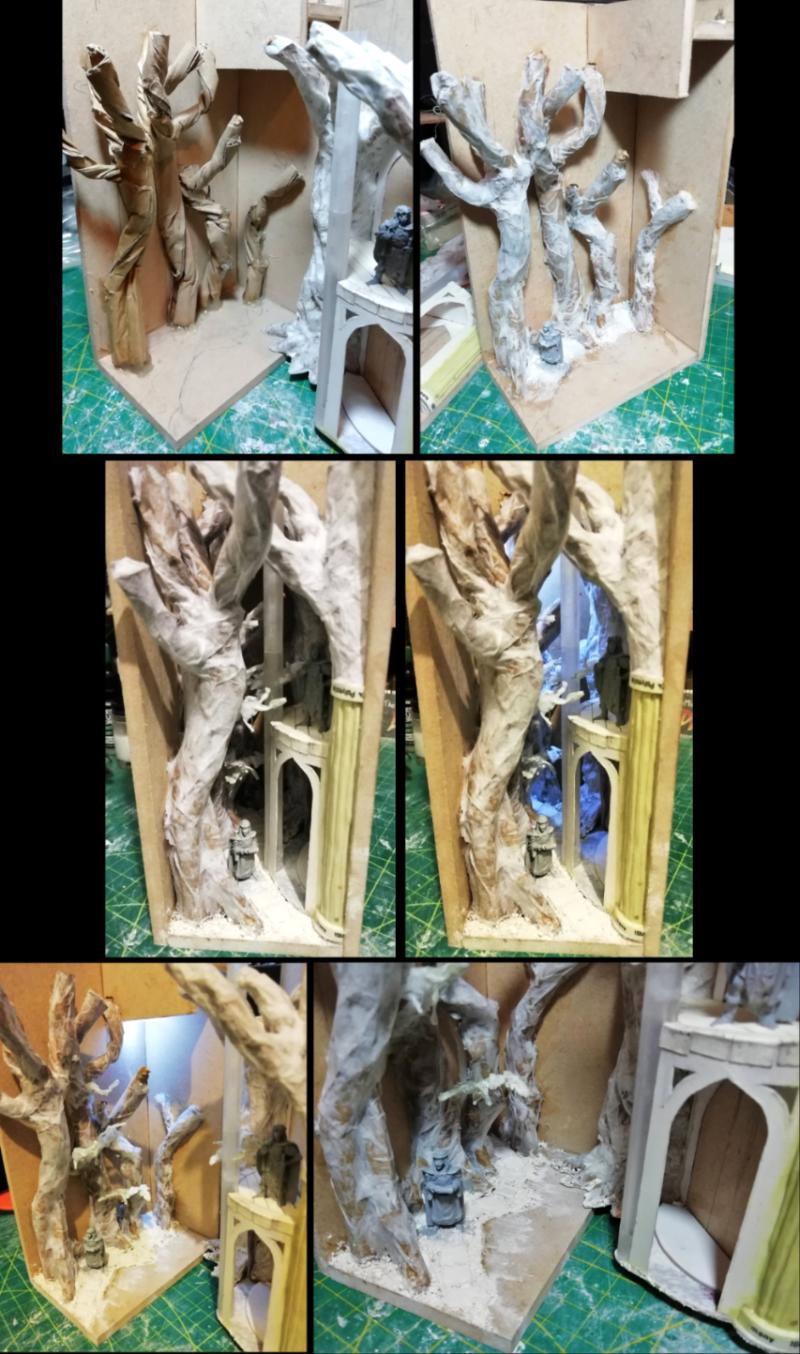
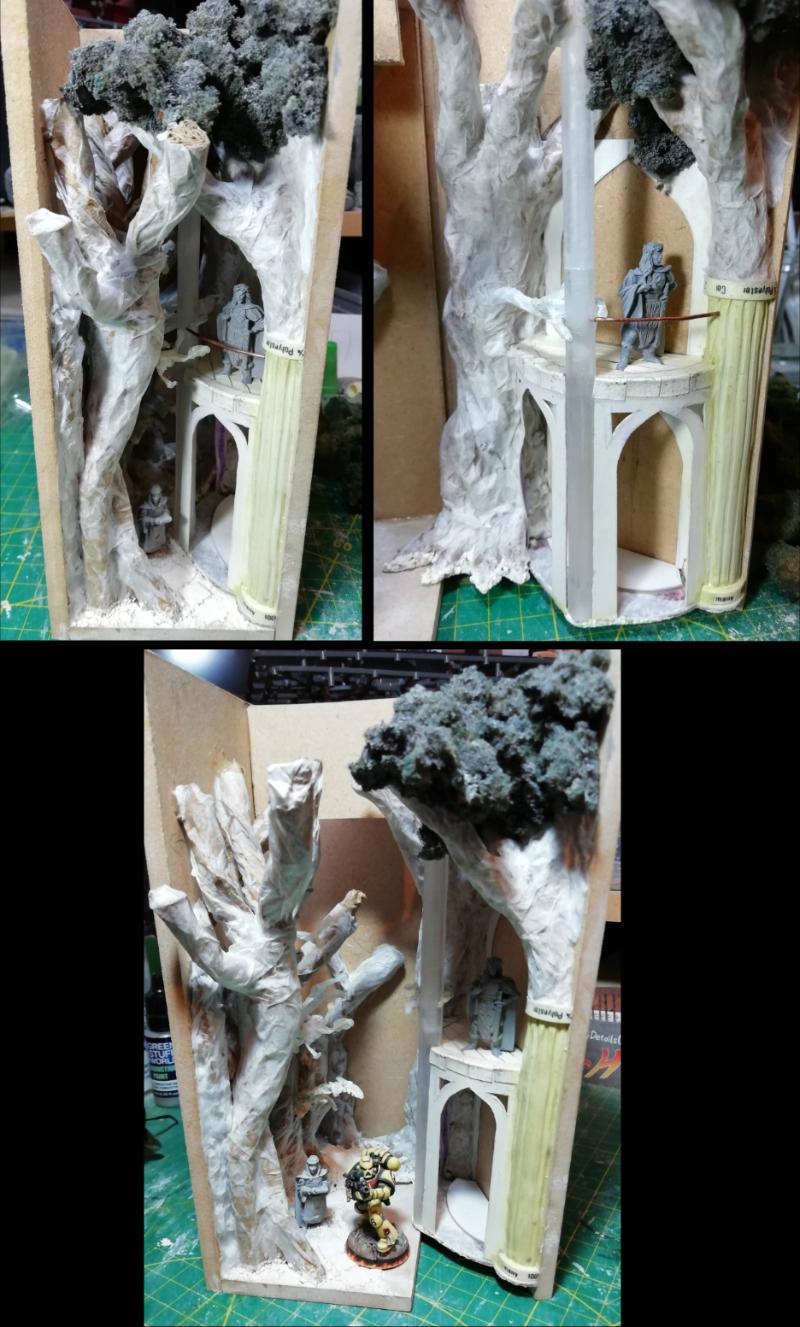
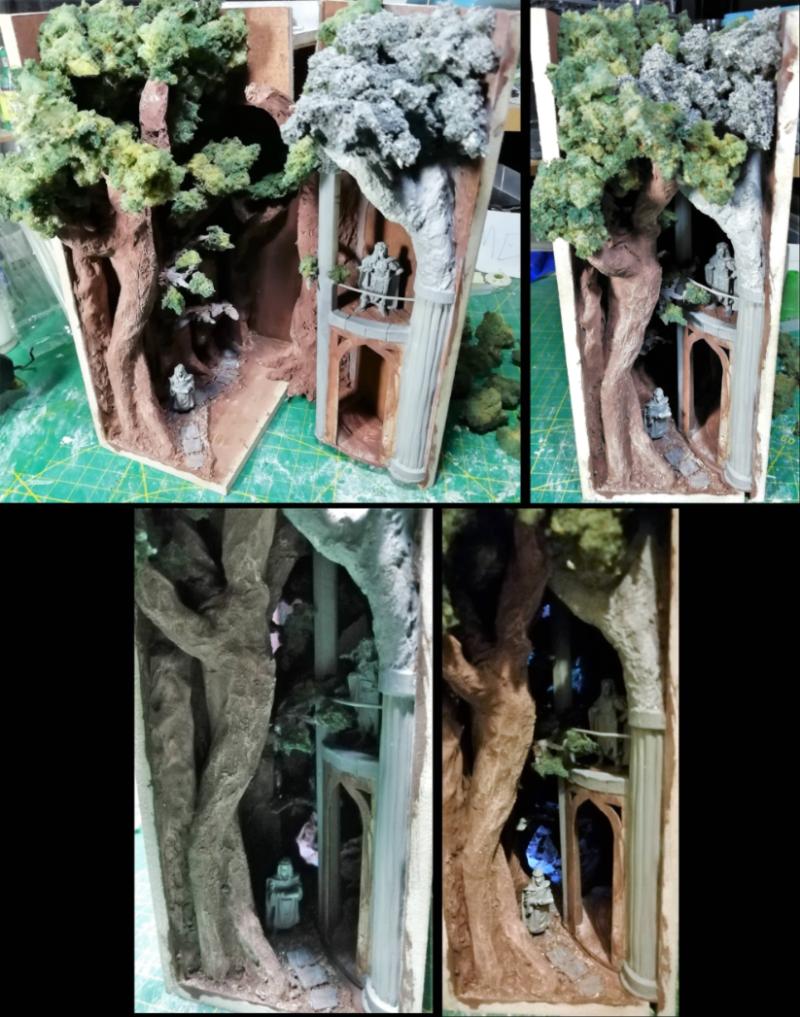
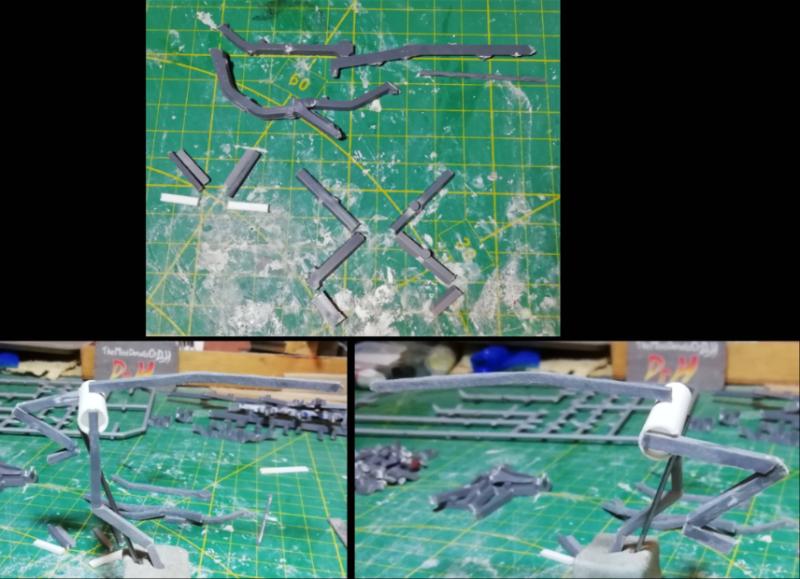


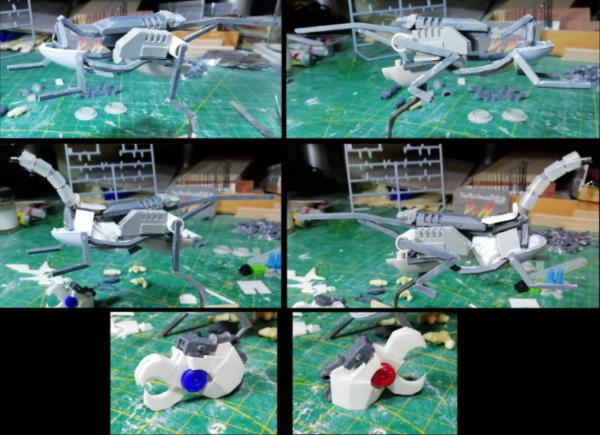
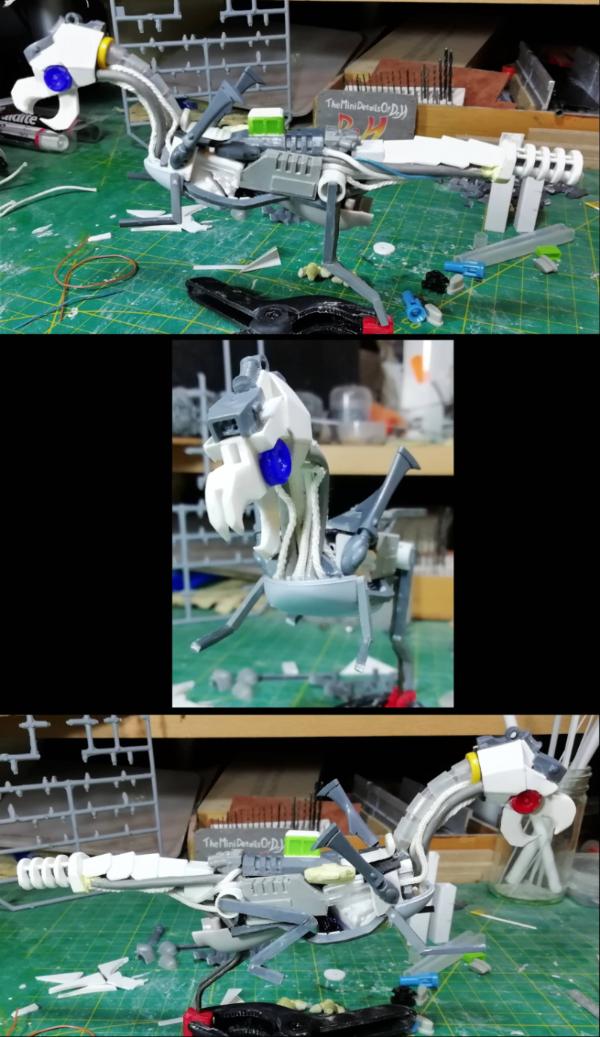
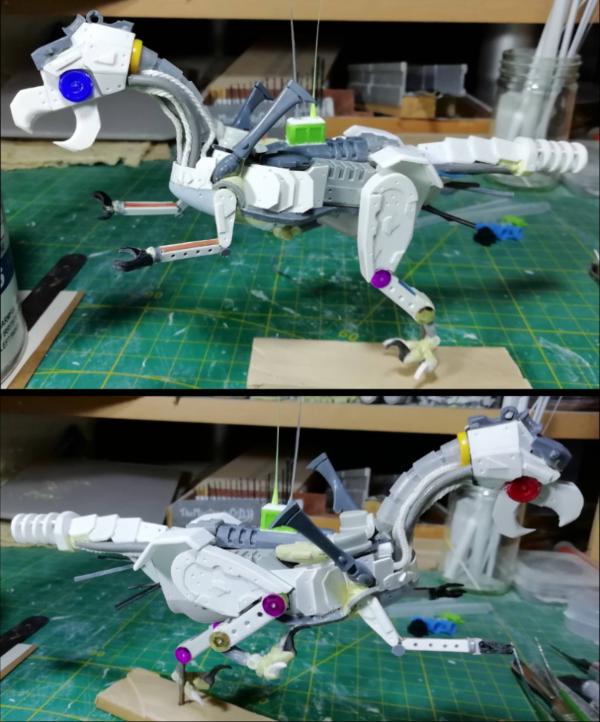
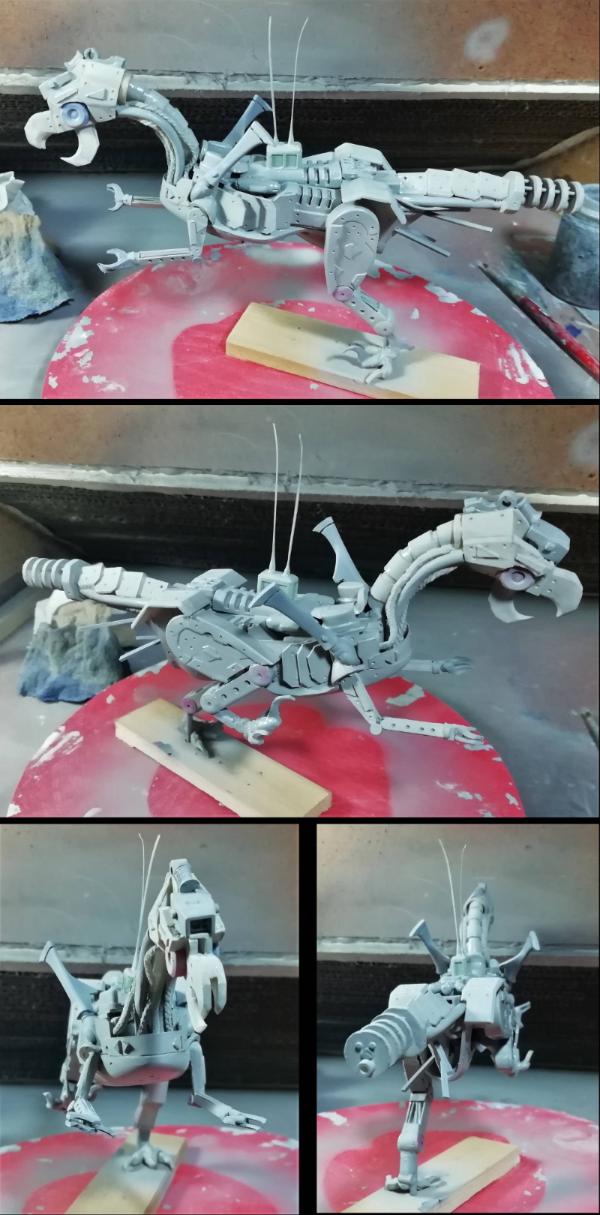
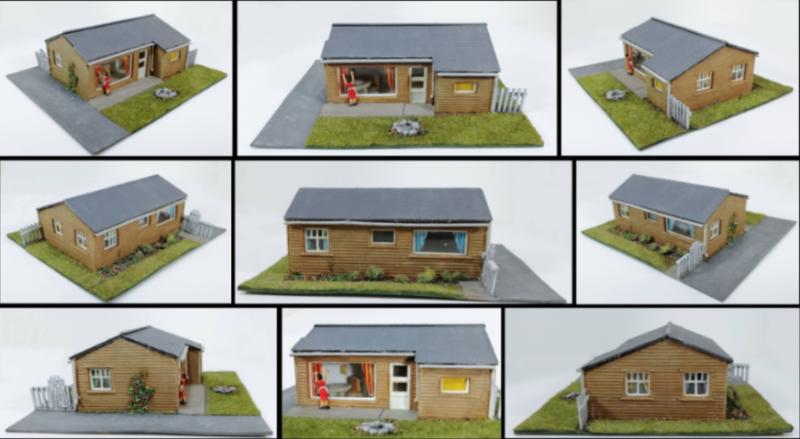
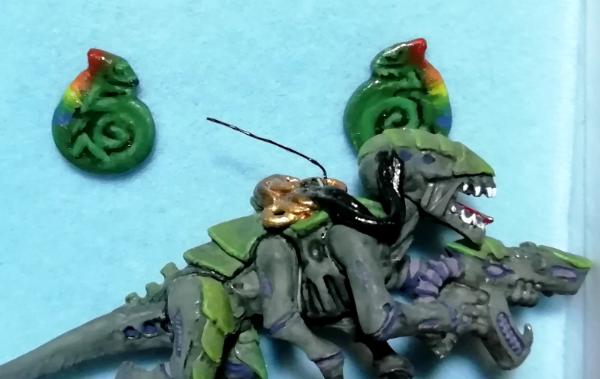
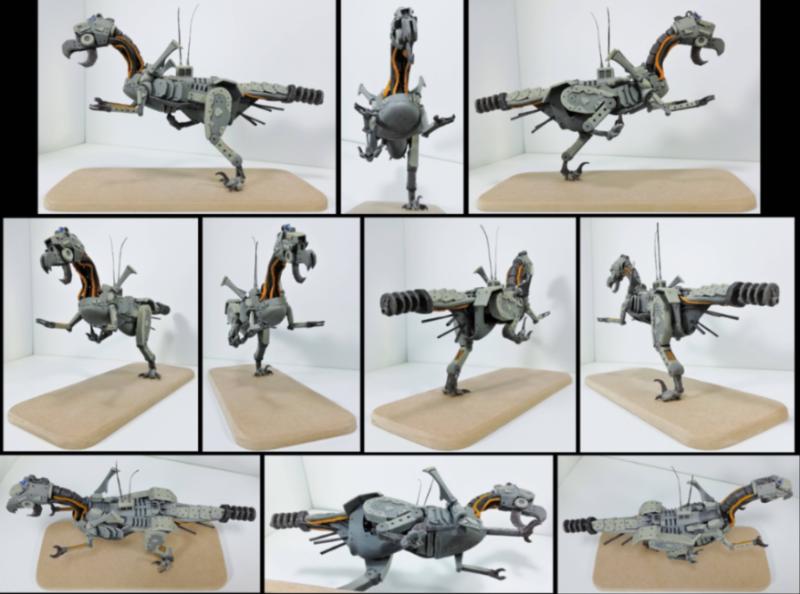

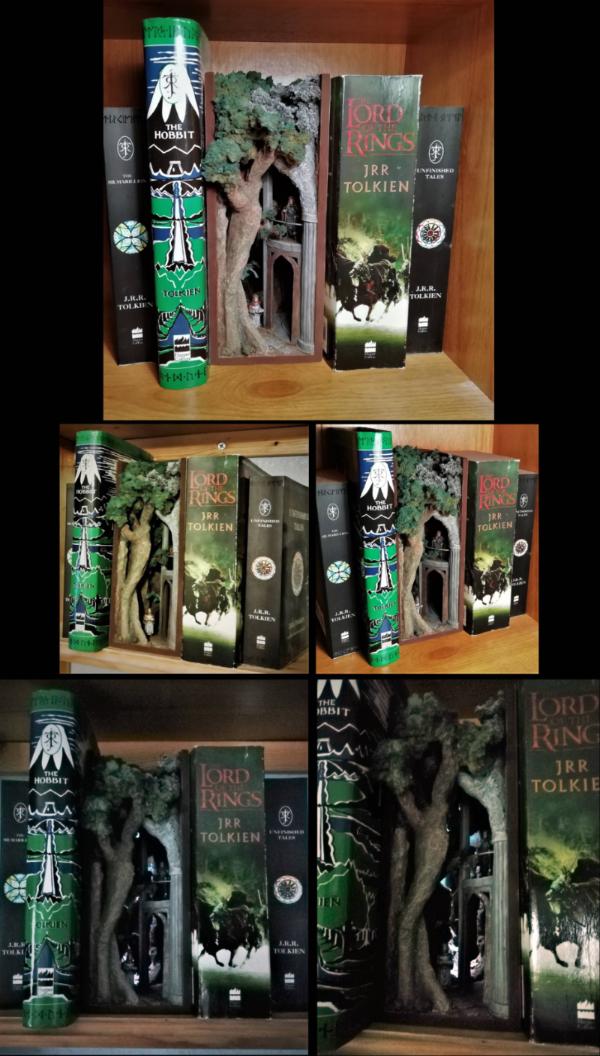
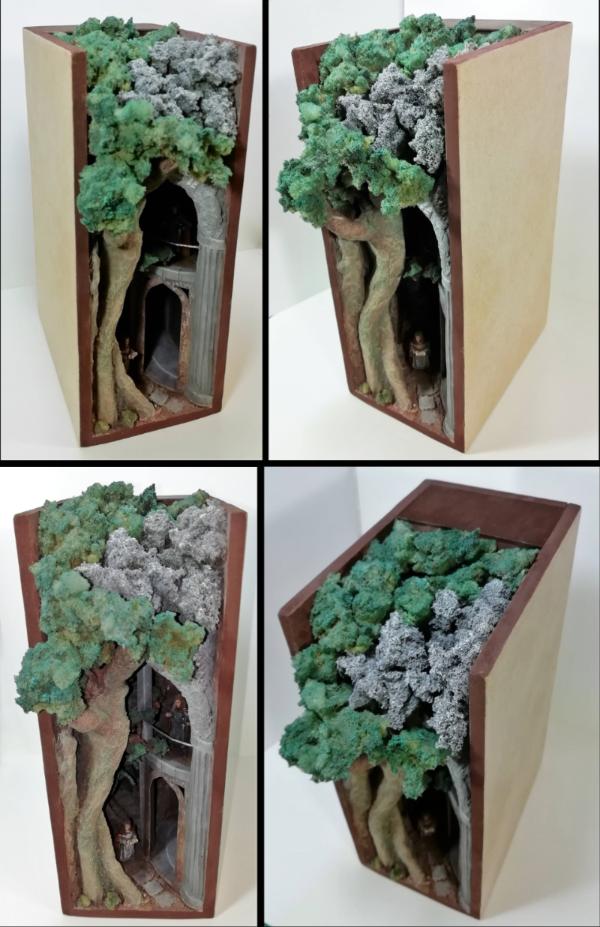
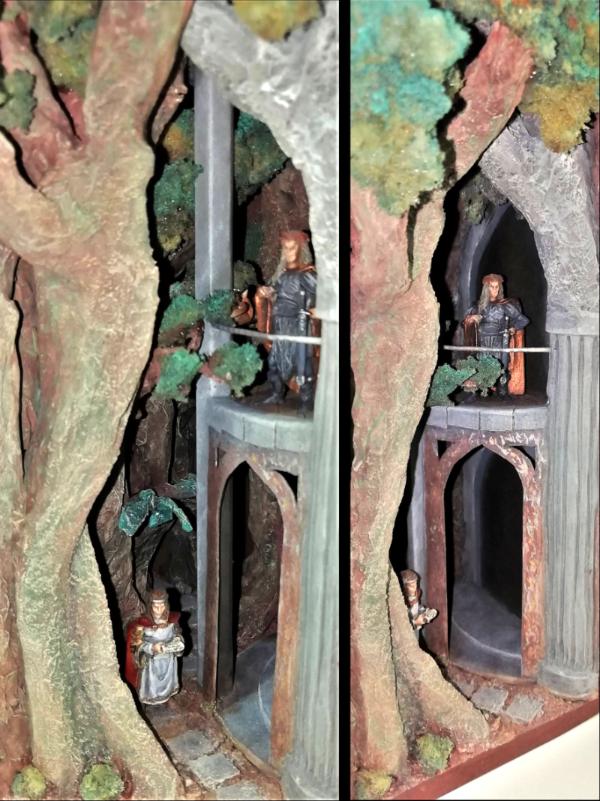

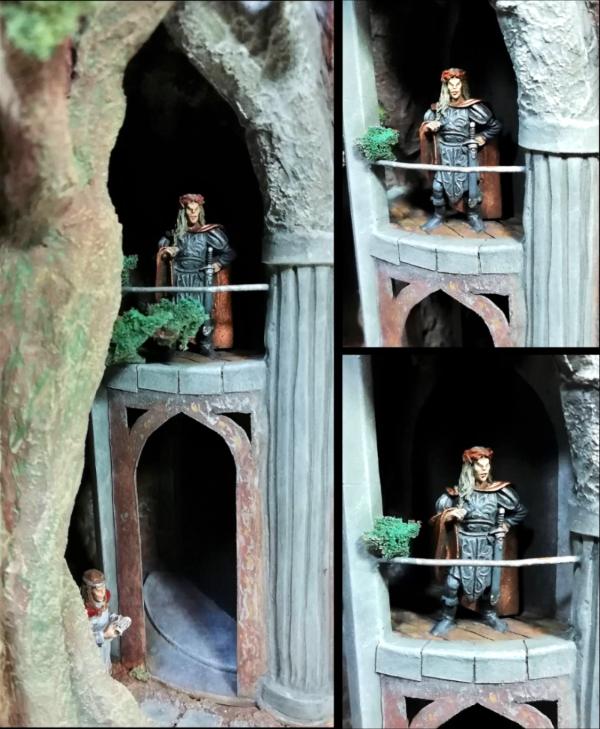
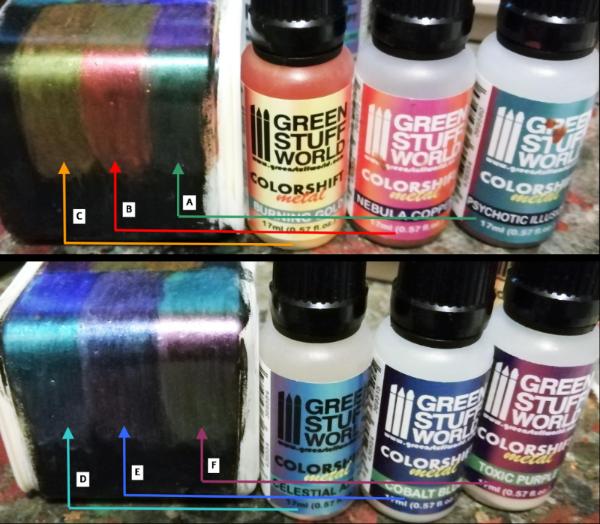
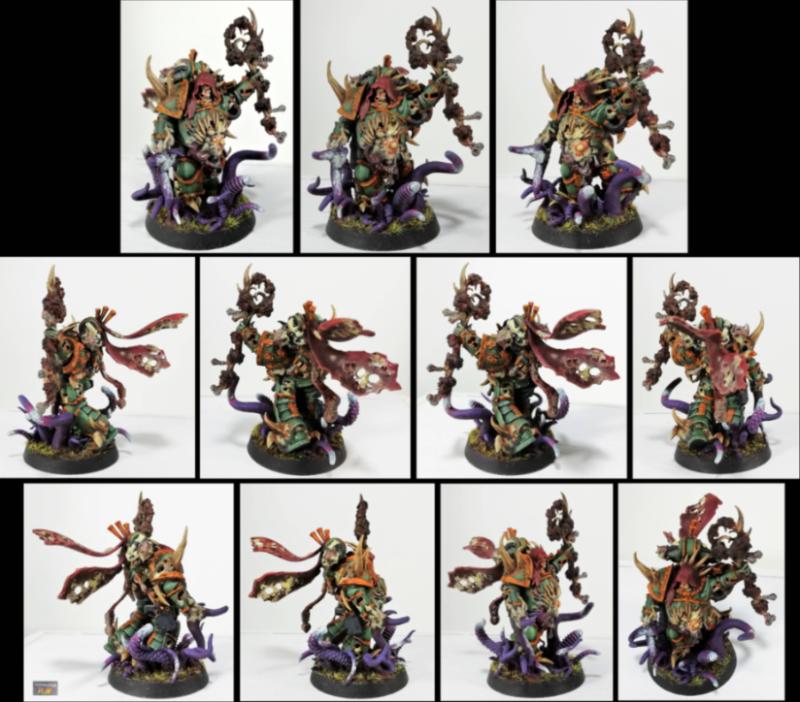
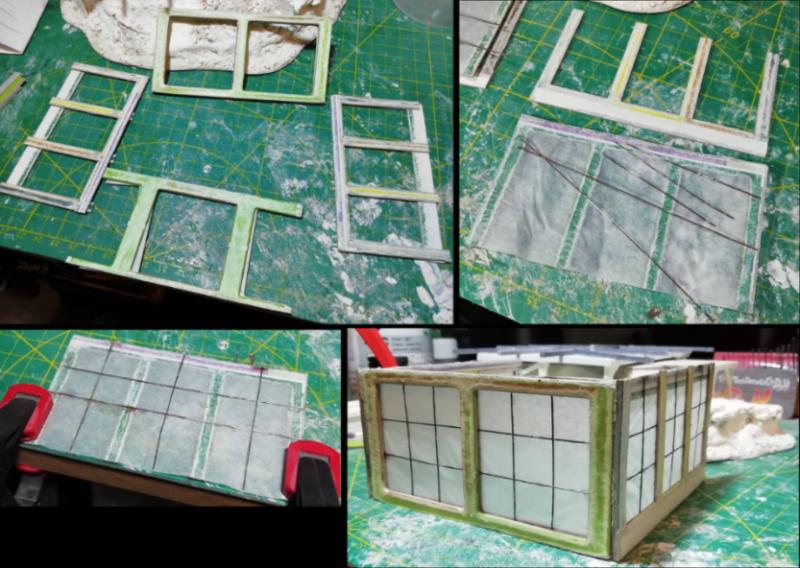
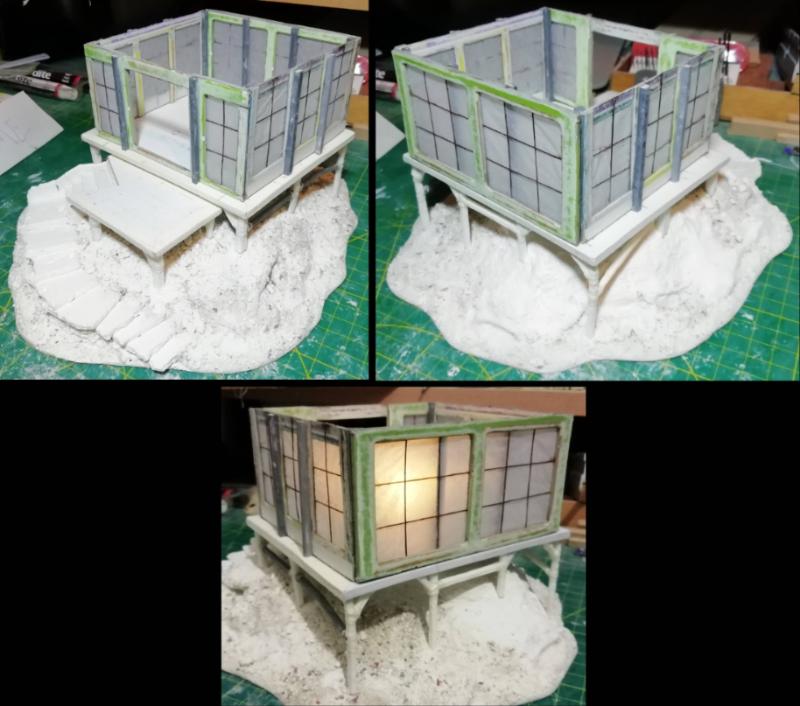
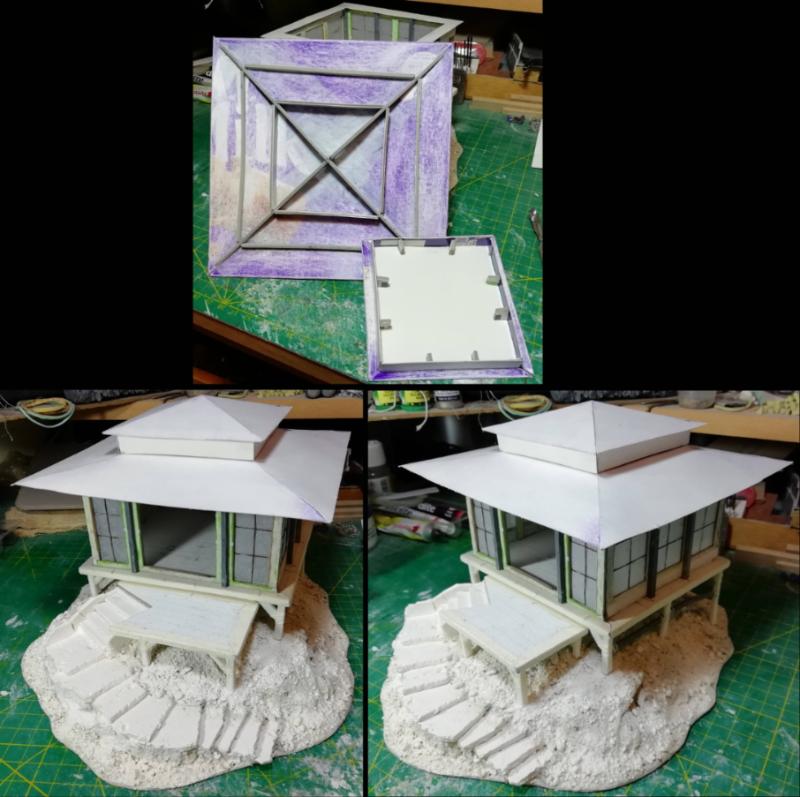
 But maybe some vaguely important hut that can be used for whatever is necessary in-game.