If the dryer wasn't the next item I was planning, what was I planning? What is missing from the bathroom collection?
The clue is in the name really...
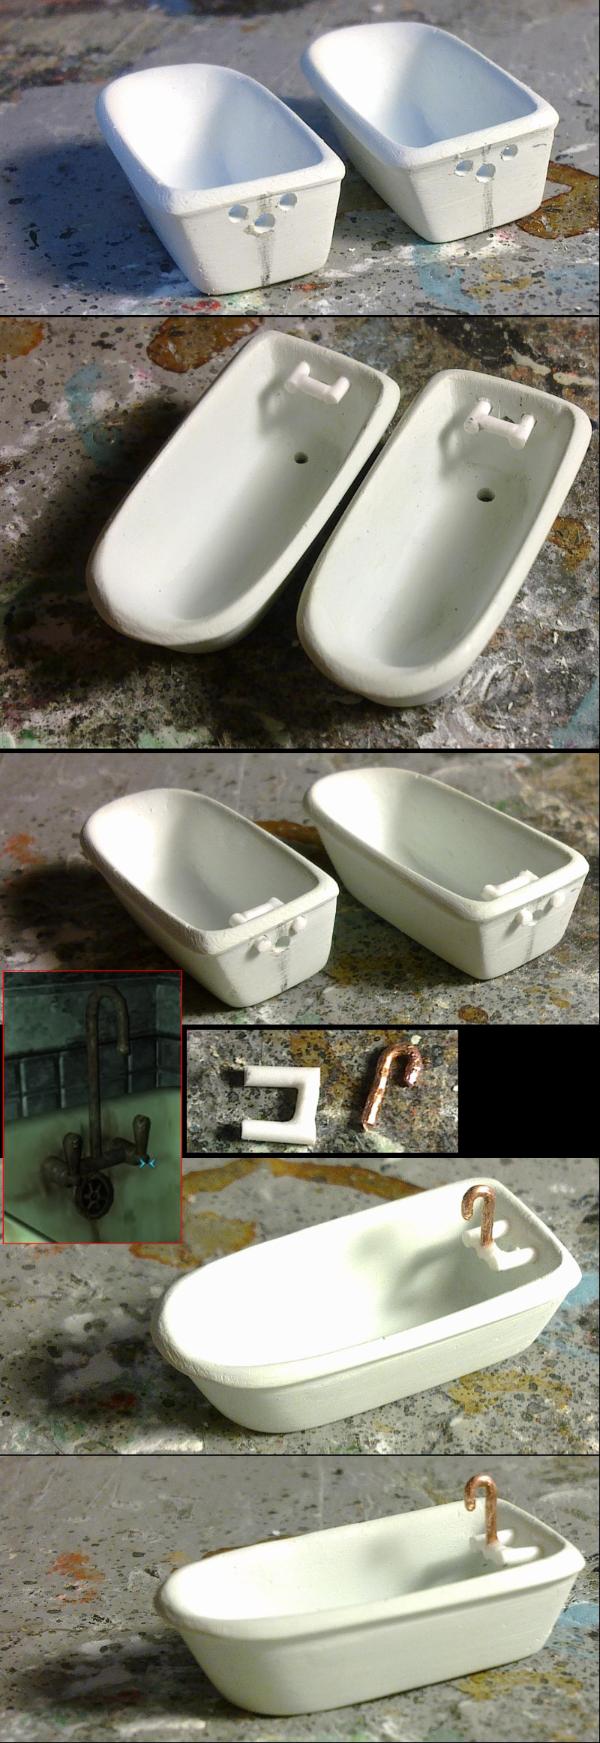
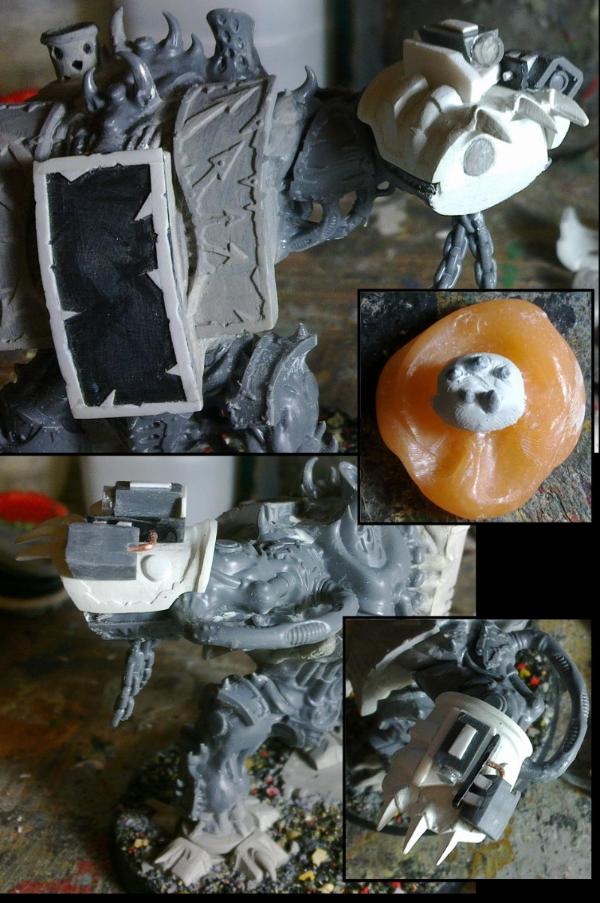
I'm just feeling out the right scale for it at the moment.
I think the length is good and the overall height is about right (depending on the eventual feet).
The depth of the inside looks a little deep at the moment, but that should be fine once the putty goes on.
I might make it a little wider at the top, looking at it, it looks a little narrow compared to the sink...
Needs to be wider, opening looks about the same as the toilet width right now. Also if you made it shorter you could make the claw foot tub option as well .
Thank you Theo. Took a second to recognise that picture. Things like that were done really well in that film. They would just cgi that these days.
As Dave said, it will have claws and is sat on a blob of blu-tack to represent the height with claws on.
dsteingass wrote: Fantastic! I vote for separate taps and handles! Hand dryer is amazing! Tub is gonna kick ass! Theo...all Fallout tubs are claw tubs
Thanks Dave. As a valued customer I respect your opinion. I will try for separate taps. Thanks. The hand dryer came together really easily and quickly. Bulked up by gluing bits of sprue together and then the pieces of plasticard (scraps left over from the dozer blade work) were added to give the right size and then a bit of sanding to get the shape. Will be easy to mould and cast too.
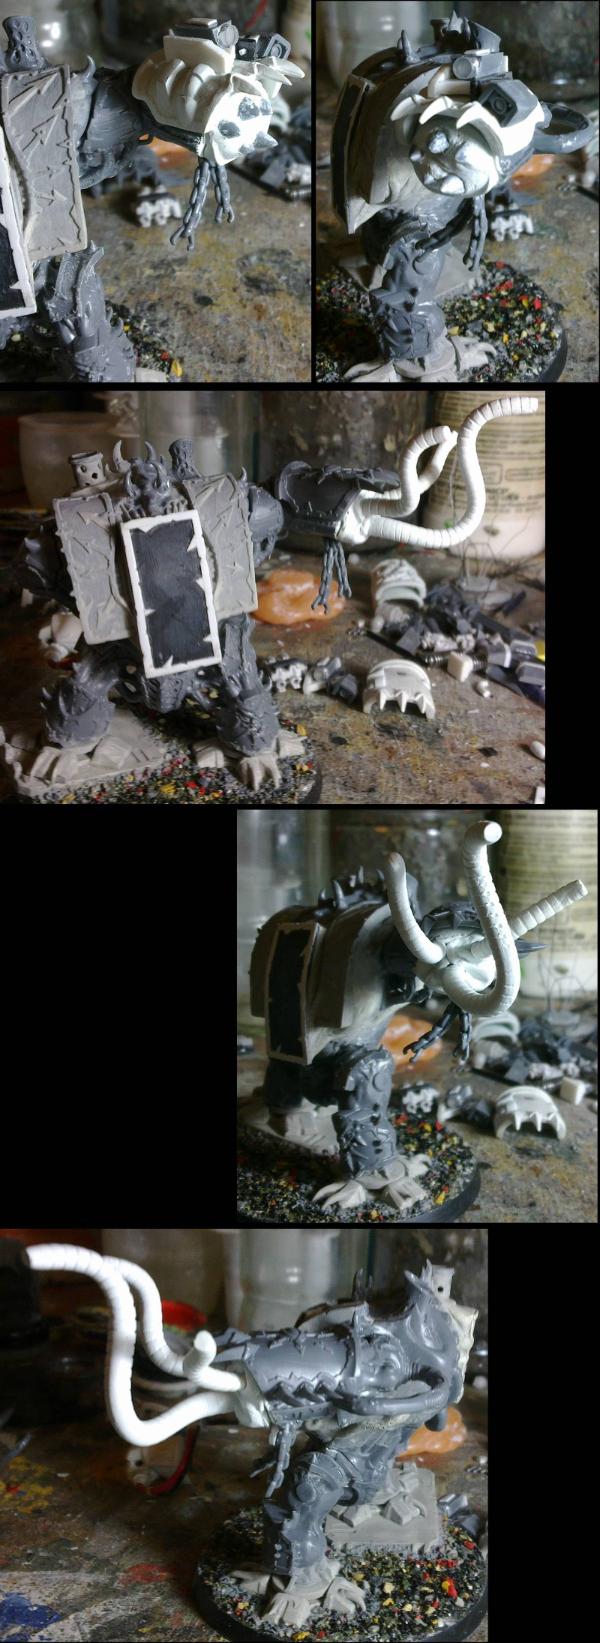
Here's an update on the bath with larger top. I think that's about right.
You will also notice that I appear to be making the bath as I did the toilets and not as the sinks.
This is because I've had another idea of how to form the shape and will report back when I get around to trying it out.
the tab wheels look amazing... I actually see a future additional use of these for some dials and other control uses... steampunk anyone?...
the tub is already looking very promising... I still remember vividly how you started with the toilets... and this is heading the same way and using the same method... and look what it developed into...
Viktor von Domm wrote: the tab wheels look amazing... I actually see a future additional use of these for some dials and other control uses... steampunk anyone?...
Indeed. I will make a separate mould for them so that they can be cast separately from the sinks and therefore extras will be available.
the tub is already looking very promising... I still remember vividly how you started with the toilets... and this is heading the same way and using the same method... and look what it developed into...
Thanks. Hopefully, with improvements. Whereas the toilet's skeleton was glued together with superglue (which meant I was often gluing myself to them), this one is held together with good ol' sticky-backed-plastic.
You may also remember my problems with filling the bowls in, between the skeleton, on the toilets with the putty. I have overcome this issue by covering the whole thing in tissue paper and water/PVA, thereby giving me a solid base to spread the putty on to.
Looking good, but seems a trifle small to me - although it has been a while since I looked at Fallout. I'm sure the scale matches as I know you'd have looked at a fair bit of reference
monkeytroll wrote:Looking good, but seems a trifle small to me - although it has been a while since I looked at Fallout. I'm sure the scale matches as I know you'd have looked at a fair bit of reference
You may be right. It's difficult to tell from some screenshots due to the way perspective works in a computer game. See below.
Viktor von Domm wrote:I can attest that you´re able to make so many good stuff with cardboard and tissue paper and PVA... really PVA is godsend...
That it is, and safe for all ages.
dsteingass wrote:I guess he'll need a skeleton for a reference rather than a Marine
Viktor von Domm wrote:as in bathed to death? LOL
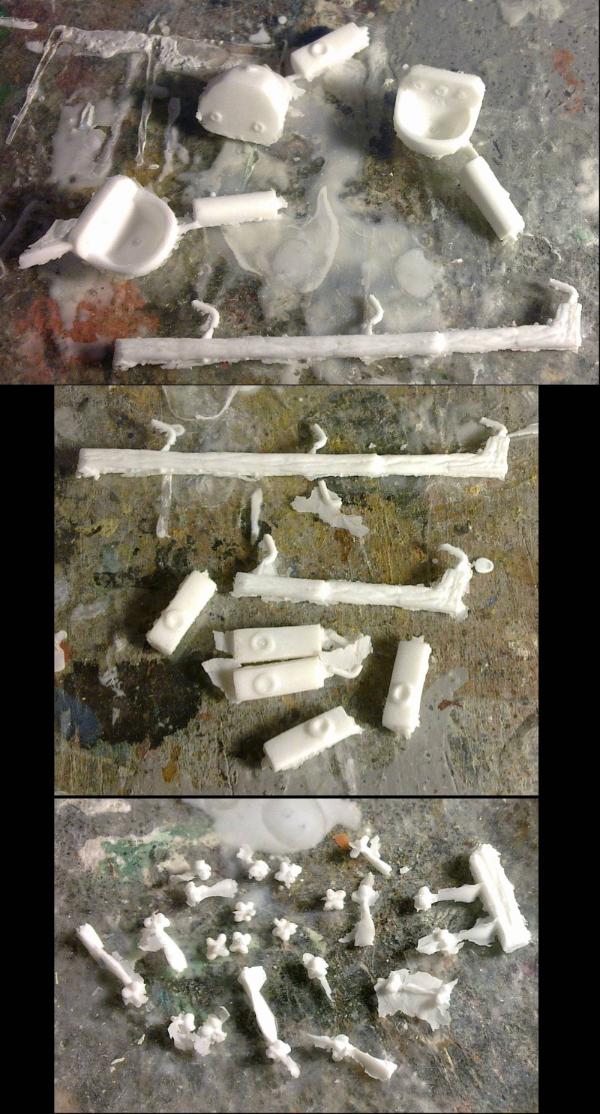
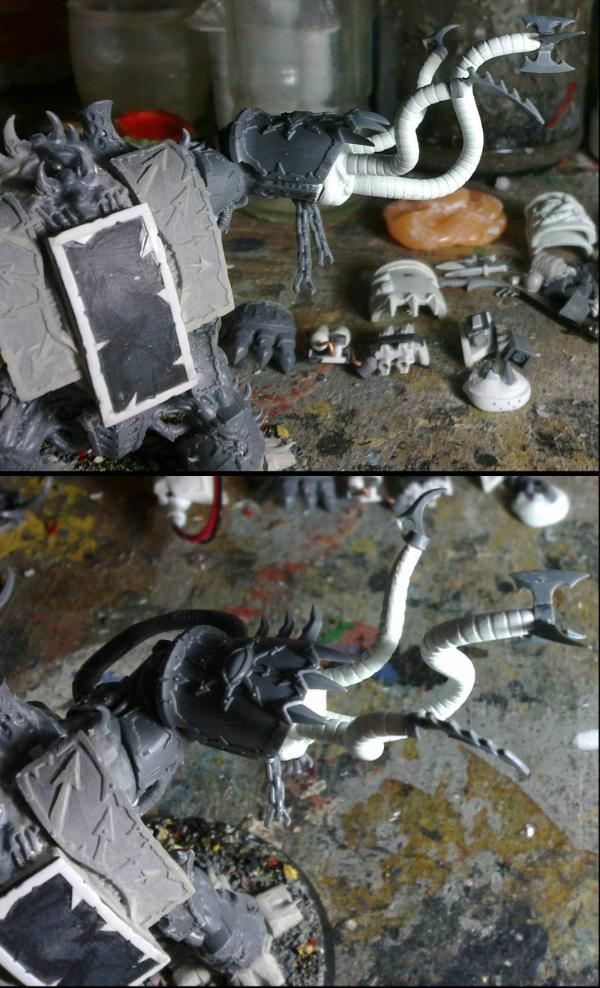
A skeleton, you say. Well it just so happens that some of a skeleton arrived today to lend a hand... (well that's all he came with and the arm isn't even attached )
You will notice the lip needs reducing (that was planned as I can only cut a useful bit of card so thin)
and it probably could do with being a tiny bit wider. This will happen shortly.
Progress on the bath. I did indeed make it wider in probably the simplest way possible, I chopped it in half...
and then glued a piece of card to the bottom and added more tissue and PVA.
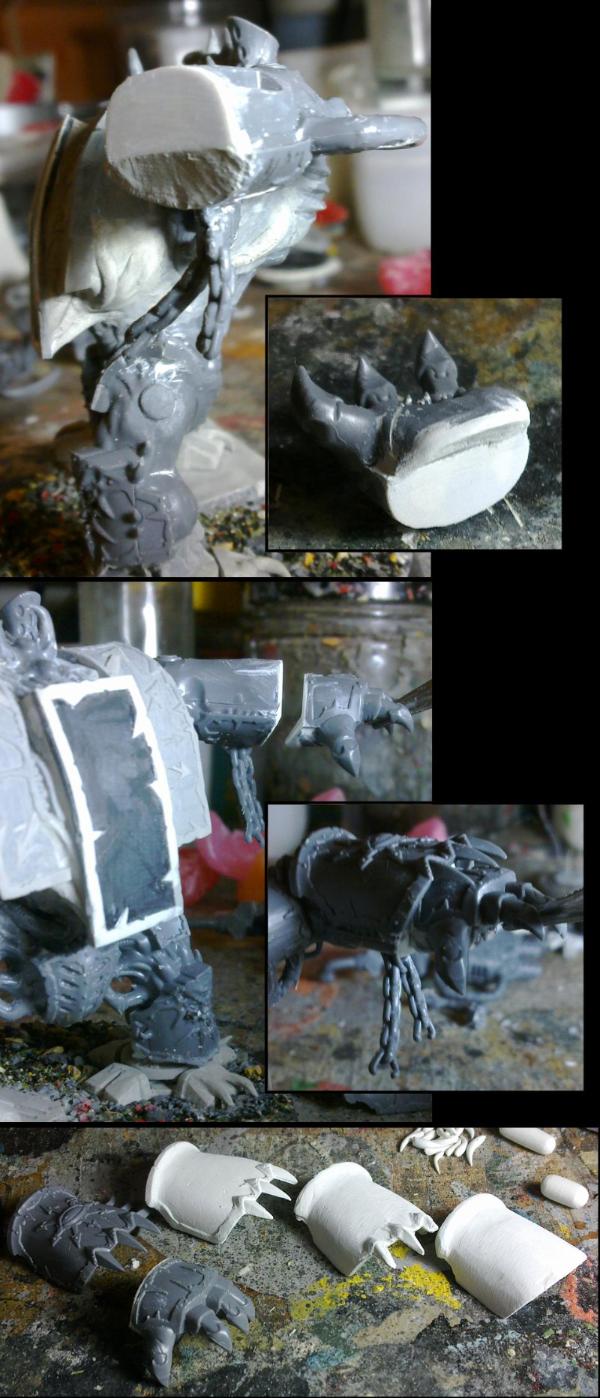
With that done and dried, I decided to solve one other problems I had with the toilet from when I made that. You will remember that I made the card skeleton and then covered that in putty before shaving and sanding it smooth. I ran into issues when the sanding reached down to the card level as that doesn't sand in the same way as putty. It wasn't the biggest issue, but I didn't want to repeat that knowing that I would have to remove more material from the bath skeleton...
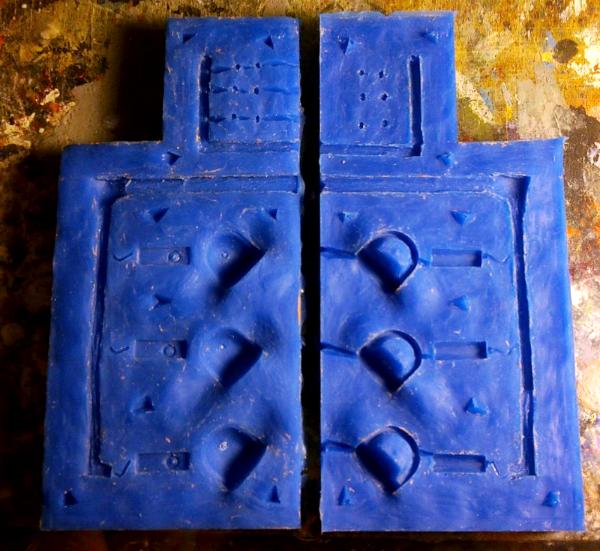
So, using the marvel that is Oyumaru, I made a mould and cast the skeleton in putty. This means that I can carve and sand away to my heart's content and not worry about finding some card in the way.
You will notice that the cast isn't perfect, but that didn't bother me as the skeleton was very rough due to the tissue layers and I knew I would be adding putty to this before moving on.
And I have started adding the putty to the skeleton. You will also see a completed hand dryer casting master. I will make one other copy of this one and then use them for the moulds for the resin.
monkeytroll wrote:Smart thinking with the putty master
Dryer looks good, bath is on it's way.
Yep, with putty being so easy to carve it's a no-brainer.
Thanks.
OneManNoodles wrote:Hand dryers!
Yea that's one problem with not using all putty... but then its a pain to get a decent shape. It's looking awesome so far.
I think this way you get the benefit of building the shape with a skeleton and then the benefit of just having putty to work with. Win-Win.
Thanks OMN.
Nice stuff. The hand dryer looks a bit thick though, like it would jut out too far from the wall. Maybe take 1mm or so off the back? Or not. It'll be good either way
Next up, one of those dispensers for tissue toilet seat covers?
For the tub make sure the underside of the lip is flat so that it can be inset into a frame. 'Tis quite the trend these days.
cormadepanda wrote:Tubby! i like it. Well, now i might need the whole set dr.
Thanks Comrade. That's what I like to hear.
Red Harvest wrote:Nice stuff. The hand dryer looks a bit thick though, like it would jut out too far from the wall. Maybe take 1mm or so off the back? Or not. It'll be good either way
Thanks. Well those in game are quite "chunky". I may leave it as is and if the customer thinks it's too thick for the purpose they can easily sand it down to fit.
Next up, one of those dispensers for tissue toilet seat covers?
There is a strange lack of these in Fallout. Probably something to do with all the toilet seats going missing...
Something to keep in mind for when I expand my miniature bathroom range though. Although wouldn't that just be a box?
For the tub make sure the underside of the lip is flat so that it can be inset into a frame. 'Tis quite the trend these days.
The lip does appear to have a flat bottom so you are in luck with that.
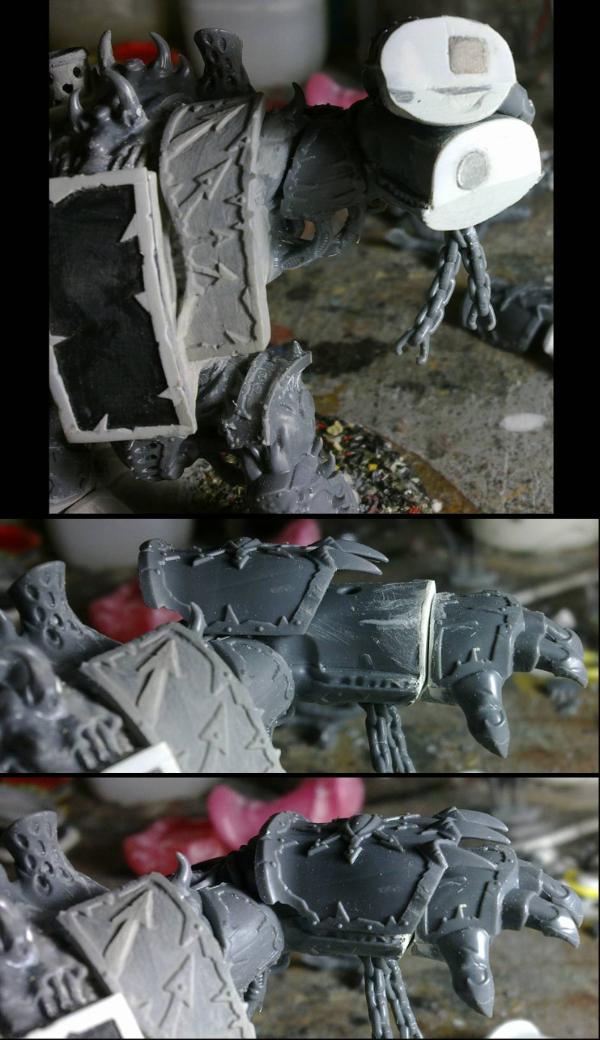
And I've done a bit of work on shaping that and starting to smooth and refine the overall shape.
Much more work to be done.
I need to add a thin layer of putty on the outside to smooth it over, and fix up the broken bits of the lip.
And then it will be just a matter of getting it perfectly smooth all over, then the taps and drains....
This will be the last thing I make before the moulding and casting of the final products. I already have a box I didn't get to do last time and now I have the sinks, hand dryers and baths, and also re-casting more Tainted toilets. Busy busy busy.
I do have a mouth-guard somewhere from when I played rugby that works in pretty much the same way. I believe it was called a Shock-Doctor... Strange how things work out...
I have to say that for me the dimensions of the tub appear slightly off to the FO one...of course you could always declare it a 28mm heroic scale tub...and be safe
but I totally like your work here!
tho it still makes me wonder why you never considered to work with just putty/ Fimo or other stuff...but then again, who would argue here as you arrived already to a perfect tub...and we all know how many roads to rome there are...
I have to say that for me the dimensions of the tub appear slightly off to the FO one...of course you could always declare it a 28mm heroic scale tub...and be safe
That's the problem with working in this scale. If you calculate real world distances into 28mm scale, they all look tiny and you nearly have to double the measurements in some cases.
The other problem is working from computer screenshots and having to estimate the relative measurements.
The height, I think is spot on; It's just slightly higher than the toilet seat.
The width; It's slightly less than the depth of the toilet (front to back) which it appears to be in the screenshots. Maybe it could be wider, but then the whole bath looks very short (lengthwise) and...
The length; Could possibly be longer, but in 28mm it's 6 foot long and on the table here it's up to the shoulder of a SM. Any longer and it becomes a giant bath...
but I totally like your work here!
tho it still makes me wonder why you never considered to work with just putty/ Fimo or other stuff...but then again, who would argue here as you arrived already to a perfect tub...and we all know how many roads to rome there are...
Thanks. The reason I didn't go straight to putty was that I knew the measurements would be out when converted and it would need modification of it's dimensions.
Things like chopping it in half lengthwise is just much easier when it's made of paper and card then of putty (milliput is really quite hard when set).
Also, if I made a total mess of the skeleton build, I could just chuck it in the bin and I've not lost anything. Putty costs money.
Also also, It's difficult to make thin walls of putty without support. It will often bend under it's own weight. So a skeleton is really helpful.
Automatically Appended Next Post:
Red Harvest wrote: They still make dentures in the UK? It's all implants these days over here, or so it seems.
I have no idea. Not at the point of needing to look into it as yet...
The tub is good, nice shape and dimensions IMHO. Legs for it? Or a place to attach them, for those who like the claw foot tub look?
Thanks Red.
The in-game bath has legs, so I will be making legs. Not sure yet how (it may involve sprue carving) and they may or may not be cast separate as that would be easier. The attachment of them would then be an option.
These look great, Dr H! I still haven't started work on my toilets yet, but when these other items become available they may give me the incentive I need to renovate my post-apoc bathroom!
cormadepanda wrote:Well the issue with GW models is they all end up as the same height ignoring race.
Yeah, it is a shame when you notice that. And again when you notice the vehicles aren't big enough... *sigh*
They are gaming pieces after all. Nobody complains about the relative sizes of the pieces on a Monopoly board...
Gives us modellers a bit more fun though.
DarkTraveler777 wrote:These look great, Dr H! I still haven't started work on my toilets yet, but when these other items become available they may give me the incentive I need to renovate my post-apoc bathroom!
The sinks are especially neat. Well done there.
Thanks DarkTraveler. Good to hear. I'll look forward to it.
Automatically Appended Next Post: Ooo, and here's the bath mostly cleaned up.
There's a few rough patches where the putty wasn't quite mixed right I will fill these in and then make a copy before moving on to the details.
For legs you may need to use the green stuff over an armature. But, try it with sprue first. Never ever hurts to experiment... on non-living subjects anyway.
I have to take most of my comments... now all clean and smooth I have to say it looks radically differently...
and I agree to your explanaitions about how to get to the form...you did the right decisions...also... money doesn't grow on trees these days... so I am fully with you on that issue!!!
dsteingass wrote:Ohhh! That widened and cleaned up ...swimmingly!
Thanks Dave.
Red Harvest wrote:For legs you may need to use the green stuff over an armature. But, try it with sprue first. Never ever hurts to experiment... on non-living subjects anyway.
Tub cleaned up very well indeed. Drain?
Thanks Red. I've not had a close look at the feet yet, so I don't know what I am aiming for. I have plenty of sprue to practice on, that's for sure.
There will be a drain hole and overflow. This may involve tiny drills.
Viktor von Domm wrote:I have to take most of my comments... now all clean and smooth I have to say it looks radically differently...
and I agree to your explanaitions about how to get to the form...you did the right decisions...also... money doesn't grow on trees these days... so I am fully with you on that issue!!!
Good to see I have won you over, Vik. Thanks.
Lamby wrote:Skeleton in the bathtub - win!
The bathroom accessories are looking ace, I like how you solved the problems with PVa-mâché and then used the rough a casting master - ingenious..
Thanks Lamby.
Yep, this is the joy of Oyumaru; when you can make a mould of anything and then reuse it to mould something else, you tend to start moulding everything. I was going to have to mould it at some point, may as well be before adding the putty.
I have moulded the cleaned up bath and hand dryer today. They need a little tidy up themselves and then it will be time for details on the bath.
Have to say, I prefer yours, at least when I hit resin with a hammer it breaks in to useful pieces. Lead or tin based white metal ... not so much.
Thanks OMN.
Their's are also larger than mine (13mm to the seat compared to my 9mm),
Their's are more expensive (more than twice the price actually),
They do have a seat, which mine don't currently have, but I plan to make seats when I get around to a mark II version of the Tainted toilets.
I also don't quite see how their toilet bowl fits with the seat. They look different shapes... and they don't have a cistern. Nice detail though.
dsteingass wrote:Fantastic! I also see the left as the copies...
Thanks Dave. I'm not sure, the left ones might be the copies, I can't remember. The left dryer is the copy. Bath, maybe.
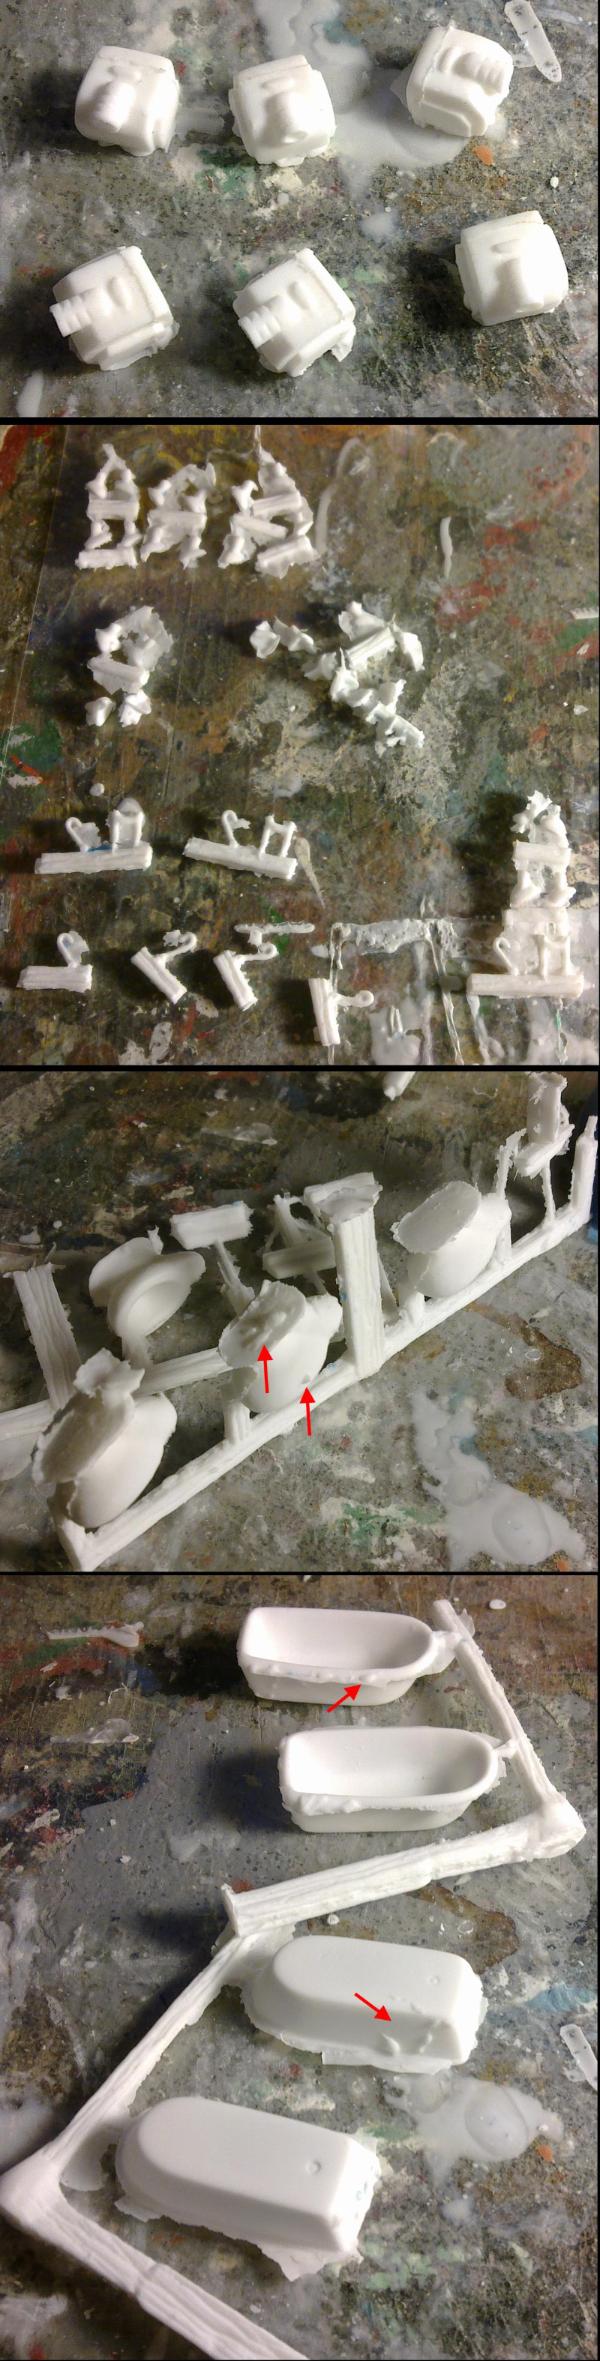
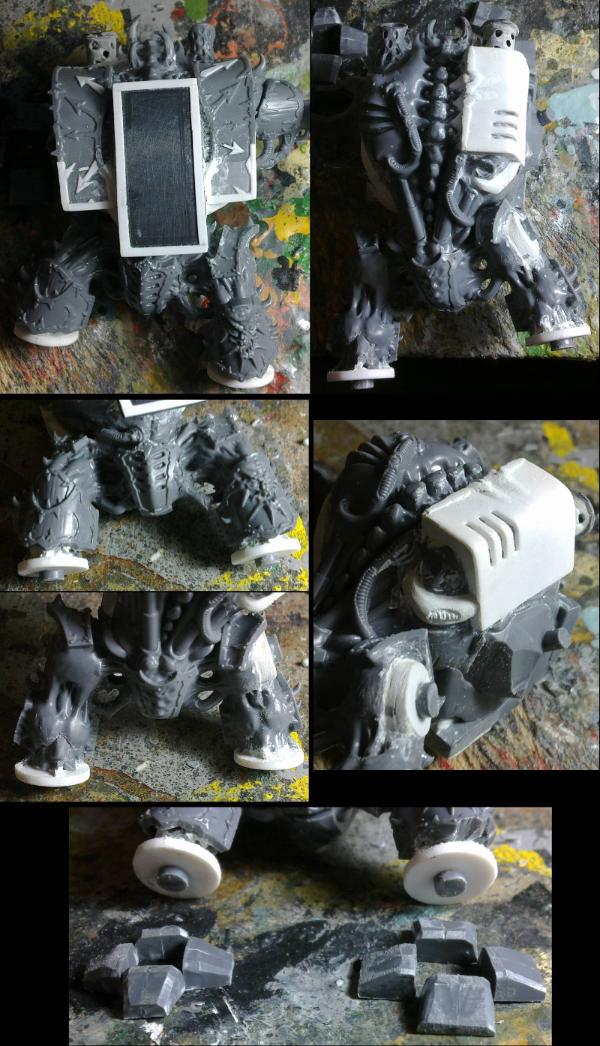
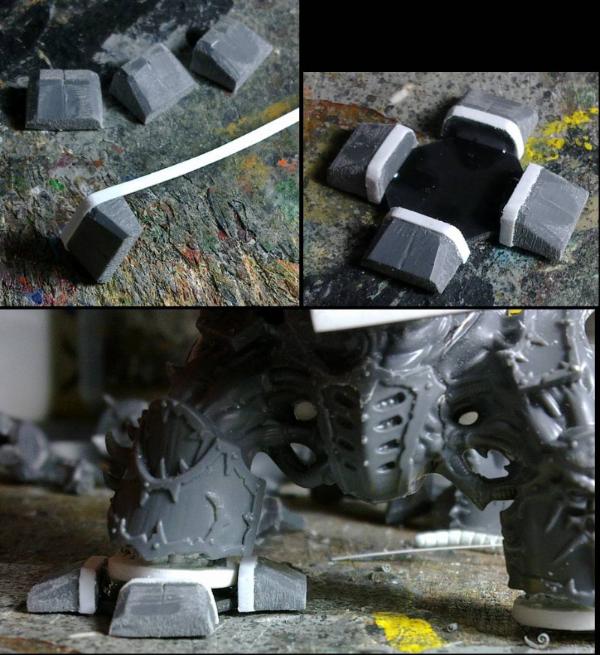
Feet... claws... whatever you call them, are in progress (just need to copy these to make 2 full sets)
And I thought I'd show a use of Oyumaru that you may not have considered:
I made a mould of the bottom of the bath (I could have used the mould that was used to cast the bath copy, but I cut that one up trying to make these feet a different way).
I then made a mould of the inside of that first mould. So I have a piece of Oyumaru the shape of the outside of a bath.
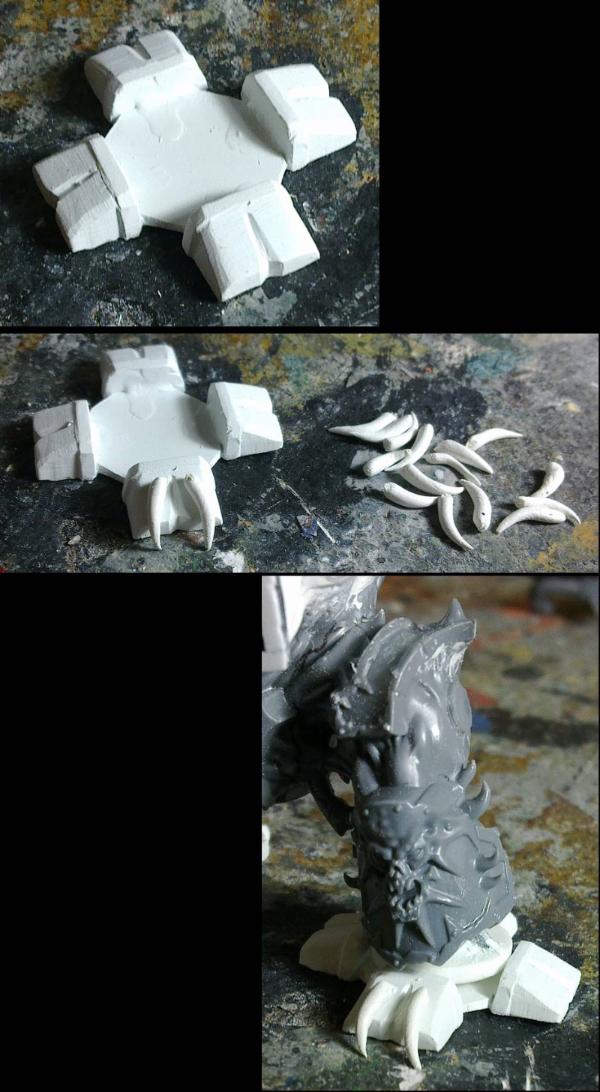
Then you add putty to that mould to make the feet attachment parts. I was going to add the actual feet carved from sprue, but I had left over putty at this stage and so used that to make the feet as well.
These don't stick to the Oyumaru and can be popped off and will now fit perfectly onto the baths. Had I made these straight onto the bath, they would likely have been stuck to them. This way, I have separate feet for those that don't want to use them.
At the final stage you can sand/carve the correct shape for the feet. One of mine didn't quite work out right and another broke, but the two left (one front and one rear conveniently) can be used to make the other two. They do fit and this will make them all identical looking anyway.
It does come in many colours and some packs are only one colour, so you can choose (if you're not looking for the cheapest of cheap deals like I did).
I started the pack at the lighter coloured end (clear, clear with sparkly bits, orange, pink, red...) as I wanted to be able to see through the Oyumaru to check that I was filling the mould cavity properly while I practised with the stuff. It's quite useful being able to see this.
Yeah, the feet might be tough, given that they are so tiny.
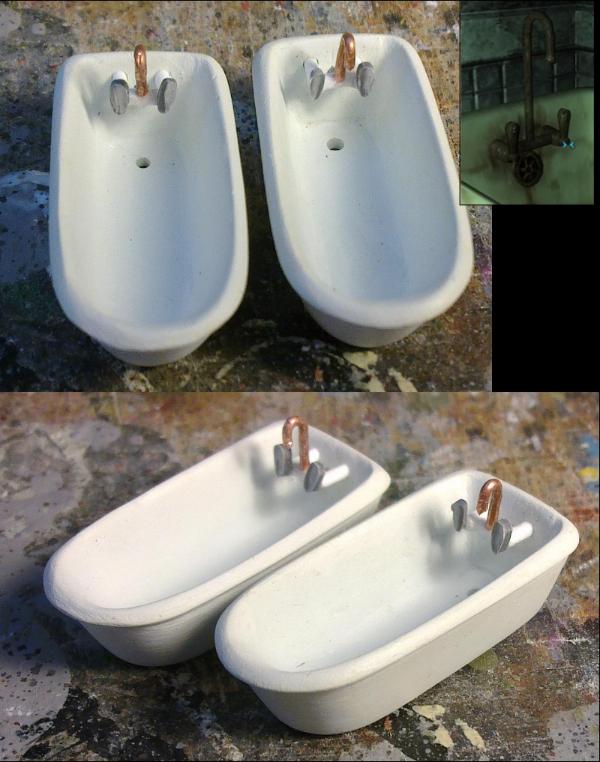
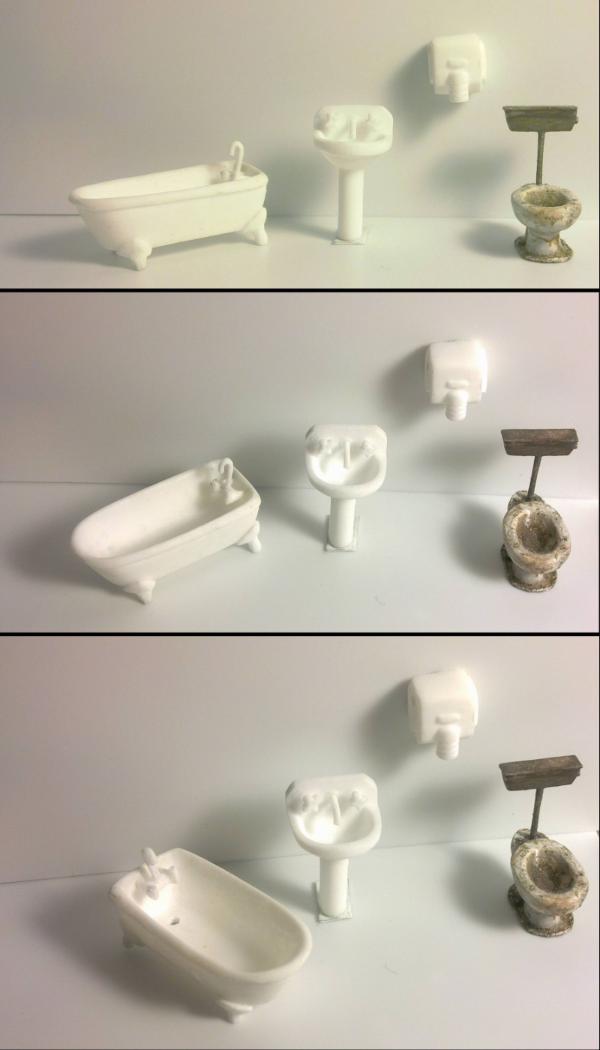
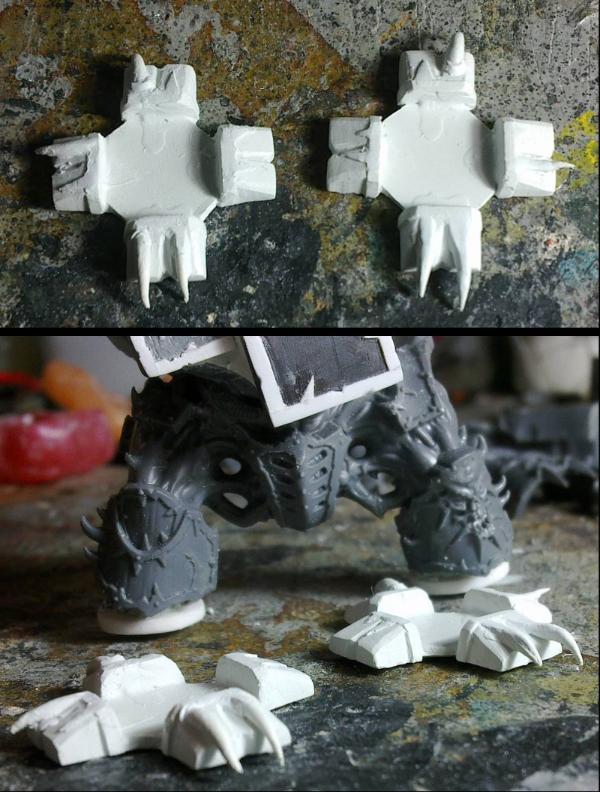
I got the copies done. Tidied all four up and they are now being copied again to make the second set.
This shows the originals and their copies, cleaned up, at the top.
The mould I used for all four (this time in orange for you Red )
And the copies as they are just out of the mould.
Then a couple of shots of checking the fit of the copies on a bath.
Tsk, I totally missed this (blame me not searching this board very often because of all the 40k spam). Good to see you're finishing off the bathroom set. I'm still waiting on my Vault (where the bulk of the toilets I bought from you are planned to be used. ...Vault 60, where every chair was swapped out for a toilet), but those would be useful with any old generic terrain really. With that bath, even though they don't have them in the games, you could stick on a shower head and rail perhaps, youknow just for added variety. I like the hand dryer actually. I mean people remember the big things like vending machines, but I'm actually more interested in little bits like those (uh, hint hint. Ooh kitchen items would be cool too ^^).
Hmn, looking at that bath I just keep thinking about one of these. Make an upgrade kit!
Oh, and not to thread jack, but you may be interest in this thread. The owner's making a load of bits and pieces from Fallout 3, and as of the moment isn't retailing them, but I donno, his techniques or whatever might be interesting.
Spoiler:
Edit:
And have you and idea when you might be putting these out? I have some stuff to work on at the moment, but my next project includes a few trailer park caravans which could use bathrooms. I'm not entirely sure that they'll have the space to fit in baths though (I guess showers are a bit more practical, but when've you seen a shower in Fallout?), but I'm sure I could find a use for them somewhere.
Wyrmalla wrote: Tsk, I totally missed this (blame me not searching this board very often because of all the 40k spam). Good to see you're finishing off the bathroom set. I'm still waiting on my Vault (where the bulk of the toilets I bought from you are planned to be used. ...Vault 60, where every chair was swapped out for a toilet), but those would be useful with any old generic terrain really. With that bath, even though they don't have them in the games, you could stick on a shower head and rail perhaps, youknow just for added variety. I like the hand dryer actually. I mean people remember the big things like vending machines, but I'm actually more interested in little bits like those (uh, hint hint. Ooh kitchen items would be cool too ^^).
Lo Wyrmalla. Well this thread is not devoid of 40k either, but will have a mix of things as I progress. (there's some hobbits coming soon) Thanks. Well, maybe I'll add upgrades like showers etc. at a later date. I'm so close to getting this done I don't really want to be adding more now.
I'm sure I will eventually work my way through the typical Fallout house. Pretty much have to, as I like my collections, complete in all details.
Hmn, looking at that bath I just keep thinking about one of these. Make an upgrade kit!
Spoiler:
Well the customer is free to do what they like with what they buy...
Oh, and not to thread jack, but you may be interest in this thread. The owner's making a load of bits and pieces from Fallout 3, and as of the moment isn't retailing them, but I donno, his techniques or whatever might be interesting.
Spoiler:
Interesting (and nice) looking stuff there. He has a head start on me for vault things. Oh I'm going to have to get around to vault things eventually too...
And have you and idea when you might be putting these out? I have some stuff to work on at the moment, but my next project includes a few trailer park caravans which could use bathrooms. I'm not entirely sure that they'll have the space to fit in baths though (I guess showers are a bit more practical, but when've you seen a shower in Fallout?), but I'm sure I could find a use for them somewhere.
Soon... ish. (I say that a lot )
But really:
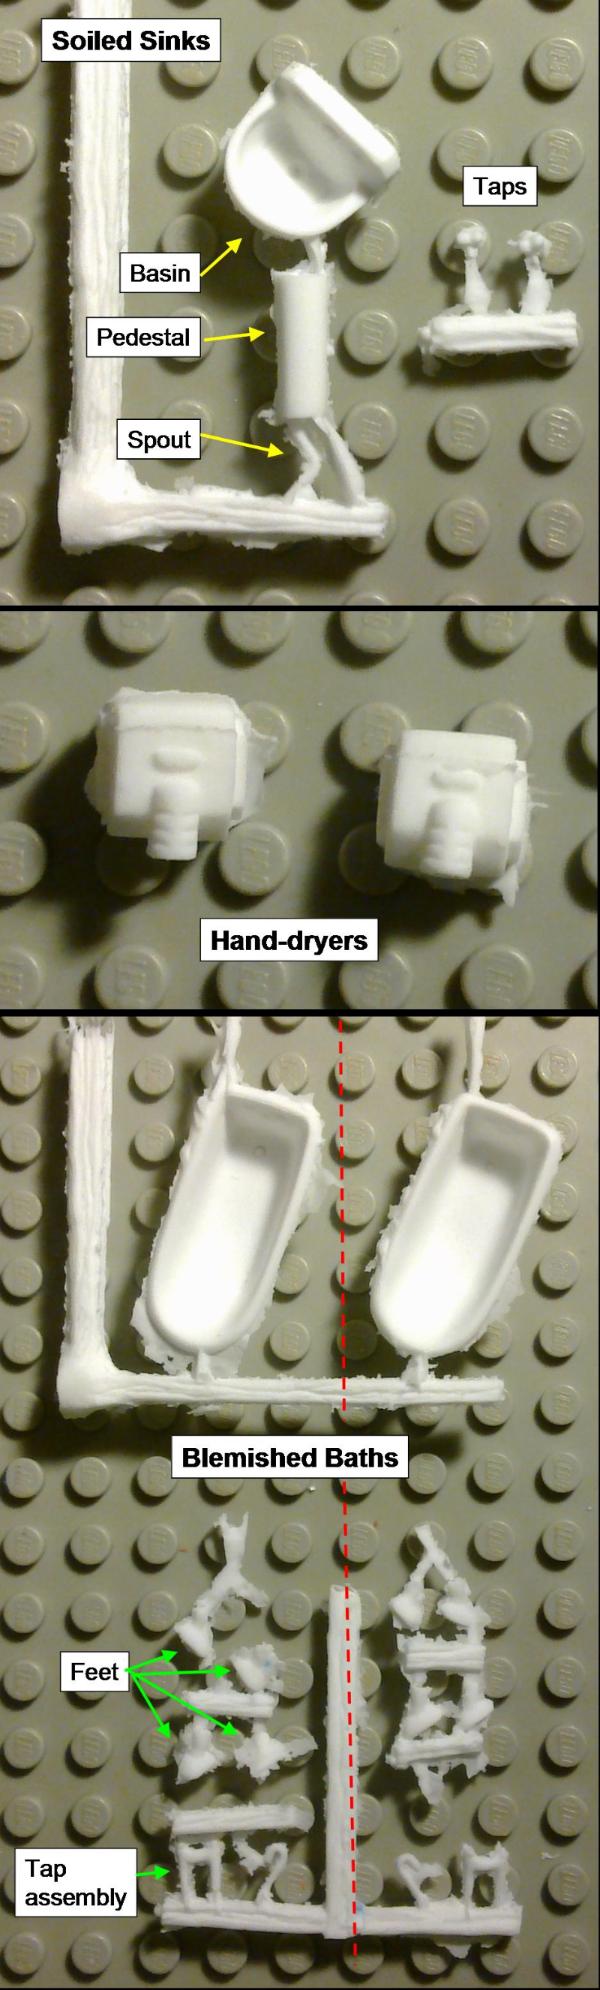
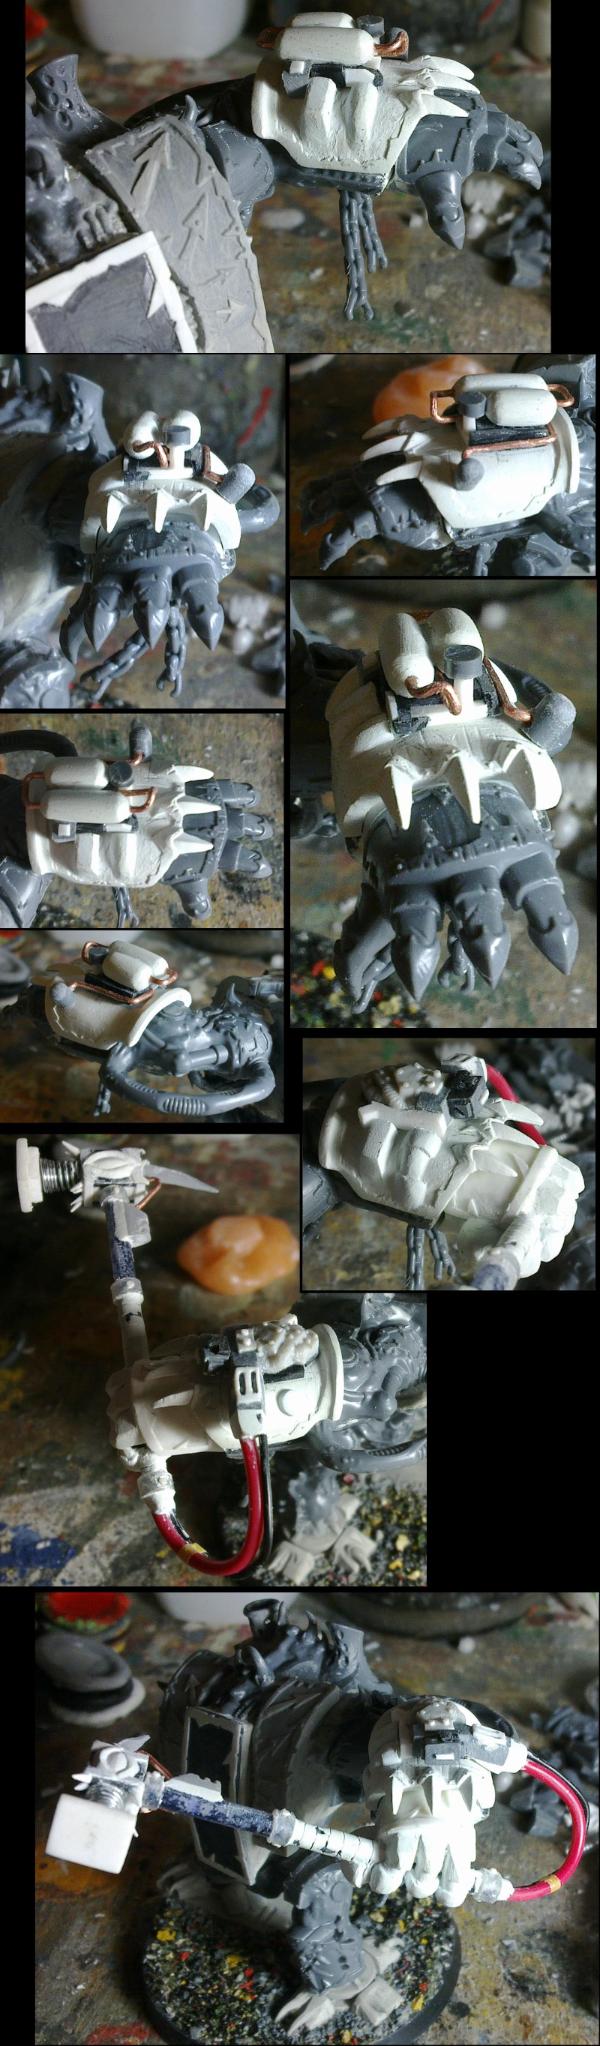
The hand-dryer is done and ready.
The sinks are pretty much ready (just want to check them over and maybe clean some bits).
The baths just need the tap built...
...and I was hoping to have something to show today in a tap shape, but the overflow holes that you may have seen above weren't quite central enough and adding holes for the tap pipes really showed how far off it was. So I've had to fill those holes and will wait until that cures completely before attempting to re-drill the required holes.
Once those are built, the baths are done (barring a final check over). I should get around to ordering more silicone and resin and then I'll be back on the fun that is moulding (planning the moulds is always a good way to get the brain cells exercised) and casting... I'm not sure how long that took with the toilets and boxes, but I am more practised this time, so should be smoother and quicker.
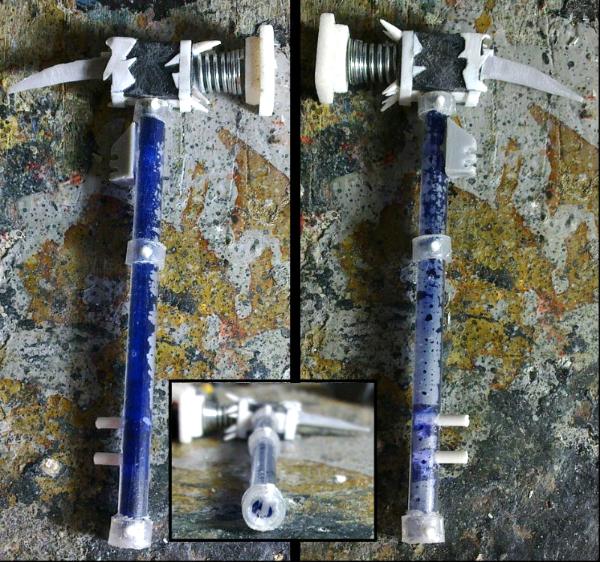
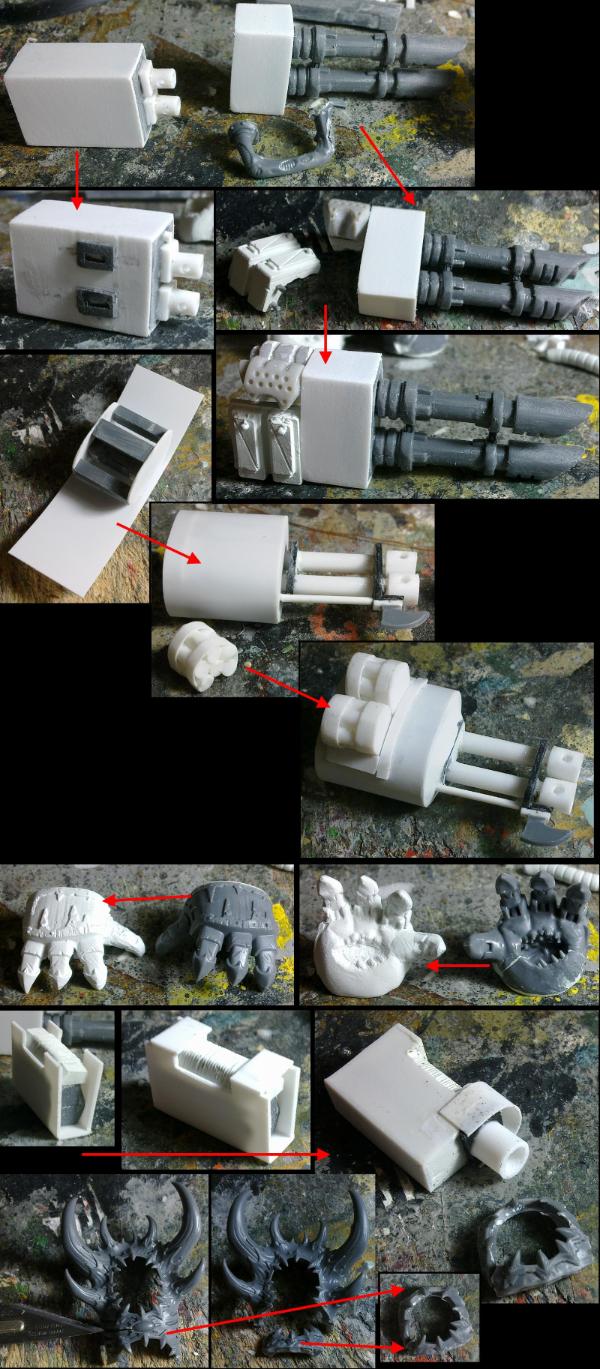
Plastic rod was inserted and then a third piece was glued between them.
The whole piece slides in and out of the holes and gives you the position for the tap attachment and the "in" pipes on the outside of the bath.
The up-and-bend over pipe... was a pain. Tried in it plastic rod, but could not get it to hold the shape.
Ended up making them from copper wire. Not ideal as I wanted to just glue to the other pieces and now I have to drill a hole in the pipe...
Drilled a hole (0.7mm) in the cross/mix pipe (1.2mm). Not quite central, but got away with it on the first tap. The second tap was broken and I've re-glued a cross pipe into that one.
It's not perfect, but I think it'll do.
Still have the actual tap handles to do (probably a job for sprue) and then I need to make some putty masters of them (good thing Oyumaru can be cut up) and then I have to decide how to dismantle the taps so that they can be cast properly...
And with the handles on...
These are a bit big at the moment, but when I get the putty casts of them done, I can sand them down to their proper shape and size.
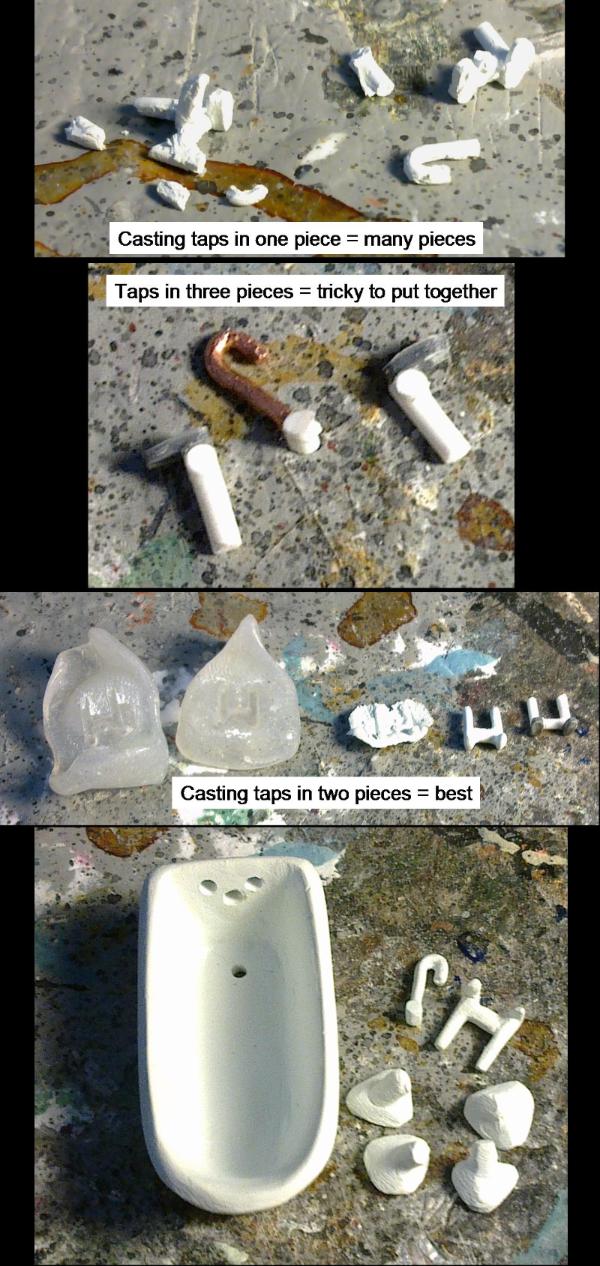
I may have to cut these into 3 pieces to cast them. I only really wanted 2 pieces, but can't see a way to achieve that easily.
I've tried some whole putty casts with Oyumaru, but I'm not sure they will work as it was difficult to fill the tiny cavities in a mould that had been cut up so much to release the originals (hence the 3 pieces). Will have to see when it's cured.
And if it doesn't work out, use an armature and green stuff. The tub is looking really nice. Will there be kitchen bits next? (I'll have to get started on some of that for my secondary project, the guethouse)
Red Harvest wrote: And if it doesn't work out, use an armature and green stuff. The tub is looking really nice. Will there be kitchen bits next? (I'll have to get started on some of that for my secondary project, the guethouse)
I don't think I could putty that small. Technically these are oversized for the scale, but any smaller and they would be too fragile to be of any use.
Anyway, I could probably cut the originals easier than their putty copies. I'll work something out.
Not given much thought as to what is next. I have a very long list, but it's in no particular order. I'll do whatever people want doing (no point making and selling things people don't ask for...). I could move on to the kitchen if that's what people want. It can't be harder than some of the bathroom things... (famous last words).
I can see you're using some rod that's thicker than the pipes in the came, which is appreciated as unlike some others (nae names) you're actually taking into account that crap like that has a tendency to snap. Ideally those taps wouldn't come in more than one part, but if that would make them a bitch to cast then its whatever works. With the size though they look like they could be a bit fiddly to work with though, but I suppose not a total hassle (heh, I'm just griping about my own butter fingered habits though).
Oh I'd appreciate an oven, a fridge, washing machine, and one of those metal wall sinks too (which could easy be turned into a work top sink too). Hmn, lemme think. If you're doing bathroom bits then a urinal could round off the bits. Cubical walls and doors would be fine too, but those would be easy for people to make themselves. Um, now that I'm thinking about it what about some living room items? A radio, clock (the star shaped one), end table, and well any of the chair types could be useful.
Wyrmalla wrote: I can see you're using some rod that's thicker than the pipes in the came, which is appreciated as unlike some others (nae names) you're actually taking into account that crap like that has a tendency to snap. Ideally those taps wouldn't come in more than one part, but if that would make them a bitch to cast then its whatever works. With the size though they look like they could be a bit fiddly to work with though, but I suppose not a total hassle (heh, I'm just griping about my own butter fingered habits though).
Can't say I don't listen to feedback, after a certain person ( ) said about the pipe for the cistern of the Tainted toilet was a bit thin, I thought I'd keep these fairly chunky.
Yeah, I would have liked to cast these in one or two pieces (one would have been fantastic), but with the way the handles stick up, the two pipes at the back and the hook of the spout, it's just not possible. I will try and make the construction foolproof though.
Oh I'd appreciate an oven, a fridge, washing machine, and one of those metal wall sinks too (which could easy be turned into a work top sink too). Hmn, lemme think. If you're doing bathroom bits then a urinal could round off the bits. Cubical walls and doors would be fine too, but those would be easy for people to make themselves. Um, now that I'm thinking about it what about some living room items? A radio, clock (the star shaped one), end table, and well any of the chair types could be useful.
Oh yeah, got to do urinals, and should do the vault versions of the sink and toilet. They can be next, maybe. And I'll look at kitchen and other household things. I'll have to have a run about some houses and get some screenshots of everything.
So after many attempts at getting good casts that work from a moulding, casting and building sense, I've settled on 2 piece taps.
Trying to get a cast in a single piece was not possible. Even with cutting the Oyumaru mould into pieces around the casts they still didn't survive and I was left with a pile of rubble.
I also tried a 3 piece tap, where the spout and a part of the mixer pipe were in one piece and was to be glued between the two tap parts.
While possible to cast easily, they prove a bit too tricky to put together in a seamless way (to the point that is would be better to make them from scratch each time).
I therefore ended up with 2 piece taps, where you just have to add the spout to the rest of the tap assembly. This should prove easiest for everyone involved.
That is therefore the putty masters done for the baths to go with the masters of the sinks and hand-dryers.
I'll be ordering the silicone and resin soon and then production will begin.
And when I say production, I mean much head scratching over how to lay out the moulds...
Thanks Red. It's not necessarily difficult, I just have to think very hard about what is the most efficient way to lay out the pieces to use the least amount of silicone and resin, and not trap any bubbles while casting.
I'm betting that the faucet can do double duty for utility sinks and troughs etc.
It's possible to use them for whatever, I can't remember what the other taps look like on the other in-game sinks and things. But yes, if the mould turns out well, I'll make use of these for future items. Same with the taps on the sinks, they will be good for other things, as mentioned by Vik.
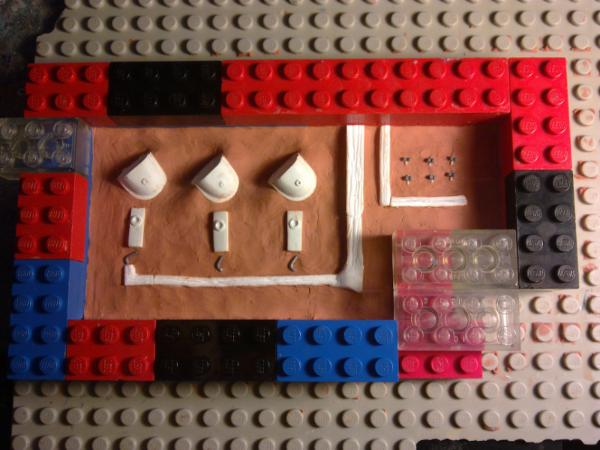
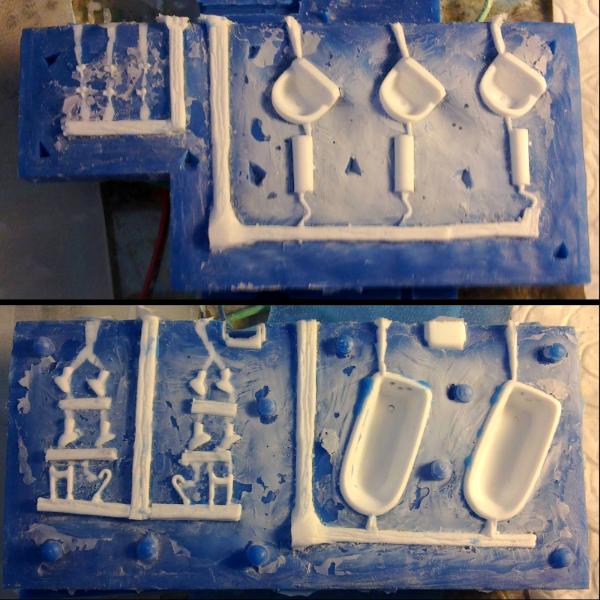
The silicone and resin arrived today and I got right on it. I've poured the first half of the first mould; Sink mould. You will notice that I kept the tap handles separate so I can cast extras for other means without having to cast the sinks.
Will have to wait until tomorrow before I can see if it worked, should be cured by 4am.
Wasn't all plain sailing though. I forgot the registration keys in the first half and had to cut them in to the silicone and then, when checking and positioning the pieces in the silicone, one of the taps (powered by the elastic nature of the silicone) went flying across my room never to be seen again. I made a replacement tap and will have to wait and see if that one comes out looking like a tap or I will get 1 in 6 being junk. That is... assuming the others come out well in the mould...
Something else I did differently this time was the channels. Whereas for the boxes and toilets I added all the channels in the mould, this time I only had the main channels represented by sprue (keeping with the wood texture sprue ) and the smaller channels and air-release channels I cut in afterwards.
Both halves appear to work with water (which I'm quite surprised by really), so fingers crossed that they will work with resin.
Red Harvest wrote: Vaccuum the area beforehand. And use a hand vac if something is lost. It'll end up in the vac. Trust me on this.
Unless the area is carpeted.
Next step is the pay-off. Gonna be good to see
Sadly, that particular corner does not get vacuumed often, the whole room is carpeted, we don't have a hand vac', and there's no guarantee that it actually landed in the area (it may not have even reached the ground)...
I did get on my hands and knees with a torch to see if I could find it, but no, gone. I did find a tiny screw I lost ages ago, but no tap.
I tend to work with a plastic tray (actually the top of a box of crackers if you must know) on my lap to catch anything I drop. But a tiny, grey object, moving very fast, off to my right is not to be found again. I can't even be sure of the exact direction. *shrugs* Will have to see how the mould works, I may never need to make another tap again.
I've started laying out the mould for the baths and should get, at least, one half done tomorrow, if not both.
Then I have the last box to mould and I'll be ready to start casting again.
Flying bits, never a good thing, once I lost a piece I was trying to glue while cutting another piece , was trying to be expedient. I found it a couple hours later, after mowing the lawn it had flipped up and stuck to my cheek . Well at least you weren't casting arrows
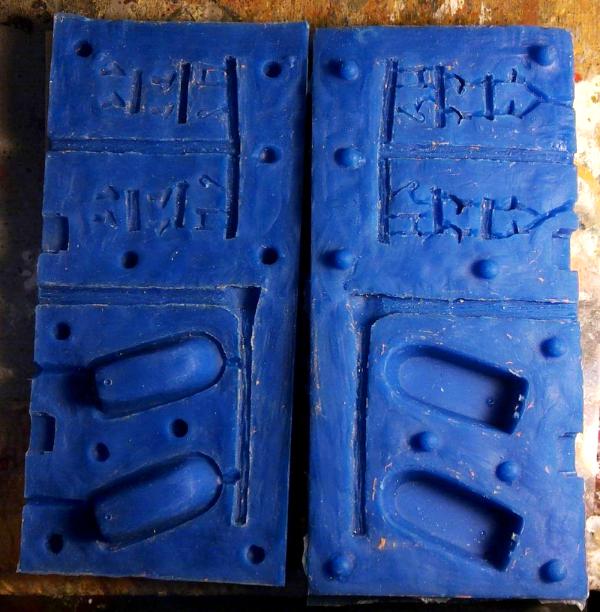
The bath mould is ready.
Again, I've tested it with water and it appears to work. But won't know if the casts will work until I start pouring resin.
I've also poured the first half of the box mould, but the second half with have to wait until I'm ready to open the next bottle of silicone.
This does mean that I have a little left in the open bottle that wants using and then I'll need other things to warrant opening the next bottle... So, it looks like I'll be making more things sooner rather than later...
However, I don't think this should stop me from casting up the bathroom supplies first. Expect casting news soon...ish.
Automatically Appended Next Post: And just to have both of the new moulds in one place, here's the sink mould again.
cormadepanda wrote:i got a sinking feeling everything will be cool in your next post. This has built up some of my internal suspense.
Thanks Comrade.
Not all good news I'm afraid...
My first cast didn't quite set properly, but showed that the moulds do work and just needed a bit of tweaking to give good casts.
The second cast didn't cure properly at all and I had to scoop and scrape the semi-solid goo out of the moulds.
The third cast cured fine, but due to the issues of the previous cast meant that some of the silicone of the moulds has been damaged. Some bits of the silicone can be seen here:
While the casts are now coming out fine, they have rough patches on them where the moulds are damaged. I can't really afford to scrap the moulds and make more (toilets, sinks and baths) and I hope people will forgive the extra sanding they will have to do on the products.
I'll show examples later of the more successful casts.
On the plus side, the moulds are working and everything is filling up, even the taps (they've actually been the most successful casts of the lot).
There's still a few bits that need changing in the new moulds. Leaks have been stopped, but the sinks in particular are giving me back-pressure issues (just need to add some more channels) and the bath accessories are occasionally trapping bubbles (modifying channels needed).
So bare with me as I fix the issues and build a stock of "good" casts.
Camkierhi wrote:Looking, good, actually looking a lot more professional than my attempts at this. Eager to see these.
Thanks Cam. You will get there eventually, with practice. Paying attention to how the air/resin flow through the moulds will give the professional look. Function leads to form in this case.
Good to hear the taps cast, they were my main concern.
Ugh. Sounds like the resin wasn't mixed fully, I hate it when that happens, best suggestion is to add properly mixed resin (you can work out the rest and why).
Old or useless moulds can be shred them up to add to fresh silicone as filler so you don't have to use as much next time, (yes it will bond perfectly)
With the large moulds try embedding some thick plasticard (say around 2.5mm should be just flexible enough for de-moulding) into the mould with liberal use of elastic bands to hold it together. you'll need less silicone to get the same support to get a giant thick mould like some people do with vastly less waste and its easier than encasing it in a shell like 'the pros' do.
Thanks. Yeah, I was expecting them not to work and having to do something with the mould, but I've only had 2 that haven't come out right. I've had much more miscasts of all the other components.
Ugh. Sounds like the resin wasn't mixed fully, I hate it when that happens, best suggestion is to add properly mixed resin (you can work out the rest and why).
It would be the most obvious reason. But I'm pretty sure it was mixed. I'm thinking it's because I was re-using the syringes I used last time and maybe a trace of the old resin components was interfering with the reaction. I've since been using new syringes and have had no problems.
That was what I expected of the cast after that to do, but not only did it remove the remaining traces of the un-cured resin, it removed parts of the silicone. Luckily no more silicone has been pulled out, just on the first one. See below for the results of the casts after this.
Old or useless moulds can be shred them up to add to fresh silicone as filler so you don't have to use as much next time, (yes it will bond perfectly)
I did wonder if this was possible. I have been saving up the scraps of silicone from mould making for this, but was concerned that they would make weak spots in the moulds. Have you done this? Not had any problems?
With the large moulds try embedding some thick plasticard (say around 2.5mm should be just flexible enough for de-moulding) into the mould with liberal use of elastic bands to hold it together. you'll need less silicone to get the same support to get a giant thick mould like some people do with vastly less waste and its easier than encasing it in a shell like 'the pros' do.
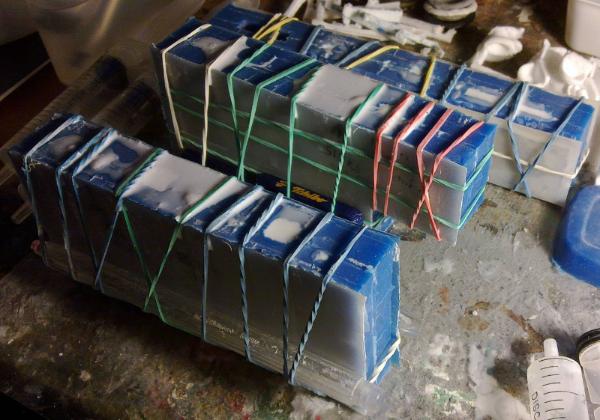
This is my solution to keeping the mould halves together...
I've chopped up some thin chopping boards and then use elastic bands to hold it together.
I add elastic bands to stop leakage and I use the pens to minimise flash inside the mould.
You can also see that I don't make very thick moulds, tight-wad that I am...
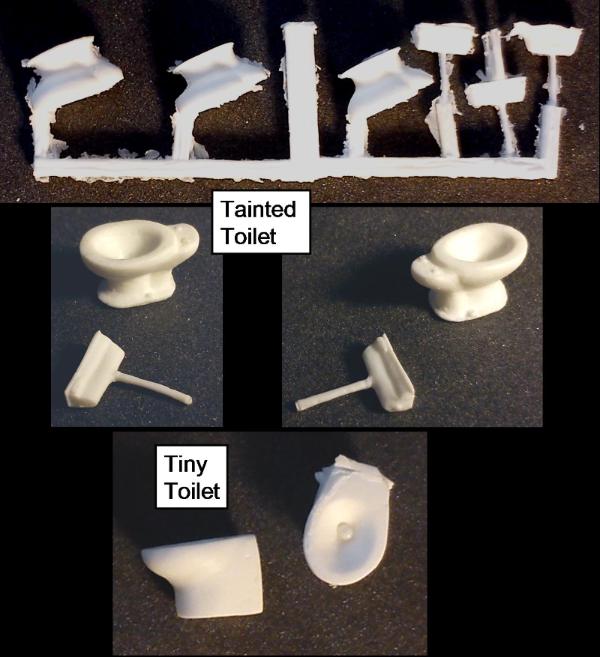
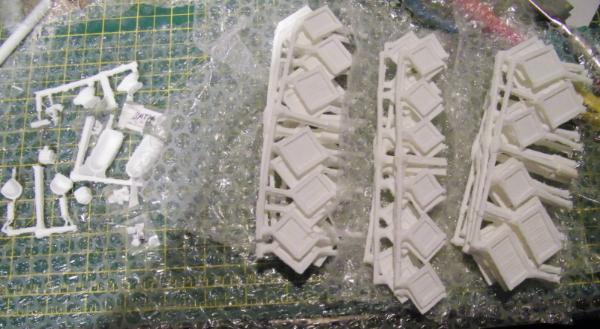
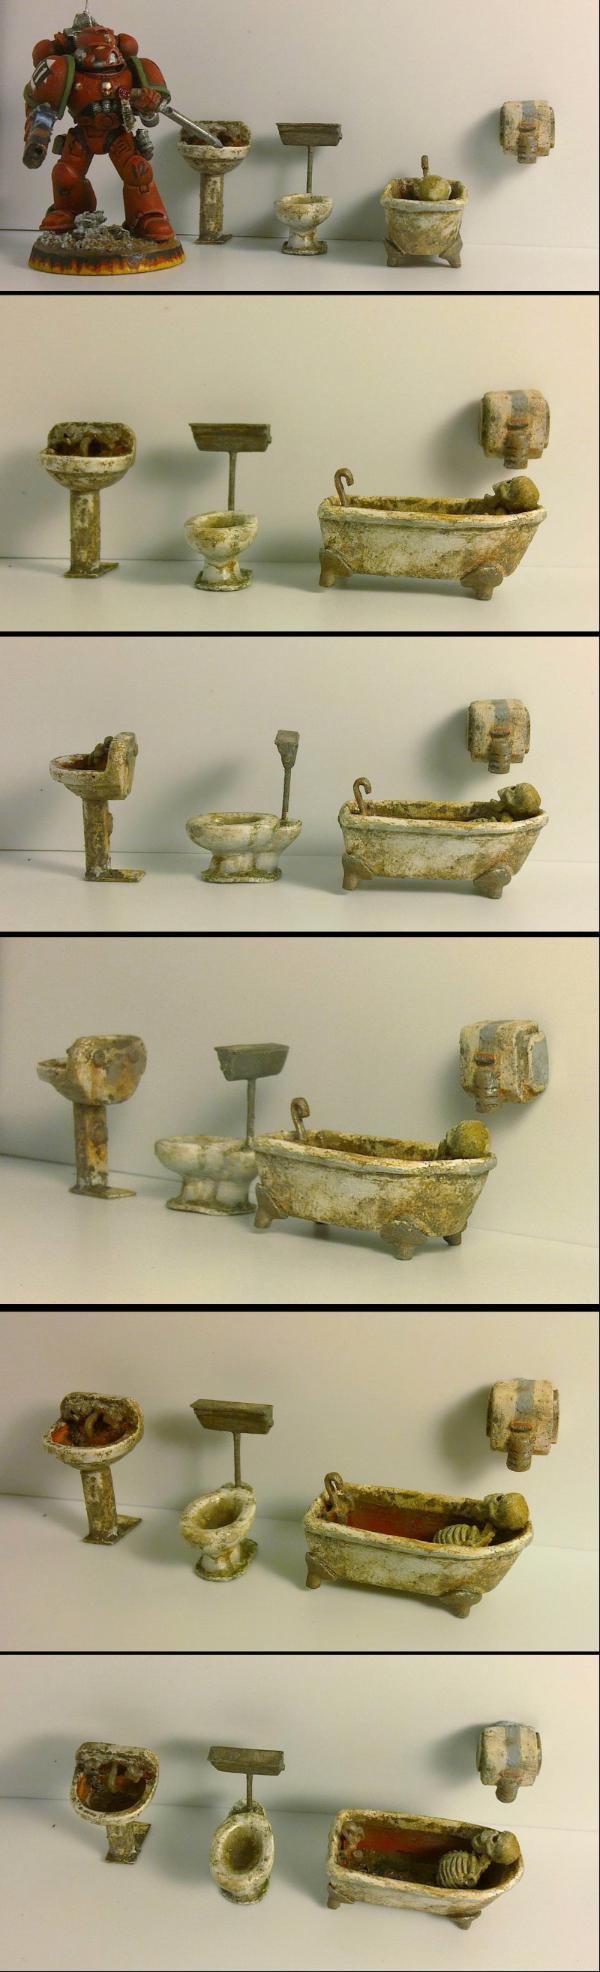
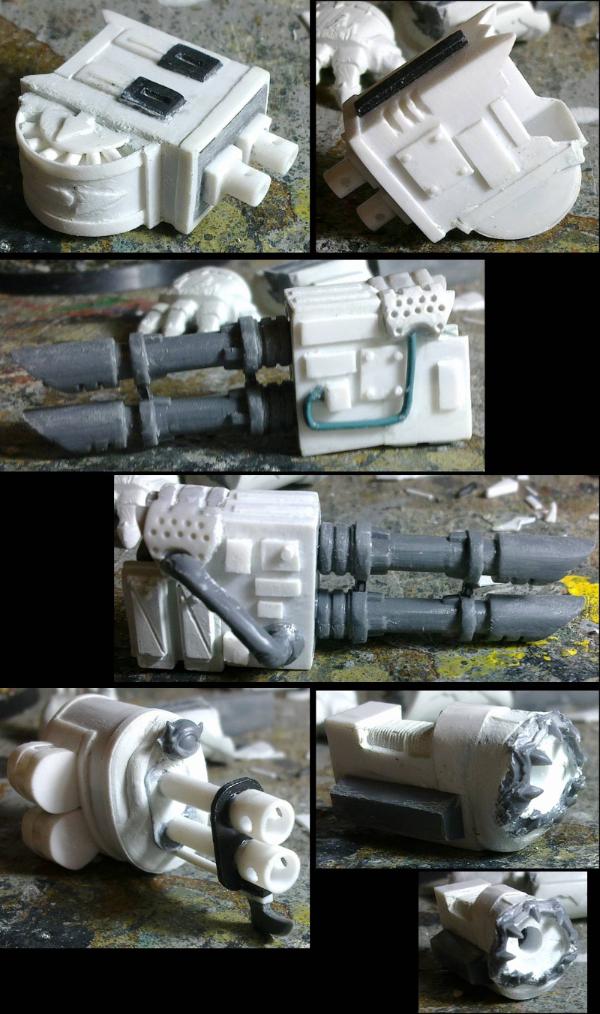
Here's some pictures that show how the casts are coming out:
Top to bottom; Sinks with pedestals and spouts, More spouts and pedestals, the actual taps (I can't tell which ones are the ones that are half the escaped one, so looks like I got away with that).
And here; Hand-dryers (notice that, unlike some model companies that shall remain nameless, I placed the mould-line NOT over any detailed parts), Bath feet and tap parts (mixed results here with some bubble issues), toilets and then baths (the red arrows show where the moulds were damaged).
All looking brilliant, I would certainly have no issue with cleanig these up a little. I think you are OK, no one expects perfection, even from the big companies.
Camkierhi wrote:All looking brilliant, I would certainly have no issue with cleanig these up a little. I think you are OK, no one expects perfection, even from the big companies.
Just let us know when we can order.
Thanks Cam.
But I expect perfection, and that's what I aim for in my products... It's just annoying that a little slip like that has meant all the hard work getting a smooth finish has been undone... Still, perfection is only a piece of sandpaper away.
Firefash wrote:Well I want a set.
Soon as you have them ready links to selling site.
I've been wanting to get some more realism into my terrain for years.
Automatically Appended Next Post: Also as a side note would love to see other items in a similar vein.
Metal stile desks, notice boards, lockers ect to go into admin buildings,
Industrial tools such as lathes, mills and the like for industrial buildings.
These kinds of details would realy bring ruins to life.
Thanks Firefash. Good to hear.
Shouldn't be too long and I'm sure to let you all know. Watch this space.
Thanks for the suggestions, I'll add them to the list. More items will happen in time (and maybe quicker than last time, judging on the popularity).
Production is in full swing and the pile of successful casts is now bigger than the pile of mis-casts.
The modifications to the moulds appear to be working.
Also, my decision to use a slower curing resin appears to be good, as I have time to ensure that the mould is filled and can top-up any drop in the level before it cures. Just as messy though
Metal desks may be quite hard the legs might have to be cast separately, lockers and notice boards are easy however. I would definitely go for industrial machinery.
It would be the most obvious reason. But I'm pretty sure it was mixed. I'm thinking it's because I was re-using the syringes I used last time and maybe a trace of the old resin components was interfering with the reaction. I've since been using new syringes and have had no problems.
Hydrolysis maybe.
That was what I expected of the cast after that to do, but not only did it remove the remaining traces of the un-cured resin, it removed parts of the silicone. Luckily no more silicone has been pulled out, just on the first one. See below for the results of the casts after this.
ouch, using any mould releases? did it react with the silicone that you could tell?
I did wonder if this was possible. I have been saving up the scraps of silicone from mould making for this, but was concerned that they would make weak spots in the moulds. Have you done this? Not had any problems?
This is what I use http://www.ebay.co.uk/itm/Polycraft-GP-3481-F-RTV-Silicone-Mould-Mold-Making-Rubber-Kit-Shore-A27-/221175561830 . I've not noticed any weakening if there is it's not , I chop the old moulds into bits around 0.25mL (not fun, friction and elasticity) and use it as an aggregate.
downsides are: increased chance of uneven upper surface and air bubbles trapped in the silicone. If you are not deairing under vacuum the lumps can obstruct trapped air bubbles percolating upwards
It may depend on what silicone you are using, its one of the 1:1 mixes correct? you can experiment with a few grams to test if you can do this, but you should be able to apply the uncured mix to pieces of the cured and it should set as though its one piece, I'm too tired to find this out but at a guess the uncured silicone breaks the inter molecular bonds between the polymer chains and the vulcanising compound made by the catalyst agent and it re-forms as it cures almost like a weld.
Like I said I haven't tested the material properties between joins but it seems good enough.
This is my solution to keeping the mould halves together...
I've chopped up some thin chopping boards and then use elastic bands to hold it together.
I add elastic bands to stop leakage and I use the pens to minimise flash inside the mould.
You can also see that I don't make very thick moulds, tight-wad that I am...
Looks fine by me We are both going through large numbers of elastic bands that is for sure. I was using plywood and G-clamps before.
No doubt that it would have been the hydrolysis products left in the syringes. Although I thought that the syringes would have been clean enough (I gave them a clean out after finishing last time), but obviously not. Syringes are cheap anyway.
ouch, using any mould releases? did it react with the silicone that you could tell?
Only talc.
Not sure if it had actually reacted with the silicone, but obviously I couldn't get the talc under the stuck on parts. It could have just been that.
This is what I use http://www.ebay.co.uk/itm/Polycraft-GP-3481-F-RTV-Silicone-Mould-Mold-Making-Rubber-Kit-Shore-A27-/221175561830 . I've not noticed any weakening if there is it's not , I chop the old moulds into bits around 0.25mL (not fun, friction and elasticity) and use it as an aggregate.
downsides are: increased chance of uneven upper surface and air bubbles trapped in the silicone. If you are not deairing under vacuum the lumps can obstruct trapped air bubbles percolating upwards
It may depend on what silicone you are using, its one of the 1:1 mixes correct? you can experiment with a few grams to test if you can do this, but you should be able to apply the uncured mix to pieces of the cured and it should set as though its one piece, I'm too tired to find this out but at a guess the uncured silicone breaks the inter molecular bonds between the polymer chains and the vulcanising compound made by the catalyst agent and it re-forms as it cures almost like a weld.
Like I said I haven't tested the material properties between joins but it seems good enough.
I see. No, no vacuum equipment.
I'm using Smooth-on Mold Star 30. Which is a Platinum-catalysed, addition cure silicone. As opposed to your condensation cure silicone. Whether that will make a difference, I don't know off the top of my head.
I'll give it a go next time I'm playing with the silicone.
Looks fine by me We are both going through large numbers of elastic bands that is for sure. I was using plywood and G-clamps before.
Yep.
Will this elastic band come off... yes.
Will this elastic band come off... *twang*... no.
I'll have to get some more soon at this rate...
Excellent releases Dr. Little sanding makes everyone like their models more. Though clamps might go better for the long haul. Environment an all. Maybe a pressure box! applies force on all sides of the mold uniformly. That be cool.
I have been busy building a stock and, while I'm still casting, I think I can start selling what I have and then I can modify my casting depending on demand.
I will have some cleaned up and assembled photos up when I get a chance to actually do this.
So, this is what I have for sale:
Toilets;
Tainted Toilet - £0.80 (each) / £2 (for 3) - 30 individual toilets available.
Tiny Toilet - £0.60 (each) / £1 (for 2) - 16 individual toilets available.
I've yet to think of a good name for the hand-dryers.
I'm also going to offer these in sets, so you can buy a complete bathroom in one go, either for a home or a public bathroom;
Small bathroom set (1x Tainted toilet, 1x Soiled Sink, and 1x Blemished Bath) - £2.30 (per set).
Large bathroom set (3x Tainted toilets, 3x Soiled Sinks, and 2x Hand-dryers) - £4.90 (per set).
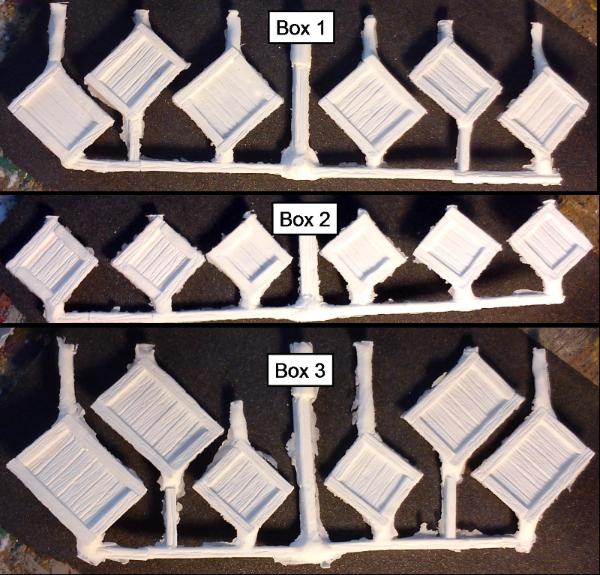
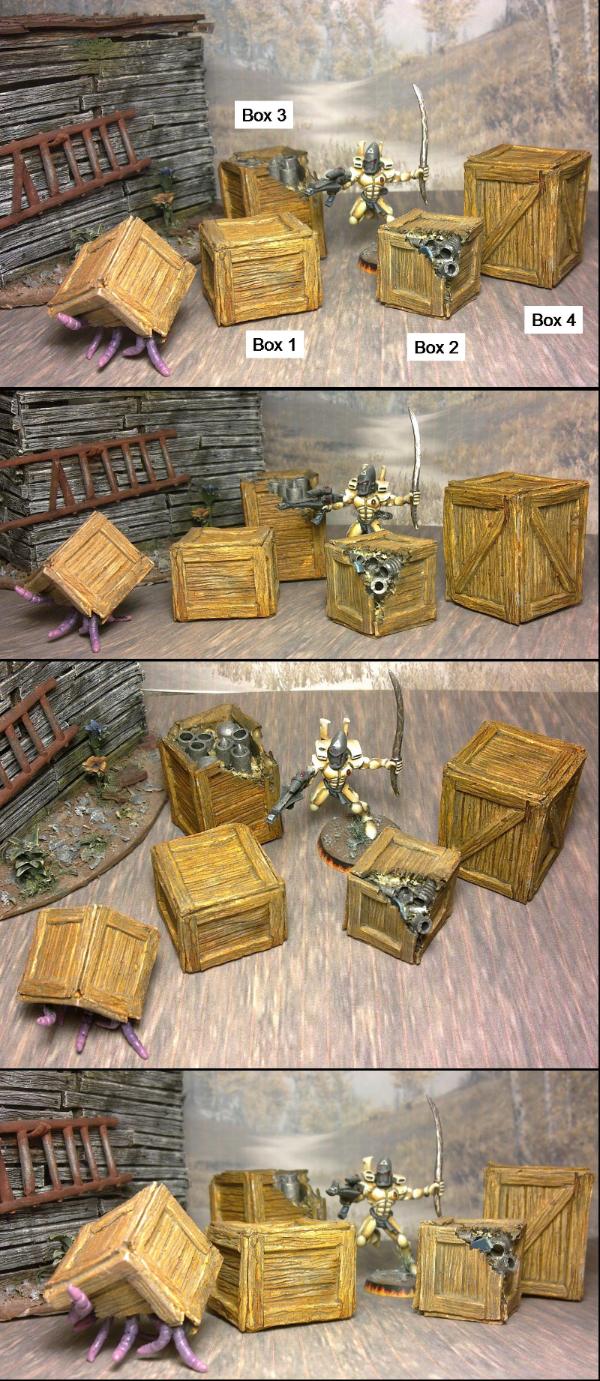
I also still have my wooden boxes available;
Spoiler:
Box 1 (medium) - £1.30 each - 18 available.
Box 2 (small) - £1.20 each - 15 available.
Box 3 (large) - £1.50 each - 15 available.
PM me here on DDakka if you are interested.
Payment (plus postage) by Paypal please.
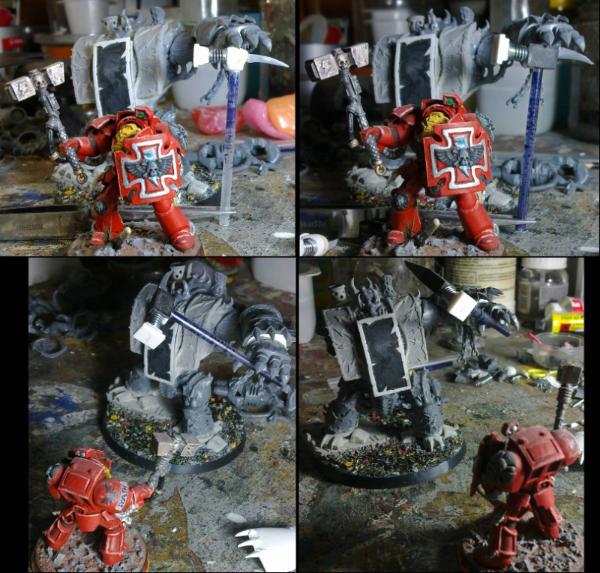
Also also, Kranon the Relentless (that I painted earlier in this thread) is still available on ebay.
Camkierhi wrote:Looking brilliant, will be ordering as soon as spare cash. Can't believe chaos dude still live and kicking.
Thanks. I'll send you the parts for the prize for your competition along with your order.
Yeah, Kranon is not feeling the love at the moment. Kranon is sad.
OneManNoodles wrote:I've been watching him on ebay for a while now, but then again my traitor guard army has been sat on there for months now :(.
Yeah, all my individual models seem to take ages to sell. Whereas the squads I've done have sold pretty quickly.
And Kranon is a very specific model for a very specific army build. Just waiting for the right person to find him.
Good luck with the army.
I need to work out how many bits I want, I'm definitely going to paint one of those tainted toilets bright gold and putting it on a plinth.
Sounds good to me.
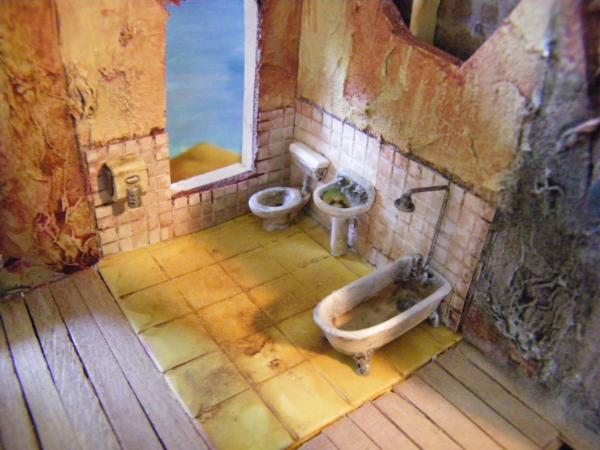
Here's the assembled photo:
These were made from mis-casts and needed a little filling in places. but show what they look like together.
And, as usual, following the process from beginning to end was as enlightening as it was entertaining, thanks for that!
Best of luck with those sales!
Thanks LT. Glad you enjoyed the show, it was a learning experience for us all.
dsteingass wrote:Fantastic!
I'd like to order a couple of public restroom sets and a couple of home bathroom sets!
Automatically Appended Next Post: You can PM me the details when you have a minute Doc
Thanks Dave. Glad you approve. PM on it's way shortly.
Red Harvest wrote:All that is needed now is a newspaper...
..C'mon I can't be the only one who 'Multi-tasks'
Well that's down to personal preference...
Looks really nice together. The tub is the best, IMHO.
Thanks. I'm pleased at how well the baths have turned out and relieved that they weren't as hard to make as I thought they would be after the toilets (which are still the most difficult item so far).
Thanks again people.
Had a break from casting today, but will be back on it again soon... work work work...
I um, may not have an immediate use for the bathroom items at the moment (or rather I do, but I have other crap to work on first), but expect an order from when I have monies coming my way. Heh, gimme a month till my uni loan turns up then I'll be silly again (...I promise no bath cars. Uh, unless I have one going spare).
I um, may not have an immediate use for the bathroom items at the moment (or rather I do, but I have other crap to work on first), but expect an order from when I have monies coming my way. Heh, gimme a month till my uni loan turns up then I'll be silly again (...I promise no bath cars. Uh, unless I have one going spare).
Hooray for student loans (I drank the majority of mine away ).
Maybe I'll throw in an extra bath if you promise to make a bath-car out of it.
Well, I ran out of talc (more is in the post). So I decided to look at what I could do with the open silicone while I waited and discovered that I actually had more than I thought... more than enough to finish the mould for box 4. Always check your calculations twice, kids.
I now have a new mould ready for when the new talc arrives (should be tomorrow).
I have plenty of things to do when I've finished with this current casting bonanza, so expect some paint soon...ish.
The mould does work. I'm just trying to get it working well (where there isn't loads of flash and all the parts fill up without having the push loads of resin through the mould).
Here's one that did come out complete.
This box is slightly larger than the largest of the other boxes, but you would only notice if you placed them next to each other (or measured).
l / w / h = 26x26x33mm compared to 22x22x35mm
dsteingass wrote: Mine arrived! I'm in-between 12-hour shifts atm, so I haven't had a chance to open and giggle yet.
Cool. Good to hear it arrived ok. I hope the wait will have been worthwhile to complete the bathroom set (all right, nearly complete. Urinals will happen, just leave a space for them). Really looking forward to seeing what you do with them.
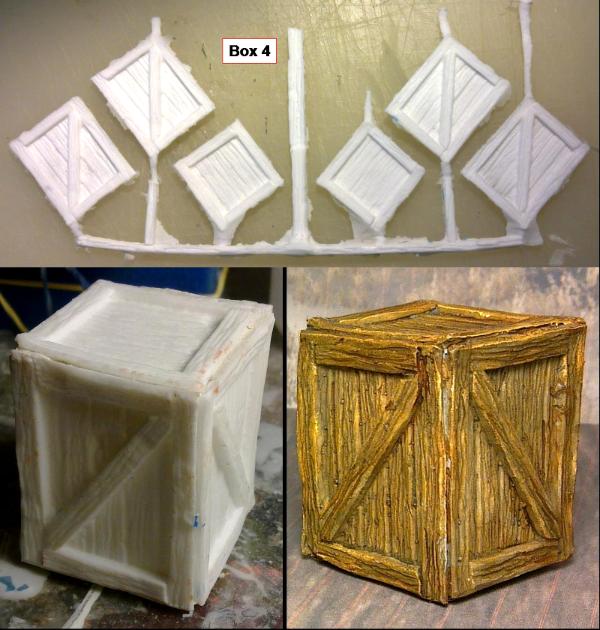
Littletower wrote:Beautiful box(ed) set! The texture got through the moulding and casting in a great way, wood really looks the part!
Thanks LT. Considering they were originally carved from sprue,
A mould of them was made with Oyumaru (love that stuff),
Casts from those were made from milliput,
Those casts were then used to make the silicone moulds,
And the final casts are in resin.
The finest of details are retained from the originals. I'm fairly sure even a fingerprint would make it through all those steps. That just goes to show how good the Oyumaru and silicone are.
Camkierhi wrote:These are brilliant, got several now and they are simply brilliant.
Thanks Cam. Glad you like them so much.
Everything has been tidied away now and grey plastic has returned to my workspace. So far they have only been painted grey (primer) and therefore not much to look at. I'll update once colours start to happen.
Dr H wrote: Considering they were originally carved from sprue,
A mould of them was made with Oyumaru (love that stuff),
Casts from those were made from milliput,
Those casts were then used to make the silicone moulds,
And the final casts are in resin.
The finest of details are retained from the originals. I'm fairly sure even a fingerprint would make it through all those steps. That just goes to show how good the Oyumaru and silicone are.
One question regarding that: Your process is original -> mould (Oyumaru) -> master cast -> mould (silicone) -> casted resin. Why do you use two mould-cast stages, instead of making the silicone moulds directly from the original carving?
(I am sure there are solid grounds for it; though, not having much experience with casting myself, I just can't see it on my own)
Littletower wrote: One question regarding that: Your process is original -> mould (Oyumaru) -> master cast -> mould (silicone) -> casted resin. Why do you use two mould-cast stages, instead of making the silicone moulds directly from the original carving?
(I am sure there are solid grounds for it; though, not having much experience with casting myself, I just can't see it on my own)
Thanks!
It's by no means, the "proper" way to do it. It's just how I do it.
It first came about from when I was doing the boxes (and toilets). Most of the original box carvings are made from sprue that I didn't thin down (cut lengthways into planks) and are therefore much thicker than the final pieces I wanted.
I wanted the walls thin so as to save on resin when casting, save on weight in the final boxes, and to allow people to easily cut the walls to make broken boxes. Therefore saving money for everyone (good for profits and cheap for customers) and having a unique selling point in the world of miniature boxes.
Also, milliput is very nice to work with once it's cured. This allowed me to make the angled edges for where the box sides meet and to carve in the letters on the backs. Both of which allow for easy building.
For the toilets, it was so that I could have multiple copies of the same shape (without having to carve 2 more) so that I could make the mould with multiple copies in and make the casting process more efficient.
So for the latest items, I just stuck to the same process.
I also like having the original laying about (just to say I have it) and the casting masters for when I need to make another mould.
So, a combination of things, and just my way of approaching perfection in my product.
Thanks!
Indeed, both reworking on the masters for further improvement of the final product and having several identical copies for a multiple mould are more than sound arguments for the two-stage process.
GamesEtc wrote:Ok, I have a question Dr H about your process.
Why did you opt to make a 2 piece mold for the boxes when you could have gotten the same result with a single piece mold, if I am correct?
It may have been possible to do most of the box pieces in a one piece mould. Even the angled rear edges.
However, I have letters and numbers carved into the back of each piece. While not a huge thing, as it's not the most difficult thing to assemble, I wanted these retained on each piece.
I was also experimenting (and maybe a bit carried away) with making model kits on a single sprue (Wood textured sprue at that), to give a professional look.
Maybe, when I do more boxes (I have plans for more futuristic-looking boxes), they may be done in single piece moulds.
cormadepanda wrote:Lovely boxes and tubs.
Thanks Comrade.
Littletower wrote:Thanks!
Indeed, both reworking on the masters for further improvement of the final product and having several identical copies for a multiple mould are more than sound arguments for the two-stage process.
Glad it makes sense. I'm still at the making-this-all-up-as-I-go stage. Learning all the time.
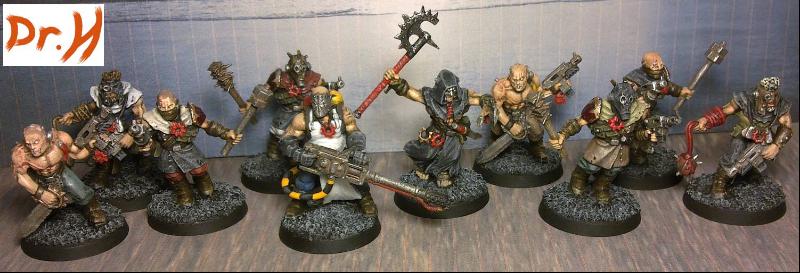
I said I had started painting, so here's the proof:
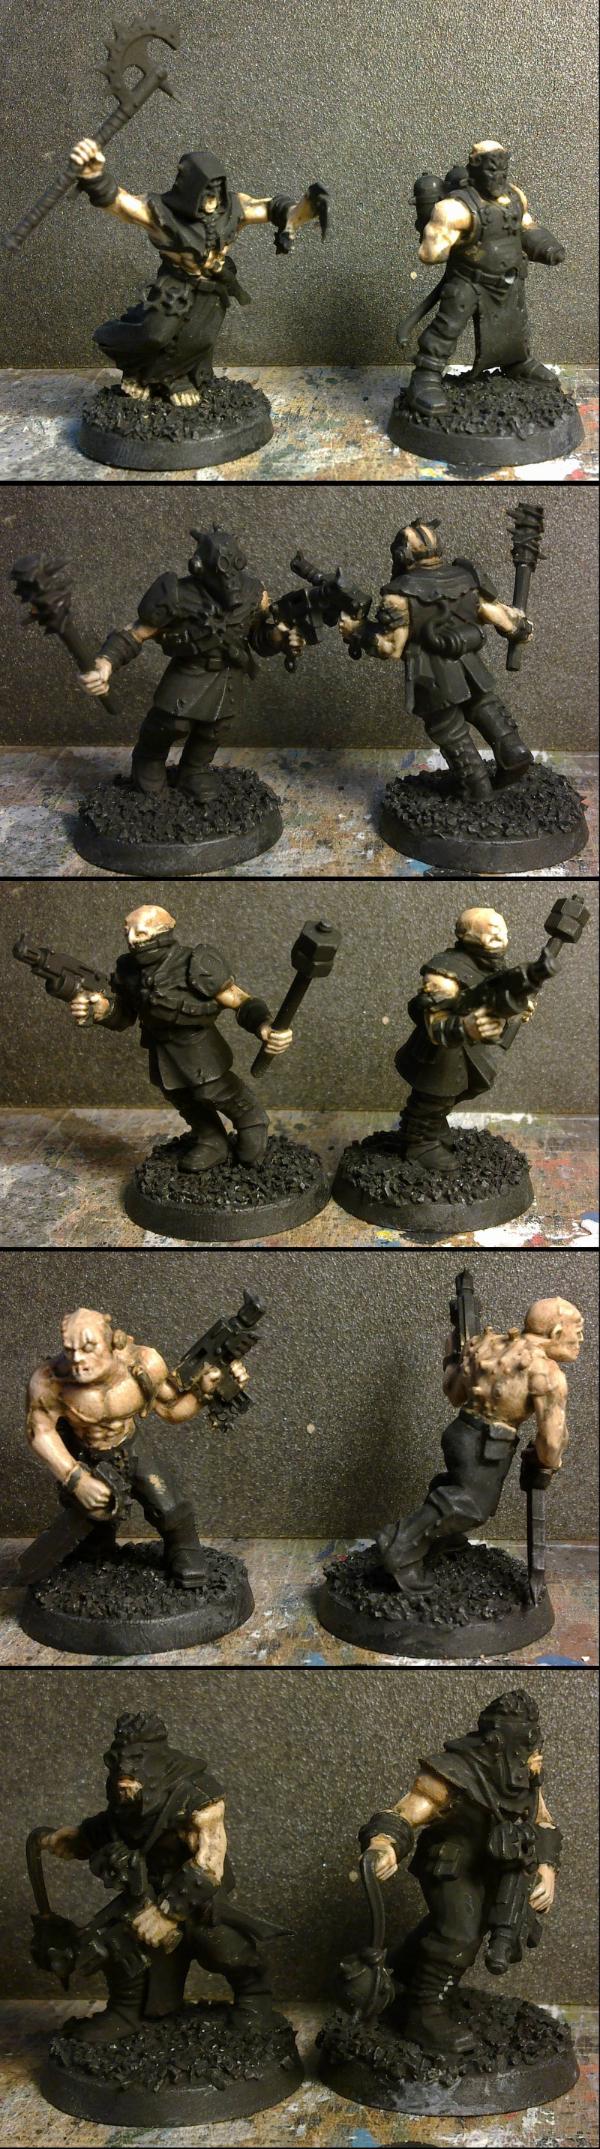
The second cultist squad from Dark Vengeance.
I've only done the skin so far (as you can tell from the blackness of the rest of them) and it's not entirely finished yet; I still have to do eyes, lips, scars, stubble, and tattoos (maybe).
There is one change in my usual process; I have already based these. As with most of the previous Dark Vengeance models, these are slot based and while it is possible to glue them into the bases and then add your chosen base material around the feet, this (I feel) would make them look like they are sinking into the ground and I want them standing on the ground.
So my process (if there is anyone interested) is to spread PVA on the empty base and sprinkle on the basing material (the carbon grains from a britta water filter). I press this down gently to get a flat surface and make sure it's stuck into the glue.
Then I place the model into it's slot. Normally, I'm doing this at the end and always had to be careful with the paint job and thought that it made more sense to do this now and not worry about the paint. The models feet are now on top of the ground. I then fill in the gaps where the slot is and give the whole base a going over with water/PVA to tie it all together.
Once it's all dry, I go over the base and pick off any bits that aren't sitting right. Then it's just a matter of painting it all.
Just because they are fairly plain and boring bases, doesn't mean I don't give them my usual attention to detail.
Thanks. More later when I've done it.
Automatically Appended Next Post: If someone would be so kind as to give me a bump, I'll post up the added details. Ta.
Isn't bumping consider a Spam post? I'm not so sure I should be giving bumps then.
Hmmm, I'm conflicted. To bump or to not bump.
Visually disturbing, those minis. One may wonder how deeply into the BDSM scene the GW people happened to be. Personally, I decided it's best not to know, eh?
Red Harvest wrote: Isn't bumping consider a Spam post? I'm not so sure I should be giving bumps then.
Hmmm, I'm conflicted. To bump or to not bump.
Visually disturbing, those minis. One may wonder how deeply into the BDSM scene the GW people happened to be. Personally, I decided it's best not to know, eh?
It's good that you should be so concious of not spamming the forum. It's for a good cause...
Yeah, it's probably best not to think to hard along those line... People do put a lot of themselves into what they create, but... yeah...
While the colour balance and flaring in these photos are playing up, you can at least see the shading and the details.
You will just have to believe me when I say they look better in real life for now. Better photos will happen as they progress.
What I'm aiming for with this bunch is a dirty, decrepit, run-down look. Their skin (should) look pale and ill, but not lifeless zombie ill. Their clothing will be faded and worn and the weapons and metals will be dull and rusty.
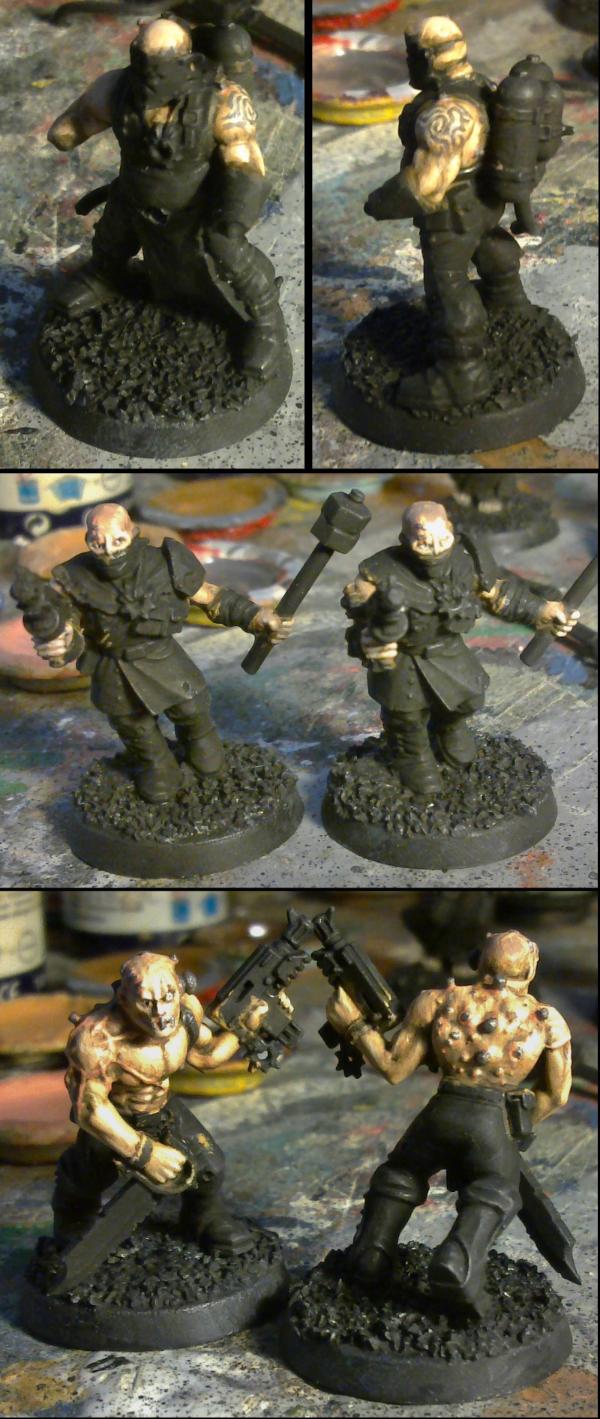
GamesEtc wrote:... is that a fuel tank from the IG models? Doesn't look like the ones I have.
It's the one that comes in the kit (Dark Vengeance). I have not altered it at all.
Littletower wrote:Nothing to add, skins are coming along (disgustingly) well.
Thanks LT.
I've started adding colours now.
Still a few bits to touch up. The blacks haven't been started yet, the white still needs to be taken up to white and some of the shadows and holes may need a touch of black.
Their boots will all be the same and will be the one thing tying them all together as a squad.
shasolenzabi wrote:Looking good! the sallow skin is so right for these guys
Thanks. Yes, together with the faded clothes and (soon to be) rusty metals, it is the fitting look I have gone for. Hopefully, while still looking unique from the GW official scheme... ?
cormadepanda wrote:Nice skin tone, but do a black one too. 40k is so white.
Thanks. Skin tones can be seen better in the latest pictures below.
I did do a black one in the last group. I couldn't think of a way of making an ill-looking black chap for this group and so he would have stood out too much.
I did try to give these some variation in skin tones, but they all worked towards being mostly the same...
Camkierhi wrote:Excellent work again, tones are great, looking brilliant.
Thanks Cam. More progress below...
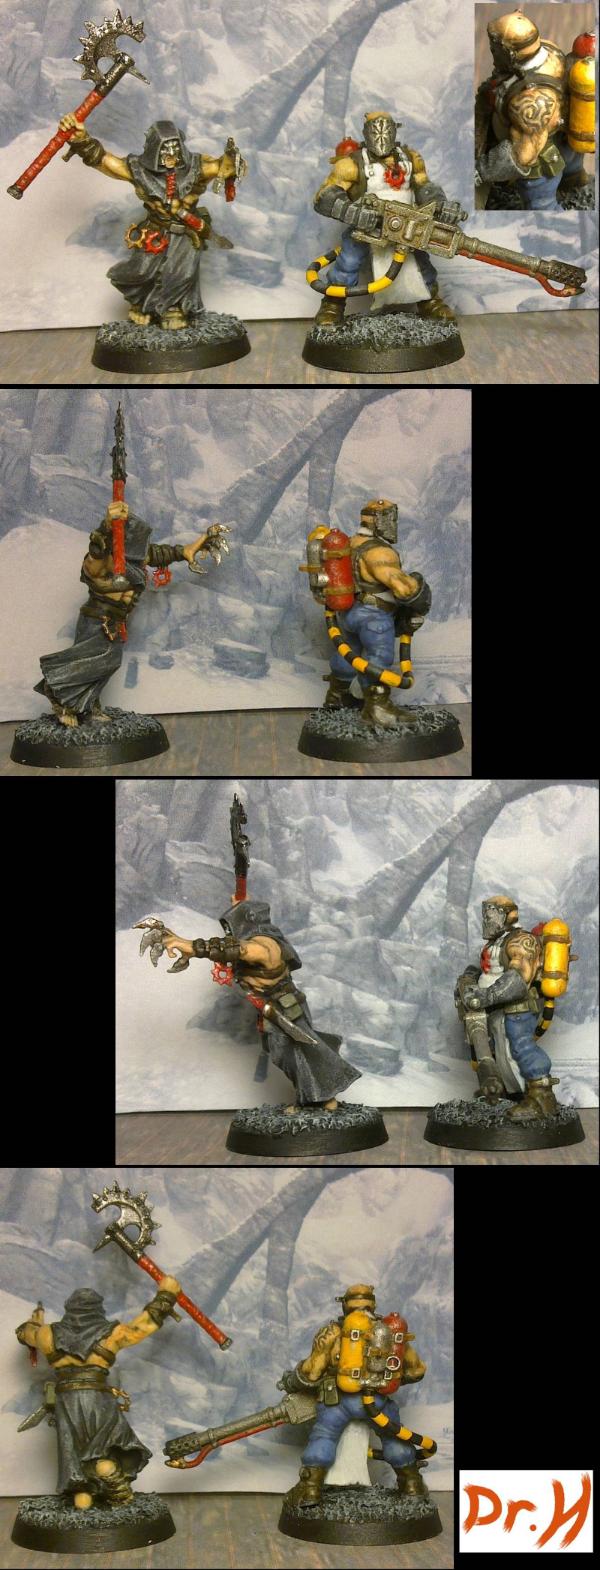
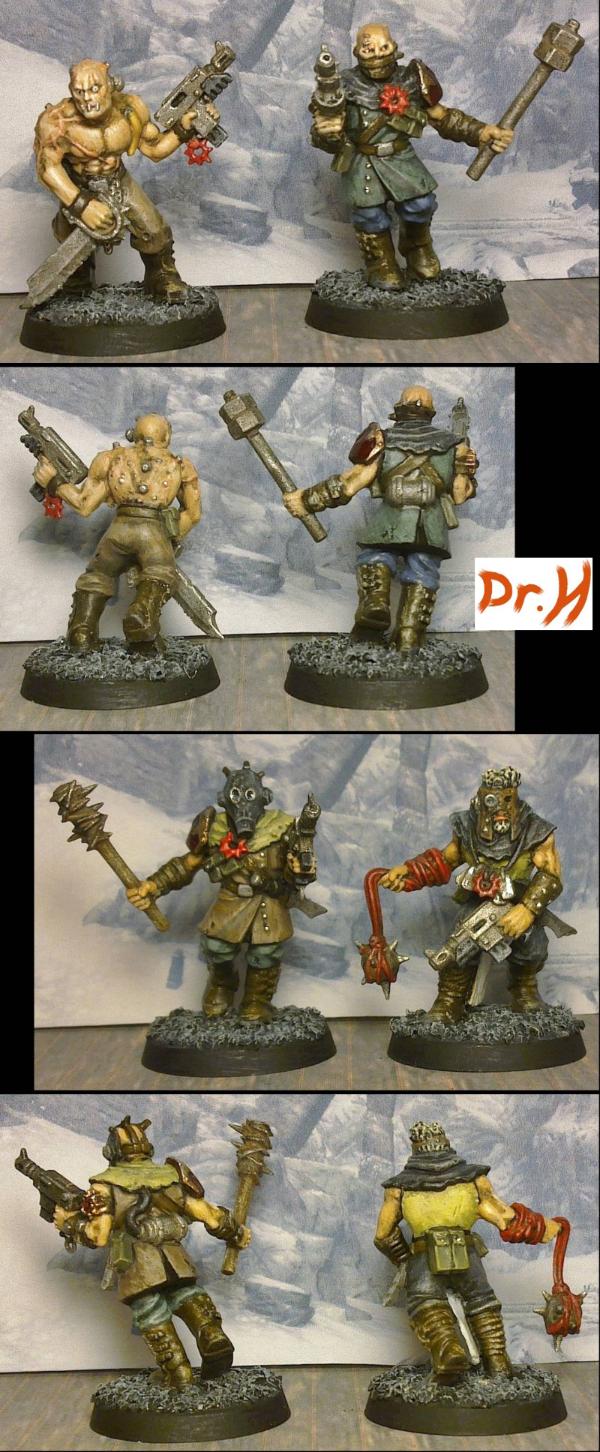
So, the clothing is mostly done and the leathers are also done.
Also, with the advent of using a white background, you can actually see the skin without the camera whiting out.
Still to do are the metals, pouches, Hair (on the last pair), lenses, and weathering.
and I must remember to drill the barrels... might do that now, before I forget.
A good method to vary skin tones Dr. is to use different color washes. Examples being orange washes for oriental and things of that sort. Also changing the base color works well.
cormadepanda wrote: A good method to vary skin tones Dr. is to use different color washes. Examples being orange washes for oriental and things of that sort. Also changing the base color works well.
Thanks Comrade.
I shall have to try different washes next time. I had half of these done with a darker base coat than the other half and it made no difference this time.
Although I don't use washes that much. I shall experiment next time I have the chance.
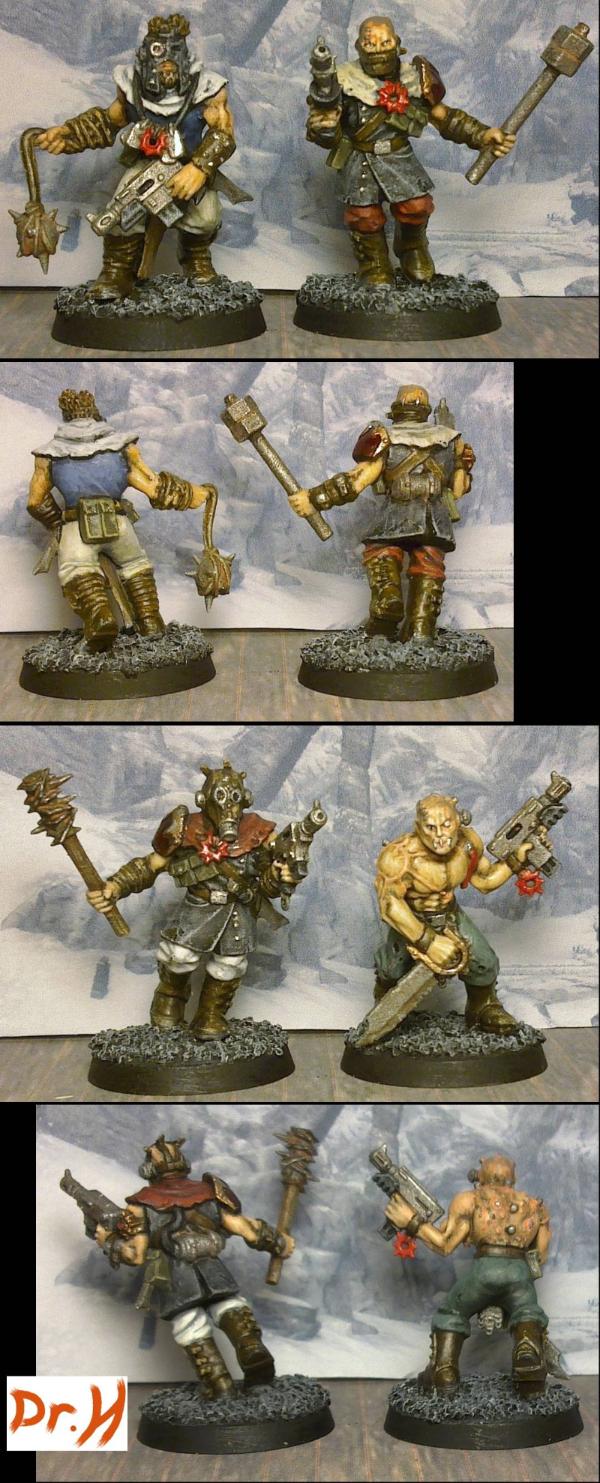
No major progress today. I have started on the metals and on some of the smaller details, but not enough to be worthy of a picture yet.
cormadepanda wrote: They came out good dr h. Really love the white shades you are making.
Thanks Comrade.
Yeah, I'm quite happy with my white method now; 3 layers from black to grey to light grey and then highlight with white.
An excellent method. Will have to try it.
and I use thin layers of paint, especially the white, and gradually build the highlights up to white. It's a similar technique I use for the skin (although that has many more layers and shades involved).
For reference (you will have to look up conversions to your preferred paint) I use these paints:
33 (black) - black is black in any paint though.
27 (Sea Grey) - fairly normal, medium to dark grey. Cover all the black, unless there are some really deep, sharp, recesses.
Sometimes I may use 64 (light grey) here if I need help blending up to the lighter shades.
147 (Light Grey) - this one is actually so light it almost looks white (until you put something white next to it). Usually a couple of thin passes to give a graduation from the darker grey.
34 (white) - white is also white in any paint. Add in really thin layers and gradually build up to white at the highlights and give the appearance of a smooth blend from the darker shadows up to the highlights.
Then just pay attention to how the light will fall on the object and paint to match reality: peaks and upper surfaces = white, recesses and lower/under surfaces = darker grey.
Yeah, my current white is a rough, but somewhat effective method. Dry brush with a dirty white, about a 1:10. 1 grey, 10 white. Fill the piece solid. Then wash with black (nulin oil) and then go back in white pure white in layers picking out details and light falling methods. Your method sounds much neater. Thank you for the more in-depth approach.
Hope it works out for you Comrade, I'm very happy with how it works for me. Seeing your method, I couldn't help thinking that washing with grey rather than black would be better. Black may be too harsh. I could be wrong, I don't know those paints.
weetyskemian44 wrote: Aha so this is why you've taken so long on the tank! You've been busy. Nice cultists! Always wanted to paint those.
Yes, this is my little bit of paid modelling on the side. Thanks Weety. Yes, the cultists are quite fun to paint and would work well with your painting style.
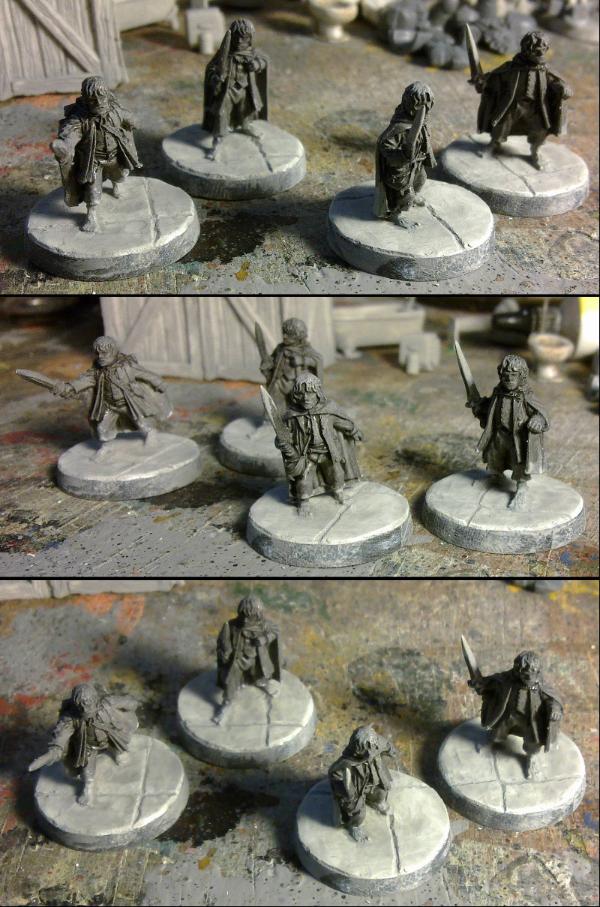
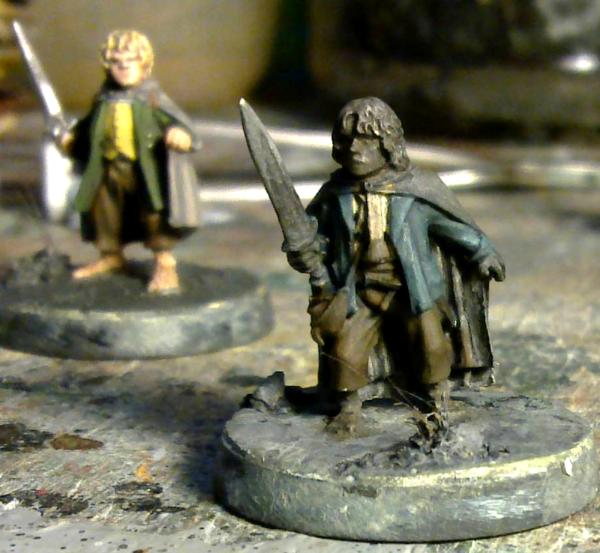
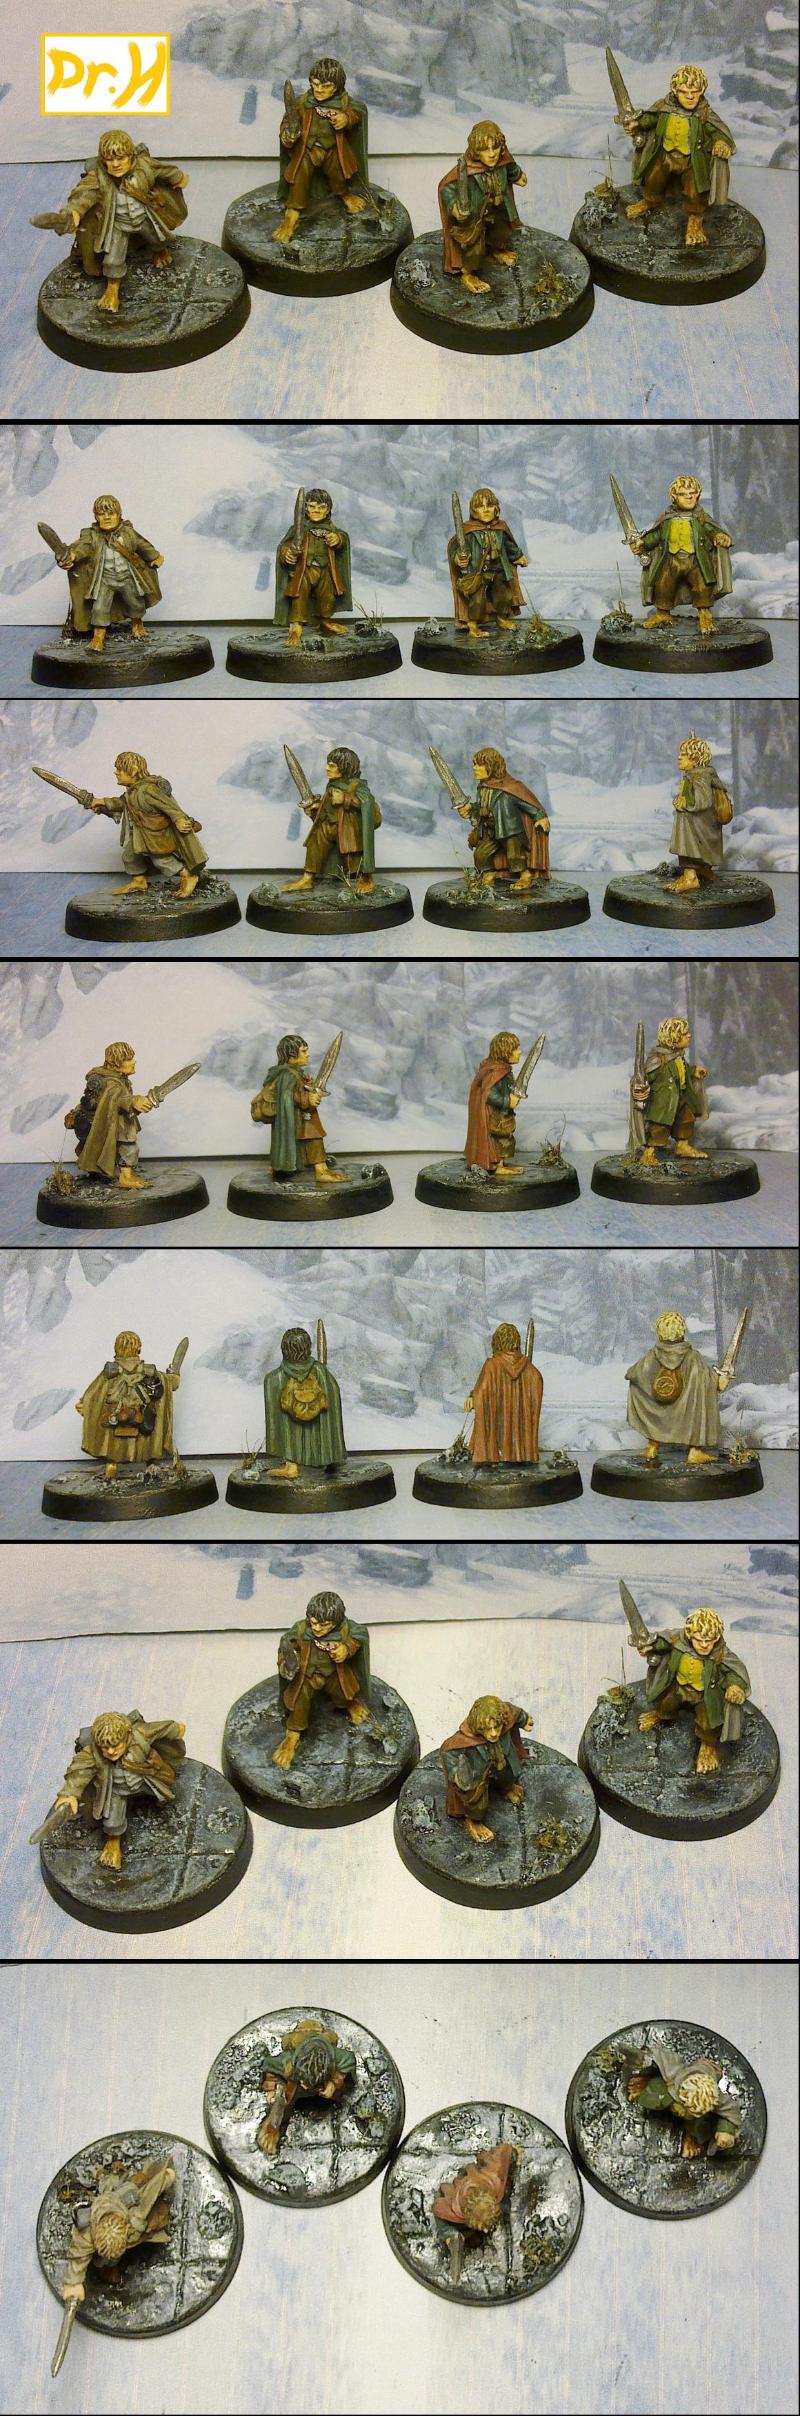
So as a change of pace and now that the tank is finished, it's time for the next set of models to paint and sell and these are Hobbits!
And they are the hobbits as well. Judging from what they are wearing, that they have swords and Frodo appears to be clinging on to the ring, I have reasoned that they are at Weathertop and Frodo is a couple of minutes away from being stabbed.
I'm therefore going to make their bases to match the ground in Weathertop, which is mostly square slabs with a bit of gravel, some rocks and the occasional dead-looking plant.
At first I was lost for how to do the bases as they are slot-type bases and the models are metal. Not having worked in metal before I didn't want to mess about trying to remove the tabs and trying to get pieces of card (my first idea for doing the slabs with) to fit about the feet and not look like pieces of card was going to be difficult. So instead I covered the bases in milliput and I'm going to be carving the details into that.
This is where they are at the moment. I've only cut the edges of the slabs, there is more to do yet. Hopefully you agree that they look like they are standing on the bases.
Progress as and when it is done.
Also; both the cultists and Kranon are still available and there is still plenty of boxes and bathroom items available. Thanks.
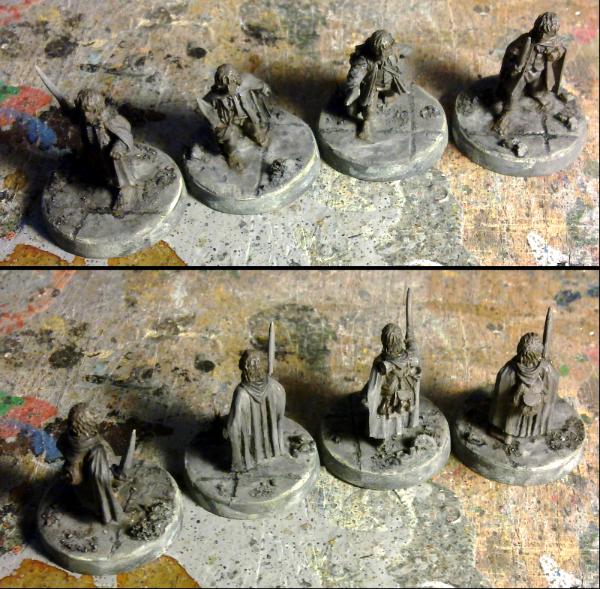
Progress on the Hobbits. I've finished making the bases for them by adding a sprinkling of dried paint, a few larger chunks, and some small lumps of sponge and paintbrush bristles for plant life (of which there isn't much on Weathertop).
I've now started to colour them in. I'm going to work on them one at a time to give them the proper attention required to take them up to Gold level.
In other news; the Cultists have sold. But poor Ol' Kranon is still looking for a loving home.
Littletower wrote: Nice progress on the Halfling, will be following and taking notes!
Cheers on the sale, too.
Thanks LT.
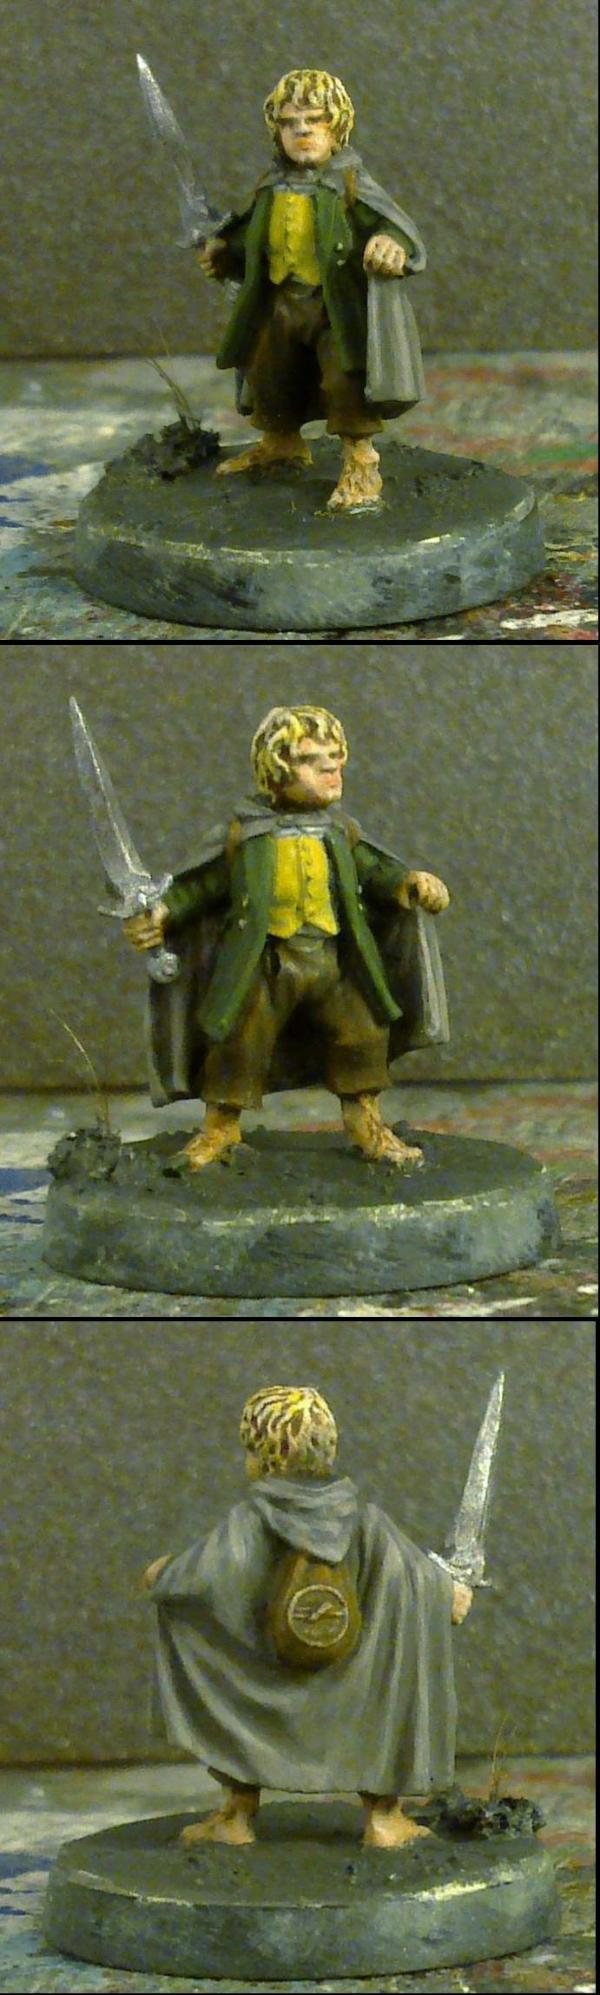
Here's Merry finished with... for now (I may touch up a few things once they are all done, the back of his hair for one).
He's been a tricky little wossname to photograph. He was either out of focus or his face was just WHITE.
The bases will all be done together so they all match.
Indeed I am, Shas... and I hope they do (or at least lead to me receiving something of value).
Here's progress on Pippin.
There's a great deal more detail on Pippin then there was on Merry. He also appears to be wearing two cloaks for some reason... Can't see it in any photos/screenshots I've found, so will assume the sculptor got carried away.
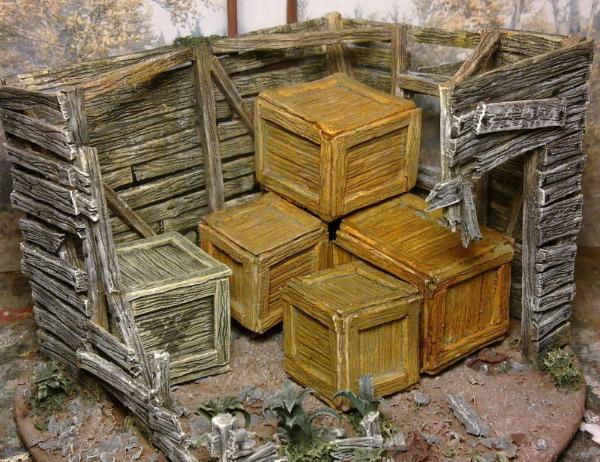
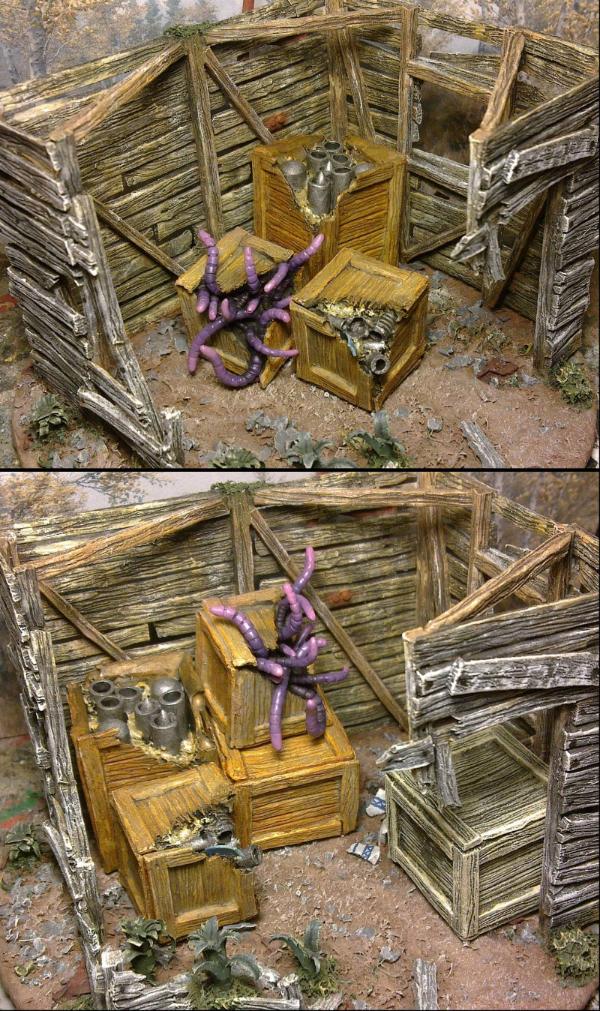
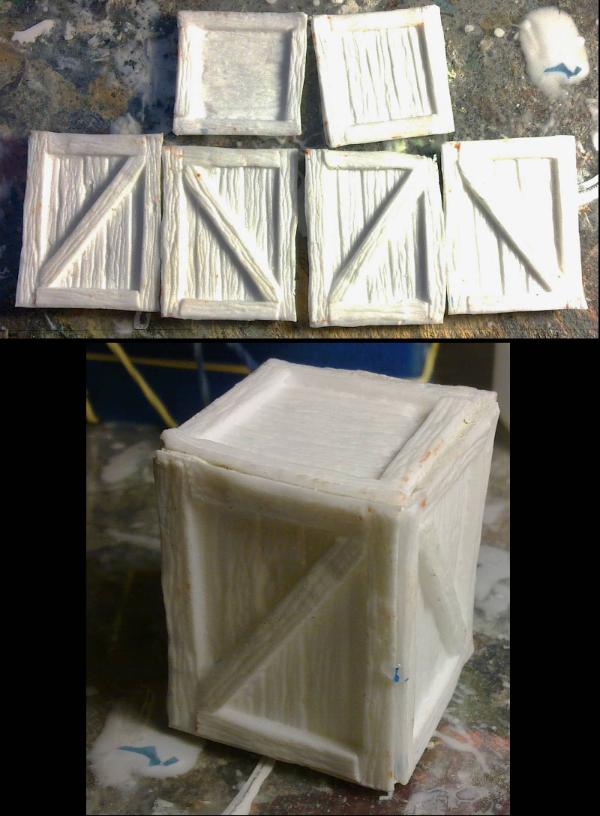
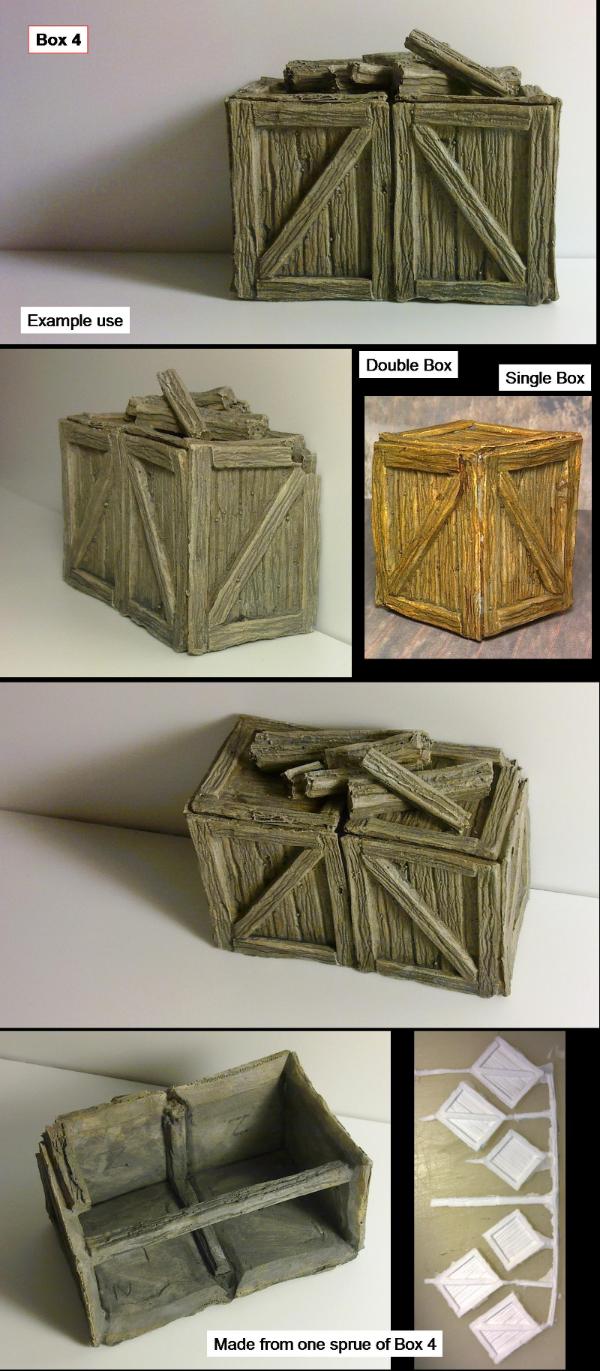
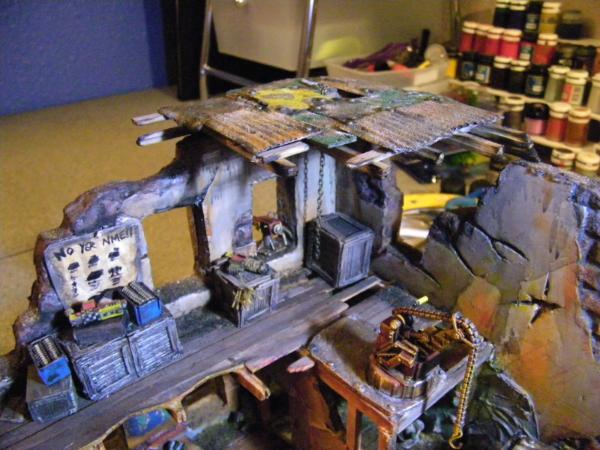
Also, here's an example of something you can do with one of my boxes.
That's a single box kit, together with it's textured sprue. The possibilities are endless... almost.
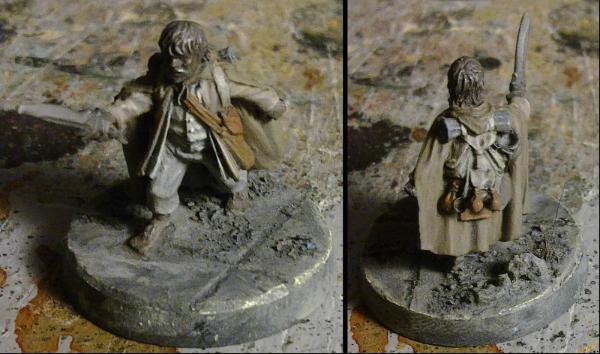
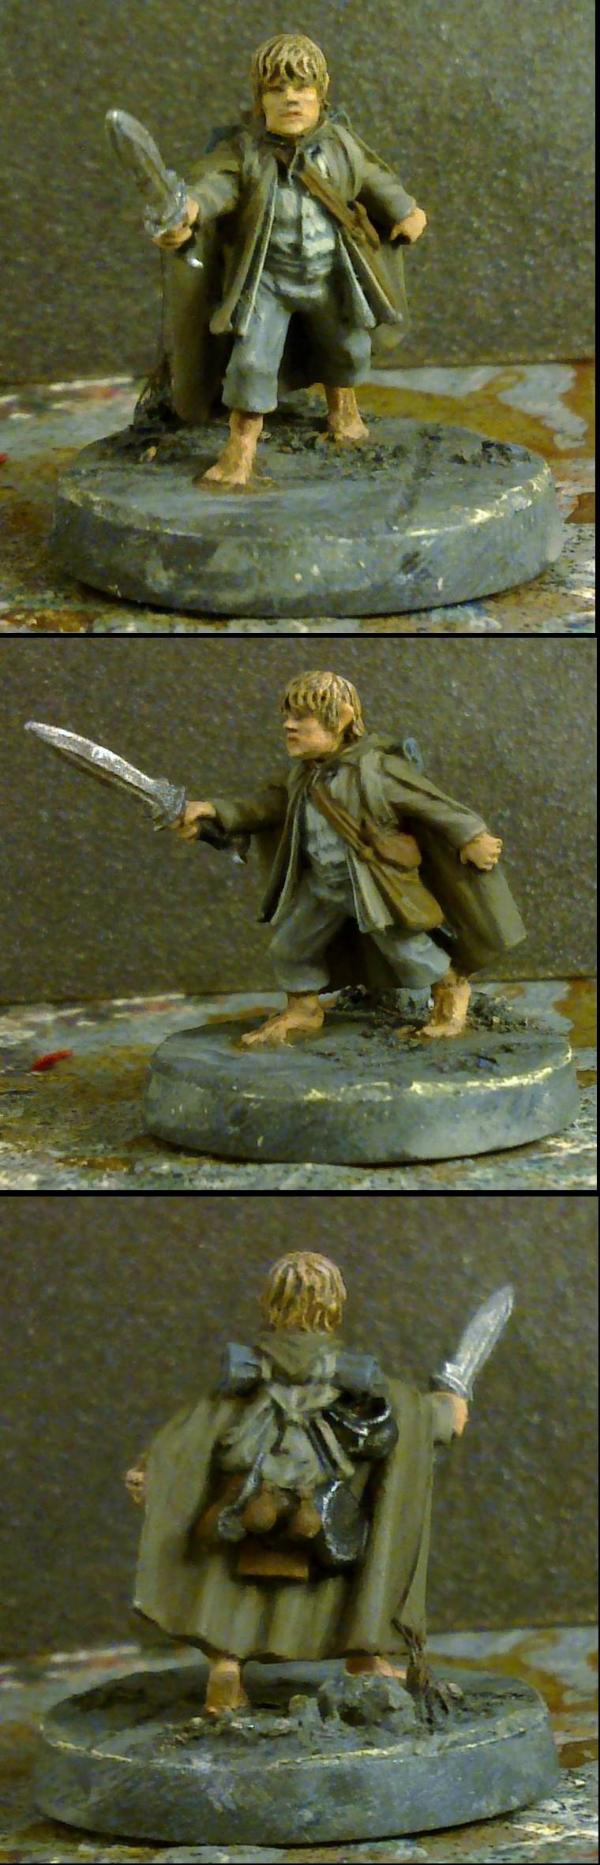
Wow, they really went out to make Sam as background/normal a character as they could for the films. He's basically various shades of browny-grey.
Merry has his Yellow waistcoat, Pippin has a red cloak, both have green jackets, and Frodo is practically technicoloured in comparison to them... and Sam is just browny-grey.
Anyway, progress on Norm Sam;
I even made some the (many) things he's carrying more brown and less grey to give him some colour...
Remember, GW used pre-production casting photos for the sculptors. Pippin was probably wearing the coat in one of those, then they scrapped it mid-filming for some camera reason. If you have the extended DVD, there are hours and hours of filming footage and behind the scenes stuff on there.
Also, in post-production, they colorize and filter the film, so a lot of the colors get washed and muted at that point.
Yeah, I've been using many different pictures to get an average for the colours on each of them. That's actually a larger version of one of the pictures I have, thanks.
Not coat, cloak. Look down by his ankles on the model and you see it stops twice. It's more obvious from the side as well.
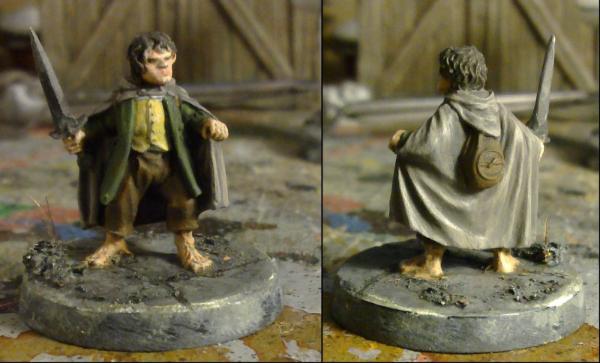
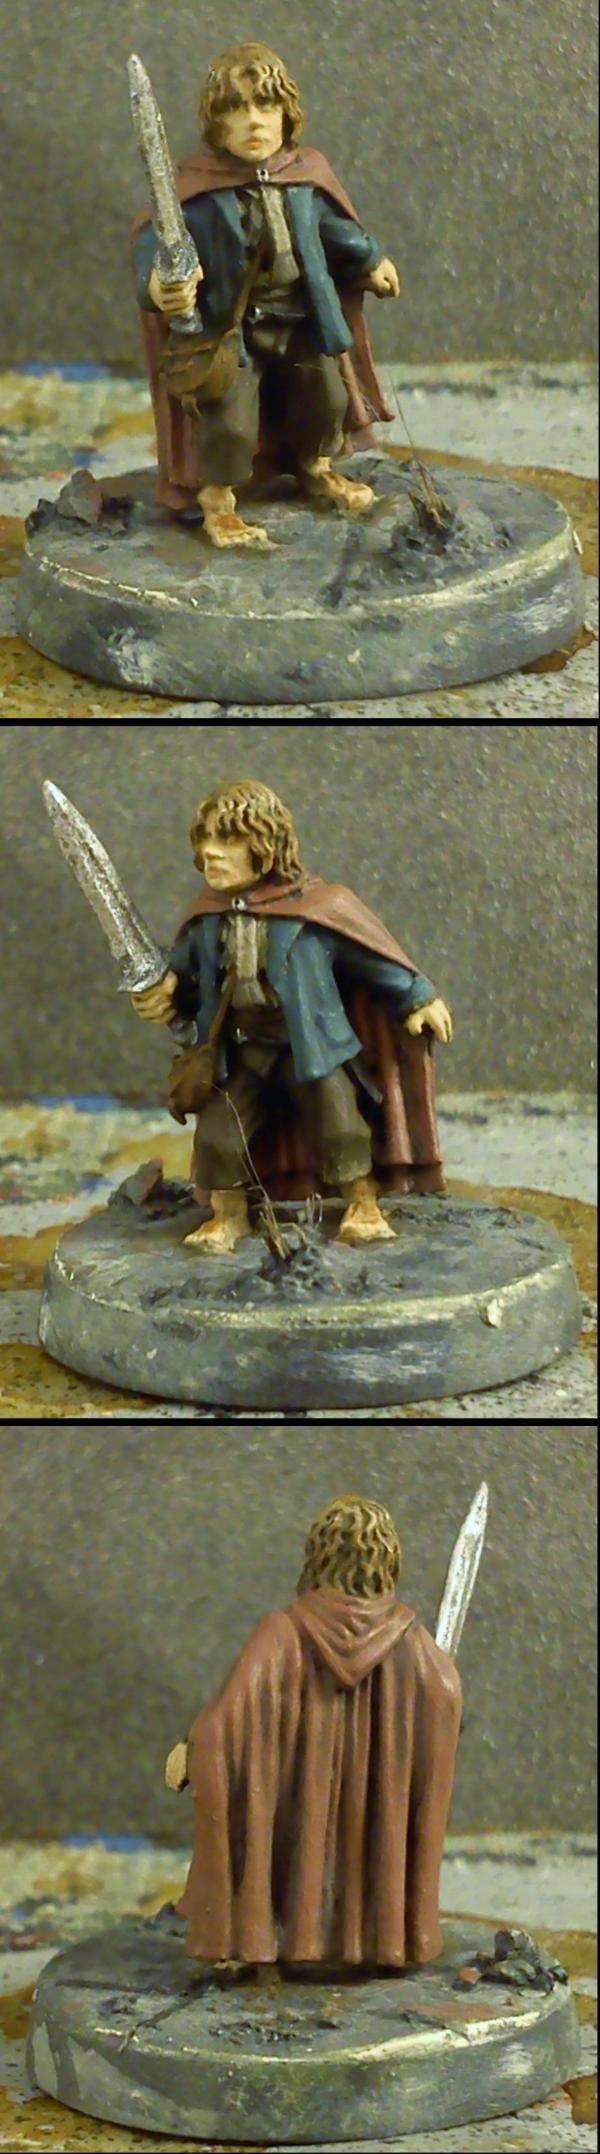
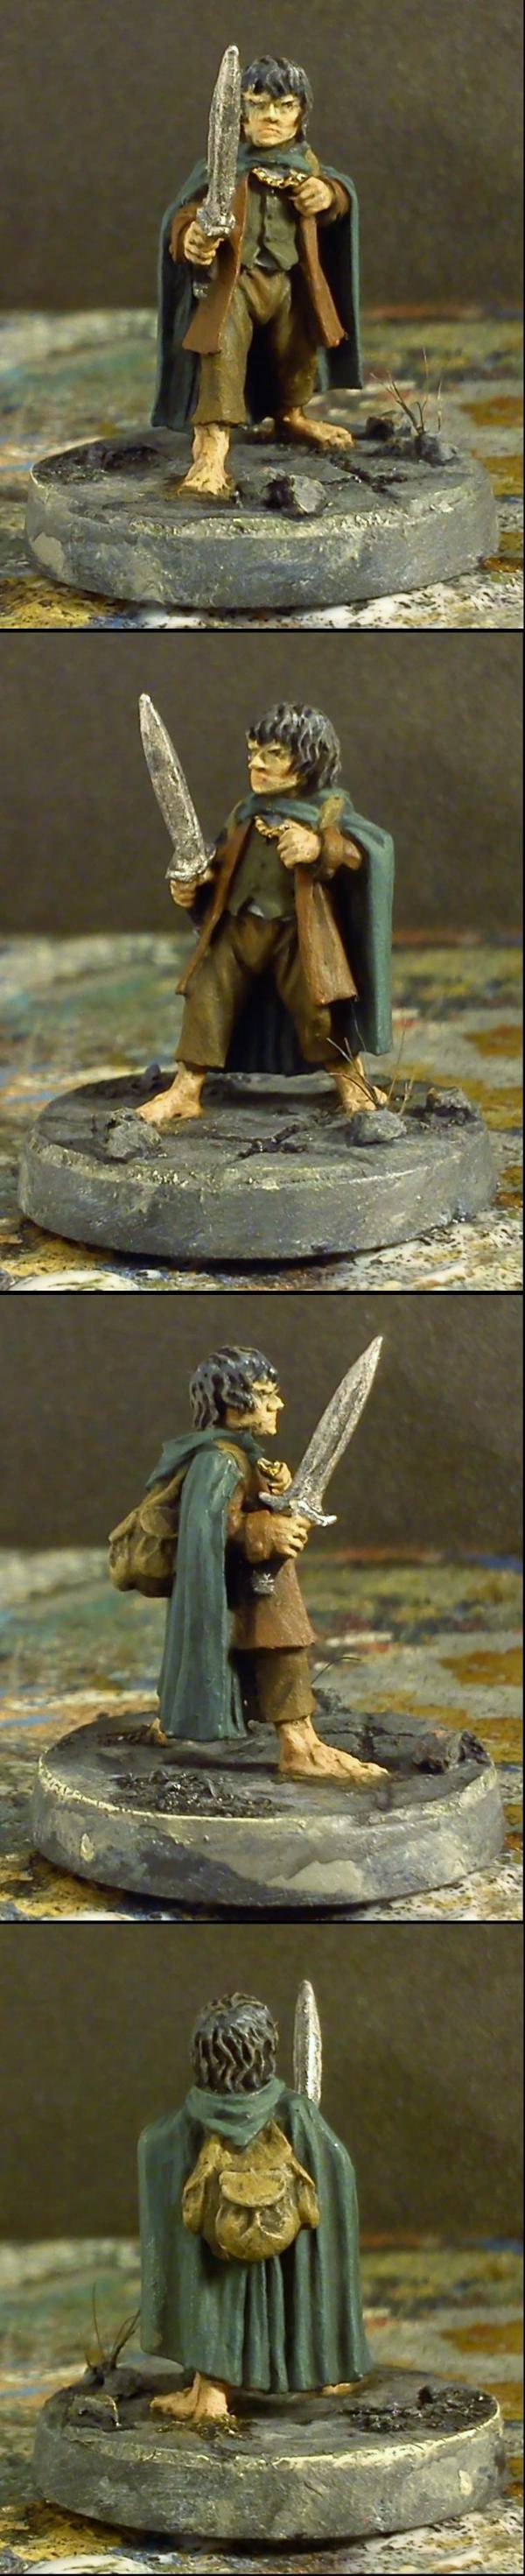
And now Frodo.
I'm going to have to re-visit his face before the end as he currently looks like "evil Frodo"... Although he is clutching the ring... nah, it's not quite right yet.
What's more annoying, is that he looks ok from the sides, it's just front-on...
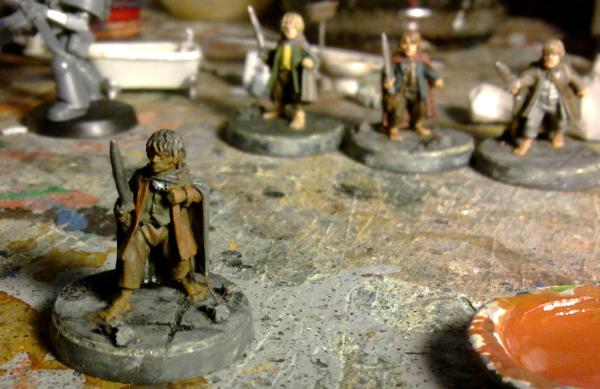
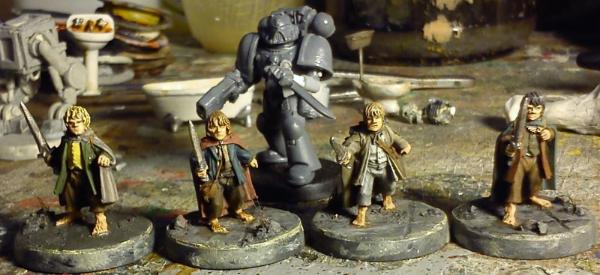
And a shot with them all together again, and a SM to show how small these little buggers are.
They will now progress together with the bases and final touch-ups.
Red Harvest wrote: So, in scale then? Nice to know that the sculptors can do that sort of thing.
Indeed they are and they're not bad likenesses considering how small they are. Won't stop me complaining about how blooming tiny they are to paint.
Good progress.
Never liked Frodo. Such a weenie.
Thanks. Ha, you're with Vik there then. Not feeling the love for Frodo
Progress; Bases are now painted and (you can't really tell from the photos) covered with gloss to make them look wet. You can just about see the reflection of Merry and Sam in their bases in the top picture. I've also touched up the skin on them. Still to do is finish off the plants on the bases and the final highlights on all of them. Then a quick check over and they'll be done.
I read somewhere that the movie studio was quite particular about scale and accuracy of the minis. Weren't these Perry sculpts? That would explain the quality.
I met the Perrys at the Baltimore Game's Day in 2002. Really decent blokes (?), chaps (?) --not sure which is the nicer description.
I like the earth tones for these guys. I would worry about them being overlooked on the tabletop though...
Red Harvest wrote:I read somewhere that the movie studio was quite particular about scale and accuracy of the minis. Weren't these Perry sculpts? That would explain the quality.
I met the Perrys at the Baltimore Game's Day in 2002. Really decent blokes (?), chaps (?) --not sure which is the nicer description.
I like the earth tones for these guys. I would worry about them being overlooked on the tabletop though...
I don't know where they came from and I forgot to make a note of what it said on the tabs before gluing them in.
I use blokes and chaps interchangeably. *shrugs*
I decided to go for as original as possible with the colour scheme to appeal to gamers and collectors equally. Will have to see how it pays off.
shasolenzabi wrote:Yeah, I figured they would be ratling sized, after all, the IG ratlings are based on those guys, them sneaksy hobbitses!
Sometimes scale is important, even to GW.
They are done. I have to stop before I start making them worse. You can fiddle only so long.
Look really good. seem to be nice, true-looking sculpts, and the paintjob does justice to the "real" (as in close to reference) look.
Frodo still looks a slightly evilish IMHO (and that's a comment from some one with a very limited painting skill, so take it please with more than a pinch of salt), and i don't recall - from the book, mostly, over the movie - than at Weathertop the ring had already taken such a toll on him, but I might be wrong about that, too. And it might be due to the sculpt, and not the paint, too.
Overall great job, and there's hoping for a quick sale!
Littletower wrote: Look really good. seem to be nice, true-looking sculpts, and the paintjob does justice to the "real" (as in close to reference) look.
Frodo still looks a slightly evilish IMHO (and that's a comment from some one with a very limited painting skill, so take it please with more than a pinch of salt), and i don't recall - from the book, mostly, over the movie - than at Weathertop the ring had already taken such a toll on him, but I might be wrong about that, too. And it might be due to the sculpt, and not the paint, too.
Overall great job, and there's hoping for a quick sale!
Thanks LT.
Yeah, he does a bit and I've tried so many things to get him to look better. As good as the sculpting is, it is a little off on his face. It's probably a casting issue really.The most obvious thing is that his right nostril is 4 times the size of his left nostril and it's his right eye I've been having the most problem with also. Not to make excuses for my painting skill (or lack thereof). His face has gone through stages of looking like he's had a stroke, to being evil, to having black eyes (one or both), to what I have here.
The other challenge (rather than call it a problem) with Frodo's face was that his hair reaches right down to his eyes and to both corners, with only a couple of small breaks where you can see his eyebrows. So it's difficult to get a good contrast between his sockets and his brow without giving him black eyes and to soften the edges of his eyes, which would help to make him look less evil.
So yeah, it was a challenge to paint these up well, but I did my best.
You're right about the ring. Weathertop is early on (just after Bree) and the ring is only just starting to show it's influence. However, at this point, they are being attacked by the Nazgul and this brings out a strong effect in the ring and Frodo becomes protective of it and attempts to use it to hide from the Nazgul (and therefore see's their ethereal visages. He refuses to give up the ring and is stabbed as a consequence.
Lovely halflings Doc. Tiny little wee folk. The colours are a match and I love your weathertop bases
Frodo is a bit of a dweeb in the films, maybe they over emphasised his cuteness. I'm sure in the book he is supposed to be stronger, taller and more adventurous than the other hobbits because of his fallohide ancestry.
I heard that Elijah Wood didn't need a hobbit size body double as he is already only 3' tall. But I would never spread such scandalous lies, he must be at least 4'5"
weetyskemian44 wrote: Lovely halflings Doc. Tiny little wee folk. The colours are a match and I love your weathertop bases
Thanks Weety.
Frodo is a bit of a dweeb in the films, maybe they over emphasised his cuteness. I'm sure in the book he is supposed to be stronger, taller and more adventurous than the other hobbits because of his fallohide ancestry.
I heard that Elijah Wood didn't need a hobbit size body double as he is already only 3' tall. But I would never spread such scandalous lies, he must be at least 4'5"
lol Frodo does start out as more adventurous than the average Hobbit, which he gets from Bilbo (who started off as reluctant to adventure, but got a taste for it).
I think they did exaggerate the change in him to a whiny, selfish, brat by the end to show the toll the ring had on him. He was early on the path towards becoming what Smeagol became. You can take more time with the subtleties in a book then you can in a film (or 3 as it happens) and you can read the thoughts of the characters (which doesn't always work in a film), which have to be acted out in a film.
In the same way, they exaggerated the plainness of Sam (poor ol' browny-grey sam), to downplay that he is the true hero of the story. Saw this while looking for inspiration:
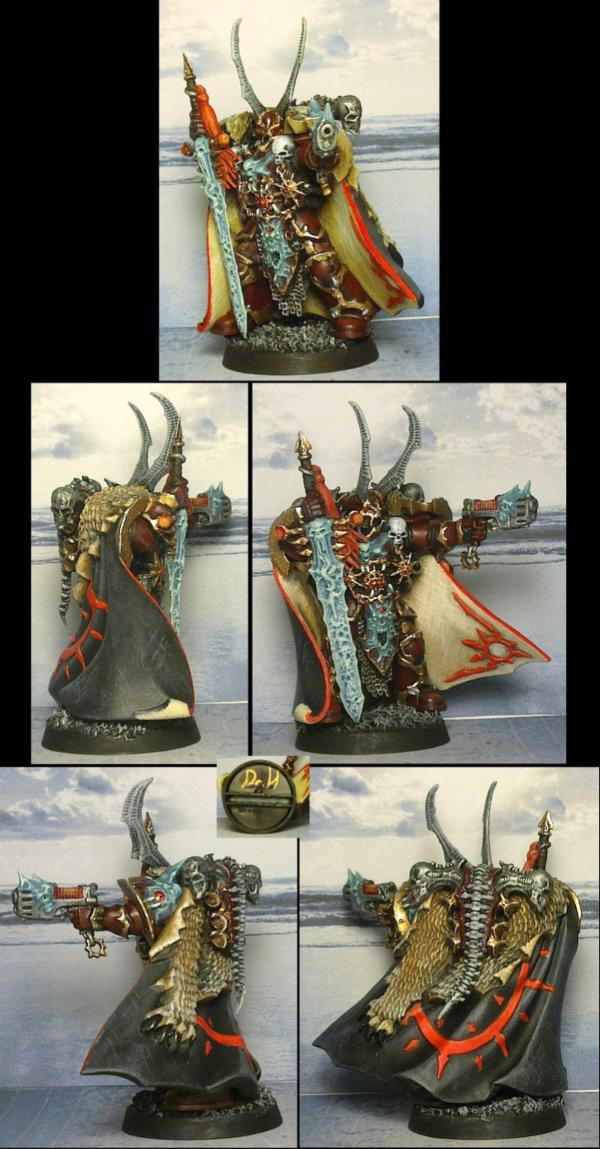
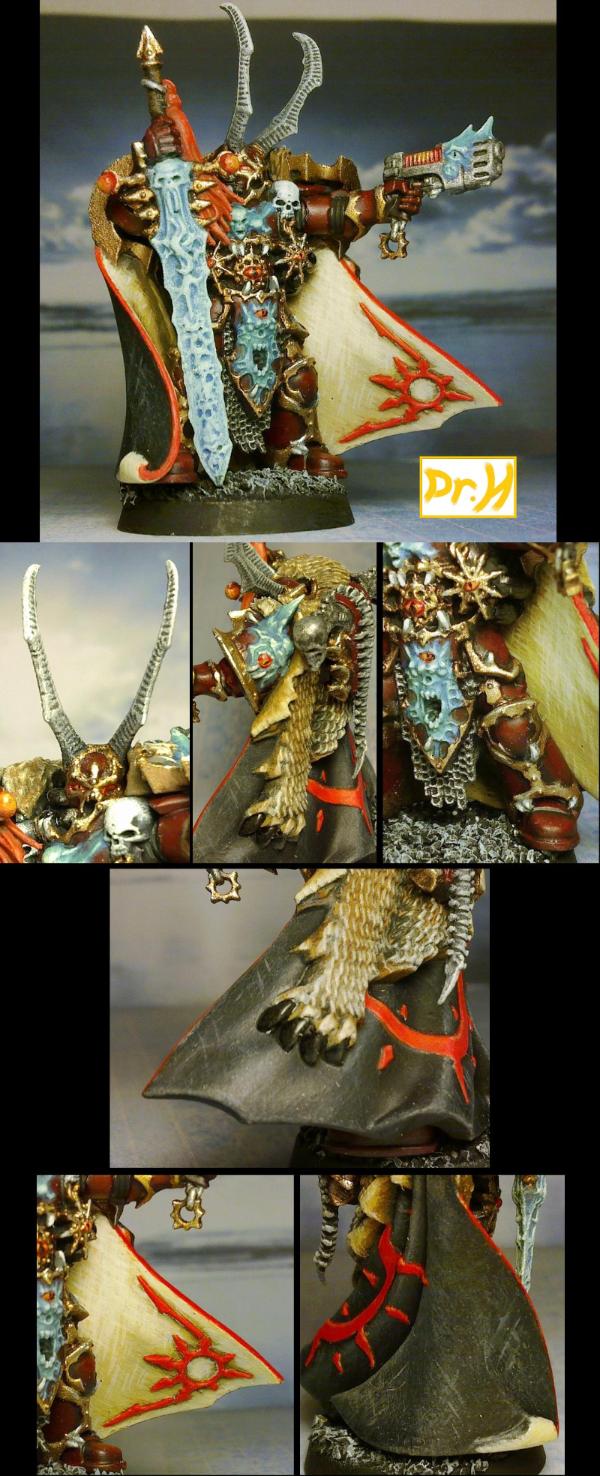
The Hobbits have now gone. But Kranon is still hanging around (they don't call him relentless for nothing).
I thought that maybe some of the details on him weren't being shown off in his photos and may have been misinterpreted as sloppy work, so I've taken some more in the hope of highlighting some of the hard work that went into him.
I've got a few more things to finish off for my own army and then I will be returning here for something big. Keep your eyes peeled.
Looking at that image I keep thinking of "That's the leader."
"how can you tell?"
"Well, the fancy pistol and honking big sword could still be anyone, but those ridiculously long horns shows he has a complex many leaders fall to, he has to be above all so the horns help him feel that tall."
Yeah, he definitely has the look of someone saying "Look at me, look how important I am!" And yet, still he looks for a home and some love. Sad Kranon
Had some very nice feedback from the new owner of the Hobbits, so that was nice. Good to hear that someone that can inspect my models up close and having paid good money for them, is really pleased/impressed with my work.
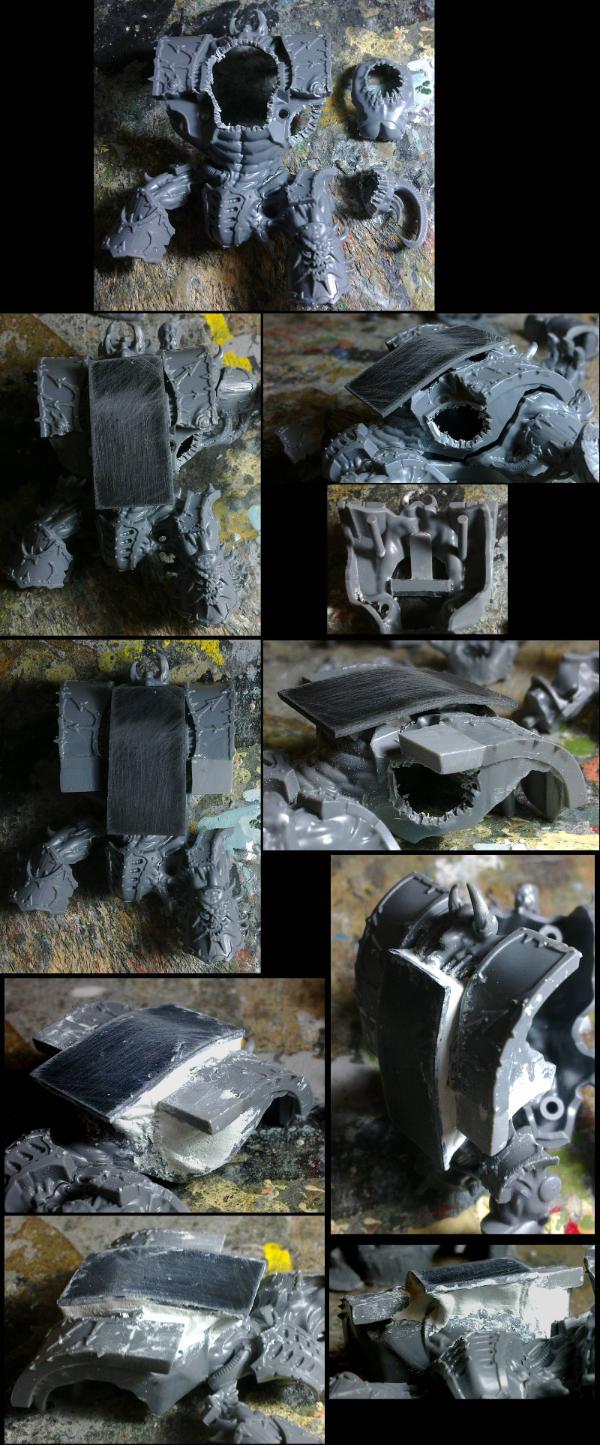
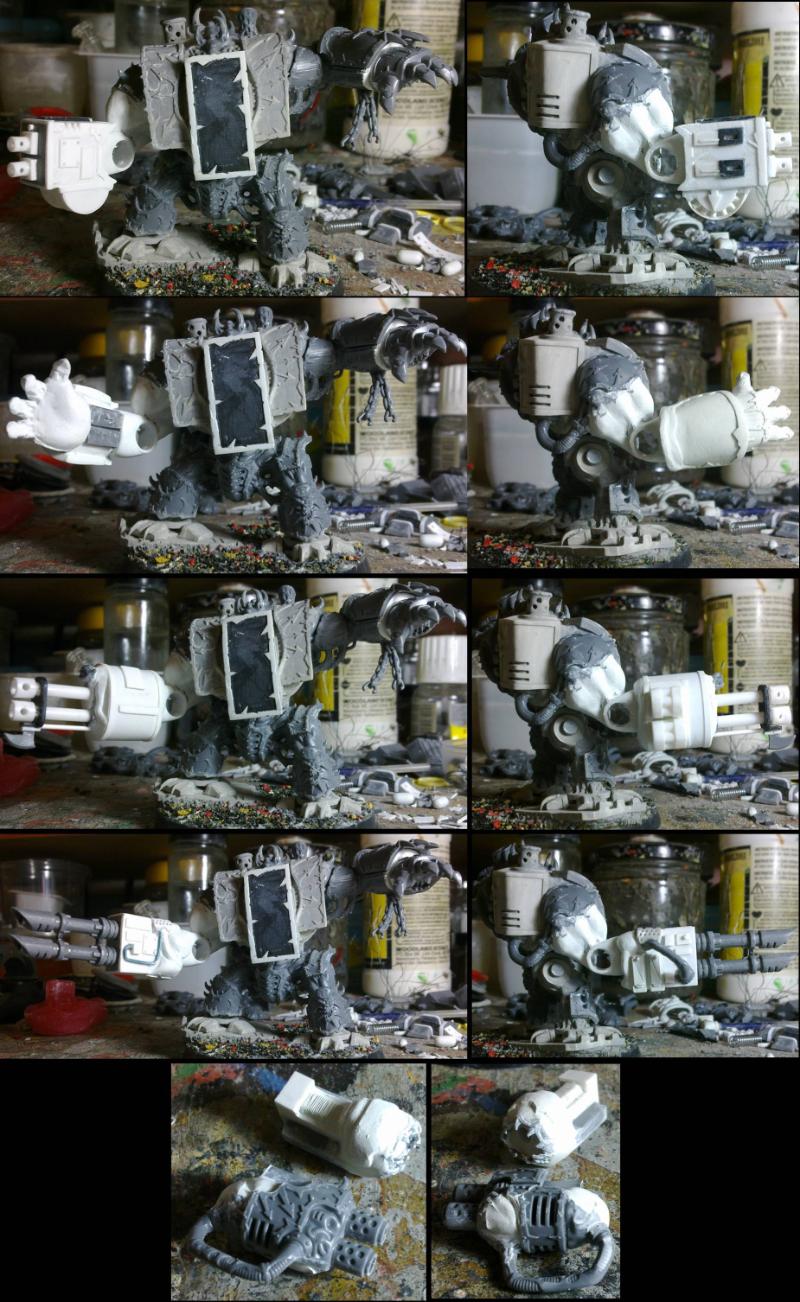
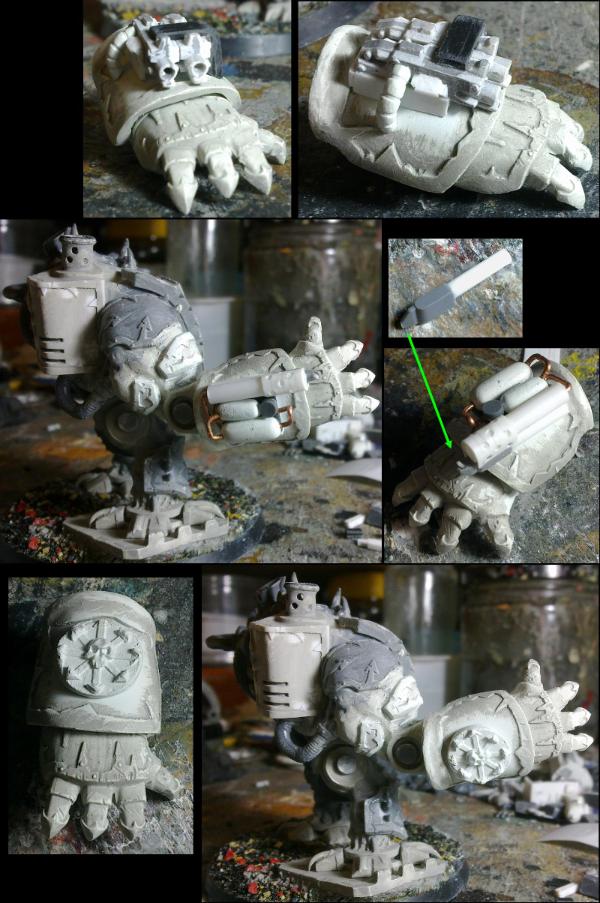
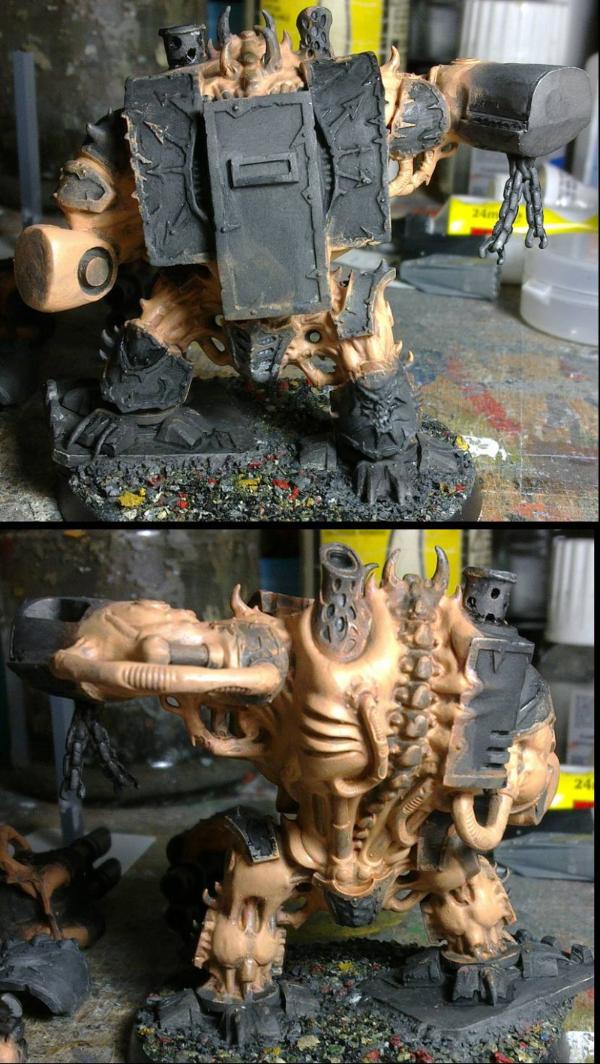
And here we come, to a new project. Those of you aware of the contents of the Dark Vengeance box set, and have looked though this thread, will notice one final model remains untouched...
Yes. The time has come to have a go at the Hellbrute... Dun Dun Duuuuuuuuuuuuuuuuuuuuuuuuuuuuuuuur...
This model, unlike the rest of the box set, raises some issues in my money-making plans. This is a single pose model, with a fixed set of weapons and seems to split the gaming community down the middle in terms of it's looks.
The biggest problem with all this... is that there is now a multi-piece, poseable, Arguably better looking, version of the model, with all the weapon options available.
This means that I could paint this one up and do the best job I've ever done, with all the tricks in the book... and half the people will not want it because it's ugly, of the remaining half, many of them will want different weapon options and of the few people left, how many will want to fork out for a standard model that can be picked up on the cheap and painted themselves.
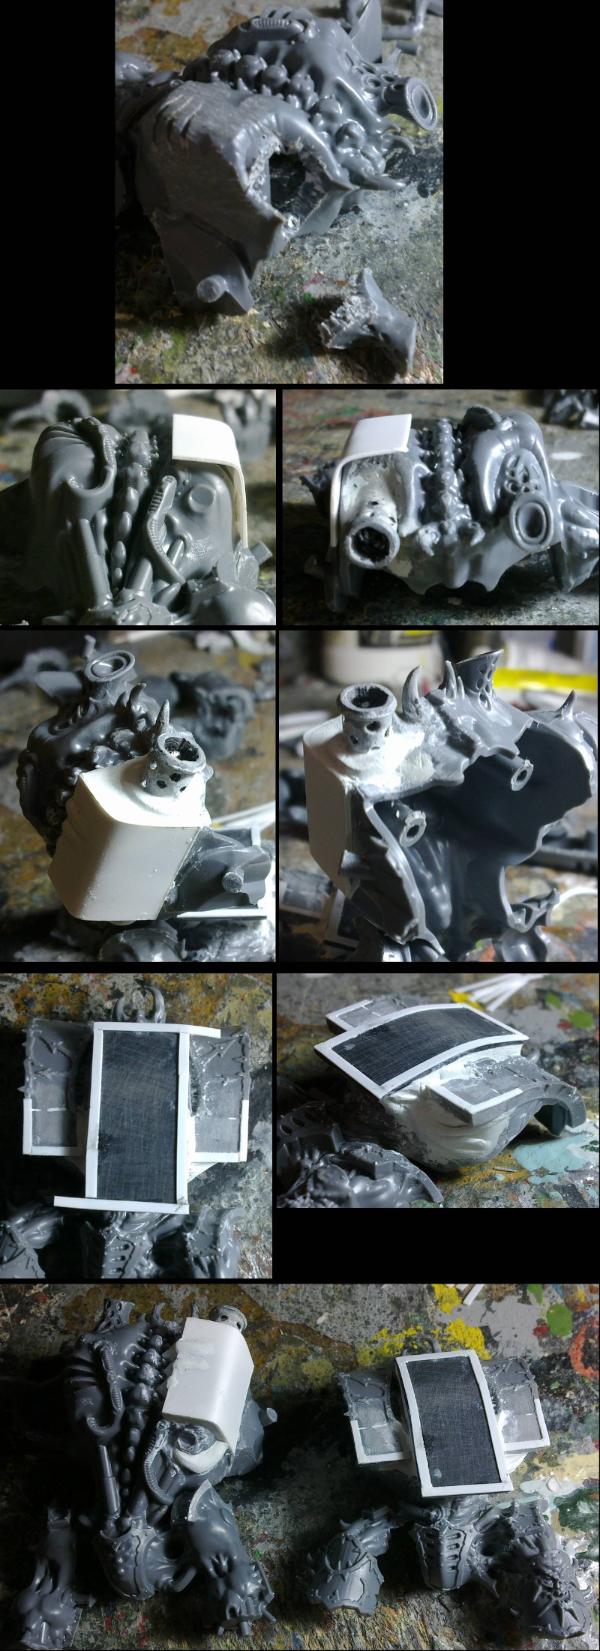
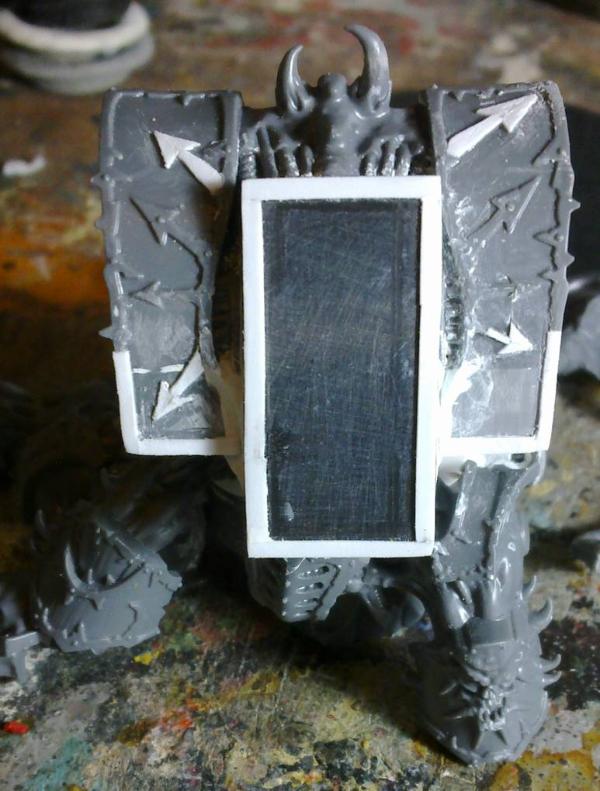
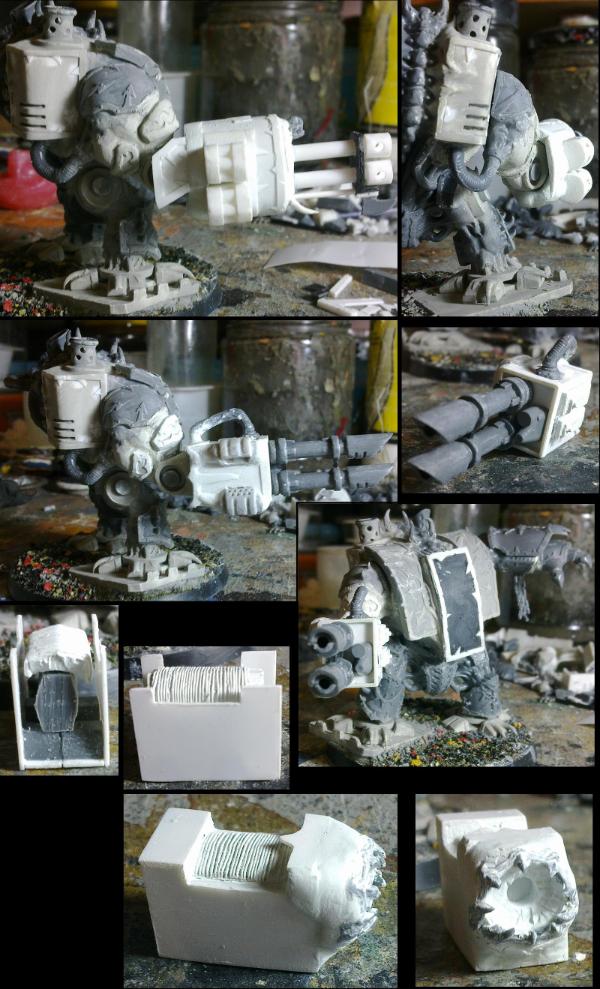
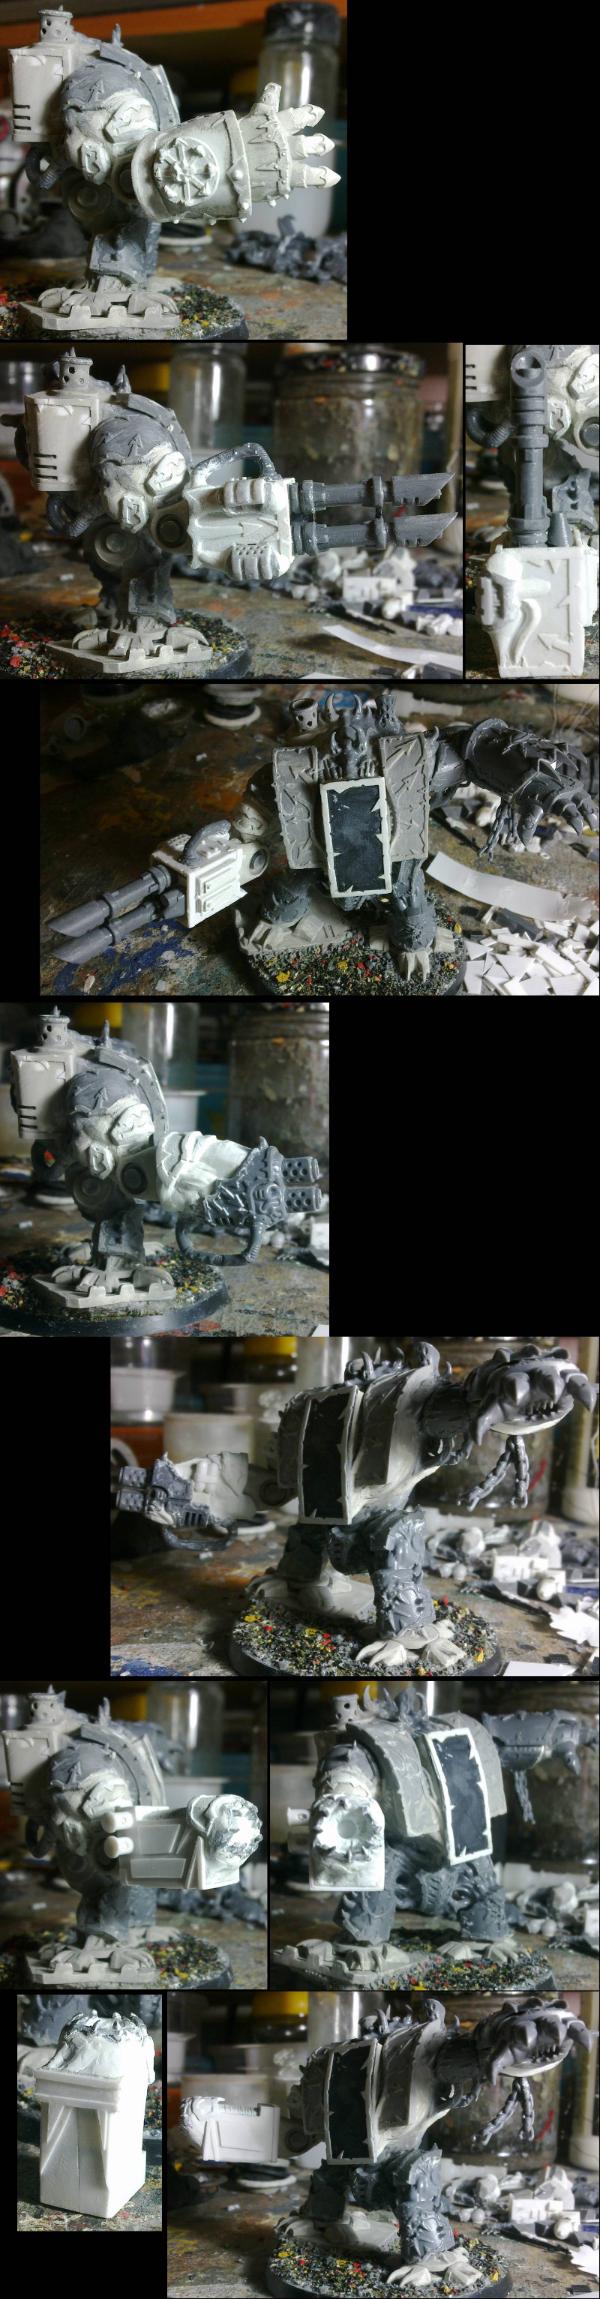
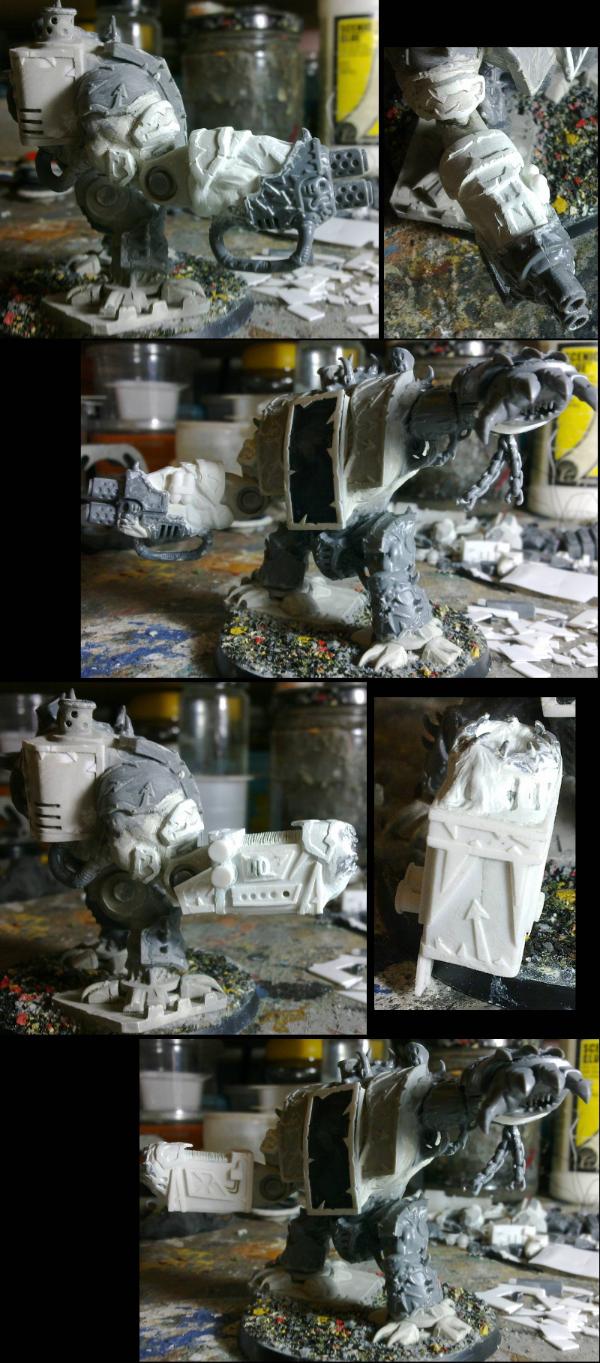
So, I need to maximise the customer base by modifying this model to create a unique, exciting, good looking (?) model... with all the weapon options...
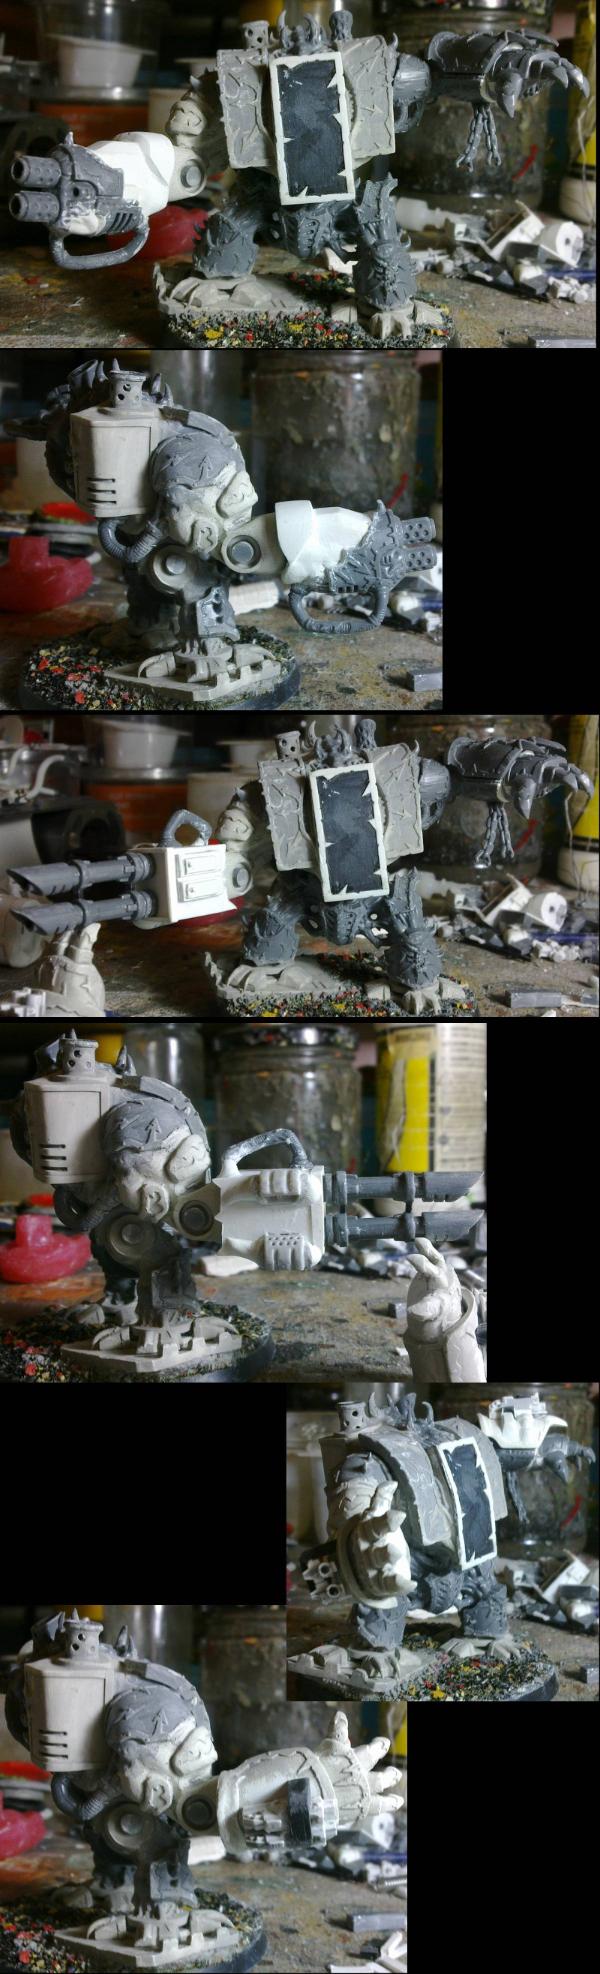
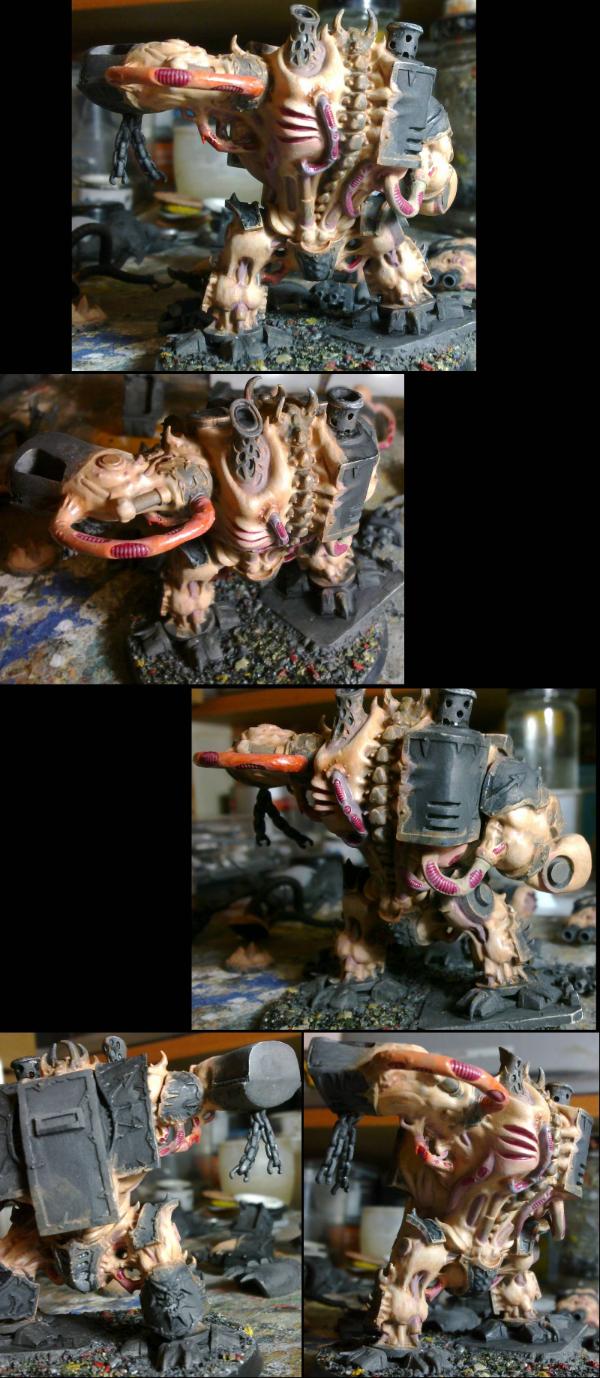
So far, I can see that the main dislikes about the model are: The large quantity of fleshy parts / lack of mechanical or armoured parts, The feet in particular, The open face on an armoured unit, The armpit tentacles, The many horns, Too much bling, A lack of options (as I mention above), How short the MM is...
And the likes: The overall look of the model (also cited as a dislike), That it's a scary / intimidating model, The level of detail from any angle (many of which are cited as dislikes above), The powerfist (which I haven't seen a single complaint about)...
It may seem that there are more dislikes, maybe there are, maybe it's my own prejudice... but this is an opinion thing and I'm not saying anyone is wrong.
I would, however, like a few more opinions on what people like and dislike about the model (be as specific as you can), and I'll be back later with my thoughts and plans of what I am thinking...
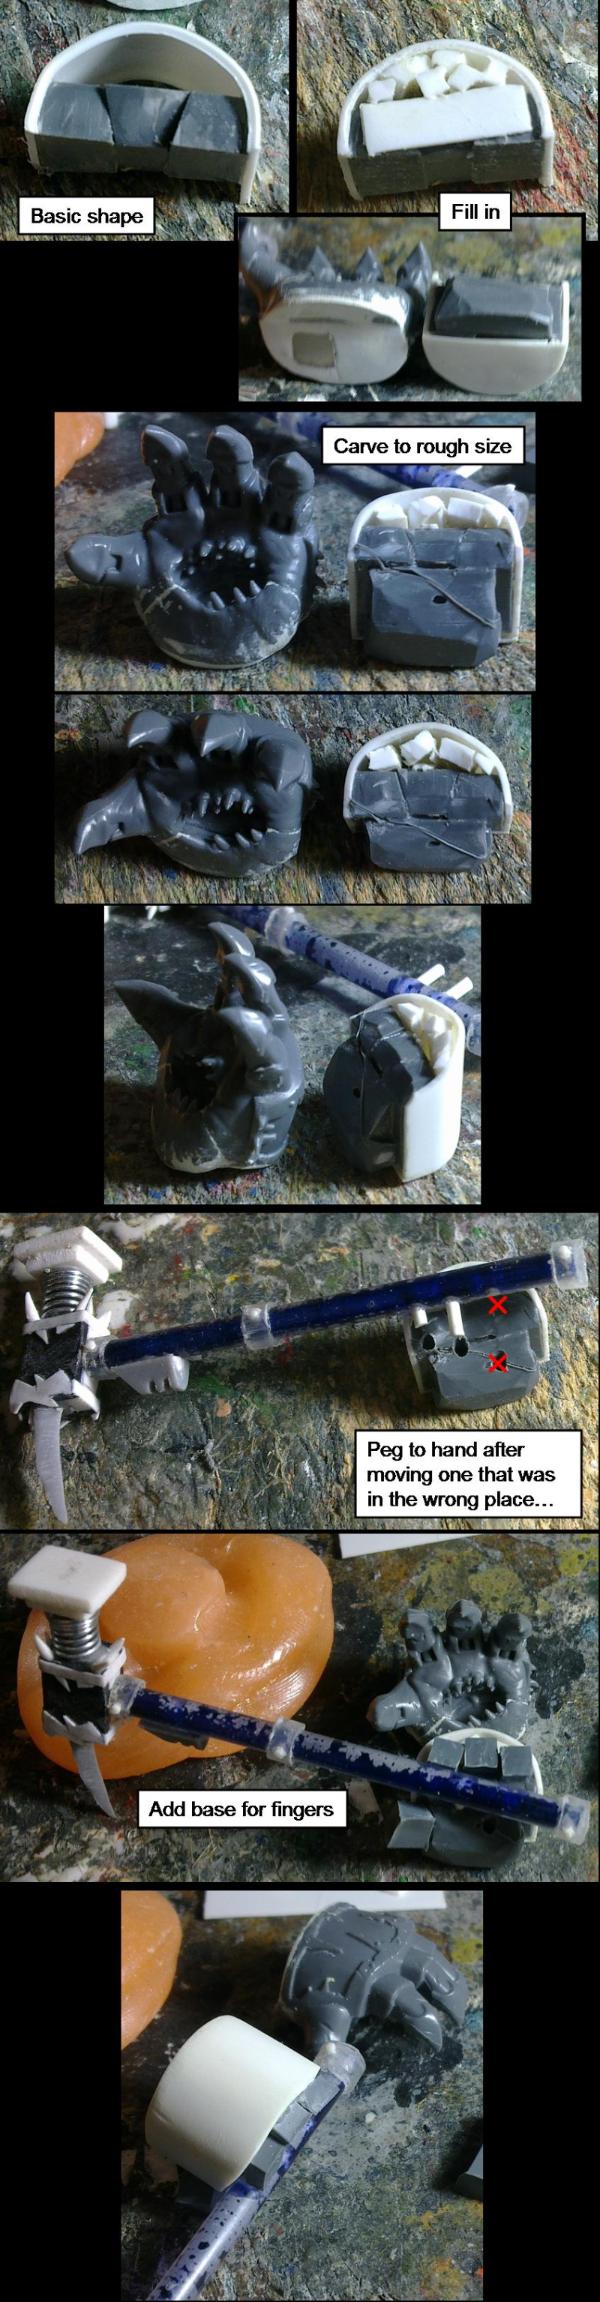
These are my thoughts on what I might change / add.
At the centre of the front of the body, the exposed head, horns, eyes and armpit tentacles are out.
Most of this is contained on a separate piece of the kit, so is easily left off.
Some of the horns may be relocated about the model, will have to see how it progresses.
There is a dangling eye on that piece that I may also find a use for.
On the main model piece, I will remove the hole and surrounding raised area (and the top of the abdominal muscles. This will all be replaced with a scratch-built armoured sarcophagus. I will also extend the armour a little further down to protect the ab's a bit more.
I may use some of the details of the front piece and removed face to add detail to the sarcophagus.
The legs, while I would like to change them, make them more mechanical, re-pose them, etc... It looks like too much work to make it worthwhile, as I'll be rebuilding the entire waist/hips section.
I may do some re-sculpting of the thighs though to make them less fleshy.
The feet will be replaced with more mechanical ones. Only one needs chopping off as the other comes separate.
The replacement feet, while mechanical, might be made to look dangerous (clawed etc...) and not just functional.
The back of the body is a bit too fleshy and symmetrical, so I plan to make the right hand side more mechanical / armoured (as if it's part-way through it's transformation to the stock Helbrute). This may involve the change of the exhaust pipe on that side.
As the bit of concrete that the left foot is on will be going with the foot the position of the whole model will change slightly (it won't be leaning as much over to the right) I will need to take account of this when re-building the right arm (that is normally aligned parallel with the ground).
The right arm will be altered slightly to be longer and look more like an arm with an elbow region an' all (not just Shoulder-Gun, forget the arm).
The left arm will remain largely unchanged.
Both arms, however, will be adapted to allow weapon swapping. This should be fairly easy for the right arm (due to the changes there), but the left arm may involve the hand being removable and the weapon options fitting in there.
All the additional weapon options will be scratch-built:
Right arm will get;
A power-fist (in a similar aesthetic to the left arm's, but not identical),
Twin-linked Las-cannon,
Twin-linked Heavy Bolter,
Reaper Autocannon,
The re-built Multi-melta,
and a Plasma Cannon (that I may use the removed ring of teeth from the body to achieve the look of the kit).
Left arm will get;
A thunder hammer (I don't like how the actual kit has the attachment of the hammer to the arm, so will be different),
The Power-Scourge (Metal tentacle things? Will be tricky to make some sturdy ones that will stand up to gaming),
Missile launcher (That fits into the end of the arm where the fist goes? As does everything else, but this will be the interesting one),
And the power fist should just be a matter of adding the hand.
I also have to make the Combi-bolter and heavy-flamer additions for the power fists.
And there will probably be little changes here and there as I come to them...
And just in time, here's wip 1 for the Chaos dreadnought.
As the saying goes "You have to break some eggs to make an omelette"...
...You have to chop up a Helbrute to make a Chaos Dreadnought. Why the distinction? Well, this is the basis for what I am aiming for; Less cartoon monster... more insane, armoured beast of war.
I wanted to start with the feet and then work upwards, as this would give me a solid base to set the rest of the pose to. However, to do the feet I needed to have both halves of the body stuck together, and to fix the number of large holes I had just cut into the body it would be easier if I could access the inside... So I've started on filling the holes.
So I've added a plate to the front to be the sarcophagus and I've extended the armour plates either side of that. Looks a bit boring at the moment, but I'll add surface details to tie it all in to the rest of the armour. The putty is mostly flattened around the sarcophagus, but is sculpted to blend in to the fleshy parts at the bottom. Again, more detail will be added later.
The rest of the model has already been chopped up, and I'll show these bits when I come to them. Thanks.
Thanks Mark. Those Hobbits were quite tricky to paint, but I'm pleased with the result.
Today's progress moves around the back of the Chaos Dreadnought, before returning to the front...
As I mentioned, I wanted to mechanise the rear of the Helbrute a little.
The right hand side of it's back is fairly plain (the left side having a pipe hanging across it) and I therefore set about it with my tools.
I removed the exhaust pipe from that side and I carved/sanded the two sides of that area to make them flat.
I added a piece of tube (that took 2 attempts to drill holes in) to represent the original exhaust pipes.
I then stuck a piece of plasticard around the corner to form the outer skin of armour.
Filled in the gaps with putty and added some details (more still to come)
Around the front, I've started to add the trim and tie the new parts to the original parts.
I am watching, just never really paid any attention to the Hellbore before. I don't mind it as a model, Puny head bothers me and the whole fleshy silly monster bit, interesting to see where you are going with this though.
Thanks chaps. I'll accept interest and intrigue as good responses.
Well, I'm working on fixing both those issues, Cam. So that's a good start.
As a thank you, here's an example to show that it won't all be straight and plain edges as it is now...
Why the original only had 5 arrows, I don't know. Thought I'd take it up to the full choas 8 points...
Red Harvest wrote:Same reason Night Goblin archers once came with 2 left hands. Or was it 2 right hands.
Jewel-like objects of magic and wonder and all that.
It will be interesting if you make a 'silk purse' out of this one. And quite remarkable. Best of luck at it.
Are you saying that they are made imperfectly...
Spoiler:
I will do what I can, and hopefully it'll be worth something to someone.
The Space Wolf flying shoe-box is still available, BTW.
If someone want's that model improved upon, they can either sit on it, or send it to me and I'll give it a go. But it'll probably be cheaper and easier to just scratch-build something better.
monkeytroll wrote:Nice work - definitely looking more dread like now, doing a good job of bringing it away from the fleshy feel, should be really interesting
Just to be contrary though, one of the things I liked about that model was that there were plenty of fleshy parts to play with
Thanks MT. There will still be plenty of flesh (and will be painted fleshy), and you will (maybe) notice that I am tying the new parts in to the fleshy areas.
I'm starting to think along the lines of Tetsuo after he's rebuilt his own arm, but before he turns into a giant blob. So I'll be running plenty of wires and cables about...
I've just cut the vents into the new back and I think I'm ready to stick the two halves together and get to work on the feet and legs...
I did indeed stick both halves together and I've been working on the legs and feet.
I've also been playing with some small details here and there; such as the mechanised hip and extra detail on some of the tubing that I've added.
I stopped short of mechanising the calves as it would be a lot of work for little gain. The hip and feet will have to do.
While there appears to be a choice of feet, I'm going to continue with the ones of the right as the ones of the left, while closer to what normal dread's have (and that was the aim), I'm not happy with how they have turned out and look a mess. The others are far easier to get clean lines.
This is only the bare shape at the moment and they will get some alterations and additions to tie them into the chaos feel. I may shorten them (to get a higher front) and might (as I've just thought of it so making a note of it here) add a notch to the middle to give them a double toe look, like ninja shoes...
Still playing about with them at the mo', basically... There is a plan even if it is not obvious at the moment... Still, progress...
Littletower wrote:Just dropping by to check in, too much went on lately, will (try to) properly comment once catched up!
Just a heads up: expectations are high!
I shall look forward to it. Are there any other kind of expectations?...
Casey's Law wrote:Love it! How did you manage to cut out the back vents so cleanly?
Thanks Casey.
Just a saw, really...
I marked out where I wanted the vents and how long in pencil.
Cut the majority of the material out with a saw which was conveniently the right thickness (or near enough).
Then tidied up the ends (as the saw was cutting at an angle) with a scalpel and a little sanding.
Thanks again, Mark.
Here's a mock up of the feet (well, a foot) to show the general shape and size.
I will now make milliput copies of this (using Oyumaru, the wonder stuff!) and then play about with details.
First of all, what can somebody not love about the chopping up of a model like this to turn it into something else, and all explained in such detail?
The reworking of the back exhaust is crisply great. How would the be called: retro-retro-fitting?
Foot/feet coming along nicely. Maybe reinforcing the double toe look before the cast, though? Or are you planning on doing that on the casts and not on the master?
Littletower wrote: First of all, what can somebody not love about the chopping up of a model like this to turn it into something else, and all explained in such detail?
The reworking of the back exhaust is crisply great. How would the be called: retro-retro-fitting?
Foot/feet coming along nicely. Maybe reinforcing the double toe look before the cast, though? Or are you planning on doing that on the casts and not on the master?
Thanks LT.
I don't know what it should be called, I just work here...
I see this as an earlier stage in the corruption of a chaos dreadnought to a helbrute. Think of it as a regression...
Any double toe look to the original is due, only to how it was made from two pieces of sprue stuck together, and not carving.
The plan is to work on the casts to get one I like the look of and then cast that to get a pair (hence, keeping it symmetrical).
The master will be kept as a master for if I ever need to make any more dreadnought feet.
Here's a look at to toe work and possible option of claws (made from spare putty, ages ago).
The claws here are only placed on, they will be moulded on to the toes as if sprouting from (or welded to) the toes.
I'm liking the toe look, so I think that will stay, now to decide upon added details...
What do we think of the claws?
Would one or two, on the occasional toe, work. Maybe some larger than others to show them growing?
Would this on every toe be too much?
As an alternative, I could do surface detail like on the armour plates, and not have the claws.
I do plan more details to show some creeping wires/cables about the model and feet, so they won't be completely bare in the end...
Well you know me and my love of asymmetric builds....gonna say I'd like to see them on an occasional toe, and the different sizes to show growth is a nice idea
Looking awesome dr H
Personally i say random claws it aint a space marine dread were everything looks all neat and well placed It gives the dread the half man/creature half machine look a bit more also Keep up the good work Regards
Mark
Thanks chaps. Good thoughts, one and all. I'll work at a combination of the above... that is, emphasize the importance of the front pair and add some chaotic growing claws about the place...
Great progress, will enjoy seeing the next step forward as always! As has been said, the detail you go into is brilliant and makes your blog very unique.
That's exactly want I meant by "reinforcing" the toe look: the split is clear now, differentiating the two nicely.
As for the claws, sprouting more than welded on (progressing mutation), maybe in different lengths to show growth, and even asymmetrically placed: two in one, none on another, and so.
I don't think the toes are your fault so much as the usual GW design flaw of everything is rounded.....except the squared toes. It's a flaw that's on so many of the models like the dreadnought where the upper half of the standard dreads are all angular then you get to the waistline and everything becomes circular. The chaos one is kind of opposite as everything is rounded and organic while the toes are all squared off. Otherwise I think your doing a great job. The color of the casket as it is is perfect for some chaos goodness. Makes me think of a deamonic volcanic glass mirror that their soul is trapped in. And when they get close enough to their enemy they can see their reflection inside and be drawn into it for 10,000 years of suffering as well.
Casey's Law wrote:Great progress, will enjoy seeing the next step forward as always!
I see what you did there...
As has been said, the detail you go into is brilliant and makes your blog very unique.
Thanks. I enjoy seeing and reading about the stages of other peoples work and how the final result is produced. So that's how I broadcast as well.
LT; Thanks. Yarp, see below.
Theophony wrote:I don't think the toes are your fault so much as the usual GW design flaw of everything is rounded.....except the squared toes. It's a flaw that's on so many of the models like the dreadnought where the upper half of the standard dreads are all angular then you get to the waistline and everything becomes circular. The chaos one is kind of opposite as everything is rounded and organic while the toes are all squared off. Otherwise I think your doing a great job.
I see what you mean, Theo. Thanks. Hopefully my squared off toes tie in with my squared off upper body, and looks good once finished.
The color of the casket as it is is perfect for some chaos goodness. Makes me think of a deamonic volcanic glass mirror that their soul is trapped in. And when they get close enough to their enemy they can see their reflection inside and be drawn into it for 10,000 years of suffering as well.
The colour is just the colour of the plasticard I used for that. All the other pieces of plasticard I have are white.
But... that is a good idea. I could leave that space blank and paint it up in a gloss black. I've been wondering what details to add there, but that might be a nice change... Thoughts people?
I now have feet, in the most plural of ways... and they have claws in an ordered and yet, disordered way (as is my way... )...
They still need tidying up once the putty sets.
You will see that I've added the spiky bits to the trim along the top of the toes so that they match the rest of the armour trim (you will also see that I've added this to the sarcophagus so it all matches), and I've tried to make it look like the claws have developed from these spiky decoration pieces.
I'm going to call these feet done (barring any final tweaks as the model progresses) and move on with the build, as time is ticking and the more it ticks the less I get paid.
Next time you see him, he should be standing on his own and have some base work done so that the pose can be fixed. Then... arms...
Aw man I wish I was funny enough to have made that joke on purpose. Looking forward to seeing it pull together and I can see it'll take paint really well.
It stands....
Not a lot to explain here, Attached feet, attached to base...
I've thrown some primer at it to tone down the white so that you can make out the details and I can check that the joins are smooth.
You will notice that I've switched which foot is raised. As I don't have the luxury of changing the legs as much as I'd like, the pose is stuck. But that didn't mean I had to keep it leaning over quite so much. The hatch extending from the side of the base is useful for keeping the outer claws of the feet safe from being damaged (as they would overhang the plain base).
Now we come to the "face" of the beast. What to do?
Go with Theo's idea of a flat, reflective, black hole of extreme nastiness.
Or Detail it like a classic dreadnought; eye slit (as if the occupant would actually look out to see where it's going ) and a few embellishments.
Or chaos it up a bit, with some moulded details like on the original armour plates (screaming faces etc.), could find a use for the original head as one of these.
Or a combination of details with the reflective black effect, as if it's a proper horror-show stretching daemon surface thing.
The black, reflective surface would be a really interesting contrast with the gribbly details across the rest of it....perhaps a few specks of white to suggest the emptiness of space, with several layers of lacquer to get a deep finish to it?
On the other hand, a motley collection of screaming faces is always going to appeal to me
Tricky choice....
No need to thank me for the help......
Raising the alternate foot was a good move, changes the profile subtly
On further reflection, not sure if the screaming faces from the warp idea really fits in with the concept of moving it back towards a more dread-like state though...think it's just my personal bias that's making me consider that.
On a more practical note, I've just grabbed myself some Oyamaru for some casting fun. I got the multi coloured block pack - am I right in thinking that once warmed up I can mix two or more block together to get a larger casting area?
monkeytroll wrote: The black, reflective surface would be a really interesting contrast with the gribbly details across the rest of it....perhaps a few specks of white to suggest the emptiness of space, with several layers of lacquer to get a deep finish to it?
Yeah, I'm also thinking a slight fade to a dark dark grey at the outside to emphasize the black hole look...
On the other hand, a motley collection of screaming faces is always going to appeal to me
Tricky choice....
No need to thank me for the help......
Thank you Monkey. It is a tough decision though with so many options and a blank slate.
Raising the alternate foot was a good move, changes the profile subtly
Ta.
On further reflection, not sure if the screaming faces from the warp idea really fits in with the concept of moving it back towards a more dread-like state though...think it's just my personal bias that's making me consider that.
Yeah, there is that. But it is still a possessed machine... So could be argued either way.
On a more practical note, I've just grabbed myself some Oyamaru for some casting fun. I got the multi coloured block pack - am I right in thinking that once warmed up I can mix two or more block together to get a larger casting area?
Yep. You can cut it up, stick it back together or stick as many sticks together for larger moulds. Once stuck together, they are one piece; warming them up again won't separate them.
On that note, if you are making a two-part mould, make sure the first half is fully cooled before adding the second half, or they will stick together and you will have to cut them apart. On the other hand, you can completely wrap something up in a large blob of the stuff and just cut it in half to make a 2-part mould.
And at the end, you can always re-heat and stick all the pieces you have cut off back together again and start over with a new mould.
For example; the mould I made for the feet, I wanted a flat bottom of the cast. But when I made the mould I pushed the Oyumaru up and around the edges of the original piece. Then I just cut away the Oyumaru that was above the piece to give a flat "top" of the mould that gave me a level to get the flat bottom of the cast. (and stuck the cut off back on to the rest of the Oyumaru)
Yeah, just play about with it. That's all I do; "I wonder if I could do x?" Give it a go, if it works, great. If not, no loss as it's reusable.
I'm currently looking at the arms of the Chaos Dread' and deciding what I want to do and how I will do it. Thoughts will filter through here as I come to them.
At the moment, looking at the left arm (as it's mostly intact), the options will be attached at the wrist, but will also have customised armour plates for the forearm:
The power fist keeps it's original plate,
The thunder-hammer will have a plate that can also be used for the power fist's combi-bolter / flamer attachments.
The missile launcher will have a unique plate, possibly with more missiles or some kind of related details.
The power scourge will also get some kind of unique plate. But I'm stuck on how to make the tentacles in a gaming-friendly way. I'm tempted to buy the original bits off ebay and adapt them for my purpose.
The right arm will be more work as it needs to be completely re-built before I can even get on to the weapon options.
I filled the end of the arm with milliput and then stuck a piece of plasticard over the end where it will meet the hands/weapons.
I added the plastic as I wanted a surface that I could get perfectly flat to aid with the magnetisation (sanding a surface of part putty and part plastic doesn't always work well as the two materials "sand" differently).
I also did the same with the power fist as that is ready to go and will be a useful test of the magnetisation.
You can also see that the armour plate covers the join nicely.
Speaking of armour plates you can see the start of the replacement plates for each arm. moulded and cast from the original so that they all fit the arm. Much more work to do on them...
Why is one round and one square-ish you ask?
The round one is a magnet (that came out of a box that didn't need it any more) and was large enough, but not too large to fit here.
The square one is a piece of metal and not a magnet. I think it would be a waste to use 2 magnets for this (as nearly everyone else seems to do?) as the fist weighs nothing and this set up can hold ~15g (judged by playing buckaroo with lumps of Oyumaru) before falling off.
You may also ask why is the magnet off centre?
This means that if this proves to not be enough to hold the other weapons, I can add another magnet (if they just fall off. I can also add a magnet to the attachment half also), or I can add a peg (if the attachment tends to spin round under it's own weight around the axis of the magnet).
So, the body of the model is now back to where I started with it. before I started chopping bits off. Everything from here on is moving forward with the model.
Thanks Theo. I'm using some scrap metal (from my "metal bits" pot) that is the same thickness as the piece of plastic I stuck on the hand. That way, I just cut a suitable hole in the plastic and stuck in the metal, job done.
Thanks Casey. That's the way I approach anything. Think it through before any cutting (this was all planned before I cut the original model up). It can slow things down a bit at times, for example...
...I'm working on the thunder hammer for him. This may require a few attempts to get "right". I know what I'm aiming for, but attempt number 1 is not quite there. Stay tuned...
Here's the first 2 attempts at a Dreadnought-sized Thunder hammer.
Slightly dusty Terminator for scale.
When I first stuck (blu-tack) the hammer in the Dread's hand, I thought it was maybe a bit short. Then I stood it up as in the pictures and realised that a 15ft hammer is probably enough.
Also, of note, I will be making a hand to hold it roughly where it is in the bottom pictures (although slightly more drawn back).
The first hammer is on the left. I wanted to try and have a ball for the central part of the head and used a suitable bead for the size. However, attaching this to the top of the handle (no prizes for guessing where this came from) proved less than solid. So I had to add putty just to hold it in place and didn't end up with an aesthetically pleasing result, and it may still not be very durable.
The second hammer head is all made from plastic (except the piece of spring) and has a "pin" that goes through the handle so that it is a solid construction. Also, not having to use much putty means that it is lighter than the first hammer, which is important for the magnet consideration (heavy weight at end of long lever). There is no putty in this one yet, but I will be using some for gaps and some details.
I think I prefer the pick on the first hammer though, so I'll swap those over.
Thanks Casey.
The scale originally stemmed from the tube I picked for the handle.
The first tube I tried (from a soap dispenser) was just too thick for him to realistically hold, and the second (also from a pen) was exactly the same thickness as the handle on that Terminator. I thought; "that won't do", so I managed to find one that is roughly 50% thicker and so I kept with that scale and made it roughly 50% longer than the Terminator's hammer (it's probably more, I didn't measure it or anything).
Then, as I said, I still thought is was too short until I stood it up next to the Terminator...
All looking amazing, doing a really nice job on this, it will end up looking very dramatic. Hammer looks great.
It is probably far to late in the day, but for the "face", I always fancied putting a "spiritual" face behind glass on a dread. Think I saw it on one of the terrible sequels to Robocop, but imagine a OSL green light on a screaming face behind a plexiglas screen. Kinda like the soul of the guy in the dread. Think I might have to have a go, but if anyone can pull that idea off it is you Doc.
Camkierhi wrote: All looking amazing, doing a really nice job on this, it will end up looking very dramatic. Hammer looks great.
Thanks Cam.
It's taking much longer than I expected. It's amazing how long even little jobs take when you actually come to time them... and it all adds up.
Hammer has had some more details added (still some more to add):
Chaos-ed it up a bit. May still add an eye to it, and it still needs some wires/cables and the handle detail (which I'll do once the hand is on as it will take up much of the space).
The rivets you see holding the rings on are actual pegs that pass all the way through the handle and do hold the rings in place (see insert).
I'm currently working on the hand and I'll have something to show of it soon-ish.
It is probably far to late in the day, but for the "face", I always fancied putting a "spiritual" face behind glass on a dread. Think I saw it on one of the terrible sequels to Robocop, but imagine a OSL green light on a screaming face behind a plexiglas screen. Kinda like the soul of the guy in the dread. Think I might have to have a go, but if anyone can pull that idea off it is you Doc.
Not too late as I've not touched it yet and still considering options.
I have thought about a Cain-like face (which I believe is what you are referring to).
Painting on something like that would save time on the modelling (being absent), painting may be tricky to get the 3D effect... but when have I stood back from something tricky...?!
Still plenty of time to decide and to collect more ideas...
Maybe cover the sarcophagus in loads of eyes, staring in all directions?
Or, if you go for having the face behind the screen, you could try to magnetise it, and have a replacement one for when it gets wrecked, where a rocket has blown a hole in the sarcophagus, and the spirit inside is escaping.
YourIntestines wrote:Maybe cover the sarcophagus in loads of eyes, staring in all directions?
Or, if you go for having the face behind the screen, you could try to magnetise it, and have a replacement one for when it gets wrecked, where a rocket has blown a hole in the sarcophagus, and the spirit inside is escaping.
Thanks for the ideas. I have considered eyes, both painted and moulded on, so that's definitely an option.
Having replacement "faces" is a good idea. It does add to the workload though, so will have to see how the arms progress.
Casey's Law wrote:Nice, is he going to be holding it by the handle as the hand looks a little too open as supplied? The upright looked like a better fit to my eye.
Thanks. He will be holding it up and ready to smash something. I'm creating a hand for it that will be fixed to the hammer, so the whole thing can replace the power-fist. I only used the PF there so you could see the rough scale with a hand.
Speaking of which, here's part one of the hand build:
This will then be "skinned" with putty to get the final look.
I was going to build up the basic shape of the fingers in sprue and then fill in the gaps with putty, but that would require quite a lot of carving down the sprue to size and shape and I might as well just make them in putty while I'm at it... although, I might just change my mind on that... stay tuned to see what I eventually do...
The fingers will be longer than those on the Power-fist. Those stubby fingers are not holding anything...
Ah good I was hoping you'd go this route but I figured it would be too time consuming. I'd say go with the tried and tested on this and block those fingers in with sprue. They are also going to have to be quite large I can see so a good base will be worth the effort.
Well, I could have made the whole hand from putty.
But I would have had to work in stages to build up the bulk (so why not use sprue to make up the bulk and save on putty),
it would have been quite heavy for the magnet to hold (plastic is lighter),
and it's easier to get straight edges and flat (or curved) surfaces with pieces of plastic. The rear in particular needs to be really flat for the magnetic join.
Have not decided on a colour scheme yet. That's not ruled out, but he will be getting many more hands/weapons so it's not all about the hammer.
Progress.
The hand for the thunder hammer still needs work (to give the fingers an armoured look and the trim on the back of the hand), but I have done enough things to give and overview of the whole model.
The thunder hammer has now been magnetised to the arm. A piece of metal is all that was required and holds it well (the shape of the hand/arm prevents any rotation). So you can now see how it will be held.
I've also worked on the attachments for the armour plate:
One for the hammer. Those cables you see coming out of the hammer will be connected up to the powerpack and they are flexible enough to not be broken.
One storm bolter for the powerfist. Two old SM boltguns stuck side-by-side.
and one fuel tank for when the powerfist has a flamer attachment.
These all still need more work and will look more like they are integrated into the armour and not just stuck on.
Casey, I use Milliput silver-grey at present. I keep meaning to try out some other putties, but this seems to work fine for me (except being tricky to photograph).
I must admit when you posted that you were attempting to renovate the Hellbrute into something presentable, the cynical part of me laughed. Well sometimes it's nice to be wrong! Very impressed with this, that arm and hammer is masterclass, such an improvement over the original.
I don't go through putty very quickly and so it seems to last forever here...
thegreatchimp wrote:I must admit when you posted that you were attempting to renovate the Hellbrute into something presentable, the cynical part of me laughed. Well sometimes it's nice to be wrong! Very impressed with this, that arm and hammer is masterclass, such an improvement over the original.
Thanks. Always pleased to hear that my modelling has won someone over.
Jehan-reznor wrote:Looking great so far, can't wait to see your plans for the right arm
Thanks Jehan. Plans for the right arm are floating about, but I'm busy with the left at the moment (there's still two more weapon options to make for the left arm yet...).
Quickly popping in to show progress before returning to work on it...
Here's part 2 of how to make a hand;
Once you have your sprue scaffold, you are ready to cover it in putty.
However, you want to make the shape to fit the arm. You could try and do this on the model, but this may lead to problems. So I used a trick that can be done with Oyumaru (the wonder material!); Make a mould of the end of the arm with one piece of Oyumaru (red). When that is cool, press in another piece of Oyumaru into that mould and you are given a perfect copy of the arm that you can sculpt on. AND, being made of silicone, the putty won't stick to it and it's more convenient to sculpt on.
Then, roughly cover the hand in putty. Make sure it adheres to the surface (some of mine didn't).
Once cured, smooth off to give you the thin parts of the fingers.
Once that is cured you can add the final layer of putty to make the armoured details.
Tidy up once cured.
And I've been working on the attachments and tying them into the armour plate/adding details.
You can see where I drew around each piece to give me an idea of the sizes and where I can add details to the armour plate Vs. the attachments.
The storm bolter is done and I'm now working on the flamer tanks and the hammer's power attachment.
Hmm, that's what I'm wondering. Absolutely amazing conversion and sculpting (that fist for the Thunder Hammer is awesome), but what price your time for this one??
And you're both right to be concerned about the money I stand to make from this. I have thought about it, and once I passed 20 hours work I knew that I wouldn't be making much of a wage from this. Now, having passed 30 hours of work (and approaching 40), I can say; I've started and so I'll finish. And I'll use this as an exercise and practice to improve upon. Somebody is going to get a very good deal if they choose to drop the cash for this.
I didn't know how much modelling I could do in a certain time-frame to see if it was worthwhile for selling. I know that I can get caught in "perfecting" little bits that nobody notices and I keep having to say to myself "that's close enough, stop fiddling". But you have to try these things to know what can be achieved, and can then budget for things in the future.
I also hoped to have this done in time for Christmas, and that's looking less and less likely. But my models do pick up speed as they go along.
It's not all doom and gloom though...
The combi-bolter was finished last time, and now the flamer and thunder hammer are done.
and I've started on the missile launcher and power scourge.
This is the missile launcher, as the PS is just a pile of random tentacles at the moment...
While I was originally going to give both of these their own armour plates, I hit upon the idea of just making attachments like the others and using just the one armour plate. This will save some time, although more would have been saved if I had hit upon this idea before I had already done some work on the additional armour plates. I might just use the original armour plate for the PS and not do anything unique for it...yes, that makes sense.
I was reading recently that it's hard to balance hours worked and pay for painting and modelling. Because it's pretty much impossible to say how long it'll take exactly and because the end product doesn't have the value to cover the labour. Interestingly I've heard folks who are just doing it on the side will not worry about recouping their labour. Many use the much simpler arrangement of producing something that they enjoy doing, can do quite quickly and sell for a good profit. So it's more an extension of the hobby to pay for more miniatures than a business. In effect you buy a kit, build it, paint it, sell it, rinse, repeat. Your balance grows and you enjoy it. I've considered doing it that way myself.
Those are really nice builds, for some reason I can't spot the actual nozzle of the flamer? Am I missing it or is it just the armour plate that is finished and it's going to attach to the weapon?
Casey's Law wrote: I was reading recently that it's hard to balance hours worked and pay for painting and modelling. Because it's pretty much impossible to say how long it'll take exactly and because the end product doesn't have the value to cover the labour. Interestingly I've heard folks who are just doing it on the side will not worry about recouping their labour. Many use the much simpler arrangement of producing something that they enjoy doing, can do quite quickly and sell for a good profit. So it's more an extension of the hobby to pay for more miniatures than a business. In effect you buy a kit, build it, paint it, sell it, rinse, repeat. Your balance grows and you enjoy it. I've considered doing it that way myself.
Yeah, that's pretty much it. I enjoy the doing (and if I wasn't doing this, I'd be doing something else modelling related), so I am not too worried about getting much for my labour.
I do plan that when I come to buying individual kits for my army (rather than the battleforces I've been recently buying), I'll buy two, build and paint one for sale and then keep the other (and any spare bits) for myself. If I can make double the cost of the kit from the sale of that kit (which is possible from what I've done in this thread), then I've got a box of model(s) for free.
That's also why I've been playing about with the moulding and casting of things, and I have a couple of other arty things on the go, to see if I can find something that is relatively quick and easy, and pays well. At the moment, I'm still only just treading water in terms of stuff in and stuff out (and that's just modelling things).
Those are really nice builds, for some reason I can't spot the actual nozzle of the flamer? Am I missing it or is it just the armour plate that is finished and it's going to attach to the weapon?
Thanks.
From what I can tell, on the actual kit (not this DV one) the flamer is a nozzle that you can fit into the mouth that is in the palm of the power fist. As that would have been tricky to make removable, especially as this model isn't made with that in mind, I decided that these tanks would represent the flamer being in use (a nozzle in the palm of the hand isn't that obvious anyway, so this is better, says I). So you can see the pipe going into the arm, and that goes to the palm of the hand.
The flamer thing makes sense although I would personally look to attach a nozzle somewhere, maybe on the plate itself.
So would you say double the price of the kit is a pretty standard return for the level you produce? I've never looked at pre-painted prices too closely because I'm not the market.
Casey's Law wrote: The flamer thing makes sense although I would personally look to attach a nozzle somewhere, maybe on the plate itself.
I will see how things go. I've got to completely scratch-build a fist for the right arm as well as it's combi-bolter and flamer attachments, an idea may hit me in the process.
So would you say double the price of the kit is a pretty standard return for the level you produce? I've never looked at pre-painted prices too closely because I'm not the market.
Well, from the things I've sold so far; SM tactical squad (bronze level) sold (in 5 minutes) for £40, and that's the DV mono-pose models, not the squad kit that is £25 from GW or cheaper elsewhere. The terminator squad (silver level) sold for £55 (again, monopose DV models), compared to £28 from GW. Or £35 if you look at the Deathwing specific kit. The cultists squads (both bronze, but maybe silver really) went for £40 and £45, although you can't buy all those direct they are £6 for 5 models (so £12 for a squad of 10). The librarian (at gold level), by himself, sold for £35. Some of the others weren't so impressive. The bikers (bronze level), for example, only went for £35, and the ravenwing bike set is £25.50.
The Dark Angels half of the DV box, paid for the whole box... need I say more...
The Hobbits... 4 little hobbits... sold for £50.
You pick the right things, and you can make a healthy profit. Although, pick something that few people want, and it'll stick around for a long time, or sell for relatively nothing... Kranon for example.
But in terms of time, I've not even been making minimum wage with any of those sales.
Very few people do make anything close to minimum wage, but there are no taxes or other sorts of, hmm, deductions from your pay, if you are not running the commission service, or are building on spec, as a 'real' business. Not sure how this adds up in the UK.
Not that I am endorsing any sort of "cheating" the Government out of its fair share of the fruits of your labor, mind you.
No C&C, sorry. Just a general impression that the project is going well.
I'd think the only way to really recover the cost - in terms of time and skill - of a modelling project such as this, and at the same time keeping a reasonable level of affordable prices, would be by going into a serial production scheme by moulding and casting, spreading the cost among numerous copies of the final product. If not, you are left in a highly priced, unique art-piece-like situation, of dubious (to say the least) marketing wisdom. You know how most of the greatest artists in history fared during their lifetimes...
On the other hand, there seems to be a niche for short-run casts of customized models, or accessories for doing so/converting.
Not sure how that would apply to this particular build - given I'm not in any way suggesting recasting, but offering for sale the alternative parts totally your creating, plus the instructions of what or where to cut to use your own bits, or where to attach the customized them. Hand, hammer, armour plates, even the feet. Again, maybe this conversion is not the best example - both for the base model being too "rare" or specific to make a conversion kit market viable, but possible to apply to something more general, like tanks conversion/customizing kits (of which I'm sure there are already some for sale, trading one problem for another, but that's a matter for another day!)
Thanks Red. Yeah, I don't really know how it works over here either. But I'll worry about making money first. before what taxes I should be paying on it.
Thanks LT. That's something to keep in mind and I may try with something in the future that doesn't require quite so much cutting up first.
This will be a rare, single piece, work of art (or as near as I get to it in this field).
Thanks Mark. Update incoming...
Here's progress on the missile launcher and Power Scourge.
You may be able to see the stretched skin around the missile tips (I went for similar to the official piece in the modelling), and a mass of writhing tentacles about the base of the scourge. Still need to add the spiky bits to the ends of the scourge.
The magnet and metal join holds these well enough too.
Dr H, this thread is so cool, that Helbrute is sweet but, I might nab some of your crates lol. (Tyranids invaded my table's world during a Chaos invasion, and those gribbly bits sticking out the box and the missiles sold the conversion I could do with your crates.)
Oh, and it is threads like this and Blackhands that give me hope with my resin casting dreams for my spotlights and turrets/crates. I know it probably sounds odd but, you posting your process saves others headaches so thanks.
The prices are very interesting. Thanks for posting.
I think it's hard to say much about those two weapons at this stage. I'm unfamiliar with the scourge and I think the launcher will come into it's own when painted.
Stormwall wrote:Dr H, this thread is so cool, that Helbrute is sweet but, I might nab some of your crates lol. (Tyranids invaded my table's world during a Chaos invasion, and those gribbly bits sticking out the box and the missiles sold the conversion I could do with your crates.)
Thanks Stormwall.
There are plenty of boxes available. You can see availability and prices in my trade thread here on DDakka. Just send me a PM and I'll sort you out.
Oh, and it is threads like this and Blackhands that give me hope with my resin casting dreams for my spotlights and turrets/crates. I know it probably sounds odd but, you posting your process saves others headaches so thanks.
Subbed.
Thanks. As part of my scientific background, it's ingrained into me to "report" failures as well as successes. You can learn more from something that didn't work as expected than something that did.
I like to read about what other people do far more than just the finished pieces, and so I tend to post in the same way. We can all learn from each other, regardless of skill level, and together we improve.
techsoldaten wrote:Wow. That's a lot of work to go to over one Helbrute. Looks really good tho!
Thanks. Yes, it is quite a lot of work. but this happens a lot with my projects With the amount of stuff I don't like about the DV Helbrute, I would be able to produce something I feel is better, if I started from scratch.
But I had the model, and felt I had to do something with it to see if I can push the profits higher (also just to make it slightly less ugly).
Casey's Law wrote:The prices are very interesting. Thanks for posting.
Not a prob'.
I think it's hard to say much about those two weapons at this stage. I'm unfamiliar with the scourge and I think the launcher will come into it's own when painted.
I know what you mean. All should become clear when painted (also a trend with my projects). See below about the scourge.
Red Harvest wrote:Tentacles! Yes! Will you try for the Doc Ock style claws at the end, or something else?
Good to see another lover of tentacles.
From what little information about the Power Scourge I can find, it is a series of metal, jointed tentacles, covered with the usual power weapon energy field, that thrash about with sharp blades on the ends.
So I went for the usual, ringed tentacles. to be painted metallic. And on the ends, blades made from a selection of Eldar and Dark Eldar bits, not claws (although one does look a bit like a Doc Oc claw).
I'm now working on the right arm, and it's looking like I'll have to make the whole forearm interchangeable (rather than just the hand as on the left arm).
First job is to set the position of the elbow and then to build the separate weapons, before I build the parts in-between those where they all have to match... more work than I intended, but necessary.
Today has mostly been taken up with thinking about how to achieve this arm and so this is all the actual, solid, progress.
It's nice to have had an immediate use for the tubes that Camkierhi sent me (because he's a bloody nice chap).
If you can guess which weapons these will end up as, then I've done my job right.
They will all be bulked up to match the Multi-melta and therefore give me the same "footprint" to allow them to be swapped.
The plasma and the power fist will require the most work though. Still I've had practice of making a fist already.
So top to bottom we've got twin Las, twin HB and twin AC? A second power fist would be great, I wonder if there is anyway to easily reverse a mould of the other hand. I can't think of one...
Indeed they are.
While I could have scratch-built the Las, I had the turret of my Predator sat there unused, and so cut off the barrels and mounted them over-under (although I spent quite a bit of time making sure the join line disappeared).
It would probably be quite easy to mould the power fist and then cut and move the thumb. The hand and fingers are very symmetrical. This is an option I'm considering. I also have the armour plate that I didn't use on the left hand that I can use here.
Casey's Law wrote:Aah, that's always the issue, the asymmetry of a hand. If it's quite symmetrical then go for it I say.
Nothing a little extra putty and/or shaving can't solve.
Camkierhi wrote:Hands is ard.
Glad they arrived safe and sound.
Hands are indeed tricky buggers to sculpt/carve. Although, the less like human hands they are, the easier they are to achieve (uncanny valley). They did, and are proving very useful. Thanks again.
So, I have been quiet for a little while, but I have been busy. The problem is that with parallel construction, lots of work = little progress on any one thing. So I had to save up the various steps of each weapon to give you all something to look at, and not a billion updates of "I stuck a piece of plastic to this bit" and "I added some putty here".
What has happened? Heavy bolter: I changed how the barrels attached to the bulk of the gun (just some spacers) and I've positioned the ejector ports. Much more to do to detail this up.
Las Cannon: I made a 2-side cast of 2 sections of the Predator turret Las cannon battery (this gives me a hollow inside) and I've stuck the top parts of two SM backpacks together to make a vent section. Gaps will be filled and some cables added.
Reaper Assault cannon: The body was built by "skinning" a skeleton (just to get some practice in this method. Took a few attempts) and I made two ammo' pods out some some rod (also from Cam). Added some putty here and there.
Power fist: Made a cast of the original power fist, using Oyumaru (I could kiss the person that invented this stuff), minus the thumb. Then made a cast of the thumb separate. Attached thumb on other side. Some of the casting didn't come out perfect, but a tweak here and there will sort that out, makes it unique. I may fill in the mouth that I couldn't cast.
Plasma cannon: The coil was made by wrapping some wire around a piece of sprue and then casting that. The cast was then assembled with sprue and some plasticard. Filled gaps with putty and now the "mouth" is being worked on. This is made from the front piece of the original Helbrute model, cut as shown and glued into a ring. Why not just use the ring in the middle? It was too big and the teeth were too small, and I still have most of the ring, for the use of, later on.
Really like the add on bits to the ends of the tentacles, really gives the extra character. How about a nice big circular/chainsaw blade CCW for the right arm? You know this guy might turn Khorne at any time.
Thanks, Da Big Mek. Yeah, it's not the easiest model to work on. At least being plastic, it's easy to cut and glue.
Thanks Casey. Hopefully it gets better looking as I go.
Thanks Shas.
Thanks Mark. Once I've got this arm and it's weapons done, and decided what I will finally do with the "face", it'll be time to paint. I even have a vague idea of a paint scheme already (this is a rare occurrence).
Thanks Weety. I almost feel as if I've found my calling, if only I could get a decent wage doing this sort of thing...
Thanks Theo. I've got enough work to do on this thing just making the official set of weapon options, without adding anything it's not meant to have. While it would be nice, not this time.
So, I now have the main bulk of the weapons assembled and the first "layer" of details added (some more than others).
There are many gaps to fill, chaos detailing to be added, and something to tie these into the arm that they are to be attached to.
That last part is what is next. I will need to find a way, for each weapon, to attach to the arm (that needs building), so that the arm can be built to attach them to...
Thanks Casey.
They all need work, here and there, to bring them towards the same aesthetic. Some have diverged a little at this stage.
But, before I can start playing about with how they look, I need to know how they will all attach to the arm.
I aim to have them all overlap the end of the arm so that they hide the join.
You can see at the rear of the Heavy bolter the shape I have cut into the plastic. I can do this on this one as I have a nice attachment point inside the body of the gun and so the overlap is already set. All the others have pretty much flat rears and need building outwards to surround the arm...
...But before I can build something to surround the arm, I need the arm so I can get the shape and size right.
I also need to know how these will attach so that I can get the length of the arm right...
In short, I needed to build both first, so that I could build the other...
I have been thinking about this for quite a while, and in the end I decided to just go for it and adapt as it goes.
So, arm build.
I was hoping to keep a fairly robotic look to it, but as I was adding the putty and building it up to the existing shoulder where the stubby arm originally attached I found that I had to extend the flesh all the way to the elbow to keep it looking natural. However, I can keep the new elbow mechanical looking.
A couple of things of note;
I did shorten the upper arm a bit, before I added the putty. The arm though, is still very long once you add the various attachments. But then there is nothing to say that a Helbrute isn't a knuckle-dragger.
I will be adding armour plates over this and there will be some wires/cables. This is just the base shape.
So near and yet so far. Still have to finish detailing the weapons, Make the flamer and combi-bolter attachments for the power fist, Finish the elbow joint off, Add armour plates to the upper arm, Rivets all over the place, And the face...
Then paint...
Speaking of the weapons, this is the current state of affairs: The heavy bolter is the nearest to being finished. A couple of little additions, probably wires, and that's it. (not including rivets and battle damage) The power fist needs the inside armour plate and then the attachments making. The Auto cannon needs it's chaos detailing and some wires. The Las Cannon needs some chaos detailing added to make it look less standard. Then the plasma cannon and multi-melta both need their rear halves built just to bring them up to the rest of the weapons.
The hand is quite permanently attached to the forearm (pinned, glued and now puttied), but it is all putty and so can be carved/modified. What don't you like about it?
I know it looks massive, but it is the same size as the original and I hope it's just the whiteness of it that makes it look huge.
I love your work here, it really is amazing.
How are you going about casting your own parts?
I'd love to try some of my own, particularly for scenery pieces (I could never have enough bits!)
gotbugs wrote: I love your work here, it really is amazing.
How are you going about casting your own parts?
I'd love to try some of my own, particularly for scenery pieces (I could never have enough bits!)
Page 2 here: for the start of the mould-making process.
Page 9 here: for the whole process of making my sinks, baths and hand-dryers.
But in short;
I make the original piece from whatever materials are necessary (and cheap/free so that many attempts can be made at little cost),
I then make a mould of that piece with Oyumaru,
From that mould, I make a putty cast (or many),
The putty cast is then cleaned up to as near to perfect as I can get it, This is now the master,
I then make a mould of the master(s) with silicone,
Then I use those moulds to make resin casts.
It is deceptively simple, put like that. I would recommend reading/watching as many tutorials as you can find. Learn as much as possible about the process, before buying anything. Being prepared before you start is very important when it comes to moulding and casting, and that includes having all the equipment ready, not just knowing what you are doing.
Once you get into it though, and you are prepared, it is quite easy; just mixing and pouring liquids. Designing the moulds is where I find my brain is really used.
I can send you a PM with more info in (such as the materials I have used, etc), as I have sent that to a few people to help them start.
Casey's Law wrote:Yeh I'm not sure what it is, maybe just the white as you say.
Will have to see then, I have made some minor changes about the thumb and have filled in the inside of the arm. I'll add some of the details to it and then prime it so that we can see...
shasolenzabi wrote:Looking almost ready for the paint work
One step forward, and sleep-walking back again...
I wasn't pleased with how the plasma cannon was shaping up, so I've cut that up and have started again.
The Las cannon may be following it...
ayoku wrote:Looking awesome Dr H The bolters are my personal favorite on this bad boy Keep up the good work Grtz
Mark
Thanks Mark.
Considering it is just based on a box, the heavy bolter has turned out quite well.
YourIntestines wrote:The arms, other than the bolter, seem too long.
I know what you mean, and that is reason I posted the pic's back-to-back, to see if anyone picked up on it.
The power fist is exactly the same as the original one (in dimensions at least), but the elbow joint is slightly larger, so overall it is slightly longer from the back of the elbow to the hand. However, I can't fix this without sculpting a whole new hand, and that's too much work.
The Auto cannon, is meant to be long (especially compared to the bolter and melta). The box on it is also a little too large, but again would be too much work to re-make from scratch again (this one took 3 attempts). I've now detailed this weapon up to match the heavy bolter.
The las cannon suffered from a couple of problems in it's build. It is meant to be long and this was how I was building it, the length of the barrels only add to the length. However, the body of the weapon turned out to be too narrow to fit over the arm (as all the other weapons do), and so I had to build out and over the arm join. This meant that the gun didn't get shorter like the others. Also, I got carried away with the detailing of the gun's surfaces and forgot to add the edging that can be seen on the HB and AC, I've tried adding some extra plastic to the front edge, but it's not as neat as it could be and would be just as much work to get it right as to re-do the whole gun... this means...
As I said, the plasma cannon is being re-built, and while I've been cutting plastic for that, I've cut some for the las cannon also. If I build that from the arm forwards, I should be able to keep the length manageable.
So that means I have 2 weapons ticked off, 2 weapons progressing, and 2 weapons being re-built...
YourIntestines wrote:The autocannon might look less unbalanced if you extended part of it back over the elbow.
Ah yes, I did add some more at the rear since that last photo, but only squaring it off really (see below). but I like that idea, I may add an armour plate sticking out the back. It's the only weapon that has the width to do that on anyway.
shasolenzabi wrote:Plasma cannon was looking "stumpy" maybe a bit longer?
The Twin linked Las-cannon does have a boxy looking main body, but I think some angled edges as opposed to 90 degree box patterning will help
Yeah, the plasma cannon was to be extended back to meet the arm, but the more I added to it, the smaller the plasma coil looked and whatever I did to it, it just didn't click for me. The mouth was off centre as well.
The various Las-weapons seem to have a technology-in-a-box look to them, and I wanted to keep that feel. Will see how it progresses though.
Both the Plasma cannon and the Las cannon have been cut up, ripped apart for pieces and are in the process of being re-built.
Here's some pictures to show the "finished" Heavy Bolter, the nearly finished Auto cannon and many angles of the power fist.
Also notice the added armour plates on the upper arm, these still need some tidying and sharpening of the details, but the added bulk helps with the balance of the whole arm (no longer large blobs on the end of a stick).
Until next time...
All looking brilliant, excellent conversions/ scratches of the weaponry. Magazines are a particular favourite.
First off, I like them all as is.
BUT... If you are overly bothered by the length then change your pivot point. It wont hurt it any to be wider, so cut it off at the elbow, and stick it on the side of the elbow, knocks the whole thing back 10mm makes all the difference. Know this from personal experience.
But I think it looks great as is. The only one I think looks a bit "long" is the hand, but that to me gives it a slight "pink horror" vibe, oh go on paint it bright pink!
I honestly think you are done as is, and should get some paint on it.
Camkierhi wrote: All looking brilliant, excellent conversions/ scratches of the weaponry. Magazines are a particular favourite.
First off, I like them all as is.
Thanks Cam.
BUT... If you are overly bothered by the length then change your pivot point. It wont hurt it any to be wider, so cut it off at the elbow, and stick it on the side of the elbow, knocks the whole thing back 10mm makes all the difference. Know this from personal experience.
But I think it looks great as is. The only one I think looks a bit "long" is the hand, but that to me gives it a slight "pink horror" vibe, oh go on paint it bright pink!
I honestly think you are done as is, and should get some paint on it.
Thanks. If it was for my army, I would play about with it and re-sculpt bits and pieces (going back and fourth for months), but this is for sale and I can't take forever with it.
Chopping it back to the elbow would mean re-doing all the weapons, not to mention the upper arm that would invariably need tweaking. There's also the risk of things interfering with his knee there too.
As I said, he's a bit of a knuckle-dragger... I'll probably paint the fist up to represent this...
What have I got to show you today?
The Multi-melta has now got enough bulk to allow me to attach it. There will be more detail added to that top part.
Las Cannon MkII is taking shape (and that shape is largely square, sorry). This is over half a centimetre shorter than before and is now roughly the same length as the AC. Any shorter, and I did look at this, and it just didn't have the bulk to look like a weapon, it was all barrel.
And progress on the combi-bolter attachment for the power fist on this side. Still needs more work, as does everything...
The Auto cannon has the added armour plate, but that needs work before I can show it.
The plasma cannon is still in pieces, but there are less pieces than there were last time (as some have been stuck together).
Progress...
Continuing from last time, the combi-bolter attachment has had a cable added that helps to centre it on the power fist.
The flamer attachment is built. This time with a nozzle as I have filled the palm-mouth on this power fist. I always thought that those end pieces of sprue were an interesting shape and have found the perfect use for them, a flamer igniter.
And there is the answer to the question that literally ...none... of you asked; what is the lucky owner going to do when they want to run this with only the power fist with no bolter or flamer? I made a thing for that (press mould job).
Also, progress on the weapons.
The Auto cannon has an armour plate. I made it angular and pointed to make it more dangerous looking. It's also curved to match the curvature of the cannon's body.
The Las Cannon has had a few details added, including some optics (also a random piece of sprue that I thought looked interesting).
And the Plasma cannon is now taking shape, again...
Thanks Cam. And speaking of details, Moar details...
I've added some studs to the power fist. I was going to add spikes/blades to match the original, but the closer to the original I made this one, the more effort I would have to put in to make it identical. That would mean, if I was to add spikes, I would have to add 3 spikes, in the same place, and in the same sizes. Any slight differences in this would then jump out. So by doing something completely different I don't have to worry about that. Only put them on the lower side as that's the bit he'll be hitting people with. This finishes the power fist (except rivets).
The Las cannon has had it's final details (except rivets) and is another weapon ticked off. 2 to go...
The MMelta has had most of it's details added, just a couple more bits left to add.
And the plasma is getting there, but much more to do.
That completes the building of all parts, and laying them out is quite impressive. The volume of "white" indicates how much work has gone in to completing this model (and you can't see all of it).
The next job will be to prime everything and check for issues, do some final tweaks and then riveting...
Well that is a beast. Hope someone will pay you bulk monies.
A decent wage? What's one of those? I've heard the legends of the decent wage what folks used to get in the before-time. Also ancient tales of sick-pay and pen-sions and job secure-ity, but I feel certain they must be mythical.
I know what you mean. I have had a decent wage as a postdoc research assistant. It didn't come with those other strange things though.
And so, it is done. Riveted, primed and ready to go... on to painting.
You will also notice that I decided on the face... and that it wasn't going to look like a face.
The thought process being, that if I gave this chaos dreadnought a face (however evil I managed to make it) it would be giving it a vulnerable side... I already removed the bare head due to physical vulnerabilities (what's the point in armour if you can shoot it in the head), but any face would make it more "human". I decided that it would be scarier if it had no facial features and would then be causing great violence with a blank look.
"it can't be reasoned with, It doesn't feel pity, or remorse, or fear. And it absolutely will not stop, ever, until you are dead"
The blank area under the slit will be for some free-hand work (as yet undecided).
These pictures should show all the important modelling details. Paint will bring out the rest.
Yes, I know, I haven't riveted the underside of the power fist. I'm going to do that now.
As is usual with how I tend to work; slow to start and speed up as I go... Painting is in progress, but I had to start on the flesh and that is slow to paint.
Thanks Mark. Paint should happen faster than the building... should...
Thanks Red. You may have seen that before, but I hadn't. The pose is pretty much the same as it was on the original model, I've just changed which foot is raised.
Glad you think it's an improvement, hopefully everyone thinks the same (truest test with be those that actually liked the original).
One day, I'll show what I think the shoebox should look like.
Camkierhi wrote:You not painting yet! Jeez
JK great stuff.
I am, Cam. I am.
I hope so too, Casey. It'll be a good deal for anyone, however much they pay. Good learning experience for me though.
Thanks Shas. Here's progress on Batman then...
As I said, I've started on the flesh and for a while I thought that I had lost the knack of painting as it was looking pretty horrible (that's why you haven't had any updates until now). But now after many layers, the flesh is starting to come together and look like flesh, with shading an' everything...
There is much more to do. More highlights, picking out individual details and then an idea I have had to make it look less squidgy...
That is the bomb. I'm so impressed that if I won the lottery tomorrow I would immediately employ you for my sculptor team. Sadly I'm as poor as a church shrew. But I will buy a ticket and keep my fingers crossed for you.
Casey's Law wrote: You know, it never crossed my mind that you'd paint the flesh in a flesh colour. I like a surprise.
It never crossed my mind not to paint it in a flesh colour... Actually I did consider it, but I don't like what GW did on the "official" scheme, where they have painted the flesh the same as the armour. What's the point of going through the effort of adding all the fleshy details and distinguishing it from the armour plates, and then painting them the same?!
I wanted to keep this as universal as possible, so some colours were out due to their links to the certain chaos gods (green for Nurgle etc...) and pink skin is the most universal (not too green or too blue, etc.), distinguishes the flesh from the armour, and will blend with one of the colours I have chosen for the armour (which shall remain a mystery to maintain some level of intrigue).
However, the plan will (hopefully) make it look less baby-soft, but I need to make it flesh-like first.
weetyskemian44 wrote: That is the bomb. I'm so impressed that if I won the lottery tomorrow I would immediately employ you for my sculptor team. Sadly I'm as poor as a church shrew. But I will buy a ticket and keep my fingers crossed for you.
Thanks Weety. Means a lot. I shall keep my fingers crossed for you too.
Fleshy parts look great You gonna create a more bruised flesh effect by adding some purple/red wshes? or will it stay a bit healthier looking flesh?
Keep up the great work DR H Grtz
Mark
ayoku wrote:Fleshy parts look great You gonna create a more bruised flesh effect by adding some purple/red wshes? or will it stay a bit healthier looking flesh?
Keep up the great work DR H Grtz
Mark
Thanks.
Yeah there will be parts that will differ in colour. All the hoses mostly.
and there will be red and sore areas around the attachment points.
This is just the base colour that will be blended/washed into other colours/tones.
Camkierhi wrote:Looking great, and I think he's a J&J babyoil fan, nice smooth skin. Great job so far.
I'm thinking more WD-40 than J&J, wait and see...
shasolenzabi wrote:I find the right colored wash also helps with fleshes.
Yarp.
I've done the highlighting as far as necessary at this point and am about to decide upon what colours the differently coloured areas will be... I think the ribbed areas will be deep blood red to start with and the rest of the hoses will be variations on purples and greens... with some reds and blues... and some yellows... make 'em repulsive...
Looking nice - in its own very particular way - and smooth so far.
But now after many layers, the flesh is starting to come together and look like flesh, with shading an' everything...
Out of curiosity: around how many layers is many? and how many different tones in those layers for the shading? (Still using enamels, right? Not sure if it would apply to acrylics too then, but I could use the reference anyway).
Littletower wrote: Looking nice - in its own very particular way - and smooth so far.
Thanks.
But now after many layers, the flesh is starting to come together and look like flesh, with shading an' everything...
Out of curiosity: around how many layers is many? and how many different tones in those layers for the shading? (Still using enamels, right? Not sure if it would apply to acrylics too then, but I could use the reference anyway).
Right, so my typical skin tone goes something like this:
Brown base coat (Humbrol 186) over black so it's on the darker side. Cover everything and make sure to get into all the crevices.
Over that, but not into the deepest of crevices, I paint a light brown (62).
Then a layer of "sand" (63) leaving a little of the previous in all crevices.
Then I start on thin, transparent layers of paint...
Over everything, but not too much in the crevices, a layer of flesh (61) with some red in it (usually Scarlet 60, but this time Crimson 20). I will usually add other colours here for ill-looking etc. flesh here instead of red for healthy flesh.
Over that, but not so deep into the crevices, a layer of flesh. *This is where it was at as you see above*
Then, depending on how light you want to go, highlight layers of flesh and "bone" (Oak 71), adding more bone each time. Usually 3 layers to get a smooth finish, and then a final layer with some white in for the last highlights.
Repeat any and/or all layers to get the desired affect. I can't really give accurate quantities of the mixes or the thinning as I do it all by eye each time.
However, on this occasion, I didn't get the consistency of the paint right for a few of the layers and they had to be done 2 or 3 times... Hence "many".
I've only done 2 passes of highlights on the flesh now (well I did repeat the first layer twice ), the second with a little white in, as I have other plans for the finished piece.
It's a long, laborious process. But I've found that this is the only way I get reasonably good flesh tones. Other colours, for armour etc., I manage with far less work.
Great, crystal clear break up of your process, thanks Your modelling and painting skills I admire, buy your teacher and tutor aspects are what I enjoy - and learn from - the most.
Littletower wrote:Great, crystal clear break up of your process, thanks Your modelling and painting skills I admire, buy your teacher and tutor aspects are what I enjoy - and learn from - the most.
Glad to help. I've learnt much from DDakka and like to give some back every now and then. Thanks.
Red Harvest wrote:Flesh is the perfect color for it. But as you say, many layers, almost like glazes... That's how Leonardo used to paint, I hear.
Thanks, Red. You could say glazes, but I wouldn't know, I haven't used any. I just work with various consistencies of the same paints: Washes are heavily diluted, glazes, less so, undiluted for dry-brushing, etc... There's no messing about with flow-aids, drying retarders, whatever, just paint and white spirit in various ratios. Stuck in my ways or scared to move on to join the acrylic master race... who knows. I know what I'm doing with these and the results speak for themselves, good or bad.
Er, anyway, onwards...
Here's the first lot of changes to the flesh areas.
So, I've added some variation to some of the hoses/cables/whatever they are, and I've added some redness/bruising around the various parts where flesh and metal meet.
Next job is to paint the smaller wires and the metal parts in and around the flesh. Then I'll be able to see where to improve the flesh/metal areas (red wash).

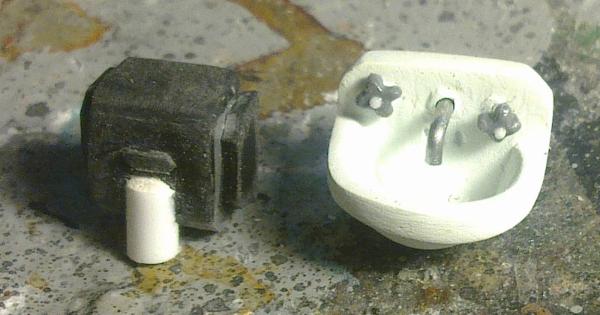


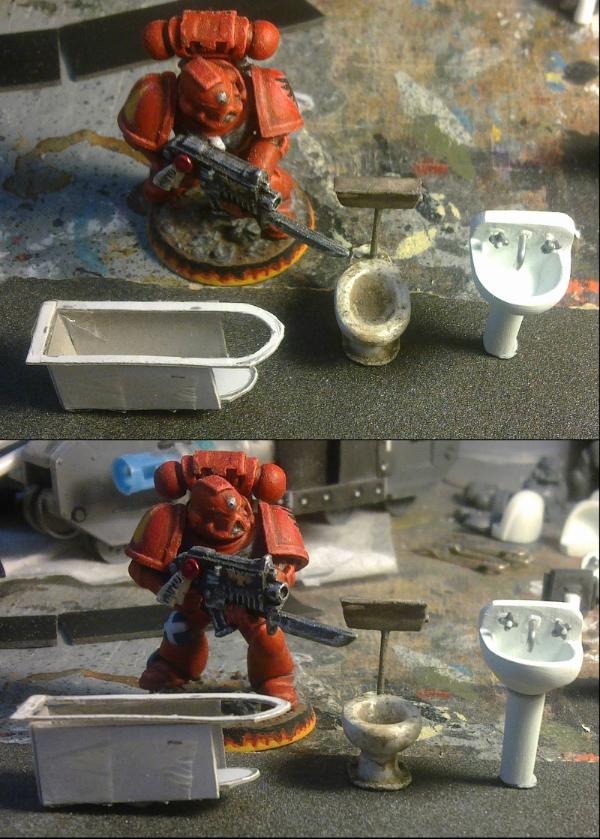


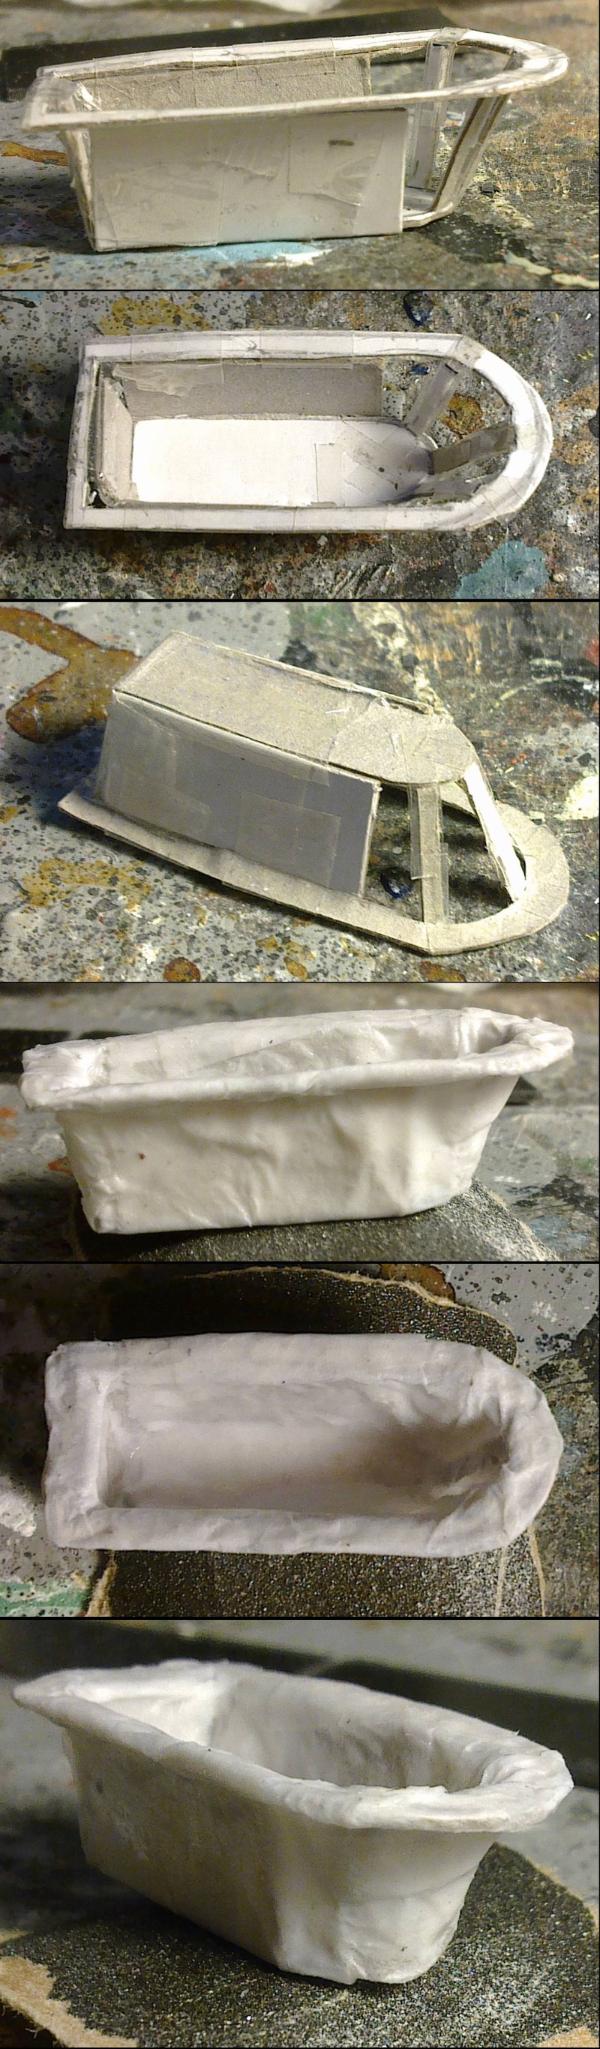

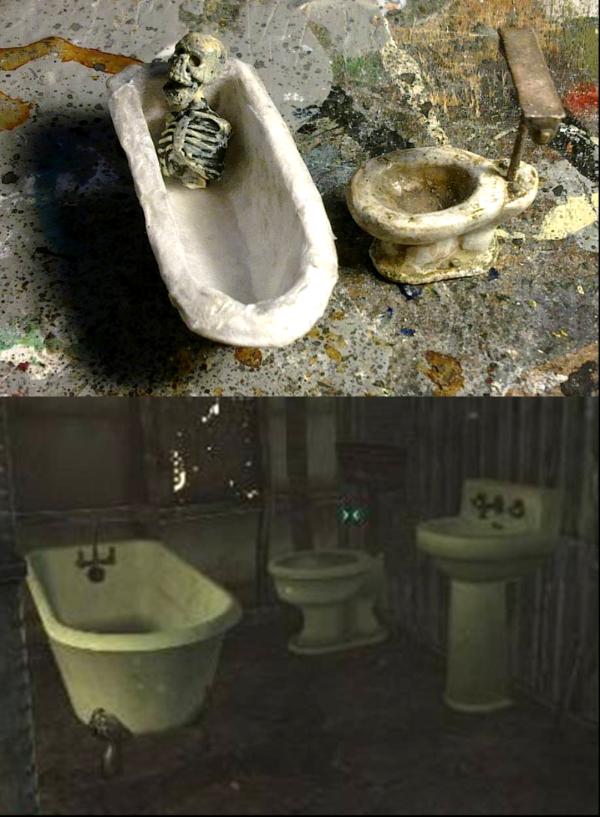
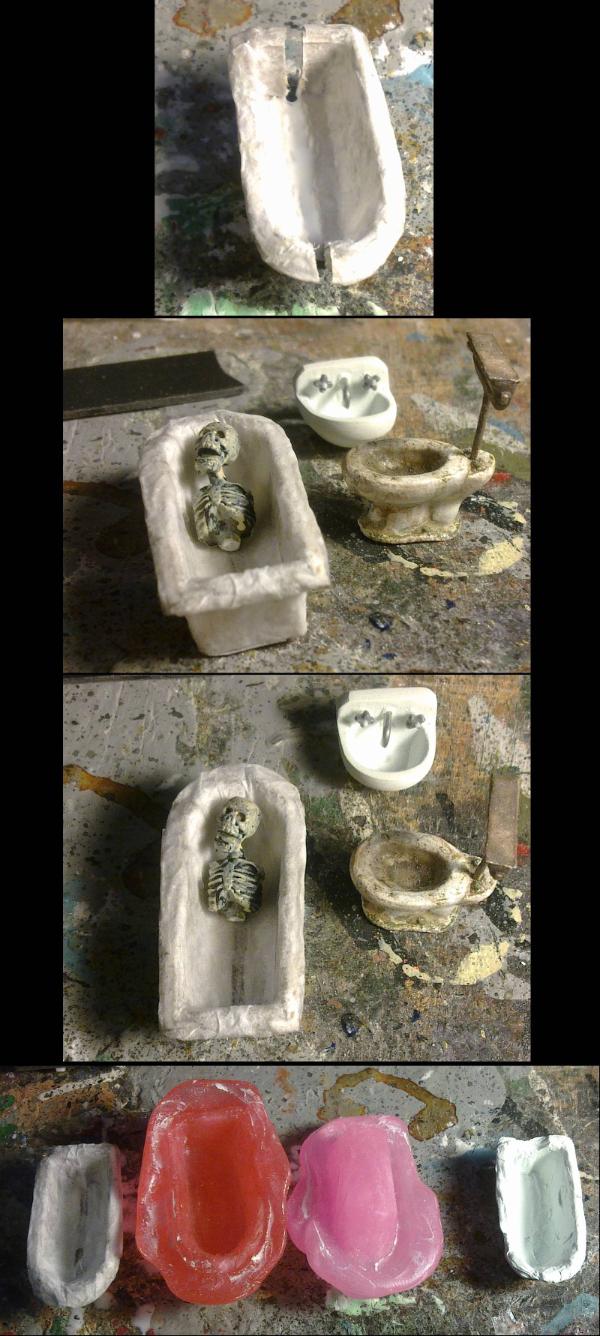
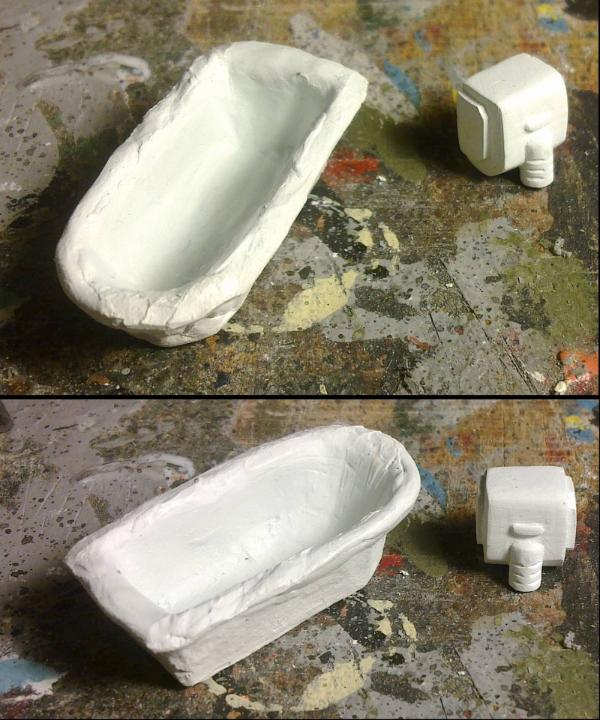

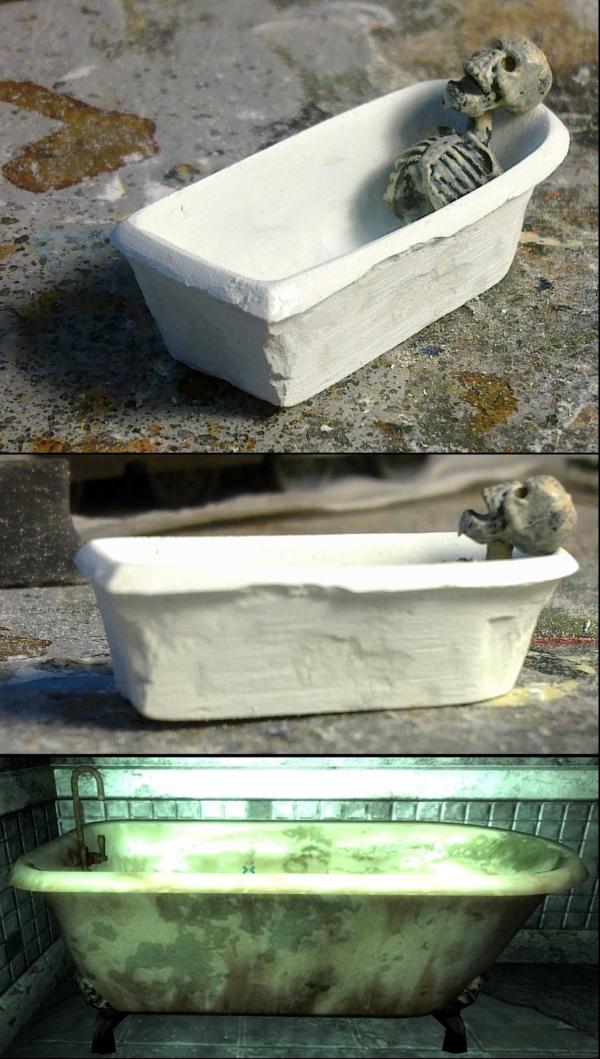
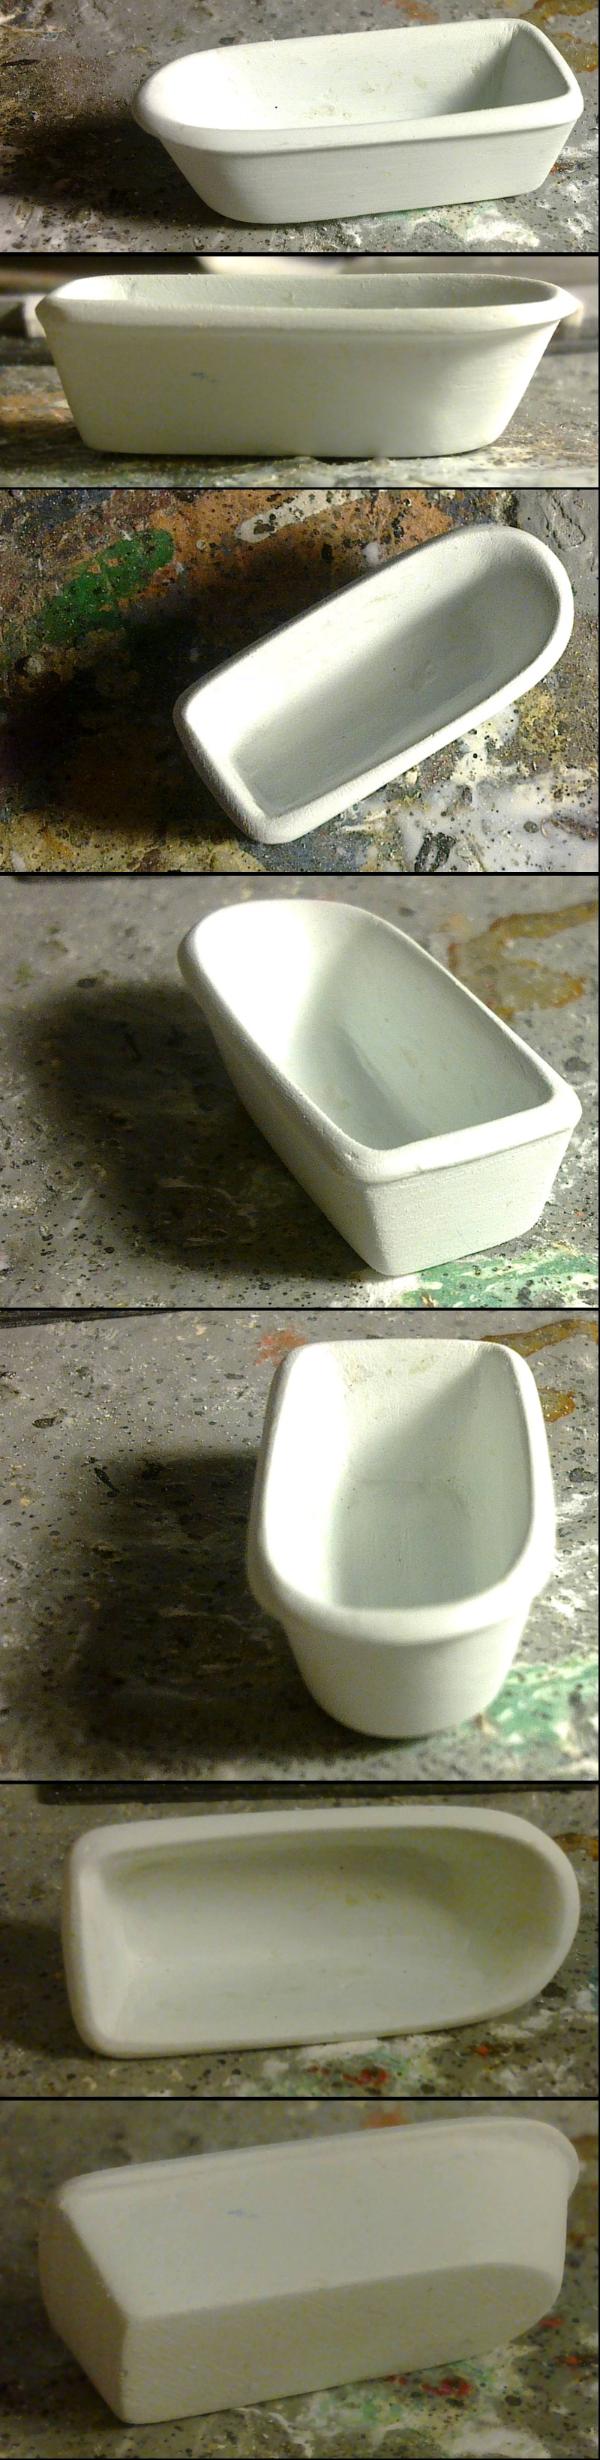
 I will fill these in and then make a copy before moving on to the details.
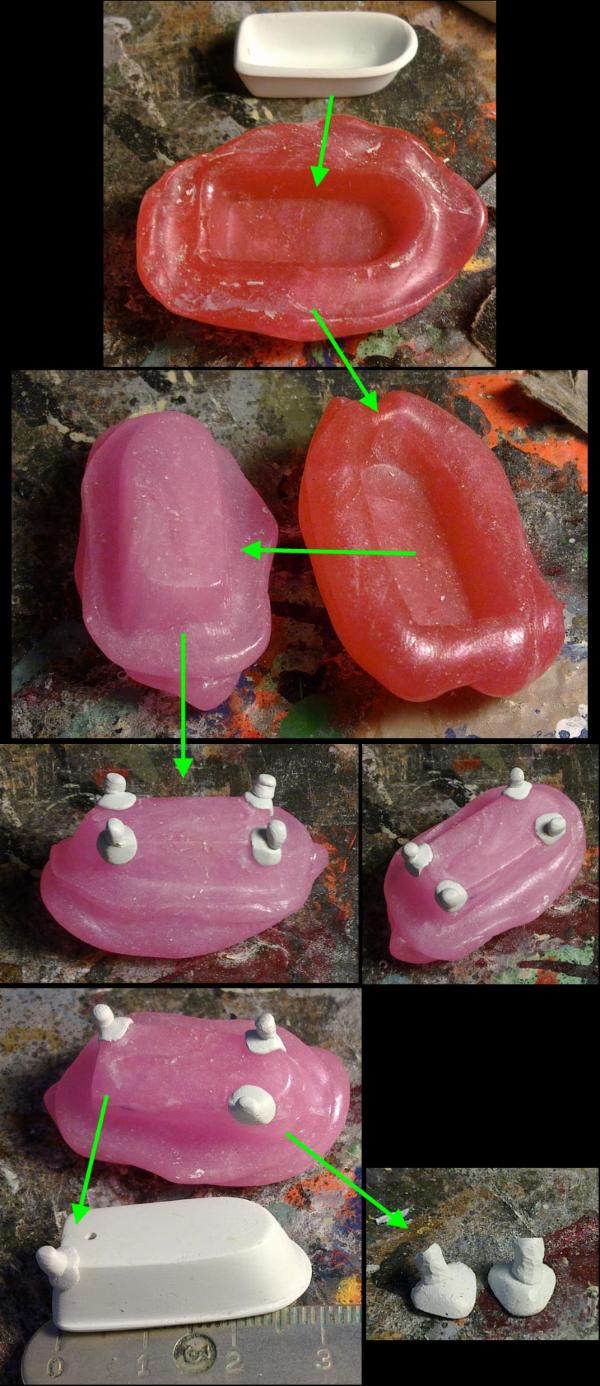
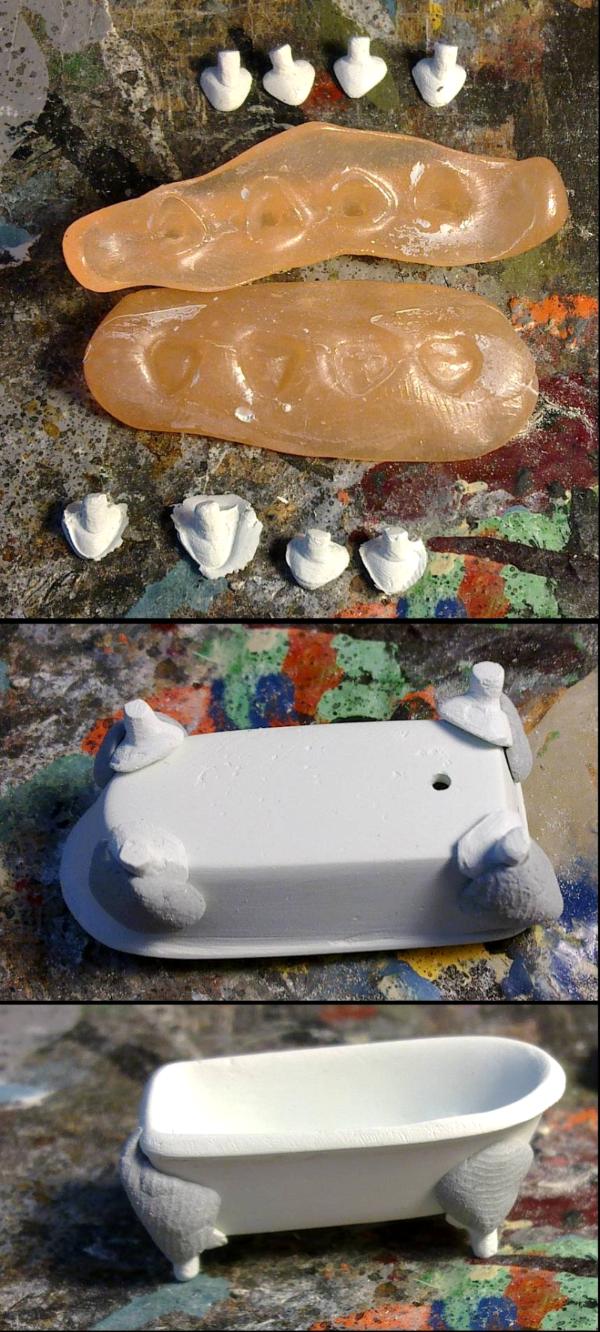

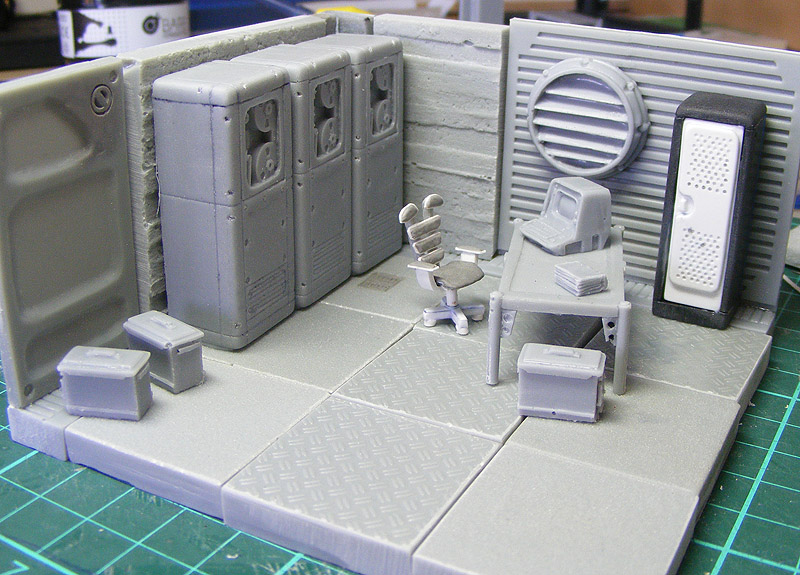
 I'm going to have to get around to vault things eventually too...
 )
)