You will have noticed there was no production for Christmas. They have been postponed until Easter because I had an eye infection that meant I couldn't look at things throughout November and early December (when I'd usually be planning the builds).
So look forward to Easter when I'll return here.
In the mean time, I have started painting my latest creation in my other (mad) blog. Updates to follow over there...
Easter approaches and modelling has started up again.
Before pictures, some life:
We have some builders in for a new kitchen. This has caused a not inconsiderable amount of disruption.
The old, sinking (trees undermining the foundations) conservatory needed to be removed, then new foundations dug.
The new extension built and then knocked through into the existing kitchen and into half the garage.
What we're keeping from the kitchen has moved into the dining room,
And half the garage needed emptying of junk (most unseen for decades).
Existing kitchen has been stripped out and the new is being added... this is where we are now (no kitchen).
So time has been taken up with moving stuff around.
I did inherit some things, among them a nice little vice and my Dad's old models:
Which have sat in boxes in the garage for decades having originally been built by a teenager ~60 years ago.
If you want to see a thread of what they looked like coming out the boxes, follow the link to my Twitter: https://twitter.com/Dr_Steve_H/status/1489298769770393603?s=20&t=pNBLzE-CFsPdGW_OUQGzYw That should take you straight to them.
There was mostly planes, but also some ships. All in a bad shape from age and teenaged building and painting.
I selected 2 planes to (eventually) save, but the rest of the models have been broken down to parts/raw materials for my modelling.
They were destined for the bin, so this is a lesser evil.
But as I said, Easter approaches, and I need to build the Christmas presents I didn't build then (see above), so another push to get some modelling done.
We'll have to see if I can return to the Raider afterwards...
Also, Mother's day happened here in the UK, and I got some earrings done for that:
This time modelled by the lovely flying Kroot, some Peacock Butterfly earrings.
And I can show you the wip for 1 of the Easter Christmas presents:
This one is using the same method I used for Lara Croft, for the same effect. Can you guess what it is yet?
I'll try and return with more in a more regular way...
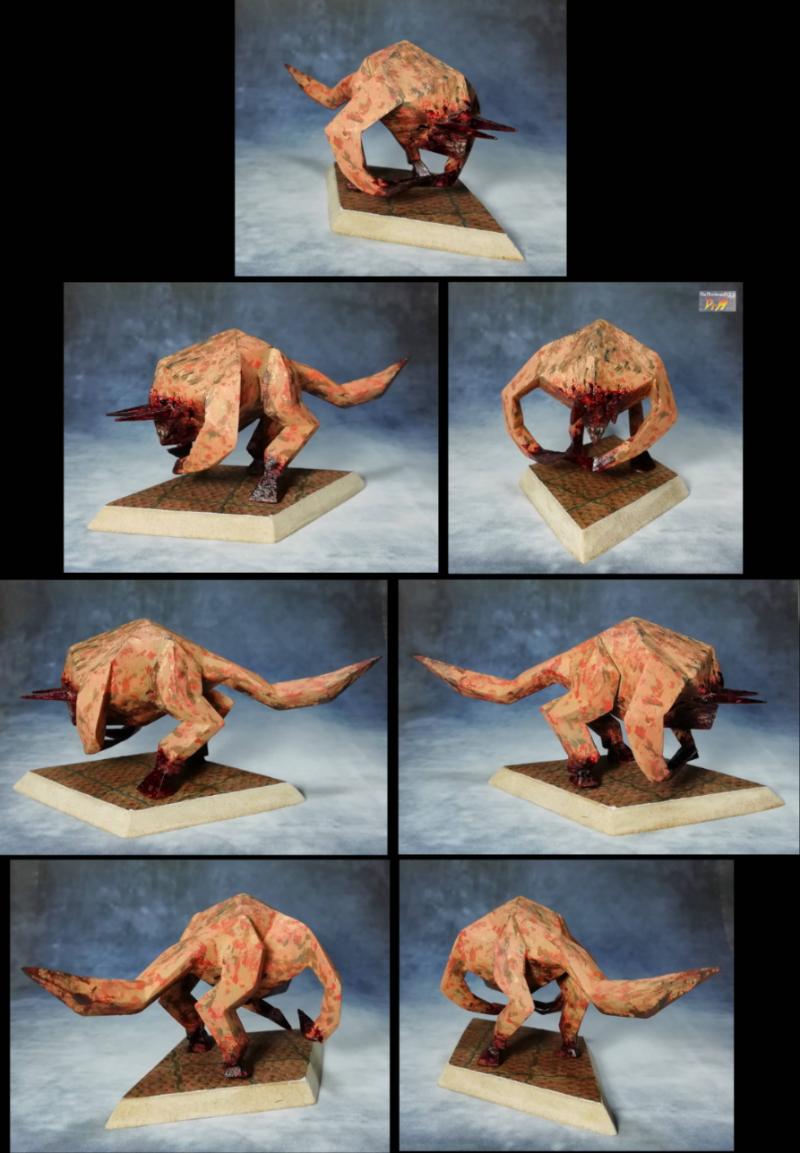
And with the tail on, it actually balances before I've got to finishing the feet/hooves.
I'd like to say I planned that, but I've been making this up as I go.
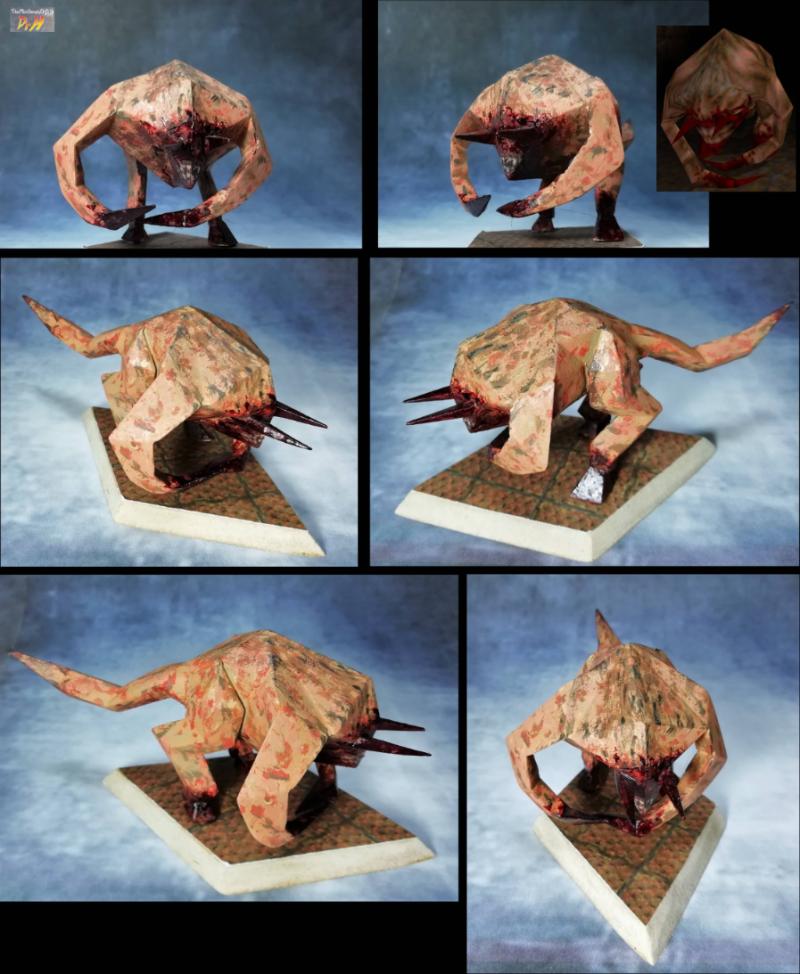
Project #4 has required quite a bit of experimentation and I wasn't sure where it was going for most of it. But now it appears to have worked so I can show you where we are (but not how I got here, I'll have to explain it).
Present #3 (not shown) also had a failed prototype and has changed form... and the painting of that has been tricky (creating a visible blend within 5mm distance). I'm happy with how that has now come out, but need varnish before I can show you.
Present #2, the "fiend" above, has been painted and is awaiting some printing out to finish the base like that of the Cacodaemon before.
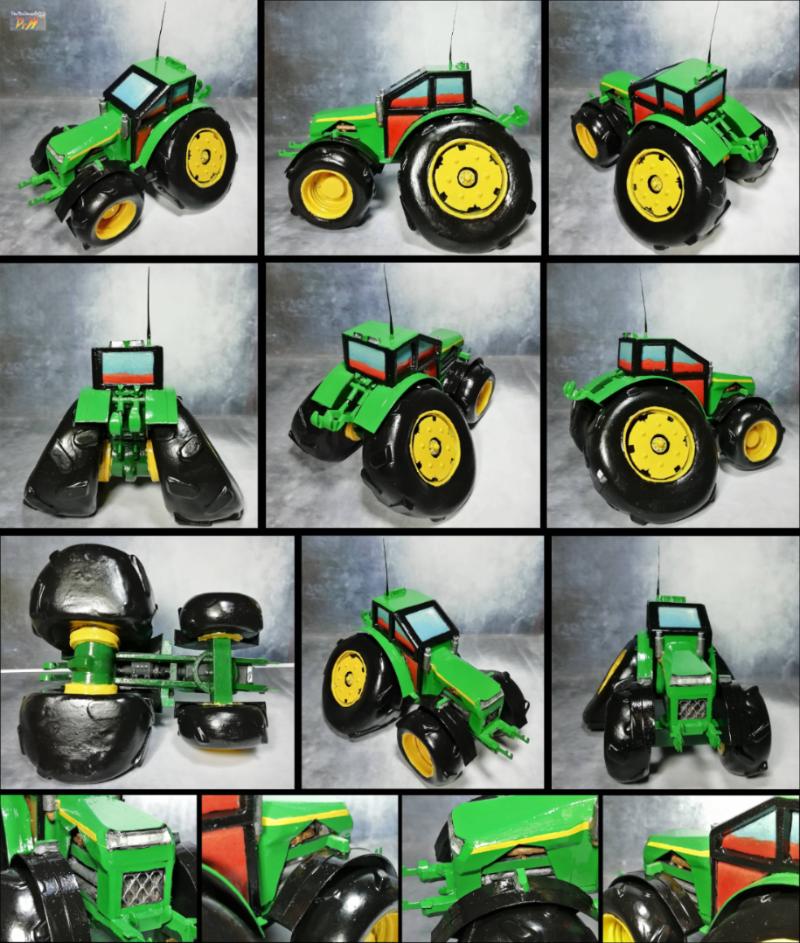
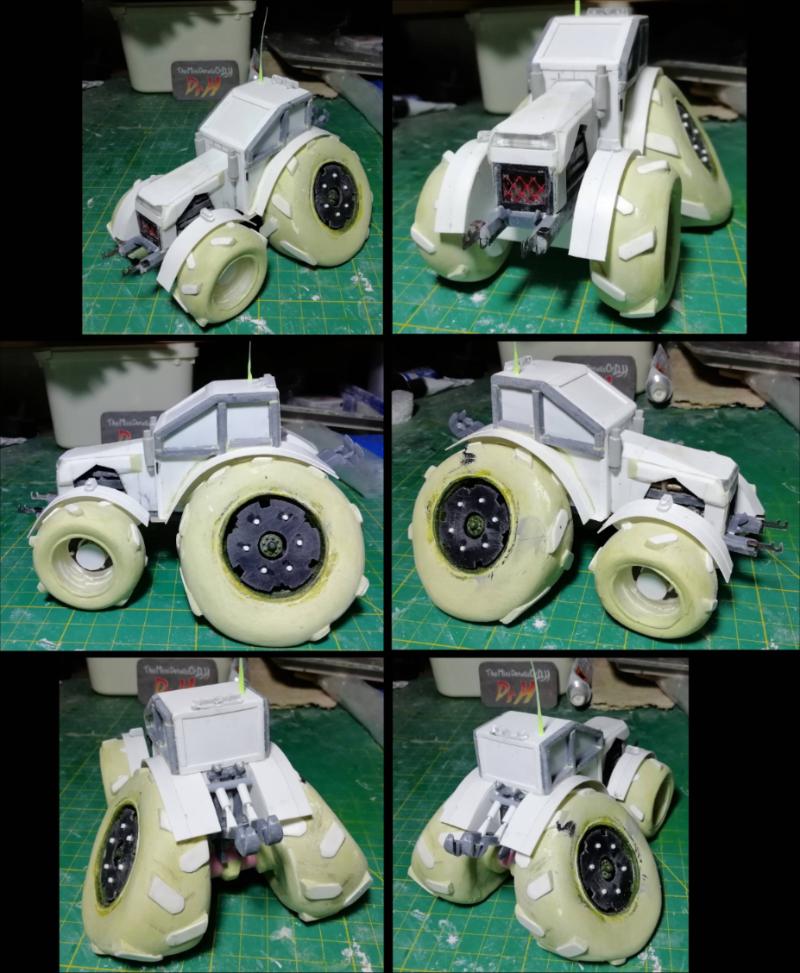
And so, here is progress photo of Present #4. Can you guess what it will be?
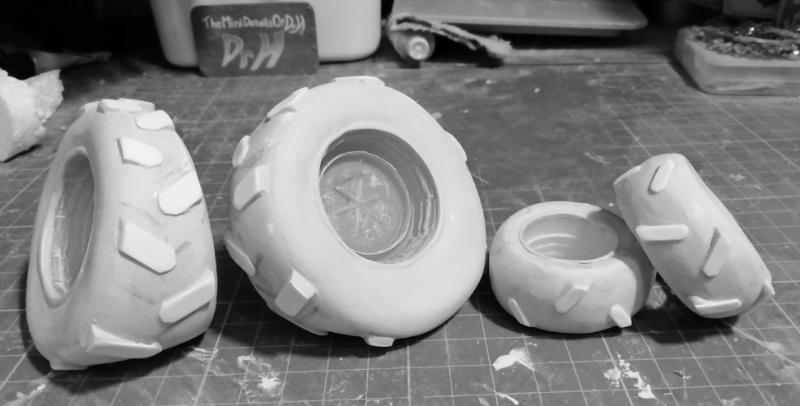
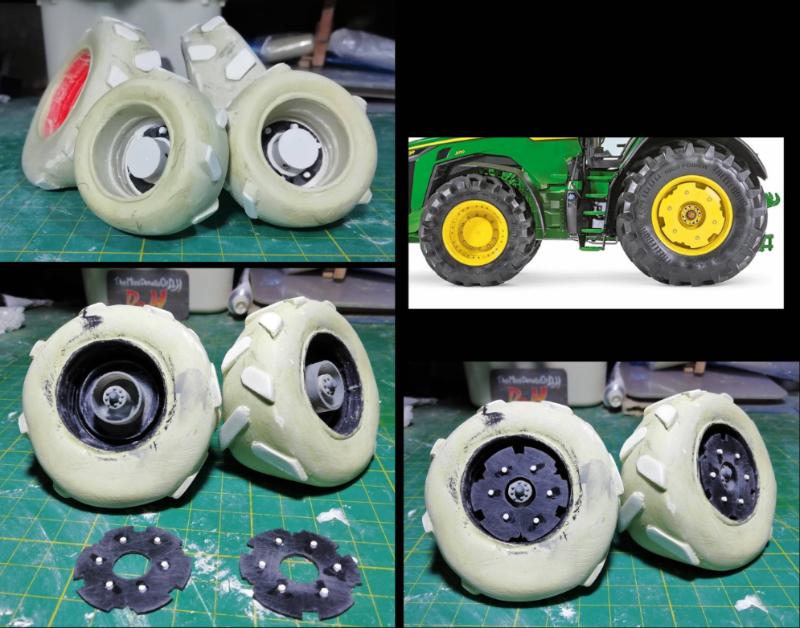
Still need to finish the wheel hubs, but a lot of work went in to creating the tyres themselves.
1. Find a suitable round object to work as a basis of the wheel hub.
The larger wheels are using lucozade bottle tops and the smaller, the "lid" of some soap dispensers.
The threads will be useful as detail inside the hubs.
2. Cut out disks of polystyrene foam to the eventual size of the tyres, and cut a hole in the middle to insert the hubs.
3. Shape the foam and use some off-cuts to form the shape of the Chibi-cartoon tyres. (yep, I'm throwing out the "realism" for this one)
4. Use some dental plaster to finish the shape and give a solid base for putty.
5. Cover in a really thin layer of epoxy putty, and sand to give the final shape/surface (as well as the rim of the hub).
6. Glue strips of plasticard to the centre-line of the tyres and fill in under them with putty.
7. Sand it all smooth and round and tyre-y.
8. Remember to take photos to show progress to the good people of DDakka.
Thanks for sticking around.
As it's the weekend, very few people will see this so bask, dear reader, in the special glory of being one of the few to see this.
I've handed over a couple of the Christmas/Easter presents, so I can show you the finished pieces.
First, some Red-spotted purple butterfly (Limenitis arthemis astyanax) earrings.
I forgot to take "scale photos" with a mini' for these, so the picture may not stay up on DDakka for long.
If so, here's a link to the Facebook post: https://www.facebook.com/TheMiniDetailsOfDrH/posts/5097192883728231
And a Samurai sculpture to match the previous sword-bearing Geisha.
Wheel hub details:
Again, think less accuracy, more cartoon representation.
I've been painting the inside of the large wheel hubs as that plate would make getting paint in difficult, once attached (not attached yet, hence not centred in the last photo).
Thanks Graven'. I like big rear ends on my tractors... (may require some recent English politics research to fully understand this)
And more.
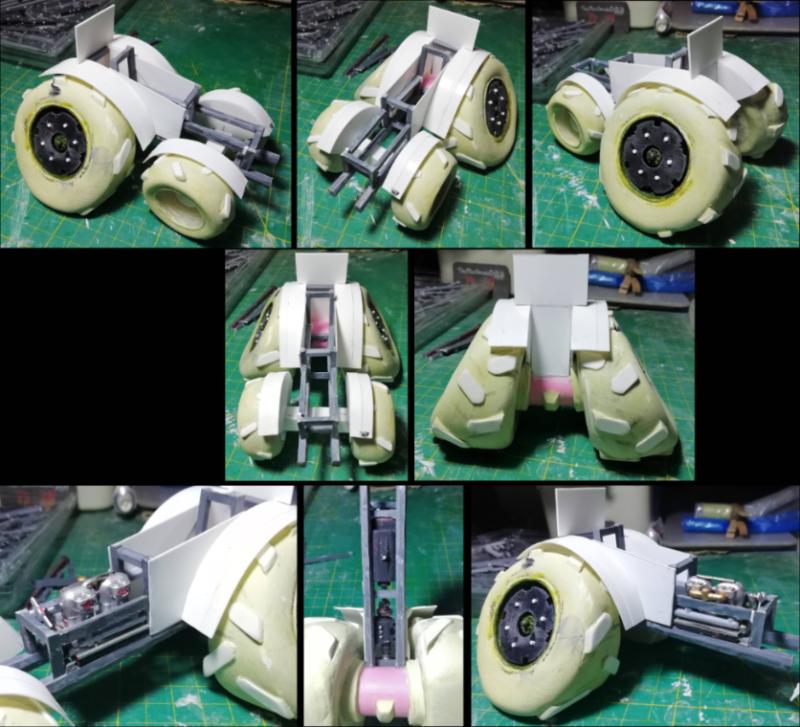
I built the frame (from sprue, what else?) to give me a solid base to build the body on.
Then I noticed that the engine is often visible through the front wheel arch... so I needed something to represent the engine.
I went digging in my box of bits with a plan of throwing a few things together to look like an engine (like what I did with the Wave Serpent)
Wave Serpent:
Spoiler:
But then I found an engine from one of the models I inherited and disassembled ...
AND NOT ONLY THAT, but it fitted perfectly between the frame I had built. I could not have built it better, on purpose.
Thanks ph34r. It's inspired by those chibi cartoon car designs that always seem to have wonky wheels.
e.g.
Spoiler:
But that sort of design idea of oversized wheels is used in a lot of things.
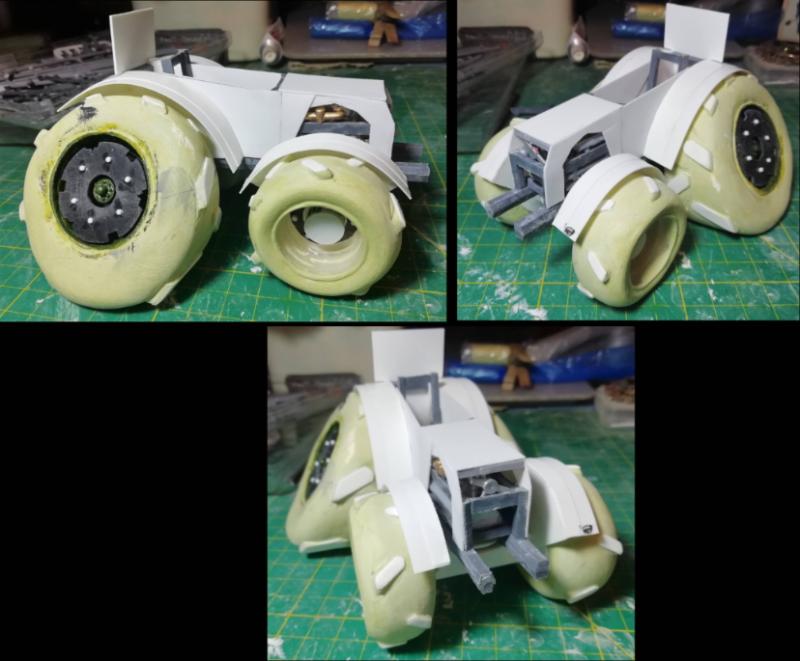
Final wip (assuming I don't find any issues while priming).
Adding details (but not too many) such as lights, aerial, tractor hooky-on-things, exhausts.
Now to prime all the things that should be primed, and not prime the things that don't want to be primed in the process...
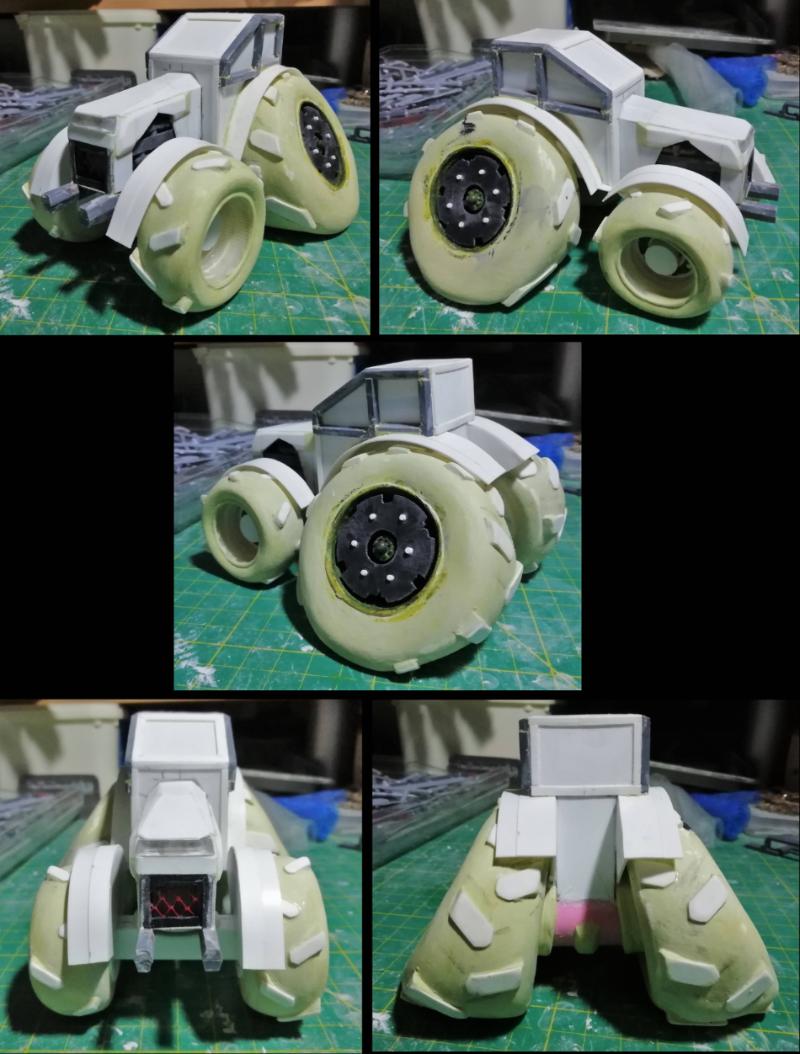
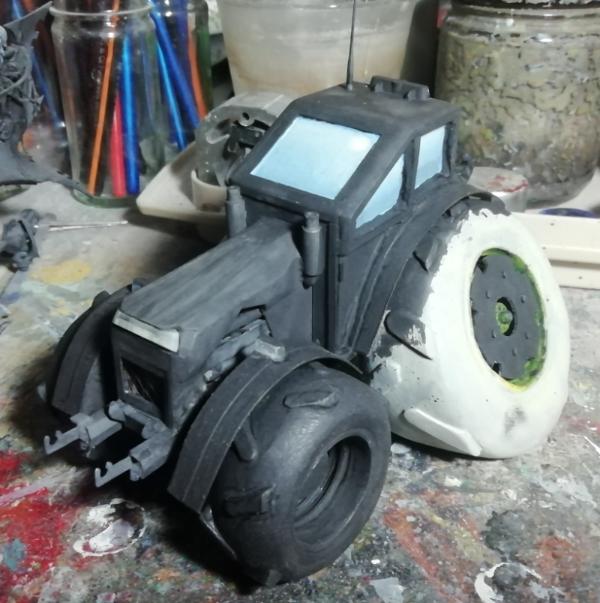
Painting has started with the windows.
I'm aiming for the same reflective sky/land look as I did for Robby the Robot.
I think I've lost the blending knack... a flat surface should be easy, it's not coming easy...
The photo is doing a lot of heavy lifting here.
And due to these Christmas presents being delayed so much, I now have to start thinking about this years' birthday presents...
For giggles, this is how rough these kind of things start out as.
2 layers of MDF and 3 of hardboard, roughly cut to shape, now glued and screwed together.
Can you guess what this is? Many internet geek points up for grabs.
Now to make all these layers the SAME rough shape.
Thanks Guardling.
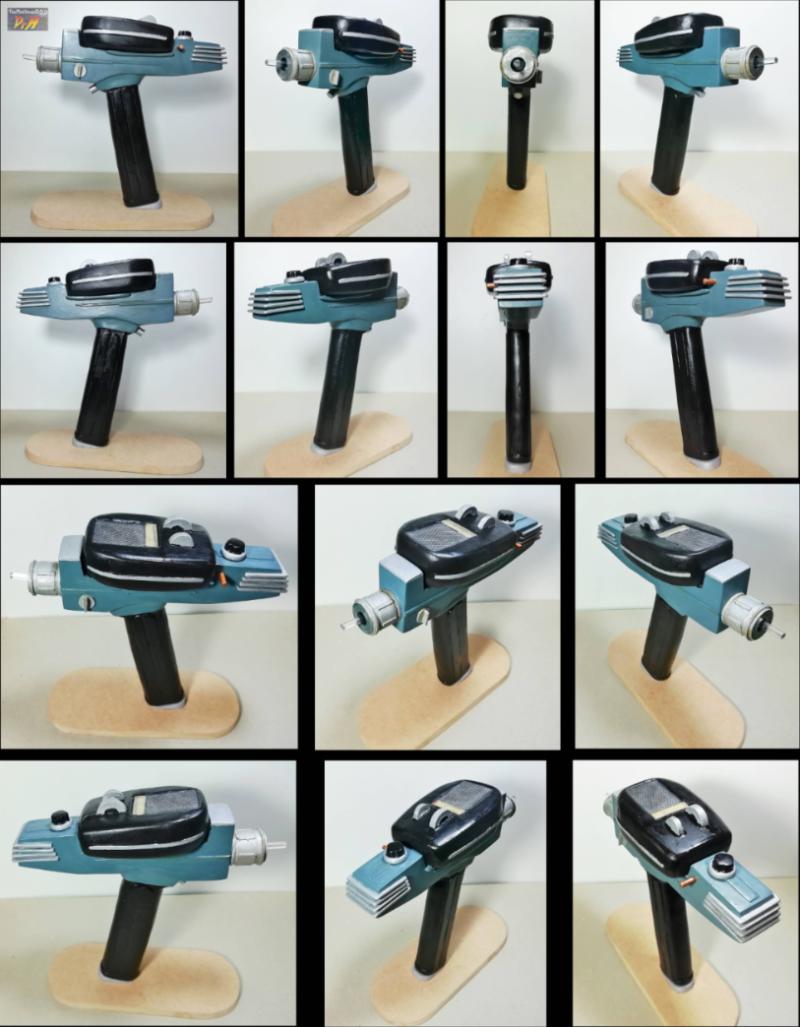
Wow, that's quick. I'd have accepted "tos phaser", but yes type 2. Indeed 1:1 scale. All the internet points to you.
I didn't realise, until looking for reference photos, that there were "types" of phaser for each series', and that the type 1's slot into the top of the type 2's, or so it looks from what I've found.
I knew that there were pistol-shaped ones and rifle-shaped ones, and the little handheld ones. but never thought about how they were related until I saw a broken down tos one and how obvious the type 1 is in the top of the type 2.
So yes, I put my hand up and say I'm not as "in to" -trek as I am -wars *, and I realised this when I noticed (on may the fourth) that I haven't made any trek props (compared to the load of starwars props).
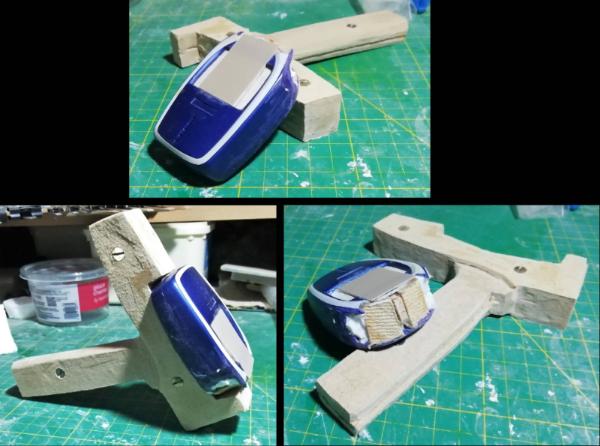
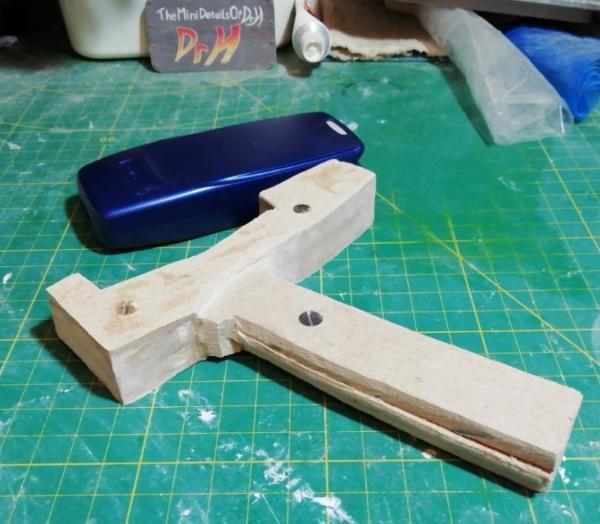
I was going to make a tos communicator, but I can't find the metal mesh I have that would be perfect for the flip top. So next on the prop list is phaser.
Now shaped, and check this; I have a set of 4 shells for my old 3330 Nokia, that's a near enough shape for the type 1 phaser on top. Needs cutting down but a good start for the shape at least.
This will all get covered with plastic and/or putty, it's just a nice solid base for a prop.
Gitsplitta wrote:I love the blend and tone of the windows. Nice work!
Thanks Gits', too kind.
It's a bit rough, but I'm going to stick with it as it's not too noticeable and will be less so with a gloss coat.
More added to it with the sun glare and now the added ground reflection.
I'll also add wheel-arch reflections when I come to paint the green.
Gloss them, leave overnight, and then re-black the frames, before green.
Very neat. Yeah, the modularity of phasers is a clever thing. Loving your work as ever. Need to tackle some windows that way, real 80s metal cover vibe.
Dr H wrote:Thanks Guardling.
Wow, that's quick. I'd have accepted "tos phaser", but yes type 2. Indeed 1:1 scale. All the internet points to you.
I didn't realise, until looking for reference photos, that there were "types" of phaser for each series', and that the type 1's slot into the top of the type 2's, or so it looks from what I've found.
I knew that there were pistol-shaped ones and rifle-shaped ones, and the little handheld ones. but never thought about how they were related until I saw a broken down tos one and how obvious the type 1 is in the top of the type 2.
So yes, I put my hand up and say I'm not as "in to" -trek as I am -wars *, and I realised this when I noticed (on may the fourth) that I haven't made any trek props (compared to the load of starwars props).
I was going to make a tos communicator, but I can't find the metal mesh I have that would be perfect for the flip top. So next on the prop list is phaser.
Now shaped, and check this; I have a set of 4 shells for my old 3330 Nokia, that's a near enough shape for the type 1 phaser on top. Needs cutting down but a good start for the shape at least.
This will all get covered with plastic and/or putty, it's just a nice solid base for a prop.
Gitsplitta wrote:I love the blend and tone of the windows. Nice work!
Thanks Gits', too kind.
It's a bit rough, but I'm going to stick with it as it's not too noticeable and will be less so with a gloss coat.
More added to it with the sun glare and now the added ground reflection.
I'll also add wheel-arch reflections when I come to paint the green.
Gloss them, leave overnight, and then re-black the frames, before green.
***************
inmygravenimage wrote:Very neat. Yeah, the modularity of phasers is a clever thing. Loving your work as ever. Need to tackle some windows that way, real 80s metal cover vibe.
Thanks Graven'.
For that reflective window effect, I'd recommend my Robby as an example.
The sky gets lighter nearer the ground, and the ground gets darker nearer the sky. Gives good contrast to the horizon.
I noticed that I've done these windows the opposite... which is not quite as good.
That tractor is just too fun. I'm kind of the opposite... more trek then wars, but I certainly couldn't identify the various phasers other than general shape.
I think it's just exposure for me; I have SWars figures from childhood, but no STrek toys at all.
I've seen all the classic films for both, but not the more recent ones:
SW - I own the 3 you'd expect on DVD (from before BRay days), I liked Rouge one, wasn't a fan of 1-3 or 7, seen 8 on TV once, not bothered with 9. Not seen the spin-offs.
ST - Seen the classic ones at least once each, don't own any, and not got around to watching the newer ones (have nothing against them yet).
As for the series': Nothing SW.
I've seen a handful of tos ST, watched TNG and Voyager on tv as it was on, did sit down and watch all of DS9 (we were lent the DVDs), and nothing newer.
But I just feel more "more" with the SWars designs.
So here's more on the phaser.
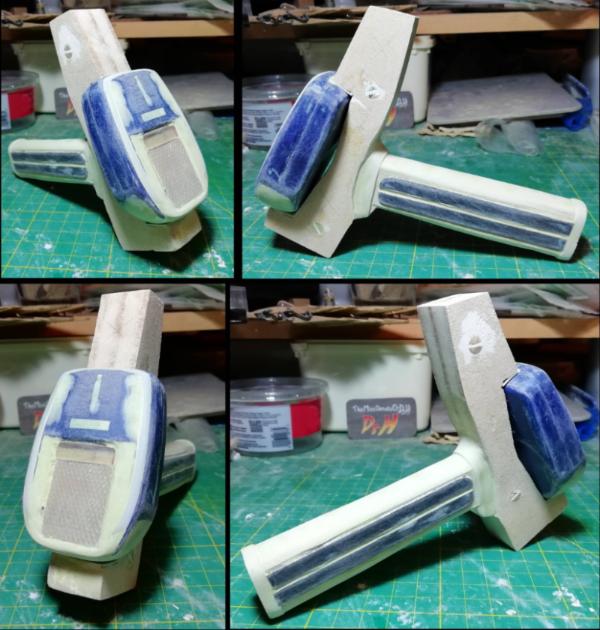
Chopped down the phone case to fit the size of the gap in the frame.
It feels small compared to the photos, but it might be because it's wider. It'll do; it's saved a lot of work as I now only have the sculpt the top end (see below).
So much like the Lightsabre I made, this is not going to be screen-accurate, more of my design, but should be recognisable as what it is.
I used some off-cuts of wood to strengthen the shell at both ends and along the length.
And of note: Something I've been doing for a while.
If you have ever built something hollow (but want to remain light, so not filling it with plaster) and then had something come loose inside and rattle around whenever you move it...
Pack the inside with polystyrene foam bits until they don't move. It won't stop things coming loose, but if they do they won't have space to rattle around.
That's all for now, painting the tractor this evening once the dust settles (it lives under a cover while I saw and sand this thing in the afternoons).
Tractor is nearing completion, so nothing to see there.
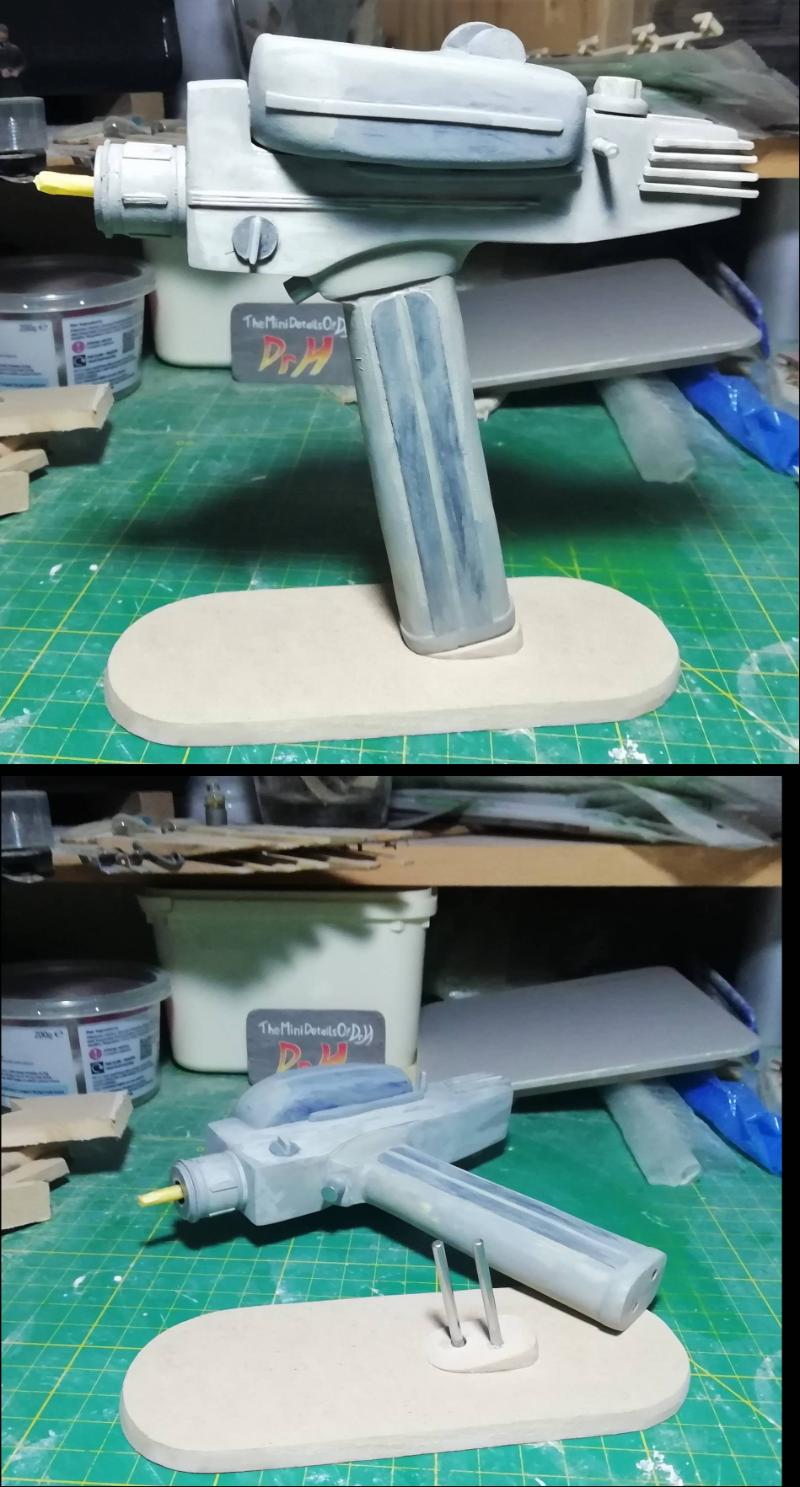
Phaser is progressing.
Handle done, body is smoothed and ready for a plastic skin for ease of detailing.
Type 1 phaser body is done, just need to find some things to use as dials.
The gap between the 2 pieces has already been fixed with the first plastic skin pieces on each side.
A true test of any Trekkie/Treker in your life... spot all the differences from the original props.
This will move over to the painting desk (the tractor is done and varnish is drying).
And I'm going to try and make a display stand for this, and get that all done before Monday.
Thanks Jehan'. If only... If I had time, I might have made a working trigger and maybe light-up the end, but no time.
I have had time to make the display stand though:
No, it is not supposed to be level. That is intentional (and I'm not even making excuses for not getting it level, this is the angle I was going for).
It's very close to the balance point, which means it's less likely to be knocked over by accident.
Thanks Gits', Graven'.
Order of operations was to drill the holes in the handle first. Being sure to keep them straight to the handle and that they are slightly larger than the posts (you don't want a tight fit).
I briefly stuck (PVA) a piece of paper to the end of the handle, cut around it to get the shape and then punctured holes to match. Then removed the paper before the glue even dried.
Then glued the paper to the base piece. Be sure to glue the OTHER side of the paper to get the holes in the right place.
Drilled holes in the base at about the right angle (these holes you do want a tight fit). Remove the paper before the glue dries.
Place the pegs in the handle and offer them up to the base.
If they are not right adjust the holes in the base until you can drop the handle all the way to the base.
Glue in the holes of the base,
Pegs in the holes of the handle,
Push pegs into the holes of the base and use a spacer so that you don't glue the gun to the base, but keep the gun there to ensure the pegs set in the correct angle.
Fill in the gaps from any adjustment of the holes.
Thanks Gits'.
There's many "differences" from an "official" prop that would drive the hardcore fans wild (as they do), but that's the feeling I was going for.
Thanks Cam'. Well, it's all relative; Doing nothing for a while and then having to complete 3 projects to a deadline can make it look that way.
Speaking of... I decided to get on with the next birthday present well in advance to give me more time between "present-making" periods in the hope that I may get back to the Raider in my other blog.
So, once more, can you guess what this is going to be (I can see this falling into 2 camps, at least)?
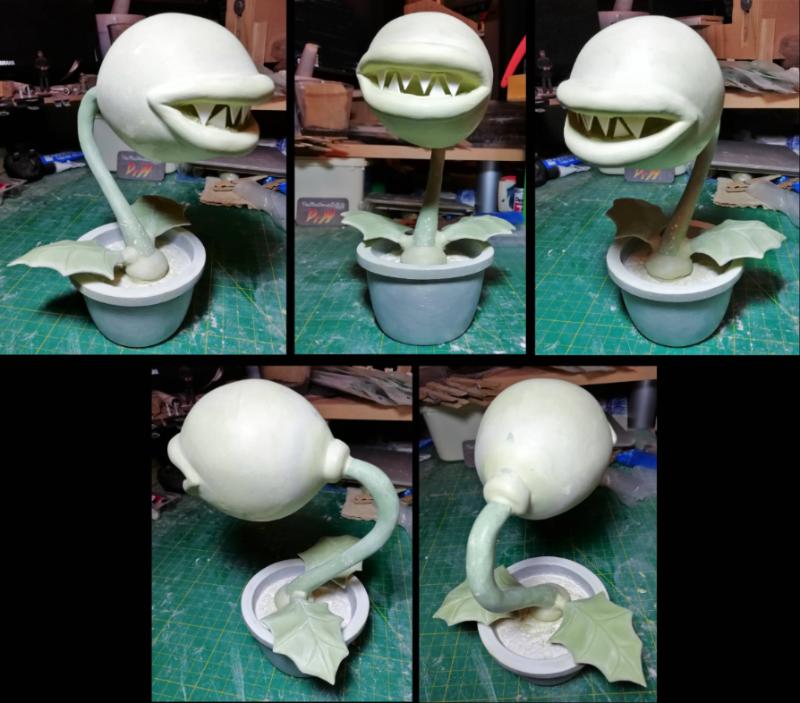
Old and unusable cooking tin thing,
Filled with plaster,
Some putty and plasticard to give a more plant-pot look to the rim,
Wire coat-hanger, covered with foil and wire and plaster (will come back to this),
Polystyrene foam and tissue/PVA to form the shape, also covered with plaster,
Milliput/GS mix to cover the "stem"... The plaster here didn't stick to the slightly flexible wire and broke off as I added the putty, so there are some inclusions.
Next step is to cover the top with milliput to give the final shape.
Also,
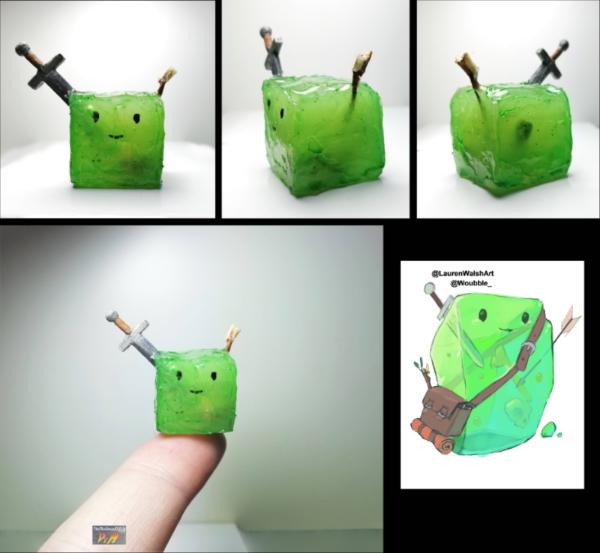
A fun side project, based on a OC from one of the artists I follow on Twitter.
They created a gelatinous cube character, and I had to have a go at a tiny one.
Scratch-built the sword, bone, and arrow, and used a HeroQuest skull (that set the scale for everything else).
Then created a cube of hot glue about them and eventually painted it with a clear green paint I have.
Sadly the hot glue I have is not quite clear enough to really see the internals in the final form.
Love the little gelatinus cube!
Love that he's so simple to make as well, looks like I'll be trying one later, for D&D of course...
Also my guess:
Spoiler:
Gotta be a Piranha Plant from the Mario series, given your track record of video game characters...
Nothing to stop you from branching off (ha!) to Audrey from Little Shop of Horrors or Frank from Harley Quinn
Guardling wrote:Love the little gelatinus cube!
Love that he's so simple to make as well, looks like I'll be trying one later, for D&D of course...
Ja. Check out the "@Woubble_" account on Twitter for a load more pictures by Lauren for inspiration.
I built him up, layer by layer, and added the items as I got to them.
Let the lower layer cool enough to just solidify before adding the next layer, as the heat would keep it molten and you can't keep the shape.
I also used the hot tip of my glue gun to shape the glue after adding it, or to correct blobs attempting to run down a side.
Careful with thin pieces of plastic: I made the arrow from plastic rod and that went soft with the heat of the glue. I had to support the end to keep it straight. The sword was fine though.
I did cut off some faces of the cube once it had all cooled (to try and get the internals more visible) and then went over it all with the hot tip of the glue gun again to give it the final texture/shape.
With more patience I would have used the thick "water effects" gel to get a better clear end result. But each layer would take hours to cure, and this one of hot glue took an hour total.
Also my guess:...
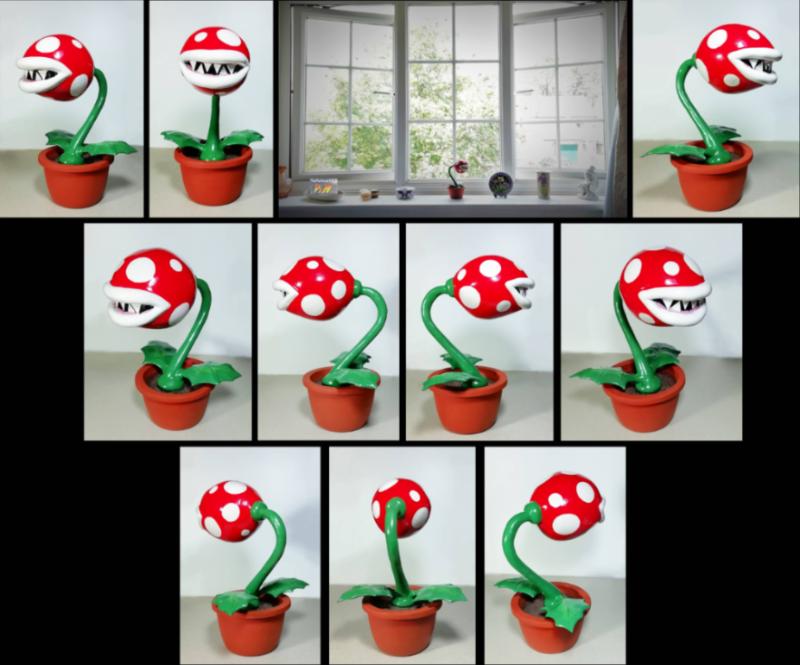
Correct on the first try.
inmygravenimage wrote:Love Cubey! All my guesses were taken
Love it. May I make one tiny suggestion? Paint the pot green, so it's a pipe. Or (gulp) even put a cylinder of card around it for the full pipe effect. As you're finished early... (ducks, hides)
Thanks Graven'. I did consider straightening the pot to make a pipe and then painting it green. Partly because it is a little unstable with the rounded edge at the bottom and the fairly heavy head.
It would have been worse if the head wasn't the thinnest layer of putty over foam (even those lips have a foam core).
However to change the pot would mean there was no point in using what I did for the pot: an old aluminium ramekin-alike (no longer usable due to corrosion inside). It has a nice plant pot shape, and would be a shame to lose it.
Plus, if it were green, that's a lot of green in one space for a household ornament, with the green stem and green leaves. And when I googled for references, it's almost 60:40 with green to plant pot. Especially if you're looking at prop's and toys.
This way, it looks like a houseplant. Which is good for a present.
Yes, I have been thinking about this the whole time I've been building and painting it...
I think that's outstanding. Sorry for not getting the Mario reference... it's a bit before my time (I'm aware of it of course... just not in my wheelhouse of games.)
Thanks Gits'. No worries, as I said with the first tease post for this project; I expected everyone to fall into the 2 camps of "Little shop..." or "Mario".
And I am not one to be able to throw stones for not getting references.
I do have more of the "pots" available, so an Audrey II is possible for the future (as is possibly a little Groot).
Life happens, some good, some bad, all... not much of this hobby.
Skip this for building below:
Spoiler:
As you may know, I've been unemployed for quite a while, and so I don't have much disposable income. However, with the world being what it is for the past few years, I decided to splash out and treat myself on something to cheer me up. And this meant only one thing, a PC upgrade.
I threw down nearly £800 on an RTX3080 graphics card to replace the old GTX960. But all was not smooth sailing... The first card, didn't arrive. but not only that, it was marked as delivered (handed to resident). It was not delivered to our house. So that one likely ended up on ebay and gave the delivery driver a nice bonus for their pay.
After some back and fourth with Amazon, we got a second card sent out for free. That one was delivered, to me. Installed it and all appeared to work, but then I started getting odd crashes and the occasional error of "out of video memory". So I started monitoring the VRAM usage, ran some tests, and found that I consistently got a crash when VRAM was over 6GB (of a total of 10GB). I contacted the card's manufacturer and ran through some tests with them. They eventually concluded that it was likely a problem with the card and I should RMA it with Amazon.
But Amazon won't just replace something, you have to send it to them to attempt a repair first. With no other option (other than a refund) I sent it in. Just over a week later I get it back, in a damaged box, with one of the dust covers for the video ports also damaged. The online note said that it had been "repaired with new parts". On inspecting the card, nothing had been done with it (other than the damage). The note stuck to the box showed that it had been logged in and out within 9 seconds. They had done nothing more than plug it in, see if produces a picture and boxed it up again. The problem persisted in my PC with this card.
I decided to give up and return it (again) for a refund this time. But because all of the above took more than a month, I had to work through the online chat to eventually convince someone to give me a refund. I sent it back and waited 2 weeks for the money to show up... Nothing except for the postage. No 800 quid, no graphics card, for over 6 weeks. I returned to the online chat to find out what had happened to my money. First person, no help, 2nd person, said that the card had not shown up and I should email the Amazon postage department to start an investigation. After I said that I was "very unhappy", he passed me on to someone else. 3rd person, found that the card had arrived and been processed, and they pushed the refund through. That took another week to show up in the bank.
It was at this time we had a problem in the family that kind of rocked my feelings of stability and was the last thing I needed after nearly 2 months of stress. I won't go into this any more.
Once that had settled down, I shelled out again for another RTX3080, But this time from a different shop (Amazon can sod off with getting my 800 quid), And a different manufacturer, And a different type of 3080; A 12GB version instead of the 10GB before.
I installed it. And the same problem persisted...
But this wasn't all bad news; this meant that the problem was with my PC, not the graphics card. 2 different cards can't have the same, very specific, manufacturing problem. So I spent another week or so working with the new manufacturer to find the problem, but eventually it turned out that I had to reinstall Windows entirely for it to work. What the specific problem was, I don't know, but something in my (long used and fiddled-with) install of Windows was causing the problem with a graphics card using more than 6GB of VRAM.
With that now working you can be sure I was gonna **** well use the thing...
...So I have been playing many PC games.
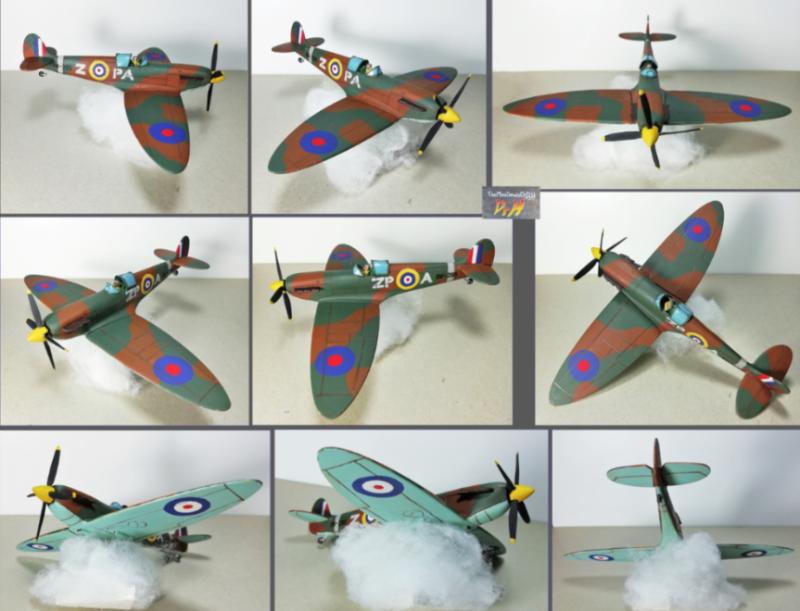
However, we did have some Birthdays, and for one I used one of the old models I acquired a while ago from the garage clear-out.
This Spitfire was built ~60 years ago by a teenager and then packed in a box and left in a garage for most of that time. I tidied it up, swapped the canopy around (it was on backwards), and removed the undercarriage. This is an odd thing, the shape of the closed undercarriage was moulded into the wings and (I assume) the instructions were to paint that shape black if you were to add the deployed undercarriage. So I decided "wheels up" was the way to go. Therefore a flight stand was required and I decided to hide it in a cloud. The propeller needed repair and I ended up installing it in a way that it can now spin. The surfaces were sanded, the (majority) of the decals were removed, and then it was primed.
And this is what it looks like now, after the re-paint.
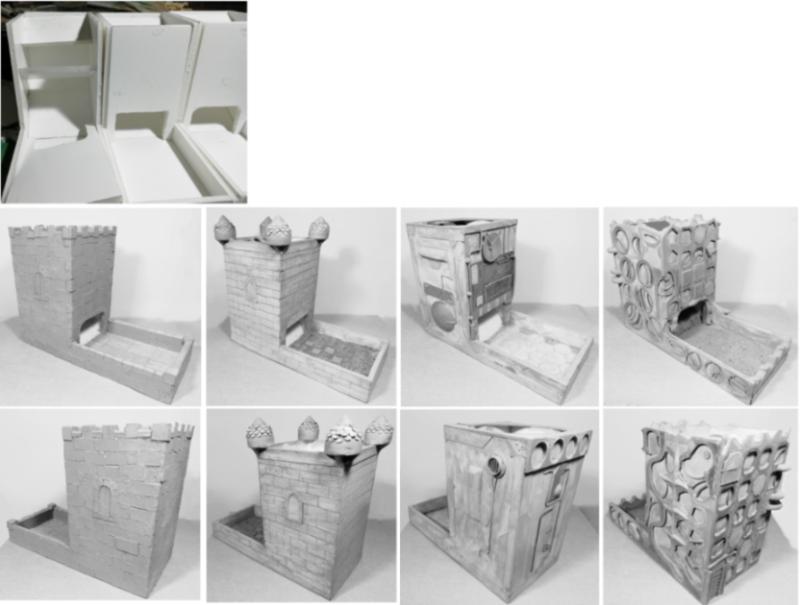
And now I'm working on some Dice Towers as this year's Christmas presents (we play a lot of games as a family, and some of those games use dice). The basic structure for each of them is identical. I followed a design I found online a long time ago, but modified to make them wider, but shorter.
Then the idea was to cover the exterior to make each one unique.
From left to right: Old castle. Made with individual card rectangle "bricks". Fantasy "Disney" castle. Made with strips of card with the bricks scribed on (to make them more regular than above). Plus corner towers. Sci-fi / cyberpunk. Bits and pieces, hexagons and angles. Alien construction. Trying to lean more towards "Eldar" alien than "H R Giger" Alien. Odd shaped bits of card with putty to merge it all together.
They are all primed now and I plan to make use of the Airbrush to paint the bulk of them. Plants for the gardens will be painted onto the walls, rather than be "real" things that will be damaged by the dice and rouge hands reaching for them.
Very good to see you again, Doc. It seems the 'close-knit community' that Alexander Graham Bell speculated upon when the commercialized the telephone has instead resulted in a level of isolation that Torquemada might have envied: we have the ability to instantly speak with someone on the other side of the world, but it takes weeks with a major, established goods provider to resolve an issue (for a not unsubstantial amount of money to boot). I'm very sorry you had to go through all that, but glad that at least now it is resolved and you're 'underway and making weigh' again.
The dice towers are very neat and it's amazing the variation you've produced using a very simple design as the base!
You were going to get this yesterday, but DDakka was not accepting pictures.
The Dice towers are complete, but I'll spread out the reveals over this week rather than post them after Christmas. Maybe they'll get more eyes on them this way.
First up is the Castle dice tower.
It was the test piece for the design and the inspiration for the whole project.
The brickwork was made from rectangles of card stuck on to the foamcore structure, with a sprinkling of fine "basing mix" for grouting and texture.
A single Gamers Grass fern is tucked into a corner, but the rest of the plantlife is painted onto the walls of the courtyard.
In other news:
I'm now on Mastodon, if any of you are on there, you can find me at @DrH@warhammer.social
I'm also nuking my Twitter account, on account of it going down the drain due to a rich idiot.
As with the Castle above, card was stuck on to make the bricks. But in this case, to make the lines neat the horizontal rows are a complete strip of card and the vertical lines are scribed on to the card.
The corner towers are milliput-covered foamcore with a roof of hole-punched card pieces with a milliput cap.
The grass is painted towel material (which was also used in some places internally for sound-reducing in some of the towers).
The stained glass is just blobs of paint in a "looks like stained glass" pattern but no aim at an actual picture.
Odd-shaped plates and blocks of card and foamcore (with putty), various cables and some odd bits were all used to give this one a future / Sci-fi / cyberpunk feel.
Coupled with bright colours and transfers.
Also, I threw on some dice-related markings, 1, 2 and 6 as stencils (just cutting the numbers out of paper and dabbing a stumpy dry-brush-like brush on them.
And then 3, 4, and 5 as dice-like dots as icons.
And, of course, the large "DIE" as in singular of dice. (crossed out so nobody thinks I'm implying anything about their health)
The final dice tower is way-out-there in concept and execution.
While the other 3 were all pretty set from the start, with solid concept/idea and there was little interpretation required to detail them in building/painting, this one went through a few concept ideas before even being built.
Originally, I thought of a HR Giger alien concept, That then became generic alien / Tyranid thing (think of the digestion pool/tower thing), Then it was briefly an alien beast thing with claws and teeth (imagine dropping your dice into an open mouth), Then I wanted it to be more "construction" than "organic", so that it matches the other 3, So I pivoted towards more Eldar like, And that became more "unknowable" alien species construction...
I present the Alien dice tower:
There was a lot of experimentation in the painting too, using all my iridescent and colour-shift paints. These, however, don't show up well in photos... or IRL even in some cases... While it follows the same construction of the others: Crenulations around the top, doorway, courtyard, windows on each side... It deviates in an alien way (is the aim); so the windows became the many holes/pits/features, also instead of the construction being blocks with small gaps, it's gaps/holes with surrounding ridges. Instead of smooth, plain, surfaces it is a riot of shapes and colours.
Also, the random icons all over it. Think Egyptian hieroglyphics. Those are all representations of numbers, mainly from historical or from around the world. Ranging from 1 to 20... because dice...
It rides a fine line between amazing and hideous. It could have been better with more planning and multiple concepts. But this is where it wanted to go and you can't fight that.
So there you have it. 4 unique dice towers.
Thanks for continuing to follow along. Have a good Christmas break everyone. See you next year, will I ever finish the Raider...
Thanks chaps. Hope you had a good holiday... 6 months ago.
Hello. Yes, remember me?
I got sucked in to driving around in Assetto Corsa, putting my new controller and graphics card to use.
Not done any model work worth speaking of... until now.
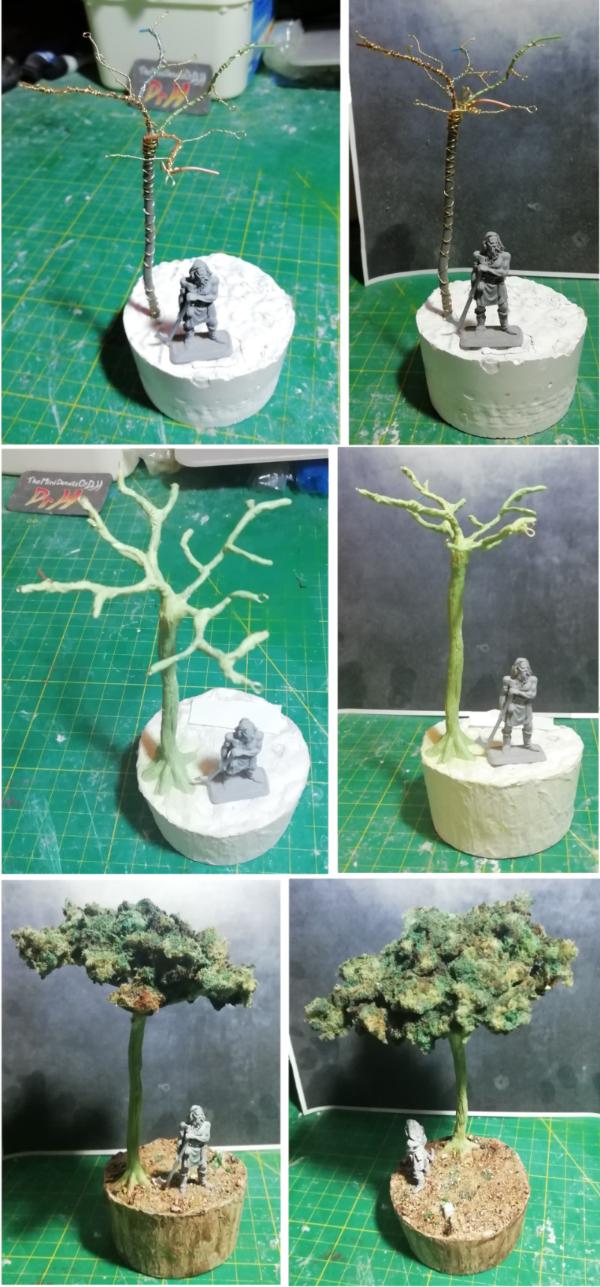
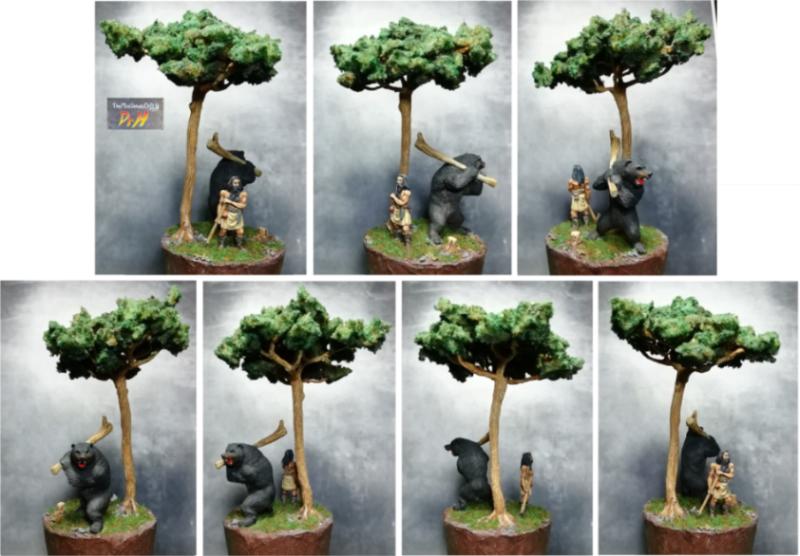
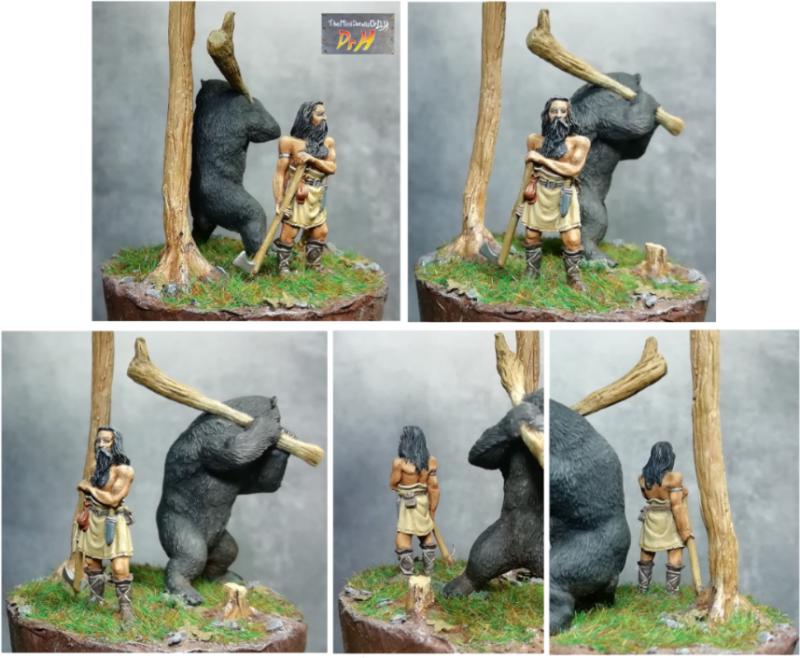
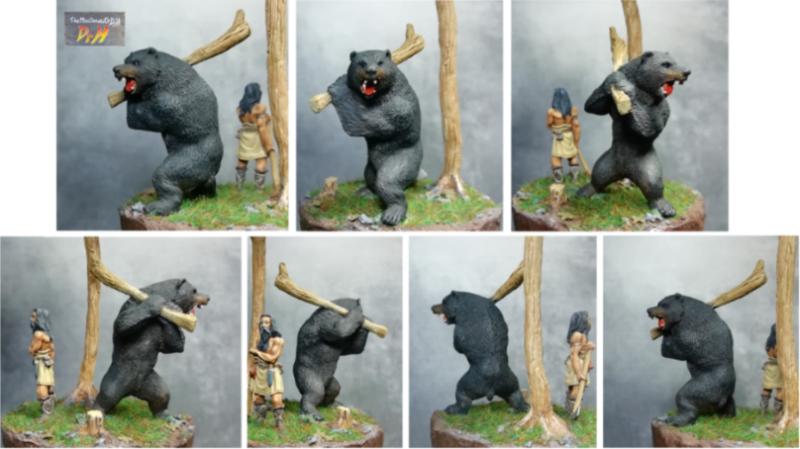
This is the last of the Mithril miniatures, miniatures: Beorn.
I've held on the him for quite a while as I've been looking for a companion miniature for what became the below diorama.
Beorn, for those of you who need a reminder, is met in the Hobbit.
And he's that chap wot turns into a bear.
How to represent a larger than average man that changes into an even larger black bear, in a model?!
I had the idea to have him and a bear mini' stood back to back on a round base so that you can rotate it and he would transform.
But I had to find the right sort of bear mini' to use;
a) that was the right size compared to the beorn mini'
2) that wasn't too warewolf/warebear looking
c) but was stood up and looking ferocious.
d) and wasn't too expensive and was available.
And this year I found Fenris games' Bjornhilda that ticked all the boxes.
But delivery was lost(?) and it was a while before I got it. So the wip is of the display base building which was all done before the bear arrived.
As the bear mini' is holding an axe in a way that I can't completely remove, and I didn't want to use the comically large axe head in this piece, I decided that it would become a tree trunk.
And as beorn is holding an axe I can have a felled tree stump on the base that can be the source of the bear's club.
But I can't just have a tree stump, so I also needed a tree.
Starting from a multi-wire electrical cable, exposed the wires at one end and splayed them out.
The cable becomes the trunk and the wires become the branches.
Wrapped them all in thin wire to give them some odd shape, and to add some extra branches, plus it gives a good key for the putty to stick to.
Thin layer of milliput, add texture.
Then add foam for the foliage at the top.
Mirror the tree's position with a stump and position Beorn.
Paint it all and wait for the bear.
The base is just some plaster, plus polystryrene foam bits, as an experiment.
Spoiler:
As for that experiment: it doesn't significantly decrease the weight of a plaster block, and while it doesn't change the overall working with said plaster block it does leave useless voids within the block that doesn't really help with inserting things firmly.
Not something to recommend.
And that's it.
Once the bear turned up I cut off the axe head and extended the club's length and matched the textures.
And now it's all done.
May I present Beorn the skin-changer.
Close up of Beorn the miniature.
Close up of Beorn the bear.
I have another project already done, but I'll wait until I've handed that over to the recipient before posting here (~next month).
Thanks Graven'. Good to see you still around these parts too.
Usually, I'd coat my trees in tissue/PVA, but I wanted this one to withstand knocking over, so Milliput/GS mix was used (with a wire base to the structure, it should bounce).
And, as promised, the other project I finished and can now show.
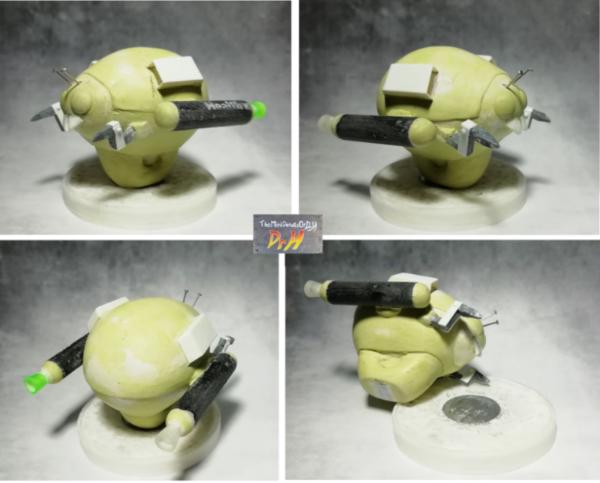
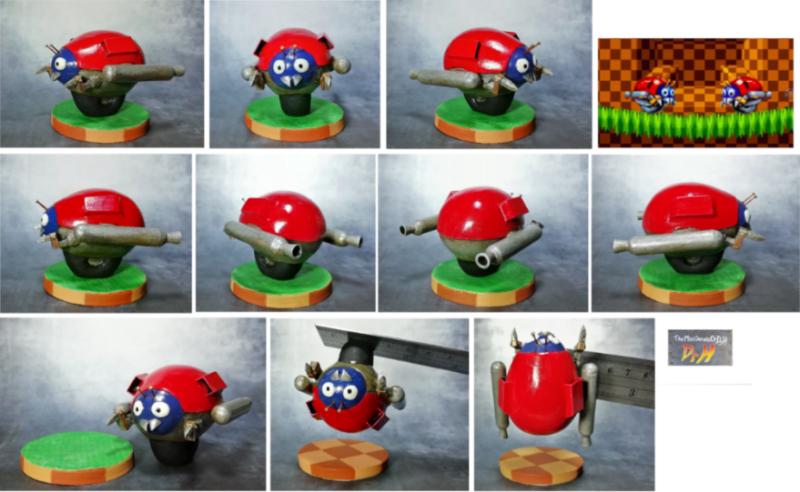
A Motobug.
As seen in Sonic the Hedgehog.
Kind of a companion to the Mario Piranha plant I made before.
Made in a similar way; polystyrene foam coated in plaster/putty, then some details.
The layer of putty in this case is very thin to keep it light enough for the magnet to be effective.
Yes, it has a magnet in the base of the wheel.
Why? The magnet was laying on my desk as I started building and I thought "why not".
There's a metal disk inserted in the base for it to attach to, but you can stick it to anything metal (of the ferrous inclination).
Work in progress shots.
Finished (with added screenshot for reference).
Thanks for sticking around. I will get around to looking at your blogs someday (do know that I feel guilty so some degree...)
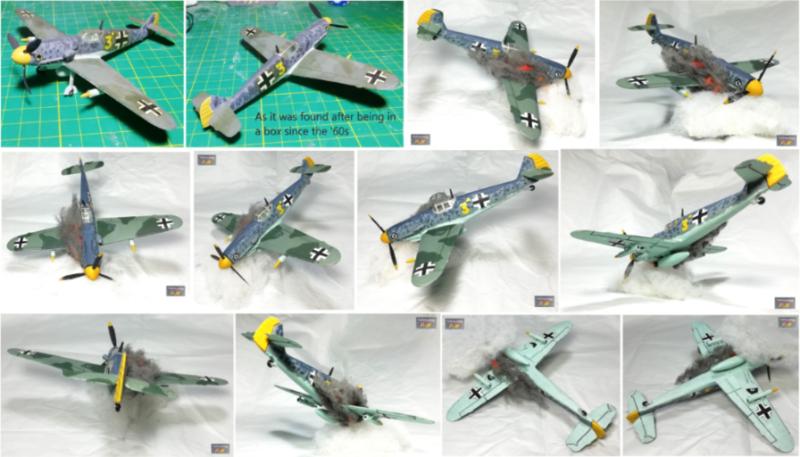
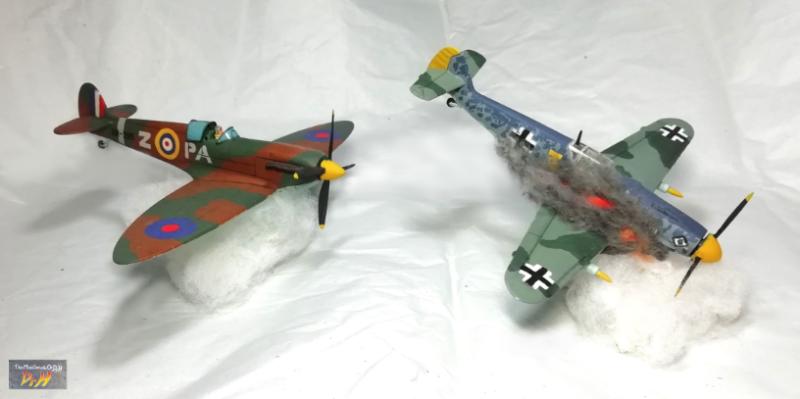
To pair with the previous Spitfire repair, I mentioned I saved another of my Dad's old models from the "materials" pile, and have now repaired and re-painted it.
Here is the Messerschmitt Bf 109.
But I couldn't just have it flying peacefully along with the Spitfire.
This time with some wip. I'll spoiler life stuff at the bottom (and type this here to remind me to add it)
Full disclosure, this is not my idea: I saw a photo pop up on Mastodon and had to make one of my own (well, as a present).
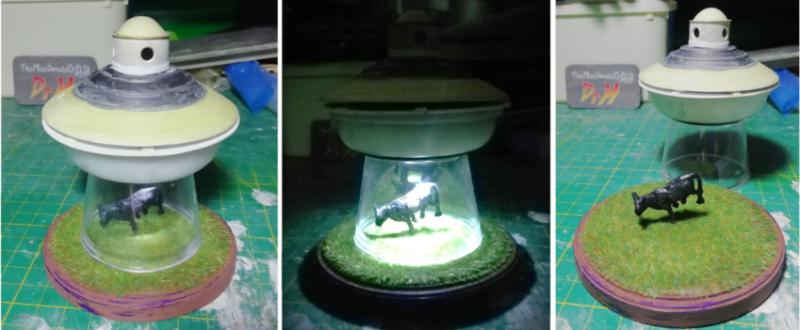
UFO abducting cattle.
First, I had to find a tiny cow model. Check! There was one amongst the model train stuff.
Then a clear, cone-shape. To act as the traction beam and support the UFO. I had a couple of options in my junk collection, selected the best. Check!
And find bits to create the UFO out of. Check! Back into the junk collection...
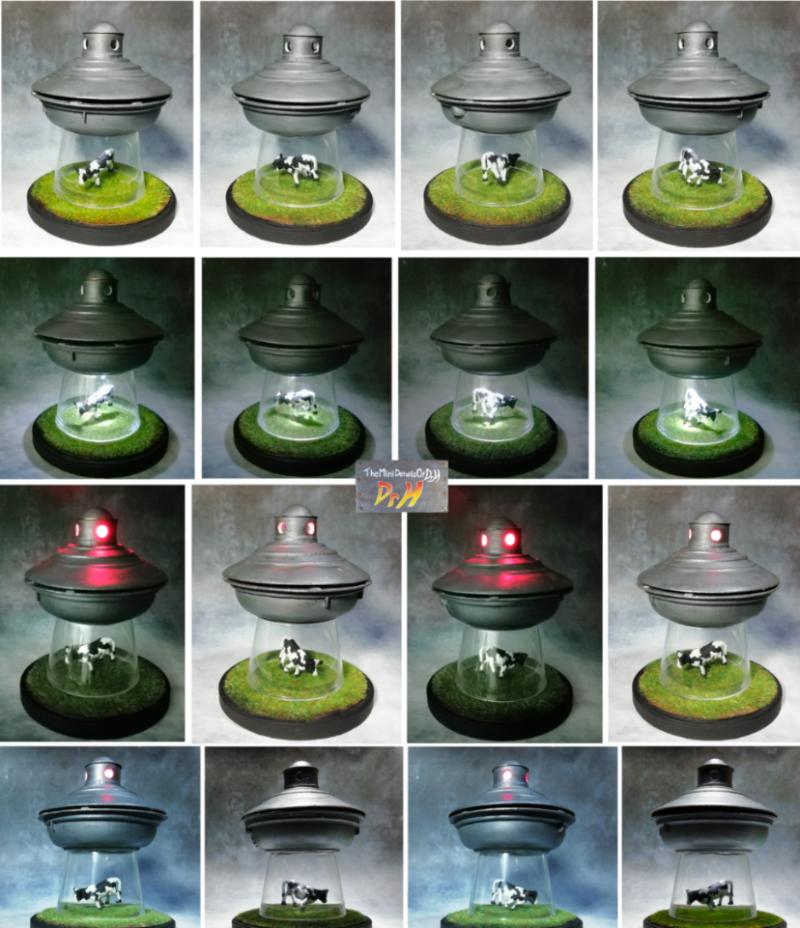
Pick out suitable and working LEDs and design a functioning circuit. This is explained below...
Obviously, if the UFO is to be standing on a clear cone, the battery for any LEDs has to be in the UFO.
If the battery and LEDs are in the UFO, so to does the circuitry and "switch".
Therefore you need to access the interior of the UFO if only to replace the battery.
Long story short; I decided that I'd use magnets to afix the top to the bottom of the UFO, AND use them to complete the electric circuit.
You may be able to twist the top to act as the switch (this did not pan out).
Starting from the bottom.
I have an LED pointed down and the legs drilled through the plastic support and spread in opposite directions.
I built a battery housing out of plastic with a piece of metal to act as contact to the underside of a button battery CR2032.
This metal folds under the plastic and was soldered to the negative side of the lower LED and to a free wire (that will be for the upper LED).
Another wire was soldered to the positive side of the lower LED, but not connected to anything yet.
This is the first picture below.
Using hot glue I insulated all that and afixed the battery housing to the top of the lower LED housing.
Leaving the battery roughly in line with the mid-point of the UFO between upper and lower halves.
This is the second picture below.
The upper half would therefore contact the positive side of the battery in a sandwich.
The upper LED was attached to a plastic support and the legs soldered to wires, like the lower one.
The wires were left relatively long to allow me to position it into the upper half of the UFO after checking the circuit.
The ends of all 4 free wires (2 in top and 2 below) were soldered to pieces of metal (that were electrically conductive AND magnetic),
And one final wire was soldered to the positive end of the upper LED and to another piece of metal (this would lead to the top of the battery).
The theory being that with the battery sat in the lower half, the negative underside would contact the metal that would take it to the negative contact of the bottom half, and the -ive side of the lower LED.
A magnet would connect that to the -ive side of the upper LED in the top half.
With the top half attached, the central contact would join the positive side of the battery to the +ive side of the upper LED (completing it's circuit), and to the positive contact of the upper half.
Another magnet would connect this to the +ive side of the lower LED (completing it's circuit).
This is the 3rd (middle) picture below.
In reality, both LEDs would not reliably light at the same time.
So I settled on creating a two-position setup where you can have one or the other LED lit.
I fixed the contacts in place using putty (big blob, press both halves together, remove excess).
I added a third magnetic attachment point to give a firm join, but this does nothing electrically.
I used 2 pegs (plastic rod) in the upper half and 4 holes (plastic tube) in the lower half to position the contacts in one of 2 options.
Getting everything lined up reliably has been tricky, but if you work on one at a time it's much easier than you expect at first.
I filled in around all these various attachment points to make it neater.
And this is the final picture below.
With it all together you have the unpainted result below:
It amuses me that there is clearly not enough room for that cow in that UFO.
Now to paint it.
Life:
Spoiler:
Has not been very exciting.
My absence it not the result of terrible news. Such as alien abduction.
No, it's just low motivation and easy distractions.
I haven't reopened my shop, so I don't "need" to build anything for that,
And I found that building 4 projects ready for Christmas every year was too much, so I've cut down there too (hence the dice towers previously):
I did try to create some game token trays for this past Christmas, but didn't make anything that worked satisfactory and so just bought some. (and so I had nothing to show you lot).
As for creativity; No new Fallout 4 settlement builds, because I've been editing my "How I build in Fallout 4" video series for my YT channel.
Dipping in and out, these take a long time to edit. but do somewhat satisfy creativity.
I have shared these videos on here before, but if you want to check out the tours of finished settlements, or see the effort that goes into building them:
https://www.youtube.com/channel/UCv_FpU4V0PkDHZjkXubkW9Q Should work.
In other news...
I am deep in Baldur's Gate 3.
I started a second playthrough before finishing the first and played them in tandem.
Then when I finished the first, started a 3rd and am playing that in tandem with the 2nd (that is nearing the end).
Life is mostly BG3.
And that is the main reason for my absence.
If you are ever looking for signs of life, I am active on Mastodon. Follow me at @DrH@warhammer.social
I'm always reposting past works daily, but am willing to chat there.
My Facebook page only gets posts of new, finished projects (such as models and videos). But you get that here anyway.
I log in, post, and log out.
And I deleted my Twitter not long after it was bought by a facist idiot.
I don't miss it, only the artists I followed there, that haven't migrated to Mastodon.
So, I'm still kicking.
Hope you are all well.
I'll try and check in on your work soon.
I am working on another prop replica.
However, I have neglected to take any wip photos as I've built it, but I will take a "before paint" shot to show you all soon-ish.
In other news:
Still playing Baldur's gate 3.
2nd playthrough finished a while ago. Monks are stupid-powerful.
3rd playthrough is well into act 3.
Trying out multi-classing with all the companions.
Some are not working as well as I hoped, but it's a matter of finding what works together (and what doesn't).
My dragonborn, Sorcerer/Bard has worked well though.
Multi-classing adds a lot more complexity to the game; managing spells for a Druid/Cleric can make your head spin.
And I have planned out my 4th playthrough already... I just can't stop BG3ing.
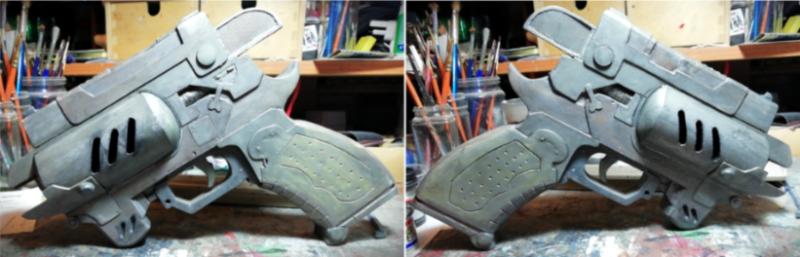
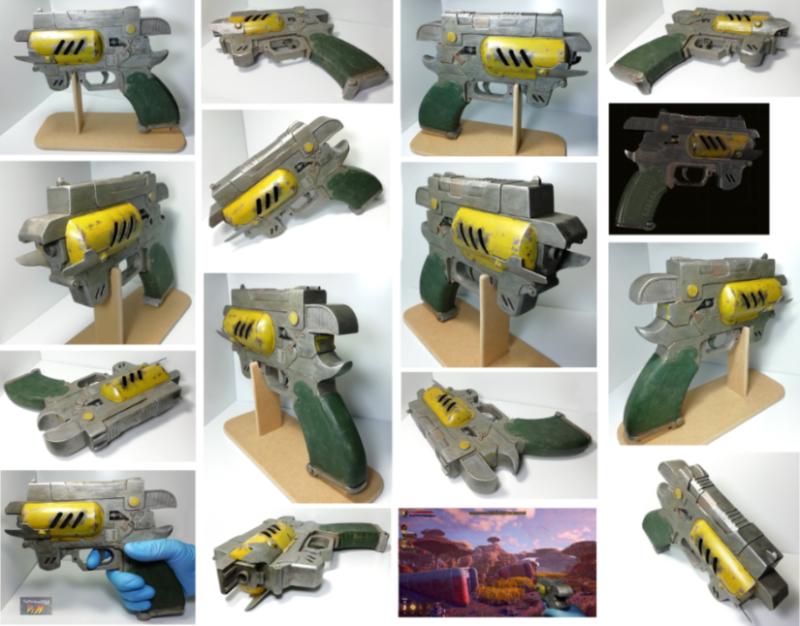
The first pistol from The Outer Worlds.
1:1 prop replica.
Included:
On a black background is a game screenshot, for comparison.
A scale shot with a hand holding the gun.
A combined picture of my gun over a game screenshot, for fun.
Thanks.
I am feeling the pull towards some hobby, maybe soon.
And an item in question is sat below my monitor and has been staring at me for months.
And it's next to another, unrelated, model that is literally staring at me.
However, I am still playing Baldur's Gate 3.
3rd playthrough has finished.
4th playthrough in a row has entered the 2nd act.
Thinking of what I might try and do for the 5th ... (leaning towards the "jack of all trades" achievement).
in other news:
Exciting things happening in my other blog, I've started building something... a model... for my collection...
Update when I've typed it.
No wip shots as I wasn't taking any.
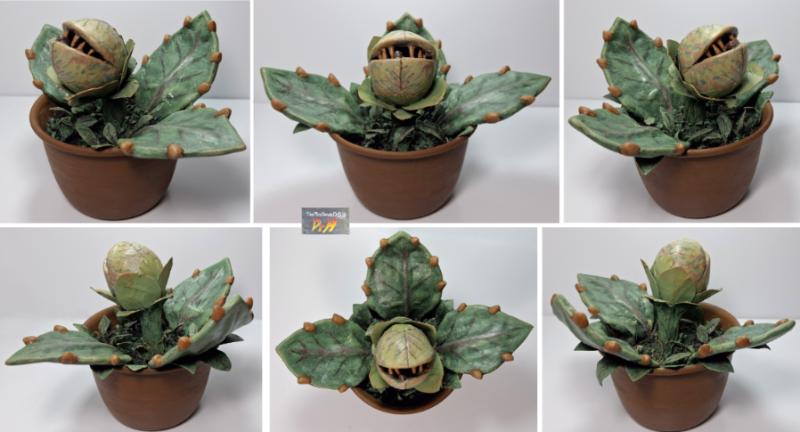
Made in the same way I did the Mario Piranha plant; polystyrene foam covered in putty.
The larger leaves are cardboard with some putty, the tiny ones are sandwich ties and tissue, or just card.
Thanks Graven'. Got to mind your fingers with both that and the project below.
Thanks Gits'. Too kind, it was a bit of a rush job really.
And now...
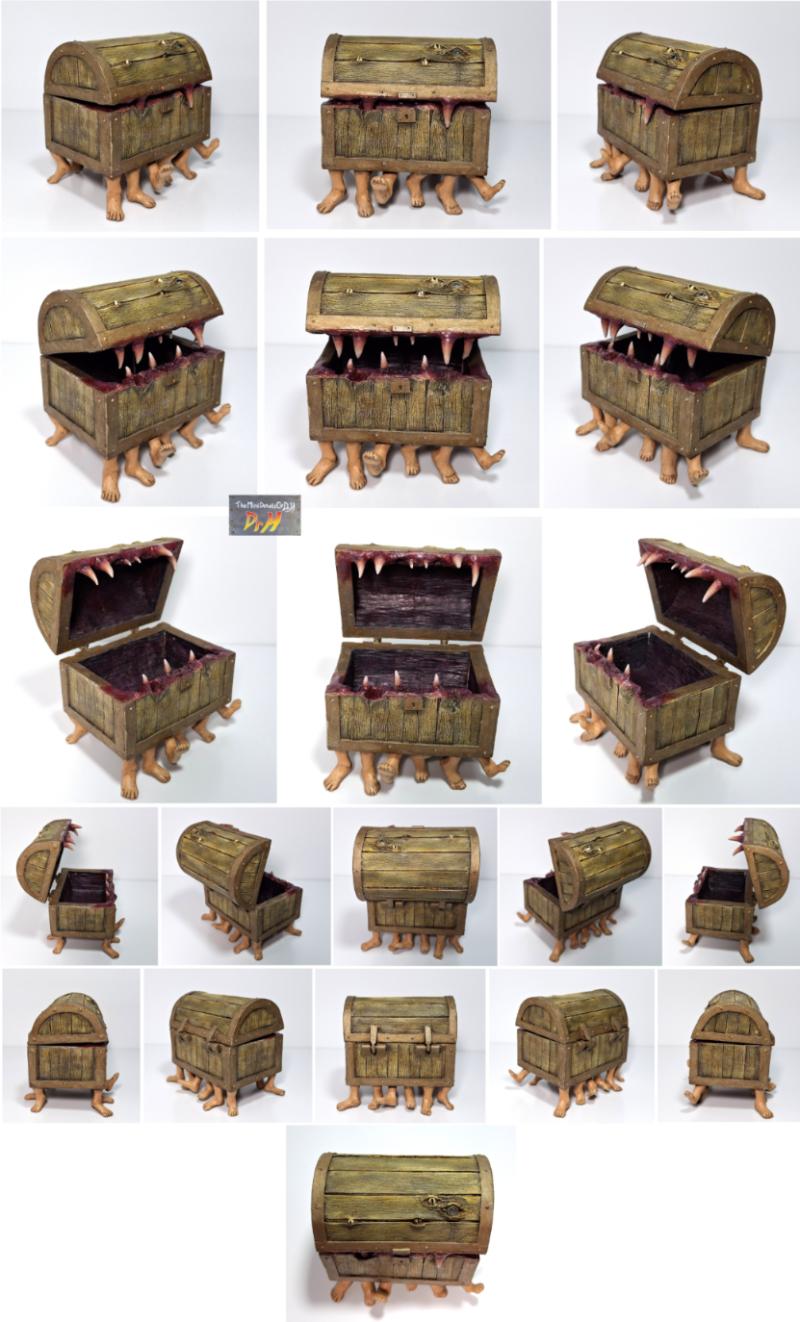
Terry Pratchett wrote about the adventures of a box on legs, amongst other things, and while I was looking up research I came to realise it's basically a mimic.
So I merged the two concepts.
Fairly simple build.
Foamcore box, skinned with card planks.
I then used plasticard for the metal details.
Water-filter beads for the rivets.
Milliput teeth, with some more for the gums.
Warping/breaking the pristeen box to fit them and the eyes in.
Random glass/plastic beads for the eyes, with some milliput to help the warped "wood".
Sculpt a pair of feet in milliput and mould them with Oyumaru.
Create a load of casts, demould early and bend,
Clean them up once set, and stick them on at random angles.
Paint.
I realise now that I didn't take any scale photos.
It'll sit on your palm alright, about 3 inches long/wide.


 but at least you're alive and... Kicking


 "more" with the SWars designs.